rotary control panel - vintage air
TRANSCRIPT

an ISO 9001:2015 Registered Company
909205-RHA REV E 12/17/18, PG 1 OF 8
HI
MED
LO OFF
C H
Rotary Control Panelwith Louver Assembly
(49205-RHA)
18865 Goll St. San Antonio, TX 78266 Phone: 800-862-6658
Sales: [email protected] Support: [email protected]
www.vintageair.com

2
www.vintageair.com
909205-RHA REV E 12/17/18, PG 2 OF 8
Cover..................................................................................................................................Table of Contents.................................................................................................................Packing List/Parts Disclaimer..................................................................................................Control Panel Installation......................................................................................................Operation of Controls............................................................................................................Gen II ComPac & Super Wiring Diagram..................................................................................Gen II Mini Wiring Diagram...................................................................................................Packing List.........................................................................................................................
1 2 3 4 5 6 7 8
Table of Contents

3
www.vintageair.com
909205-RHA REV E 12/17/18, PG 3 OF 8
Packing List: Rotary Control Panel (49205-RHA)
No. 1.2.3.4.5.6.7.8.9.
10.11.12.13.14.15.16.17.18.
Qty.112411111132111112
Part No.11092-VUT11413-RUA11458-VUS18157-VUB20558-VUP20570-VUP20571-VUP20572-VUP49205-RHI49219-VUI49457-VUI23123-VUW23139-VUW23138-VUW49057-VUL186890186892182353
DescriptionThermostat, 48” Adjustable RotaryPotentiometer, RotaryRotary Switch, 3-SpeedShaft Nut, 7/16”Label, Blower SpeedLabel, ModeLabel, ThermostatLabel, HeatBezel with Louver, Gen IIKnob, Rotary PotentiometerKnob, ControlBuddy ClipJumper Wire, 6”Jumper Wire, 11”LouverFlat Washer, PotentiometerShaft Nut, PotentiometerScrew, #8 x 1/2”, Wide Head
** Before beginning installation, open all packages and check contents of shipment. Please report any shortages directly to Vintage Air within 15 days. After 15 days, Vintage Air will not be responsible for missing or damaged items.
NOTE: Images may not depict actual parts and quantities. Refer to packing list for actual parts and quantities.
1
4
7 8
10 17 16 15
2
1314
3
95
11
6
NOTE: The heater control valve knob is retained by a 5/64” Allen screw.
18
18
12
4
www.vintageair.com
909205-RHA REV E 12/17/18, PG 4 OF 8
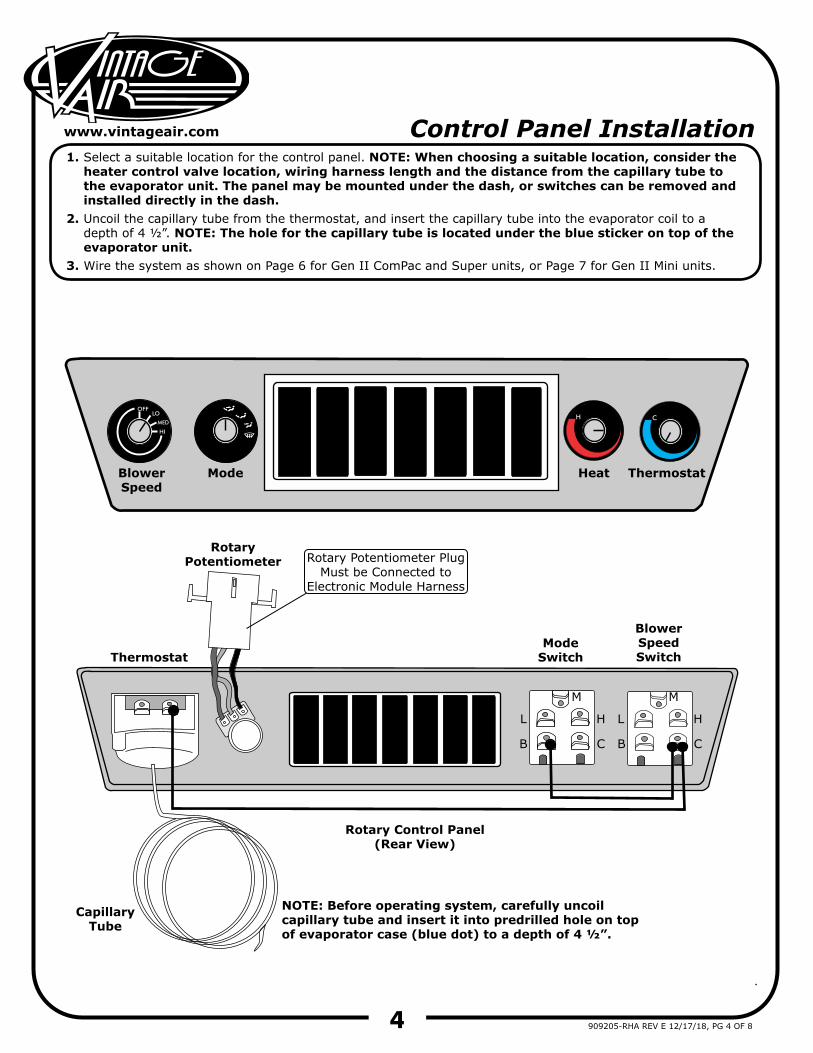
Control Panel Installation1.
2.
3.
Select a suitable location for the control panel. NOTE: When choosing a suitable location, consider the heater control valve location, wiring harness length and the distance from the capillary tube to the evaporator unit. The panel may be mounted under the dash, or switches can be removed and installed directly in the dash.Uncoil the capillary tube from the thermostat, and insert the capillary tube into the evaporator coil to a depth of 4 ½”. NOTE: The hole for the capillary tube is located under the blue sticker on top of the evaporator unit.Wire the system as shown on Page 6 for Gen II ComPac and Super units, or Page 7 for Gen II Mini units.
HI
MED
LO OFF
C H
BlowerSpeed
BlowerSpeedSwitch
Rotary Potentiometer
Rotary Control Panel(Rear View)
CapillaryTube
ThermostatMode
Switch
ThermostatHeatMode
M M
H HL L
B BC C
NOTE: Before operating system, carefully uncoil capillary tube and insert it into predrilled hole on top of evaporator case (blue dot) to a depth of 4 ½”.
Rotary Potentiometer Plug Must be Connected to
Electronic Module Harness

5
www.vintageair.com
909205-RHA REV E 12/17/18, PG 5 OF 8
HI
MED
LO OFF
Operation of Controls
1. Any vent temperature is available in any mode.2. Select desired mode, then adjust air temperature for comfort.3. Heat knob adjusts flow of hot water through the heater. Counterclockwise is off. Clockwise is for increasing heat.4. A/C thermostat knob controls the evaporator coil temperature. Counterclockwise is off. Full clockwise is maximum cold (28°).5. For A/C operation, rotate thermostat clockwise to its stop, then back off slightly (1/8 turn) to prevent coil freeze-up. To warm up vent temperature during A/C operation, slightly increase the heat knob setting.6. For heat operation, rotate thermostat counterclockwise to its stop (off), then adjust heat knob for desired temperature.7. For defrost operation, adjust A/C thermostat to 3/4 cold, then adjust heat knob to attain proper temperature for de-fog/defrost.
BlowerSpeed
Mode
Floor
Bi-Level
Dash
Defrost
Heat
Off
Hot
A/C Thermostat
Off
Cold
H C

6
www.vintageair.com
909205-RHA REV E 12/17/18, PG 6 OF 8
87
86 85
30
87a87
86 85
30
87aPurple
Wiring Diagram:Gen II ComPac/Super Units—Heat/Cool/Defrost
Blue
Black Orange
Orange
PurpleBlue
Blue
HighBlowerRelay
PowerRelay
Blue ModeSwitch
BlowerSpeedSwitch
Yellow
Yellow
WhiteGround
WhiteControl Module
Ground
Bla
ck Bla
ck/W
hite
Whi
te/O
rang
eW
hite
/Blu
eW
hite
/Bro
wn
Whi
te/R
ed
Heater ContolValve Servo
(Rear View of Plug)Note Orientation
of Plugs
Floor/Vent Servo
(Rear View of Plug)
Defrost Servo
(Rear View of Plug)
Ora
nge
Bro
wn
Red
Lt.
Blu
e
Purp
leG
rey
Connect toKey-on Ignition
Source (5-Amp Fuse)
30-AmpCircuit Breaker
Aux.Heater Control
Valve Potentiometer
Bat.To Battery or
Battery Terminalon Starter Solenoid.
Ground
WhiteWhiteBlowerMotor
Red
Red
Red(Optional)For Defrost
Only!
(Optional)For Defrost
Only!
Pink
Blu
e
Yello
w
Gre
en
Red/WhiteWhite/YellowGrey/Black
Red/WhiteWhite/Yellow
Grey/Black
(Required) CompressorSafety Switch(Binary Type) A/C
Clutch
A/CThermostat M
L H
B C
ML H
B C
7
www.vintageair.com
909205-RHA REV E 12/17/18, PG 7 OF 8
Resister OnBlower
Blue
White Purple
Ground
WhiteGround
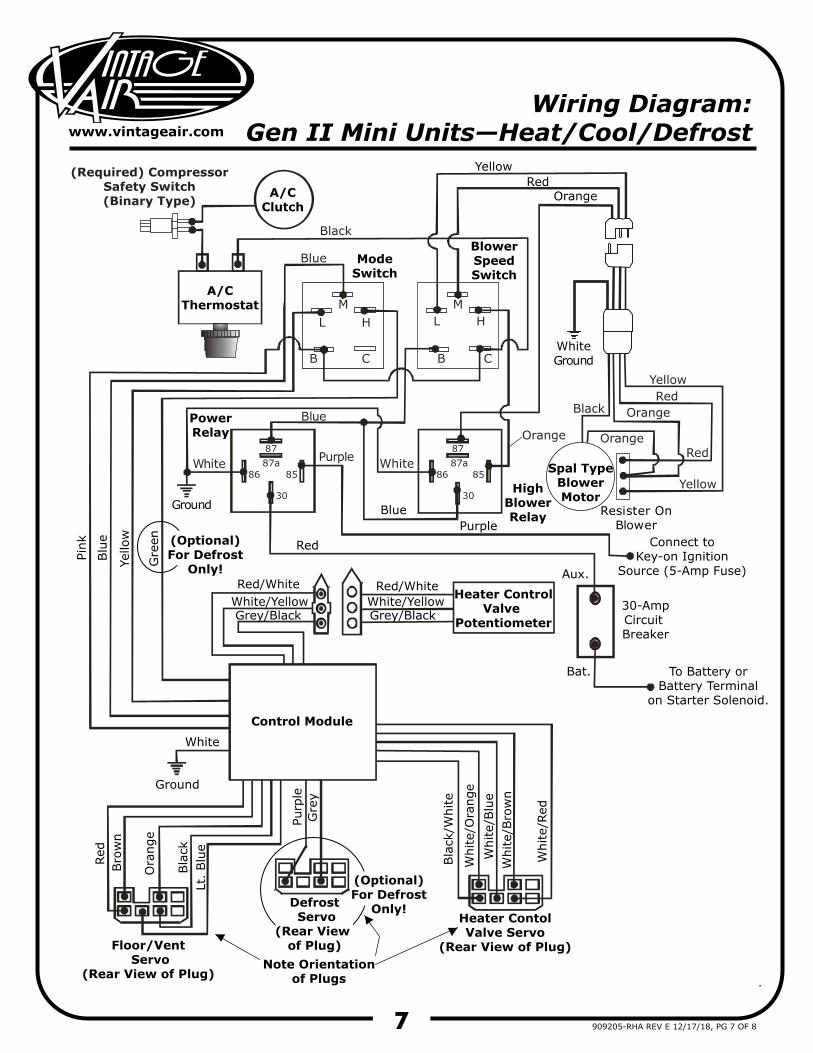
Wiring Diagram:Gen II Mini Units—Heat/Cool/Defrost
Blue
Black
Black
Orange
Orange
OrangeOrange
PurpleBlue
PowerRelay
ModeSwitch
BlowerSpeedSwitch
Yellow
Yellow
White
Control Module
Ground
Bla
ck
Red
Bla
ck/W
hite
Whi
te/O
rang
eW
hite
/Blu
eW
hite
/Bro
wn
Whi
te/R
ed
Heater ContolValve Servo
(Rear View of Plug)Note Orientation
of Plugs
Floor/Vent Servo
(Rear View of Plug)
Defrost Servo
(Rear View of Plug)
Ora
nge
Bro
wn
Lt.
Blu
e
Purp
leG
rey
Connect toKey-on Ignition
Source (5-Amp Fuse)
30-AmpCircuit Breaker
Aux.Heater Control
Valve Potentiometer
Bat. To Battery orBattery Terminal
on Starter Solenoid.
White Spal TypeBlowerMotor
RedYellow
Red
Red
Red(Optional)For Defrost
Only!
(Optional)For Defrost
Only!
Pink
Blu
e
Yello
w
Gre
en
Red/WhiteWhite/YellowGrey/Black
Red/WhiteWhite/YellowGrey/Black
(Required) CompressorSafety Switch(Binary Type)
A/CClutch
A/CThermostat
HighBlowerRelay
ML H
B
87
86 85
30
87a87
86 85
30
87a
C
ML H
B C

8
www.vintageair.com
909205-RHA REV E 12/17/18, PG 8 OF 8
Packing List: Rotary Control Panel (49205-RHA)
NOTE: Images may not depict actual parts and quantities. Refer to packing list for actual parts and quantities.
Checked By:Packed By:
Date:
1
4
7 8
10 17 16 15
2
1314
3
95
11
6
NOTE: The heater control valve knob is retained by a 5/64” Allen screw.
No. 1.2.3.4.5.6.7.8.9.
10.11.12.13.14.15.16.17.18.
Qty.112411111132111112
Part No.11092-VUT11413-RUA11458-VUS18157-VUB20558-VUP20570-VUP20571-VUP20572-VUP49205-RHI49219-VUI49457-VUI23123-VUW23139-VUW23138-VUW49057-VUL186890186892182353
DescriptionThermostat, 48” Adjustable RotaryPotentiometer, RotaryRotary Switch, 3-SpeedShaft Nut, 7/16”Label, Blower SpeedLabel, ModeLabel, ThermostatLabel, HeatBezel with Louver, Gen IIKnob, Rotary PotentiometerKnob, ControlBuddy ClipJumper Wire, 6”Jumper Wire, 11”LouverFlat Washer, PotentiometerShaft Nut, PotentiometerScrew, #8 x 1/2”, Wide Head
18
18
12