rockcote maintenance guide
TRANSCRIPT

1
Maintenance GuideRender and Texture Systems | Exterior paintwork | Interior paintwork

Care and maintenance of your ROCKCOTE render or paint systemThank you for choosing ROCKCOTE products for your project. ROCKCOTE renders and paints are designed to look amazing and perform exceptionally in Australia’s harsh conditions.
With regular maintenance, ROCKCOTE render or paint will continue to enhance your home, office or commercial building for many years to come.
We are so confident in the performance of ROCKCOTE systems that we offer up to a 15 year Manufacturer’s Warranty (when applied in accordance with the relevant ROCKCOTE technical specifications), designed to give you total peace of mind.
This guide is designed to help you make the most of your ROCKCOTE system, provide instructions for cleaning and regular maintenance, and help you identify issues that may need addressing by a building professional.
It is important to keep this guide (and your warranty documentation) with other important documents for your property so it can be given to new owners if the property changes hands.
If you have any questions, our Customer Service team is here to help. Please call us on 1300 736 668 if you have any questions about the information in this document.
Contents3 Render and Texture maintenance
6 Render systems stain removal
9 Paint maintenance
10 Exterior paintwork
14 Interior paintwork
32
Render and Texture Maintenance GuideProperly maintained, your ROCKCOTE Render or Texture System will last well in excess of its standard warranty period. Following ROCKCOTE’s maintenance guidelines will ensure the optimum lifetime and integrity of the coating.
These guidelines are appropriate for all external ROCKCOTE Render and Paint, Coloured Render or Texture Coating systems.

How to make the most of your ROCKCOTE render system
It is important to conduct regular checks of your ROCKCOTE render or texture system, as well as carry out an annual clean down. Developing a regular maintenance schedule and following our handy hints will keep your system looking good for many years.
Keeping your ROCKCOTE render system cleanYour ROCKCOTE system should be cleaned down every 12 months. At the same time, inspect the coating for any signs of cracking or delamination and conduct repairs if necessary.
Regular, monthly visual checks should be carried out to check for dust, mould, dirt and cracking.
If your ROCKCOTE system gets dirty, wash it immediately as this will eliminate the possibility of dirt or grime penetrating the coating, making it easier to clean.
It is best to ensure separation between garden beds and external rendered walls. Plant foliage should be kept well away from walls to prevent staining.
It is the home owner’s responsibility to ensure regular termite inspections are carried out. Keep weep holes clear of garden mulch and debris to allow visibility for termite inspection.
Plan your maintenance scheduleScheduling maintenance on a calendar or your phone will help ensure regular tasks are carried out and not forgotten.
Take into consideration the type of work required and the time of year you want to get it done. A little time and effort at regular intervals can prevent expensive repairs in the long term.
Cleaning methodsPressure cleaning 500 Psi using a fan tip, not a direct needlepoint, as this may lift the sturdiest finish. Do not place the fan tip too close to the surface, as this could also cause damage.
Hand cleaning Some of the best cleaning results are achieved by scrubbing with a stiff broom or brush, hosing as you go, so you don’t allow a film, dry grime or residue to form. (This can be more difficult to remove than the original dirt!)
Cleaning fluid Most household cleaners are safe for general cleaning, assuming that all personal safety guidelines are followed. For stubborn stains such as rust, CLR Clear is a suitable cleaner.
Handy Hints › Keep gutters clear of leaves and debris
› Avoid placing garden beds up against the coating
› Regularly wash down windows and eaves
› Carry out regular checks on the coating
› Wash the coating immediately if dirt or grime is present
› Do not use solvent based cleaners
› Regularly check sealants around doors and windows and designated movement joints
› Contact your ROCKCOTE applicator for an assessment if the surface becomes damaged
Mould and mildewCracking, damp areas and dirt build-up can lead to the growth of mould. As well as causing unsightly stains, mould can affect the performance of the coating system. Mould is especially common on heavily textured finishes, walls facing away from direct sunlight and walls shaded by trees or other buildings.
Mould will appear as dark grey, black or green patches and will continue to spread if not addressed. Washing with a high-pressure hose or soap alone is not enough to remove mould spores. The spores must be killed or the mould will reappear.
ROCKCOTE Fungicidal Wash, available from your ROCKCOTE Stockist, should be used to remove mould. Be sure to follow the instructions on the product Technical Data Sheet, available on our website.
Repairing damageIf the surface becomes damaged, contact your ROCKCOTE applicator as soon as possible, as they have the necessary expertise to rectify damage.
Alternatively, contact ROCKCOTE on 1300 736 668 and we will direct you to a qualified tradesperson who can assess the damage and quote on repairs.
See our Guide to stain removal on pages 6 and 7 for dealing with stubborn stains.
54
Washing down walls regularly improves the longevity of your ROCKCOTE system.
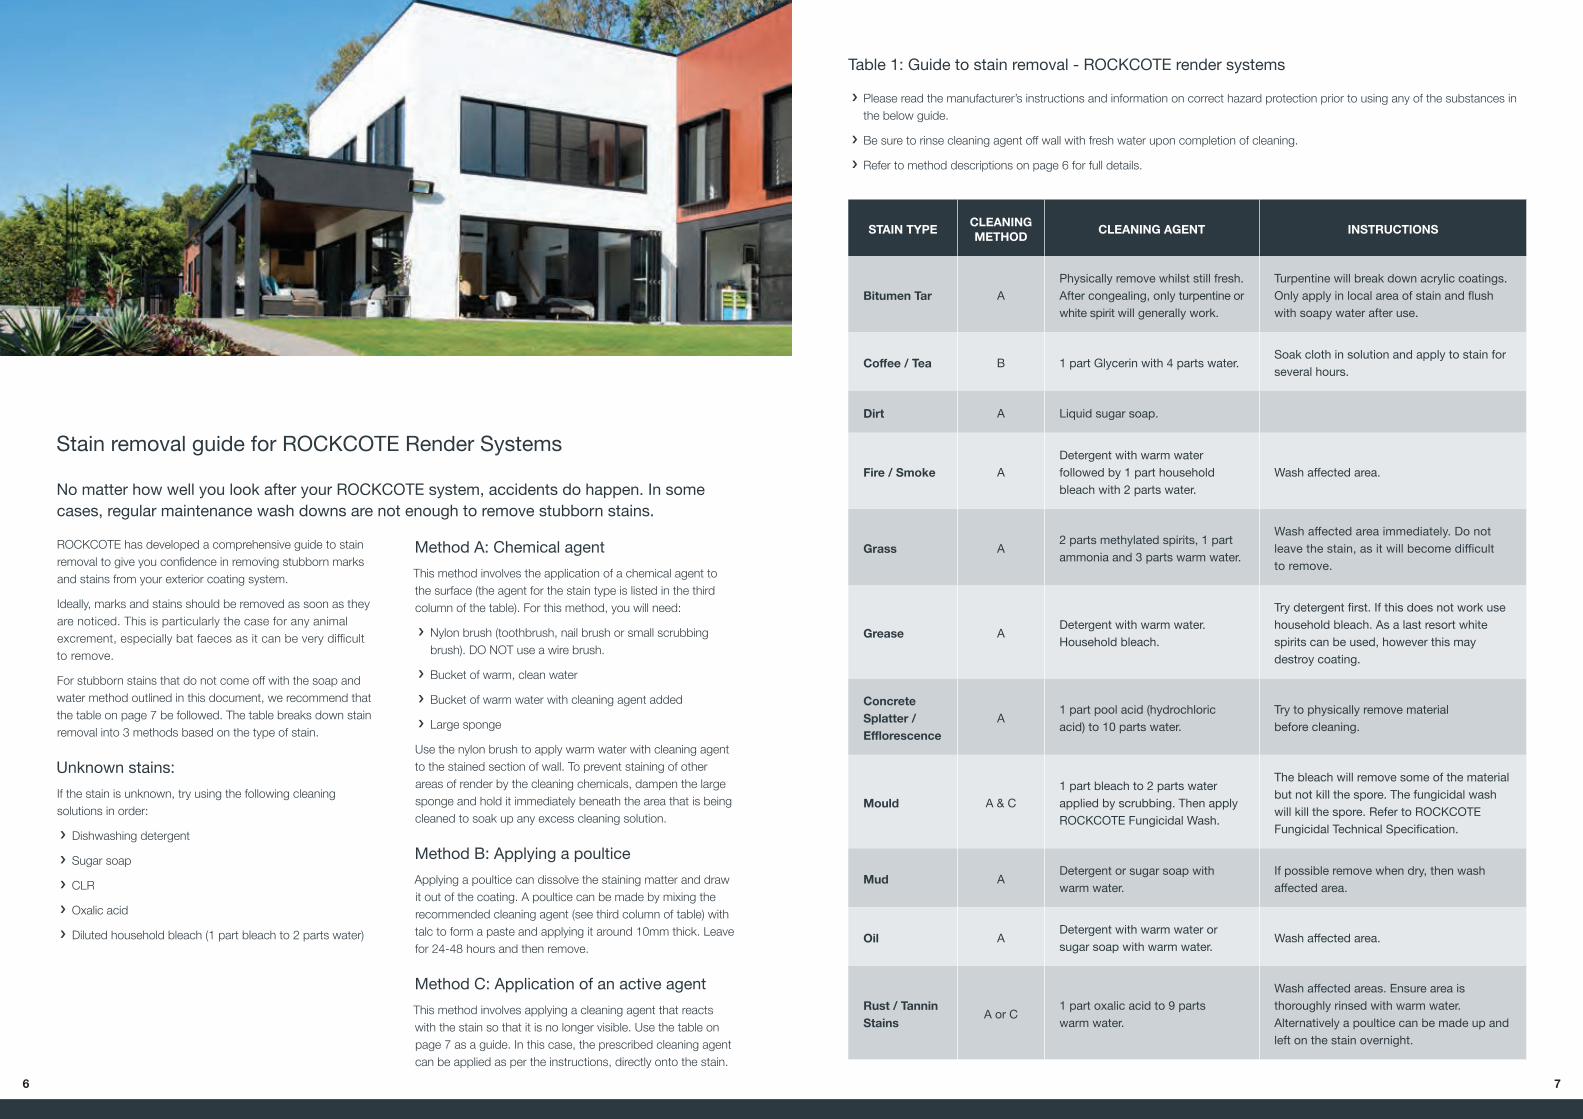
Stain removal guide for ROCKCOTE Render Systems
No matter how well you look after your ROCKCOTE system, accidents do happen. In some cases, regular maintenance wash downs are not enough to remove stubborn stains.
ROCKCOTE has developed a comprehensive guide to stain removal to give you confidence in removing stubborn marks and stains from your exterior coating system.
Ideally, marks and stains should be removed as soon as they are noticed. This is particularly the case for any animal excrement, especially bat faeces as it can be very difficult to remove.
For stubborn stains that do not come off with the soap and water method outlined in this document, we recommend that the table on page 7 be followed. The table breaks down stain removal into 3 methods based on the type of stain.
Unknown stains:If the stain is unknown, try using the following cleaning solutions in order:
› Dishwashing detergent
› Sugar soap
› CLR
› Oxalic acid
› Diluted household bleach (1 part bleach to 2 parts water)
Method A: Chemical agentThis method involves the application of a chemical agent to the surface (the agent for the stain type is listed in the third column of the table). For this method, you will need:
› Nylon brush (toothbrush, nail brush or small scrubbing brush). DO NOT use a wire brush.
› Bucket of warm, clean water
› Bucket of warm water with cleaning agent added
› Large sponge
Use the nylon brush to apply warm water with cleaning agent to the stained section of wall. To prevent staining of other areas of render by the cleaning chemicals, dampen the large sponge and hold it immediately beneath the area that is being cleaned to soak up any excess cleaning solution.
Method B: Applying a poulticeApplying a poultice can dissolve the staining matter and draw it out of the coating. A poultice can be made by mixing the recommended cleaning agent (see third column of table) with talc to form a paste and applying it around 10mm thick. Leave for 24-48 hours and then remove.
Method C: Application of an active agentThis method involves applying a cleaning agent that reacts with the stain so that it is no longer visible. Use the table on page 7 as a guide. In this case, the prescribed cleaning agent can be applied as per the instructions, directly onto the stain.
Table 1: Guide to stain removal - ROCKCOTE render systems
› Please read the manufacturer’s instructions and information on correct hazard protection prior to using any of the substances in the below guide.
› Be sure to rinse cleaning agent off wall with fresh water upon completion of cleaning.
› Refer to method descriptions on page 6 for full details.
STAIN TYPE CLEANING METHOD CLEANING AGENT INSTRUCTIONS
Bitumen Tar A Physically remove whilst still fresh. After congealing, only turpentine or white spirit will generally work.
Turpentine will break down acrylic coatings. Only apply in local area of stain and flush with soapy water after use.
Coffee / Tea B 1 part Glycerin with 4 parts water. Soak cloth in solution and apply to stain for several hours.
Dirt A Liquid sugar soap.
Fire / Smoke A Detergent with warm water followed by 1 part household bleach with 2 parts water.
Wash affected area.
Grass A 2 parts methylated spirits, 1 part ammonia and 3 parts warm water.
Wash affected area immediately. Do not leave the stain, as it will become difficult to remove.
Grease A Detergent with warm water. Household bleach.
Try detergent first. If this does not work use household bleach. As a last resort white spirits can be used, however this may destroy coating.
Concrete Splatter / Efflorescence
A 1 part pool acid (hydrochloric acid) to 10 parts water.
Try to physically remove material before cleaning.
Mould A & C 1 part bleach to 2 parts water applied by scrubbing. Then apply ROCKCOTE Fungicidal Wash.
The bleach will remove some of the material but not kill the spore. The fungicidal wash will kill the spore. Refer to ROCKCOTE Fungicidal Technical Specification.
Mud A Detergent or sugar soap with warm water.
If possible remove when dry, then wash affected area.
Oil A Detergent with warm water or sugar soap with warm water.
Wash affected area.
Rust / Tannin Stains
A or C 1 part oxalic acid to 9 parts warm water.
Wash affected areas. Ensure area is thoroughly rinsed with warm water. Alternatively a poultice can be made up and left on the stain overnight.
76
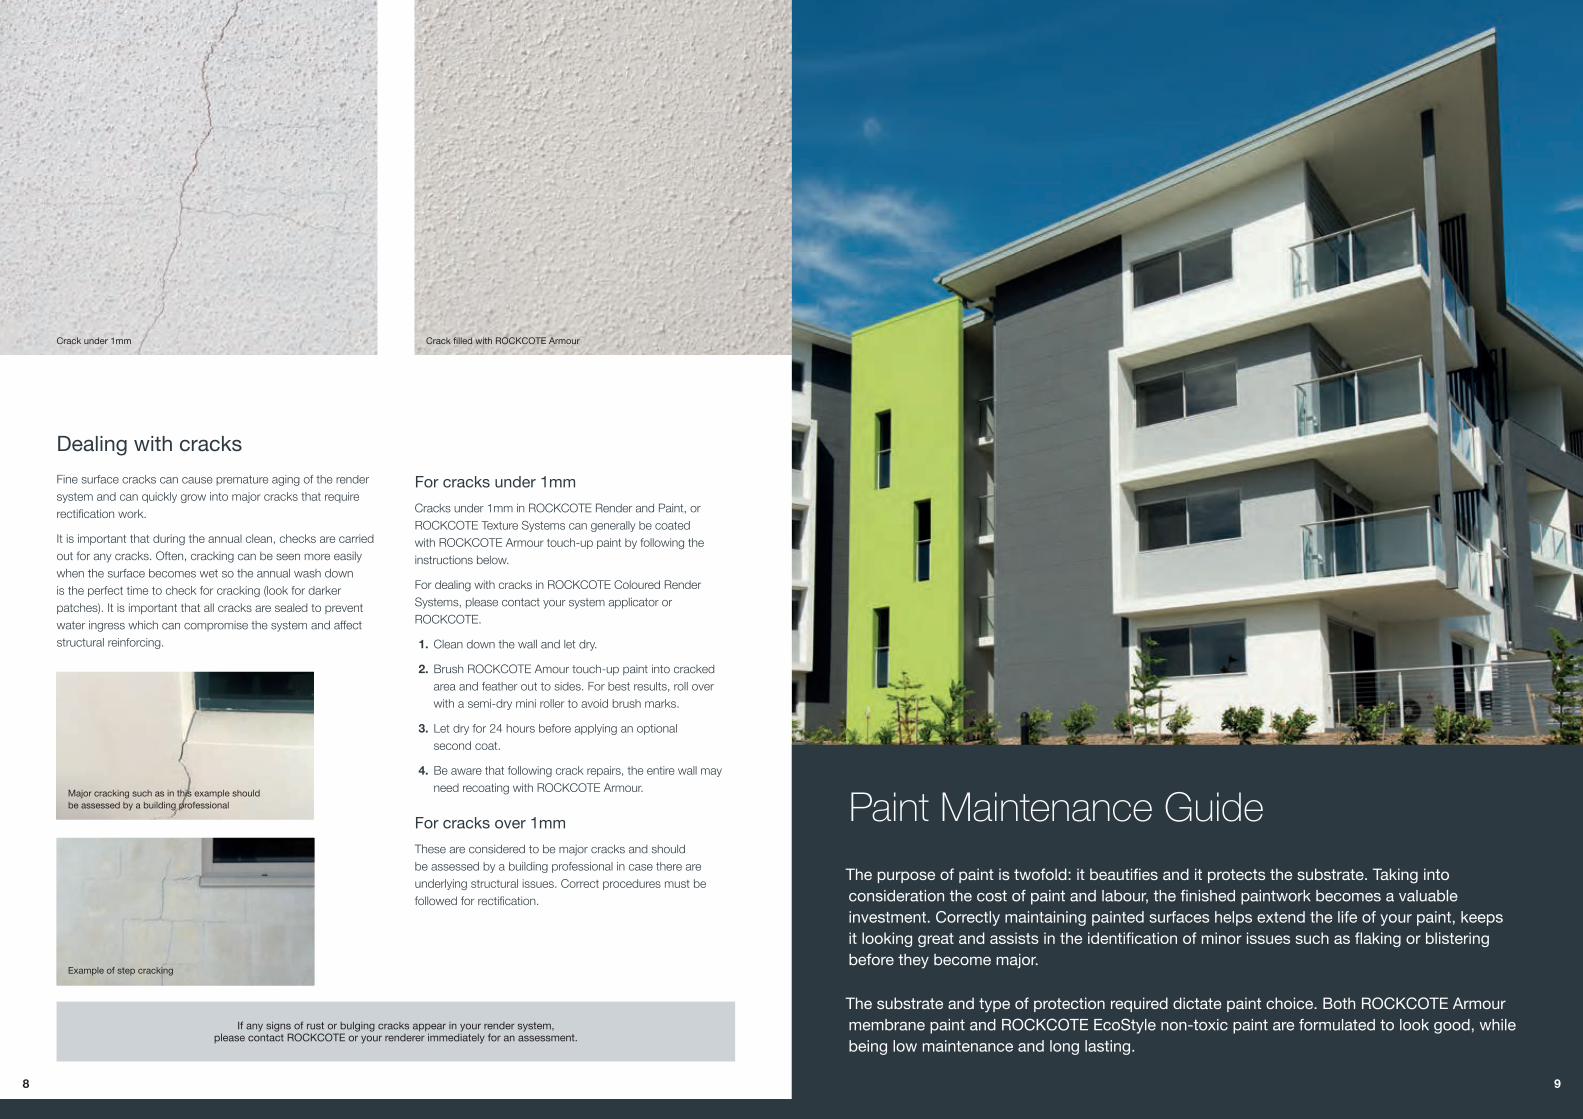
Crack filled with ROCKCOTE ArmourCrack under 1mm
Dealing with cracksFine surface cracks can cause premature aging of the render system and can quickly grow into major cracks that require rectification work.
It is important that during the annual clean, checks are carried out for any cracks. Often, cracking can be seen more easily when the surface becomes wet so the annual wash down is the perfect time to check for cracking (look for darker patches). It is important that all cracks are sealed to prevent water ingress which can compromise the system and affect structural reinforcing.
For cracks under 1mmCracks under 1mm in ROCKCOTE Render and Paint, or ROCKCOTE Texture Systems can generally be coated with ROCKCOTE Armour touch-up paint by following the instructions below.
For dealing with cracks in ROCKCOTE Coloured Render Systems, please contact your system applicator or ROCKCOTE.
1. Clean down the wall and let dry.
2. Brush ROCKCOTE Amour touch-up paint into cracked area and feather out to sides. For best results, roll over with a semi-dry mini roller to avoid brush marks.
3. Let dry for 24 hours before applying an optional second coat.
4. Be aware that following crack repairs, the entire wall may need recoating with ROCKCOTE Armour.
For cracks over 1mmThese are considered to be major cracks and should be assessed by a building professional in case there are underlying structural issues. Correct procedures must be followed for rectification.
Paint Maintenance GuideThe purpose of paint is twofold: it beautifies and it protects the substrate. Taking into consideration the cost of paint and labour, the finished paintwork becomes a valuable investment. Correctly maintaining painted surfaces helps extend the life of your paint, keeps it looking great and assists in the identification of minor issues such as flaking or blistering before they become major.
The substrate and type of protection required dictate paint choice. Both ROCKCOTE Armour membrane paint and ROCKCOTE EcoStyle non-toxic paint are formulated to look good, while being low maintenance and long lasting.
Major cracking such as in this example should be assessed by a building professional
Example of step cracking
If any signs of rust or bulging cracks appear in your render system, please contact ROCKCOTE or your renderer immediately for an assessment.
98
Maintaining exterior paintwork
Whether your home or building is timber, cement render, masonry or some form of building panel, an annual spring clean will benefit all exterior painted surfaces and extend the life of the paint.
Importantly, paint on a rendered home is not just there to look good. Properly applied, it helps to protect the substrate and your coating system.
If marks or dirt appear, it is best to wash them off immediately to ensure the ongoing integrity of the paint.
Note that simply hosing down painted surfaces, even with good water pressure, is generally not sufficient to remove the build-up of grime, stains and dust that can accumulate on the surface between maintenance cleans. See Annual cleaning instructions for details.
Annual cleaning for exterior paintworkNote that heavily textured surfaces and those in highly polluted areas or close to the coast will require more regular cleaning.
Conduct a test on an inconspicuous area first, rinse immediately and wait 24 hours prior to getting started on entire walls.
1. Long handled brooms or swirling brush electric cleaners may be necessary for higher areas and eaves.
2. If mould is present on any surfaces, follow the instructions on page 11 for ‘Mould Prevention’.
3. Prepare a bucket of warm water mixed with a moderate amount of mild household detergent such as dishwashing liquid. Bleaches should not be used for full wall cleaning.
4. Apply the water to the entire painted area with a soft bristle brush, broom or soft cloth. Ensure under eaves and along fascias are included.
5. Before the painted surface has dried, hose it down with clean water.
Mould preventionCracking, damp areas and dirt build-up can lead to the growth of mould. As well as causing unsightly stains, mould can affect the performance of the paint. Mould is especially common on heavily textured finishes, walls facing away from direct sunlight and walls shaded by trees or other buildings.
In areas where mould appears, ROCKCOTE recommends applying ROCKCOTE Fungicidal Wash which will kill mould and algae, and prevent re-growth. Bleach and harsh cleaning chemicals do not remove the mould spores and can degrade your coating. ROCKCOTE Fungicidal Wash is available from ROCKCOTE stockists or contact Head Office on 1300 736 668.
TimberworkAs a natural material, timber exhibits a high degree of movement as it flexes and expands in heat and dampness and contracts in cold and dry conditions. Certain types of timber are also more prone to grain-cracking.
When a crack occurs in the timber, either along a grain or at joints, acrylic paints will bridge the crack only to a degree, and past that will crack with the substrate. If timely maintenance is not carried out, moisture can enter the crack and be absorbed into the timber. Entrapped moisture can cause:
› Blistering of the paint
› Mould growth within the timber fibres
› Expansion and contraction leading to cracking
› Rotting of the timber and widespread peeling of the paint
Please contact ROCKCOTE or you painter for guidance on dealing with cracking issues in timberwork.
How to extend the life of your paintwork:
› Buy a quality product and ensure the manufacturer’s recommended system is followed for your substrate
› Ensure the paint is applied correctly and allow it to dry thoroughly
› Know how to remove dirt, grease, mould etc. without damaging the surface
› Regularly perform maintenance checks. Large projects should have a maintenance program in place, with specifications for rectification of damage
› Wash down annually according to ROCKCOTE instructions
1110
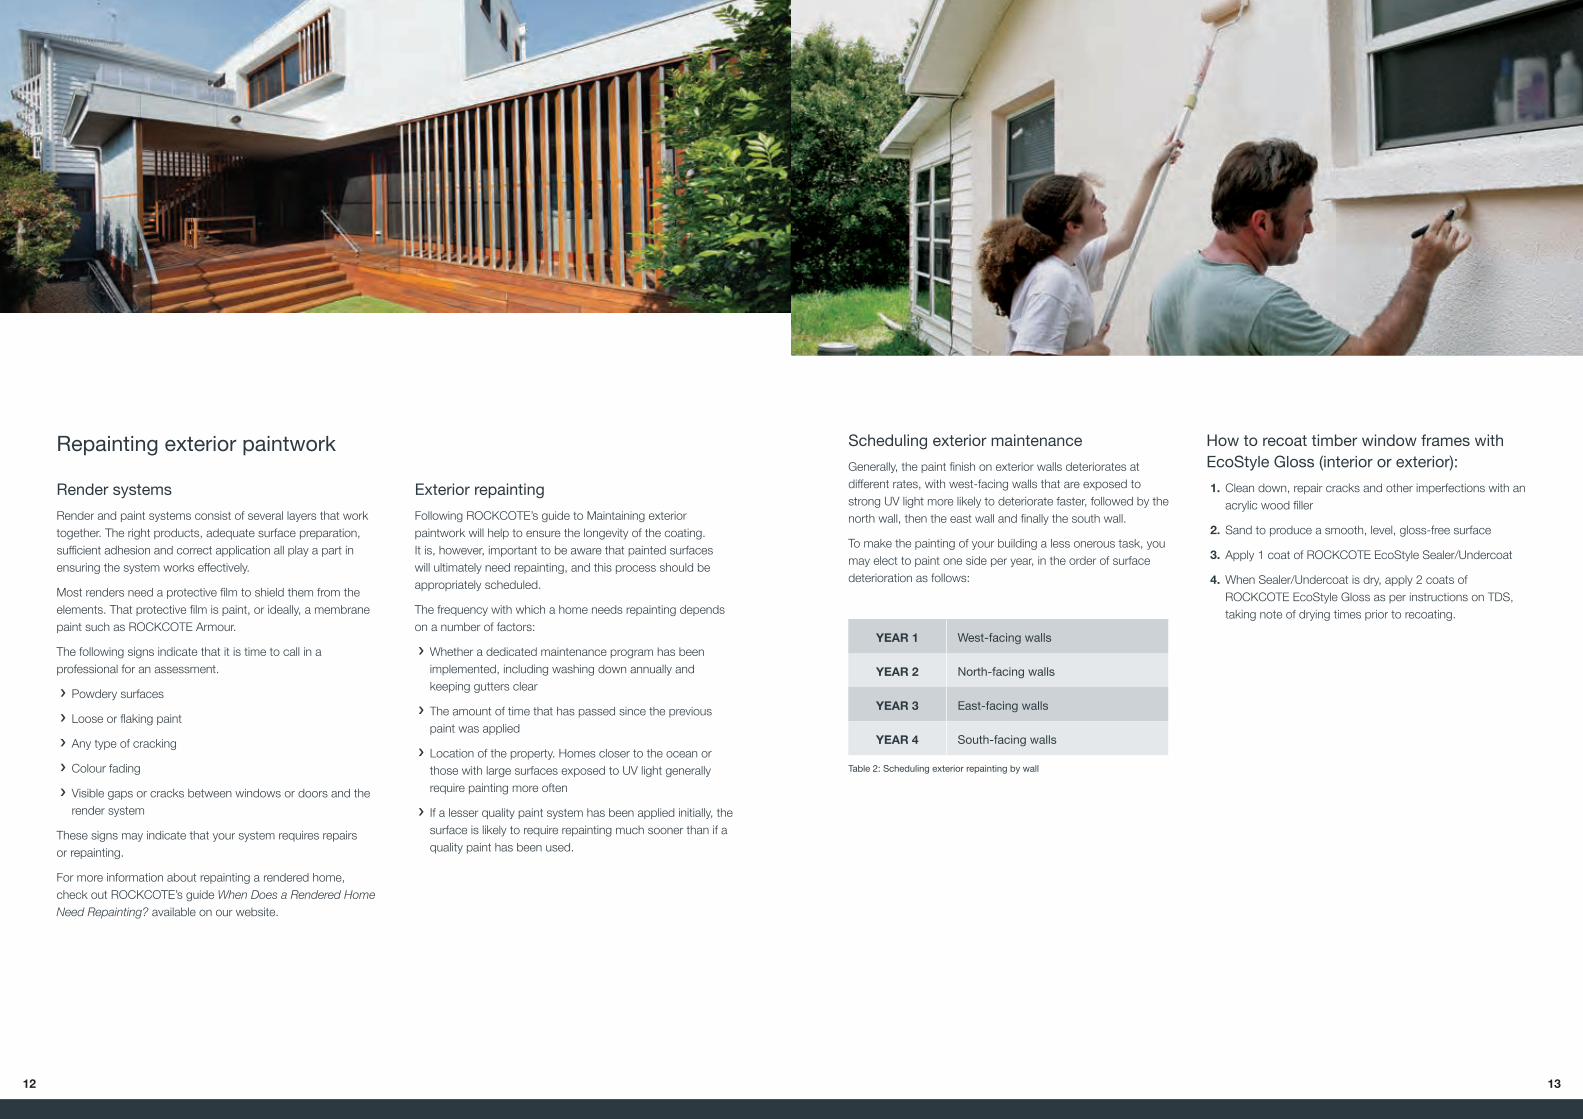
YEAR 1 West-facing walls
YEAR 2 North-facing walls
YEAR 3 East-facing walls
YEAR 4 South-facing walls
Table 2: Scheduling exterior repainting by wall
Scheduling exterior maintenanceGenerally, the paint finish on exterior walls deteriorates at different rates, with west-facing walls that are exposed to strong UV light more likely to deteriorate faster, followed by the north wall, then the east wall and finally the south wall.
To make the painting of your building a less onerous task, you may elect to paint one side per year, in the order of surface deterioration as follows:
How to recoat timber window frames with EcoStyle Gloss (interior or exterior):1. Clean down, repair cracks and other imperfections with an
acrylic wood filler
2. Sand to produce a smooth, level, gloss-free surface
3. Apply 1 coat of ROCKCOTE EcoStyle Sealer/Undercoat
4. When Sealer/Undercoat is dry, apply 2 coats of ROCKCOTE EcoStyle Gloss as per instructions on TDS, taking note of drying times prior to recoating.
Repainting exterior paintwork
Render systemsRender and paint systems consist of several layers that work together. The right products, adequate surface preparation, sufficient adhesion and correct application all play a part in ensuring the system works effectively.
Most renders need a protective film to shield them from the elements. That protective film is paint, or ideally, a membrane paint such as ROCKCOTE Armour.
The following signs indicate that it is time to call in a professional for an assessment.
› Powdery surfaces
› Loose or flaking paint
› Any type of cracking
› Colour fading
› Visible gaps or cracks between windows or doors and the render system
These signs may indicate that your system requires repairs or repainting.
For more information about repainting a rendered home, check out ROCKCOTE’s guide When Does a Rendered Home Need Repainting? available on our website.
Exterior repaintingFollowing ROCKCOTE’s guide to Maintaining exterior paintwork will help to ensure the longevity of the coating. It is, however, important to be aware that painted surfaces will ultimately need repainting, and this process should be appropriately scheduled.
The frequency with which a home needs repainting depends on a number of factors:
› Whether a dedicated maintenance program has been implemented, including washing down annually and keeping gutters clear
› The amount of time that has passed since the previous paint was applied
› Location of the property. Homes closer to the ocean or those with large surfaces exposed to UV light generally require painting more often
› If a lesser quality paint system has been applied initially, the surface is likely to require repainting much sooner than if a quality paint has been used.
1312
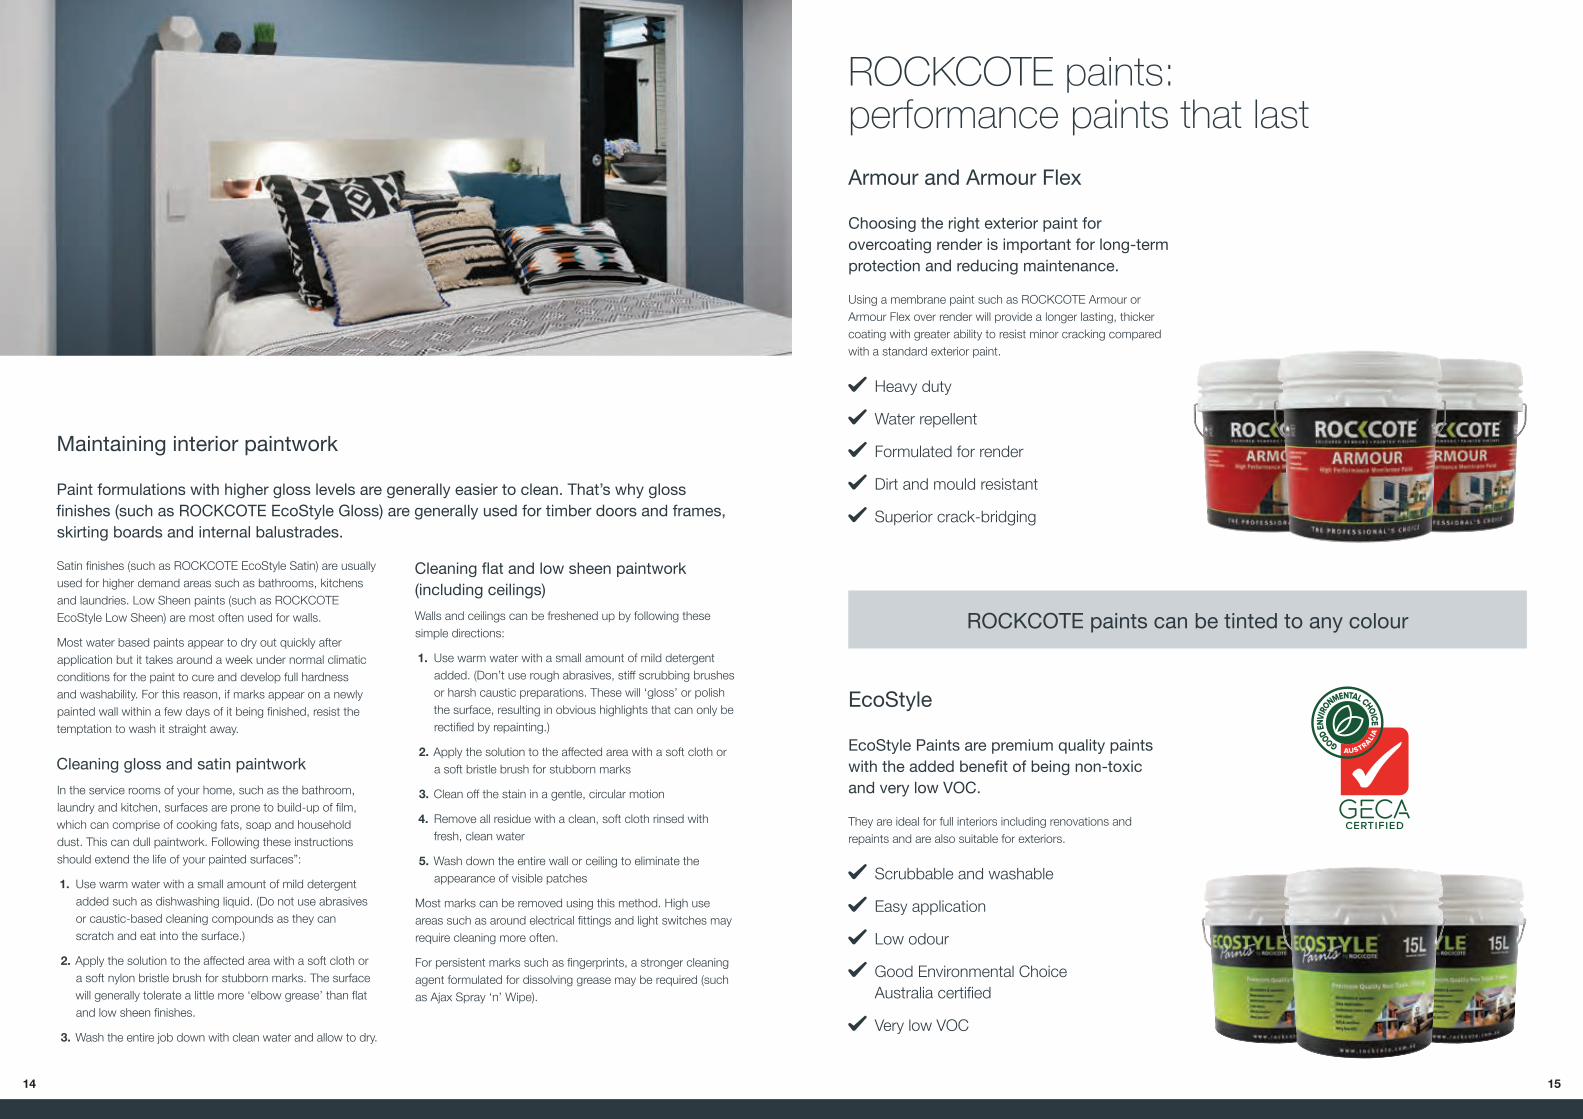
Maintaining interior paintwork
Paint formulations with higher gloss levels are generally easier to clean. That’s why gloss finishes (such as ROCKCOTE EcoStyle Gloss) are generally used for timber doors and frames, skirting boards and internal balustrades.
Satin finishes (such as ROCKCOTE EcoStyle Satin) are usually used for higher demand areas such as bathrooms, kitchens and laundries. Low Sheen paints (such as ROCKCOTE EcoStyle Low Sheen) are most often used for walls.
Most water based paints appear to dry out quickly after application but it takes around a week under normal climatic conditions for the paint to cure and develop full hardness and washability. For this reason, if marks appear on a newly painted wall within a few days of it being finished, resist the temptation to wash it straight away.
Cleaning gloss and satin paintworkIn the service rooms of your home, such as the bathroom, laundry and kitchen, surfaces are prone to build-up of film, which can comprise of cooking fats, soap and household dust. This can dull paintwork. Following these instructions should extend the life of your painted surfaces”:
1. Use warm water with a small amount of mild detergent added such as dishwashing liquid. (Do not use abrasives or caustic-based cleaning compounds as they can scratch and eat into the surface.)
2. Apply the solution to the affected area with a soft cloth or a soft nylon bristle brush for stubborn marks. The surface will generally tolerate a little more ‘elbow grease’ than flat and low sheen finishes.
3. Wash the entire job down with clean water and allow to dry.
Cleaning flat and low sheen paintwork (including ceilings)Walls and ceilings can be freshened up by following these simple directions:
1. Use warm water with a small amount of mild detergent added. (Don’t use rough abrasives, stiff scrubbing brushes or harsh caustic preparations. These will ‘gloss’ or polish the surface, resulting in obvious highlights that can only be rectified by repainting.)
2. Apply the solution to the affected area with a soft cloth or a soft bristle brush for stubborn marks
3. Clean off the stain in a gentle, circular motion
4. Remove all residue with a clean, soft cloth rinsed with fresh, clean water
5. Wash down the entire wall or ceiling to eliminate the appearance of visible patches
Most marks can be removed using this method. High use areas such as around electrical fittings and light switches may require cleaning more often.
For persistent marks such as fingerprints, a stronger cleaning agent formulated for dissolving grease may be required (such as Ajax Spray ‘n’ Wipe).
ROCKCOTE paints: performance paints that lastArmour and Armour Flex
Choosing the right exterior paint for overcoating render is important for long-term protection and reducing maintenance.
Using a membrane paint such as ROCKCOTE Armour or Armour Flex over render will provide a longer lasting, thicker coating with greater ability to resist minor cracking compared with a standard exterior paint.
Heavy duty
Water repellent
Formulated for render
Dirt and mould resistant
Superior crack-bridging
EcoStyle
EcoStyle Paints are premium quality paints with the added benefit of being non-toxic and very low VOC.
They are ideal for full interiors including renovations and repaints and are also suitable for exteriors.
Scrubbable and washable
Easy application
Low odour
Good Environmental Choice Australia certified
Very low VOC
ROCKCOTE paints can be tinted to any colour
1514

16
phone: 1300 736 668head office: 18 Machinery Road, Yandina, QLD 4561email: [email protected]: www.rockcote.com.au QHO-MBR014-V004