robotics experiment with pic microcontroller · pdf fileserial port and parallel port gp2d120...
TRANSCRIPT

Robotics experiment with PIC microcontroller���1
Robotics experiment withPIC microcontroller
based-on Robo-PICA robot kit
3rd Edition
(C) Innovative Experiment Co.,Ltd.
�������������������

2���Robotics experiment with PIC microcontroller
ContentsChapter 1 Part list of Robo-PICA and Introduce software tools...............5
1.1 Robo-PICA part list
1.2 Hand tools for making robot kit
1.3 Software development tools for Robot programming
Chapter 2 RBX-877V2.0 Robot Controller board...................................25
2.1 Technical features
2.2 Circuit description
Activity 1 : Write programs for testing RBX-877 V2.0 Controller board
Chapter 3 Building Robo-PICA kit..............................................................35
Activity 2 : Make the Robo-PICA
Chapter 4 Simple robot ’s programming control...................................45
Activity 3 : Simple movement control
Activity 4 : Speed control of Robo-PICA
Chapter 5 Contactless object detection...............................................57
5.1 PIC16F8875s A/D converter
5.2 ADC register
5.3 ADC configuration
5.4 A/D Conversion procedure
5.5 GP2D120 : 4 to 30cm. Infrared distance sensor
Activity 5 : Reading the Analog signal
Activity 6 : Testing GP2D120
Activity 7 : Contactless object detection robot

Robotics experiment with PIC microcontroller���3
Chapter 6 Line following mission..............................................................71
6.1 Infrared reflector sensor
Activity 8 : Reading the Line tracking sensor
Activity 9 : Moves follow the black line
Chapter 7 Remote control experiment...................................................79
7.1 38kHz Infrared receiver module
7.2 Infrared remote control 4 channels
Activity 10 : Reading Remote control data
Activity 11 : IR control Robo-PICA’s movement
Appendix A : Activating the License Keyof mikroC compiler................................................................87
� mikroC is registered trademark of mikroElektronika (www.mikroe.com).
PIC and PICkit2TM are registered trademarks of Microchip Technology(www.microchip.com).

4���Robotics experiment with PIC microcontroller
Robotics experiment with PIC microcontroller���5
Chapter 1Part list of Robo-PICA and
Introduce software tool
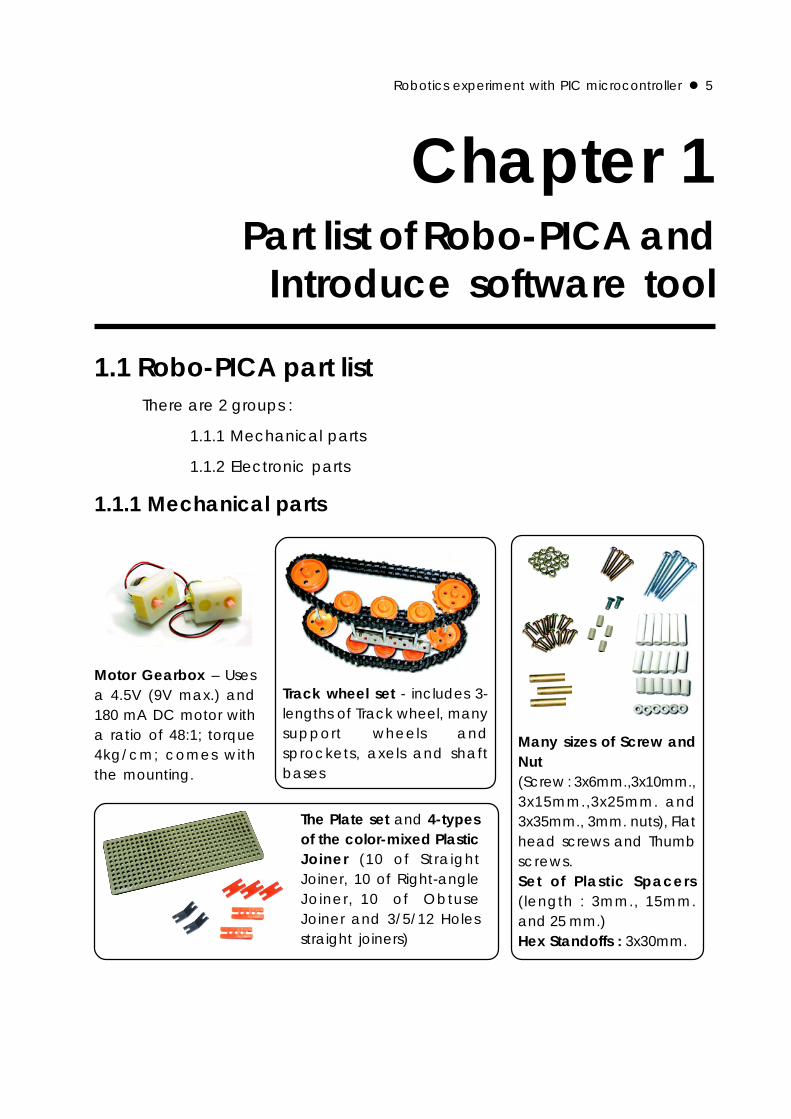
1.1 Robo-PICA part listThere are 2 groups :
1.1.1 Mechanical parts
1.1.2 Electronic parts
1.1.1 Mechanical parts
Motor Gearbox – Usesa 4.5V (9V max.) and180 mA DC motor witha ratio of 48:1; torque4kg/cm; comes withthe mounting.
Many sizes of Screw andNut(Screw : 3x6mm.,3x10mm.,3x15mm.,3x25mm. and3x35mm., 3mm. nuts), Flathead screws and Thumbscrews.Set of Plastic Spacers(length : 3mm., 15mm.and 25 mm.)Hex Standoffs : 3x30mm.
Track wheel set - includes 3-lengths of Track wheel, manysupport wheels andsprockets, axels and shaftbases
The Plate set and 4-typesof the color-mixed PlasticJoiner (10 of StraightJoiner, 10 of Right-angleJoiner, 10 of ObtuseJoiner and 3/5/12 Holesstraight joiners)
6���Robotics experiment with PIC microcontroller
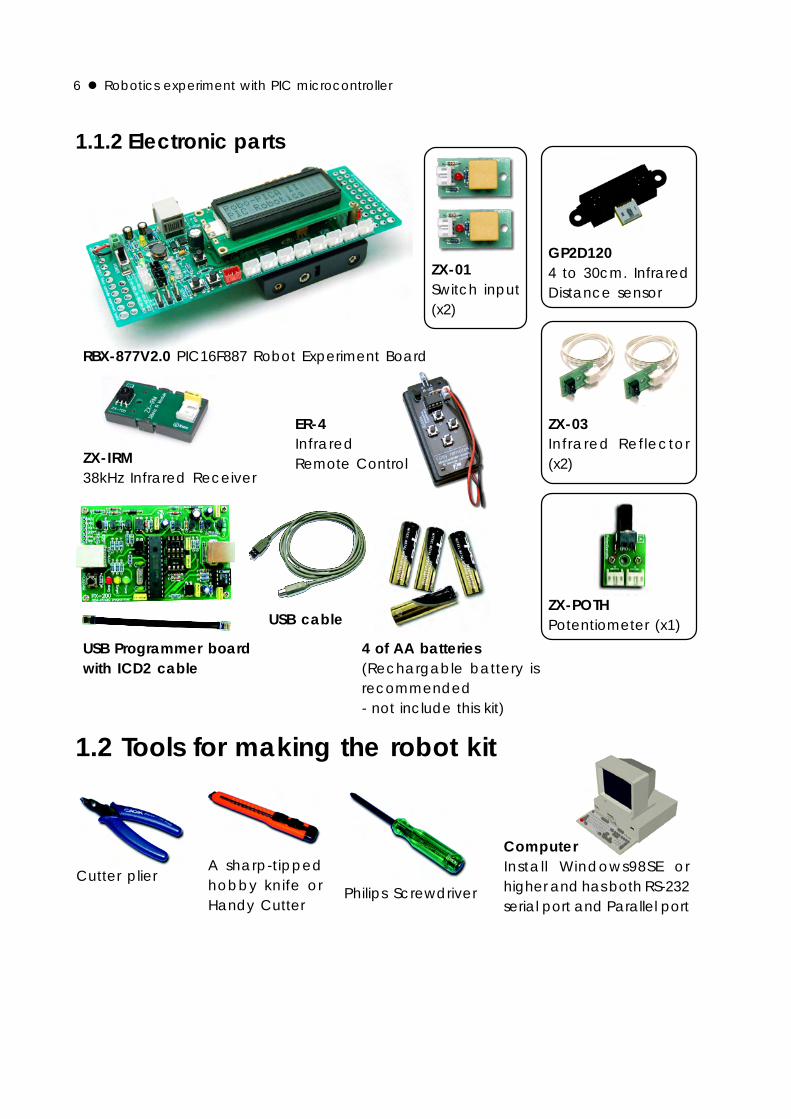
1.1.2 Electronic parts
ZX-03Infrared Reflector(x2)
ZX-01Switch input(x2)
ZX-IRM38kHz Infrared Receiver
1.2 Tools for making the robot kit
Cutter plierA sharp-tippedhobby knife orHandy Cutter
Philips Screwdriver
ComputerInstall Windows98SE orhigher and has both RS-232serial port and Parallel port
GP2D1204 to 30cm. InfraredDistance sensor
ER-4InfraredRemote Control
RBX-877V2.0 PIC16F887 Robot Experiment Board
USB Programmer boardwith ICD2 cable
USB cable
4 of AA batteries(Rechargable battery isrecommended- not include this kit)
ZX-POTHPotentiometer (x1)
Robotics experiment with PIC microcontroller���7
1.3 Software development tools for Robot programmingThe RoboPICA kit uses the PIC Micrcontroller PIC16F887. Builders can write the
controlled program in assembly, BASIC and C language. Only BASIC and C program
language requires the use of a compiler software.
However in this kit all examples are in C language with mikroC compiler from
mikroElektronika (mikroE : www.mikroe.com). The Robo-PICA robot kit can use this com-
piler as well.
The demo version of Mikro C compiler is used for this robot kit. Builders who need
to develop the advance program will need to purchase the full version from MikroE at
their webiste. The demo version of mikroC can be downloaded from http://
www.mikroe.com. However in the Robo-PICA robot kit, this software is in the bundled
CD-ROM. You must download the mikroC manual latest version from mikroElektronika
website. This building manual does not describe all the instructions.
Another one tools is PIC microcontroller programmer software. The Robo-PICA
provides a USB programmer. Its function is compatible Microchip’s PICkit2TM program-
mer. The software can use PICkit2TM programming software. Free downlaod the latest
version at www.microchip.com.
1.3.1 mikroC Compiler (Demo version)
1.3.1.1 Overview
mikroC is a powerful, feature rich development tool for PICmicros. It is designed
to provide the customer with the easiest possible solution for developing applications
for embedded systems, without compromising performance or control.
mikroC provides a successful match featuring highly advanced IDE, ANSI com-
pliant compiler, broad set of hardware libraries, comprehensive documentation, and
plenty of ready-to-run examples.
mikroC allows you to quickly develop and deploy complex applications:
� Write your C source code using the highly advanced Code Editor
� Use the included mikroC libraries to dramatically speed up the development:
data acquisition, memory, displays, conversions, communications…
Special thanks : All information about mikroC Compiler and PICkit2 Programming software are
referenced from owner website and documentation (www.mikroe.com and www.microchip.com).
Thanks for all free and open-source developement tools. User who need the full features of mikroC
compiler can purchase on-line at www.mikroe.com.

8����Robotics experiment with PIC microcontroller
� Monitor your program structure, variables, and functions in the Code
Explorer. Generate commented, human-readable assembly, and standard HEX com-
patible with all programmers.
� Inspect program flow and debug executable logic with the integrated
Debugger. Get detailed reports and graphs on code statistics, assembly listing, calling
tree…
� mikroE have provided plenty of examples for you to expand, develop,
and use as building bricks in your projects.
� In Demo version, hex output is limited to 2k of program words.
1.3.1.2 Installation the mikroC compiler Demo version
Download the latest version from mikroElektronika website; www.mikroe.com.
Run the installation file. Addition, you must download the 5 of necessary documentation
files about compiler manual, Creating First Project in mikroC for PIC, Quick Reference
Guide for C language, Compilers IDE document and Obtaining and Activating the Li-
cense Key.
You can see all C syntax and all function details from the mikroC manual. In this
manual would be describe about the robot activities only.
1.3.2 PICkit2TM Programming SoftwareThe PICkit™ 2 Microcontroller Programming software is capable of programming
most of Microchip’s Flash microcontrollers. For specific products supported, see the
README file or check with Microchip’s website.
The full featured Windows programming interface supports baseline (PIC10F,
PIC12F5xx, PIC16F5xx), midrange (PIC12F6xx, PIC16F), PIC18F, PIC24, dsPIC30, and dsPIC33
families of 8-bit and 16-bit microcontrollers, and many Microchip Serial EEPROM products.
The PICkit™ 2 Microcontroller Programming software works with a PICkit2TM OEM
USB programmer. The USB programmer is the in-system programming via ICD2 jack.
1.3.2.1 PICkit2TM Programming Software installation
1.3.2.1.1 Install from PX-200 CD-ROM
The working software of the USB programmer is PICkit2TM Programming Software.
The newer version is developed from Microsoft.NET. Thus, user must install the
Microsoft.NET Framework first.

Robotics experiment with PIC microcontroller���9
(A) Install of the Microsoft .NET Framework
First thing to do is to install the Microsoft.NET Framework. Select from the
folder PICkit 2 Setup v2.01 dotNET � dotnetfx in the bundled CD-ROM. Double-click at
dotnetfx.exe file. After complete, install the PICkit2TM Programming Software by double-
click at PICkit2Setup.msi file. The software installation will start.
(B) Microsoft .NET Framework is installed ready
User can install the PICkit2TM Programming Software by enter to folder PICkit2 Setup v2.01x in the bundled CD-ROM of Robo-PICA kit. Double-click at PICkit2Setup.msifile. The software installation will start.
1.3.2.1.2 Install from the internet.
Visit the Microchip website at www.microchip.com. Select Development toolswebpage and enter to PICkit 2 Programmer/Debugger webpage.
(A) Install of the Microsoft .NET Framework
For user who have not install Microsoft .NET Framework, they will need to
install it first via downloading the file from topic PICkit2V2.01 Install with .NET Frame-work. You will get the PICkit 2 Setup v2.01 dotNET.zip file (version number may vary).
Extract this file and store it in the folder PICkit 2 Setup v2.01 dotNET. Enter to this folder
and into the dotnetfx folder. Double-click at dotnetfx.exe file to start Microsoft .NET
Framework installation. After this is completed, install the Pickit2TM Programming Soft-
ware by double-clicking on the PICkit2Setup.msi file. THe software installation will start.
(B) Microsoft .NET Framework is installed ready
Users who have Microsoft .NET Framework already installed can down-
load the setup file from PICkit2V2.01 Install header. You will get file PICkit 2 Setup v2.01.zip(version number may be vary) Extract this file and store in the folder PICkit 2 Setup v2.01.
Enter to this folder and double-click on the PICkit2Setup.msi file to start the software
installation.
After run the installation setup file ; PICkit2Setup.msi. Click on the accept button
on each step and follow the installation progress until it is finished.
10����Robotics experiment with PIC microcontroller
1.3.2.2 Using PICkit2TM Programming Software
1.3.2.2.1 Testing hardware connection
(1) Connect the USB cable between the programmer and Computer’s USB port.
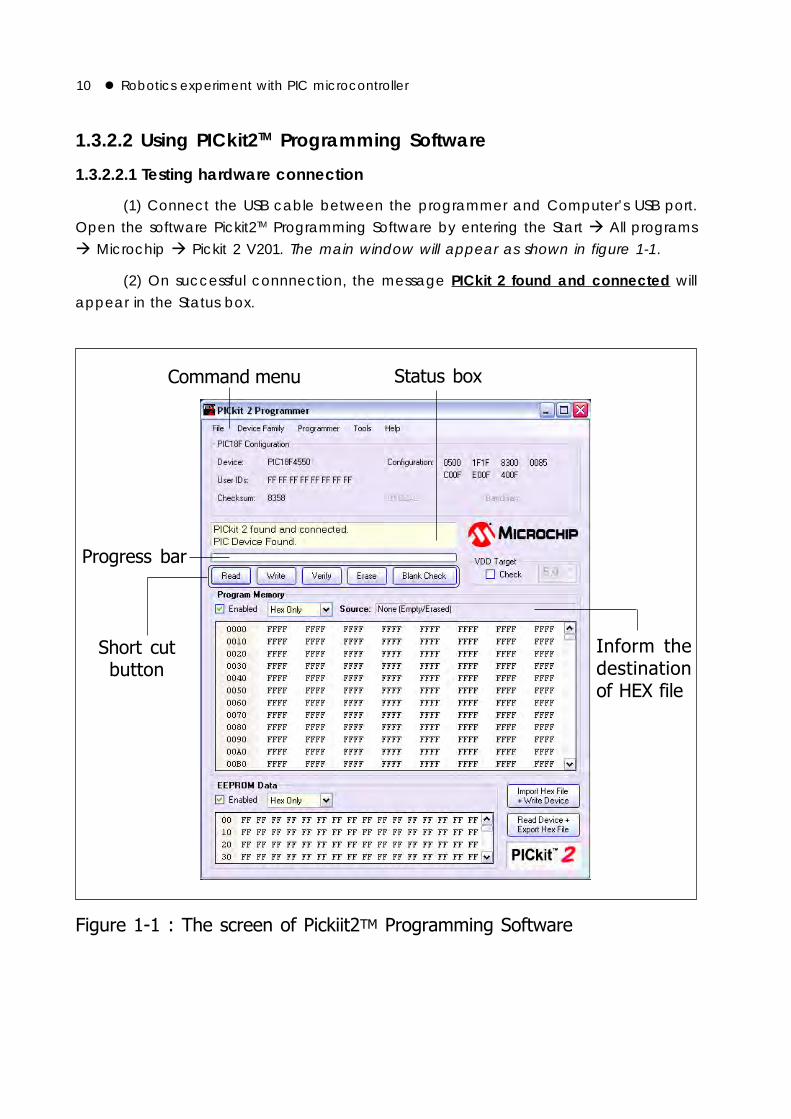
Open the software Pickit2TM Programming Software by entering the Start � All programs
� Microchip � Pickit 2 V201. The main window will appear as shown in figure 1-1.
(2) On successful connnection, the message PICkit 2 found and connected will
appear in the Status box.
��������������� ����������������������������������������
����� ����������������
������ � ���
������ ���������
������� ����� ����������� !"���#�
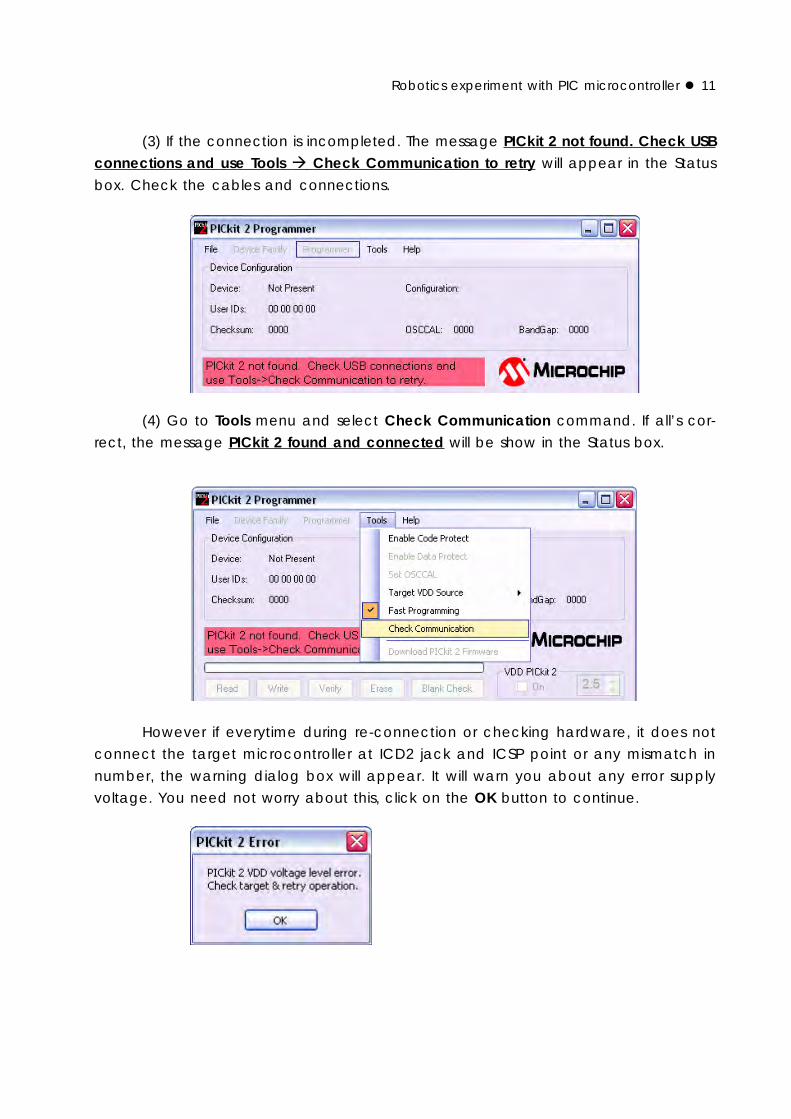
Robotics experiment with PIC microcontroller���11
(3) If the connection is incompleted. The message PICkit 2 not found. Check USBconnections and use Tools � Check Communication to retry will appear in the Status
box. Check the cables and connections.
(4) Go to Tools menu and select Check Communication command. If all’s cor-
rect, the message PICkit 2 found and connected will be show in the Status box.
However if everytime during re-connection or checking hardware, it does not
connect the target microcontroller at ICD2 jack and ICSP point or any mismatch in
number, the warning dialog box will appear. It will warn you about any error supply
voltage. You need not worry about this, click on the OK button to continue.

12����Robotics experiment with PIC microcontroller
1.3.2.2.2 Command menu description
FILE
• Import File – Import a hex file for programming
• Export File – Export a hex file read from a device
• Exit – Exit the program (duplicated with the Quit button)
DEVICE FAMILY
• Baseline (12-bit Core) – Configures the programming software for baseline Flash
devices
• Mid-range - Configures the programming software for 14-bit core flash de-
vices. The devices in this range include PIC12F6xx and 16F6xx, 7x, 7xx, 8x, 8xx. When
selected, software will check the connection target at ICD2 and ICSP terminal. If found
the correct device, device number will appear at Device line in Midrange Configura-tion box. Click the OK button to continue. For RBX-877V2.00 board would be use this
group chip because the controller board provides PIC16F887; it is mid-range PIC
microcontroller.
• PIC18F - Configures the programming software for PIC18F core flash devices.
• PIC18F_J_ - Configures the programming software for PIC18FxxJxx low voltage
devices.
• PIC24 - Configures the programming software for 16-bit core devices; PIC24FJxx.
• dsPIC30 - Configures the programming software for 16-bit core devices; dsPIC30Fxx.
• dsPIC33 - Configures the programming software for 16-bit core devices;
dsPIC33Fxx.

Robotics experiment with PIC microcontroller���13
PROGRAMMER
• Read Device – Reads the program memory, data EEPROM memory, ID loca-
tions, and Configuration bits.
• Write Device – Writes the program memory, data EEPROM memory, ID loca-
tions, and Configuration bits.
• Verify – Verifies the program memory, data EEPROM memory, ID locations and Con-
figuration bits read from the target MCU against the code stored in the programming software.
• Erase – Performs a bulk erase of the target MCU. OSCCAL and band gap val-
ues are preserved (PIC12F629/675 and PIC16F630/676 only).
• Blank Check – Performs a blank check of program memory, data EEPROM
memory, ID locations and Configuration bits.
• Verify on Write - Verifies program memory, data EEPROM memory, ID locations
and Configuration bits read from the target MCU against the code stored in the pro-
gramming software with word per word.
• Full Erase (OSCCAL and BG erased) – Performs a bulk erase including the OSCCAL
and Band Gap (BG) values (PIC12F629/675 and PIC16F630/676 only).
• Regenerate OSCCAL – Regenerates the OSCCAL value (only for PIC12F629/
675 and PIC16F630/676). The AUX line must be connected to the RA4/T1G pin.
• Set Band Gap Calibration Value – Sets the band gap value.
• Write on PICkit Button - Set for supporting of programming the target microcon-
troller witth PROGRAM switch on the USB programmer board.
TOOLS
• Enable Code Protect – Enables code protection for Flash program memory.
• Enable Data Protect – Enables code protection for EEPROM data memory.
• Set OSCCAL - Sets the OSCCAL value for alignment internal clock frequency.
• Target VDD Source – Power target from the USB Programmer.
Auto-Detect : Select to USB programmer turn on or off the supply voltage
to target microcontroller automatically (not suggess to use this option).
Forced PICkit2 : Set the programmer to supply the suitable voltage to tar-
get microcontroller. After select, LED at Targer position will light and at VDD PICkit2 box
on screen will check atr On position. User can adjust the supply voltage from selection
box in the right-hand (not suggess to use this option).
Forced Target : Select to inform the software knows about the target has
voltage applied. Suggess to use this option for safty operation. Also in this option, user
must apply the supply voltage to the target PIC microcontroller.

14����Robotics experiment with PIC microcontroller
• Fast Programming - Select the PX-200 to programs the Flash device with high speed.
• Check Communication – Verifies communication with the USB Programmer
and reads the device ID of the target MCU.
• Download PICkit 2 Firmware – Performs a download of the USB Programmer
firmware operating system. (this USB programmer is compatible PICkit2TM Programmer).
Sometime call this function to OS update.
Help
Displays all user manual, technical document and a dialog box indicating the
version and date.
1.3.2.2.3 Important things to know in using the PICkit2TM Programming Software
Editing memory value
The PICkit2TM Programming Software supports the editing memory value in each
address, both Flash program and data EEPROM memory. User can click at any address
that need to change the value and input the new value directly.
Moreover user can select to access both memory types and only one.
(a) Access only EEPROM data memory
Click at Enabled box in Program Memory border to remove the mark. At
EEPROM data border, it will show Write and Read EEPROM data only in red message. It
means user can read and write only EEPROM data memory. See the illlustration below.
�
Robotics experiment with PIC microcontroller���15
(b) Access only Flash program memory
Click at Enabled box in EEPROM data border to remove the mark. At
EEPROM data border will show Preserve device EEPROM data on write in red message.
It means the EEPROM data memory will be protected. User can access only Flash pro-
gram memory. See the illlustration below.
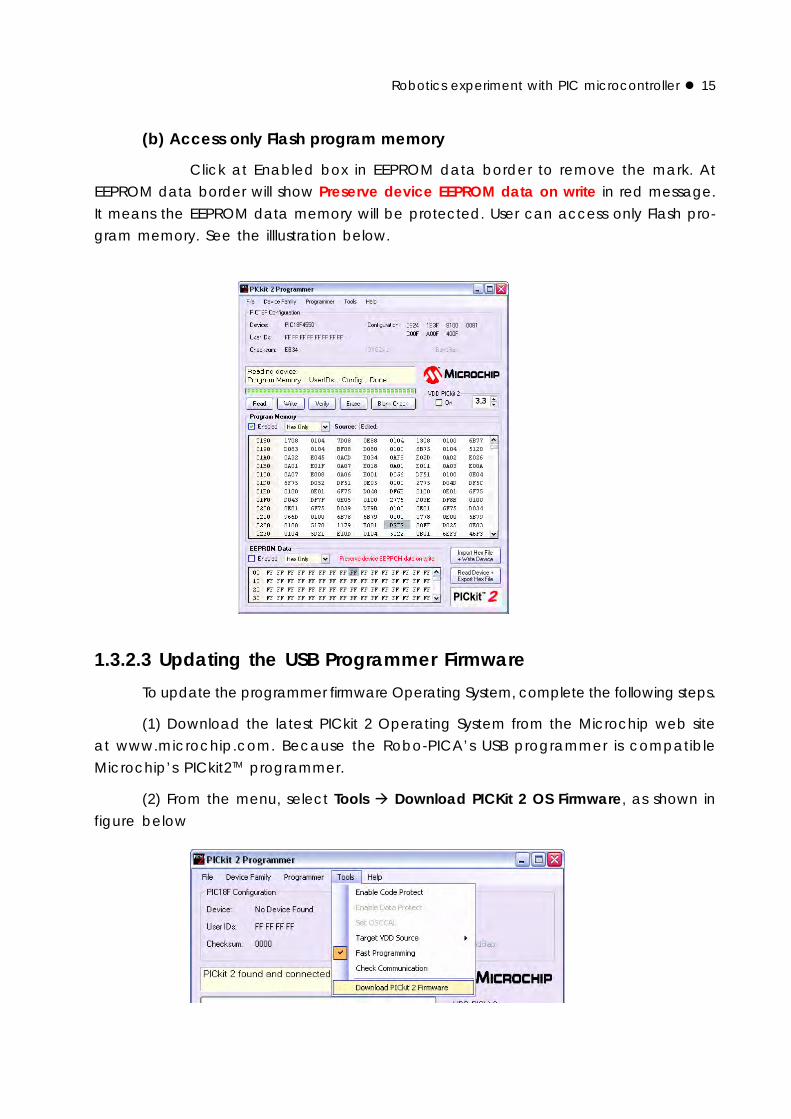
1.3.2.3 Updating the USB Programmer Firmware
To update the programmer firmware Operating System, complete the following steps.
(1) Download the latest PICkit 2 Operating System from the Microchip web site
at www.microchip.com. Because the Robo-PICA’s USB programmer is compatible
Microchip’s PICkit2TM programmer.
(2) From the menu, select Tools � Download PICKit 2 OS Firmware, as shown in
figure below