road test system - dmv.ny.gov. introduction to the road test system driving school ... dmv to...
TRANSCRIPT

No part of this publication may be reproduced or transmitted in any form or by any means without prior written permission. This document shall be considered “uncontrolled” when downloaded or printed.
Version 1.0 ©2017 Applus Technologies, Inc.
Road Test System Driving School Scheduling User Guide


i
Table of Contents
About this User Guide ......................................................................................................................... 1
Intended Audience ...................................................................................................................... 1
1. Introduction to the Road Test System Driving School Scheduling Application ................................... 2
1.1 Appointment Scheduling Features ...................................................................................... 2
1.2 Browser Requirements ...................................................................................................... 3
2. Dashboard Overview/Log in ......................................................................................................... 3
3. Navigating the Driving School Scheduling Application..................................................................... 4
3.1 General Administrative Navigation ...................................................................................... 4
4. Appointment Scheduling .............................................................................................................. 6
4.1 Displaying and Navigating the Third Party Scheduling Page ................................................. 6
4.2 Using reCAPTCHA ............................................................................................................. 8
4.3 Creating an Appointment ................................................................................................... 9
4.4 Rescheduling an Appointment .......................................................................................... 17
4.5 Canceling an Appointment ............................................................................................... 18
4.6 Accessing Standard Scheduling Reports ............................................................................ 19
5. Support .................................................................................................................................... 21
ii
Table of Figures
Figure 1.1-1: RTS Search Feature ........................................................................................................ 2
Figure 1.2-1: Dashboard Login Page .................................................................................................... 3
Figure 1.2-2: Driving School Scheduling Home Page.............................................................................. 4
Figure 4.1-1: Accessing the Third Party Scheduling Page ....................................................................... 6
Figure 4.1-2: Third Party/Driving School Scheduling Page ...................................................................... 7
Figure 4.2-1: Accessing the reCAPTCHA test ......................................................................................... 8
Figure 4.2-2: Taking the reCAPTCHA Test ............................................................................................ 9
Figure 4.2-3: reCAPTCHA Verification ................................................................................................... 9
Figure 4.3-1: Third Party/Driving School Scheduling Page .................................................................... 10
Figure 4.3-2: Enter Client Information Page ........................................................................................ 11
Figure 4.3-3: Navigating the Calendar to Enter Date of Birth................................................................ 11
Figure 4.3-4: Check Eligibility ............................................................................................................. 12
Figure 4.3-5: Client Information Page – All CIDs are Valid - Continue ................................................... 12
Figure 4.3-6: Client Information Page - Appointment Already Booked Message ..................................... 13
Figure 4.3-7: Third Party Scheduling Page .......................................................................................... 14
Figure 4.3-8: Third Party Scheduling - Multiple Time Slots Required ..................................................... 14
Figure 4.3-9: Appointment Availability Detail ....................................................................................... 15
Figure 4.3-10: Appointment Details Page ............................................................................................ 15
Figure 4.3-11: Schedule Appointment - Applicant Appointment Confirmation Page ................................ 16
Figure 4.3-12: Confirm No Appointment Confirmation Request ............................................................ 17
Figure 4.3-13: Booking Confirmation Page .......................................................................................... 17
Figure 4.5-1: View/Cancel Third Party Appointment ............................................................................ 18
Figure 4.5-2: Test History Page Displays to Cancel an Appointment ..................................................... 18
Figure 4.5-3: Confirming an Appointment Cancellation ........................................................................ 19
Figure 4.5-4: Appointment Cancellation Confirmation .......................................................................... 19
Figure 4.6-1: Road Skills Report Drop-Down List ................................................................................. 20
Figure 4.6-2: Reporting Navigation Bar ............................................................................................... 20
1
About this User Guide
This User Guide contains instructions for using the New York Department of Motor Vehicles (DMV)
customer service features available through the Road Test System (RTS), which is web-based and
accessible via URL by PC or mobile devices. It describes how Driving Schools (DS) can schedule,
reschedule, and cancel Class D, DJ, M, MJ, RV, Farm A, Farm B, and CDL road test appointments for their
customers.
Intended Audience
The intended audience for this User Guide includes Driving Schools who have been granted user access
rights to the Road Test System for servicing the road test appointment scheduling needs of their
customers.
By using this system, Driving Schools and their employees agree to only schedule or change road test
appointments for customers who give the school authorization to do so on their behalf.
Access to this system is a privilege that may be suspended or revoked by DMV for any inappropriate use
of the system, or for any violation of the Commissioner’s Regulations deemed serious by the Department
of Motor Vehicles.
2
1. Introduction to the Road Test System Driving School Scheduling Application
The Driving School Scheduling Application of the Road Test System provides access to designated Driving
School (DS) users at DMV selected driving schools, the ability to search, view, create, reschedule and
cancel road tests appointments for their customers.
1.1 Appointment Scheduling Features
The RTS is a robust scheduling system that is easy-to-use. It provides intuitive navigation features and
cues. Highlights of the system follow.
Appointment Scheduling
The DS user can schedule appointments for their customers at road test locations throughout the state.
The RTS utilizes a calendar of Time Slots for each Test Site. The Time Slots are color coded by test type.
The DS user can search for new appointments on a specific date or within a date range.
Notifications
The RTS will send automatic email or text notifications of appointment confirmation(s) to Applicants who
opt to receive them once the road test appointment(s) is scheduled. The system will also send out
reminders 5 days prior to their scheduled appointment.
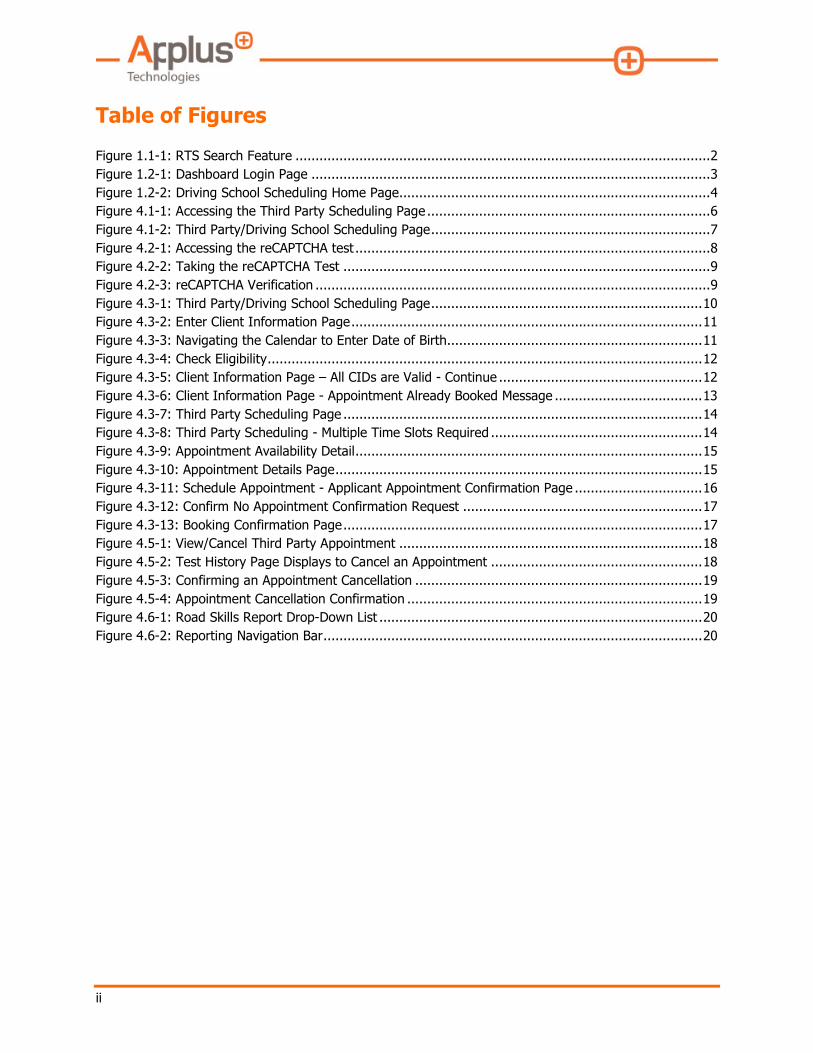
Search for Booked Appointments
The RTS Search feature will find open Time Slots and assist with rescheduling, or canceling
appointments. The DS user can search for booked appointments by entering a Client Identifier (CID)
and/or an Appointment Confirmation Number.
Figure 1.1-1: RTS Search Feature
Appointment Reporting
The RTS Search provides DS users the ability to report on appointments they have scheduled with the
DMV to facilitate the management of their customers’ activity.
3
1.2 Browser Requirements
The DS user can access the RTS Scheduling Application via HTML 5 compliant browser. At a minimum,
the following version numbers are recommended for the most popular browsers.
• Internet Explorer Version 11
• Chrome Version 45
• Firefox Version 41
2. Dashboard Overview/Log in
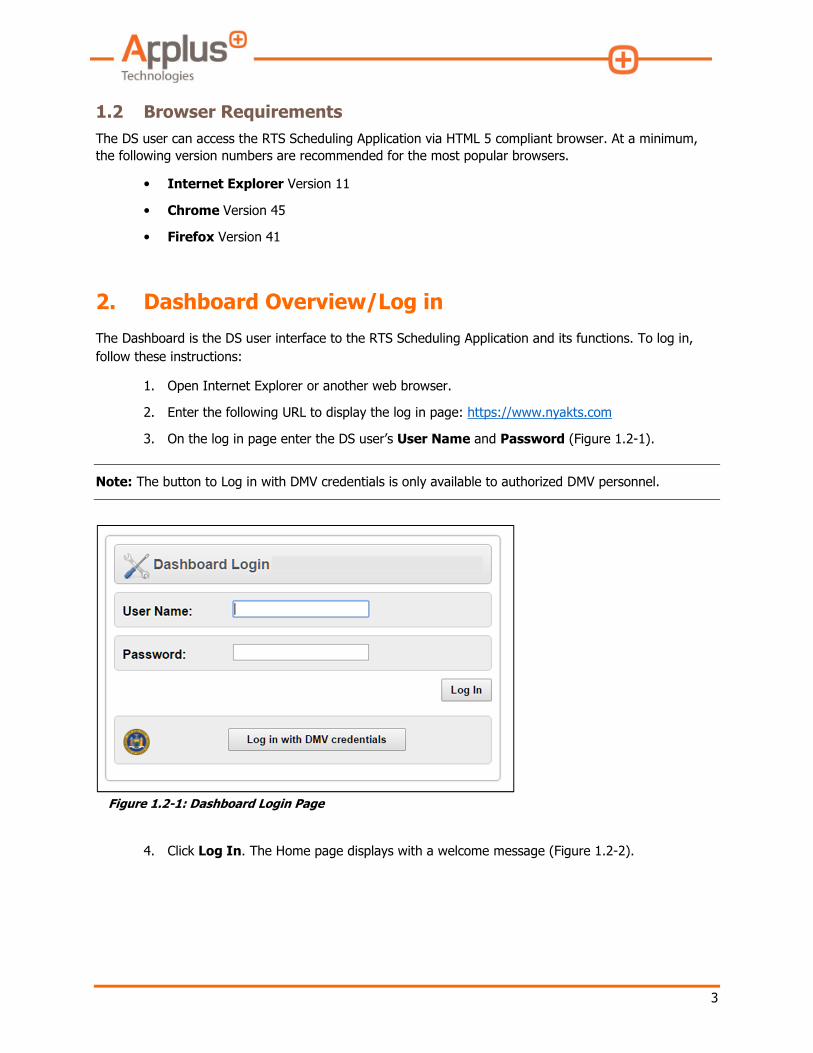
The Dashboard is the DS user interface to the RTS Scheduling Application and its functions. To log in,
follow these instructions:
1. Open Internet Explorer or another web browser.
2. Enter the following URL to display the log in page: https://www.nyakts.com
3. On the log in page enter the DS user’s User Name and Password (Figure 1.2-1).
Note: The button to Log in with DMV credentials is only available to authorized DMV personnel.
Figure 1.2-1: Dashboard Login Page
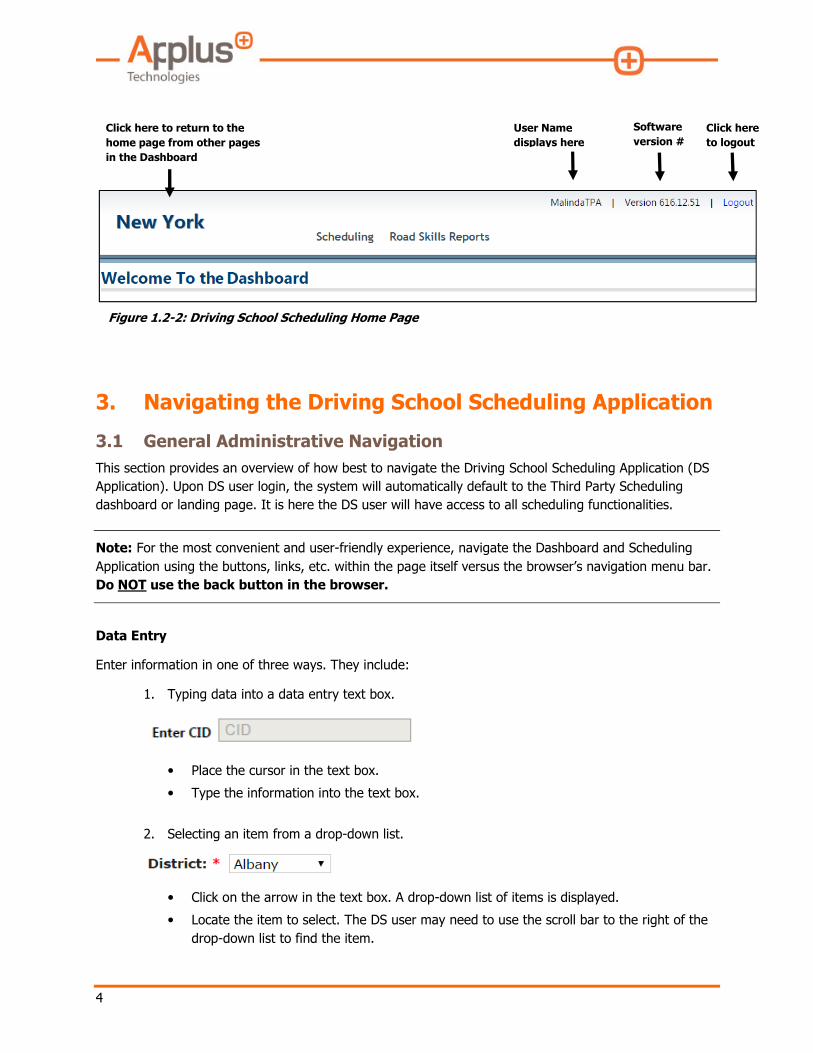
4. Click Log In. The Home page displays with a welcome message (Figure 1.2-2).
4
Figure 1.2-2: Driving School Scheduling Home Page
3. Navigating the Driving School Scheduling Application
3.1 General Administrative Navigation
This section provides an overview of how best to navigate the Driving School Scheduling Application (DS
Application). Upon DS user login, the system will automatically default to the Third Party Scheduling
dashboard or landing page. It is here the DS user will have access to all scheduling functionalities.
Note: For the most convenient and user-friendly experience, navigate the Dashboard and Scheduling
Application using the buttons, links, etc. within the page itself versus the browser’s navigation menu bar.
Do NOT use the back button in the browser.
Data Entry
Enter information in one of three ways. They include:
1. Typing data into a data entry text box.
• Place the cursor in the text box.
• Type the information into the text box.
2. Selecting an item from a drop-down list.
• Click on the arrow in the text box. A drop-down list of items is displayed.
• Locate the item to select. The DS user may need to use the scroll bar to the right of the
drop-down list to find the item.
Click here to return to the
home page from other pages
in the Dashboard
User Name
displays here
Software
version #
Click here
to logout

5
• Click the item to select it.
3. Selecting a date using a calendar.
• Place the cursor in the text box. A calendar displays.
• Click the arrow buttons in the calendar to navigate to other months and/or years.
• Click on a day to select it.
NOTE: Fields with a red asterisk * require data entry.
Save and Cancel
• Click SAVE to save information entered or edited.
• Click CANCEL to end the process without saving changes.
Refresh, Print, and Export
Certain screens allow for the refreshing, printing, and exporting of a list of items or an individual record
on a screen.
• Click Refresh to reload the page with any recent updates, if applicable.
• Click Print to print a hard copy or PDF of the list or record on the screen. A print dialog box
displays. Select a printer name or PDF. Click Print.
• Click Export to create and download a spreadsheet of the list or record on the screen. Click
the spreadsheet to open it. Click File, Save As, and Save.

6
Page Navigation
Some screens display navigation arrows. They appear when there are multiple pages in a list.
• Click the black arrows to go to the first or last page in the list.
• Click the white arrows to go to the previous or next page in the list.
Panel View/Hide
The DS user can expand and collapse panels on the screen by clicking on the arrows on the left side of
the panel.
4. Appointment Scheduling
This section provides instruction on how to add, reschedule, and cancel a road test appointment,
including sending appointment confirmations to Applicants.
Note: The creation, cancelation or modification of appointments is not permitted within 24 hours of the
appointment time.
4.1 Displaying and Navigating the Third Party Scheduling Page
Figure 4.1-1: Accessing the Third Party Scheduling Page
1. Click on Scheduling.
2. The Third Party/Driving School Scheduling page displays (Figure 4.1-2). It contains three
sections.

7
Figure 4.1-2: Third Party/Driving School Scheduling Page
Section 1
Use this section to start the process of scheduling new appointments, or rescheduling existing
appointments. The DS user may find Test Sites in closest proximity to a ZIP Code or County, or select a
specific Test Site.
• Location
o Zip Code: Locates a Test Site in closest proximity to a ZIP Code entered.
o City: Locates a Test Site in a County chosen from a drop down list.
• Mileage Radius: Locates a Test Site within a Mileage Radius chosen from a drop down list.
• Test Site: Allows the DS user to select a specific Test Site from a drop down list versus filtering
the search request.
• APPLY FILTER: Filters search and displays Test Sites in closest proximity to a ZIP Code or
County and Mileage Radius.
• Appointments Needed on Same Day: Allows certain DS users to schedule multiple
appointments at a Test Site in one transaction.
• SCHEDULE APPOINTMENTS: Applies search criteria and navigates to the next page.
Note: You must complete the reCAPTCHA exercise in Section 2 (below) before clicking on SCHEDULE
APPOINTMENTS.
Section 2
The DS user will notice a dialogue box with a “reCAPTCHA” logo in the lower right hand corner.
reCAPTCHA is a security feature installed on the scheduling dashboard and is designed to establish that
a user is human versus an Internet or web robot. Internet robots run automated tasks over the internet
that could be potentially harmful to websites. The reCAPTCHA verification process protects the system
and is required first each time the DS user schedules, reschedules, or cancels a driver license Applicant’s
appointment.
8
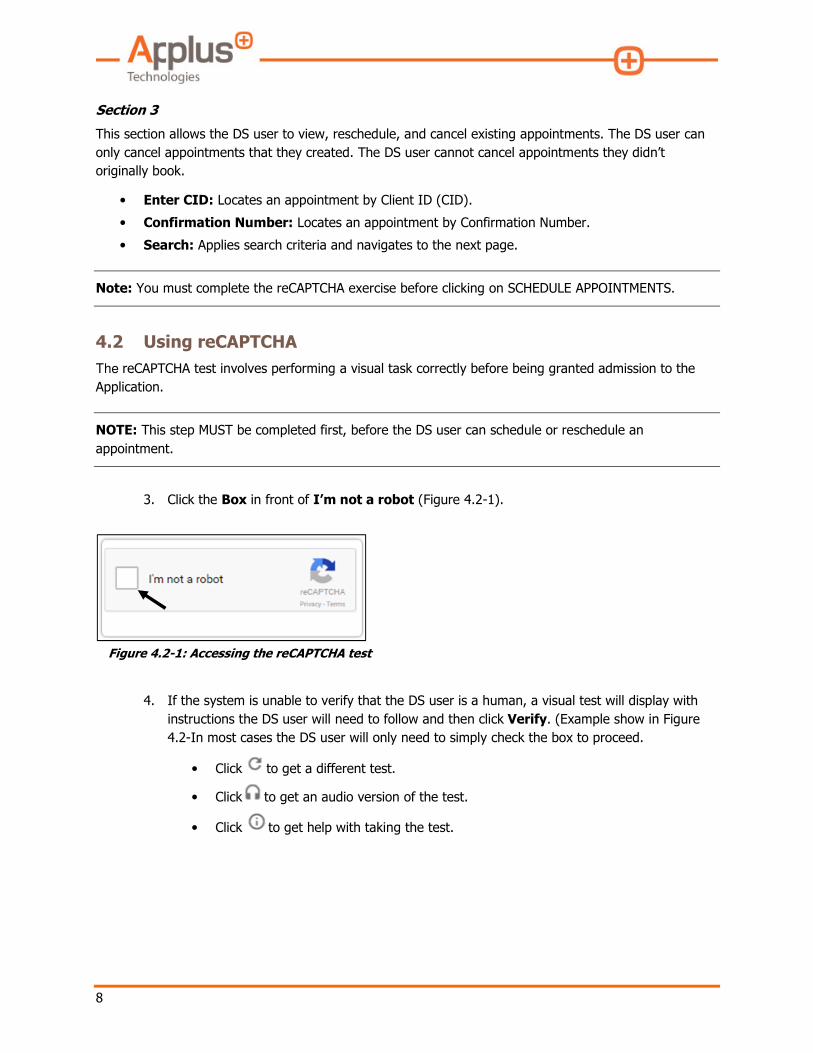
Section 3
This section allows the DS user to view, reschedule, and cancel existing appointments. The DS user can
only cancel appointments that they created. The DS user cannot cancel appointments they didn’t
originally book.
• Enter CID: Locates an appointment by Client ID (CID).
• Confirmation Number: Locates an appointment by Confirmation Number.
• Search: Applies search criteria and navigates to the next page.
Note: You must complete the reCAPTCHA exercise before clicking on SCHEDULE APPOINTMENTS.
4.2 Using reCAPTCHA
The reCAPTCHA test involves performing a visual task correctly before being granted admission to the
Application.
NOTE: This step MUST be completed first, before the DS user can schedule or reschedule an
appointment.
3. Click the Box in front of I’m not a robot (Figure 4.2-1).
Figure 4.2-1: Accessing the reCAPTCHA test
4. If the system is unable to verify that the DS user is a human, a visual test will display with
instructions the DS user will need to follow and then click Verify. (Example show in Figure
4.2-In most cases the DS user will only need to simply check the box to proceed.
• Click to get a different test.
• Click to get an audio version of the test.
• Click to get help with taking the test.

9
Figure 4.2-2: Taking the reCAPTCHA Test
5. When the DS user has successfully passed the test, a confirmation message will appear,
(Figure 4.2-3), and the scheduling process can be continued.
Figure 4.2-3: reCAPTCHA Verification
4.3 Creating an Appointment
Follow these steps to create a road test appointment.
Log In
1. Log in to the Dashboard. See 2. Dashboard Overview / Log in.
2. The DS user should see the Third Party Scheduling page.

10
Figure 4.3-1: Third Party/Driving School Scheduling Page
Selecting a Test Site
1. Ask the Applicant where they would like to take the test. If they know the exact location,
click the Arrow in the Test Site field to view the list of locations. Click the Test Site Name to
select it. Otherwise:
• If the Applicant is unsure of the Test Site location, ask them what ZIP Code or
County they want to take the test in.
• Enter the ZIP Code or click the Arrow in the SELECT field to view a list of Counties.
Click the County Name to select it.
• The DS user is able to provide the Applicant with a range of test site location
options; closest to furthest from the Applicant’s ZIP Code or County, depending upon
the selection. (e.g., 10 miles, 250 miles, etc.)
• Select a Mileage Radius and click APPLY FILTER.
• Ask Applicant which of the resulting Test Sites they prefer and select that site.
2. Click the Arrow in the Appointments Needed on Same Day field. Select the number of
appointments from the drop down list by clicking the Number.
• If the DS user is authorized to schedule more than one appointment in one
transaction, the drop down list will display more than one number (e.g., 1, 2, 3). If
the DS user is not, they will only see the number 1.
3. Click SCHEDULE APPOINTMENTS.
Enter Client/Applicant Information
1. The Enter Client Information page displays (Figure 4.3-2). Request the Applicant’s CID
and type it into the CID 1 field.

11
Figure 4.3-2: Enter Client Information Page
2. Ask the Applicant for their date of birth and use the calendar to enter it into the Date of
Birth field. To display the calendar, hover the cursor over the Date of Birth field. To
navigate the calendar and to enter the date, see Figure 4.3-4 below.
Figure 4.3-3: Navigating the Calendar to Enter Date of Birth
3. Ask the Applicant what type of test they would like to schedule. Click the Arrow in Test Type
field to view a drop down list of test types. Click the Test Type to select it.
• If the DS user is authorized to schedule more than one appointment in one transaction,
and selected more than one on the prior screen, the DS user can click Add CID (Figure
4.3-2) and follow steps 1 through 3 above to enter each Applicant’s information into the
fields (i.e., CID, Date of Birth, and Test Type). Once the maximum number of
appointments has been reached, the “Add CID” button will become disabled.
4. Ask the Applicant(s) if they approve of the DS user scheduling the appointment on their
behalf. If the DS user is scheduling an appointment for more than one Applicant, they must
ask each one this question. Click the Box in front of “By continuing, I attest that I have full
agreement of each applicant.” This confirms the DS user has an agreement from the
Applicant(s) to schedule their road test, and MUST be completed in order to continue the
scheduling process.
• If an Applicant does not approve of the DS user scheduling the appointment on their
behalf, click the red X in front of their CID to remove it.
Click arrow to display
previous months
within the year.
Click arrow to display
months in a drop down
list. Click on the month
to select it.
Click arrows to display the next
month within the year.
Click arrow to display other
years in a drop down list. Click
the year to select it.
Click a day in a month
and year to select it.
12
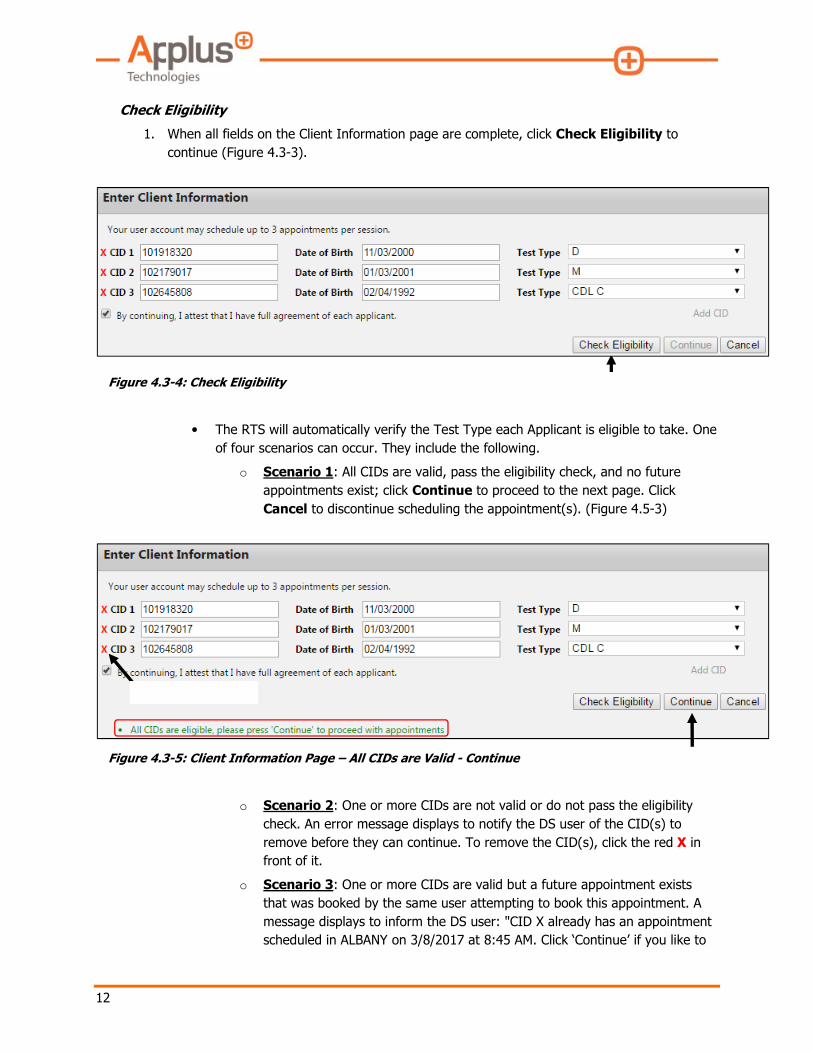
Check Eligibility
1. When all fields on the Client Information page are complete, click Check Eligibility to
continue (Figure 4.3-3).
Figure 4.3-4: Check Eligibility
• The RTS will automatically verify the Test Type each Applicant is eligible to take. One
of four scenarios can occur. They include the following.
o Scenario 1: All CIDs are valid, pass the eligibility check, and no future
appointments exist; click Continue to proceed to the next page. Click
Cancel to discontinue scheduling the appointment(s). (Figure 4.5-3)
Figure 4.3-5: Client Information Page – All CIDs are Valid - Continue
o Scenario 2: One or more CIDs are not valid or do not pass the eligibility
check. An error message displays to notify the DS user of the CID(s) to
remove before they can continue. To remove the CID(s), click the red X in
front of it.
o Scenario 3: One or more CIDs are valid but a future appointment exists
that was booked by the same user attempting to book this appointment. A
message displays to inform the DS user: "CID X already has an appointment
scheduled in ALBANY on 3/8/2017 at 8:45 AM. Click ‘Continue’ if you like to
13
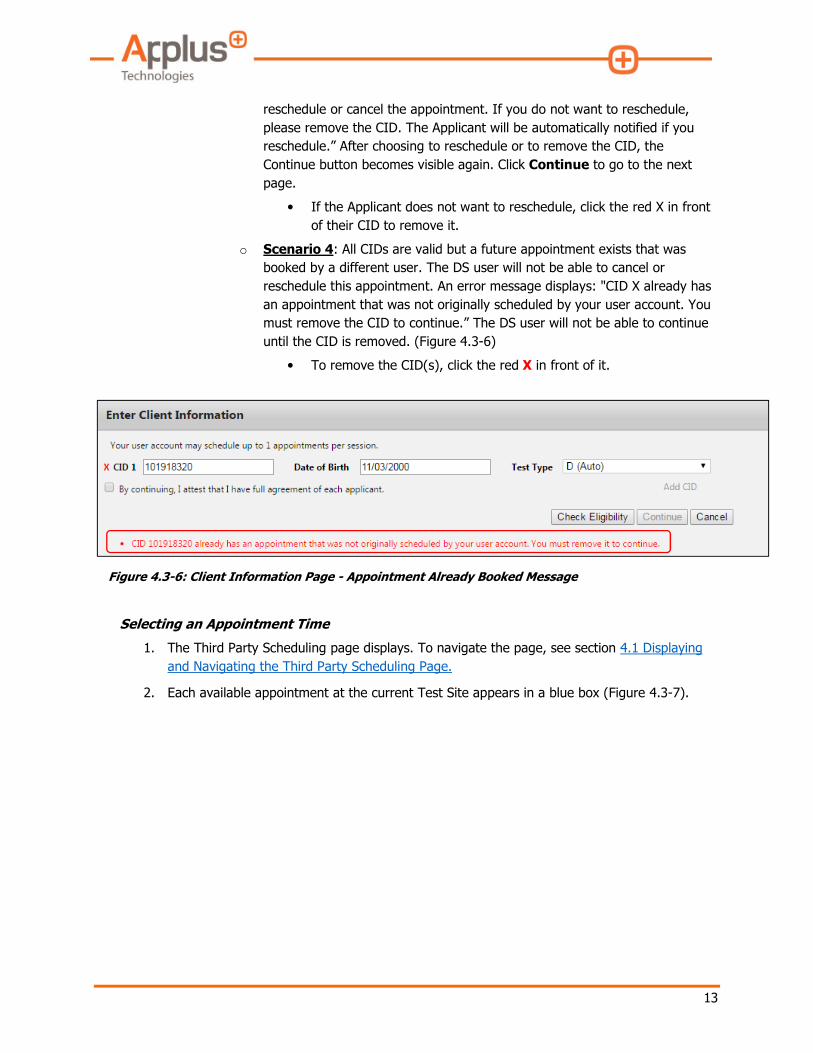
reschedule or cancel the appointment. If you do not want to reschedule,
please remove the CID. The Applicant will be automatically notified if you
reschedule.” After choosing to reschedule or to remove the CID, the
Continue button becomes visible again. Click Continue to go to the next
page.
• If the Applicant does not want to reschedule, click the red X in front
of their CID to remove it.
o Scenario 4: All CIDs are valid but a future appointment exists that was
booked by a different user. The DS user will not be able to cancel or
reschedule this appointment. An error message displays: "CID X already has
an appointment that was not originally scheduled by your user account. You
must remove the CID to continue.” The DS user will not be able to continue
until the CID is removed. (Figure 4.3-6)
• To remove the CID(s), click the red X in front of it.
Figure 4.3-6: Client Information Page - Appointment Already Booked Message
Selecting an Appointment Time
1. The Third Party Scheduling page displays. To navigate the page, see section 4.1 Displaying
and Navigating the Third Party Scheduling Page.
2. Each available appointment at the current Test Site appears in a blue box (Figure 4.3-7).
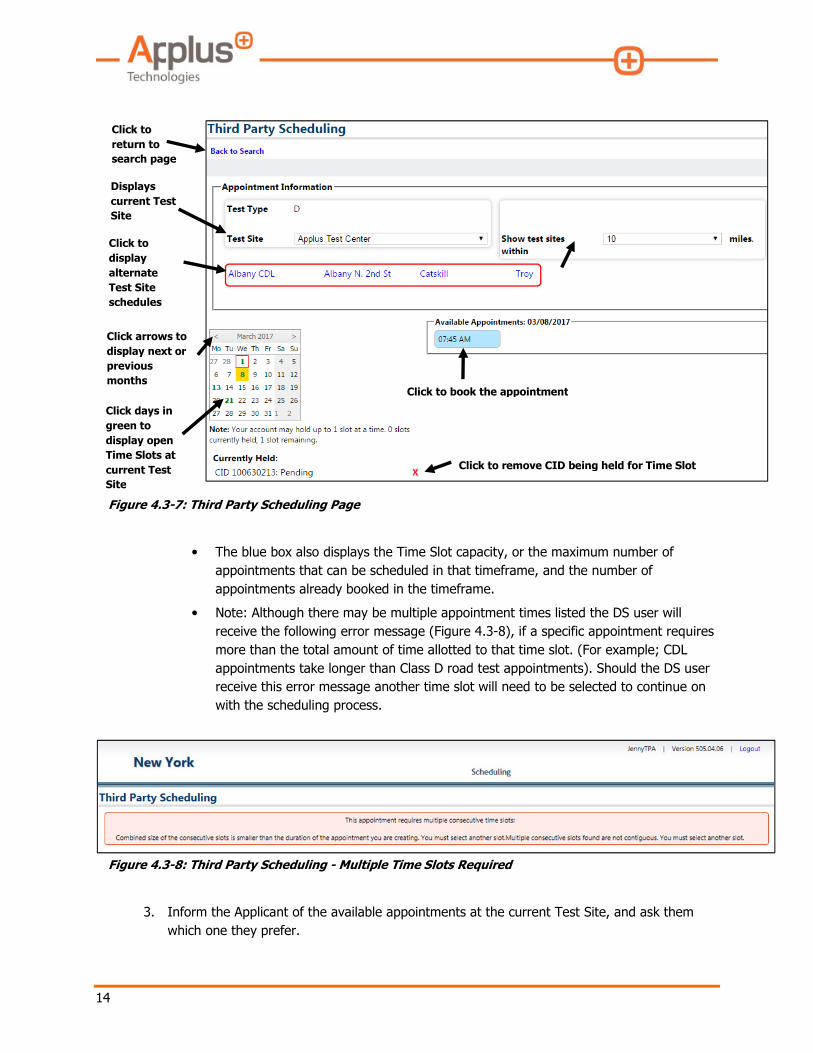
14
Figure 4.3-7: Third Party Scheduling Page
• The blue box also displays the Time Slot capacity, or the maximum number of
appointments that can be scheduled in that timeframe, and the number of
appointments already booked in the timeframe.
• Note: Although there may be multiple appointment times listed the DS user will
receive the following error message (Figure 4.3-8), if a specific appointment requires
more than the total amount of time allotted to that time slot. (For example; CDL
appointments take longer than Class D road test appointments). Should the DS user
receive this error message another time slot will need to be selected to continue on
with the scheduling process.
Figure 4.3-8: Third Party Scheduling - Multiple Time Slots Required
3. Inform the Applicant of the available appointments at the current Test Site, and ask them
which one they prefer.
Click arrows to
display next or
previous
months Click to book the appointment
Click days in
green to
display open
Time Slots at
current Test
Site
Click to remove CID being held for Time Slot
Click to
display
alternate
Test Site
schedules
Displays
current Test
Site
Click to
return to
search page
15
• If the Applicant prefers a different appointment time and it is unavailable at the
current Test Site, use the navigation features on the Schedule Appointment page to
view available appointments at another Test Site.
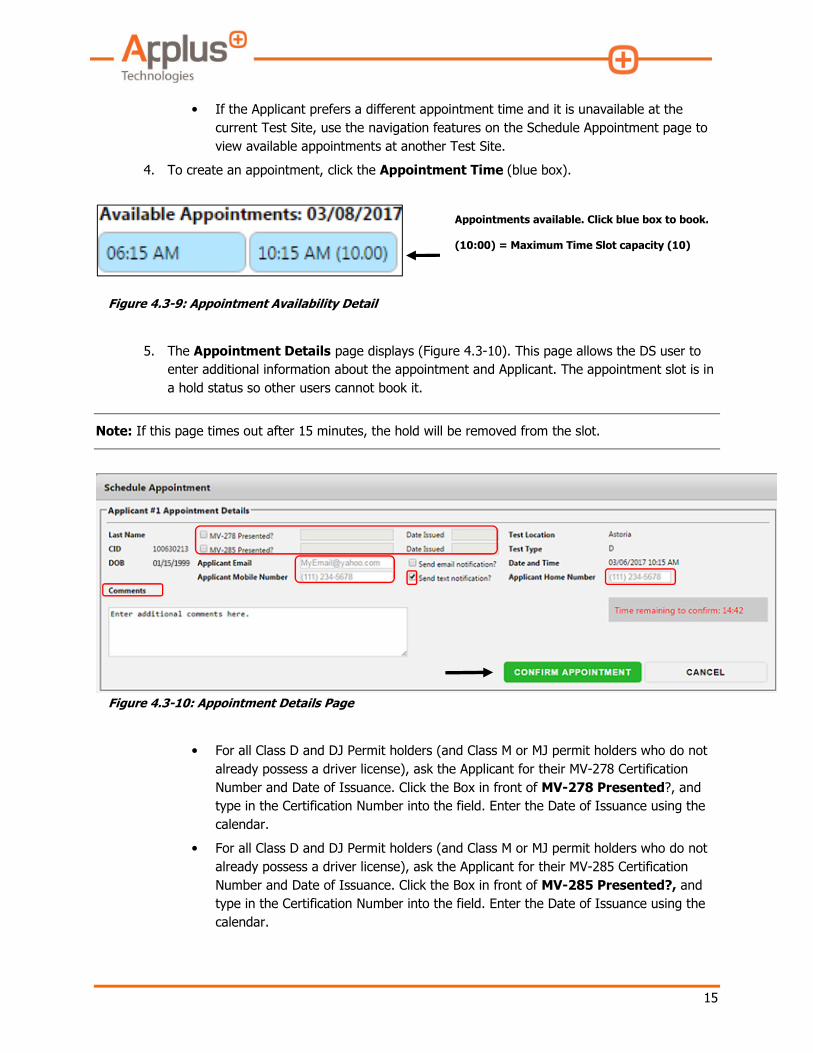
4. To create an appointment, click the Appointment Time (blue box).
Figure 4.3-9: Appointment Availability Detail
5. The Appointment Details page displays (Figure 4.3-10). This page allows the DS user to
enter additional information about the appointment and Applicant. The appointment slot is in
a hold status so other users cannot book it.
Note: If this page times out after 15 minutes, the hold will be removed from the slot.
Figure 4.3-10: Appointment Details Page
• For all Class D and DJ Permit holders (and Class M or MJ permit holders who do not
already possess a driver license), ask the Applicant for their MV-278 Certification
Number and Date of Issuance. Click the Box in front of MV-278 Presented?, and
type in the Certification Number into the field. Enter the Date of Issuance using the
calendar.
• For all Class D and DJ Permit holders (and Class M or MJ permit holders who do not
already possess a driver license), ask the Applicant for their MV-285 Certification
Number and Date of Issuance. Click the Box in front of MV-285 Presented?, and
type in the Certification Number into the field. Enter the Date of Issuance using the
calendar.
Appointments available. Click blue box to book.
(10:00) = Maximum Time Slot capacity (10)
16
• Ask the Applicant if they would like an email or text notification of the appointment.
If they do, click on the Box in front of their preference and enter their Email Address
and/or Mobile Phone Number into the appropriate fields. The DS user may also
request and enter the Applicant’s Home Phone Number, but they will not receive a
voice confirmation or reminder via this telephone number.
• Inform the Applicant that they can reschedule or cancel their appointment online
using the public scheduling website at http://nyrtsscheduler.com
• The Applicant will automatically receive a confirmation message via email or text,
depending upon the desired option, and the message will include all appointment
details.
• The DS user may add additional information to the confirmation message by entering
it into the Comments field.
• The DS user should then inform the Applicant that they will receive an appointment
reminder five days before the appointment date via their preference, (email or text).
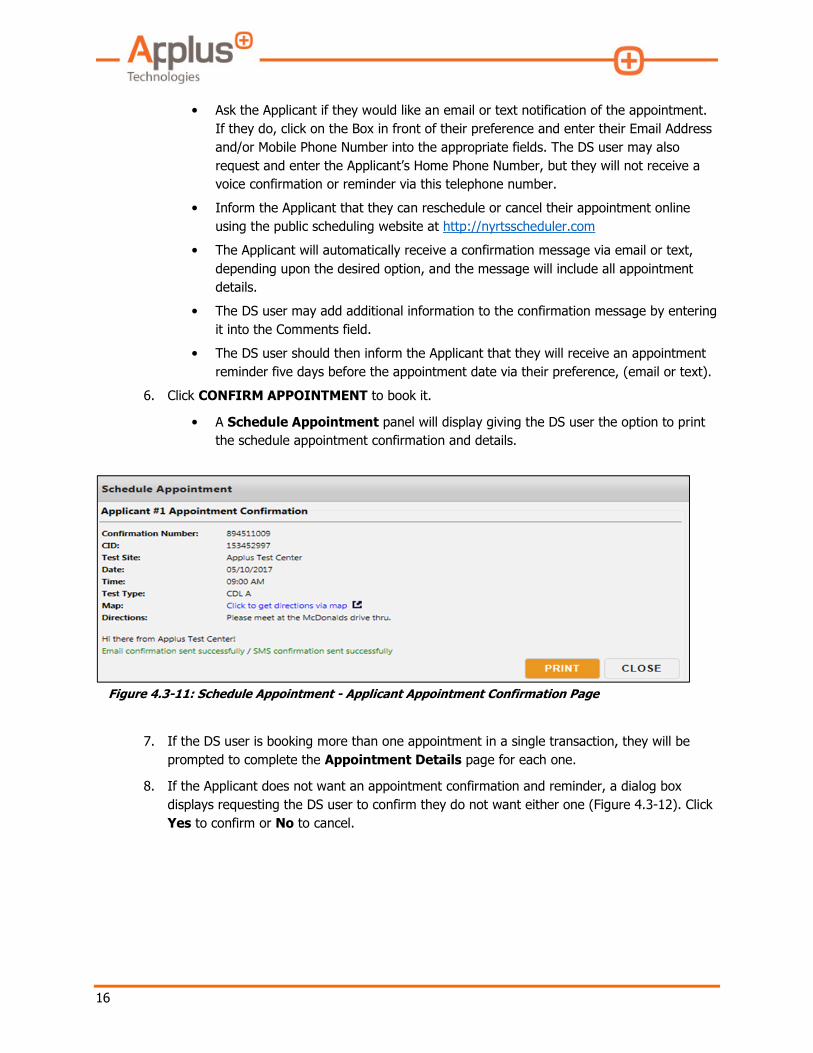
6. Click CONFIRM APPOINTMENT to book it.
• A Schedule Appointment panel will display giving the DS user the option to print
the schedule appointment confirmation and details.
Figure 4.3-11: Schedule Appointment - Applicant Appointment Confirmation Page
7. If the DS user is booking more than one appointment in a single transaction, they will be
prompted to complete the Appointment Details page for each one.
8. If the Applicant does not want an appointment confirmation and reminder, a dialog box
displays requesting the DS user to confirm they do not want either one (Figure 4.3-12). Click
Yes to confirm or No to cancel.

17
Figure 4.3-12: Confirm No Appointment Confirmation Request
9. The Booking Confirmation page displays the details of the appointment in a printable panel.
Click Print to print the confirmation. Click CLOSE to exit.
Figure 4.3-13: Booking Confirmation Page
10. To return to the Scheduling home page, click on Scheduling at the top of the screen.
4.4 Rescheduling an Appointment
1. To reschedule an appointment, follow all steps in the Selecting an Appointment Time
above. (The scheduling application is unique in that it allows the DS user to schedule multiple
appointments in one session so steps are repeated for each scheduled applicant without
having to search again).
2. If the Applicant does not want to reschedule, click the red X in front of their CID to remove
it.
3. To cancel an appointment, see section 4.5 Canceling an Appointment below.
4. To return to the Scheduling home page, click on Scheduling at the top of the screen.

18
4.5 Canceling an Appointment
Note: The DS user can only cancel appointments that they originally booked. The DS user will not be
able to cancel appointments made by other users. The DS user cannot cancel or reschedule an
appointment that is scheduled to occur within 24 hours of the appointment time.
Use the following instructions to cancel a road test appointment:
1. Log in to the Dashboard.
2. The Third Party Scheduling landing page will appear (Figure 4.1-1). See 4.1 Displaying and
Navigating the Third Party Scheduling Page.
3. The DS user must always take the reCAPTCHA test first before canceling an appointment.
Once completed successfully,
4. The DS user should request the CID or Confirmation Number from the Applicant. Type the
CID or Confirmation Number into their respective fields (Figure 4.4-1).
5. Click Search (Figure 4.4-1).
Figure 4.5-1: View/Cancel Third Party Appointment
6. The Test History page displays. Click Cancel Appointment (Figure 4.4-2).
Figure 4.5-2: Test History Page Displays to Cancel an Appointment
7. A dialog box displays requesting the DS user confirm the cancelation. Click Yes to confirm it.
Click No to cancel (Figure 4.4-3).

19
Note: the DS user MUST ask the Applicant if they have their full agreement to cancel the appointment
and MUST check the agreement confirmation first before being able to continue the process
Figure 4.5-3: Confirming an Appointment Cancellation
8. An appointment cancelation confirmation message displays to inform the DS user the
appointment has been canceled and the Applicant has been notified successfully. Click
Close.
Figure 4.5-4: Appointment Cancellation Confirmation
9. To return to the Scheduling home page, click on Scheduling at the top of the screen.
4.6 Accessing Standard Scheduling Reports
The following two reports are available to DS users to report on appointments they have scheduled with
the DMV to facilitate the management of their registered driver license Applicant activity.
• Appointment Activity Report
This report is available to DS Users and provides a report of all appointment activity within
that Driving School. The DS User can drill down and filter the report by the user name, CID,
Test type, etc. The report also displays a timestamp on all reporting activity.

20
• Appointments Schedule Report -
This report is available to DS Users and provides a report for all appointments scheduled by a
Driving School and can be filtered and searched upon by specific date range, region, or T&I
District
1. Log in to the Dashboard.
2. Hover your cursor over Road Skills Reports. A drop-down list of reports displays. (Figure
4.6-1). Click a Report Name to select it.
Figure 4.6-1: Road Skills Report Drop-Down List
3. A search dialog box displays with search criteria fields specific to each report. There are two
ways to enter information into the search fields. They include typing data into the field(s)
and selecting data from a drop-down list. To view a report, click View Report on the right
side of the screen.
4. The report displays. A navigation bar will show above the report, allowing the DS user to
move between pages of the report, search within the report, export the report to various file
formats, and refresh the screen (Figure 4.6-2).
Figure 4.6-2: Reporting Navigation Bar
5. To return to the Scheduling home page, click on Scheduling at the top of the screen.

21
5. Support
This manual is published to assist you with the functions of this system. You can download additional
copies at www.dmv.ny.gov and click on “Organizations” and then on “Driver Training Providers.
The Bureau of Driver Training Programs can only assist Driving Schools with information about obtaining
or accessing a Driving School account. Driver Training Programs can be reached weekdays between 9am
and 4pm at (518) 473-7174, Option 3.
PLEASE NOTE: Driver Training Programs cannot help you with using the system or scheduling road test
appointments (including availability, changing appointments, and/or questions about the testing process).
If you have any questions regarding road test sites, and/or anything related to the actual road test,
please contact the Testing & Investigations unit who manages the road test site where the test is
scheduled.