richtextbox for uwphelp.grapecity.com/componentone/pdf/uwp/uwp_richtextbox.pdfdisplay and edit...
TRANSCRIPT

ComponentOne
RichTextBox for UWP

GrapeCity US
GrapeCity201 South Highland Avenue, Suite 301Pittsburgh, PA 15206Tel: 1.800.858.2739 | 412.681.4343Fax: 412.681.4384Website: https://www.grapecity.com/en/E-mail: [email protected]
Trademarks
The ComponentOne product name is a trademark and ComponentOne is a registered trademark of GrapeCity, Inc. Allother trademarks used herein are the properties of their respective owners.
Warranty
ComponentOne warrants that the media on which the software is delivered is free from defects in material andworkmanship, assuming normal use, for a period of 90 days from the date of purchase. If a defect occurs during thistime, you may return the defective media to ComponentOne, along with a dated proof of purchase, andComponentOne will replace it at no charge. After 90 days, you can obtain a replacement for the defective media bysending it and a check for $2 5 (to cover postage and handling) to ComponentOne.
Except for the express warranty of the original media on which the software is delivered is set forth here,ComponentOne makes no other warranties, express or implied. Every attempt has been made to ensure that theinformation contained in this manual is correct as of the time it was written. ComponentOne is not responsible for anyerrors or omissions. ComponentOne’s liability is limited to the amount you paid for the product. ComponentOne isnot liable for any special, consequential, or other damages for any reason.
Copying and Distribution
While you are welcome to make backup copies of the software for your own use and protection, you are notpermitted to make copies for the use of anyone else. We put a lot of time and effort into creating this product, and weappreciate your support in seeing that it is used by licensed users only.
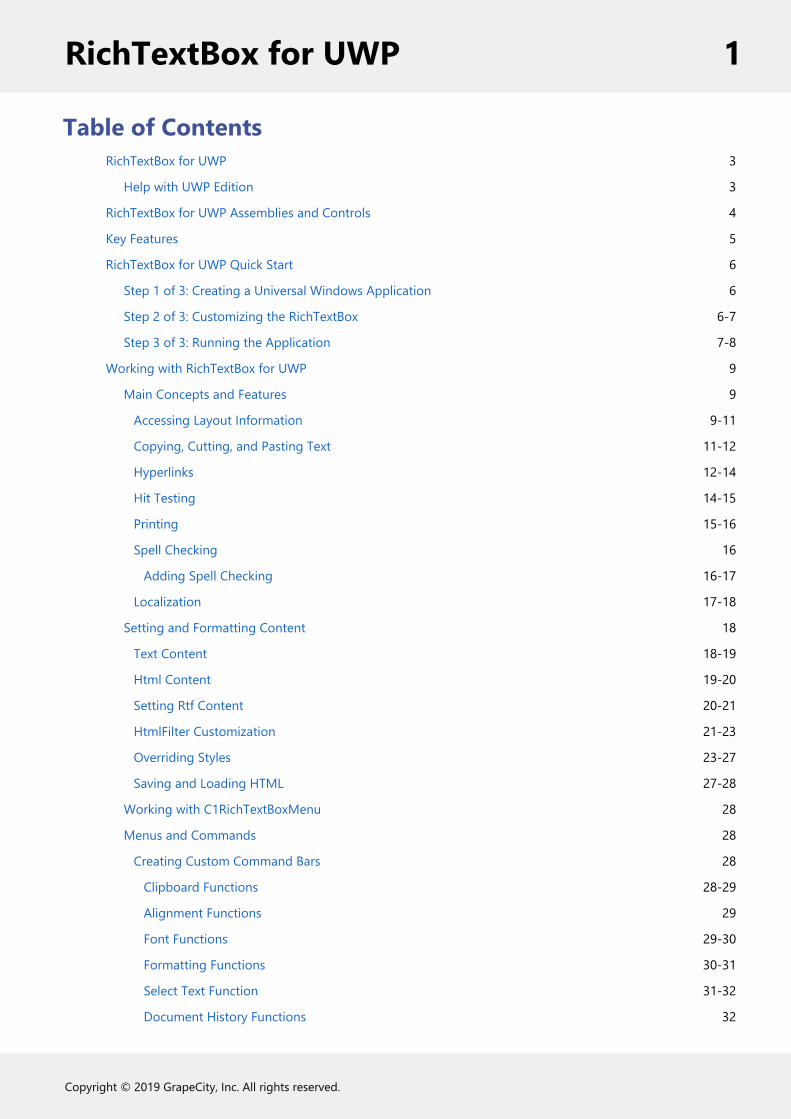
Table of ContentsRichTextBox for UWP 3
Help with UWP Edition 3
RichTextBox for UWP Assemblies and Controls 4
Key Features 5
RichTextBox for UWP Quick Start 6
Step 1 of 3: Creating a Universal Windows Application 6
Step 2 of 3: Customizing the RichTextBox 6-7
Step 3 of 3: Running the Application 7-8
Working with RichTextBox for UWP 9
Main Concepts and Features 9
Accessing Layout Information 9-11
Copying, Cutting, and Pasting Text 11-12
Hyperlinks 12-14
Hit Testing 14-15
Printing 15-16
Spell Checking 16
Adding Spell Checking 16-17
Localization 17-18
Setting and Formatting Content 18
Text Content 18-19
Html Content 19-20
Setting Rtf Content 20-21
HtmlFilter Customization 21-23
Overriding Styles 23-27
Saving and Loading HTML 27-28
Working with C1RichTextBoxMenu 28
Menus and Commands 28
Creating Custom Command Bars 28
Clipboard Functions 28-29
Alignment Functions 29
Font Functions 29-30
Formatting Functions 30-31
Select Text Function 31-32
Document History Functions 32
RichTextBox for UWP 1
Copyright © 2019 GrapeCity, Inc. All rights reserved.

Using the AppBar 32-34
Working with C1Document Object 35
Defining C1RichTextBox.Document Elements 35
The C1TextElement Class 35-36
Other C1RichTextBox.Documents Elements 36
Creating Documents and Reports 36-42
Implementing Split Views 42-43
Using the C1Document Class 43-44
Understanding C1TextPointer 44-48
Supported Elements 49
HTML Elements 49-51
HTML Attributes 51-56
CSS Properties 56-60
CSS Selectors 60-61
Tutorials 62
Creating an AppBar Application 62
Step 1 of 5: Creating the Application 62-64
Step 2 of 5: Adding Resource Files and General Application Code 64-78
Step 3 of 5: Adding General Application Code 78-79
Step 4 of 5: Adding Code for the BottomAppBar 79-85
Step 5 of 5: Running the Application 85-86
Printing C1RichTextBox Contents 86
Step 1 of 4: Setting Up the Application 86-87
Step 2 of 4: Adding Resource Files and Code 87-89
Step 3 of 4: Adding Application Code 89-93
Step 4 of 4: Running the Application 93-94
RichTextBox for UWP 2
Copyright © 2019 GrapeCity, Inc. All rights reserved.

RichTextBox for UWPDisplay and edit formatted text as HTML documents with RichTextBox for UWP. The C1RichTextBox controlsupports basic HTML formatting, CSS, lists, hyperlinks, tables, images, and more. Use the control to display HTMLcontent from the Web or use it as a rich text editor.
Help with UWP EditionGetting Started
For information on installing ComponentOne Studio UWP Edition, licensing, technical support, namespaces andcreating a project with the control, please visit Getting Started with ComponentOne Studio UWP Edition.
RichTextBox for UWP 3
Copyright © 2019 GrapeCity, Inc. All rights reserved.

RichTextBox for UWP Assemblies and ControlsAdd powerful rich text editing and viewing to your mobile apps. RichTextBox for UWP Edition supports commonformatting tags, automatic line wrapping, HTML and RTF import/export, table support, images, annotations, and more.
The following table displays the assemblies and main classes included in them along with the descriptions:
C1.UWP.RichTextBox.dll C1RichTextBox
Control used to view and edit C1Document documents. The control can import and export HTML, and supports richformatting including fonts, foreground and background colors, borders, paragraph alignment, images, hyperlinks,lists, arbitrary UIElement objects, and more.
C1.UWP.RichTextBox.dll C1Document
Class that represents documents as a hierarchical list of elements that represent document components such asparagraphs, lists, images, and so on. The object model exposed by the C1Document object is similar to the one usedin the WPF FlowDocument class and in the HTML DOM.
C1.UWP.RichTextBox.AppBar.dll C1ApplicationBarToggleButton<T>
Base class for ApplicationBar toggle buttons which includes built-in tools to create a simple command barsupporting Bold, Italic, Underline, Undo, Redo, Increase Font Size, Decrease Font Size, Center Align, Right Align, LeftAlign, and Justify commands.
C1.UWP.RichTextBox.Menu.dll C1RichTextBoxMenu
Control that acts as a complete radial context menu. It allows you to edit and format text that includes differentfonts, decorations, sizes, colors, and other basic HTML and RTF style attributes supported by CSS and inline markup.
C1.UWP.RichTextBox.PdfFilter.dll PDFFilter
Class that allows you to export the RichTextBox content to PDF file.
RichTextBox for UWP 4
Copyright © 2019 GrapeCity, Inc. All rights reserved.

RichTextBox for UWP Key FeaturesRichTextBox for UWP allows you to create customized, rich applications. Make the most of RichTextBox for UWPby taking advantage of the following key features:
Load, Display, and Save HTML Documents
The C1RichTextBox control supports displaying and editing rich text formatted as HTML. Load existing HTMLcontent into the C1RichTextBox control, edit the document, and then save it back as HTML or plain text.
Mouse and Touch Support
Select text and move the input caret easily by either mouse or touch input. The text selection is modeled afterthe native TextBox behavior so it's familiar and easy to accomplish on a touch device.
Rich Formatting
Edit and format text containing multiple fonts, decorations, sizes, colors, and other basic HTML style attributessupported by CSS and inline markup.
Clipboard Support
The C1RichTextBox control fully supports the clipboard for both plain and rich text through the keyboard(CTRL+C, CTRL+V, CTRL+X) and UI commands for touch displays. Implement cut/copy/paste commands withinyour AppBar or any other way imaginable.
Built-in AppBar Tools
The AppBar library includes built-in tools that you can use with the C1RichTextBox control to speed upcommand creation for common editing features like text formatting and document history. The built-in toolssupport the following commands: Bold, Italic, Underline, Undo, Redo, Increase Font Size, Decrease Font Size,Center Align, Right Align, Left Align, and Justify.
Hyperlinks: Insert and Navigate
The C1RichTextBox control supports inserting and navigating hyperlinks. When the user clicks a hyperlinkthe RequestNavigate event is fired on the control and you can handle what happens from there.
Insert Tables and Images
The C1RichTextBox control supports inserting images from the Web or from the users machine. You can alsoinsert tables. The Beta version has limited editing support for tables and images.
Undo/Redo Support
The C1RichTextBox control keeps track of all document history, so users have the ability to easily undo andredo changes. By default, keyboard commands (CTRL+Z/CTRL+Y) perform these actions.
RichTextBox for UWP 5
Copyright © 2019 GrapeCity, Inc. All rights reserved.

RichTextBox for UWP Quick StartIn this quick start you'll create a Universal Windows application in Visual Studio, add the C1RichTextBox control tothe application, add code to customize the application, and run the application to view possible run-time interactions.
Step 1 of 3: Creating a Universal Windows ApplicationIn this step you'll create a new Universal Windows application, set the application up, and add the C1RichTextBoxcontrol to the application. After completing this step, you should have a mostly functional Rich Text editor.
Complete the following steps:
1. In Visual Studio select File | New | Project.2. In the New Project dialog box, select Templates | Visual C# | Windows | Universal. From the templates list,
select Blank App (Universal Windows). Enter a Name and click OK to create your project.3. Right-click the project name in the Solution Explorer and select Add Reference.4. In the Reference Manager dialog box, expand Universal Windows and select Extensions; you should see the
UWP assemblies in the center pane. Select C1.UWP.RichTextBox.5. Open MainPage.xaml if it isn't already open, and add the following markup within the <Page> tag:
XAML Markup
xmlns:RichTextBox="using:C1.Xaml.RichTextBox"
This adds references to the required assembly to the project.
6. In the XAML window of the project, place the cursor between the <Grid x:Name="ContentPanel"></Grid> tags and click once.
7. Add the following markup within the <Grid> tags to add the C1RichTextBox control. Note that this markupgives the control a name:
XAML Markup
<RichTextBox:C1RichTextBox Name="C1RTB" />
8. Place your cursor beneath the markup for the C1RichTextBox control you just added. Locatethe C1RichTextBoxMenu control in the Visual Studio Toolbox and double-click to add it to your application.
9. Edit the C1RichTextBoxMenu markup so that it resembles the following sample. This will give theC1RichTextBoxMenu a name and bind it to the C1RichTextBox control:
XAML Markup
<RichTextBox:C1RichTextBoxMenu x:Name="rtbMenu" RichTextBox="{Binding ElementName=RTB1}" />
What You've Accomplished
If you run the application, you'll see an almost fully functional C1RichTextBox application. You can enter and edit textin the C1RichTextBox control. In the next step you'll customize the application further.
Step 2 of 3: Customizing the RichTextBox
RichTextBox for UWP 6
Copyright © 2019 GrapeCity, Inc. All rights reserved.

In the previous step you created a new Universal Windows application, set the application up, and added the controlto the application. In this step you'll customize the application further.
Complete the following steps:
1. In the Solution Explorer, right-click the MainPage.xaml file and select View Code to open the code file.2. In the Code Editor, add the following code to import the following namespaces:
Visual Basic
Imports C1.Xaml.RichTextBox
C#
using C1.Xaml.RichTextBox;
3. Add the following code to the MainPage constructor:Visual Basic
Me.C1RTB.FontSize = 24Me.C1RTB.Text = "Hello World! Welcome to the most complete rich text editor available for UWP Edition. Load, edit, and save formatted text as HTML or RTF documents with RichTextBox for UWP Edition. The C1RichTextBox control provides rich formatting, automatic line wrapping, HTML and RTF import/export, table support, images, annotations, and more."
C#
this.C1RTB.FontSize = 24;this.C1RTB.Text = "Hello World! Welcome to the most complete rich text editor available for UWP Edition. Load, edit, and save formatted text as HTML or RTF documents with RichTextBox for UWP Edition. The C1RichTextBox control provides rich formatting, automatic line wrapping, HTML and RTF import/export, table support, images, annotations, and more.";
This code adds content to the C1RichTextBox control.
What You've Accomplished
In this step you added content to your C1RichTextBox application, now all that's left is to run it. In the next step you'llrun the application and view some of the run-time interactions possible with the C1RichTextBox control.
Step 3 of 3: Running the ApplicationIn the previous steps you created a new Universal Windows application, added the C1RichTextBox control, andcustomized the application. All that's left now is to run the application and view some possible run-time interactions.
Complete the following steps:
1. In the menu select Debug | Start Debugging to run the application.2. Tap inside the C1RichTextBox control. The on-screen keyboard will appear allowing you to enter text.3. Enter text inside the C1RichTextBox using the on-screen keyboard.4. Select a word, for example "Welcome". Notice that the word is highlighted and selected. To change you
selection, you can select and drag the handles that appear on either side of the selected word. For example,select part of the next sentence:
What You've Accomplished
Congratulations, you've completed this Quick Start! You learned a bit about using the C1RichTextBox control. In this
RichTextBox for UWP 7
Copyright © 2019 GrapeCity, Inc. All rights reserved.
tutorial you created a new application, added the C1RichTextBox control, and viewed some possible run-timeinteractions.
RichTextBox for UWP 8
Copyright © 2019 GrapeCity, Inc. All rights reserved.

Working with RichTextBox for UWPThe most complete rich text editor available for UWP Edition, load, edit, and save formatted text as HTML or RTFdocuments with RichTextBox for UWP. The C1RichTextBox control provides rich formatting, automatic line wrapping,HTML and RTF import/export, table support, images, annotations, and more.
The C1.UWP.RichTextBox assembly contains two main objects: the C1RichTextBox control and the C1Documentobject.
C1RichTextBox is a powerful text editor that allows you to display and edit formatted text. C1RichTextBox supportsall the usual formatting options, including fonts, background and foreground colors, lists, hyperlinks, images, borders,and so on. C1RichTextBox also supports loading and saving documents in HTML format.
C1Document is the class that represents the contents of a C1RichTextBox. It is analogous to the FlowDocument classin WPF. As in WPF, a C1Document is composed of stacked elements (C1Block objects) which in turn are composed ofinline elements (C1Run objects).
Many applications may deal only with the C1RichTextBox control, which provides a simple linear view of thedocument. Other applications may choose to use the rich object model provided by the C1Document class to createand manage documents directly, with full access to the document structure.
Main Concepts and Features
Accessing Layout InformationWhen C1RichTextBox creates the C1Document layout, it creates a parallel tree composed of C1TextElementViewobjects. For each C1TextElement in the C1Document tree, there is at least one C1TextElementView that is tasked withits layout and drawing.
Take this C1Document tree as an example:
Its corresponding view tree will look like the following:
RichTextBox for UWP 9
Copyright © 2019 GrapeCity, Inc. All rights reserved.

Each C1TextElementView provides some basic layout information for its corresponding C1TextElement:
C1TextElementView.Origin: this is the origin of the view in document coordinates.
C1TextElementView.DesiredSize: this is the desired size of the view from the last time it was measured.
Multiple C1TextElementViews can be composed to handle layout and drawing for out C1TextElement. When this isdone, the C1TextElementView.Content property contains the inner most C1TextElementView in the composition. Thecontent view’s children correspond to the C1TextElementView.Children collection of the associated C1TextElement.
View composition is used in C1BoxView to handle margin, padding and border for its C1TextElementView.Contentview. This means that the origin of each C1BoxView is outside the margin, padding and border box, while the origin ofits C1TextElementView.Content is inside.
C1FlowView takes care of flowing boxes and text into lines. Each line is represented by a C1Line object. Note thata C1Line object not only contains single lines of text, but may also contain an entire paragraph. Each C1FlowViewcontains a list of C1Line, which are always vertically stacked. In turn, each C1Line is composed of C1LineFragments,which are horizontally stacked. C1LineFragments have a reference to the child element whose origin matches theposition of the fragment.
For example, the following code counts the lines in a C1RichTextBox:
Visual Basic
Private Function CountLines(rtb As C1RichTextBox) As Integer Dim root = rtb.ViewManager.GetView(rtb.Document) Return CountLines(root)End FunctionPrivate Function CountLines(view As C1TextElementView) As Integer Dim count As Integer = 0 Dim flow = TryCast(view, C1FlowView) If flow IsNot Nothing Then For Each line As var In flow.Lines
RichTextBox for UWP 10
Copyright © 2019 GrapeCity, Inc. All rights reserved.

If TypeOf line.Fragments.First().Element Is C1Inline Then count += 1 End If Next End If For Each child As var In view.Children count += CountLines(child) Next Return countEnd Function
C#
int CountLines(C1RichTextBox rtb){ var root = rtb.ViewManager.GetView(rtb.Document); return CountLines(root);}int CountLines(C1TextElementView view){ int count = 0; var flow = view as C1FlowView; if (flow != null) { foreach (var line in flow.Lines) { if (line.Fragments.First().Element is C1Inline) { ++count; } } } foreach (var child in view.Children) { count += CountLines(child); } return count;}
At first, the root view is obtained. That's the same as the view associated to root element,so C1RichTextViewManager.GetView is used to get the view of rtb.Document. After that, the view tree is traversedcounting the lines in each C1FlowView found. Note that you only count the lines with C1Inline elements; otherwiseyou would also count paragraphs and other container blocks.
Copying, Cutting, and Pasting TextThe C1RichTextBox control fully supports the clipboard for both plain and rich text through the keyboard (CTRL+C,CTRL+V, CTRL+X) and UI commands for touch displays. Implement cut/copy/paste commands within your AppBar orany other way imaginable. Use the ClipboardMode property to indicate if you want to copy, cut, or paste plain text orrich text.
You can see the code within button_Click events:
RichTextBox for UWP 11
Copyright © 2019 GrapeCity, Inc. All rights reserved.

The code above allows you to quickly and easily implement copy/cut/paste commands.
C#
private void btnCopy_Click(object sender, Windows.UI.Xaml.RoutedEventArgs e) { rtb.ClipboardCopy(); }private void btnCut_Click(object sender, Windows.UI.Xaml.RoutedEventArgs e) { rtb.ClipboardCopy(); }private void btnPaste_Click(object sender, Windows.UI.Xaml.RoutedEventArgs e) { rtb.ClipboardPaste(); } }
HyperlinksThe C1RichTextBox supports hyperlinks. As in regular HTML documents, this feature allows you to make certain partsof the document active. When the user clicks them, the application receives a notification and takes some action.
The code below shows how you can create a hyperlink:
Visual Basic
Public Sub New() InitializeComponent() ' Set text rtb.Text = "This is some text with a hyperlink in it." ' Create hyperlink Dim pos As Integer = rtb.Text.IndexOf("hyperlink") rtb.[Select](pos, 9) Dim uri = New Uri("http://www.grapecity.com", UriKind.Absolute) rtb.Selection.MakeHyperlink(uri) ' Handle navigation requests rtb.NavigationMode = NavigationMode.Always AddHandler _rtb.RequestNavigate, AddressOf _rtb_RequestNavigateEnd Sub
C#
public MainPage(){ InitializeComponent(); // Set text rtb.Text = "This is some text with a hyperlink in it."; // Create hyperlink int pos = rtb.Text.IndexOf("hyperlink"); rtb.Select(pos, 9); var uri = new Uri("http://www.grapecity.com", UriKind.Absolute); rtb.Selection.MakeHyperlink(uri);
RichTextBox for UWP 12
Copyright © 2019 GrapeCity, Inc. All rights reserved.

// Handle navigation requests rtb.NavigationMode = C1.Xaml.RichTextBox.NavigationMode.Always; rtb.RequestNavigate += rtb_RequestNavigate;}
The code starts by assigning some text to the C1RichTextBox. Next, it selects the word "hyperlink" and callsthe EditExtensions.MakeHyperlink method to make it a hyperlink. The parameter is a URI that is assigned to the newhyperlink's C1Hyperlink.NavigateUri property.
Then, the code sets the C1RichTextBox.NavigationMode property to determine how the C1RichTextBox shouldhandle the mouse over hyperlinks. The default behavior is moving the mouse over a hyperlink, and tapping firesthe C1RichTextBox.RequestNavigate event. This allows users to edit the hyperlink text as they would edit regular text.
The C1RichTextBox.RequestNavigate event handler is responsible for handling the hyperlink navigation.
Note that hyperlink actions are not restricted to URI navigation. You could define a set of custom URI actions to beused as commands within your application. The custom URIs would be parsed and handled by theC1RichTextBox.RequestNavigate handler. For example, the code below uses hyperlinks to show message boxes:
Visual Basic
Public Sub New() InitializeComponent() ' Set text rtb.Text = "This is some text with a hyperlink in it." ' Create hyperlink Dim pos As Integer = _rtb.Text.IndexOf("hyperlink") rtb.[Select](pos, 9) Dim uri = New Uri("msgbox:Thanks for clicking!") rtb.Selection.MakeHyperlink(uri) ' Handle navigation requests rtb.NavigationMode = NavigationMode.Always AddHandler rtb.RequestNavigate, AddressOf _rtb_RequestNavigateEnd SubPrivate Sub rtb_RequestNavigate(sender As Object, e As RequestNavigateEventArgs) Dim uri As Uri = e.Hyperlink.NavigateUri If uri.Scheme = "msgbox" Then MessageBox.Show(uri.LocalPath) End IfEnd Sub
C#
public MainPage() { this.InitializeComponent(); // Set text rtb.Text = "This is some text with a hyperlink in it."; // Create hyperlink int pos = rtb.Text.IndexOf("hyperlink"); rtb.Select(pos, 9); var uri = new Uri("http://www.grapecity.com", UriKind.Absolute); rtb.Selection.MakeHyperlink(uri); // Handle navigation requests rtb.NavigationMode = C1.Xaml.RichTextBox.NavigationMode.Always;
RichTextBox for UWP 13
Copyright © 2019 GrapeCity, Inc. All rights reserved.

rtb.RequestNavigate += rtb_RequestNavigate; } private async void rtb_RequestNavigate(object sender, RequestNavigateEventArgs e) { var md = new MessageDialog("The document is requesting to navigate to " + e.Hyperlink.NavigateUri, "Navigate"); md.Commands.Add(new UICommand("OK", (UICommandInvokedHandler) => { Windows.System.Launcher.LaunchUriAsync(e.Hyperlink.NavigateUri); })); md.Commands.Add(new UICommand("Cancel", (UICommandInvokedHandler) => { rtb.Select(e.Hyperlink.ContentStart.TextOffset, e.Hyperlink.ContentRange.Text.Length); })); await md.ShowAsync(); }
The C1RichTextBox.RequestNavigate handler uses the URI members to parse the command and argument. Youcould use this technique to create documents with embedded menus for example.
Note that the MakeHyperlink method is just a quick and easy way to turn an existing part of a document into ahyperlink. You can also create hyperlinks by adding C1Hyperlink elements to C1Document objects. This is described inlater sections.
Hit TestingThe C1RichTextBox supports hyperlinks, which provide a standard mechanism for implementing user interactivity. Insome cases, you may want to go beyond that and provide additional, custom mouse interactions. For example, youmay want to apply some custom formatting or show a context menu when the user clicks an element.
To enable these scenarios, the C1RichTextBox exposes ElementTapped events anda C1RichTextBox.GetPositionFromPoint method.
If all you need to know is the element that triggered the mouse event, you can get it from the source parameter in theevent handler. If you need more detailed information (the specific word that was clicked within the element forexample), then you need the C1RichTextBox.GetPositionFromPoint method. C1RichTextBox.GetPositionFromPointtakes a point in client coordinates and returns a C1TextPosition object that expresses the position in documentcoordinates.
The C1TextPosition object has two main properties: Element and Offset. The Element property represents anelement within the document; Offset is a character index (if the element is a C1Run) or the index of the child elementat the given point.
For example, the code below creates a C1RichTextBox and attaches a handler to the C1RichTextBox.RightTappedevent:
C#
public sealed partial class MainPage : Page { C1RichTextBox rtb; public MainPage() {
RichTextBox for UWP 14
Copyright © 2019 GrapeCity, Inc. All rights reserved.

this.InitializeComponent(); // Create a C1RichTextBox and add it to the page rtb = new C1RichTextBox(); LayoutRoot.Children.Add(rtb); // Attach event handler rtb.RightTapped += rtb_RightTapped; }
If you wanted to toggle the C1TextElement.FontWeight value of a single word, then you would need to determinewhich character was clicked and expand the selection to the whole word. This is wherethe C1RichTextBox.GetPositionFromPoint method becomes necessary. Here is a version of the event handler thataccomplishes that:
C#
void rtb_RightTapped(object sender, RightTappedRoutedEventArgs e){ // Get position in control coordinates var pt = e.GetPosition(rtb); // Get text pointer at position var pointer = rtb.GetPositionFromPoint(pt); // Check that the pointer is pointing to a C1Run var run = pointer.Element as C1Run; if (run != null) { // Get the word within the C1Run var text = run.Text; var start = pointer.Offset; var end = pointer.Offset; while (start > 0 && char.IsLetterOrDigit(text, start - 1)) start--; while (end < text.Length - 1 && char.IsLetterOrDigit(text, end + 1)) end++; // Toggle the bold property for the run that was clicked var word = new C1TextRange(pointer.Element, start, end - start + 1); word.FontWeight = word.FontWeight.HasValue && word.FontWeight.Value.Weight == FontWeights.Bold.Weight ? FontWeights.Normal : FontWeights.Bold; } } }}
Notice that the C1TextElement.FontWeight property returns a nullable value. If the range contains a mix of values forthis attribute, the property returns null. The code used to toggle the C1TextElement.FontWeight property is the samewe used earlier when implementing the formatting toolbar.
The GetPositionFromPoint method allows you to get a C1TextPosition object from a point on the screen.The GetRectFromPosition method performs the reverse operation, returning a Rect that represents the screenposition of a C1TextPosition object. This is useful in situations where you want to present a UI element near a specificportion of a document.
RichTextBox for UWP 15
Copyright © 2019 GrapeCity, Inc. All rights reserved.

PrintingC1RichTextBox for UWP supports printing through standard Windows printing techniques. The control also supportspaged layout, so users can see how the document will look when printed.
For more information on printing in C1RichTextBox, please see the Printing C1RichTextBox Contents topic.
A Printing sample was installed on your machine in the ComponentOne Samples folder.
Spell CheckingRichTextBox for UWP supports as-you-type spell checking with a wavy, red underline that highlights misspelledwords.
The end-user may right-click the mistake in the document to see a menu with options that include selecting one ofthe correction suggestions. Users can also choose to ignore the misspelled word or to add it to the dictionary.
Spell checking is done using the C1SpellChecker component, which is included in ComponentOne Studio UWPEdition.
There are 4 steps for adding spell-checking to your application.
1. Declare a new C1SpellChecker control.2. Assign C1SpellChecker to the SpellChecker property of your C1RichTextBox control.3. Obtain the stream for your resource file.4. Load the MainDictionary of your choice.
To add spell-checking to your application, see the Adding Spell Checking Task-Based Help topic.
Dictionary Support
RichTextBox for UWP supports 22 different, customizable dictionaries.
Adding Spell CheckingIn this topic you'll add spell-checking to your application. This topic assumes you have added a C1RichTextBoxcontrol and a C1RichTextBoxMenu control to your page.
In this help topic, you'll use an English dictionary resource. If you wish to use a different dictionary, you may chooseany from the 22 supported dictionaries.
The main steps for adding spell-checking are to declare a new C1SpellChecker, load the Main Dictionary of yourchoice, and to assign C1SpellChecker to the SpellChecker property of your C1RichTextBox.
1. Edit the C1RichTextBox and C1RichTextBoxMenu controls to reflect the following:XAML Markup
<c1RTB:C1RichTextBoxMenu x:Name="rtbMenu" RichTextBox="{Binding ElementName=rtb}"/> <c1RTB:C1RichTextBox x:Name="rtb" BorderThickness="2" BorderBrush="DarkGray" />
2. In the Solution Explorer, right-click your application's name and select Add | New Folder. Name the folderResources.
3. In the Solution Explorer, right-click the Resources folder and select Add | Existing Item. The Add ExistingItem dialog box will appear.
4. In the Add Existing Item dialog box locate the C1Spell_en-US.dct file included in the RichTextBoxSamples
RichTextBox for UWP 16
Copyright © 2019 GrapeCity, Inc. All rights reserved.

sample folder.This is a US English dictionary file – if you add another file, instead, you can adapt the steps below with theappropriate code.
5. In the Properties window, set the C1Spell_en-US.dct file's Build Action to Embedded Resource.6. Right-click your MainPage.xaml page and select View Code from the context menu.7. Add the following import statements to the top of the page:
C#
using C1.Xaml.SpellChecker; using C1.Xaml.RichTextBox;
8. Set the Text property in the MainPage() constructor:C#
rtb.Text = @"Some facts about Mark Twain (spelling errors intentional ;-) A steambat pilot neded a vast knowldege of the ever-chaging river to be able to stop at any of the hundreds of ports and wood-lots along the river banks. Twain meticulosly studied 2,000 miles (3,200 km) of the Mississipi for more than two years before he received his steamboat pilot license in 1859.";
9. Declare a new C1SpellChecker:C#
var spell = new C1SpellChecker();
10. Assign C1SpellChecker to the SpellChecker property of your C1RichTextBox control:C#
rtb.SpellChecker = spell;
11. Obtain the stream to your resource file. Make sure you insert your application name where indicated:C#
Assembly asm = typeof(MainPage).GetTypeInfo().Assembly;Stream stream = asm.GetManifestResourceStream("YourApplicationName.Resources.C1Spell_en-US.dct");
12. Load the MainDictionary of your choice:C#
spell.MainDictionary.Load(stream);
What You've AccomplishedIn this topic, you added text to your C1RichTextBox control, and then added some code to handle spell-checking.
Localization
RichTextBox for UWP 17
Copyright © 2019 GrapeCity, Inc. All rights reserved.

Localizing strings can be done easily with just a bit of code and the built-in localization files. If the language needed isnot one that is included, you can create your own localization resource file.
Note: The file extension for a UWP Edition Resource file is .resw.
Follow these steps:
1. Add a resource file to your application:1. Right-click or tap your application name and select Add | New Item.2. In the Add New Item dialog box, select Resource File (.resw).3. Name your resource file so the name reflects the following format:
[Windows Apps Assembly Name].Resources.[C1 Control].resw
4. Select Add to add your file.5. When your file opens, add or edit the strings to reflect the changes you need to make.
2. Select the resource file your just added and change the Build Action to PRIResource in the Properties window.
3. Run your sample and see the changes you made to the resource strings. In the following images, only the textfor the "Paste" function was changed:
Setting and Formatting ContentThe C1RichTextBox control allows you to create, load, or save different types of content. The following topicsdescribe the types of content that can be specified in the C1RichTextBox, creating hyperlinks in the control, spellchecking, and performing some editing tasks.
Text Content
RichTextBox for UWP 18
Copyright © 2019 GrapeCity, Inc. All rights reserved.

The content of the C1RichTextBox can be specified in two ways, using the C1RichTextBox.Text property orthe C1RichTextBox.Html property. The C1RichTextBox.Text property is used to assign and retrieve the control contentas plain text. There are a few different ways to set the text content.
At Design Time
To set the C1RichTextBox.Text property, complete the following steps:
1. Click the C1RichTextBox control once to select it.2. Navigate to the Properties window, and enter text, for example "Hello World!", in the text box next to the
C1RichTextBox.Text property.
This will set the C1RichTextBox.Text property to the value you chose.
In XAML
For example, to set the C1RichTextBox.Text property add Text="Hello World!" to the <c1rtb:C1RichTextBox>tag so that it appears similar to the following:
XAML Markup
<c1rtb:C1RichTextBox HorizontalAlignment="Left" Margin="10,10,0,0" Name="C1RichTextBox1" VerticalAlignment="Top" Height="83" Width="208" Text="Hello World!" />
In Code
For example, to set the C1RichTextBox.Text property add the following code to your project:
Visual Basic
Me.C1RichTextBox1.Text = "Hello World!"
C#
this.c1RichTextBox1.Text = "Hello World!";
The C1RichTextBox also exposes a C1RichTextBox.TextWrapping property that specifies whether the control shouldwrap long lines or whether it should keep the lines together and provide a horizontal scrollbar instead.
Visual Basic
Me.C1RichTextBox1.TextWrapping = TextWrapping.NoWrap
C#
this.c1RichTextBox1.TextWrapping = TextWrapping.NoWrap;
The code above sets the C1RichTextBox control so that text content will not wrap in the control and will appear in acontinuous line.
Html ContentThe C1RichTextBox.Html property is used to assign and retrieve formatted text as HTML. When the Html property isset, the Html document is converted to a C1Document that, when displayed, resembles the Html content as much aspossible. The original structure and styles are not kept.
RichTextBox for UWP 19
Copyright © 2019 GrapeCity, Inc. All rights reserved.

When the Html property is read, or exported, an Html document is generated from the current C1Document. Thereare two ways that html can be generated, with a stylesheet or with inline styles. You can use the GetHtml method,passing HtmlEncoding.Inline as the second parameter, to generate Html with inline style.
The HTML text needs to be encoded in the XAML file, so, for example, instead of <b> for bold, tags are encoded as<b>;.
At Design Time
To set the C1RichTextBox.Html property, complete the following steps:
1. Click the C1RichTextBox control once to select it.2. Navigate to the Properties window, and enter text, for example <h1>Hello World<h1>", in the text box next
to the C1RichTextBox.Html property.
This will set the C1RichTextBox.Html property to the value you chose.
In XAML
For example, to set the C1RichTextBox.Html property add Html="Hello World!" to the<c1rtb:C1RichTextBox> tag so that it appears similar to the following:
XAML Markup
<c1rtb:C1RichTextBox HorizontalAlignment="Left" Margin="10,10,0,0" Name="C1RichTextBox1" VerticalAlignment="Top" Height="83" Width="208" Html="<h1>Hello World!</h1>" />
In Code
For example, to set the C1RichTextBox.Html property add the following code to your project:
Visual Basic
Me.C1RichTextBox1.Html = "<b>Hello World!</b>"
C#
this.c1RichTextBox1.Html = "<b>Hello World!</b>"
Setting Rtf ContentYou can read, edit, and display rich text formatted documents using the C1RichTextBox control. To set RTF content inthe C1RichTextBox control, you must use a separate RtfFilter class. This class allows you to convert RTF to aDocument that the control can understand.
The RtfFilter includes support for images, fonts, tables, and most formatting supported by Microsoft WordPad. Youcan also use the control to convert RTF to HTML and vice versa, since the C1RichTextBox control also supports readingand writing HTML.
To load an RTF string into a C1RichTextBox control, call the ConvertToDocument method from the RtfFilter class:
C#
string rtf = @"{\rtf1\ansi\ansicpg1252\deff0\deflang1033{\fonttbl{\f0\fnil\fcharset0 Calibri;}}{\*\generator Msftedit
RichTextBox for UWP 20
Copyright © 2019 GrapeCity, Inc. All rights reserved.

5.41.21.2510;}\viewkind4\uc1\pard\sa200\sl276\slmult1\lang9\f0\fs22 some rtf content\par}";C1RichTextBox1.Document = new RtfFilter().ConvertToDocument(rtf);
To output the content of C1RichTextBox as RTF, call the ConvertFromDocument method.
C#
string rtf = new RtfFilter().ConvertFromDocument(c1RichTextBox1.Document);
HtmlFilter CustomizationHtmlFilter is the component in C1RichTextBox that transforms HTML strings to C1Documents and back. It's alsocapable of transforming to and from an intermediate representation of an HTML document called C1HtmlDocument.
When transforming between C1HtmlDocument and C1Document, several events are fired allowing customization ofeach node that is transformed. These events are:
HtmlFilter.ConvertingHtmlNode
This event is fired just before an HTML node is transformed. If marked as handled by the event handler thenHtmlFilter assumes the node was transformed and skips it.
HtmlFilter.ConvertedHtmlNode
This event is fired after a node was transformed. It can be used to make minor changes to the transformationresult.
HtmlFilter.ConvertingTextElement
This event is fired just before a C1TextElement is transformed. If marked as handled by the event handler thenHtmlFilter assumes the element was transformed and skips it.
HtmlFilter.ConvertedTextElement
This event is fired after a C1TextElement is transformed. It can be used to make minor changes to thetransformation result.
As an example, you can see how the HtmlFilterCustomization sample adds support for GIF images usingC1.Xaml.Imaging. It uses both HtmlFilter.ConvertingHtmlNode and HtmlFilter.ConvertingTextElement events.
HtmlFilter.ConvertinHtmlNode
Here is the HtmlFilter.ConvertingHtmlNode event handler:
Visual Basic
Private Sub HtmlFilter_ConvertingHtmlNode(sender As Object, e As ConvertingHtmlNodeEventArgs) Dim htmlElement = TryCast(e.HtmlNode, C1HtmlElement) If htmlElement IsNot Nothing AndAlso htmlElement.Name = "img" Then Dim src As String If htmlElement.Attributes.TryGetValue("src", src) Then Dim uri = New Uri("/HtmlFilterCustomization;component/" & src, UriKind.Relative)
RichTextBox for UWP 21
Copyright © 2019 GrapeCity, Inc. All rights reserved.

Dim resource = Application.GetResourceStream(uri) If resource IsNot Nothing Then Dim imageSource = New C1Bitmap(resource.Stream).ImageSource Dim image = New Image() With { _ Key .Source = imageSource _ } SetImageSource(image, src) e.Parent.Children.Add(New C1InlineUIContainer() With { _ Key .Child = image _ }) e.Handled = True End If End If End IfEnd Sub
C#
void HtmlFilter_ConvertingHtmlNode(object sender, ConvertingHtmlNodeEventArgs e){ var htmlElement = e.HtmlNode as C1HtmlElement; if (htmlElement != null && htmlElement.Name == "img") { string src; if (htmlElement.Attributes.TryGetValue("src", out src)) { var uri = new Uri("/HtmlFilterCustomization;component/" + src, UriKind.Relative); var resource = Application.GetResourceStream(uri); if(resource != null) { var imageSource = new C1Bitmap(resource.Stream).ImageSource; var image = new Image { Source = imageSource }; SetImageSource(image, src); e.Parent.Children.Add(new C1InlineUIContainer { Child = image }); e.Handled = true; } } }}
The first thing the event handler does is cast e.HtmlNode to C1HtmlElement. There are two types that inheritfrom C1HtmlNode: C1HtmlElement, which represents an HTML element like <img/>, and C1HtmlText, whichrepresents a text node.
Once the C1HtmlNode object has been cast to C1HtmlElement, it's possible to check the tag name, and access itsattributes. This is done to see if the element is in fact an IMG tag, and to obtain the SRC attribute. The rest of the codetakes care of creating the appropriate element, which is then added to e.Parent. Note that the SRC value is saved asan attached property, to be accessed when exporting.
Once the transformation is done, the handler can set e.Handled to True in order to prevent HtmlFilter fromtransforming this C1HtmlNode.
RichTextBox for UWP 22
Copyright © 2019 GrapeCity, Inc. All rights reserved.

HtmlFilter.ConvertingTextElement
The HtmlFilter.ConvertingTextElement event handler looks like the following:
Visual Basic
Private Sub HtmlFilter_ConvertingTextElement(sender As Object, e As ConvertingTextElementEventArgs) Dim inlineContainer = TryCast(e.TextElement, C1InlineUIContainer) If inlineContainer IsNot Nothing Then Dim src = GetImageSource(inlineContainer.Child) If src IsNot Nothing Then Dim element = New C1HtmlElement("img") element.Attributes("src") = src e.Parent.Add(element) e.Handled = True End If End IfEnd Sub
C#
void HtmlFilter_ConvertingTextElement(object sender, ConvertingTextElementEventArgs e){ var inlineContainer = e.TextElement as C1InlineUIContainer; if (inlineContainer != null) { var src = GetImageSource(inlineContainer.Child); if (src != null) { var element = new C1HtmlElement("img"); element.Attributes["src"] = src; e.Parent.Add(element); e.Handled = true; } }}
This is pretty similar to the other handler, only it transforms a C1TextElement to a C1HtmlElement. Note that the SRCvalue is recovered from the attached property, and a C1HtmlElement is created with that attribute. As before, thenew element is added to e.Parent, and the event is marked as Handled.
Overriding StylesThere are two different ways you can apply changes to your C1RichTextBox document. You can modify parts of anunderlying document using C1TextRange, or you can modify only the view and not the underlying document. A goodexample of modifying the view and not the document is highlighting a selection with different foreground andbackground colors. The style change doesn't belong to the document itself; it belongs to the current view. You can
RichTextBox for UWP 23
Copyright © 2019 GrapeCity, Inc. All rights reserved.

also see this in syntax coloring and as-you-type spell-checking.
You can see this behavior in action in the SyntaxHighlight sample, installed on your machine.
The C1RichTextBox control supports these scenarios with the StyleOverrides property. This property contains acollection of objects that specify ranges and style modifications to be applied to the view only. This approach has twoadvantages over applying style modifications to C1TextRange objects:
The style overrides are not applied to the document, and therefore are not applied when you save a documentas HTML (you would not normally want the current selection and spelling error indicators to be persisted to afile).
Because the changes are not added to the document, and only affect the part that is currently visible, thisapproach is much more efficient than changing C1TextRange objects directly.
The limitation of this approach is that the style changes cannot involve style elements that affect the document flow.You can use style overrides to change the background, foreground, and to underline parts of the document. But youcannot change the font size or style, for example, since that would affect the document flow.
The code examples in the following text are taken from the SyntaxHighlight sample.
In demonstrating the use of style overrides, first, we need to declare a C1RangeStyleCollection object, aC1RichTextBox object, and a C1RichTextBoxMenu object. We'll also initialize the styles used to color the document,and create a Page_Loaded event. Within that event, we will add the C1RangeStyleCollection to the control'sStyleOverrides collection.
C#
public sealed partial class SyntaxHighlight : UserControl { C1RichTextBox _rtb; C1RichTextBoxMenu _menu; C1RangeStyleCollection _rangeStyles = new C1RangeStyleCollection(); // initialize regular expression used to parse HTML string tagPattern = @"</?(?<tagName>[a-zA-Z0-9_:\-]+)" + @"(\s+(?<attName>[a-zA-Z0-9_:\-]+)(?<attValue>(=""[^""]+"")?))*\s*/?>"; // initialize styles used to color the document C1TextElementStyle brDarkBlue = new C1TextElementStyle { { C1TextElement.ForegroundProperty, new SolidColorBrush(Color.FromArgb(255, 0, 0, 180)) } }; C1TextElementStyle brDarkRed = new C1TextElementStyle { { C1TextElement.ForegroundProperty, new SolidColorBrush(Color.FromArgb(255, 180, 0, 0)) } }; C1TextElementStyle brLightRed = new C1TextElementStyle { { C1TextElement.ForegroundProperty, new SolidColorBrush(Colors.Red) } }; public SyntaxHighlight()
RichTextBox for UWP 24
Copyright © 2019 GrapeCity, Inc. All rights reserved.

{ InitializeComponent(); Loaded += SyntaxHighlight_Loaded; } void SyntaxHighlight_Loaded(object sender, RoutedEventArgs e) { if (_rtb == null) { _rtb = new C1RichTextBox { ReturnMode = ReturnMode.SoftLineBreak, TextWrapping = TextWrapping.NoWrap, IsReadOnly = false, Document = new C1Document { Background = new SolidColorBrush(Colors.White), FontFamily = new FontFamily("Courier New"), FontSize = 16, Blocks = { new C1Paragraph { Children = { new C1Run { Text = GetStringResource("w3c.htm") }, }, } } }, StyleOverrides = { _rangeStyles } }; if (_menu == null) { _menu = new C1RichTextBoxMenu(); } LayoutRoot.Children.Add(_rtb); _menu.RichTextBox = _rtb; LayoutRoot.Children.Add(_menu); _rtb.TextChanged += tb_TextChanged; UpdateSyntaxColoring(_rtb.Document.ContentRange); } }
Next, we'll set the TextChanged event. In this event, you will detect any changes in the document and trigger theUpdateSyntaxColoring method.
C#
void tb_TextChanged(object sender, C1TextChangedEventArgs e)
RichTextBox for UWP 25
Copyright © 2019 GrapeCity, Inc. All rights reserved.

{ var start = e.Range.Start.Enumerate(LogicalDirection.Backward) .FirstOrDefault(p => p.Symbol.Equals('\n')); if (start != null) { start = start.GetPositionAtOffset(1); } var end = e.Range.End.Enumerate().FirstOrDefault(p => p.Symbol.Equals('\n')); var doc = e.Range.Start.Element.Root; UpdateSyntaxColoring(new C1TextRange(start ?? doc.ContentStart, end ?? doc.ContentEnd)); }
The UpdateSyntaxColoring method applies formatting to the view by selecting an entire tag and coloring it.
C#
// perform syntax coloring void UpdateSyntaxColoring(C1TextRange range) { // remove old coloring _rangeStyles.RemoveRange(range); var input = range.Text; // highlight the matches foreach (Match m in Regex.Matches(input, tagPattern)) { // select whole tag, make it dark blue _rangeStyles.Add(new C1RangeStyle(GetRangeAtTextOffset(range.Start, m), brDarkBlue)); // select tag name, make it dark red var tagName = m.Groups["tagName"]; _rangeStyles.Add(new C1RangeStyle(GetRangeAtTextOffset(range.Start, tagName), brDarkRed)); // select attribute names, make them light red var attGroup = m.Groups["attName"]; if (attGroup != null) { var atts = attGroup.Captures; for (int i = 0; i < atts.Count; i++) { var att = atts[i]; _rangeStyles.Add(new C1RangeStyle(GetRangeAtTextOffset(range.Start, att), brLightRed)); } } } }
RichTextBox for UWP 26
Copyright © 2019 GrapeCity, Inc. All rights reserved.
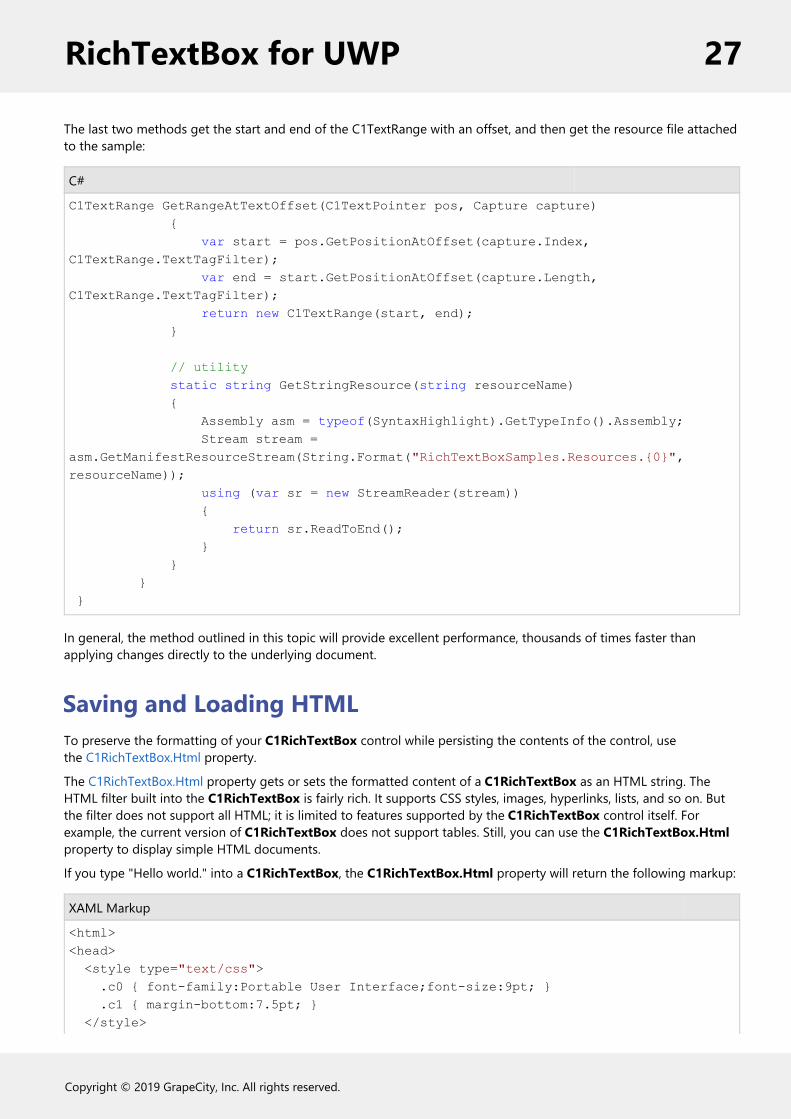
The last two methods get the start and end of the C1TextRange with an offset, and then get the resource file attachedto the sample:
C#
C1TextRange GetRangeAtTextOffset(C1TextPointer pos, Capture capture) { var start = pos.GetPositionAtOffset(capture.Index, C1TextRange.TextTagFilter); var end = start.GetPositionAtOffset(capture.Length, C1TextRange.TextTagFilter); return new C1TextRange(start, end); } // utility static string GetStringResource(string resourceName) { Assembly asm = typeof(SyntaxHighlight).GetTypeInfo().Assembly; Stream stream = asm.GetManifestResourceStream(String.Format("RichTextBoxSamples.Resources.{0}", resourceName)); using (var sr = new StreamReader(stream)) { return sr.ReadToEnd(); } } } }
In general, the method outlined in this topic will provide excellent performance, thousands of times faster thanapplying changes directly to the underlying document.
Saving and Loading HTMLTo preserve the formatting of your C1RichTextBox control while persisting the contents of the control, usethe C1RichTextBox.Html property.
The C1RichTextBox.Html property gets or sets the formatted content of a C1RichTextBox as an HTML string. TheHTML filter built into the C1RichTextBox is fairly rich. It supports CSS styles, images, hyperlinks, lists, and so on. Butthe filter does not support all HTML; it is limited to features supported by the C1RichTextBox control itself. Forexample, the current version of C1RichTextBox does not support tables. Still, you can use the C1RichTextBox.Htmlproperty to display simple HTML documents.
If you type "Hello world." into a C1RichTextBox, the C1RichTextBox.Html property will return the following markup:
XAML Markup
<html><head> <style type="text/css"> .c0 { font-family:Portable User Interface;font-size:9pt; } .c1 { margin-bottom:7.5pt; } </style>
RichTextBox for UWP 27
Copyright © 2019 GrapeCity, Inc. All rights reserved.

</head><body class="c0"><p class="c1">Hello world.</p></body></html>
Note that the C1RichTextBox.Html property is just a filter between HTML and the internal C1Document class. Anyinformation in the HTML stream that is not supported by the C1RichTextBox (for example, comments and metainformation) is discarded, and will not be preserved when you save the HTML document later.
Working with C1RichTextBoxMenuThe C1RichTextBoxMenu acts as a complete radial context menu, allowing you to edit and format text containingmultiple fonts, decorations, sizes, colors, and other basic HTML and RTF style attributes supported by CSS and inlinemarkup.
Adding a C1RichTextBoxMenu to your application is simple. Once you've added a C1RichTextBox control to yourapplication and given it a name, you can add a C1RichTextBoxMenu and bind it to the C1RichTextBox control usingthe RichTextBox property:
XAML
<c1RTB:C1RichTextBoxMenu x:Name="rtbMenu" RichTextBox="{Binding ElementName=rtb}"/><c1RTB:C1RichTextBox x:Name="rtb" BorderThickness="2" BorderBrush="DarkGray" RequestNavigate="rtb_RequestNavigate" />
For more information on using the C1RichTextBoxMenu assembly, you can see the DemoRichTextBoxsample installed in the ComponentOne samples folder.
C1RichTextBox Menus and Commands RichTextBox for UWP allows you to customize both the AppBar and the Menu. These flexible tools allow you to giveusers complete text-editing capabilities on-demand, freeing up valuable RichTextBox real estate.
Creating Custom Command BarsYou can create your own custom toolbar, context menu, or pop-up controls that apply formatting and functionality tothe C1RichTextBox control. The following section describes the code necessary to perform the most basic formattingcommands. It does not include code for setting up an AppBar application.
For a complete sample that covers more functions like inserting tables, hyperlinks, and images.
The following code snippets assume the name of the C1RichTextBox control on your page is rtb.
Clipboard FunctionsThe following code snippets demonstrate the code used for clipboard functions:
Copy
C#
rtb.ClipboardCopy();
RichTextBox for UWP 28
Copyright © 2019 GrapeCity, Inc. All rights reserved.

Paste
C#
if (!rtb.IsReadOnly){ rtb.ClipboardPaste();}
Cut
C#
if (rtb.IsReadOnly) rtb.ClipboardCopy();else{ rtb.ClipboardCut();}
Alignment FunctionsThe following code snippets demonstrate the code used for aligning text:
Align Left
C#
rtb.Selection.TextAlignment = C1TextAlignment.Left;
Align Center
C#
rtb.Selection.TextAlignment = C1TextAlignment.Center;
Align Right
C#
rtb.Selection.TextAlignment = C1TextAlignment.Right;
Justify
C#
rtb.Selection.TextAlignment = C1TextAlignment.Justify;
Font FunctionsThe following code snippets demonstrate the code used for font functions:
Font Family
RichTextBox for UWP 29
Copyright © 2019 GrapeCity, Inc. All rights reserved.

C#
rtb.Selection.FontFamily = new FontFamily("Arial");
Font Size
C#
rtb.Selection.TrimRuns();foreach (var run in rtb.Selection.Runs){ run.FontSize = size;}
Formatting FunctionsThe following code snippets demonstrate the code used for formatting functions:
Foreground Color
C#
rtb.Selection.Foreground = new SolidColorBrush(Colors.Red);
Highlight (background) color
C#
rtb.Selection.InlineBackground = new SolidColorBrush(Colors.Yellow);
Toggle Bold
C#
if (rtb.Selection.FontWeight != null && rtb.Selection.FontWeight.Value.Weight == FontWeights.Bold.Weight){ rtb.Selection.FontWeight = FontWeights.Normal;}else{ rtb.Selection.FontWeight = FontWeights.Bold;}
Toggle Italic
C#
if (rtb.Selection.FontStyle != null && rtb.Selection.FontStyle == FontStyle.Italic){ rtb.Selection.FontStyle = FontStyle.Normal;
RichTextBox for UWP 30
Copyright © 2019 GrapeCity, Inc. All rights reserved.
}else{ rtb.Selection.FontStyle = FontStyle.Italic;}
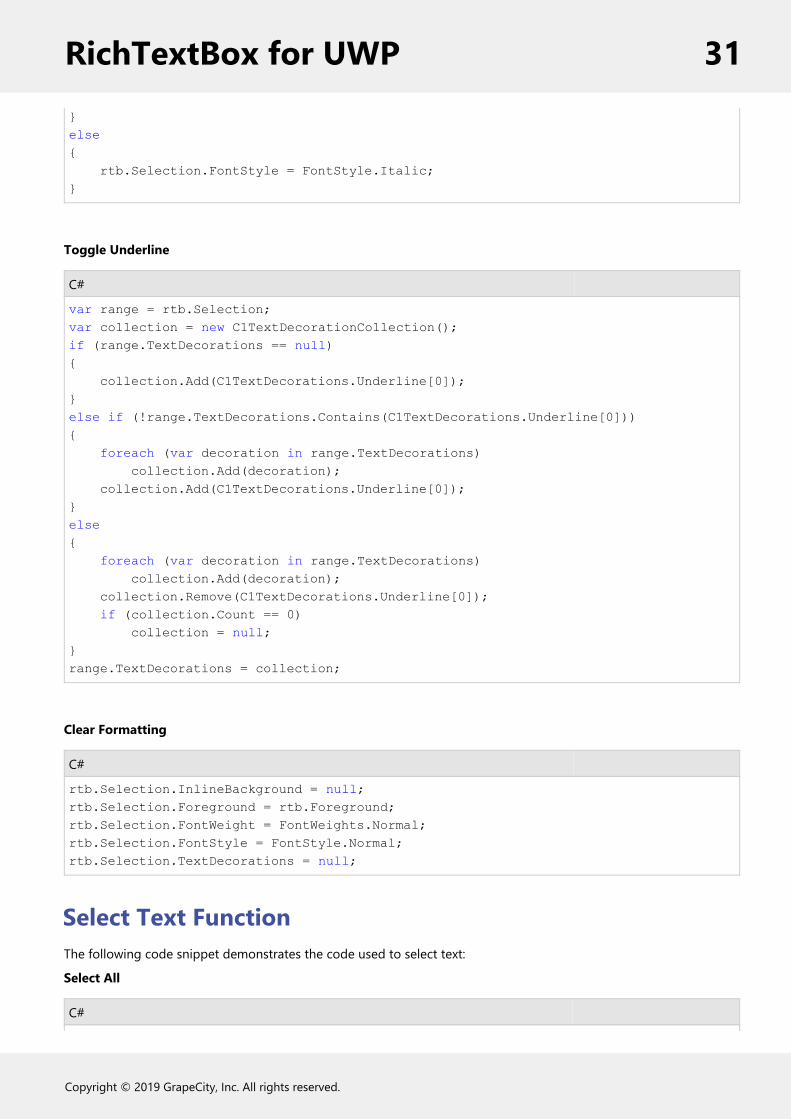
Toggle Underline
C#
var range = rtb.Selection;var collection = new C1TextDecorationCollection();if (range.TextDecorations == null){ collection.Add(C1TextDecorations.Underline[0]);}else if (!range.TextDecorations.Contains(C1TextDecorations.Underline[0])){ foreach (var decoration in range.TextDecorations) collection.Add(decoration); collection.Add(C1TextDecorations.Underline[0]);}else{ foreach (var decoration in range.TextDecorations) collection.Add(decoration); collection.Remove(C1TextDecorations.Underline[0]); if (collection.Count == 0) collection = null;}range.TextDecorations = collection;
Clear Formatting
C#
rtb.Selection.InlineBackground = null;rtb.Selection.Foreground = rtb.Foreground;rtb.Selection.FontWeight = FontWeights.Normal;rtb.Selection.FontStyle = FontStyle.Normal;rtb.Selection.TextDecorations = null;
Select Text FunctionThe following code snippet demonstrates the code used to select text:
Select All
C#
RichTextBox for UWP 31
Copyright © 2019 GrapeCity, Inc. All rights reserved.

rtb.SelectAll();
Document History FunctionsThe following snippets demonstrates the code used to create document history functions:
Undo
C#
if (rtb.DocumentHistory.CanUndo){ rtb.DocumentHistory.Undo();}
Redo
C#
if (rtb.DocumentHistory.CanRedo){ rtb.DocumentHistory.Redo();}
Using the AppBarThe C1.Xaml.RichTextBox.AppBar library includes built-in tools that you can use to create a simple command bar. Thebuilt-in tools support the following commands: Bold, Italic, Underline, Undo, Redo, Increase Font Size, Decrease FontSize, Center Align, Right Align, Left Align, and Justify. There is no visible application bar control; however, you can addthe C1 Tools included in the assembly to the application bar.
For a full example of implementing the AppBar assembly in your application, please see the Creating an AppBarApplication tutorial. You can also see the AppBarDemo sample that was installed in the ComponentOne samplesfolder:
C:\Users\YourUserName\Documents\ComponentOne Samples\WinRT XAMLPhone\C1.Xaml.RichTextBox\CS\RichTextBoxSamples
To use the C1 Tools in the AppBar assembly, your markup should resemble the following. Place it after the closing</Grid> tag:
XAML
<Page.BottomAppBar> <AppBar x:Name="topAppBar" Padding="10,0,10,0" > </AppBar></Page.TopAppBar>
Note that the AppBar can be set to appear at the top of the page as well, using the following markup:
XAML
<Page.TopAppBar>
RichTextBox for UWP 32
Copyright © 2019 GrapeCity, Inc. All rights reserved.

<AppBar x:Name="bottomAppBar" Padding="10,0,10,0" > </AppBar></Page.BottomAppBar>
The C1 Tools you wish to use will be placed within a StackPanel control between the <AppBar> </AppBar> tags:
XAML
<StackPanel Orientation="Horizontal" HorizontalAlignment="Left"> <RichTextBox:C1BoldTool x:Name="btnBold" Style="{StaticResource BoldAppBarButtonStyle}" /> <RichTextBox:C1ItalicTool x:Name="btnItalic" Style="{StaticResource ItalicAppBarButtonStyle}" /> <RichTextBox:C1UnderlineTool x:Name="btnUnderline" Style="{StaticResource UnderlineAppBarButtonStyle}" /></StackPanel>
If you wish to use a set of general Button controls, you can do that as well:
XAML
<StackPanel Orientation="Horizontal" HorizontalAlignment="Left"> <Button x:Name="btnCopy" Style="{StaticResource CopyAppBarButtonStyle}" Click="btnCopy_Click"/> <Button x:Name="btnPaste" Style="{StaticResource PasteAppBarButtonStyle}" Click="btnPaste_Click"/> <Button x:Name="btnCut" Style="{StaticResource CutAppBarButtonStyle}" Click="btnCut_Click"/></StackPanel>
Since the general Button controls have click events, you'll have to add the following code to handle the click events:
C#
#region Clipboard private void btnCopy_Click(object sender, Windows.UI.Xaml.RoutedEventArgs e) { rtb.ClipboardCopy(); } private void btnCut_Click(object sender, Windows.UI.Xaml.RoutedEventArgs e) { if (rtb.IsReadOnly) rtb.ClipboardCopy(); else rtb.ClipboardCut(); } private void btnPaste_Click(object sender, Windows.UI.Xaml.RoutedEventArgs e) { if (!rtb.IsReadOnly) { rtb.ClipboardPaste(); } }
RichTextBox for UWP 33
Copyright © 2019 GrapeCity, Inc. All rights reserved.

#endregion
RichTextBox for UWP 34
Copyright © 2019 GrapeCity, Inc. All rights reserved.

Working with C1Document ObjectThe C1Document object exposes a rich object model for creating and editing the underlying document. So far, wehave focused on the object model of the C1RichTextBox control, which is the editable view of a C1Document object.The architecture of the C1Document object is similar to the one used by the Microsoft WPF RichTextBox control,which provides a view of a FlowDocument object.
The C1Document exposes the structure of the document, where the C1RichTextBox deals mainly with text as a flat,linear view of the control. The document model in C1Document makes it easy to enumerate runs within eachparagraph, items within each list, and so on. This will be shown in a later section.
Programming directly against the C1Document object is the best way to perform many tasks, including reportgeneration and the implementation of import and export filters. For example, the Html property exposes an HTMLfilter with methods that convert C1Document objects to and from HTML strings. You could implement a similar filterclass to import and export other popular formats such as RTF or PDF.
Defining C1RichTextBox.Document Elements
The C1TextElement ClassThe base class for all elements in a C1Document is the C1TextElement class. The C1TextElement class is comprised ofthree further classes: the C1Block class, the C1Document class, and the C1Inline class.
C1Block Class
The C1Block element is an abstract class that provides a base for all block-level flow content elements. Block-level flow content elements are classes that inherit from C1Block, such as the C1Paragraph class
The following elements inherit from the C1Block Class:
Element Description
C1BlockUIContainer A block-level flow content element which enables UIElement elements to beembedded in flow content.
C1List A block-level flow element that provides facilities for presenting content in anordered or unordered list.
C1ListItem A flow content element that represents a particular content item in a C1List.
C1Paragraph A block-level flow content element used to group content into a paragraph.
C1Section A block-level flow content element used for grouping other C1Block elements.
C1Table A block-level flow content element that provides a grid-based presentationorganized by rows and columns.
C1TableCell A flow content element that defines a cell of content within a C1Table.
C1TableRow A flow content element that defines a row within a C1Table
C1TableRowGroup A flow content element that is used to group C1TableRow elements withina C1Table.
C1Document Class
The C1Document class represents a flow element.
C1Inline Class
RichTextBox for UWP 35
Copyright © 2019 GrapeCity, Inc. All rights reserved.

The C1Inline abstract class provides a base for all inline flow elements. The C1Inline class is comprised of thefollowing elements:
C1Inline Elements Description
C1InlineUIContainer An inline-level flow content element which enables UIElement elements tobe embedded in flow content.
C1Run An inline-level flow element intended to contain a run of formatted orunformatted text.
C1Span The C1Span class groups other C1Inline flow content elements, suchas C1Hyperlink elements.
Other C1RichTextBox.Documents ElementsThere are other elements in the Documents namespace that are not contained in the C1TextElement class.
C1HtmlDocument
This element represents an Html document.
C1TextRange
This element represents a text range in a C1Document.
C1TextPointer
This element represents a position in a C1Document.
Creating Documents and ReportsTo illustrate the process of creating a C1Document, we will walk through the steps required to implement a simpleassembly documentation utility.
To start, create a new project and add a reference to the C1.UWP and C1.UWP.RichTextBox assemblies. Then editthe page constructor as follows:
C#
using C1.Xaml;using C1.Xaml.RichTextBox;using C1.Xaml.RichTextBox.Documents;using System.Reflection;using System.Text;using Windows.UI;using Windows.UI.Text;
// The Blank Page item template is documented at http://go.microsoft.com/fwlink/?LinkId=234238
namespace RTBTestsDoc{
RichTextBox for UWP 36
Copyright © 2019 GrapeCity, Inc. All rights reserved.
/// <summary> /// An empty page that can be used on its own or navigated to within a Frame. /// </summary> public sealed partial class MainPage : Page { // C1RichTextBox that will display the C1Document C1RichTextBox _rtb;
public MainPage() { this.InitializeComponent(); // Create the C1RichTextBox and add it to the page _rtb = new C1RichTextBox(); LayoutRoot.Children.Add(_rtb);
// Create document and show it in the C1RichTextBox _rtb.Document = DocumentAssembly(typeof(C1RichTextBox).GetTypeInfo().Assembly); _rtb.IsReadOnly = true;
}
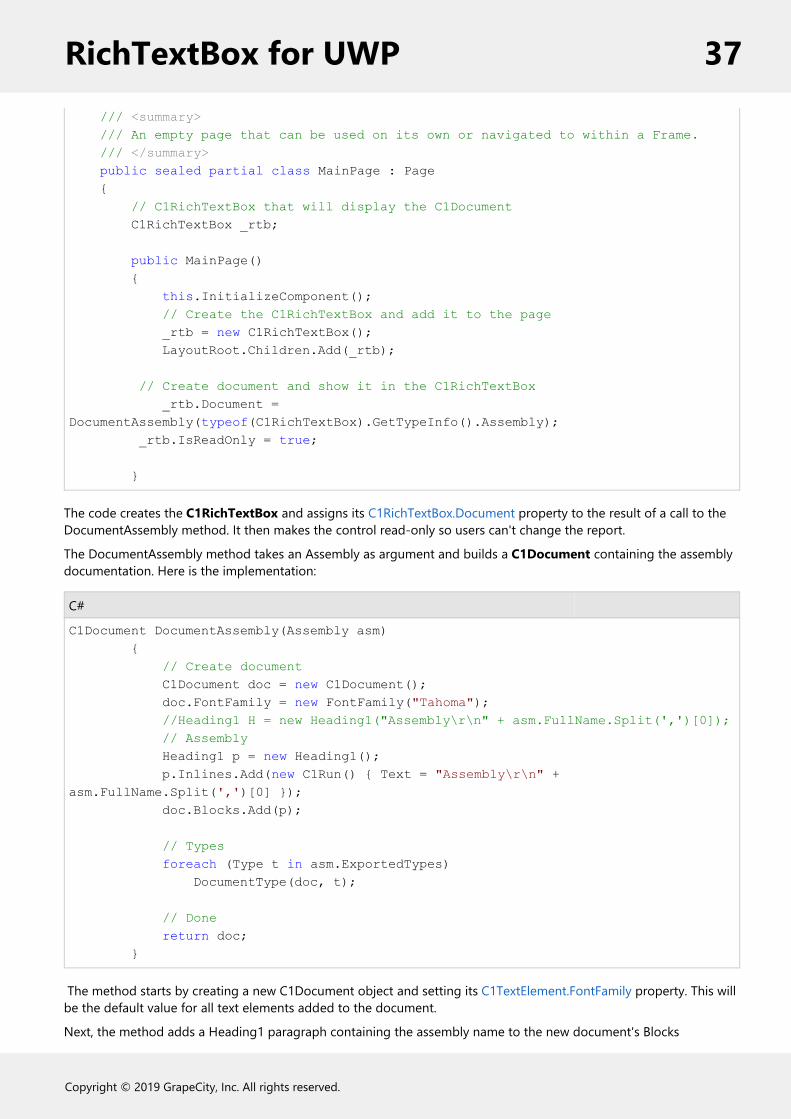
The code creates the C1RichTextBox and assigns its C1RichTextBox.Document property to the result of a call to theDocumentAssembly method. It then makes the control read-only so users can't change the report.
The DocumentAssembly method takes an Assembly as argument and builds a C1Document containing the assemblydocumentation. Here is the implementation:
C#
C1Document DocumentAssembly(Assembly asm) { // Create document C1Document doc = new C1Document(); doc.FontFamily = new FontFamily("Tahoma"); //Heading1 H = new Heading1("Assembly\r\n" + asm.FullName.Split(',')[0]); // Assembly Heading1 p = new Heading1(); p.Inlines.Add(new C1Run() { Text = "Assembly\r\n" + asm.FullName.Split(',')[0] }); doc.Blocks.Add(p);
// Types foreach (Type t in asm.ExportedTypes) DocumentType(doc, t); // Done return doc; }
The method starts by creating a new C1Document object and setting its C1TextElement.FontFamily property. This willbe the default value for all text elements added to the document.
Next, the method adds a Heading1 paragraph containing the assembly name to the new document's Blocks
RichTextBox for UWP 37
Copyright © 2019 GrapeCity, Inc. All rights reserved.

collection. Blocks are elements such as paragraphs and list items that flow down the document. They are similar to"div" elements in HTML. Some document elements contain an Inlines collection instead. These collections containelements that flow horizontally, similar to "span" elements in HTML.
The Heading1 class inherits from C1Paragraph and adds some formatting. We will add several such classes to theproject, for normal paragraphs and headings 1 through 4.
The Normal paragraph is a C1Paragraph that takes a content string in its constructor:
C#
class Normal : C1Paragraph { public Normal() { // this.Inlines.Add(new C1Run() { Text = text }); this.Padding = new Thickness(30, 0, 0, 0); this.Margin = new Thickness(0); } }
The Heading paragraph extends Normal and makes the text bold:
C#
class Heading : Normal { public Heading() { this.FontWeight = FontWeights.Bold; } }
Heading1 through Heading4 extend Heading to specify font sizes, padding, borders, and colors:
C#
class Heading1 : Heading { public Heading1() { this.Background = new SolidColorBrush(Colors.Yellow); this.FontSize = 24; this.Padding = new Thickness(0, 10, 0, 10); this.BorderBrush = new SolidColorBrush(Colors.Black); this.BorderThickness = new Thickness(3, 1, 1, 0); } } class Heading2 : Heading { public Heading2() { this.FontSize = 18; this.FontStyle = FontStyle.Italic ; this.Background = new SolidColorBrush(Colors.Yellow);
RichTextBox for UWP 38
Copyright © 2019 GrapeCity, Inc. All rights reserved.

this.Padding = new Thickness(10, 5, 0, 5); this.BorderBrush = new SolidColorBrush(Colors.Black); this.BorderThickness = new Thickness(3, 1, 1, 1); } } class Heading3 : Heading { public Heading3() { this.FontSize = 14; this.Background = new SolidColorBrush(Colors.LightGray); this.Padding = new Thickness(20, 3, 0, 0); } } class Heading4 : Heading { public Heading4() { this.FontSize = 14; this.Padding = new Thickness(30, 0, 0, 0); } }
Now that we have classes for all paragraph types in the document, it's time to add the content. Recall that we used aDocumentType method in the first code block. Here is the implementation for that method:
C#
void DocumentType(C1Document doc, Type t) {
// Type Heading2 h2 = new Heading2(); h2.Inlines.Add(new C1Run() { Text = "Class " + t.Name }); doc.Blocks.Add(h2);
// Properties Heading3 h3 = new Heading3(); h3.Inlines.Add(new C1Run() { Text = "Properties" }); doc.Blocks.Add(h3); foreach (PropertyInfo pi in t.GetRuntimeProperties()) { if (pi.DeclaringType == t) DocumentProperty(doc, pi); }
// Methods h3 = new Heading3(); h3.Inlines.Add(new C1Run() { Text = "Methods" }); doc.Blocks.Add(h3); foreach (MethodInfo mi in t.GetRuntimeMethods()) {
RichTextBox for UWP 39
Copyright © 2019 GrapeCity, Inc. All rights reserved.

if (mi.DeclaringType == t) DocumentMethod(doc, mi); }
// Events h3 = new Heading3(); h3.Inlines.Add(new C1Run() { Text = "Events" }); doc.Blocks.Add(h3); foreach (EventInfo ei in t.GetRuntimeEvents()) { if (ei.DeclaringType == t) DocumentEvent(doc, ei); } }
The method adds a Heading2 paragraph with the class name and then uses reflection to enumerate all the publicproperties, events, and methods in the type. The code for these methods is simple:
C#
void DocumentProperty(C1Document doc, PropertyInfo pi) { if (pi.PropertyType.IsGenericParameter) return;
Heading4 h4 = new Heading4(); h4.Inlines.Add(new C1Run() { Text = pi.Name }); doc.Blocks.Add(h4);
var text = string.Format("public {0} {1} {{ {2}{3} }}", pi.PropertyType.Name, pi.Name, pi.CanRead ? "get; " : string.Empty, pi.CanWrite ? "set; " : string.Empty); Normal n = new Normal(); n.Inlines.Add(new C1Run() { Text = text }); doc.Blocks.Add(n); }
The method adds a Heading4 paragraph containing the property name, then some Normal text containing theproperty type, name, and accessors.
The methods used for documenting events and properties are analogous:
C#
void DocumentMethod(C1Document doc, MethodInfo mi) { if (mi.IsSpecialName) return;
Heading4 h4 = new Heading4(); h4.Inlines.Add(new C1Run() { Text = mi.Name });
RichTextBox for UWP 40
Copyright © 2019 GrapeCity, Inc. All rights reserved.

doc.Blocks.Add(h4); var parms = new StringBuilder(); foreach (var parm in mi.GetParameters()) { if (parms.Length > 0) parms.Append(", "); parms.AppendFormat("{0} {1}", parm.ParameterType.Name, parm.Name); } var text = string.Format("public {0} {1}({2})", mi.ReturnType.Name, mi.Name, parms.ToString());
Normal n = new Normal(); n.Inlines.Add(new C1Run() { Text = text }); doc.Blocks.Add(n); }
void DocumentEvent(C1Document doc, EventInfo ei) { Heading4 h4 = new Heading4(); h4.Inlines.Add(new C1Run() { Text = ei.Name }); doc.Blocks.Add(h4);
var text = string.Format("public {0} {1}", ei.EventHandlerType.Name, ei.Name);
Normal n = new Normal(); n.Inlines.Add(new C1Run() { Text = text }); doc.Blocks.Add(n); } }}
If you run the project now, it will resemble the image below:
RichTextBox for UWP 41
Copyright © 2019 GrapeCity, Inc. All rights reserved.

The resulting document can be viewed and edited in the C1RichTextBox like any other. It can also be exported toHTML using the C1RichTextBox.Html property in the C1RichTextBox, or copied through the clipboard to applicationssuch as Microsoft Word or Excel.
You could use the same technique to create reports based on data from a database. In addition to formatted text,the C1Document object model supports the following features:
Lists
Lists are created by adding C1List objects to the document. The C1List object has a C1List.ListItems propertythat contains C1ListItem objects, which are also blocks.
Hyperlinks
Hyperlinks are created by adding C1Hyperlink objects to the document. The C1Hyperlink object hasan C1Span.Inlines property that contains a collection of runs (typically C1Run elements that contain text), anda NavigateUri property that determines the action to be taken when the hyperlink is clicked.
Images
Images and other FrameworkElement objects are created by adding C1BlockUIContainer objects to thedocument. The C1BlockUIContainer object has a C1BlockUIContainer.Child property that can be set to anyFrameworkElement object.
Note that not all objects can be exported to HTML. Images are a special case that the HTML filter knows how tohandle.
Implementing Split Views
RichTextBox for UWP 42
Copyright © 2019 GrapeCity, Inc. All rights reserved.

Many editors offer split-views of a document, allowing you to keep a part of the document visible while you work onanother part.
You can achieve this easily by connecting two or more C1RichTextBox controls to the same underlying C1Document.Each control acts as an independent view, allowing you to scroll, select, and edit the document as usual. Changesmade to one view are reflected on all other views.
To show how this works, let's extend the previous example by adding a few lines of code to the page constructor:
C#
// Add a second C1RichTextBox to the page LayoutRoot.RowDefinitions.Add(new RowDefinition()); LayoutRoot.RowDefinitions.Add(new RowDefinition()); var rtb2 = new C1RichTextBox(); rtb2.SetValue(Grid.RowProperty, 1); LayoutRoot.Children.Add(rtb2);
// Bind the second C1RichTextBox to the same document rtb2.Document = _rtb.Document;
The new code adds a new C1RichTextBox to the page and then sets its C1RichTextBox.Document property to thedocument being shown by the original C1RichTextBox.
If you run the project again, you will see that the bottom control is editable (we did not setits C1RichTextBox.IsReadOnly property to False). If you type into it, you will see the changes on both controlssimultaneously.
The mechanism is general; we could easily attach more views of the same document. Moreover, any changes youmake to the underlying document are immediately reflected on all views.
Using the C1Document ClassAs discussed earlier, the C1RichTextBox provides a linear, flat view of the control content, while C1Document exposesthe document structure.
To illustrate the advantages of working directly with the document object, suppose you wanted to add somefunctionality to the previous sample: when the user presses the CTRL key, you want to capitalize the text in allparagraphs of type Heading2.
The object model exposed by the C1RichTextBox is not powerful enough to do this reliably. You would have to locatespans based on their formatting, which would be inefficient and unreliable (what if the user formatted some plain textwith the same format used by Heading2?).
Using the C1Document object model, this task becomes trivial. You simply have to handle the KeyDown event withinthe InitializeComponent() method:
C#
public MainPage() { this.InitializeComponent(); //No changes here...
// Bind the second C1RichTextBox to the same document rtb2.Document = _rtb.Document;
RichTextBox for UWP 43
Copyright © 2019 GrapeCity, Inc. All rights reserved.

rtb2.KeyDown += rtb2_KeyDown; } void rtb2_KeyDown(object sender, KeyRoutedEventArgs e) { if (e.Key == VirtualKey.Control) { var h2 = _rtb.Document.Blocks.OfType<Heading2>().FirstOrDefault(); if (h2 != null) h2.ContentRange.ToUppercase(); } }
The code monitors the keyboard. When the user presses the CTRL key, it enumerates all Heading2 elements in thedocument and replaces their content with capitals.
Understanding C1TextPointerThe C1TextPointer class represents a position inside a C1Document. It is intended to facilitate traversal andmanipulation of C1Documents. The functionality is analogous to WPF's TextPointer class, although the object modelhas many differences.
A C1TextPointer is defined by a C1TextElement and an offset inside of it. Let's take this image as an example:
The nodes in blue text in the image above are C1TextElements. You can also see that there are three offset positionsmarked before, between, and after the two C1Paragraph elements. The offset positions that are marked indicatethe C1TextPointer's position within the C1Document element.
In a C1Run element, each character in its text is considered a child of the element, so the offset indicates a positioninside the text.
The C1InlineUIContainer is only considered to have a single child, the UIElement it displays, so it has two offsetpositions: one before and one after the child.
You can also visualize the document as a sequence of symbols, where a symbol can be either an element tag or sometype of content. An element tag indicates the start or end of an element. So, if you wanted to recreate the aboveimage in XML, it would look like this:
RichTextBox for UWP 44
Copyright © 2019 GrapeCity, Inc. All rights reserved.

C#
<C1Document> <C1Paragraph> <C1Run>CAT</C1Run> <C1InlineUIContainer><UI/></C1InlineUIContainer> </C1Paragraph> <C1Paragraph> <C1Run>DOG</C1Run> </C1Paragraph></C1Document>
Viewing a document like this, a C1TextPointer points to a position between tags or content. This view gives a clearorder to C1TextPointer. In fact, C1TextPointer implements IComparable, and also overloads the comparison operatorsfor convenience.
The symbol that is after a C1TextPointer can be obtained using the C1TextPointer.Symbol property. This propertyreturns an object that can be of type StartTag, EndTag, char, or UIElement.
If you want to iterate through the positions in a document, there are two methods available: GetPositionAtOffsetand Enumerate. GetPositionAtOffset is the low-level method; it just returns the position at a specified integer offset, asyou can see in the following code from the SyntaxHighlight sample:
C#
C1TextRange GetRangeAtTextOffset(C1TextPointer pos, Capture capture) { var start = pos.GetPositionAtOffset(capture.Index, C1TextRange.TextTagFilter); var end = start.GetPositionAtOffset(capture.Length, C1TextRange.TextTagFilter); return new C1TextRange(start, end); }
Enumerate is the recommended way to iterate through positions. It returns an IEnumerable<C1TextPointer> thatiterates through all the positions in a specified direction. For instance, this returns all the positions in a document:
C#
document.ContentStart.Enumerate()
Note that ContentStart returns the first C1TextPointer in a C1TextElement; there is also a ContentEnd property thatreturns the last position.
The interesting thing about Enumerate is that it returns a lazy enumeration. That is, C1TextPointer objects are onlycreated when the IEnumerable is iterated. This allows for efficient use of LINQ extensions methods for filtering,finding, selecting, and so on. As an example, let's say you want to get the C1TextRange for the word contained undera C1TextPointer . You can do the following:
Visual Basic
Private Function ExpandToWord(pos As C1TextPointer) As C1TextRange ' Find word start Dim wordStart = If(pos.IsWordStart, pos, pos.Enumerate(LogicalDirection.Backward).First(Function(p) p.IsWordStart))
' Find word end
RichTextBox for UWP 45
Copyright © 2019 GrapeCity, Inc. All rights reserved.

Dim wordEnd = If(pos.IsWordEnd, pos, pos.Enumerate(LogicalDirection.Forward).First(Function(p) p.IsWordEnd))
' Return new range from word start to word end Return New C1TextRange(wordStart, wordEnd)End Function
C#
C1TextRange ExpandToWord(C1TextPointer pos){ // Find word start var wordStart = pos.IsWordStart ? pos : pos.Enumerate(LogicalDirection.Backward).First(p => p.IsWordStart);
// Find word end var wordEnd = pos.IsWordEnd ? pos : pos.Enumerate(LogicalDirection.Forward).First(p => p.IsWordEnd);
// Return new range from word start to word end return new C1TextRange(wordStart, wordEnd);}
The Enumerate method returns the positions in a specified direction, but it doesn't include the current position. Sothe code first checks if the parameter position is a word start, and if not, searches backward for a position that is aword start. Likewise for the word end, it checks the parameter position and then searches forward. We want to findthe word that contains the parameter position, so we need the first word end moving forward and the first word startmoving backward. C1TextPointer already contains the properties IsWordStart and IsWordEnd that tells you whether aposition is a word start or end depending on the surrounding symbols. We use the First LINQ extension method tofind the first position that satisfies our required predicate. And finally we create a C1TextRange from the twopositions.
LINQ extension methods can be very useful when working with positions. As another example we can count the wordsin a document like this:
Visual Basic
document.ContentStart.Enumerate().Count(Function(p) p.IsWordStart AndAlso TypeOf p.Symbol Is Char)
C#
document.ContentStart.Enumerate().Count(p => p.IsWordStart && p.Symbol is char)
Note that we need to check that the symbol following a word start is a char because IsWordStart returns True forpositions that are not exactly at the start of a word. For instance the position just before a C1Run start tag isconsidered a word start if the first position of the C1Run is a word start.
Let's implement a Find method as another example:
RichTextBox for UWP 46
Copyright © 2019 GrapeCity, Inc. All rights reserved.

Visual Basic
Private Function FindWordFromPosition(position As C1TextPointer, word As String) As C1TextRange ' Get all ranges whose text length is equal to word.Length Dim ranges = position.Enumerate().[Select](Function(pos) ' Get a position that is at word.Length offset ' but ignoring tags that do not change the text flow Dim [end] = pos.GetPositionAtOffset(word.Length, C1TextRange.TextTagFilter) Return New C1TextRange(pos, [end])
End Function) ' returned value will be null if word is not found. Return ranges.FirstOrDefault(Function(range) range.Text = word)End Function
C#
C1TextRange FindWordFromPosition(C1TextPointer position, string word){ // Get all ranges whose text length is equal to word.Length var ranges = position.Enumerate().Select(pos => { // Get a position that is at word.Length offset // but ignoring tags that do not change the text flow var end = pos.GetPositionAtOffset(word.Length, C1TextRange.TextTagFilter); return new C1TextRange(pos, end); }); // returned value will be null if word is not found. return ranges.FirstOrDefault(range => range.Text == word);}
We want to find the word from a specified position, so we enumerate all positions forward, and select all rangeswhose text length is word.Length. For each position we need to find the position that is at word.Length distance. Forthis we use the GetPositionAtOffset method. This method returns a position at a specified offset, but it also countsall inline tags as valid positions, we need to ignore this to account for the case when a word is split betweentwo C1Run elements. That is why we use C1TextRange.TextTagFilter; this is the same filter method used by the internallogic that translates document trees into text. As a final step we search for the range whose text matches the searchedword.
As a last example let's replace the first occurrence of a word:
Visual Basic
Dim wordRange = FindWordFromPosition(document.ContentStart, "cat")If wordRange IsNot Nothing Then wordRange.Text = "dog"End If
C#
RichTextBox for UWP 47
Copyright © 2019 GrapeCity, Inc. All rights reserved.

var wordRange = FindWordFromPosition(document.ContentStart, "cat");if (wordRange != null){ wordRange.Text = "dog";}
We can use the previous example to first find the word, and then replace the text by just assigningto C1TextRange.Text property.
RichTextBox for UWP 48
Copyright © 2019 GrapeCity, Inc. All rights reserved.

Supported Elements
HTML ElementsRichTextBox for UWP supports many HTML elements. The following table lists HTML elements by names and noteswhether they are supported by RichTextBox for UWP.
Name Supported
A YES
ABBR YES
ACRONYM YES
ADDRESS YES
APPLET NO
AREA NO
B YES
BASE NO
BASEFONT YES
BDO NO
BIG YES
BLOCKQUOTE YES
BODY YES
BR YES
BUTTON NO
CAPTION NO
CENTER YES
CITE YES
CODE YES
COL YES
COLGROUP YES
DD YES
DEL YES
DFN YES
DIV YES
DL YES
DT YES
EM YES
FIELDSET NO
FONT YES
FORM NO
FRAME NO
RichTextBox for UWP 49
Copyright © 2019 GrapeCity, Inc. All rights reserved.

FRAMESET NO
H1 YES
H2 YES
H3 YES
H4 YES
H5 YES
H6 YES
HEAD YES
HR YES
HTML YES
I YES
IFRAME NO
IMG YES
INPUT NO
INS YES
ISINDEX NO
KBD YES
LABEL YES
LEGEND NO
LI YES
LINK NO
MAP NO
MENU YES
META NO
NOFRAMES NO
NOSCRIPT NO
OBJECT NO
OL YES
OPTGROUP NO
OPTION NO
P YES
PARAM NO
PRE YES
Q NO
S YES
SAMP YES
SCRIPT NO
SELECT NO
RichTextBox for UWP 50
Copyright © 2019 GrapeCity, Inc. All rights reserved.

SMALL YES
SPAN YES
STRIKE YES
STRONG YES
STYLE YES
SUB YES
SUP YES
TABLE YES
TBODY YES
TD YES
TEXTAREA NO
TFOOT YES
TH YES
THEAD YES
TITLE NO
TR YES
TT YES
U YES
UL YES
VAR YES
HTML AttributesRichTextBox for UWP supports many HTML attribute. The following table lists HTML attributes by name and elementand notes whether they are supported by RichTextBox for UWP.
Name Elements Supported
abbr TD, TH NO
accept-charset
FORM NO
accept FORM, INPUT NO
accesskey A, AREA, BUTTON, INPUT, LABEL, LEGEND, TEXTAREA NO
action FORM NO
align CAPTION NO
align APPLET, IFRAME, IMG, INPUT, OBJECT NO
align LEGEND NO
align TABLE NO
align HR NO
align DIV, H1, H2, H3, H4, H5, H6, P YES
RichTextBox for UWP 51
Copyright © 2019 GrapeCity, Inc. All rights reserved.

align COL, COLGROUP, TBODY, TD, TFOOT, TH, THEAD, TR NO
alink BODY NO
alt APPLET NO
alt AREA, IMG NO
alt INPUT NO
archive APPLET NO
archive OBJECT NO
axis TD, TH NO
background BODY NO
bgcolor TABLE YES
bgcolor TR YES
bgcolor TD, TH YES
bgcolor BODY YES
border TABLE YES
border IMG, OBJECT YES
cellpadding TABLE NO
cellspacing TABLE YES
char COL, COLGROUP, TBODY, TD, TFOOT, TH, THEAD, TR NO
charoff COL, COLGROUP, TBODY, TD, TFOOT, TH, THEAD, TR NO
charset A, LINK, SCRIPT NO
checked INPUT NO
cite BLOCKQUOTE, Q NO
cite DEL, INS NO
class All elements but BASE, BASEFONT, HEAD, HTML, META, PARAM, SCRIPT, STYLE, TITLE YES
classid OBJECT NO
clear BR NO
code APPLET NO
codebase OBJECT NO
codebase APPLET NO
codetype OBJECT NO
color BASEFONT, FONT NO
cols FRAMESET NO
cols TEXTAREA NO
colspan TD, TH YES
compact DIR, DL, MENU, OL, UL NO
content META NO
coords AREA NO
coords A NO
data OBJECT NO
RichTextBox for UWP 52
Copyright © 2019 GrapeCity, Inc. All rights reserved.

datetime DEL, INS NO
declare OBJECT NO
defer SCRIPT NO
dir All elements but APPLET, BASE, BASEFONT, BDO, BR, FRAME, FRAMESET, IFRAME,PARAM, SCRIPT
NO
dir BDO NO
disabled BUTTON, INPUT, OPTGROUP, OPTION, SELECT, TEXTAREA NO
enctype FORM NO
face BASEFONT, FONT YES
for LABEL NO
frame TABLE YES
frameborder FRAME, IFRAME NO
headers TD, TH NO
height IFRAME NO
height TD, TH NO
height IMG, OBJECT YES
height APPLET NO
href A, AREA, LINK YES
href BASE NO
hreflang A, LINK NO
hspace APPLET, IMG, OBJECT YES
http-equiv META NO
id All elements but BASE, HEAD, HTML, META, SCRIPT, STYLE, TITLE YES
ismap IMG, INPUT NO
label OPTION NO
label OPTGROUP NO
lang All elements but APPLET, BASE, BASEFONT, BR, FRAME, FRAMESET, IFRAME, PARAM,SCRIPT
NO
language SCRIPT NO
link BODY NO
longdesc IMG NO
longdesc FRAME, IFRAME NO
marginheight FRAME, IFRAME NO
marginwidth FRAME, IFRAME NO
maxlength INPUT NO
media STYLE NO
media LINK NO
method FORM NO
multiple SELECT NO
RichTextBox for UWP 53
Copyright © 2019 GrapeCity, Inc. All rights reserved.

name BUTTON, TEXTAREA NO
name APPLET NO
name SELECT NO
name FORM NO
name FRAME, IFRAME NO
name IMG YES
name A YES
name INPUT, OBJECT NO
name MAP NO
name PARAM NO
name META NO
nohref AREA NO
noresize FRAME NO
noshade HR NO
nowrap TD, TH NO
object APPLET NO
onblur A, AREA, BUTTON, INPUT, LABEL, SELECT, TEXTAREA NO
onchange INPUT, SELECT, TEXTAREA NO
onclick All elements but APPLET, BASE, BASEFONT, BDO, BR, FONT, FRAME, FRAMESET, HEAD,HTML, IFRAME,
ISINDEX, META, PARAM, SCRIPT, STYLE, TITLE
NO
ondblclick All elements but APPLET, BASE, BASEFONT, BDO, BR, FONT, FRAME, FRAMESET, HEAD,
HTML, IFRAME, ISINDEX, META, PARAM, SCRIPT, STYLE, TITLE
NO
onfocus A, AREA, BUTTON, INPUT, LABEL, SELECT, TEXTAREA NO
onkeydown All elements but APPLET, BASE, BASEFONT, BDO, BR, FONT, FRAME, FRAMESET, HEAD,HTML,
IFRAME, ISINDEX, META, PARAM, SCRIPT, STYLE, TITLE
NO
onkeypress All elements but APPLET, BASE, BASEFONT, BDO, BR, FONT, FRAME, FRAMESET, HEAD,HTML,
IFRAME, ISINDEX, META, PARAM, SCRIPT, STYLE, TITLE
NO
onkeyup All elements but APPLET, BASE, BASEFONT, BDO, BR, FONT, FRAME, FRAMESET, HEAD,
HTML, IFRAME, ISINDEX, META, PARAM, SCRIPT, STYLE, TITLE
NO
onload FRAMESET NO
onload BODY NO
onmousedown All elements but APPLET, BASE, BASEFONT, BDO, BR, FONT, FRAME, FRAMESET, HEAD,HTML,
IFRAME, ISINDEX, META, PARAM, SCRIPT, STYLE, TITLE
NO
onmousemove All elements but APPLET, BASE, BASEFONT, BDO, BR, FONT, FRAME, FRAMESET, HEAD,HTML,
IFRAME, ISINDEX, META, PARAM, SCRIPT, STYLE, TITLE
NO
onmouseout All elements but APPLET, BASE, BASEFONT, BDO, BR, FONT, FRAME, FRAMESET, HEAD,HTML,
IFRAME, ISINDEX, META, PARAM, SCRIPT, STYLE, TITLE
NO
RichTextBox for UWP 54
Copyright © 2019 GrapeCity, Inc. All rights reserved.

onmouseover All elements but APPLET, BASE, BASEFONT, BDO, BR, FONT, FRAME, FRAMESET, HEAD,HTML,
IFRAME, ISINDEX, META, PARAM, SCRIPT, STYLE, TITLE
NO
onmouseup All elements but APPLET, BASE, BASEFONT, BDO, BR, FONT, FRAME, FRAMESET, HEAD,HTML,
IFRAME, ISINDEX, META, PARAM, SCRIPT, STYLE, TITLE
NO
onreset FORM NO
onselect INPUT, TEXTAREA NO
onsubmit FORM NO
onunload FRAMESET NO
onunload BODY NO
profile HEAD NO
prompt ISINDEX NO
readonly TEXTAREA NO
readonly INPUT NO
rel A, LINK NO
rev A, LINK NO
rows FRAMESET NO
rows TEXTAREA NO
rowspan TD, TH YES
rules TABLE YES
scheme META NO
scope TD, TH NO
scrolling FRAME, IFRAME NO
selected OPTION NO
shape AREA NO
shape A NO
size HR NO
size FONT NO
size INPUT NO
size BASEFONT NO
size SELECT NO
span COL NO
span COLGROUP NO
src SCRIPT NO
src INPUT NO
src FRAME, IFRAME NO
src IMG NO
standby OBJECT NO
start OL YES
RichTextBox for UWP 55
Copyright © 2019 GrapeCity, Inc. All rights reserved.

style All elements but BASE, BASEFONT, HEAD, HTML, META, PARAM, SCRIPT, STYLE, TITLE YES
summary TABLE NO
tabindex A, AREA, BUTTON, INPUT, OBJECT, SELECT, TEXTAREA NO
target A, AREA, BASE, FORM, LINK NO
text BODY NO
title All elements but BASE, BASEFONT, HEAD, HTML, META, PARAM, SCRIPT, TITLE YES
type A, LINK NO
type OBJECT NO
type PARAM NO
type SCRIPT NO
type STYLE NO
type INPUT NO
type LI NO
type OL NO
type UI NO
type BUTTON NO
usemap IMG, INPUT, OBJECT NO
valign COL, COLGROUP, TBODY, TD, TFOOT, TH, THEAD, TR YES
value INPUT NO
value OPTION NO
value PARAM NO
value BUTTON NO
value LI NO
valuetype PARAM NO
version HTML NO
vlink BODY NO
vspace APPLET, IMG, OBJECT YES
width HR NO
width IFRAME NO
width IMG, OBJECT YES
width TABLE NO
width TD, TH NO
width APPLET NO
width COL YES
width COLGROUP NO
width PRE NO
CSS Properties
RichTextBox for UWP 56
Copyright © 2019 GrapeCity, Inc. All rights reserved.
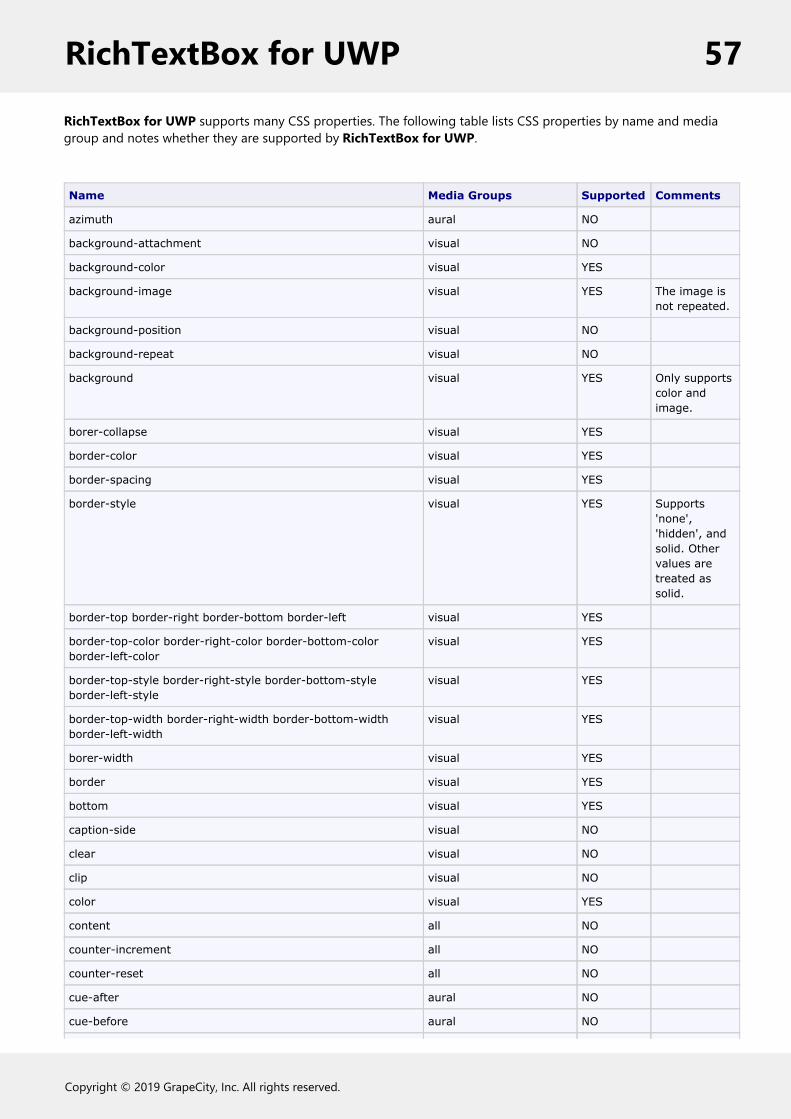
RichTextBox for UWP supports many CSS properties. The following table lists CSS properties by name and mediagroup and notes whether they are supported by RichTextBox for UWP.
Name Media Groups Supported Comments
azimuth aural NO
background-attachment visual NO
background-color visual YES
background-image visual YES The image isnot repeated.
background-position visual NO
background-repeat visual NO
background visual YES Only supportscolor andimage.
borer-collapse visual YES
border-color visual YES
border-spacing visual YES
border-style visual YES Supports'none','hidden', andsolid. Othervalues aretreated assolid.
border-top border-right border-bottom border-left visual YES
border-top-color border-right-color border-bottom-colorborder-left-color
visual YES
border-top-style border-right-style border-bottom-styleborder-left-style
visual YES
border-top-width border-right-width border-bottom-widthborder-left-width
visual YES
borer-width visual YES
border visual YES
bottom visual YES
caption-side visual NO
clear visual NO
clip visual NO
color visual YES
content all NO
counter-increment all NO
counter-reset all NO
cue-after aural NO
cue-before aural NO
RichTextBox for UWP 57
Copyright © 2019 GrapeCity, Inc. All rights reserved.
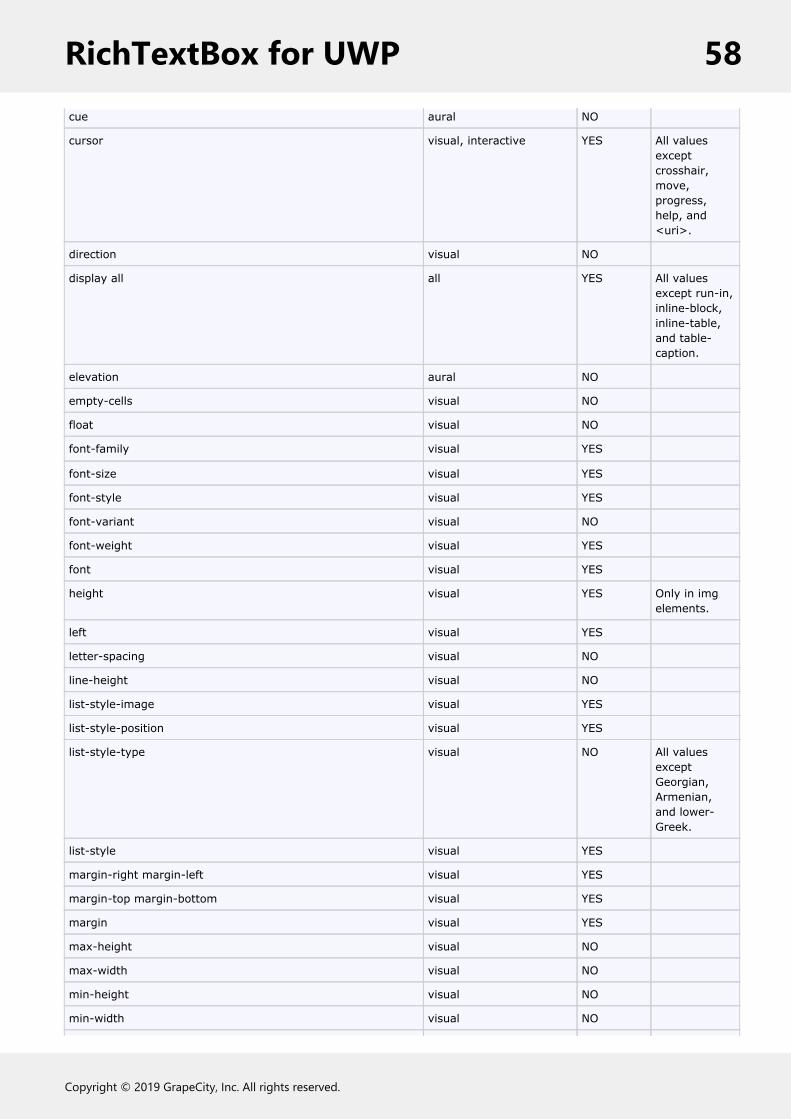
cue aural NO
cursor visual, interactive YES All valuesexceptcrosshair,move,progress,help, and<uri>.
direction visual NO
display all all YES All valuesexcept run-in,inline-block,inline-table,and table-caption.
elevation aural NO
empty-cells visual NO
float visual NO
font-family visual YES
font-size visual YES
font-style visual YES
font-variant visual NO
font-weight visual YES
font visual YES
height visual YES Only in imgelements.
left visual YES
letter-spacing visual NO
line-height visual NO
list-style-image visual YES
list-style-position visual YES
list-style-type visual NO All valuesexceptGeorgian,Armenian,and lower-Greek.
list-style visual YES
margin-right margin-left visual YES
margin-top margin-bottom visual YES
margin visual YES
max-height visual NO
max-width visual NO
min-height visual NO
min-width visual NO
RichTextBox for UWP 58
Copyright © 2019 GrapeCity, Inc. All rights reserved.

orphans visual, paged NO
outline-color visual, interactive NO
outline-style visual, interactive NO
outline-width visual, interactive NO
outline visual, interactive NO
overflow visual NO
padding-top padding-right padding-bottom padding-left visual YES
padding visual YES
page-break-after visual, paged NO
page-break-before visual, paged NO
page-break-inside visual, paged NO
pause-after aural NO
pause-before aural NO
pause aural NO
pitch-range aural NO
pitch aural NO
play-during aural NO
position visual NO
quotes visual NO
richness aural NO
right visual NO
speak-header aural NO
speak-numeral aural NO
speak-punctuation aural NO
speak aural NO
speech-rate aural NO
stress aural NO
table-layout visual NO
text-align visual YES
text-decoration visual YES
text-indent visual YES
text-transform visual NO
top visual NO
unicode-bidi visual NO
vertical-align visual YES All valuesexcept<percentage>and<length>.
visibility visual YES
RichTextBox for UWP 59
Copyright © 2019 GrapeCity, Inc. All rights reserved.

voice-family aural NO
volume aural NO
white-space visual YES Nowrap andpre aretreated likenormal andpre-wrap.
windows visual, paged NO
width visual YES Only in imgelements.
word-spacing visual NO
z-index visual NO
CSS SelectorsRichTextBox for UWP supports several CSS selectors. The following table lists CSS selectors by pattern and CSS leveland notes whether they are supported by RichTextBox for UWP.
Pattern CSS Level Supported
* 2 YES
E 1 YES
E[foo] 2 YES
E[foo="bar"] 2 YES
E[foo~="bar"] 2 YES
E[foo^="bar"] 3 YES
E[foo$="bar"] 3 YES
E[foo*="bar"] 3 YES
E[foo|="en"] 2 YES
E:root 3 NO
E:nth-child(n) 3 NO
E:nth-last-child(n) 3 NO
E:nth-of-type(n) 3 NO
E:nth-last-of-type(n) 3 NO
E:first-child 2 NO
E:last-child 3 NO
E:first-of-type 3 NO
E:last-of-type 3 NO
E:only-child 3 NO
E:only-of-type 3 NO
E:empty 3 NO
E:link 1 NO
RichTextBox for UWP 60
Copyright © 2019 GrapeCity, Inc. All rights reserved.
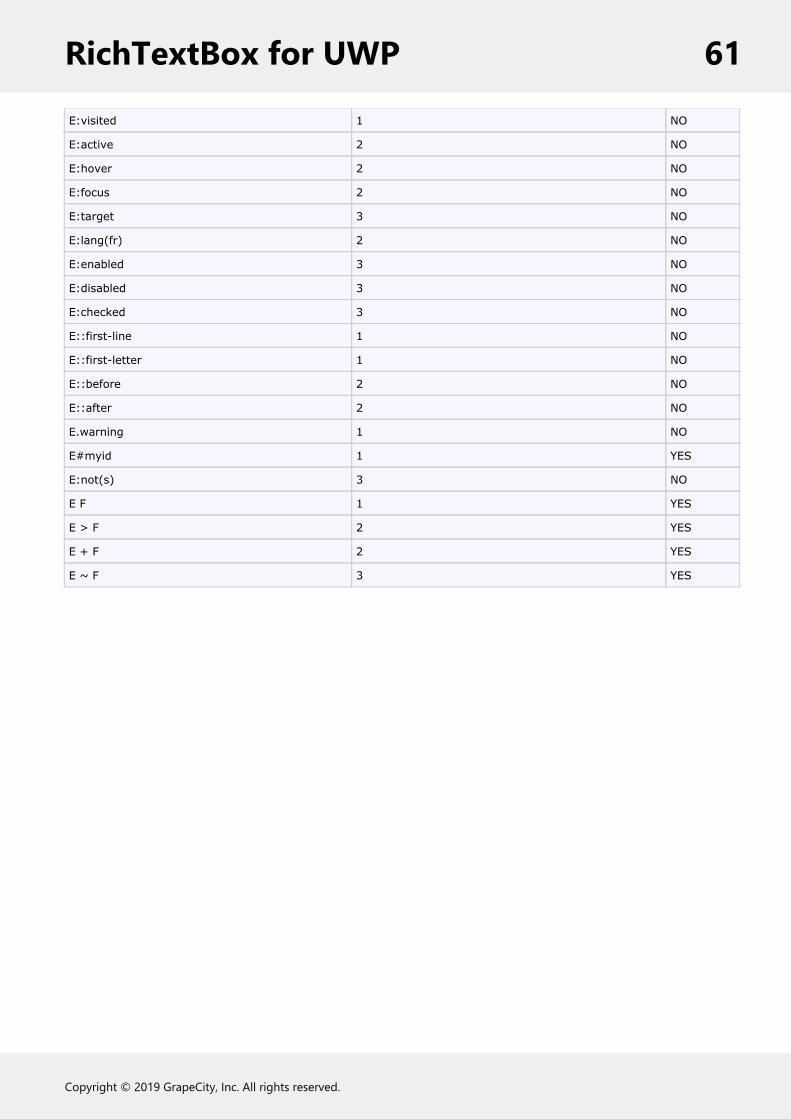
E:visited 1 NO
E:active 2 NO
E:hover 2 NO
E:focus 2 NO
E:target 3 NO
E:lang(fr) 2 NO
E:enabled 3 NO
E:disabled 3 NO
E:checked 3 NO
E::first-line 1 NO
E::first-letter 1 NO
E::before 2 NO
E::after 2 NO
E.warning 1 NO
E#myid 1 YES
E:not(s) 3 NO
E F 1 YES
E > F 2 YES
E + F 2 YES
E ~ F 3 YES
RichTextBox for UWP 61
Copyright © 2019 GrapeCity, Inc. All rights reserved.

Tutorials
Creating an AppBar ApplicationIn this tutorial, you'll create an application using the C1.RichTextBox.AppBar.dll assembly. You'll add markup and codeto create custom top and bottom app bars. You'll also add content through code. There are two files that you'll use inthis application: StandardStyles.xaml and simple.htm.
StandardStyles.xaml can be found in the Common folder, and simple.htm can be found in the Resources folder.
Step 1 of 5: Creating the ApplicationIn this step, you'll create a new Universal Windows application, add a C1RichTextBox control, and add the markup tocreate the top and bottom app bars.
1. Select File | New | Project to open the New Project dialog box.1. Select Templates | Visual C# | Windows | Universal.2. From the templates list, select Blank App (Universal Windows).3. Enter a name for your application and click OK. A new, blank application will open.
2. In the Solution Explorer, right-click the References file and select Add Reference from the list. Browse tolocate the following assembly references:
C1.UWPC1.UWP.RichTextBoxC1.UWP.RichTextBox.AppBarC1.UWP.RichTextBox.Menu
3. Double-click the MainPage.xaml file to open it.
4. Add the following namespace declarations to the <Page> tag at the top of the page:
XAML
xmlns:RichTextBox="using:C1.Xaml.RichTextBox"xmlns:Xaml="using:C1.Xaml"
Your <Page> tag should resemble the following:
XAML
<Page xmlns:RichTextBox="using:C1.Xaml.RichTextBox" xmlns="http://schemas.microsoft.com/winfx/2006/xaml/presentation" xmlns:x="http://schemas.microsoft.com/winfx/2006/xaml" xmlns:local="using:AppBarTest3" xmlns:d="http://schemas.microsoft.com/expression/blend/2008" xmlns:mc="http://schemas.openxmlformats.org/markup-compatibility/2006" xmlns:Xaml="using:C1.Xaml" x:Class="AppBarTest3.MainPage" mc:Ignorable="d">
5. Directly above the <Grid> </Grid> tags on your page, add <Page.Resources>:
RichTextBox for UWP 62
Copyright © 2019 GrapeCity, Inc. All rights reserved.

XAML
<Page.Resources> <ResourceDictionary Source="Common/StandardStyles.xaml"/> </Page.Resources>
You'll add the StandardStyles.xaml file in Step 2.
6. Add the following markup between the <Grid> </Grid> tags to add some row definitions:
XAML
<Grid.RowDefinitions> <RowDefinition Height="140"/> <RowDefinition Height="*"/></Grid.RowDefinitions>
7. Place your cursor below the closing </Grid.RowDefinition> tag. Open the Visual Studio ToolBox andlocate the C1RichTextBox control. Double-click the control to add it to your page.
8. Edit the <RichTextBox:C1RichTextBox/> tag to that is resembles the following. You'll add a name foryour control and two events:
<RichTextBox:C1RichTextBox x:Name="rtb" Grid.Row="1" Margin="116,0,100,100"RequestNavigate="rtb_RequestNavigate" PointerPressed="rtb_PointerPressed" />
9. Locate the closing </Grid> tag on your page and place your cursor beneath it. Add the following markup tocreate the framework for the top and bottom AppBars:
XAML
<Page.TopAppBar> <AppBar x:Name="topAppBar" IsSticky="True" Padding="10,0,10,0"> <Grid> <StackPanel Orientation="Horizontal" HorizontalAlignment="Right"> </StackPanel> </Grid> </AppBar></Page.TopAppBar><Page.BottomAppBar> <AppBar x:Name="bottomAppBar" IsSticky="True" Padding="10,0,10,0"> <Grid> <StackPanel Orientation="Horizontal" HorizontalAlignment="Left"> </StackPanel> <StackPanel Orientation="Horizontal" HorizontalAlignment="Right"> </StackPanel> </Grid> </AppBar></Page.BottomAppBar>
10. Place your cursor between the TopAppBar's <StackPanel> </StackPanel> tags. Add the followingmarkup to add three C1RichTextBox Tools:
RichTextBox for UWP 63
Copyright © 2019 GrapeCity, Inc. All rights reserved.

XAML
<RichTextBox:C1LeftAlignTool x:Name="btnLeftAlign" Style="{StaticResource AlignLeftAppBarButtonStyle}" /><RichTextBox:C1CenterAlignTool x:Name="btnCenterAlign" Style="{StaticResource AlignCenterAppBarButtonStyle}" /><RichTextBox:C1RightAlignTool x:Name="btnRightAlign" Style="{StaticResource AlignRightAppBarButtonStyle}" />
13. Next, locate the first set of <StackPanel> </StackPanel> tags in the BottomAppBar. Add the followingmarkup to add three general Button controls:
XAML
<Button x:Name="btnCopy" Style="{StaticResource CopyAppBarButtonStyle}" Click="btnCopy_Click"/><Button x:Name="btnPaste" Style="{StaticResource PasteAppBarButtonStyle}" Click="btnPaste_Click"/><Button x:Name="btnCut" Style="{StaticResource CutAppBarButtonStyle}" Click="btnCut_Click"/>
14. Locate the second set of <StackPanel> </StackPanel> tags. Add the following markup to add fiveC1RichTextBox Tools and one general Button control:
XAML
<RichTextBox:C1IncreaseFontSizeTool x:Name="btnIncreaseFontSize" Style="{StaticResource FontIncreaseAppBarButtonStyle}"/><RichTextBox:C1DecreaseFontSizeTool x:Name="btnDecreaseFontSize" Style="{StaticResource FontDecreaseAppBarButtonStyle}"/><RichTextBox:C1BoldTool x:Name="btnBold" Style="{StaticResource BoldAppBarButtonStyle}" /><RichTextBox:C1ItalicTool x:Name="btnItalic" Style="{StaticResource ItalicAppBarButtonStyle}" /><RichTextBox:C1UnderlineTool x:Name="btnUnderline" Style="{StaticResource UnderlineAppBarButtonStyle}" /><Button x:Name="btnMore" Style="{StaticResource MoreAppBarButtonStyle}" Click="btnMore_Click"/>
In this step, you created a new Universal Windows application, added the C1RichTextBox control, added themarkup for the two App Bars, and added both C1 Tools and general controls to the App Bar markup. In thenext step, you'll add your resource files and some general application code.
Step 2 of 5: Adding Resource Files and General ApplicationCodeIn this step, you'll add the resource files that contain the styles and the content which your application will use. Right-click your application name and select Add | New Folder. Name the new folder Common.
1. Right-click the Common folder and select Add | New Item.2. Select Blank Page from the available templates in the Add New Item dialog window, name it
StandardStyles.xaml, and click OK.
RichTextBox for UWP 64
Copyright © 2019 GrapeCity, Inc. All rights reserved.

3. When the file opens, add the following XAML markup:XAML
<ResourceDictionary xmlns="http://schemas.microsoft.com/winfx/2006/xaml/presentation" xmlns:x="http://schemas.microsoft.com/winfx/2006/xaml"> <!-- Non-brush values that vary across themes --> <ResourceDictionary.ThemeDictionaries> <ResourceDictionary x:Key="Default"> <x:String x:Key="BackButtonGlyph"></x:String> <x:String x:Key="BackButtonSnappedGlyph"></x:String> </ResourceDictionary> <ResourceDictionary x:Key="HighContrast"> <x:String x:Key="BackButtonGlyph"></x:String> <x:String x:Key="BackButtonSnappedGlyph"></x:String> </ResourceDictionary> </ResourceDictionary.ThemeDictionaries> <x:String x:Key="ChevronGlyph"></x:String> <!-- RichTextBlock styles --> <Style x:Key="BasicRichTextStyle" TargetType="RichTextBlock"> <Setter Property="Foreground" Value="{ThemeResource ApplicationForegroundThemeBrush}"/> <Setter Property="FontSize" Value="{ThemeResource ControlContentThemeFontSize}"/> <Setter Property="FontFamily" Value="{ThemeResource ContentControlThemeFontFamily}"/> <Setter Property="TextTrimming" Value="WordEllipsis"/> <Setter Property="TextWrapping" Value="Wrap"/> <Setter Property="Typography.StylisticSet20" Value="True"/> <Setter Property="Typography.DiscretionaryLigatures" Value="True"/> <Setter Property="Typography.CaseSensitiveForms" Value="True"/> </Style> <Style x:Key="BaselineRichTextStyle" TargetType="RichTextBlock" BasedOn="{StaticResource BasicRichTextStyle}"> <Setter Property="LineHeight" Value="20"/> <Setter Property="LineStackingStrategy" Value="BlockLineHeight"/> <!-- Properly align text along its baseline --> <Setter Property="RenderTransform"> <Setter.Value> <TranslateTransform X="-1" Y="4"/> </Setter.Value> </Setter> </Style> <Style x:Key="ItemRichTextStyle" TargetType="RichTextBlock" BasedOn="{StaticResource BaselineRichTextStyle}"/> <Style x:Key="BodyRichTextStyle" TargetType="RichTextBlock" BasedOn="{StaticResource BaselineRichTextStyle}"> <Setter Property="FontWeight" Value="SemiLight"/> </Style> <!-- TextBlock styles --> <Style x:Key="BasicTextStyle" TargetType="TextBlock"> <Setter Property="Foreground" Value="{ThemeResource
RichTextBox for UWP 65
Copyright © 2019 GrapeCity, Inc. All rights reserved.

ApplicationForegroundThemeBrush}"/> <Setter Property="FontSize" Value="{ThemeResource ControlContentThemeFontSize}"/> <Setter Property="FontFamily" Value="{ThemeResource ContentControlThemeFontFamily}"/> <Setter Property="TextTrimming" Value="WordEllipsis"/> <Setter Property="TextWrapping" Value="Wrap"/> <Setter Property="Typography.StylisticSet20" Value="True"/> <Setter Property="Typography.DiscretionaryLigatures" Value="True"/> <Setter Property="Typography.CaseSensitiveForms" Value="True"/> </Style> <Style x:Key="BaselineTextStyle" TargetType="TextBlock" BasedOn="{StaticResource BasicTextStyle}"> <Setter Property="LineHeight" Value="20"/> <Setter Property="LineStackingStrategy" Value="BlockLineHeight"/> <!-- Properly align text along its baseline --> <Setter Property="RenderTransform"> <Setter.Value> <TranslateTransform X="-1" Y="4"/> </Setter.Value> </Setter> </Style> <Style x:Key="HeaderTextStyle" TargetType="TextBlock" BasedOn="{StaticResource BaselineTextStyle}"> <Setter Property="FontSize" Value="56"/> <Setter Property="FontWeight" Value="Light"/> <Setter Property="LineHeight" Value="40"/> <Setter Property="RenderTransform"> <Setter.Value> <TranslateTransform X="-2" Y="8"/> </Setter.Value> </Setter> </Style> <Style x:Key="SubheaderTextStyle" TargetType="TextBlock" BasedOn="{StaticResource BaselineTextStyle}"> <Setter Property="FontSize" Value="26.667"/> <Setter Property="FontWeight" Value="Light"/> <Setter Property="LineHeight" Value="30"/> <Setter Property="RenderTransform"> <Setter.Value> <TranslateTransform X="-1" Y="6"/> </Setter.Value> </Setter> </Style> <Style x:Key="TitleTextStyle" TargetType="TextBlock" BasedOn="{StaticResource BaselineTextStyle}"> <Setter Property="FontWeight" Value="SemiBold"/> </Style> <Style x:Key="SubtitleTextStyle" TargetType="TextBlock" BasedOn="{StaticResource BaselineTextStyle}"> <Setter Property="FontWeight" Value="Normal"/>
RichTextBox for UWP 66
Copyright © 2019 GrapeCity, Inc. All rights reserved.

</Style> <Style x:Key="ItemTextStyle" TargetType="TextBlock" BasedOn="{StaticResource BaselineTextStyle}"/> <Style x:Key="BodyTextStyle" TargetType="TextBlock" BasedOn="{StaticResource BaselineTextStyle}"> <Setter Property="FontWeight" Value="SemiLight"/> </Style> <Style x:Key="CaptionTextStyle" TargetType="TextBlock" BasedOn="{StaticResource BaselineTextStyle}"> <Setter Property="FontSize" Value="12"/> <Setter Property="Foreground" Value="{ThemeResource ApplicationSecondaryForegroundThemeBrush}"/> </Style> <Style x:Key="GroupHeaderTextStyle" TargetType="TextBlock"> <Setter Property="FontFamily" Value="{ThemeResource ContentControlThemeFontFamily}"/> <Setter Property="TextTrimming" Value="WordEllipsis"/> <Setter Property="TextWrapping" Value="NoWrap"/> <Setter Property="Typography.StylisticSet20" Value="True"/> <Setter Property="Typography.DiscretionaryLigatures" Value="True"/> <Setter Property="Typography.CaseSensitiveForms" Value="True"/> <Setter Property="FontSize" Value="26.667"/> <Setter Property="LineStackingStrategy" Value="BlockLineHeight"/> <Setter Property="FontWeight" Value="Light"/> <Setter Property="LineHeight" Value="30"/> <Setter Property="RenderTransform"> <Setter.Value> <TranslateTransform X="-1" Y="6"/> </Setter.Value> </Setter> </Style> <!-- Button styles --> <!-- TextButtonStyle is used to style a Button using subheader-styled text with no other adornment. There are two styles that are based on TextButtonStyle (TextPrimaryButtonStyle and TextSecondaryButtonStyle) which are used in the GroupedItemsPage as a group header and in the FileOpenPickerPage for triggering commands. --> <Style x:Key="TextButtonStyle" TargetType="ButtonBase"> <Setter Property="MinWidth" Value="0"/> <Setter Property="MinHeight" Value="0"/> <Setter Property="Template"> <Setter.Value> <ControlTemplate TargetType="ButtonBase"> <Grid Background="Transparent"> <ContentPresenter x:Name="Text" Content="{TemplateBinding Content}" /> <Rectangle
RichTextBox for UWP 67
Copyright © 2019 GrapeCity, Inc. All rights reserved.

x:Name="FocusVisualWhite" IsHitTestVisible="False" Stroke="{ThemeResource FocusVisualWhiteStrokeThemeBrush}" StrokeEndLineCap="Square" StrokeDashArray="1,1" Opacity="0" StrokeDashOffset="1.5"/> <Rectangle x:Name="FocusVisualBlack" IsHitTestVisible="False" Stroke="{ThemeResource FocusVisualBlackStrokeThemeBrush}" StrokeEndLineCap="Square" StrokeDashArray="1,1" Opacity="0" StrokeDashOffset="0.5"/> <VisualStateManager.VisualStateGroups> <VisualStateGroup x:Name="CommonStates"> <VisualState x:Name="Normal"/> <VisualState x:Name="PointerOver"> <Storyboard> <ObjectAnimationUsingKeyFrames Storyboard.TargetName="Text" Storyboard.TargetProperty="Foreground"> <DiscreteObjectKeyFrame KeyTime="0" Value="{ThemeResource ApplicationPointerOverForegroundThemeBrush}"/> </ObjectAnimationUsingKeyFrames> </Storyboard> </VisualState> <VisualState x:Name="Pressed"> <Storyboard> <ObjectAnimationUsingKeyFrames Storyboard.TargetName="Text" Storyboard.TargetProperty="Foreground"> <DiscreteObjectKeyFrame KeyTime="0" Value="{ThemeResource ApplicationPressedForegroundThemeBrush}"/> </ObjectAnimationUsingKeyFrames> </Storyboard> </VisualState> <VisualState x:Name="Disabled"> <Storyboard> <ObjectAnimationUsingKeyFrames Storyboard.TargetName="Text" Storyboard.TargetProperty="Foreground"> <DiscreteObjectKeyFrame KeyTime="0" Value="{ThemeResource ApplicationPressedForegroundThemeBrush}"/> </ObjectAnimationUsingKeyFrames> </Storyboard> </VisualState> </VisualStateGroup> <VisualStateGroup x:Name="FocusStates"> <VisualState x:Name="Focused"> <Storyboard>
RichTextBox for UWP 68
Copyright © 2019 GrapeCity, Inc. All rights reserved.

<DoubleAnimation Duration="0" To="1" Storyboard.TargetName="FocusVisualWhite" Storyboard.TargetProperty="Opacity"/> <DoubleAnimation Duration="0" To="1" Storyboard.TargetName="FocusVisualBlack" Storyboard.TargetProperty="Opacity"/> </Storyboard> </VisualState> <VisualState x:Name="Unfocused"/> </VisualStateGroup> <VisualStateGroup x:Name="CheckStates"> <VisualState x:Name="Checked"/> <VisualState x:Name="Unchecked"> <Storyboard> <ObjectAnimationUsingKeyFrames Storyboard.TargetName="Text" Storyboard.TargetProperty="Foreground"> <DiscreteObjectKeyFrame KeyTime="0" Value="{ThemeResource ApplicationSecondaryForegroundThemeBrush}"/> </ObjectAnimationUsingKeyFrames> </Storyboard> </VisualState> <VisualState x:Name="Indeterminate"/> </VisualStateGroup> </VisualStateManager.VisualStateGroups> </Grid> </ControlTemplate> </Setter.Value> </Setter> </Style> <Style x:Key="MenuTextButtonStyle" TargetType="ButtonBase"> <Setter Property="MinWidth" Value="0"/> <Setter Property="MinHeight" Value="0"/> <Setter Property="Template"> <Setter.Value> <ControlTemplate TargetType="ButtonBase"> <Grid Background="Transparent"> <ContentPresenter x:Name="Text" Content="{TemplateBinding Content}" /> <Rectangle x:Name="FocusVisualWhite" IsHitTestVisible="False" Stroke="{ThemeResource FocusVisualWhiteStrokeThemeBrush}" StrokeEndLineCap="Square" StrokeDashArray="1,1" Opacity="0" StrokeDashOffset="1.5"/> <Rectangle x:Name="FocusVisualBlack" IsHitTestVisible="False" Stroke="{ThemeResource FocusVisualBlackStrokeThemeBrush}" StrokeEndLineCap="Square"
RichTextBox for UWP 69
Copyright © 2019 GrapeCity, Inc. All rights reserved.

StrokeDashArray="1,1" Opacity="0" StrokeDashOffset="0.5"/> <VisualStateManager.VisualStateGroups> <VisualStateGroup x:Name="CommonStates"> <VisualState x:Name="Normal"/> <VisualState x:Name="PointerOver"> <Storyboard> <ObjectAnimationUsingKeyFrames Storyboard.TargetName="Text" Storyboard.TargetProperty="Foreground"> <DiscreteObjectKeyFrame KeyTime="0" Value="{ThemeResource ApplicationPointerOverForegroundThemeBrush}"/> </ObjectAnimationUsingKeyFrames> </Storyboard> </VisualState> <VisualState x:Name="Pressed"> <Storyboard> <ObjectAnimationUsingKeyFrames Storyboard.TargetName="Text" Storyboard.TargetProperty="Foreground"> <DiscreteObjectKeyFrame KeyTime="0" Value="{ThemeResource ApplicationPressedForegroundThemeBrush}"/> </ObjectAnimationUsingKeyFrames> </Storyboard> </VisualState> <VisualState x:Name="Disabled"> <Storyboard> <ObjectAnimationUsingKeyFrames Storyboard.TargetName="Text" Storyboard.TargetProperty="Foreground"> <DiscreteObjectKeyFrame KeyTime="0" Value="{ThemeResource ApplicationPressedForegroundThemeBrush}"/> </ObjectAnimationUsingKeyFrames> </Storyboard> </VisualState> </VisualStateGroup> <VisualStateGroup x:Name="FocusStates"> <VisualState x:Name="Focused"> <Storyboard> <DoubleAnimation Duration="0" To="1" Storyboard.TargetName="FocusVisualWhite" Storyboard.TargetProperty="Opacity"/> <DoubleAnimation Duration="0" To="1" Storyboard.TargetName="FocusVisualBlack" Storyboard.TargetProperty="Opacity"/> </Storyboard> </VisualState> <VisualState x:Name="Unfocused"/> </VisualStateGroup> <VisualStateGroup x:Name="CheckStates"> <VisualState x:Name="Checked"/> <VisualState x:Name="Unchecked"> <Storyboard> <ObjectAnimationUsingKeyFrames Storyboard.TargetName="Text" Storyboard.TargetProperty="Foreground">
RichTextBox for UWP 70
Copyright © 2019 GrapeCity, Inc. All rights reserved.

<DiscreteObjectKeyFrame KeyTime="0" Value="{ThemeResource ApplicationSecondaryForegroundThemeBrush}"/> </ObjectAnimationUsingKeyFrames> </Storyboard> </VisualState> <VisualState x:Name="Indeterminate"/> </VisualStateGroup> </VisualStateManager.VisualStateGroups> </Grid> </ControlTemplate> </Setter.Value> </Setter> </Style> <Style x:Key="TextPrimaryButtonStyle" TargetType="ButtonBase" BasedOn="{StaticResource TextButtonStyle}"> <Setter Property="Foreground" Value="{ThemeResource ApplicationHeaderForegroundThemeBrush}"/> </Style> <Style x:Key="TextSecondaryButtonStyle" TargetType="ButtonBase" BasedOn="{StaticResource TextButtonStyle}"> <Setter Property="Foreground" Value="{ThemeResource ApplicationSecondaryForegroundThemeBrush}"/> </Style> <!-- TextRadioButtonStyle is used to style a RadioButton using subheader-styled text with no other adornment. This style is used in the SearchResultsPage to allow selection among filters. --> <Style x:Key="TextRadioButtonStyle" TargetType="RadioButton" BasedOn="{StaticResource TextButtonStyle}"> <Setter Property="Margin" Value="0,0,30,0"/> </Style> <!-- AppBarButtonStyle is used to style a Button (or ToggleButton) for use in an App Bar. Content will be centered and should fit within the 40 pixel radius glyph provided. 16-point Segoe UI Symbol is used for content text to simplify the use of glyphs from that font. AutomationProperties.Name is used for the text below the glyph. --> <Style x:Key="AppBarButtonStyle" TargetType="ButtonBase"> <Setter Property="Foreground" Value="{ThemeResource AppBarItemForegroundThemeBrush}"/> <Setter Property="VerticalAlignment" Value="Stretch"/> <Setter Property="FontFamily" Value="Segoe UI Symbol"/> <Setter Property="FontWeight" Value="Normal"/> <Setter Property="FontSize" Value="20"/> <Setter Property="AutomationProperties.ItemType" Value="App Bar Button"/> <Setter Property="Template">
RichTextBox for UWP 71
Copyright © 2019 GrapeCity, Inc. All rights reserved.

<Setter.Value> <ControlTemplate TargetType="ButtonBase"> <Grid x:Name="RootGrid" Width="100" Background="Transparent"> <StackPanel VerticalAlignment="Top" Margin="0,12,0,11"> <Grid Width="40" Height="40" Margin="0,0,0,5" HorizontalAlignment="Center"> <TextBlock x:Name="BackgroundGlyph" Text="" FontFamily="Segoe UI Symbol" FontSize="53.333" Margin="-4,-19,0,0" Foreground="{ThemeResource AppBarItemBackgroundThemeBrush}"/> <TextBlock x:Name="OutlineGlyph" Text="" FontFamily="Segoe UI Symbol" FontSize="53.333" Margin="-4,-19,0,0"/> <ContentPresenter x:Name="Content" HorizontalAlignment="Center" Margin="-1,-1,0,0" VerticalAlignment="Center"/> </Grid> <TextBlock x:Name="TextLabel" Text="{TemplateBinding AutomationProperties.Name}" Foreground="{ThemeResource AppBarItemForegroundThemeBrush}" Margin="0,0,2,0" FontSize="12" TextAlignment="Center" Width="88" MaxHeight="32" TextTrimming="WordEllipsis" Style="{StaticResource BasicTextStyle}"/> </StackPanel> <Rectangle x:Name="FocusVisualWhite" IsHitTestVisible="False" Stroke="{ThemeResource FocusVisualWhiteStrokeThemeBrush}" StrokeEndLineCap="Square" StrokeDashArray="1,1" Opacity="0" StrokeDashOffset="1.5"/> <Rectangle x:Name="FocusVisualBlack" IsHitTestVisible="False" Stroke="{ThemeResource FocusVisualBlackStrokeThemeBrush}" StrokeEndLineCap="Square" StrokeDashArray="1,1" Opacity="0" StrokeDashOffset="0.5"/> <VisualStateManager.VisualStateGroups> <VisualStateGroup x:Name="ApplicationViewStates"> <VisualState x:Name="FullScreenLandscape"/> <VisualState x:Name="Filled"/>
RichTextBox for UWP 72
Copyright © 2019 GrapeCity, Inc. All rights reserved.

<VisualState x:Name="FullScreenPortrait"> <Storyboard> <ObjectAnimationUsingKeyFrames Storyboard.TargetName="TextLabel" Storyboard.TargetProperty="Visibility"> <DiscreteObjectKeyFrame KeyTime="0" Value="Collapsed"/> </ObjectAnimationUsingKeyFrames> <ObjectAnimationUsingKeyFrames Storyboard.TargetName="RootGrid" Storyboard.TargetProperty="Width"> <DiscreteObjectKeyFrame KeyTime="0" Value="60"/> </ObjectAnimationUsingKeyFrames> </Storyboard> </VisualState> <VisualState x:Name="Snapped"> <Storyboard> <ObjectAnimationUsingKeyFrames Storyboard.TargetName="TextLabel" Storyboard.TargetProperty="Visibility"> <DiscreteObjectKeyFrame KeyTime="0" Value="Collapsed"/> </ObjectAnimationUsingKeyFrames> <ObjectAnimationUsingKeyFrames Storyboard.TargetName="RootGrid" Storyboard.TargetProperty="Width"> <DiscreteObjectKeyFrame KeyTime="0" Value="60"/> </ObjectAnimationUsingKeyFrames> </Storyboard> </VisualState> </VisualStateGroup> <VisualStateGroup x:Name="CommonStates"> <VisualState x:Name="Normal"/> <VisualState x:Name="PointerOver"> <Storyboard> <ObjectAnimationUsingKeyFrames Storyboard.TargetName="BackgroundGlyph" Storyboard.TargetProperty="Foreground"> <DiscreteObjectKeyFrame KeyTime="0" Value="{ThemeResource AppBarItemPointerOverBackgroundThemeBrush}"/> </ObjectAnimationUsingKeyFrames> <ObjectAnimationUsingKeyFrames Storyboard.TargetName="Content" Storyboard.TargetProperty="Foreground"> <DiscreteObjectKeyFrame KeyTime="0" Value="{ThemeResource AppBarItemPointerOverForegroundThemeBrush}"/> </ObjectAnimationUsingKeyFrames> </Storyboard> </VisualState> <VisualState x:Name="Pressed"> <Storyboard> <ObjectAnimationUsingKeyFrames Storyboard.TargetName="OutlineGlyph" Storyboard.TargetProperty="Foreground"> <DiscreteObjectKeyFrame KeyTime="0" Value="{ThemeResource AppBarItemForegroundThemeBrush}"/>
RichTextBox for UWP 73
Copyright © 2019 GrapeCity, Inc. All rights reserved.

</ObjectAnimationUsingKeyFrames> <ObjectAnimationUsingKeyFrames Storyboard.TargetName="BackgroundGlyph" Storyboard.TargetProperty="Foreground"> <DiscreteObjectKeyFrame KeyTime="0" Value="{ThemeResource AppBarItemForegroundThemeBrush}"/> </ObjectAnimationUsingKeyFrames> <ObjectAnimationUsingKeyFrames Storyboard.TargetName="Content" Storyboard.TargetProperty="Foreground"> <DiscreteObjectKeyFrame KeyTime="0" Value="{ThemeResource AppBarItemPressedForegroundThemeBrush}"/> </ObjectAnimationUsingKeyFrames> </Storyboard> </VisualState> <VisualState x:Name="Disabled"> <Storyboard> <ObjectAnimationUsingKeyFrames Storyboard.TargetName="OutlineGlyph" Storyboard.TargetProperty="Foreground"> <DiscreteObjectKeyFrame KeyTime="0" Value="{ThemeResource AppBarItemDisabledForegroundThemeBrush}"/> </ObjectAnimationUsingKeyFrames> <ObjectAnimationUsingKeyFrames Storyboard.TargetName="Content" Storyboard.TargetProperty="Foreground"> <DiscreteObjectKeyFrame KeyTime="0" Value="{ThemeResource AppBarItemDisabledForegroundThemeBrush}"/> </ObjectAnimationUsingKeyFrames> <ObjectAnimationUsingKeyFrames Storyboard.TargetName="TextLabel" Storyboard.TargetProperty="Foreground"> <DiscreteObjectKeyFrame KeyTime="0" Value="{ThemeResource AppBarItemDisabledForegroundThemeBrush}"/> </ObjectAnimationUsingKeyFrames> </Storyboard> </VisualState> </VisualStateGroup> <VisualStateGroup x:Name="FocusStates"> <VisualState x:Name="Focused"> <Storyboard> <DoubleAnimation Storyboard.TargetName="FocusVisualWhite" Storyboard.TargetProperty="Opacity" To="1" Duration="0"/> <DoubleAnimation Storyboard.TargetName="FocusVisualBlack" Storyboard.TargetProperty="Opacity" To="1" Duration="0"/> </Storyboard>
RichTextBox for UWP 74
Copyright © 2019 GrapeCity, Inc. All rights reserved.

</VisualState> <VisualState x:Name="Unfocused" /> <VisualState x:Name="PointerFocused" /> </VisualStateGroup> <VisualStateGroup x:Name="CheckStates"> <VisualState x:Name="Checked"> <Storyboard> <DoubleAnimation Duration="0" To="0" Storyboard.TargetName="OutlineGlyph" Storyboard.TargetProperty="Opacity"/> <ObjectAnimationUsingKeyFrames Storyboard.TargetName="BackgroundGlyph" Storyboard.TargetProperty="Foreground"> <DiscreteObjectKeyFrame KeyTime="0" Value="{ThemeResource AppBarItemForegroundThemeBrush}"/> </ObjectAnimationUsingKeyFrames> <ObjectAnimationUsingKeyFrames Storyboard.TargetName="BackgroundCheckedGlyph" Storyboard.TargetProperty="Visibility"> <DiscreteObjectKeyFrame KeyTime="0" Value="Visible"/> </ObjectAnimationUsingKeyFrames> <ObjectAnimationUsingKeyFrames Storyboard.TargetName="Content" Storyboard.TargetProperty="Foreground"> <DiscreteObjectKeyFrame KeyTime="0" Value="{ThemeResource AppBarItemPressedForegroundThemeBrush}"/> </ObjectAnimationUsingKeyFrames> </Storyboard> </VisualState> <VisualState x:Name="Unchecked"/> <VisualState x:Name="Indeterminate"/> </VisualStateGroup> </VisualStateManager.VisualStateGroups> </Grid> </ControlTemplate> </Setter.Value> </Setter> </Style> <!-- Standard AppBarButton Styles for use with Button and ToggleButton An AppBarButton Style is provided for each of the glyphs in the Segoe UI Symbol font. Uncomment any style you reference (as not all may be required). --> <Style x:Key="CopyAppBarButtonStyle" TargetType="ButtonBase" BasedOn="{StaticResource AppBarButtonStyle}"> <Setter Property="AutomationProperties.AutomationId" Value="CopyAppBarButton"/> <Setter Property="AutomationProperties.Name" Value="Copy"/> <Setter Property="Content" Value=""/> </Style> <Style x:Key="PasteAppBarButtonStyle" TargetType="ButtonBase"
RichTextBox for UWP 75
Copyright © 2019 GrapeCity, Inc. All rights reserved.

BasedOn="{StaticResource AppBarButtonStyle}"> <Setter Property="AutomationProperties.AutomationId" Value="PasteAppBarButton"/> <Setter Property="AutomationProperties.Name" Value="Paste"/> <Setter Property="Content" Value=""/> </Style> <Style x:Key="CutAppBarButtonStyle" TargetType="ButtonBase" BasedOn="{StaticResource AppBarButtonStyle}"> <Setter Property="AutomationProperties.AutomationId" Value="CutAppBarButton"/> <Setter Property="AutomationProperties.Name" Value="Cut"/> <Setter Property="Content" Value=""/> </Style> <Style x:Key="UnderlineAppBarButtonStyle" TargetType="ButtonBase" BasedOn="{StaticResource AppBarButtonStyle}"> <Setter Property="AutomationProperties.AutomationId" Value="UnderlineAppBarButton"/> <Setter Property="AutomationProperties.Name" Value="Underline"/> <Setter Property="Content" Value=""/> </Style> <Style x:Key="BoldAppBarButtonStyle" TargetType="ButtonBase" BasedOn="{StaticResource AppBarButtonStyle}"> <Setter Property="AutomationProperties.AutomationId" Value="BoldAppBarButton"/> <Setter Property="AutomationProperties.Name" Value="Bold"/> <Setter Property="Content" Value=""/> </Style> <Style x:Key="ItalicAppBarButtonStyle" TargetType="ButtonBase" BasedOn="{StaticResource AppBarButtonStyle}"> <Setter Property="AutomationProperties.AutomationId" Value="ItalicAppBarButton"/> <Setter Property="AutomationProperties.Name" Value="Italic"/> <Setter Property="Content" Value=""/> </Style> <Style x:Key="MoreAppBarButtonStyle" TargetType="ButtonBase" BasedOn="{StaticResource AppBarButtonStyle}"> <Setter Property="AutomationProperties.AutomationId" Value="MoreAppBarButton"/> <Setter Property="AutomationProperties.Name" Value="More"/> <Setter Property="Content" Value=""/> </Style> <Style x:Key="RedoAppBarButtonStyle" TargetType="ButtonBase" BasedOn="{StaticResource AppBarButtonStyle}"> <!-- <Setter Property="AutomationProperties.AutomationId;"/> --><Setter Property="AutomationProperties.Name" Value="Align Right"/> <Setter Property="Content" Value=""/> </Style></ResourceDictionary>
Right-click your application name again and select Add | New Folder. Name the new folder Resources.
1. Right-click the Resources folder and select Add | New Item.
RichTextBox for UWP 76
Copyright © 2019 GrapeCity, Inc. All rights reserved.

2. Select HTML Page from the available templates in the Add New Item dialog window. Name the new filesimple.htm.
3. When the blank page opens, add the following markup:Example Title
<!DOCTYPE HTML PUBLIC "-//W3C//DTD HTML 4.01 Transitional//EN"><html><body style="font-size:medium">
<p> Display and edit formatted text as HTML documents with <strong> RichTextBox<span style="font-size:x-small"><sup>TM</sup></span> for WinRT</strong>. Use the control to display HTML content from the Web or use it as a rich text editor. The <strong>C1RichTextBox</strong> control supports: </p> <ul style="line-height:1.5em"> <li> Most text <span style="background-color: yellow"><strong>decorations</strong></span>, <span style="color: red"><em>alignments</em></span> and <u>styles</u> </li> <li> Bulleted and numbered lists </li> <li> Clipboard and document history (undo and redo) </li> <li> Hyperlinks: <a href="http://www.grapecity.com">GrapeCity website</a> </li> <li> Insert tables and pictures </li> </ul>
</body></html>
4. Select simple.htm in the Solution Explorer. In the Properties window, set the Build Action to EmbeddedResource.
5. Rebuild your application.
5. Double-click the App.xaml file in the Solution Explorer and add the following markup:XAML
<Application.Resources> <ResourceDictionary> <ResourceDictionary.MergedDictionaries> <!-- Styles that define common aspects of the platform look and feel required by Visual Studio project and item templates --> <ResourceDictionary Source="Common/StandardStyles.xaml"/> </ResourceDictionary.MergedDictionaries> </ResourceDictionary>
RichTextBox for UWP 77
Copyright © 2019 GrapeCity, Inc. All rights reserved.
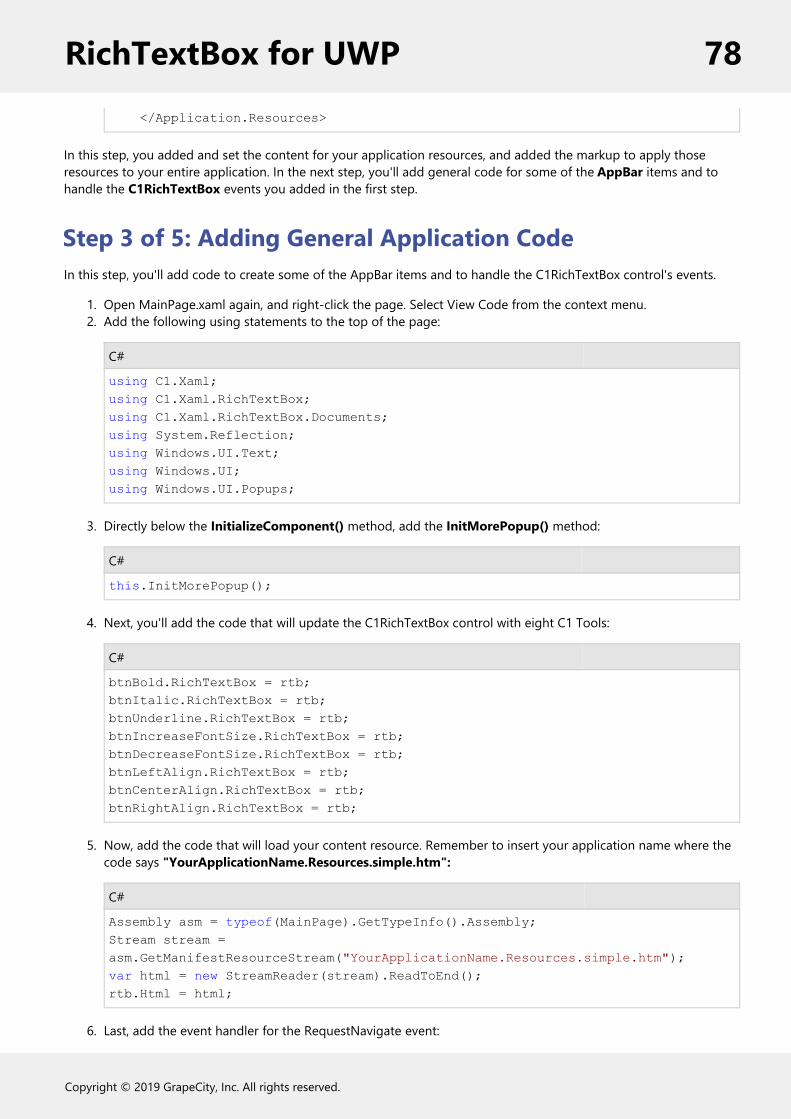
</Application.Resources>
In this step, you added and set the content for your application resources, and added the markup to apply thoseresources to your entire application. In the next step, you'll add general code for some of the AppBar items and tohandle the C1RichTextBox events you added in the first step.
Step 3 of 5: Adding General Application CodeIn this step, you'll add code to create some of the AppBar items and to handle the C1RichTextBox control's events.
1. Open MainPage.xaml again, and right-click the page. Select View Code from the context menu.2. Add the following using statements to the top of the page:
C#
using C1.Xaml;using C1.Xaml.RichTextBox;using C1.Xaml.RichTextBox.Documents;using System.Reflection;using Windows.UI.Text;using Windows.UI;using Windows.UI.Popups;
3. Directly below the InitializeComponent() method, add the InitMorePopup() method:
C#
this.InitMorePopup();
4. Next, you'll add the code that will update the C1RichTextBox control with eight C1 Tools:
C#
btnBold.RichTextBox = rtb;btnItalic.RichTextBox = rtb;btnUnderline.RichTextBox = rtb;btnIncreaseFontSize.RichTextBox = rtb;btnDecreaseFontSize.RichTextBox = rtb;btnLeftAlign.RichTextBox = rtb;btnCenterAlign.RichTextBox = rtb;btnRightAlign.RichTextBox = rtb;
5. Now, add the code that will load your content resource. Remember to insert your application name where thecode says "YourApplicationName.Resources.simple.htm":
C#
Assembly asm = typeof(MainPage).GetTypeInfo().Assembly;Stream stream = asm.GetManifestResourceStream("YourApplicationName.Resources.simple.htm");var html = new StreamReader(stream).ReadToEnd();rtb.Html = html;
6. Last, add the event handler for the RequestNavigate event:
RichTextBox for UWP 78
Copyright © 2019 GrapeCity, Inc. All rights reserved.

C#
private async void rtb_RequestNavigate(object sender, RequestNavigateEventArgs e) { var md = new MessageDialog("The document is requesting to navigate to " + e.Hyperlink.NavigateUri, "Navigate");
md.Commands.Add(new UICommand("OK", (UICommandInvokedHandler) => { Windows.System.Launcher.LaunchUriAsync(e.Hyperlink.NavigateUri); }));
md.Commands.Add(new UICommand("Cancel", (UICommandInvokedHandler) => { rtb.Select(e.Hyperlink.ContentStart.TextOffset, e.Hyperlink.ContentRange.Text.Length); }));
await md.ShowAsync();
In this step, you added code to handle C1RichTextBox events and to create some of the C1 Tools used in theAppBar. In the next step, you'll add the code for the bottom AppBar.
Step 4 of 5: Adding Code for the BottomAppBarIn this step, you'll add the code that handles the flyout and click events for the BottomAppBar items.
1. The first section of code to add to your page contains five regions: Clipboard, Undo/Redo, Lists, clearformatting, and sub/superscript:
C#
#region Clipboard private void btnCopy_Click(object sender, Windows.UI.Xaml.RoutedEventArgs e) { rtb.ClipboardCopy(); }
private void btnCut_Click(object sender, Windows.UI.Xaml.RoutedEventArgs e) { if (rtb.IsReadOnly) rtb.ClipboardCopy(); else rtb.ClipboardCut(); }
private void btnPaste_Click(object sender, Windows.UI.Xaml.RoutedEventArgs e)
RichTextBox for UWP 79
Copyright © 2019 GrapeCity, Inc. All rights reserved.

{ if (!rtb.IsReadOnly) { rtb.ClipboardPaste(); } } #endregion
#region Undo/Redo void btnRedo_Click(object sender, RoutedEventArgs e) { if (rtb.DocumentHistory.CanRedo) { rtb.DocumentHistory.Redo(); } morePopUp.Hide(); }
void btnUndo_Click(object sender, RoutedEventArgs e) { if (rtb.DocumentHistory.CanUndo) { rtb.DocumentHistory.Undo(); } morePopUp.Hide(); } #endregion
#region Lists void btnBulletedList_Click(object sender, RoutedEventArgs e) { // check if selection is already a list if (rtb.Selection.Lists.Count<C1.Xaml.RichTextBox.Documents.C1List>() > 0) { // undo list rtb.Selection.UndoList(); } else { // make bullet list rtb.Selection.MakeList(C1.Xaml.RichTextBox.Documents.TextMarkerStyle.Disc); } morePopUp.Hide(); }
void btnNumberedList_Click(object sender, RoutedEventArgs e) { // check if selection is already a list if (rtb.Selection.Lists.Count<C1.Xaml.RichTextBox.Documents.C1List>
RichTextBox for UWP 80
Copyright © 2019 GrapeCity, Inc. All rights reserved.

() > 0) { // undo list rtb.Selection.UndoList(); } else { // make number list rtb.Selection.MakeList(C1.Xaml.RichTextBox.Documents.TextMarkerStyle.Decimal); } morePopUp.Hide(); } #endregion
#region clear formatting void btnClear_Click(object sender, RoutedEventArgs e) { // clear foreground and background colors rtb.Selection.InlineBackground = null; rtb.Selection.Foreground = rtb.Foreground;
// clear font rtb.Selection.FontWeight = FontWeights.Normal; rtb.Selection.FontStyle = FontStyle.Normal; rtb.Selection.TextDecorations = null; } #endregion
#region sub/super script void btnSubscript_Click(object sender, RoutedEventArgs e) { // subscript if (rtb.Selection.InlineAlignment != C1VerticalAlignment.Sub && rtb.Selection.InlineAlignment != null) { rtb.Selection.InlineAlignment = C1VerticalAlignment.Sub; ShrinkFont(4); } else { rtb.Selection.InlineAlignment = C1VerticalAlignment.Baseline; GrowFont(4); } morePopUp.Hide(); }
void btnSuperscript_Click(object sender, RoutedEventArgs e) { // superscript if (rtb.Selection.InlineAlignment != C1VerticalAlignment.Super &&
RichTextBox for UWP 81
Copyright © 2019 GrapeCity, Inc. All rights reserved.

rtb.Selection.InlineAlignment != null) { rtb.Selection.InlineAlignment = C1VerticalAlignment.Super; ShrinkFont(4); } else { rtb.Selection.InlineAlignment = C1VerticalAlignment.Baseline; GrowFont(4); } morePopUp.Hide(); }
private void GrowFont(int size) { // grow font rtb.Selection.TrimRuns(); foreach (var run in rtb.Selection.Runs) { run.FontSize += size; } }
private void ShrinkFont(int size) { // shrink font rtb.Selection.TrimRuns(); foreach (var run in rtb.Selection.Runs) { run.FontSize -= size; } } #endregion
2. The next region of code to be added contains the events for the More button and menu:
C#
#region More Flyout morePopUp = new Flyout(); private void btnMore_Click(object sender, RoutedEventArgs e) { morePopUp.Placement = FlyoutPlacementMode.Top; morePopUp.ShowAt(sender as FrameworkElement); }
void InitMorePopup() { Border menuBorder = new Border(); menuBorder.Height = 260; menuBorder.Width = 150; StackPanel panel = new StackPanel();
RichTextBox for UWP 82
Copyright © 2019 GrapeCity, Inc. All rights reserved.

panel.VerticalAlignment = Windows.UI.Xaml.VerticalAlignment.Center;
// bulleted list Button btnBulletedList = new Button(); btnBulletedList.Content = "Bulleted List"; btnBulletedList.Style = Application.Current.Resources["MenuTextButtonStyle"] as Style; btnBulletedList.Margin = new Thickness(20, 5, 20, 5); btnBulletedList.Click += btnBulletedList_Click;
// numbered list Button btnNumberedList = new Button(); btnNumberedList.Content = "Numbered List"; btnNumberedList.Style = Application.Current.Resources["MenuTextButtonStyle"] as Style; btnNumberedList.Margin = new Thickness(20, 5, 20, 5); btnNumberedList.Click += btnNumberedList_Click;
// undo Button btnUndo = new Button(); btnUndo.Content = "Undo"; btnUndo.Style = Application.Current.Resources["MenuTextButtonStyle"] as Style; btnUndo.Margin = new Thickness(20, 5, 20, 5); btnUndo.Click += btnUndo_Click;
// undo Button btnRedo = new Button(); btnRedo.Content = "Redo"; btnRedo.Style = Application.Current.Resources["MenuTextButtonStyle"] as Style; btnRedo.Margin = new Thickness(20, 5, 20, 5); btnRedo.Click += btnRedo_Click;
// clear formatting Button btnClear = new Button(); btnClear.Content = "Clear Formatting"; btnClear.Style = Application.Current.Resources["MenuTextButtonStyle"] as Style; btnClear.Margin = new Thickness(20, 5, 20, 5); btnClear.Click += btnClear_Click;
// superscript Button btnSuperscript = new Button(); btnSuperscript.Content = "Superscript"; btnSuperscript.Style = Application.Current.Resources["MenuTextButtonStyle"] as Style; btnSuperscript.Margin = new Thickness(20, 5, 20, 5); btnSuperscript.Click += btnSuperscript_Click;
// subscript
RichTextBox for UWP 83
Copyright © 2019 GrapeCity, Inc. All rights reserved.

Button btnSubscript = new Button(); btnSubscript.Content = "Subscript"; btnSubscript.Style = Application.Current.Resources["MenuTextButtonStyle"] as Style; btnSubscript.Margin = new Thickness(20, 5, 20, 5); btnSubscript.Click += btnSubscript_Click;
// strikethrough Button btnStrikethrough = new Button(); btnStrikethrough.Content = "Strikethrough"; btnStrikethrough.Style = Application.Current.Resources["MenuTextButtonStyle"] as Style; btnStrikethrough.Margin = new Thickness(20, 5, 20, 5); btnStrikethrough.Click += btnStrikethrough_Click;
panel.Children.Add(btnBulletedList); panel.Children.Add(btnNumberedList); panel.Children.Add(btnSubscript); panel.Children.Add(btnSuperscript); panel.Children.Add(btnStrikethrough); panel.Children.Add(btnUndo); panel.Children.Add(btnRedo); panel.Children.Add(btnClear); menuBorder.Child = panel; morePopUp.Content = menuBorder;
}
void btnStrikethrough_Click(object sender, RoutedEventArgs e) { // strikethrough var range = rtb.Selection; var collection = new C1TextDecorationCollection(); if (range.TextDecorations == null) { collection.Add(C1TextDecorations.Strikethrough[0]); } else if (!range.TextDecorations.Contains(C1TextDecorations.Strikethrough[0])) { foreach (var decoration in range.TextDecorations) collection.Add(decoration);
collection.Add(C1TextDecorations.Strikethrough[0]); } else { foreach (var decoration in range.TextDecorations) collection.Add(decoration);
collection.Remove(C1TextDecorations.Strikethrough[0]);
RichTextBox for UWP 84
Copyright © 2019 GrapeCity, Inc. All rights reserved.

if (collection.Count == 0) collection = null; } range.TextDecorations = collection; morePopUp.Hide(); } #endregion
3. The last section of code handles the PointerPressed event:
C#
private void rtb_PointerPressed(object sender, PointerRoutedEventArgs e) { bottomAppBar.IsOpen = true; topAppBar.IsOpen = true; } }}
In this step, you added the code for the Bottom AppBar events. In the next step, you'll run your application.
Step 5 of 5: Running the ApplicationIn this step, you'll run the application.
1. Press F5 or start debugging to run your application:
RichTextBox for UWP 85
Copyright © 2019 GrapeCity, Inc. All rights reserved.

Congratulations! You have completed the Creating an AppBar Application Tutorial! In this tutorial, youcreated a new application, added markup and code, and added resource files.
Printing C1RichTextBox ContentsIn this tutorial, you'll create a new Universal Windows application that will allow you to add printing capabilities toyour C1RichTextBox control. The sample on which this tutorial is based can be found in the C1RichTextBox Samplesfolder.
You will also need the dickens.htm file located in the Resources folder of the Printing sample.
Step 1 of 4: Setting up the ApplicationIn this step, you'll create a new Universal Windows application, add a C1RichTextBox control, and add the markup tocreate the C1RichTextBox control and a C1RichTextBoxMenu control.
1. Select File | New | Project to open the New Project dialog box.1. Select Templates | Visual C# | Windows | Universal. From the templates list, select Blank App (Universal
Windows).2. Enter a name for your application and click OK. A new application will open.
2. In the Solution Explorer, right-click the References file and select Add Reference from the list. Browse tolocate the following assembly references:
C1.UWPC1.UWP.RichTextBox
RichTextBox for UWP 86
Copyright © 2019 GrapeCity, Inc. All rights reserved.

C1.UWP.RichTextBox.Menu
3. Double-click the MainPage.xaml file to open it.4. Add the following namespace declaration to the <Page> tag at the top of the page:
XAML
xmlns:c1RTB="using:C1.Xaml.RichTextBox"
5. Next, you'll add some Grid.Resources and RowDefinitions. The following markup should be placed betweenthe <Grid> </Grid> tags:
XAML
<Grid.Resources> <DataTemplate x:Name="printTemplate"> <Grid Height="{Binding ViewManager.PresenterInfo.Height}" Width="{Binding ViewManager.PresenterInfo.Width}"> <c1RTB:C1RichTextPresenter Source="{Binding}" Margin="{Binding ViewManager.PresenterInfo.Padding}" /> </Grid> </DataTemplate> </Grid.Resources> <Grid.RowDefinitions> <RowDefinition Height="Auto"/> <RowDefinition/> </Grid.RowDefinitions>
6. Right below the closing </Grid.RowDefinitions> tag, add a general Button control. Edit the markup sothat it resembles the following. You'll add a Name, the Content, and a Click event:XAML
<Button x:Name="btnPrint" Content="Print" HorizontalAlignment="Left" Click="btnPrint_Click" />
7. Finally, add aC1RichTextBoxMenu control and a C1RichTextBox control by locating the controls in the VisualStudio ToolBox and double-clicking them. Edit the markup to resemble the following:XAML
<c1RTB:C1RichTextBoxMenu x:Name="rtbMenu" RichTextBox="{Binding ElementName=rtb}" Grid.Row="1" /><c1RTB:C1RichTextBox x:Name="rtb" Grid.Row="1" FontFamily="Times New Roman" FontSize="20" ViewMode="Print" HorizontalContentAlignment="Center" Background="#EEEEEE"/>
In this step, you set up a new Universal Windows application, added the appropriate references for the application,and added C1RichTextBox controls to the application. In the next step, you'll add the appropriate resource files andsome application code.
RichTextBox for UWP 87
Copyright © 2019 GrapeCity, Inc. All rights reserved.

Step 2 of 4: Adding Resource Files and CodeIn the previous step, you set up your application and added controls. In this step, you'll add the necessary resourcefiles and add some of the code that controls printing. In this step, you'll add a resource file that was installed with yourComponentOne Studio UWP Edition Samples. You can find the samples in the Documents folder of your system.
1. Right-click your application name in the Solution Explorer and select Add | New Folder from the contextmenu. Name the new folder Resources and click OK.
2. Right-click the Resources folder and select Add | Existing Item from the context menu. Browse to the locationof your Samples, and select dickens.htm from the RichTextBoxSamples\Resources folder. Click OK to addthe file to your Resources folder.
3. Select the dickens.htm file in the Solution Explorer and set the Build Action property to Embedded Resourcein the Properties window. Rebuild your application.
4. Right-click your application page; select View Code from the context menu. The MainPage.xaml.cs page willopen.
5. Import the following namespaces:C#
using Windows.UI.Xaml.Printing;using C1.Xaml.RichTextBox;using Windows.UI.ViewManagement;using Windows.Graphics.Printing;using System.Reflection;using Windows.UI.Popups;
6. Edit the MainPage class so that it resembles the following code:C#
public sealed partial class MainPage : Page { /// <summary> /// PrintDocument is used to prepare the pages for printing. /// Prepare the pages to print in the handlers for the Paginate, GetPreviewPage, and AddPages events. /// </summary> protected PrintDocument printDocument = null; /// <summary> /// Marker interface for document source /// </summary> protected IPrintDocumentSource printDocumentSource = null; /// <summary> /// A list of UIElements used to store the rtb pages. /// </summary> internal List<FrameworkElement> pages = null; /// <summary> /// Used for printing the document of C1RichTextBox. /// </summary> C1RichTextViewManager viewManager;
7. Edit the MainPage() constructor so that it resembles the following code. Please remember to replace"YourApplicationName" in the GetManifestResourceStream() with your application name:C#
public MainPage() {
RichTextBox for UWP 88
Copyright © 2019 GrapeCity, Inc. All rights reserved.

this.InitializeComponent(); Assembly asm = typeof(MainPage).GetTypeInfo().Assembly; Stream stream = asm.GetManifestResourceStream("YourApplicationName.Resources.dickens.htm"); var html = new StreamReader(stream).ReadToEnd(); rtb.Html = html; pages = new List<FrameworkElement>(); this.Loaded += Printing_Loaded; this.Unloaded += Printing_Unloaded; }
In this step, you added a Resources file, and the appropriate existing dickens.htm file. You also added code tothe MainPage.xaml.cs file. In the next step, you'll add the rest of the code to handle the Button_Click eventfor the general Button control, and the Printing events that you added in the MainPage() constructor.
Step 3 of 4: Adding Application CodeIn the previous step, you added a resource file and started adding code to your application. In this step, you'll add therest of your application code.
1. First, you'll add the event handlers for the Printing_Loaded, Printing_Unloaded, and btnPrint_Click eventswithin and event handler region:C#
#region event handlers void Printing_Unloaded(object sender, RoutedEventArgs e) { UnregisterForPrinting(); } void Printing_Loaded(object sender, RoutedEventArgs e) { // init printing RegisterForPrinting(); } private async void btnPrint_Click(object sender, RoutedEventArgs e) { await Windows.Graphics.Printing.PrintManager.ShowPrintUIAsync(); } #endregion
2. Create another region for the printing implementation:C#
#region implemention #endregion
3. Within the implementation region, add the PrintTaskRequested event handler:C#
/// <summary> /// This is the event handler for PrintManager.PrintTaskRequested. /// </summary>
RichTextBox for UWP 89
Copyright © 2019 GrapeCity, Inc. All rights reserved.

/// <param name="sender">PrintManager</param> /// <param name="e">PrintTaskRequestedEventArgs </param> protected void PrintTaskRequested(PrintManager sender, PrintTaskRequestedEventArgs e) { PrintTask printTask = null; printTask = e.Request.CreatePrintTask("SamplePDF", sourceRequested => { // Print Task event handler is invoked when the print job is completed. printTask.Completed += async (s, args) => { // Notify the user when the print operation fails. if (args.Completion == PrintTaskCompletion.Failed) { await Dispatcher.RunAsync(Windows.UI.Core.CoreDispatcherPriority.Normal, () => { MessageDialog dialog = new MessageDialog("Failed to print."); dialog.ShowAsync(); }); } };
4. Directly below the PrintTaskRequested event handler, set some options like the paper size and orientation:C#
// set print options like paper size and orientation Dispatcher.RunAsync(Windows.UI.Core.CoreDispatcherPriority.Normal, () => { var layout = rtb.ViewManager.PresenterInfo as C1PageLayout; if (layout != null && layout.Width > layout.Height) { printTask.Options.Orientation = PrintOrientation.Landscape; } }); sourceRequested.SetSource(printDocumentSource); }); }
5. The method you'll add next registers the app for printing with Windows and sets up the event handlers for theprint process:C#
/// <summary> /// This method registers the app for printing with Windows and sets up the necessary event handlers for the print process. /// </summary>
RichTextBox for UWP 90
Copyright © 2019 GrapeCity, Inc. All rights reserved.

protected void RegisterForPrinting() { // Create the PrintDocument. printDocument = new PrintDocument(); // Save the DocumentSource. printDocumentSource = printDocument.DocumentSource; // Add an event handler which sets up print preview. printDocument.Paginate += Paginate; // Add an event handler which provides a specified preview page. printDocument.GetPreviewPage += GetPrintPreviewPage; // Add an event handler which provides all final print pages. printDocument.AddPages += AddPrintPages; // Create a PrintManager and add a handler for printing initialization. PrintManager printMan = PrintManager.GetForCurrentView(); printMan.PrintTaskRequested += PrintTaskRequested; }
6. Add the method that un-registers the app for printing:C#
/// <summary> /// This method unregisters the app for printing with Windows. /// </summary> protected void UnregisterForPrinting() { if (printDocument == null) return; printDocument.Paginate -= Paginate; printDocument.GetPreviewPage -= GetPrintPreviewPage; printDocument.AddPages -= AddPrintPages; // Remove the handler for printing initialization. PrintManager printMan = PrintManager.GetForCurrentView(); printMan.PrintTaskRequested -= PrintTaskRequested; }
7. The last code you'll add within the implementation region contains three event handlers:C#
/// <summary> /// This is the event handler for PrintDocument.Paginate. /// It fires when the PrintManager requests print preview /// </summary> /// <param name="sender">PrintDocument</param> /// <param name="e">Paginate Event Arguments</param> protected void Paginate(object sender, PaginateEventArgs e) { pages.Clear(); viewManager = new C1RichTextViewManager { Document = rtb.Document, PresenterInfo = rtb.ViewManager.PresenterInfo
RichTextBox for UWP 91
Copyright © 2019 GrapeCity, Inc. All rights reserved.

}; PrintDocument printDoc = (PrintDocument)sender; // Report the number of preview pages printDoc.SetPreviewPageCount(rtb.ViewManager.Presenters.Count, PreviewPageCountType.Intermediate); } /// <summary> /// This is the event handler for PrintDocument.GetPrintPreviewPage. It provides a specific print preview page, /// in the form of an UIElement, to an instance of PrintDocument. PrintDocument subsequently converts the UIElement /// into a page that the Windows print system can deal with. /// </summary> /// <param name="sender">PrintDocument</param> /// <param name="e">Arguments containing the preview requested page</param> protected void GetPrintPreviewPage(object sender, GetPreviewPageEventArgs e) { // Add the first page if (e.PageNumber == 1) AddOnePrintPreviewPage(0); PrintDocument printDoc = (PrintDocument)sender; printDoc.SetPreviewPage(e.PageNumber, pages[e.PageNumber - 1]); // Add the other pages if (e.PageNumber == 1) for (int i = 1; i < viewManager.Presenters.Count; i++) AddOnePrintPreviewPage(i); } /// <summary> /// This is the event handler for PrintDocument.AddPages. It provides all pages to be printed, in the form of /// UIElements, to an instance of PrintDocument. PrintDocument subsequently converts the UIElements /// into a pages that the Windows print system can deal with. /// </summary> /// <param name="sender">PrintDocument</param> /// <param name="e">Add page event arguments containing a print task options reference</param> protected void AddPrintPages(object sender, AddPagesEventArgs e) { // Loop over all of the pages and add each one to be printed foreach (FrameworkElement page in pages) { printDocument.AddPage(page); } PrintDocument printDoc = (PrintDocument)sender; // Indicate that all of the print pages have been provided printDoc.AddPagesComplete(); } void AddOnePrintPreviewPage(int index)
RichTextBox for UWP 92
Copyright © 2019 GrapeCity, Inc. All rights reserved.

{ var page = (FrameworkElement)printTemplate.LoadContent(); page.DataContext = viewManager.Presenters[index]; if (!pages.Contains(page)) pages.Add(page); }
In this step, you added application code. In the next step, you'll run the application.
Step 4 of 4: Running the ApplicationIn the previous step, you added application code. In this step, you'll run the application.
1. Press F5 or start debugging to run your application. Your application should resemble the following image:
2. Tap or click the Print button. You can choose the printer you wish to use:
RichTextBox for UWP 93
Copyright © 2019 GrapeCity, Inc. All rights reserved.

3. Choose a printer. The Print dialog will open, so you can preview the printed document, and set the print settings:
What You've Accomplished
In this tutorial, you added printing capabilities to your C1RichTextBox control using native Windows print events. You alsoloaded a document from your Resources folder, and created the C1RichTextBox control using XAML markup.
RichTextBox for UWP 94
Copyright © 2019 GrapeCity, Inc. All rights reserved.