ribbonx: customizing the office 2007 ribbon - excelguru · ribbonx: customizing the office 2007...
TRANSCRIPT


RibbonX:
Customizing the Office 2007 Ribbon
Chapter 7: comboBox and dropDown Controls
ISBN: 978-0-470-19111-8
Copyright of Wiley Publishing, Inc. Posted with Permission

Introduction xxix
Part I The Building Blocks for a Successful Customization 1
Chapter 1 An Introduction to the Office User Interface 3What Is the Ribbon and Why Does It Exist? 3
Problems with the Old UI 4Issues Solved with the New UI 6Issues Created with the New UI 7
What Happened to the Toolbars from My Pre-2007 Files? 9A Customization Example for Pre-2007 UIs 10Ribbon Components 16Tips for Navigating the Ribbon and Quick Access Toolbar (QAT) 17
Using Keyboard Shortcuts and Keytips 17Using the Mouse Wheel 19Minimizing and Maximizing the Ribbon 19Adding Commands to the QAT 20Assigning a Macro to a QAT Button 22Changing the QAT Location 24
Preparing for Ribbon Customization 24Showing the Developer Tab 24Showing CustomUI Errors at Load Time 26Reviewing Office 2007 Security 26Has Customization of the Office UI Become Easier? 27
Conclusion 27
Chapter 2 Accessing the UI Customization Layer 29Accessing the Excel and Word Ribbon Customization Layers 30
What’s New in Excel and Word Files? 30Creating a Ribbon Customization with Notepad 30
Contents
xiii
91118ftoc.qxd:WileyRedTight 12/3/07 9:54 AM Page xiii

Creating the customUI File 30Creating the File to Use the Customized UI 31Attaching the XML to the File 32
Using the Microsoft Office 2007 Custom UI Editor to Modify Your UI 35
Installing Microsoft .NET Framework 2.0 for Windows XP Users 36
Installing the Microsoft Office 2007 Custom UI Editor 38Using the CustomUI Editor to Customize the Ribbon 39Storing Customization Templates in the CustomUI Editor 41Some Notes About Using the CustomUI Editor 42
XML Notepad 43Installing XML Notepad 43Using XML Notepad 43The Benefits of XML Notepad 47The Drawbacks of XML Notepad 48
A Final Word on Excel and Word Customizations 48Microsoft Access Customizations 48
Storing the CustomUI Information in Tables 49Creating an Access UI Modification Using a Table 49Access USysRibbons Caveat 51
Other Techniques for Access UI Customizations 52Conclusion 52
Chapter 3 Understanding XML 55What Is XML and Why Do You Need It? 55Essential Background 57
Tags 57Elements 59Attributes 59
The id Attribute 60The label Attribute 61
Tips for Laying Out XML Code 61Creating Comments in XML Code 63
The Core XML Framework 65The customUI Element 65
Required Attributes of the customUI Element 66Optional Static and Dynamic Attributes with
Callback Signatures 66Allowed Children Objects of the customUI Element 67
The ribbon Element 67Required Attributes of the ribbon Element 67Optional Static Attributes 68Allowed Children Objects of the ribbon Element 68Graphical View of ribbon Attributes 68
The tabs Element 69Required Attributes of the tabs Element 69Allowed Children Objects of the tabs Element 70
xiv Contents
91118ftoc.qxd:WileyRedTight 12/3/07 9:54 AM Page xiv

The tab Element 70Required Attributes of the tab Element 70Optional Static and Dynamic Attributes with
Callback Signatures 71Allowed Children Objects of the tab Element 72Graphical View of tab Attributes 72Built-in Tabs 72
Referring to Built-in Tabs 72Modifying a Built-in Tab 73
Custom Tabs 74Creating Custom Tabs 74Positioning Custom Tabs 75
The group Element 76Required Attributes of the group Element 76Optional Static and Dynamic Attributes with
Callback Signatures 76Allowed Children Objects of the group Element 78Graphical View of group Attributes 79Built-in Groups 80
Referring to Built-in Groups 80Using a Built-in Group on a Custom Tab 81
Custom Groups 83Creating Custom Groups 83Positioning Custom Groups 83Custom Groups on Built-in Tabs 85
Conclusion 85
Chapter 4 Introducing Visual Basic for Applications (VBA) 87Getting Started with Visual Basic for Applications (VBA) 88
What Is VBA? 89Macro-Enabled Documents 89Using the Visual Basic Editor (VBE) 90
Recording Macros for Excel and Word 91A Recording Example 94Editing the Recorded Macro 95Editing Macro Options After Recording 96
Subprocedures versus Functions 97Object Model 98Subprocedures 98Functions 100
VBA Coding Techniques 101Looping Statements 101
For-Next Loops 102Do-While/Do-Until Loops 105
With . . . End With Statement 106If . . . Then . . . Else . . . End If Statement 107Select Case Statement 109
Contents xv
91118ftoc.qxd:WileyRedTight 12/3/07 9:54 AM Page xv

Writing Your Own Code 110Naming Conventions 111Data Types 112Working with Events 114
Workbook Events 115Worksheet Events 117Form and Report Events in Access 119Document-Level Events in Word 122Application-Level Events 123
The Object Browser 125Referencing Libraries 126
Early and Late Bindings Explained 128Debugging Your Code 129
Debug.Print and Debug.Assert 130Stop Statement 131Immediate Window 132Locals Window 134Watches Window 135
Error Handling 137On Error Resume Next 138On Error GoTo 138
Working with Arrays 140Determining the Boundaries of an Array 141Resizing Arrays 142
Conclusion 143
Chapter 5 Callbacks: The Key to Adding Functionality to Your Custom UI 145Callbacks: What They Are and Why You Need Them 145Setting Up the File for Dynamic Callbacks 146
Capturing the IRibbonUI Object 147Adjusting the XML to Include onLoad 147Setting Up VBA Code to Handle the onLoad Event 147
Generating Your First Callback 148Writing Your Callback from Scratch 148Using the Office CustomUI Editor to Generate Callbacks 150Understanding the Order of Events When a File Is Open 151Can I Have Two Callbacks with the Same Name
But Different Signatures? 152Calling Procedures Located in Different Workbooks 153Organizing Your Callbacks 155
Individual Callback Handlers 155Using Global Callback Handlers 157Handling Callbacks in Access 158
Using VBA to Handle Callbacks 158Using Macros to Handle Callbacks 160
xvi Contents
91118ftoc.qxd:WileyRedTight 12/3/07 9:54 AM Page xvi

Invalidating UI Components 162What Invalidating Does and Why You Need It 162Invalidating the Entire Ribbon 163Invalidating Individual Controls 165
Conclusion 167
Chapter 6 RibbonX Basic Controls 169The button Element 169
Required Attributes of the button Element 170Optional Static and Dynamic Attributes with
Callback Signatures 171Allowed Children Objects of the button Element 173Parent Objects of the button Element 173Graphical View of button Attributes 173Using Built-in button Controls 174A button Idiosyncrasy: The showLabel Attribute 175Creating Custom button Controls 176
An Excel Example 176A Word Example 179An Access Example 181
The checkBox Element 183Required Attributes of the checkBox Element 184Optional Static and Dynamic Attributes with
Callback Signatures 184Allowed Children Objects of the checkBox Element 186Parent Objects of the button Element 186Graphical View of checkBox Attributes 186Using Built-in checkBox Controls 187Creating Custom Controls 188
An Excel Example 188A Word Example 192An Access Example 194
The editBox Element 196Required Attributes of the editBox Element 197Optional Static and Dynamic Attributes with
Callback Signatures 197Allowed Children Objects of the editBox Element 199Parent Objects of the editBox Element 199Graphical View of editBox Attributes 200Using Built-in editBox Controls 200Creating Custom Controls 200
An Excel Example 200A Word Example 203An Access Example 205
The toggleButton Element 209Required Attributes of the toggleButton Element 209Optional Static and Dynamic Attributes with
Callback Signatures 210
Contents xvii
91118ftoc.qxd:WileyRedTight 12/3/07 9:54 AM Page xvii

Allowed Children Objects of the toggleButton Element 212Parent Objects of the toggleButton Element 212Graphical View of toggleButton Attributes 212Using Built-in toggleButton Controls 213Creating Custom Controls 214
An Excel Example 214A Word Example 217An Access Example 220
Conclusion 223
Chapter 7 comboBox and dropDown Controls 225The item Element 225
Required Attributes of the item Element 226Optional Static and Dynamic Attributes with
Callback Signatures 226Allowed Children Objects of the item Element 227Parent Objects of the item Element 227Graphical View of item Attributes 227Using Built-in Controls 228Creating Custom Controls 228
The comboBox Element 229Required Attributes of the comboBox Element 229Optional Static and Dynamic Attributes with
Callback Signatures 229Allowed Children Objects of the comboBox Element 232Parent Objects of the comboBox Element 232Graphical View of comboBox Attributes 232Using Built-in Controls 232Creating Custom Controls 234
An Excel Example 235A Word Example 237An Access Example 239
The dropDown Element 244Required Attributes of the dropDown Element 244Optional Static and Dynamic Attributes with
Callback Signatures 244Allowed Children Objects of the dropDown Element 247Parent Objects of the dropDown Element 247Graphical View of dropDown Attributes 248Using Built-in Controls 248Creating Custom Controls 249
An Excel Example 249A Word Example 254An Access Example 258
Conclusion 261
xviii Contents
91118ftoc.qxd:WileyRedTight 12/3/07 9:54 AM Page xviii

Chapter 8 Custom Pictures and Galleries 263Custom Pictures 263
Suggested Picture Formats 263Appropriate Picture Size and Scaling 266
Adding Custom Pictures to Excel or Word Projects 266Using the Custom UI Editor 267Loading Custom Pictures On-the-Fly 268
Adding Custom Pictures to Access Projects 270Using GDI+ to Load PNG Files 274Using the Gallery Control 276
Example of Static Attributes 278Example of Built-in Controls 280Creating an Image Gallery On-the-Fly 281
Conclusion 282
Chapter 9 Creating Menus 285The menu Element 286
Required Attributes of the menu Element 286Optional Static and Dynamic Attributes with
Callback Signatures 286Allowed Children Objects of the menu Element 288Parent Controls of the menu Element 289Graphical View of menu Attributes 289Using Built-in Controls 290Creating Custom Controls 291
An Excel Example 292A Word Example 294An Access Example 296
The splitButton Element 299Required Attributes of the splitButton Element 299Optional Static and Dynamic Attributes with
Callback Signatures 300Allowed Children Objects of the splitButton Element 301Parent Objects of the splitButton Element 301Graphical View of splitButton Attributes 301Using Built-in Controls 302Creating Custom Controls 303
An Excel Example 303A Word Example 305An Access Example 306
The dynamicMenu Element 310Required Attributes of the dynamicMenu Element 310Optional Static and Dynamic Attributes with
Callback Signatures 311Allowed Children Objects of the dynamicMenu Element 313Parent Objects of the dynamicMenu Element 313
Contents xix
91118ftoc.qxd:WileyRedTight 12/3/07 9:54 AM Page xix

Graphical View of dynamicMenu Attributes 313Using Built-in Controls 314Creating Custom Controls 314
Conclusion 320
Chapter 10 Formatting Elements 323The box Element 324
Required Attributes of the box Element 324Optional Static and Dynamic Attributes with
Callback Signatures 324Allowed Children Objects of the box Element 325Parent Objects of the box Element 326Graphical View of box Attributes 326Using Built-in box Elements 327Creating Custom box Elements 327
Horizontal Alignment 327Vertical Alignment 328Nesting box Controls 329
The buttonGroup element 333Required Attributes of the buttonGroup element 334Optional Static and Dynamic Attributes with
Callback Signatures 335Allowed Children Objects of the buttonGroup Element 336Parent Objects of the buttonGroup Element 336Graphical View of a buttonGroup 336Using Built-in buttonGroup Elements 336Creating Custom buttonGroup Elements 337
The labelControl Element 338Required Attributes 338Optional Static and Dynamic Attributes with
Callback Signatures 338Allowed Children Objects of the labelControl Element 340Parent Objects of the labelControl Element 340Graphical View of a labelControl 340Using Built-in labelControl Elements 341Creating Custom labelControl Elements 341
The separator Element 344Required Attributes of the separator Element 344Optional Static and Dynamic Attributes with
Callback Signatures 345Allowed Children Objects of the separator Element 346Parent Objects of the separator Element 346Graphical View of a Separator 346Using Built-in separator Elements 346Creating Custom separator Elements 346
xx Contents
91118ftoc.qxd:WileyRedTight 12/3/07 9:54 AM Page xx

The menuSeparator Element 347Required Attributes of the menuSeparator Element 347Optional Static and Dynamic Attributes with
Callback Signatures 348Allowed Children Objects of the menuSeparator Element 349Parent Objects of the menuSeparator Element 349Graphical View of the menuSeparator Element 349Using Built-in menuSeparator Elements 350Creating Custom menuSeparator Elements 350
Conclusion 352
Chapter 11 Using Controls and Attributes to Help Your Users 355The dialogBoxLauncher Element 356
Required and Optional Attributes 356Allowed Children Objects 356Parent Objects 357Examples of Using the dialogBoxLauncher Element 357
Built-in dialogBoxLaunchers 357A Custom dialogBoxLauncher with Built-in Dialogs 358Custom dialogBoxLauncher with Custom Userforms 360
The keytip Attribute 362Creating a Keytip 363Keytip Idiosyncrasies 364
screentip and supertip Attributes 366Creating screentip and supertip Attributes 366
Overwriting Built-in Control Attributes 368Conclusion 369
Part II Advanced Concepts in Ribbon Customization 371
Chapter 12 Advanced VBA Techniques 373Working with Collections 373
Determining Whether an Item Belongs to a Collection 377Class Modules 378
Properties, Methods, and Events 378Working with Properties 379Working with Methods 380Working with Events 382
Web Services and CustomUI 383Using VBA Custom Properties 389
Setting Up the Custom Properties 389Saving and Retrieving Values from the Registry 394Conclusion 399
Chapter 13 Overriding Built-in Controls in the Ribbon 401Starting the UI from Scratch 402
Setting the startFromScratch Attribute 402Activating a Tab at Startup 404Disabling and Repurposing Commands 406
Contents xxi
91118ftoc.qxd:WileyRedTight 12/3/07 9:54 AM Page xxi

Disabling Commands, Application Options, and Exit 406Disabling Commands 406Disabling the Commands Associated with the Application
Options and Exit Controls 407Repurposing a Command Associated with a Generic Control 408Affecting the Keyboard Shortcuts and Keytips 410
Conclusion 412
Chapter 14 Customizing the Office Menu and the QAT 413Adding Items to the Office Menu 413Adding Items to the QAT 418
Customization Overview 418sharedControls versus documentControls 419
Adding Custom and Built-in Commands to the QAT 420Adding Custom and Built-in Groups to the QAT 422Repurposing QAT Controls 424Table-Driven Approach for QAT Customization
(Excel and Word) 428Table-Driven Approach for QAT Customization (Access) 430QAT Caveats 433
Inability to Load Controls 433Inability to Load Custom Images to Controls 434Duplication of Controls on XML-Based and
XML-Free Customizations 434Conclusion 435
Chapter 15 Working with Contextual Controls 437Making Your Items Contextual 437
Tabs 438Groups 439
Working Through Nonvisibility Methods 441Enabling and Disabling Controls 441
Working with Contextual Tabs and tabSets 442Creating a Custom Contextual Tab in Access 442
Renaming a tabSet 444Modifying Built-in Contextual Tabs 445
Working with Contextual Pop-up Menus 447Replacing Built-in Pop-up Menus in Their Entirety 448Adding Individual Items to Pop-up Menus 453
Multilingual UI 455Conclusion 458
Chapter 16 Sharing and Deploying Ribbon Customizations 459Excel Deployment Techniques 460
Distributing Workbooks 460Using Templates 461Creating and Deploying Add-ins 463
Preparing a Workbook for Conversion to an Add-in 464Converting a Workbook to an Add-in Format 465
xxii Contents
91118ftoc.qxd:WileyRedTight 12/3/07 9:54 AM Page xxii

Installing an Add-in 465Unloading and Removing Add-ins 467Toggling the IsAddin Property 467
A Note on the PERSONAL.XLSB Workbook 468Word Deployment Techniques 469
Distributing Documents 469Using Templates 470
Configuring Template Directories 470Creating Templates 471
Global Templates 472Preparing a Document for Conversion to a Global Template 473Converting a Template to a Global Template 474Editing Global Templates 475Removing Global Templates 476
A Note on the Normal.dotm Template 476Sharing Ribbon Items Across Files(Word and Excel) 477
Creating a Shared Namespace 478Sharing Tabs and Groups in Excel 479Sharing Tabs and Groups in Word 485
Deploying Word and Excel Solutions Where Multiple Versions of Office are in Use 491
Do Legacy CommandBar Customizations Still Work? 491Method 1: Creating Separate Versions 492Method 2: Calling a Previous Version from a New Add-in 493
Using a 2003 Excel Add-in as a Front-End Loader for a 2007 Add-in 494
Using a Word 2007 Global Template as a Front-End for a 2003 Template 500
Access Deployment Techniques 504General Information Concerning Database Deployment 504
Preparing the Files for Multi-User Environments 504Managing Access Startup Options 507Leveraging the startFromScratch Attribute 507Adjusting Access Options for Your Users 508Creating an ACCDE File 510
Loading the customUI from an External Source 511Deploying Solutions to Users with Full-Access Installations 514
Deploying Customizations with Full Versions of Access 514Deploying Solutions to Users with the Access Runtime Version 518
Conclusion 519
Chapter 17 Security In Microsoft Office 523Security Prior to Office 2007 524Macro-Enabled and Macro-Free File Formats 524The Trust Center 525
Trusted Publishers 526
Contents xxiii
91118ftoc.qxd:WileyRedTight 12/3/07 9:54 AM Page xxiii

Trusted Locations 526Adding, Modifying, or Removing Trusted Locations 528Trusting Network Locations 529Disabling Trusted Locations 529
Add-ins 529Requiring Add-ins to Be Signed 530Disabling Notification for Unsigned Add-ins 530Disabling All Add-ins 531
ActiveX Settings 531Macro Settings 532
Setting Macro Options 532Trusting VBA Project Access 533
Message Bar 533Privacy Options 534
Digital Certificates 534How Digital Certificates Work 534Acquiring a Digital Certificate 535Using SELFCERT.exe to Create a Digital Signature 536Adding a Digital Certificate to a Project 537Trusting a Digital Certificate on Another Machine 538Deleting a Digital Certificate from Your Machine 540
Conclusion 542
Appendix A Tables of RibbonX Tags 545How to Use This Appendix 545Ribbon Container Elements 546
customUI Element 546ribbon Element 548contextualTabs Element 548tabSet Element 548qat Element 549sharedControls Element 549documentControls Element 549officeMenu Element 549tabs Element 550tab Element 550group Element 551
Ribbon Control Elements 552box Element 553button Element 553buttonGroup Element 556checkBox Element 557comboBox Element 558dialogBoxLauncher Element 562dropDown Element 562dynamicMenu Element 566
xxiv Contents
91118ftoc.qxd:WileyRedTight 12/3/07 9:54 AM Page xxiv

editBox Element 568gallery Element 571item Element 575labelControl Element 576menu Element 577menuSeparator Element 579separator Element 580splitButton Element 581toggleButton Element 582
Appendix B Tables of Tab and Group idMso Names 587Common Tab idMso Identifiers 587Contextual Tab idMso Identifiers 588
Contextual Tab idMso Identifiers for Excel 588Contextual Tab idMso Identifiers for Access 589Contextual Tab idMso Identifiers for Word 590
Group idMso Identifiers 590Excel’s Group idMso Identifiers 590Access’s Group idMso Identifiers 595Word’s Group idMso Identifiers 600
Appendix C imageMso Reference Guide 607How to Get Your Own imageMso References 607Your Own Reference Tool 608
Appendix D Keytips and Accelerator keys 611Keytips and Accelerator Keys for Excel 611
Appendix E RibbonX Naming Conventions 615How Our Naming System Works 615Naming Samples 617
Appendix F Where to Find Help 621Websites with RibbonX Information 621Websites Maintained by the Authoring and Tech Edit Team 623Newsgroups 623Web Forums 624
Index 627
Contents xxv
91118ftoc.qxd:WileyRedTight 12/3/07 9:54 AM Page xxv

225
In the previous chapter, you learned about the button, checkBox, editBox, and toggleButton controls. This chapter explores two new controls: the comboBoxand the dropDown. The comboBox and dropDown list are similar in a great many ways,including design, implementation, and appearance. They also have some importantdifferences that are discussed in this chapter.
Before you can start exploring these two controls, you need to learn about the fun-damental element that supports them: the item element. The chapter begins by explor-ing this critical piece.
Following the section on the item element, you’ll find both the comboBox and dropDownsections, which explore these two elements in great detail. As in the previous chapter,examples are included for each application, some of which display the creation of staticversions of controls, while others create fully dynamic versions. Whether you’re workingthrough the examples or just reading the chapter, you will appreciate seeing a fully func-tioning version. As you are preparing to work through the examples, we encourage youto download the companion files. The source code and files for this chapter can be foundon the book’s web site at www.wiley.com/go/ribbonx.
The item Element
The item element is used to create static items that must be used within a gallery,dropDown, or comboBox. This particular element is not intended for use on its own, butrather must be an integral part of other controls, such as those mentioned above.
comboBox anddropDown Controls
C H A P T E R
7
91118c07.qxd:WileyRedTight 11/28/07 9:16 PM Page 225

Unlike other sections of this book, where we provide full working examples of theelement being discussed, we review only the XML construct and discuss the structureof the item element. This departure from the pattern reflects the fact that the item ele-ment is so tightly integrated with the comboBox, dropDown, and gallery controls that itcannot be separated from them. Because of this, you need to know a little bit aboutitem before you can move on. The way these are used may seem rather complicated fornow, but rest assured that the processes will become surprisingly clear when youexamine the comboBox and dropDown RibbonX elements later in this chapter.
Required Attributes of the item ElementEach item requires a unique id attribute, as described in Table 7-1.
Table 7-1: Required Attribute of the item Element
ATTRIBUTE WHEN TO USE
id Use this attribute to create your own item.
The item element has only one attribute, the id. As we just mentioned, the item con-trol must be used in conjunction with other elements; therefore, it relies on the otherelements for all other attributes.
NOTE Unlike other elements, there is no idMso or idQ attribute available forthe item control.
Optional Static and Dynamic Attributeswith Callback Signatures Each item element can optionally make use of any or all of the attributes shown inTable 7-2.
Table 7-2: Optional Attributes for the item Element
image (none) (none) (none)
imageMso (none) (none) (none)
label (none) (none) (none)1 to 1024characters
1 to 1024characters
1 to 1024characters
VBA CALLBACKSIGNATURE FORDYNAMIC ATTRIBUTE
DEFAULTVALUE
ALLOWEDVALUES
DYNAMICATTRIBUTE
STATIC ATTRIBUTE
226 Part I ■ The Building Blocks for a Successful Customization
91118c07.qxd:WileyRedTight 11/28/07 9:16 PM Page 226

Table 7-2 (continued)
screentip (none) (none) (none)
supertip (none) (none) (none)
Did you notice the lack of callback signatures in Table 7-2?It is important to understand that the items in the XML code underlying Ribbon
modifications are always static. This is actually a good thing, as it means that you canprovide a static list of items to the control without having to write a single line of VBA.
Don’t misunderstand this to mean that you can’t create items for a control on-the-flyusing VBA, as that is not the case. When you create an item for a control, the callbackis actually associated with the Parent object (i.e., the comboBox, dropDown, or gallerycontrol), not the actual item itself.
NOTE As you design your XML code, you are given a choice between usingstatic item elements (specified in your XML), or dynamic elements (generatedvia the parent control’s callback signature.) Whichever route you choose ismutually exclusive of the other. In other words, if you specify static items for a control, you cannot also specify dynamic items for that control as well.
Allowed Children Objects of the item ElementThe item element does not support child objects of any kind, so it cannot have anyembedded controls.
Parent Objects of the item ElementAn item may only be used in the following controls:
■■ comboBox
■■ dropDown
■■ gallery
Graphical View of item AttributesFigure 7-1 shows a dropDown control on a Ribbon group. It houses three static itemelements that are written into the XML code. The callouts annotate where the item’sstatic attributes are displayed.
VBA CALLBACKSIGNATURE FORDYNAMIC ATTRIBUTE
DEFAULTVALUE
ALLOWEDVALUES
DYNAMICATTRIBUTE
STATIC ATTRIBUTE
1 to 1024characters
1 to 1024characters
Chapter 7 ■ comboBox and dropDown Controls 227
91118c07.qxd:WileyRedTight 11/28/07 9:16 PM Page 227

Figure 7-1: Graphical view of the item elements
Using Built-in ControlsYou don’t have the opportunity to leverage built-in item elements because Microsoftdoes not expose them for our use, but the chances are fairly good that you wouldn’twant to use them anyway, so it’s not really a big loss. If you did want to have some ofthese items in a control, you could just include the entire parent element in your Ribbon.
Creating Custom ControlsWe explore the setup for the parent controls shortly, so this section focuses on theunderlying XML code needed to create the static item elements demonstrated inFigure 7-1.
As mentioned earlier, Figure 7-1 makes use of a dropDown control to house theseitems. The dropDown control should be constructed, like all controls, with opening andclosing XML tags. The following code goes between those tags:
<item id=”rxitemddColor1”
imageMso=”AppointmentColor1”
label=”Red”
screentip=”This is Red!”
supertip=”Trust me, it really is Red!”/>
<item id=”rxitemddColor2”
imageMso=”AppointmentColor2”
label=”Blue”
screentip=”This is Blue!”
supertip=”Trust me, it really is Blue!”/>
<item id=”rxitemddColor3”
imageMso=”AppointmentColor10”
label=”Yellow”
screentip=”This is Yellow!”
supertip=”Trust me, it really is Yellow!”/>
As you review Figure 7-1, you will see each of the elements in the live representationon the Ribbon.
228 Part I ■ The Building Blocks for a Successful Customization
91118c07.qxd:WileyRedTight 11/28/07 9:16 PM Page 228

The comboBox Element
The comboBox control displays data based on a designated record source, and it is ahybrid of the editBox that we covered in Chapter 6 and the dropDown control that wereview next.
One of the great features of a comboBox control is that, in addition to being able topick something from the list, the user can also type something into the text box. Insearching and selecting from the list, it acts like a “hot lookup,” enabling users to skipto the closest match. As the user keeps typing, the choices are narrowed down. At anytime, users may accept one of the displayed values or they may keep typing to create anew entry.
The comboBox is best used in the following situations:
■■ The list is very long and you wish to give users the capability to quickly jumpto the appropriate place by typing a few keys. (The fonts control is a goodexample of this.)
■■ You wish to present users with a pre-defined list, but also want them to be ableto add items to the list.
As mentioned earlier in the chapter, you can populate the comboBox with both staticlists and dynamically created lists.
Required Attributes of the comboBox ElementThe comboBox control requires any one of the id attributes shown in Table 7-3.
Table 7-3: Required id Attributes of the comboBox Element
ATTRIBUTE WHEN TO USE
id When creating your own comboBox
idMso When using an existing Microsoft comboBox
idQ When creating a comboBox shared between namespaces
Optional Static and Dynamic AttributeswithCallback SignaturesIn addition to the required id attribute, the comboBox control will optionally accept anyone of the insert attributes listed in Table 7-4.
Chapter 7 ■ comboBox and dropDown Controls 229
91118c07.qxd:WileyRedTight 11/28/07 9:16 PM Page 229

Table 7-4: Optional insert Attributes of the comboBox Element
insertAfterMso Valid Mso Group Insert after Microsoftcontrol
insertBeforeMso Valid Mso Group Insert beforeMicrosoft control
insertAfterQ Valid Group idQ Insert after sharednamespace control
insertBeforeQ Valid Group idQ Insert before sharednamespace control
Finally, the comboBox may also be configured to use any or all of the optional attrib-utes or callbacks shown in Table 7-5.
Table 7-5: Optional Attributes and Callbacks of the comboBox Element
(none) onChange (none) Sub OnChange (control As IRibbonControl, text AsString)
enabled getEnabled true Sub GetEnabled (control As IRibbonControl, ByRefreturnedVal)
image getImage (none) Sub GetImage (control As IRibbonControl, ByRefreturnedVal)
imageMso getImage (none) Same as above
(none) getItemCount 1 to 1024 (none) Sub GetItemCount (control As IRibbonControl, ByRefreturnedVal)
(none) getItemID (none) Sub GetItemID (control AsIRibbonControl, index As Integer, ByRef id)
(none) getItemImage (none) Sub GetItemImage (controlAs IRibbonControl, index AsInteger, ByRef returnedVal)
Uniquetext string
1 to 1024characters
VBA CALLBACKSIGNATURE FORDYNAMIC ATTRIBUTE
DEFAULTVALUE
ALLOWEDVALUES
DYNAMICATTRIBUTE
STATIC ATTRIBUTE
WHENTO USE
DEFAULTVALUE
ALLOWEDVALUES
INSERTATTRIBUTE
true, false,1, 0
1 to 1024characters
1 to 1024characters
1 to 4096characters
Insert at endof group
Insert at endof group
Insert at endof group
Insert at endof group
230 Part I ■ The Building Blocks for a Successful Customization
91118c07.qxd:WileyRedTight 11/28/07 9:16 PM Page 230

Table 7-5 (continued)
(none) getItemLabel (none) Sub GetItemLabel (control As IRibbonControl, index AsInteger, ByRef returnedVal)
(none) (none) Sub GetItemScreenTip(control As IRibbonControl,index As Integer, ByRefreturnedVal)
(none) getItemSupertip (none) Sub GetItemSuperTip(control As IRibbonControl,index As Integer, ByRefreturnedVal)
keytip getKeytip (none) Sub GetKeytip (control As IRibbonControl, ByRefreturnedVal)
label getLabel (none) Sub GetLabel (control AsIRibbonControl, ByRefreturnedVal)
maxLength (none) 1 to 1024 1024 (none)
screentip getScreentip (none) Sub GetScreentip (control As IRibbonControl, ByRefreturnedVal)
showImage getShowImage true Sub GetShowImage (controlAs IRibbonControl, ByRefreturnedVal)
(none) true (none)
showItemImage (none) true (none)
showLabel getShowLabel true, false true Sub GetShowLabel (controlAs IRibbonControl, ByRefreturnedVal)
sizeString (none) 12* (none)
supertip getSupertip (none) Sub GetSupertip (control AsIRibbonControl, ByRefreturnedVal)
Continued
1 to 1024characters
1 to 1024characters
showItem ↵Attribute
true, false,1, 0
getItem ↵Screentip
VBA CALLBACKSIGNATURE FORDYNAMIC ATTRIBUTE
DEFAULTVALUE
ALLOWEDVALUES
DYNAMICATTRIBUTE
STATIC ATTRIBUTE
true, false,1, 0
true, false,1, 0
1 to 1024characters
1 to 3characters
1 to 1024characters
1 to 1024characters
1 to 1024characters
1 to 1024characters
Chapter 7 ■ comboBox and dropDown Controls 231
91118c07.qxd:WileyRedTight 11/28/07 9:16 PM Page 231

Table 7-5 (continued)
tag (none) (none) (none)
(none) getText (none) Sub GetText (control AsIRibbonControl, ByRefreturnedVal)
visible getVisible true Sub GetVisible (control AsIRibbonControl, ByRefreturnedVal)
NOTE The default value for the sizeString attribute (if the attribute is notdeclared at all) is approximately 12, but this varies depending on the charactersused and the system font.
Allowed Children Objects of the comboBox ElementThe only child object that can be used with the comboBox element is the item element.
Parent Objects of the comboBox ElementThe comboBox element may be nested within the following elements:
■■ box
■■ group
Graphical View of comboBox AttributesFigure 7-2 gives a graphical representation of the visible attributes that can be set onthe comboBox control.
Figure 7-2 shows all of the comboBox attributes except for the screentip and super-tip. These two attributes only show when the dropDown list portion is not active; con-sequently, they could not be captured while showing the dropDown list.
Using Built-in ControlsOf all the controls in Excel and Word, probably the best known is the Fonts comboBox.If you are creating custom Ribbon tabs to group your most commonly used controlstogether, then you will certainly want to add this control. It is therefore the first onethat we look at.
VBA CALLBACKSIGNATURE FORDYNAMIC ATTRIBUTE
DEFAULTVALUE
ALLOWEDVALUES
DYNAMICATTRIBUTE
STATIC ATTRIBUTE
1 to 4096characters
1 to 1024characters
true, false,1, 0
232 Part I ■ The Building Blocks for a Successful Customization
91118c07.qxd:WileyRedTight 11/28/07 9:16 PM Page 232

Figure 7-2: Graphical view of the comboBox elements
The XML code for the example that you are about to build is almost completelyapplication agnostic; it will work equally well in Excel and Word, and it only requiresa very minor change to work in Access. We’ll go through examples for each applicationso that you will be comfortable and confident in all three.
NOTE The completed example files (comboBox-Fonts.xlsx, comboBox-Fonts.docx, and comboBox-Fonts.accdb) can be downloaded from the book’s websiteat www.wiley.com/go/ribbonx.
Because we are only using built-in controls, this example does not require VBA.We’ll begin with Excel, so start by creating and saving a new xlsx file. Open the file inthe CustomUI Editor, apply the RibbonBase template you created in Chapter 2, andinsert the following code between the <tabs> and </tabs> tags:
<tab id=”rxtabDemo”
label=”Demo”
insertBeforeMso=”TabHome”>
<group id=”rxgrpDemo”
label=”Demo”>
<comboBox idMso=”Font”/>
<comboBox idMso=”FontSize”/>
</group>
</tab>
Remember to validate your code to catch any pesky typing errors. Once you havedone this, save the file, and open it in Excel. Navigate to the Demo tab and you will seethe UI shown in Figure 7-3.
Figure 7-3: The Font and FontSize comboBox controls on a new Excel tab
Chapter 7 ■ comboBox and dropDown Controls 233
91118c07.qxd:WileyRedTight 11/28/07 9:16 PM Page 233
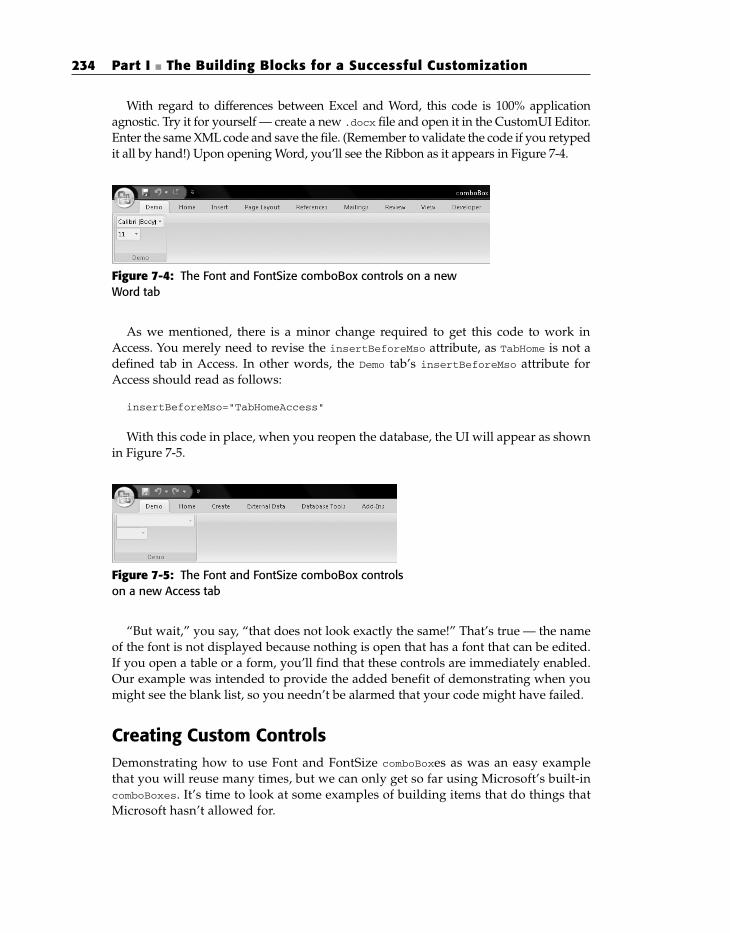
With regard to differences between Excel and Word, this code is 100% applicationagnostic. Try it for yourself — create a new .docx file and open it in the CustomUI Editor.Enter the same XML code and save the file. (Remember to validate the code if you retypedit all by hand!) Upon opening Word, you’ll see the Ribbon as it appears in Figure 7-4.
Figure 7-4: The Font and FontSize comboBox controls on a new Word tab
As we mentioned, there is a minor change required to get this code to work inAccess. You merely need to revise the insertBeforeMso attribute, as TabHome is not adefined tab in Access. In other words, the Demo tab’s insertBeforeMso attribute forAccess should read as follows:
insertBeforeMso=”TabHomeAccess”
With this code in place, when you reopen the database, the UI will appear as shownin Figure 7-5.
Figure 7-5: The Font and FontSize comboBox controls on a new Access tab
“But wait,” you say, “that does not look exactly the same!” That’s true — the nameof the font is not displayed because nothing is open that has a font that can be edited.If you open a table or a form, you’ll find that these controls are immediately enabled.Our example was intended to provide the added benefit of demonstrating when youmight see the blank list, so you needn’t be alarmed that your code might have failed.
Creating Custom ControlsDemonstrating how to use Font and FontSize comboBoxes as was an easy examplethat you will reuse many times, but we can only get so far using Microsoft’s built-incomboBoxes. It’s time to look at some examples of building items that do things thatMicrosoft hasn’t allowed for.
234 Part I ■ The Building Blocks for a Successful Customization
91118c07.qxd:WileyRedTight 11/28/07 9:16 PM Page 234

The Excel and Word examples in this section display how to employ static lists in thecomboBox controls and incorporate the item controls that were covered in the first sec-tion of this chapter. With the Access example, we start to explore a dynamic comboBoxcontrol.
An Excel Example
For this example, we again assume that you have hidden the entire user interface. Inaddition, also imagine that in an attempt to make your application look less like Excel,you have hidden all the worksheet tabs. You still want users to be able to movebetween the three worksheets, however, so you need to provide some vehicle toaccomplish this. In many ways, the comboBox can be an ideal control for this kind ofnavigation: It lists all the “pages” in your application, and allows users to type in a spe-cific one that they may wish to jump to.
Naturally, you need a macro or two to make this work, so create a new macro-enabledExcel file (.xlsm). Save it, and then open it in the CustomUI Editor. Apply the RibbonBasetemplate, and insert the following code between the <tabs> and </tabs> tags:
<tab id=”rxtabDemo”
label=”Navigation”
insertBeforeMso=”TabHome”>
<group id=”rxgrpNavigate”
label=”Navigate To”>
<comboBox id=”rxcboSelectSheet”
label=”Activate:”
onChange=”rxcboSelectSheet_Click”>
<item id=”rxitemcboSelectSheet1”
label=”Sheet1”/>
<item id=”rxitemcboSelectSheet2”
label=”Sheet2”/>
<item id=”rxitemcboSelectSheet3”
label=”Sheet3”/>
</comboBox>
</group>
</tab>
Notice that the comboBox makes use of the onChange callback to take action whenan item is selected. In addition, this comboBox holds three items: Sheet1, Sheet2, andSheet3. These items are static and cannot be changed from within the file; nor willthe user be able to add additional items. This is a perfect fit for the goal of ensuringthat users are able to navigate only to these worksheets.
Before you close the CustomUI Editor, be sure to validate your code for typingerrors, and then copy the onChange callback.
C ROSS-RE FE RE NC E For a refresher on working with callbacks and theCustomUI Editor, see Chapter 5.
Chapter 7 ■ comboBox and dropDown Controls 235
91118c07.qxd:WileyRedTight 11/28/07 9:16 PM Page 235

When you are back in Excel, open the VBE and paste the callback into a new stan-dard module. Now you need to edit the callback to make it react as you wish. You canfigure out how to do that by thinking through the order of events:
1. The user will select an item from the Worksheet list.
2. The callback will be triggered.
3. The selected value of the comboBox (in this case, the worksheet name) will bepassed to the routine.
4. The worksheet will be activated.
So far so good, but there is one more piece that may cause a glitch: We stated thatusers can only select one of the sheets specified in the code. And what happens if theytype in a different value? To deal with these eventualities, you should edit the callbacksignature to read as follows:
‘Callback for rxcboSelectSheet onChange
Sub rxcboSelectSheet_Click(control As IRibbonControl, text As String)
On Error Resume Next
Worksheets(text).Activate
If Err.Number <> 0 Then
MsgBox “Sorry, that worksheet does not exist!”
End If
End Sub
The second line of code attempts to activate the worksheet that has been passed tothe callback. Items chosen from the list will always be a valid name, but text typed inby the user may not match an item in the list. The On Error statement at the beginningof the routine deals with this by telling the code to continue to the next line even if anerror is present.
At this point, you can check whether the Err property is zero. If the Err property doesnot equal zero, then an error must have occurred; therefore, the value the user typed isnot valid. In addition, because you want the user to know that their input wasn’t accept-able, you include a message box. Of course, you can display whatever message thatyou’d like and even add other options, but message box customization is outside ourfocus, so let’s keep moving.
Now that your callback is set up correctly, click the Navigation tab and play withthe comboBox. Try selecting items from the list, as well as typing in a value, as shownin Figure 7-6.
Figure 7-6: Using a comboBox to change worksheets in Excel
236 Part I ■ The Building Blocks for a Successful Customization
91118c07.qxd:WileyRedTight 11/28/07 9:16 PM Page 236

A Word Example
Recall that in Chapter 6 we built a customization that allowed the user to enter thewidth of the Styles pane in an editBox. Although this works nicely for giving users thecapability to control the width, it isn’t very intuitive, as there is no indication of whattype of values to put in the box. There are some techniques that provide this informa-tion to the user, but those are more complex, and we cover them in Chapter 11. Fornow, you can use the comboBox to provide the user with a pre-set list of options fromwhich to choose.
To make things easy for the user, we keep the checkBox that we used to toggle theStyles pane on and off. In addition, rather than create everything from scratch, you canuse the editBox example file created in Chapter 6. In that, we replaced the editBoxwith the comboBox control.
NOTE Instead of using the editBox example you created in the previouschapter, you can also download the complete editBox example, editBox-StyleInspector Width.docm, from the book’s website.
To get started, open the existing file in the CustomUI Editor and replace the editBox-specific XML with the following:
<comboBox id=”rxcboStyleWidth”
label=”Inspector Width”
sizeString=”1234”
onChange=”rxcboStyleWidth_Click”>
<item id=”rxitemcboStyleWidth1”
label=”1.00”/>
<item id=”rxitemcboStyleWidth2”
label=”2.00”/>
<item id=”rxitemcboStyleWidth3”
label=”3.00”/>
<item id=”rxitemcboStyleWidth4”
label=”4.00”/>
<item id=”rxitemcboStyleWidth5”
label=”5.00”/>
<item id=”rxitemcboStyleWidth6”
label=”6.00”/>
<item id=”rxitemcboStyleWidth7”
label=”7.00”/>
<item id=”rxitemcboStyleWidth8”
label=”8.00”/>
</comboBox>
As usual, validate the XML code before saving the file, and because you alreadyhave the checkBox callbacks programmed in the file, you only need to copy the call-back signature for the rxcboStyleWidth_click event.
If you examine this XML, you will see that we have added eight options to thecomboBox’s drop-down list portion: the numbers 1.00 through 8.00. Remember thatwhile each item’s id must be unique, it is the item’s label that will be passed to thecallback when the control is accessed.
Chapter 7 ■ comboBox and dropDown Controls 237
91118c07.qxd:WileyRedTight 11/28/07 9:16 PM Page 237

TI P In this example, a four-character sizeString is declared even though weonly show three digits. This is because we want to allow a number with twodecimal places and one leading digit. The decimal also counts as a character, sowe must include it in our maximum size.
Upon opening Word, you will again want to jump into the VBE right away to pasteyour callback. Recall that earlier in the chapter we mentioned that the comboBox controlis a hybrid between the editBox and dropDown controls. This works very much to yourbenefit in this case because the editBox callback already exists in the file.
To port the code from the editBox to the comboBox, you have two options:
1. Copy the code from the rxtxtStyleWidth_getText routine to the rxc-boStyleWidth_Click routine and delete the original rxtxt routine.
2. Replace the rxtxtStyleWidth_getText signature line with the rxc-boStyleWidth_Click line.
TI P If you elect to rewrite the signature line, it is a good idea to get into thepractice of making sure that you rewrite all of the parameters as well, not justthe name of the callback. This will ensure that if you are updating from onetype of callback to another it will still run.
TI P If you paste a callback signature line into your module and then updateanother callback to an identical signature, be sure to delete or rename theoriginal. Otherwise, you will receive an error that an “Ambiguous Name HasBeen Detected.”
Once you have updated your procedure, save the file and select the View tab. Yourupdated Style Options will look like what is shown in Figure 7-7.
Figure 7-7: Using a comboBox to change Word’s Style Inspector width
238 Part I ■ The Building Blocks for a Successful Customization
91118c07.qxd:WileyRedTight 11/28/07 9:16 PM Page 238

Try using the comboBox to change the width of the Style Inspector pane. Notice thefollowing:
■■ It only shows when the checkbox is checked.
■■ The width changes each time you select a new value.
■■ Typing a custom value also changes the Style Inspector width.
■■ Typing text will return a custom error message.
An Access Example
In this example, we again build on the Access database used in the last chapter. Thistime, we add a new group containing a comboBox that opens a form directly to a spe-cific field.
Unlike previous examples that used static callbacks, this customization makes useof callbacks to dynamically populate the comboBox with a list of all the authors in thetblAuthors table. To do this, we repopulate the comboBox every time the form is closed.We recognize that the data in the comboBox and the table may become out of sync, butit could be impractical to maintain the XML code for each and every record added tothe database, as frequent updates would have a significant performance impact.
To get started, open the Access example from the previous section or download thetoggleButton-Form Tools.accdb file from the book’s website. Copy the RibbonX infor-mation from the RibbonXML field of the USysRibbons table and paste it into a freshinstance of the CustomUI Editor. Between the </group> and <group id=”rxgrpTools”>tags, enter the following XML for the comboBox control:
<group id=”rxgrpSearch”
label=”Search Tools”>
<comboBox id=”rxcboSearchAuthor”
label=”Review Author:”
onChange=”rxcboSearchAuthor_Click”
getItemID=”rxcboSearchAuthor_getItemId”
getItemCount=”rxcboSearchAuthor_getItemCount”
getItemLabel=”rxcboSearchAuthor_getItemLabel”/>
</group>
As you can immediately see, the comboBox specification looks much different thanthat shown in the Excel and Word examples. A host of callbacks are declared and noitem controls are listed. Because the items will be provided dynamically by the call-backs at run-time, it isn’t necessary to declare any static items.
NOTE Although it has been mentioned before, it is worth repeating a veryimportant point: Even if you did want to declare one or more static item controlsthat will show up in every comboBox control you use, it must be done through thecallback if you elect to populate any controls dynamically. Use of dynamic (orstatic) callbacks is an “all or nothing” approach.
Chapter 7 ■ comboBox and dropDown Controls 239
91118c07.qxd:WileyRedTight 11/28/07 9:16 PM Page 239

C ROSS-RE FE RE NC E Another thing to notice about the preceding XMLcode is that there is no </comboBox> tag. Instead, the comboBox declaration endswith a /> instead of the / character. As discussed in Chapter 3, this is possiblebecause no child elements are declared for the comboBox control.
Once you have the code validated and copied into the RibbonXML field of the USys-Ribbons table, generate and copy all of the rxcboSearchAuthor callbacks.
If you are keeping track, you will notice that we have declared four callbacks, but only three callouts are generated by the CustomUI Editor. Specifically, the rxcboSearchAuthor_getItemId callback signature is missing, which appears to be abug in the CustomUI Editor program.
Fortunately, you can consult Table 7-5, earlier in this chapter, and obtain the signa-ture for this callback. It is declared as follows:
Sub GetItemID(control As IRibbonControl, index As Integer, ByRef id)
NOTE If for some reason you don’t have this book with you when you’reattempting this in a project, you can also search for these callback signatureson the Internet. An article containing all of the callback signatures can belocated on the MSDN site at the following URL: http://msdn2.microsoft.com/en-us/library/ad7222523.aspx
Most of the callback signatures have been generated for you, so copy and paste theminto the code module that holds the rest of the code. Next, you need to manually typein the GetItemID callback signature.
Before we start writing the code, it’s time to figure out exactly how this works.Again, you do this by thinking through the steps in a logical manner. We want to do thefollowing:
1. Create a list of all the authors currently in the database.
2. Submit that list to the comboBox.
3. Open the form when the user clicks on (or manually enters) an author’s name.
4. Let the user know when an author cannot be found (and close the form).
5. Start again at Step 1 when the form is closed (to ensure that the list is current ifany authors were added).
As with all code, the methods by which you accomplish these things are limitedonly to your imagination and ability. What is detailed below can certainly be done dif-ferently, but it works well for the purposes of this example.
To begin, the code needs a place to store the list of author names, and a count ofthose names. To do this, you add two global variables to the top of your project, justunderneath the Option lines. The first is a variant array (a dynamically sized space tohold the list of names), and the second is a Long data type, which can hold the count ofthe names in the array. They read as follows:
Public gaAuthorList As Variant
Public glngItemCount As Long
240 Part I ■ The Building Blocks for a Successful Customization
91118c07.qxd:WileyRedTight 11/28/07 9:16 PM Page 240

C ROSS-RE FE RE NC E For a review of variant arrays, please see Chapter 4.
Now that you have a variable to hold the list of names, it makes sense to work on theroutine that populates the list. Because we indicated that the list will be populatedwhen the file is loaded and every time a form is closed, it makes sense to build theprocess into a routine, and to call the routine whenever we need to check the table andpopulate the list. The routine looks as follows:
Sub PopulateAuthorArray()
‘Populate the global array of author names
Dim db As DAO.Database
Dim rst As DAO.Recordset
Dim lngLoopCount As Long
‘Open the recordset for the authors table
Set db = CurrentDb()
Set rst = db.OpenRecordset(“tblAuthors”, dbOpenTable)
‘Store list of all authors in an array
On Error Resume Next
lngLoopCount = 0
With rst
If .EOF Then .MoveFirst
glngItemCount = .RecordCount
ReDim gaAuthorList(glngItemCount - 1)
Do While Not (.EOF)
gaAuthorList(lngLoopCount) = !AuthorName.Value
.MoveNext
lngLoopCount = lngLoopCount + 1
Loop
End With
‘Release all objects
rst.Close
db.Close
Set rst = Nothing
Set db = Nothing
End Sub
The routine loops through all the records in the tlbAuthors table and adds them tothe gaAuthorList array. In addition, it sets the glngItemCount variable to hold the totalnumber of records that were in the table (and therefore the array.)
Next, we deal with the callbacks.The getItemCount callback simply returns the number stored in the glngItemCount
variable, telling the control how many records you have:
‘Callback for rxcboSearchAuthor getItemCount
Sub rxcboSearchAuthor_getItemCount(control As IRibbonControl, _
ByRef returnedVal)
returnedVal = glngItemCount
End Sub
Chapter 7 ■ comboBox and dropDown Controls 241
91118c07.qxd:WileyRedTight 11/28/07 9:16 PM Page 241

The getItemID callback is used to create a unique item ID for each of the item con-trols that are dynamically fed into the comboBox. The index variable is always unique(numbered from zero to the number of items you have, less one), so you can simplyadd the index to a string of text, as shown here:
‘Callback for rxcboSearchAuthor getItemID
Sub rxcboSearchAuthor_getItemID(control As IRibbonControl, _
index As Integer, ByRef ID)
ID = “rxitemcboSearchAuthor” & index
End Sub
TI P You may wonder why we didn’t just set up this callback using ID = indexto generate an ID for the item. We could have used that approach, but it wouldfail if we added another comboBox to the project and used the same logicbecause the IDs would no longer be unique (i.e., two controls could end upwith an id=0.) It is a far better practice to ensure that your ID is tagged withyour control name. Therefore, in addition to generating a unique ID, you arenow generating a coding habit that will never leave you debugging this issue.
The getItemLabel callback returns the author’s name from the global array that wasestablished earlier. When the array is created, each element has an index, or place, inthe array. You can use the following callback to return the element of the array corre-sponding to the index number:
‘Callback for rxcboSearchAuthor getItemLabel
Sub rxcboSearchAuthor_getItemLabel(control As IRibbonControl, _
index As Integer, ByRef returnedVal)
returnedVal = gaAuthorList(index)
End Sub
NOTE If you are experienced with changing the base of an array and intend toapply that technique in these databases, you need to adjust these indexes tocoincide with your arrays.
The Click event is the final callback that needs programming in our example. It usesthe following code:
‘Callback for rxcboSearchAuthor onChange
Sub rxcboSearchAuthor_Click(control As IRibbonControl, text As String)
‘Open the form at the requested Author
Dim sAuthorName As String
Dim rs As DAO.Recordset
‘Open the appropriate form
sAuthorName = “[AuthorName] = ‘“ & text & “‘“
242 Part I ■ The Building Blocks for a Successful Customization
91118c07.qxd:WileyRedTight 11/28/07 9:16 PM Page 242

DoCmd.OpenForm “frmAuthors”
‘Find the correct author
With Forms!frmAuthors
Set rs = .RecordsetClone
rs.FindFirst sAuthorName
If rs.NoMatch Then
MsgBox “Author Not found”
DoCmd.Close acForm, “frmAuthors”, acSaveNo
Else
.Bookmark = rs.Bookmark
End If
End With
‘Release the objects
Set rs = Nothing
End Sub
This event opens the form and attempts to activate the record pertaining to the authorwho has either been selected from the comboBox or typed in manually. If the record can befound it is “bookmarked” and activated. If the record is not found, the user is informed(via our friendly message box) and the form is closed.
There is one final thing left to do in order for this example to work: You need to hookthe PopulateAuthorArray to the appropriate routines. Without this hook, the array willnever be filled and the comboBox will sit empty.
To create the hook, simply insert the following code snippet in the rxIRibbonUI_onLoad event (before or after the line that captures the RibbonUI), as well as in thefrmAuthor’s Form_Deactivate event (just before the line that invalidates the RibbonUI):
‘Populate the array of Author names
Call PopulateAuthorArray
Now that you have made all of these modifications, save, close, and reopen your data-base. You will have a new group on the Ribbon that holds the combBox. Select an author’sname from the list and you will be taken to their record, as shown in Figure 7-8.
Figure 7-8: Using a comboBox to jump to a specific
Chapter 7 ■ comboBox and dropDown Controls 243
91118c07.qxd:WileyRedTight 11/28/07 9:16 PM Page 243

record in a form
Now try adding your name to the Author’s table. After all, you have done a lot ofwork just to get to this point! After adding your name, close the form and check thecomboBox list. Voilà, your name in print!
The dropDown Element
Like the comboBox, the dropDown control presents the user with a pre-defined list ofoptions from which to choose. In addition, it too can be populated either at design-timeusing XML to provide a static list, or dynamically at run-time via callbacks.
The biggest of differences between the comboBox and dropDown controls lies in theability of the comobBox to accept user-entered data; the dropDown control has no suchfacility, forcing the user to select an item from the pre-defined list and only from that list.
At first glance, you may ask yourself why anyone would want to use a dropDownover a comboBox. After all, wouldn’t you always want to make the controls more robustand accessible? The answer depends upon your implementation, of course, but somereasons you may want to use the dropDown control include the following:
■■ You do not want users to enter their own information.
■■ Your list is not long, so using the “auto complete” capability is not a concern.
■■ You are not interested in programming the callbacks to validate user-entered data.
Required Attributes of the dropDown ElementTo create a dropDown control, you need to define one and only one of the id attributesshown in Table 7-6.
Table 7-6: Required id Attributes for the dropDown Element
ATTRIBUTE WHEN TO USE
id When creating your own dropDown
idMso When using an existing Microsoft dropDown
idQ When creating a dropDown shared between namespaces
Optional Static and Dynamic Attributeswith Callback SignaturesThe dropDown element optionally accepts any one insert attribute shown in Table 7-7.
244 Part I ■ The Building Blocks for a Successful Customization
91118c07.qxd:WileyRedTight 11/28/07 9:16 PM Page 244

Table 7-7: Optional insert Attributes for the dropDown Element
insertAfterMso Valid Mso Group Insert after Microsoftcontrol
insertBeforeMso Valid Mso Group Insert beforeMicrosoft control
insertAfterQ Valid Group idQ Insert after sharednamespace control
insertBeforeQ Valid Group idQ Insert before sharednamespace control
In addition to the insert attribute, you may also include any or all of the optionalstatic attributes or dynamic equivalents shown in Table 7-8.
Table 7-8: Optional Attributes and Callbacks of the dropDown Element
enabled getEnabled true Sub GetEnabled (control As IRibbonControl, ByRefreturnedVal)
image getImage (none) Sub GetImage (control As IRibbonControl, ByRefreturnedVal)
imageMso getImage (none) Same as above
(none) getItemCount (none) Sub GetItemCount (controlAs IRibbonControl, ByRefreturnedVal)
(none) getItemID (none) Sub GetItemID (control As IRibbonControl, index As Integer, ByRef id)
(none) getItemImage (none) Sub GetItemImage (controlAs IRibbonControl, index As Integer, ByRefreturnedVal)
Continued
1 to 1024characters
Uniquetext string
1 to 1024
1 to 1024characters
VBA CALLBACKSIGNATURE FORDYNAMIC ATTRIBUTE
WHENTO USE
DEFAULTVALUE
ALLOWEDVALUES
INSERTATTRIBUTE
DEFAULTVALUE
ALLOWEDVALUES
DYNAMICATTRIBUTE
STATIC ATTRIBUTE
1 to 1024characters
true, false,1, 0
Insert at endof group
Insert at endof group
Insert at endof group
Insert at endof group
Chapter 7 ■ comboBox and dropDown Controls 245
91118c07.qxd:WileyRedTight 11/28/07 9:16 PM Page 245

Table 7-8 (continued)
(none) getItemLabel (none) Sub GetItemLabel (control As IRibbonControl, index As Integer, ByRefreturnedVal)
(none) getItemScreentip (none) Sub GetItemScreenTip(control As IRibbonControl,index As Integer, ByRefreturnedVal)
(none) getItemSupertip (none) Sub GetItemSuperTip(control As IRibbonControl,index As Integer, ByRefreturnedVal)
keytip getKeytip (none) Sub GetKeytip (control As IRibbonControl, ByRefreturnedVal)
label getLabel (none) Sub GetLabel (control As IRibbonControl, ByRefreturnedVal)
screentip getScreentip (none) Sub GetScreentip (controlAs IRibbonControl, ByRefreturnedVal)
(none) (none) Sub GetSelectedItemID(control As IRibbonControl,ByRef returnedVal)
(none) (none) Sub GetSelectedItemIndex(control As IRibbonControl,ByRef returnedVal)
showImage getShowImage true Sub GetShowImage (controlAs IRibbonControl, ByRefreturnedVal)
(none) true (none)
(none) true (none)
getSelected ↵ItemID
showItem ↵Label
true, false,1, 0
showItem ↵Image
true, false,1, 0
true, false,1, 0
getSelected ↵ItemIndex
1 to 1024
Uniquetext string
VBA CALLBACKSIGNATURE FORDYNAMIC ATTRIBUTE
DEFAULTVALUE
ALLOWEDVALUES
DYNAMICATTRIBUTE
STATIC ATTRIBUTE
1 to 1024characters
1 to 1024characters
1 to 1024characters
1 to 3characters
1 to 1024characters
1 to 1024characters
246 Part I ■ The Building Blocks for a Successful Customization
91118c07.qxd:WileyRedTight 11/28/07 9:16 PM Page 246

Table 7-8 (continued)
showLabel getShowLabel true Sub GetShowLabel (controlAs IRibbonControl, ByRefreturnedVal)
sizeString (none) 12* (none)
supertip getSupertip (none) Sub GetSupertip (control As IRibbonControl, ByRefreturnedVal)
tag (none) (none) (none)
visible getVisible true Sub GetVisible (control As IRibbonControl, ByRefreturnedVal)
(none) onAction (none) Sub OnAction (control As IRibbonControl,selectedId As String,selectedIndex As Integer)
NOTE The default value for the sizeString attribute (if the attribute is not declared at all) is approximately 12, but this will vary depending on thecharacters used and the system font.
Allowed Children Objects of the dropDown ElementThe only child object that can be used with the dropdown element is the item element.
Parent Objects of the dropDown ElementThe dropDown element may be used within the following controls:
■■ box
■■ group
VBA CALLBACKSIGNATURE FORDYNAMIC ATTRIBUTE
DEFAULTVALUE
ALLOWEDVALUES
DYNAMICATTRIBUTE
STATIC ATTRIBUTE
true, false,1, 0
1 to 1024characters
1 to 1024characters
1 to 1024characters
1 to 1024characters
true, false,1, 0
Chapter 7 ■ comboBox and dropDown Controls 247
91118c07.qxd:WileyRedTight 11/28/07 9:16 PM Page 247
Graphical View of dropDown AttributesFigure 7-9 shows a dropDown control on a Ribbon group, which houses two dynamicitems. The captions annotate the properties that can be set on a dropDown control.
Figure 7-9: Graphical view of the dropDown element
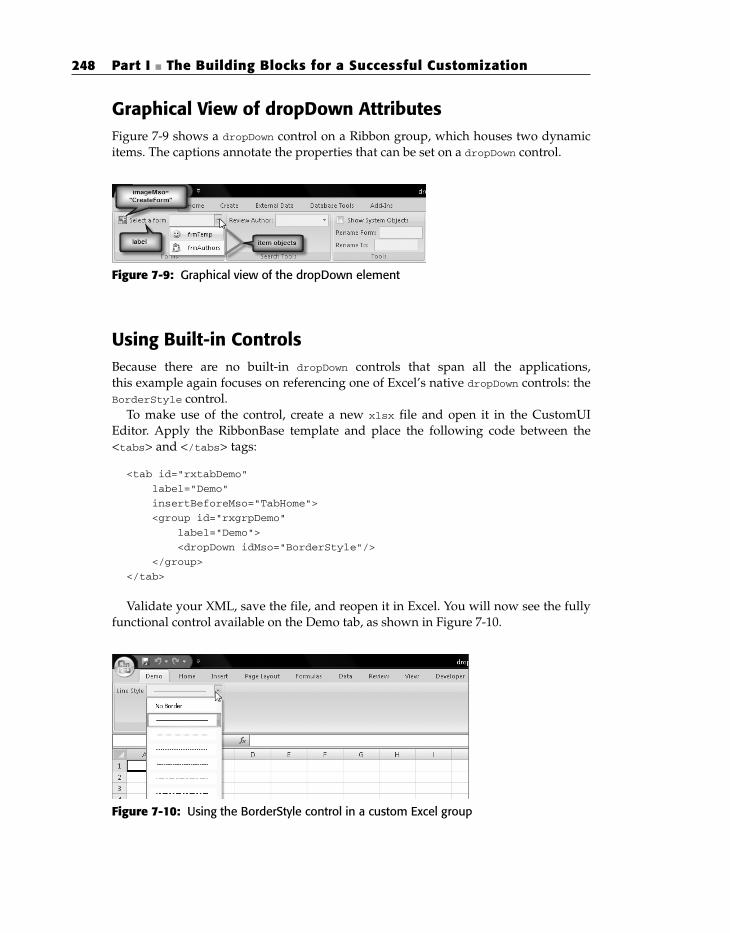
Using Built-in ControlsBecause there are no built-in dropDown controls that span all the applications, this example again focuses on referencing one of Excel’s native dropDown controls: theBorderStyle control.
To make use of the control, create a new xlsx file and open it in the CustomUI Editor. Apply the RibbonBase template and place the following code between the<tabs> and </tabs> tags:
<tab id=”rxtabDemo”
label=”Demo”
insertBeforeMso=”TabHome”>
<group id=”rxgrpDemo”
label=”Demo”>
<dropDown idMso=”BorderStyle”/>
</group>
</tab>
Validate your XML, save the file, and reopen it in Excel. You will now see the fullyfunctional control available on the Demo tab, as shown in Figure 7-10.
Figure 7-10: Using the BorderStyle control in a custom Excel group
248 Part I ■ The Building Blocks for a Successful Customization
91118c07.qxd:WileyRedTight 11/28/07 9:16 PM Page 248

Creating Custom ControlsIn this section we again create custom tools, rather than reuse the commands and func-tionality inherent in the programs.
In addition to employing a static dropDown list in Excel, the previous comboBoxexample will also be revised so that it dynamically populates a dropDown control. TheWord example will remain static, but we add another useful tool to the collection thatyou have been building. The Access example again creates a completely dynamic listin the dropDown control.
An Excel Example
This example is quite interesting because it uses two dropDown elements in tandem.Similar to the comboBox example in the previous section, the first control lists all theworksheets in the workbook. In this case, however, we employ the available callbacksto update the dropDown list as worksheets are added to or removed from the workbook.Pretty cool — and you can certainly see the value in the example and anticipate ampleopportunities to incorporate this into your customizations.
NOTE By switching from a comboBox to a dropDown, we lose the capability to type in the worksheet we want to activate. It should be assumed that thisprocess was a conscious choice on the part of the developer.
The second control allows us to toggle the visibility of the selected worksheetbetween Excel’s three states: xlSheetVisible, xlSheetHidden, and xlSheetVeryHidden.
NOTE The xlSheetVeryHidden state of an Excel worksheet is not known tomost users because it must be set from VBA. This is a state that enables adeveloper to completely hide a worksheet from the users, and it will not showin the menu that allows users to unhide sheets.
One of the best ways to highlight the differences between the two controls is to convertone to the other, so that is exactly how this example begins. If you have not completed theprevious example, or are unsure how it compares to the examples in this book, downloadthe comboBox-Select Sheet.xlsm file from the book’s website.
Before you open the file in Excel, open it in the CustomUI Editor and replace every-thing from and including the <comboBox> to the end of and including </comboBox> withthe following XML:
<dropDown id=”rxddSelectSheet”
label=”Apply To:”
visible=”true”
onAction=”rxddSelectSheet_Click”
getItemID=”rxitemddSelectSheet_getItemId”
getItemCount=”rxitemddSelectSheet_getItemCount”
getItemLabel=”rxitemddSelectSheet_getItemLabel”/>
Chapter 7 ■ comboBox and dropDown Controls 249
91118c07.qxd:WileyRedTight 11/28/07 9:16 PM Page 249

<dropDown id=”rxddSheetVisible”
label=”Set To:”
onAction=”rxddSheetVisible_Click”>
<item id=”rxitemddSheetVisible1”
label=”Visible”/>
<item id=”rxitemddSheetVisible2”
label=”Hidden”/>
<item id=”rxitemddSheetVisible3”
label=”VeryHidden”/>
</dropDown>
Notice a few things about the preceding code:
■■ The first dropDown declaration has no ending </dropDown> tag. This is because itcontains all of its attributes within the code block and is requesting all of itschild objects via callbacks; therefore, it does not require any static child objectsdeclared in the XML, and can be closed by using /> at the end.
■■ The callback signature for the dropDown is different from the comboBox. Whereasthe comboBox used an onChange callback, the dropDown uses an onAction call-back when it is clicked.
■■ The second dropDown list does have a </dropDown> tag to close it. This isbecause it holds a static list of item objects declared directly in the XML code.
In addition, we also need to capture the RibbonUI object in order to update the listsdynamically. Adjust the CustomUI tag to include the onLoad element as shown below:
<customUI
onLoad=”rxIRibbonUI_onLoad”
xmlns=”http://schemas.microsoft.com/office/2006/01/customui”>
As always, you should validate your code, save it, and generate and copy the call-back signatures. As with the comboBox element, be aware that the callback for thegetItemID callback will not be generated by the CustomUI Editor. If you were doingthis on your own, you’d once again need to look this up and type it in manually (orcopy it from a functional example).
Open Excel again, but don’t be alarmed when you see the error message indicatingthat it cannot run the macro, shown in Figure 7-11.
Figure 7-11: Error message indicating a missing callback
This is to be expected, as we have declared an onLoad callback but have not yet pro-vided the programming. To do that, in the VBE, open the code module that holds allthe RibbonX event code and paste the callback signatures at the end.
250 Part I ■ The Building Blocks for a Successful Customization
91118c07.qxd:WileyRedTight 11/28/07 9:16 PM Page 250

Before we go any further, let’s deal with the onLoad callback. You want to add twovariables to the top of the project. The first will hold the RibbonUI object, while the sec-ond will store the worksheet name that was selected. They are placed just under theOption Explicit line and should be declared as follows:
Public RibbonUI As IRibbonUI
Dim sSheetName As String
Next, we make sure that the RibbonUI object is captured at load time by setting theonLoad callback as follows:
‘Callback for customUI.onLoad
Sub rxIRibbonUI_onLoad(ribbon As IRibbonUI)
Set RibbonUI = ribbon
End Sub
Now it’s time to look at the rest of the callback signatures, starting with the callbackthat tells the control how many items exist. Fortunately, it doesn’t require much codeto make this work, as the item count will always be equal to the number of worksheetsin the workbook. You can use the following code:
‘Callback for rxddSelectSheet getItemCount
Sub rxitemddSelectSheet_getItemCount(control As IRibbonControl, _
ByRef returnedVal)
returnedVal = Worksheets.Count
End Sub
Next, we set up the callback for the getItemLabel, which returns the text of eachitem to the dropDown list:
‘Callback for rxddSelectSheet getItemLabel
Sub rxitemddSelectSheet_getItemLabel(control As IRibbonControl, _
index As Integer, ByRef returnedVal)
returnedVal = Worksheets(index + 1).Name
End Sub
If you haven’t worked much with arrays, you might not notice a very big issue lurk-ing in the middle of this routine. Pay careful attention to the fact that the name beingreturned for an item is the index + 1.
The reason for this shift is that by default VBA works in zero-based arrays (as previ-ously mentioned, VBA starts counting at 0, not 1), but Excel’s default worksheetindexes and names work in one-based arrays (Excel starts counting at 1, not 0.)
To understand the ramifications, assume that we have a workbook set up to start withthe default 3 worksheets. In the getItemCount procedure, we asked for a count of theWorksheets 1, 2, and 3. We received a total count of 3, as we would expect. What is inter-esting, however, is how this actually dimensions the array. Have a look at Table 7-9 to seehow the array will manifest itself.
Chapter 7 ■ comboBox and dropDown Controls 251
91118c07.qxd:WileyRedTight 11/28/07 9:16 PM Page 251

Table 7-9: Dimensions and Values of an Array
ARRAY INDEX ELEMENT VALUE ACTUAL VALUE
0 Worksheets(index + 1).Name Sheet1
1 Worksheets(index + 1).Name Sheet2
2 Worksheets(index + 1).Name Sheet3
NOTE If this appears intimidating, don’t worry about it. It is confusing for mostusers who are not accustomed to working with arrays. As a rule of thumb, if thevalues you are trying to pass in to or retrieve from an array appear to be out ofsync by one, just adjust your index, as shown in the previous code snippet.
Next, you will want to ensure that the callback is programmed to dynamically gener-ate the unique ID for each of the drop-down items. The callback should read as follows:
‘Callback for rxddSelectSheet getItemID
Sub rxitemddSelectSheet_getItemID(control As IRibbonControl, _
index As Integer, ByRef id)
id = “rxitemddSelectSheet” & index
End Sub
There is one more callback to set up: the rxddSelectSheet_Click callback. Becausewe started with the previous file, you have all the code for the rxcboSelectSheet_Click event that was triggered by selecting a comboBox item. However, you can’t justrename and reuse. Take a look at Table 7-10, noting the difference between the callbacksignatures.
Table 7-10: Difference between dropDown and comboBox Callback Signatures
CONTROL CALLBACK SIGNATURE
comboBox rxcboSelectSheet_Click (control As IRibbonControl, text As String)
dropDown rxddSelectSheet_Click (control As IRibbonControl, id As String, ↵index As Integer)
You can see that while the comboBox passes the text of the control to the callback, thedropDown is not quite so friendly. Instead, it passes the ID and the index number. Unfor-tunately, we’re not interested in that number at this time; we need to show the user theactual name of the sheet.
In order to work out the control’s name, we can leverage one of the less obvious fea-tures of Ribbon construction. We can actually call the getItemLabel callback to give usthis information!
252 Part I ■ The Building Blocks for a Successful Customization
91118c07.qxd:WileyRedTight 11/28/07 9:16 PM Page 252

If you take a good look at the getItemLabel callback, you’ll see that it accepts threeparameters. The key to making this work is the keyword that prefaces the variable inthe last parameter:
Sub rxitemddSelectSheet_getItemLabel(control As IRibbonControl, _
index As Integer, ByRef returnedVal)
In VBA, every parameter is passed to a procedure specifying that the variable is passedby either ByVal (which is the default, so the parameter is typically omitted, as it is implied)or ByRef. The difference is that when a variable is passed ByVal, a copy of the variable isused inside the receiving procedure. Anything that is done to it within the procedure is lost when the procedure goes out of scope (ends).
In contrast, when a variable is passed to a procedure ByRef, the actual variable ispassed as a parameter. Anything that is done to the variable inside that procedure is passed back to the calling procedure when the called procedure ends. It’s this capa-bility that enables us to make use of the getItemLabel callback.
Update your callbacks so that the rxddSelectSheet_Click routine reads as follows,and delete the rxcboSelectSheet_Click event:
‘Callback for rxddSelectSheet onAction
Sub rxddSelectSheet_Click(control As IRibbonControl, id As String, _
Index As Integer)
On Error Resume Next
Call rxitemddSelectSheet_getItemLabel(control, index, sSheetName)
If Err.Number <> 0 Then
MsgBox “Sorry, that worksheet does not exist!”
RibbonUI.InvalidateControl “rxddSelectSheet”
End If
End Sub
Make note of how we are calling the getItemLabel callback, and especially how weare passing the sSheetName variable to the returnedVal parameter. Because the actualsSheetName variable is passed, and not a copy, the changes made in that procedure willreplicate back to the global variable, and the worksheet name will be ready when weneed it.
Finally, we’ve completed the setup for the dynamic dropDown control, and we canfocus on setting up the sole callback for the static dropDown. Update the callback for thiscontrol to read as follows:
‘Callback for rxddSheetVisible onAction
Sub rxddSheetVisible_Click(control As IRibbonControl, id As String, _
index As Integer)
`Check that a worksheet has been selected
On Error Resume Next
sSheetName = Worksheets(sSheetName).Name
If Err.Number <> 0 Then
MsgBox “Sorry, but you need to select a valid sheet first!”
Exit Sub
End If
Chapter 7 ■ comboBox and dropDown Controls 253
91118c07.qxd:WileyRedTight 11/28/07 9:16 PM Page 253
‘Change the sheet’s visibility
Select Case id
Case “rxitemddSheetVisible1”
Worksheets(sSheetName).Visible = xlSheetVisible
Case “rxitemddSheetVisible2”
Worksheets(sSheetName).Visible = xlSheetHidden
Case “rxitemddSheetVisible3”
Worksheets(sSheetName).Visible = xlSheetVeryHidden
End Select
‘Tell user if it is last visible sheet
If Err.Number <> 0 Then
MsgBox “Sorry, this is the only visible sheet.” & vbCrLf & _
“You can’t hide them all!”
End If
On Error GoTo 0
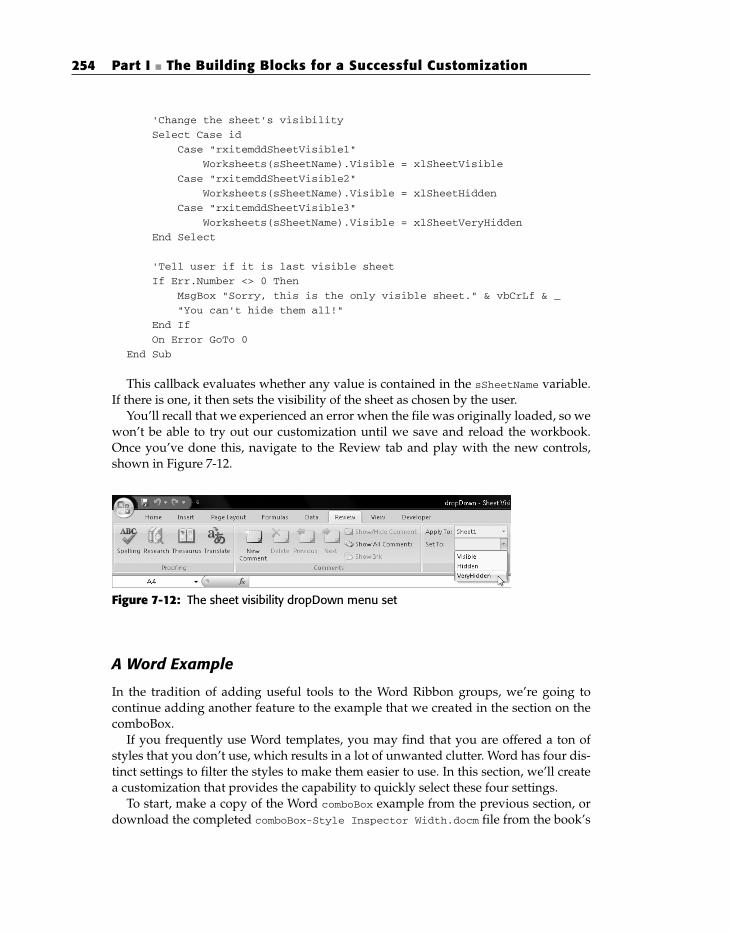
End Sub
This callback evaluates whether any value is contained in the sSheetName variable.If there is one, it then sets the visibility of the sheet as chosen by the user.
You’ll recall that we experienced an error when the file was originally loaded, so wewon’t be able to try out our customization until we save and reload the workbook.Once you’ve done this, navigate to the Review tab and play with the new controls,shown in Figure 7-12.
Figure 7-12: The sheet visibility dropDown menu set
A Word Example
In the tradition of adding useful tools to the Word Ribbon groups, we’re going to continue adding another feature to the example that we created in the section on thecomboBox.
If you frequently use Word templates, you may find that you are offered a ton ofstyles that you don’t use, which results in a lot of unwanted clutter. Word has four dis-tinct settings to filter the styles to make them easier to use. In this section, we’ll createa customization that provides the capability to quickly select these four settings.
To start, make a copy of the Word comboBox example from the previous section, ordownload the completed comboBox-Style Inspector Width.docm file from the book’s
254 Part I ■ The Building Blocks for a Successful Customization
91118c07.qxd:WileyRedTight 11/28/07 9:16 PM Page 254

website. Open the new file in the CustomUI Editor and insert the following XMLbetween the </comboBox> and </group> tags:
<dropDown id=”rxddStylesView”
label=”Show Styles:”
onAction=”rxddStylesView_Click”>
<item id=”rxitemddStylesAll”
label=”All”/>
<item id=”rxitemddStylesInCurrent”
label=”InCurrent”/>
<item id=”rxitemddStylesInUse”
label=”InUse”/>
<item id=”rxitemddStylesRecommended”
label=”Recommended”/>
<item id=”rxitemddStyles(none)“
label=”None”/>
</dropDown>
This will enter a static dropDownunder the existing controls. It holds five different items:four related to the Styles view options and a final option to hide the Styles task pane.
Validate the code, as you usually do, and copy the rxddStylesView_Click callback.Open Word, open the VBE, and paste your callback signature in the module that holdsthe rest of the existing callback signatures. The next step is to record a macro that willcapture as much information about the process as possible.
TI P Never overlook the macro recorder, as it is a handy tool. Even if it canonly record pieces of the process, the documentation provides a great place tostart learning about the objects that you are trying to manipulate. In addition,you can save a lot of time and avoid typos by copying and pasting from thegenerated code.
We’re trying to capture a couple of different things here. The first is how to showand hide the Styles task pane at the side of the document. The second is how to selectthe desired filtered view.
Let’s walk through the process. To begin, start the macro recorder and pressAlt+Ctrl+Shift+S to show the Styles task pane on the side of your screen. (You couldalso navigate to the Home tab and click the little arrow in the bottom, right corner ofthe Styles group, if you prefer.)
Next, in the bottom right corner of the Styles pane, you will see an Options link.Click the link and you will see the dialog shown in Figure 7-13.
In the drop-down list, select Recommended and then click OK. Return to the StylePane Options and select each option in turn, saying OK to each one. Finally, close theStyles task pane.
Chapter 7 ■ comboBox and dropDown Controls 255
91118c07.qxd:WileyRedTight 11/28/07 9:16 PM Page 255

Figure 7-13: The Style Pane Options dialog
Now it’s time to examine the code that was recorded. You should see somethingsimilar to the annotated version shown here:
Sub Macro1()
‘All styles
ActiveDocument.FormattingShowFilter = wdShowFilterFormattingInUse
‘In current document Styles
ActiveDocument.FormattingShowFilter = wdShowFilterStylesAll
‘In use Styles
ActiveDocument.FormattingShowFilter = wdShowFilterStylesInUse
‘Recommended Styles
ActiveDocument.FormattingShowFilter = wdShowFilterStylesAvailable
‘Turn off the Styles task pane
CommandBars(“Styles”).Visible = False
End Sub
NOTE We’ve annotated the code because the constants that Microsoft usedare less than intuitive. One might think that the wdShowFilterStylesAll wouldapply the All setting, not the In Current Document setting, as it does. Ratherthan have you waste time figuring out which is which, we’ve provided theclarification so that you can stay focused on the exercise.
NOTE There is no code recorded to launch the Styles pane, but there is codeto close it. Interestingly enough, once you have opened the Styles pane in yourcurrent Word instance, you can show the Styles task pane by executing thecommand CommandBars(“Styles”).Visible = true. Until you have activated it at least once manually, however, the code will fail. This is a known bug inMicrosoft Word, and it is hoped that it will be fixed in an upcoming servicepack. There is a workaround for the issue, however, which is to replaceCommandBars(“Styles”).Visible = true with Application.TaskPanes(wdTaskPaneFormatting).Visible = True.
256 Part I ■ The Building Blocks for a Successful Customization
91118c07.qxd:WileyRedTight 11/28/07 9:16 PM Page 256

The good news here is that you can easily adapt this code into the callback signature,as the commands are relatively straightforward. Placing a case statement in the call-back will give us the following:
‘Callback for rxddStylesView onAction
Sub rxddStylesView_Click(control As IRibbonControl, id As String, _
Index As Integer)
On Error Resume Next
Application.TaskPanes(wdTaskPaneFormatting).Visible = True
Select Case id
Case “rxitemddStylesAll”
ActiveDocument.FormattingShowFilter = _
wdShowFilterFormattingInUse
Case “rxitemddStylesInCurrent”
ActiveDocument.FormattingShowFilter = _
wdShowFilterStylesAll
Case “rxitemddStylesInUse”
ActiveDocument.FormattingShowFilter = _
wdShowFilterStylesInUse
Case “rxitemddStylesRecommended”
ActiveDocument.FormattingShowFilter = _
wdShowFilterStylesAvailable
Case “rxitemddStylesNone”
CommandBars(“Styles”).Visible = False
End Select
End Sub
NOTE The addition of the line continuations (a space followed by theunderscore and a hard return) is not essential to making the code work, but it does make it easier to read.
Once you have this code fully integrated, save the file and browse to the View tab.Try using various selections on the Show Styles dropDown, as shown in Figure 7-14.
Figure 7-14: The Show Styles dropDown in use
Chapter 7 ■ comboBox and dropDown Controls 257
91118c07.qxd:WileyRedTight 11/28/07 9:16 PM Page 257

An Access Example
The final example in this section also builds on the previous file. This time, you replacethe button that was created to launch the Authors form with a dynamic dropDown listthat will launch any of the forms. This dropDown will update each time a new form isadded to, or removed from, the database. As an added twist, we also add a callback toretrieve an image for each item in the dropDown list.
Make a copy of the Access example from the previous section or download thecomboBox-Author Query.accdb file from the book’s website. Open it and copy the RibbonX information from the RibbonXML field of the USysRibbons table. Onceyou’ve done that, open the CustomUI Editor and paste the code in the blank pane.Locate the following code:
<button id=”rxbtnFrmAuthors”
imageMso=”FileCreateDocumentWorkspace”
size=”large”
label=”Enter Authors”
onAction=”rxbtnFrmAuthors_click”/>
Replace it with this code:
<dropDown id=”rxddSelectForm”
label=”Select a form”
imageMso=”CreateForm”
onAction=”rxddSelectForm_click”
getItemCount=”rxddSelectForm_getItemCount”
getItemID=”rxddSelectForm_getItemID”
getItemImage=”rxddSelectForm_getItemImage”
getItemLabel=”rxddSelectForm_getItemLabel”/>
Like the comboBox code used in the previous example, setting up a dynamic dropDown involves a great many callbacks.
As always, validate the XML code. Once it is error-free, copy all of the XML andreplace the code that is stored in the RibbonX field of your USysRibbons table.
Next, use the CustomUI Editor to generate the callbacks, copy all of the rxddSe-lectForm signatures, and paste them to the code module that holds the rest of the call-back code. Be sure to manually create the following callback that the CustomUI Editordoes not generate:
‘Callback for rxddSelectFrom getItemID
Sub rxddSelectForm_getItemID(control As IRibbonControl, _
index As Integer, ByRef ID)
End Sub
Now that all of the callbacks are placed in the module, it’s time to start hookingthem up to do the things that we want. By examining the XML code, you can see thatthe dropDown control will be placed in the group with an icon beside it. The rest of thecontent, of course, will be dynamic.
258 Part I ■ The Building Blocks for a Successful Customization
91118c07.qxd:WileyRedTight 11/28/07 9:16 PM Page 258

In order to populate the dropDown list dynamically, you need to return the total num-ber of items that the list will contain, which is done using the getItemCount callback.We’re interested in knowing the total number of forms in the database, and that numbercan be retrieved with the following code:
‘Callback for rxddSelectForm getItemCount
Sub rxddSelectForm_getItemCount(control As IRibbonControl, _
ByRef returnedVal)
returnedVal = CurrentProject.AllForms.Count
End Sub
You also know that each item in the dropDown list must have its own unique ID. Asin the previous examples, this can easily be accomplished by setting up the callback toread as follows:
‘Callback for rxddSelectFrom getItemID
Sub rxddSelectForm_getItemID(control As IRibbonControl, _
index As Integer, ByRef ID)
ID = “rxitemddSelectForm” & index
End Sub
Next, you need to determine how to get the label for each item. Because each formhas an index number in the collection, the callback can be set up as follows:
‘Callback for rxddSelectForm getItemLabel
Sub rxddSelectForm_getItemLabel(control As IRibbonControl, _
index As Integer, ByRef returnedVal)
returnedVal = CurrentProject.AllForms(index).Name
End Sub
One more callback needs to be set up in order to populate the items in the list box.The XML code specifies that we also want an image for each item in the list, so we needa callback to get the image. The completed callback signature will look like this:
‘Callback for rxddSelectForm getItemImage
Sub rxddSelectForm_getItemImage(control As IRibbonControl, _
index As Integer, ByRef returnedVal)
Select Case CurrentProject.AllForms(index).Name
Case Is = “frmAuthors”
returnedVal = “FileCreateDocumentWorkspace”
Case Else
returnedVal = “HappyFace”
End Select
End Sub
This callback looks up the name of the form by passing the index number to theAllForms collection. Once that name has been returned, it is evaluated by the case
Chapter 7 ■ comboBox and dropDown Controls 259
91118c07.qxd:WileyRedTight 11/28/07 9:16 PM Page 259

statement. If the form name matches any of the cases, it is assigned the picture speci-fied. The Else portion of this code assigns Microsoft’s HappyFace image to any formthat is not specified in the code.
NOTE Remember that the contents of the dropDown list will be populateddynamically. This is important, as a user may add a new form — so it would notlikely be in the list. By using the Else statement to assign a default image, youdon’t have to worry about constantly updating the code.
Now that all the callbacks are in place to populate the dropDown, we need to add thecallback to handle the user’s selections. We’ll use the onAction callback, which is set upas shown here:
‘Callback for rxddSelectForm onAction
Sub rxddSelectForm_click(control As IRibbonControl, ID As String, _
Index As Integer)
Dim sFormName As String
Call rxddSelectForm_getItemLabel(control, index, sFormName)
DoCmd.OpenForm sFormName, acNormal
RibbonUI.InvalidateControl (“rxddSelectForm”)
End Sub
Note that this routine again uses the trick of retrieving the item’s label by leveragingthe ability to set the sFormName variable by executing the getItemLabel callback. Oncethe selected form name has been retrieved, the form is opened.
The invalidation contained in this routine ensures that each time a form is opened,the dropDown is repopulated. Therefore, if a new form has been added, then it will beadded to and appear in the dropDown list.
NOTE Because a form needs to be opened via the dropDown to repopulate it,there is a one-click delay in the updating of the list each time a form is addedto or deleted from the project. Ideally, the invalidation would actually behoused in a class module to monitor the creation and deletion of a form.However, this is more complicated and would distract from our demonstrationof incorporating and using the dropDown control. We’ve placed the invalidationin the onAction callback. We encourage you to investigate creating a classmodule to monitor the form creation and removal events at your leisure.
The final piece of programming work is to clean up remnant code from the buttonyou replaced. All you need to do is locate the rxbtnFrmAuthors_click routine anddelete it from the project.
Now that all the code is in place, close and reload the Access database, thereby sav-ing your work and allowing the new Ribbon to be installed as the file opens.
When you return to your database, check the dropDown menu. Next, try adding anew form. Click on the menu to launch the Authors form and then check the dropDown
260 Part I ■ The Building Blocks for a Successful Customization
91118c07.qxd:WileyRedTight 11/28/07 9:16 PM Page 260

list again. You will see that your control now also houses the new form as well, asshown in Figure 7-15.
This demonstrates that one-click delay just mentioned. The drop-down list needs tobe refreshed after it is repopulated.
Figure 7-15: Dynamic dropDown list to select a form in Access
Conclusion
As you’ve seen, the comboBox and dropDown controls are extremely similar in imple-mentation and appearance. The examples presented in this chapter covered using sta-tic items defined in the XML code, as well as leveraging VBA to provide dynamicallyupdated controls. There is no question, however, that one of the biggest deterrents tousing either of these methods to set up an effective, fully dynamic solution is the copi-ous amount of code that would have to be manually generated.
When considering these controls, the main questions facing you are which oneshould you use, and when? The answer depends completely on how much latitudeyou wish to give your users. If, on the one hand, you need to limit users to selectingfrom a standard list that never changes, then you’ll want to use a dropDown control. Onthe other hand, if you want to offer your users either of the following options, then youwill want to use a comboBox:
■■ The ability to jump to an item in the list
■■ The ability to enter text that is not already defined in the list
Now that you have learned how to present users with different lists of items, it istime to learn about two controls that can add impressive richness to your applications.In Chapter 8, you will learn how to incorporate the picture and gallery controls intoyour customizations.
Chapter 7 ■ comboBox and dropDown Controls 261
91118c07.qxd:WileyRedTight 11/28/07 9:16 PM Page 261

91118c07.qxd:WileyRedTight 11/28/07 9:16 PM Page 262