review course code: dam 461 course title: statistical
TRANSCRIPT

1
REVIEW
COURSE CODE: DAM 461
COURSE TITLE: STATISTICAL DATABASE SYSTEM.
Course Reviewer: Prof. ADEKUNLE, Yinka A.
College of Computing and
Engineering Sciences,
Babcock University, Ilishan-
Remo, Ogun State, Nigeria.

2
The study units of this course were reviewed as follow:
Module 1 Fundamentals of Database Systems
Unit 1 Databases and Database Users
Unit 2 Database System Concepts and Architecture
Unit 3 Data Modelling Using the Entity-Relationship Model
Module 2 The Statistical database system
Unit 1 Statistical Database Concepts
Unit 2 Statistical Data Analysis, Mining and Decision Tree
Unit 3 Computer Security and Statistical Databases
Module 3 Application of Statistical Database System
Unit 1 SPEA SMART Airport Statistical Data Management System (SMART
STAT)
#### General Comments

3
Module 1 Fundamentals of Database Systems
Unit 1 Databases and Database Users
1.0 Introduction
2.0 Objective
3.0 Definitions and functions
3.1 Characteristics of the Database Approach
3.2 Actors on the Scene
3.3 Advantages of Using a Database Management System
3.4 Implications of the Database Approach
3.5 When Not to Use a Database Management System
4.0 Conclusion
5.0 Summary
6.0 Tutor Marked Assignment
7.0 Further Reading and Other Resources

4
1.0 Good
2.0 God
3.0 Definition of database is standard and of are of the authors word. The functions of a database
can be worked upon by add recent functions such as:
Data Dictionary Management
Data Storage Management
Data Transformation and Presentation
Security Management
Multiuser Access Control
Backup and Recovery Management
Data Integrity Management
Database Access Languages and Application Programming Interfaces
Database Communication Interfaces
Transaction Management
3.1 Good
3.2 Good
3.3 Good
3.4 Implications of Database Approach
Flexibility in? “Flexibility in altering data” would be preferred.
This could also be added:
Readily Available Information Across Network
3.5 Good
4.0 Good
5.0 Good
6.0 Good
7.0 Good
PLEASE NOTE: Module 1 and it units’ alongside subsequent modules and their units
should be on a page (New page).
Then again, page numbers should be included.

5
Module 1 Fundamentals of Database Systems
Unit 2 Database System Concepts and Architecture
1.0 Introduction
2.0 Objective
3.0 Data Models and Their Categories
3.1 History of Data Models
3.2 Schemas, Instances, and States
3.3 Data and the Three-Schema Architecture
3.4 Data Independence
3.5 DBMS Languages and Interfaces
3.6 The Database System Environment
3.7 Database System Utilities and Tools
3.8 Centralized and Client-Server Architectures
3.9 Classification of DBMSs
4.0 Conclusion
5.0 Summary
6.0 Tutor Marked Assignment
7.0 Further Reading and Other Resources

6
1.0 Good
2.0 Good
3.0 “Figure 1: An ERD showing a relationship between products and suppliers” should be named
on the same page with the diagram itself for easy understanding of the material. “Figures 6 and 7”
should also be worked upon, text are not visible to the readers.
3.1 Good
3.2 Should be taken to a new page (Good)
3.3 Good
3.4 Data and the Three-Schema Architecture
This should be added: Advantages of Three-schema Architecture:
Following are the advantages of three schema architecture:
This architecture makes the database abstract. It is used to hide the details of how data is
physically stored in a computer system, which makes it easier to use for a user.
This architecture allows each user to access the same database with a different customized
view of data.
This architecture enables a database admin to change the storage structure of the database
without affecting the user currently on the system.
3.5 DBMS Languages and Interfaces
An introduction of diagram/figure here, would benefit the user of this material in better
assimilating.
This should be added:
Figure (Number): An illustration of the types of DBMS Languages
7
3.6 Good
3.7 Good
3.8 Good
3.9 Good
4.0 Good
5.0 Good
6.0 Added Tutor Marked Assignment
1. What is a data model?
2. What is a high-level conceptual data model?
3. What is an entity? An attribute? A relationship?
4. List and briefly describe the common record-based logical data models.
5. There is a database and there were 50 data insert/manipulation operation. Please prove that
this database state is valid.
6. There is a new database that has only 2 levels (conceptual and internal). Please discuss the
advantages and disadvantages of this database architecture.
7.0 Good
Quotes in the last referencing should be removed.

8
Module 1 Fundamentals of Database Systems
Unit 3 Data Modelling Using the Entity-Relationship Model
1.0 Introduction
2.0 Objective
3.0 Using High-Level Conceptual Data Models for Database Design
3.1 A Sample Database Application
3.2 Entity Types, Entity Sets, Attributes, and keys
3.3 Relationships, Relationship Types, Roles, and Structural Constraints
3.4 Weak Entity Types
3.5 Refining the ER Design for the Company Database
3.6 ER Diagrams, Naming Conventions, and Design Issues
4.0 Conclusion
5.0 Summary
6.0 Tutor Marked Assignment
7.0 Further Reading and Other Resources

9
1.0 Good
2.0 Good
3.0 Good
3.1 A Sample Database Application (This section should be updated)
Understanding Sample Database Application
Sample Database Application features an easy-to-use interface for viewing, updating, and
searching order and customer information for clothing products. Users can navigate among the
pages using the Home, Customers, Products, Orders, and Reports navigation menu. Like all sample
packaged applications, Sample Database Application is fully editable.
Topics:
Installing and Running Sample Database Application
Understanding Sample Database Application
Modifying Sample Database Application
3.1.1 Installing and Running Sample Database Application
To install Sample Database Application:
1. Sign in to Oracle Application Express. The Workspace home page appears.
2. Click the Packaged Apps icon. The Packaged Apps page appears.
3. Locate and select Sample Database Application
Hint:
Use the Search field at the top of the page to narrow the display.
4. Click Install Packaged App.
5. Select an Authentication scheme and click Next.
6. Click Install Packaged App again.
The Packaged Application Details page appears. The success message, Application
installed, displays at the top of the page.
7. To run the application, click Run. Enter the appropriate login credentials:
8. Username - Enter your workspace username.
9. Password - Enter your workspace password.
10. Click Sign In.
Hint:
Once you install a packaged application, it displays under Installed Packaged Apps on the
Packaged Apps page.

10
3.1.2 Understanding Sample Database Application
Sample Database Application demonstrates:
Examples of ways to display summary information.
Reports and forms for viewing, updating, and adding customers, products, and orders
Various charts and maps available in Oracle Application Express
Mobile pages to replicate the majority of functionality available in the desktop pages
Sample Database Application features the following built-in functionality and key pages:
Hint:
The size of left navigation menu changes depending upon the size of the window. In some
of the images in this section, the navigation menu is minimized.
Topics:
Home Page
Customers Page
Using the Customers Page
Products Page
Using the Products Page
Orders Page
Using the Orders Page
Reports Page
Administration Page
Accessing the Mobile Version
3.1.1.1 Home Page
Figure (Number): Home Page

11
The home page contains the following main regions:
Dashboard - Demonstrates the use of a Badge List plug-in. This regions displays a value
based on an underlying SQL statement. Links in this region take you to reports on Monthly
Sales, Monthly Orders, Total Products, and Total Customers.
Top Customers - Demonstrates the Slider Tooltip plug-in. This regions displays a value
based on an underlying SQL statement. Links in this region take you to reports on Monthly
Sales, Monthly Orders, Total Products, and Total Customers.
Top Products - Top Products is an interactive report. The report is based on an underlying
SQL statement and displays a subset of the information that appears on the Customers
page. Users can view the additional details by clicking the product or by clicking the view
Products icon (a right arrow) in the upper right corner of the region.
Top Orders by Date - Demonstrates the use of a HTML5 Bar Chart plug-in. This chart
displays orders by date and order amount, based on an underlying SQL statement. Users
can view the Orders page by clicking the right arrow in the upper right corner.
Tags - Demonstrates the use of a Tag Cloud plug-in. This region displays a value based on
an underlying SQL statement. Links in this region take you to search results matching the
selected tag.
3.1.1.2 Customers Page
The Customers page enables users to view and edit customer information.
Figure (Number): Customers Page
Customers is an interactive grid tracking customer information. To search for a customer
information, enter search terms in the Search field and click Go. To sort by customer, click the
column heading and then select the sort icons.
3.1.1.3 Using the Customers Page
This section describes functionality built into the Customers page.
Topics:
Editing a Customer
Creating a Customer
Uploading Data
12
3.1.1.3a Editing a Customer
To update existing customer information:
1. Click the customer name.
2. On the Customer Details page, edit the fields and click Apply Changes.
3. To delete a customer, click Delete.
3.1.1.3b Creating a Customer
To add a new customer:
1. Click the Create Customer button.
2. On the Customer Details page, edit the fields and click Add Customer.
3.1.1.3c Uploading Data
To upload data:
1. Click the Upload Data button.
2. For Import From:
a. Import From - Select either:
i. Upload file, comma separated (*.csv) or tab delimited. If selected, select the
file in the File Name form element.
ii. Copy and Paste. If selected, a Copy and Paste field displays at the bottom
on the window.
b. Separator - Identify a column separator character. Use \t for tab separators.
c. Optionally Enclosed By - Enter a delimiter character. See field-level Help for more
details.
d. First Row has Column Names - Select or deselect Yes.
e. File Character Set - Select the appropriate file character set.
f. Click Next.
3. On Data/Table Mapping, review the mappings and click Next.
4. Click Load Data.
5. Review Results.
6. Click Finish.
13
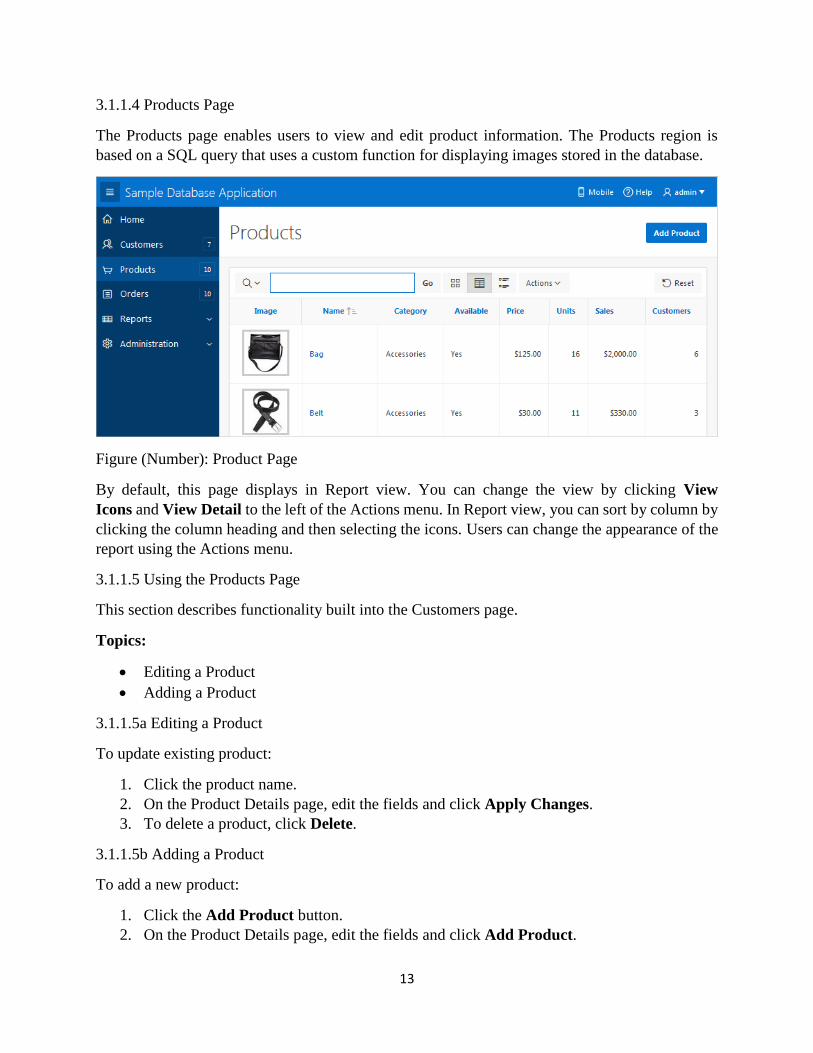
3.1.1.4 Products Page
The Products page enables users to view and edit product information. The Products region is
based on a SQL query that uses a custom function for displaying images stored in the database.
Figure (Number): Product Page
By default, this page displays in Report view. You can change the view by clicking View
Icons and View Detail to the left of the Actions menu. In Report view, you can sort by column by
clicking the column heading and then selecting the icons. Users can change the appearance of the
report using the Actions menu.
3.1.1.5 Using the Products Page
This section describes functionality built into the Customers page.
Topics:
Editing a Product
Adding a Product
3.1.1.5a Editing a Product
To update existing product:
1. Click the product name.
2. On the Product Details page, edit the fields and click Apply Changes.
3. To delete a product, click Delete.
3.1.1.5b Adding a Product
To add a new product:
1. Click the Add Product button.
2. On the Product Details page, edit the fields and click Add Product.
14
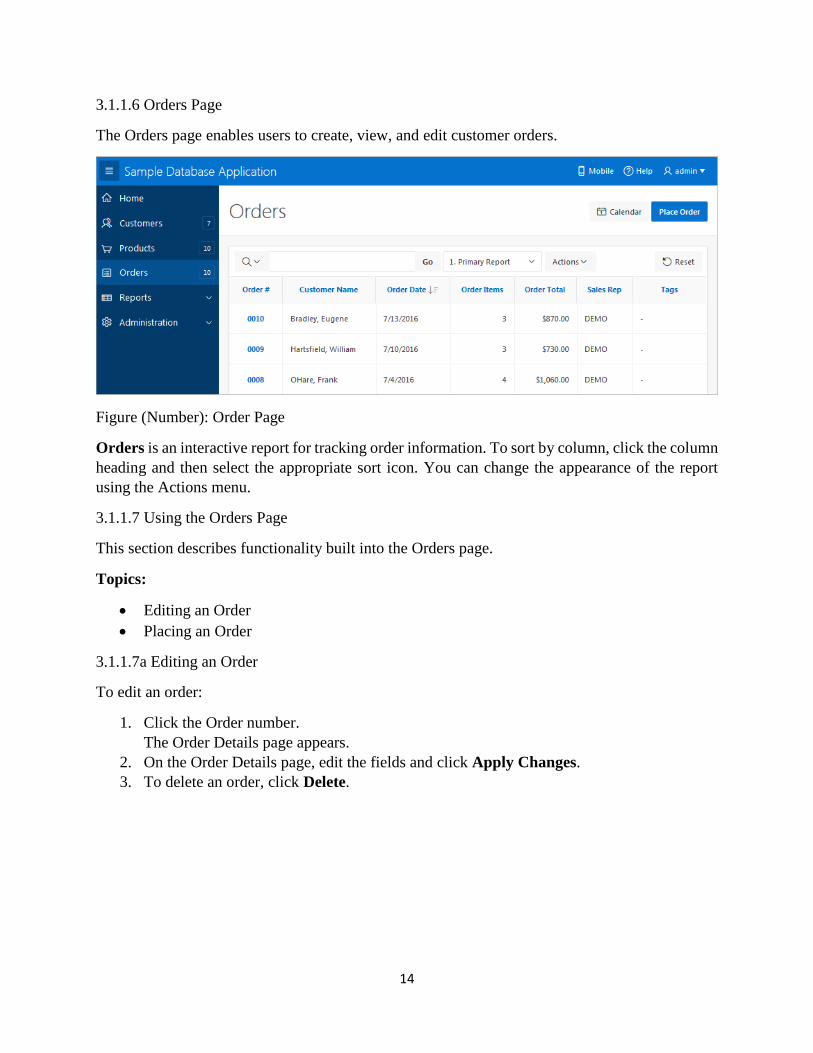
3.1.1.6 Orders Page
The Orders page enables users to create, view, and edit customer orders.
Figure (Number): Order Page
Orders is an interactive report for tracking order information. To sort by column, click the column
heading and then select the appropriate sort icon. You can change the appearance of the report
using the Actions menu.
3.1.1.7 Using the Orders Page
This section describes functionality built into the Orders page.
Topics:
Editing an Order
Placing an Order
3.1.1.7a Editing an Order
To edit an order:
1. Click the Order number.
The Order Details page appears.
2. On the Order Details page, edit the fields and click Apply Changes.
3. To delete an order, click Delete.
15
3.1.1.7b Placing an Order
To create an order:
1. Click the Place order button.
The Identify Customer wizard appears.
2. Follow the on-screen instructions to enter order information.
3. Click Complete Order.
The order confirmation page appears.
4. Click Close.
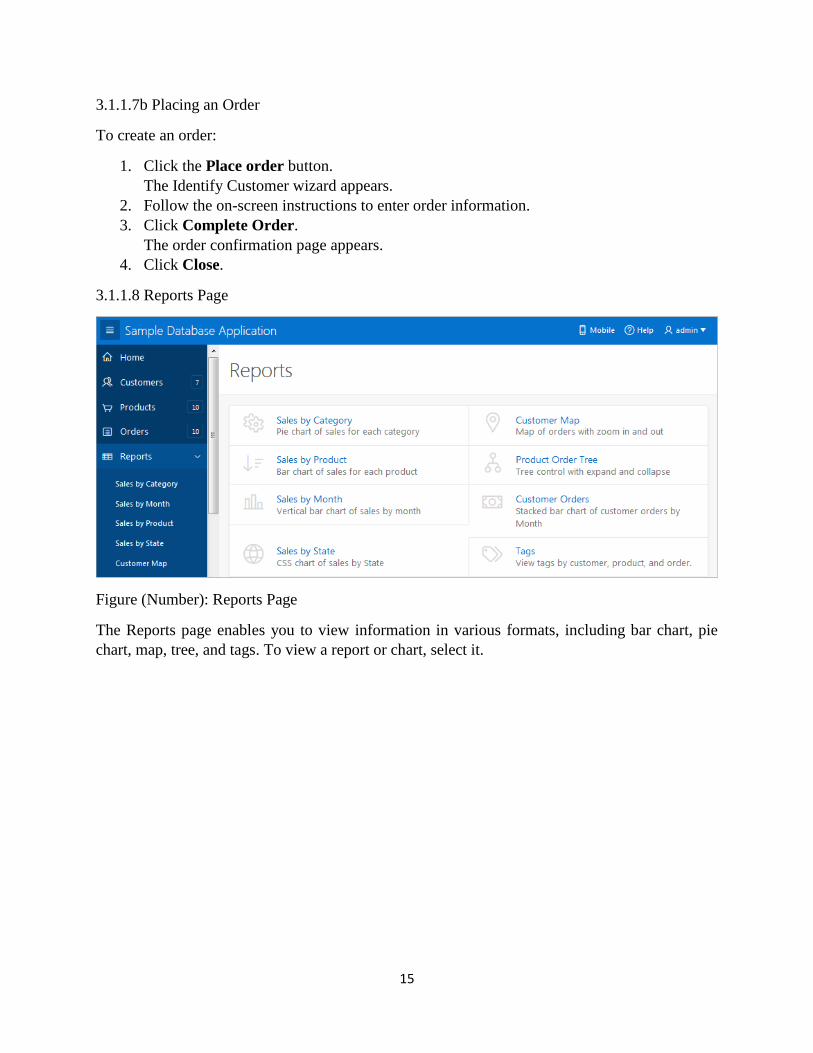
3.1.1.8 Reports Page
Figure (Number): Reports Page
The Reports page enables you to view information in various formats, including bar chart, pie
chart, map, tree, and tags. To view a report or chart, select it.
16
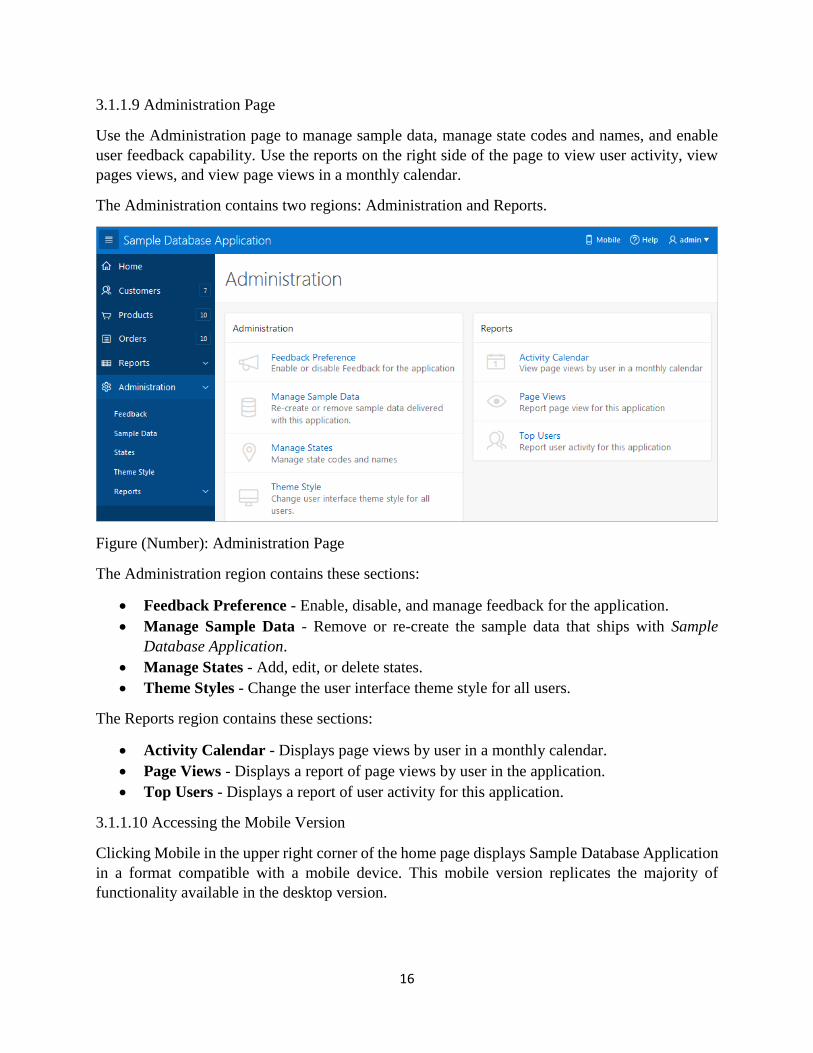
3.1.1.9 Administration Page
Use the Administration page to manage sample data, manage state codes and names, and enable
user feedback capability. Use the reports on the right side of the page to view user activity, view
pages views, and view page views in a monthly calendar.
The Administration contains two regions: Administration and Reports.
Figure (Number): Administration Page
The Administration region contains these sections:
Feedback Preference - Enable, disable, and manage feedback for the application.
Manage Sample Data - Remove or re-create the sample data that ships with Sample
Database Application.
Manage States - Add, edit, or delete states.
Theme Styles - Change the user interface theme style for all users.
The Reports region contains these sections:
Activity Calendar - Displays page views by user in a monthly calendar.
Page Views - Displays a report of page views by user in the application.
Top Users - Displays a report of user activity for this application.
3.1.1.10 Accessing the Mobile Version
Clicking Mobile in the upper right corner of the home page displays Sample Database Application
in a format compatible with a mobile device. This mobile version replicates the majority of
functionality available in the desktop version.

17
To access the mobile version of Sample Database Application:
1. Go to the Packaged Apps page and run Sample Database Application.
2. Click Mobile in the upper right corner.
The Mobile version of Sample Database Application appears.
3. To view a page, select it.
4. To edit a specific customer or product, select it.
A form appears. You can edit the content and click Apply Changes.
To delete a record, click Delete.
5. To return to the home page, click the Home icon in the upper left corner.
The home page appears.
6. On the home page:
a. Click Full Site to return to the desktop version of Sample Database Application.
b. Click Logout to return to App Builder.
Figure (Number): Sample Database Application (Mobile) Page
3.2 Good
3.3 Good
3.4 Good
3.5 Good
3.6 Good
4.0 Good
5.0 Good
6.0 Good
7.0 ADD: Application Express App Builder User's Guide: https://docs.oracle.com/database/apex-
5.1/HTMDB/understanding-sample-database-application.htm#HTMDB02006

18
Module 2 The Statistical database system
Unit 1 Statistical Database Concepts
1.0 Introduction
2.0 Objective
3.0 Basic Definition
3.1 Concept of Public Policies on Statistical Data
3.2 The Design of a Statistical Database
3.3 Features and Requirements of a Statistical Database
3.4 Statistical Database Modelling
3.5 Some Statistical Data Models
4.0 Conclusion
5.0 Summary
6.0 Tutor Marked Assignment
7.0 Further Reading and Other Resources

19
1.0 Good
2.0 Good
3.0 Good
3.1 Should be properly arranged in such a way that the header would follow their body of text
3.2 Should be properly arranged in such a way that the header would follow their body of text. In
materials for student fonts and font sizes should remain consistent.
3.3 Should be properly arranged in such a way that the header would follow their body of text
3.4 Good
3.5 Good
4.0 Good
5.0 Good
6.0 Good
7.0 Good

20
Module 2. The Statistical Database System
Unit 2 Statistical Data Analysis, Mining and Decision Tree
1.0 Introduction
2.0 Objective
3.0 Statistical analysis of Oracle performance data using R
3.1 Data Mining and the Semantic Conference Organizer
3.2 Data Mining and Decision Tree
4.0 Conclusion
5.0 Summary
6.0 Tutor Marked Assignment
7.0 Further Reading and Other Resources
21
1.0 Good
2.0 Good
3.0 Good
3.1 Good
3.2 Good
4.0 Good
5.0 Good
6.0 Good
7.0 Referencing should be in alphabetical order.

22
#### General Comments
1. Page number should be present for easy referencing between students and tutors.
2. Page Margins should also be justified.
3. Modules and it units should be on a page (New page).