rev electric jet ski - robotics uwarobotics.ee.uwa.edu.au/theses/2013-revski-safety-white.pdf ·...
TRANSCRIPT

THE UNIVERSITY OF WESTERN AUSTRALIA
REV Electric Jet Ski Safety Systems
Riley White 20742356
School of Mechanical and Chemical Engineering University of Western Australia
Supervisor: Professor Thomas Bräunl School of Electrical and Electronic Engineering
University of Western Australia
Final Year Project Thesis
for the degree of Bachelor of Engineering (Mechatronics)
School of Mechanical and Chemical Engineering
University of Western Australia
Submitted: October 26th, 2013

2
Project Summary The aim for this project is to design the safety systems for an electric-powered jet ski. The
REV project in the past has converted several petrol powered cars to electric power, but this
is the first time a water vehicle has been attempted. There are obvious reasons for converting
from fossil fuel to electric power, such as lower emissions, less noise pollution and lower
running costs. With a push from society as a whole towards clean energy vehicles and
lowering emissions, this project finds itself highly relevant to the current climate.
Although the idea is similar to previous REV projects, converting a petrol powered vehicle to
electric power, a water craft has its own unique challenges not found in a car. Water, for
example, can be very hazardous to electric systems, as anyone who has dropped their phone
in the pool would know. The REV Jet Ski will be exposed to water in its operating
environment, and so extra care will need to be taken to ensure water proofing of the critical
components, to which water exposure would be damaging. Water leakage sensing is one
aspect this project deals with, in addition to temperature sensing, battery management, a
deadman's switch and safe charging.
A large consideration for this project is adaptability, taking into account future work. At the
present time the REV jet ski is not complete, and so the safety requirements may grow to
incorporate unforseen needs as the project develops. With this in mind, it was necessary to
design a safety system that could be added to as required, and be easy to understand for future
students who are new to the project, so that they may add to it as work on the REV jet ski
progresses. A modular design that is easy to troubleshoot and modify has been developed,
using off-the-shelf, relatively inexpensive, standard parts from local Perth vendors. This
ensures that future additions in the form of additional modules will be easy to construct, cost
effective and fit uniformly with existing safety modules.

4
Acknowledgments
I would firstly like to thank my project supervisor, Professor Thomas Bräunl, for guiding
through the course of this project, and giving me the fantastic opportunity to work on a real
design project such as this.
I would also like to thank my fellow REV team members who I have greatly enjoyed working
alongside of, and have learnt much from.
Finally I would like to thank my family and friends for being so supportive during this
stressful and busy time.

5
Table of Contents Project Summary ........................................................................................................................ 2
Letter of Transmittal .................................................................................................................. 3
Acknowledgments...................................................................................................................... 4
Nomenclature ............................................................................................................................. 8
1 Introduction ............................................................................................................................. 9
1.1 Background ...................................................................................................................... 9
1.2 Literature Review........................................................................................................... 10
2 Project Management and Engineering Practice .................................................................... 12
2.1 Introduction .................................................................................................................... 12
2.2 Budget ............................................................................................................................ 12
2.3 Timeline ......................................................................................................................... 13
2.4 Communications Management ...................................................................................... 13
3 Component Overview ........................................................................................................... 13
3.1 Introduction .................................................................................................................... 13
3.2 Motor.............................................................................................................................. 14
3.3 Batteries ......................................................................................................................... 14
3.4 Controller ....................................................................................................................... 18
4 Safety System Overview ....................................................................................................... 19
4.1 Introduction .................................................................................................................... 19
4.1.1 Requirements .......................................................................................................... 19
4.1.2 Failsafe .................................................................................................................... 20
4.1.3 Charging .................................................................................................................. 20
4.2 Requirement Specifics ................................................................................................... 21
4.2.1 Temperature ............................................................................................................ 21
4.2.2 Water ....................................................................................................................... 22
4.2.3 BMS ........................................................................................................................ 23

6
4.2.4 Deadman's Switch ................................................................................................... 24
4.2.5 Safe to Charge ......................................................................................................... 25
4.3 Relays vs. Microcontroller ............................................................................................. 26
4.4 Design Overview ........................................................................................................... 26
5 Design ................................................................................................................................... 27
5.1 Introduction .................................................................................................................... 27
5.2 Design Criteria and Requirements ................................................................................. 27
5.3 Modular Design ............................................................................................................. 28
5.4 Sensors ........................................................................................................................... 29
5.4.1 Water ....................................................................................................................... 29
5.4.2 Temperature ............................................................................................................ 30
5.4.3 BMS ........................................................................................................................ 32
5.4.4 Charging Box .......................................................................................................... 32
5.4.5 Deadman's switch/Ignition Key .............................................................................. 34
5.5 Final Wiring ................................................................................................................... 35
6 Implementation ..................................................................................................................... 37
6.1 Construction ................................................................................................................... 37
6.1.1 Introduction ............................................................................................................. 37
6.1.2 Water Module ......................................................................................................... 37
6.1.3 Temperature Module ............................................................................................... 39
6.1.4 BMS Module ........................................................................................................... 39
6.1.5 Charging Module .................................................................................................... 40
6.1.6 Ignition Key Module ............................................................................................... 42
6.1.7 Final Assembly ....................................................................................................... 43
6.2 Testing............................................................................................................................ 44
7 Conclusions and Future Work .............................................................................................. 46
7.1 Current Status................................................................................................................. 46

7
7.2 Future Work ................................................................................................................... 47
7.2.1 LED Indicators ........................................................................................................ 47
7.2.2 Safety System Enclosure......................................................................................... 47
7.2.3 Early Warnings, Data logging and Microcontroller Outputs .................................. 47
7.2.4 Sensor Placement .................................................................................................... 48
7.2.5 User Override .......................................................................................................... 48
7.2.6 Fire Extinguisher System ........................................................................................ 48
7.2.7 Relay Upgrades and Testing ................................................................................... 49
7.3 Outcomes and Conclusions ............................................................................................ 49
9 References ............................................................................................................................. 51
Appendix .................................................................................................................................. 55
Appendix A: SME Custom Motor Datasheet ...................................................................... 55
Appendix B: Headway LiIon Datasheet .............................................................................. 61
Appendix C: FMEA Chart ................................................................................................... 62
Appendix D: Generic Module .............................................................................................. 66
Appendix E: Kemo Electric Water Sensor B192 Data Sheet .............................................. 67
Appendix F: Kemo Electric Relay Card B197 Data Sheet .................................................. 68
Appendix G: Water Module Drawing.................................................................................. 69
Appendix H: Kemo Temperature Sensor B048 Datasheet .................................................. 70
Appendix I: Temperature Module Drawing ........................................................................ 71
Appendix J: SN54HC02 NOR Gate Data Sheet Excerpt..................................................... 72

8
Nomenclature REV Renewable Energy Vehicle
V Volts
A Amps
Ah Amp-Hours
BMS Battery Management System
SME Submersible Motors Engineering
PWR Power Line
CRG Charge Line
SAE Society of Automotive Engineers
DESS Digitally Encoded Security System
IC Integrated Circuit

9
1 Introduction
1.1 Background
The REV project has been designing, creating and converting electric vehicles since 2008,
starting with the conversion of a Hyundai Getz from petrol to electric power. The REV
project has continued to grow stronger, converting a BMW, Ford Focus and Lotus Elise to
electric power, installing electric charging stations and designing and building formula SAE
cars. The REV Jet Ski project is the first time the team has taken on a water craft.
The REV Jet Ski project began in semester 2, 2012. A SEADOO GTI130 was purchased with
no motor or fuel tank. With the exception of the fuel tank and petrol engine, the jet ski
contained all the parts from its previous life as a petrol-powered vehicle. This included
steering, a controller, a display, reverse mechanism, impellor, deadman's switch and fuse box.
Although some of these components are not utilised by the new electrically powered design,
the hull would serve as the base for the rest of the project.
The new electric motor was built by Submersible Motors Engineering (SME) who specialise
in motors for water-based applications. In a great show of generosity, SME agreed to build
and install the motor for free as a sponsorship deal with the REV team. Once the motor was
selected, the appropriate batteries were selected and purchased, and the battery housing was
designed as part of a thesis project by Rajinda Jayamanna. At the same time, a cooling system
was designed as part of a thesis project by Rowan Clark.
This thesis deals with the safety systems of the jet ski. These include temperature sensing,
water leakage detection, battery management systems (BMS), a deadman's switch and safe
charging. As work continues on the REV jet ski project, and it is not complete at the present
time, adaptability to future requirements has been at the forefront of the design of the safety
systems. The design features modular components, with a different module for each sensor.
This gives the system a neat, contained and easy to use feel, and makes additions to the safety
system easy to do in the form of extra modules.

10
1.2 Literature Review
Whilst the concept of an electric jet ski is a new idea, and to our knowledge, the first of its
kind in Australia, there are still aspects of other safety systems that can be relevant to the one
intended for the jet ski. The temperature cut off is of particular interest, as there are a number
of requirements, as well as a number of ways of satisfying them.
A possible way to detect temperature and enable a soft cut-off (gradual instead of
instantaneous shutoff at a certain point) can be modelled on the systems developed by James
Dinh and George Korinsky in their 1993 patent for "Temperature Dependent Fan Control
Circuit For Personal Computer". The aim of the invention is to create a personal computer
cooling fan that changes speed with the temperature, rather than having two set speeds, low
or high. The invention makes use of a thermistor, which is a resistor with high resistance at
low temperatures and low resistance and high temperatures (Dinh & Korinsky 1993). In the
fan control circuit, as the temperature at the thermistor rises and the resistance decreases, the
voltage across the fan proportionately increases, as a result of the way the circuit is
structured. Figure 4 in the patent shows that there is a linear relationship between temperature
and voltage supplied to the fan between 30 and 50 degrees Celsius, where the system is most
often operated. Outside of this range the system may still be operated, however the
relationship between the temperature and voltage supplied to the fan may not be linear (Dinh
& Korinsky 1993).
This design also includes an overheating protection mechanism, through use of a transistor.
As the temperature increases the thermistor resistance gets lower until the voltage across the
base of a particular transistor becomes low enough to turn said transistor on, which causes a
current to be sent to other components which result in a silicon control rectifier redirecting
current around the circuit to send a signal to the power supply to shut off (Dinh & Korinsky
1993). This patent effectively includes a controlled approach to monitoring temperature with
a soft-cut, as well as an instantaneous cut-off for when the temperature is too high.
Another method of temperature control in an electrical circuit is the patent for "Safety
Feature For Electric Vehicle Control" by Francis Thompson in 1974. The patent refers to a

11
field controlled direct current drive motor for an electric vehicle, but the temperature control
is of particular interest. In this invention a temperature sensor is connected to the drive motor
which provides an excess temperature output signal when the temperature of the drive motor
exceeds a certain value (Thompson 1975). When this happens, operating characteristics of
the vehicle are altered to reduce performance, allowing the temperature to cool, but while still
enabling continued operation (Thompson 1975). The reason this can happen is because there
is an amplifier in the armature current feedback circuit (used for comparing with desired
armature current to provide control for the system) which is responsive to the temperature
sensor so as to increase the feedback signal when the temperature exceeds a certain value
(Thompson 1975). This would cause the control system to have feedback higher than usual,
causing it to lower current into the motor to match the desired armature current. In this way
the motor will still be operational, but just in a reduced capacity in accordance with the
temperature.
Both of these patents refer to the control of a motor when temperature approaches or exceeds
an acceptable value, which could possibly result in damage to the components. Whether it be
a thermistor being used to proportionally change the voltage supplied to a cooling fan based
on the inversely proportional relationship between temperature and resistance of the
thermistor, or using an amplifier taking inputs from a temperature sensor to increase the
feedback signal to a comparator, both methods have their strengths. The method used by
James Dinh and George Korinsky in their 1993 patent seems simpler and more direct,
however in the context of a vehicle safety system it may be difficult to apply. The method
employed by Francis Thompson in 1975 seemed more complex at first, however the principle
of control on which the temperature sensing is based could translate well to the context of a
jet ski safety system. This patent was after all, for the safety features of an electric vehicle.
Through review of both patents, it is evident that it is possible to design a temperature shut
off system for both the instantaneous emergency case, and a soft cut in a controlled sense to
limit performance to allow the systems to cool, whilst still being able to navigate until a safe
place to stop is found.

12
2 Project Management and Engineering Practice
2.1 Introduction
The project team consists of final year students completing their thesis using the REV
Electric Jet Ski as the basis for a final year project. The students are from a variety of
disciplines, and the team is run under the guidance and supervision of Professor Thomas
Bräunl. The project was started in semester 2, 2012, and has seen 2 students graduate and
leave the project, 3 students about to complete their theses, and another two students set to
finish semester 1, 2014. Currently the team consists of 5 members. With the constant flux of
members, documentation and communications management has been paramount.
On many occasions team members have been required to interact with members of industry
in various formats, and so a professional standard has been upheld at all times.
2.2 Budget
Budget constraints have played a large part in the design and construction of various
components in the project. The exact budget is confidential, however the lack of funding able
to be sourced has meant that cost effectiveness has been taken into consideration at every step
of the project.
Sponsorship was obtained from the following companies:
Altronics For use of the entire REV project, a store credit was donated to the
team. This has been highly useful as a lot of the electrical components
have been able to be sourced from Altronics, which is a local Perth
vendor.
SME The motor for the electric powered jet ski was built for free by SME,
as part of a sponsorship deal.
Unfortunately, despite applying for various sponsorship programs, monetary sponsorship was
unable to be obtained, which has meant that low-cost has had to be at the forefront of design.

13
2.3 Timeline
At the commencement of semester 1, 2013, a project plan was produced to help give the
newer members of the team a foundation to begin understanding the project. This project plan
included overviews of team member roles, contact information and communications
management, milestone list and a Gantt chart, among other items. The timeline for the project
specified at this time was soon outdated as updating the Gantt chart became difficult and near
impossible due to unpredictable delays beyond our control. The main delay was in the motor
construction and installation. The estimated time by the external company was 2 weeks for
construction and installation, once they had received the jet ski. After weekly checkups and
continuous postponements, the jet ski was finally ready to be collected some 3 months later.
This delay had a huge impact on the timeline of the project, and saw the graduation of 2 team
members during its time.
2.4 Communications Management
Communications management is defined as "Generating, collecting, disseminating, storing
and disposing of timely and appropriate project information" - (Kloppenborg 2012). In the
REV Jet Ski team all relevant information, including designs, proposals, project plans,
datasheets and images have been stored and shared using the Dropbox collaborative storage
application. This has allowed each team member to access information on the project from
anywhere, and has proved invaluable. The main form of communication has been a group
emailing list, ensuring that all team members and supervisors can stay in touch. Weekly
meetings have been held, however due to the student nature of the team, it has been difficult
to consistently get attendance from all team members. However, as a result of the Dropbox
and the emailing list, team members who are unable to attend meetings are kept in the loop
with any important information they may have missed. This has kept good cohesion in the
group and enabled everyone to stay up to date on all matters of the project.
3 Component Overview
3.1 Introduction
The REV Jet Ski is made up of 3 key electrical components: the motor, the batteries and the
controller. These 3 systems are critical to the operation of the jet ski, and have the most dire

14
consequences if they are damaged. For this reason, they are focussed on such that the greatest
understanding of the component is gained to better help design a safety system that can
protect it.
3.2 Motor
The motor was built and installed by Submersible Motors Engineering (SME). This was done
free of charge, however when the jet ski came back with the motor installed, it wasn't fitted
correctly, and so the motor mounting points had to be readjusted. The datasheet for the motor
can be found in Appendix A. Key points from the data sheet are as follows:
Output Power 50kW
Rated Voltage 96V
Given Speed 8000rpm
Operating Temperature 75°C
The AC motor is to be driven by the Curtis controller (see section 3.4). Which will regulate
the voltage to vary the speed of the motor accordingly.
The motor, having been designed and built by SME (who specialise in submersible motors),
is designed to be waterproof, and as such does not need to be in an enclosure.
3.3 Batteries
The batteries used to power the REV Electric Jet Ski are Headway 10Ah Li-Ion cells. They
were sourced from EV works, a local vendor that supplies components to electric vehicles,
and use Lithium Iron Phosphate (LiFePO4) as the main ingredient (International Battery Inc
2010). The datasheet can be found in appendix B, and a full list of ingredients, their
percentage of the battery composition and hazards can be seen in table 3.3.1.

15
Table 3.3.1: Li-Ion Battery Cell Composition/Ingredient List - (International Battery 2010)
These batteries are grouped together in series in modules of 8 cells. This provides them with
80Ah. 30 of these 8 cell modules are then linked together to provide them with the 96 volts
needed to power the jet ski systems.
"Lithium batteries have been a revolution in energy storage and a major enabling factor in the
resurgence of electric vehicles. However lithium batteries can be damaged if their voltage
goes out of safe operating range – either too high (overcharging) or too low (over-
discharging). " -(EV Works 2010) To combat the risk of overcharging or over discharging the
battery cells, a battery management system is used (BMS). The BMS is responsible for
signalling if the battery cells go out of safe operating range and begin to either over charge or
over discharge. The BMS is discussed in greater detail in section 4.2.3.
The batteries are to be housed in the front section of the jet ski, shown in figure 3.3.2. The
battery placement and housing was the topic of the thesis by Rajinda Jayamanna, and the
recommended configuration is shown in figure 3.3.3, and the proposed housing in figure
3.3.4. The configuration of the bottom layer being larger than the top two is due to the
interior space in the front of the jet ski. The hull narrows in towards the top, where the upper
two layers are located. Therefore, these layers were made smaller and the bottom one larger.
The reasoning behind the placement of the batteries at the front of the jet ski is that the petrol
fuel tank was previously located on the mounting points shown in figure 3.3.5. By placing the
batteries here and the motor at the back, the weight distribution is kept as close to the original
petrol-powered design as possible.

16
Figure 3.3.2: The front section of the jet ski
Figure 3.3.3: Recommended battery configuration
(Above- top two layers, Underneath- bottom layer) -
(Jayamanna 2013)
Figure 3.3.4: Proposed housing design -
(Jayamanna 2013)
Figure 3.3.5: Fuel tank mounting points -
(Jayamanna 2013)
17
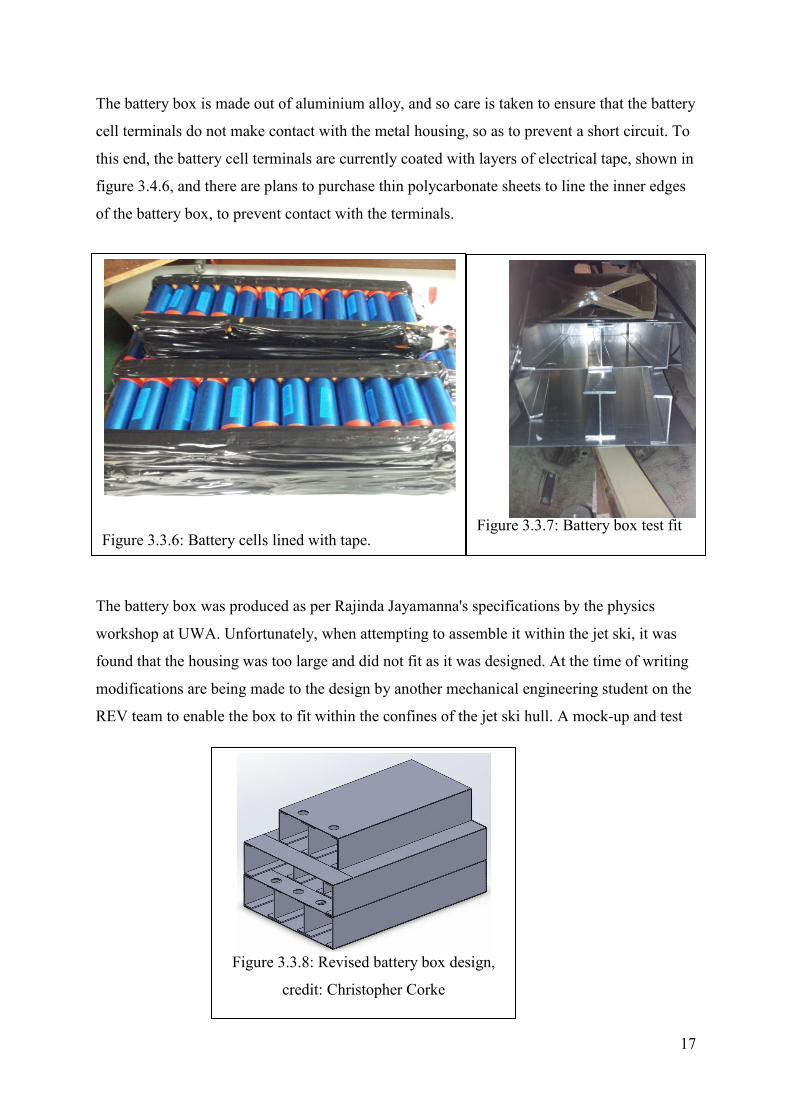
Figure 3.3.6: Battery cells lined with tape.
The battery box is made out of aluminium alloy, and so care is taken to ensure that the battery
cell terminals do not make contact with the metal housing, so as to prevent a short circuit. To
this end, the battery cell terminals are currently coated with layers of electrical tape, shown in
figure 3.4.6, and there are plans to purchase thin polycarbonate sheets to line the inner edges
of the battery box, to prevent contact with the terminals.
The battery box was produced as per Rajinda Jayamanna's specifications by the physics
workshop at UWA. Unfortunately, when attempting to assemble it within the jet ski, it was
found that the housing was too large and did not fit as it was designed. At the time of writing
modifications are being made to the design by another mechanical engineering student on the
REV team to enable the box to fit within the confines of the jet ski hull. A mock-up and test
Figure 3.3.7: Battery box test fit
Figure 3.3.8: Revised battery box design,
credit: Christopher Corke

18
fit of this design can be seen in figure 3.3.7, and the proposed Solidworks model is shown in
figure 3.3.8. This new design takes into account the space constraints at the top of the jet ski
interior.
3.4 Controller
The controller used is a Curtis 1238 AC motor controller, and was purchased from Bylong
Industries at a price of $3,113. The controller can be seen in figure 3.4.1. The controller
arrived without software or a manual, but through some research datasheets were obtained
and software was downloaded. A connector had to be constructed, as the controller required
inverted TTL logic (Curtis Instruments, Inc 2009) , whereas the PC user interface used USB
inputs. A USB to TTL converter was obtained, and so all that was left was to invert the signal
to match the Curtis controller input. The schematic for this connector was developed by Alex
Beckley, and is shown in figure 3.4.2. The connector was then constructed utilising a
waterproof connector on the end attached to the jet ski, and is shown in figure 3.4.3.
Figure 3.4.2 shows the TTL ports that were on a USB to TTL converter wired into an
inverter, which are then outputted to the controller. In figure 3.4.3 the USB to TTL connector
is seen mounted in the right hand side of the box, whilst a 3 pin water-proof connector is
wired to the TTL controller outputs on the left. The reason for the waterproof connector is
that the other half of the connector (not seen in the above figures) will remain with the
controller in the jet ski, where water may be present, and so has to be waterproof.
Figure 3.4.1: Curtis 1238 AC controller
Figure 3.4.3: Finished Curtis-PC
connector

19
4 Safety System Overview
4.1 Introduction
The safety systems on any vehicle are crucial. They ensure the safety and functionality of
both the user and the vehicle itself. As such, these systems need to be reliable and effective,
leaving nothing to chance. For this reason, a system of relays was used in the REV Jet Ski
safety circuit. These relays are linked to sensors that measure temperature and water levels.
Originally it was intended that a microcontroller would be used to take inputs from the
temperature and water sensors and run a single relay, serving as the complete safety circuit.
This idea was dropped however, in favour of the relay-only system due to the reliability and
robustness of the relays compared to the chance that something could go wrong with the
microcontroller.
4.1.1 Requirements
The REV Jet Ski has a number of vital components that are crucial to operation, and present a
large consequence if they are damaged and/or left untreated. These vital components are the
batteries, the motor, the controller, and of course the user. In order to identify the potential
threats to these components that may damage or disrupt their operation a FMEA chart was
Figure 3.4.2: Curtis - PC connector schematic- Credit, Alex Beckley

20
constructed. This can be found in appendix C. "An FMEA (Failure Mode and Effect
Analysis) is a systematic method of identifying and preventing product and process problems
before they occur ... Ideally, FMEAs are conducted in the product design or process
development stages" - (McDermott, Mikulak & Beauregard 2009) . A hazard is defined as "a
potential source of harm"- (ISO/IEC 1999), where as a risk is the consequence, and likely
hood of that consequence occuring (ISO/IEC 2009). The main hazards identified were high
temperature, extreme low temperature, water leakage, short circuit, crash and user dismount.
The risks associated with these hazards varied between components, damage or disruption of
operation was common to most. Often it is not practical to remove a hazard completely (such
as removing the hazard of water from a jet ski, a water craft), and so while the safety systems
may not be able to remove the hazard, but it is the aim to do what is possible to prevent
damage and mitigate the risk of each hazard.
4.1.2 Failsafe
Failsafe is defined as "causing a piece of machinery to revert to a safe condition in the event
of a breakdown or malfunction" (Oxford University Press 2013). It is important for the safety
systems of a vehicle to be failsafe, so that should something cause the safety system to fail, it
will automatically prevent (to the best of its ability) further damage to subsequent systems. In
the case of the REV Jet Ski safety systems, the system should be failsafe such that if power is
lost to the safety system, power will be shutoff and operation will cease. This is to prevent
possible damage to the vital components occurring during continued operation without the
protection of the safety system.
4.1.3 Charging
The 240 battery cells are charged using a GWL/Power Charger 96V/25A, designed for
LiFePO4 / LiFeYPO4 + BMS. This charger takes a nominal input voltage of 230V AC, and
outputs a charge of 96V at 25A (Ev-power.eu, 2013). As each module contains a total of
80Ah, as shown in equation 4.1.3.1, it will take up to 3.2 hours to fully charge the batteries.
𝐶ℎ𝑎𝑟𝑔𝑒 𝑇𝑖𝑚𝑒 (ℎ𝑜𝑢𝑟𝑠) = 𝑇𝑜𝑡𝑎𝑙 𝑐ℎ𝑎𝑟𝑔𝑒 𝑜𝑓 𝑏𝑎𝑡𝑡𝑒𝑟𝑖𝑒𝑠 (𝐴𝑚𝑝 𝐻𝑜𝑢𝑟𝑠)𝐶𝑢𝑟𝑟𝑒𝑛𝑡 𝑠𝑢𝑝𝑝𝑙𝑖𝑒𝑑 𝑏𝑦 𝑐ℎ𝑎𝑟𝑔𝑒𝑟 (𝐴𝑚𝑝𝑠)
3.2 = 8025 (𝑒𝑞𝑢𝑎𝑡𝑖𝑜𝑛 (4.1.3.1))

21
The vehicle should not be in operation whilst charging. This is for the safety of the operator,
as the charging port is located within the jet ski, where there are potentially dangerous
voltages and fast moving parts. The charger and cable, shown in figure 4.1.3.2, is plugged
into the charging port. The charging port must be water proof, as it may be exposed to water
when not in use. Due to the expense of a water proof connector, a waterproof box that
contains the charging port is proposed. This box will be closed during normal operation of the
jet ski (when not charging), and thus will be water proof. A diagram of this proposed
assembly is shown in figure 4.1.3.3.
4.2 Requirement Specifics
4.2.1 Temperature
The components that are most sensitive and at risk to high temperatures are the batteries. The
controller has its own built in temperature sensor that protects it from operation in high
temperature, and is also cooled by a heat exchanger plate (Clark 2013). The motor is also
water-cooled. Currently, the batteries lack a dedicated cooling system due to the space
restrictions in the front section of the jet ski, where the battery housing is located. The
batteries also have the most dangerous consequence to high temperature. At elevated
temperatures such as 100°C the batteries may vent flammable liquids and gases (International
Battery Inc 2010). It is also recommended that the batteries are not stored below -33°C or
above 55°C. A Queensland survey by RACQ conducted in 2009 reported that temperatures
Figure 4.1.3.2: Charger Figure 4.1.3.3: Water-proof box for
charging port assembly

22
within sealed test vehicles (cars) reached up to 60.4°C when left in the sun on a sunny
Brisbane day when the ambient temperature reached a peak of 33°C (Ewing & Manning
2009). The report also concluded that on a sunny day temperatures inside cars typically
doubled the ambient temperature when left in the sun (Ewing & Manning 2009). Therefore,
on summer days in Perth (the location of the jet ski) where temperatures are commonly
known to reach above 40°C, the jet ski must be parked in the shade where it is not exposed to
the sun for extended periods of time when not in use.
Given the recommendation that the batteries not be stored above 55°C, an ideal temperature
limit would be below 55°C, to ensure that no harm could possibly come to the batteries as a
result of temperature. However, given the study by RACQ, this temperature limit could be
surpassed on a summer day during normal operation. The manufacturer also recommends that
the batteries are not discharged above approximately 60°C (see Appendix B). This, and the
information that flammable liquids and gases are vented when the temperature reaches
approximately 100°C, indicates the temperature limit should be somewhere below 100°C, at
a point which could not be reached whilst the jet ski is not operating or during normal
operating conditions. Therefore a limit of approximately 60°C should be used. This is only an
estimate however, as testing has not yet been conducted on the jet ski systems as they are
incomplete at the time of writing.
4.2.2 Water
Water is an ever present hazard to the jet ski during normal operation, as it is intended for use
on the water (almost certainly not pure water). The main danger (in terms of the jet ski) with
water located in oceans and rivers is that it is an excellent conductor of electricity. As a
result, a water leak into the hull of the jet ski could potentially bridge exposed wires or
terminals, causing a short circuit, damage to the systems, or in the worst case, harm to the
driver.
Currently, every measure is being taken to ensure water-proofing where possible. The
connectors that connect the batteries together are all IP67 rated waterproof (Altronics 2013).
These can be seen in figure 4.2.2.1. The motor was produced by Submersible Motors

23
Engineering and is also waterproof. Exposed connections, such as the connector to the
controller, also utilise water proof connectors. The charging port will also feature a water
proof design, with the proposed design featuring a water-proof box to encase the port when
not charging. However, despite these efforts, should water leak into the hull of the jet ski, it is
possible that there may be exposed wires or terminals that could cause damage if in contact
with water. To this end, water sensors are needed to shut off power to prevent damage,
should water be detected.
4.2.3 BMS
As mentioned previously, the BMS is responsible for signalling if the batteries go outside of
their safe operating range by either over charging or over discharging. The BMS modules
used in this project are ZEVA 8-Cell Battery Monitor Modules, purchased from EV works.
Each module can only monitor a limited number of cells, and so there are multiple BMS
modules all working concurrently. These modules then feed to a single master module, the
ZEVA BMMCU. This master module outputs a 12V signal (ZEVA, n.d), on if the batteries
are operating within their safe range, or off if they are not. The four BMS modules as well as
the master module can be seen in figure 4.2.3.1.
Figure 4.2.2.1: Waterproof
connector (Altronics, 2013)

24
Figure 4.2.3.1 BMS Modules & Master (Right)
4.2.4 Deadman's Switch
The emergency switch, commonly known as a Deadman's switch, is a device connected to
the user via clip or other attachment, that is required for the vehicle to be operational. By
connecting the switch to the user, the vehicle is prevented from running should the user fall
off during use. In the context of the REV jet ski, the Deadman's switch is located at the base
of the handle bars (shown in figure 4.2.4.1), and serves as a key, similar to the ignition key of
a car, that is required to start, and operate, the vehicle. In the workshop manual of the
SEADOO jet ski, the switch is referred to as a DESS (Digitally Encoded Security System),
and are somehow encoded to unlock different capabilities of the jet ski. There are, according
to the workshop manual, 3 different DESSs, all which limit the running speed of the motor to
a certain degree. However, only two DESSs belonging to this particular jet ski are known to
exist, one of which is the white DESS, which according to the workshop manual, is the
training key. This training key was once used to limit the top speed of the jet ski (Seadoo
2008). Unfortunately, as we have removed the original petrol engine and control systems, this
key is no longer functional. Possible future work is to look into utilising these limits with the
new controller and electric motor.
A deadman's switch that would serve as a key to start the vehicle is however, still a desired
component. Therefore testing was undertaken to see if modifications could be made to the
white DESS to utilise it without the previous restrictions relating to the petrol motor system.
The old control system was still attached to the jet ski, and using the relevant sections of the
workshop manual (shown in figure 4.2.4.2), it was found that wires BK and WH-GY were
the outputs of the switch. By testing the resistance across these wires using a multimeter, and

25
bridging the two terminals of the switch (seen in figure 4.2.4.1), it was found that a closed
loop could be made by simply bridging the two switch terminals. This fact means that
modifications can be made to the DESS, and it can be included in the design of the safety
systems.
4.2.5 Safe to Charge
For the batteries to be charged, they must be in a stable, safe condition, in the same way they
must be safe and stable when the vehicle is in operation, because the batteries are still in use,
whether they are charging or discharging. Therefore, in addition to a system to shut off power
in the presence of water and high temperature, there should also be a system to allow the safe
charging of the batteries in the same manner. This system should also prevent the batteries
from charging whilst the system is in use.
The charging port is also only water proof when the lid is closed. This can be seen in figure
4.1.3.3.
Figure 4.2.4.2: DESS Wiring
Diagram (Seadoo 2008)
Figure 4.2.4.1: Deadman's switch

26
4.3 Relays vs. Microcontroller
Relays have been chosen in this project due to their robustness over microcontrollers.
Previous experience on other REV projects has shown that systems using relays have been
more reliable than those using microcontrollers. Whether this has been due to faults with the
microcontroller itself or the coding is unknown, but for logic as simple as on/off when a fault
is detected, the added functionality of a microcontroller is not needed. Therefore in order to
keep things as simple and robust as possible, a system utilising relays has been used instead
of microcontrollers.
4.4 Design Overview
The overall design will feature relays at each sensor to determine whether or not the system is
safe. Figure 4.4.1 depicts this in a flowchart format.
This flowchart format closely resembles three of the modules in the modular design that will
be discussed in greater detail in section 5.3. Simply put, if a hazard is detected at any point,
power to the drive system will be cut in order to protect the components and the user. If a
fault is not detected, the signal will travel to the next module, and unless it is stopped by a
hazard being detected, it will reach then end and allow the system to have power.
Figure 4.4.1: Flowchart of safety system

27
5 Design
5.1 Introduction
The physical design of the safety system has to take into account several factors. These
include the power available, the power of the output signal required, the functionality
required (emergency cut-off, safe to charge), as well as non-technical issues, such as budget
and time constraints. Budget constraints have been a large consideration of the project, as
discussed in the project overview section (2.2). The budget constraint has influenced the
choice of sensors purchase.
Due to the student nature of the project, with new students coming on board as old ones
leave, it is also important to consider future work on the project. At the time of writing the jet
ski is not complete, and so it is likely that systems will change as the project develops. For
this reason, the safety system features a design that can be added to as the project develops
and the jet ski needs more sensors. This is discussed in the sections below.
5.2 Design Criteria and Requirements
Input: 12V DC
<3A
Output: 12V DC to run relay for 96V DC
12V DC signal for charge
Functionality: Temperature shutoff at approx 60°C
Water leakage detection
BMS
Deadman's switch/Ignition key
Charging box open/closed
The input is determined by the drive circuit. This was developed by Alex Beckley and was
pre-existing at the time of developing the safety system.

28
The first output is to drive a 12V relay that switches a 96V load. This first 12V output is
responsible for shutting off the power to the drive systems in case of danger. The second 12V
output is to go to the charger, to allow the charger to operate. The charger takes a 12V input
to activate it. By having an output of the safety system control this activation, it can be
safeguarded against charging when it is not safe to do so, or turning the jet ski on whilst it is
still charging.
5.3 Modular Design
One important requirement for the safety system is the need to account for future works on
the project. Due to the jet ski being incomplete at the time of writing, it is important to have a
safety system that can grow and adapt to issues that may be unforeseen at this time. At the
present time, the issues of temperature, water leakage, battery management, Deadman's
switch and safe charging have been identified, and are being accounted for. There may
however, be more safety issues that develop as the jet ski is completed and subsequently
tested. This is why a safety system that can be added to as the jet ski develops is important.
This is why the safety system features a modular design.
In essence, the modular design features a different module for each sensor. Each module will
feature an identical shell, as shown in the physical drawing in Appendix D. This shell is made
of standard parts that can be purchased from local Perth vendors Jaycar or Altronics. Each
module will have the same inputs and outputs, as well as spaces for sensor wires. These
inputs and outputs then plug into a pre-made veroboard, as shown in figure 5.3.1. There are 4
lines on the veroboard, 12V supply, ground (GND), safe power line (PWR) and safe charge
line (CRG).
Figure 5.3.1: Sketch of a veroboard strip. Each row represents a different line, 12V,
GND, PWR or CRG

29
The 12V supply is the input line that comes from the drive circuit. This supplies power to the
sensors and relays in each module. Each module is linked to the 12V supply and GND in
parallel, such that each will operate independent of the others. The PWR line is broken at
each module, and so has two pins across it per module. The reason for this is that if the
sensors detects that it is safe to run, the relay will be closed, and current will be allowed to
flow from one PWR pin to the other, bridging the gap. The CRG line operates in a similar
fashion, however it is only necessary on one module at this stage. The individual modules
will be discussed in the sections below.
5.4 Sensors
5.4.1 Water
The water module was based around a relatively inexpensive and robust water sensor that
could be purchased from local vendors. The selected water sensor for the prototype is a Kemo
Electronic Water Level Sensor 9 V/DC. The datasheet for this module can be found in
Appendix E. The reasons for selection are as follows:
x Availability- purchased from local Perth vendor Jaycar Electronics
x Low cost- $9.95 (Jaycar Electronics, 2013)
x Simple to use - if water bridges the two bare wire contacts, an LED lights up. A relay
can also be put in place as well that will be driven when water is in contact with the
sensing wires. (Kemo Electronic 2012)

30
This particular water sensor outputs a small voltage of approximately 2V. This output signal
is then coupled with a relay card, also purchased from Jaycar Electronics, and the datasheet
can be found in Appendix F. The water sensor requires a 9V signal, however, and the supply
line is 12V. For this a voltage regulator is used, L7809CV. This voltage regulator steps down
the voltage from 12V to 9V. The 12V line still runs to power the relay card, and GND is
connected to both the relay card and the water sensor. The load side of the relay card switches
between on and off (off if water is detected), and allows the PWR line to pass through, should
water not be detected. The sensor wires head out from the module encasing to detect water.
The wiring diagram for this module is shown in figure 5.4.1, and the physical drawing is
shown in Appendix G. Notice that the shell is the same as the generic model, with the inside
changed. It should be noted that the CRG line does not appear on the wiring diagram, yet
there is a port for one on the physical drawing. This is because it is not in use for this
particular module, but the standard module design still features one.
5.4.2 Temperature
The temperature module has been based around a similar sensor, again one that is relatively
inexpensive and from local Perth vendors, should future REV Jet Ski team members wish to
purchase more. The temperature sensor to be used is a Kemo Electronic Temperature switch
12V/DC B048. The datasheet for this module can be found in Appendix H. The reasons for
selecting this particular sensor are as follows:
x Availability- purchased from local Perth vendor Jaycar Electronics
x Low cost- $24.95 (Jaycar Electronics, 2013)
Figure 5.4.1: Water module wiring
diagram

31
x Range encompasses expected operating range, approximately -30°C to 150°C (Kemo
Electronic 2012)
x Variable temperature switch value (within accuracy of approximately ±10° (Kemo
Electronic 2012)
In our application, the temperature accuracy is not of the utmost importance. The temperature
sensor only needs to switch the relay once the temperature is outside of an acceptable range.
The accuracy of ±10° is an acceptable range.
This particular sensor comes with a relay built in, and so the wiring is less complex. The 12V
supply line runs directly to the sensor, as does GND. The two wires for the thermistor, which
is responsible for sensing the temperature, head off outside the enclosure to the desired
temperature sensing position. The PWR line runs in one end of the load side of the relay, and
out the other. This can be seen in the wiring diagram in figure 5.4.2.1, and in the physical
diagram in Appendix I. It should be noted that the CRG line does not appear on the wiring
diagram, yet it does appear on the physical drawing. This is because the CRG line is not in
use for this particular module, and the standard module design does feature a CRG port.
Therefore the port is on the module, but not in use.
Figure 5.4.2.1: Temperature
Module Wiring Diagram

32
Figure 5.4.3.1: BMS safety
module wiring diagram
5.4.3 BMS
The BMS modules themselves are located near the batteries they are monitoring, to make it
easy to associate each module with its respective cell group. This also helps to reduce on
wiring mess. Each BMS monitoring module will signal to a master module, that will throw a
12V signal low or high if any battery cell has crossed its safe operating threshold. In terms of
the safety system BMS module, this 12V signal will be used as the input to a relay card- the
same Kemo Electric B197 relay card used in the water module. The wiring diagram for this
module is shown in figure 5.4.3.1.
5.4.4 Charging Box
It is requirement for safety that the vehicle does not operate while charging (see section
4.1.3). In addition, the charging box should not be open whilst the vehicle is in use, as this
negates the waterproof properties of the box shielding the charging port. From these two
statements, it can be deduced that
PWR = CRG^
where
CRG = BOX^
therefore

33
PWR = BOX
where BOX is the digital logic 1 when the charge box is closed.
With this in mind, the charge box module wiring diagram can be designed. Shown in figure
5.4.4.1, 12V supply is sent to the relay supply and to the switch for the charging box. If the
box is closed the switch is closed, and so there is a 12V input to the relay as well. On the load
side, the PWR IN line is on one side, and PWR OUT on the other. Joined to PWR OUT is a
NOT logic gate, which negates the value of PWR OUT and sends it to CRG. The NOT logic
gate is powered by PWR IN. This ensures that should there be a problem with another
module that has shutoff power (for example water was detected), CRG will still return a value
of 0. This is critical as it is a requirement that the batteries are charged in a safe condition,
just as if they were being discharged (see section 4.2.5). Table 5.4.4.2 shows a truth table
depicting the logic in this module.
PWR IN BOX (closed = 1) PWR OUT CRG
0 0 0 0
0 1 0 0
1 0 0 1
1 1 1 0
Table 5.4.4.2: Truth table for Charging box module
Table 5.4.4.2 shows that
Figure 5.4.4.1: Charging box
wiring diagram

34
PWR OUT = (PWR IN)(BOX)
and CRG = (PWR IN)(BOX^)
This ensures that there is no way from this module that the jet ski can be in use and charged
at the same time.
5.4.5 Deadman's switch/Ignition Key
As discussed in section 4.2.4, despite having removed the functionality of the DESS, it would
still be a desirable function to have a Deadman's switch from a safety point of view, as well
as an ignition key to ensure that the vehicle has an easy way to be turned on and off. By using
the two existing wires that are attached to the switch (see section 4.2.4) and modifying the
DESS key a simple switch could be created that would enable a closed loop when the key
switch is plugged in.
Modifying the DESS key would involve placing conductive material around the inside of the
plug such that when it is connected to the switch it joins the two terminals, as shown in figure
5.4.5.1.
Once the DESS key is modified, the two wires connected to the switch could be fed into the
ignition key safety module as inputs. The wiring diagram for this safety module is shown in
figure 5.4.5.2. This module features the same relay card used previously, the Kemo Electric
B197 Relay Card. The data sheet can be found in Appendix F.
Figure 5.4.5.1: Terminals of the
Ignition key
Joining these two terminals

35
5.5 Final Wiring
The final wiring design takes into account all the individual modules. The key feature of this
design is that if one module is faulty, it can be removed and replaced with a replica, or better,
more improved module that is more reliable. In this way the system is highly adaptable to the
growth of the REV Jet Ski project.
There are 3 main lines, a 12V supply line (red), a ground line GND (black) and a PWR line
(blue). The PWR line is used to power the 12V - 96V relay. If each module is safe, then the
current will pass through to the end. If however, one module detects a fault, current will be
stopped at that module, and will not make it to the end to switch the 96V relay. In addition to
this PWR line output, there is a safe to charge line, CRG. The charge line requires all the
things that the PWR line requires, such as temperature and water, except the ability to charge
or run, as discussed in section 5.4.4. Therefore, in the charging box module, the output of
CRG goes to its own line, where it will be inverted from PWR (unless there is a fault
previously) so that the jet ski cannot be operated and charging at the same time. This wiring
diagram is shown in figure 5.5.1.
Figure 5.4.5.2: Ignition module
wiring diagram

Figure 5.5.1 Safety System Modular Wiring Diagram

6 Implementation
6.1 Construction
6.1.1 Introduction
A requirement for this safety system is that it is adaptable. To achieve this, it was designed to
be built with standard, off the shelf components that can be sourced from local Perth vendors.
By designing it in this way, future modules can be easily manufactured, should they be
required, using inexpensive components that are easily sourced.
The shell for the modules is a standard jiffy box that can be purchased from Jaycar
Electronics or Altronics (multiple store locations across Perth). They are 83mm x 54mm x
31mm and cost $3.95 from Jaycar Electronics (Jaycar Electronics, 2013). The reasoning
behind this is that these shells are commonly available, a standard size and cost effective.
They themselves do not need to be waterproof, as it is intended that the entire system will be
housed within a waterproof enclosure.
No specialist skills are required to construct the safety system, beyond being able to solder
and drill holes. This once again adds to the adaptability of the system for future work, as
future students on the project will be able to construct or modify future modules without
having to hire or pay someone else to do it, which could be costly. Each module has a near
identical shell design (the charging module will have an extra output pin). The design for this
shell is found in appendix D, and shows the locations of holes to be drilled. Once the holes
are drilled, interlocking pin sockets are glued in. The pins are 2 pin crimp style headers, and
can be purchased from Jaycar Electronics for $0.50. One half is glued into the module shell,
the other the veroboard. Holes for the wires are drilled and the wires for the sensors are
placed through.
6.1.2 Water Module
The water module was constructed using the Kemo Electric Water Sensor (see section 5.4.1)
and the Kemo Electric Relay Card (for the datasheet see Appendix F). The water sensor

38
required a 9V input, whereas the relay card required a 12V input. For this reason a voltage
regulator that took the 12V input down to 9V was used. The 12V input was thus connected in
parallel to the voltage regulator and the relay card supply. This is done according to the
wiring diagram shown in figure 5.4.1. The completed water module can be seen in figures
6.1.2.1 and 6.1.2.2 with the cover off and on, respectively. The connections are shown in
figure 6.1.2.1 before the sensor is mounted, so that the wires can be seen for the purposes of
the photograph. In reality it would be mounted to the inside of the box and be harder to see.
A key benefit to this particular water sensor is that since the requirement for water to be
detected is that the gap between to two sensor wires is bridged, additional wires can be joined
in parallel to be placed at different locations in the jet ski. If water bridges any of these wire
pairs the module will cut off power. This is explained visually in figure 6.1.2.3. Note that the
Figure 6.1.2.1: The water module
prior to mounting
Figure 6.1.2.2: The completed
water module
Figure 6.1.2.3: Different sensor
lines from the water module.

39
different colours indicate a different sensor wire pair that would stem off to a different
location in the jet ski. This allows the water module to be expanded without making an
entirely new module.
6.1.3 Temperature Module
The temperature module was built using the Kemo Electric Temperature Sensor, as described
in section 5.4.2. This module only requires the one board, and such is simpler to mount. The
12V supply and GND pins are soldered to the inputs on the board (the board schematics can
be found in appendix H), and the PWR in and out pins are soldered to the S and P ports on
the relay side of the board. The thermistor sensor is to be cut and extended with wires to the
desired location on the jet ski. For now this will stay intact until the exact location is known
once thermal testing of the jet ski is undertaken. The complete temperature sensor to be
mounted is shown in figure 6.1.3.1. Note the thermistor on the right is still attached to the
board. When the location of the temperature recording is known wires of appropriate length
will be inserted.
6.1.4 BMS Module
The BMS module features only an input from the BMS sensors into a relay card, and so is
relatively simple to make. The BMS sensors themselves will not be located in the safety
system, as they will be mounted close to the batteries. The reason the safety system is not
close to the batteries too is that there are significant space restrictions near the batteries.
There would not be enough room for the safety system to be securely mounted near the
batteries. The sensor wire coming into the module is from the master BMS module (see
Figure 6.1.3.1: Temperature module ready to be
mounted.

40
section 5.4.3). This is either a 12V high or low signal and so can be soldered straight onto the
relay IN port. The 12V supply and GND pins are soldered onto the relay card 12V and (-)
pins, and the PWR in and out pins are soldered onto the S and P ports as usual.
6.1.5 Charging Module
The charging module requires the use of an inverter (see figure 5.4.4.1). The reason for this,
as discussed in section 5.4.4, is that charging and running the jet ski are mutually exclusive
events, that is they cannot occur at the same time. This is shown in table 5.4.4.2, where the
CRG output is HIGH if PWR IN is HIGH and the box is open (BOX = 0). Conversely, the
CRG output is LOW and the PWR OUT output is HIGH if PWR IN is HIGH and the box is
closed (BOX = 1). As PWR IN is a requirement to both, an inverter that is powered by PWR
IN is used. This means that if PWR IN is LOW, CRG will also be low (in addition to PWR
OUT). This is best demonstrated by figure 6.1.5.1. This figure shows the circuit diagram for
PWR IN, PWR OUT, and the inverted signal of PWR OUT, CRG. Note that PWR IN is
connected to PWR OUT by the relay switch, as well as CRG via the power supply to the
inverter. Thus it is common to both, and both outputs will be 0 if PWR IN is also 0. This
module is placed at the end of the series (shown in figure 5.5.1). By doing this, if there is a
problem with previous modules it will ensure that there system is not allowed to run or
charge.
Figure 6.1.5.1: Circuit diagram for
PWR IN, PWR OUT, CRG and
inverter

41
The system was constructed using the common quadruple NOR gate IC, SN74HC02 from
Texas Instruments. An excerpt from the data sheet for this component can be found in
Appendix J. The sensor is wired up to the IC as shown in figure 6.1.5.2. This particular IC
was chosen due to it being very common and inexpensive, as well as being able to be used at
12V.
This module utilises the same relay card as all the others (shown in Appendix F), and is
constructed and put in the same standard jiffy box with the pin design as shown in Appendix
D.
The sensor to detect whether or not the box is open or closed is to be a switch that will be
closed when the lid is down, completing a circuit. As discussed in section 4.1.3, a water proof
box with a lid is intended to be used to house the charging port instead of a costly waterproof
connector. As the battery box has not yet been installed, the batteries have not been able to be
inserted and so wiring has not yet been attempted. For this reason the exact location and size
requirements of the charging port are unknown at this stage. Therefore a mock-up of the
assembly with a switch to display the proof-of-concept of the charging module was
constructed. This can be seen in figures 6.1.5.3 and 6.1.5.4, where the lid of the box is open
and closed, respectively. Note that when the lid is closed the other half of the connector is
plugged in, which is bridged at the top and so forms a connection across the two pins. This
Figure 6.1.5.2: Wiring diagram of IC SN74HC02

42
completes the circuit from the charging module and so provides a HIGH input into the relay
card.
6.1.6 Ignition Key Module
The construction of this module involves utilising the existing wires from the DESS (see
section 4.2.4). The two wires are the inputs to the module, and form a closed circuit using the
contact terminals (figure 5.4.5.1) and the 12V supply line. The input wires serve as the inputs
to drive the relay, and when the contact terminals are bridged the input is the 12V from the
supply line, and as such the relay is closed, allowing PWR IN to connect to PWR OUT, and
the PWR signal to pass through to the next module.
It was built using the same Kemo Electric Relay Card used in the other modules. As the
DESS key supplied from the original SEADOO GTI130 was encoded to limit the
performance of the petrol powered jet ski, it is not desirable to modify it in such a way that
would prevent future encoding of the key. At the present time it has not been able to be coded
as according to the workshop manual, coding requires a special hardware interface to plug the
DESS into and special software called B.U.D.S (Seadoo, 2008). Future works on the project
may be able to look into programming the DESS key, but for now a simple bridge across the
terminals will suffice. This particular module has not been completed at the time of writing as
the interior of the jet ski and the mounting points for the safety system and other components
are still being modified. If it were to be implemented now it would get in the way and merely
Figure 6.1.5.3: Water-proof box
mock-up with lid open
Figure 6.1.5.3: Water-proof box
mock-up with lid closed

43
have to be removed later to put all the other components in. The reason for this is that it is
attached to the DESS terminal, which cannot be removed from the jet ski.
6.1.7 Final Assembly
To join all the modules together, a strip of veroboard is used. The pins are soldered into the
12V, GND and PWR lines, with a single pin for each module on the 12V and GND lines and
2 pins for each module on the PWR line, one for PWR IN and the other for PWR OUT. 12V
and GND are continuous, that is the veroboard is not scratched. By scratching the veroboard,
the connection along a strip is broken. As the 12V and GND lines connect to each module in
parallel, these lines are not scratched. Between each PWR IN and PWR OUT pin pair
however, the veroboard is scratched to prevent current from flowing. This ensures that
current must flow through the relay switch in order to carry onto the end. Figure 6.1.7.1
shows the two sets of module pins in a board. In this view however, the copper lines they are
soldered to are on the other side, and so it is impossible to see the scratches. Figure 6.1.7.2
shows a sketch detailing the pins, lines and scratches.
The next step in the construction is to plug in all the modules. This is shown in figure 6.1.7.3
and figure 6.1.7.4. The modules are not incredibly stable in their current position, and so in
the future it is intended that a dedicated housing for the modules will be developed to help
them remain in position. Once the modules are in position, input wires to the start of each line
Figure 6.1.7.1: Pins in veroboard
Figure 6.1.7.2: Sketch of veroboard 12V, GND and PWR lines depicting scratches

44
on the veroboard (with the exception of CRG) can be soldered in, as well as output wires at
the other end. The output wires are PWR and CRG. CRG goes to an input on the charger that
is allows it to charge or not based on whether it is safe to do so. The PWR output line is used
to drive a larger relay that switches the 96V supply to the motor controller on or off (as
outlined in the requirements in section 5.2).
At the present time, the jet ski is not ready for the safety system to be mounted. There are still
many things to be done first, including properly installing the motor, installing the revised
battery box, installing the batteries, as well as installing a platform for the motor controller
and safety system to be mounted on. Hence the safety system cannot be fully completed until
the exact locations of sensors, other components and wires are known. This will be discussed
further in section 7.
6.2 Testing
At the present time, the water sensor module is the only completed module. It is intended that
LED indicators be added to all modules, and so there is still much work to be done, this will
be discussed in section 7. The remaining modules are incomplete due to the rest of the jet ski
not being ready as planned. A major hold up with the construction of the motor (as discussed
in section 2.3) meant that physical work on the jet ski was delayed by approximately 3
months. Critical components such as the batteries and their housing, the motor and a platform
to mount auxiliary systems (controller, safety systems etc) have therefore not yet been able to
be installed or fully designed or constructed. Since the sensors rely on the batteries
Figure 6.1.7.3: Plugging in the
modules
Figure 6.1.7.4: Plugging in the
modules

45
(temperature sensor placement, BMS) and knowing the location of the mounting platform,
they have not yet been able to installed, and hence have not been able to be tested.
However, the water module has been tested. The testing for this module involved pouring
approximately 10mL (one cap-full) onto a flat surface and placing the sensor wires (see
section 5.4.1) at either end of the puddle. A 12V power supply was provided at the input, and
a multimeter measuring resistance was placed at the PWR IN and PWR OUT ports. When the
12V power supply was connected the resistance on the multimeter went to near 0Ω. When
water bridged the gap between the two wires the resistance on the multimeter went to infinity
(in practise the resistance was not actually infinity however it was beyond the capabilities that
the multimeter could measure). This indicated an open circuit, which is the desired response.
The temperature sensor itself was also tested. The temperature sensor requires manual tuning
of the potentiometer (see the datasheet in Appendix H) to adjust the cut-off to the desired
value. For this test, the potentiometer was tuned so that the cut-off was low, approximately
35°C. The reason for this temperature value was that it was easy to replicate in the lab.
Similar to the test for the water module, a 12V power supply was connected to the 12V and
GND pins, and a multimeter connected to the relay ports on the opposite side. When the 12V
power supply was connected, the multimeter was measuring a resistance of near 0Ω. As the
thermistor was warmed up using body heat, the relay contact opened and the multimeter
could not measure the resistance anymore. This is again the desired response and once a
thermal test of the rest of the jet ski components is done and a temperature cut-off decided
further testing can be done.
The rest of the modules have not been tested yet as they are still in the construction phase.
However, they utilise the same relay card as the water sensor and so should produce a similar
result. This can only be confirmed however once they are built and tested.

46
7 Conclusions and Future Work
7.1 Current Status
At the time of writing, the physical construction of the safety system is nearing completion.
The water module is complete and the materials for the other modules purchased and ready to
build once the corresponding systems in the jet ski to the modules are ready. The design of
each individual module is complete to a stage where it satisfies the design criteria and
requirements as stated in section 5.2. There is however, future work planned for the modules,
and this is discussed in section 7.2.
Currently the jet ski is being fitted rubber mountings for the revised battery box. The revised
battery box has been designed by Christopher Corke, a mechanical engineering student that
joined the project in August of 2013. This revised battery box (figure 3.3.8) is currently being
manufactured by the UWA Physics Workshop and will be installed onto the rubber
mountings when it is complete. The motor from SME has been constructed, however when it
was installed it was done so incorrectly, as so had to be removed. It is currently not installed
in the jet ski. New mounting points for this motor have been made and will be installed once
the battery box has been installed. The reason for this is that the space requirements inside the
jet ski are such that there is not enough room to install the battery box whilst the motor is
inside. The battery box has to be made and installed first, then the motor can be put in
afterwards. Before any electrical components are installed, a water test to check if the hull
leaks or not will be conducted. In order for this to happen all exhaust pipes from the previous
petrol motor must be sealed. Currently 2 of the 3 exhaust pipes are sealed, and the last one is
expected to be sealed in the coming weeks.
The battery modules (seen in figure 3.3.6), have been assembled and wired up, ready to be
installed into the battery box. Unfortunately, as the design for the battery box has been
changed, these modules will have to be re-wired to the new configuration to fit with the
design shown in figure 3.3.8.

47
7.2 Future Work
7.2.1 LED Indicators
At present time, without the use of a multimeter, there is no way to tell if the modules have
power or if they have detected a fault. This is a necessary feature, and one that it is intended
to be implemented in the near future. The design for the module shell in appendix D features
2 holes at the top of the module for LEDs. It is intended that there will be one LED that will
light up when power is supplied to the module from the 12V line, and another LED that will
show that the PWR line is passing through the module, that is that there is no fault. This way
the user will be able to tell if something has gone wrong, which module has detected it, and
hence be able to potentially fix the problem.
7.2.2 Safety System Enclosure
The safety system will need to be in a waterproof enclosure to protect the individual modules.
This enclosure will need to have a waterproof grommet to allow the sensor cables through
without allowing water to leak into the safety systems. This enclosure would be then be
securely mounted to a platform in a position that it is accessible should modules need to be
changed in and out.
7.2.3 Early Warnings, Data logging and Microcontroller Outputs
With the present design, if a fault is detected, power is cut without warning. This is not
desirable, and ideally there would some form of warning prior to the cut-off. This would be
possible to implement with a microcontroller such as an Arduino, or a Raspberry-Pi. The
most obvious module to implement this in is temperature. Temperature could be measured
using the existing sensors, or new ones, connected to an Arduino or Raspberry-Pi. If the
existing sensors are used to monitor temperature, the microcontroller must not interfere with
their role in the existing design. The current safety system design must remain dedicated to
the emergency cut-off of power, keeping things as simple as possible. The microcontroller
could easily piggyback off the signals outputted by the relays however, or from new sensors.
Data logging could also be a worthwhile area to look in to. This could also be done with a
microcontroller. Should an error occur, it may be useful to know when it happened and under
what conditions each sensor was. Future modules could also be added, such as an

48
accelerometer, or a clock, so that if faults occur the conditions of use and time are known. For
warnings and data logging purposes, it would be useful if each module had an additional
output to send to a microcontroller. This microcontroller could in addition control a display,
where the current status of all modules could be shown. If temperature is approaching a range
close to the cut-off, lights could flash or alarms could sound alerting the driver to either slow
down or return to shore. These would be ideal features and should be looked into in the
future.
7.2.4 Sensor Placement
At the present time the other components (batteries, motor etc) have not been installed in the
jet ski. Once they are installed, sensors will be able to be placed in the appropriate locations.
Exactly how many sensors are required, where they are required and what lengths of wire are
required to reach them will all need to be decided once the other components are installed in
the jet ski.
7.2.5 User Override
Should power cut off because of a fault whilst the jet ski is in use, the user could effectively
be stranded in a body of water some distance from shore. This is not ideal, and so a safety
system override is required. This is a dangerous feature however, as it is possible that it
would enable users to ignore dangerous hazards such as high temperature or water leakages,
and simply override the safety system to continue using the jet ski. One possible solution to
this would be to place an override switch with a timer in the jet ski, so that the user only has a
short space of time to get back to shore before the power shuts off again. There are risks
associated with this override function, as stated above, however being stranded is very
undesirable, and so this is an area that requires examination in the future.
7.2.6 Fire Extinguisher System
Currently there is no protection or detection for fire in the safety systems. Hopefully ones of
the other safety modules would cut off power to prevent a fire from occurring, however if a
fire does break out there needs to be some protection. It is likely that the fire would be
inaccessible to the user, so suppression using a handheld fire extinguisher would be near

49
impossible, as well as quite dangerous, given the close proximity the user would have to be to
the fire in order to put it out. A better option would be a remotely operated fire extinguisher.
Lifeline Fire and Safety Systems Ltd. is a company that specialises in these devices. Their
product, the Zero ZERO Remote Electric CD is designed specifically for single seat vehicles
and is activated remotely (Lifeline Fire and Safety Systems Ltd, 2013). This is a critical and
potentially life-saving safety feature and definitely requires future work.
7.2.7 Relay Upgrades and Testing
Currently the relays used in the safety system are Pasi BV1719 model relays, and as far as
can be seen, are not tested for automotive use. It is possible that they would be suitable for
use in the REV Jet Ski safety systems, however as a datasheet cannot be located it cannot be
assured. Automotive relays designed for use in cars or vehicles that experience similar
conditions to the REV Jet Ski are required to ensure reliable functionality from the safety
system.
The safety systems should also be tested under conditions replicating what will be
experienced in the jet ski, including high temperature, possible humidity (although hopefully
not if housed in a waterproof box) and vibrations. The safety system must be able to function
reliably under all these conditions, and so this is a necessary task to be done in the near
future.
7.3 Outcomes and Conclusions
The objective of this project was to design a safety system for the REV Electric Jet Ski that
took into account temperature, water leakage, battery management (BMS modules), charging
and a deadman's switch, whilst being cost effective and highly adaptable to the ongoing
nature of the project. These objectives have been met, and so the project to design the safety
system could be considered a success. Each sensor area has been accounted for, and the
design is highly adaptable and cost effective. The modular design from standard off-the-shelf
parts is the main reason for this. Through the modular design, each current sensor area can be
accounted for, as well as any new requirements thought up as the project develops. The

50
modular design also allows individual modules, components to be upgraded or modified
without affecting other sensors.
Whilst the project could be considered a success in that it has delivered a design that satisfies
the objectives, there is still much work to be done to improve the safety system to a point
where it can be used reliably and effectively to protect the user and critical systems of the jet
ski from the hazards outlined in section 4.4.1. This work, for the foreseeable future, is outline
in section 7.2, however there will likely be new safety requirements appear as the project
develops. This once again emphasises the need for an adaptable safety system design, which
this project has endeavoured to deliver.

51
9 References
Altronics 2013 Waterproof Connectors Available from:
<http://www.altronics.com.au/index.asp?area=item&id=P9344> [26/10/2013]
Clark, R 2013 REVjet: Electric Jetski Project Investigation and proposal of
thermal management system and auxiliary mounting assembly
Bachelor thesis, The University of Western Australia
Curtis Instruments, Inc 2009 1310 Manual
Available from : <www.curtisinstruments.com> [26/10/2013]
Dinh, J & Korinsky, G 1993 Temperature Dependent Fan Control For Personal
Computer US Patent 5,526,289
Ev-power.eu 2013 GWL/Power Charger 96V/25A for LiFePO4 / LiFeYPO4 +
BMS con. Available from: < http://www.ev-
power.eu/Chargers-48V-to-96V/Charger-96V-25A-for-
LiFePO4-LiFeYPO4-BMS-option.html> [26/10/2013]
EV Works 2010 ZEVA 8 Cell Batter Monitor Module. Available from: <
http://www.evworks.com.au/index.php?product=BMM-AModule> [26/10/2013]
Ewing, Manning, 2009 Temperature In Cars Available from:
<http://www.racq.com.au/__data/assets/pdf_file/0007/48796/09_Temperature_in_Cars.pdf>
[10/10/2013]

52
Headway Headquarter s 2013 Headway 38120S Spec Sheet Available from:
<http://headway-headquarters.com/38120s/> [26/10/10]
International Battery Inc 2010 LiFePO4 Material Safety Data Sheet
International Battery, Inc, USA
ISO 2009 Risk Management- Principles and Guidelines ISO 31000:2009
Available from International Organisation for Standardisation
[26/10/2013]
ISO/IEC 1999 Safety aspects - Guidelines for their inclusion in standards.
ISO/IEC Guide 51:1999. Available from International
Organisation for Standardisation. [26/10/2013]
Jayamanna, R 2013 Design of the Battery Restraining System and the Motor
Mounting system for the REV Jet Ski
Bachelor thesis, The University of Western Australia
Jaycar Electronics 2013 2013 Jaycar Electronics Engineering & Scientific Catalogue
Available from: < http://www.jaycar.com.au/printed.asp> [26/10/2013]
Kemo Electronic 2012 Kemo Electric Water Sensor B192 Data Sheet Available from:
<http://www.kemo-electronic.de/datasheets/b192.pdf> [26/10/2013]

53
Kemo Electronic 2012 Kemo Temperature Sensor B048 Datasheet Available from:
<http://www.kemo-electronic.de/datasheets/b048.pdf> [26/10/2013]
Kemo Electronic 2012 Kemo Electric Relay Card B197 Data Sheet Available from:
<http://www.kemo-electronic.de/datasheets/b197.pdf> [26/10/2013]
Kloppenborg, TJ 2012 Contemporary Project Management,
South-Western, Ohio, USA
Lifeline Fire and Safety Systems Ltd 2013 Zero ZERO Remote Electric CD Available from:
<http://www.lifeline-fire.co.uk/motorsport/details.asp?product=zero-
zero-remote-electric-cd-15> [26/10/2013]
McDermott, R, Mikulak, RJ & Beauregard, M 2011 The Basics of FMEA, 2nd Edition
Taylor and Francis USA
Oxford University Press, 2013 Define: Failsafe Available from:
<http://oxforddictionaries.com/definition/english/fail--
safe?q=failsafe> [10/10/2013]
Seadoo 2008 2008 Shop Manual 4-Tec Series
Available from: <www.seadoomanuals.net> [26/10/2013]

54
Texas Instruments 1997 SN54HC02, SN74HC02 QUADRUPLE 2-INPUT
POSITIVE-NOR GATES Available from:
<http://www.jaycar.com.au/images_uploaded/SCLS076B.PDF> [26/10/13]
Thompson, F 1974 Safety Feature For Electric Vehicle Control
US Patent 4,090,114
ZEVA n.d 8-cell Battery Monitor Module Available from:
<http://www.evworks.com.au/store/datasheets/BMM
8%20v1-3%20Manual.pdf> [26/10/2013]

55
Appendix
Appendix A: SME Custom Motor Datasheet
Credit: Submersible Motors Engineering
JS102-50kW 96V 135Hz 200mm 16/09/2012
BEST
Given Output Power (kW): 50 50 50 50 Rated Voltage (V): 96 96 96 96 Winding Connection: Delta Wye Wye Wye Number of Poles: 2 2 2 2 Given Speed (rpm): 8000 8000 8000 8000 Frequency (Hz): 135 135 135 135 Stray Loss (W): 250 250 250 250 Frictional Loss (W): 150 150 150 150 Windage Loss (W): 150 150 150 150
Type of Load: Constant Power Constant
Power Constant
Power Constant
Power Operating Temperature (C): 75 75 75 75
STATOR DATA
Number of Stator Slots: 24 24 24 24 Outer Diameter of Stator (mm): 224 224 224 224 Inner Diameter of Stator (mm): 110 110 110 110 Type of Stator Slot: 3 3 3 3 Dimension of Stator Slot
hs0_stator (mm): 1 1 1 1 hs1_stator (mm): 1.12 1.12 1.12 1.12 hs2_stator (mm): 25.98 25.98 25.98 25.98 bs0_stator (mm): 4.5 4.5 4.5 4.5 bs1_stator (mm): 8.37091 8.37091 8.37091 8.37091 bs2_stator (mm): 15.2116 15.2116 15.2116 15.2116 rs_stator (mm): 2 2 2 2 Top Tooth Width (mm): 6.6 6.6 6.6 6.6 Bottom Tooth Width (mm): 6.6 6.6 6.6 6.6
Length of Stator Core (mm): 200 180 170 165 Stacking Factor of Stator Core: 0.95 0.95 0.95 0.95 Type of Steel: DW315_50 DW315_50 DW315_50 DW315_50 Number of lamination sectors 1 1 1 1 Press board thickness (mm): 0 0 0 0 Magnetic press board No No No No Number of Conductors per Slot: 7 4 4 4 Number of Parallel Branches: 2 2 2 2

56
Number of Wires per Conductor: 5 9 9 9 Type of Coils: 11 10 10 10 Coil Pitch: 11 11 11 11 Wire Diameter (mm): 2.4 2.4 2.4 2.4 Wire Wrap Thickness (mm): 0.08 0.08 0.08 0.08 Slot Insulation Thickness (mm): 0.23 0.23 0.23 0.23 Layer Insulation Thickness (mm): 0 0 0 0 Top Free Space in Slot (%): 0 0 0 0 Bottom Free Space in Slot (%): 0 0 0 0 Conductor Length Adjustment (mm): 0 0 0 0 End Length Correction Factor 1 1 1 1 End Leakage Reactance Correction Factor 1 1 1 1 Limited Slot Fill Factor (%): 75 75 75 75
ROTOR DATA
Number of Rotor Slots: 28 28 28 28 Air Gap (mm): 1 1 1 1 Inner Diameter of Rotor (mm): 70 70 70 70 Type of Rotor Slot: 4 4 4 4 Dimension of Rotor Slot
hr0_top (mm): 1 1 1 1 hr01_top (mm): 1 1 1 1 hr1_top (mm): 1 1 1 1 hr2_top (mm): 11 11 11 11 br0_top (mm): 0.0001 0.0001 0.0001 0.0001 br1_top (mm): 5.3 5.3 5.3 5.3 br2_top (mm): 2.93 2.93 2.93 2.93 rr_top (mm): 0.5 0.5 0.5 0.5 Cast Rotor: No No No No Half Slot: No No No No
Length of Rotor (mm): 200 180 170 165 Stacking Factor of Rotor Core: 0.95 0.95 0.95 0.95 Type of Steel: DW315_50 DW315_50 DW315_50 DW315_50 Skew Width: 0 0 0 0 End Length of Bar (mm): 0 0 0 0 Height of End Ring (mm): 12 12 12 12 Width of End Ring (mm): 23 23 23 23 Resistivity of Rotor Bar
at 75 Centigrade (ohm.mm^2/m): 0.0217391 0.021739 0.021739 0.021739 Resistivity of Rotor Ring
at 75 Centigrade (ohm.mm^2/m): 0.0217391 0.021739 0.021739 0.021739 Magnetic Shaft: Yes Yes Yes Yes

57
MATERIAL CONSUMPTION
Armature Copper Density (kg/m^3): 8900 8900 8900 8900 Rotor Bar Material Density (kg/m^3): 8900 8900 8900 8900 Rotor Ring Material Density (kg/m^3): 8900 8900 8900 8900
Armature Core Steel Density (kg/m^3): 7600 7600 7600 7600 Rotor Core Steel Density (kg/m^3): 7600 7600 7600 7600
Armature Copper Weight (kg): 13.6946 13.4328 13.085 12.911 Rotor Bar Material Weight (kg): 2.56644 2.30979 2.18147 2.11731 Rotor Ring Material Weight (kg): 1.4508 1.4508 1.4508 1.4508 Armature Core Steel Weight (kg): 31.1656 28.049 26.4907 25.7116 Rotor Core Steel Weight (kg): 5.58917 5.03025 4.75079 4.61106 Total Net Weight (kg): 54.4666 50.2727 47.9588 46.8018
Armature Core Steel Consumption (kg): 60.6851 54.6166 51.5823 50.0652 Rotor Core Steel Consumption (kg): 13.7228 12.3505 11.6644 11.3213
RATED-LOAD OPERATION
Stator Resistance (ohm): 0.00543842 0.001646 0.001604 0.001582 Stator Leakage Reactance (ohm): 0.0697862 0.030588 0.029314 0.028663 Rotor Resistance (ohm): 0.00973848 0.002945 0.002828 0.002769 Rotor Leakage Reactance (ohm): 0.114821 0.03361 0.03196 0.031095 Resistance Corresponding to
Iron-Core Loss (ohm): 66.605 19.5658 18.472 17.9222 Magnetizing Reactance (ohm): 3.20249 0.933966 0.874659 0.841934
Stator Phase Current (A): 211.085 374.624 370.868 369.366 Current Corresponding to
Iron-Core Loss (A): 1.32784 2.53589 2.70646 2.79891 Magnetizing Current (A): 27.6162 53.1247 57.1579 59.5801 Rotor Phase Current (A): 200.952 355.876 351.28 349.223
Copper Loss of Stator Winding (W): 726.957 693.201 661.777 647.703 Copper Loss of Rotor Winding (W): 1179.77 1119.02 1046.85 1013.15 Iron-Core Loss (W): 352.305 377.467 405.919 421.202 Frictional and Windage Loss (W): 293.627 294.318 295.142 295.529 Stray Loss (W): 250 250 250 250 Total Loss (W): 2802.66 2734 2659.69 2627.59 Input Power (kW): 52.7998 52.7307 52.6574 52.6265 Output Power (kW): 49.9971 49.9967 49.9977 49.9989
Mechanical Shaft Torque (N.m): 60.3256 60.2539 60.1705 60.1324 Efficiency (%): 94.6919 94.8152 94.9491 95.0071 Power Factor: 0.864412 0.842504 0.849849 0.8528

58
Rated Slip: 0.0229212 0.021767 0.020391 0.019747 Rated Shaft Speed (rpm): 7914.34 7923.69 7934.84 7940.05
NO-LOAD OPERATION
No-Load Stator Resistance (ohm): 0.00543842 0.001646 0.001604 0.001582 No-Load Stator Leakage Reactance (ohm): 0.0699069 0.030638 0.02936 0.028706 No-Load Rotor Resistance (ohm): 0.00973671 0.002945 0.002827 0.002769 No-Load Rotor Leakage Reactance (ohm): 1.54912 0.422163 0.371975 0.351156
No-Load Stator Phase Current (A): 29.4628 57.6597 61.5321 63.8776 No-Load Iron-Core Loss (W): 397.431 441.446 466.888 480.721 No-Load Input Power (W): 980.969 1003.95 1069.09 1080.06 No-Load Power Factor: 0.0861456 0.078639 0.080057 0.07815 No-Load Slip: 0.000117516 0.000101 0.00011 0.000106 No-Load Shaft Speed (rpm): 8099.05 8099.18 8099.11 8099.14
BREAK-DOWN OPERATION
Break-Down Slip: 0.07 0.06 0.06 0.06 Break-Down Torque (N.m): 97.6001 88.0791 93.3874 96.258 Break-Down Torque Ratio: 1.61789 1.4618 1.55205 1.60077 Break-Down Phase Current (A): 459.015 735.892 773.1 793.152
LOCKED-ROTOR OPERATION
Locked-Rotor Torque (N.m): 20.1279 13.9218 15.0851 15.887 Locked-Rotor Phase Current (A): 688.392 1048.63 1115.01 1156.73 Locked-Rotor Torque Ratio: 0.333655 0.231053 0.250706 0.264201 Locked-Rotor Current Ratio: 3.26121 2.79915 3.00649 3.13165
Locked-Rotor Stator Resistance (ohm): 0.00543842 0.001646 0.001604 0.001582 Locked-Rotor Stator
Leakage Reactance (ohm): 0.0681067 0.030271 0.028918 0.028178 Locked-Rotor Rotor Resistance (ohm): 0.0126702 0.003807 0.003642 0.003559 Locked-Rotor Rotor
Leakage Reactance (ohm): 0.0717822 0.022858 0.021015 0.019931
DETAILED DATA AT RATED OPERATION
Stator Slot Leakage Reactance (ohm): 0.0304867 0.017918 0.016923 0.016426 Stator End-Winding Leakage
Reactance (ohm): 0.0242114 0.00827 0.00827 0.00827 Stator Differential Leakage
Reactance (ohm): 0.0150879 0.0044 0.004121 0.003967 Rotor Slot Leakage Reactance (ohm): 0.0964679 0.028137 0.026765 0.02606

59
Rotor End-Winding Leakage
Reactance (ohm): 0.00370488 0.00121 0.00121 0.00121 Rotor Differential Leakage
Reactance (ohm): 0.0146088 0.00426 0.00399 0.003841 Skewing Leakage Reactance (ohm): 0 0 0 0
Net Slot Area (mm^2): 315.218 315.218 315.218 315.218 Slot Fill Factor (%): 68.2906 70.2418 70.2418 70.2418 Stator Winding Factor: 0.957662 0.957662 0.957662 0.957662
Stator-Teeth Flux Density (Tesla): 1.14383 1.25414 1.32734 1.37348 Rotor-Teeth Flux Density (Tesla): 1.02331 1.122 1.18748 1.22876 Stator-Yoke Flux Density (Tesla): 1.04835 1.15148 1.22073 1.26535 Rotor-Yoke Flux Density (Tesla): 0.710646 0.780549 0.827493 0.857741 Air-Gap Flux Density (Tesla): 0.498079 0.546113 0.577986 0.598078
Stator-Teeth Ampere Turns (A.T): 4.4496 6.6522 9.64217 12.4226 Rotor-Teeth Ampere Turns (A.T): 1.44999 1.8394 2.2556 2.64017 Stator-Yoke Ampere Turns (A.T): 13.3593 17.6987 21.368 24.7974 Rotor-Yoke Ampere Turns (A.T): 1.2412 1.30733 1.34354 1.37442 Air-Gap Ampere Turns (A.T): 486.453 533.366 564.495 584.118
Correction Factor for Magnetic
Circuit Length of Stator Yoke: 0.7 0.7 0.65825 0.631193 Correction Factor for Magnetic
Circuit Length of Rotor Yoke: 0.562677 0.533892 0.514561 0.502105 Saturation Factor for Teeth: 1.01213 1.01592 1.02108 1.02579 Saturation Factor for Teeth & Yoke: 1.04214 1.05155 1.06131 1.07059 Induced-Voltage Factor: 0.921266 0.895197 0.901993 0.905029
Stator Current Density (A/mm^2): 4.666 4.60056 4.55443 4.53599 Specific Electric Loading (A/mm): 51.3091 52.0349 51.5131 51.3046 Stator Thermal Load (A^2/mm^3): 239.408 239.39 234.613 232.717
Rotor Bar Current Density (A/mm^2): 12.3835 12.5314 12.3694 12.2966 Rotor Ring Current Density (A/mm^2): 9.34159 9.4532 9.33094 9.27604
Half-Turn Length of
Stator Winding (mm): 404.918 386.146 376.146 371.146
WINDING ARRANGEMENT
The 3-phase, 1-layer winding can be arranged in 24 slots as below: 10 10 10
AAAAZZZZBBBBXXXXCCCCYYYY
15 15 15

60
82.5 82.5 82.5
Average coil pitch is: 10 0 0 0
Angle per slot (elec. degrees): 15
Phase-A axis (elec. degrees): 112.5
First slot center (elec. degrees): 0
16 16 16
TRANSIENT FEA INPUT DATA
2 2 2
0.001646 0.001604 0.001582
For one phase of the Stator Winding:
9.75E-06 9.75E-06 9.75E-06 Number of Turns: 28
Parallel Branches: 2 8.31E-07 8.31E-07 8.31E-07 Terminal Resistance (ohm): 0.00543842 1.42E-09 1.42E-09 1.42E-09 End Leakage Inductance (H): 2.85E-05
For Rotor End Ring Between Two Bars of One Side: 180 170 165 Equivalent Ring Resistance (ohm): 8.31E-07 0.95 0.95 0.95 Equivalent Ring Inductance (H): 1.42E-09 0.95 0.95 0.95 2D Equivalent Value:
0.018753 0.017711 0.01719
Equivalent Model Depth (mm): 200
Equivalent Stator Stacking Factor: 0.95
Equivalent Rotor Stacking Factor: 0.95
Estimated Rotor Inertial Moment (kg m^2): 0.0208362

61
Appendix B: Headway LiIon Datasheet
(Headway Headquarters 2013)

Appendix C: FMEA Chart
Item and Function
Potential Failure Mode
Potential Effect(s) of Failure
Severity Potential Cause(s) of Failure
Secondary cause (cause of cause)
Current Controls
Detection RPN Recommended Action
Batteries -supply power to all systems
Short circuit No power to
system, fire
Very High Water leakage
bridges contacts
Water proof-
box
Fuse
protection,
power will
shut-off.
Need water
sensors
Install water
sensors, have
an alarm.
Evacuate.
Insulation
breaks and
contact is made
between two
terminals and
battery housing
Multi-
layered tape
insulation
and silicon
sheets
between
batteries and
housing
Fuse
protection,
power will
shut-off.
Have an alarm
for notice to
evacuate
vehicle in case
of fire.
Uninsulated
wire terminals
Heat shrink
on all
connections
Fuse
protection,
power will
shut-off.
Have an alarm
for notice to
evacuate
vehicle in case

63
of fire
Battery
rupture and
leakage of
flammable
gasses and
liquids
Fire, power
loss
Very High High
temperature in
excess of 100°C
(International
Battery Inc
2010)
Water
cooled
insulation
(intended)
(Clark,
2013)
Need
temperature
sensor
Install
temperature
sensor with
cut-off, and
warning
system.
Evacuate if
occurs.
Collision, high
impact
Metal
housing to
withstand
typical
forces
(Jayamanna,
2013)
Visual Ensure driver
training
No charge No power to
system
Low Lack of
charging/general
use
Sensor to
show
remaining
charge
Visual Ensure sensor
is checked
before
disembarking,
charge batteries
Battery charge
is too low to be
BMS Light on
BMS,
Replace battery

64
charged remaining
charge will
be at 0.
Motor- drives impellor
Motor stops-
fails to
rotate drive
shaft
System halts Medium Damage due to
collision or
impact
Rubber
mounts,
limited
vibration
absorption.
Visual Take care
whilst driving,
ensure driver is
adequately
trained
No power to
motor
Low battery
charge
Sensor will
show
remaining
charge
Visual Charge
batteries
Short circuit Fuse Fuse will
blow
Problem
with
controller
Controller
displays
error light
Inspection of
light,
diagnosis of
error with
controller
data-logs
Check light and
connect
controller to
PC
Controller - supplies power to
Error, stops
supplying
power
Motor has
no power
Medium No power to
controller
Flat battery Sensor to
show
remaining
Visual Charge
batteries

65
motor charge

66
Appendix D: Generic Module

Appendix E: Kemo Electric Water Sensor B192 Data Sheet

68
Appendix F: Kemo Electric Relay Card B197 Data Sheet
(Kemo Electric 2012)
Note only the English translations are included

69
Appendix G: Water Module Drawing

70
Appendix H: Kemo Temperature Sensor B048 Datasheet
Note: Only the English translations are shown here.

71
Appendix I: Temperature Module Drawing

72
Appendix J: SN54HC02 NOR Gate Data Sheet Excerpt
(Texas Instruments 1997)