retail producer portal guide 07-24-18 · 1 registering for the portal n . 07/ 24/2018 retail...
TRANSCRIPT

Retail Producer Portal Guide
Blue Cross and Blue Shield of Illinois, Blue Cross and Blue Shield of Montana, Blue Cross and Blue Shield of New Mexico, Blue Cross and Blue Shield of Oklahoma, and Blue Cross and Blue Shield of Texas,
Divisions of Health Care Service Corporation, a Mutual Legal Reserve Company, an Independent Licensee of the Blue Cross and Blue Shield Association
JULY 24, 2018
The Retail Producer Portal is a comprehensive business management and client service tool. The portal enables you to design and deliver quotes, enroll members in Blue plans, manage prospects and serve and support active clients with a host of features developed directly from your feedback.

Table of Contents n
07/24/2018 RETAIL PRODUCER PORTAL GUIDE PAGE 2
Table of Contents
1 Registering for the Portal ................................................ 3 Select a User Name and Password................................................. 4 Register for Your State ....................................................................... 5
2 Logging In to the Portal .................................................. 7 Login ..................................................................................................... 7 Recover Your User Name .................................................................. 8 Reset Password ................................................................................... 9 Account Lock Out ............................................................................ 12
3 Using Your Express Link .................................................. 13 Review Your Agent Information .................................................... 13 Select “Need Assistance” Info ....................................................... 14 Get Your Express Link! ...................................................................... 14
4 Creating a Proposal/Quote ......................................... 15 Enter Client/Applicant Information ............................................... 15 Select Matching Plans ..................................................................... 16 Return to Applicants Page ............................................................. 17 Save Proposal ................................................................................... 17 Send Quote ....................................................................................... 18 Compare Selected Plans................................................................ 19 View Saved Proposals/Quotes ...................................................... 20 Open Emailed Quotes .................................................................... 21 Have Clients Create a Retail Shopping Cart Account ............. 23
5 Enrolling Clients .............................................................. 26 Enroll via Producer Portal & Shopping Cart ................................ 27
Complete Applicant Info ..................................................... 27 Select the Plan..................................................................... 28 Complete Enrollment via Retail Shopping Cart .................. 29
Enroll via Producer Portal Only ...................................................... 30 Before You Start .................................................................. 30
Start Application ................................................................. 31 Cancel, Save and Exit, or Submit ......................................... 36 Accessing Incomplete Applications ..................................... 38 Special Enrollment .............................................................. 39
6 Managing Leads ........................................................... 40 Add New Prospects ......................................................................... 40 Search for Prospects ........................................................................ 41
7 Searching for a Member .............................................. 42
8 Producer-Assisted Transactions ................................... 45 Order Permanent ID Cards ............................................................ 45 Generate Temporary ID Cards ...................................................... 47 Change Primary Care Physician ................................................... 49 Change Client Information ............................................................ 53
9 Using Reports .................................................................. 55 Select Report Options ..................................................................... 56 Create & Save Custom Reports .................................................... 60 View Custom Reports ...................................................................... 61 Examples of Frequently Used Reports .......................................... 62 Using Book of Business Reports ...................................................... 64 Exporting Reports ............................................................................. 65
10 Managing Documents & Questions .......................... 66 Upload a Document ....................................................................... 66 View Document Submissions ......................................................... 68 Submit a General E-Question ........................................................ 69 Submit a Member-Specific E-Question ........................................ 70 Delete an E-Question ...................................................................... 71
11 Changing Account Information ................................ 72 Edit Your Profile ................................................................................. 72 Change Your Password .................................................................. 73
12 Contact Information & Resources ............................. 74

1 Registering for the Portal n
07/24/2018 RETAIL PRODUCER PORTAL GUIDE PAGE 3
1 Registering for the Portal Only those that have completed our onboarding/contracting process can register with the Retail Producer Portal. That process includes completing important contact and license information via the online Producer Express onboarding system. After the onboarding/contracting process is complete, you will receive a “Welcome” email with your personal nine-digit producer identification number. At that point, you are ready to register with the Retail Producer Portal. Go to https://osc.hcsc.net/producerportal/ If you have completed the onboarding process, click the “Register” button.

1 Registering for the Portal n
07/24/2018 RETAIL PRODUCER PORTAL GUIDE PAGE 4
Select a User Name and Password Complete all required fields to register for the Retail Producer Portal.
1. Enter your First and Last Name
2. Enter a User Name
3. Create a Password and confirm it.
• The password must be six to nine characters.
• The password can only contain letters and/or numbers; no special characters are allowed.
• If you select letters, the letters can be lower case, upper case or a mix of both.

1 Registering for the Portal n
07/24/2018 RETAIL PRODUCER PORTAL GUIDE PAGE 5
Register for Your State
4. Select all the states in which you are authorized to sell.
5. Complete all required fields for each state. Required fields have a red asterisk.
6. In the Agent Unique ID box, enter the nine-digit identification number included in your “Welcome” email when you completed contracting (producers and agencies) or onboarding (subproducers) with our Producer Administration teams.
NOTE: If you contracted or onboarded to sell in multiple states, you have a unique ID number for each state.
7. Click the “Continue” button.

1 Registering for the Portal n
07/24/2018 RETAIL PRODUCER PORTAL GUIDE PAGE 6
Register for Your State (continued) 8. After you click the “Continue” button, a confirmation
message appears. Either select “Edit” to change the information you entered or click on the “Submit Registration” button.
9. Once you submit your information, a note pops up that you can have full use of the site once you receive a confirmation email. It can take up to 24 hours on a regular business day – and longer on the weekend – before you receive the confirmation email. For example, if you register at 3:00 p.m. on Monday, you should receive access by 3:00 p.m. on Tuesday. If you register Friday, Saturday or Sunday, it could be Monday or Tuesday before you receive an email confirmation. Click the “Back to Login Page” button, but note that it takes another day or two to activate your registration.
Please do not register more than one time.
Registration Confirmation Email Once you receive your activation email (example at left), you can return to the Retail Producer Portal and log in with the User Name and Password that you created during the registration process. If you do not receive this email within two business days, please contact us.

2 Logging In to the Portal n
07/24/2018 RETAIL PRODUCER PORTAL GUIDE PAGE 7
2 Logging In to the Portal After going through the registration process, and receiving your registration confirmation email (see previous page), you can go to the Retail Producer Portal, log in and use the site. You should bookmark this page or save it to your favorites.
Login
1. Enter the User Name you created during the registration process.
2. Enter the Password you created during the registration process.
3. Click the “Login” button.

2 Logging In to the Portal n
07/24/2018 RETAIL PRODUCER PORTAL GUIDE PAGE 8
Recover Your User Name If you forget your User Name at any time, follow these steps.
1. On the login page, click on the “Forget User Name?” link.
2. In the “Forgot User Name?” area, enter the “Agent Unique ID” in the space provided. This is your nine-digit producer number that was included in your “Welcome” email after you completed our contracting/onboarding process.
3. Enter the email address associated with the account in the space provided.
4. Click the “Submit” button.
5. A confirmation message appears letting you know that we sent your user name in an email to your email address on file. Click the “OK” button.
6. You’ll receive an email with your user name. If you don’t see the email in your inbox, check your spam or junk folder. Return to the Retail Producer Portal and enter your user name and password.

2 Logging In to the Portal n
07/24/2018 RETAIL PRODUCER PORTAL GUIDE PAGE 9
Reset Password If you forget the password you originally used to set up your account, follow these steps to create a new password.
1. On the login page, select the “Reset Password?” link.
2. Enter the user name in the space provided.
3. Enter the email address associated with the account in the space provided.
4. Click the “Submit” button.
5. A confirmation message appears letting you know that we sent you a temporary password to your email address on file. Click the “OK” button.

2 Logging In to the Portal n
07/24/2018 RETAIL PRODUCER PORTAL GUIDE PAGE 10
Reset Password (continued)
6. We send you an email with the subject line of “Retail Producer Portal Password Reset.” The email includes a case-sensitive temporary password.
7. Return to the Retail Producer Portal and enter your user name
8. Enter the temporary password from the email.
9. After logging back into the Retail Producer Portal with the temporary password, select “Edit Profile” from the dropdown Account menu. The Account menu is located in the top right section of the portal.

2 Logging In to the Portal n
07/24/2018 RETAIL PRODUCER PORTAL GUIDE PAGE 11
Reset Password (continued)
1. In the Change Password section, enter the temporary password from the email into the “Current Password” field. Enter a new password in the “New Password” field and confirm the new password.
• The password must be six to nine characters.
• The password can only contain letters and/or numbers; no special characters are allowed.
• If you select letters, the letters can be lower case, upper case or a mix of both.
2. Select the “Update Password” button.
3. A confirmation message appears. Select the “Back to Profile Page” button.

2 Logging In to the Portal n
07/24/2018 RETAIL PRODUCER PORTAL GUIDE PAGE 12
Account Lock Out Using the incorrect user name and/or password three consecutive times results in an account lock out. If you enter the incorrect combination of “User Name” and “Password” on your first and second attempts, the following error message appears. After the third attempt, you’ll see the following message.
At this point, you should use the “Forgot User Name?” or “Reset Password?” features to retrieve your user name and reset your password before you attempt to log in again. Please see pages 8-11 for details. Once you have retrieved your user name and reset your password, close your web browser application and clear the application’s history and cache before attempting to log in again.

3 Using Your Express Link n
07/24/2018 RETAIL PRODUCER PORTAL GUIDE PAGE 13
3 Using Your Express Link
After you register for the portal, you will have access to Express Link. Express Link is a customized HTML hyperlink, embedded with your name and nine-digit producer number. When clients click on the code – in the form of a link or web button – it takes them to our Retail Shopping Cart and your producer info is attached to their shopping and enrollment experience. If a client starts an application, your producer info is automatically added to the application. Express Link ensures that you receive credit for any policies sold.
To get started on using your Express Link, click in the top right section of the portal, select the “Menu” button, and scroll to the “Express Link” option and select it. The following sections show you how to configure and use your Express Link.
Review Your Agent Information
1. In the Express Link configuration area, make sure the information displayed in the “Review Your Agent Information” section is correct, especially your nine-digit producer number (Agent Unique ID). Applications, enrollments and your FFM registration are linked to your producer number allowing you to receive credit for your sales.
2. Using a valid agent email address ensures you receive email notifications about a client’s application.
3. If you need to edit this information, click on the “Edit Profile” button.
NOTE: Agent Name and Agent Unique ID cannot be edited. If your name changes, contact the Producer Service Center for next steps. See page 74 for contact information.

3 Using Your Express Link n
07/24/2018 RETAIL PRODUCER PORTAL GUIDE PAGE 14
Select “Need Assistance” Info 1. In this section, choose the content you want displayed in
online applications started by clients. 2. A preview of the information you choose is displayed
in the “Box Preview” area.
Get Your Express Link! 1. You can use Express Link in two ways. You can generate “link” code that you copy into an email, or you can
generate “button” code for use on your website. This code is specific to you. Read below on how to copy either the “link” or “button” code.
2. The “link” code is displayed here.
3. To copy the “link” code, click on the blue “Get HTML Link Code” button.
4. This preview area displays how the link will appear to clients.
5. The “button” code is displayed here.
6. To copy the “button” code, click on the “Select Button Code” button. You may need the help of a web developer to add this button code to your website.
7. This preview area shows how the button code will look to your website visitors.
TIPS FOR USING EXPRESS LINK: • If you share your Express Link by email, ask clients
to save the email until enrollment is complete. • Clients should use your link to access our Retail
Shopping Cart, then log in or create a new account right away. For details on helping your clients create a Retail Shopping Cart account see pages 23-25.

4 Creating a Proposal/Quote
07/24/2018 RETAIL PRODUCER PORTAL GUIDE PAGE 15
4 Creating a Proposal/Quote You can use the Retail Producer Portal to create proposals and/or quotes and send them to clients. Here’s how.
Enter Client/Applicant Information
1. Select the Quotes tab.
2. Complete the required fields for the quote. We refer to this initial information as the “census.”
3. Note that a “County” field appears under the zip code after the zip code has been entered. If more than one county is available, click outside of the zip code box and then select the county from the drop down list.
4. Enter all of the primary applicant’s information. Additional fields may appear, such as those for a spouse and children, but only after the other census information is entered (including birthday) for the primary applicant.
5. Select the “Continue” button.

4 Creating a Proposal/Quote
07/24/2018 RETAIL PRODUCER PORTAL GUIDE PAGE 16
Select Matching Plans 1. From the Matching Plans
page, you can select up to three Medical plans by checking the box beside the plan name.
2. You can also check the “Yes” or “No” box beside “Dental Coverage.” If “Yes” is selected for dental, the dental plans appear in a drop down list.
3. If you don’t need a quote or proposal, and you want to begin the application now, you can select “Apply for This Plan” next to the desired plan to enroll via the shopping cart. Or, remember the plan name and click on the Enrollment tab to enroll via the portal. (See the Enrollment section for details on enrolling.)
4. If you want to make changes to the applicant’s “census” info, select the “Return to Applicants Page” link at the top or button at the bottom. See the next page for more details.
5. If you want to save these options as a proposal, select the green “Save Proposal” button. See the next page for more details.
6. If you want to send a quote, select the green “Send Quote” button. See page 18 for more details.
7. If you want to compare plans, select the “Compare up to 3 Plans” button at the bottom of the screen. See page 19 for next steps.

4 Creating a Proposal/Quote
07/24/2018 RETAIL PRODUCER PORTAL GUIDE PAGE 17
Return to Applicants Page 1. If you selected Return to
Applicants Page from the Matching Plans screen (see previous page), you are directed back to the “Applicants” page.
2. Note that effective dates for major medical off-exchange policies must begin on the first of the month. Effective dates for temporary or short-term plans can be any time of the month.
3. You can change or add information in this section. For example, you can add or remove a spouse and/or children.
4. Click on the “Continue” button after making your changes.
Save Proposal 1. If you selected Save Proposal from the Matching Plans screen (see previous
page), a pop-up box opens so that you can enter the Proposal Name. Proposals are often saved with the client’s name but you can use any naming convention that works for you. For more on saved proposals, see page 20.
2. Select the “Save” button.

4 Creating a Proposal/Quote
07/24/2018 RETAIL PRODUCER PORTAL GUIDE PAGE 18
Send Quote 1. If you selected Send Quote from the Matching Plans
screen, a “Send This Quote” screen opens. Choose which plans you’d like to send.
2. Be sure the client’s email address is correct.
3. If you want a copy of the quote and/or proposal sent to you, select this option and check your email address for accuracy.
4. You have the option of using a default email message with the quote or creating a custom message.
5. Your contact information is inserted at the bottom of the message by default.
6. Clicking on the “Generate and attach a formal proposal letter” allows you to send the quote and save the proposal. We recommend this option. When you select this option, two things happen:
• First, the Proposal Name box opens. Type a Proposal Name to save it. You can view it any time under the “Client Info” tab. For details about viewing saved proposals, see page 20.
• Second, the “Send Quote and Save Proposal” button appears. Click on this button.
7. If you don’t select “Generate and attach a formal proposal letter,” then you can only send the quote; the proposal isn’t saved. The Proposal Name box is hidden and the “Send Quote” button is enabled.
For more details about how clients receive their emailed proposals/quotes, see page 21.

4 Creating a Proposal/Quote
07/24/2018 RETAIL PRODUCER PORTAL GUIDE PAGE 19
Compare Selected Plans
1. If you chose Compare up to 3 Plans in the matching plans screen (see page 16), a new window opens. It shows a side-by-side comparison of up to 3 plans with several plan details.
2. Click on any of the question mark icons for a more detailed definition of the feature.
3. If you want to view a PDF file of the formulary for each plan in the comparison chart, click on the “View” link.
4. To view a PDF file of the Summary of Benefits and Coverage (SBC) for each plan, click on the “Summary of Benefits” link.
5. You’ll need a PDF reader to view the SBC. If you don’t have one, select this link to download the free version of Adobe’s PDF reader.
6. To change plans for a new comparison, click on the red “Close” button. When you select “Close,” you return to the Matching Plans screen.

4 Creating a Proposal/Quote
07/24/2018 RETAIL PRODUCER PORTAL GUIDE PAGE 20
View Saved Proposals/Quotes After you save a proposal or send a quote, you are directed to a page where you can view existing proposals/quotes.
1. To view a proposal/quote, select the proposal you’d like to review from the “View Existing Proposals” table. Producers often save a proposal with the name of the client.
2. You can choose to recreate the quote again by selecting the “Regenerate” link.
3. The prospect’s information will display under the “View Existing Proposals” table.
4. You can also save or delete the prospect’s information or create a proposal.

4 Creating a Proposal/Quote
07/24/2018 RETAIL PRODUCER PORTAL GUIDE PAGE 21
Open Emailed Quotes After the quote is generated and sent to the client via email, the client receives an email like the one at right. The email contains the following:
1. A custom message that you entered (see Step 4 on page 18)
2. A website link to the Retail Shopping Cart. This link is specific to you and the client and includes all of the plans that you saved for him or her. The link is included in the body of the email as well as in the PDF proposal letter.
3. A proposal letter in an attached PDF file
The Proposal PDF & Password The Proposal (like the one at right) includes information about the quote, client demographic information and available products. It’s signed with your agent info.
The proposal requires a password to open. The password is the primary applicant’s zip code.

4 Creating a Proposal/Quote
07/24/2018 RETAIL PRODUCER PORTAL GUIDE PAGE 22
Open Emailed Quotes (continued)
The URL Link The quote-specific link – whether accessed in the proposal letter PDF or accessed via the body of the proposal email – takes the client to a Retail Shopping Cart page where the plans you selected for the proposal can be viewed. Because the client went to the Retail Shopping Cart via a link that you generated, your producer information is captured. If the client selects a plan and applies for coverage, you are credited with the sale. However, until your client creates a shopping account, the client must use your Express Link for every shopping session. Once your client has a Retail Shopping Cart account, you are attached to that user. See pages 23-25 for details on how to help clients set up shopping accounts.

4 Creating a Proposal/Quote
07/24/2018 RETAIL PRODUCER PORTAL GUIDE PAGE 23
Have Clients Create a Retail Shopping Cart Account You should instruct the client to create a shopping account. This way, if they don’t complete the application process on the day you sent the Express Link, they can complete it later. Once you are attached to the user with a Retail Shopping Cart account, you continue to be associated with that user even if they shop for plans that were not included in your proposal.
Creating an Account Creating an account is fast and easy. (See registration form at left.) Users are required to enter minimal information for an account: user name, email address, password and a security question. Note these shopping account setup tips: • The user name field cannot contain special characters, so the email address
cannot be used as the user name. • The password must be 8-20 characters and is case sensitive. It must contain
at least one of the following: letter, number or special character.

4 Creating a Proposal/Quote
07/24/2018 RETAIL PRODUCER PORTAL GUIDE PAGE 24
Have Clients Create a Retail Shopping Cart Account (continued)
Additional Retail Shopping Cart Account Tips If the client ends a Retail Shopping Cart session before logging in or creating an account, the client must use your Express Link each time he or she returns to shop or until a shopping account is created. The same is true for clients that reach the Retail Shopping Cart via an Express Link button on your website.
The client should use the “Forgot User Name or Password” links on the Retail Shopping Cart if your client forgets login information, instead of creating a new account.
Once the Client Has a Retail Shopping Cart Account If there is a particular plan or plans the client wants to save, they can select the “Save for Later” link. The link name will change to “Saved” and the plan will be added to the cart for viewing later.
Your producer information will be retained with the user.
When the client selects the cart icon, they may get a pop-up message regarding saved plans. Select OK.
Saved plans will be available for the client to view when they sign back in to their Retail Shopping Cart account.
4 Creating a Proposal/Quote
07/24/2018 RETAIL PRODUCER PORTAL GUIDE PAGE 25
Have Clients Create a Retail Shopping Cart Account (continued)
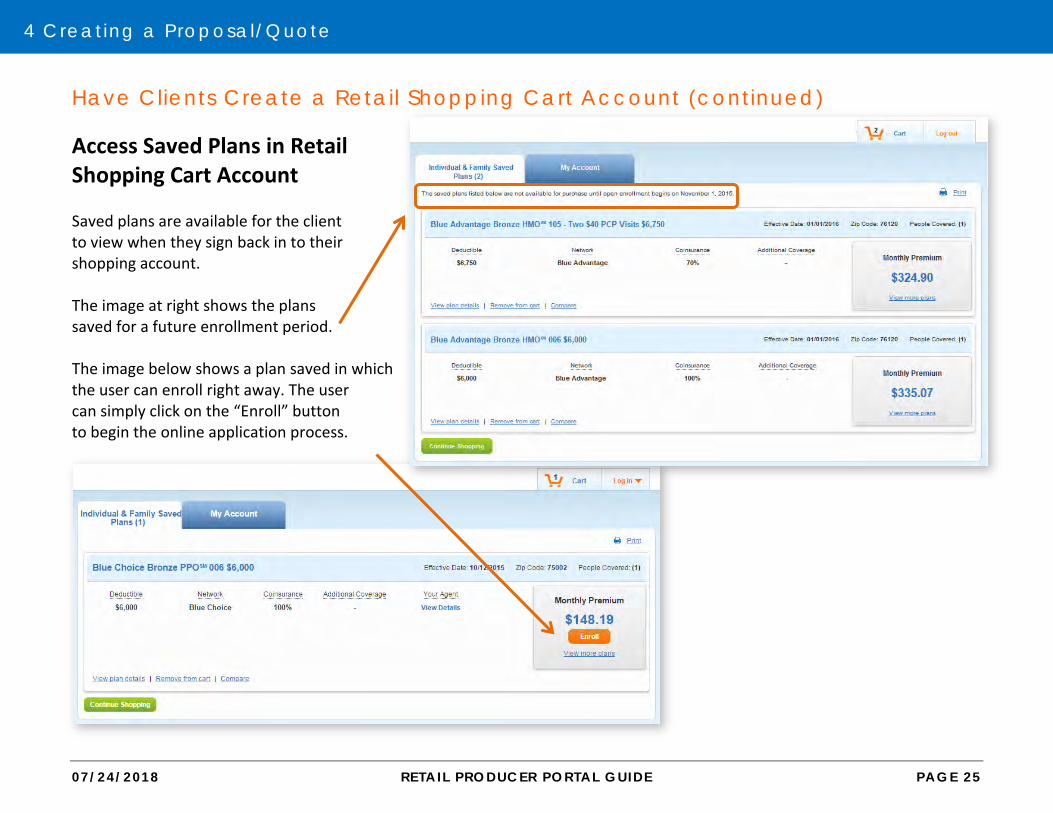
Access Saved Plans in Retail Shopping Cart Account Saved plans are available for the client to view when they sign back in to their shopping account. The image at right shows the plans saved for a future enrollment period. The image below shows a plan saved in which the user can enroll right away. The user can simply click on the “Enroll” button to begin the online application process.

5 Enrol l ing Clients
07/24/2018 RETAIL PRODUCER PORTAL GUIDE PAGE 26
5 Enrolling Clients Digital Enrollment Pathways There are two pathways for completing and submitting enrollment applications online:
1. RETAIL PRODUCER PORTAL & RETAIL SHOPPING CART (see pages 27-29) You begin the process via the Retail Producer Portal. Then you and your client complete and submit the application via the Retail Shopping Cart. The following are the kinds of applications that you can complete via this pathway: On and off exchange medical applications, open and special enrollment On and off exchange medical with dental applications, open and special enrollment Child only applications (parents enrolling for a minor child), open and special enrollment Applications authorized by personal representatives of applicants, open and special enrollment
2. RETAIL PRODUCER PORTAL ONLY (see pages 30-39) You manage the entire online enrollment process via the Retail Producer Portal. The following are the kinds of applications that you can complete via this pathway: Off exchange medical with dental applications, open and special enrollment Off exchange medical applications, open and special enrollment
There are many advantages for using this pathway: Manage the entire application process. Stay attached to the application/policy throughout. Enroll faster – the portal was designed for you so the process is streamlined with all steps on one page. Skip creating a shopping account for each client – this pathway doesn’t require a shopping account. See all stages of the application’s progress; application is received and viewable in the portal within 24 hours. Start and save applications, complete and submit later (up to 90 days!) if needed. Receive all enrollment notifications. Give agency office personnel ability to submit subproducers’ apps. Reduce overall applicant-to-member timeframes.

5 Enrol l ing Clients
07/24/2018 RETAIL PRODUCER PORTAL GUIDE PAGE 27
Enroll via Producer Portal & Shopping Cart
Complete Applicant Info
1. Select the Quotes tab.
2. Complete the required name fields for the quote.
3. Note that a “County” field appears under the zip code after the zip code has been entered. If more than one county is available, select from the drop down list.
4. Enter all of the primary’s information. Additional fields may appear, such as those for for a spouse and children. Complete as needed.
5. Select the “Continue” button.

5 Enrol l ing Clients
07/24/2018 RETAIL PRODUCER PORTAL GUIDE PAGE 28
Select the Plan
6. If you don’t need a quote or proposal, and you’re helping your client enroll, select “Apply for This Plan” next to the desired plan.
7. A pop-up box will display. Click on the “Continue Online” button to enroll in the plan via the Retail Shopping Cart. This option is enabled year round for open and special enrollments.
Note that the online enrollment process will require payment before application submission.
The “Print Application Sign and Mail” button is available if you want to submit a paper application by mail.

5 Enrol l ing Clients
07/24/2018 RETAIL PRODUCER PORTAL GUIDE PAGE 29
Complete Enrollment via Retail Shopping Cart The Retail Shopping Cart leads your client through all steps of the enrollment process. These steps include:
• Log in or create a Retail Shopping Cart account (this is critical – see pages 23-25 for details)
• Receiving an official tax credit for coverage if applicable
• Selecting a medical plan
• Choosing or declining a dental plan
• Agreeing to Terms and Agreements
• Entering detailed applicant and contact information
• Finding a primary care physician (PCP) or medical group if the member chooses an HMO plan
Applicants can select a PCP/medical group at a later time or producers can submit this information via the Retail Producer Portal. See pages 49-52 for details.
• Making an initial premium payment, which is required to effectuate coverage
• Choosing billing for subsequent and ongoing premium payments
• Reviewing and submitting the application

5 Enrol l ing Clients
07/24/2018 RETAIL PRODUCER PORTAL GUIDE PAGE 30
Enroll via Producer Portal Only
Before You Start This pathway allows you to manage the entire online enrollment process via the Retail Producer Portal. Here’s when you can (and can’t) use the portal to enroll your clients:
Off exchange medical with dental applications, open and special enrollment
Off exchange medical applications, open and special enrollment
On exchange medical applications On exchange medical with dental applications Child only applications Applications authorized by personal representatives Dental only applications
Producer Information When you select the Enrollment tab, check the information displayed in the Producer Information section.
1. Select the Enrollment tab.
2. In the Producer Information panel, check the Writing Producer Number* field. It will automatically populate with the producer ID number associated with the log in. However, some users may have the ability to change this number. For example, if you log in as the agency principal, you can enter the producer ID numbers of any of your subproducers. This feature allows office personnel to submit applications for their sales agents. Be sure to enter nine digits. If the producer ID number is less than nine digits (such as 123456), use leading zeros (such as 000123456).
3. Select the “Start Application” button to begin the application process.
* ENSURE THE WRITING PRODUCER NUMBER IS ACCURATE! This is the nine-digit producer identification number included in your “Welcome” email when you completed contracting (producers and agencies) or onboarding (subproducers). If you contracted or onboarded to sell in multiple states, you have a unique ID number for each state.
Jane Doe ABC Health Insurance Agency

5 Enrol l ing Clients
07/24/2018 RETAIL PRODUCER PORTAL GUIDE PAGE 31
Start Application
Application Information 1. Once you select the “Start
Application” button, verify the Writing Producer Number. Once you begin with the producer ID number displayed here, it can’t be changed. If it’s incorrect here, click the Enrollment tab to start over.
2. When you first begin applying, the applicant name won’t be populated. As you move through the application, the field will update.
3. Choose your application. The time of year and the plan year selected determine if a special enrollment is required. If so, special enrollment fields will populate. Note that if you apply for special enrollment, you’ll need to select a qualifying life event and supply supporting documentation. (See page 39 for details.)
4. This will reflect the next available effective date, but the field could change as you enter more information.
5. The estimated monthly premium will not populate until you select a plan and enter specific information such as zip code, date of birth and tobacco use. It will update as you add dependents.
Authorization To begin the application process, you must authorize one of the following:
6. You have a paper application signed by the client in every area that requires a signature. If your office submits applications on the sales agent’s behalf, you should select this option. Note that you’ll need to maintain signed copies of paper applications for a minimum of two years.
7. Your client is with you in person, understands all terms, acknowledgments and authorizations and agrees to them. If you select the “in person” option, all of the terms and agreements will display in a pop-up.

5 Enrol l ing Clients
07/24/2018 RETAIL PRODUCER PORTAL GUIDE PAGE 32
BlueCare Dental 4 Kids 1B
Plan Selection 1. Input the zip code of your
client.
2. If the zip code covers more than one county, select the correct county.
3. Choose the plan in which your client would like to enroll. Be sure to remember the plan name; you’ll need that information when using the Provider Finder to search for, find and enter a primary care physician (PCP) or medical group number for plans that require it.
4. Choose dental coverage. The dropdown defaults to a pediatric dental plan. Note that you can’t select dental coverage without selecting medical coverage. To apply for stand-alone dental coverage, you’ll need to apply via a paper application. Online enrollment (via the Retail Producer Portal or the Retail Shopping Cart) for a stand-alone dental plan is not available at this time.

5 Enrol l ing Clients
07/24/2018 RETAIL PRODUCER PORTAL GUIDE PAGE 33
See the next page for more on steps 7 and 8.
Applicant Information: Primary In the Applicant Information panel, enter all required data fields (those with a red asterisk). Some fields will populate depending on information already pro-vided. For example, a tobacco question populates if the applicant is 18 or over.
1. Enter primary applicant information.
2. Provide residential and mailing addresses.
3. When census fields are completed, the “Estimated Monthly Premium” will update. As you add dependents, this number will change.
4. Enter phone numbers and an email address.
5. The option to receive electronic versions of documentation, such as fulfillment and policy materials, is preselected. You can choose to deselect it.
6. Primary Care Physician (PCP) or Medical Group number fields will populate if the applicant is choosing a plan that requires it. You can input a PCP or Medical Group number here. If needed, use the Provider Finder to search for a PCP/Medical Group. Know the plan name before you search – you must search within the network for the plan in which you are applying to see PCP or Medical Group numbers.
5 Enrol l ing Clients
07/24/2018 RETAIL PRODUCER PORTAL GUIDE PAGE 34
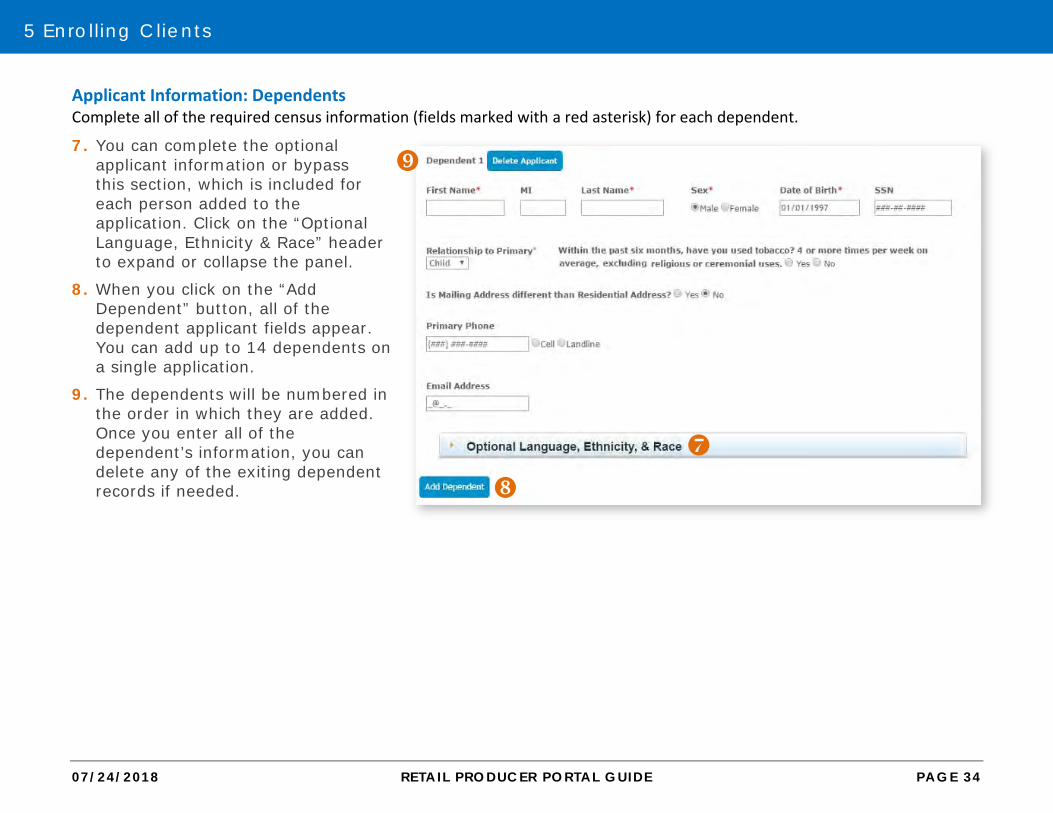
Applicant Information: Dependents Complete all of the required census information (fields marked with a red asterisk) for each dependent.
7. You can complete the optional applicant information or bypass this section, which is included for each person added to the application. Click on the “Optional Language, Ethnicity & Race” header to expand or collapse the panel.
8. When you click on the “Add Dependent” button, all of the dependent applicant fields appear. You can add up to 14 dependents on a single application.
9. The dependents will be numbered in the order in which they are added. Once you enter all of the dependent’s information, you can delete any of the exiting dependent records if needed.

5 Enrol l ing Clients
07/24/2018 RETAIL PRODUCER PORTAL GUIDE PAGE 35
Phone Consent 1. In the Phone Consent panel, cell phone
and landline questions populate based on the phone information provided in the Applicant Information panel.
Payment 2. Choose an initial payment type for the
first month’s premium. An initial payment is required when submitting an off-exchange app. Funds will be collected when the app is submitted.
Proxy & Other Coverage Information 3. In the Proxy & Other Coverage
Information panel, you can click on the proxy statement link to review it. Select to agree to the statement if your client consents.
4. If your client or any dependents on the application had previous coverage in the last five years, select “Yes” for Other Coverage. Enter the required information; it must be completed before submission. Note that applicant names will populate based on data previously entered.
5. If your client is replacing coverage, select “Yes” and enter the required information.

5 Enrol l ing Clients
07/24/2018 RETAIL PRODUCER PORTAL GUIDE PAGE 36
Cancel, Save and Exit, or Submit
1. Cancel: The application data entry window will close without saving any changes.
2. Save and Exit: At minimum, these fields must be populated to save an incomplete application to the portal:
Writing Producer Number Zip Code/County Medical Plan Primary Applicant First and Last
Name Primary Date of Birth Tobacco Use (if 18+)
If you don’t complete the fields above, you can’t click on Save and Exit; the button will be gray and disabled.
After clicking “Save and Exit,” reopen the app from the Incomplete Applications table on the Enrollment tab.
3. Submit Application: If you don’t complete all necessary fields required for submission, the “Submit Application” button will be gray and disabled. It will become blue and enabled when you’ve completed all fields. Upon submission, you will be directed to our vendor payment site to make the initial premium payment, which is required. Once enrolled, you can locate the policy by using the Client Search function in the Client Info tab.

5 Enrol l ing Clients
07/24/2018 RETAIL PRODUCER PORTAL GUIDE PAGE 37
Make Initial Payment When you click on the “Submit Application” button, a new internet browser window or tab will open.
1. You’ll be directed to our payment systems vendor to make either a bank account or a credit/debit card payment, depending on your choice in the Payment panel.
2. You also have the ability to set up regular premium payments, which we recommend.
3. You must apply an e-signature to submit payment.
4. When you click to “Submit,” note that the initial payment is processed immediately.
5. After clicking “Submit,” a popup note appears on the Retail Producer Portal site with a Client Application ID number. We recommend keeping this number until the application has been processed and you have access to the E-Application number in case you need to refer to the transaction.
5 Enrol l ing Clients
07/24/2018 RETAIL PRODUCER PORTAL GUIDE PAGE 38
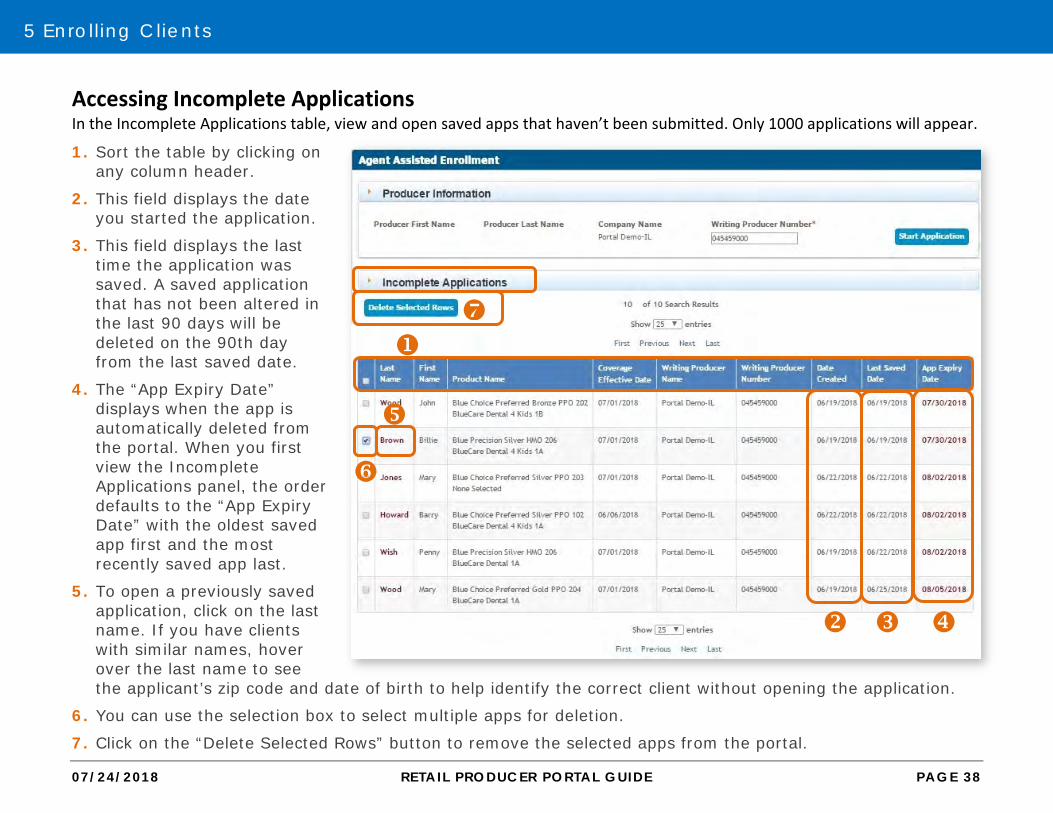
Accessing Incomplete Applications In the Incomplete Applications table, view and open saved apps that haven’t been submitted. Only 1000 applications will appear.
1. Sort the table by clicking on any column header.
2. This field displays the date you started the application.
3. This field displays the last time the application was saved. A saved application that has not been altered in the last 90 days will be deleted on the 90th day from the last saved date.
4. The “App Expiry Date” displays when the app is automatically deleted from the portal. When you first view the Incomplete Applications panel, the order defaults to the “App Expiry Date” with the oldest saved app first and the most recently saved app last.
5. To open a previously saved application, click on the last name. If you have clients with similar names, hover over the last name to see the applicant’s zip code and date of birth to help identify the correct client without opening the application.
6. You can use the selection box to select multiple apps for deletion.
7. Click on the “Delete Selected Rows” button to remove the selected apps from the portal.
5 Enrol l ing Clients
07/24/2018 RETAIL PRODUCER PORTAL GUIDE PAGE 39
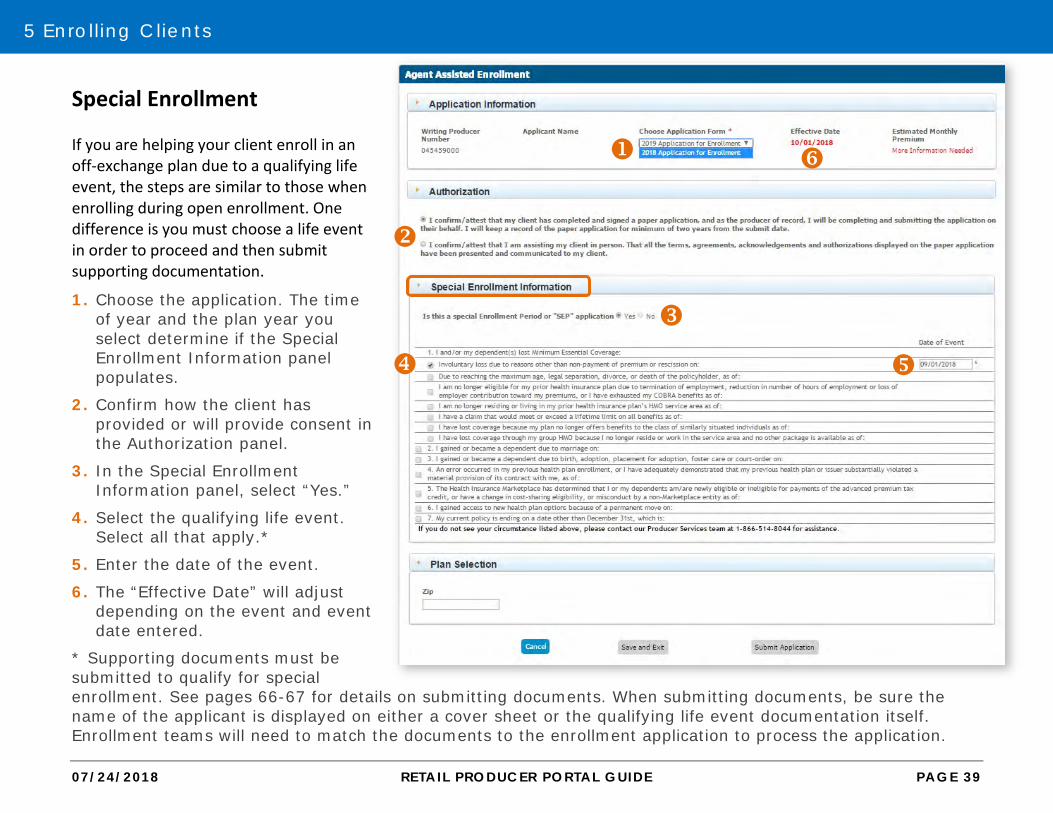
Special Enrollment If you are helping your client enroll in an off-exchange plan due to a qualifying life event, the steps are similar to those when enrolling during open enrollment. One difference is you must choose a life event in order to proceed and then submit supporting documentation.
1. Choose the application. The time of year and the plan year you select determine if the Special Enrollment Information panel populates.
2. Confirm how the client has provided or will provide consent in the Authorization panel.
3. In the Special Enrollment Information panel, select “Yes.”
4. Select the qualifying life event. Select all that apply.*
5. Enter the date of the event.
6. The “Effective Date” will adjust depending on the event and event date entered.
* Supporting documents must be submitted to qualify for special enrollment. See pages 66-67 for details on submitting documents. When submitting documents, be sure the name of the applicant is displayed on either a cover sheet or the qualifying life event documentation itself. Enrollment teams will need to match the documents to the enrollment application to process the application.
6 Managing Leads
07/24/2018 RETAIL PRODUCER PORTAL GUIDE PAGE 40
6 Managing Leads You can use the Retail Producer Portal to manage your leads and prospects by adding, saving and deleting prospect records. After they are saved, you can search for them, track them or delete them as applicable.
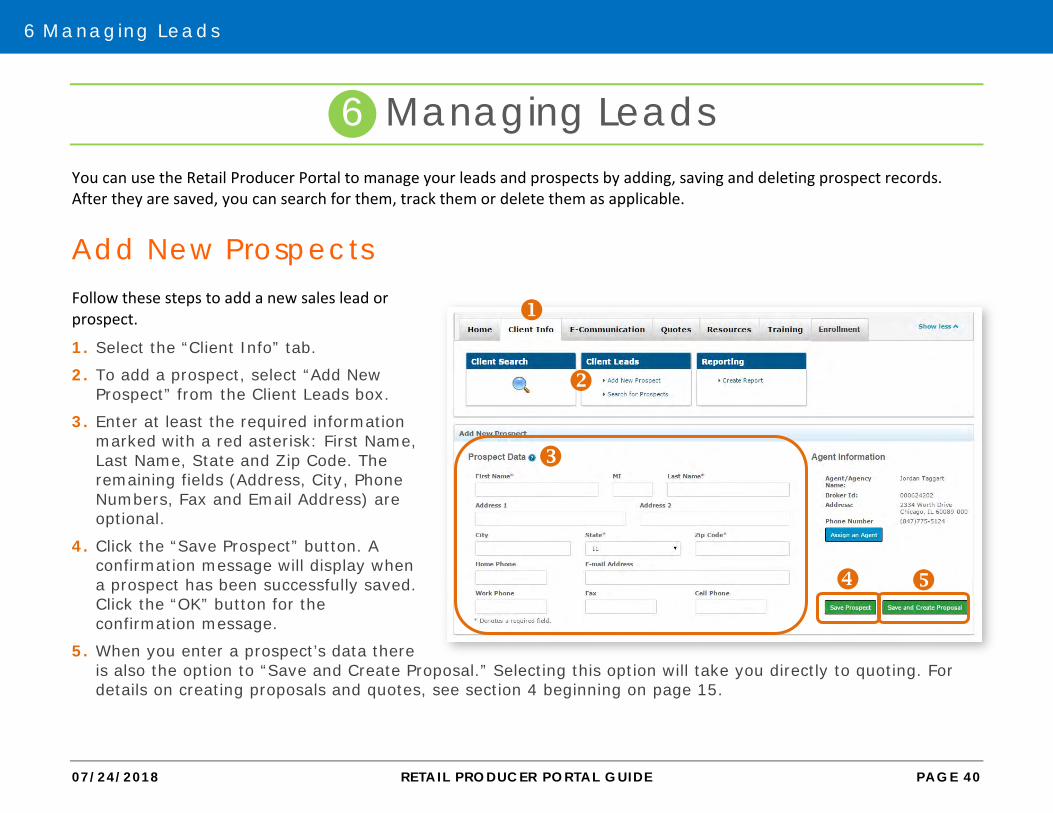
Add New Prospects Follow these steps to add a new sales lead or prospect.
1. Select the “Client Info” tab.
2. To add a prospect, select “Add New Prospect” from the Client Leads box.
3. Enter at least the required information marked with a red asterisk: First Name, Last Name, State and Zip Code. The remaining fields (Address, City, Phone Numbers, Fax and Email Address) are optional.
4. Click the “Save Prospect” button. A confirmation message will display when a prospect has been successfully saved. Click the “OK” button for the confirmation message.
5. When you enter a prospect’s data there is also the option to “Save and Create Proposal.” Selecting this option will take you directly to quoting. For details on creating proposals and quotes, see section 4 beginning on page 15.

6 Managing Leads
07/24/2018 RETAIL PRODUCER PORTAL GUIDE PAGE 41
Search for Prospects
To search for a client, sales lead or prospect, follow these steps.
1. Select the “Client Info” tab.
2. To search for a prospect, select “Search for Prospects” from the Client Leads box.
3. Enter any piece of information to find a client. You can enter information in all four fields or just one.
4. If you want to see all of your prospects, click on the “Show All” button.
5. Click the “Submit” button.
6. Matching results will display in the lower portion of the page.
7. To delete prospects, select the box next to their record and click the “Delete Selected Rows” button.
8. To print prospect records, select the box next to their record and click the “Print Selected Rows” button, or you can “Print All.”
9. To export prospect records to a Microsoft Excel spreadsheet, select the box next to their record and click the “Export Selected Rows” button or you can “Export All.”

7 Searching for a Member
07/24/2018 RETAIL PRODUCER PORTAL GUIDE PAGE 42
7 Searching for a Member You can search for clients by completing fields in the Client Search section of the Retail Producer Portal’s Home page. In addition, there are many other ways to search for clients from the “Client Info” tab.
Simple Search
1. Select the “Home” tab.
2. Enter a member’s account number. Searches must be done with the primary insured’s information, not a spouse’s or a dependent’s.
3. You can also enter the last four digits of the primary insured’s Social Security Number.
4. Click the “Submit” button.
5. To do a more advanced search, click on the “Client Info” tab, where you have additional fields for searching.
7 Searching for a Member
07/24/2018 RETAIL PRODUCER PORTAL GUIDE PAGE 43
Advanced Options
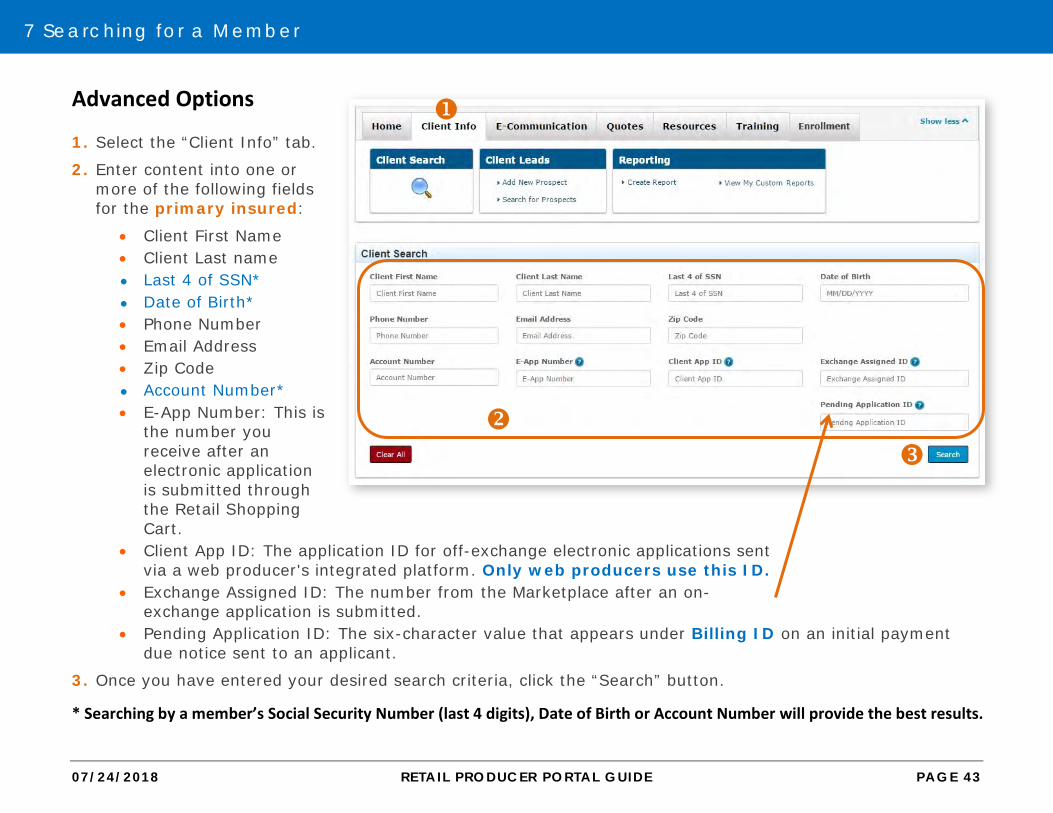
1. Select the “Client Info” tab.
2. Enter content into one or more of the following fields for the primary insured:
• Client First Name • Client Last name ● Last 4 of SSN* ● Date of Birth* • Phone Number • Email Address • Zip Code ● Account Number* • E-App Number: This is
the number you receive after an electronic application is submitted through the Retail Shopping Cart.
• Client App ID: The application ID for off-exchange electronic applications sent via a web producer's integrated platform. Only web producers use this ID.
• Exchange Assigned ID: The number from the Marketplace after an on- exchange application is submitted.
• Pending Application ID: The six-character value that appears under Billing ID on an initial payment due notice sent to an applicant.
3. Once you have entered your desired search criteria, click the “Search” button.
* Searching by a member’s Social Security Number (last 4 digits), Date of Birth or Account Number will provide the best results.

7 Searching for a Member
07/24/2018 RETAIL PRODUCER PORTAL GUIDE PAGE 44
View Search Results
Results from a client search will be displayed on the lower portion of the page. Click on the Account Number hyperlink shown in the results table.
When you select the Account Number link, the member’s demographic information is displayed:
• Account Number
• Name
• Address
• Email Address
• Home Phone
• Cell Phone
• Work Phone
• Spouse Cell Phone
• Fax
8 Producer-Assisted Transactions
07/24/2018 RETAIL PRODUCER PORTAL GUIDE PAGE 45
8 Producer-Assisted Transactions There are several ways you can help clients via features and functions in the Retail Producer Portal. You have the ability to get temporary and permanent ID cards for both medical and dental policies into the hands of clients. You can also change Primary Care Physicians and member contact information. When you submit these requests, other member systems are subsequently updated.
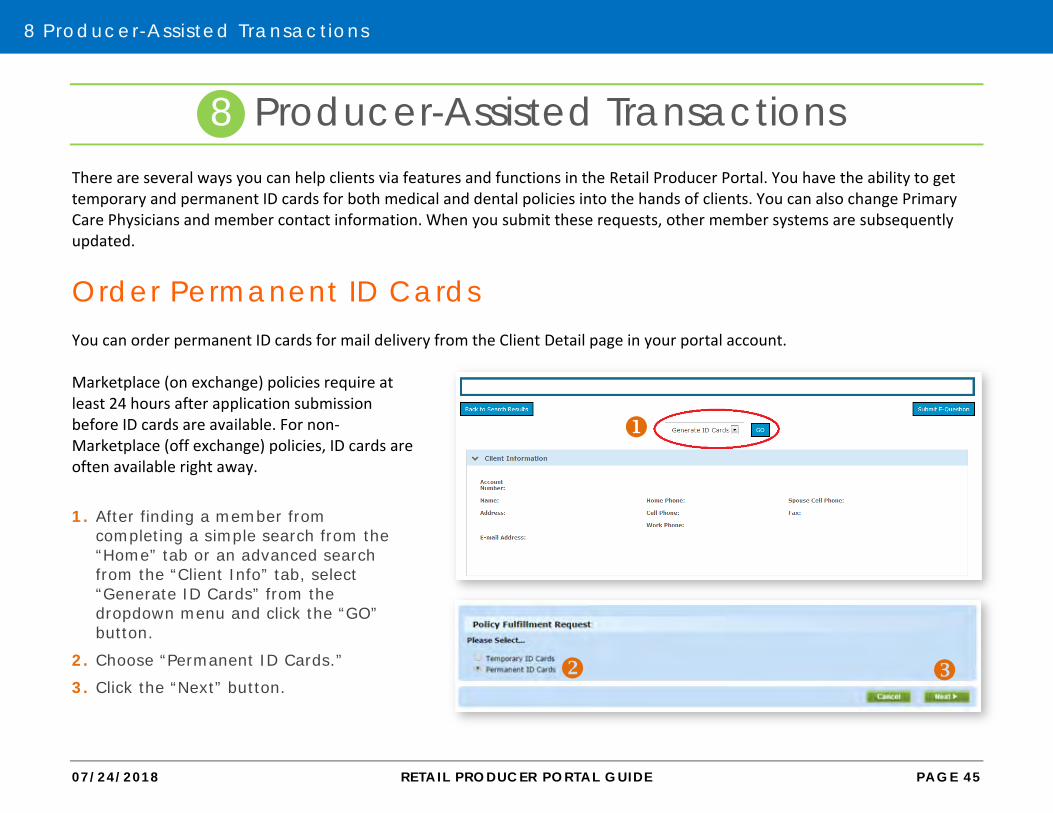
Order Permanent ID Cards You can order permanent ID cards for mail delivery from the Client Detail page in your portal account. Marketplace (on exchange) policies require at least 24 hours after application submission before ID cards are available. For non-Marketplace (off exchange) policies, ID cards are often available right away.
1. After finding a member from completing a simple search from the “Home” tab or an advanced search from the “Client Info” tab, select “Generate ID Cards” from the dropdown menu and click the “GO” button.
2. Choose “Permanent ID Cards.”
3. Click the “Next” button.

8 Producer-Assisted Transactions
07/24/2018 RETAIL PRODUCER PORTAL GUIDE PAGE 46
Order Permanent ID Cards (continued) 4. Select the policy type. You can select an ID card
for a medical or dental policy.
5. For plans that require a Primary Care Physician (PCP), select the member needing the card. Each member selected receives a separate ID Card with his or her own PCP information. For plans that don’t require a PCP, you don’t have to select a member’s name. For these cards, only the primary insured’s name is included.
6. For Permanent ID Cards, you can order cards for mail delivery. The cards will be delivered by the United States Postal Service. You have the option of selecting the address on file for the member or entering in an alternate address for the ID Card mailing.
7. Be sure to choose a reason for replacing the ID Card.

8 Producer-Assisted Transactions
07/24/2018 RETAIL PRODUCER PORTAL GUIDE PAGE 47
Generate Temporary ID Cards
1. After finding a member from completing a simple search from the "Home" tab or an advanced search from the "Client Info" tab, select "Generate ID Cards" from the dropdown menu and click the "GO" button.
2. Choose “Temporary ID Cards”
3. Click the “Next” button.
4. Select a policy.
5. For plans that require a Primary Care Physician, you must select the member needing the ID Card. Each member selected receives a separate ID Card with the Primary Care Physician information included.
For plans that do not require a Primary Care Physician, you do not have to select a member’s name. For these ID Cards, only the primary insured’s name is on the ID Card.
Click on the member’s link to generate the ID Card.
8 Producer-Assisted Transactions
07/24/2018 RETAIL PRODUCER PORTAL GUIDE PAGE 48
Generate Temporary ID Cards (continued)
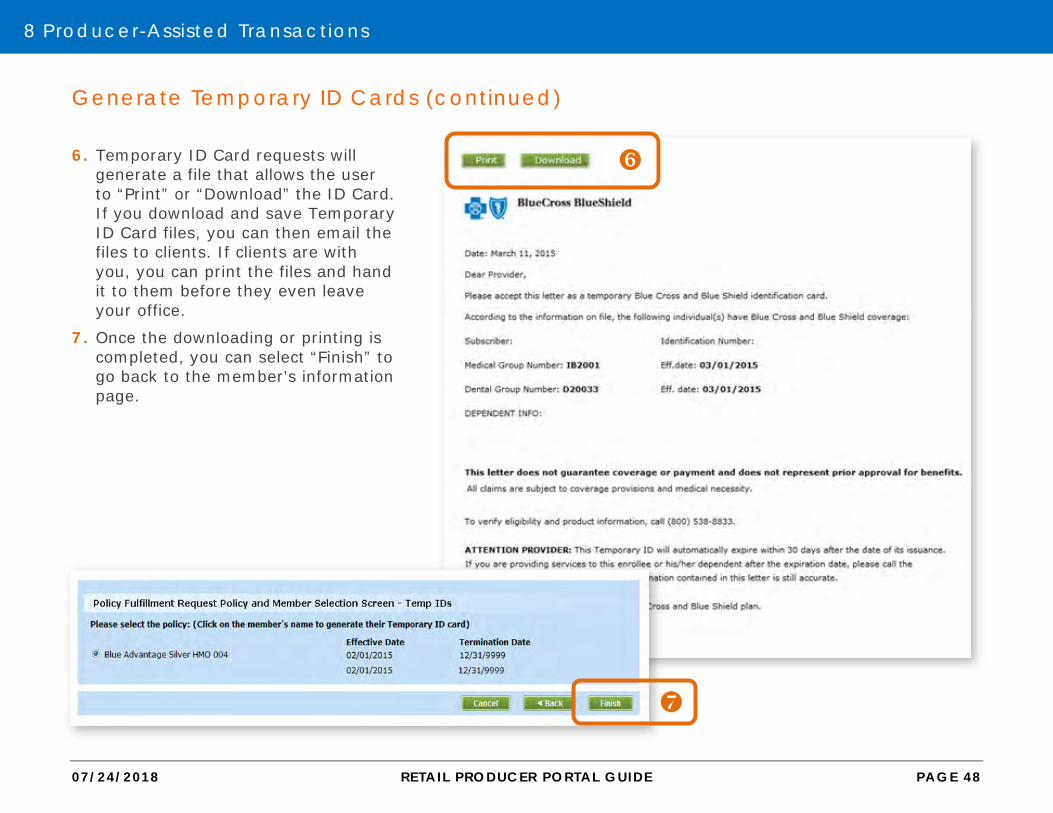
6. Temporary ID Card requests will generate a file that allows the user to “Print” or “Download” the ID Card. If you download and save Temporary ID Card files, you can then email the files to clients. If clients are with you, you can print the files and hand it to them before they even leave your office.
7. Once the downloading or printing is completed, you can select “Finish” to go back to the member's information page.

8 Producer-Assisted Transactions
07/24/2018 RETAIL PRODUCER PORTAL GUIDE PAGE 49
Change Primary Care Physician The Retail Producer Portal allows you to make a Primary Care Physician (PCP) change for a client.
1. After finding a member from completing a simple search from the “Home” tab or an advanced search from the “Client Info” tab, select “Change PCP” from the dropdown menu and click the “GO” button.
2. When the “Provider Change” page opens, select the member name needing the PCP change.
3. Click on the “Provider Finder” link. Locate the Medical Group / PCP/ PCPA / NPI number(s) for the new PCP.
4. Put a check mark in the box(es) beside the name(s) of the members needing the PCP change.
5. Put the Medical Group / PCP/ PCPA / NPI number in the appropriate field.
6. Select the “Search” button. See the following page for next steps.

8 Producer-Assisted Transactions
07/24/2018 RETAIL PRODUCER PORTAL GUIDE PAGE 50
Change Primary Care Physician (continued)
1. After you click the “Search” button, the new PCP information is displayed.
2. Choose a reason for changing provider(s) from the “Provider Change Reason” dropdown list located in the Provider Assignment section. For a list of reasons, see page 52.
3. Click the “Validate” button.
4. If the reason selected is not valid, an error message will display at the bottom of the page and a new reason selection must be made.

8 Producer-Assisted Transactions
07/24/2018 RETAIL PRODUCER PORTAL GUIDE PAGE 51
Change Primary Care Physician (continued)
5. If you do not receive an Error message, verify the PCP changes are correct
6. Select the “Finish” button.
7. A message appears that the change was successful and new ID Cards were generated.

8 Producer-Assisted Transactions
07/24/2018 RETAIL PRODUCER PORTAL GUIDE PAGE 52
Change Primary Care Physician (continued)
PCP Changes Each client’s PCP can only be updated one time, per transaction. Reasons for changing a PCP include:
• Referral problems • Retired • New member benefit not supported • No reason given • New enrollee • Member preferred one doctor for family • Member’s former provider in network • Doctor/medical group location
• Left network (closed) • Hospital affiliated • Dependent age • Concern with service • Change of residence • Concern with physician • Concern with access • Asked out
Provider Termination Dates You don’t need to enter a termination date for the new PCP. The termination date will automatically default to December 31, 9999. The new PCP assignment will remain in effect until the member makes another change or until coverage ends. Please do not alter the date.
Selecting Two PCPs A client may have a PCP for one period of time and another PCP effective on a future date. (Example: PCP 1 is effective from October 1 to December 31, and PCP 2 is effective from January 1 onward.) If the client wants two different PCPs for two different time periods, you will need to complete two separate PCP update transactions. Examples of when this might take place are when a PCP is leaving a network or when a client is moving to a new policy/network in the future.
Effective Dates for PCPs In some instances, depending on the state, an effective/start date for a PCP can only be on the first of the month. In those cases, a “Warning Message(s)” will display. You may click “Accept” or “Modify” if you wish to change the effective date of the new PCP selection.
8 Producer-Assisted Transactions
07/24/2018 RETAIL PRODUCER PORTAL GUIDE PAGE 53
Change Client Information
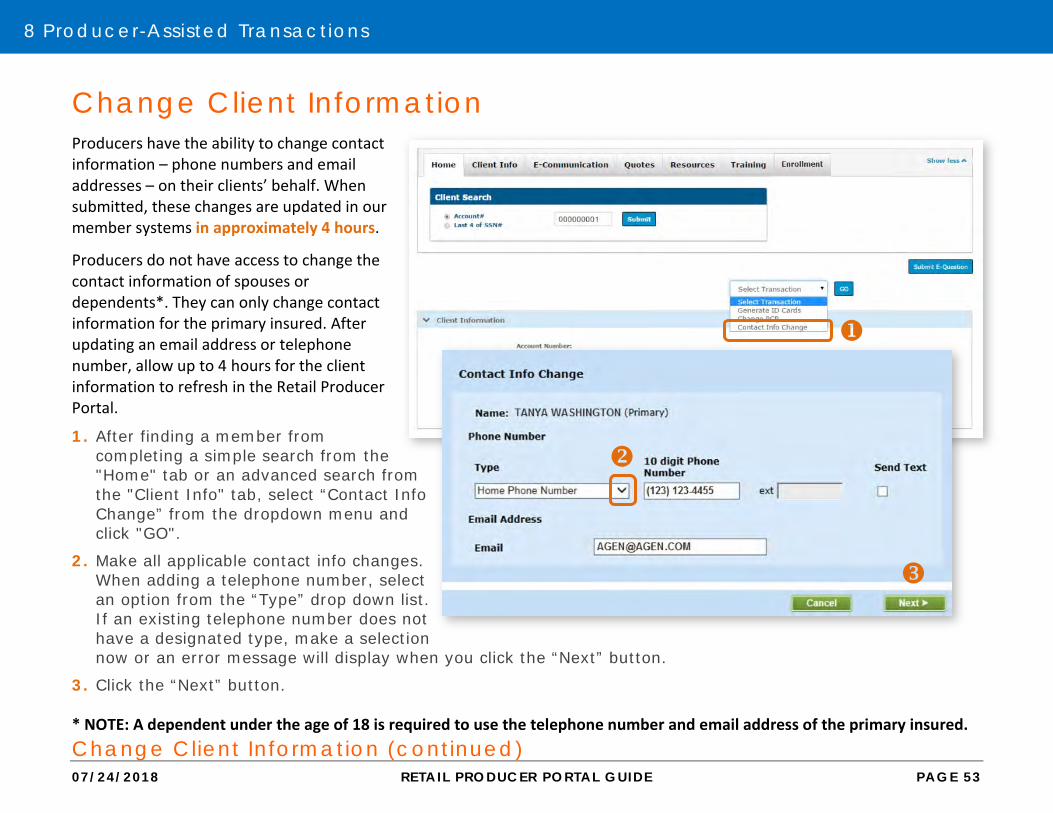
Producers have the ability to change contact information – phone numbers and email addresses – on their clients’ behalf. When submitted, these changes are updated in our member systems in approximately 4 hours.
Producers do not have access to change the contact information of spouses or dependents*. They can only change contact information for the primary insured. After updating an email address or telephone number, allow up to 4 hours for the client information to refresh in the Retail Producer Portal.
1. After finding a member from completing a simple search from the "Home" tab or an advanced search from the "Client Info" tab, select “Contact Info Change” from the dropdown menu and click "GO".
2. Make all applicable contact info changes. When adding a telephone number, select an option from the “Type” drop down list. If an existing telephone number does not have a designated type, make a selection now or an error message will display when you click the “Next” button.
3. Click the “Next” button.
* NOTE: A dependent under the age of 18 is required to use the telephone number and email address of the primary insured. Change Client Information (continued)

8 Producer-Assisted Transactions
07/24/2018 RETAIL PRODUCER PORTAL GUIDE PAGE 54
4. Confirm changes are correct.
5. Select “Finish.”
6. A message should appear that the updates were successfully saved.
7. If there is an issue, an error message will display. Follow instructions and click the “OK” button.
9 Using Reports
07/24/2018 RETAIL PRODUCER PORTAL GUIDE PAGE 55
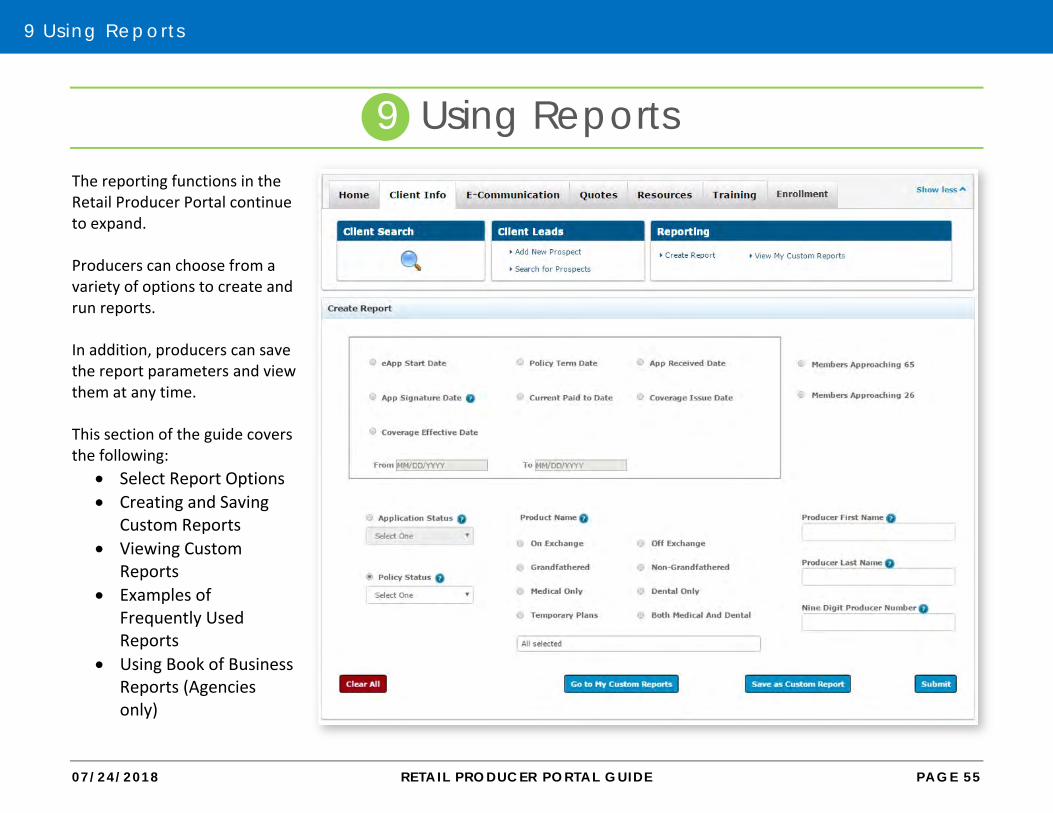
9 Using Reports The reporting functions in the Retail Producer Portal continue to expand. Producers can choose from a variety of options to create and run reports. In addition, producers can save the report parameters and view them at any time. This section of the guide covers the following:
• Select Report Options • Creating and Saving
Custom Reports • Viewing Custom
Reports • Examples of
Frequently Used Reports
• Using Book of Business Reports (Agencies only)

9 Using Reports
07/24/2018 RETAIL PRODUCER PORTAL GUIDE PAGE 56
Section 1 Section 2
Section 4 Section 3
Select Report Options
1. Click on “Client Info.”
2. Select the “Create Report” link in the Reporting section.
3. Create a report by selecting parameters in one of the reporting sections. See the following pages for details on each report type, which are divided into four types of reports:
• Section 1: Date-Driven Reports (page 57)
• Section 2: Retention Reports (page 57)
• Section 3: Application Status Reports (page 58) and Policy Status Reports (page 58-59)
• Section 4: Producer Reports (page 59)
4. Click the “Clear All” button to remove all selections made on the page.
5. Click the “Submit” button to pull the report using the report parameters you selected.
9 Using Reports
07/24/2018 RETAIL PRODUCER PORTAL GUIDE PAGE 57
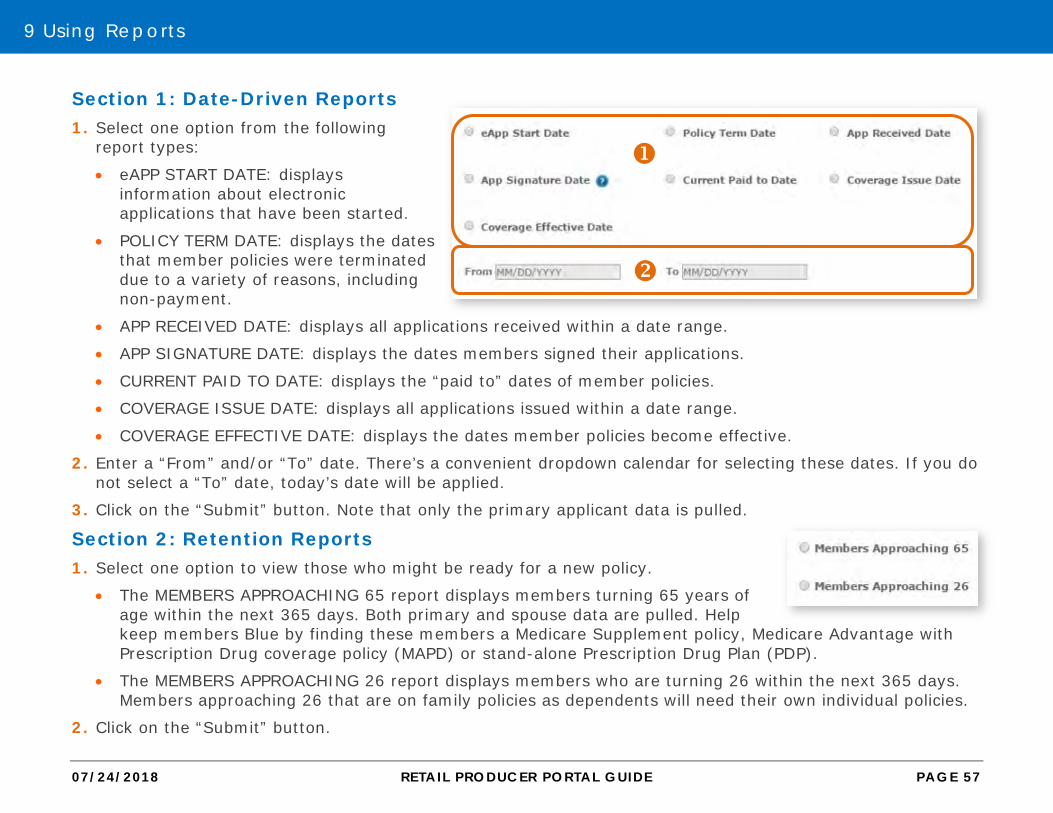
Section 1: Date-Driven Reports 1. Select one option from the following
report types:
• eAPP START DATE: displays information about electronic applications that have been started.
• POLICY TERM DATE: displays the dates that member policies were terminated due to a variety of reasons, including non-payment.
• APP RECEIVED DATE: displays all applications received within a date range.
• APP SIGNATURE DATE: displays the dates members signed their applications.
• CURRENT PAID TO DATE: displays the “paid to” dates of member policies.
• COVERAGE ISSUE DATE: displays all applications issued within a date range.
• COVERAGE EFFECTIVE DATE: displays the dates member policies become effective.
2. Enter a “From” and/or “To” date. There’s a convenient dropdown calendar for selecting these dates. If you do not select a “To” date, today’s date will be applied.
3. Click on the “Submit” button. Note that only the primary applicant data is pulled.
Section 2: Retention Reports 1. Select one option to view those who might be ready for a new policy.
• The MEMBERS APPROACHING 65 report displays members turning 65 years of age within the next 365 days. Both primary and spouse data are pulled. Help keep members Blue by finding these members a Medicare Supplement policy, Medicare Advantage with Prescription Drug coverage policy (MAPD) or stand-alone Prescription Drug Plan (PDP).
• The MEMBERS APPROACHING 26 report displays members who are turning 26 within the next 365 days. Members approaching 26 that are on family policies as dependents will need their own individual policies.
2. Click on the “Submit” button.

9 Using Reports
07/24/2018 RETAIL PRODUCER PORTAL GUIDE PAGE 58
Section 3: Application Status Reports For application reports, select the “Application Status” radio button, choose one of the following from its dropdown menu and click on the “Submit” button. Dropdown options include:
• All • Started • Pending / In Progress • Withdrawn
Note: Only primary applicant data is pulled. In addition, Application Status reports are for those that have not been effectuated.
Section 3: Policy Status Reports 1. For policy reports, select the “Policy Status”
radio button and select one of the following from its dropdown menu:
• All • Grace Period • Termed • Active • Missing Binder Payment
2. You can select (but are not required to) an additional filtering report option from the “Product Name” section if you like. This section is for members that have been effectuated. Options include:
• Use the “All” pull down menu to select one product or multiple products. For example, you could use the multiple plan selection option to choose plans for a specific metallic, network or plan type.
• ON EXCHANGE: displays members with On Exchange policies.
• OFF EXCHANGE: displays members with Off Exchange policies.
9 Using Reports
07/24/2018 RETAIL PRODUCER PORTAL GUIDE PAGE 59
• GRANDFATHERED: displays members with a non QHP policy. Options will populate for states with active members.
• NON-GRANDFATHERED: displays members with a QHP policy but it is not a metallic policy. Options will populate for states with active members.
• MEDICAL ONLY: displays members who only have medical policies, not dental policies.
• DENTAL ONLY: shows members who only have dental policies, not medical policies.
• TEMPORARY PLANS: displays members who have temporary (short-term) policies
• BOTH MEDICAL AND DENTAL: displays members who have a medical and dental policy.
NOTE: All of these options are available for “Policy Status” reports only. You must select from the “Policy Status” dropdown menu before you can choose an additional filtering option from the “Product Name” section.
3. Click on the “Submit” button.
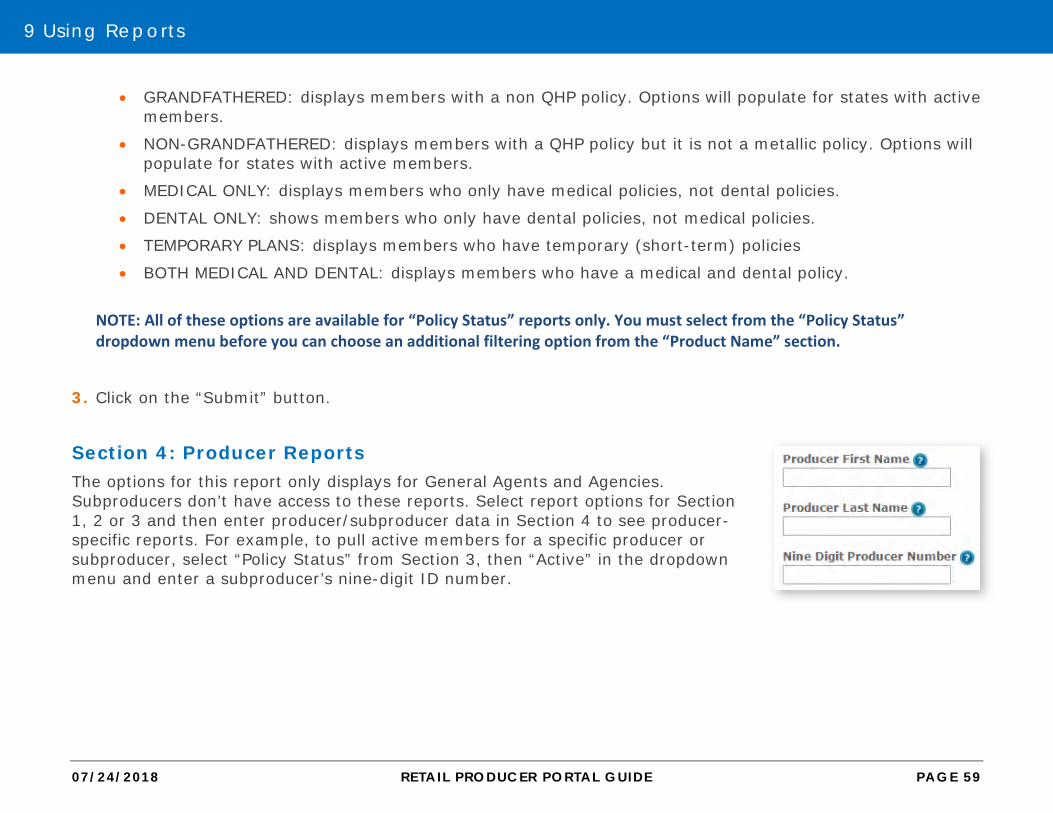
Section 4: Producer Reports The options for this report only displays for General Agents and Agencies. Subproducers don’t have access to these reports. Select report options for Section 1, 2 or 3 and then enter producer/subproducer data in Section 4 to see producer-specific reports. For example, to pull active members for a specific producer or subproducer, select “Policy Status” from Section 3, then “Active” in the dropdown menu and enter a subproducer’s nine-digit ID number.

9 Using Reports
07/24/2018 RETAIL PRODUCER PORTAL GUIDE PAGE 60
Create & Save Custom Reports
1. Select the “Create Report” link from the Reporting section of the Client Info tab.
2. Select your reporting parameters. In this example, the report being created is for all active off exchange policies.
3. Click the “Submit” button.
4. Select the “Save as Custom Report” button.
5. A pop-up box opens allowing you to create a name for the report.
6. Click the “Save” button to save the custom report.

9 Using Reports
07/24/2018 RETAIL PRODUCER PORTAL GUIDE PAGE 61
View Custom Reports After saving custom reports, you can run them again at any time. You can save up to 10 custom reports.
1. Select “View My Custom Reports” from the Reporting section of the Client Info tab.
2. Click on the “Run Report” button to see refreshed data.
3. If you’ve saved 10 reports and need to save another, one saved report will need to be deleted by clicking on the “Remove” button before a new report can be added.

9 Using Reports
07/24/2018 RETAIL PRODUCER PORTAL GUIDE PAGE 62
Examples of Frequently Used Reports
Pending Applications and Applications Needing Binder/Initial Payment
You can run a report of submitted on-exchange and off-exchange qualified health plan applications that still require that important initial payment. To create a report of those needing to pay their first premium, follow these steps:
1. Go to the “Client Info” tab
2. Click on the “Create Report” link from the Reporting section.
3. Select “Application Status” and choose “Pending / In Progress” from the dropdown menu.
4. Click “Submit”.
5. Then, export your data. See page 65 for details on exporting data from your reports.
6. Repeat steps 1 and 2 above.
7. Select “Policy Status” and choose “Missing Binder Payment” from the dropdown menu.
8. Select optional filtering options from the “Product Name” section.
9. Repeat steps 4 and 5. These two reports will give you a complete picture of those needing support to get their applications completed and their policies effectuated.

9 Using Reports
07/24/2018 RETAIL PRODUCER PORTAL GUIDE PAGE 63
Examples of Frequently Used Reports (continued)
Multiple Plan Names You can select as many or as few plan names as needed from the product name drop down list for a report.
1. Select the “Create Report” link from the Reporting section of the Client Info tab.
2. Select “Policy Status” and choose, from the drop down list: All, Grace Period, Termed, Active or Missing Binder Payment.
3. Click on the product name drop down list. Select multiple plan names. In this example, all dental plans are chosen. You could use this feature to select by metallic level, network, product type and much more.
4. Click the “Submit” button.
You can select as many or as few plan names as needed from the drop down list. What ’s more, you can save the report parameters and run the report in the future at any time.
1.

9 Using Reports
07/24/2018 RETAIL PRODUCER PORTAL GUIDE PAGE 64
Using Book of Business Reports Book of Business reports are available to all General Agents and Agencies that have subproducers. For General Agents and Agencies with this access, they can select the Book of Business link from the Reporting section of the Client Info tab. Other producers will not see the “Book of Business” link. You can search and create reports for a specific producer by using the producer’s nine-digit producer number (as shown at right). You can also search your entire hierarchy. Additional options allow you to include subproducers, include dental business and filter by premium status. Filtering by premium status can be used for client outreach as non-payment can jeopardize coverage. You have several options sorting data as shown in the table at right. Only the first 1000 rows will display when the “Search” button is clicked. However, all results will be included when you click on the “Export All” or “Print All” buttons.

9 Using Reports
07/24/2018 RETAIL PRODUCER PORTAL GUIDE PAGE 65
Exporting Reports
It’s easy to print and/or export some or all of the data from any report.
1. Export Selected Rows: Select the rows that you’d like to export and click on the “Export Selected Rows” button. The data you selected is automatically saved to a Microsoft Excel spreadsheet file with the default filename of “AdvancedSearchResults.xls” and is downloaded to your computer’s download folder. Open the file and save it with an appropriate name to the location needed.
2. Print Selected Rows: Select the rows that you’d like to print. Then click on the “Print Selected Rows” button. All of the data that you selected will appear in print preview. Select the “Print” link in the top right corner to send the data to your printer. If you have Adobe Acrobat, you can also save the data to a PDF file.
3. Export All: All of the data in the table is automatically saved to a Microsoft Excel spreadsheet file with the default filename of “AdvancedSearchResults.xls” and downloaded to your computer’s download folder. Open the file and save it with an appropriate name to the location needed.
4. Print All: Click “Print All” and all of the data in the table will appear in a print preview window. Select the “Print” link in the top right corner to send the data to your printer. If you have Adobe Acrobat, you can also save the data to a PDF file.

10 Managing Documents & Questions n
07/24/2018 RETAIL PRODUCER PORTAL GUIDE PAGE 66
10 Managing Documents & Questions
Upload a Document You can submit documents via the portal in the following file types:
PDF JPG JPEG PNG GIF TIF BMP
All file types listed above, except for PDFs, are different types of image files. PDFs are typically created using Adobe Acrobat or Adobe Reader software. You can upload a file up to 10 MB (or 10,000 KB) in size. To reduce the size of an image file, lessen the resolution during scanning. Typically, JPG, JPEG, PNG and GIF image files are smaller in file size than TIF and BMP image files.

10 Managing Documents & Questions n
07/24/2018 RETAIL PRODUCER PORTAL GUIDE PAGE 67
Upload a Document (continued) To upload a document, Select the E-Communication tab and follow these steps:
1. In the “Document Submission” area, click on the “Document Submission” link.
2. An “Account Number” is optional.
3. The “E-App Number” field is also optional. You can submit documents for OFF EXCHANGE policies not yet effectuated.
4. Select an option from the “Document Type” drop down box:
Bank Draft Authorization Coverage changes New Business Application Other Documents Outstanding Requirements Rollover Application SEP Documentation Temporary Coverage Application Upgrades/Add Dependents
5. Click the “Browse” button and navigate to the file’s location. Select it. The filename will populate the “Location and Filename” field.
6. Click the “Submit” button.
7. You will then receive a Document Submission confirmation message. It displays the file name and tracking number you should retain for your records. Click the “OK” button.

10 Managing Documents & Questions n
07/24/2018 RETAIL PRODUCER PORTAL GUIDE PAGE 68
View Document Submissions
1. To view your documents, select the “E-Communication” tab.
2. Click on the “View Submitted Documents” link.
3. Submitted documents are displayed in a list format. The list provides a history only; documents cannot be viewed or accessed once submitted.
4. To delete a document submission, click the box next to the document in the list and select the “Delete Selected Rows” button. A message appears asking if you’re sure if you want to delete the message. Click the “OK” button to confirm.

10 Managing Documents & Questions n
07/24/2018 RETAIL PRODUCER PORTAL GUIDE PAGE 69
Submit a General E-Question
1. Select the “E-Communication” tab.
2. Choose the “New E-Question” link.
3. Select the “General E-Question” option for general questions not related to a specific member.
4. Enter a “Subject.”
5. Post your question.
6. Click on the “Submit” button.

10 Managing Documents & Questions n
07/24/2018 RETAIL PRODUCER PORTAL GUIDE PAGE 70
Submit a Member-Specific E-Question
1. Select the “E-Communication” tab.
2. Choose the “New E-Question” link.
3. Select the “Member Specific E-Question” option for questions related to a specific member.
4. Enter the required information for the member/client.
5. Enter a “Subject.”
6. Post your question.
7. Click on the “Submit” button.
8. You’ll receive a confirmation message. Click the “OK” button.

10 Managing Documents & Questions n
07/24/2018 RETAIL PRODUCER PORTAL GUIDE PAGE 71
Delete an E-Question If you submitted an E-Question that is no longer relevant or is incorrect, you can easily delete it.
1. Select “E-Communication” tab.
2. Choose the “View My E-Questions” link.
3. Select the box beside the E-Question you want to delete.
4. Select the “Delete Selected Rows” button.
5. When the confirmation box appears, click “OK.”

11 Changing Account Information
07/24/2018 RETAIL PRODUCER PORTAL GUIDE PAGE 72
11 Changing Account Information The Edit Profile feature enables you to change your agency listing information or account password.
Edit Your Profile If you accidentally set up your profile with wrong information, or need to change it for any reason, follow these steps.
1. Click on “Account,” located in the top right area of the Retail Producer Portal application window.
2. Select the “Edit Profile” option menu item from the dropdown list.
3. Update any of the following information:
• Company Name
• Address
• Phone
• Email Address
You cannot edit your Name or nine-digit producer ID number.
4. Once complete, click on the “Update Profile” button. A message appears that your profile has been updated. Click the “Back to Profile Page” button.

11 Changing Account Information
07/24/2018 RETAIL PRODUCER PORTAL GUIDE PAGE 73
Change Your Password
1. Click on “Account,” located in the top right area of the Retail Producer Portal application window.
2. Select the “Edit Profile” option menu item from the dropdown list.
3. Enter your current password.
4. Enter your new password.
• The password must be six to nine characters.
• The password can only contain letters and/or numbers; no special characters.
• If you select letters, the letters can be lower case, upper case or a mix of both.
5. Confirm your new password.
6. Click on the “Update Password” button.
7. After updating your password, a message appears that your profile has been updated. Click the “Back to Profile Page” button.

12 Contact Information & Resources
07/24/2018 RETAIL PRODUCER PORTAL GUIDE PAGE 74
12 Contact Information & Resources
Producer Services for Major Medical
Il l inois 888-313-5526 Montana 855-454-7109 New Mexico 888-222-0572 Oklahoma 888-399-9394 Texas 888-697-0679 State Farm Agents 877-699-5849
Producer Services for Medicare Supplement
Il l inois 800-538-0382 Montana 855-258-8475 New Mexico 800-307-8144 Oklahoma 800-522-9266 Texas 800-366-4236
Producer Service Center The Producer Service Center supports our producers on issues around:
• Producer of record corrections and change requests • Commissions • Appointments and licensing • MAPD/PDP certifications and FFM registration • Account changes such as address, phone number and email address
Contact the Producer Service Center at 855-782-4272 or by email at [email protected]. Most issues can be resolved via our online producer services tool. Log into Blue Access for ProducersSM and click on the “Producer Services” link for options.