restone user manual 2016 - restone – bases...
TRANSCRIPT

MANUAL DE INSTALAÇÃO BASES DE DUCHESHOWER TRAY’S INSTALLATION GUIDE
RESTONE
RESTONE

RESTONEMANUAL DE INSTALAÇÃO BASES DE DUCHE
Para uma correta aplicação, uso e manutenção deste produto, leia atentamente este Manual. Armazenar a base de duche sempre em posição horizontal para evitar danos na peça.No caso de necessitar de ajustar as medidas da base que adquiriu ao espaço que a vai receber, saiba que esta pode ser facilmente cortada com uma rebarbadora utilizando um disco de diamante, sem que tal altere a sua estabilidade estrutural.Antes de iniciar o processo de instalação certifique-se que tem à sua disposição todos os materiais necessários para colagem e vedação.Para a colagem da base de duche à base de suporte utilize Cola e Veda de poliuretano monocomponente para exterior (PU) ou Cola e Veda de polímero (MS). (Não usar cimentos cola).Para vedar as juntas de dilatação entre a base e as paredes de contacto, bem como para proceder à vedação por baixo da base utilize um vedante, à cor desejada, indicado para ambientes húmidos, que garanta total estanqueidade.Deve ainda ser um vedante anti fungos, antibacteriano e de elasticidade permanente. (Não use materiais ácidos, apenas neutros).Para uma correta instalação da sua base de duche, deve ter em atenção que a base de suporte sobre a qual assenta deve estar perfeitamente nivelada, seca e limpa de impurezas.Esta base de suporte deve ser preparada com massas sólidas e firmes (com uma argamassa à base de cimento) e não de areia ou de massa podre. Deve ainda deixar uma abertura para a instalação da respetiva tubagem e válvula de esgoto.A tubagem acima referida deve ter uma inclinação mínima de dois por cento para assegurar o bom escoamento da água.Deve certificar-se que não existem fugas de água, ou seja, que o escoamento decorre sem anomalias.Certifique-se também que o nível desta tubagem e respetiva válvula não se encontra acima do nível da base de suporte. Caso contrário a base de duche não assentará corretamente.Após verificação dos pontos acima mencionados poderá tapar parcialmente o rasgo da tubagem de esgoto.
Antes de instalar a sua base de duche deve verificar se não existem defeitos ou anomalias na superfície da mesma.No caso de detetar qualquer espécie de deficiência na peça, não deve proceder à sua instalação mas sim contactar o respetivo distribuidor. Caso contrário a Restone não assumirá qualquer responsabilidade de reparação ou devolução.
No momento da desembalagem da base de duche, deve utilizar o cartão que a envolve para proteger a sua superfície durante toda a instalação da mesma.A película transparente que cobre a base também deve ser retirada para verificação do bom estado da peça.Antes da colocação da base de duche deve aplicar uma quantidade generosa de vedante em todas as paredes que estabelecem contacto com a base para evitar possíveis infiltrações de água. De seguida colocar a junta de borracha da válvula em todo o interior do orifício de esgoto da base de duche.Posteriormente deve aplicar Cola e Veda no verso da base de duche. Aconselhamos a colocação de um cordão de Cola e Veda no orifício da válvula, nas laterais da peça e, por último, tiras de Cola e Veda, colocadas na horizontal, de uma extremidade à outra, com um espaçamento entre as mesmas de cerca de dez centímetros. (Não aplicar com cimentos cola).É imprescindível deixar uma junta de dilatação mínima de 5mm em todo o perímetro da base de duche que estará em contacto com as paredes.(No caso de aplicar qualquer tipo de revestimento de parede não deixar que este entre em contacto direto com a base de duche. Deixe uma junta de dilatação mínima de 5mm).De seguida aplicar a argola de aço inox, fazendo coincidir os três parafusos com as porcas da válvula.Por último utilizar uma chave de aperto exercendo pressão com o objetivo de a deixar corretamente apertada.Note que caso já tenha instalado um sifonamento, para além daquele que tem agora colocado na sua base de duche, terá de retirar, ou o copo da válvula da base, ou a curva do sifão de pátio. Caso contrário, o fluxo de água estará comprometido.Mantendo a base protegida, force a aderência da mesma à Cola e Veda, verificando se está devidamente nivelada.A junta de dilatação deve ser vedada com um vedante elástico recomendado para conseguir a correta estanqueidade entre a base de duche e as paredes de contacto com a mesma, bem como com o piso da base de suporte. (Não usar materiais ácidos, usar materiais neutros).Esta junta deve ser vedada com material elástico (e não com cimentos rígidos).(O vedante aplicado terá de secar durante um período mínimo de 24h, sendo que, durante este período, é impreterível não molhar a base de duche).Antes de aplicar qualquer tipo de revestimento e de colocar um resguardo, ou qualquer outro material fixo em cima da base, deve verificar a correta instalação da mesma e comprovar o correto escoamento da água.Na limpeza e manutenção da sua base use detergentes de ph neutro, esponjas ou panos suaves.Nunca usar produtos abrasivos e dissolventes (como acetona, álcool, diluentes, ácidos, amoníacos, colorantes de cabelo, cloro, entre outros.)Para limpeza de manchas difíceis use uma esponja de fibra branca e o nosso produto Resclean .No final, seque sempre a sua base removendo qualquer traço de produto de limpeza.
Todos os nossos produtos estão garantidos de acordo com a Normativa Europeia vigente.Nota: A Restone não se responsabiliza pela incorreta e inapropriada instalação das suas bases, bem como pelo uso inadequado do respetivo produto. Por conseguinte, não assumirá custos inerentes às eventuais necessidades de substituição da sua base de duche como consequência do seu uso indevido e incorreta instalação.
www.restone.pt
01
PT

RESTONESHOWER TRAY’S INSTALLATION GUIDE
For the correct fit, use and maintenance, of Restone shower tray’s, please read carefully this guide. Always lay down the shower tray in a horizontal position to prevent damage.In case you need to adapt the shower tray’s measures to the pretended place, you should know that you might easily cut it whit a grinder using a diamond blade. It will not change its initial structure and stability.Before starting the installation process make sure that you have all the required materials to glue and seal.To glue the floor to the shower tray´s subfloor, please use a polyurethane glue – PUR or MS. (Do not use cement glue).To seal the expansion joints between the shower tray and the contact walls, as well as to seal it to sub floor, use a sealant of a desired colour, required for moist environments – a sealant that o�ers complete watertightness.It also must be an anti-fungal and anti-bacterial sealant with permanent elasticity. (Do not use acidic materials, only neutral materials).For a correct fit of your shower tray, the sub floor must be levelwise perfect, well dry and free from any impurities.This sub floor must be prepared with cement (solid and firm). Do not use sand or any “rotten mass”. Leave a gap to install the pipes and the drainage valve.The pipes must have a slope of at least 2% to ensure an excellent water drain. Check for leaks in water pipes.Also ensure that pipes and drainage valve are not installed directly over the cement.Not doing this mean that shower tray will not seat properly.After that you can partially fill the space around the gap.Before installing your shower tray ensure that there isn't any damaged.If you detect any anomaly on your shower tray, please don’t install it. Contact your distributor reporting it. Otherwise, Restone will decline any responsibility for it and will not replace it for a new one.
When unpacking your shower tray use your package cartoon on top of the tray in order to protect it from any damage, using this procedure in all assembly proccess.To ensure the good condition of the tray, please remove the cover transparent film on top of it. Before fitting the shower tray, apply a generous amount of sealant in all walls in contact with it, to avoid water infiltrations.After apply the valve joint rubber r ing inside the drainage valve hole of your shower tray. After that apply polyurethane glue on the back of the shower tray.We advise a continuous bead of polyurethane glue around the valve port, on the boards and glue trips, in the horizontal, from one end to the other, with ten centimeters space between them. (Do not apply adhesive cements).You must leave an expansion joint, (at least) of 5mm, around all shower tray perimeter that is in contact with any wall.If you apply any type of wall covering don’t let it in direct contact with your shower tray. Leave an expansion joint, (at least) of 5mm. After, apply the stainless steel´s ring matching each three screws with the nut valves. Tighten the screws correctly.If you had the siphon hose installed before, besides the one you have now installed on your shower tray, you will have to take of the cup valve or the siphon curve of the yard. If you don’t do it, the water flow will be a�ected.Keep the shower tray protected and then force the polyurethane glue to “stick” in the shower tray. Check if it´s level wise. The expansion joint must be sealed with an elastic sealant recommended to ensure the correct water tightness between the shower tray and the contact walls. (Don’t use acidic materials, only neutral materials).This expansion joint must be sealed with elastic materials, not with tight cements.The sealant applied has to dry during twenty four hours. During this time you can´t wet the shower tray.Before applying any kind of ceramic coating and any screen, or any other material on the top of the tray, be sure that your shower tray is correctly fitted and that there is no problem with the water drain.Clean and maintain your shower tray using ph neutral detergents, soft sponges and soft wiping cloths.Do not use abrasive products and solvents (acetone, alcohol, diluents, acids, ammonia, hair dye, chlorine, among others).To clean any hard stains use a white fiber sponge and our Resclean product.In the end, always dry your shower tray removing any trace of cleaning products.
All of our products are guaranteed according to current European norms.PLEASE NOTE: RESTONE™ is not responsible for the incorrect and inappropriate assembly and fitting of its shower trays, nor does it take any responsibility for the inadequate use of the respective product. Therefore, RESTONE™ will not take on any inherent costs to the possible substitution needs of your shower tray as consequence of its inadequate use and incorrect installation requirements.
www.restone.pt
02
EN

RESTONE
Ø90
6030
(mm)
x1BaseShower Tray
Grelha ou TampaGrid
Válvula Ø90Drainage valve Ø90
x1
x1
FERRAMENTAS NECESSÁRIAS PARA A APLICAÇÃO DA BASENECESSARY TOOLS TO FIT YOUR TRAY
SHOWER TRAY AND PARTSBASE DE DUCHE E COMPONENTES
Corte a SecoDry Cut
Nível Chave de cruz
www.restone.pt
Pistola de Colagem Fita métricaLevel Spanner wrench Glue Gun Tape measure Ø230mm
03

PREPARING THE FLOOR SUPPORTPREPARAÇÃO DA BASE DE SUPORTE
1
Utilizar uma argamassa sólida e firme.Deixar a base de suporte perfeitamente nivelada, seca e limpa, com abertura para válvula e tubagem.
1. 2.
www.restone.pt
180mm
60mm50mm
180mm
AREIASAND
CIMENTO
CEMENT
± 0 mm
Abertura para válvulaOpening for drainage valve
Use a solid and firm cement mortar.The sub floor must be levelwise perfect, well dry and clean. Leave a gap to install the pipes and the drainage valve.
04

DRAIN VALVE INSTALLATIONINSTALAÇÃO DA VÁLVULA DE ESGOTO
2
Na colocação da válvula verifique se esta coincide com o eixo do orifício da base de duche.O tubo de esgoto que liga à válvula deve ter, no mínimo, 2% de inclinação.
During the drainage valve installation, be sure it matches perfectly with the shower tray´s hole.The drain valve connection pipe must have a slope of at least 2%.
www.restone.pt
Min.60 mm
Min.2%
05
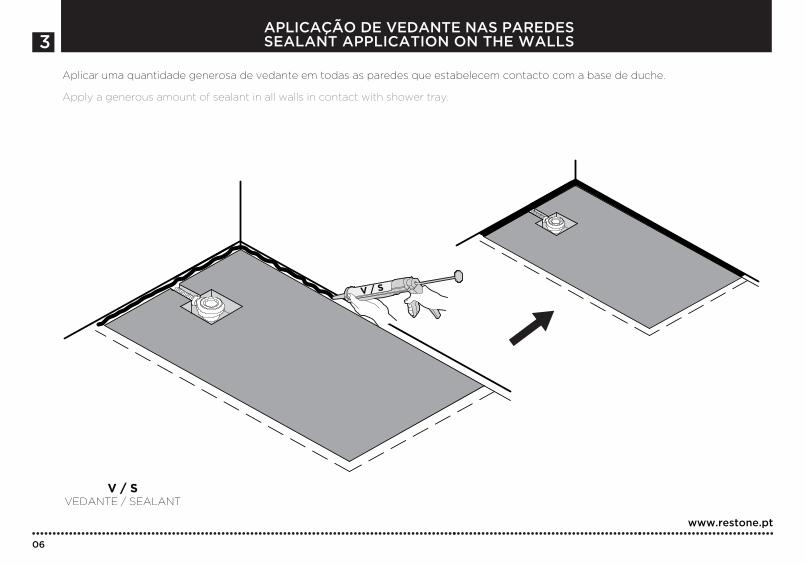
SEALANT APPLICATION ON THE WALLSAPLICAÇÃO DE VEDANTE NAS PAREDES
3
Aplicar uma quantidade generosa de vedante em todas as paredes que estabelecem contacto com a base de duche.
Apply a generous amount of sealant in all walls in contact with shower tray.
www.restone.pt
V / S
06
V / SVEDANTE / SEALANT

APPLYING POLYURETHANE GLUE IN THE BACK OF TRAYAPLICAÇÃO DE COLA E VEDA NO VERSO DA BASE DE DUCHE
4
Colocar primeiro a junta de borracha da válvula em todo o interior do orifício do esgoto da base de duche.A posteriori aplicar Cola e Veda no verso da base de duche, colocando-a então sobre a base de suporte.(Não esqueça de deixar uma junta de dilatação mínima de 5 mm em todo o perímetro da base que estará em contacto com as paredes.)
First apply the valve joint rubber ring inside the drainage valve hole of your shower tray.After that apply polyurethane glue on the back of the shower tray and then place it on the subfloor.(Please don’t forget to leave an expansion joint, (at least) of 5mm, around all shower tray perimeter in contact with walls.)
www.restone.pt
1. 2.
C.V. / P.G.
07
C.V. / P.G.COLA E VEDA / POLYURETHANE GLUE

FINISHING DRAIN VALVE ASSEMBLYFINALIZAÇÃO DA APLICAÇÃO DA VÁLVULA
5
Comece por proteger a sua base com o cartão que a embalou.De seguida aplicar a argola de aço inox.
Protect your shower tray by using the package cartoon on top of it.After apply the stainless steel ring.
www.restone.pt
Image of correct drain valve assembly
Pormenor final da correctaaplicação da válvula
08
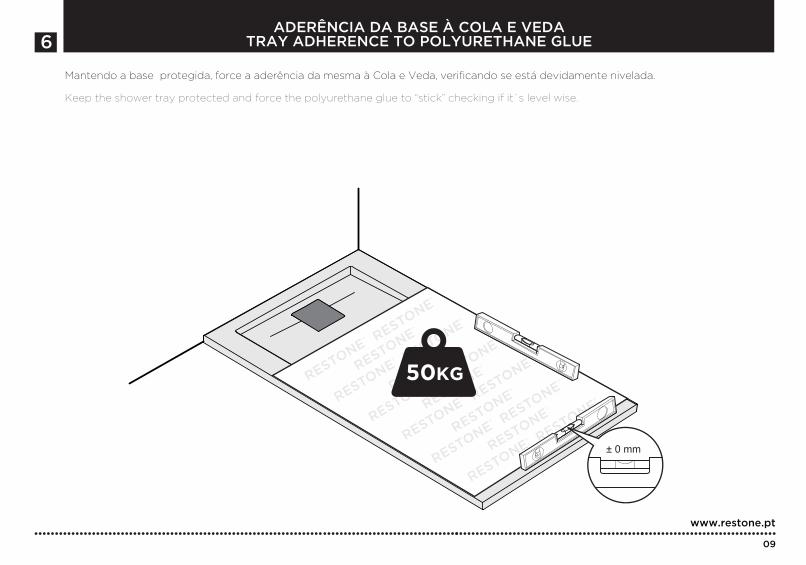
TRAY ADHERENCE TO POLYURETHANE GLUEADERÊNCIA DA BASE À COLA E VEDA
6
Mantendo a base protegida, force a aderência da mesma à Cola e Veda, verificando se está devidamente nivelada.
Keep the shower tray protected and force the polyurethane glue to “stick” checking if it´s level wise.
www.restone.pt
± 0 mm
09

SEALANT APPLICATIONAPLICAÇÃO DO VEDANTE
7
Aplicar o vedante elástico recomendado para conseguir a correta estanqueidade entre a base de duche e as paredes de contacto com a mesma, bem como com o piso da base de suporte.
Desta forma garante a ausência de infiltrações através das laterais da base e por baixo da mesma.
Apply the recommended elastic sealant to ensure the correct water tightness between the shower tray and contact walls as well with the subfloor.
This procedure will avoid any lateral and underneath water infiltrations in your shower tray.
www.restone.pt
24h
20 MAX.
V / S
V / S
V / S
V / S
10
V / SVEDANTE / SEALANT
V / S
V / S
V / S
5 mm MIN.
5 mm MIN.
5 mm MIN.

SEALING AND GLUING MATERIALSMATERIAIS PARA COLAGEM E VEDAGEM
8Para colagem da base de duche à base de suporte utilize Cola e Veda de poliuretano monocomponente para exterior (PU) ou Cola e Veda de polímero (MS). (Não usar cimentos cola).Para vedar utilize um vedante, à cor desejada, indicado para ambientes húmidos, que garanta total estanqueidade.Deve ainda ser um vedante anti fungos, antibacteriano e de elasticidade permanente. (Não usar vedantes ácidos - apenas neutros).
To glue the shower tray bottom to the support base, please use a polyurethane glue – PUR or MS. (Do not use cement glue).To seal use a sealant, of your desired colour, required for moist environments, that o�ers complete watertightness.It also must be an anti-fungal and anti-bacterial sealant with permanent elasticity. (Do not use acidic materials, only neutral materials).
www.restone.pt
11
COLA E VEDAPOLYURETHANE GLUE
SELANTESEALANT
VEDANTES ÁCIDOSACIDIC SEALANT
CIMENTO COLACEMENT GLUE
CIMENTO
CEMENT

CLEANING AND MAINTENANCELIMPEZA E MANUTENÇÃO
9Use detergentes de ph neutro, esponjas ou panos suaves.Nunca usar produtos abrasivos e dissolventes (como acetona, álcool, diluentes, cloro, amoníacos, colorantes de cabelo, entre outros).Para limpeza de manchas difíceis use uma esponja de fibra branca e o nosso produto Resclean.
Use ph neutral detergentes, soft sponges and soft wiping cloths.Do not use abrasive products and solvents (acetone, alcohol, diluents, acids, ammonia, hair dye, chlorine,among others).To clean any hard stains use a white fiber sponge and our Resclean product.
www.restone.pt
Resclean PH
Neutro
HARD
12

RESTONE

www.restone.pt