reportcaster html user interface manual - blujay...
TRANSCRIPT
ReportCaster HTML User Interface ManualVersion 7 Release 7.03
DN4501104.0511
Cactus, EDA, EDA/SQL, FIDEL, FOCUS, Information Builders, the Information Builders logo, iWay, iWay Software,Parlay, PC/FOCUS, RStat, TableTalk, Web390, and WebFOCUS are registered trademarks, and DataMigrator andMagnify are trademarks of Information Builders, Inc.
Adobe, the Adobe logo, Acrobat, Adobe Reader, Flash, Adobe Flash Builder, Flex, and PostScript are either registeredtrademarks or trademarks of Adobe Systems Incorporated in the United States and/or other countries.
Due to the nature of this material, this document refers to numerous hardware and software products by theirtrademarks. In most, if not all cases, these designations are claimed as trademarks or registered trademarks by theirrespective companies. It is not this publisher’s intent to use any of these names generically. The reader is thereforecautioned to investigate all claimed trademark rights before using any of these names other than to refer to theproduct described.
Copyright © 2011, by Information Builders, Inc. and iWay Software. All rights reserved. Patent Pending. This manual,or parts thereof, may not be reproduced in any form without the written permission of Information Builders, Inc.
WebFOCUS
Contents
Preface................................................................................................................7Documentation Conventions..............................................................................................8
Related Publications..........................................................................................................9
Customer Support.............................................................................................................9
Information You Should Have.............................................................................................9
User Feedback................................................................................................................11
Information Builders Consulting and Training.....................................................................11
1. Using the Single Page Scheduling Tool.........................................................13About the Single Page Scheduling Tool.............................................................................14
Creating a Schedule Using the Scheduling Tool.................................................................17
Distribution Options in the Single Page Scheduling Tool.....................................................21
Distributing Scheduled Output Using E-mail in the Single Page Scheduling Tool............21
Distributing Scheduled Output to a Printer in the Single Page Scheduling Tool..............26
Distributing Scheduled Output to MR in the Single Page Scheduling Tool.....................27
Distributing a Report to the Report Library in the Single Page Scheduling Tool..............29
Frequency Options in the Single Page Scheduling Tool.......................................................33
The Once Run Interval in the Single Page Scheduling Tool..........................................34
The Minutes Run Interval in the Single Page Scheduling Tool......................................34
The Hourly Run Interval in the Single Page Scheduling Tool.........................................35
The Daily Run Interval in the Single Page Scheduling Tool...........................................35
The Weekly Run Interval in the Single Page Scheduling Tool........................................36
The Monthly Run Interval in the Single Page Scheduling Tool......................................36
The Yearly Run Interval in the Single Page Scheduling Tool.........................................38
The Custom Run Interval in the Single Page Scheduling Tool.......................................38
Applying a Secondary Run Interval in the Single Page Scheduling Tool.........................39
Report Options................................................................................................................40
Report Formats.......................................................................................................42
Report Parameters..................................................................................................43
ReportCaster HTML User Interface Manual 3

Notification Options in the Single Page Scheduling Tool.....................................................48
Setting On Error and Always Notification in the Single Page Scheduling Tool.................48
2. Using the Scheduling Wizard.........................................................................51Overview.........................................................................................................................52
Schedule Options............................................................................................................53
Creating a Secondary Run Interval............................................................................58
Report Information..........................................................................................................60
Report Parameters..........................................................................................................63
Distribution Options in the Scheduling Wizard....................................................................71
Distributing a Report Using E-mail in the Scheduling Wizard........................................72
Distributing a Report to a Printer in the Scheduling Wizard..........................................85
Distributing a Report to Managed Reporting in the Scheduling Wizard..........................87
Distributing a Report to the Report Library in the Scheduling Wizard............................90
Priority, Notification, and Zip File Options..........................................................................96
Running a Schedule Without Saving It...............................................................................99
3. Working With Distribution Lists in the HTML User Interface.......................101Accessing the Distribution or Address Book List Interface................................................102
Creating a Distribution or Address Book List....................................................................103
Editing a Distribution List...............................................................................................110
Deleting a Distribution List.............................................................................................111
4. Maintaining a Schedule Using the HTML User Interface..............................113About the Schedules Interface.......................................................................................114
Editing a Schedule in the HTML User Interface................................................................115
Cloning a Schedule.......................................................................................................117
Deleting a Schedule......................................................................................................119
Viewing a Log Report.....................................................................................................120
Purging the Log File.......................................................................................................125
Schedule Blackout Dates...............................................................................................127
Checking the Status of a Scheduled Job.........................................................................130
Creating, Updating, and Deleting an Execution ID............................................................131
5. Using the Report Library from the HTML Interface......................................135About the Report Library................................................................................................136
4 WebFOCUS
Contents
Creating and Maintaining a Library Access List................................................................136
Creating and Maintaining a Library Access List in the HTML User Interface........................136
Accessing the Report Library..........................................................................................139
Viewing Library Content.................................................................................................142
Viewing On-demand Paging Reports........................................................................148
Using the Library Watch List...........................................................................................153
Deleting Content From the Library...................................................................................157
Searching for Library Content.........................................................................................158
PDF Drill Through Support..............................................................................................161
Reader Comments...........................................................................................167
ReportCaster HTML User Interface Manual 5
Contents
6 WebFOCUS
Contents
WebFOCUS
Preface
This documentation describes the HTML User Interface of ReportCaster.
Documentation Enhancements
In Version 7 Release 7.03, the ReportCaster documentation was reorganized to align it withhow the user accesses the product on the Bindows™ platform. The user can access threeinterfaces on the Bindows platform: ReportCaster Administration, ReportCaster Development,and ReportCaster Library Content. These three interfaces are now documented in twomanuals. The ReportCaster Administration manual describes the ReportCaster Administrationinterface, and the ReportCaster Development and Library Content manual describes theReportCaster Development and ReportCaster Library Content interfaces. Additionally, wemoved legacy information into two other manuals, ReportCaster Administration Applet Versionand ReportCaster HTML User Interface. This simplified documentation model streamlinesthe documentation and eliminates duplicate information.
How This Manual Is Organized
This manual includes the following chapters:
ContentsChapter/Appendix
Explains how to use the single page Scheduling Toolto create a ReportCaster schedule.
Using the Single PageScheduling Tool
1
Describes how to schedule a report using theScheduling Wizard.
Using the Scheduling Wizard2
Discusses how to create, edit, and delete aDistribution List using the HTML User Interface.
Working With DistributionLists in the HTML UserInterface
3
Discusses how to edit the properties of a schedule,clone a schedule, delete a schedule, check the statusof a schedule, or run a log report to obtain informationabout a schedule. Describes purging log records andhow to create, update, and delete your Execution IDs.
Maintaining a ScheduleUsing the HTML UserInterface
4
ReportCaster HTML User Interface Manual 7

ContentsChapter/Appendix
Describes using the Report Library, a storage andretrieval facility for ReportCaster output, from theHTM Interface. Provides information about creatingand maintaining Library Access Lists, and viewingLibrary Content.
Using the Report Libraryfrom the HTML Interface
5
Documentation ConventionsThe following table lists and describes the conventions that apply in this manual.
DescriptionConvention
Denotes syntax that you must enter exactly as shown.THIS TYPEFACE
or
this typeface
Represents a placeholder (or variable) in syntax for a value thatyou or the system must supply.
this typeface
Indicates a default setting.underscore
Represents a placeholder (or variable), a cross-reference, or animportant term. It may also indicate a button, menu item, ordialog box option you can click or select.
this typeface
Highlights a file name or command.this typeface
Indicates keys that you must press simultaneously.Key + Key
Indicates two or three choices; type one of them, not the braces.{ }
Indicates a group of optional parameters. None are required,but you may select one of them. Type only the parameter in thebrackets, not the brackets.
[ ]
Separates mutually exclusive choices in syntax. Type one ofthem, not the symbol.
|
Indicates that you can enter a parameter multiple times. Typeonly the parameter, not the ellipsis points (...).
...
8 WebFOCUS
Documentation Conventions
DescriptionConvention
Indicates that there are (or could be) intervening or additionalcommands.
.
.
.
Related PublicationsTo view a current listing of our publications and to place an order, visit our TechnicalDocumentation Library, http://documentation.informationbuilders.com. You can also contactthe Publications Order Department at (800) 969-4636.
Customer SupportDo you have any questions about this product?
Join the Focal Point community. Focal Point is our online developer center and more than amessage board. It is an interactive network of more than 3,000 developers from almostevery profession and industry, collaborating on solutions and sharing tips and techniques,http://forums.informationbuilders.com/eve/forums.
You can also access support services electronically, 24 hours a day, with InfoResponseOnline. InfoResponse Online is accessible through our World Wide Web site,http://www.informationbuilders.com. It connects you to the tracking system and known-problem database at the Information Builders support center. Registered users can open,update, and view the status of cases in the tracking system and read descriptions of reportedsoftware issues. New users can register immediately for this service. The technical supportsection of www.informationbuilders.com also provides usage techniques, diagnostic tips,and answers to frequently asked questions.
Call Information Builders Customer Support Service (CSS) at (800) 736-6130 or (212) 736-6130. Customer Support Consultants are available Monday through Friday between 8:00a.m. and 8:00 p.m. EST to address all your questions. Information Builders consultants canalso give you general guidance regarding product capabilities and documentation. Pleasebe ready to provide your six-digit site code number (xxxx.xx) when you call.
To learn about the full range of available support services, ask your Information Buildersrepresentative about InfoResponse Online, or call (800) 969-INFO.
Information You Should HaveTo help our consultants answer your questions effectively, be prepared to provide the followinginformation when you call:
ReportCaster HTML User Interface Manual 9
Preface

Your six-digit site code (xxxx.xx).
Your WebFOCUS configuration:
The front-end you are using, including vendor and release.
The communications protocol (for example, TCP/IP or HLLAPI), including vendor andrelease.
The software release.
Your server version and release. You can find this information using the Version optionin the Web Console.
The stored procedure (preferably with line numbers) or SQL statements being used inserver access.
The Master File and Access File.
The exact nature of the problem:
Are the results or the format incorrect? Are the text or calculations missing ormisplaced?
The error message and return code, if applicable.
Is this related to any other problem?
Has the procedure or query ever worked in its present form? Has it been changed recently?How often does the problem occur?
What release of the operating system are you using? Has it, your security system,communications protocol, or front-end software changed?
Is this problem reproducible? If so, how?
Have you tried to reproduce your problem in the simplest form possible? For example, ifyou are having problems joining two data sources, have you tried executing a querycontaining just the code to access the data source?
Do you have a trace file?
How is the problem affecting your business? Is it halting development or production? Doyou just have questions about functionality or documentation?
10 WebFOCUS
Information You Should Have
User FeedbackIn an effort to produce effective documentation, the Documentation Services staff welcomesyour opinions regarding this manual. Please use the Reader Comments form at the end ofthis manual to communicate suggestions for improving this publication or to alert us tocorrections. You can also use the Documentation Feedback form on our Web site,http://documentation.informationbuilders.com/feedback.asp.
Thank you, in advance, for your comments.
Information Builders Consulting and TrainingInterested in training? Information Builders Education Department offers a wide variety oftraining courses for this and other Information Builders products.
For information on course descriptions, locations, and dates, or to register for classes, visitour World Wide Web site (http://www.informationbuilders.com) or call (800) 969-INFO tospeak to an Education Representative.
ReportCaster HTML User Interface Manual 11
Preface

12 WebFOCUS
Information Builders Consulting and Training
WebFOCUS
Using the Single Page Scheduling Tool1Topics:
If you configure ReportCaster to use thesingle page Scheduling Tool rather thanthe standard Scheduling tool, then usethis section for details on creatingReportCaster schedules with the singlepage Scheduling tool.
About the Single Page Scheduling Tool
Creating a Schedule Using theScheduling Tool
Distribution Options in the Single PageScheduling Tool
Frequency Options in the Single PageScheduling Tool
Report Options
Notification Options in the Single PageScheduling Tool
ReportCaster HTML User Interface Manual 13
About the Single Page Scheduling ToolThe single page Scheduling Tool provides the full scheduling function of ReportCasterpresented in a unified user interface. Using the Developer Studio HTML Composer Tool, youcan add a schedule button to an HTML form that will open the ReportCaster single pageScheduling Tool. For details on adding the Schedule button to a form, see the Designing aUser Interface for a Web Application With the HTML Composer manual. The single pageScheduling Tool also opens from the WebFOCUS Business Intelligence Dashboard when youright-click a report and select Schedule.
Note: Using this tool, you can only schedule Managed Reporting Standards Reports and Myreports.
You can customize the Scheduling Tool user interface through the use of a template assignedto the Schedule button at development time. For example, you can set the form to omitcertain sections, expand or collapse certain sections, assign default values to specific fields,control the contents of a drop-down list, and show check boxes checked or unchecked. TheReportCaster developer customizes the Scheduling Tool. If you are a ReportCaster developer,contact Information Builders Customer Support Services for information about customizingthe Scheduling Tool.
14 WebFOCUS
About the Single Page Scheduling Tool

The following image shows the Scheduling Tool user interface (using a template suppliedby Information Builders).
The Scheduling Tool is partitioned into the following sections:
Distribution. Provides a drop-down list of distribution methods and the correspondingdistribution options. The Scheduling Tool template you select when creating the Schedulebutton can limit the choices in the Distribution drop-down list.
Frequency. Provides the options related to the time interval to run the schedule.
ReportCaster HTML User Interface Manual 15
1. Using the Single Page Scheduling Tool
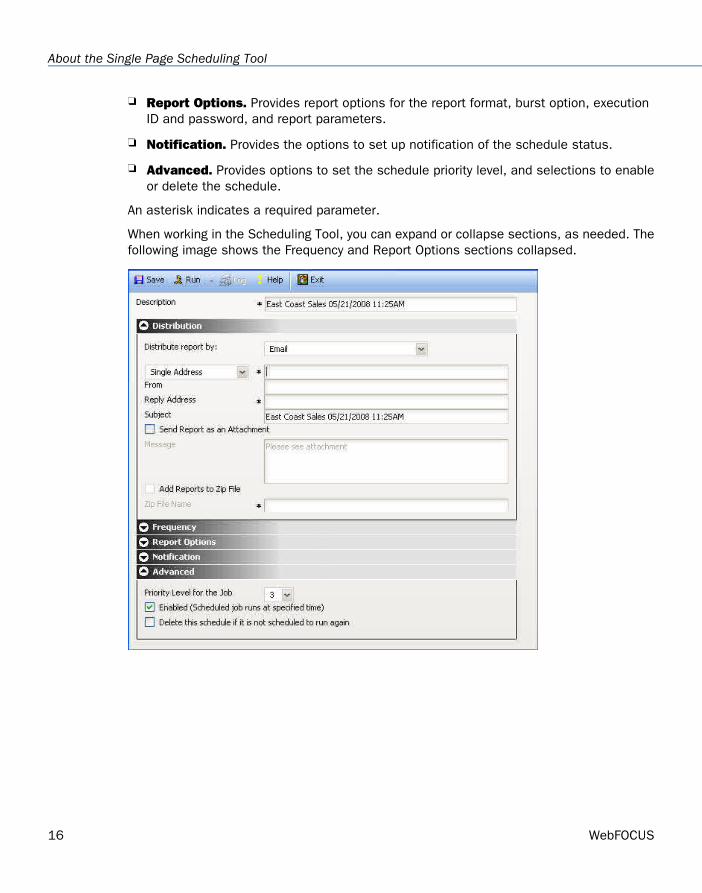
Report Options. Provides report options for the report format, burst option, executionID and password, and report parameters.
Notification. Provides the options to set up notification of the schedule status.
Advanced. Provides options to set the schedule priority level, and selections to enableor delete the schedule.
An asterisk indicates a required parameter.
When working in the Scheduling Tool, you can expand or collapse sections, as needed. Thefollowing image shows the Frequency and Report Options sections collapsed.
16 WebFOCUS
About the Single Page Scheduling Tool
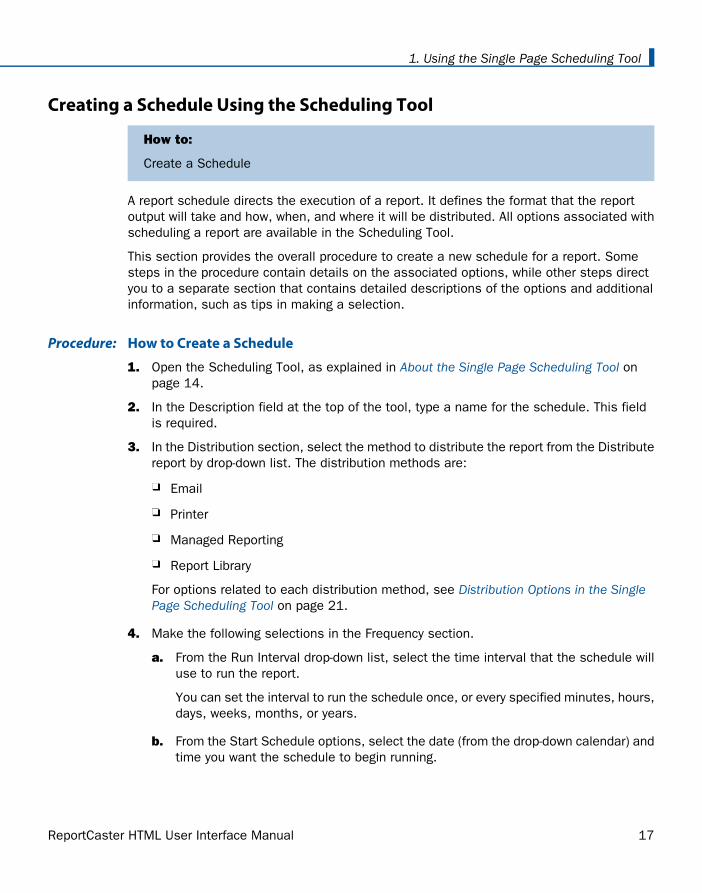
Creating a Schedule Using the Scheduling Tool
How to:
Create a Schedule
A report schedule directs the execution of a report. It defines the format that the reportoutput will take and how, when, and where it will be distributed. All options associated withscheduling a report are available in the Scheduling Tool.
This section provides the overall procedure to create a new schedule for a report. Somesteps in the procedure contain details on the associated options, while other steps directyou to a separate section that contains detailed descriptions of the options and additionalinformation, such as tips in making a selection.
How to Create a ScheduleProcedure:
1. Open the Scheduling Tool, as explained in About the Single Page Scheduling Tool onpage 14.
2. In the Description field at the top of the tool, type a name for the schedule. This fieldis required.
3. In the Distribution section, select the method to distribute the report from the Distributereport by drop-down list. The distribution methods are:
Printer
Managed Reporting
Report Library
For options related to each distribution method, see Distribution Options in the SinglePage Scheduling Tool on page 21.
4. Make the following selections in the Frequency section.
a. From the Run Interval drop-down list, select the time interval that the schedule willuse to run the report.
You can set the interval to run the schedule once, or every specified minutes, hours,days, weeks, months, or years.
b. From the Start Schedule options, select the date (from the drop-down calendar) andtime you want the schedule to begin running.
ReportCaster HTML User Interface Manual 17
1. Using the Single Page Scheduling Tool
Note: To change the time setting, select either the hour or minutes and use thearrows to increase or decrease the value.
c. If applicable, from the End Schedule options, select the date and time you want theschedule to stop running.
d. If applicable, from the Every option, use the up and down arrows to set the numberof times you want the schedule to run for the selected interval, for example, threetimes each month.
e. Select the remaining options associated with the chosen run interval. For adescription of the run interval options, see Frequency Options in the Single PageScheduling Tool on page 33.
5. In the Report Options section:
a. Select the format of the report. The valid formats are AHTML, ALPHA, COM, COMMA,COMT, DFIX, DHTML, DOC, EXCEL, EXL2K TEMPLATE, EXL2K, EXL2K FORMULA,EXL2K PIVOT, EXL97, Flash, GIF, HTML, HTML ODP, JPEG, PDF, PNG, PPT, PPTTemplate, PS, SVG, TAB, TABT, VISDIS, WK1, WP, and XML. For information on theseformats, see the ReportCaster Administration manual.
b. Select whether or not you want to burst the report.
c. If needed, change the value of an existing report parameter.
For details on changing a report parameter, see Report Parameters on page 43.
6. In the Notification section, select whether or not you want to send a notification whenthe schedule runs and under what conditions to send it. The notification options are:
Never.
Always. Send a notification each time the schedule runs.
On Error. Only send a notification when there is an error running the schedule.
7. In the Advanced Options section, select the following options:
Priority Level for the Job. Use the drop-down list to select the priority for runningthe job, with 1 being the highest priority and 5 the lowest priority. The default prioritylevel is 3.
The ReportCaster Distribution Server queue sorts scheduled jobs by priority and thenby time. If multiple jobs share the same priority and time, ReportCaster arbitrarilyschedules the jobs.
Enabled. Select this option to activate the schedule to run.
18 WebFOCUS
Creating a Schedule Using the Scheduling Tool

Delete this schedule if it is not scheduled to run again. This option is usefulfor test purposes.
8. To save the schedule, click Save at the top of the Scheduling Tool.
The Scheduling Tool validates the fields and displays a status message in a separatewindow. If the schedule was created successfully, the following status message appears,as shown in the following image.
If the schedule was not created, the following message appears in a separate window:
Please enter valid information in all required fields.
ReportCaster HTML User Interface Manual 19
1. Using the Single Page Scheduling Tool
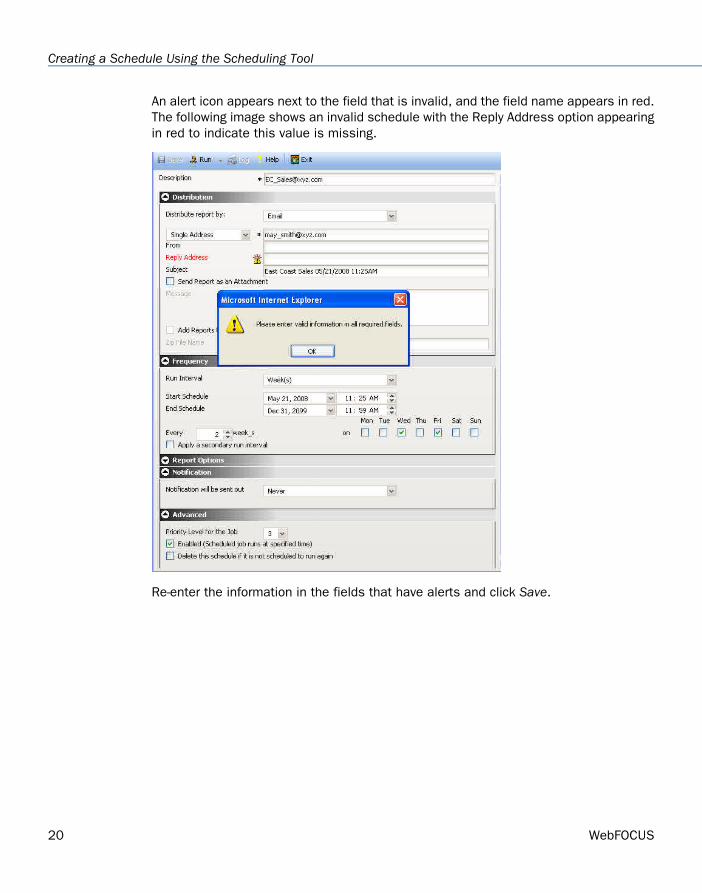
An alert icon appears next to the field that is invalid, and the field name appears in red.The following image shows an invalid schedule with the Reply Address option appearingin red to indicate this value is missing.
Re-enter the information in the fields that have alerts and click Save.
20 WebFOCUS
Creating a Schedule Using the Scheduling Tool
Distribution Options in the Single Page Scheduling Tool
In this section:
Distributing Scheduled Output Using E-mail in the Single Page Scheduling Tool
Distributing Scheduled Output to a Printer in the Single Page Scheduling Tool
Distributing Scheduled Output to MR in the Single Page Scheduling Tool
Distributing a Report to the Report Library in the Single Page Scheduling Tool
The Distribution section of the Scheduling Tool provides the options available for distributingthe scheduled report. You can distribute a report using one of the following methods:
Printer
Managed Reporting
Report Library
This section describes the options available for each distribution method.
Distributing Scheduled Output Using E-mail in the Single Page Scheduling Tool
How to:
Distribute Scheduled Output Using E-mail
Reference:
E-Mail Distribution Examples
When you distribute a report through e-mail, you can include the report in the body of the e-mail (known as an inline e-mail message) or send it as an attachment. Distributing a reportas an inline e-mail message is particularly useful when you distribute the report to mobiledevices, fax machines, or through e-mail systems that do not support attachments. You canalso distribute a report to a Fax machine, as explained later in this section.
Note:
The availability of the inline message option when you create a schedule depends on theInline Report Distribution setting in the ReportCaster Server Configuration tool.
The display of a report that is distributed as an inline e-mail message can be affectedby settings in the e-mail client.
ReportCaster HTML User Interface Manual 21
1. Using the Single Page Scheduling Tool
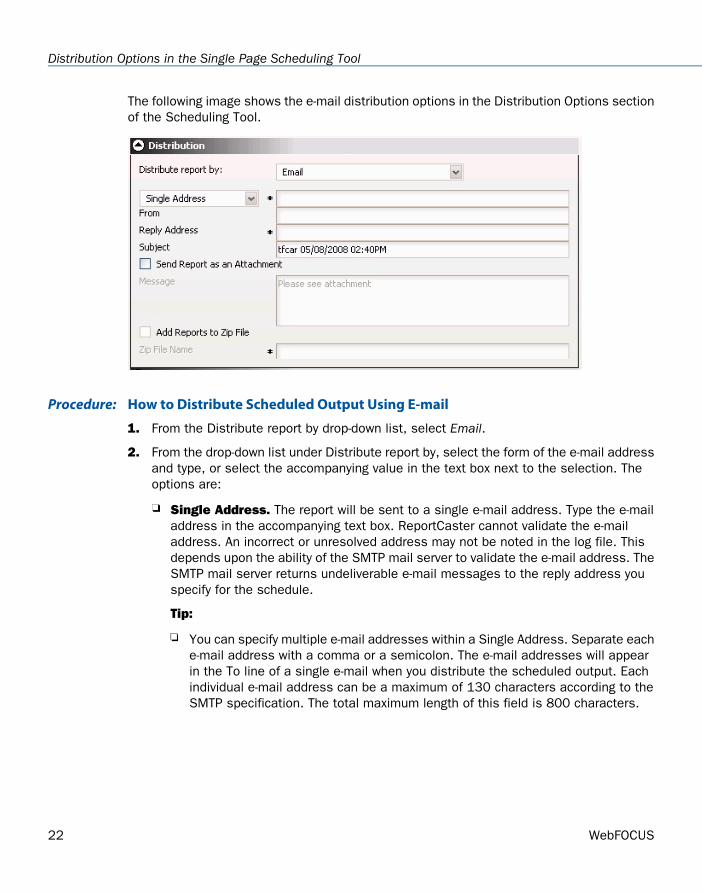
The following image shows the e-mail distribution options in the Distribution Options sectionof the Scheduling Tool.
How to Distribute Scheduled Output Using E-mailProcedure:
1. From the Distribute report by drop-down list, select Email.
2. From the drop-down list under Distribute report by, select the form of the e-mail addressand type, or select the accompanying value in the text box next to the selection. Theoptions are:
Single Address. The report will be sent to a single e-mail address. Type the e-mailaddress in the accompanying text box. ReportCaster cannot validate the e-mailaddress. An incorrect or unresolved address may not be noted in the log file. Thisdepends upon the ability of the SMTP mail server to validate the e-mail address. TheSMTP mail server returns undeliverable e-mail messages to the reply address youspecify for the schedule.
Tip:
You can specify multiple e-mail addresses within a Single Address. Separate eache-mail address with a comma or a semicolon. The e-mail addresses will appearin the To line of a single e-mail when you distribute the scheduled output. Eachindividual e-mail address can be a maximum of 130 characters according to theSMTP specification. The total maximum length of this field is 800 characters.
22 WebFOCUS
Distribution Options in the Single Page Scheduling Tool
Additionally, you can use group mail lists (defined on your mail server) with theSingle Address option. Group mail lists enable you to distribute a report ornotification to multiple recipients without having to maintain multiple e-mailaddresses in the ReportCaster Repository. The format of the group mail listdepends upon the mail server being used. For example, if you are using a MicrosoftExchange Server and your group mail list is defined as #group1, you would entergroup1@listdomain in the Single Address field. If the group mail list contains aspace within its name, it must be enclosed within quotation marks. For moreinformation, see your mail server administrator.
Distribution List. The report will be sent to all e-mail addresses on the selecteddistribution list. Select a distribution list from the drop-down list, which is activatedwhen you select the Distribution List option.
3. In the From field, type any value (for example, the name of the person creating theschedule). ReportCaster does not require this field, but your e-mail system may requireit.
4. In the Reply Address, type a valid e-mail address. If recipients reply to the e-mail, theirmessages are sent to this address. If your e-mail system is unable to deliver the content,the undeliverable output message is also returned to this address. ReportCaster requiresthis field.
5. In the Subject field, type the text you want to appear in the e-mail subject line.ReportCaster does not require this information, but your e-mail system may need it. Thevalue you entered in the schedule Description field becomes the default Subject value.
When creating a schedule, you can place multiple parameters and burst values fromthe scheduled procedure in an e-mail subject line. This enables the subject to bedynamically created in order to personalize e-mails to recipients. Parameters referencedin the subject line must be stored with the schedule information in the ReportCastertables.
You must specify parameters in the format '&parmname' (where parmname is the nameof the parameter). You must specify burst values using the syntax '%BURST'.
Note:
The parameter name cannot be the name of an existing report procedure. You canspecify an unlimited number of parameters.
If you have multiple burst values in a Distribution List, only the first value sent to theReportCaster Distribution Server is included in the subject.
For an example of specifying parameters and burst values in an e-mail subject line, seeE-Mail Distribution Examples on page 24.
ReportCaster HTML User Interface Manual 23
1. Using the Single Page Scheduling Tool

6. Specify whether or not you want the report to be sent as an e-mail attachment or withinthe body of the e-mail (inline) by selecting or clearing the Send Report as an Attachmentoption. (The availability of the inline option depends on your ReportCaster configuration.)
If you select the Send Report as an Attachment option, you can also:
a. Type a message to appear in the e-mail body.
b. Zip the attachment by selecting the Add the Reports to Zip File option. Provide aname for the file in the Zip File Name field.
E-Mail Distribution ExamplesReference:
This section provides an example of using burst values and multiple parameters whensending the report in an e-mail, and distributing a report to a Fax machine using e-mail.
Specifying Parameters and Burst Values in an E-mail Subject FieldExample:
The following schedule specifies burst values and multiple parameters in the e-mail subjectline.
The following image shows an example of a resulting e-mail subject line.
24 WebFOCUS
Distribution Options in the Single Page Scheduling Tool
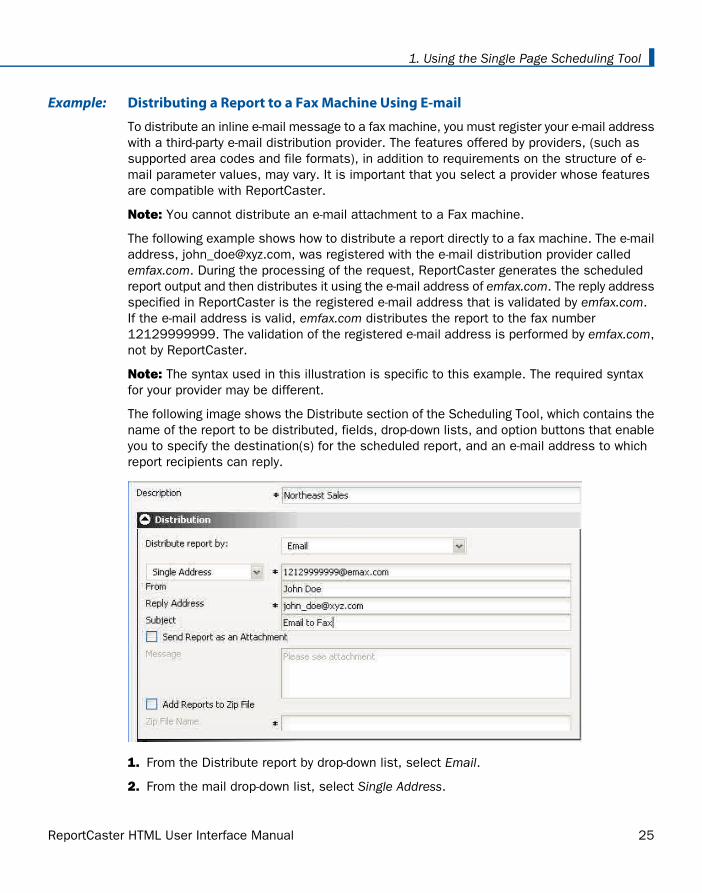
Distributing a Report to a Fax Machine Using E-mailExample:
To distribute an inline e-mail message to a fax machine, you must register your e-mail addresswith a third-party e-mail distribution provider. The features offered by providers, (such assupported area codes and file formats), in addition to requirements on the structure of e-mail parameter values, may vary. It is important that you select a provider whose featuresare compatible with ReportCaster.
Note: You cannot distribute an e-mail attachment to a Fax machine.
The following example shows how to distribute a report directly to a fax machine. The e-mailaddress, [email protected], was registered with the e-mail distribution provider calledemfax.com. During the processing of the request, ReportCaster generates the scheduledreport output and then distributes it using the e-mail address of emfax.com. The reply addressspecified in ReportCaster is the registered e-mail address that is validated by emfax.com.If the e-mail address is valid, emfax.com distributes the report to the fax number12129999999. The validation of the registered e-mail address is performed by emfax.com,not by ReportCaster.
Note: The syntax used in this illustration is specific to this example. The required syntaxfor your provider may be different.
The following image shows the Distribute section of the Scheduling Tool, which contains thename of the report to be distributed, fields, drop-down lists, and option buttons that enableyou to specify the destination(s) for the scheduled report, and an e-mail address to whichreport recipients can reply.
1. From the Distribute report by drop-down list, select Email.
2. From the mail drop-down list, select Single Address.
ReportCaster HTML User Interface Manual 25
1. Using the Single Page Scheduling Tool

In the accompanying text box, type the e-mail address to be used by the e-mail provideraccording to their requirements. In this example, it is [email protected] [email protected] (where emfax.com is the name of your e-mail provider).
Note: You can also select a Distribution List. However, be sure to use the syntax requiredby your provider.
3. In the From field, type any value (for example, the name of the person creating theschedule). ReportCaster does not require this field, but your e-mail system or the e-mailprovider may require it.
4. In the Reply Address field, type your registered e-mail address. If your e-mail system isunable to deliver the content, the undeliverable output message is returned to thisaddress. ReportCaster requires this field.
5. In the Subject field, type the text you want to appear in the message subject line.ReportCaster does not require this information, but your e-mail system or e-mail providermay require it.
6. Continue selecting the remaining schedule options, then click Save to save the schedule.
Distributing Scheduled Output to a Printer in the Single Page Scheduling Tool
How to:
Distribute Scheduled Output to a Printer
The report formats that support printing are DOC, PDF (when ReportCaster is configured toenable PDF printing and the printer has the appropriate driver), PS, and WP. The followingimage shows the printer distribution options in the Distribution Options section of theScheduling Tool.
How to Distribute Scheduled Output to a PrinterProcedure:
1. From the Distribute report by drop-down list, select Printer.
2. From the drop-down list that appears under the Distribute report by option, select theform of the e-mail address and type or select the accompanying value in the text boxnext to the selection. The options are:
26 WebFOCUS
Distribution Options in the Single Page Scheduling Tool
Single Printer. Specify the printer using the following format.
queue@printserver
where:
queue
Is the name of the printer queue.
printserver
Is the host name or IP address of the printer.
ReportCaster can differentiate between the printer queue and the printer hostname/IP address due to the presence of the '@' separator. Although ReportCastersupports specifying only the host name or IP address of the printer, InformationBuilders recommends specifying both the printer queue and host name/IP addresswhen distributing ReportCaster output to a printer. The maximum length of thisfield is 800 characters.
Distribution List.
The field next to Distribution List provides a drop-down list of all printer DistributionLists that you own and all public printer Distribution Lists.
Note: If the printer you specify is not recognized, the following message is recorded inthe log file when the ReportCaster Distribution Server tries to distribute the report:
Cannot connect to specified printer
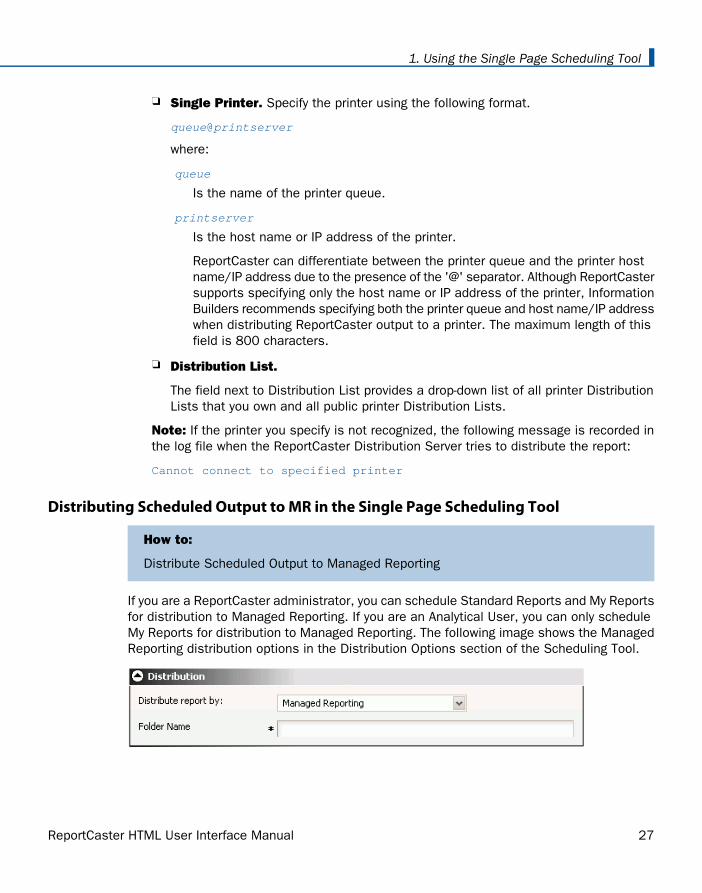
Distributing Scheduled Output to MR in the Single Page Scheduling Tool
How to:
Distribute Scheduled Output to Managed Reporting
If you are a ReportCaster administrator, you can schedule Standard Reports and My Reportsfor distribution to Managed Reporting. If you are an Analytical User, you can only scheduleMy Reports for distribution to Managed Reporting. The following image shows the ManagedReporting distribution options in the Distribution Options section of the Scheduling Tool.
ReportCaster HTML User Interface Manual 27
1. Using the Single Page Scheduling Tool
Tip: Information Builders recommends distributing scheduled output to the Report Libraryrather than to Managed Reporting. The Report Library includes secure access to librarycontent, the ability to save multiple versions of the same output, and the ability to set anexpiration date or keep a specified number of versions.
When you select the Managed Reporting distribution method, the report output is distributedto Managed Reporting as a Standard Report or a My Report. The report is available to otherusers who have access to the Domain.
ReportCaster performs the following tasks when you create a schedule to distribute outputto the Managed Reporting Repository:
1. The WebFOCUS Reporting Server communicates to Managed Reporting using the HTTPprotocol. The WebFOCUS Reporting Server sends a request to Managed Reporting tocreate a Standard Reports or My Reports group folder containing the report output.
2. The output is stored differently depending on where the report was scheduled:
If you scheduled the report in Standard Reports, ReportCaster creates a folder inStandard Reports within the same Domain. The report output is stored in the Domain/app directory.
If you created the report in My Reports, ReportCaster creates a folder in My Reportswithin the same Domain. The report output is stored in your directory in the ManagedReporting Repository. Since ReportCaster does not distinguish subfolders, it distributesthe reports to the highest level folder regardless of the folder hierarchy within ManagedReporting.
Note: Multiple Managed Reporting reports are stored in the same folder if they both runat the same time. Information Builders recommends assigning each Managed Reportingreport a different start time.
How to Distribute Scheduled Output to Managed ReportingProcedure:
1. From the Distribute report by drop-down list, select Managed Reporting.
2. In the Folder Name field, type a name for the folder on Managed Reporting to which youwill distribute the output.
This description must not exceed 90 characters.
28 WebFOCUS
Distribution Options in the Single Page Scheduling Tool
Distributing a Report to the Report Library in the Single Page Scheduling Tool
How to:
Distribute a Report to the Report Library
Reference:
Considerations When Limiting Distribution to Values in an Access List
When distributing a report to the Report Library, you can send an e-mail informing users ofits availability and provide the URL to the content in the library.
The Report Library provides secure access to library content and it enables you to savemultiple versions of the same report output, set an expiration date, and keep a specifiednumber of versions. When creating a schedule for a distribution to the library, you have theoption to designate a category in the library where you want the report to reside. The ReportLibrary is only available to ReportCaster users who have been granted library privileges.
Note: When a report is distributed to the Report Library, the Log Report will include thereport ID and the report version number. This enables you to confirm which reports andreport version were distributed to the Library.
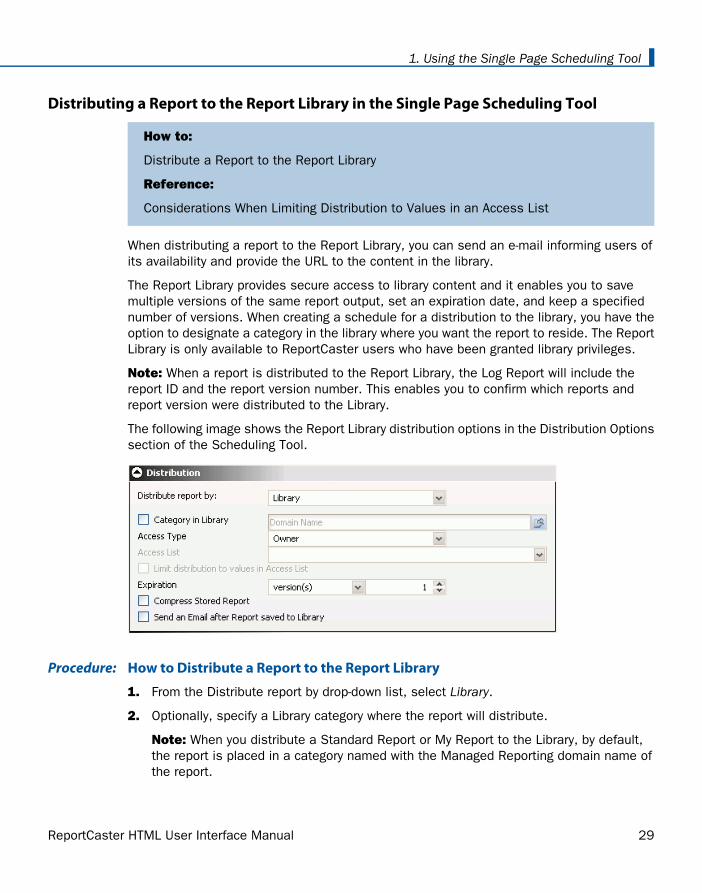
The following image shows the Report Library distribution options in the Distribution Optionssection of the Scheduling Tool.
How to Distribute a Report to the Report LibraryProcedure:
1. From the Distribute report by drop-down list, select Library.
2. Optionally, specify a Library category where the report will distribute.
Note: When you distribute a Standard Report or My Report to the Library, by default,the report is placed in a category named with the Managed Reporting domain name ofthe report.
ReportCaster HTML User Interface Manual 29
1. Using the Single Page Scheduling Tool
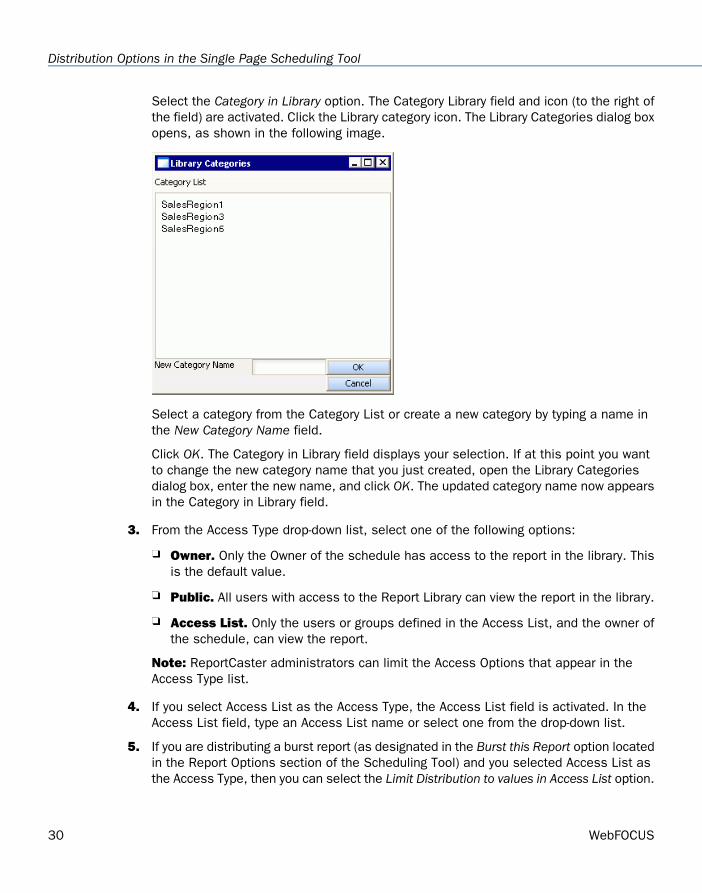
Select the Category in Library option. The Category Library field and icon (to the right ofthe field) are activated. Click the Library category icon. The Library Categories dialog boxopens, as shown in the following image.
Select a category from the Category List or create a new category by typing a name inthe New Category Name field.
Click OK. The Category in Library field displays your selection. If at this point you wantto change the new category name that you just created, open the Library Categoriesdialog box, enter the new name, and click OK. The updated category name now appearsin the Category in Library field.
3. From the Access Type drop-down list, select one of the following options:
Owner. Only the Owner of the schedule has access to the report in the library. Thisis the default value.
Public. All users with access to the Report Library can view the report in the library.
Access List. Only the users or groups defined in the Access List, and the owner ofthe schedule, can view the report.
Note: ReportCaster administrators can limit the Access Options that appear in theAccess Type list.
4. If you select Access List as the Access Type, the Access List field is activated. In theAccess List field, type an Access List name or select one from the drop-down list.
5. If you are distributing a burst report (as designated in the Burst this Report option locatedin the Report Options section of the Scheduling Tool) and you selected Access List asthe Access Type, then you can select the Limit Distribution to values in Access List option.
30 WebFOCUS
Distribution Options in the Single Page Scheduling Tool
This option stipulates that only the burst values specified in the selected Access Listwill be distributed to the Report Library. For more information, see Considerations WhenLimiting Distribution to Values in an Access List on page 32.
6. From the Expiration drop-down list, select one of the following options:
version(s). The Report Library stores the output for the top number of versionsspecified. For example, if you specify 3 versions and the current version is 7, thenversions 7, 6, and 5 are stored in the library. However, if you delete version 6, thenonly versions 7 and 5 are stored in the library. If you then distribute version 8 to thelibrary, only version 8 and 7 are stored in the library since version 6 was deleted andversion 5 is not among the top 3 versions.
Use the up and down arrows to select the number of versions.
Never Expire. The report remains in the Report Library until it is manually deletedby the owner or ReportCaster administrator.
day(s). The Report Library stores the report for the number of day(s) specified. Usethe up and down arrows to select the number of days.
week(s). The Report Library stores the report for the number of week(s) specified.Use the up and down arrows to select the number of weeks.
month(s). The Report Library stores the report for the number of month(s) specified.Use the up and down arrows to select the number of months.
year(s). The Report Library stores the report for the number of year(s) specified.Use the up and down arrows to select the number of years.
Note: ReportCaster automatically purges expired reports one hour after the scheduledLog Purge Time. The default Log Purge Time is 1:00 A.M., therefore, the default librarypurge time is 2:00 A.M. each day.
7. Optionally, check the Compress Stored Report option to conserve repository space.
Note: If you distribute a compressed report to the library, consider that this may impactend user response time in viewing the report. A compressed report must first bedecompressed before it is sent to the user. You should weigh the benefits of savingrepository space against the impact of the time it takes to retrieve a compressed reportfrom the library.
8. Optionally, check the Send an Email after Report saved to Library option to send an e-mailmessage to users that have access rights to the report that it is available. The e-mailmessage also contains the URL to the report content in the Library.
When you select this option, the following fields appear:
ReportCaster HTML User Interface Manual 31
1. Using the Single Page Scheduling Tool
From. This can be any value, for example, the name of the person creating theschedule. ReportCaster does not require this, but your e-mail system may require it.
Reply Address. The e-mail address of the sender. This is a required field. If reportrecipients reply to the notification, their messages are sent to this address.
Subject. The optional text that you want to appear in the e-mail subject line.
Message. An optional message you want to appear in the body of the e-mailnotification.
Considerations When Limiting Distribution to Values in an Access ListReference:
When limiting Report Library distribution to values in an Access List, note the following:
All other burst values not specified in the Access List are not distributed to the library.
This option does not alter the running of the procedure or the retrieval of records fromthe data source, but simply filters the burst report sections returned from the WebFOCUSReporting Server based on the burst values specified in the Access List.
When the Burst this Report option is enabled and the Limit distribution to values in AccessList option is not enabled, ReportCaster continues to distribute all burst report sectionsreturned by the WebFOCUS Reporting Server to the Report Library.
Upon saving the schedule, validation is performed to confirm that the schedule has theBurst this Report option enabled. If it has not been selected, a message appears remindingyou that you must enable the Burst this Report option to limit distribution to valuesspecified in an Access List, and the schedule options are redisplayed.
The log file contains information specifying that the Limit distribution to values in AccessList option was selected. A separate log entry appears for each Access List burst valuespecifying whether a report section for that burst value was distributed to the library.
32 WebFOCUS
Distribution Options in the Single Page Scheduling Tool
Frequency Options in the Single Page Scheduling Tool
In this section:
The Once Run Interval in the Single Page Scheduling Tool
The Minutes Run Interval in the Single Page Scheduling Tool
The Hourly Run Interval in the Single Page Scheduling Tool
The Daily Run Interval in the Single Page Scheduling Tool
The Weekly Run Interval in the Single Page Scheduling Tool
The Monthly Run Interval in the Single Page Scheduling Tool
The Yearly Run Interval in the Single Page Scheduling Tool
The Custom Run Interval in the Single Page Scheduling Tool
Applying a Secondary Run Interval in the Single Page Scheduling Tool
You can schedule a report to run just once or repeatedly, for example, twice a week or thelast Thursday of every month. This section describes the options available in the SchedulingTool Frequency section when the schedule is set to the following run intervals:
Once
Minute(s)
Hour(s)
Day(s)
Week(s)
Month(s)
Year(s)
Custom
Note: ReportCaster administrators can define dates on which schedules cannot run or beset to run. These are known as schedule blackout dates.
ReportCaster HTML User Interface Manual 33
1. Using the Single Page Scheduling Tool

The Once Run Interval in the Single Page Scheduling ToolThe Once option in the Run Interval drop-down list sets the job to execute immediately. Youcan modify the date or time if you do not want the schedule to run immediately. You canspecify the date and time you want the schedule to run using the Start Schedule options,as shown in the following image.
To select a date, choose a date from the drop-down date calendar. To select a time, selecteither the hour or minutes and use the up and down arrows to increase or decrease thevalue.
The Minutes Run Interval in the Single Page Scheduling ToolThe Minute(s) option in the Run Interval drop-down list, sets the schedule to run every nminutes.
In the Every minute(s) field, type or select the minutes interval (1 to 59), check the days ofthe week on which you want to run the schedule, and select the Start Schedule and EndSchedule date and time to define the time period in which the schedule will run. For example,the following schedule will run every thirty minutes on Mondays and Fridays beginning atnoon May 16, 2008 and ending 6:00 PM October 30, 2010.
Tip: Selecting this option may affect system performance if you choose to run the scheduleevery five minutes or less. We recommend specifying a minimum of thirty minutes. Theminute interval option is primarily useful for alert schedules.
34 WebFOCUS
Frequency Options in the Single Page Scheduling Tool
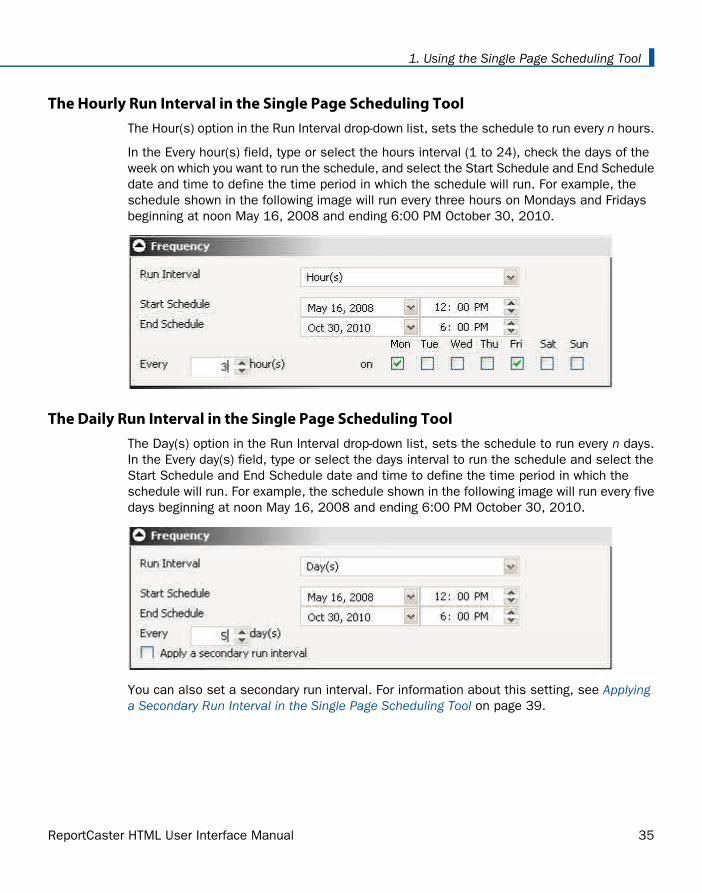
The Hourly Run Interval in the Single Page Scheduling ToolThe Hour(s) option in the Run Interval drop-down list, sets the schedule to run every n hours.
In the Every hour(s) field, type or select the hours interval (1 to 24), check the days of theweek on which you want to run the schedule, and select the Start Schedule and End Scheduledate and time to define the time period in which the schedule will run. For example, theschedule shown in the following image will run every three hours on Mondays and Fridaysbeginning at noon May 16, 2008 and ending 6:00 PM October 30, 2010.
The Daily Run Interval in the Single Page Scheduling ToolThe Day(s) option in the Run Interval drop-down list, sets the schedule to run every n days.In the Every day(s) field, type or select the days interval to run the schedule and select theStart Schedule and End Schedule date and time to define the time period in which theschedule will run. For example, the schedule shown in the following image will run every fivedays beginning at noon May 16, 2008 and ending 6:00 PM October 30, 2010.
You can also set a secondary run interval. For information about this setting, see Applyinga Secondary Run Interval in the Single Page Scheduling Tool on page 39.
ReportCaster HTML User Interface Manual 35
1. Using the Single Page Scheduling Tool
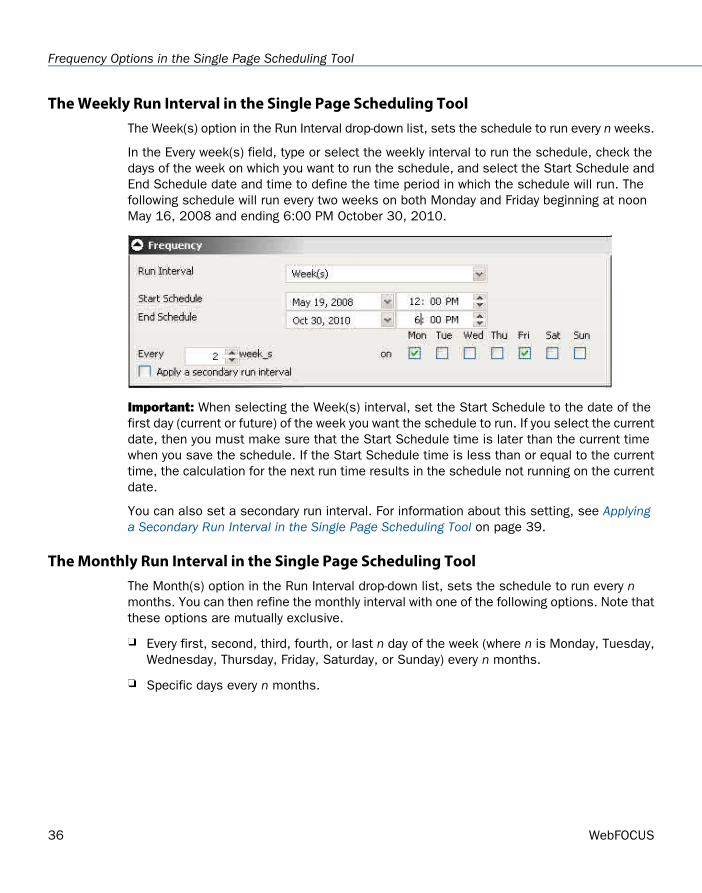
The Weekly Run Interval in the Single Page Scheduling ToolThe Week(s) option in the Run Interval drop-down list, sets the schedule to run every n weeks.
In the Every week(s) field, type or select the weekly interval to run the schedule, check thedays of the week on which you want to run the schedule, and select the Start Schedule andEnd Schedule date and time to define the time period in which the schedule will run. Thefollowing schedule will run every two weeks on both Monday and Friday beginning at noonMay 16, 2008 and ending 6:00 PM October 30, 2010.
Important: When selecting the Week(s) interval, set the Start Schedule to the date of thefirst day (current or future) of the week you want the schedule to run. If you select the currentdate, then you must make sure that the Start Schedule time is later than the current timewhen you save the schedule. If the Start Schedule time is less than or equal to the currenttime, the calculation for the next run time results in the schedule not running on the currentdate.
You can also set a secondary run interval. For information about this setting, see Applyinga Secondary Run Interval in the Single Page Scheduling Tool on page 39.
The Monthly Run Interval in the Single Page Scheduling ToolThe Month(s) option in the Run Interval drop-down list, sets the schedule to run every nmonths. You can then refine the monthly interval with one of the following options. Note thatthese options are mutually exclusive.
Every first, second, third, fourth, or last n day of the week (where n is Monday, Tuesday,Wednesday, Thursday, Friday, Saturday, or Sunday) every n months.
Specific days every n months.
36 WebFOCUS
Frequency Options in the Single Page Scheduling Tool
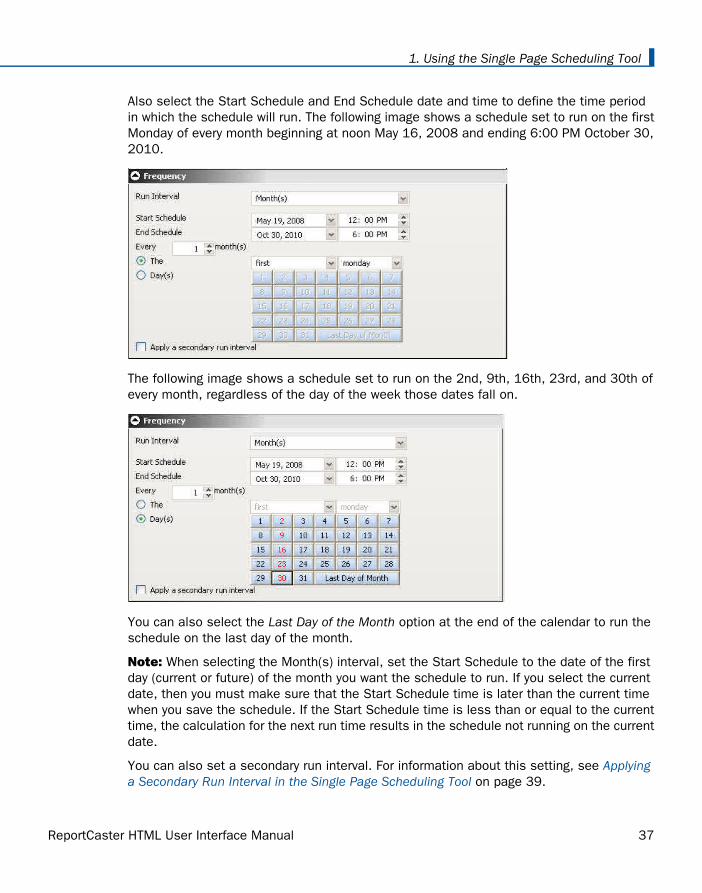
Also select the Start Schedule and End Schedule date and time to define the time periodin which the schedule will run. The following image shows a schedule set to run on the firstMonday of every month beginning at noon May 16, 2008 and ending 6:00 PM October 30,2010.
The following image shows a schedule set to run on the 2nd, 9th, 16th, 23rd, and 30th ofevery month, regardless of the day of the week those dates fall on.
You can also select the Last Day of the Month option at the end of the calendar to run theschedule on the last day of the month.
Note: When selecting the Month(s) interval, set the Start Schedule to the date of the firstday (current or future) of the month you want the schedule to run. If you select the currentdate, then you must make sure that the Start Schedule time is later than the current timewhen you save the schedule. If the Start Schedule time is less than or equal to the currenttime, the calculation for the next run time results in the schedule not running on the currentdate.
You can also set a secondary run interval. For information about this setting, see Applyinga Secondary Run Interval in the Single Page Scheduling Tool on page 39.
ReportCaster HTML User Interface Manual 37
1. Using the Single Page Scheduling Tool

The Yearly Run Interval in the Single Page Scheduling ToolThe Year(s) option in the Run Interval drop-down list, sets the schedule to run every n yearsduring a specific time period. The following image shows a schedule set to run every twoyears beginning at noon May 16, 2008 and ending 6:00 PM October 30, 2010.
You can also set a secondary run interval. For information about this setting, see Applyinga Secondary Run Interval in the Single Page Scheduling Tool on page 39.
The Custom Run Interval in the Single Page Scheduling ToolThe Custom option in the Run interval drop-down list enables you to select a set of datesthat do not follow a specific pattern. For example, if you want to run a quarterly report on adifferent day of each quarter, then you can use the Custom run interval to set the scheduleto run on dates such as, March 3 (Wednesday), June 4 (Friday), September 7 (Tuesday),and December 2 (Thursday).
The following image shows the Custom Run Interval options, which includes Start Schedule(initially set to the current date and time) and the End Schedule date and time options, theCustom calendar, and the Custom Date List node that appears in the right pane.
38 WebFOCUS
Frequency Options in the Single Page Scheduling Tool
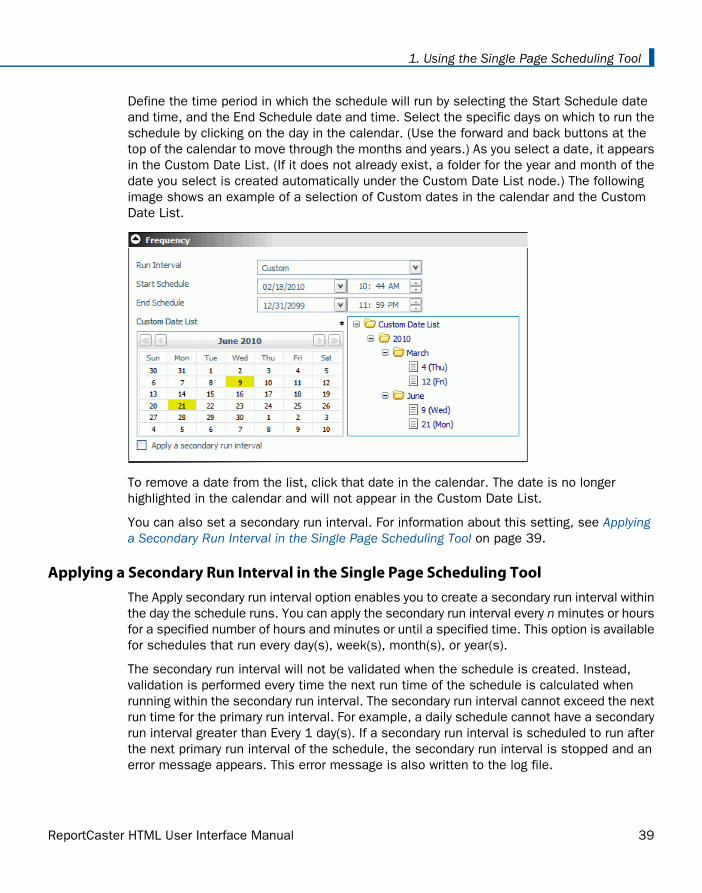
Define the time period in which the schedule will run by selecting the Start Schedule dateand time, and the End Schedule date and time. Select the specific days on which to run theschedule by clicking on the day in the calendar. (Use the forward and back buttons at thetop of the calendar to move through the months and years.) As you select a date, it appearsin the Custom Date List. (If it does not already exist, a folder for the year and month of thedate you select is created automatically under the Custom Date List node.) The followingimage shows an example of a selection of Custom dates in the calendar and the CustomDate List.
To remove a date from the list, click that date in the calendar. The date is no longerhighlighted in the calendar and will not appear in the Custom Date List.
You can also set a secondary run interval. For information about this setting, see Applyinga Secondary Run Interval in the Single Page Scheduling Tool on page 39.
Applying a Secondary Run Interval in the Single Page Scheduling ToolThe Apply secondary run interval option enables you to create a secondary run interval withinthe day the schedule runs. You can apply the secondary run interval every n minutes or hoursfor a specified number of hours and minutes or until a specified time. This option is availablefor schedules that run every day(s), week(s), month(s), or year(s).
The secondary run interval will not be validated when the schedule is created. Instead,validation is performed every time the next run time of the schedule is calculated whenrunning within the secondary run interval. The secondary run interval cannot exceed the nextrun time for the primary run interval. For example, a daily schedule cannot have a secondaryrun interval greater than Every 1 day(s). If a secondary run interval is scheduled to run afterthe next primary run interval of the schedule, the secondary run interval is stopped and anerror message appears. This error message is also written to the log file.
ReportCaster HTML User Interface Manual 39
1. Using the Single Page Scheduling Tool
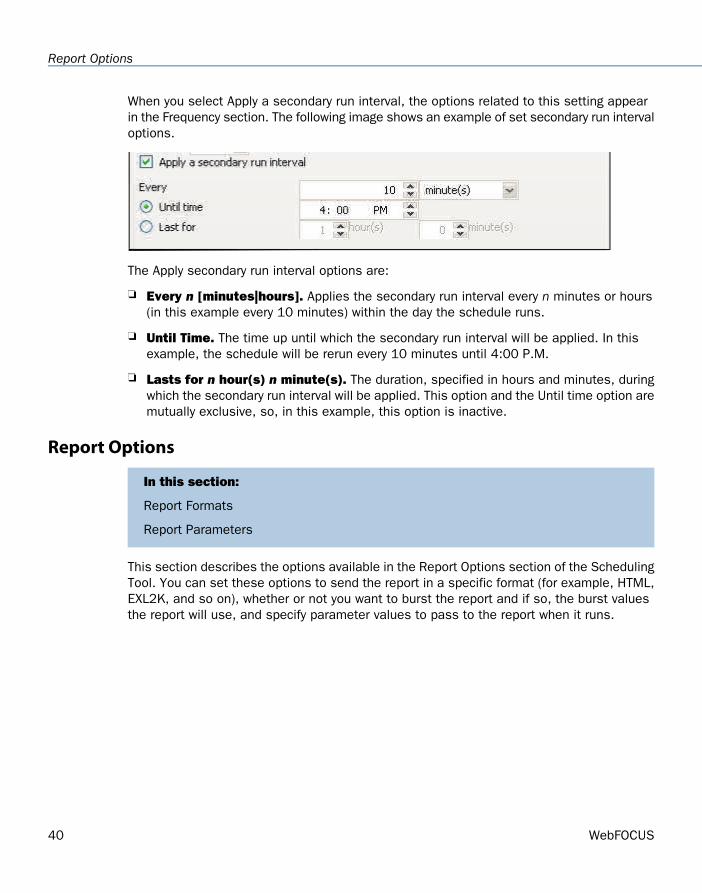
When you select Apply a secondary run interval, the options related to this setting appearin the Frequency section. The following image shows an example of set secondary run intervaloptions.
The Apply secondary run interval options are:
Every n [minutes|hours]. Applies the secondary run interval every n minutes or hours(in this example every 10 minutes) within the day the schedule runs.
Until Time. The time up until which the secondary run interval will be applied. In thisexample, the schedule will be rerun every 10 minutes until 4:00 P.M.
Lasts for n hour(s) n minute(s). The duration, specified in hours and minutes, duringwhich the secondary run interval will be applied. This option and the Until time option aremutually exclusive, so, in this example, this option is inactive.
Report Options
In this section:
Report Formats
Report Parameters
This section describes the options available in the Report Options section of the SchedulingTool. You can set these options to send the report in a specific format (for example, HTML,EXL2K, and so on), whether or not you want to burst the report and if so, the burst valuesthe report will use, and specify parameter values to pass to the report when it runs.
40 WebFOCUS
Report Options

The following image shows the Report Options section of the Scheduling Tool.
The burst feature enables you to break a report into sections and distribute relevant sectionsto individual users. To burst the report, select the Burst this Report check box. Burst valuescan be specified in a Distribution List.
The Save Report As option enables you to rename the schedule output to a more descriptivename. This is useful if you are distributing output in e-mail attachments.
In the Execution ID field, specify a valid ID that is authorized to execute procedures on theserver running the report.
If the Execution ID field is grayed out, it means that a default Execution ID and passwordhave been specified within the ReportCaster configuration file.
If the Execution ID field is not grayed out and blank, then type a valid ID that will connectto the Reporting Server to run the scheduled report, and assign a password by clickingSet Password. In the password dialog box, type a password and confirm the password,then click OK.
Note: After you save the schedule, this execution ID is available from the Execution IDdrop-down list for future scheduling.
If the Execution ID field is not grayed out and contains an ID, then either use that ID,select a new ID from the drop-down list, or type a new valid ID and create a password.
Note: You can change the password of a selected execution ID by clicking Set Passwordand typing a new password for the ID.
ReportCaster HTML User Interface Manual 41
1. Using the Single Page Scheduling Tool
Report FormatsSelect the format of the report from the Send the Report in this Format drop-down list of theScheduling Tool, Report Options area.
Use the following guidelines when selecting a format:
The report format specified in this field overrides the format statement in the procedure,except for specialized formats (EXL2K FORMULA, EXL2K PIVOT, EXL2K TEMPLATE, PPTTEMPLATE, DFIX). When a report uses a specialized format, the format selection in thereport schedule must match that specified in the report.
There are limitations on what formats are valid for certain options. For instance, not allformats are supported for bursting or printing.
The formats that support bursting are AHTML (except for FML reports), ALPHA, COM,COMMA, COMT, DHTML (except for FML reports), DFIX, DOC, EXL2K, EXL2K FORMULA,EXL2K TEMPLATE, EXL97, GIF, HTML and HTML ODP (except for FML reports), JPEG,PDF, PNG, PPT, PS, SVG, TAB, TABT, and WP.
The formats that support printing are DOC, PDF (when you configure ReportCaster toprint PDF files and the printer has the appropriate driver), PS, and WP.
When scheduling a procedure created using Graph Assistant or Advanced GraphAssistant and:
an image format (JPEG, GIF, PNG, SVG) was chosen as the output format, thenyou must select an image format as the schedule output.
the PDF/SVG or PDF/GIF format was chosen as the output format, then you mustselect PDF as the schedule output.
The HTML ODP format can only be distributed to the Report Library.
If the report is a Coordinated Compound PDF Report, then you can select any supportedcompound format (AHTML, DHTML, EXL2K, Flash, PDF, or PPT), but remember that notall of these formats support bursting.
When scheduling a chart or graph report, the available formats will depend on which toolcreated the report. When the report was created using:
Graph Assistant or Advanced Graph Assistant, then the available formats are GIF,JPEG, PDF, PNG, and SVG.
Report Assistant or InfoAssist, then the available formats are all formats except GIF,JPEG, PDF, PNG, and SVG.
Power Painter, then the available formats are AHTML, DHTML, EXL2K, EXL2K PIVOT,Flash, PDF, and PPT.
42 WebFOCUS
Report Options
If the FEX was created using an editor, then all formats that the ReportCasteradministrator set to appear in the formats option list will be available.
For detailed information about each format, see the ReportCaster Administration manual.
Report Parameters
How to:
Define a Parameter Value in the Scheduling Tool
Select Parameter Values From a List
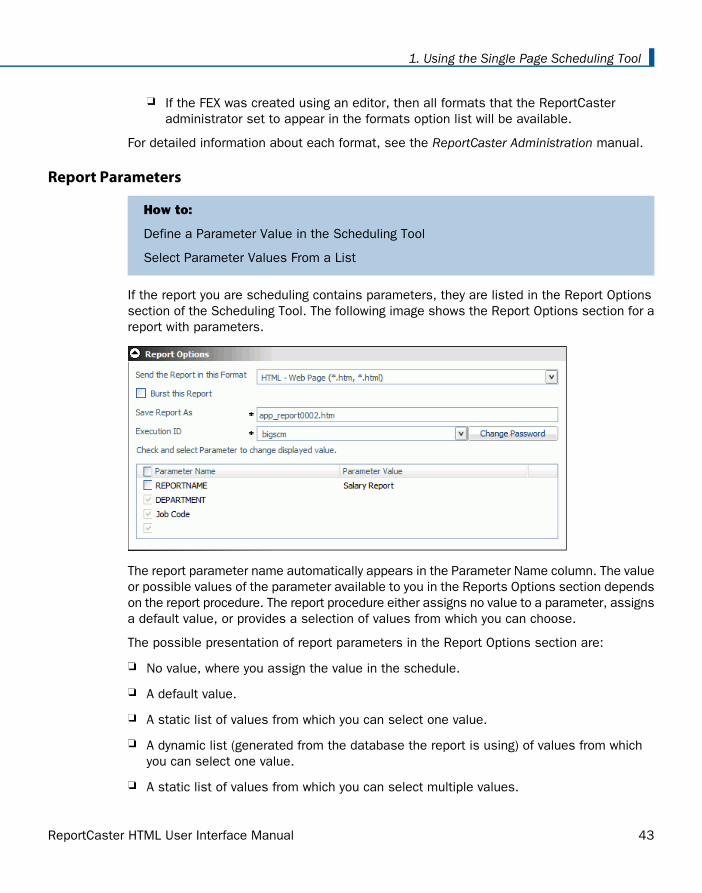
If the report you are scheduling contains parameters, they are listed in the Report Optionssection of the Scheduling Tool. The following image shows the Report Options section for areport with parameters.
The report parameter name automatically appears in the Parameter Name column. The valueor possible values of the parameter available to you in the Reports Options section dependson the report procedure. The report procedure either assigns no value to a parameter, assignsa default value, or provides a selection of values from which you can choose.
The possible presentation of report parameters in the Report Options section are:
No value, where you assign the value in the schedule.
A default value.
A static list of values from which you can select one value.
A dynamic list (generated from the database the report is using) of values from whichyou can select one value.
A static list of values from which you can select multiple values.
ReportCaster HTML User Interface Manual 43
1. Using the Single Page Scheduling Tool
A dynamic list (generated from the database the report is using) of values from whichyou can select multiple values.
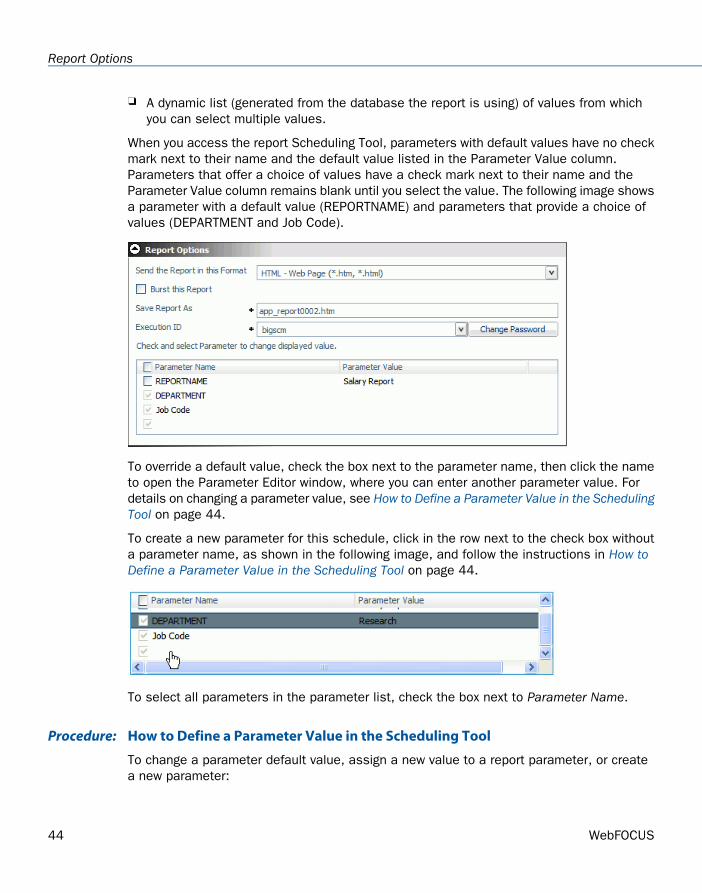
When you access the report Scheduling Tool, parameters with default values have no checkmark next to their name and the default value listed in the Parameter Value column.Parameters that offer a choice of values have a check mark next to their name and theParameter Value column remains blank until you select the value. The following image showsa parameter with a default value (REPORTNAME) and parameters that provide a choice ofvalues (DEPARTMENT and Job Code).
To override a default value, check the box next to the parameter name, then click the nameto open the Parameter Editor window, where you can enter another parameter value. Fordetails on changing a parameter value, see How to Define a Parameter Value in the SchedulingTool on page 44.
To create a new parameter for this schedule, click in the row next to the check box withouta parameter name, as shown in the following image, and follow the instructions in How toDefine a Parameter Value in the Scheduling Tool on page 44.
To select all parameters in the parameter list, check the box next to Parameter Name.
How to Define a Parameter Value in the Scheduling ToolProcedure:
To change a parameter default value, assign a new value to a report parameter, or createa new parameter:
44 WebFOCUS
Report Options
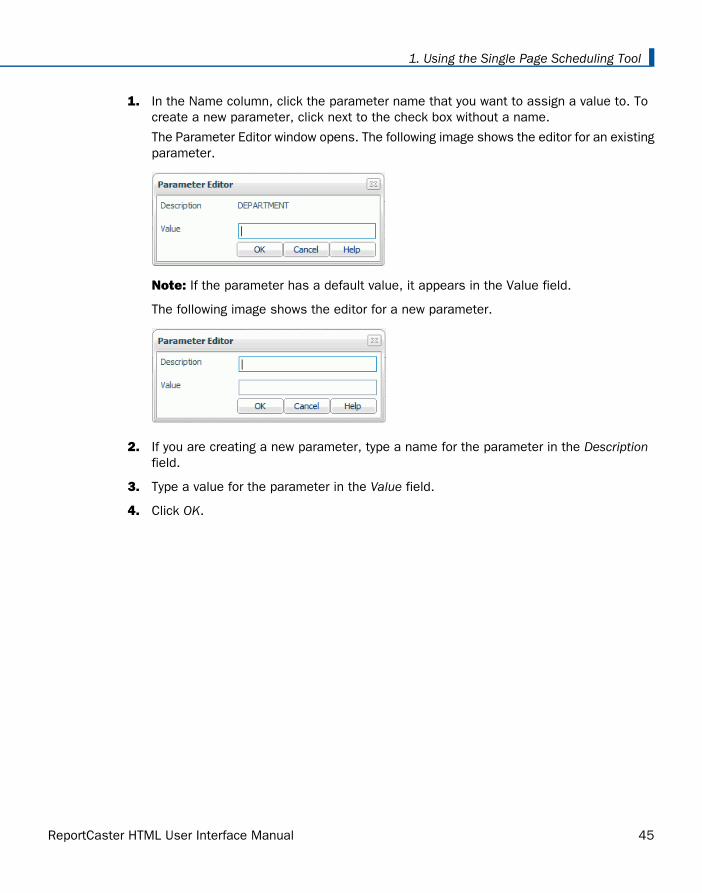
1. In the Name column, click the parameter name that you want to assign a value to. Tocreate a new parameter, click next to the check box without a name.
The Parameter Editor window opens. The following image shows the editor for an existingparameter.
Note: If the parameter has a default value, it appears in the Value field.
The following image shows the editor for a new parameter.
2. If you are creating a new parameter, type a name for the parameter in the Descriptionfield.
3. Type a value for the parameter in the Value field.
4. Click OK.
ReportCaster HTML User Interface Manual 45
1. Using the Single Page Scheduling Tool
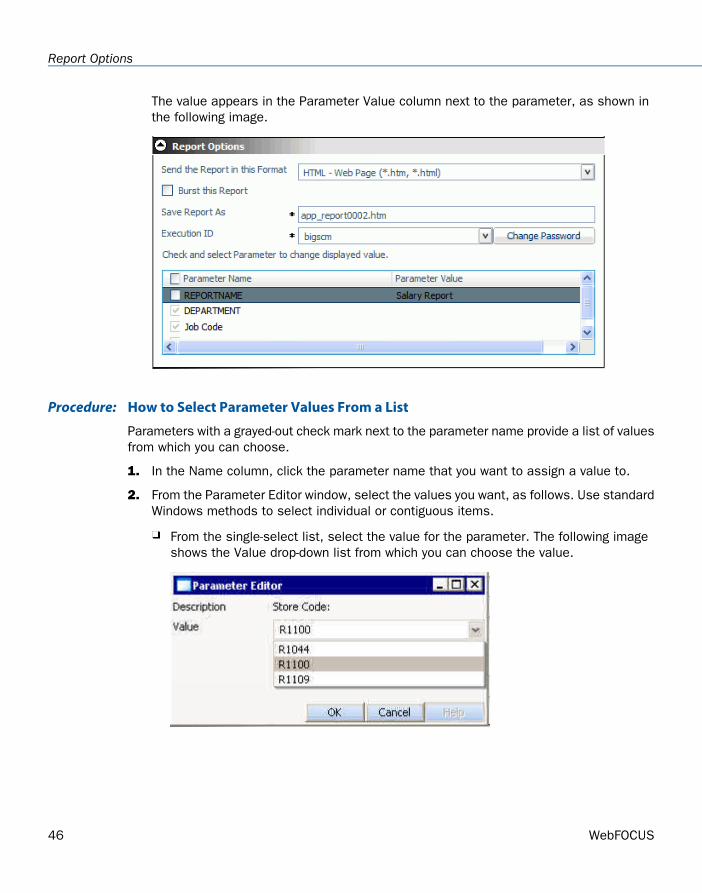
The value appears in the Parameter Value column next to the parameter, as shown inthe following image.
How to Select Parameter Values From a ListProcedure:
Parameters with a grayed-out check mark next to the parameter name provide a list of valuesfrom which you can choose.
1. In the Name column, click the parameter name that you want to assign a value to.
2. From the Parameter Editor window, select the values you want, as follows. Use standardWindows methods to select individual or contiguous items.
From the single-select list, select the value for the parameter. The following imageshows the Value drop-down list from which you can choose the value.
46 WebFOCUS
Report Options

From the multi-select list, select either No Selection or one or more values, as shownin the following image.
From the multi-select list, select one or more values, as shown in the following image.
3. Click OK.
ReportCaster HTML User Interface Manual 47
1. Using the Single Page Scheduling Tool
Notification Options in the Single Page Scheduling Tool
In this section:
Setting On Error and Always Notification in the Single Page Scheduling Tool
Reference:
Notification and Log Information for Unavailable Options
The Notification area of the Scheduling Tool provides the options to send a notification ofthe schedule status to specific e-mail recipients. You can send notification:
Never. ReportCaster will not send a notification of the schedule status under anycircumstances. This is the default value.
On Error. The specified users are notified when errors are encountered while runningthe schedule. We recommend using the On Error notification option.
Always. The specified users are always notified when the schedule runs.
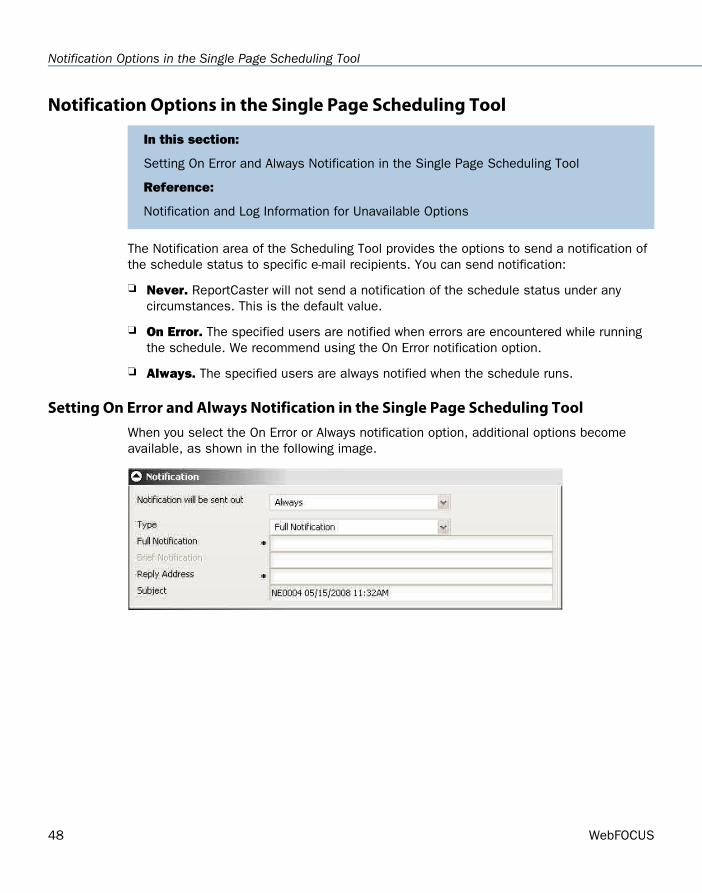
Setting On Error and Always Notification in the Single Page Scheduling ToolWhen you select the On Error or Always notification option, additional options becomeavailable, as shown in the following image.
48 WebFOCUS
Notification Options in the Single Page Scheduling Tool
The On Error and Always notification options are:
Type. Select either a brief or detailed notification, as follows.
Full Notification. A full notification sends a complete log report as an e-mailattachment.
Brief Notification. A brief notification sends the ID and job description of a schedule,as well as messages about the schedule (such as, Completed Successfully).
Full & Brief Notification. Sends both types of notifications.
Tip: Information Builders recommend using the Brief Notification option when you aresending notification to devices that have limited memory, such as pagers and cell phones.If you want to notify multiple recipients, you can use group mail lists defined on your mailserver provided that you append an at sign (@) followed by a valid domain.
Full Notification. When the notification type is Full Notification or Full & Brief Notification,type the e-mail address to which you want a full notification sent. There is no syntax errorchecking for this field.
Brief Notification. When the notification type is Brief Notification or Full & BriefNotification, type the e-mail address to which you want a full notification sent. There isno syntax error checking for this field.
Reply Address. Type the e-mail address of the sender. If report recipients reply to thereport sender, their messages are sent to this address. If your e-mail system is unableto deliver a report, the undeliverable report message is also returned to this address.
Subject. Type the text you want to display in the subject line of the e-mail notification.There is a limit of 255 alphanumeric characters. By default, this field contains the reportname and data and time stamp.
Notification and Log Information for Unavailable OptionsReference:
When schedules with unavailable Task Types and/or distribution methods are not permittedto run, error notification is triggered. The full and brief notifications and the log report informsyou that the ReportCaster administrator or the owner of the schedule must change theunavailable Task Types or distribution methods in the schedule.
When schedules with unavailable Task Types or distribution methods are permitted to run,normal job execution occurs and a message appears in the log report indicating that yourReportCaster administrator is allowing existing schedules using the unavailable Task Typesor distribution methods to run.
ReportCaster HTML User Interface Manual 49
1. Using the Single Page Scheduling Tool

50 WebFOCUS
Notification Options in the Single Page Scheduling Tool
WebFOCUS
Using the Scheduling Wizard2Topics:
As a Managed Reporting Analytical User,you can schedule Standard Reports oryour own My Reports using theReportCaster Scheduling tool. If youaccess ReportCaster from ManagedReporting, the scheduling tool is theReportCaster Scheduling Wizard. Thissection described how to use theScheduling Wizard to schedule a report.
Overview
Schedule Options
Report Information
Report Parameters
Distribution Options in the SchedulingWizard
Priority, Notification, and Zip FileOptions
Running a Schedule Without Saving It
ReportCaster HTML User Interface Manual 51
OverviewThe Scheduling Wizard includes the following series of windows:
Schedule. Specify when and how often to run the schedule. For more information, seeSchedule Options on page 53.
Report Information. Select the report format, whether or not to burst the report, andthe Execution ID and password. For more information, see Report Information on page60.
Distribution. Select whether to distribute the report as an e-mail message, to a printer,as a report in a Managed Reporting folder, or to the Report Library. You must also selectwhether to distribute the report using a Distribution List, a Distribution File, or a singlelocation. For more information, see Distribution Options in the Scheduling Wizard on page71.
Settings. Specify the priority level of the schedule and select notification options. Formore information, see Priority, Notification, and Zip File Options on page 96.
Note:
When selecting an option (for example, Send report as attachment), you must use themouse or the arrow keys to navigate through the Scheduling Wizard. Do not use the Tabkey.
You cannot schedule alert reports using the Scheduling Wizard. To create an alertschedule, you must use the ReportCaster Development and Administration Interface.
52 WebFOCUS
Overview

Schedule Options
In this section:
Creating a Secondary Run Interval
How to:
Specify Schedule Options
When you access the ReportCaster Scheduling Wizard, the Schedule window opens first.
In the Schedule window, shown in the following image, you will specify the job description,the run intervals, the date and time you want the schedule to run, and whether to enable ordisable the schedule. You can select the schedule to run once or repeatedly on any day atany time.
ReportCaster HTML User Interface Manual 53
2. Using the Scheduling Wizard
How to Specify Schedule OptionsProcedure:
Specify the following information in the Schedule window:
1. In the Description field, type a descriptive name that identifies the schedule. After theschedule runs, the description appears in your list of schedules.
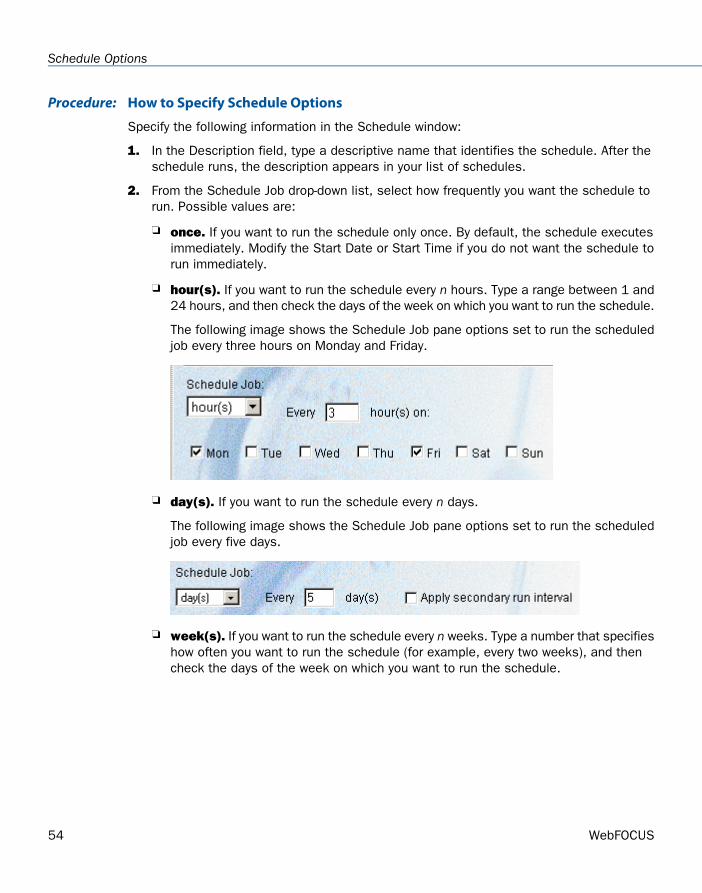
2. From the Schedule Job drop-down list, select how frequently you want the schedule torun. Possible values are:
once. If you want to run the schedule only once. By default, the schedule executesimmediately. Modify the Start Date or Start Time if you do not want the schedule torun immediately.
hour(s). If you want to run the schedule every n hours. Type a range between 1 and24 hours, and then check the days of the week on which you want to run the schedule.
The following image shows the Schedule Job pane options set to run the scheduledjob every three hours on Monday and Friday.
day(s). If you want to run the schedule every n days.
The following image shows the Schedule Job pane options set to run the scheduledjob every five days.
week(s). If you want to run the schedule every n weeks. Type a number that specifieshow often you want to run the schedule (for example, every two weeks), and thencheck the days of the week on which you want to run the schedule.
54 WebFOCUS
Schedule Options
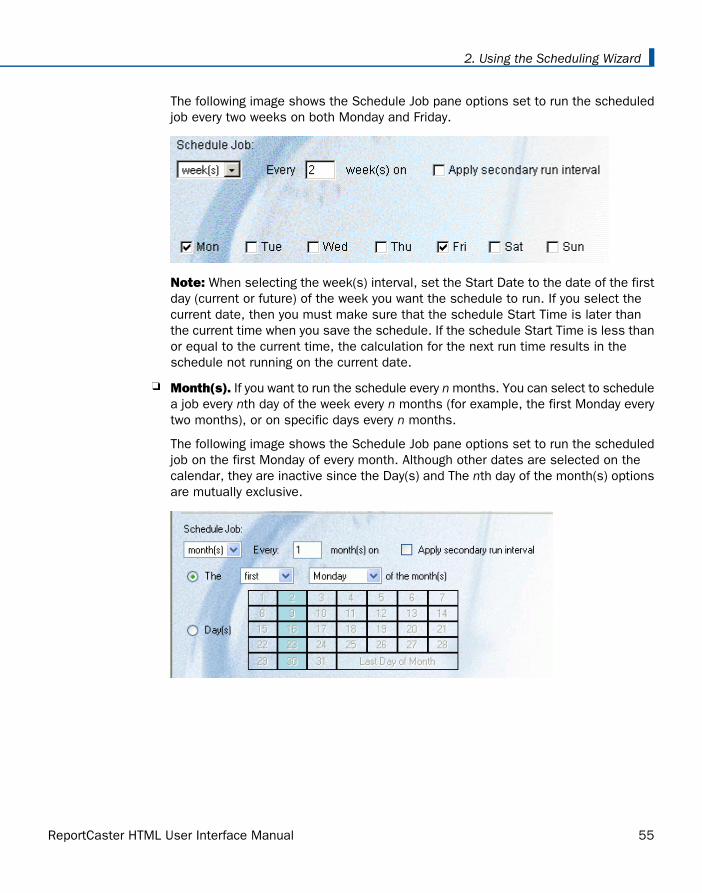
The following image shows the Schedule Job pane options set to run the scheduledjob every two weeks on both Monday and Friday.
Note: When selecting the week(s) interval, set the Start Date to the date of the firstday (current or future) of the week you want the schedule to run. If you select thecurrent date, then you must make sure that the schedule Start Time is later thanthe current time when you save the schedule. If the schedule Start Time is less thanor equal to the current time, the calculation for the next run time results in theschedule not running on the current date.
Month(s). If you want to run the schedule every n months. You can select to schedulea job every nth day of the week every n months (for example, the first Monday everytwo months), or on specific days every n months.
The following image shows the Schedule Job pane options set to run the scheduledjob on the first Monday of every month. Although other dates are selected on thecalendar, they are inactive since the Day(s) and The nth day of the month(s) optionsare mutually exclusive.
ReportCaster HTML User Interface Manual 55
2. Using the Scheduling Wizard

The following image shows the Schedule Job pane options set to run the scheduledjob on the 2nd, 9th, 16th, 23rd, and 30th every month. The schedule will not run onthe first Monday of every month.
You can also click the Last Day of the Month option at the end of the calendar to runthe schedule on the last day of the month.
Note: When selecting the Month(s) interval, set the Start Date to the date of thefirst day (current or future) of the month you want the schedule to run. If you selectthe current date, then you must make sure that the schedule Start Time is later thanthe current time when you save the schedule. If the schedule Start Time is less thanor equal to the current time, the calculation for the next run time results in theschedule not running on the current date.
year(s). If you want to run the schedule every n years.
The following image shows, in the Schedule Job pane, that the scheduled job willrun every two years.
3. Optionally, select the Apply secondary run interval check box if you want to create asecondary run interval within the day the schedule runs. This option is only available forschedules that run every day(s), week(s), month(s), or year(s). For more information,see Creating a Secondary Run Interval on page 58.
4. In the Start Date field, specify the date on which you want the schedule to begin. Youcan type this value in the field using the format MM/DD/YYYY, or you can click thecalendar and select the date. The default Start Date is the current date.
56 WebFOCUS
Schedule Options
5. In the Start Time field, using the drop-down lists, specify the time you want the scheduleto begin. The default Start Time is the current time. The start time applies only to theStart Date and does not apply to any date thereafter. If you select a time that is afterthe current time, the scheduled job is not run until the next instance of the Start Timethat fits within the specifications of the schedule.
6. In the End Date field, specify the date on which you want the schedule to end. You cantype this value in the field using the format MM/DD/YYYY, or you can click the calendarand then select the date. The default End Date is 12/31/2099. (Contact yourReportCaster administrator if you want another default End Date.) This field does notdisplay for a schedule job that will only run once.
7. In the End Time field, using the drop-down lists, specify the time you want the scheduleto end. The default End Time 11:59 PM. (Contact your ReportCaster administrator if youwant another default End Time.) This field does not display for a schedule job that willonly run once.
8. Uncheck the Enabled (Scheduled jobs run at specified time) check box if you want theschedule to be inactive.
9. Check Delete job if it is not scheduled to run again if you want the schedule to run onceand not be stored in the ReportCaster Repository.
10. Click Next to continue scheduling the report:
If you selected the Apply secondary run interval check box, you are sent to the optionalApply secondary run interval window. For more information, see Creating a SecondaryRun Interval on page 58.
If you did not select the Apply secondary run interval check box, you are sent to theReport Information window. For more information, see Report Information on page60.
ReportCaster HTML User Interface Manual 57
2. Using the Scheduling Wizard
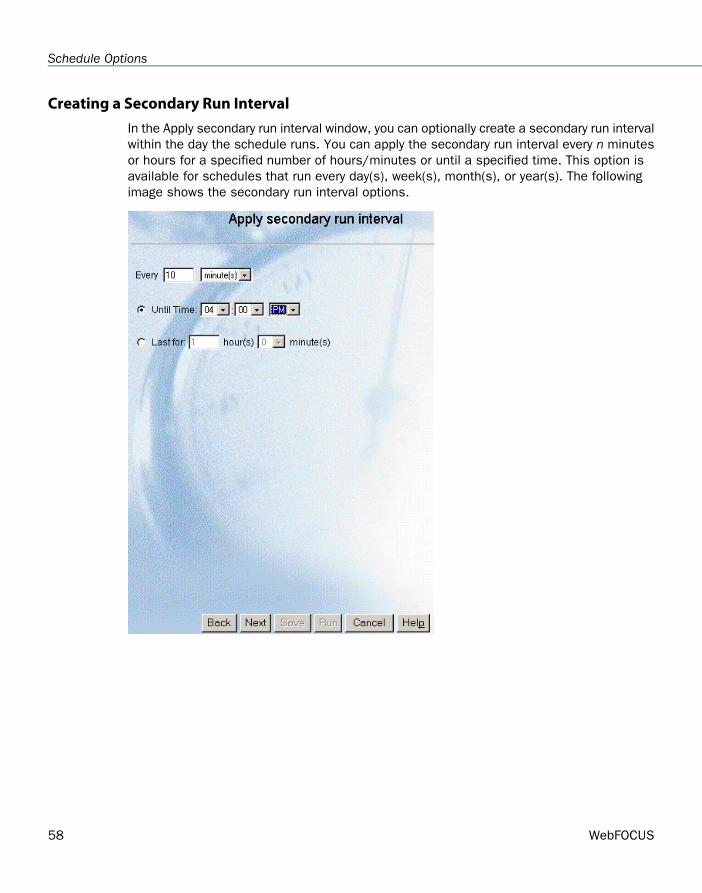
Creating a Secondary Run IntervalIn the Apply secondary run interval window, you can optionally create a secondary run intervalwithin the day the schedule runs. You can apply the secondary run interval every n minutesor hours for a specified number of hours/minutes or until a specified time. This option isavailable for schedules that run every day(s), week(s), month(s), or year(s). The followingimage shows the secondary run interval options.
58 WebFOCUS
Schedule Options
The Apply secondary run interval options are:
Every n [minutes|hours]. Applies the secondary run interval every n minutes or hours(in this example every 10 minutes) within the day the schedule runs.
Until Time. The time up until which the secondary run interval will be applied. In thisexample, the schedule will be rerun every 10 minutes until 4:00 P.M.
Lasts for n hour(s) n minute(s). The duration, specified in hours/minutes, during whichthe secondary run interval will be applied. This option and the Until time option aremutually exclusive, so this option is inactive in this example.
Note:
The secondary run interval will not be validated when the schedule is created. Instead,validation is performed every time the NEXTRUNTIME of the schedule is calculated whenrunning within the secondary run interval. The secondary run interval cannot exceed theNEXTRUNTIME for the primary run interval. For example, a daily schedule cannot have asecondary run interval greater than Every 1 day(s). If you schedule a secondary run intervalto run after the next primary run interval, the secondary run interval is stopped and anerror message is displayed to the user and written to the log file.
To continue to the Report Information window, click Next. For more information, seeReport Information on page 60.
When a schedule is updated, the next run time is recalculated based only on the primaryrun interval. This means that if a schedule that includes a secondary run interval isupdated before the secondary schedule is able to run, then the secondary run intervalis ignored and the NEXTRUNTIME is calculated based on the primary interval.
For example, a schedule exists that is set to run daily at 2:00 PM with a secondary runinterval of every 10 minutes from 2:00 PM to 3:00 PM. When the schedule runs at 2:00PM, the NEXTRUNTIME is reset to run at 2:10, which honors the secondary run interval.If this schedule is updated at 2:03 PM, the NEXTRUNTIME is recalculated to be 2:00 PMthe next day, rather than 2:10 PM on the current day.
ReportCaster HTML User Interface Manual 59
2. Using the Scheduling Wizard
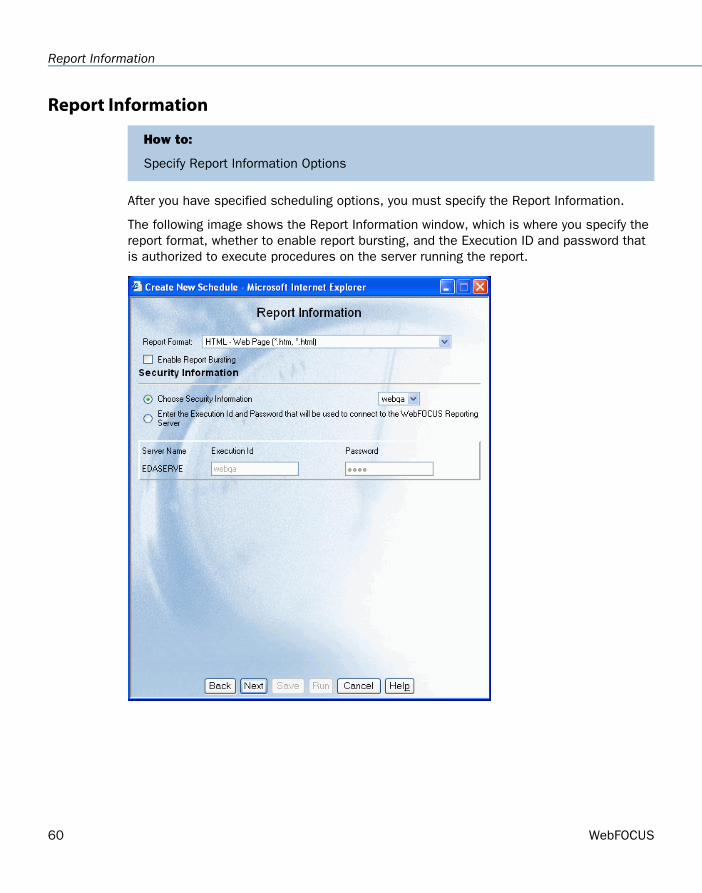
Report Information
How to:
Specify Report Information Options
After you have specified scheduling options, you must specify the Report Information.
The following image shows the Report Information window, which is where you specify thereport format, whether to enable report bursting, and the Execution ID and password thatis authorized to execute procedures on the server running the report.
60 WebFOCUS
Report Information

How to Specify Report Information OptionsProcedure:
Specify the following report information:
1. From the Report Format drop-down list, select the report format. The default value isHTML.
Use the following guidelines when selecting a format:
The report format specified in this field overrides the format statement in theprocedure, except for specialized formats (EXL2K FORMULA, EXL2K PIVOT, EXL2KTEMPLATE, PPT TEMPLATE, DFIX). When a report uses a specialized format, theformat selection in the report schedule must match that specified in the report.
There are limitations on what formats are valid for certain options. For instance, notall formats are supported for bursting or printing.
The formats that support bursting are AHTML (except for FML reports), ALPHA,COM, COMMA, COMT, DHTML (except for FML reports), DFIX, DOC, EXL2K, EXL2KFORMULA, EXL2K TEMPLATE, EXL97, GIF, HTML and HTML ODP (except for FMLreports), JPEG, PDF, PNG, PPT, PS, SVG, TAB, TABT, and WP.
The formats that support printing are DOC, PDF (when you configure ReportCasterto enable PDF printing and the printer has the appropriate driver), PS, and WP.
When scheduling a procedure that was created using Graph Assistant or AdvancedGraph Assistant and:
an image format (JPEG, GIF, PNG, SVG) was chosen as the output format, thenyou must select an image format as the schedule output.
the PDF/SVG or PDF/GIF format was chosen as the output format, then youmust select PDF as the schedule output.
The HTML ODP format can only be distributed to the Report Library.
If the report is a Coordinated Compound PDF Report, then you can select anysupported compound format (AHTML, DHTML, EXL2K, FLEX, PDF, or PPT), but keepin mind that not all of these formats support bursting.
ReportCaster administrators specify which report formats will appear in the Tasks tab.Contact your ReportCaster administrator for changes to the format selections.
For detailed information about each format, see ReportCaster Development and LibraryContent manual.
ReportCaster HTML User Interface Manual 61
2. Using the Scheduling Wizard
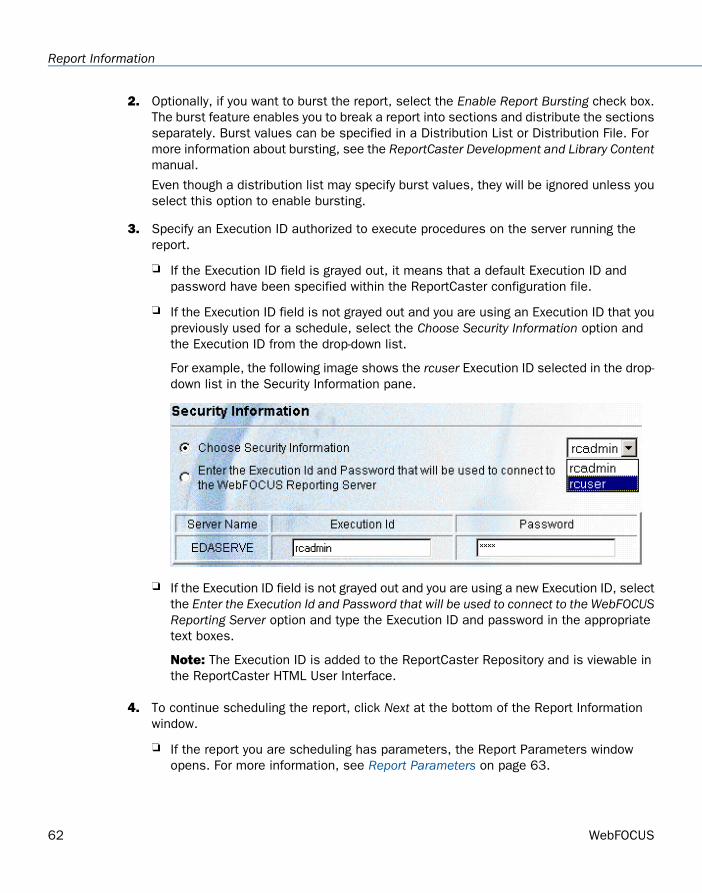
2. Optionally, if you want to burst the report, select the Enable Report Bursting check box.The burst feature enables you to break a report into sections and distribute the sectionsseparately. Burst values can be specified in a Distribution List or Distribution File. Formore information about bursting, see the ReportCaster Development and Library Contentmanual.
Even though a distribution list may specify burst values, they will be ignored unless youselect this option to enable bursting.
3. Specify an Execution ID authorized to execute procedures on the server running thereport.
If the Execution ID field is grayed out, it means that a default Execution ID andpassword have been specified within the ReportCaster configuration file.
If the Execution ID field is not grayed out and you are using an Execution ID that youpreviously used for a schedule, select the Choose Security Information option andthe Execution ID from the drop-down list.
For example, the following image shows the rcuser Execution ID selected in the drop-down list in the Security Information pane.
If the Execution ID field is not grayed out and you are using a new Execution ID, selectthe Enter the Execution Id and Password that will be used to connect to the WebFOCUSReporting Server option and type the Execution ID and password in the appropriatetext boxes.
Note: The Execution ID is added to the ReportCaster Repository and is viewable inthe ReportCaster HTML User Interface.
4. To continue scheduling the report, click Next at the bottom of the Report Informationwindow.
If the report you are scheduling has parameters, the Report Parameters windowopens. For more information, see Report Parameters on page 63.
62 WebFOCUS
Report Information

If the report you are scheduling does not have parameters, the Distribution windowopens. For more information, see Distribution Options in the Scheduling Wizard onpage 71.
Report Parameters
How to:
Specify Parameter Values
Reference:
Considerations When Specifying Parameter Values
If the schedule you are creating has parameters, you must specify the parameter values inthe Report Parameters window. Each parameter name and description are populatedautomatically, so you only need to specify the parameter values.
The following image shows an example of the Report Parameters window with a parameternamed Store Name and a value of Web Sales.
ReportCaster HTML User Interface Manual 63
2. Using the Scheduling Wizard
How to Specify Parameter ValuesProcedure:
To specify parameter values:
1. In the Value field, specify the parameter value(s) that correspond to each parameterwithin the report.
Note: For more information about specifying parameter values for a procedure, seeConsiderations When Specifying Parameter Values on page 64.
2. To continue to the Distribution window, click Next. For more information, see DistributionOptions in the Scheduling Wizard on page 71.
Considerations When Specifying Parameter ValuesReference:
Consider the following when specifying parameter values for a procedure:
The maximum number of characters for each parameter value is 3200. You can storemultiple values for a single parameter, however, multiple values for a parameter arestored as one entry that must not exceed the 3200 maximum character limit.
ReportCaster displays the description for the parameter when it is specified in theprocedure. Otherwise, ReportCaster displays the parameter name.
ReportCaster performs field validation for numeric and alpha formats, and range valuevalidation.
ReportCaster displays default variable values, as well as static or dynamic single-selectand multi-select lists.
Note:
The No Selection option is displayed for dynamic multi-select lists. When selected,this option does not perform any data selection test on that field.
ReportCaster does not support using the -HTMLFORM command to create a dynamicselectable list of parameter values.
As an alternate method of creating a dynamic selectable list of parameter values, usethe schedule technique in the HTML Composer.
The Specify All Parameter Values check box is always enabled if there is any parametersavailable for the report (Standard Report, My Report, or WF Server Procedure). You cancheck or uncheck this option to quickly enable or disable the check boxes for eachindividual parameter. If the check box for an individual parameter is unchecked, the inputfield for the parameter value is disabled, the default parameter value(s) are displayed(but cannot be changed), and no parameter data is saved to the ReportCaster Repository.
64 WebFOCUS
Report Parameters

ReportCaster will not prompt for variables with defaults set by the -DEFAULTH command.The purpose of the -DEFAULTH command is to enable you to assign amper variables adefault value and not be dynamically prompted for that variable.
When specifying parameters with special characters (for example, %, &, |):
If you are specifying the entire WHERE condition as the parameter value, you must enclosethe value within two single quotation marks rather than a double quotation mark. Forexample: ''WHERE CAR NOT LIKE MOTO%''
If you are only specifying a value as the parameter value, it is not necessary to enclosethe parameter value within quotation marks. For example: O&DINFO
Note: You can only schedule saved procedures using ReportCaster. HTML forms cannot bescheduled using ReportCaster. Parameter prompting is not available in pre-processing orpost-processing procedures. For more information about WebFOCUS auto prompting, seeCoding a User Interface in the Developing Reporting Applications manual.
Setting a Default Variable Parameter ValueExample:
Tip: Since ReportCaster requires considerations for special characters, we recommend usingthe syntax specified in the following examples.
The following procedure sets a default value of NY for the STATE (2-3 letters for US State)field, and a default value of Web Sales for the SNAME (Store Name) field. Note that theremust be an ampersand in front of the field name in the -DEFAULT command for the ampervariable(s) to contain a default attribute in ReportCaster.
-DEFAULT &STATE=NY-DEFAULT &SNAME=Web SalesTABLE FILE CENTORDSUM QTY_IN_STOCK BY STATE BY SNAME BY PRODNAMEON TABLE SUBHEAD"Inventory Report"WHERE STATE EQ '&STATE.2-3 letters for US State.'WHERE SNAME EQ '&SNAME.Store Name.'END
ReportCaster HTML User Interface Manual 65
2. Using the Scheduling Wizard
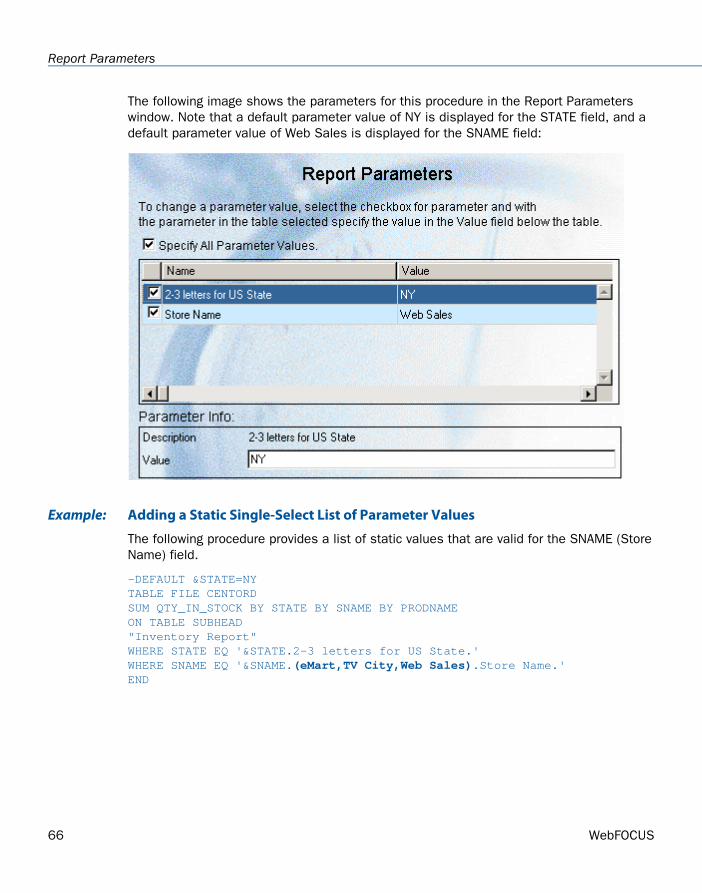
The following image shows the parameters for this procedure in the Report Parameterswindow. Note that a default parameter value of NY is displayed for the STATE field, and adefault parameter value of Web Sales is displayed for the SNAME field:
Adding a Static Single-Select List of Parameter ValuesExample:
The following procedure provides a list of static values that are valid for the SNAME (StoreName) field.
-DEFAULT &STATE=NYTABLE FILE CENTORDSUM QTY_IN_STOCK BY STATE BY SNAME BY PRODNAMEON TABLE SUBHEAD"Inventory Report"WHERE STATE EQ '&STATE.2-3 letters for US State.'WHERE SNAME EQ '&SNAME.(eMart,TV City,Web Sales).Store Name.'END
66 WebFOCUS
Report Parameters
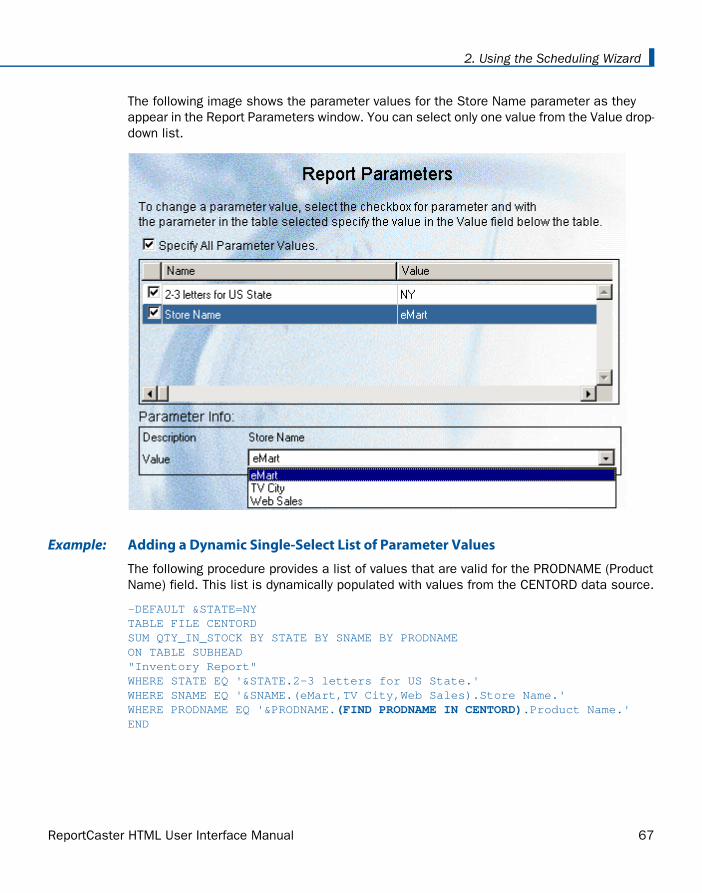
The following image shows the parameter values for the Store Name parameter as theyappear in the Report Parameters window. You can select only one value from the Value drop-down list.
Adding a Dynamic Single-Select List of Parameter ValuesExample:
The following procedure provides a list of values that are valid for the PRODNAME (ProductName) field. This list is dynamically populated with values from the CENTORD data source.
-DEFAULT &STATE=NYTABLE FILE CENTORDSUM QTY_IN_STOCK BY STATE BY SNAME BY PRODNAMEON TABLE SUBHEAD"Inventory Report"WHERE STATE EQ '&STATE.2-3 letters for US State.'WHERE SNAME EQ '&SNAME.(eMart,TV City,Web Sales).Store Name.'WHERE PRODNAME EQ '&PRODNAME.(FIND PRODNAME IN CENTORD).Product Name.'END
ReportCaster HTML User Interface Manual 67
2. Using the Scheduling Wizard
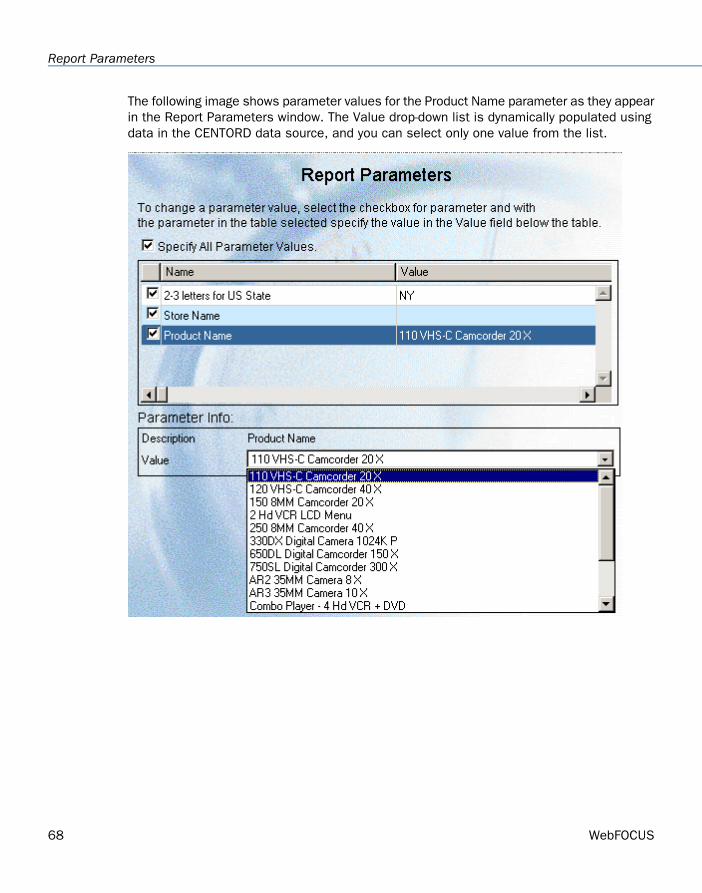
The following image shows parameter values for the Product Name parameter as they appearin the Report Parameters window. The Value drop-down list is dynamically populated usingdata in the CENTORD data source, and you can select only one value from the list.
68 WebFOCUS
Report Parameters

Adding a Static Multi-Select List of Parameter ValuesExample:
The following procedure provides a list of static values that are valid for the SNAME (StoreName) field.
-DEFAULT &STATE=NYTABLE FILE CENTORDSUM QTY_IN_STOCK BY STATE BY SNAME BY PRODNAMEON TABLE SUBHEAD"Inventory Report"WHERE STATE EQ '&STATE.2-3 letters for US State.'WHERE SNAME EQ &SNAME.(OR(eMart,TV City,Web Sales)).Store Name.END
The following image of the Report Parameters window shows the Store Name parameterand its Value drop-down list with multiple selections.
ReportCaster HTML User Interface Manual 69
2. Using the Scheduling Wizard
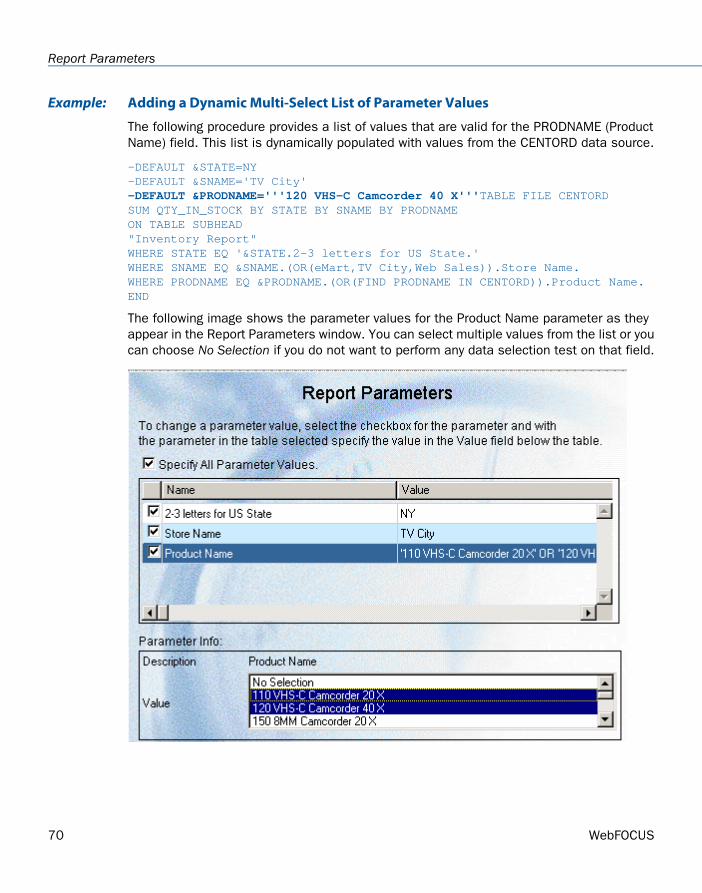
Adding a Dynamic Multi-Select List of Parameter ValuesExample:
The following procedure provides a list of values that are valid for the PRODNAME (ProductName) field. This list is dynamically populated with values from the CENTORD data source.
-DEFAULT &STATE=NY-DEFAULT &SNAME='TV City'-DEFAULT &PRODNAME='''120 VHS-C Camcorder 40 X'''TABLE FILE CENTORDSUM QTY_IN_STOCK BY STATE BY SNAME BY PRODNAMEON TABLE SUBHEAD"Inventory Report"WHERE STATE EQ '&STATE.2-3 letters for US State.'WHERE SNAME EQ &SNAME.(OR(eMart,TV City,Web Sales)).Store Name.WHERE PRODNAME EQ &PRODNAME.(OR(FIND PRODNAME IN CENTORD)).Product Name.END
The following image shows the parameter values for the Product Name parameter as theyappear in the Report Parameters window. You can select multiple values from the list or youcan choose No Selection if you do not want to perform any data selection test on that field.
70 WebFOCUS
Report Parameters

Important: When coding a dynamic multi-select list of parameter values using -DEFAULTsyntax without storing parameter values in the ReportCaster Repository, use the -DEFAULTvalue as specified in the procedure. The scheduled request will fail if you do not specifythree single quotation marks before and after the parameter value string.
Distribution Options in the Scheduling Wizard
In this section:
Distributing a Report Using E-mail in the Scheduling Wizard
Distributing a Report to a Printer in the Scheduling Wizard
Distributing a Report to Managed Reporting in the Scheduling Wizard
Distributing a Report to the Report Library in the Scheduling Wizard
The Distribution window enables you to select how you want to distribute scheduled reportoutput. You can distribute the report using one of the following methods:
Email. See Distributing a Report Using E-mail in the Scheduling Wizard on page 72.
Printer. See Distributing a Report to a Printer in the Scheduling Wizard on page 85.
Managed Reporting. See Distributing a Report to Managed Reporting in the SchedulingWizard on page 87.
Library. See Distributing a Report to the Report Library in the Scheduling Wizard on page90.
Note: Using the ReportCaster Server Configuration tool, you can configure the distributionmethods that appear in the Scheduling Wizard. If you want the Scheduling Wizard to displaydifferent distribution methods, contact your ReportCaster administrator.
ReportCaster HTML User Interface Manual 71
2. Using the Scheduling Wizard
Distributing a Report Using E-mail in the Scheduling Wizard
How to:
Distribute a Report Using E-mail
Retrieve E-mail Addresses for a Schedule Using Address Search
Reference:
Considerations When Distributing a Report Using E-mail
You can distribute a report as an e-mail attachment or within the body of an e-mail message(inline). Distributing a report as an inline e-mail message is particularly useful when thereport is distributed to mobile devices, fax machines, or through e-mail systems that do notsupport attachments. For more information about distributing a report to a fax machine, seeDistributing a Report to a Fax Machine Using E-mail on page 82.
Note:
The availability of the inline message option when you create a schedule depends on theInline Report Distribution setting in the ReportCaster Server Configuration tool. See theReportCaster administrator to enable this option.
The display of a report that is distributed as an inline e-mail message can be affectedby settings in the e-mail client.
How to Distribute a Report Using E-mailProcedure:
1. In the Distribution window, select Email from the Distribute Reports by drop-down list.
72 WebFOCUS
Distribution Options in the Scheduling Wizard

The following image shows the Distribute Reports by Email window, which containsoptions to specify the e-mail destination of the report, the reply address, and whetherthe report will be distributed as an e-mail attachment or within the body of an e-mailmessage (inline).
2. From the Mail Information drop-down list, select Single Address, Distribution File, orDistribution List.
Note: If the Email Delivery, Restrict Email Domains option is set to yes in theReportCaster Server Configuration tool, then only those e-mail domains (the portion ofthe e-mail address following the at symbol) listed in Allowed Email Domains (also in theServer Configuration tool) are valid e-mail recipients.
Single Address. In the accompanying text box, type the e-mail address of the singlerecipient. ReportCaster cannot validate the e-mail address. An incorrect or unresolvedaddress may not be noted in the log file. This depends upon the ability of the SMTPmail server to validate the e-mail address. The SMTP mail server returns undeliverablee-mail messages to the reply address you specify for the schedule.
ReportCaster HTML User Interface Manual 73
2. Using the Scheduling Wizard

Tip:
You can specify multiple e-mail addresses within the Single Address option.Separate each e-mail address with a comma or a semicolon. The e-mail addresseswill appear in the To line of a single e-mail when the scheduled output isdistributed. Each individual e-mail address can be a maximum of 130 charactersas per SMTP specification. The total maximum length of this field is 800characters.
Additionally, you can use group mail lists (defined on your mail server) with theSingle Address option. Group mail lists enable you to distribute a report ornotification to multiple recipients without having to maintain multiple e-mailaddresses in the ReportCaster Repository. The format of the group mail list isdependent upon the mail server being used. For example, if you are using aMicrosoft Exchange Server and your group mail list is defined as #group1, youwould enter group1@listdomain in the Single Address field. If the group mail listcontains a space within its name, it must be enclosed within quotation marks.For more information, see your mail server administrator.
You can retrieve e-mail addresses defined in an LDAP data source. For moreinformation, see How to Retrieve E-mail Addresses for a Schedule Using AddressSearch on page 77.
Distribution File. In the accompanying text box, type the full path and file name ofan external distribution file. The path and file must be accessible to the ReportCasterDistribution Server.
The external distribution contains comma-delimited records that specify e-mailaddresses, burst values, and encryption information. Distribution Files can also beautomatically deleted after a schedule runs. For information on Distribution Files,contact your ReportCaster administrator or see the ReportCaster Administrationmanual.
Tip: You can specify multiple e-mail addresses within a single record of an externaldistribution file. For more information, see the ReportCaster Development and LibraryContent manual.
74 WebFOCUS
Distribution Options in the Scheduling Wizard

Distribution List. The following image shows the Select Address drop-down list.
From the Select Address drop-down list, select a Distribution List. Note that this drop-down list displays all e-mail Distribution Lists that you are the owner of, and all publice-mail Distribution Lists. For more information about creating a Distribution List, seeWorking With Distribution Lists in the HTML User Interface on page 101.
3. In the From field, type any value (for example, the name of the person creating theschedule). ReportCaster does not require this field, but your e-mail system may requireit.
4. In the Reply Address field, type a valid e-mail address. If recipients reply to the e-mail,their messages are sent to this address. If your e-mail system is unable to deliver thecontent, the undeliverable output message is also returned to this address. ReportCasterrequires this field.
Tip: You can retrieve e-mail addresses defined in an LDAP data source. For more details,see How to Retrieve E-mail Addresses for a Schedule Using Address Search on page 77.
5. In the Subject field, type the text you want to appear in the e-mail subject line.ReportCaster does not require this information, but your e-mail system may require it.If you do not type an entry in this field, the text that was entered in the scheduleDescription field will appear in the subject line of the e-mail.
When creating a schedule, you can place multiple parameters and burst values fromthe scheduled procedure in an e-mail subject line. This enables the subject to be createddynamically in order to personalize e-mails to recipients. Parameters referenced in thesubject line must be stored with the schedule information in the ReportCaster tables.
Parameters must be specified in the format '&parmname' (where parmname is the nameof the parameter). Burst values must be specified using the syntax '%BURST'.
Note:
The parameter name cannot also be the name of an existing WebFOCUS procedure.You can specify an unlimited number of parameters.
If you have multiple burst values in a Distribution List, only the first value sent to theReportCaster Distribution Server is included in the subject.
For an example of specifying parameters and burst values in an e-mail subject line, seeSpecifying Parameters and Burst Values in an E-mail Subject Line on page 77.
6. In the Save As Report Name field, type a name for the report to be distributed.
ReportCaster HTML User Interface Manual 75
2. Using the Scheduling Wizard

By default, this value is populated as descname.ext, where descname is the descriptivename of the Managed Reporting procedure, and ext is the extension for the format youselected, for example, Regional Sales.htm. If the report is burst, it is distributed asRegional Sales_burstvalue.htm. If you decide to change the default value, and you specifyan extension, be sure to specify the extension of the format you selected. If you do notspecify an extension, ReportCaster automatically uses the extension of the format youselected. If you are distributing the report to the Report Library, the category name underwhich the report is stored is the domain name.
7. Specify whether you want to distribute the report as an e-mail attachment or within thebody of the e-mail message (inline). (The availability of the inline option depends on yourReportCaster configuration.)
If you want to distribute the report within the body of an e-mail message, select theSelect report as inline message option.
When distributing to PDA or Blackberry, check the capabilities of the device. If thedevice does not support attachments, use the inline option. Information Buildersrecommends using the WP format.
If you want to distribute the report as an e-mail attachment, select the Send reportas attachment option. If you want to send an optional message within the body ofyour e-mail, type the message in the Enter message for body of email text box. Themessage can contain a maximum of 256 characters.
8. To continue to the Settings window, click Next. For more information, see Priority,Notification, and Zip File Options on page 96.
Note: For information on the e-mail distribution method, see Considerations When Distributinga Report Using E-mail on page 84.
76 WebFOCUS
Distribution Options in the Scheduling Wizard
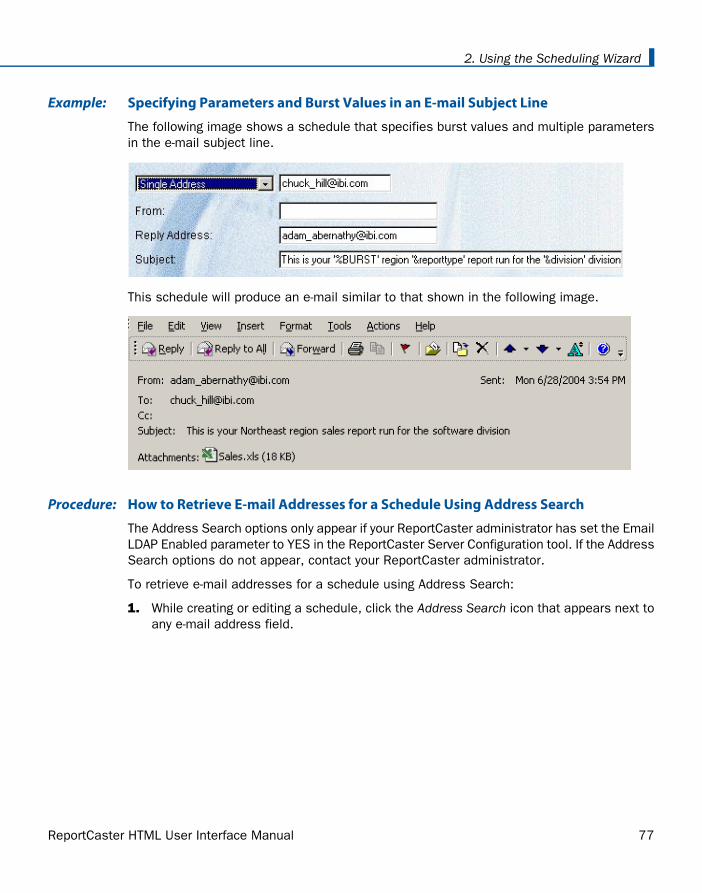
Specifying Parameters and Burst Values in an E-mail Subject LineExample:
The following image shows a schedule that specifies burst values and multiple parametersin the e-mail subject line.
This schedule will produce an e-mail similar to that shown in the following image.
How to Retrieve E-mail Addresses for a Schedule Using Address SearchProcedure:
The Address Search options only appear if your ReportCaster administrator has set the EmailLDAP Enabled parameter to YES in the ReportCaster Server Configuration tool. If the AddressSearch options do not appear, contact your ReportCaster administrator.
To retrieve e-mail addresses for a schedule using Address Search:
1. While creating or editing a schedule, click the Address Search icon that appears next toany e-mail address field.
ReportCaster HTML User Interface Manual 77
2. Using the Scheduling Wizard

The following image shows action buttons, input fields, and drop-down lists in the AddressSearch pane.
2. In the Search Pattern fields, type the search string. You can search using the followingcombinations:
Last Name [Equals | Starts with | Ends with | Contains]
First Name [Equals | Starts with | Ends with | Contains]
Email [Equals | Starts with | Ends with | Contains]
78 WebFOCUS
Distribution Options in the Scheduling Wizard
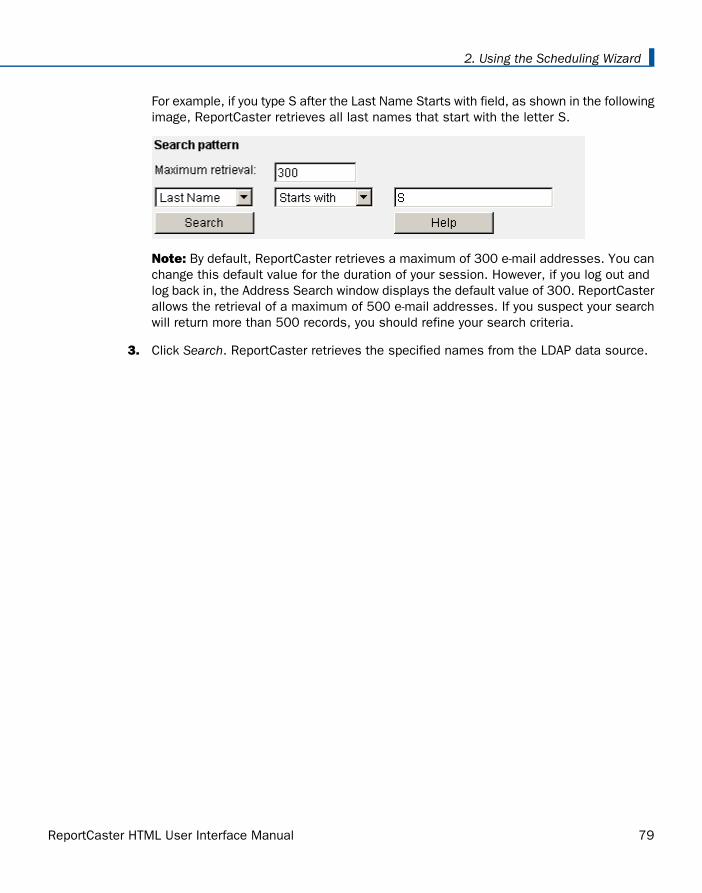
For example, if you type S after the Last Name Starts with field, as shown in the followingimage, ReportCaster retrieves all last names that start with the letter S.
Note: By default, ReportCaster retrieves a maximum of 300 e-mail addresses. You canchange this default value for the duration of your session. However, if you log out andlog back in, the Address Search window displays the default value of 300. ReportCasterallows the retrieval of a maximum of 500 e-mail addresses. If you suspect your searchwill return more than 500 records, you should refine your search criteria.
3. Click Search. ReportCaster retrieves the specified names from the LDAP data source.
ReportCaster HTML User Interface Manual 79
2. Using the Scheduling Wizard

The following image shows retrieved search data under the Name and Email Addresscolumn headings in the Address Search pane.
4. Select an e-mail address you want to use in your schedule, and then click the field (forexample, Reply) for which you want to insert the e-mail address. Repeat this process ifyou want to select multiple e-mail addresses.
Note:
Alternatively, double-click an e-mail address to automatically insert it into the fieldfor which you clicked the Address Search icon.
If the Email Delivery, Restrict Email Domains option is set to yes in the ReportCasterServer Configuration tool, then only those e-mail domains (the portion of the e-mailaddress following the at symbol) listed in Allowed Email Domains (also in the ServerConfiguration tool) are valid e-mail recipients.
80 WebFOCUS
Distribution Options in the Scheduling Wizard
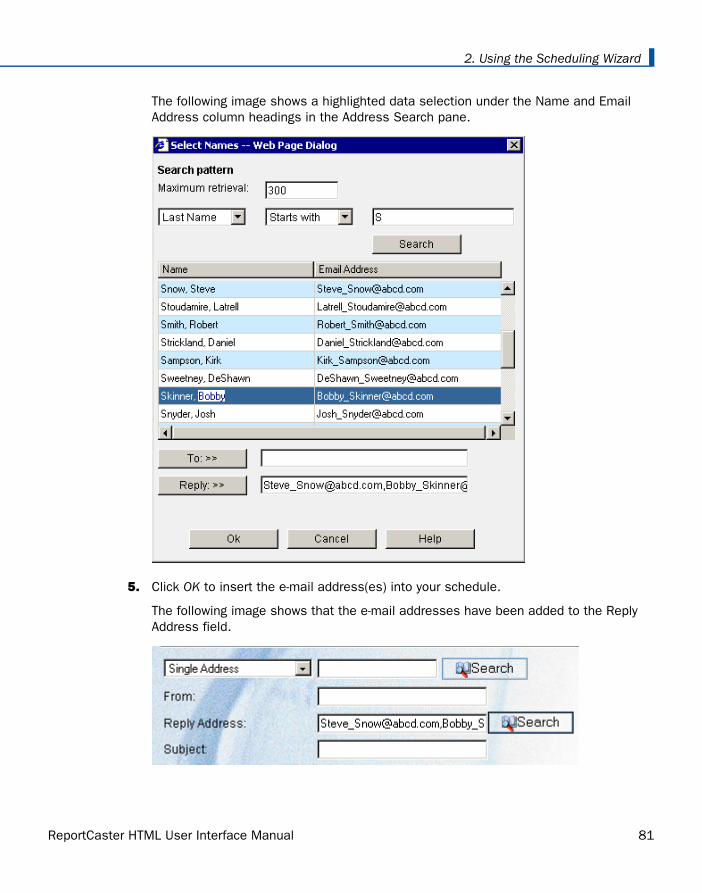
The following image shows a highlighted data selection under the Name and EmailAddress column headings in the Address Search pane.
5. Click OK to insert the e-mail address(es) into your schedule.
The following image shows that the e-mail addresses have been added to the ReplyAddress field.
ReportCaster HTML User Interface Manual 81
2. Using the Scheduling Wizard
By default, ReportCaster separates multiple e-mail addresses with a comma. The e-mailaddresses appear in the To line of a single e-mail when the scheduled output isdistributed.
Note: Repeat these steps if you want to change your search criteria or insert additional e-mail addresses into your schedule. If you insert additional e-mail addresses while the originale-mail addresses are selected, the new e-mail addresses replace the old ones. If you positionyour cursor after the original e-mail addresses, the new e-mail addresses are appended tothe old ones, separated by a comma. However, be aware that the maximum number ofcharacters is 800 when inserting addresses.
Distributing a Report to a Fax Machine Using E-mailExample:
To distribute an inline e-mail message to a fax machine, you must register your e-mail addresswith a third-party e-mail distribution provider. The features offered by providers, (such assupported area codes and file formats), in addition to requirements on the structure of e-mail parameter values, may vary. It is important that you select a provider whose featuresare compatible with ReportCaster.
The following example shows how to distribute a report directly to a fax machine. The e-mailaddress, [email protected], was registered with the e-mail distribution provider calledemfax.com. During the processing of the request, ReportCaster generates the scheduledreport output and then distributes it using the e-mail address of emfax.com. The reply addressspecified in ReportCaster is the registered e-mail address that is validated by emfax.com.If the e-mail address is valid, emfax.com distributes the report to the fax number12129999999. The validation of the registered e-mail address is performed by emfax.com,not by ReportCaster.
Note: The syntax used in this illustration is specific to this example. The required syntaxfor your provider may be different.
1. On the Distribution window, select Email from the Distribute Reports by drop-down list.
82 WebFOCUS
Distribution Options in the Scheduling Wizard
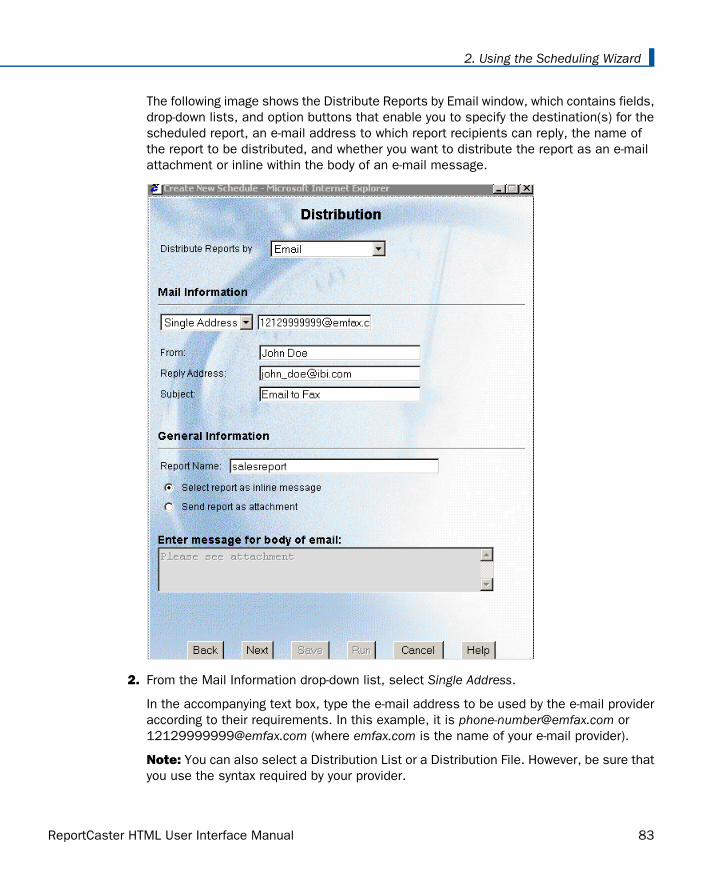
The following image shows the Distribute Reports by Email window, which contains fields,drop-down lists, and option buttons that enable you to specify the destination(s) for thescheduled report, an e-mail address to which report recipients can reply, the name ofthe report to be distributed, and whether you want to distribute the report as an e-mailattachment or inline within the body of an e-mail message.
2. From the Mail Information drop-down list, select Single Address.
In the accompanying text box, type the e-mail address to be used by the e-mail provideraccording to their requirements. In this example, it is [email protected] [email protected] (where emfax.com is the name of your e-mail provider).
Note: You can also select a Distribution List or a Distribution File. However, be sure thatyou use the syntax required by your provider.
ReportCaster HTML User Interface Manual 83
2. Using the Scheduling Wizard

3. In the From field, type any value (for example, the name of the person creating theschedule). ReportCaster does not require this field, but your e-mail system or the e-mailprovider may require it.
4. In the Reply Address field, type your registered e-mail address. If your e-mail system isunable to deliver the content, the undeliverable output message is returned to thisaddress. ReportCaster requires this field.
5. In the Subject field, type the text you want to appear in the e-mail subject line.ReportCaster does not require this information, but your e-mail system or e-mail providermay require it.
6. In the Report Name field, type the name of the report to be distributed.
7. Select the Select report as inline message option button.
Note: You cannot distribute an e-mail attachment to a fax machine.
8. To continue to the Settings window, click Next at the bottom of the Distribution window.For more information, see Priority, Notification, and Zip File Options on page 96.
Considerations When Distributing a Report Using E-mailReference:
If the Email Delivery, Restrict Email Domains option is set to yes in the ReportCaster ServerConfiguration tool, then only those e-mail domains (the section of the e-mail address followingthe at (@) sign) listed in Allowed Email Domains (also in the Server Configuration tool) arevalid e-mail recipients. The Distribution Server will not deliver output to an e-mail addresswhose domain is not on this list. Instead, the schedule will fail and an error message willbe written to the ReportCaster log.
ReportCaster transfers e-mail asynchronously to your e-mail system. The delivery timedepends upon your e-mail system.
Exchange Mail Server Considerations:
If you do not see a From value that is specified in the schedule information for the e-mailyou receive in the e-mail client inbox, then this is due to their mail server configuration.For more information on how to control this setting for a Microsoft Exchange Server, seethe following URLs:
http://support.microsoft.com/default.aspx?scid=kb;en-us;288635
http://support.microsoft.com/kb/174755/EN-US/
http://support.microsoft.com/default.aspx?scid=kb;en-us;242301
Alternatively, you can contact Microsoft customer support for assistance. If you are usinga mail server other than a Microsoft Exchange Server, refer to the vendor documentationor contact their customer support for assistance.
84 WebFOCUS
Distribution Options in the Scheduling Wizard
When distributing a report to an Exchange Server, attachment names have a .txt extensionadded to WP and DOC format output. This occurs because WP and DOC formats are notmapped to a standard MIME type. The Exchange Server interprets WP and DOC outputas a text/plain MIME type and adds the .txt extension to the end of the file name. Forexample, hold.wp.txt or hold.doc.txt.
Exchange Server individual recipient names ([email protected]) and ExchangeServer-defined distribution lists ([email protected]) can be specified in ReportCasterDistribution Lists. However, Exchange Server user-defined distribution lists cannot bereferenced in a ReportCaster Distribution List. They are defined internally on the usersmachine. The ReportCaster Distribution List is parsed by the Exchange Server and notby the mail client. Since a ReportCaster Distribution List is parsed by the Exchange Server,when an external server submits an Exchange Server distribution list, it must contain theproper prefix and the proper domain (which is prefaced by an at (@) sign). Consult yourExchange Server administrator for these values.
CC:Mail Considerations:
When you distribute ReportCaster generated e-mail attachments greater than 20K in sizeto users of cc:Mail, cc:Mail renames the attachment textitm.txt, ignoring the file name andextension supplied by the user. This change affects DOC, HTML, and WP formats on UNIXand Windows platforms. However, despite the naming convention issue, the attachmentscontain the correct output and can be viewed if the attachment is saved to disk with thecorrect extension.
Distributing a Report to a Printer in the Scheduling Wizard
How to:
Distribute a Report to a Printer
This section explains how to schedule a report to a printer. The report formats that supportprinting are DOC, PDF (when you configure ReportCaster to enable PDF printing and theprinter has the appropriate driver), PS, and WP.
How to Distribute a Report to a PrinterProcedure:
1. On the Distribution window, select Printer from the Distribute Reports by drop-down list.
ReportCaster HTML User Interface Manual 85
2. Using the Scheduling Wizard
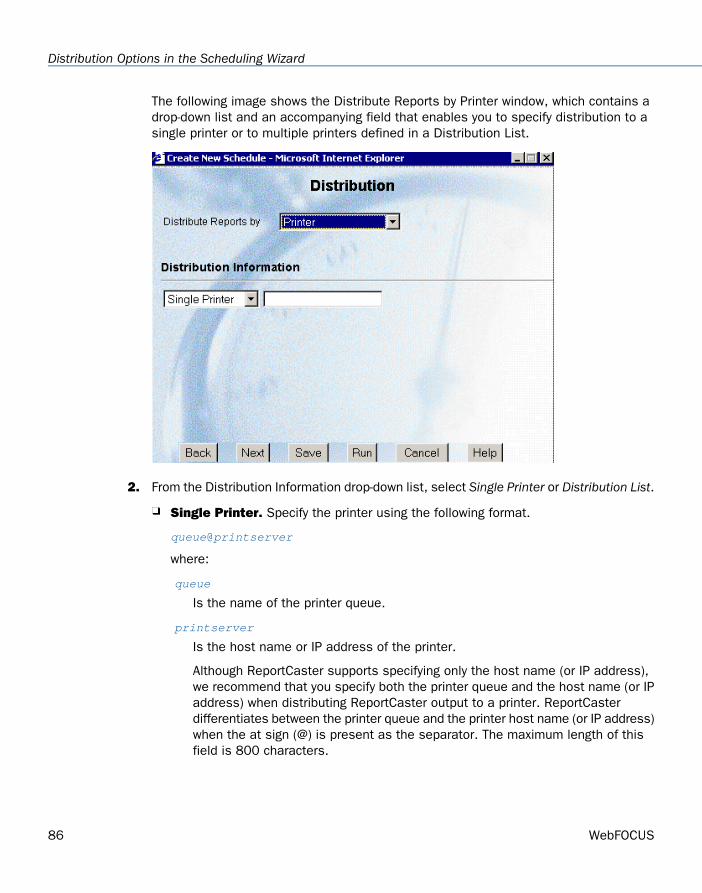
The following image shows the Distribute Reports by Printer window, which contains adrop-down list and an accompanying field that enables you to specify distribution to asingle printer or to multiple printers defined in a Distribution List.
2. From the Distribution Information drop-down list, select Single Printer or Distribution List.
Single Printer. Specify the printer using the following format.
queue@printserver
where:
queue
Is the name of the printer queue.
printserver
Is the host name or IP address of the printer.
Although ReportCaster supports specifying only the host name (or IP address),we recommend that you specify both the printer queue and the host name (or IPaddress) when distributing ReportCaster output to a printer. ReportCasterdifferentiates between the printer queue and the printer host name (or IP address)when the at sign (@) is present as the separator. The maximum length of thisfield is 800 characters.
86 WebFOCUS
Distribution Options in the Scheduling Wizard
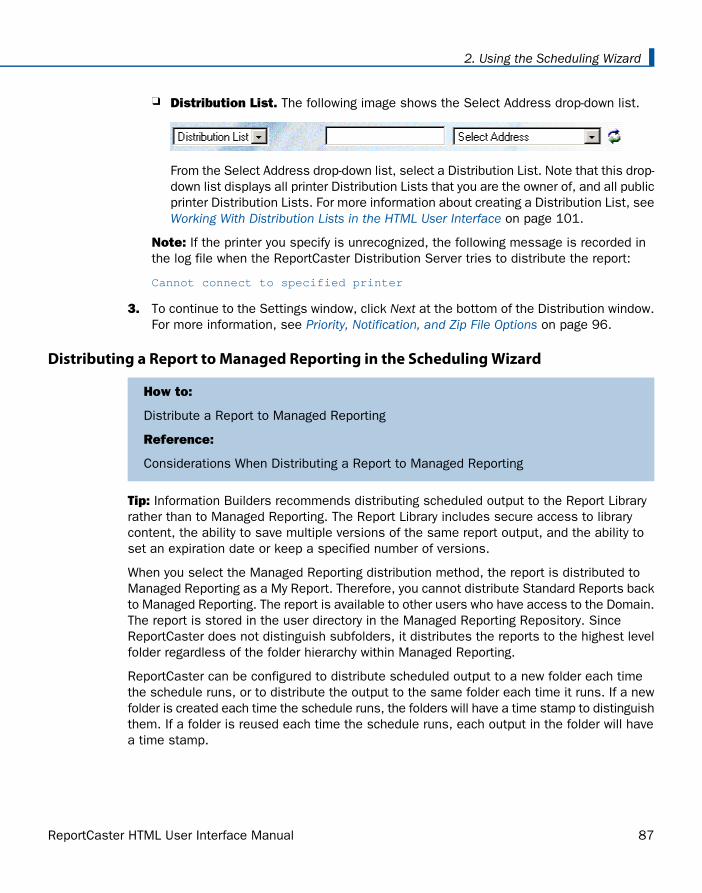
Distribution List. The following image shows the Select Address drop-down list.
From the Select Address drop-down list, select a Distribution List. Note that this drop-down list displays all printer Distribution Lists that you are the owner of, and all publicprinter Distribution Lists. For more information about creating a Distribution List, seeWorking With Distribution Lists in the HTML User Interface on page 101.
Note: If the printer you specify is unrecognized, the following message is recorded inthe log file when the ReportCaster Distribution Server tries to distribute the report:
Cannot connect to specified printer
3. To continue to the Settings window, click Next at the bottom of the Distribution window.For more information, see Priority, Notification, and Zip File Options on page 96.
Distributing a Report to Managed Reporting in the Scheduling Wizard
How to:
Distribute a Report to Managed Reporting
Reference:
Considerations When Distributing a Report to Managed Reporting
Tip: Information Builders recommends distributing scheduled output to the Report Libraryrather than to Managed Reporting. The Report Library includes secure access to librarycontent, the ability to save multiple versions of the same report output, and the ability toset an expiration date or keep a specified number of versions.
When you select the Managed Reporting distribution method, the report is distributed toManaged Reporting as a My Report. Therefore, you cannot distribute Standard Reports backto Managed Reporting. The report is available to other users who have access to the Domain.The report is stored in the user directory in the Managed Reporting Repository. SinceReportCaster does not distinguish subfolders, it distributes the reports to the highest levelfolder regardless of the folder hierarchy within Managed Reporting.
ReportCaster can be configured to distribute scheduled output to a new folder each timethe schedule runs, or to distribute the output to the same folder each time it runs. If a newfolder is created each time the schedule runs, the folders will have a time stamp to distinguishthem. If a folder is reused each time the schedule runs, each output in the folder will havea time stamp.
ReportCaster HTML User Interface Manual 87
2. Using the Scheduling Wizard

How to Distribute a Report to Managed ReportingProcedure:
1. In the New Schedule Distribution window, select Managed Reporting from the DistributeReports by drop-down list.
The following image shows the Distribute Reports by Managed Reporting window, whichcontains the Folder Name field where you must specify the Managed Reporting foldername where you will distribute the report.
2. In the Folder Name field, type the job description of the scheduled report. This entrymust not exceed 90 characters.
This is will be the name of the folder(s) in Managed Reporting that contain the outputof the schedule when it runs.
3. To continue to the Settings window, click Next at the bottom of the Distribution window.For more information, see Priority, Notification, and Zip File Options on page 96.
88 WebFOCUS
Distribution Options in the Scheduling Wizard
Considerations When Distributing a Report to Managed ReportingReference:
When distributing a report to Managed Reporting, consider the following:
You cannot distribute Standard Reports back to Managed Reporting.
Multiple Managed Reporting reports are distributed to the same folder if they both runat the same time. Information Builders recommends assigning each Managed Reportingreport a different start time.
The PostScript (PS) format is not supported for this distribution method.
When ReportCaster is configured with a WebFOCUS Client on a z/OS UNIX Web serverand a WebFOCUS Reporting Server on z/OS, Managed Reporting distribution is notsupported for EXCEL or WK1 format. This limitation is due to an EBCDIC to ASCIItranslation problem. This problem does not occur when the WebFOCUS Client is installedon UNIX (AIX, HP-UX, Sun) or Windows platforms. We recommend using the EXL2K formatinstead.
When distributing a report to Managed Reporting with a format of COMMA, the followinginformation must be added to the /client76/wfs/etc/mime.wfs file to open the outputin Excel:
<ADDTYPE> .csv application/vnd.ms-excel binary yes yes no yes no
When distributing a report to Managed Reporting, you can only drill-down to another reportif it is a procedure on the WebFOCUS Reporting Server. There is currently no support fordrill-down functionality to Managed Reporting procedures.
If you are distributing a large report to Managed Reporting, take into consideration theamount of memory configured on your Application Server. The report output returned toManaged Reporting will be stored in memory by the WebFOCUS Client (Servlet) and thenwritten to the Managed Reporting Repository. If there is not enough memory availableon your Application Server, the ReportCaster servlet trace file will contain the followingmessage:
return code not found. See your application server trace for information.
The log report will include the following message:
Unable to distribute to Managed Reporting: return code not found
The problem can be resolved by one or more of the following ways:
Increase the memory available on your Application Server. Contact your ReportCasteradministrator.
Modify your report so that it returns a smaller report or less output.
Limit the number of scheduled jobs distributing to Managed Reporting during the sametime period.
ReportCaster HTML User Interface Manual 89
2. Using the Scheduling Wizard
Distributing a Report to the Report Library in the Scheduling Wizard
How to:
Distribute a Report to the Report Library
Reference:
Changing the Burst Option When Distributing to the Library
Considerations When Limiting Distribution to Values in an Access List
When you create a schedule, you can specify to distribute report output to the Report Library,a storage and retrieval facility. When distributing a report to the Report Library, you can sendan e-mail informing users of its availability and provide the URL to the content in the library.
The Report Library includes secure access to library content, the ability to save multipleversions of the same report output, and the ability to set an expiration date or keep aspecified number of versions. The Report Library is only available to ReportCaster users whohave been granted library privileges.
Note: When a report is distributed to the Report Library, the Log Report will include thereport ID and the report version number. This enables you to confirm which reports andreport version were distributed to the Library.
For more information about the Report Library, see the ReportCaster Development and LibraryContent manual.
How to Distribute a Report to the Report LibraryProcedure:
1. In the New Schedule Distribution window, select Library from the Distribute Reports bydrop-down list.
90 WebFOCUS
Distribution Options in the Scheduling Wizard

The following image shows the Distribute Reports by Library window, which containsfields, drop-down lists, and option buttons that enable you to specify which users canview the report in the library, and how long to store the report in the library. You canalso optionally specify e-mail information to alert users with appropriate access rightsthat the report is available in the library, and provide direct access to the report.
2. Optionally, specify a category in the Library where the report will be distributed. To dothis, select the Category in Library option and type the name of an existing or new Librarycategory.
Note: By default, the report is stored in the Library under a category that is named withthe Managed Reporting domain of the report.
3. Optionally, select the Send email after saving report to library check box if you want tosend an e-mail message to users with access rights to the content in the Report Library.Any user with access to this report receives this e-mail message, which contains theURL address needed to access the scheduled report output.
ReportCaster HTML User Interface Manual 91
2. Using the Scheduling Wizard

Note:
ReportCaster administrators can limit to whom the Email for library option is available.For details, see Configuring ReportCaster the ReportCaster Administration manual.
If the Email Delivery, Restrict Email Domains option is set to yes in the ReportCasterServer Configuration tool, then only those e-mail domains (the portion of the e-mailaddress following the at (@) sign) listed in Allowed Email Domains (also in the ServerConfiguration tool) are valid e-mail recipients.
Selecting the Send email after saving report to library check box activates the followingfields:
From (optional). This can be any value (for example, the name of the person creatingthe schedule). ReportCaster does not require this, but your e-mail system may requireit.
Reply Address (required). The e-mail address of the sender. If report recipientsreply to the notification, their messages are sent to this address. If your e-mail systemis unable to deliver a report, the undeliverable report message is also returned tothis address.
Subject (optional). Type the text you want to appear in the subject line of the e-mailmessage.
Enter message for body of email (optional). Type an e-mail message in the textbox. You can overwrite the default message.
Note: When a Managed Reporting report (Standard Report or My Report) is distributedto the Report Library and Public distribution is specified, the library e-mail is sent onlyto the Managed Reporting users authorized to access the Domain from which the reportoriginated. For Access List distribution, there is no filtering or validation done for thelibrary e-mail, as it is the responsibility of the Access List owner to maintain the list sothat it only includes authorized users. Users who receive a library e-mail who are notauthorized to view the report according to Managed Reporting security, cannot view thereport in the library.
4. From the Access Options drop-down list, select one of the following option buttons tospecify which users can view the report in the library. Depending on what you previouslyspecified, these users may also receive an e-mail notification when the report isdistributed to the library.
Owner. Only the owner of the schedule has access to the report in the library. Thisis the default value.
Public. All users with access to the Report Library can view the report in the library.
92 WebFOCUS
Distribution Options in the Scheduling Wizard

Access List. Only the users or groups defined in the Access List, and the owner ofthe schedule, can view the report.
For more information about creating a Library Access List, see the ReportCasterDevelopment and Library Content manual.
Note: ReportCaster administrators can limit the Access Options that appear on theDistribution window. For details, see Configuring ReportCaster in the ReportCasterAdministration manual.
5. Optionally, select the Limit distribution to values in Access List check box. When youselect this check box, only the burst values specified in an Access List are distributedto the Report Library. This option is used in combination with the Enable Report Burstingoption (located in the Report Information window) and is only enabled when the AccessList option is selected. For more information, see Considerations When LimitingDistribution to Values in an Access List on page 95.
6. From the Expiration of Reports in Library drop-down list, select one of the followingoptions:
Never Expire. The report remains in the Report Library until it is manually deletedby the owner or ReportCaster administrator.
Expire after. If you select this option, specify a number and then select one of thefollowing options:
version(s). The Report Library stores the output for the top number of versionsspecified. For example, if you specify 3 versions and the current version is 7, thenversions 7, 6, and 5 are stored in the library. However, if you delete version 6, thenonly versions 7 and 5 are stored in the library. If you then distribute version 8 to thelibrary, only version 8 and 7 are stored in the library since version 6 was deleted andversion 5 is not among the top 3 versions.
day(s). The Report Library stores the report for the number of day(s) specified.
week(s). The Report Library stores the report for the number of week(s) specified.
month(s). The Report Library stores the report for the number of month(s) specified.
year(s). The Report Library stores the report for the number of year(s) specified.
Note: ReportCaster automatically purges expired reports one hour after the scheduledLog Purge Time. The default Log Purge Time is 1:00 A.M., therefore, the defaultlibrary purge time is 2:00 A.M. each day.
7. To continue to the Settings window, click Next at the bottom of the Distribution window.For more information, see Priority, Notification, and Zip File Options on page 96.
ReportCaster HTML User Interface Manual 93
2. Using the Scheduling Wizard
Note: When distributing a report to the Report Library, you can only drill-down to anotherreport if it is a procedure on the WebFOCUS Reporting Server. Currently, no support existsfor drill-down functionality to Managed Reporting procedures.
Changing the Burst Option When Distributing to the LibraryReference:
Enabling or disabling the burst option in a schedule being distributed to the library is notrecommended because burst and non-burst reports appear differently in the library. Ratherthan editing your schedule and changing this option, we recommend creating a new schedule,as follows:
1. Clone your existing library schedule (see Cloning a Schedule on page 117) and specify aunique name for the new schedule job description.
2. Edit the new schedule as follows:
a. Select the Enabled check box to activate the schedule.
b. Enable or disable the burst option, as needed.
c. Click Save to save the schedule.
3. Optionally, delete the original schedule if it is no longer needed and evaluate whetheryou need the existing content in the library.
Note:
When ReportCaster distributes the new schedule content to the library, a new folder iscreated for the library content. To delete the original folder in the library, you must deleteall versions of the report within the folder.
94 WebFOCUS
Distribution Options in the Scheduling Wizard
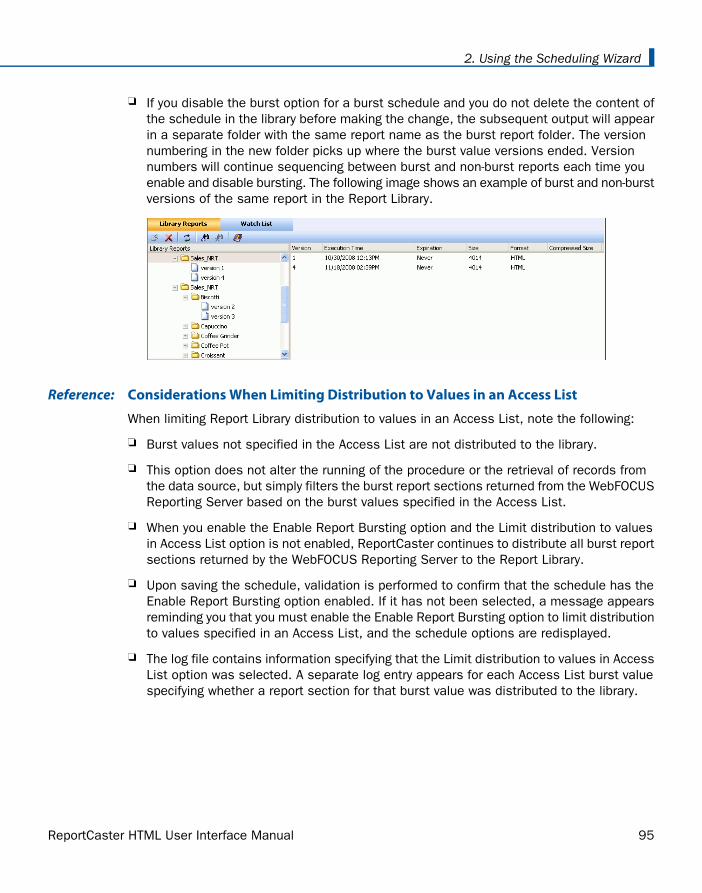
If you disable the burst option for a burst schedule and you do not delete the content ofthe schedule in the library before making the change, the subsequent output will appearin a separate folder with the same report name as the burst report folder. The versionnumbering in the new folder picks up where the burst value versions ended. Versionnumbers will continue sequencing between burst and non-burst reports each time youenable and disable bursting. The following image shows an example of burst and non-burstversions of the same report in the Report Library.
Considerations When Limiting Distribution to Values in an Access ListReference:
When limiting Report Library distribution to values in an Access List, note the following:
Burst values not specified in the Access List are not distributed to the library.
This option does not alter the running of the procedure or the retrieval of records fromthe data source, but simply filters the burst report sections returned from the WebFOCUSReporting Server based on the burst values specified in the Access List.
When you enable the Enable Report Bursting option and the Limit distribution to valuesin Access List option is not enabled, ReportCaster continues to distribute all burst reportsections returned by the WebFOCUS Reporting Server to the Report Library.
Upon saving the schedule, validation is performed to confirm that the schedule has theEnable Report Bursting option enabled. If it has not been selected, a message appearsreminding you that you must enable the Enable Report Bursting option to limit distributionto values specified in an Access List, and the schedule options are redisplayed.
The log file contains information specifying that the Limit distribution to values in AccessList option was selected. A separate log entry appears for each Access List burst valuespecifying whether a report section for that burst value was distributed to the library.
ReportCaster HTML User Interface Manual 95
2. Using the Scheduling Wizard
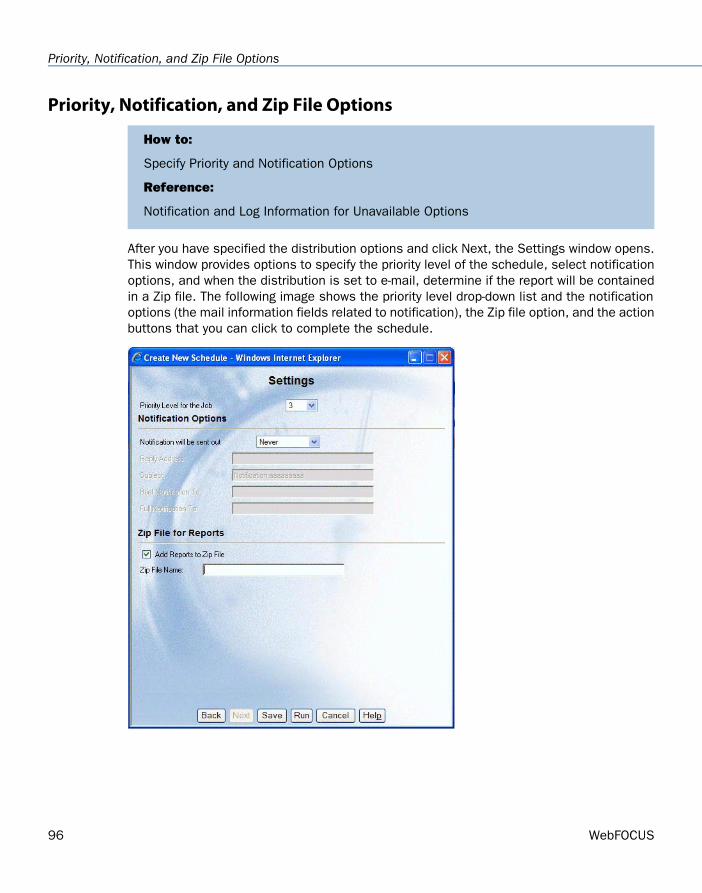
Priority, Notification, and Zip File Options
How to:
Specify Priority and Notification Options
Reference:
Notification and Log Information for Unavailable Options
After you have specified the distribution options and click Next, the Settings window opens.This window provides options to specify the priority level of the schedule, select notificationoptions, and when the distribution is set to e-mail, determine if the report will be containedin a Zip file. The following image shows the priority level drop-down list and the notificationoptions (the mail information fields related to notification), the Zip file option, and the actionbuttons that you can click to complete the schedule.
96 WebFOCUS
Priority, Notification, and Zip File Options
How to Specify Priority and Notification OptionsProcedure:
Specify the following information in the Settings window:
1. From the Priority Level for the Job drop-down list, select the priority for running the job.The highest priority is 1 and the lowest is 5. The default priority is 3. The ReportCasterDistribution Server queue sorts scheduled jobs by priority and then by the time theschedule is set to run. If multiple jobs share the same priority and time, ReportCasterarbitrarily schedules the jobs.
2. From the Notification will be sent out drop-down list, you can send notification of theschedule status to a specified e-mail address by selecting one of the following options:
Never. ReportCaster does not send notification of the schedule status under anycircumstances. If you select Never, you can proceed to Step 7.
The default value is Never. Contact your ReportCaster administrator If you want theScheduling Wizard to display a different default value.
On Error. The specified users are notified when errors are encountered while runningthe schedule. Information Builders recommends using the On Error notification option.
Always. The specified user is always notified when the schedule runs.
3. In the Reply Address field, type the e-mail address of the sender. If report recipientsreply to the report sender, their messages are sent to this address. If your e-mail systemis unable to deliver a report, the undeliverable report message is also returned to thisaddress.
Note: If the Email Delivery, Restrict Email Domains option is set to yes in theReportCaster Server Configuration tool, then only those e-mail domains (the portion ofthe e-mail address following the at (@) sign) listed in Allowed Email Domains (also inthe Server Configuration tool) are valid e-mail recipients.
Tip: You can retrieve e-mail addresses defined in an LDAP data source. For more details,see How to Retrieve E-mail Addresses for a Schedule Using Address Search on page 77.
4. In the Subject field, type the text you want to display in the e-mail subject line. There isa limit of 255 alphanumeric characters.
5. In the Brief Notification To field, type the e-mail address to which you want a briefnotification sent. A brief notification sends the ID and job description of a schedule, aswell as messages about the schedule (such as Completed Successfully). Note that thereis no syntax error checking for this field.
Note: If the Email Delivery, Restrict Email Domains option is set to yes in theReportCaster Server Configuration tool, then only those e-mail domains (the portion ofthe e-mail address following the at (@) sign) listed in Allowed Email Domains (also inthe Server Configuration tool) are valid e-mail recipients.
ReportCaster HTML User Interface Manual 97
2. Using the Scheduling Wizard

Tip:
We recommend using the Brief Notification option when you are sending notificationto devices that have limited memory, such as pagers and cell phones. If you wantto notify multiple recipients, you can use group mail lists defined on your mail serverprovided that you append an at (@) sign followed by a valid domain.
You can retrieve e-mail addresses defined in an LDAP data source. For moreinformation, see How to Retrieve E-mail Addresses for a Schedule Using AddressSearch on page 77.
6. In the Full Notification To field, type the e-mail address to which you want a full notificationsent. A full notification sends a complete log report as an e-mail attachment. Note thatthere is no syntax error checking for this field.
Note: If the Email Delivery, Restrict Email Domains option is set to yes in theReportCaster Server Configuration tool, then only those e-mail domains (the portion ofthe e-mail address following the at (@) sign) listed in Allowed Email Domains (also inthe Server Configuration tool) are valid e-mail recipients.
Tip:
If you want to notify multiple recipients, you can use group mail lists defined on yourmail server provided that you append an at (@) sign followed by a valid domain.
You can retrieve e-mail addresses defined in an LDAP data source. For moreinformation, see How to Retrieve E-mail Addresses for a Schedule Using AddressSearch on page 77.
7. If the distribution method is by e-mail, then you have the option to Zip the report output.To do this, select Add Reports to Zip File, then type a name for the file in the Zip FileName field.
8. Click Save. The Created New Schedule Successfully message appears.
9. Click Close to complete the schedule and exit the Scheduling Wizard.
Notification and Log Information for Unavailable OptionsReference:
When schedules with unavailable Task Types or distribution methods are not permitted torun, error notification is triggered and information is included in full and brief notificationsand in the log report that your ReportCaster administrator or the owner of the schedule mustchange the unavailable Task Types or distribution methods in the schedule.
When schedules with unavailable Task Types or distribution methods are permitted to run,normal job execution occurs and a message appears in the log report indicating that yourReportCaster administrator is allowing existing schedules using the unavailable Task Typesor distribution methods to run.
98 WebFOCUS
Priority, Notification, and Zip File Options
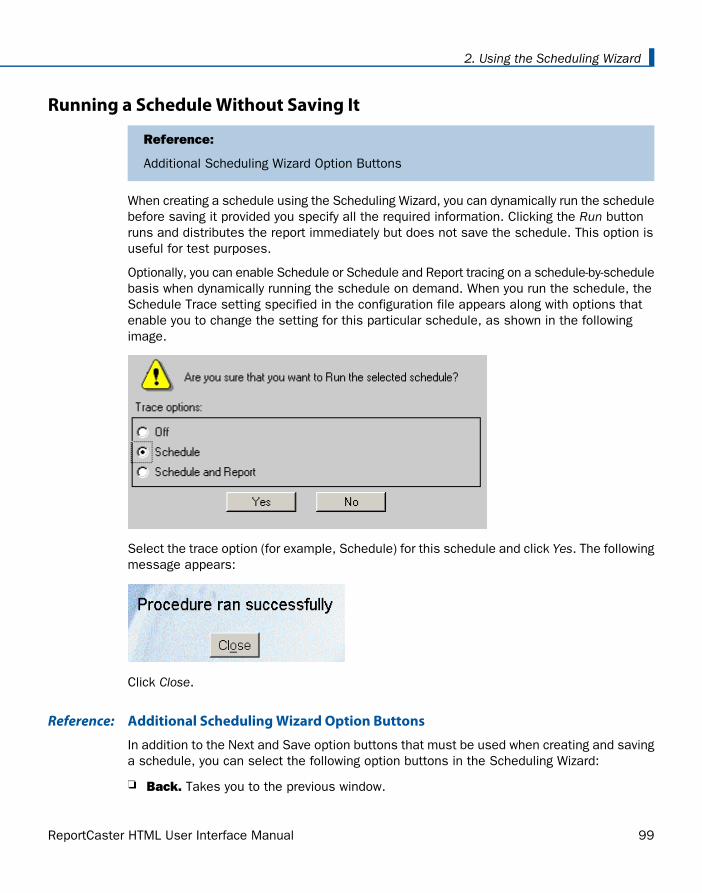
Running a Schedule Without Saving It
Reference:
Additional Scheduling Wizard Option Buttons
When creating a schedule using the Scheduling Wizard, you can dynamically run the schedulebefore saving it provided you specify all the required information. Clicking the Run buttonruns and distributes the report immediately but does not save the schedule. This option isuseful for test purposes.
Optionally, you can enable Schedule or Schedule and Report tracing on a schedule-by-schedulebasis when dynamically running the schedule on demand. When you run the schedule, theSchedule Trace setting specified in the configuration file appears along with options thatenable you to change the setting for this particular schedule, as shown in the followingimage.
Select the trace option (for example, Schedule) for this schedule and click Yes. The followingmessage appears:
Click Close.
Additional Scheduling Wizard Option ButtonsReference:
In addition to the Next and Save option buttons that must be used when creating and savinga schedule, you can select the following option buttons in the Scheduling Wizard:
Back. Takes you to the previous window.
ReportCaster HTML User Interface Manual 99
2. Using the Scheduling Wizard
Cancel. Cancels the schedule request.
Help. Opens the online Help.
100 WebFOCUS
Running a Schedule Without Saving It
WebFOCUS
Working With Distribution Lists in the HTMLUser Interface
3
Topics:This section explains how to create andmaintain Distribution Lists using theHTML User Interface. When creating aschedule, you can distribute reportoutput to a single recipient or severalrecipients. If you are creating a scheduleto be distributed to several recipients,you may want to create a DistributionList. You can assign a Distribution Listconsisting of multiple recipients toseveral schedules.
Accessing the Distribution or AddressBook List Interface
Creating a Distribution or AddressBook List
Editing a Distribution List
Deleting a Distribution List
If the entire report is not relevant tothose receiving it, you can specifysections of the report to be sent usingthe burst option. Each person on yourDistribution List can receive differentsections of the report depending on theindividual burst values you specify.
If you are distributing to the ReportLibrary, you must create an Access Listinstead of a Distribution List. For moreinformation, see the ReportCasterDevelopment and Library Content manual.
ReportCaster HTML User Interface Manual 101
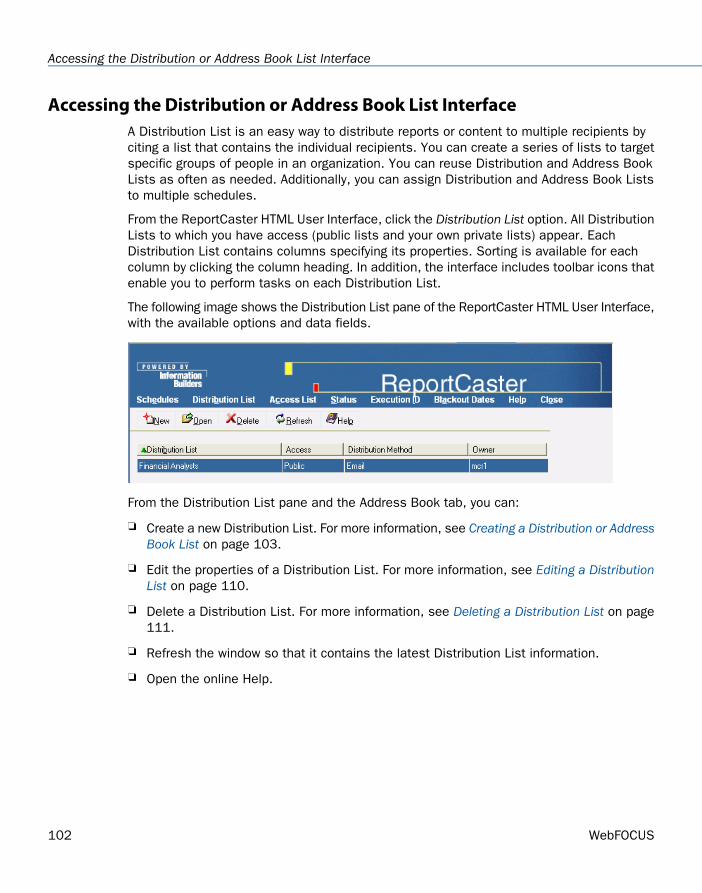
Accessing the Distribution or Address Book List InterfaceA Distribution List is an easy way to distribute reports or content to multiple recipients byciting a list that contains the individual recipients. You can create a series of lists to targetspecific groups of people in an organization. You can reuse Distribution and Address BookLists as often as needed. Additionally, you can assign Distribution and Address Book Liststo multiple schedules.
From the ReportCaster HTML User Interface, click the Distribution List option. All DistributionLists to which you have access (public lists and your own private lists) appear. EachDistribution List contains columns specifying its properties. Sorting is available for eachcolumn by clicking the column heading. In addition, the interface includes toolbar icons thatenable you to perform tasks on each Distribution List.
The following image shows the Distribution List pane of the ReportCaster HTML User Interface,with the available options and data fields.
From the Distribution List pane and the Address Book tab, you can:
Create a new Distribution List. For more information, see Creating a Distribution or AddressBook List on page 103.
Edit the properties of a Distribution List. For more information, see Editing a DistributionList on page 110.
Delete a Distribution List. For more information, see Deleting a Distribution List on page111.
Refresh the window so that it contains the latest Distribution List information.
Open the online Help.
102 WebFOCUS
Accessing the Distribution or Address Book List Interface
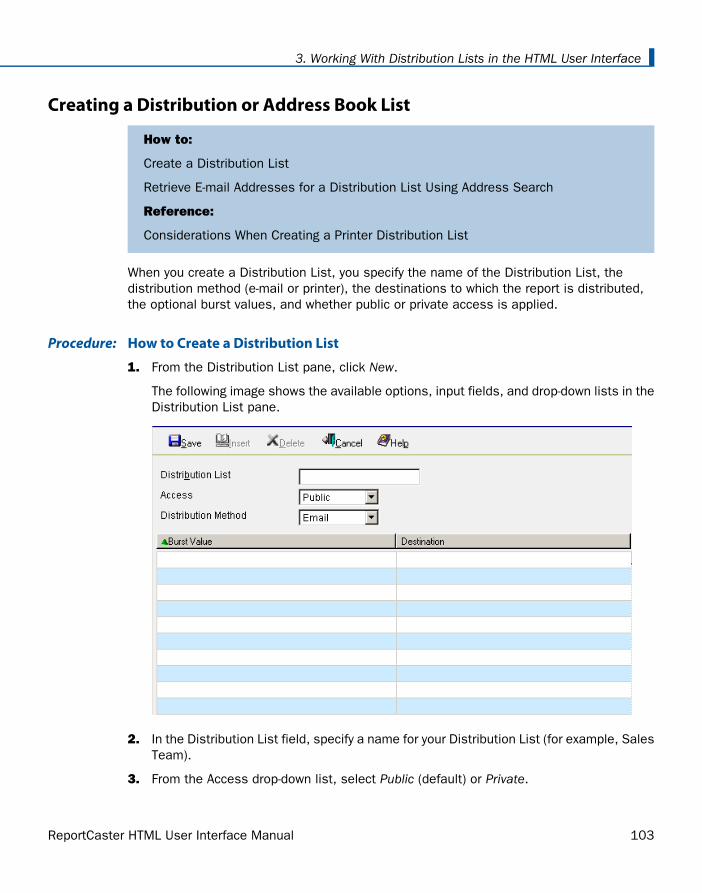
Creating a Distribution or Address Book List
How to:
Create a Distribution List
Retrieve E-mail Addresses for a Distribution List Using Address Search
Reference:
Considerations When Creating a Printer Distribution List
When you create a Distribution List, you specify the name of the Distribution List, thedistribution method (e-mail or printer), the destinations to which the report is distributed,the optional burst values, and whether public or private access is applied.
How to Create a Distribution ListProcedure:
1. From the Distribution List pane, click New.
The following image shows the available options, input fields, and drop-down lists in theDistribution List pane.
2. In the Distribution List field, specify a name for your Distribution List (for example, SalesTeam).
3. From the Access drop-down list, select Public (default) or Private.
ReportCaster HTML User Interface Manual 103
3. Working With Distribution Lists in the HTML User Interface
Only the owner and ReportCaster administrators can view a Private Distribution List,whereas every ReportCaster user can view a Public Distribution List.
4. From the Distribution Method drop-down list, select Email (default) or Printer.
5. If you are bursting a report, specify individual sort values in the Burst Value field. Theburst value is case-sensitive, has a maximum of 75 characters, and, when used withkeywords, can contain wild cards and Java regular expressions.
The burst value for a tabular report is the first BY field, which is the primary sort field.The burst value for a graph report is the second BY field. The burst value specified mustexist in the data source that the scheduled job reports against.
For more information, see the ReportCaster Development and Library Content manual.
6. In the Destination field, specify the destinations to which the report is distributed:
If you selected Email as the distribution method, type the e-mail addresses of therecipients (for example, [email protected]). Be careful typing this information becausethere is no edit checking.
Note: If the Email Delivery, Restrict Email Domains option is set to yes in theReportCaster Server Configuration tool, then only those e-mail domains (the portionof the e-mail address following the at symbol) listed in Allowed Email Domains (alsoin the Server Configuration tool) are valid e-mail recipients.
If you selected Printer as the distribution method, specify the printer using thefollowing format
queue@printserver
where:
queue
Is the name of the printer queue.
printserver
Is the host name or IP address of the printer.
Although ReportCaster supports specifying only the host name (or IP address), werecommend that you specify both the printer queue and the host name (or IP address)when distributing ReportCaster output to a printer. ReportCaster differentiates betweenthe printer queue and the printer host name (or IP address) when the at sign (@) ispresent as the separator.
You can specify a maximum of 800 characters within a single Destination line.
104 WebFOCUS
Creating a Distribution or Address Book List
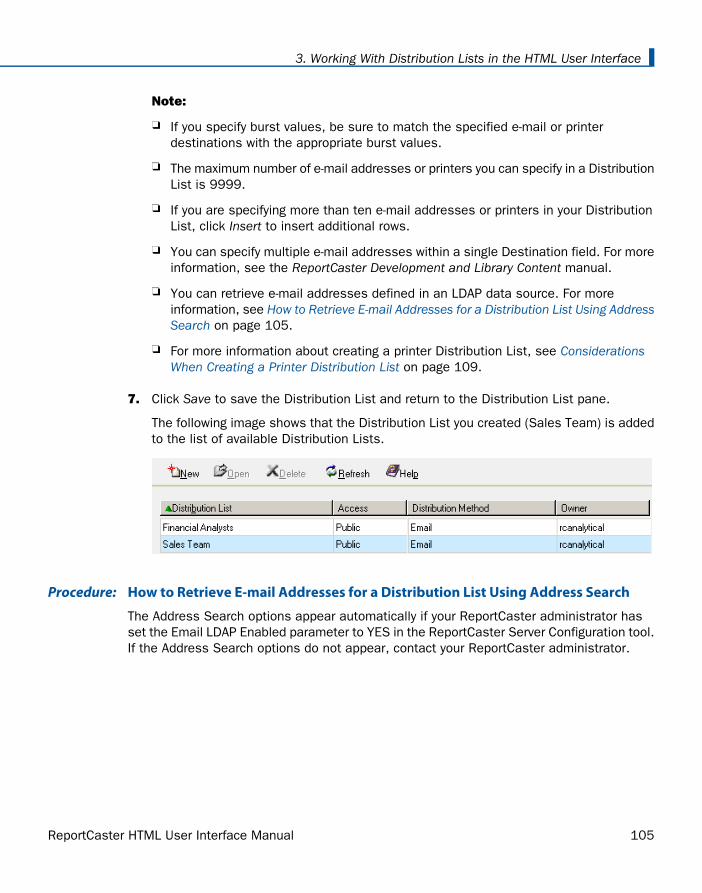
Note:
If you specify burst values, be sure to match the specified e-mail or printerdestinations with the appropriate burst values.
The maximum number of e-mail addresses or printers you can specify in a DistributionList is 9999.
If you are specifying more than ten e-mail addresses or printers in your DistributionList, click Insert to insert additional rows.
You can specify multiple e-mail addresses within a single Destination field. For moreinformation, see the ReportCaster Development and Library Content manual.
You can retrieve e-mail addresses defined in an LDAP data source. For moreinformation, see How to Retrieve E-mail Addresses for a Distribution List Using AddressSearch on page 105.
For more information about creating a printer Distribution List, see ConsiderationsWhen Creating a Printer Distribution List on page 109.
7. Click Save to save the Distribution List and return to the Distribution List pane.
The following image shows that the Distribution List you created (Sales Team) is addedto the list of available Distribution Lists.
How to Retrieve E-mail Addresses for a Distribution List Using Address SearchProcedure:
The Address Search options appear automatically if your ReportCaster administrator hasset the Email LDAP Enabled parameter to YES in the ReportCaster Server Configuration tool.If the Address Search options do not appear, contact your ReportCaster administrator.
ReportCaster HTML User Interface Manual 105
3. Working With Distribution Lists in the HTML User Interface

The following image shows the Address Search pane that appears to the right of theDistribution List pane while creating or editing a Distribution List.
1. Type the search string. You can search using the following combinations:
Last Name [Equals | Starts with | Ends with | Contains]
First Name [Equals | Starts with | Ends with | Contains]
Email [Equals | Starts with | Ends with | Contains]
For example, if you type S after the Last Name Starts with field, as shown in the followingimage, ReportCaster retrieves last names that start with the letter S. The Address Searchpane also contains action buttons, input fields, and drop-down lists.
Note: By default, ReportCaster retrieves a maximum of 300 e-mail addresses. You canchange this default value for the duration of your session. However, if you log out andlog back in, the Address Search pane displays the default value of 300. ReportCasterenables the retrieval of a maximum of 500 e-mail addresses. If you suspect your searchwill return more than 500 records, you should refine your search criteria.
2. Click Search.
ReportCaster retrieves the specified names from the LDAP data source.
106 WebFOCUS
Creating a Distribution or Address Book List
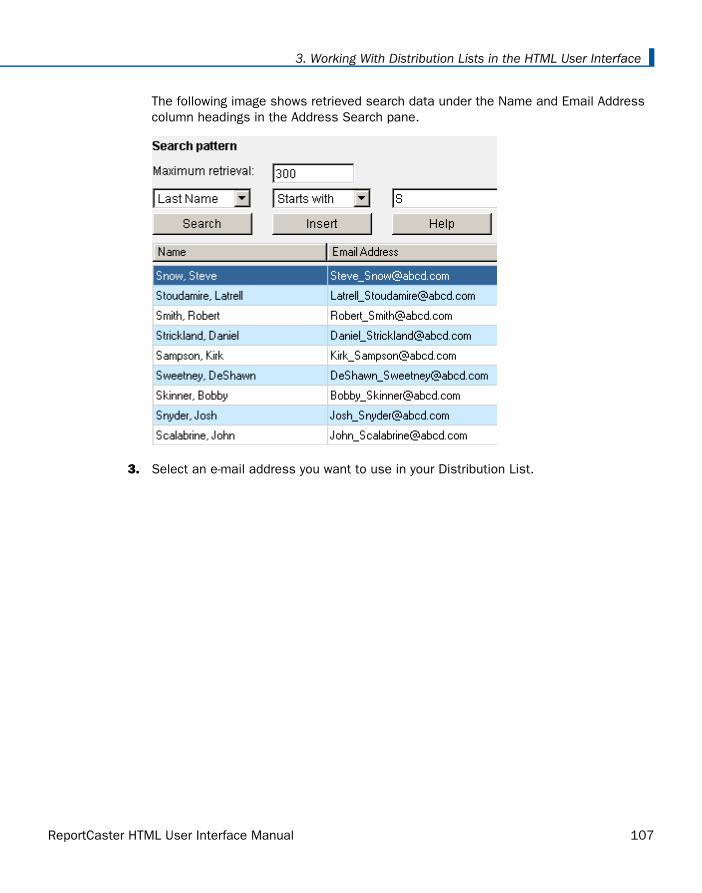
The following image shows retrieved search data under the Name and Email Addresscolumn headings in the Address Search pane.
3. Select an e-mail address you want to use in your Distribution List.
ReportCaster HTML User Interface Manual 107
3. Working With Distribution Lists in the HTML User Interface

The following image shows a highlighted data selection under the Name and EmailAddress column headings in the Address Search pane.
4. Click Insert to insert the e-mail address into your Distribution List.
Note: Alternatively, you can double-click an e-mail address to automatically insert it intoyour Distribution List.
5. Repeat Step 3 and Step 4 if you want to select and insert additional e-mail addressesinto your Distribution List.
108 WebFOCUS
Creating a Distribution or Address Book List
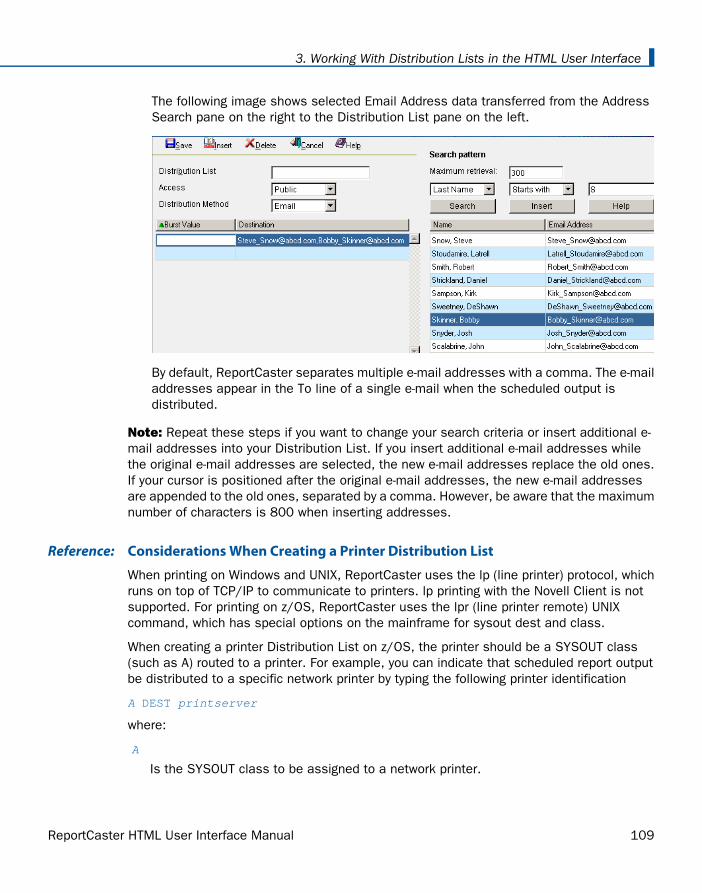
The following image shows selected Email Address data transferred from the AddressSearch pane on the right to the Distribution List pane on the left.
By default, ReportCaster separates multiple e-mail addresses with a comma. The e-mailaddresses appear in the To line of a single e-mail when the scheduled output isdistributed.
Note: Repeat these steps if you want to change your search criteria or insert additional e-mail addresses into your Distribution List. If you insert additional e-mail addresses whilethe original e-mail addresses are selected, the new e-mail addresses replace the old ones.If your cursor is positioned after the original e-mail addresses, the new e-mail addressesare appended to the old ones, separated by a comma. However, be aware that the maximumnumber of characters is 800 when inserting addresses.
Considerations When Creating a Printer Distribution ListReference:
When printing on Windows and UNIX, ReportCaster uses the lp (line printer) protocol, whichruns on top of TCP/IP to communicate to printers. lp printing with the Novell Client is notsupported. For printing on z/OS, ReportCaster uses the lpr (line printer remote) UNIXcommand, which has special options on the mainframe for sysout dest and class.
When creating a printer Distribution List on z/OS, the printer should be a SYSOUT class(such as A) routed to a printer. For example, you can indicate that scheduled report outputbe distributed to a specific network printer by typing the following printer identification
A DEST printserver
where:
A
Is the SYSOUT class to be assigned to a network printer.
ReportCaster HTML User Interface Manual 109
3. Working With Distribution Lists in the HTML User Interface
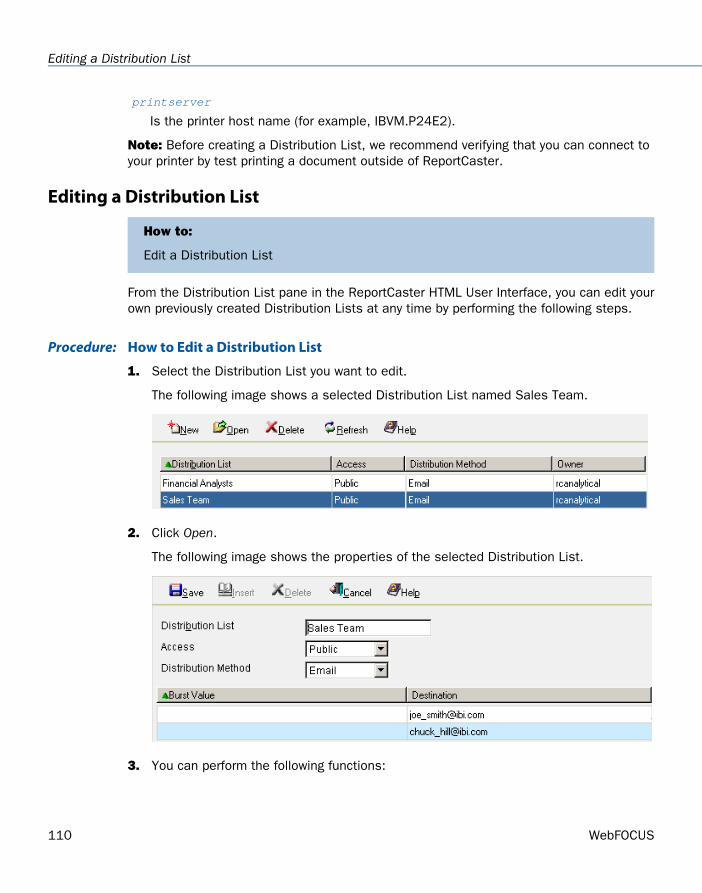
printserver
Is the printer host name (for example, IBVM.P24E2).
Note: Before creating a Distribution List, we recommend verifying that you can connect toyour printer by test printing a document outside of ReportCaster.
Editing a Distribution List
How to:
Edit a Distribution List
From the Distribution List pane in the ReportCaster HTML User Interface, you can edit yourown previously created Distribution Lists at any time by performing the following steps.
How to Edit a Distribution ListProcedure:
1. Select the Distribution List you want to edit.
The following image shows a selected Distribution List named Sales Team.
2. Click Open.
The following image shows the properties of the selected Distribution List.
3. You can perform the following functions:
110 WebFOCUS
Editing a Distribution List

Copy the Distribution List by changing its name. The original Distribution List remainsunaltered.
Change the values of already existing entries. For example, you can make theDistribution List Private instead of Public or you can change the destinations.
Insert additional Burst values and Destinations by clicking Insert. A new row appearswhere your cursor is positioned, enabling you to insert additional entries.
Delete Burst Values and Destinations by selecting the row and clicking Delete.
4. After you have made the necessary changes to your Distribution List, click Save to savethe changes.
Deleting a Distribution List
How to:
Delete a Distribution List
From the Distribution List pane in the ReportCaster HTML User Interface, you can deleteyour own Distribution Lists at any time by performing the following steps.
How to Delete a Distribution ListProcedure:
1. Select the Distribution List you want to delete.
The following image shows a selected Distribution List named Sales Team.
2. Click Delete. A message appears asking for confirmation to delete the list. Click OK todelete the Distribution List.
ReportCaster HTML User Interface Manual 111
3. Working With Distribution Lists in the HTML User Interface

112 WebFOCUS
Deleting a Distribution List

WebFOCUS
Maintaining a Schedule Using the HTML UserInterface
4
Topics:The ReportCaster Interface, accessedfrom either Dashboard (select Tools, thenReportCaster) or the WebFOCUSWelcome Page (ReportCasterDevelopment), provides the samefunctionality as the ReportCaster HTMLUser Interface with a different look andfeel. This section explains the optionsand features of maintaining a schedulefrom the ReportCaster HTML UserInterface perspective. The options andfeatures also work with the currentReportCaster Interface.
About the Schedules Interface
Editing a Schedule in the HTML UserInterface
Cloning a Schedule
Deleting a Schedule
Viewing a Log Report
Purging the Log File
Schedule Blackout DatesBoth interfaces provide access to yourexisting schedules and enables you toedit the properties of a schedule, clonea schedule, delete a schedule, or run alog report to obtain information about aschedule. Additionally, you can purge logrecords to conserve space in the log file,view the dates on which you cannot runor set schedules to run and check thestatus of your scheduled jobs. Finally,you can create, update, and deleteExecution IDs.
Checking the Status of a ScheduledJob
Creating, Updating, and Deleting anExecution ID
ReportCaster HTML User Interface Manual 113

About the Schedules InterfaceAs a Managed Reporting user with ReportCaster scheduling priviledges, you can access theHTML User Interface, where you can perform various maintenance functions on the schedulesthat you created. The ReportCaster HTML User Interface is available from the BusinessIntelligence Dashboard and Managed Reporting. For instruction on accessing this interface,see the ReportCaster Development and Library Content manual.
Once you are in the ReportCaster HTML User Interface, click the Schedules option. A list ofall the scheduled jobs you have created appears in the interface. The following image showshow each scheduled job contains information displayed under column headings for ScheduleId, Description, Next Run Time, Method, Distribution, and Active. The window includes toolbaricons that enables you to perform functions on each scheduled job. Sorting is available foreach column by clicking the column heading.
From the Schedules window, you can:
Open the Scheduling Wizard to edit the properties of a selected schedule. For moreinformation, see Editing a Schedule in the HTML User Interface on page 115.
View a log report for one or more selected schedules. For more information, see Viewinga Log Report on page 120.
Delete one or more selected schedules. For more information, see Deleting a Scheduleon page 119.
Purge log file information for one or more selected schedules or for all schedules in yourlist. For more information, see Purging the Log File on page 125.
Clone a selected schedule. For more information Cloning a Schedule on page 117.
Run one or more selected schedules.
Refresh the current schedule list with any newly created schedules.
Open the online Help.
114 WebFOCUS
About the Schedules Interface
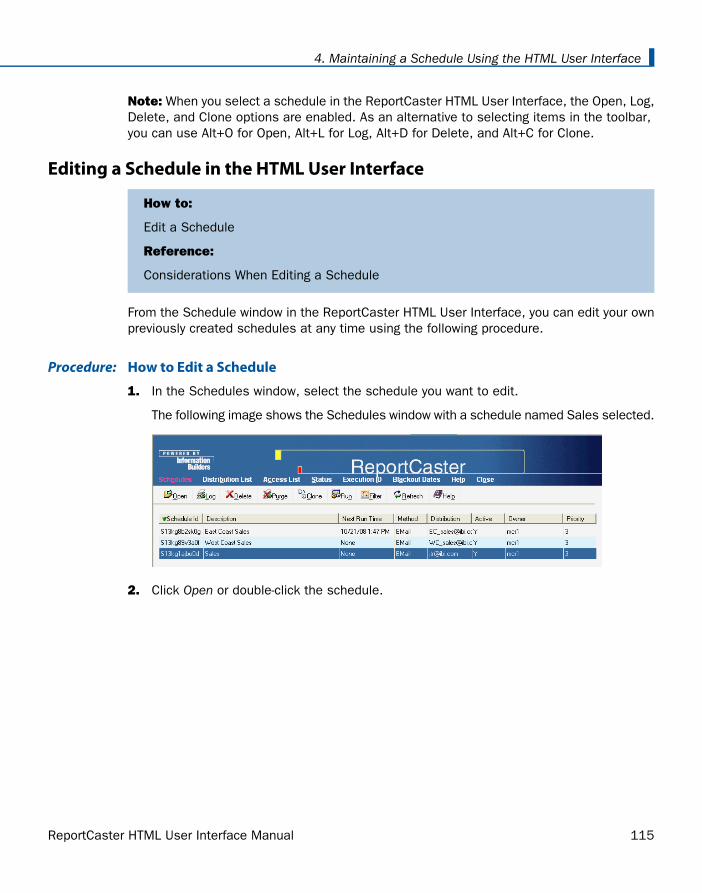
Note: When you select a schedule in the ReportCaster HTML User Interface, the Open, Log,Delete, and Clone options are enabled. As an alternative to selecting items in the toolbar,you can use Alt+O for Open, Alt+L for Log, Alt+D for Delete, and Alt+C for Clone.
Editing a Schedule in the HTML User Interface
How to:
Edit a Schedule
Reference:
Considerations When Editing a Schedule
From the Schedule window in the ReportCaster HTML User Interface, you can edit your ownpreviously created schedules at any time using the following procedure.
How to Edit a ScheduleProcedure:
1. In the Schedules window, select the schedule you want to edit.
The following image shows the Schedules window with a schedule named Sales selected.
2. Click Open or double-click the schedule.
ReportCaster HTML User Interface Manual 115
4. Maintaining a Schedule Using the HTML User Interface
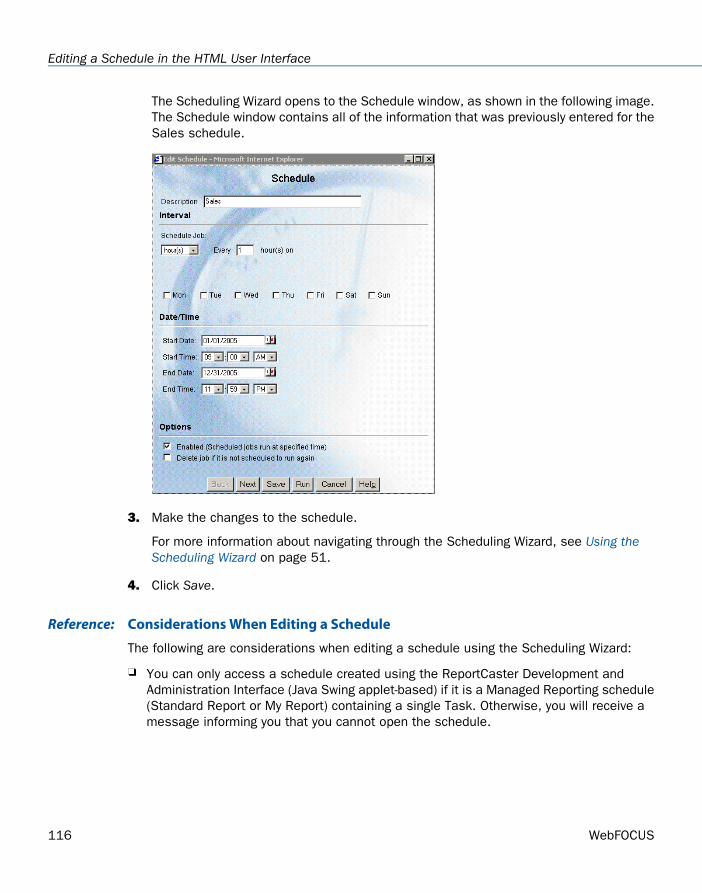
The Scheduling Wizard opens to the Schedule window, as shown in the following image.The Schedule window contains all of the information that was previously entered for theSales schedule.
3. Make the changes to the schedule.
For more information about navigating through the Scheduling Wizard, see Using theScheduling Wizard on page 51.
4. Click Save.
Considerations When Editing a ScheduleReference:
The following are considerations when editing a schedule using the Scheduling Wizard:
You can only access a schedule created using the ReportCaster Development andAdministration Interface (Java Swing applet-based) if it is a Managed Reporting schedule(Standard Report or My Report) containing a single Task. Otherwise, you will receive amessage informing you that you cannot open the schedule.
116 WebFOCUS
Editing a Schedule in the HTML User Interface
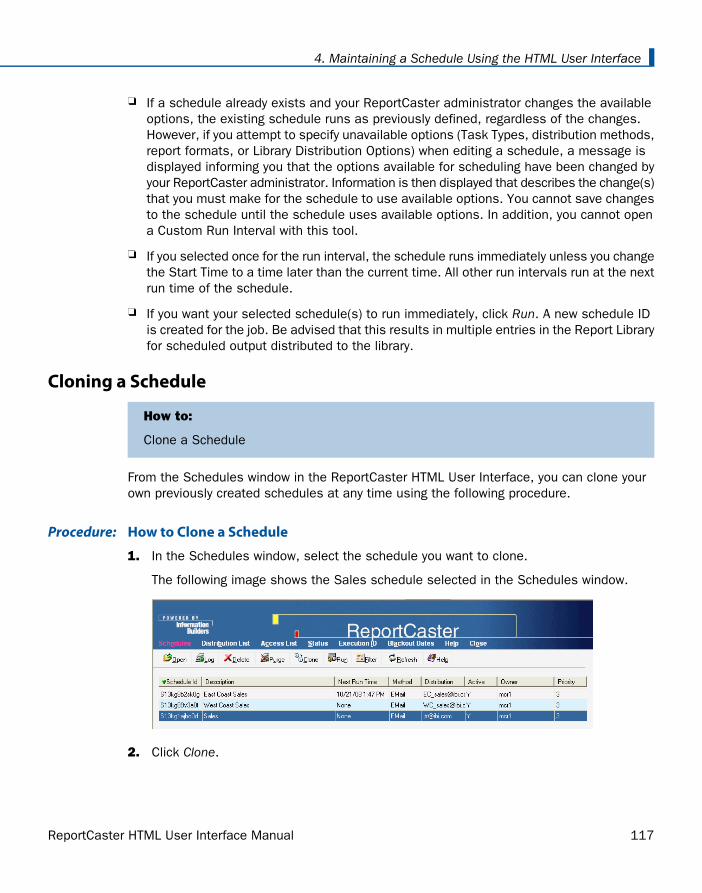
If a schedule already exists and your ReportCaster administrator changes the availableoptions, the existing schedule runs as previously defined, regardless of the changes.However, if you attempt to specify unavailable options (Task Types, distribution methods,report formats, or Library Distribution Options) when editing a schedule, a message isdisplayed informing you that the options available for scheduling have been changed byyour ReportCaster administrator. Information is then displayed that describes the change(s)that you must make for the schedule to use available options. You cannot save changesto the schedule until the schedule uses available options. In addition, you cannot opena Custom Run Interval with this tool.
If you selected once for the run interval, the schedule runs immediately unless you changethe Start Time to a time later than the current time. All other run intervals run at the nextrun time of the schedule.
If you want your selected schedule(s) to run immediately, click Run. A new schedule IDis created for the job. Be advised that this results in multiple entries in the Report Libraryfor scheduled output distributed to the library.
Cloning a Schedule
How to:
Clone a Schedule
From the Schedules window in the ReportCaster HTML User Interface, you can clone yourown previously created schedules at any time using the following procedure.
How to Clone a ScheduleProcedure:
1. In the Schedules window, select the schedule you want to clone.
The following image shows the Sales schedule selected in the Schedules window.
2. Click Clone.
ReportCaster HTML User Interface Manual 117
4. Maintaining a Schedule Using the HTML User Interface
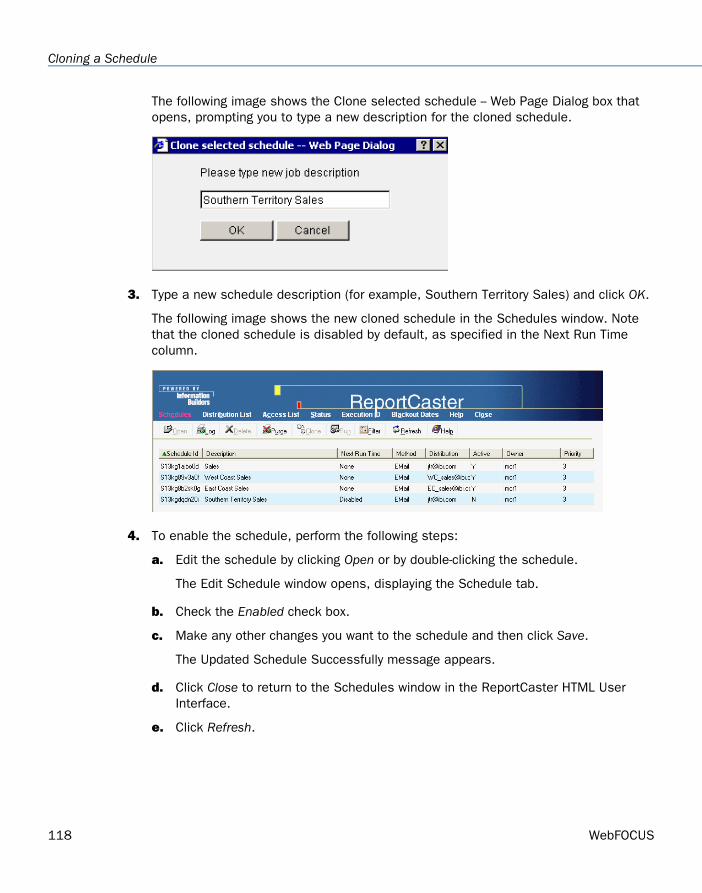
The following image shows the Clone selected schedule -- Web Page Dialog box thatopens, prompting you to type a new description for the cloned schedule.
3. Type a new schedule description (for example, Southern Territory Sales) and click OK.
The following image shows the new cloned schedule in the Schedules window. Notethat the cloned schedule is disabled by default, as specified in the Next Run Timecolumn.
4. To enable the schedule, perform the following steps:
a. Edit the schedule by clicking Open or by double-clicking the schedule.
The Edit Schedule window opens, displaying the Schedule tab.
b. Check the Enabled check box.
c. Make any other changes you want to the schedule and then click Save.
The Updated Schedule Successfully message appears.
d. Click Close to return to the Schedules window in the ReportCaster HTML UserInterface.
e. Click Refresh.
118 WebFOCUS
Cloning a Schedule
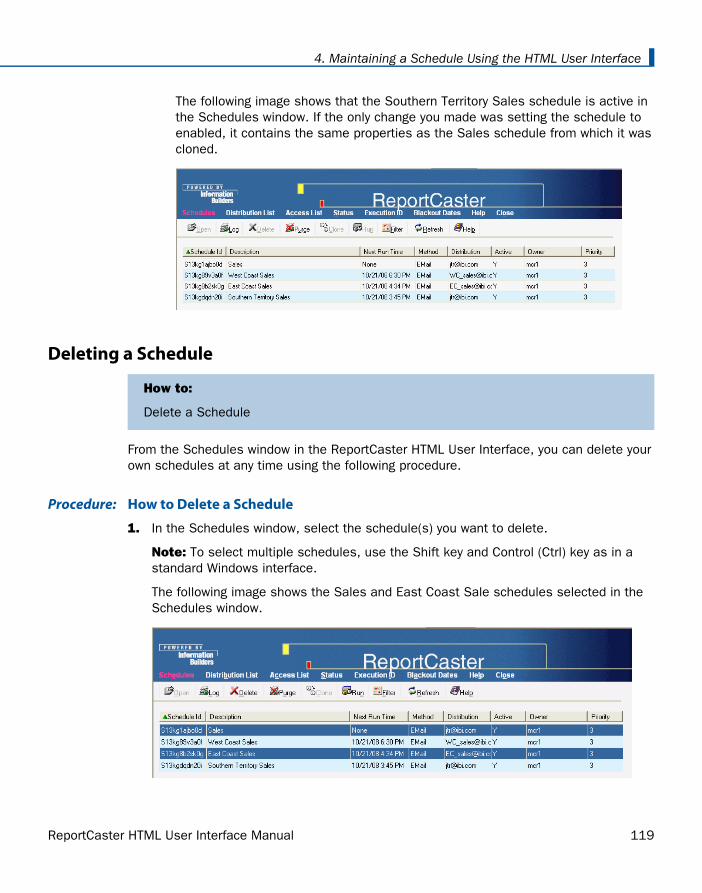
The following image shows that the Southern Territory Sales schedule is active inthe Schedules window. If the only change you made was setting the schedule toenabled, it contains the same properties as the Sales schedule from which it wascloned.
Deleting a Schedule
How to:
Delete a Schedule
From the Schedules window in the ReportCaster HTML User Interface, you can delete yourown schedules at any time using the following procedure.
How to Delete a ScheduleProcedure:
1. In the Schedules window, select the schedule(s) you want to delete.
Note: To select multiple schedules, use the Shift key and Control (Ctrl) key as in astandard Windows interface.
The following image shows the Sales and East Coast Sale schedules selected in theSchedules window.
ReportCaster HTML User Interface Manual 119
4. Maintaining a Schedule Using the HTML User Interface
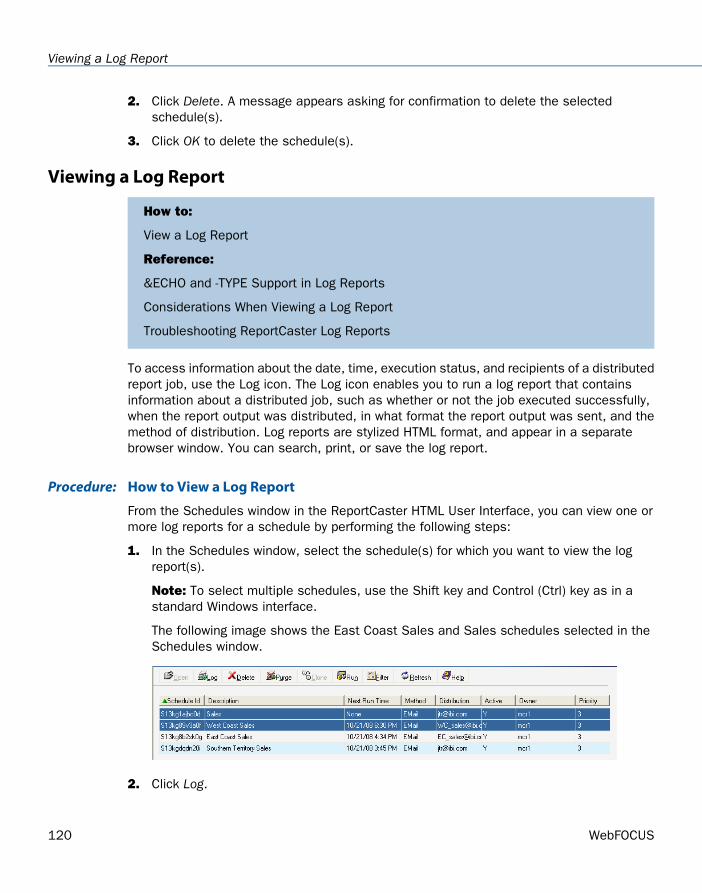
2. Click Delete. A message appears asking for confirmation to delete the selectedschedule(s).
3. Click OK to delete the schedule(s).
Viewing a Log Report
How to:
View a Log Report
Reference:
&ECHO and -TYPE Support in Log Reports
Considerations When Viewing a Log Report
Troubleshooting ReportCaster Log Reports
To access information about the date, time, execution status, and recipients of a distributedreport job, use the Log icon. The Log icon enables you to run a log report that containsinformation about a distributed job, such as whether or not the job executed successfully,when the report output was distributed, in what format the report output was sent, and themethod of distribution. Log reports are stylized HTML format, and appear in a separatebrowser window. You can search, print, or save the log report.
How to View a Log ReportProcedure:
From the Schedules window in the ReportCaster HTML User Interface, you can view one ormore log reports for a schedule by performing the following steps:
1. In the Schedules window, select the schedule(s) for which you want to view the logreport(s).
Note: To select multiple schedules, use the Shift key and Control (Ctrl) key as in astandard Windows interface.
The following image shows the East Coast Sales and Sales schedules selected in theSchedules window.
2. Click Log.
120 WebFOCUS
Viewing a Log Report

The following image shows the ReportCaster Web Page Dialog box that opens, with theSelected Schedule check box active and checked and the Last Executed option selected.
To switch from the schedule you selected to viewing information about all of yourschedules, uncheck the Selected Schedule check box. If you want to change your selectioncriteria, click Cancel and select another schedule from the list.
3. Select one of the following options:
Last Executed. Produces a log report containing the most currently run process forthe selected schedule(s) or for all schedules (if you did not select a schedule). Thisis the default option.
All Executed. Produces a log report containing all run processes for the selectedschedule(s) or for all schedules (if you did not select a schedule).
Date Executed. Activates the Start Date and Start Time fields.
If you have selected the Date Executed option, proceed to the following step. Otherwise,proceed to Step 6.
4. In the Start Date field, specify the date on which you want the log report to begin. Thereport displays all processes for the selected schedule (or schedules) that were run onor after the specified Start Date. You can select a Start Date from the pop-up calendar,or you can accept the default Start Date, which is the current date.
5. In the Start Time field, specify a start time for the Start Date by using the drop-downlists. The default value for the Start Time is 1:00 AM.
6. Click OK to view the log report.
ReportCaster HTML User Interface Manual 121
4. Maintaining a Schedule Using the HTML User Interface
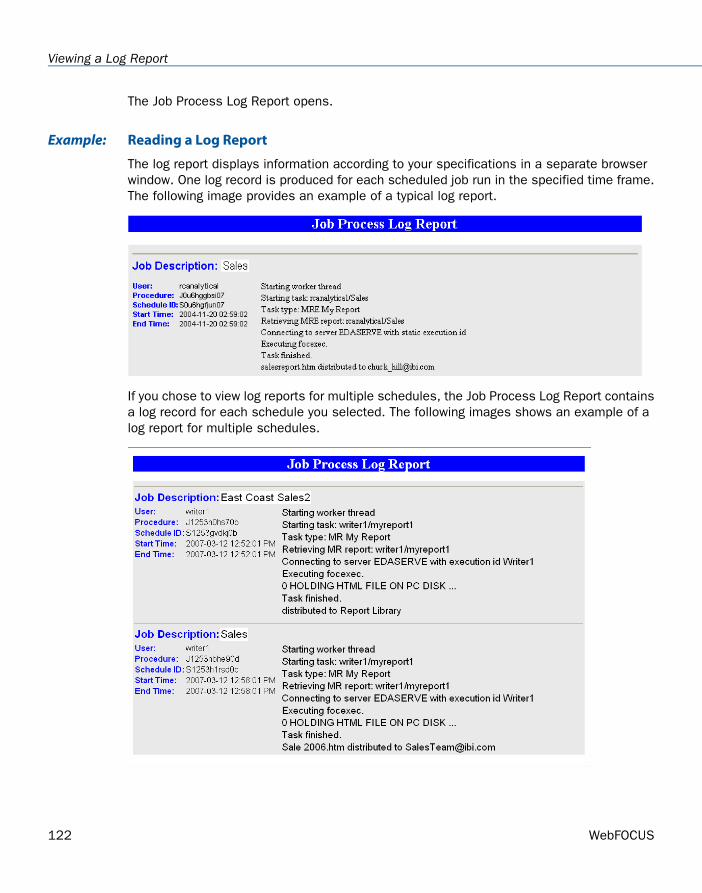
The Job Process Log Report opens.
Reading a Log ReportExample:
The log report displays information according to your specifications in a separate browserwindow. One log record is produced for each scheduled job run in the specified time frame.The following image provides an example of a typical log report.
If you chose to view log reports for multiple schedules, the Job Process Log Report containsa log record for each schedule you selected. The following images shows an example of alog report for multiple schedules.
122 WebFOCUS
Viewing a Log Report
The log report first lists the job description for the record, which is the unique descriptionidentifier that you specified when you created the schedule. Underneath the Job Description,the left column of the log report includes the following information:
User. ReportCaster user ID, indicating the owner of the schedule.
Procedure. Unique key generated by ReportCaster that identifies a specific executionof a scheduled job.
Schedule ID. Unique key generated by ReportCaster that was assigned to the job whenit was scheduled.
Start Time. Date and time the job started running.
End Time. Date and time the job finished running.
In the second column, the log report specifies messages consisting of the following:
General information, such as the method of distribution for a particular job (for example,e-mail distribution).
Processing information, indicating that the request started, distribution was successful,and the request was completed. Processing information also includes reasons why arequest failed, such as the unavailability of a data source.
&ECHO and -TYPE Support in Log ReportsReference:
Values from &ECHO variables and –TYPE commands in WebFOCUS procedures appear inlog reports. The &ECHO variable displays command lines as they execute in order to testand debug procedures. The -TYPE command enables you to comment and evaluate yourcode for informational and debugging purposes. For example, if the following procedure isscheduled using ReportCaster, it may produce a log report similar to the example that followsthis procedure.
-SET &ECHO=ALL;-TYPE Country Sales and Growth -TYPE Parameter RATE is passed into report to forecast potential sales growthTABLE FILE CARHEADING"Sales Growth Forecast using Rate: &RATE "SUM SALES AS 'Sales' COMPUTE GROWTH/D12.2 = (SALES * &RATE) + SALES; AS 'Sales, Forecast' BY COUNTRY AS 'Country'END
ReportCaster HTML User Interface Manual 123
4. Maintaining a Schedule Using the HTML User Interface
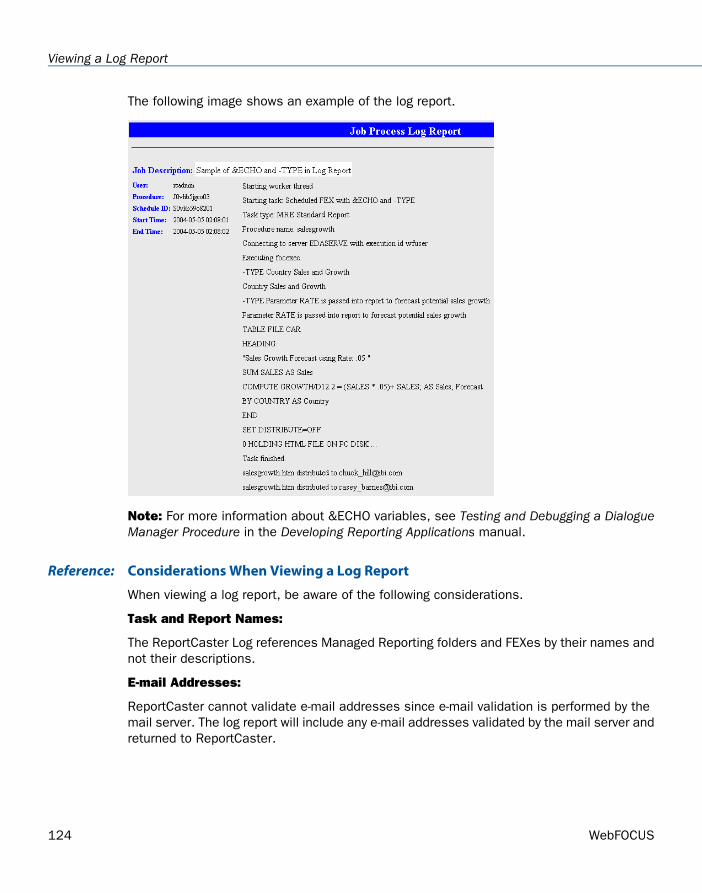
The following image shows an example of the log report.
Note: For more information about &ECHO variables, see Testing and Debugging a DialogueManager Procedure in the Developing Reporting Applications manual.
Considerations When Viewing a Log ReportReference:
When viewing a log report, be aware of the following considerations.
Task and Report Names:
The ReportCaster Log references Managed Reporting folders and FEXes by their names andnot their descriptions.
E-mail Addresses:
ReportCaster cannot validate e-mail addresses since e-mail validation is performed by themail server. The log report will include any e-mail addresses validated by the mail server andreturned to ReportCaster.
124 WebFOCUS
Viewing a Log Report

Burst Reports:
If a valid burst value is omitted in a Distribution List, Distribution File, or Dynamic AddressList, ReportCaster treats the blank value as if it is a valid burst value, and no entriesindicating a blank burst value appear in the log file. This will significantly reduce the sizeof the log file, particularly when the database contains many values for the primary fieldand only a small subset of those values are burst.
If a burst value is specified in a Distribution List, Distribution File, or Dynamic AddressList and it is not found in the database, the following message appears in the log file:
Burst Value: value is not in the database.
When a report is successfully burst, the log file will include the following message foreach burst value:
FILE filename SUCCESSFULLY DISTRIBUTED TO destination FOR burst value.
Unavailable Options:
When schedules with unavailable Task Types or distribution methods are not permitted torun, error notification is triggered and information is included in full and brief notificationsand in the log report that your ReportCaster administrator or the owner of the schedule mustchange the unavailable Task Types or distribution methods in the schedule.
When schedules with unavailable Task Types or distribution methods are permitted to run,normal job execution occurs and a message appears in the log report indicating that yourReportCaster administrator is allowing existing schedules using the unavailable Task Typesor distribution methods to run.
Troubleshooting ReportCaster Log ReportsReference:
If you do not receive a log report because there is an insufficient amount of memory available,this may be because the report is too large or you have too many windows open. InformationBuilders recommends closing all windows and attempting to run the log report again. If youare still unsuccessful, rerun a schedule that successfully created a log report. If you aresuccessful in running the log report, this confirms that the original log report that did notrun was too large to be processed. Contact your ReportCaster administrator to help youtroubleshoot this issue.
Purging the Log FileThe log file accumulates information and can become difficult to navigate. InformationBuilders recommends that you periodically purge log records to conserve space.
ReportCaster administrators configure the number of days in which the log files willautomatically be purged. To find out how long your log reports will be available, see yourReportCaster administrator.
ReportCaster HTML User Interface Manual 125
4. Maintaining a Schedule Using the HTML User Interface
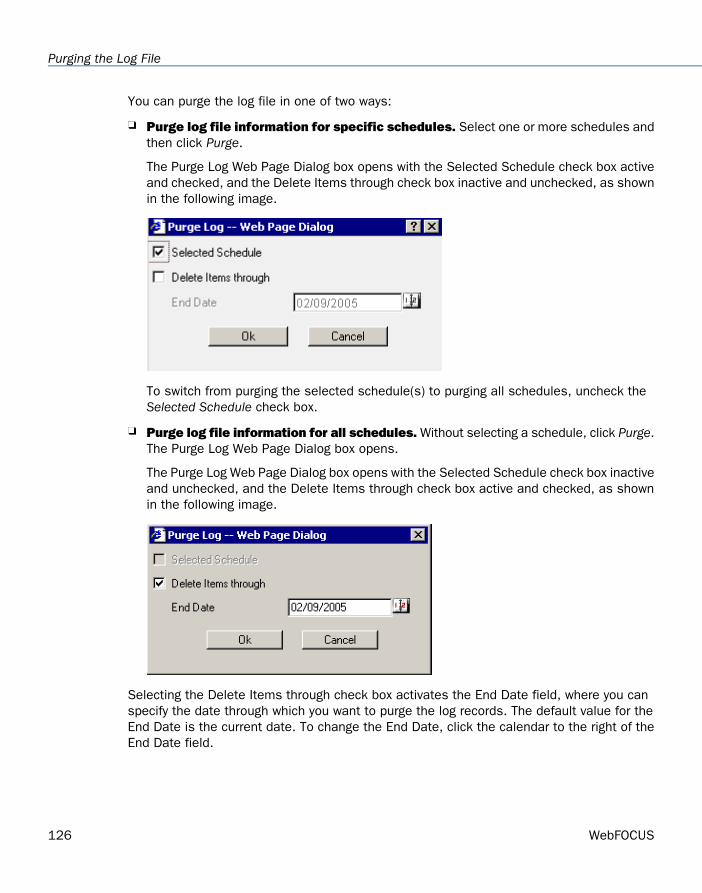
You can purge the log file in one of two ways:
Purge log file information for specific schedules. Select one or more schedules andthen click Purge.
The Purge Log Web Page Dialog box opens with the Selected Schedule check box activeand checked, and the Delete Items through check box inactive and unchecked, as shownin the following image.
To switch from purging the selected schedule(s) to purging all schedules, uncheck theSelected Schedule check box.
Purge log file information for all schedules. Without selecting a schedule, click Purge.The Purge Log Web Page Dialog box opens.
The Purge Log Web Page Dialog box opens with the Selected Schedule check box inactiveand unchecked, and the Delete Items through check box active and checked, as shownin the following image.
Selecting the Delete Items through check box activates the End Date field, where you canspecify the date through which you want to purge the log records. The default value for theEnd Date is the current date. To change the End Date, click the calendar to the right of theEnd Date field.
126 WebFOCUS
Purging the Log File
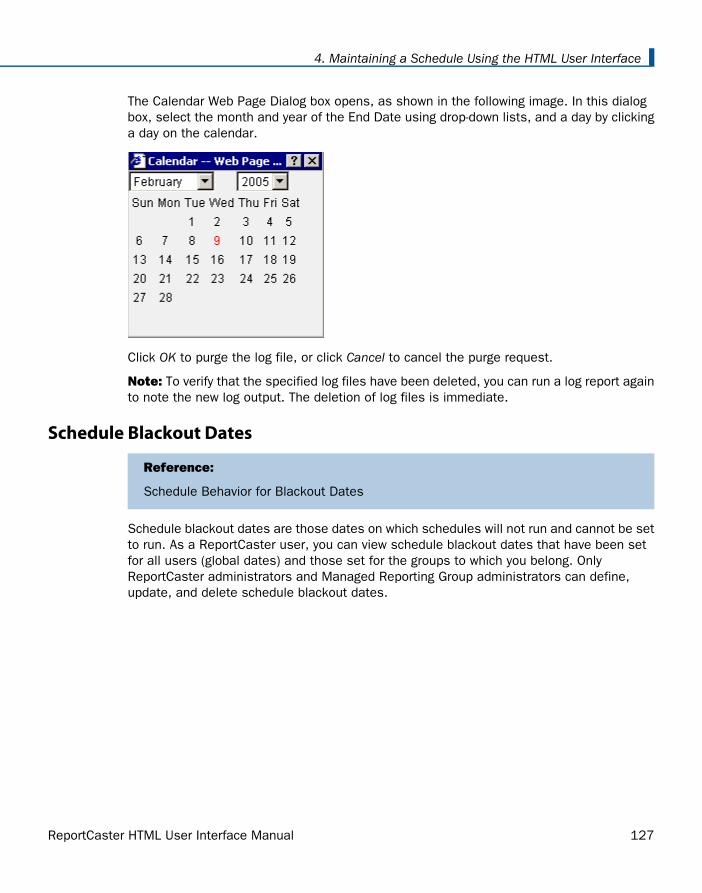
The Calendar Web Page Dialog box opens, as shown in the following image. In this dialogbox, select the month and year of the End Date using drop-down lists, and a day by clickinga day on the calendar.
Click OK to purge the log file, or click Cancel to cancel the purge request.
Note: To verify that the specified log files have been deleted, you can run a log report againto note the new log output. The deletion of log files is immediate.
Schedule Blackout Dates
Reference:
Schedule Behavior for Blackout Dates
Schedule blackout dates are those dates on which schedules will not run and cannot be setto run. As a ReportCaster user, you can view schedule blackout dates that have been setfor all users (global dates) and those set for the groups to which you belong. OnlyReportCaster administrators and Managed Reporting Group administrators can define,update, and delete schedule blackout dates.
ReportCaster HTML User Interface Manual 127
4. Maintaining a Schedule Using the HTML User Interface
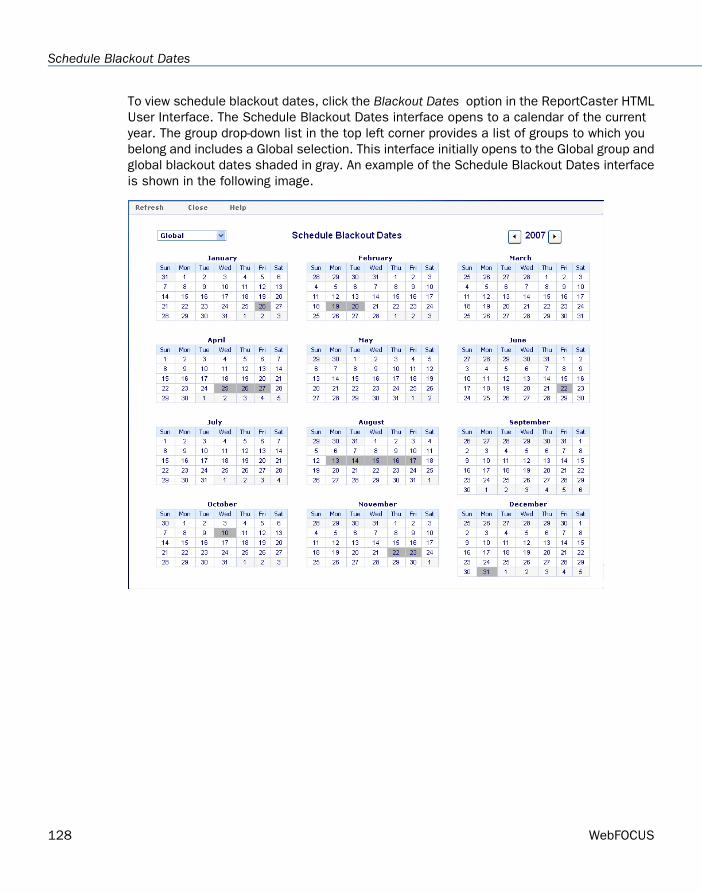
To view schedule blackout dates, click the Blackout Dates option in the ReportCaster HTMLUser Interface. The Schedule Blackout Dates interface opens to a calendar of the currentyear. The group drop-down list in the top left corner provides a list of groups to which youbelong and includes a Global selection. This interface initially opens to the Global group andglobal blackout dates shaded in gray. An example of the Schedule Blackout Dates interfaceis shown in the following image.
128 WebFOCUS
Schedule Blackout Dates
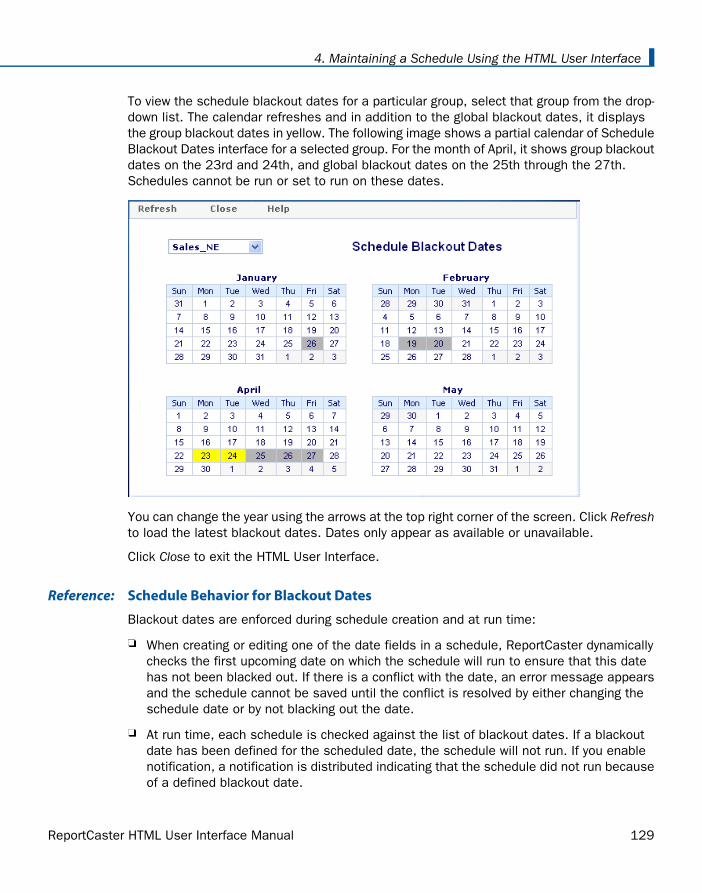
To view the schedule blackout dates for a particular group, select that group from the drop-down list. The calendar refreshes and in addition to the global blackout dates, it displaysthe group blackout dates in yellow. The following image shows a partial calendar of ScheduleBlackout Dates interface for a selected group. For the month of April, it shows group blackoutdates on the 23rd and 24th, and global blackout dates on the 25th through the 27th.Schedules cannot be run or set to run on these dates.
You can change the year using the arrows at the top right corner of the screen. Click Refreshto load the latest blackout dates. Dates only appear as available or unavailable.
Click Close to exit the HTML User Interface.
Schedule Behavior for Blackout DatesReference:
Blackout dates are enforced during schedule creation and at run time:
When creating or editing one of the date fields in a schedule, ReportCaster dynamicallychecks the first upcoming date on which the schedule will run to ensure that this datehas not been blacked out. If there is a conflict with the date, an error message appearsand the schedule cannot be saved until the conflict is resolved by either changing theschedule date or by not blacking out the date.
At run time, each schedule is checked against the list of blackout dates. If a blackoutdate has been defined for the scheduled date, the schedule will not run. If you enablenotification, a notification is distributed indicating that the schedule did not run becauseof a defined blackout date.
ReportCaster HTML User Interface Manual 129
4. Maintaining a Schedule Using the HTML User Interface

Note: Schedule blackout dates for a specific user include the global blackout dates andthe blackout dates assigned to the group(s) to which the user belongs.
Checking the Status of a Scheduled JobFrom the ReportCaster HTML User Interface, click the Status menu option to generate a listof your scheduled jobs that are in the ReportCaster Distribution Server queue.
The following image shows how each scheduled job contains information displayed undercolumn headings for Schedule Id, Description, Priority, Start Time, Owner, and Status. Sortingis available for each column by clicking the column heading.
The Status column contains one of the following values:
Run. The scheduled job is currently running.
Queue. The scheduled job is waiting for a thread to become available to run the request.
After you have generated a status list of scheduled jobs, you can:
Select a scheduled job with a status of Queue and click Remove. The schedule is removedfrom the queue if it is still in the queue, and the Status list is refreshed.
Select a scheduled job with a status of Queue to enable the Update Priority button. Inthe New Priority field, you can change the priority of the scheduled job using the drop-downlist. Click Update Priority to change the priority of the scheduled job if it is still in thequeue.
Click Refresh to refresh the current list of schedules to show any new jobs that are inthe ReportCaster Distribution Server queue. You can automate this process by selectinga value (for example, 10 Seconds) from the Auto Refresh drop-down list.
Click Help to open the online Help.
130 WebFOCUS
Checking the Status of a Scheduled Job

Creating, Updating, and Deleting an Execution ID
How to:
Generate a List of Execution IDs
Create a New Execution ID
Change an Execution ID and Password
Delete an Execution ID
An Execution ID is a valid user ID that is used to run a schedule on a specified server. Whenan Execution ID is created, changed, or deleted on a server, it must also be created, changed,or deleted in the ReportCaster Repository tables using ReportCaster. Similarly, when thepassword for an Execution ID is changed on the server, the password for that Execution IDmust also be changed in the ReportCaster Repository tables. Exceptions are when Executioncredentials are Trusted.
How to Generate a List of Execution IDsProcedure:
From the ReportCaster HTML User Interface, click the Execution ID menu option to generatea list of your Execution IDs defined to ReportCaster.
The following image shows a list of Execution IDs. The list includes the Execution ID, theServer Name where the Execution ID is authorized to run schedules, the Server Type (forexample, WebFOCUS Server), and the Owner of the Execution ID for that server.
Note: Execution IDs appear when the Run Id Type setting for that server is set to User. ForTrusted servers, only the Execution ID can be changed.
After you have generated a list of Execution IDs, you can:
Click New to create a new Execution ID.
Select an Execution ID and click Open to optionally change the Execution ID for a specificserver, or change the password of the Execution ID.
Select an Execution ID and click Delete to delete the Execution ID from the ReportCasterRepository tables.
ReportCaster HTML User Interface Manual 131
4. Maintaining a Schedule Using the HTML User Interface
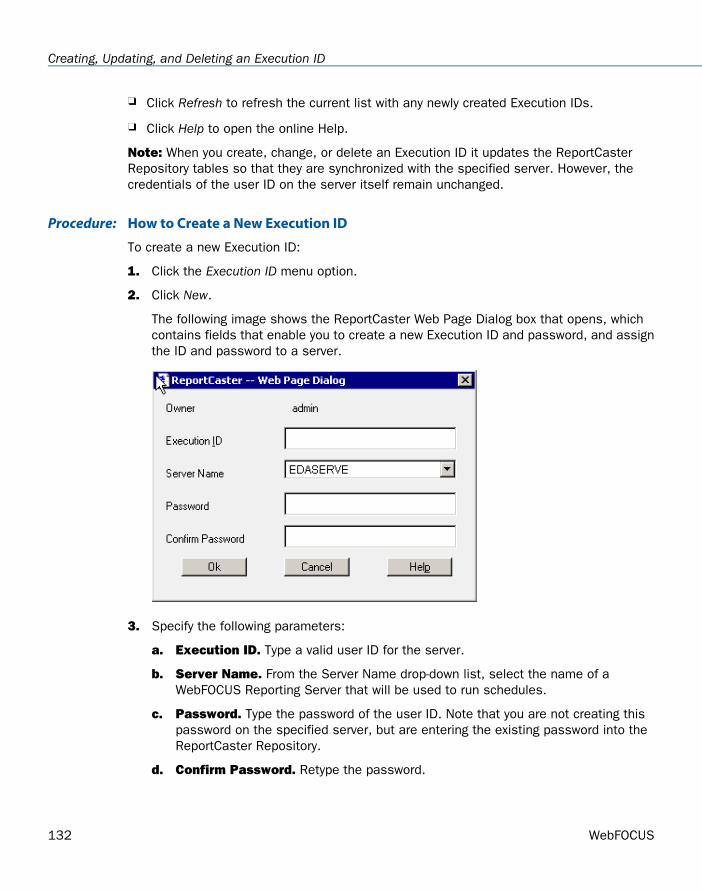
Click Refresh to refresh the current list with any newly created Execution IDs.
Click Help to open the online Help.
Note: When you create, change, or delete an Execution ID it updates the ReportCasterRepository tables so that they are synchronized with the specified server. However, thecredentials of the user ID on the server itself remain unchanged.
How to Create a New Execution IDProcedure:
To create a new Execution ID:
1. Click the Execution ID menu option.
2. Click New.
The following image shows the ReportCaster Web Page Dialog box that opens, whichcontains fields that enable you to create a new Execution ID and password, and assignthe ID and password to a server.
3. Specify the following parameters:
a. Execution ID. Type a valid user ID for the server.
b. Server Name. From the Server Name drop-down list, select the name of aWebFOCUS Reporting Server that will be used to run schedules.
c. Password. Type the password of the user ID. Note that you are not creating thispassword on the specified server, but are entering the existing password into theReportCaster Repository.
d. Confirm Password. Retype the password.
132 WebFOCUS
Creating, Updating, and Deleting an Execution ID
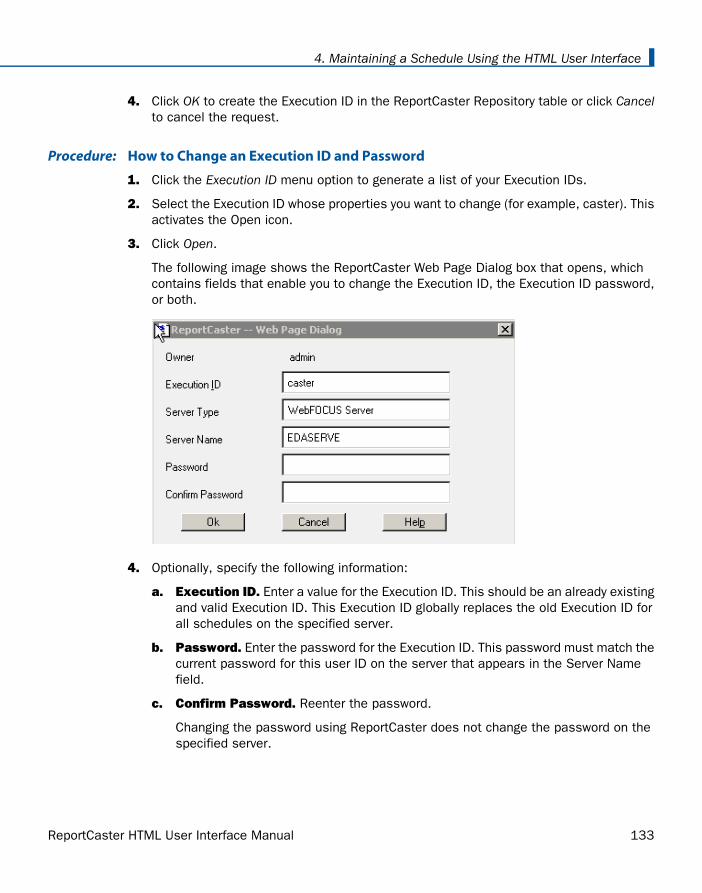
4. Click OK to create the Execution ID in the ReportCaster Repository table or click Cancelto cancel the request.
How to Change an Execution ID and PasswordProcedure:
1. Click the Execution ID menu option to generate a list of your Execution IDs.
2. Select the Execution ID whose properties you want to change (for example, caster). Thisactivates the Open icon.
3. Click Open.
The following image shows the ReportCaster Web Page Dialog box that opens, whichcontains fields that enable you to change the Execution ID, the Execution ID password,or both.
4. Optionally, specify the following information:
a. Execution ID. Enter a value for the Execution ID. This should be an already existingand valid Execution ID. This Execution ID globally replaces the old Execution ID forall schedules on the specified server.
b. Password. Enter the password for the Execution ID. This password must match thecurrent password for this user ID on the server that appears in the Server Namefield.
c. Confirm Password. Reenter the password.
Changing the password using ReportCaster does not change the password on thespecified server.
ReportCaster HTML User Interface Manual 133
4. Maintaining a Schedule Using the HTML User Interface
5. Click OK to change the Execution ID or password values in the ReportCaster Repositorytables. A message appears confirming that the values have been changed.
How to Delete an Execution IDProcedure:
To delete an Execution ID
1. Click the Execution ID menu option to generate a list of your Execution IDs.
2. Select the Execution ID you want to delete.
3. Click Delete. A message appears asking for confirmation to delete the selected ExecutionID.
4. Click OK.
After the Execution ID is deleted, a scheduled job that requires this Execution ID on thespecified server is not run unless the schedule is modified to use a valid Execution ID. Ifyou modify the Execution credentials for a single schedule that specifies the deleted ExecutionID, ReportCaster makes this modification for all schedules that specify the deleted ExecutionID.
134 WebFOCUS
Creating, Updating, and Deleting an Execution ID
WebFOCUS
Using the Report Library from the HTMLInterface
5
Topics:When you create a schedule, you havethe option to distribute the scheduledoutput to the ReportCaster ReportLibrary, a storage and retrieval facility.When you choose this option, you canconfigure the schedule to send an e-mailnotification of the distribution thatincludes the URL to the report in thelibrary.
About the Report Library
Creating and Maintaining a LibraryAccess List
Creating and Maintaining a LibraryAccess List in the HTML User Interface
Accessing the Report LibraryYou can also create and use LibraryAccess Lists, which can associate withspecific schedules to define the usersand groups that can access the scheduleoutput when it is distributed to theLibrary.
Viewing Library Content
Using the Library Watch List
Deleting Content From the Library
Searching for Library Content
PDF Drill Through Support
ReportCaster HTML User Interface Manual 135
About the Report LibraryThe Report Library provides secure access to its content, the ability to save multiple versionsof the same output, and the ability to set an expiration date and control the number ofversions kept in the library. The Library Watch List provides a way to easily track and viewreports of interest. You can create Library Access lists to define specific users and groupsenabled to view the output of specified schedules distributed to the Report Library.
The Report Library is available only to ReportCaster users who have been granted accessto the library by an administrator. You can also create Access Lists that define users andgroups that you want to view your distributions to the library.
Creating and Maintaining a Library Access ListAn Access List defines the users and groups that are allowed to view the output of specifiedschedules distributed to the Report Library. After you create the Access List, it can be usedas often as needed. Each Access List is created as a private list that is known only byReportCaster administrators and the user who created it.
Creating and Maintaining a Library Access List in the HTML User Interface
How to:
Create a New Library Access List
Edit and Delete a Library Access List
This section describes how to create and maintain a Library Access List using the legacyHTML User Interfaces and is provided for your convenience in the case that your configurationof ReportCaster uses this interface as the default.
How to Create a New Library Access ListProcedure:
1. From the ReportCaster HTML User Interface, click the Access List option. For instructionon accessing the ReportCaster HTML User Interface, see the ReportCaster Developmentand Library Content manual.
All Access Lists you have created appear, along with a description for each Access List.
Note: In the ReportCaster HTML User Interface, even when logged on as an administratoryou can only view Access Lists that you own. To view all Access Lists, use theReportCaster Development and Administration Interface.
136 WebFOCUS
About the Report Library
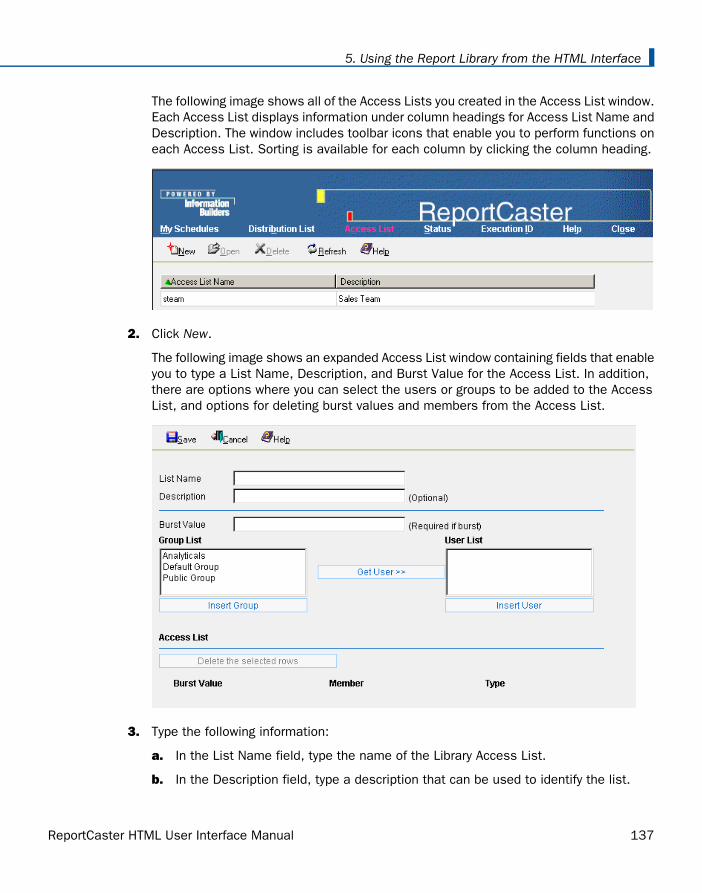
The following image shows all of the Access Lists you created in the Access List window.Each Access List displays information under column headings for Access List Name andDescription. The window includes toolbar icons that enable you to perform functions oneach Access List. Sorting is available for each column by clicking the column heading.
2. Click New.
The following image shows an expanded Access List window containing fields that enableyou to type a List Name, Description, and Burst Value for the Access List. In addition,there are options where you can select the users or groups to be added to the AccessList, and options for deleting burst values and members from the Access List.
3. Type the following information:
a. In the List Name field, type the name of the Library Access List.
b. In the Description field, type a description that can be used to identify the list.
ReportCaster HTML User Interface Manual 137
5. Using the Report Library from the HTML Interface

c. In the Burst Value field, type an optional burst value. This value is case-sensitive.
4. Add groups and users to the Access List.
To add groups to the Access List:
In the Group List field, select the group or groups you want to add to the Access List(for example, Analyticals), and then click Insert Group. This populates the Burst Value(if applicable), Member, and Type fields at the bottom of the window. Note that onlygroups that have been granted access to content in the Report Library appear in theGroup List. All members of the group will have access.
To add users to the Access List:
In the Group List field, select the group from which you want to add users to the AccessList, and then click Get User. This populates the User List field with the users from thespecified group. In the User List field, select the user or users you want to add to theAccess List (for example, rcanalytical), and then click Insert User. This populates theBurst Value (if applicable), Member, and Type fields at the bottom of the window.
Note: To delete a group or user from the Access List, select that group or user and thenclick Delete the selected rows.
5. Click Save to save the Access List.
How to Edit and Delete a Library Access ListProcedure:
From the Access List window in the ReportCaster HTML User Interface, you can edit or deleteyour own previously created Access Lists at any time by performing the following steps:
1. Select the Access List you want to edit or delete.
The following image shows a selected row of data for the Sales Team in the Access Listwindow.
2. Perform one of the following actions:
To edit the Access List, click Open.
138 WebFOCUS
Creating and Maintaining a Library Access List in the HTML User Interface
To delete the Access List, click Delete.
3. Perform one of the following actions:
If you are editing the Access List, make the necessary changes and click Save. Notethat if you rename the Access List, the original Access List remains unaltered.
If you are deleting the Access List, a message appears asking to confirm that youwant to delete the Access List. Click OK to delete the Access List.
Accessing the Report LibraryThe Report Library interface provides access to the library content that you have permissionto view. In addition to viewing content, you can delete content from the library, and put itemson the Library Watch List. The Library Watch List interface, accessed through a tab in theReport Library interface, enables you to track and focus on content that is of special interestto you.
There are several ways to access the Report Library interface:
From the e-mail notification sent when a scheduled job runs. E-mail notification is anoption available to you when creating a schedule with output to be distributed to theReport Library. This notification is sent to all recipients with access rights to the contentand contains the URL needed to access the content in the Report Library.
If you receive such an e-mail, open the e-mail and click the link to the library content.When the logon window opens, type your ReportCaster user ID and password. After asuccessful logon, you are sent directly to the specified output within the Library Contentinterface. Note that there is a link back to the Library Content interface that enables youto view additional content to which you have access in the library.
From Managed Reporting Domains environment, click the Report Library icon on thetoolbar.
From the Business Intelligence Dashboard, select Library from the Tools drop-down list.(You can also add the Report Library Interface to a Dashboard Content page.)
From a browser by typing the following URL:
http://hostname[:port]/rc_context_root/library/liblogon.jsp
where:
hostname[:port]
Is the host name and optional port number (specified only if you are not using thedefault port number) of the Application Server where the ReportCaster Web applicationis deployed.
ReportCaster HTML User Interface Manual 139
5. Using the Report Library from the HTML Interface
rc_context_root
Is the site customized context root for the ReportCaster Web application deployedon your Application Server. rcaster is the default value.
When the Report Library logon page opens, type your ReportCaster user ID and password.After a successful logon, you can view all content to which you have access in the ReportLibrary.
From the WebFOCUS Welcome page, click the Report Library Content option.
From the WebFOCUS Welcome page, click the ReportCaster, Report Library Content option.
The WebFOCUS Welcome page is located at the following URL:
http://hostname[:port]/wf_context_root/welcome.jsp
where:
hostname[:port]
Is the host name and optional port number (specified only if you are not using thedefault port number) where the WebFOCUS Web application is deployed.
wf_context_root
Is the site-customized context root for the WebFOCUS Web application deployed onyour Application Server. The default value is ibi_apps.
Note: The Report Library option to change your password for the ReportCaster user ID shouldnot be used when ReportCaster is configured with Managed Reporting. This is because thisoption only updates the password in the ReportCaster Repository and not the ManagedReporting Repository. If this option is used, the user must also use the Managed Reportingchange password option to update the password in the Managed Reporting Repository.
The Report Library interface, shown in the following image, includes two tabs:
Library Reports, which provides access to all content in the library that you have permissionto view. For more information, see Viewing Library Content on page 142.
140 WebFOCUS
Accessing the Report Library
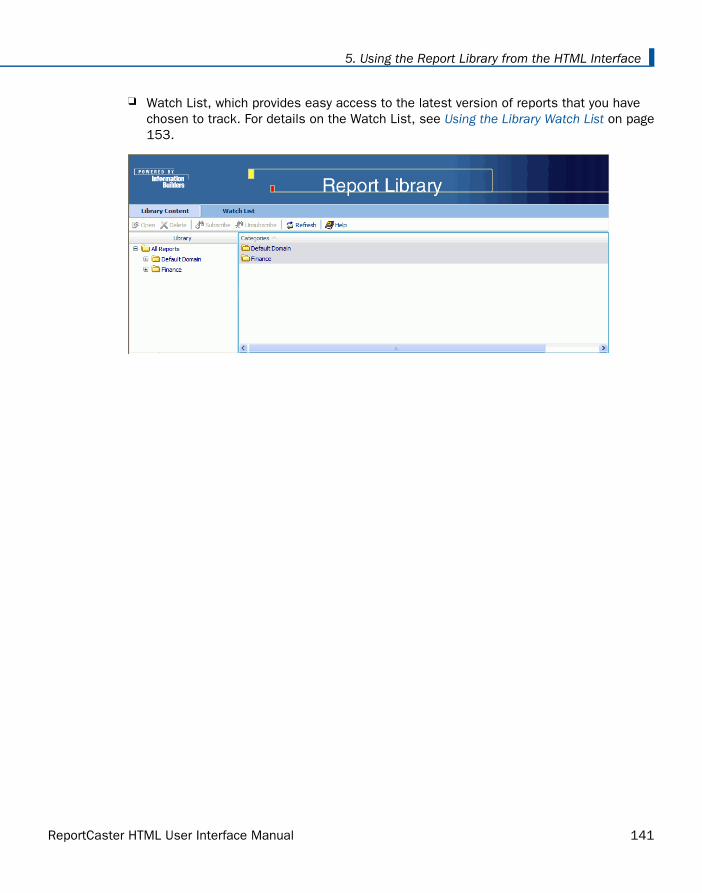
Watch List, which provides easy access to the latest version of reports that you havechosen to track. For details on the Watch List, see Using the Library Watch List on page153.
ReportCaster HTML User Interface Manual 141
5. Using the Report Library from the HTML Interface

Viewing Library Content
In this section:
Viewing On-demand Paging Reports
How to:
View Content in the Report Library
The Report Library interface Library Reports tab opens the Library Reports interface, whichprovides access to all content in the library that you have permission to view. The LibraryReports interface, shown in the following image, displays the Library Reports navigation treein the left pane and the details of the selected item in the right pane.
Note: Whether you are a ReportCaster administrator or an end user, you can only viewreports that you own, that are public, or that are protected by an Access List of which youare a member.
Reports are stored in the library under categories that you designate when creating aschedule. (If a category is not specified when creating a schedule for either a StandardReport or My Report, then the domain name under which the Standard Report or My Reportwas created in Managed Reporting is used as the category in the Report Library.) The topof the navigation tree in the left pane is titled All Reports, and when expanded, displays thecategories under which your reports reside as branches of the tree. This information alsoappears in the right pane. Categories and reports are listed alphabetically.
Each category folder contains report folders for that category, and each report folder containsthe versions of the report generated by the report schedule. The report folder name is thesame as the description given to the schedule that generated the report. If the report isburst, the report folder contains a folder for each burst value and the report versions residein those folders.
142 WebFOCUS
Viewing Library Content
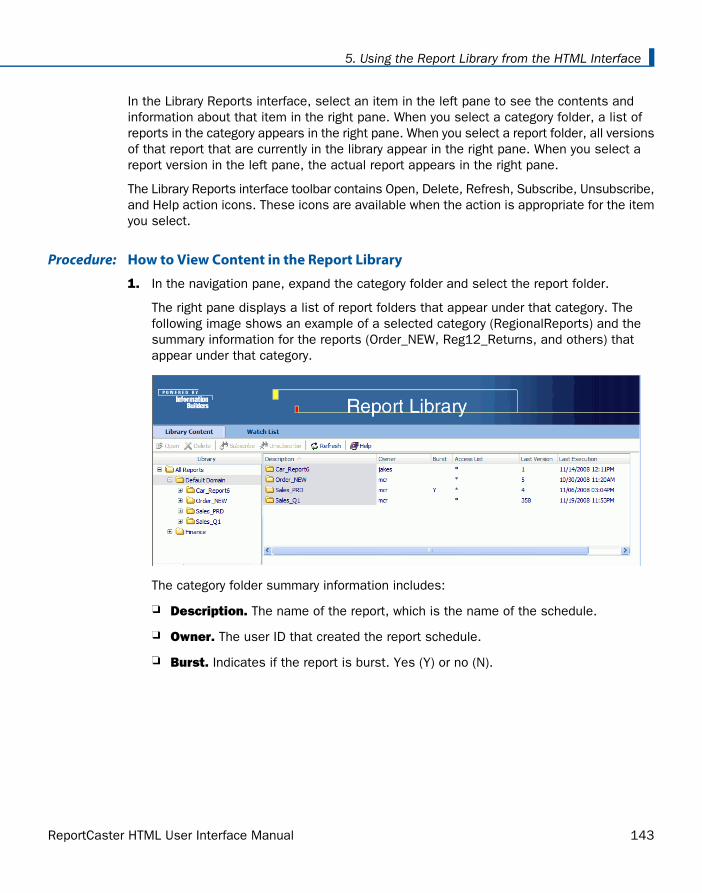
In the Library Reports interface, select an item in the left pane to see the contents andinformation about that item in the right pane. When you select a category folder, a list ofreports in the category appears in the right pane. When you select a report folder, all versionsof that report that are currently in the library appear in the right pane. When you select areport version in the left pane, the actual report appears in the right pane.
The Library Reports interface toolbar contains Open, Delete, Refresh, Subscribe, Unsubscribe,and Help action icons. These icons are available when the action is appropriate for the itemyou select.
How to View Content in the Report LibraryProcedure:
1. In the navigation pane, expand the category folder and select the report folder.
The right pane displays a list of report folders that appear under that category. Thefollowing image shows an example of a selected category (RegionalReports) and thesummary information for the reports (Order_NEW, Reg12_Returns, and others) thatappear under that category.
The category folder summary information includes:
Description. The name of the report, which is the name of the schedule.
Owner. The user ID that created the report schedule.
Burst. Indicates if the report is burst. Yes (Y) or no (N).
ReportCaster HTML User Interface Manual 143
5. Using the Report Library from the HTML Interface

Access List. Reflects the Library access selection in the report schedule, as follows:
The name of the Library Access List that is applied to the report.
An asterisk (*), which indicates the report is public (anyone with access to thelibrary has access to the report).
Blank, which indicates that only the owner of the schedule has access to thereport.
Last Version. The latest version of the report in the library, for example, 3.
Last Execution. The date and time of the last schedule execution and distribution.The date format is YYYYMMDD, where YYYY is the 4-digit year, MM is the month,DD is the day of the month. The time format is HHMM, where HH is the hour andMM is the minute, followed by either AM or PM.
Note: You can sort the columns in ascending or descending order by clicking the columnheading.
144 WebFOCUS
Viewing Library Content
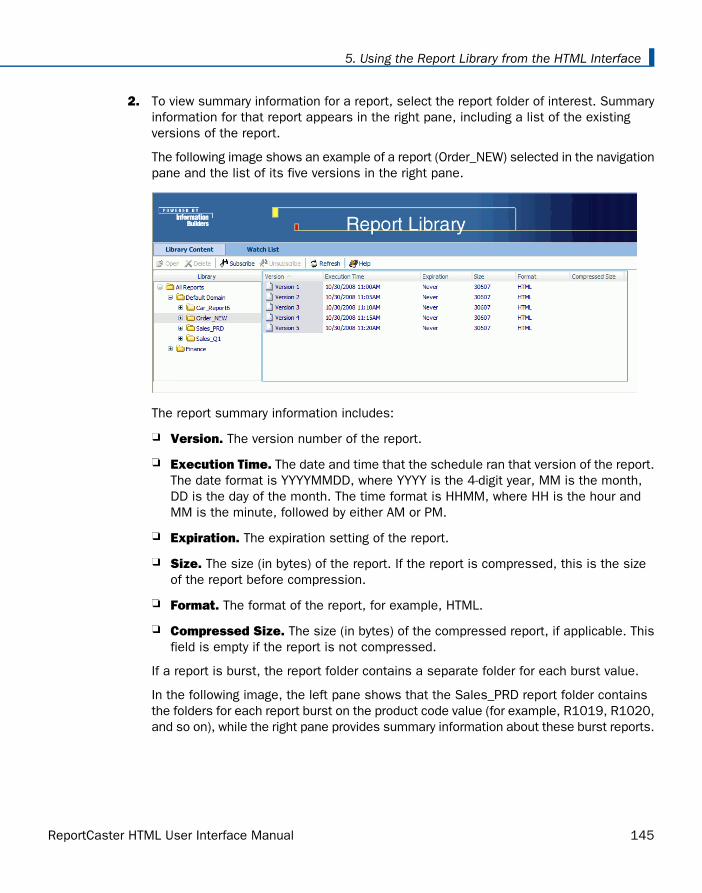
2. To view summary information for a report, select the report folder of interest. Summaryinformation for that report appears in the right pane, including a list of the existingversions of the report.
The following image shows an example of a report (Order_NEW) selected in the navigationpane and the list of its five versions in the right pane.
The report summary information includes:
Version. The version number of the report.
Execution Time. The date and time that the schedule ran that version of the report.The date format is YYYYMMDD, where YYYY is the 4-digit year, MM is the month,DD is the day of the month. The time format is HHMM, where HH is the hour andMM is the minute, followed by either AM or PM.
Expiration. The expiration setting of the report.
Size. The size (in bytes) of the report. If the report is compressed, this is the sizeof the report before compression.
Format. The format of the report, for example, HTML.
Compressed Size. The size (in bytes) of the compressed report, if applicable. Thisfield is empty if the report is not compressed.
If a report is burst, the report folder contains a separate folder for each burst value.
In the following image, the left pane shows that the Sales_PRD report folder containsthe folders for each report burst on the product code value (for example, R1019, R1020,and so on), while the right pane provides summary information about these burst reports.
ReportCaster HTML User Interface Manual 145
5. Using the Report Library from the HTML Interface
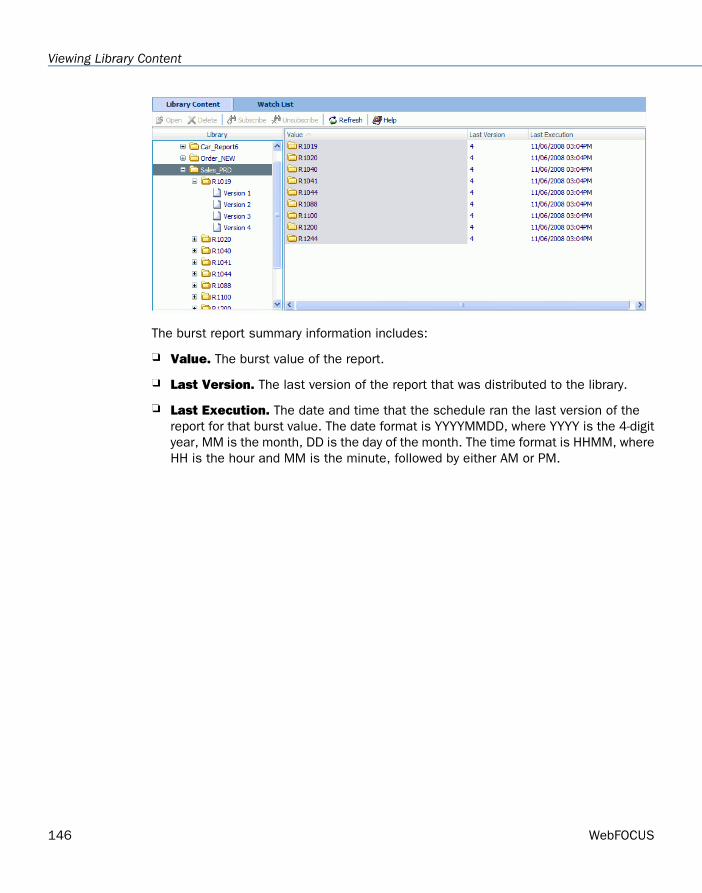
The burst report summary information includes:
Value. The burst value of the report.
Last Version. The last version of the report that was distributed to the library.
Last Execution. The date and time that the schedule ran the last version of thereport for that burst value. The date format is YYYYMMDD, where YYYY is the 4-digityear, MM is the month, DD is the day of the month. The time format is HHMM, whereHH is the hour and MM is the minute, followed by either AM or PM.
146 WebFOCUS
Viewing Library Content
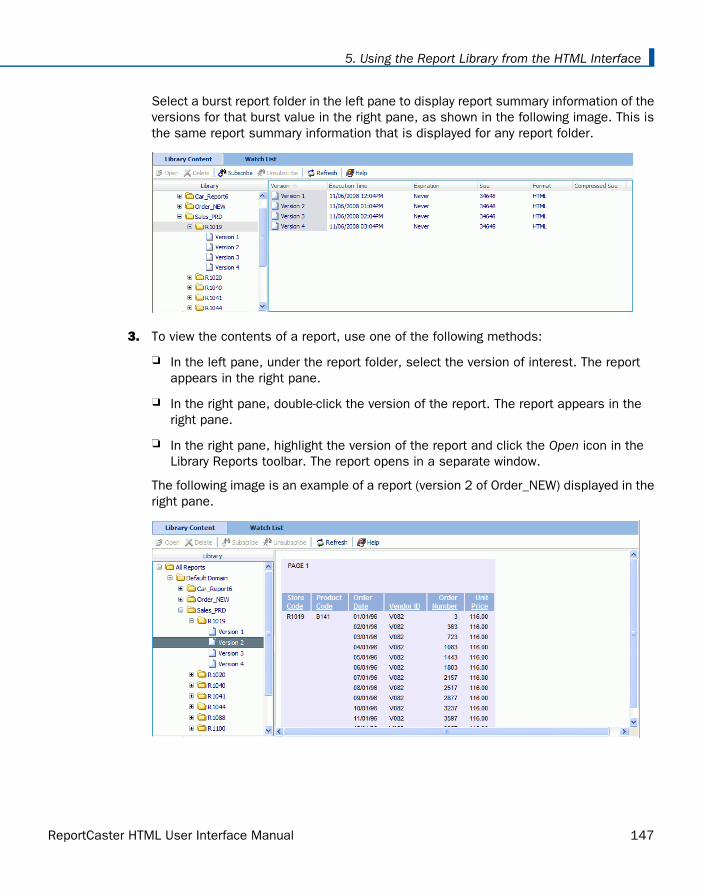
Select a burst report folder in the left pane to display report summary information of theversions for that burst value in the right pane, as shown in the following image. This isthe same report summary information that is displayed for any report folder.
3. To view the contents of a report, use one of the following methods:
In the left pane, under the report folder, select the version of interest. The reportappears in the right pane.
In the right pane, double-click the version of the report. The report appears in theright pane.
In the right pane, highlight the version of the report and click the Open icon in theLibrary Reports toolbar. The report opens in a separate window.
The following image is an example of a report (version 2 of Order_NEW) displayed in theright pane.
ReportCaster HTML User Interface Manual 147
5. Using the Report Library from the HTML Interface
Viewing On-demand Paging Reports
In this section:
Searching in an On-demand Paging Report
The Report Library On-demand Paging feature enables you to view a report one page at atime from the Library while the Web server holds the remaining pages and feeds them atyour request. This feature is useful for large reports because it decreases the amount oftime you must wait before you can begin viewing the report.
On-demand Paging reports open from the Library inside the WebFOCUS Viewer. This toolprovides the framework to view report pages and enables you to search for specific pagesor information in the report.
To enable the On-demand Paging feature, reports must be distributed in the On-demandPaging format (HTML ODP). You must select HTML ODP as the format when creating aschedule for a report to be distributed in the On-demand Paging format. HTML ODP is availableas a format when Library is selected for distribution.
Note: When HTML ODP is selected as the format, the Distribution Server adds SETWEBVIEWTARG=OFF to the procedure to control the behavior of the frames in the Library.SET WEBVIEWTARG does not override ON TABLE SET WEBVIEWTARG. Therefore, the scheduledprocedure should not contain an ON TABLE SET WEBVIEWTARG statement.
You can open an On-demand Paging report inside the Report Library or in a separate window,as follows:
To open the report in the right Library pane, use one of the following methods:
In the left navigation pane, click the version of the report you want to view.
In the right Library pane, double click the version of the report you want to view.
To open the report in a separate window, use one of the following methods:
In the left navigation pane, right-click the version you want to view and select Openfrom the drop-down list.
In the right Library pane, select the version you want to view and click the Open iconin the Library toolbar.
148 WebFOCUS
Viewing Library Content
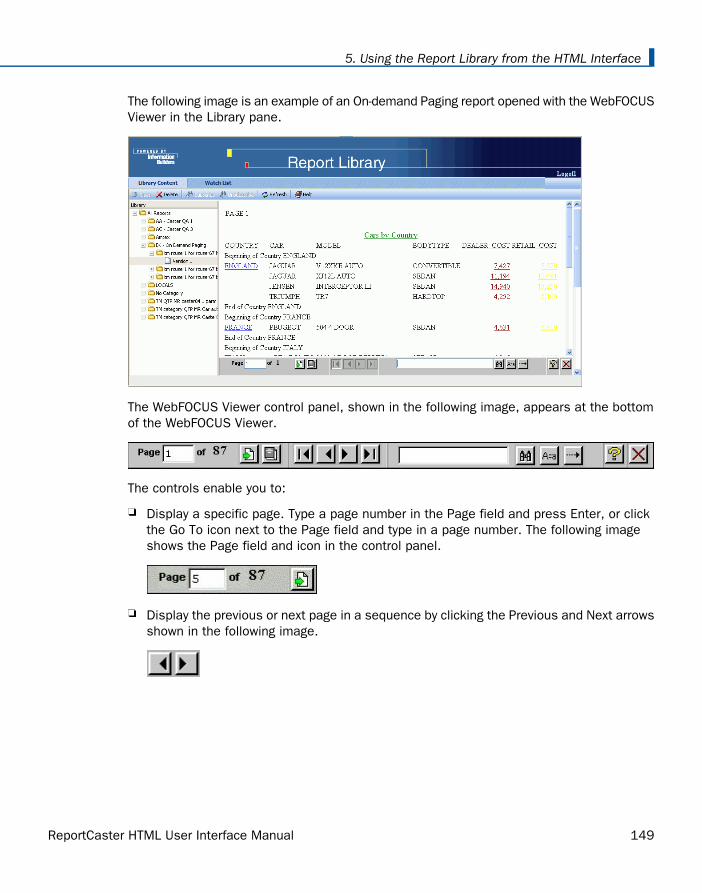
The following image is an example of an On-demand Paging report opened with the WebFOCUSViewer in the Library pane.
The WebFOCUS Viewer control panel, shown in the following image, appears at the bottomof the WebFOCUS Viewer.
The controls enable you to:
Display a specific page. Type a page number in the Page field and press Enter, or clickthe Go To icon next to the Page field and type in a page number. The following imageshows the Page field and icon in the control panel.
Display the previous or next page in a sequence by clicking the Previous and Next arrowsshown in the following image.
ReportCaster HTML User Interface Manual 149
5. Using the Report Library from the HTML Interface
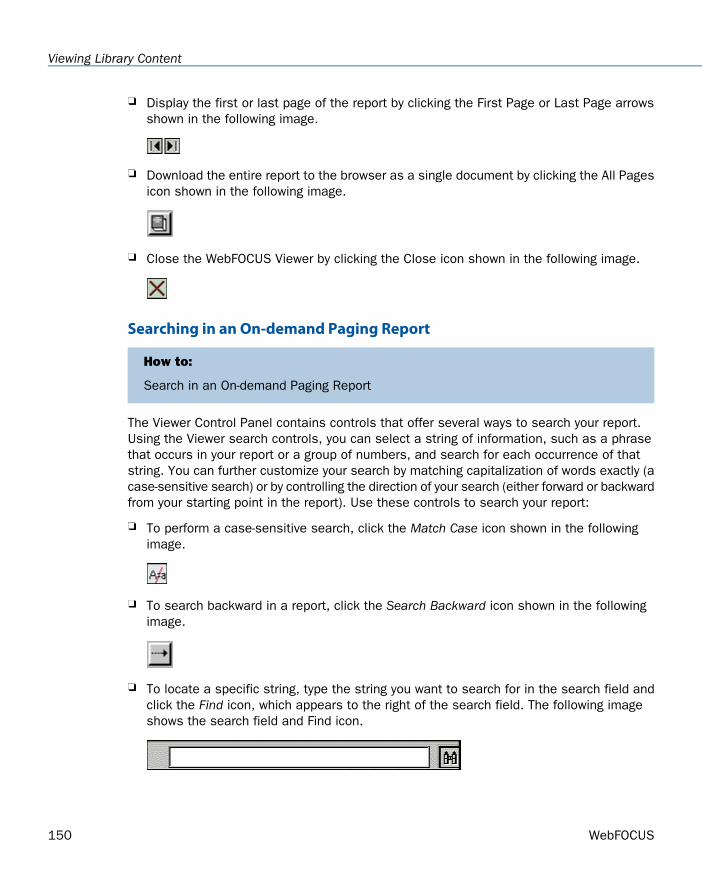
Display the first or last page of the report by clicking the First Page or Last Page arrowsshown in the following image.
Download the entire report to the browser as a single document by clicking the All Pagesicon shown in the following image.
Close the WebFOCUS Viewer by clicking the Close icon shown in the following image.
Searching in an On-demand Paging Report
How to:
Search in an On-demand Paging Report
The Viewer Control Panel contains controls that offer several ways to search your report.Using the Viewer search controls, you can select a string of information, such as a phrasethat occurs in your report or a group of numbers, and search for each occurrence of thatstring. You can further customize your search by matching capitalization of words exactly (acase-sensitive search) or by controlling the direction of your search (either forward or backwardfrom your starting point in the report). Use these controls to search your report:
To perform a case-sensitive search, click the Match Case icon shown in the followingimage.
To search backward in a report, click the Search Backward icon shown in the followingimage.
To locate a specific string, type the string you want to search for in the search field andclick the Find icon, which appears to the right of the search field. The following imageshows the search field and Find icon.
150 WebFOCUS
Viewing Library Content
How to Search in an On-demand Paging ReportProcedure:
1. Enter the string in the Search input box.
2. Click Match Case if you want to perform a case-sensitive search.
Notice that the WebFOCUS Viewer displays the Match Case button with a red line acrossit to indicate that it is active.
3. To begin your search, click:
a. Search Backward to search for the string from the current page back to the firstpage.
or
b. Find to search from the current page to the end of your report.
The WebFOCUS Viewer searches the report and underlines the first occurrence of thestring.
4. Click Find again to search for another occurrence of the string.
Using the Viewer Control Panel to SearchExample:
You want to use the Viewer Control Panel to navigate a long report called Coffee Sales tofind occurrences of the string "Kona," a type of coffee that you sell. After you run the report,WebFOCUS displays the first page of the report in the Viewer.
ReportCaster HTML User Interface Manual 151
5. Using the Report Library from the HTML Interface
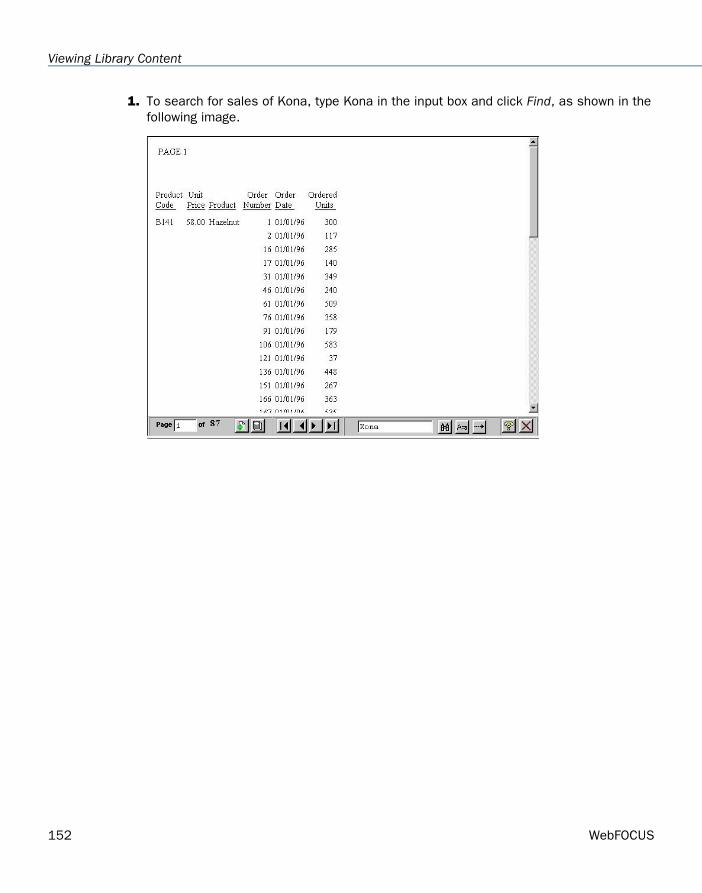
1. To search for sales of Kona, type Kona in the input box and click Find, as shown in thefollowing image.
152 WebFOCUS
Viewing Library Content
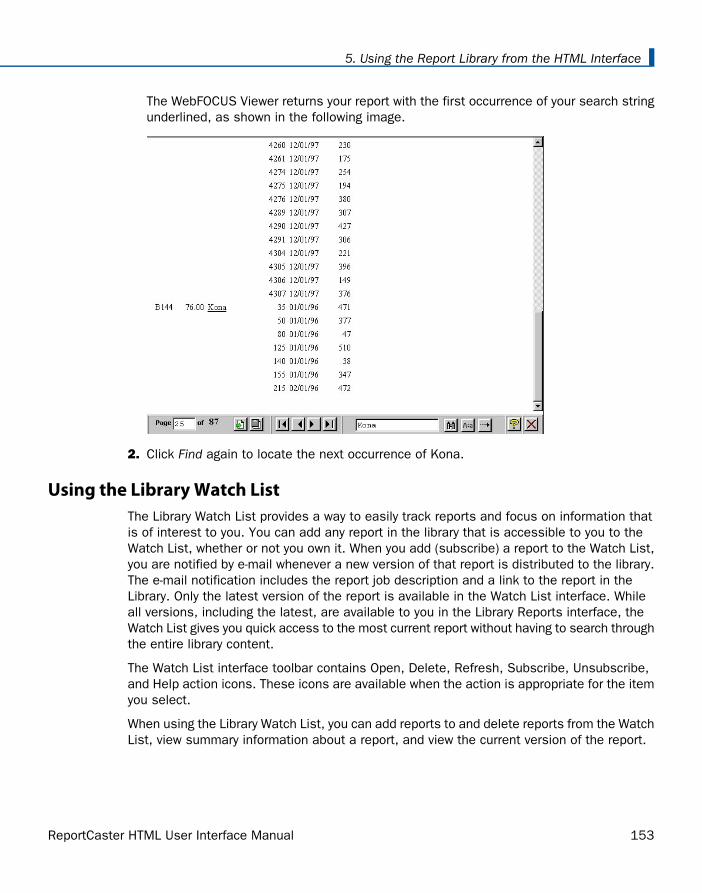
The WebFOCUS Viewer returns your report with the first occurrence of your search stringunderlined, as shown in the following image.
2. Click Find again to locate the next occurrence of Kona.
Using the Library Watch ListThe Library Watch List provides a way to easily track reports and focus on information thatis of interest to you. You can add any report in the library that is accessible to you to theWatch List, whether or not you own it. When you add (subscribe) a report to the Watch List,you are notified by e-mail whenever a new version of that report is distributed to the library.The e-mail notification includes the report job description and a link to the report in theLibrary. Only the latest version of the report is available in the Watch List interface. Whileall versions, including the latest, are available to you in the Library Reports interface, theWatch List gives you quick access to the most current report without having to search throughthe entire library content.
The Watch List interface toolbar contains Open, Delete, Refresh, Subscribe, Unsubscribe,and Help action icons. These icons are available when the action is appropriate for the itemyou select.
When using the Library Watch List, you can add reports to and delete reports from the WatchList, view summary information about a report, and view the current version of the report.
ReportCaster HTML User Interface Manual 153
5. Using the Report Library from the HTML Interface
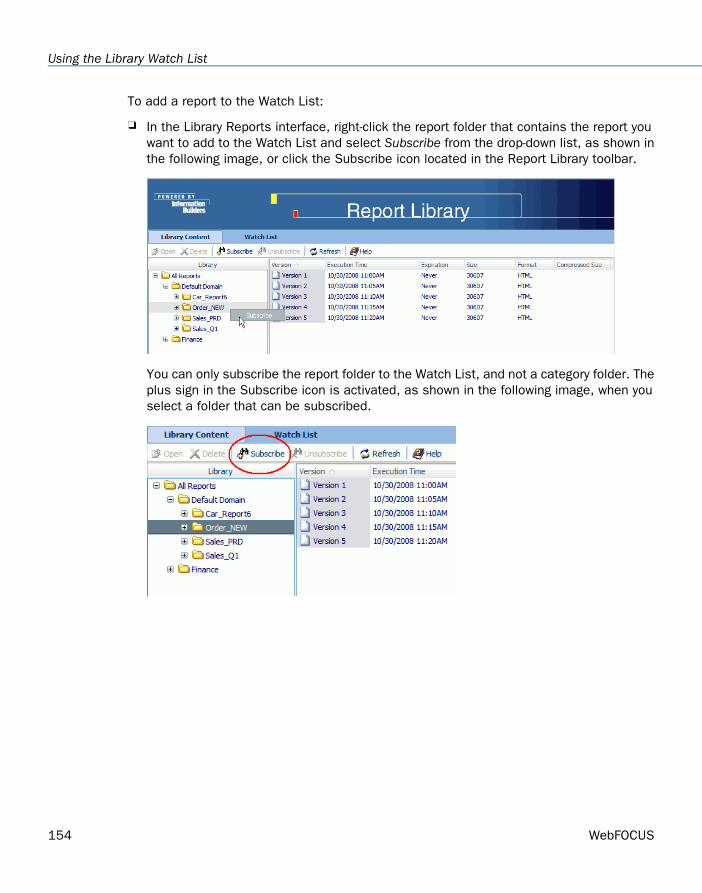
To add a report to the Watch List:
In the Library Reports interface, right-click the report folder that contains the report youwant to add to the Watch List and select Subscribe from the drop-down list, as shown inthe following image, or click the Subscribe icon located in the Report Library toolbar.
You can only subscribe the report folder to the Watch List, and not a category folder. Theplus sign in the Subscribe icon is activated, as shown in the following image, when youselect a folder that can be subscribed.
154 WebFOCUS
Using the Library Watch List

If a report is burst, you can only subscribe the report for an individual burst value andnot the entire report. The following image shows a burst value report (R1019) that isselected for subscription to the Watch List.
The report is moved to the Watch List interface, as shown in the following image. Noticethat only the most current version of the report appears in the Watch List.
In addition, the Library Reports interface shows a binocular icon as part of the reportfolder to indicate it is on the Watch List, as shown in the following image.
ReportCaster HTML User Interface Manual 155
5. Using the Report Library from the HTML Interface

To see summary information about the reports in the Watch List, select All Reports in theleft pane. The following information about the Watch List reports appears in the right pane:
Description. The name of the report, which is the name of the schedule.
Owner. The user ID that created the schedule.
Access List. This field reflects the Library access selection in the schedule, as follows:
The name of the Library Access List that is applied to the schedule.
An asterisk (*), which indicates the report is public (anyone with access to the libraryhas access to the report).
Blank, which indicates that only the owner of the schedule has access to the report.
Last Version. The latest version of the report in the library, for example, 4 of 4.
Last Execution. The date and time of the last schedule execution and distribution. Thedate format is YYYYMMDD, where YYYY is the 4-digit year, MM is the month, DD is theday of the month. The time format is HHMM, where HH is the hour and MM is the minute,followed by either AM or PM.
To view the contents of a report, select the report in the left pane and the report contentappears in the right pane. The following image shows an example of a report in the WatchList.
156 WebFOCUS
Using the Library Watch List
To remove a report from the Watch List, do one of the following:
In the Watch List interface, right-click the report in the left pane and select Unsubscribe.Click Refresh to clear the report icon from the Watch List interface.
In the Library Reports interface, right-click the report (which includes a binocular icon toindicate it is on the Watch List) and select Unsubscribe. The Watch List no longer containsthis report.
In either the Library Reports interface or the Watch List interface, click the Unsubscribeicon located in the Report Library toolbar.
Deleting Content From the LibraryTo delete content from the library, you must be in the Library Reports interface. You cannotdelete library content while in the Watch List interface. You can only delete content that youown.
Note: In the Library Reports interface, you can only delete the content that you own, whetheryou are a ReportCaster administrator or an end user. However, the ReportCaster administratorcan delete library content through the Library Management tool. For more information onthis tool, see the ReportCaster Administration manual.
The delete option (available from the right-click drop-down list or from the Delete icon in thetoolbar) is only available for reports that you own, and for those items that can be deleted.For example, you cannot delete a report folder until you delete all of the content (reportversions) under that folder.
When you delete a version of a report, ReportCaster does not renumber the remainingversions. For example, if there are six versions of a report and you delete versions 1, 2, and4, the remaining versions are 3, 5, and 6, and the next version of this report to be distributedto the library will be version 7.
Note: A category remains in the Report Library until all versions of the report (or reports) inthat category and the schedule (or schedules) that created the report (or reports) are deleted.If you delete all versions of the report (or reports) but do not delete the schedule (orschedules) that created the report (or reports), then the category will remain in the library.
When you delete a report that is on the Watch List, the Watch List interface still containsthe report icon in the left pane, but rather than the report, a document icon with a red Xappears in the right pane. This reminds you that a report is still on the Watch List eventhough there is no content currently available, and it also makes you aware of reports thatyou do not own that have been deleted.
ReportCaster HTML User Interface Manual 157
5. Using the Report Library from the HTML Interface
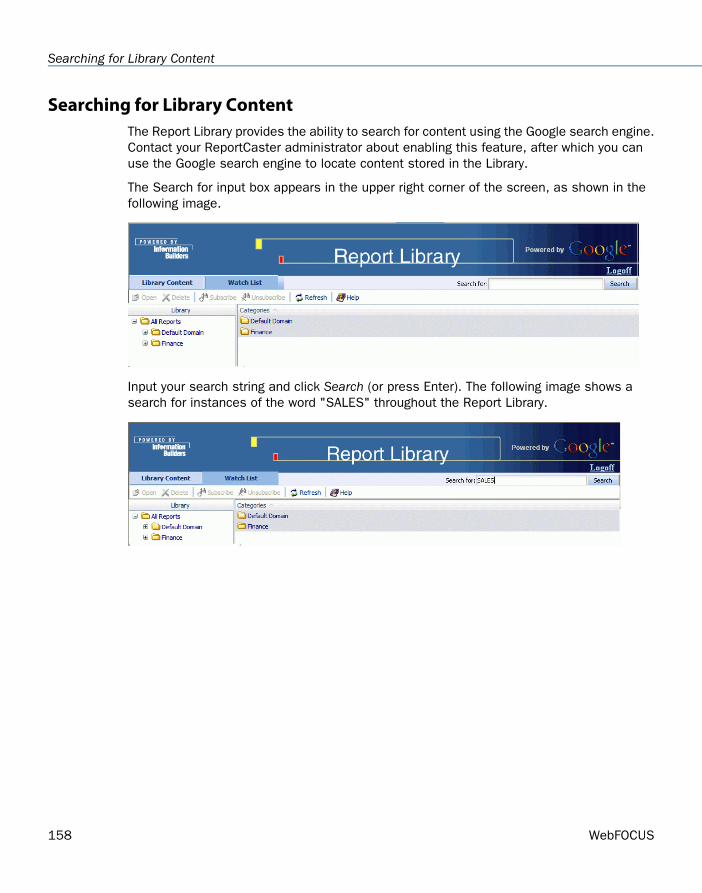
Searching for Library ContentThe Report Library provides the ability to search for content using the Google search engine.Contact your ReportCaster administrator about enabling this feature, after which you canuse the Google search engine to locate content stored in the Library.
The Search for input box appears in the upper right corner of the screen, as shown in thefollowing image.
Input your search string and click Search (or press Enter). The following image shows asearch for instances of the word "SALES" throughout the Report Library.
158 WebFOCUS
Searching for Library Content
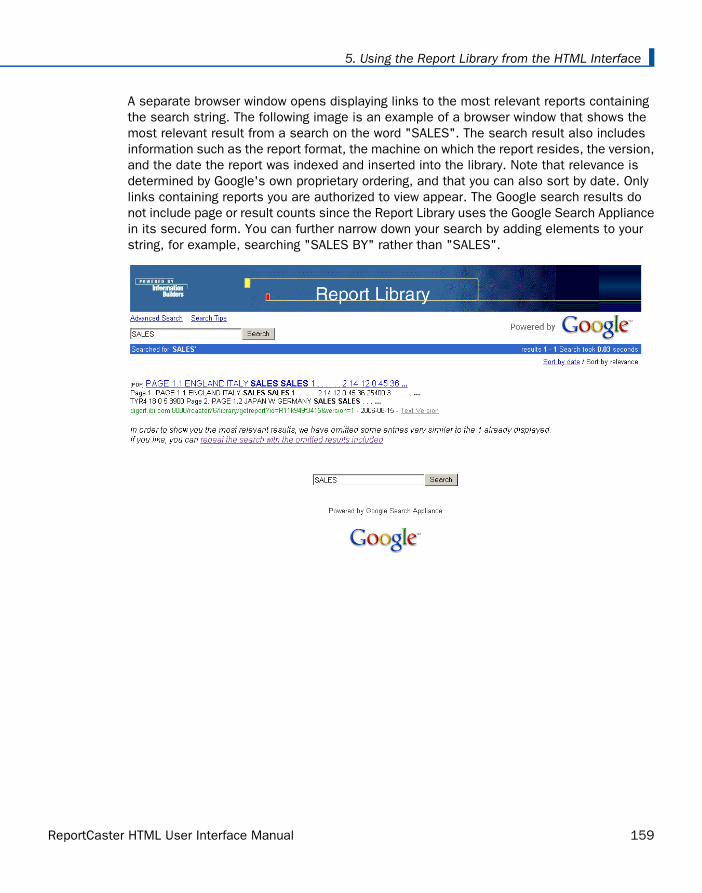
A separate browser window opens displaying links to the most relevant reports containingthe search string. The following image is an example of a browser window that shows themost relevant result from a search on the word "SALES". The search result also includesinformation such as the report format, the machine on which the report resides, the version,and the date the report was indexed and inserted into the library. Note that relevance isdetermined by Google's own proprietary ordering, and that you can also sort by date. Onlylinks containing reports you are authorized to view appear. The Google search results donot include page or result counts since the Report Library uses the Google Search Appliancein its secured form. You can further narrow down your search by adding elements to yourstring, for example, searching "SALES BY" rather than "SALES".
ReportCaster HTML User Interface Manual 159
5. Using the Report Library from the HTML Interface

Click the repeat the search with the omitted results included link to display more results onthe page, as shown in the following image.
160 WebFOCUS
Searching for Library Content
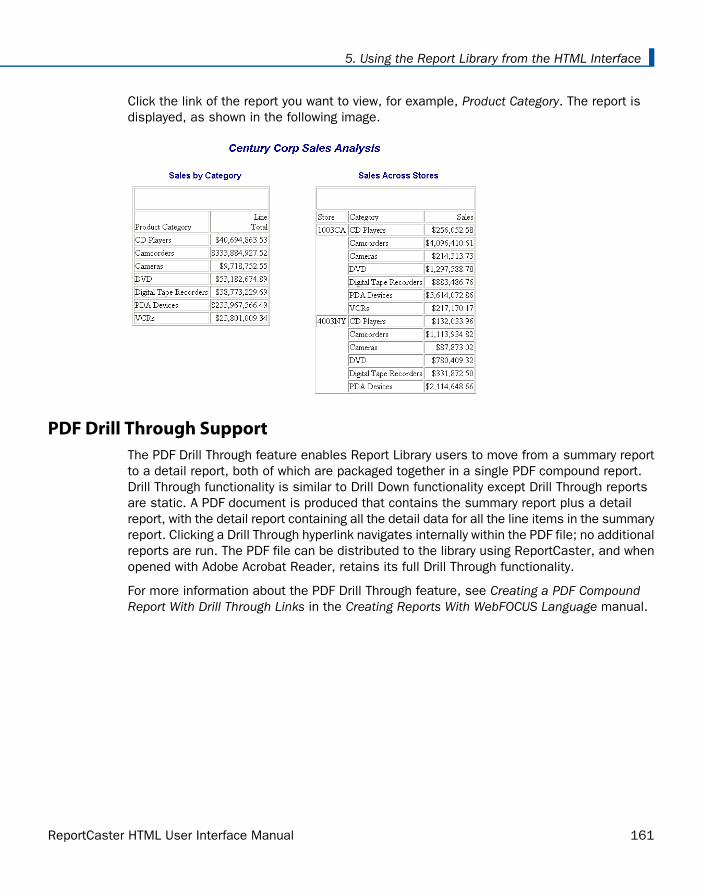
Click the link of the report you want to view, for example, Product Category. The report isdisplayed, as shown in the following image.
PDF Drill Through SupportThe PDF Drill Through feature enables Report Library users to move from a summary reportto a detail report, both of which are packaged together in a single PDF compound report.Drill Through functionality is similar to Drill Down functionality except Drill Through reportsare static. A PDF document is produced that contains the summary report plus a detailreport, with the detail report containing all the detail data for all the line items in the summaryreport. Clicking a Drill Through hyperlink navigates internally within the PDF file; no additionalreports are run. The PDF file can be distributed to the library using ReportCaster, and whenopened with Adobe Acrobat Reader, retains its full Drill Through functionality.
For more information about the PDF Drill Through feature, see Creating a PDF CompoundReport With Drill Through Links in the Creating Reports With WebFOCUS Language manual.
ReportCaster HTML User Interface Manual 161
5. Using the Report Library from the HTML Interface
162 WebFOCUS
PDF Drill Through Support

WebFOCUS
Index
-TYPE commands 123
&ECHO variables 123
AAccess Lists 136, 137, 138
creating 137deleting 138editing 138
Address Search option 77, 105distribution lists 105schedules 77
amper auto-prompting in ReportCaster 65, 66, 67, 69, 70
adding a dynamic multi-select list of values 70adding a dynamic single-select list of values 67adding a static multi-select list of values 69adding a static single-select list of values 66setting default variables 65
Apply secondary run interval window 58
applying a secondary run interval 58
B
blackout dates for schedules 127
burst values 24, 77, 104specifying in an e-mail subject line 24, 77
bursting reportsenable report bursting option 62limiting burst values distributed to the Library93
C
case sensitive searches 150, 151
cc mail considerations 84
cloning schedules 117
creating a distribution list 103
creating a schedule 51
creating a secondary run interval 58
D
default variable values in ReportCaster 65
deleting a distribution list 111
deleting a schedule 119
deleting Report Library content 157
distributing reports 25, 71, 72, 73, 77, 82, 86, 87, 88, 90, 91, 109, 135
accessing an LDAP Address Book 77by e-mail 25, 72, 73, 82, 135by fax 25, 82to Managed Reporting 87, 88to printers 86, 109to the Report Library 90, 91
distribution files 25, 74, 82, 86
distribution lists 101, 102, 103, 105, 109, 110, 111, 120
accessing an LDAP Address Book 105creating 103, 109deleting 111editing 110, 120
distribution options 71
ReportCaster HTML User Interface Manual 163
Distribution tab 71
Drill Through feature 161
dynamic multi-select list of values in ReportCaster
70
dynamic single-select list of values in ReportCaster
67
dynamically running a schedule on demand 99
Ee-mail 25, 72, 82, 84
attachments 25, 82inline reports 25, 82
editing a distribution list 110
editing a schedule 115, 116
editing a schedule with unavailable options 117
Exchange Mail Server considerations 84
Execution IDs 62, 131, 132, 133, 134changing 133creating 132deleting 134generating a list of 131
external distribution files 25, 74, 82, 86
F
faxing reports 25, 82
G
Google Search in Report Library 158
H
HTML User Interface 113
I
inline e-mail reports 25, 82
L
LDAP integration 77, 105
Library Access Lists 136, 137, 138creating 137deleting 138editing 138
Library Content interface 139, 142
limiting burst values distributed to the Library 93
limiting burst values distributed to the Report Library
32
log files 123, 125purging 125
log reports 120, 122, 123, 124, 125considerations 124reading 122troubleshooting 125viewing 120
M
maintaining a schedule 114
Managed Reporting 87, 88
N
notification and log information for unavailable
options 98, 125
notification options 96
164 WebFOCUS
Index

O
On-demand Paging reports 148
P
parameter prompting enhancement 64
parameters 24, 43, 63, 77specifying in an e-mail subject line 24, 77specifying values in a report 43, 63
PDF Drill Through 161
printers 109distributing reports to 109
purging log files 125
R
Report Information window 60
Report Library 90, 91, 135, 136, 139, 142, 143, 157, 158
Access Lists for 136deleting content from 157searching for content 158viewing content in 139, 142, 143
report parameters 43, 63
Report Parameters window 43, 63
ReportCaster HTML User Interface 113
ReportCaster Scheduling Wizard 51, 53
reports 51, 71, 86, 87, 101, 120, 150, 151distributing 71, 86, 87scheduling 51searching for 150, 151tracking 120
retrieving e-mail addresses using Address Search
77, 105
run interval options 53
running a schedule 99
S
schedule blackout dates 127
schedule subintervals 58
schedules 51, 53, 114, 115, 116, 117, 119, 130checking status 130cloning 117creating 51, 53deleting 119editing 115, 116maintaining 114
Scheduling Wizard 51, 53
searching for Library content 158
secondary run intervals 58
Settings window 96
specifying report parameters 43, 63
static multi-select list of values in ReportCaster 69
static single-select list of values in ReportCaster 66
Status option 130
U
unavailable options in ReportCaster 98, 117, 125
using Google search in the Report Library 158
VViewer Control Panel
case sensitive searches 151searching reports 151
ReportCaster HTML User Interface Manual 165
Index
W
Watch List 153
Z
z/OS UNIX system 88, 109
zipping e-mail distribution 96
166 WebFOCUS
Index

WebFOCUS
Reader Comments
In an ongoing effort to produce effective documentation, the Documentation Services staffat Information Builders welcomes any opinion you can offer regarding this manual.
Please use this form to relay suggestions for improving this publication or to alert us tocorrections. Identify specific pages where applicable. You can contact us through the followingmethods:
Documentation Services - Customer SupportMail:Information Builders, Inc.Two Penn PlazaNew York, NY 10121-2898
(212) 967-0460Fax:
http://www.informationbuilders.com/bookstore/derf.htmlWeb form:
Name:
Company:
Address:
Telephone: Date:
Email:
Comments:
Information Builders, Two Penn Plaza, New York, NY 10121-2898 (212) 736-4433ReportCaster HTML User Interface Manual DN4501104.0511Version 7 Release 7.03
Creating Reports With WebFOCUS Language
Version 7 Release 6
Information Builders
Two Penn Plaza
New York, NY 10121-2898
Printed on recycled paper in the U.S.A.
ReportCaster HTML User Interface ManualVersion 7 Release 7.03