renovo video scheduler 7 - morenet video scheduler... · 1 . renovo video scheduler 7.0 . a quick...
TRANSCRIPT
1
Renovo Video Scheduler 7.0 A quick ‘upgrade’ guide for users of Renovo Video Scheduler 6.x and earlier versions
This guide is intended to help existing users of Renovo Video Scheduler software adjust quickly to the interface refresh changes that have been implemented in Renovo Video Scheduler release 7.0. This version has been updated to include web changes made through released build 7.0.1.41, dated 12/22/2015. Although the look and feel are changed from Renovo Release 6.4, the functionality is still there (with many new enhancements added), and we think we’ve made the scheduling interfaces easier to use and navigate, easier on the eyes, and even more fully-featured and user-friendly. Highlights of Video Scheduler 7.0 changes:
• Drop-down menus and a rectangular, framed format make it easier to schedule using tablet and touch-screen devices, including phones.
• The interface has been refreshed with appearance and navigation features similar to those found in current office-related product suites.
• Color schemes are subdued and understated, with largely white backgrounds and gray shading for column headers and separators.
• Brightly colored buttons have replaced buttons that tended to blend into the background in previous Video Scheduler releases. The buttons have also largely replaced underlined text links that were not always easy to read or find in previous versions.
• Filtering is always available at and across the top of the page you are viewing. You do not need to click into a separate box or click out of the box to make filtering active, as in past versions.
• Terminology on many pages has been updated. For example, ‘Bridge’ replaces ‘MCU’, and ‘Conference Now’ replaces ‘Ad Hoc’ scheduling.
• The Calendar page (home page for most users) can be easily changed between four views: no need to navigate to your User Preferences or bring up Calendar View reporting to change your view.
• Calendar page filtering is dynamic, and begins as soon as you enter any text into the filter box. • Conference status colors have been updated and grouped. • ‘MCU Reservation’ and ‘New Reservation’ have been combined into one scheduling option for both MCU and
endpoint-only (aka codec) conferences. MOREnet conferences are always MCU. The endpoint only is an additional service.
This document has screen shots on every page. Items with the most visible and structural changes are shown first (calendar and scheduling screens), while those with the fewest changes are shown later (admin and events menus). We hope that you will find this document useful, and that the changes we have made will help you to schedule video (and non-video) conferences. Sincerely, --The Renovo/GTL Team

2
Table of Contents Login Page………………….…………..……………..………..……………………………………………………………………………………………………………….3 Calendar…………………….………………………………………….………………………………………………………………………………………………………….4 Conference Summary…………………..…………..……………….…………………………………………………………………………………………………….7 Conference Scheduling Options……………………………..…………………………………………………………………………………………………………8
Full Scheduler ………………………………………………………………………………………………………………………………………………………..9 Full Scheduler – General Information……………………………………………………………………………………………………………………..9 Full Scheduler – Add Date(s)………………………………………………………………………………………………………………………………..10 Full Scheduler – Add Rooms…………………………………………………………………………………………………………………………………13 Full Scheduler – Bridge Setup………………………………………….……………………………………………………………………………………14 Full Scheduler – Summary………………………………………………………..…………………………………………………………………………..19
SEARCH………………………………………………………………………………………………………………………………………………………………………….21 ADMIN…………………………………………………………………………………………………………………………………………………………………………..22
ADMIN menu – Live Control…………………….………………………………………………………………………………………………………..23 ADMIN menu – Live Control – Edit…………………………………………………………………………………………………………………….24 ADMIN menu – Live Control – Bridge Status………………………………………………………………………………………………………25 ADMIN menu – Live Control – Bridge Status – Room Detail……………………………………………………………………………….26 ADMIN menu – Live Control – Contact Information…………………………………………………………………………………………..27 ADMIN menu – Room Approval………………………………………………………………………………………………….…………………….28 ADMIN menu – Create New User………………………………………………………………………………………………………………………29 ADMIN menu – Guest User Setup……………………………………………………………………………………………………………………..29

3
Login page: http://vs.video.more.net/VideoManager
Figure 1 – Video Scheduler default login screen Login process and options are the same. Login directs the user to the Calendar page, as before.

4
Calendar
Figure 2 – Calendar page menu and calendar option changes The look of the Calendar page has changed substantially, and there are more available options for the user.
1. MOREnet logo 2. New Main Menu location – menu has been moved from a column on the left side of the screen, to a drop-down
menu across the top bar. 3. If you hover your mouse over the ‘Renovo’ button upper right, the User Preferences options and Logout options
appear. **The ‘Renovo’ button is the logged in user ‘Renovo’. This will be replaced with your user name.** 4. The Renovo Software Video Scheduler version is displayed just below the ‘Renovo’ button, upper right. 5. Calendar View menu option has been removed because all calendars are available as clickable choices on the
Calendar screen. MORE CALENDAR PAGE HIGHLIGHTS ARE SHOWN ON THE NEXT PAGE:
4 Renovo Video Scheduler version shown here
5 Change calendar type on the fly here
1 MOREnet logo 2 New Drop-Down Main Menu replaces left-side Menu
3 Hover mouse over the ‘Renovo**’ button to access
• User Preferences • User Profile • Change Password • Log Out
Calendar Type display shown is Monthly

5
Calendar Page, version 7.0 – Part 2
Figure 3 – Calendar view and filter option changes Date Selection, Conference Search Filtering, and Conference Status filtering is dynamic, and is displayed at the top of the calendar list.
6. Calendar date searches are similar to previous versions, but the icons and selectors have been moved. The arrows are closer together than on the previous Calendar page for easier toggling of calendar dates.
7. The Calendar icon for monthly date selection (along with a calendar month drop-down and calendar year drop-down selector) is placed closer to the right-left arrow selectors, and the date range of the selected calendar is more clearly visible (for example, a ‘Daily by Room’ screen shot is shown here).
Figure 4
8. The text search filter box is placed at the top of the calendar view, instead of within a separate box. 9. The ‘Clear filter’ button helps to remind you if any conference filtering is in place. The button only appears if
conference filtering is active. 10. The ‘Additional Filter Options’ button allows you to choose additional Filter options and Sorting options. As
before, filtering options may be set in your user Preferences (located by clicking on ‘Renovo’ button (3, above).
7 Calendar button for date selection is moved here
6 Right/left arrows toggle calendar view forward or backward in increments depending on calendar type being viewed
8 Text filter box moved here
9 ‘Clear filter’ button only appears when any active filtering is in place
10 Click on filter icon for additional filtering options

6
Additional Filter Options allows you to change your filtering preferences during this session, without having to go back to your User Preferences menu selections and saving them there.
Calendar Page, version 7.0 – Part 3
Figure 5 – Calendar view color changes, dynamic filtering, Conference information and summary Filters are all located at the top of the calendar, and no longer placed into a separate box on the side of the page. Filtering is dynamic. ****Conference color indicators have changed, and some information displayed is shown in a different format than in past software versions. ****We know that change is sometimes difficult, but we hope you’ll like the new color scheme anyway
11. As soon as you type any characters into the conference filter window, filtering will begin. You don’t need to press the ‘filter’ button as in past software versions.
12. Status colors have been updated. Prestart, Running, Validated, Requested, and Complete are grouped into shades of blues and greens. Cancelled is black. Error remains Yellow. Conflict, Suspended, and Missing Endpoints statuses are grouped into shades of purple, red, and orange.
13. Conference status filtering is dynamic. When you check or uncheck any status box, filtering/un-filtering occurs. 14. As in previous versions, when you hover on a conference icon, you will see the conference details. The
presentation of the text is different, but hopefully easier to read because fonts and shades have been introduced to separate some of the data elements.
15. As in previous versions, when you click on a conference icon, you will be placed onto the Conference Summary page for the conference. Conference Summary is described below.
11 Text filtering is dynamic. Filtering updates as you type a string, and the Clear filter button immediately pops up.
12 PLEASE NOTE that status colors have been UPDATED – CHANGED!!!
13 Conference status is dynamically filtered/unfiltered by checking or unchecking the check box next to its status description.
14 Hover on any conference icon to see conference details. Displayed information is the same, but the format of the displayed details is changed slightly from previous software versions.
15 Click on any conference icon to view its Conference Summary page. Conference Summary is described on the next page.

7
Conference Summary
Figure 6 – Conference Summary page The Conference Summary page is a good example of how buttons have largely replaced icons and clickable underlined/bolded/colored words. This is intended to improve efficiency of navigation on the pages.
1. Buttons have replaced the icons that were used in previous software versions. The icons were OK for people who were used to them, but they were sometimes inscrutable to others.
2. Detail text is reformatted, colored and boded, to make it easier to read and absorb and hopefully a little easier on the eyes.
3. Buttons have replaced underlined or bolded text in the conference detail area. They are easier to see and to click on, than the text fields they replaced.
4. ‘Bridge’ is the replacement term, where possible, for ‘MCU’.
1 Buttons replace the icons at the top of the page.
3 Buttons replace the underlined, highlighted text in the conference details.
4 In many places, “MCU” has been replaced by “Bridge”
2 Conference detail text has been reformatted to make it a little easier to separate the information into its component parts.

8
Conference Scheduling Options
Figure 7 – New Conference menu selections All new conferences can be scheduled via the NEW option on the drop-down menu. All of the scheduling methods have been renamed. The functionality of the various scheduling options remains, but you will find the look and feel of the schedulers to be a little different.
1. Conference Now replaces the previous ‘Ad Hoc’ scheduling method. Not for MOREnet member use. 2. Quick Scheduler replaces the previous ‘Multipoint’ scheduling method. Not for MOREnet member use. 3. Full Scheduler replaces both ‘MCU Reservation’, and ‘New Reservation’. You can schedule Bridge (MCU)
conferences, codec conferences, and ‘No Transmit’ (non-video) conferences using the same Full Scheduler scheduling option. MOREnet members use this option.
1 To schedule a new conference, select NEW on the menu bar
2 Conference Now replaces Ad Hoc
3 Quick Scheduler replaces Multipoint Scheduler
4 Full Scheduler replaces MCU Reservation, AND New Reservation. Both Bridge and codec conferences may be scheduled using this option.
9
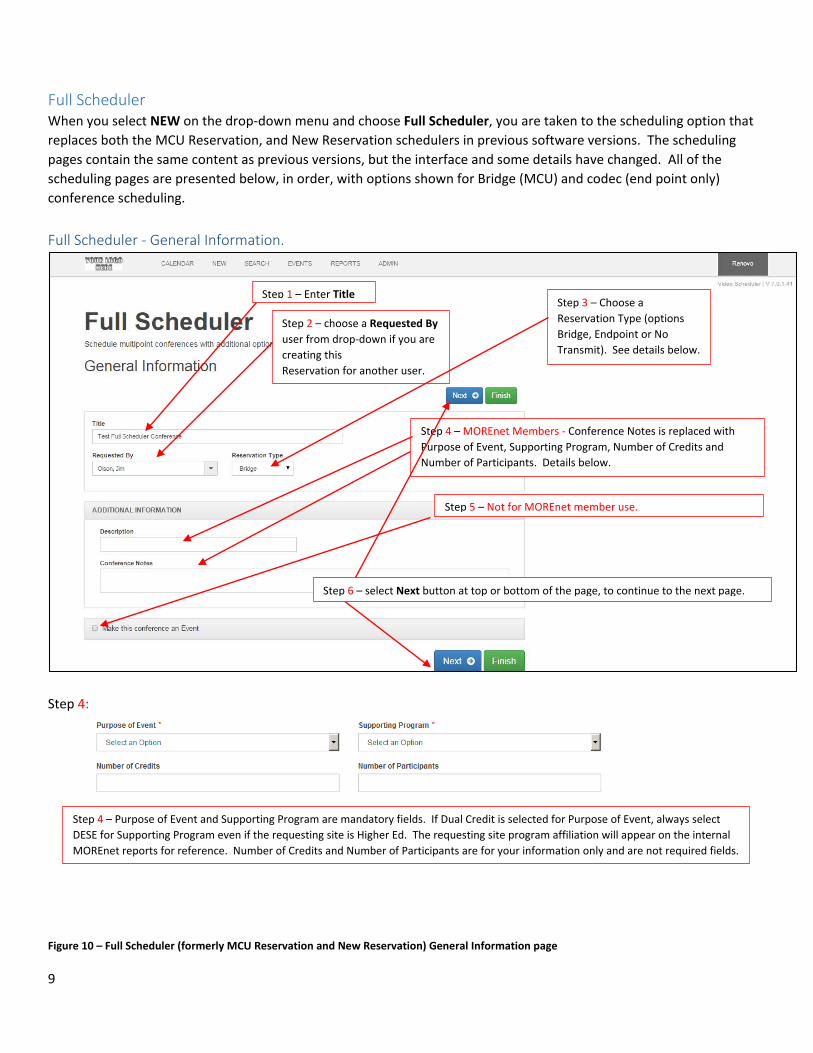
Full Scheduler When you select NEW on the drop-down menu and choose Full Scheduler, you are taken to the scheduling option that replaces both the MCU Reservation, and New Reservation schedulers in previous software versions. The scheduling pages contain the same content as previous versions, but the interface and some details have changed. All of the scheduling pages are presented below, in order, with options shown for Bridge (MCU) and codec (end point only) conference scheduling.
Full Scheduler - General Information.
Step 4:
Figure 10 – Full Scheduler (formerly MCU Reservation and New Reservation) General Information page
Step 1 – Enter Title
Step 2 – choose a Requested By user from drop-down if you are creating this Reservation for another user.
Step 3 – Choose a Reservation Type (options Bridge, Endpoint or No Transmit). See details below.
Step 4 – MOREnet Members - Conference Notes is replaced with Purpose of Event, Supporting Program, Number of Credits and Number of Participants. Details below.
Step 5 – Not for MOREnet member use.
Step 6 – select Next button at top or bottom of the page, to continue to the next page.
Step 4 – Purpose of Event and Supporting Program are mandatory fields. If Dual Credit is selected for Purpose of Event, always select DESE for Supporting Program even if the requesting site is Higher Ed. The requesting site program affiliation will appear on the internal MOREnet reports for reference. Number of Credits and Number of Participants are for your information only and are not required fields.

10
Step 3 details: Reservation type Bridge is the default displayed reservation type, and is used for any MOREnet bridge (MCU) conference. The other options in the dropdown list are for Non-MCU (codec or No Transmit) conferences and are not applicable to MOREnet members as the conference will not be active on the bridge. Full Scheduler - Add Date(s) Use this page to add conference dates and times. You will find that all of the previous date and time selection functionality is available, but the presentation has been reformatted.
Figure 11 – Full Scheduler Add Date(s) window Recurrences are formatted in a slightly different way than in previous software versions.
For a single conference time & date, first choose the times and date. Then, press the add date button to add the conference date to your list. Selected conference instances appear below. You can also click the calendar icon, multi-select dates and add all using the add date button.
For reoccurring conference dates, click anywhere on the RECURRENCE bar to access the RECURRENCE scheduling window (see Figure 12 below). When you have selected your recurrence pattern, select the generate button to create recurring conference dates.
Plus button selects all conferences in the list. Minus button deselects all conferences in the list. Use these buttons when editing or deleting individual or all conferences.
After selecting your dates, press the Next button.

11
Figure 12 – Recurrence generation in Add Dates window Add Date(s) page changes of note:
• Start and end times are presented in 30-minute increments in the Start and End times drop-down lists.
Figure 13 – Start Time (and End time) drop-down selections in 30-minute increments
To add recurring dates: Choose the date pattern for your recurring meeting, then select the generate button to generate the dates (and times, selected in the time selector in Figure 11). Generated instances are added to the conference date list as shown in Figure 11.

12
• Duration times are presented in 15-minute increments in the Duration time drop-down list.
Figure 14 – Duration time drop-down selections are in 15-minute increments.
• Start, end, or duration times that do not fit the presented drop-down pattern may be manually edited in the
appropriate window (for example, Start time has been changed, and End time is being edited, in Figure 15 below).
Figure 15 – And of the time selections may be edited by the user, to the minute level

13
Full Scheduler - Add Rooms This page contains the same information that it did in previous versions, but the presentation has been reformatted.
Figure 16 – Full Scheduler - Add Rooms page **Change for Add Rooms page: In previous software releases, when the in use indicator appeared next to a room on the room selection list, the user could click on the in use icon to view the conflict, but the room could still be selected for the new reservation – even though the Renovo software would certainly return a Conflict status when the reservation was booked (Validated). In Release 7.0, the user will still be allowed to view the in use conflict information, but will NOT be allowed to select the room for the new conference until the conflict is resolved in the Renovo scheduling system. A new, requested indicator will appear in the In Use column if you use Room Approvals, and a room has been Requested for Approval. Behavior is similar to the in use indicator: click the requested indicator to see the Requested conflict information. You will not be able to select the requested room for a new conference until the conflict is resolved in the Renovo scheduling system.
Remember that rooms can be moved to Selected Rooms using any standard windows method. Highlight room or rooms with click, shift-click, ctl-click, then double-click, or use Add Selected Rooms button. Or, filter the list down to what you want, click on Select All Visible, then Add Selected Rooms.
When you have selected all the rooms for your conferences, choose Next.
See In Use scheduling rules changes in notes below Figure 16.
The first room you click on or select defaults to the Origination Room. If you are unsure which was first selected or you need to change room, click on the Origination Room check box for the desired room.
Edit – Not a MOREnet Member option.

14
Full Scheduler- Bridge Setup This page contains the same information that it did in previous versions, but the presentation has been reformatted.
Figure 17 – Full Scheduler – Bridge Setup page
The selected Bridge (MCU) is presented in a large, hard-to-miss window at the top of the option lists. It is easier to identify than in previous software versions.
Terminology change – Bridge replaces MCU wherever possible.
See Figure 18 below for details
See Figure 19 below for details
Advanced Settings room parameter buttons are added. In previous versions, a link only showed up if the user hovered a mouse over the room name. See Figure 20 for details.
Select Finish when you are satisfied with the selections on this page.

15
BRIDGE CAPACITY information window on the Bridge Setup page is normally open, but can be closed by clicking anywhere on the BRIDGE CAPACITY bar.
If the bridge is full, change the conference to another bridge under Bridge Setup.

16
Figure 18 – Full Scheduler – Bridge Setup page – Bridge Capacity information display GENERAL CONFERENCE SETUP information window on the Bridge Setup page is normally open, but can be closed by clicking anywhere on the GENERAL CONFERENCE SETUP bar. The information displayed in this window varies depending on the Bridge that is selected for the conference. These options will be discussed in your individualized training.
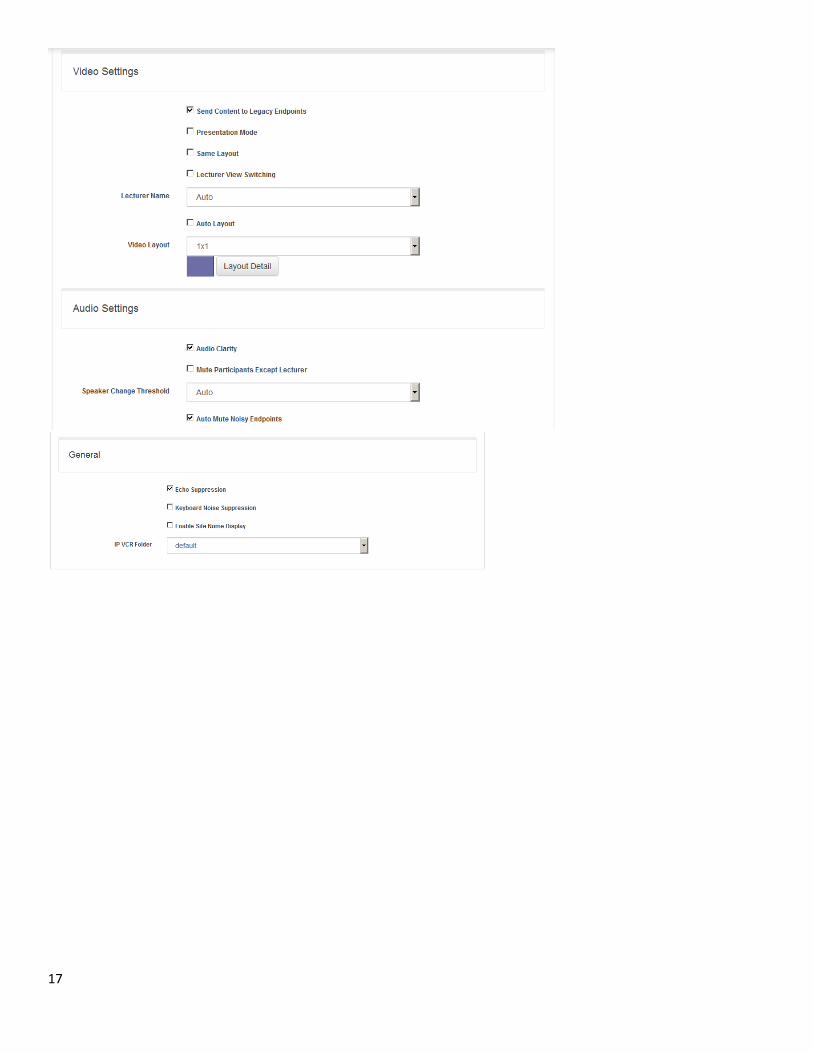
17

18
Participants – confirm the connection setup type is accurate. Room Standby = the bridge will call the room, Room Dial Out = the room will call the bridge. MOREnet can change the default from Room Standby to Room Dial Out. Please email [email protected] with the endpoint identifying information and how they should be configured and we’ll make the changes. Select Finish.

19
Figure 19 – Full Scheduler – Bridge Setup page – General Conference Setup option selection window (Cisco TMS example)
Full Scheduler – Summary
Figure 20 – Full Scheduler – Summary page Select the Email To: button to select additional email recipients from your Email Contacts list, to receive reservation and conference notification emails.
Figure 21 – Full Scheduler – Summary page – Add Email recipients
Icons are replaced by buttons
Select additional email notification recipients using the Email To: button – see Figure 20
Filter conferences on this page using the Filter button – see Figure 21
Jump to any previous Full Scheduler page, to make modifications to your reservation.
Final step, as in previous versions, is to Validate your reservation so that resources are booked, and reservation and conference numbers are assigned.
Add email recipients for this reservation, by moving them from the upper window to the lower window.
Add a new email recipient by entering Name and Email address, then press New.
Select Return button when finished.

20
Use the Filter button (shown in Figure 20 above) to filter conferences on the Summary page.
Figure 22 – Full Scheduler – Summary page – Filtering conferences in the reservation Use the Detail button (shown in Figure 20 above) to display details for the corresponding conference or room.
Figure 23 – Full Scheduler – Summary page – Conference Origination and Detail
Filter options for Summary page: • Filter window for text (room name, room ID) • Filter drop-down for day of week, or day pattern • Future Only check-box to filter past conferences • Default button to show your user-configured base filter • Show all button to remove all filters
Use Apply button to activate the new filter.
Set Origination has been changed from text to a button. Individual conference origination rooms may be changed here.
Remove has been changed from text to a button. Individual conferences, or rooms within a conference, can be removed here.

21
SEARCH Choose SEARCH from the drop-down menu list to access the Search screen to search for reservations and conferences.
Figure 24 – Search page After you select the Search button, results are displayed below the filter options on the page.
Figure 24 – Search results displayed at bottom of Search page
To search for reservations or conferences: • enter a Reservation ID or Conference ID • edit the default search Date Range if desired • Enter any additional filtering criteria • Use the Search button to initiate the search
The Search filters in the lower section of this page, work in the same way as described in Figure 22, above.
Sort results by clicking on any column header.
Click on any Reservation in the displayed results to bring up its Summary page.

22
ADMIN (This is available for an additional fee. It is listed as Remote Conference Management under Services on http://www.more.net) Select ADMIN from the drop-down menu to access the Admin functions list. The menu will vary based on available options and privileges for the user.
Figure 27 – ADMIN menu drop-down options Admin menu changes:
1. Live Control replaces Maintenance from previous versions. 2. Move Off Bridge replaces Move Off Of MCU from previous versions.
23
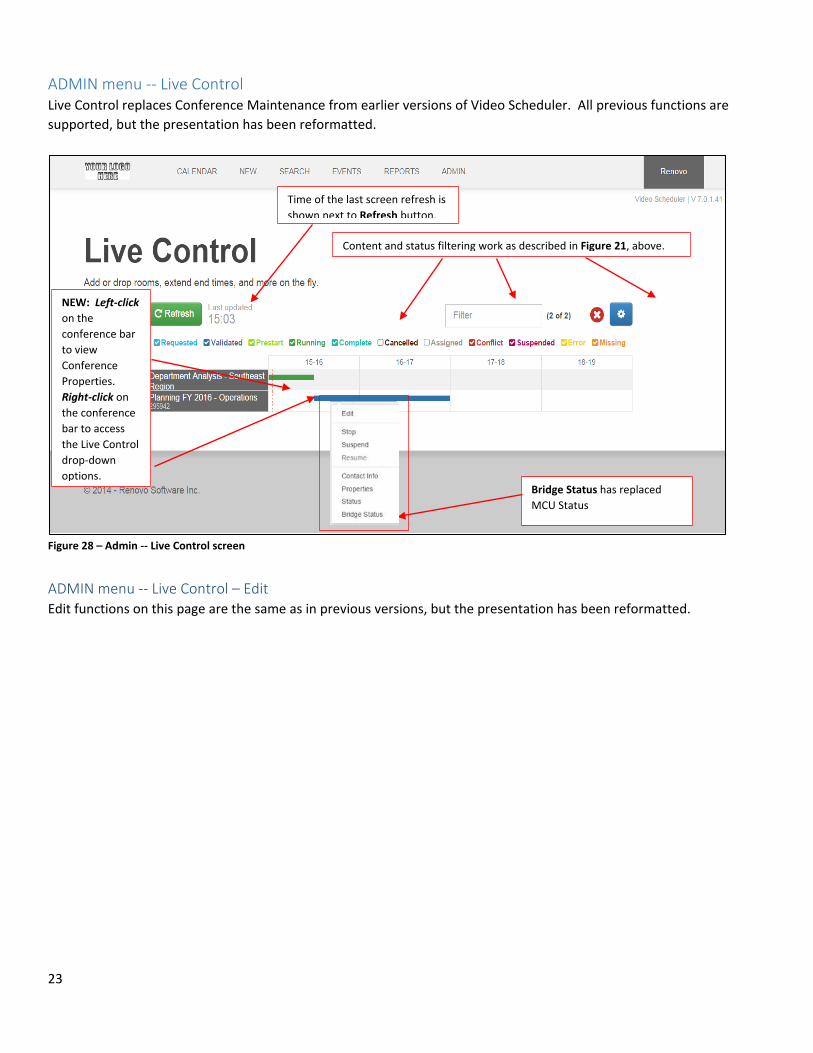
ADMIN menu -- Live Control Live Control replaces Conference Maintenance from earlier versions of Video Scheduler. All previous functions are supported, but the presentation has been reformatted.
Figure 28 – Admin -- Live Control screen
ADMIN menu -- Live Control – Edit Edit functions on this page are the same as in previous versions, but the presentation has been reformatted.
Content and status filtering work as described in Figure 21, above.
NEW: Left-click on the conference bar to view Conference Properties. Right-click on the conference bar to access the Live Control drop-down options.
Bridge Status has replaced MCU Status
Time of the last screen refresh is shown next to Refresh button.
24
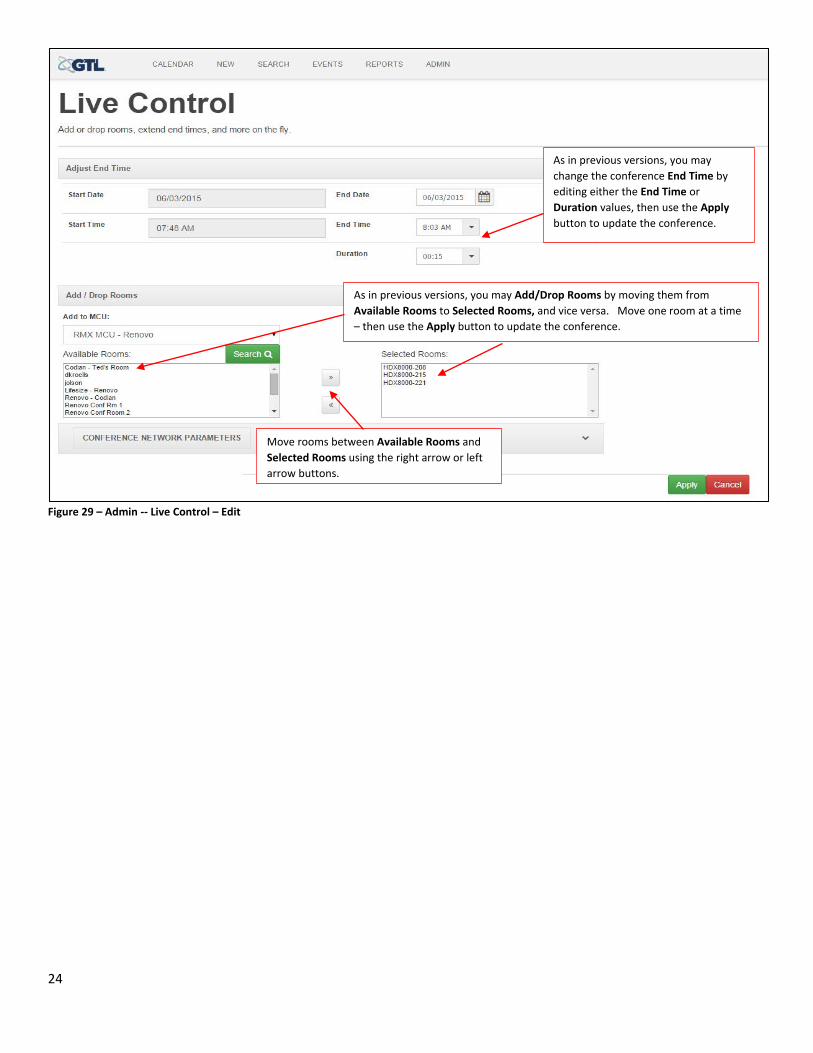
Figure 29 – Admin -- Live Control – Edit
As in previous versions, you may change the conference End Time by editing either the End Time or Duration values, then use the Apply button to update the conference.
As in previous versions, you may Add/Drop Rooms by moving them from Available Rooms to Selected Rooms, and vice versa. Move one room at a time – then use the Apply button to update the conference.
Move rooms between Available Rooms and Selected Rooms using the right arrow or left arrow buttons.

25
ADMIN menu -- Live Control – Bridge Status Edit functions on this page are the same as in previous versions, but the presentation has been reformatted.
Figure 30 – Admin -- Live Control – Bridge Status
A room in ERROR status is flagged in two ways:
1. Error indicator 2. Red border
When a room / endpoint is connected, video and audio control buttons are available (available options depend on the bridge or end point type).
Group mute/unmute of audio or video are available, either from a single room or globally.
User may flag endpoint(s) as having bad audio. If a room(s) is flagged, then ‘Except Flagged Endpoints’ will be checked. If the user Audio Unmute(s) All sites using Audio Unmute All or Unblock All when this is checked – the Flagged rooms will remain muted.
Jump directly to the conference’s Live Control – Edit page to add or drop end points, extend or shorten conference time.
Conference End Time and Remaining Time are dynamically displayed and updated. As conference end time nears, Remaining: changes colors green-red.
Connection status of end points is updated with the Refresh button. Last update time is shown.

26
ADMIN menu -- Live Control – Bridge Status – Room Detail The functions on this page are the same as in previous versions, but the presentation has been reformatted.
Figure 30 – Admin -- Live Control – Bridge Status – Room Detail
Use the Detail button in the connected Room window, to open or close the Room Detail information. Information displayed varies by bridge type.
Note that audio/video control buttons change color. Red means mute or block, green means unmute or unblock.

27
ADMIN menu -- Live Control – Contact Information Contact Information available from the Live Control screen for running conferences has been reformatted. Contact information from Room contacts, and address and connection information from rooms, is displayed if the field is updated in Renovo and contains a valid value. Empty fields (fields with no information entered) are not displayed to reduce clutter.
Figure 30 – Admin -- Live Control – Conference Information

28
ADMIN menu – Room Approval All previous functions are supported, but the presentation has been reformatted.
Figure 34 – Admin – Room Approvals

29
ADMIN menu – Create New User All previous functions are supported, but the presentation has been reformatted.
Figure 35 – Admin – Create New User
ADMIN menu – Guest User Setup All previous functions are supported, but the presentation has been reformatted.
Figure 36 – Admin – Guest User Setup