registering for classes with bobcat schedule...
TRANSCRIPT

Registering for Classes with Bobcat Schedule Builder
The Bobcat Schedule Builder helps you prepare for advising and registration by planning out optimized variations of your classes that take into account your personal needs (work, athletics, leisure, etc.). The scheduler automatically saves your work so you can come back and rework a schedule at a later time or get a head start on the planning your next semester. Once you are satisfied with your schedule, you can register for your classes directly through Texas State Self-Service using the Bobcat Schedule Builder Registration Cart provided you have an active time ticket.
Accessing Bobcat Schedule Builder: Log in to Texas State Self-Service using your NetID and password.
From the Student tab, click Registration
Last Edited: 11/19/14 Page 1

Registering for Classes with Bobcat Schedule Builder
From the Registration page you can then select Bobcat Schedule Builder link which will automatically redirect you to the Bobcat Schedule Builder application.
Once in the application, you will first need to select your term.
Last Edited: 11/19/14 Page 2

Registering for Classes with Bobcat Schedule Builder
From there you will be directed to the main Bobcat Schedule Builder page
Last Edited: 11/19/14 Page 3

Registering for Classes with Bobcat Schedule Builder
Class Selection Options: Bobcat Schedule Builder provides several options to narrow down your class searches. The Course Status dropdown lets you select between ‘Open Classes Only’ or ‘Open and Full Classes’. Term dropdown allows you to switch between terms. The Parts of Term dropdown lets you to filter classes by specific parts of term. You are also able to filter classes by campus using the Campus dropdown menu.
Last Edited: 11/19/14 Page 4

Registering for Classes with Bobcat Schedule Builder
Example: Changing Parts of Term
Select ‘Change Parts of Term’ from the Parts of Term dropdown menu.
Another window will open where you can check which parts of term you would like to search for. Choose Save and Close to return to the main Bobcat Schedule Builder page.
Last Edited: 11/19/14 Page 5

Registering for Classes with Bobcat Schedule Builder
Adding Courses: Click the ‘Add Course’ button under the Courses section.
A new window will open that allows you to first select a subject. The number next to the subject indicates how many different courses exist.
Last Edited: 11/19/14 Page 6
Registering for Classes with Bobcat Schedule Builder
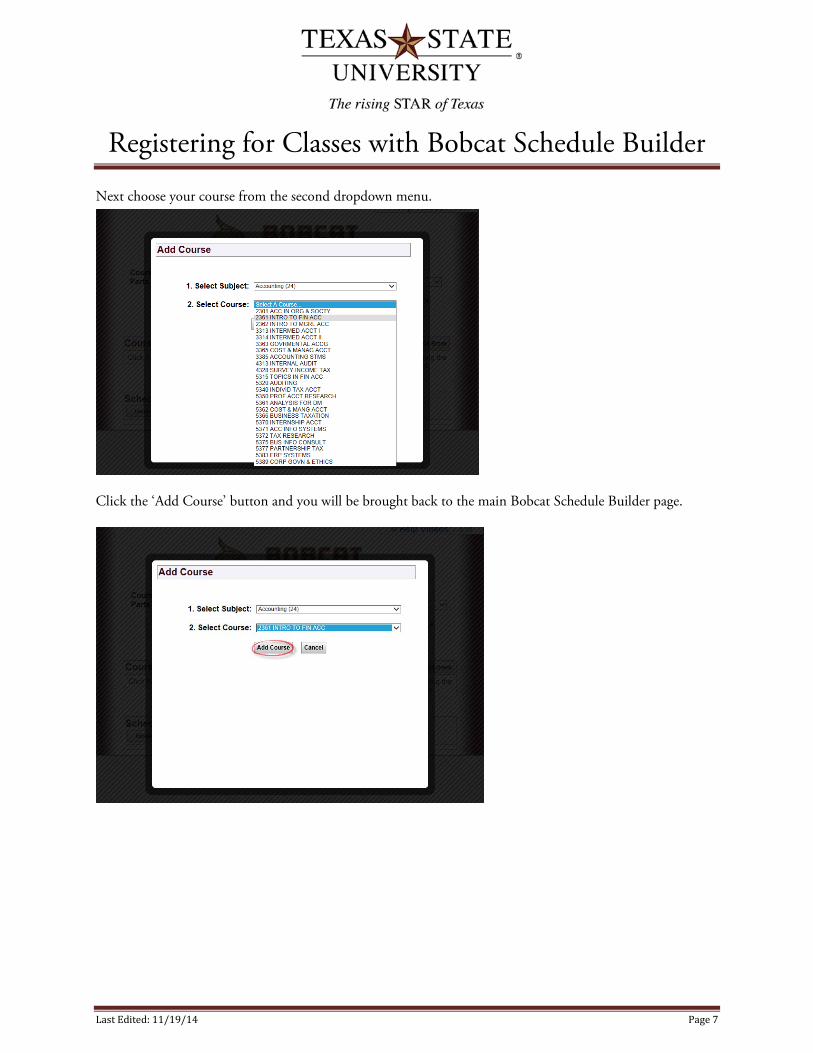
Next choose your course from the second dropdown menu.
Click the ‘Add Course’ button and you will be brought back to the main Bobcat Schedule Builder page.
Last Edited: 11/19/14 Page 7

Registering for Classes with Bobcat Schedule Builder
A yellow bar with flash briefly indication your course was successfully added.
Repeat this process to continue adding courses as necessary.
Last Edited: 11/19/14 Page 8

Registering for Classes with Bobcat Schedule Builder
Adding Breaks: Breaks allow you to exclude times in your schedule search. This is helpful for scheduling a lunch break or working hours. To begin click the ‘Add Break’ button.
Last Edited: 11/19/14 Page 9

Registering for Classes with Bobcat Schedule Builder
Enter a descriptive name for your break and select the start and end time. Also make sure to check the corresponding days of the week. Click ‘Save Break’ when you are finished.
Repeat this process to add as many breaks as you need.
Last Edited: 11/19/14 Page 10

Registering for Classes with Bobcat Schedule Builder
View/Edit Courses: Clicking a ‘View/Edit’ link under the Courses section allows you to view detailed information about a course. You have the option of deselecting any sections you do not want included in your search. When you are done click the ‘Save and Close’ button to return to the main screen.
Last Edited: 11/19/14 Page 11

Registering for Classes with Bobcat Schedule Builder
Generating Schedules: When you have finished entering your search criteria, click the ‘Generate Schedules’ button to create a list of possible schedules. Make sure the classes and breaks you want to include have a check mark next to them.
Last Edited: 11/19/14 Page 12
Registering for Classes with Bobcat Schedule Builder
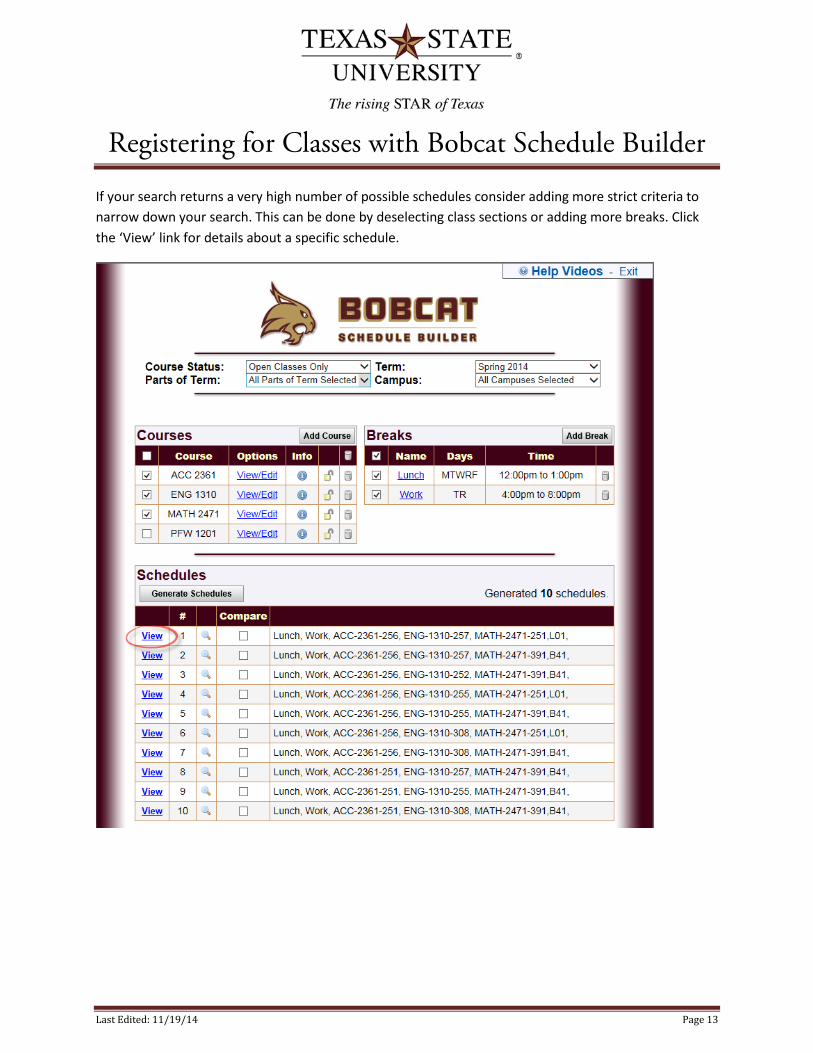
If your search returns a very high number of possible schedules consider adding more strict criteria to narrow down your search. This can be done by deselecting class sections or adding more breaks. Click the ‘View’ link for details about a specific schedule.
Last Edited: 11/19/14 Page 13

Registering for Classes with Bobcat Schedule Builder
A new window will open showing a detailed list of the classes selected and a calender view of a typical week. You may find a class at a certain time that you like and want it to be included in all of your searches. You have the ability to lock that class by clicking the padlock icon in the upper right next to the class name. Clicking the ‘Close Schedule’ button will return you to the main screen where you can generate a new set of schedules that will all contain the lock class or classes you had previously choosen.
Last Edited: 11/19/14 Page 14

Registering for Classes with Bobcat Schedule Builder
Notice the class now shows it is locked and after clicking on the ‘Generate Schedules’ button there are fewer schedules to choose from. You can only lock a course when viewing a specific schedule but you are able to unlock a course from the main screen by clicking the padlock icon.
Last Edited: 11/19/14 Page 15
Registering for Classes with Bobcat Schedule Builder
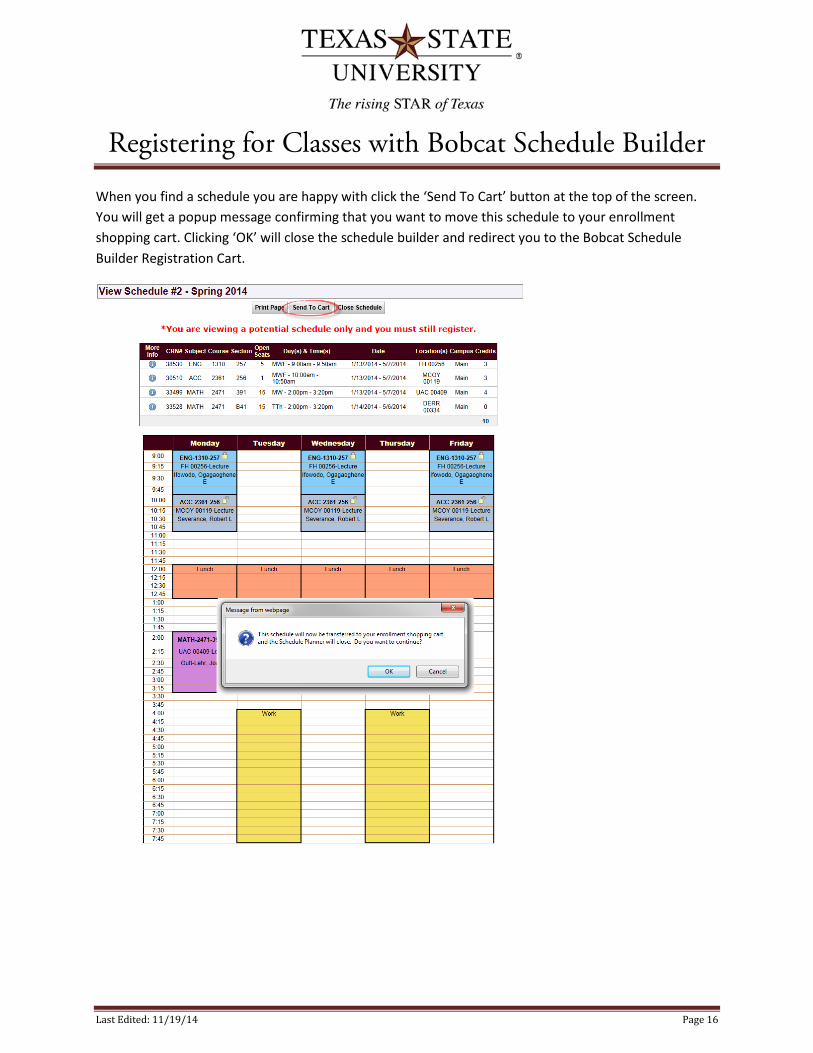
When you find a schedule you are happy with click the ‘Send To Cart’ button at the top of the screen. You will get a popup message confirming that you want to move this schedule to your enrollment shopping cart. Clicking ‘OK’ will close the schedule builder and redirect you to the Bobcat Schedule Builder Registration Cart.
Last Edited: 11/19/14 Page 16

Registering for Classes with Bobcat Schedule Builder
If you try to log in to the Bobcat Schedule Builder again after you have added classes to your Registration cart you will be presented with the following screen.
Last Edited: 11/19/14 Page 17

Registering for Classes with Bobcat Schedule Builder
Clicking ‘Go Back To Registration’ will return you to the Registration menu in Texas State Self-Service. If you click ‘Continue Planning Schedule’ it will open the main Bobcat Schedule Builder screen. The classes you had previously added to your Registration Cart will now show on the main screen as well.
Additional classes can be added from here, but you are not able to remove classes from your cart using the Bobcat Schedule Builder. That can be done by viewing your Registration Cart.
Last Edited: 11/19/14 Page 18
Registering for Classes with Bobcat Schedule Builder
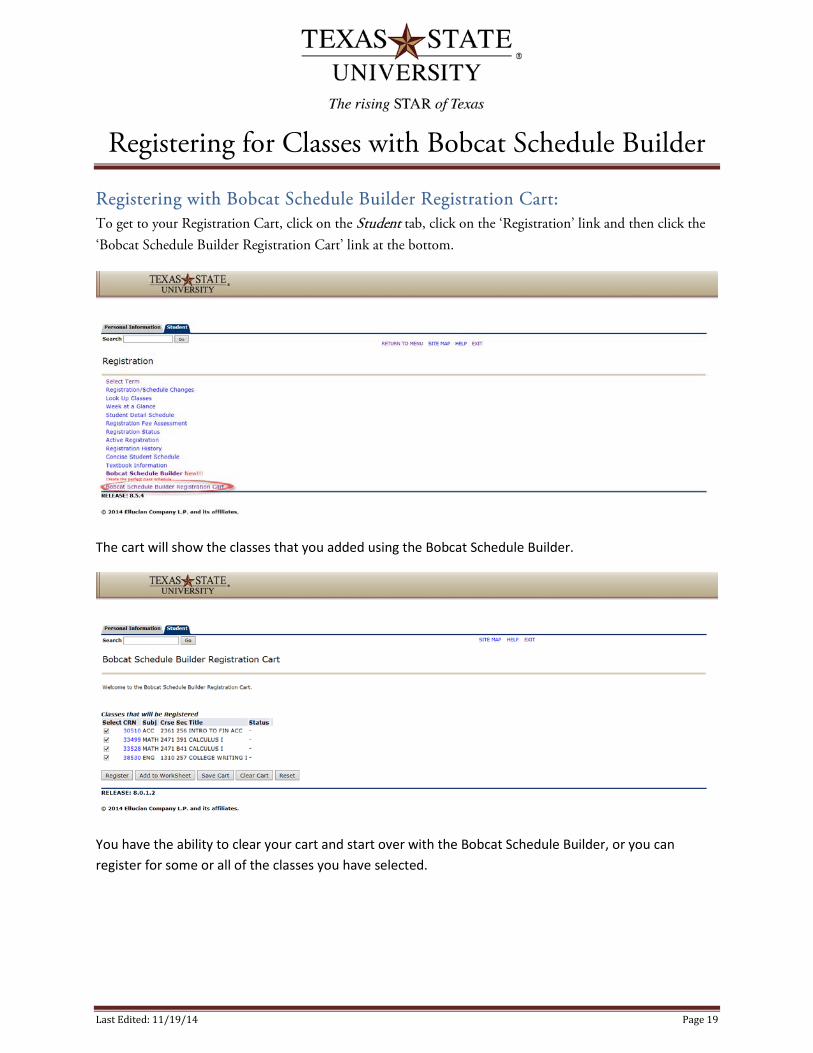
Registering with Bobcat Schedule Builder Registration Cart: To get to your Registration Cart, click on the Student tab, click on the ‘Registration’ link and then click the ‘Bobcat Schedule Builder Registration Cart’ link at the bottom.
The cart will show the classes that you added using the Bobcat Schedule Builder.
You have the ability to clear your cart and start over with the Bobcat Schedule Builder, or you can register for some or all of the classes you have selected.
Last Edited: 11/19/14 Page 19
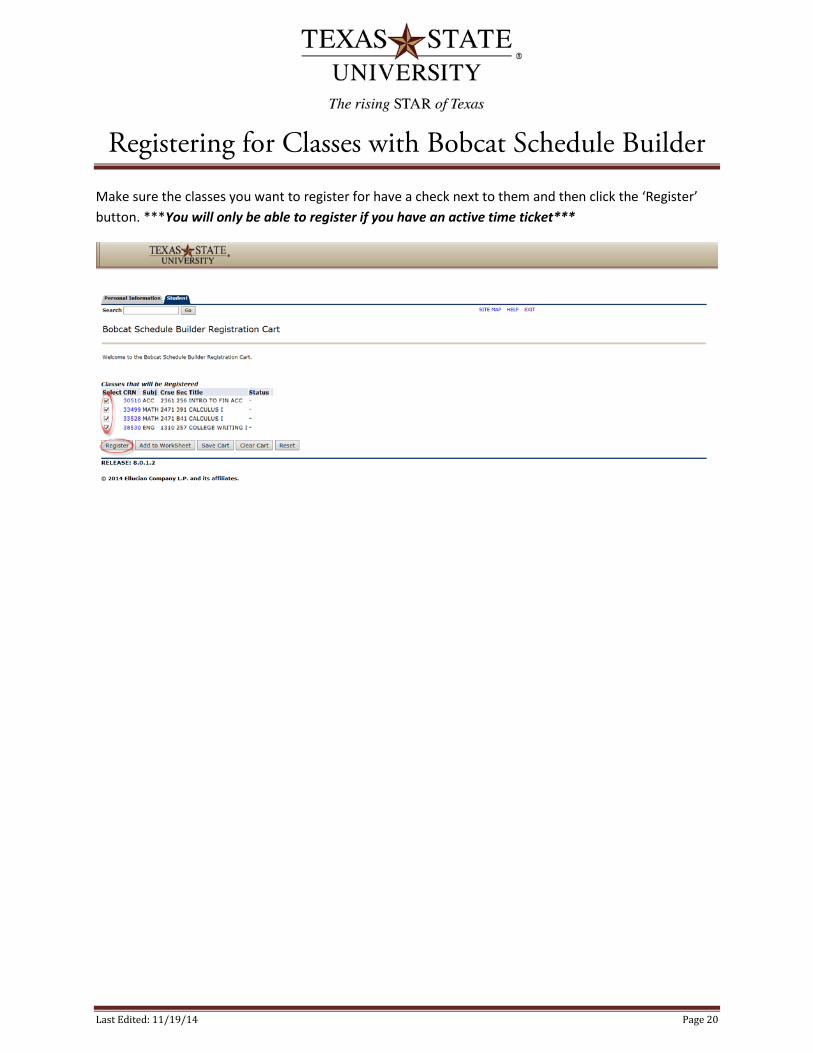
Registering for Classes with Bobcat Schedule Builder
Make sure the classes you want to register for have a check next to them and then click the ‘Register’ button. ***You will only be able to register if you have an active time ticket***
Last Edited: 11/19/14 Page 20

Registering for Classes with Bobcat Schedule Builder
You will be automatically redirected to the Add or Drop Classes page (can be found again by clicking the ‘Registration/Schedule Changes’ link on the Student tab in Texas State Self-Service). This page will show you all of the classes you were registered for along with any errors that might have prevented registration such as missing pre-requisites. You can add additional classes on the bottom if you know the CRN or you can drop classes by selecting an action from the drop-down menus. When you are done click the ‘I’m Finished’ button.
Last Edited: 11/19/14 Page 21