refrigerator - freezer en - freezer en thank you for your trust and for buying this appliance. we...
TRANSCRIPT

142019
Instructions for Use 31
Refrigerator - Freezer EN
Thank you for your trust and for buying this appliance. We hope it willsuccessfully serve the purpose for many years.
Refrigerator with freezer is for domestic useonly.The lower part of the appliance isrefrigerator and is used for storing fresh foodsat the temperature of 0°C and higher.
The upper part is freezer and is used forfreezing fresh foods and storing frozen foodsfor longer periods of time (up to one year,depending on the kind of foods you store). Thecompartment is marked with four stars.
Before Putting Into Use .......................31Instructions for UseMounting InstructionsWe Care for the EnvironmentTips for Energy Savings
Important .............................................32Disposing of the Worn Out Appliance
Placing and Installation ......................32Choosing the Right PlaceConnection to Power Supply
Description of the Appliance ..............33Refrigerator (A)Freezer (B)Opening the freezer door
Operation Control ...............................34Temperature Selection
Use.........................................................35Storing Fresh FoodsFreezing Fresh FoodsStoring Frozen FoodsHow to make ice cubes
Maintenance and Cleaning .................37Automatic Defrosting of the RefrigeratorManual Defrosting of the FrezingCompartmentCleaning the ApplianceSwitch Off the Appliance When Not In Use
Trouble-Shooting Guide......................38
Before Putting Into Use• Before connecting the appliance to the mains
supply, place it on the location where it willlater on be installed and leave it for about 2hours, which will reduce a possibility ofmalfunctions in the cooling system due totransport handling.
• Clean the appliance, and be thorough,especially in the interior (See Cleaning andMaintenance).
• In case the interior accessories are notcorrectly placed, rearrange them asdescribed in chapter Description of theAppliance.
Instructions for Use
These instructions for use are intended for theuser. They describe the appliance and itscorrect and safe use. They were prepared forvarious types of refrigerators therefore youmight find in it some functions that do not applyto your appliance and description of the
accesories that your appliance does notinclude.
Mounting Instructions
Integrated appliances are equipped withinstructions for mounting the appliance into thekitchen unit. The appliance should be mountedby qualified technician and instructions are forhis use only.
We Care for the Environment
• Our products use environmentally friendlypackaging, which can be either recycled ordisposed of in an environmentally friendlymanner. To this end, individual packagingmaterials are clearly marked.
• These instructions are printed either onrecycled paper or chlorine free bleachedpaper.
• When your appliance finally wears out,please try not to burden the environment with

142019
Instructions for Use32
it; call your nearest authorised service agent.(See Disposing of the Worn Out Appliance)
Tips for Energy Savings
• Try not to open the door too often, especiallywhen the weather is wet and hot. Once youopen the door, mind to close it as soon aspossible. This is especially important if youhave an upright model.
• Every now and then check if the appliance issufficiently ventilated (adequate aircirculation behind the appliance).
• Use higher thermostat settings only whenrequired or recommended.
• Before loading the appliance with packagesof fresh foods, make sure they are cooled toambient temperature.
• Ice and frost layer increase energyconsumption, so do clean the appliance assoon as the layer is 3-5 mm thick.
• If the gasket is damaged or if it turns out thatthe sealing is poor, the energy consumptionis substantially higher. To restore efficiency,replace the gasket.
• The condenser on the rear wall should bealways clean, free of dust or any impurities.
• Always consider instructions stated insections Positioning and Energy Saving Tips,otherwise the energy consumption issubstantially higher.
Important• If you have bought this appliance to replace
an old one equipped with a lock that cannotbe opened from inside (lock, bolt), make surethat the lock is broken. This will makeit impossible for children to lock themselvesinside the appliance and suffocate.
• The appliance must be correctly connectedto the mains supply. (see: Connecting to theMains Supply).
• Do not touch the cooled surfaces while theappliance operates, especially not with wethands, because the skin may stick to thecold surfaces.
• Do not freeze bottles containing liquid,especially not soft drinks, such as mineralwater, sparkling wine, beer, cola etc.,because liquid expands during freezing andthe glass bottle is very likely to blow up.
• Do not eat frozen food (bread, fruit,vegetables), because you can get frostbites.
• If the food has strange smell or color, throw itaway, because it is very likely that it isspoiled and therefore dangerous to eat.
• Disconnect the appliance from the powersupply before repairing it (only a qualifiedtechnician should repair it), before cleaningand before replacing the light bulb.
• Do not defrost the appliance with otherelectric appliances (as for example with hairdryer) and never scrape the frost layer withsharp objects. Use only enclosed tools ortools recommended by the manufacturer.
• For the sake of environment protection - becareful not to damage the rear wall of theappliance (the condenser unit or the tubes -
for example when moving the appliance) orany part of the refrigerating system inside theappliance.
• The refrigerating system of the appliance isfilled with refrigerant and oil, so when theappliance is damaged, handle it with careand dispose it of in compliance withenvironmental protecting precautions. (SeeWe Care for the Environment).
• If the supply cord is damaged, it must bereplaced by the manufacturer or his serviceagent or a qualified person in order to avoidhazard.
• The rating plate is inside the appliance oroutside on the rear wall.
Disposing of the Worn Out Appliance• When your appliance finally wears out,
dispose it of. If the appliance has a lock,break it, in order to prevent eventualaccidents (danger of children get lockedinside the appliance).
• The refrigerating system of the appliance isfilled with refrigerant and insulatingsubstances which should be separatelytreated and processed. Call your nearestauthorised service agent or specialisedservicing centre. If you don't find one, contactyour local authorities or your distributor. Becareful not to damage the tubes on the rearwall of the appliance (danger of pollution).
142019
Instructions for Use 33
Placing and InstallationChoosing the Right Place
Place the appliance in dry and regularlyventilated room. Allowed ambient temperaturedepends on the model (class) of the applianceand is stated on the rating plate of theappliance. Never place the appliance near heatemitting devices (e.g. cooker, radiator, waterheater or similar devices) and do not expose itto direct sunlight. The appliance should bepositioned at least 3 cm away from the electricor gas cooker and at least 30 cm away from theoil or coal stove. If this is not possible, use anappropriate insulation. Behind the appliancethere should be free space at least 200 cm2
wide and above the appliance the high kitchenunits should be at least 5 cm away from theappliance in order to assure adequateventilation of the condenser unit.
Class Ambient temparatureSN (sub-normal) from + 10°C to + 32°CN (normal) from + 16°C to + 32°CST (sub-tropical) from + 18°C to + 38°CT (tropical) from + 18°C to + 43°C
Connection to Power Supply
Connect the appliance with the cable and plugto the power supply socket outlet with a groundterminal (safety socket). Required nominalvoltage and frequency are indicated on therating plate. The connection to the mainssupply and earthing have to be madeaccording to current standards and regulations.The appliance resists temporary voltagetolerance up to -15 to +10 %.
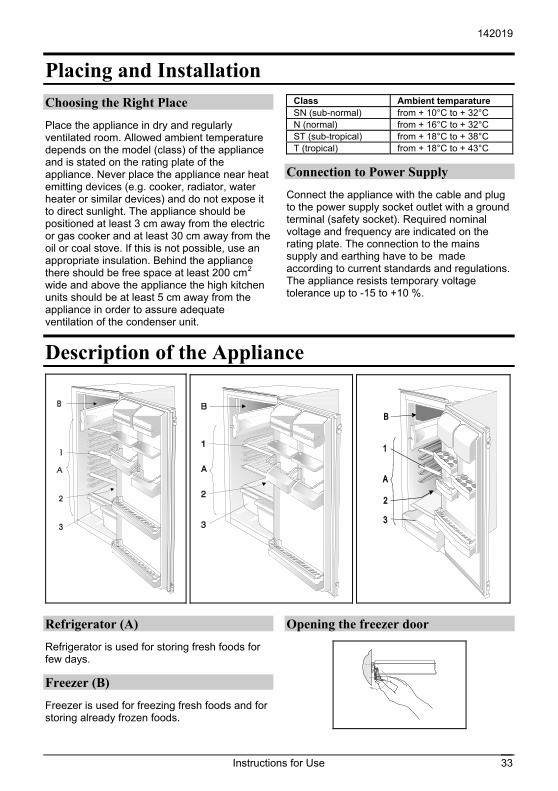
Description of the Appliance
Refrigerator (A)
Refrigerator is used for storing fresh foods forfew days.
Freezer (B)
Freezer is used for freezing fresh foods and forstoring already frozen foods.
Opening the freezer door

142019
Instructions for Use34
Shelf (1)(number depends on the model)Shelf can be optionally placed on the guidesinside the appliance. It is protected againstpulling out. If you want to remove it, slightly liftup the back part and pull it out.Glass shelves (some models only have them)are protected with plastic spacers. Beforepulling the shelf out, spacers must be movedtowards you. Spacers can be also removed,however, it is better to keep them for any latertransport.Quickly perishable food should be stored on theback i.e. the coldest part of the shelves.
Bottle rack(in some models only)Bottle rack (number depends on model) isintended for storing the bottles. There are twoinstallation positions available (horizontal orlifted in the front) thus enabling the positioningof bottles on the stopper as well. It is protectedagainst pulling out. If you want to pull it out,simply lift its rear part and pull it towards you.
Warning!If the door contains storing shelves, install therack in such position that the length of thebottles will not hinder the closing of the door.The rack may carry 9 bottles of 0,75 l or moreat the maximum (total weight max. 13 kg) –
note the label underneath the thermostat boxinside the appliance.
Defrost Water Outlet (2)Regularly check the defrost water outlet and thechannel, because they should never be clogged(as for example with food rests). If clogged, usea plastic straw and clean it.
Fruit and Vegetable Container (3)The container is on the bottom under the glassshelf and is used mainly for storing fruits andvegetables. It provides adequate humiditywhich has favourable effect on food stored.
Door LinerThe door liner consists of various shelves orholders used for storing eggs, cheese, butterand yogurt as well as other smaller packages,tubes, cans etc. The lower shelf is used forstoring bottles.
Illumination in the Interior of theRefrigeratorThe light for illuminating the interior of theappliance is on, when the door is opened. Theoperation of the light does not depend on theposition of the thermostat knob.
NOTE:• The appliance can be equipped with various
accesories, depending on the model of theappliance.
• Various accesories (spice container, tubeholder or additional shelves and drawerpartitions) can be bought in authorizedcentres.
Operation ControlThe appliance is controlled with thermostatknob, situated in the right upper part inside theappliance. Turn the knob clockwise from STOP(0) position towards 7 and backwards.
Temperature Selection
• Higher settings on the knob (towards 7)mean lower temperatures (colder) in all threecompartments of the appliance. At highersettings temperature in the interior of theappliance may even drop below 0°C. When
the ambient temperature is normal, werecommend medium setting.
• Changes of the ambient temprature affecttemperature in the interior of the appliance(choose correct setting of the thermostatknob).
• In STOP (0) position the appliance does notoperate (the cooling system is switched off),yet power supply is not interrupted (the lightis on, when you open the refrigerator door).

142019
Instructions for Use 35
• Temperature in the refrigerator and infreezing compartment depends on thefrequency of opening the door as well.
UseStoring Fresh Foods
Proper use of the appliance, adequately packedfood, correct temperature and taking intoaccount hygienic precautions will substantiallyinfluence the quality of the food stored.• Foods to be stored in the refrigerator should
be properly packed as to prevent mixingvarious moisture degrees and odors (inpolyethylene bags or sheet, aluminium foil,wax paper, or stored in covered containers orbottles).
• Before storing food in the refrigerator,remove the excessive packaging (likeyoghurt in multi-package).
• Pack systematically and make sure thatfoodstuffs do not touch each other (variousodours may mix). Assure adequate aircirculation around packages.
• Never store inflammable, volatile or explosivesubstances.
• Beverages with high alcohol percentage shallbe stored in tightly sealed bottles in verticalposition.
• Food should not touch the rear wall of therefrigerator!
• Some organic solutions like volatile oils inlemon and orange peel, acid in butter etc.can cause damages when in contact withplastic surfaces or gaskets for longer periodof time.
• Foods should be cooled down before storing.• Crispy and delicate foods should be stored in
the coldest parts of the refrigerator.• Try not to open the door too often.• Set the thermostat to the setting where lower
temperatures are reached. Set thethermostat gradually as to avoid freezing ofthe foods. Use a thermometer and measurethe temperature in the individualcompartments. Place the thermostat in aglass vessel filled with water. Temperaturereadings are most reliable few hour aftersteady state is reached.
• Unpleasant odor inside the refrigerator is asign that something is wrong with foods orthat your refrigerator needs cleaning.Unpleasant odor can be eliminated orreduced by washing the interior of therefrigerator with a mild solution of water andvinegar. We also recommend using activatedcarbon filters to clean the air or to neutralizeodors.
• If you plan a longer journey, make sure toremove quickly perishable articles of food outof the appliance before you leave.

142019
Instructions for Use36
Fresh Food Storage Time in the RefrigeratorArticle of food Storage time (days)
1 2 3 4 5 6 7 8 9 10 11 12 13 14Butter + + + + + + + = = = = =Eggs + + + + + + + + + + = = = =Meat: fresh uncut + + = chopped + = smoked + + + + + + + + + + = = = =Fish + =Marinade + + + + + + + + + + = = = =Root + + + + + + + + = = = = = =Cheese + + + + = = = = = = = = = =Sweets + + = = = =Fruit + + = = = = = = = =Prepared dishes + + = =
Legend: + reccomended storage time = possible storage time
Freezing Fresh Foods
• Carefully select food you intend to freeze; itshould be of adequate quality and suitablefor freezing.
• Use correct packaging and wrap it right.− The packaging should be air tight and
shouldn't leak since this could causesubstantial vitamin loss and dehydrationof foods.
− Foils and bags should be soft enough totightly wrap around the foods.
• Mark packages with following data: kind andamount of foods and the date of loading.
• It is most important that the food is frozen asquickly as possible. Therefore werecommend the size of the package not to betoo large and to be cooled before loading intothe freezer.
• The amount of fresh foods that can beloaded in the freezer within 24 hours isindicated on the rating plate (freezingcapacity). If the loaded amount is too large,the quality of freezing is reduced whichaffects the quality of frozen foods.
Freezing Procedure• Before it starts freezing, set the thermostat to
the position 3-6 for 24 hours. If you have amodel with integrated switch for intensivecooling, turn ON the switch. After 24 hoursload the appliance with fresh load packages.24 hours from the time when fresh food wasput in the appliance turn the thermostat dialto the operating temperature (seetemperature selection). At the abovementioned model it is necessary to turn OFF
the switch, which has previously beenengaged.
The switch is ON when the marking (I)or colour marking is visible, and OFFwhen the marking (0) is visible or colourmarking is not visible (depending onmodel).
• The next time you want to freeze fresh foods,repeat the freezing procedure and be carefulthat packages with fresh foods do not touchfrozen packages.
• For freezing smaller amount of foods (up to 1kg) there is no need to change thethermostat setting (see TemperatureSelection).
Storing Frozen Foods
Frozen foods can be stored on the bottom ofthe appliance or on the shelf.
Commercially Frozen FoodsThe storage time and the recommendedtemperature for storing commercially frozenfoods are indicated on the packaging. Forstoring and using consider the manufacturer'sinstruction. When shopping, be careful andchoose only adequately packed foods providedwith complete data and stored in freezers

142019
Instructions for Use 37
where the temperature is not higher than -18°C.Do not buy packages of food covered with frostlayer. This indicates that the package was
thawed before at least once. Be careful thatpackages don't start to thaw, as thetemperature raise reduces the quality of foods.
Approximate Storage Time for Frozen FoodsFood Storage time (in months)
1 2 3 4 5 6 7 8 9 10 11 12Vegetable + + +Fruit + + +Braed, Pastries +Milk +Redy-made meals +Meat: Beef + + +
Veal + + +Pork + + +Poultry + + +Game + + +Minced meat +
Smoked sausages +Fish: lean +
fat +Offal +
Defrosting Frozen FoodPartially thawed or defrosted foods should beused as soon as possible. Cold air preservesthe food but it does not destroy microorganismswhich rapidly activate after defrosting and makefoods perishable. Partial defrosting reduces thenutritional value of foods, especially of fruits,vegetables and ready-made meals.
How to make ice cubes
Recommended thermostat position for icemaking is on the middle setting. Fill two thirdsof the ice tray with cold water or any other liquidconvenient for freezing. Insert the ice tray intothe guides or on the cooling plate.Timerequired for the ice to form, largely depends onambient temperature, thermostat setting and on
how often you open the door. It usually takes 2-6 hours (depends on which model ofrefrigerator you have). With smallerrefrigerators we recommend you make a stockof ice cubes (store them in a separate plasticbox). The easiest way to empty the ice tray is toturn the tray around, pour it with cold water andslightly twist it (bend it).
Maintenance and CleaningAutomatic Defrosting of theRefrigerator
There is no need to defrost the refrigerator,because ice depositing on the inner back wall isdefrosted automatically. Ice is depositing on theinner back wall during the compressoroperation; later on, when the compressor is notoperating ice is defrosting and water dropscollect and drain through the outlet in the innerback wall into the drain pan situated above thecompressor, from where it evaporates.
Manual Defrosting of the FrezingCompartment
When the frost and ice layer in the frezingcompartment is 3-5 mm thick, you should cleanthe freezer.• Turn the thermostat knob to STOP (0)
position, and disconnect the power supply.Empty the compartment and take care thatthe packages remain frozen.

142019
Instructions for Use38
• Put a suitable vessel under the frezingcompartment to collect the defrost water.Leave the door of the compartment open toaccelerate defrosting.
• Avoid using defrosting sprays, as they maycause damage to the plastic parts and maybe hazardous to health.
Cleaning the Appliance
Disconnect the power supply beforecleaning the appliance.Do not use coarse or aggressive cleaningagents as you can damage the surface.Be careful to remove any cleanser agentremaining after cleaning.• Clean the exterior with water and detergent.
Varnished surfaces are cleaned with softcloth and an alcohol based cleaning agent(for example glass cleaners). You may alsouse alcohol (ethanol or isoprophylic alcohol).
The application of abrasive and speciallyaggressive cleaners, such as the stainlesssteel cleaners, is not appropriate for thecleaning of plastic and coated parts.
• Remove the detachable accesories in theinterior of the appliance and clean it withwater and liquid detergent. Plastic partscannot be washed in washing machine.
• Wash the interior of the appliance withlukewarm water, in which you added one ortwo spoonfuls of vinegar.
• Every now and then wipe the condenser onthe rear wall. Use soft non-metal brush orvacuum cleaner.
• Do not forget to clean also the defrost waterreceptacle above the refrigeratorcompressor (do not remove the receptacle).
After cleaning, connect the appliance to powersupply and reload the packages.
Switch Off the Appliance When Not InUse
If you do not intend to use the appliance for alonger period, set the thermostat knob to theSTOP (0) position, disconnect the powersupply, take out the foods and defrost andclean the appliance. Leave the door slightlyopen.
Trouble-Shooting GuideDuring the service, you can come across sometroubles that in most cases result fromimproper handling of the appliance and caneasy be eliminated.
The Appliance Fails to Operate Afterconnecting to the Mains Supply• Check the supply in the outlet socket and
make sure the appliance is switched on(thermostat in operating position).
Continuous Operation of the RefrigeratingSystem• the door was frequently opened or it was left
opened for too long;
• the door is not properly closed (the door maysag, the gasket may be polluted ordamaged);
• perhaps you have overloaded the appliancewith fresh foods;
• The reason may be inadequate ventilation ofthe compressor and condenser (assureadequate air circulation and wipe off thecondenser);
• Continuous operation button activated (seesection Freezing of Food).
Ice Formation on the Inner Rear WallAs long as the defrost water runs to thechannel and through the opening to the drain

142019
Instructions for Use 39
pan on the compressor, automatic defrosting ofthe appliance is assured.In case the ice formation on the inner back wallis increased (3-5 mm), ice should be manuallydefrosted.Set the thermostat knob to STOP (0) positionand leave the door open. Never use electricdevices for defrosting and do not scrape the iceor frost layer with sharp objects.After completed defrosting, turn the knob todesired position and close the refrigerator door.The cause of increased ice formation may beone of the following:
− the door does not seal well (clean thegasket if it is contaminated, or replace itif it is damaged);
− the door was frequently opened or it wasleft opened for too long;
− the food stored in the refrigerator waswarm;
− the food or dish is touching the innerback wall.
Water is Leaking From the RefrigeratorIn case the discharge water outlet is clogged,or the defrost water drips over the channel,water leaks from the refrigerator.• Clean the clogged opening, for example with
a plastic straw.• Manually defrost the increased ice layer. See
Ice Formation on the Inner Back Wall.
NoiseCooling in refrigerating-freezing appliances isenabled by the refrigerating system withcompressor, which produces noise. How noisythe appliance is depends on where it is placed,how it is used and how old the appliance is.• During the operation of the compressor the
noise of liquid is heard and when thecompressor is not operating, the refrigerantflow is heard. This is a normal condition and
it has no influence whatsoever on the lifetimeof the appliance.
• After starting the appliance, the operationof the compressor and the refrigerant flowmay be louder, which does not mean thatsomething is wrong with the appliance and ithas no influence on the lifetime of theappliance. Gradually the noise is reduced.
• Sometimes unusual and stronger noise isheard, which is rather unusual for theappliance. This noise is often a consequenceof inadequate placing.− The appliance shall be placed and
levelled firmly on solid base.− It should not touch the wall or kitchen
units standing next to it.− Check the accesories in the interior of
the appliance, they should be placedcorrectly in their positions; also checkthe bottles, tins and other vessels thatmight touch each other and rattle.
Bulb ReplacementBefore replacing the light bulb, disconnect theappliance form the power supply.Press the cover at the rear side (in the arrow 1direction) and remove the plastic cover (in thearrow 2 direction). Replace the bulb with a newone (E14, max. 15 W).Don't forget: the old bulb does not belong toorganic waste.Light bulb is consuming good therefore ourin-guarantee service does not relate to it.
WE RESERVE THE RIGHT TO ALTER THE SPECIFICATIONS WITH NOINFLUENCE ON THE OPERATION OF THE APPLIANCE.

Mounting Instructions8
Mounting Instructions
Integrated Refrigerating andFreezing Appliances
Mounting instructions for refrigerating and freezing appliances arefor qualified technicians only.Appliance should be mounted and installed in compliance withthese instructions, current standards and regulations.
Mounting instructions were prepared for various types/models ofappliances, therefore they may describe some procedures that donot apply to your appliance.
Mounting Dimensions andRequired Air Circulation 9Changing the Direction ofOpening the Door 10-11Mounting the Appliance 12-13

Mounting Instructions 9
Mounting Dimensions and Required AirCirculation
The rear wall of the appliance is getting warm during the operationof the appliance (and water is evaporating from the drain pan onthe compressor). You must therefore provide for adequate aircirculation on the rear of the appliance.• At the base of the kitchen unit intended for building in the
integrated appliance, there should be at least 200 cm² freespace, for adequate air circulation.
• On the upper part of the appliance the air is coming out, so trynot to cover the opening for the outflow air.
A (mm) B (mm)575 575-580875 875-880
1025 1025-10301225 1225-1230

Mounting Instructions10
Changing the Direction of Opening the DoorIf you find the direction of opening the door on your applianceinconvenient, you can change it. Holes on the opposite side havealready been prepared in the factory and are now plugged.• Remove the cover of the upper hinge, unscrew the hinge and
take off the door (the door is not fixed on the lower hinge).• Unscrew the upper rail, replace it to the opposite side of the
appliance and fix it.• Remove the washer from the lower hinge and unscrew (rotate it
in clockwise) the fastener on the lower hinge.• Replace the fastener and the washer in reverse order into the
opening of the lower hinge on the opposite side of theappliance.
• Take off all door corners and interchange them (instead of thecorner with a hole insert the one without the hole and viceversa).
• Put the door of the appliance on the lower hinge.• Fix the upper hinge and cover it.• Replace the slide guides to the opposite side of the door.• Plug the remaining holes with decorative caps.• Check the gasket, it shouldn't be creased and it should seal
well. In case it does not fit perfectly, pull it out and rotate for180°.In certain models it is not possible to replace the door gasket.Should the seal not adhere to the casing of the applianceperfectly, it will have to be heated from a suitable distance (bymeans of hair drier, for example) and lightly stretched to therequired height.
Changing the Direction of Opening the Door on the LowTemperature Compartment• Unscrew the blocking element and the hinge of the low
temperature compartment and take off the door.• Plug the holes with plastic caps provided.• Turn the door for 180° and replace it on the opposite side of the
low temperature compartment. Fix the hinge and the blockingelement of the door (position of holes already provided).

Mounting Instructions 11
1 Cover for the upper hinge 6 Lower hinge fastener 2 Upper hinge 7 Lower hinge 3 Upper rail 8 Corner without a hole4 Slide guide 9 Corner with a hole5 Lower hinge washer
10 Low temperature compartment 12 Door hinge11 Blocking element

Mounting Instructions12
Mounting the Appliance• Push the appliance for some 38 mm into the kitchen unit and
allow at least 4 mm free space on both sides between theappliance and the side walls of the kitchen unit (Fig. 1).
• Widely open the door and put it together with the kitchen unitdoor. The procedure is as follows.− Fix the slide guides (attached in a plastic bag along with the
screws ST 4,2 x 9,5) to the edge of the door. Cover the openholes with the attached cap.
− Put together the appliance door and the door of the kitchenunit (Fig. 2).
− Insert the slides into the guides and fix them on the kitchenunit door some 15 mm from the edge, using the A 4 x 12screws (Fig. 3).
− Remove the slide guides and separate the appliance doorfrom the door of the kitchen unit.
− Fix the slides and be careful not to move them while fixing(Fig. 4).
− Fix the slide guides to the original position.− Close the door and check the gasket (it should not be
creased). The door should open and close smoothly.NOTE:Appliance with the height of 575 mm have only one slide and oneslide guide.• Fix the appliance into the kitchen unit. On the upper side, fix the
three screws A 4 x 12 through the rail and on the lower side withtwo screws A 4 x 16, through the lower hinges. Drill holes,ø 3 x 5 (Fig. 5).
• Seal the gap on the opposite side of the hinge with theenclosed seal (Fig. 6).
WARNINGBefore mounting the appliance into the kitchen unit, disconnectthe power supply and set the thermostat knob to STOP (0)position or switch off the ON/OFF switch.

Mounting Instructions 13
Fig. 1 Fig. 2
Fig.3 Fig. 4
Fig. 5 Fig. 6