reference manual - synleor · reference manual by jonathan schmid-burgk and ruth herberz. ......
TRANSCRIPT

Reference Manual
Harmony Improvisator for Windows and Mac OS August, 2010
Created by Jonathan Schmid-Burgk. Reference Manual by Jonathan Schmid-Burgk and Ruth Herberz.
The information in this document is subject to change without notice and does not represent a commitment on the part of Synleor. The software described by this document is subject to a License Agreement and may not be copied to other media except as specifically allowed in the License Agreement. No part of this publication may be copied, reproduced or otherwise transmitted or recorded, for any purpose, without prior written permission by Synleor.
Mac and Mac OS are trademarks of Apple Inc, registered in the U.S. and other countries. Windows is a registered trademark of Microsoft Corporation in the United States and other countries. All other product and company names are trademarks or registered trademarks of their respective holders.
© Synleor, 2010. All rights reserved. Made in Germany.

TABLE OF CONTENTS
TABLE OF CONTENTS
1 Welcome to Harmony Improvisator ..........................................................1
1.1 What is unique about Harmony Improvisator?............................................. 1
1.2 How does Harmony Improvisator work? ..................................................... 1
1.3 Different versions of Harmony Improvisator ............................................... 2
1.4 Brief introduction to harmonic theory ........................................................ 2
2 Getting started.............................................................................................4
2.1 SAVIHost............................................................................................... 4
2.2 VSTLord ................................................................................................ 4
2.3 Cubase ................................................................................................. 4
2.4 Ableton Live........................................................................................... 5
2.5 FL Studio............................................................................................... 6
2.6 Studio One ............................................................................................ 7
2.7 Sonar ................................................................................................... 8
2.8 Logic Pro ............................................................................................... 8
3 Functions and options................................................................................9
3.1 The user interface – overview................................................................... 9
3.2 Main key ..............................................................................................10
3.3 Scale degrees .......................................................................................10
3.4 Derivatives ...........................................................................................11
3.5 Suggestions..........................................................................................11
3.6 Recently triggered .................................................................................12
3.7 Harmonic timeline .................................................................................12
3.8 Active pattern .......................................................................................13
3.9 Input options ........................................................................................13
3.10 Output options ......................................................................................14
3.11 Show options ........................................................................................14
3.12 Magnetic notes......................................................................................15
3.13 Voicing adjustment ................................................................................15
3.14 Save / Load ..........................................................................................16
3.15 Parallel instances of Harmony Improvisator ...............................................16
4 Explanation of the harmonic symbols ....................................................17
5 Tutorials .....................................................................................................18
5.1 Simple .................................................................................................18
5.2 Advanced .............................................................................................21
Index................................................................................................................25

CHAPTER 1: WELCOME TO HARMONY IMPROVISATOR 1
1 Welcome to Harmony Improvisator
Thank you for purchasing Harmony Improvisator.
Utilising centuries of knowledge, Harmony Improvisator opens up the infinite world of
harmonic theory. No other tool provides such a uniquely transparent and understandable
approach to writing chord progressions.
1.1 What is unique about Harmony Improvisator?
Harmony Improvisator is a VST plug-in which is intended to facilitate composing music
based on the rules of classical harmonic theory. With Harmony Improvisator you do not
have to worry about harmonic functions, keys, scales or the rules of part-writing, but
instead you can fully concentrate on the creative part of your composing work. Harmony
Improvisator is suitable for people with all different levels of background knowledge. If
you are not familiar with the basic principles of harmonic theory, the clearly arranged
graphical user interface allows you to compose according to harmonic rules easily and
will make you become familiar with sound chord progressions fast. Experts will
appreciate how quickly and accurately the Harmony Improvisator algorithm can help you
to explore unusual chords and to create sophisticated harmonic patterns with just a few
clicks.
1.2 How does Harmony Improvisator work?
Harmony Improvisator is not a programme itself, but a plug-in that has to be embedded
in host software as a VST instrument (VSTi). It is compatible with most commonly used
digital audio workstations (DAWs). A list of supported software and detailed instructions
how to embed Harmony Improvisator in the different sequencer programmes can be
found in Chapter 2.
Harmony Improvisator offers you a large number of different chords, including standard
chords but also more sophisticated ones. Per default, chords that you trigger in Harmony
Improvisator are routed to a built-in synthesizer. You can optionally load a separate
sampler or synthesizer in your host application and route the midi output of Harmony
Improvisator to it. To hear the harmonies very clearly, we suggest piano or organ as
instruments. Once you have clicked the first chord, Harmony Improvisator comes up with
suggestions what chord you could play next. It automatically considers the rules of part-
writing, so that you can be sure that chord progressions will be accurate in terms of voice
leading. Using the suggestions or also the full set of available chords, it is simple to
experiment with harmonies. All chords can easily be placed in the progression timeline

CHAPTER 1: WELCOME TO HARMONY IMPROVISATOR 2
via drag and drop. Individual notes can be edited in the sheet music view, and you can
save your harmonic progression as MIDI or HARM file.
More detailed information on the different functions of Harmony Improvisator can be
found in Chapter 3.
1.3 Different versions of Harmony Improvisator
Harmony Improvisator is available for Windows and for Intel Mac. When downloading the
free demo version or purchasing the full version of Harmony Improvisator, you will
automatically receive both versions.
The Windows version of Harmony Improvisator is generally compatible with Windows XP,
Windows Vista and Windows 7. It was designed for 32-bit systems, but in principle it also
works on 64-bit systems. However, if you work with a 64-bit system we strongly
recommend trying out the free demo version first before buying to make sure it works on
your system.
The Intel Mac version of Harmony Improvisator was designed for Mac OS X.
For us the best way to prevent piracy is to provide our customers with a special value
that they cannot download from some piracy site: We grant our customers a free lifetime
update service for Harmony Improvisator. Whenever we publish a new version, you will
automatically receive an update via e-mail. Since all customers will always have the up-
to-date version, there is no version numbering for Harmony Improvisator.
1.4 Brief introduction to harmonic theory
The term harmony derives from the Greek harmos ‘joint’ and the Latin harmonia ‘joining,
concord’. Today harmony is a broad term for the simultaneous sounding of musical
notes, the so-called “vertical’ component of music, as distinguished from the melodic line
which is called the “horizontal’ aspect of music.
Harmonic theory is the systematic approach to analyse and explain chord characteristics
and provide rules for composing. This involves studying chords and their construction, as
well as how to connect chords to create a chord progression. Functional harmonic theory
aims at understanding how harmonies and harmonic progressions evoke a certain
impression on the listener.
It would certainly go beyond the scope of this manual to give a detailed overview of
harmonic theory. Interested users may be referred to specific literature. However, here is
a very brief introduction of terms that you will most probably come across when studying
harmony.

CHAPTER 1: WELCOME TO HARMONY IMPROVISATOR 3
There are twelve pitches in the musical scale, forming a so-called octave. Each pitch is
referred to as a “degree’ of the scale. The first degree of the scale is called the tonic. The
fourth degree is the subdominant, and the fifth degree is called the dominant.
The relationship between two separate musical pitches is called interval. Intervals can be
consonant (for example major and minor third, fourth, and fifth) or dissonant (for
example major second, and seventh). Dissonant intervals produce tension and therefore
require resolution.
A chord is a set of harmonically related notes and any chord refers to a certain
combination of intervals. The most frequently used chords are triads consisting of three
different notes: major, minor, diminished or augmented triads. A chord is in root position
when the tonic is the lowest note of the chord. If this is not the case, the chord is said to
be inverted.
In Western music, a so-called harmonic cadence is a series of at least two chords that
concludes a musical phrase. A very commonly used progression is I–IV–V–I, that is tonic
– subdominant – dominant – tonic. In C scale, this is equivalent to C–F–G–C.
The fundamental rules established by Hugo Riemann and others many decades ago hold
true even for most of today's music. They seem to have a foundation in the physiology of
human sound perception by our cochlea and the brain. Even though the reasons for the
strong emotional impact of polyphonic music still remain to be unveiled, the rules of
functional harmonic theory are so simple and yet powerful that composing according to
them can bring remarkable results. You will see…!

CHAPTER 2: GETTING STARTED 4
2 Getting started
As described in section 1.2, Harmony Improvisator is a tool that has to be embedded in
host sequencer software as a VSTi plug-in. Most commercially available audio software
supports the VST format, and below you find detailed instructions for the use of Harmony
Improvisator in some of the most commonly used DAWs. There is also a number of free
host programmes available in the internet, and we suggest the free SAVIHost for
Windows users, and the VSTLord for Mac users (see below).
2.1 SAVIHost
SAVIHost is a very simple and freely available VST host for Windows. It can be
downloaded on http://www.hermannseib.com/english/savihost.htm and is basically just
an EXE file that does not need any installation.
When you execute the EXE file, a window will pop up in which you can set the directory
of the VST plug-in. In this case, you choose Harmony Improvisator’s DLL file and click
‘Open’. The Harmony Improvisator user interface will be visible now and you can start
working immediately. You should now hear a sound when clicking on any of Harmony
Improvisator’s chord buttons. If you cannot hear any sound, make sure that the ‘Run’
button in the SAVIHost (right below the ‘File’ menu) is activated.
2.2 VSTLord
VSTLord is a free VST host that we suggest for Mac users. It can be downloaded on
http://www.kvraudio.com/get/2101.html.
In order to load Harmony Improvisator in VSTLord, open VSTLord and choose File New
Synth. In the pop-up window find the file "HarmonyImprovisator.vst" and double-click it.
Harmony Improvisator will open and should produce sound when you click chords with
the mouse.
2.3 Cubase
Harmony Improvisator can be embedded in Cubase 5 on both PC and Mac according to
the following instructions:
At first, copy Harmony Improvisator’s DLL file into the folder that Cubase accesses for
VST plug-ins. Normally this is the folder ‘vstplugins’ within the Cubase folder in your local
programme directory.

CHAPTER 2: GETTING STARTED 5
After starting Cubase and opening a new project, click on the ‘Devices’ menu and then on
‘VST instruments’. When you select Harmony Improvisator, its user interface will
automatically pop up and you can start experimenting with harmonies and harmonic
progressions right away by using its built-in synthesizer.
If you want to route the sound to an external synthesizer or sampler, please follow these
instructions:
In Harmony Improvisator’s GUI, select ‘OUTPUT: MIDI out’.
Add your instrument of choice to your Cubase project in additional track.
Create a new MIDI track by going to the ‘Projects’ menu and selecting ‘Add track’
--> MIDI.
In the ‘Input’ drop-down menu for this MIDI track, select Harmony Improvisator.
In the ‘Output’ drop-down menu for this MIDI track, select your instrument.
Enable monitoring in the ‘Monitoring’ section for this MIDI track (The little speaker
symbol lights up).
When you click on any chords in Harmony Improvisator now, they should be played
back by the instrument of your choice.
You can always get back to Harmony Improvisator’s user interface by clicking on the ‘edit
VST instrument’ button in the Harmony Improvisator track.
2.4 Ableton Live
Harmony Improvisator can be embedded in Live 8 on both PC and Mac. Simply follow
these instructions:
Live usually scans your computer for available plug-ins when it you start the programme.
Therefore, Harmony Improvisator should appear in the plug-in list that becomes visible
when you click on the plug-in devices button on the left side of Live’s GUI. If Harmony
Improvisator is not in the list already, you can search for it using the search option within
the plug-in browser.
Drag the Harmony Improvisator plug-in into the project area to create a new track.
Harmony Improvisator’s user interface will automatically pop up, so you can start
experimenting with harmonies and harmonic progressions right away using its built-in
synthesizer.
You can also route Harmony Improvisator’s chords to an external synthesizer or sampler:
In the ‘OUTPUT’ box of Harmony Improvisator, choose ‘MIDI out’.
Drag your desired instrument from Live’s instrument list into the project area to
create a new track.

CHAPTER 2: GETTING STARTED 6
Make sure the ‘I-O’ button on the right side is active so that input/output options are
visible for each track.
In the ‘MIDI from’ section of the instrument’s track, choose Harmony Improvisator in
both white panels.
In the instrument track, activate ‘Monitor’ by clicking on the ‘In’ button.
When you click chords in Harmony Improvisator, you should now hear your sound of
choice.
To get back to Harmony Improvisator’s user interface, click on the Improvisator track
and then on the little spanner within the small box that opens at the bottom of Live.
2.5 FL Studio
Harmony Improvisator can be embedded in FL Studio 9 on both PC and Mac. Proceed like
this:
First of all, copy Harmony Improvisator’s DLL file into the folder that FL Studio uses for
VST plug-ins.
From the FL Studio menu, select ‘CHANNELS’, then ‘Add one’ --> ‘More…’. In the window
that pops up, scroll down to the VST plug-ins and activate Harmony Improvisator in this
list. (There should be an F symbol next to it now.) If Harmony Improvisator is not listed
yet, press ‘Refresh’ and then select ‘Fast scan’. Close this window and get back to the
main FL Studio GUI.
To insert Harmony Improvisator into your FL Studio project, go to ‘CHANNELS’, then ‘Add
one’ and click on Harmony Improvisator in this list. Harmony Improvisator will now be
visible in the box where all the different layers are displayed, and its user interface will
pop up automatically in a Fruity wrapper window.
If you have closed Harmony Improvisator’s GUI but want to get it back to the screen, all
you have to do is click on Harmony Improvisator in the pattern window and then select
‘PLUGIN’ from the pop-up that appears on the right side of FL Studio’s GUI.
You can enjoy trying out different harmonies and creating harmonic progressions with
Harmony Improvisator by using its default internal synthesizer. Alternatively, you can
direct Harmony Improvisator to an external synthesizer or sampler as follows:
In Harmony Improvisator’s Fruity wrapper window, click on the ‘extra options’ button
in the left-hand corner of the Fruity wrapper. Select the MIDI ‘Output port’ you want
to use, for example output port 1. (You can get back to Harmony Improvisator’s GUI
by clicking on the ‘extra options’ button again).
Click on the ‘CHANNELS’ menu, then on ‘Add one’ and select one of your instruments
to use as a sound source.

CHAPTER 2: GETTING STARTED 7
In the pattern window, click on your chosen instrument, which should now pop up in
a Fruity wrapper. Click on the ‘extra options’ button. As MIDI ‘Input port’ select the
same port that you used as output port for Harmony Improvisator.
When you click any chords in Harmony Improvisator now, they should be played
back by your chosen instrument.
2.6 Studio One
Harmony Improvisator can be embedded in PreSonus Studio One on both PC and Mac.
The following instructions will help you:
Studio One automatically scans your computer for VST plug-ins. When you create a new
song in Studio One, you can see a list of all available VST plug-ins in the browser on the
right-hand side if you click on ‘Instruments’. If Harmony Improvisator is not in this VST
list yet, go to the ‘Studio One/Options/Locations/VST Plug-ins’ menu and click on the
‘Add’ button to add the directory which the Harmony Improvisator DLL file is contained
in. Restart Studio One.
To use Harmony Improvisator in Studio One, drag it from the browser into the Song.
Harmony Improvisator’s user interface will automatically pop up and you can directly
start experimenting with harmonies by making use of the internal synthesizer.
If you have closed Harmony Improvisator’s GUI, you can always return to it by clicking at
the ‘Instrument editor’ button (little keyboard symbol) in the Harmony Improvisator
track.
To make sure that the instrument tracks remain active when opening the Harmony
Improvisator GUI again, simply deactivate the ‘Input Monitoring Follows Selection’ option
in the track menu.
Instead of using Harmony Improvisator’s internal sound, you can also direct its sound to
an external instrument:
Choose ‘OUTPUT: Midi out’ in Harmony Improvisator.
Drag your instrument of choice from the instrument browser on the right-hand side
into the Studio One Song to create an additional track.
In the instrument track, select Harmony Improvisator as input (in the black panel at
the bottom of this track)
Make sure that in both tracks – Harmony Improvisator and your instrument of choice
– the speaker symbols are active. (They should appear blue once they are
activated.)
Any chords you click in Harmony Improvisator should now be played back by your
instrument of choice.

CHAPTER 2: GETTING STARTED 8
2.7 Sonar
Sonar 8 is only available for Windows. Harmony Improvisator can be embedded by
considering the following instructions:
Copy Harmony Improvisator’s DLL file into the folder that Sonar uses for VST plug-ins.
Usually this is in the directory C:\programmes\cakewalk\vstplugins. By default Sonar
scans its VST folder upon start-up, so Harmony Improvisator should automatically appear
in the list of VST plug-ins.
To open Harmony Improvisator in Sonar, go to the ‘Insert’ menu and select ‘Soft Synths’,
then ‘vstplugins’ and therein select Harmony Improvisator. In the window that pops up,
make sure that you check ‘All Synth Audio Outputs’ as well as ‘Enable MIDI output’, then
press ‘OK’.
In the new Harmony Improvisator track, double-click on the symbol next to the track
name to open Harmony Improvisator’s user interface. Enjoy experimenting with
harmonies by using the built-in synthesizer.
Alternatively, you can route Harmony Improvisator’s sound to an external synthesizer or
sampler. For this purpose, choose ‘MIDI out’ in the ‘OUTPUT’ box of Harmony
Improvisator. In addition, insert your designated instrument as a separate track in Sonar
and choose Harmony Improvisator as its MIDI input by right-clicking on the instrument’s
track, selecting ‘Track Properties’ and then choosing Harmony Improvisator under ‘Input’.
Chords you click in Harmony Improvisator should now be played back by your instrument
of choice.
2.8 Logic Pro
Logic Pro 9 is only available for Mac and does not support VST plug-ins. So far there is no
AU version of Harmony Improvisator, but there is a workaround to make it work in Logic:
Open Harmony Improvisator in the freely available ‘VSTLord’ host (see section 2.2). In
Harmony Improvisator’s GUI, select ‘Virtual Midi Port’ from the ‘Output’ Options. Now
open Logic and create a MIDI track for a synthesizer or sampler of your choice. As MIDI
input please choose ‘Improvisator Virtual Out’ and press a chord button in Harmony
Improvisator to test the routing. You can record the notes that Harmony Improvisator
routes to Logic in the same way you would usually record MIDI input from an external
MIDI keyboard by simply pressing ’Record’ in Logic while Harmony Improvisator
generates MIDI output.

CHAPTER 4: EXPLANATION OF THE HARMONIC SYMBOLS 9
3 Functions and options
3.1 The user interface – overview
Experiment with chords Settings and options
Harmonic timeline
All functions and options of Harmony Improvisator will be explained in the next sections.

CHAPTER 4: EXPLANATION OF THE HARMONIC SYMBOLS 10
3.2 Main key
You can select the main key from the circle of fifths in the upper
right corner of Harmony Improvisator’s GUI. If you change the
main key once you have created a chord progression, all the
chords will automatically be transposed into the new main key.
3.3 Scale degrees
The two rows of buttons top left are the most important buttons. These are the scale
degrees of the chosen key. The upper row corresponds to the current major key and the
lower one to the corresponding minor key.
It is possible to change the reference for your harmonies. If you right-click on any of the
chords from the ‘scale degrees’ box, this chord is selected as new tonic, meaning that all
other functions will be in reference to the selected chord. This is graphically represented
by the reference chord in brackets (see below). To get back to the original setting, simply
right-click again until you get back to the original functions. Alternatively, press on the
chosen main key in the circle of fifths again.

CHAPTER 4: EXPLANATION OF THE HARMONIC SYMBOLS 11
3.4 Derivatives
Below the scale degrees, you find more complex derivatives of these functions:
various inversions, i.e. the same chord with a different bass note
one gender inversion
suspensions, which are chords that tend to be solved to a simple harmony
various characteristic derivatives of subdominants
various characteristic derivatives of dominants
3.5 Suggestions
In the central part of the user interface you find suggestions for
harmonies that could well follow the chord you have just
triggered. These are computed anew after each choice of
harmony. The first suggestion usually is a rather common sound,
for example the standard resolution of a suspension or of a
dominant.
To try more than one suggestion without loosing the others, you
can right-click them to avoid that new suggestions are generated
after each click.

CHAPTER 4: EXPLANATION OF THE HARMONIC SYMBOLS 12
3.6 Recently triggered
Above the ten suggestion buttons, Harmony Improvisator
presents the four most recent harmonic functions that have been
triggered.
3.7 Harmonic timeline
To create a harmonic progression, you can place any chord in the timeline by dragging it
there with the mouse. Individual harmonies can be deleted, replaced or moved via drag
and drop. If you right-click on the timeline, you can insert a pause, and you can also
reset the whole pattern if you want to start all over.
Use the slider on the left-hand side below the time line to view the beginning or end of
your progression. The zoom slider on the right below the timeline allows zooming in and
out on the time resolution.
You can play back the created chord progression in a loop with the play button beneath
the harmonic timeline, and stop the playback by clicking on the stop button. When the
progression is played back, the keyboard at the bottom will show you the triggered
notes, and the chord that is currently played back will be presented in the box on the
bottom right.
With the timeline you cannot only visualise the actual sheet music of your harmonic
progression, but you can also manually change individual notes via drag and drop. To
make writing of melodies and manipulation of chord notes in the sheet music view easier,
you can make a certain scale or the notes of the underlying chords magnetic. The
different criteria you can choose from are explained in section 3.12 on Magnetic Notes.

CHAPTER 4: EXPLANATION OF THE HARMONIC SYMBOLS 13
3.8 Active pattern
With Harmony Improvisator it is possible to create up to seven different
harmonic patterns for assembling a piece of music. In the drop-down
menu ‘Active Pattern’ you can switch between the patterns. As described
below in section 3.9, these patterns can be triggered by MIDI keyboard.
3.9 Input options
There are two different possibilities to use a MIDI keyboard to
control Harmony Improvisator.
Trigger patterns
When having created multiple harmonic patterns, you can use your MIDI keyboard to
trigger the individual patterns. For this purpose, select ‘Trigger Patterns’ from the Input
options. The patterns are automatically being looped and synchronized to the host
project. Any C on the keyboard triggers pattern #1, any D triggers pattern #2 and so
forth (only white keys). That way you can easily experiment with and record sequences
of patterns to generate long and more complex arrangements in your host sequencer.
Change Main Key
Alternatively you can use your MIDI keyboard to change the main key. To do so, select
‘Change Main Key’ from the Input options and simply press the respective key on your
keyboard.
CHAPTER 4: EXPLANATION OF THE HARMONIC SYMBOLS 14
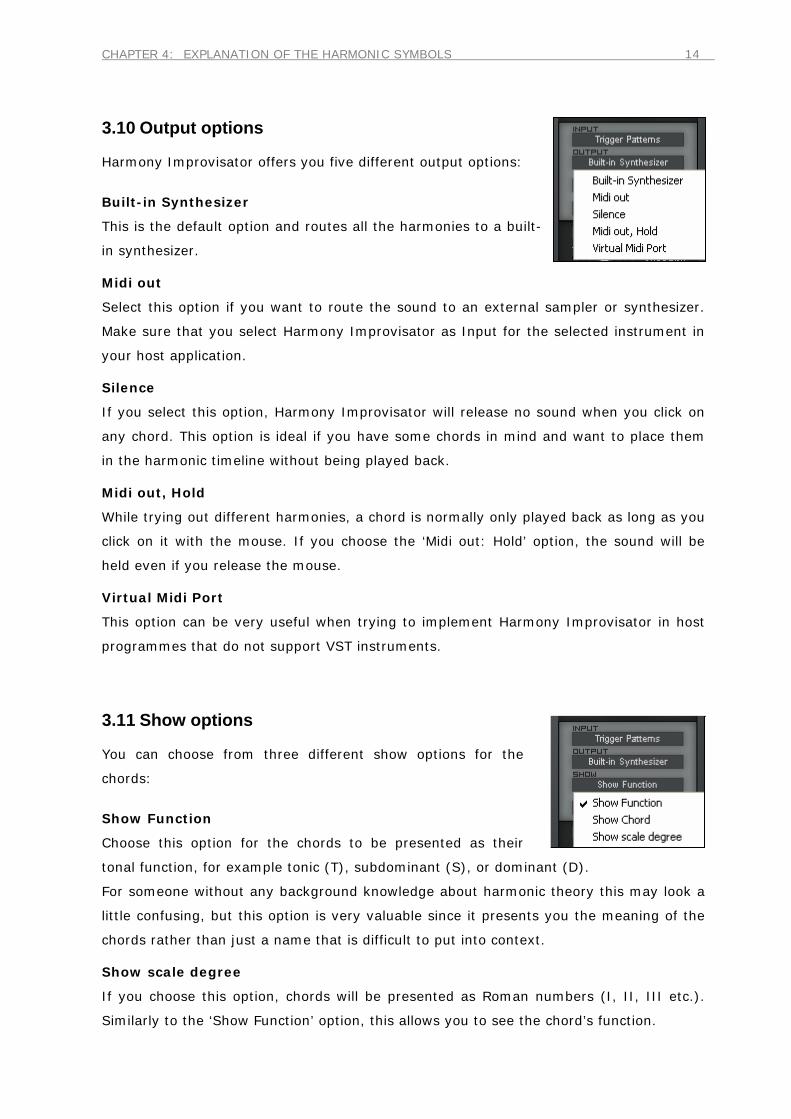
3.10 Output options
Harmony Improvisator offers you five different output options:
Built-in Synthesizer
This is the default option and routes all the harmonies to a built-
in synthesizer.
Midi out
Select this option if you want to route the sound to an external sampler or synthesizer.
Make sure that you select Harmony Improvisator as Input for the selected instrument in
your host application.
Silence
If you select this option, Harmony Improvisator will release no sound when you click on
any chord. This option is ideal if you have some chords in mind and want to place them
in the harmonic timeline without being played back.
Midi out, Hold
While trying out different harmonies, a chord is normally only played back as long as you
click on it with the mouse. If you choose the ‘Midi out: Hold’ option, the sound will be
held even if you release the mouse.
Virtual Midi Port
This option can be very useful when trying to implement Harmony Improvisator in host
programmes that do not support VST instruments.
3.11 Show options
You can choose from three different show options for the
chords:
Show Function
Choose this option for the chords to be presented as their
tonal function, for example tonic (T), subdominant (S), or dominant (D).
For someone without any background knowledge about harmonic theory this may look a
little confusing, but this option is very valuable since it presents you the meaning of the
chords rather than just a name that is difficult to put into context.
Show scale degree
If you choose this option, chords will be presented as Roman numbers (I, II, III etc.).
Similarly to the ‘Show Function’ option, this allows you to see the chord’s function.
CHAPTER 4: EXPLANATION OF THE HARMONIC SYMBOLS 15
Show Chords
Choose this option if you prefer to see actual chord names (F7, Bb4, e6 etc.). Although
this option may seem very simple, it has the disadvantage that you cannot deduce the
tonal meaning of the chords, so it will not enable you to understand the harmonic
progressions Harmony Improvisator creates for you.
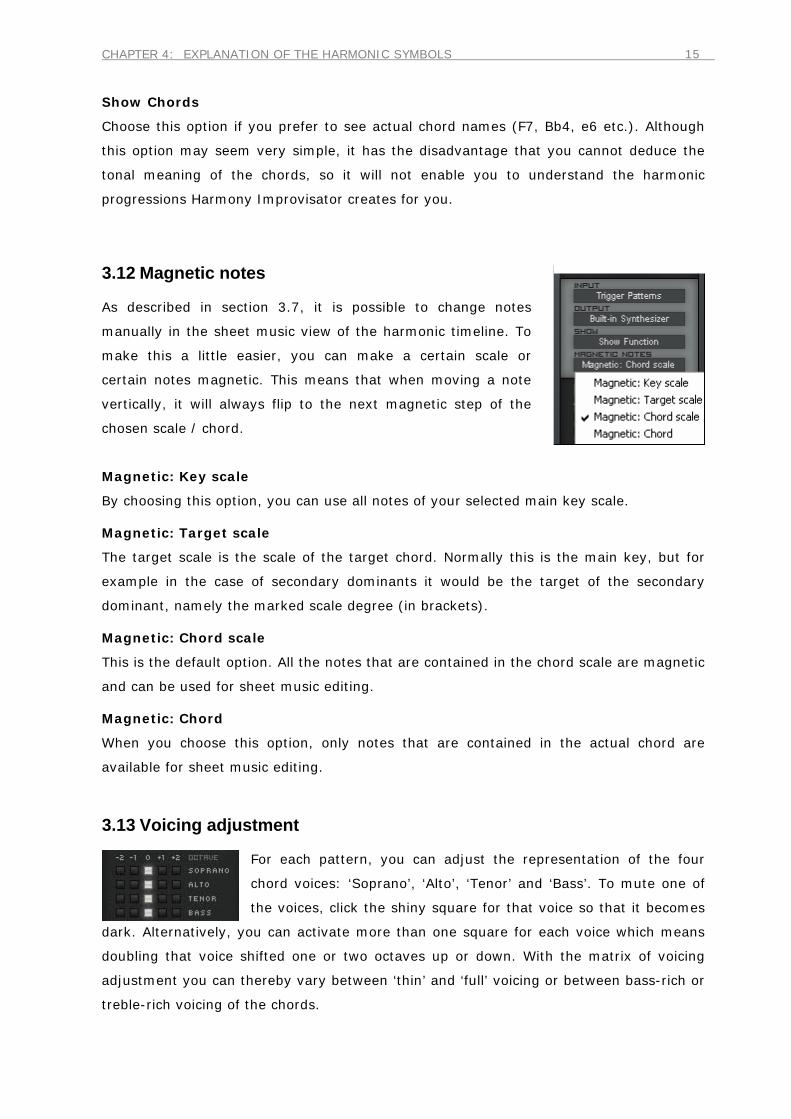
3.12 Magnetic notes
As described in section 3.7, it is possible to change notes
manually in the sheet music view of the harmonic timeline. To
make this a little easier, you can make a certain scale or
certain notes magnetic. This means that when moving a note
vertically, it will always flip to the next magnetic step of the
chosen scale / chord.
Magnetic: Key scale
By choosing this option, you can use all notes of your selected main key scale.
Magnetic: Target scale
The target scale is the scale of the target chord. Normally this is the main key, but for
example in the case of secondary dominants it would be the target of the secondary
dominant, namely the marked scale degree (in brackets).
Magnetic: Chord scale
This is the default option. All the notes that are contained in the chord scale are magnetic
and can be used for sheet music editing.
Magnetic: Chord
When you choose this option, only notes that are contained in the actual chord are
available for sheet music editing.
3.13 Voicing adjustment
For each pattern, you can adjust the representation of the four
chord voices: ‘Soprano’, ‘Alto’, ‘Tenor’ and ‘Bass’. To mute one of
the voices, click the shiny square for that voice so that it becomes
dark. Alternatively, you can activate more than one square for each voice which means
doubling that voice shifted one or two octaves up or down. With the matrix of voicing
adjustment you can thereby vary between ‘thin’ and ‘full’ voicing or between bass-rich or
treble-rich voicing of the chords.

CHAPTER 4: EXPLANATION OF THE HARMONIC SYMBOLS 16
3.14 Save / Load
Once you have created a nice harmonic progression with
Harmony Improvisator you surely want to save it. You have two
different options for that.
Save
If you choose this option, the chord progression will be saved as HARM file, which is a
Harmony Improvisator specific format. You can select your desired directory in the
window that pops up. You should make sure to select this format if you intend to open
your harmonic progression again with Harmony Improvisator, since it is the only format
that Harmony Improvisator can read. To load a HARM file simply click on the ‘Load’
button and select the respective file.
Save MIDI
Choose this option if you would like to save your harmonic progression in as standard
MIDI file which can be opened in any sequencer software. Please note that Harmony
Improvisator itself is not able to load MIDI files.
3.15 Parallel instances of Harmony Improvisator
When it comes to triggering multiple VST instruments independently within one project,
Harmony Improvisator can be launched several times in parallel. Each instance's output
can be routed to a different target instrument but all Improvisator instances constantly
communicate so that they share the same harmonic framework and main key.
In order to set up combos of different instruments, simply launch Harmony Improvisator
several times within one host project and route the different MIDI outputs to different
sampler or synthesizer plug-ins. When you manipulate the harmonic progression or the
main key in one of these Improvisator instances, all the other instances are updated
automatically. You can write different voicings for different instruments now and all of
them are being played back synchronously, triggered by your host sequencer.

CHAPTER 4: EXPLANATION OF THE HARMONIC SYMBOLS 17
4 Explanation of the harmonic symbols
Unless you change the ‘Show’ options, Harmony Improvisator by default presents
function symbols instead of chord names. Since these symbols are seldom used in the
context of producing music with the computer, this may be confusing at a first glance,
but they represent the essential concept of Harmony Improvisator. The chord symbol E7
for example only tells you how to play the chord, which does not contain any information
about the meaning of the chord. Harmony Improvisator is not designed for presenting
interesting chords out of a “black box” that you can only play but not understand.
Instead, it is aimed at presenting the user with the value of a chord in a certain context.
Thereby, once you have spent a little time becoming familiar with this type of harmonic
functions, you can more easily decide which chord you would like to use in a certain part
of your harmonic progression.
The harmonic symbols are quite easy to understand and we will give a short overview
here:
A small letter stands for a minor chord, a capital letter for a major chord.
T and t stand for “tonic“, the main key itself. S and s stand for “subdominant”, the chord
which is based on the fourth degree of the key scale. D and d represent the “dominant”,
the fifth degree’s chord. The harmonic progression T-S-D-T is generally called “cadence”;
it is the most common harmonic motif in Western music.
The superscript numbers represent an added note or suspension in the corresponding
interval to the base note of the function symbol. The symbol s56 for example represents a
minor subdominant with added sixth, a so called “Sixte ajoute”.
The numbers below the symbols denote which tone is set as the lowest note, the bass of
the chord. The 3 for example means that the third degree of the key scale is the bass,
which corresponds to the first inversion of a chord.
P and p stand for the parallel of a chord. The parallel of a major chord is a minor chord
three semitones below the main key. The parallel of a minor chord is a major chord three
semitones up. For instance, A minor is the parallel of C major and vice versa.
A superscript “v” represents a diminished chord which has a dissonant, dominant
character.
A crossed symbol means that the first degree note of the chord is missing.
DD stands for „double dominant“, which is the dominant of the main key’s dominant. For
example, if the main key is C major, the dominant is G. Thus the double dominant is D.
The symbol sn represents a so-called “Neapolitan chord”, which has a characteristic minor
sixth and no fifth. This type of chord has the function to prepare the dominant.

CHAPTER 5: TUTORIALS 18
5 Tutorials
5.1 Simple
This tutorial shows you how to create a simple chord progression with Harmony
Improvisator. We do not use the suggestions here, but instead show you something that
you can easily reproduce to get a feeling for Harmony Improvisator’s basic functions.
1. Please launch Harmony Improvisator in your host software according to the
embedding notes in Chapter 2. Choose ‘Show Function’ in the Show options and
select ‘C major’ as main key to follow this tutorial.
2. Choose your first chord and drag it to the ‘1’ in the harmonic timeline. In this case we
use the minor chord of the main scale, that is the tonic ‘t’:
3. Now drag the second chord into the harmonic timeline on count ‘2’. Here we chose
the minor chord of the subdominant ‘s’:

CHAPTER 5: TUTORIALS 19
4. Select the third chord and drag it to count ‘3’ of the harmonic timeline. In this case,
we chose the major chord of the dominant with an added fourth and sixth, noted D46:

CHAPTER 5: TUTORIALS 20
5. Drag your fourth chord to count ‘4’ of the harmonic timeline. For this tutorial we
selected the dominant seventh chord, denoted as D7.
6. Of course you can keep going like this if you want to create a longer harmonic
pattern. But for this tutorial we stop here.
7. Press the ‘Play’ button and enjoy what you’ve created.
8. If you like this harmonic progression, click on ‘Save’ and then ‘Save MIDI’ to save it
as MIDI file, which allows you to load and edit it in other programmes.
9. We also suggest that you save the progression as HARM file because this is the only
format Harmony Improvisator can load. That way you can elongate or edit the
progression with Harmony Improvisator later if you feel like. Simply click on ‘Save’
and select ‘Save’ from the drop-down menu.
10. We encourage you to try out different chords, maybe change the main key of this
progression, use the suggestions to get new ideas, and just enjoy being creative.

CHAPTER 5: TUTORIALS 21
5.2 Advanced
This tutorial is a little more advanced than the first one. It includes a change of target
scale and we have used some chords that are not immediately visible in the GUI upon
starting Harmony Improvisator.
1. Launch Harmony Improvisator in your host software according to the embedding
notes in Chapter 2. Make sure ‘Active Pattern’ is set to ‘1’ so that the chord
progression you build up in the timeline will be referred to as harmonic pattern one.
Please use the ‘Show Function’ setup to be able to follow this tutorial.
2. To create the harmonic pattern, all the desired chords are placed in the harmonic
timeline by drag and drop with the mouse.
3. The first chord is a suspension of the tonic. In order to make this chord available in
the GUI, left-click once on the minor tonic chord ‘t’, which is the very left button in
the second row of scale degree chords (highlighted in white in the snapshot below).
Now left-click on the ‘t12’ button (marked with orange rectangle) and drag this chord
to count ‘1’ in the harmonic timeline.
4. The suspension you have just added to
your chord progression leads to the
minor chord of the tonic ‘t’. Left-click
on this button (highlighted in white in
the screenshot above) and drag the
chord to count ‘1 ½’ in the harmonic
timeline.

CHAPTER 5: TUTORIALS 22
5. Our third chord is a suspension of the subdominant parallel, namely ‘sP49’. In order to
access this chord, left-click once on the ‘sP’ chord (highlighted in white in the
snapshot below). You will see that now ‘sP49’ becomes available (marked with orange
box). Drag this chord to count ‘3’ in the harmonic timeline.
6. The suspension that we have just
added leads to the fourth chord, the
subdominant parallel ‘sP’. The position
of the respective button is marked in
the screenshot above (highlighted in
white). Drag this chord to count ‘3 ½’
of the harmonic timeline.
7. The fifth chord is a diminished dominant targeted at the subdominant: ‘D3v’. In order
to make this chord
available, right-
click the sub-
dominant ‘s’ once
(highlighted in
white in the
snapshot below).
You will then find
the chord of
interest available
at the very bottom,
as marked by the
orange box below.
Drag this chord to
count ‘5’ in the
harmonic timeline.

CHAPTER 5: TUTORIALS 23
8. The chord we have just added has
prepared the next chord, which is the
subdominant ‘s’. Left-click once on the
respective button in the second row of
scale degrees chords and then drag this
chord to count ‘5 ½’ in the harmonic
timeline.
9. Our next chord is a suspension of the dominant ‘D46’. It has a special place at the
bottom of the chord array because in functional harmonic theory it exists only for the
dominant and is used very often. Drag this chord to count ‘7’ in the harmonic
timeline.
10. This suspension of the dominant leads
to the final chord of this tutorial
sequence, the dominant ‘D’. It can be
found in the very first row of scale
degree chords. Drag this chord to count
‘7 ½’ in the harmonic timeline.
11. When you loop your harmonic progression by clicking the play button, the dominant
at the end will lead back to the tonic at the beginning of the sequence.
12. To make the voicing a bit more compact, move the soprano
one octave down. You can do this by clicking on the bright
square in the soprano row once to deactivate it, and then
activate -1 in the same row by clicking on the respective grey
square so that it becomes bright.
13. Press play again to hear the result. If you do not hear the difference right away,
change the voicing back to the original setting and compare both.
14. In order to build a track around the harmonic progression with your host sequencer,
create a sequence eight bars in length on the input MIDI track of Harmony
Improvisator. Insert only a single C (in any octave) at the very beginning of the

CHAPTER 5: TUTORIALS 24
sequence. As you know from Section 3.9, any C will trigger harmonic pattern #1,
while any D would trigger pattern #2 and so on.
Now, for all parts of your song where you want active pattern #1 to be played back
synchronised to your host project, you simply insert this sequence.
15. When you now press the Play button in your host software, you will hear the
harmonies you entered into the harmonic timeline synchronous to your host
sequencer clock.
16. Now you are ready to build a drum pattern, for instance, if you like.
17. Do not forget to always save your harmonic progressions as HARM and MIDI files if
you like them.

INDEX 25
Index
Ableton Live......................................5
Active pattern .................................13
Cadence ..................................... 3, 17
Chord buttons .................................10
Chord suggestions ....................... 1, 11
Cubase.............................................4
Derivatives of scale degrees ..............11
Dominant ................................... 3, 17
Double dominant .............................18
Embedding .......................................4
FL Studio..........................................6
free lifetime update service .................2
Free VST hosts ..................................4
Function symbols.............................17
GUI overview ....................................9
HARM file .......................................16
Harmonic symbols ...........................17
Harmonic theory................................2
Harmonic timeline............................12
Input options ..................................13
Interval............................................3
Inversions .................................. 3, 11
Load file .........................................16
Logic Pro ..........................................8
Mac version of Harmony Improvisator...2
Magnetic notes................................15
Main key ........................................10
MIDI export ....................................16
Neapolitan chord .............................18
Numbers below chord symbols...........17
Output options ................................14
Parallel instances of Harmony
Improvisator ................................16
Parallels of chords............................17
Recently triggered chords .................12
Reference change ............................10
Save ..............................................16
SAVIHost......................................... 4
Scale degrees..................................10
Show options ..................................14
Sonar.............................................. 7
Studio One ...................................... 7
Subdominant .............................. 3, 17
Superscript numbers ........................17
Suspensions....................................11
Tonic ......................................... 3, 17
Tutorials .........................................19
Updates........................................... 2
Versions of Harmony Improvisator ...... 2
Voicing adjustment ..........................15
VSTi................................................ 1
VSTLord .......................................... 4
Windows version of Harmony
Improvisator ................................. 2