red hot flash - quilter by · pdf fileblock size: 11-3/8" quilt size: 59" x...
TRANSCRIPT
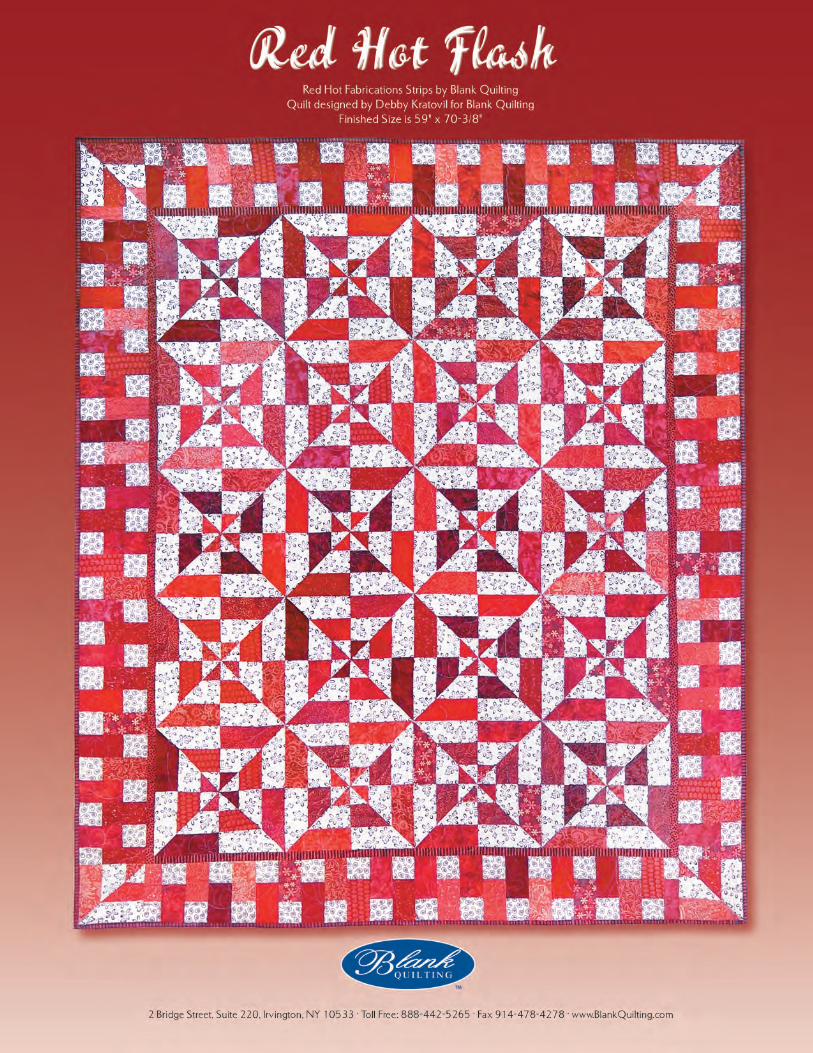
Block Size: 11-3/8"Quilt Size: 59" x 70-3/8"
Red Hot Flash
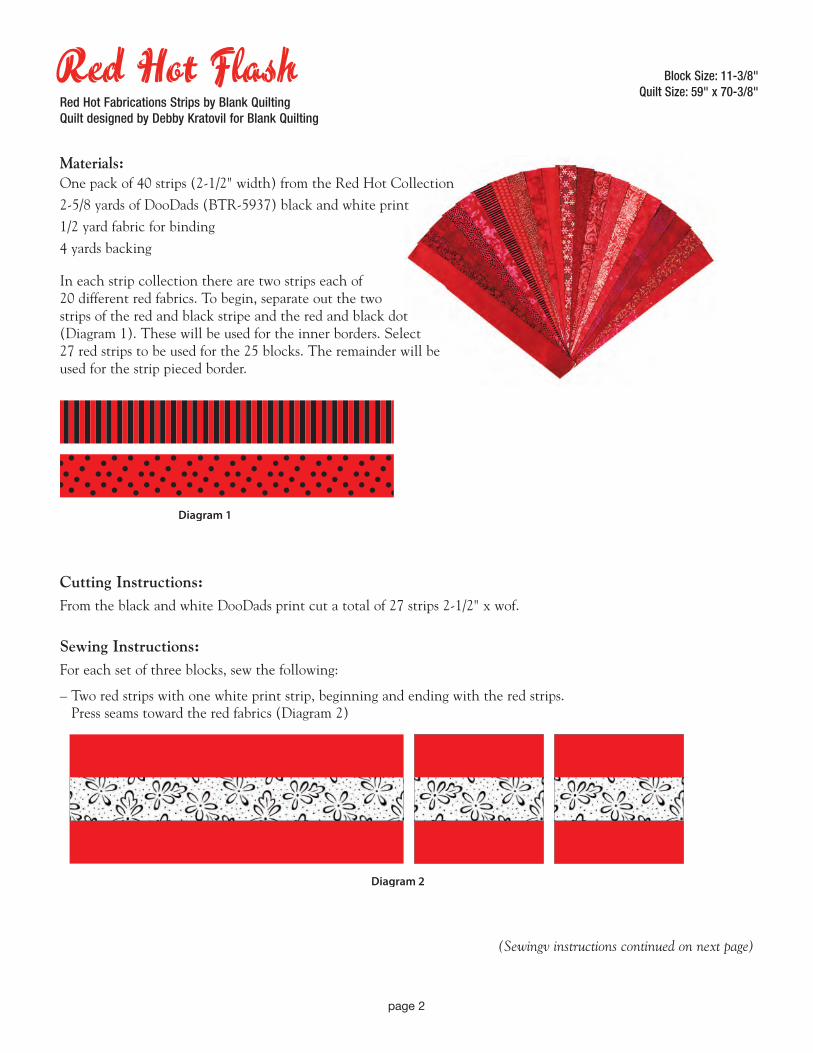
Cutting Instructions:From the black and white DooDads print cut a total of 27 strips 2-1/2" x wof.
Sewing Instructions:For each set of three blocks, sew the following:
– Two red strips with one white print strip, beginning and ending with the red strips. Press seams toward the red fabrics (Diagram 2)
Red Hot Fabrications Strips by Blank QuiltingQuilt designed by Debby Kratovil for Blank Quilting
page 2
Materials:
In each strip collection there are two strips each of20 different red fabrics. To begin, separate out the twostrips of the red and black stripe and the red and black dot(Diagram 1). These will be used for the inner borders. Select27 red strips to be used for the 25 blocks. The remainder will beused for the strip pieced border.
One pack of 40 strips (2-1/2" width) from the Red Hot Collection
2-5/8 yards of DooDads (BTR-5937) black and white print
1/2 yard fabric for binding
4 yards backing
(Sewingv instructions continued on next page)

Sewing Instructions: (continued)– Two white/black print strips with one red strip, beginning and ending with the white print strips.Press seams toward the red strip (Diagram 3).
Make a total of 9 strip sets of EACH combination for a total of 18 strip sets.
page 3
(Cutting & stitching instructions continued on next page)
Cutting & Stitching:1. Cut each of the 18 strip sets into 6-1/2" x 6-1/2" squares (see Diagrams 2 and 3). Keep them in separate piles
according to the combinations. (Make a pile of red-white-red squares and another pile of white-red-whitesquares). See Diagram 4.
2. Select TWO of a red-white-red matching combination and TWO of a white-red-white combination. Youwant the three red fabrics to all be different and keep these four squares together (using a pin keeps themfrom getting mixed up). Repeat until you have matched all squares. Each set of 4 squares will sew up intoone block.
3. Set aside all but one set of 4 squares. Now we are ready to create our blocks.
4. Place one red-white-red square as shown in Diagram 5 on the left and a white-red-white square on the right.Cut the square on the left from bottom left to top right and the square on the right from top left to bottomright. See Diagram 6. This is the “mountain" cutyou will use for every single paired cutting.

Cutting & Stitching: (continued)5. Swap out the triangles as shown in Diagram 7 (they will only fit together one way) and pin together, taking
care to nestle the seams against each other (this is why we always pressed the seams toward the red fabricstrip in each strip set). Repeat for the second two squares (cut, swap and pin).
6. Sew the four triangle sets together along the diagonal with a 1/4" seam and press the seams open.
7. Refer to Diagram 8 to make one block. Sew the fourunits together and press the seams open to reduce bulk.
8. Repeat for the remaining sets of four squares to make atotal of 27 blocks (we use 25 blocks in our quilt center).
Quilt Assembly:1. Sew four blocks into a horizontal row and press seams well. Make five horizontal rows. Sew these rows together to
make the quilt center. It should measure 50" x 57-1/4".
2. Cut each of the two red/black striped strips and the two red/black dotted strips into half along their lengths toyield four strips EACH 1-1/4" x wof. Sew together to create the lengths you need to sew onto the quilt center asinner borders. Press seams toward the newly added strips. Refer to Quilt Assembly Diagram picture.
3. Using the remaining 13 red print strips, cut the following from each strip: 9 rectangles 2-1/2" x 4-1/4" for a total of 117 rectangles (Diagram 9).
4. Cut seven 2-1/2" x wof strips from the black and white print. Re-cut into the following: 112 squares 2-1/2" x 2-1/2" (Diagram 10).
page 4
(Quilt assembly instructions continued on next page)

page 5
Quilt Assembly: (continued)5. Sew a 2-1/2" black and white square to the short end of each of the 2-1/2" x 4-1/2" red rectangles (Diagram 11).
These units now measure 2-1/2" x 6-1/4".
6. Sew twenty-six of the units from Diagram 11 together, flip-flopping them as shown, to create a “piano key" border for the quilt top; repeat for the bottom border. Sew to quilt top, trimming the side edges of the borderseven with the quilt center if necessary.
7. Sew together the side borders using 30 of the 2-1/2" x 6-1/4" units for each side. Use left over units from theblocks (which measure 6-1/4" x 6-1/4" unfinished) as your border corner blocks as shown. Sew corner blocksonto the short ends of the side borders and then join to quilt center.
Press quilt top well. Center measures approximately 59" x 70-3/8".
Quilt Finishing:1. Layer quilt top, batting and backing. Quilt as desired.
2. Cut six binding strips 2-1/4" x wof; seam together into a long row and press for binding. Use to bind quilt.
Enjoy!

BLK-2783-002
While all possible care has been taken to ensure the accuracy of this pattern, we are not responsible for printing errors or the way in which individual work varies.
© 2012 Blank Quilting • All rights reserved2 Bridge Street, Suite 220, Irvington, NY 10533 • Toll Free: 888-442-5265 • Fax 914-478-4278 • www.BlankQuilting.com