red hat openstack platform 15
TRANSCRIPT
Red Hat OpenStack Platform 15
Manage Secrets with OpenStack Key Manager
How to integrate OpenStack Key Manager (Barbican) with your OpenStackdeployment.
Last Updated: 2021-01-21

Red Hat OpenStack Platform 15 Manage Secrets with OpenStack KeyManager
How to integrate OpenStack Key Manager (Barbican) with your OpenStack deployment.
OpenStack [email protected]
Legal Notice
Copyright © 2021 Red Hat, Inc.
The text of and illustrations in this document are licensed by Red Hat under a Creative CommonsAttribution–Share Alike 3.0 Unported license ("CC-BY-SA"). An explanation of CC-BY-SA isavailable athttp://creativecommons.org/licenses/by-sa/3.0/. In accordance with CC-BY-SA, if you distribute this document or an adaptation of it, you mustprovide the URL for the original version.
Red Hat, as the licensor of this document, waives the right to enforce, and agrees not to assert,Section 4d of CC-BY-SA to the fullest extent permitted by applicable law.
Red Hat, Red Hat Enterprise Linux, the Shadowman logo, the Red Hat logo, JBoss, OpenShift,Fedora, the Infinity logo, and RHCE are trademarks of Red Hat, Inc., registered in the United Statesand other countries.
Linux ® is the registered trademark of Linus Torvalds in the United States and other countries.
Java ® is a registered trademark of Oracle and/or its affiliates.
XFS ® is a trademark of Silicon Graphics International Corp. or its subsidiaries in the United Statesand/or other countries.
MySQL ® is a registered trademark of MySQL AB in the United States, the European Union andother countries.
Node.js ® is an official trademark of Joyent. Red Hat is not formally related to or endorsed by theofficial Joyent Node.js open source or commercial project.
The OpenStack ® Word Mark and OpenStack logo are either registered trademarks/service marksor trademarks/service marks of the OpenStack Foundation, in the United States and othercountries and are used with the OpenStack Foundation's permission. We are not affiliated with,endorsed or sponsored by the OpenStack Foundation, or the OpenStack community.
All other trademarks are the property of their respective owners.
Abstract
How to integrate OpenStack Key Manager (Barbican) with your OpenStack deployment.
. . . . . . . . . . . . . . . . . . . . . . . . . . . . . . . . . . . . . . . . . . . . . . . . . . . . . . . . . . . . . . . . . . . . . . . . . . . . . . . . . . . . . . . . . . . . . . . . . . . . . . . . . . . . . . . . . . . . . . . . . . . . . . . . . . . . . . . . . . . . . . . . . . . . . . . . . . . . . . . . . . . . . . . . . . . . . . . . . . . . . . . . . . . . . . . . . . . . . . . . . . . . . . . . . . . . . . . . . . . . . . . . . . . . . . . . . . . . . . . . . . . . . . . . . . . . . . . . . . . . . . . . . . . . . . . . . . . . . . . .
. . . . . . . . . . . . . . . . . . . . . . . . . . . . . . . . . . . . . . . . . . . . . . . . . . . . . . . . . . . . . . . . . . . . . . . . . . . . . . . . . . . . . . . . . . . . . . . . . . . . . . . . . . . . . . . . . . . . . . . . . . . . . . . . . . . . . . . . . . . . . . . . . . . . . . . . . . . . . . . . . . . . . . . . . . . . . . . . . . . . . . . . . . . . . . . . . . . . . . . . . . . . . . . . . . . . . . . . . . . . . . . . . . . . . . . . . . . . . . . . . . . . . . . . . . . . . . . . . . . . . . . . . . . . . . . . . . . . . . . .
. . . . . . . . . . . . . . . . . . . . . . . . . . . . . . . . . . . . . . . . . . . . . . . . . . . . . . . . . . . . . . . . . . . . . . . . . . . . . . . . . . . . . . . . . . . . . . . . . . . . . . . . . . . . . . . . . . . . . . . . . . . . . . . . . . . . . . . . . . . . . . . . . . . . . . . . . . . . . . . . . . . . . . . . . . . . . . . . . . . . . . . . . . . . . . . . . . . . . . . . . . . . . . . . . . . . . . . . . . . . . . . . . . . . . . . . . . . . . . . . . . . . . . . . . . . . . . . . . . . . . . . . . . . . . . . . . . . . . . . .
. . . . . . . . . . . . . . . . . . . . . . . . . . . . . . . . . . . . . . . . . . . . . . . . . . . . . . . . . . . . . . . . . . . . . . . . . . . . . . . . . . . . . . . . . . . . . . . . . . . . . . . . . . . . . . . . . . . . . . . . . . . . . . . . . . . . . . . . . . . . . . . . . . . . . . . . . . . . . . . . . . . . . . . . . . . . . . . . . . . . . . . . . . . . . . . . . . . . . . . . . . . . . . . . . . . . . . . . . . . . . . . . . . . . . . . . . . . . . . . . . . . . . . . . . . . . . . . . . . . . . . . . . . . . . . . . . . . . . . . .
. . . . . . . . . . . . . . . . . . . . . . . . . . . . . . . . . . . . . . . . . . . . . . . . . . . . . . . . . . . . . . . . . . . . . . . . . . . . . . . . . . . . . . . . . . . . . . . . . . . . . . . . . . . . . . . . . . . . . . . . . . . . . . . . . . . . . . . . . . . . . . . . . . . . . . . . . . . . . . . . . . . . . . . . . . . . . . . . . . . . . . . . . . . . . . . . . . . . . . . . . . . . . . . . . . . . . . . . . . . . . . . . . . . . . . . . . . . . . . . . . . . . . . . . . . . . . . . . . . . . . . . . . . . . . . . . . . . . . . . .
. . . . . . . . . . . . . . . . . . . . . . . . . . . . . . . . . . . . . . . . . . . . . . . . . . . . . . . . . . . . . . . . . . . . . . . . . . . . . . . . . . . . . . . . . . . . . . . . . . . . . . . . . . . . . . . . . . . . . . . . . . . . . . . . . . . . . . . . . . . . . . . . . . . . . . . . . . . . . . . . . . . . . . . . . . . . . . . . . . . . . . . . . . . . . . . . . . . . . . . . . . . . . . . . . . . . . . . . . . . . . . . . . . . . . . . . . . . . . . . . . . . . . . . . . . . . . . . . . . . . . . . . . . . . . . . . . . . . . . . .
Table of Contents
CHAPTER 1. OVERVIEW
CHAPTER 2. CHOOSING A BACKEND2.1. MIGRATING BETWEEN BACKENDS
CHAPTER 3. INSTALLING BARBICAN3.1. ADD USERS TO THE CREATOR ROLE ON OVERCLOUD
3.1.1. Test barbican functionality3.2. UNDERSTANDING POLICIES
3.2.1. Viewing the default policy
CHAPTER 4. MANAGING SECRETS IN BARBICAN4.1. LISTING SECRETS4.2. ADDING NEW SECRETS4.3. UPDATING SECRETS4.4. DELETING SECRETS4.5. GENERATE A SYMMETRIC KEY4.6. BACKUP AND RESTORE KEYS
4.6.1. Backup and restore the simple crypto back end4.6.1.1. Backup and restore the KEK4.6.1.2. Backup and restore the back end database
4.6.1.2.1. Create the test secret4.6.1.2.2. Backup the barbican database4.6.1.2.3. Delete the test secrets4.6.1.2.4. Restore the databases4.6.1.2.5. Verify the restore process
CHAPTER 5. BARBICAN HARDWARE SECURITY MODULE (HSM) INTEGRATION5.1. CHOOSING A BACKEND5.2. ENCRYPTED BLOB5.3. HARDWARE SECURITY MODULE (HSM) SUPPORT5.4. MIGRATING BETWEEN BACKENDS5.5. INTEGRATE WITH AN HSM APPLIANCE5.6. INTEGRATE BARBICAN WITH AN ATOS HSM5.7. REQUIREMENTS5.8. CONFIGURE THE CONTROLLER
5.8.1. Test your HSM connection5.9. INTEGRATE BARBICAN WITH AN NCIPHER NSHIELD CONNECT XC5.10. CONFIGURE THE CONTROLLER
5.10.1. Test your HSM connection5.11. REVIEW TLS ACTIVITY BETWEEN BARBICAN AND THE HSM5.12. KEY STORAGE CONSIDERATIONS5.13. ROTATING THE KEYS5.14. PLANNING BACKUP FOR BARBICAN AND THE HSM
CHAPTER 6. ENCRYPTING CINDER VOLUMES6.1. MIGRATE EXISTING VOLUME KEYS TO BARBICAN
6.1.1. Overview of the migration steps6.1.2. Behavioral differences6.1.3. Reviewing the migration process6.1.4. Troubleshooting the migration process
6.1.4.1. Role assignment
4
55
789
1010
121212121213141414141415161617
1819
202020212121212324242526262727
28303131313232
Table of Contents
1
. . . . . . . . . . . . . . . . . . . . . . . . . . . . . . . . . . . . . . . . . . . . . . . . . . . . . . . . . . . . . . . . . . . . . . . . . . . . . . . . . . . . . . . . . . . . . . . . . . . . . . . . . . . . . . . . . . . . . . . . . . . . . . . . . . . . . . . . . . . . . . . . . . . . . . . . . . . . . . . . . . . . . . . . . . . . . . . . . . . . . . . . . . . . . . . . . . . . . . . . . . . . . . . . . . . . . . . . . . . . . . . . . . . . . . . . . . . . . . . . . . . . . . . . . . . . . . . . . . . . . . . . . . . . . . . . . . . . . . . .
. . . . . . . . . . . . . . . . . . . . . . . . . . . . . . . . . . . . . . . . . . . . . . . . . . . . . . . . . . . . . . . . . . . . . . . . . . . . . . . . . . . . . . . . . . . . . . . . . . . . . . . . . . . . . . . . . . . . . . . . . . . . . . . . . . . . . . . . . . . . . . . . . . . . . . . . . . . . . . . . . . . . . . . . . . . . . . . . . . . . . . . . . . . . . . . . . . . . . . . . . . . . . . . . . . . . . . . . . . . . . . . . . . . . . . . . . . . . . . . . . . . . . . . . . . . . . . . . . . . . . . . . . . . . . . . . . . . . . . . .
. . . . . . . . . . . . . . . . . . . . . . . . . . . . . . . . . . . . . . . . . . . . . . . . . . . . . . . . . . . . . . . . . . . . . . . . . . . . . . . . . . . . . . . . . . . . . . . . . . . . . . . . . . . . . . . . . . . . . . . . . . . . . . . . . . . . . . . . . . . . . . . . . . . . . . . . . . . . . . . . . . . . . . . . . . . . . . . . . . . . . . . . . . . . . . . . . . . . . . . . . . . . . . . . . . . . . . . . . . . . . . . . . . . . . . . . . . . . . . . . . . . . . . . . . . . . . . . . . . . . . . . . . . . . . . . . . . . . . . . .
6.1.5. Clean up the fixed keys
CHAPTER 7. ENCRYPT AT-REST SWIFT OBJECTS7.1. ENABLE AT-REST ENCRYPTION FOR SWIFT
CHAPTER 8. VALIDATE GLANCE IMAGES8.1. ENABLE GLANCE IMAGE VALIDATION8.2. VALIDATE AN IMAGE
CHAPTER 9. VALIDATE IMAGES USED FOR VOLUME CREATION9.1. VALIDATE THE IMAGE SIGNATURE ON A NEW VOLUME
32
3434
353535
3838
Red Hat OpenStack Platform 15 Manage Secrets with OpenStack Key Manager
2

Table of Contents
3
CHAPTER 1. OVERVIEWOpenStack Key Manager (barbican) is the secrets manager for Red Hat OpenStack Platform. You canuse the barbican API and command line to centrally manage the certificates, keys, and passwords usedby OpenStack services. Barbican currently supports the following use cases described in this guide:
Symmetric encryption keys - used for Block Storage (cinder) volume encryption, ephemeraldisk encryption, and Object Storage (swift) encryption, among others.
Asymmetric keys and certificates - used for glance image signing and verification, amongothers.
In this release, barbican offers integration with the Block Storage (cinder) and Compute (nova)components.
Red Hat OpenStack Platform 15 Manage Secrets with OpenStack Key Manager
4
CHAPTER 2. CHOOSING A BACKENDSecrets (such as certificates, API keys, and passwords) can either be stored as an encrypted blob in thebarbican database, or directly in a secure storage system.
To store the secrets as an encrypted blob in the barbican database, the following options are available.
Simple crypto plugin - The simple crypto plugin is enabled by default and uses a singlesymmetric key to encrypt the blob of secrets. This key is stored in plain text in the barbican.conf file.
NOTE
The simple crypto plugin is currently the only plugin supported by Red Hat.
PKCS#11 crypto plugin - The PKCS#11 crypto plugin encrypts secrets with project-specific keyencryption keys (KEK), which are stored in the barbican database. These project-specific KEKsare encrypted by a master KEK, which is stored in a hardware security module (HSM). Allencryption and decryption operations take place in the HSM, rather than in-process memory.The PKCS#11 plugin communicates with the HSM through the PKCS#11 protocol. Because theencryption is done in secure hardware, and a different KEK is used per project, this option ismore secure than the simple crypto plugin.
Alternatively, you can store the secrets directly in a secure storage system:
KMIP plugin - The Key Management Interoperability Protocol (KMIP) plugin works with devicesthat have KIMP enabled, such as an HSM. Secrets are stored directly on the device instead ofthe barbican database. The plugin can authenticate to the device either with a username andpassword or a client certificate stored in the barbican.conf file.
Red Hat Certificate System (dogtag) - Red Hat Certificate System is a Common Criteria andFIPS certified security framework for managing various aspects of Public Key Infrastructure(PKI). The key recovery authority (KRA) subsystem stores secrets as encrypted blobs in itsdatabase. The master encryption keys are stored in either a software-based Network SecurityServices (NSS) database or an HSM. For more information about Red Hat Certificate System,see Product Documentation for Red Hat Certificate System .
NOTE
Regarding high availability (HA) options: The barbican service runs within Apache and isconfigured by director to use HAProxy for high availability. HA options for the back endlayer will depend on the back end being used. For example, for simple crypto, all thebarbican instances have the same encryption key in the config file, resulting in a simpleHA configuration.
2.1. MIGRATING BETWEEN BACKENDS
Barbican allows you to define a different backend for a project. If no mapping exists for a project, thensecrets are stored in the global default backend. This means that multiple backends can be configured,but there must be at least one global backend defined. The heat templates supplied for the differentbackends contain the parameters that set each backend as the default.
If you do store secrets in a certain backend and then decide to migrate to a new backend, you can keep
CHAPTER 2. CHOOSING A BACKEND
5

If you do store secrets in a certain backend and then decide to migrate to a new backend, you can keepthe old backend available while enabling the new backend as the global default (or as a project-specificbackend). As a result, the old secrets remain available through the old backend.
Red Hat OpenStack Platform 15 Manage Secrets with OpenStack Key Manager
6
CHAPTER 3. INSTALLING BARBICANBarbican is not enabled by default in Red Hat OpenStack Platform. This procedure describes how youcan deploy barbican in an existing OpenStack deployment. Barbican runs as a containerized service, sothis procedure also describes how to prepare and upload the new container images:
NOTE
This procedure configures barbican to use the simple_crypto backend. Additionalbackends are available, such as PKCS11 and DogTag, however they are not supported inthis release.
1. On the undercloud node, create an environment file for barbican. This will instruct director toinstall barbican (when its included in openstack overcloud deploy […] )
$ cat /home/stack/configure-barbican.yaml parameter_defaults: BarbicanSimpleCryptoGlobalDefault: true
BarbicanSimpleCryptoGlobalDefault - Sets this plugin as the global default plugin.
Further options are also configurable:
BarbicanPassword - Sets a password for the barbican service account.
BarbicanWorkers - Sets the number of workers for barbican::wsgi::apache. Uses '%{::processorcount}' by default.
BarbicanDebug - Enables debugging.
BarbicanPolicies - Defines policies to configure for barbican. Uses a hash value, forexample: { barbican-context_is_admin: { key: context_is_admin, value: 'role:admin' } }. This entry is then added to /etc/barbican/policy.json. Policies aredescribed in detail in a later section.
BarbicanSimpleCryptoKek - The Key Encryption Key (KEK) is generated by director,if none is specified.
2. This step prepares new container images for barbican. You will need to include the configure-barbican.yaml and all the relevant template files. Change the following example to suit yourdeployment:
$ openstack overcloud container image prepare \ --namespace example.lab.local:5000/rhosp15-rhel8 \ --tag latest \ --push-destination 192.168.100.1:8787 \ --output-images-file ~/container-images-with-barbican.yaml \ -e /home/stack/virt/config_lvm.yaml \ -e /usr/share/openstack-tripleo-heat-templates/environments/network-isolation.yaml \ -e /home/stack/virt/network/network-environment.yaml \ -e /home/stack/virt/hostnames.yml \ -e /home/stack/virt/nodes_data.yaml \ -e /home/stack/virt/extra_templates.yaml \ -e /home/stack/virt/docker-images.yaml \ -e /usr/share/openstack-tripleo-heat-templates/environments/services/barbican.yaml \
CHAPTER 3. INSTALLING BARBICAN
7
-e /usr/share/openstack-tripleo-heat-templates/environments/barbican-backend-simple-crypto.yaml \ -e /home/stack/configure-barbican.yaml
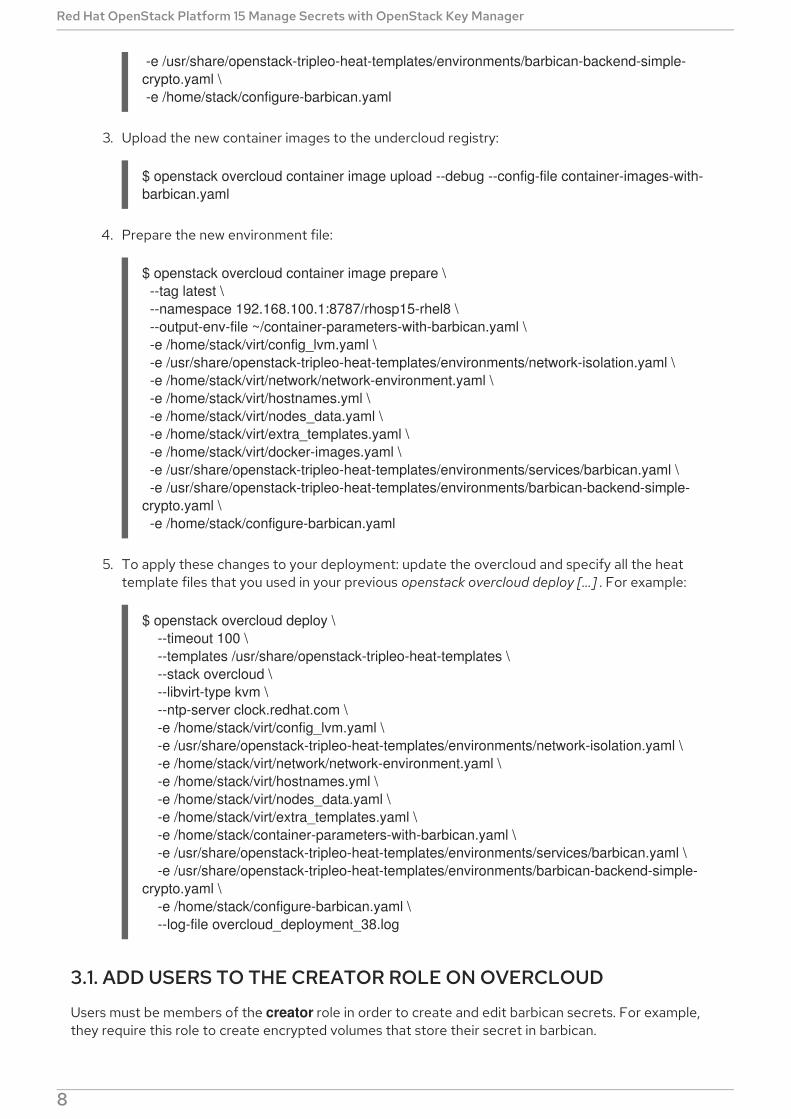
3. Upload the new container images to the undercloud registry:
$ openstack overcloud container image upload --debug --config-file container-images-with-barbican.yaml
4. Prepare the new environment file:
$ openstack overcloud container image prepare \ --tag latest \ --namespace 192.168.100.1:8787/rhosp15-rhel8 \ --output-env-file ~/container-parameters-with-barbican.yaml \ -e /home/stack/virt/config_lvm.yaml \ -e /usr/share/openstack-tripleo-heat-templates/environments/network-isolation.yaml \ -e /home/stack/virt/network/network-environment.yaml \ -e /home/stack/virt/hostnames.yml \ -e /home/stack/virt/nodes_data.yaml \ -e /home/stack/virt/extra_templates.yaml \ -e /home/stack/virt/docker-images.yaml \ -e /usr/share/openstack-tripleo-heat-templates/environments/services/barbican.yaml \ -e /usr/share/openstack-tripleo-heat-templates/environments/barbican-backend-simple-crypto.yaml \ -e /home/stack/configure-barbican.yaml
5. To apply these changes to your deployment: update the overcloud and specify all the heattemplate files that you used in your previous openstack overcloud deploy […] . For example:
$ openstack overcloud deploy \ --timeout 100 \ --templates /usr/share/openstack-tripleo-heat-templates \ --stack overcloud \ --libvirt-type kvm \ --ntp-server clock.redhat.com \ -e /home/stack/virt/config_lvm.yaml \ -e /usr/share/openstack-tripleo-heat-templates/environments/network-isolation.yaml \ -e /home/stack/virt/network/network-environment.yaml \ -e /home/stack/virt/hostnames.yml \ -e /home/stack/virt/nodes_data.yaml \ -e /home/stack/virt/extra_templates.yaml \ -e /home/stack/container-parameters-with-barbican.yaml \ -e /usr/share/openstack-tripleo-heat-templates/environments/services/barbican.yaml \ -e /usr/share/openstack-tripleo-heat-templates/environments/barbican-backend-simple-crypto.yaml \ -e /home/stack/configure-barbican.yaml \ --log-file overcloud_deployment_38.log
3.1. ADD USERS TO THE CREATOR ROLE ON OVERCLOUD
Users must be members of the creator role in order to create and edit barbican secrets. For example,they require this role to create encrypted volumes that store their secret in barbican.
Red Hat OpenStack Platform 15 Manage Secrets with OpenStack Key Manager
8
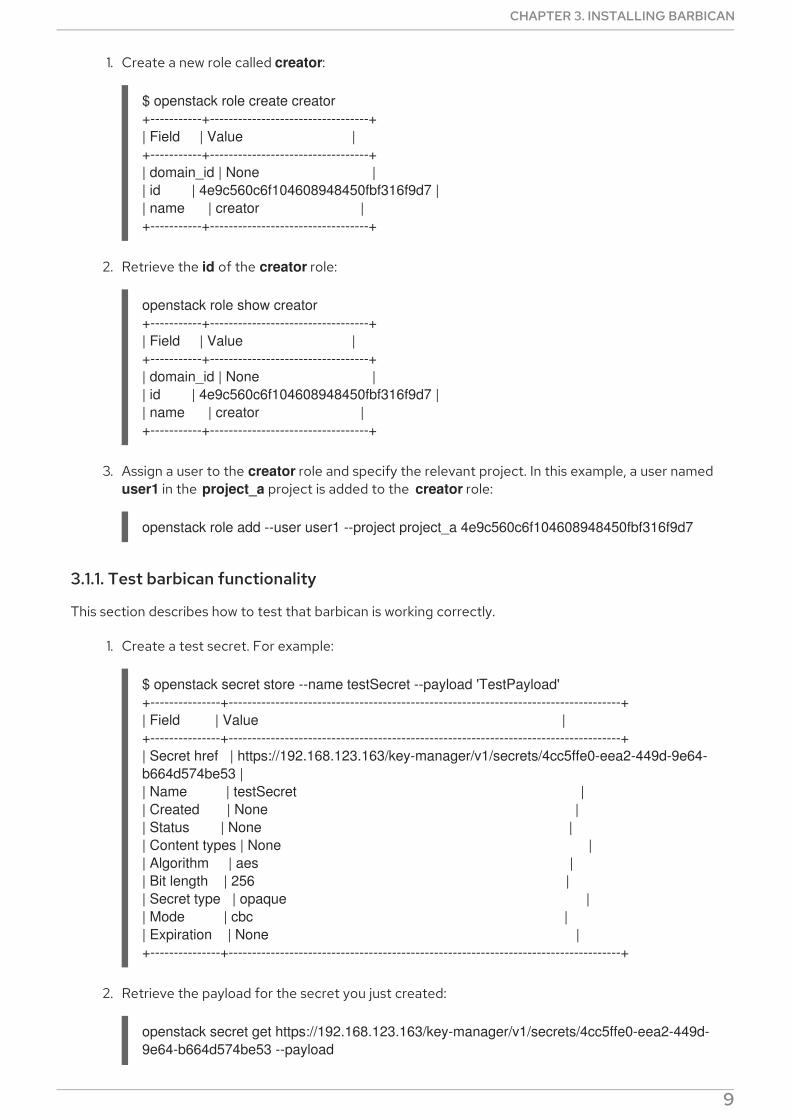
1. Create a new role called creator:
$ openstack role create creator+-----------+----------------------------------+| Field | Value |+-----------+----------------------------------+| domain_id | None || id | 4e9c560c6f104608948450fbf316f9d7 || name | creator |+-----------+----------------------------------+
2. Retrieve the id of the creator role:
openstack role show creator+-----------+----------------------------------+| Field | Value |+-----------+----------------------------------+| domain_id | None || id | 4e9c560c6f104608948450fbf316f9d7 || name | creator |+-----------+----------------------------------+
3. Assign a user to the creator role and specify the relevant project. In this example, a user named user1 in the project_a project is added to the creator role:
openstack role add --user user1 --project project_a 4e9c560c6f104608948450fbf316f9d7
3.1.1. Test barbican functionality
This section describes how to test that barbican is working correctly.
1. Create a test secret. For example:
$ openstack secret store --name testSecret --payload 'TestPayload'+---------------+------------------------------------------------------------------------------------+| Field | Value |+---------------+------------------------------------------------------------------------------------+| Secret href | https://192.168.123.163/key-manager/v1/secrets/4cc5ffe0-eea2-449d-9e64-b664d574be53 || Name | testSecret || Created | None || Status | None || Content types | None || Algorithm | aes || Bit length | 256 || Secret type | opaque || Mode | cbc || Expiration | None |+---------------+------------------------------------------------------------------------------------+
2. Retrieve the payload for the secret you just created:
openstack secret get https://192.168.123.163/key-manager/v1/secrets/4cc5ffe0-eea2-449d-9e64-b664d574be53 --payload
CHAPTER 3. INSTALLING BARBICAN
9
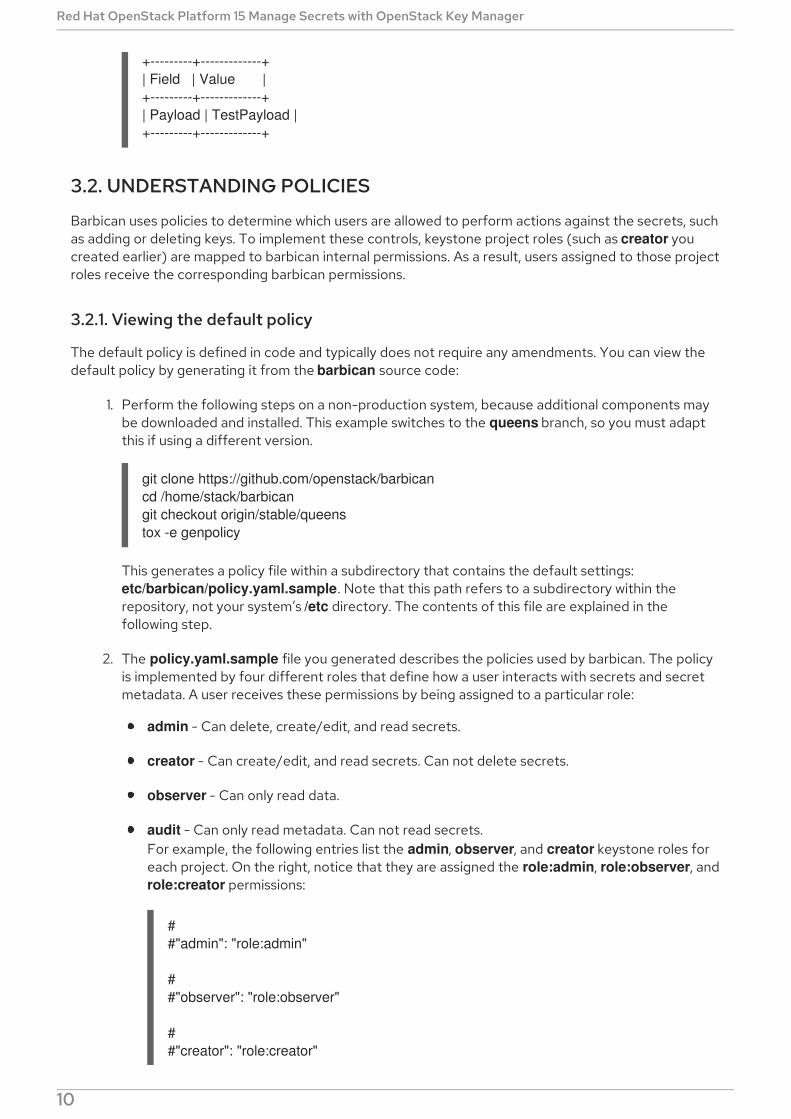
+---------+-------------+| Field | Value |+---------+-------------+| Payload | TestPayload |+---------+-------------+
3.2. UNDERSTANDING POLICIES
Barbican uses policies to determine which users are allowed to perform actions against the secrets, suchas adding or deleting keys. To implement these controls, keystone project roles (such as creator youcreated earlier) are mapped to barbican internal permissions. As a result, users assigned to those projectroles receive the corresponding barbican permissions.
3.2.1. Viewing the default policy
The default policy is defined in code and typically does not require any amendments. You can view thedefault policy by generating it from the barbican source code:
1. Perform the following steps on a non-production system, because additional components maybe downloaded and installed. This example switches to the queens branch, so you must adaptthis if using a different version.
git clone https://github.com/openstack/barbicancd /home/stack/barbicangit checkout origin/stable/queenstox -e genpolicy
This generates a policy file within a subdirectory that contains the default settings: etc/barbican/policy.yaml.sample. Note that this path refers to a subdirectory within therepository, not your system’s /etc directory. The contents of this file are explained in thefollowing step.
2. The policy.yaml.sample file you generated describes the policies used by barbican. The policyis implemented by four different roles that define how a user interacts with secrets and secretmetadata. A user receives these permissions by being assigned to a particular role:
admin - Can delete, create/edit, and read secrets.
creator - Can create/edit, and read secrets. Can not delete secrets.
observer - Can only read data.
audit - Can only read metadata. Can not read secrets.For example, the following entries list the admin, observer, and creator keystone roles foreach project. On the right, notice that they are assigned the role:admin, role:observer, androle:creator permissions:
##"admin": "role:admin"
##"observer": "role:observer"
##"creator": "role:creator"
Red Hat OpenStack Platform 15 Manage Secrets with OpenStack Key Manager
10
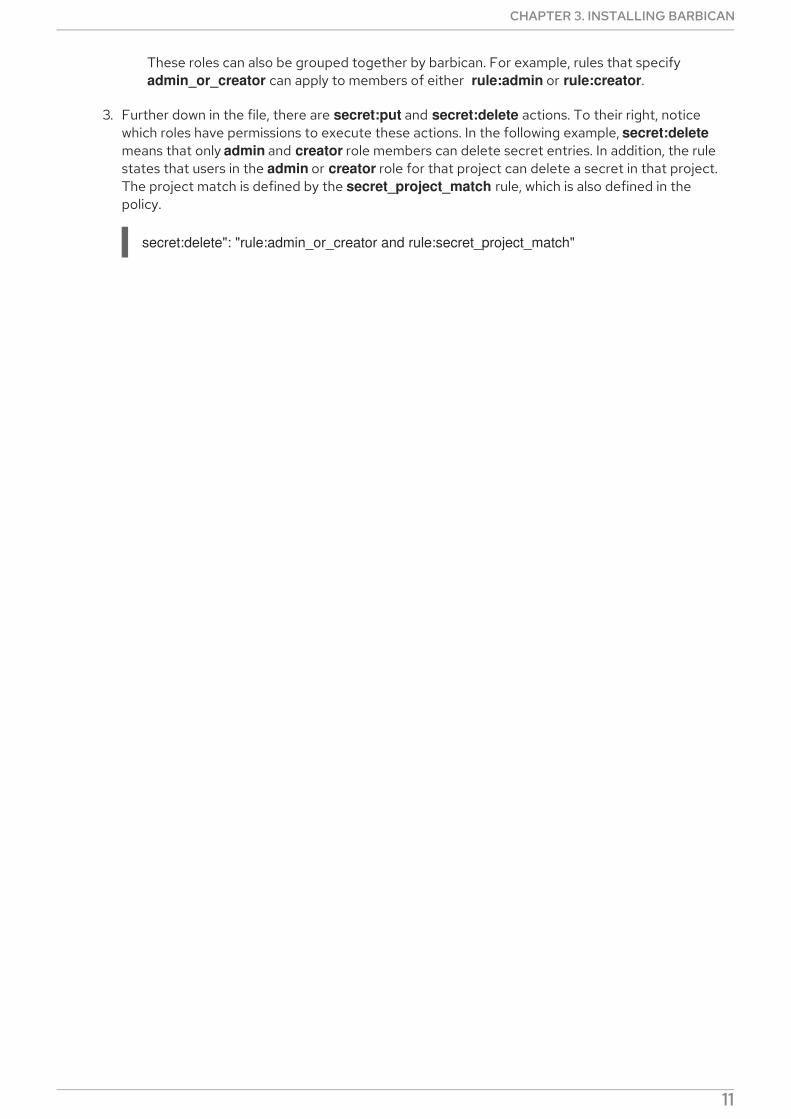
These roles can also be grouped together by barbican. For example, rules that specify admin_or_creator can apply to members of either rule:admin or rule:creator.
3. Further down in the file, there are secret:put and secret:delete actions. To their right, noticewhich roles have permissions to execute these actions. In the following example, secret:deletemeans that only admin and creator role members can delete secret entries. In addition, the rulestates that users in the admin or creator role for that project can delete a secret in that project.The project match is defined by the secret_project_match rule, which is also defined in thepolicy.
secret:delete": "rule:admin_or_creator and rule:secret_project_match"
CHAPTER 3. INSTALLING BARBICAN
11
CHAPTER 4. MANAGING SECRETS IN BARBICAN
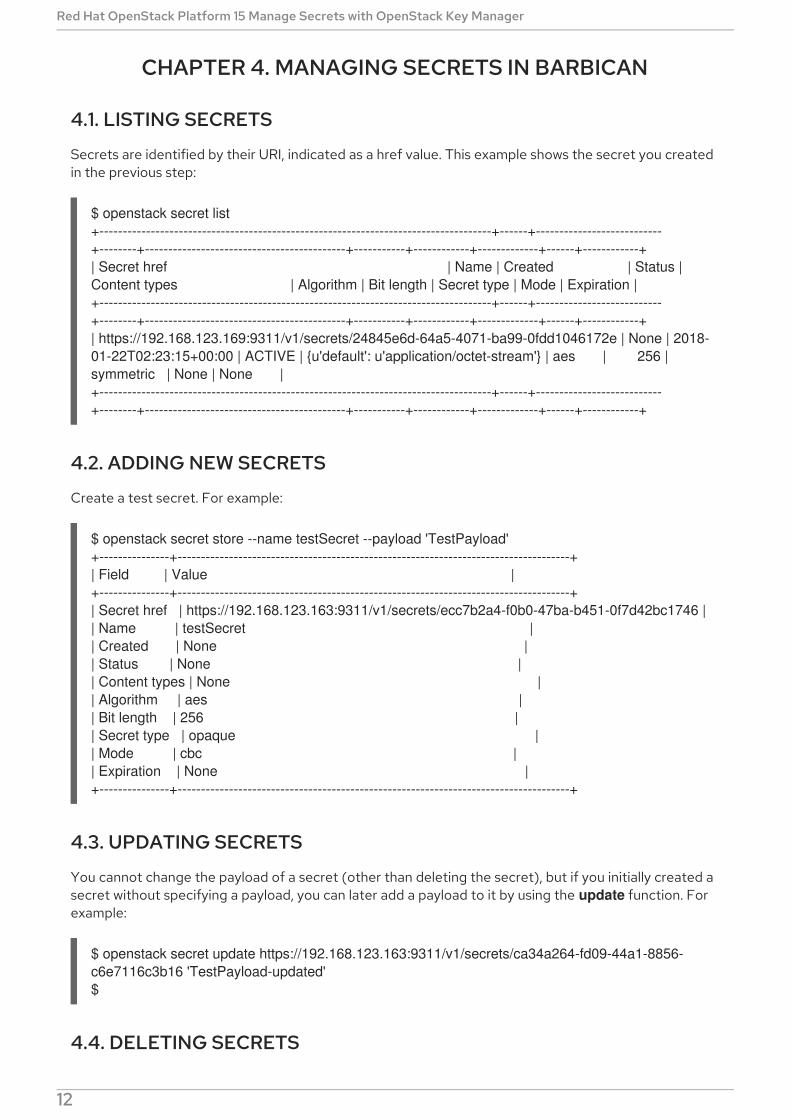
4.1. LISTING SECRETS
Secrets are identified by their URI, indicated as a href value. This example shows the secret you createdin the previous step:
$ openstack secret list+------------------------------------------------------------------------------------+------+---------------------------+--------+-------------------------------------------+-----------+------------+-------------+------+------------+| Secret href | Name | Created | Status | Content types | Algorithm | Bit length | Secret type | Mode | Expiration |+------------------------------------------------------------------------------------+------+---------------------------+--------+-------------------------------------------+-----------+------------+-------------+------+------------+| https://192.168.123.169:9311/v1/secrets/24845e6d-64a5-4071-ba99-0fdd1046172e | None | 2018-01-22T02:23:15+00:00 | ACTIVE | {u'default': u'application/octet-stream'} | aes | 256 | symmetric | None | None |+------------------------------------------------------------------------------------+------+---------------------------+--------+-------------------------------------------+-----------+------------+-------------+------+------------+
4.2. ADDING NEW SECRETS
Create a test secret. For example:
$ openstack secret store --name testSecret --payload 'TestPayload'+---------------+------------------------------------------------------------------------------------+| Field | Value |+---------------+------------------------------------------------------------------------------------+| Secret href | https://192.168.123.163:9311/v1/secrets/ecc7b2a4-f0b0-47ba-b451-0f7d42bc1746 || Name | testSecret || Created | None || Status | None || Content types | None || Algorithm | aes || Bit length | 256 || Secret type | opaque || Mode | cbc || Expiration | None |+---------------+------------------------------------------------------------------------------------+
4.3. UPDATING SECRETS
You cannot change the payload of a secret (other than deleting the secret), but if you initially created asecret without specifying a payload, you can later add a payload to it by using the update function. Forexample:
$ openstack secret update https://192.168.123.163:9311/v1/secrets/ca34a264-fd09-44a1-8856-c6e7116c3b16 'TestPayload-updated'$
4.4. DELETING SECRETS
Red Hat OpenStack Platform 15 Manage Secrets with OpenStack Key Manager
12
You can delete a secret by specifying its URI. For example:
$ openstack secret delete https://192.168.123.163:9311/v1/secrets/ecc7b2a4-f0b0-47ba-b451-0f7d42bc1746$
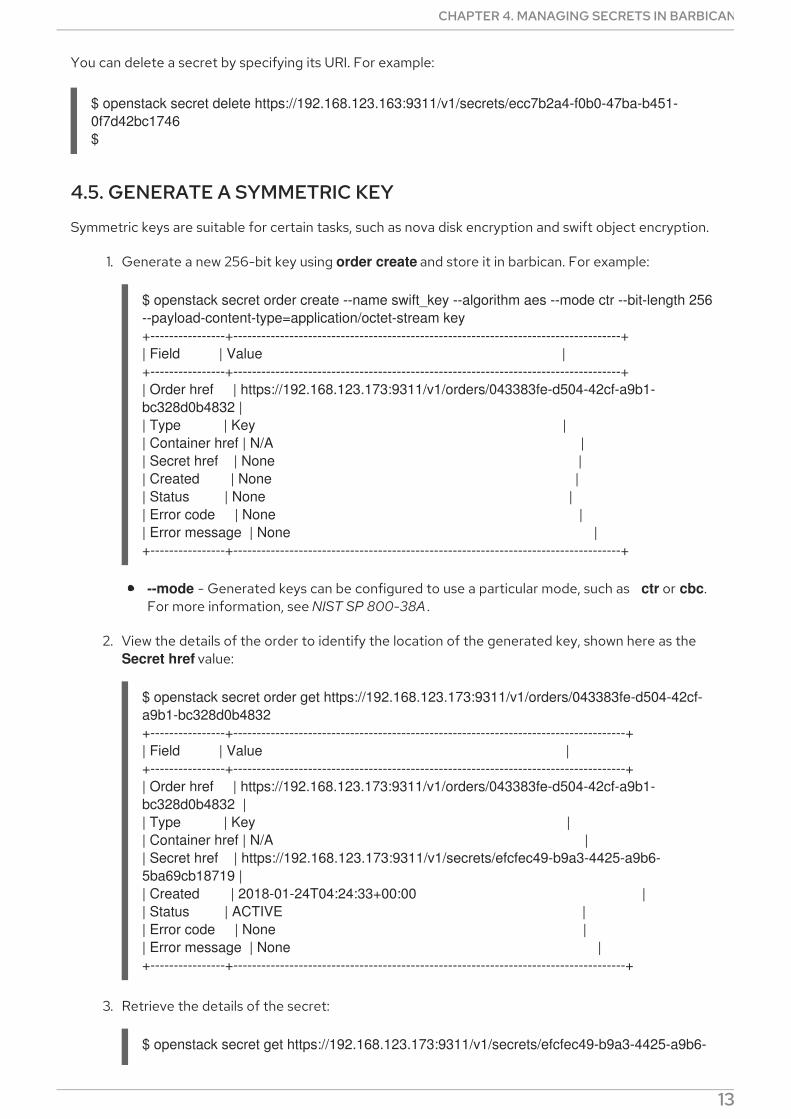
4.5. GENERATE A SYMMETRIC KEY
Symmetric keys are suitable for certain tasks, such as nova disk encryption and swift object encryption.
1. Generate a new 256-bit key using order create and store it in barbican. For example:
$ openstack secret order create --name swift_key --algorithm aes --mode ctr --bit-length 256 --payload-content-type=application/octet-stream key+----------------+-----------------------------------------------------------------------------------+| Field | Value |+----------------+-----------------------------------------------------------------------------------+| Order href | https://192.168.123.173:9311/v1/orders/043383fe-d504-42cf-a9b1-bc328d0b4832 || Type | Key || Container href | N/A || Secret href | None || Created | None || Status | None || Error code | None || Error message | None |+----------------+-----------------------------------------------------------------------------------+
--mode - Generated keys can be configured to use a particular mode, such as ctr or cbc.For more information, see NIST SP 800-38A .
2. View the details of the order to identify the location of the generated key, shown here as the Secret href value:
$ openstack secret order get https://192.168.123.173:9311/v1/orders/043383fe-d504-42cf-a9b1-bc328d0b4832+----------------+------------------------------------------------------------------------------------+| Field | Value |+----------------+------------------------------------------------------------------------------------+| Order href | https://192.168.123.173:9311/v1/orders/043383fe-d504-42cf-a9b1-bc328d0b4832 || Type | Key || Container href | N/A || Secret href | https://192.168.123.173:9311/v1/secrets/efcfec49-b9a3-4425-a9b6-5ba69cb18719 || Created | 2018-01-24T04:24:33+00:00 || Status | ACTIVE || Error code | None || Error message | None |+----------------+------------------------------------------------------------------------------------+
3. Retrieve the details of the secret:
$ openstack secret get https://192.168.123.173:9311/v1/secrets/efcfec49-b9a3-4425-a9b6-
CHAPTER 4. MANAGING SECRETS IN BARBICAN
13
5ba69cb18719+---------------+------------------------------------------------------------------------------------+| Field | Value |+---------------+------------------------------------------------------------------------------------+| Secret href | https://192.168.123.173:9311/v1/secrets/efcfec49-b9a3-4425-a9b6-5ba69cb18719 || Name | swift_key || Created | 2018-01-24T04:24:33+00:00 || Status | ACTIVE || Content types | {u'default': u'application/octet-stream'} || Algorithm | aes || Bit length | 256 || Secret type | symmetric || Mode | ctr || Expiration | None |+---------------+------------------------------------------------------------------------------------+
4.6. BACKUP AND RESTORE KEYS
The process for backup and restore of encryption keys will vary depending on the type of back end:
4.6.1. Backup and restore the simple crypto back end
Two separate components need to be backed up for simple crypto back end: the KEK and the database.It is recommended that you regularly test your backup and restore process.
4.6.1.1. Backup and restore the KEK
For the simple crypto back end, you need to backup the barbican.conf file that contains the masterKEK is written. This file must be backed up to a security hardened location. The actual data is stored inthe Barbican database in an encrypted state, described in the next section.
To restore the key from a backup, you need to copy the restored barbican.conf over theexisting barbican.conf.
4.6.1.2. Backup and restore the back end database
This procedure describes how to backup and restore a barbican database for the simple crypto backend. To demonstrate this, you will generate a key and upload the secrets to barbican. You will thenbackup the barbican database, and delete the secrets you created. You will then restore the databaseand confirm that the secrets you created earlier have been recovered.
NOTE
Be sure you are also backing up the KEK, as this is also an important requirement. This isdescribed in the previous section.
4.6.1.2.1. Create the test secret
1. On the overcloud, generate a new 256-bit key using order create and store it in barbican. Forexample:
(overcloud) [stack@undercloud-0 ~]$ openstack secret order create --name swift_key --algorithm aes --mode ctr --bit-length 256 --payload-content-type=application/octet-stream key
Red Hat OpenStack Platform 15 Manage Secrets with OpenStack Key Manager
14
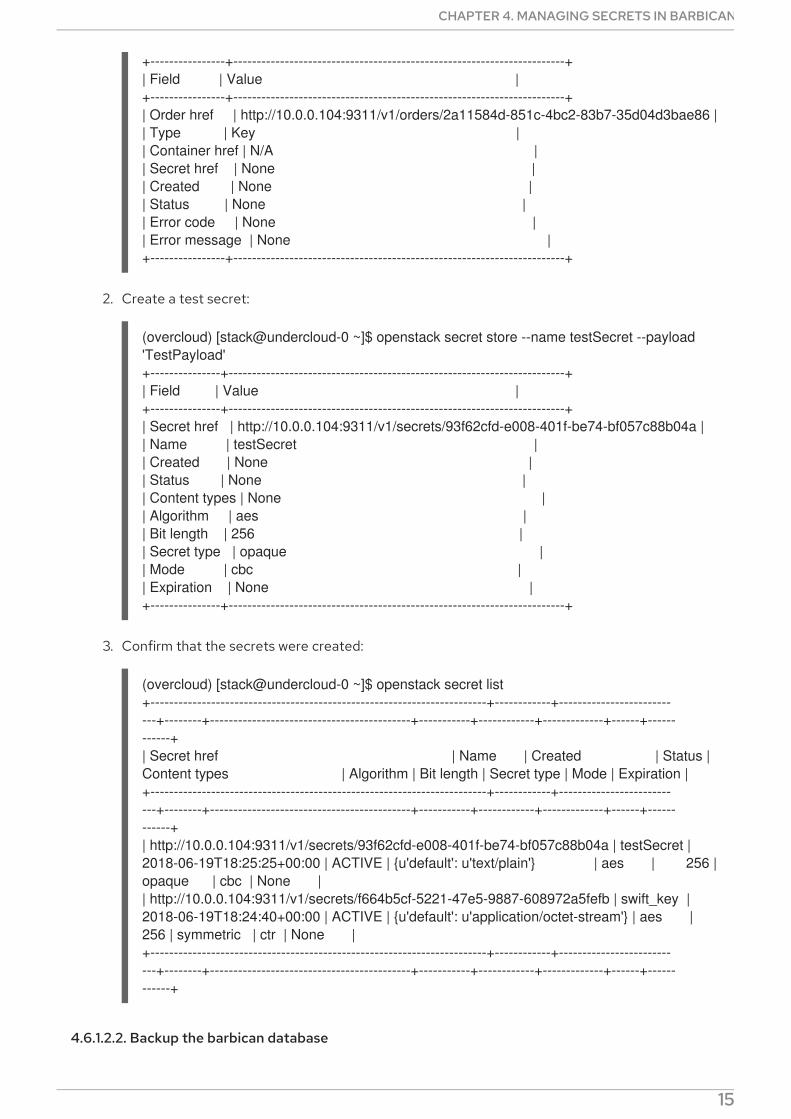
+----------------+-----------------------------------------------------------------------+| Field | Value |+----------------+-----------------------------------------------------------------------+| Order href | http://10.0.0.104:9311/v1/orders/2a11584d-851c-4bc2-83b7-35d04d3bae86 || Type | Key || Container href | N/A || Secret href | None || Created | None || Status | None || Error code | None || Error message | None |+----------------+-----------------------------------------------------------------------+
2. Create a test secret:
(overcloud) [stack@undercloud-0 ~]$ openstack secret store --name testSecret --payload 'TestPayload'+---------------+------------------------------------------------------------------------+| Field | Value |+---------------+------------------------------------------------------------------------+| Secret href | http://10.0.0.104:9311/v1/secrets/93f62cfd-e008-401f-be74-bf057c88b04a || Name | testSecret || Created | None || Status | None || Content types | None || Algorithm | aes || Bit length | 256 || Secret type | opaque || Mode | cbc || Expiration | None |+---------------+------------------------------------------------------------------------+
3. Confirm that the secrets were created:
(overcloud) [stack@undercloud-0 ~]$ openstack secret list+------------------------------------------------------------------------+------------+---------------------------+--------+-------------------------------------------+-----------+------------+-------------+------+------------+| Secret href | Name | Created | Status | Content types | Algorithm | Bit length | Secret type | Mode | Expiration |+------------------------------------------------------------------------+------------+---------------------------+--------+-------------------------------------------+-----------+------------+-------------+------+------------+| http://10.0.0.104:9311/v1/secrets/93f62cfd-e008-401f-be74-bf057c88b04a | testSecret | 2018-06-19T18:25:25+00:00 | ACTIVE | {u'default': u'text/plain'} | aes | 256 | opaque | cbc | None || http://10.0.0.104:9311/v1/secrets/f664b5cf-5221-47e5-9887-608972a5fefb | swift_key | 2018-06-19T18:24:40+00:00 | ACTIVE | {u'default': u'application/octet-stream'} | aes | 256 | symmetric | ctr | None |+------------------------------------------------------------------------+------------+---------------------------+--------+-------------------------------------------+-----------+------------+-------------+------+------------+
4.6.1.2.2. Backup the barbican database
CHAPTER 4. MANAGING SECRETS IN BARBICAN
15
Run these steps while logged in to the controller-0 node.
NOTE
Only the user barbican has access to the barbican database. So the barbican userpassword is required to backup or restore the database.
1. Retrieve barbican user password. For example:
[heat-admin@controller-0 ~]$ sudo grep -r "barbican::db::mysql::password" /etc/puppet/hieradata/etc/puppet/hieradata/service_configs.json: "barbican::db::mysql::password": "seDJRsMNRrBdFryCmNUEFPPev",
2. Backup the barbican database:
[heat-admin@controller-0 ~]$ mysqldump -u barbican -p"seDJRsMNRrBdFryCmNUEFPPev" barbican > barbican_db_backup.sql
3. Database backup is stored in /home/heat-admin
[heat-admin@controller-0 ~]$ lltotal 36-rw-rw-r--. 1 heat-admin heat-admin 36715 Jun 19 18:31 barbican_db_backup.sql
4.6.1.2.3. Delete the test secrets
1. On the overcloud, delete the secrets you created previously, and verify they no longer exist. Forexample:
(overcloud) [stack@undercloud-0 ~]$ openstack secret delete http://10.0.0.104:9311/v1/secrets/93f62cfd-e008-401f-be74-bf057c88b04a(overcloud) [stack@undercloud-0 ~]$ openstack secret delete http://10.0.0.104:9311/v1/secrets/f664b5cf-5221-47e5-9887-608972a5fefb(overcloud) [stack@undercloud-0 ~]$ openstack secret list
(overcloud) [stack@undercloud-0 ~]$
4.6.1.2.4. Restore the databases
Run these steps while logged in to the controller-0 node.
1. Make sure you have the barbican database on the controller which grants access to the barbican user for database restoration:
[heat-admin@controller-0 ~]$ mysql -u barbican -p"seDJRsMNRrBdFryCmNUEFPPev"Welcome to the MariaDB monitor. Commands end with ; or \g.Your MariaDB connection id is 3799Server version: 10.1.20-MariaDB MariaDB Server
Copyright (c) 2000, 2016, Oracle, MariaDB Corporation Ab and others.
Type 'help;' or '\h' for help. Type '\c' to clear the current input statement.
Red Hat OpenStack Platform 15 Manage Secrets with OpenStack Key Manager
16

MariaDB [(none)]> SHOW DATABASES;+--------------------+| Database |+--------------------+| barbican || information_schema |+--------------------+2 rows in set (0.00 sec)
MariaDB [(none)]> exitBye[heat-admin@controller-0 ~]$
2. Restore the backup file to the barbican database:
[heat-admin@controller-0 ~]$ sudo mysql -u barbican -p"seDJRsMNRrBdFryCmNUEFPPev" barbican < barbican_db_backup.sql[heat-admin@controller-0 ~]$
4.6.1.2.5. Verify the restore process
1. On the overcloud, verify that the test secrets were restored successfully:
(overcloud) [stack@undercloud-0 ~]$ openstack secret list+------------------------------------------------------------------------+------------+---------------------------+--------+-------------------------------------------+-----------+------------+-------------+------+------------+| Secret href | Name | Created | Status | Content types | Algorithm | Bit length | Secret type | Mode | Expiration |+------------------------------------------------------------------------+------------+---------------------------+--------+-------------------------------------------+-----------+------------+-------------+------+------------+| http://10.0.0.104:9311/v1/secrets/93f62cfd-e008-401f-be74-bf057c88b04a | testSecret | 2018-06-19T18:25:25+00:00 | ACTIVE | {u'default': u'text/plain'} | aes | 256 | opaque | cbc | None || http://10.0.0.104:9311/v1/secrets/f664b5cf-5221-47e5-9887-608972a5fefb | swift_key | 2018-06-19T18:24:40+00:00 | ACTIVE | {u'default': u'application/octet-stream'} | aes | 256 | symmetric | ctr | None |+------------------------------------------------------------------------+------------+---------------------------+--------+-------------------------------------------+-----------+------------+-------------+------+------------+(overcloud) [stack@undercloud-0 ~]$
CHAPTER 4. MANAGING SECRETS IN BARBICAN
17
CHAPTER 5. BARBICAN HARDWARE SECURITY MODULE(HSM) INTEGRATION
OpenStack Key Manager (Barbican) is the secrets manager for Red Hat OpenStack Platform. You canuse the Barbican API and command line to centrally manage the certificates, keys, and passwords usedby OpenStack services. Barbican currently supports the following use cases described in this guide:
Symmetric encryption keys - used for Block Storage (cinder) volume encryption, ephemeraldisk encryption, Object Storage (Sswift) encryption, among others.
Asymmetric keys and certificates - glance image signing and verification, octavia TLS loadbalancing, among others.
In this release, Barbican offers integration with the Block Storage (cinder), Networking (neutron), andCompute (nova) components.
Red Hat OpenStack Platform 15 Manage Secrets with OpenStack Key Manager
18
5.1. CHOOSING A BACKEND
Secrets (such as certificates, API keys, and passwords) can either be stored as an encrypted blob in the
CHAPTER 5. BARBICAN HARDWARE SECURITY MODULE (HSM) INTEGRATION
19
Secrets (such as certificates, API keys, and passwords) can either be stored as an encrypted blob in theBarbican database, directly in a secure storage system, including a Hardware Security Module (HSM)appliance.
5.2. ENCRYPTED BLOB
The simple crypto plugin is enabled by default and uses a single symmetric key to encrypt the blob ofsecrets. This key is stored in plain text in the barbican.conf file.
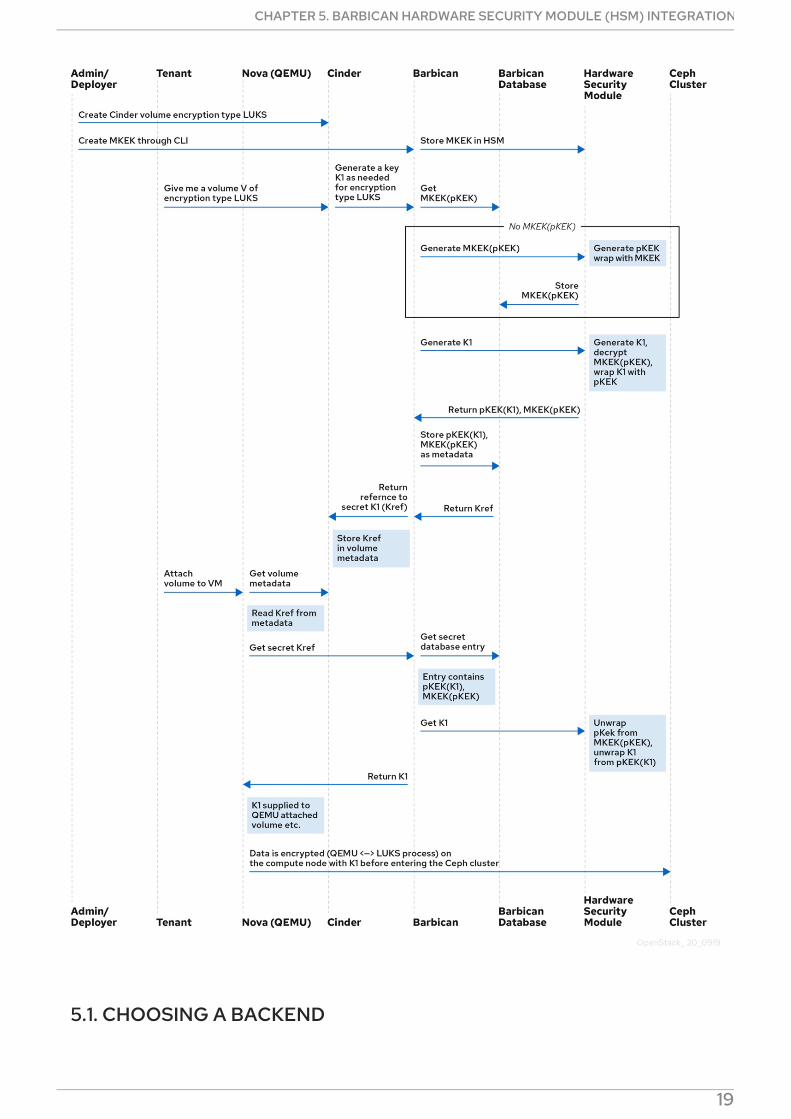
5.3. HARDWARE SECURITY MODULE (HSM) SUPPORT
You can use the PKCS#11 crypto plugin to store the secrets in a Hardware Security Module (HSM), whichare physical rack-mounted appliances produced by third party vendors. These secrets are encryptedusing the pKEK, which in turn is also stored in the Barbican database. The pKEK is encrypted and anHMAC operation is applied using the MKEK and HMAC keys, which are also stored in the HSM.
This guide explains how to integrate Barbican with certain HSM appliances from Atos and nCipher.
You can use the following approaches to interact with an HSM:
PKCS#11 crypto plugin - The PKCS#11 crypto plugin encrypts secrets with project-specific keyencryption keys (KEK), which are stored in the Barbican database. These project-specific KEKsare encrypted by a master KEK. The encrypted blob containing the PKEK also undergoes HMACprocessing by an HMAC key, which is also stored in the HSM. All encryption and decryptionoperations take place in the HSM, rather than in-process memory. The PKCS#11 plugincommunicates with the HSM through the PKCS#11 protocol. Because the encryption isperformed in secure hardware, and a different KEK is used per project, this option is moresecure than the simple crypto plugin.
KMIP plugin - Note that this approach is not supported by Red Hat. The Key ManagementInteroperability Protocol (KMIP) plugin works with devices that have KMIP enabled, such as anHSM. Secrets are stored directly on the device instead of the Barbican database. The plugin canauthenticate to the device either with a username and password or a client certificate stored inthe barbican.conf file.
Red Hat Certificate System (dogtag) - Red Hat Certificate System is a Common Criteria andFIPS certified security framework for managing various aspects of Public Key Infrastructure(PKI). The key recovery authority (KRA) subsystem stores secrets as encrypted blobs in itsdatabase. The master encryption keys are stored in either a software-based Network SecurityServices (NSS) database or an HSM. For more information about Red Hat Certificate System,see Product Documentation for Red Hat Certificate System .
NOTE
Regarding high availability (HA) options: The Barbican service runs within Apache and isconfigured by director to use HAProxy for high availability. Your HA options for thebackend layer will depend on the which backend is used: For example, with simple crypto,all the Barbican instances have the same encryption key in the configuration file, resultingin a simple HA configuration.
5.4. MIGRATING BETWEEN BACKENDS
Barbican allows you to define a different backend for a project. If no mapping exists for a project, thensecrets are stored in the global default backend. This means that multiple backends can be configured,but there must be only one global backend defined. The heat templates supplied for the different
Red Hat OpenStack Platform 15 Manage Secrets with OpenStack Key Manager
20
backends contain the parameters that set each backend as the default.
If you do store secrets in a certain backend and then decide to migrate to a new backend, you can keepthe old backend available while enabling the new backend as the global default (or as a project-specificbackend). As a result, the old secrets remain available through the old backend.
5.5. INTEGRATE WITH AN HSM APPLIANCE
This chapter explains how to integrate your Red Hat OpenStack Platform deployment with certain HSMappliances. It also describes general operational procedures that you will need to consider.
5.6. INTEGRATE BARBICAN WITH AN ATOS HSM
This section explains how to integrate the PKCS#11 backend with your Trustway Proteccio NetHSMappliance.
5.7. REQUIREMENTS
A working Barbican deployment in your Red Hat OpenStack Platform environment.
Plan your HSM integration so that you have the following settings ready for the directordeployment. These values will be entered into barbican-backend-pkcs11-atos.yaml(described in the following section).
BarbicanPkcs11CryptoLogin - the passphrase used by the PKCS#11 library (PIN).
Prior to installation, you must follow the ATOS procedures to generate a client certificatefor the controllers. Host the client certificate, the server certificate, and the Atos client ISOfile on an HTTP or FTP server that is accessible by the overcloud nodes. Some of thismaterial is secret (such as client keys) and must be protected; if you use passwords to dothis, you must provide the location as http://user:pass@location, or ftp://user:pass@location, among other possibilities. During the installation process,director invokes ansible scripts to retrieve these files. The file paths used in the followingvalues must be accessible during the installation process.
atos_client_iso_location
atos_client_cert_location
atos_client_key_location
atos_server_cert_location
atos_client_working_dir
atos_client_iso_name
atos_hsm_ip_address
5.8. CONFIGURE THE CONTROLLER
This procedure uses an Ansible role to download and install the Atos client software on the controller,and then modifies the Atos configuration file to include to the predefined HSM IP and credentials.
1. Create an environment file in OVERCLOUD_TEMPLATES named barbican-backend-pkcs11-
CHAPTER 5. BARBICAN HARDWARE SECURITY MODULE (HSM) INTEGRATION
21
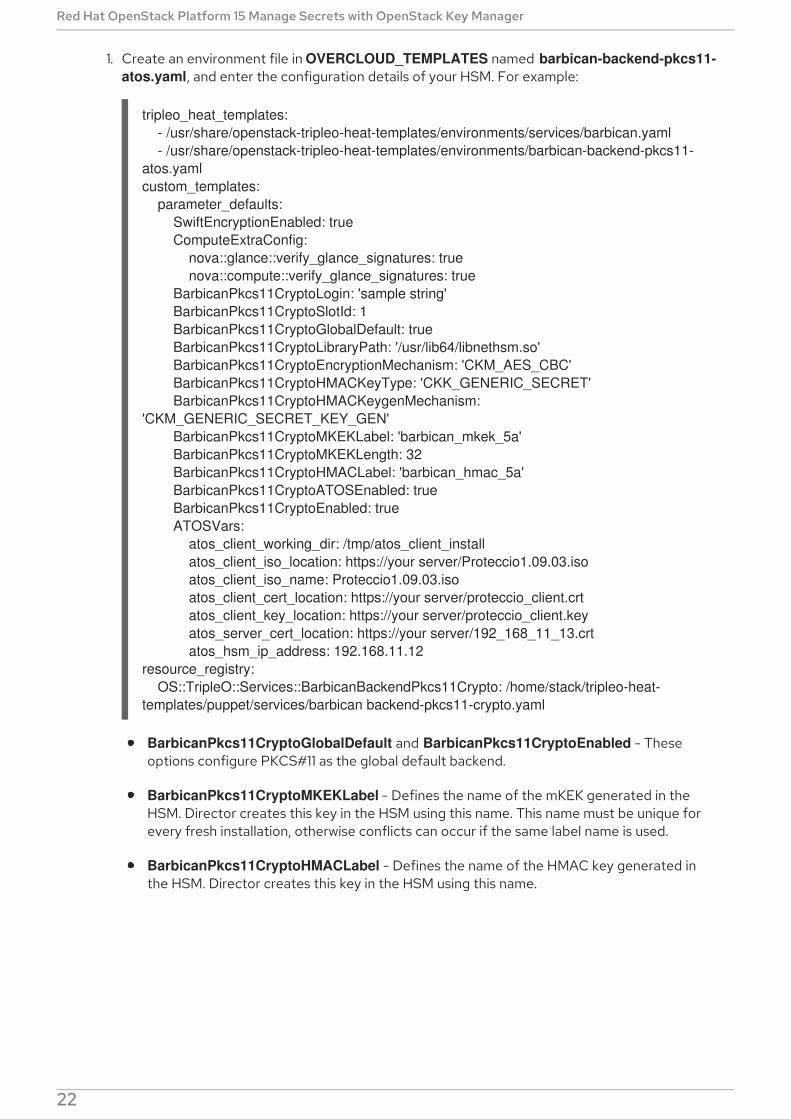
1. Create an environment file in OVERCLOUD_TEMPLATES named barbican-backend-pkcs11-atos.yaml, and enter the configuration details of your HSM. For example:
tripleo_heat_templates: - /usr/share/openstack-tripleo-heat-templates/environments/services/barbican.yaml - /usr/share/openstack-tripleo-heat-templates/environments/barbican-backend-pkcs11-atos.yamlcustom_templates: parameter_defaults: SwiftEncryptionEnabled: true ComputeExtraConfig: nova::glance::verify_glance_signatures: true nova::compute::verify_glance_signatures: true BarbicanPkcs11CryptoLogin: 'sample string' BarbicanPkcs11CryptoSlotId: 1 BarbicanPkcs11CryptoGlobalDefault: true BarbicanPkcs11CryptoLibraryPath: '/usr/lib64/libnethsm.so' BarbicanPkcs11CryptoEncryptionMechanism: 'CKM_AES_CBC' BarbicanPkcs11CryptoHMACKeyType: 'CKK_GENERIC_SECRET' BarbicanPkcs11CryptoHMACKeygenMechanism: 'CKM_GENERIC_SECRET_KEY_GEN' BarbicanPkcs11CryptoMKEKLabel: 'barbican_mkek_5a' BarbicanPkcs11CryptoMKEKLength: 32 BarbicanPkcs11CryptoHMACLabel: 'barbican_hmac_5a' BarbicanPkcs11CryptoATOSEnabled: true BarbicanPkcs11CryptoEnabled: true ATOSVars: atos_client_working_dir: /tmp/atos_client_install atos_client_iso_location: https://your server/Proteccio1.09.03.iso atos_client_iso_name: Proteccio1.09.03.iso atos_client_cert_location: https://your server/proteccio_client.crt atos_client_key_location: https://your server/proteccio_client.key atos_server_cert_location: https://your server/192_168_11_13.crt atos_hsm_ip_address: 192.168.11.12resource_registry: OS::TripleO::Services::BarbicanBackendPkcs11Crypto: /home/stack/tripleo-heat-templates/puppet/services/barbican backend-pkcs11-crypto.yaml
BarbicanPkcs11CryptoGlobalDefault and BarbicanPkcs11CryptoEnabled - Theseoptions configure PKCS#11 as the global default backend.
BarbicanPkcs11CryptoMKEKLabel - Defines the name of the mKEK generated in theHSM. Director creates this key in the HSM using this name. This name must be unique forevery fresh installation, otherwise conflicts can occur if the same label name is used.
BarbicanPkcs11CryptoHMACLabel - Defines the name of the HMAC key generated inthe HSM. Director creates this key in the HSM using this name.
NOTE
Red Hat OpenStack Platform 15 Manage Secrets with OpenStack Key Manager
22

NOTE
By default, the HSM allows a maximum of 32 concurrent connections. If thisnumber is exceeded, you can expect to receive a memory error from thePKCS#11 client. You can calculate the number of connections as follows:
Each controller has one barbican-api and one barbican-worker process.
Each Barbican API process is executed with N Apache workers - (where N defaults to the number of CPUs).
Each worker has one connection to the HSM.
BarbicanWorkers - Each barbican-worker process has one connection to thedatabase; this setting lets you define the number of Apache workers per APIprocess. By default, it matches the CPU count. This setting configures barbican::wsgi::apache::workers. The number of Barbican workers iscontrolled by the parameter queue/asynchronous_workers in barbican.conf, which defaults to 1. Currently there is no tripleO parameterto manage this value.
For example, if you have three controllers, each with 32 cores, then eachcontroller’s Barbican API uses 32 Apache workers (because BarbicanWorkers will default to 32). Consequently, one controllerconsumes all 32 HSM connections available. To avoid this contention, limitthe number of Barbican Apache workers configured for each node. In thisexample, setting BarbicanWorkers to 10 will allow all three controllers tomake ten concurrent connections each to the HSM.
2. Execute the script by adding the path to your existing openstack overcloud deploy command,and re-running it.
5.8.1. Test your HSM connection
1. Create a test secret. For example:
$ openstack secret store --name testSecret --payload 'TestPayload'+---------------+------------------------------------------------------------------------------------+| Field | Value |+---------------+------------------------------------------------------------------------------------+| Secret href | https://192.168.123.163/key-manager/v1/secrets/4cc5ffe0-eea2-449d-9e64-b664d574be53 || Name | testSecret || Created | None || Status | None || Content types | None || Algorithm | aes || Bit length | 256 || Secret type | opaque || Mode | cbc || Expiration | None |+---------------+------------------------------------------------------------------------------------+
2. Retrieve the payload for the secret you just created:
CHAPTER 5. BARBICAN HARDWARE SECURITY MODULE (HSM) INTEGRATION
23
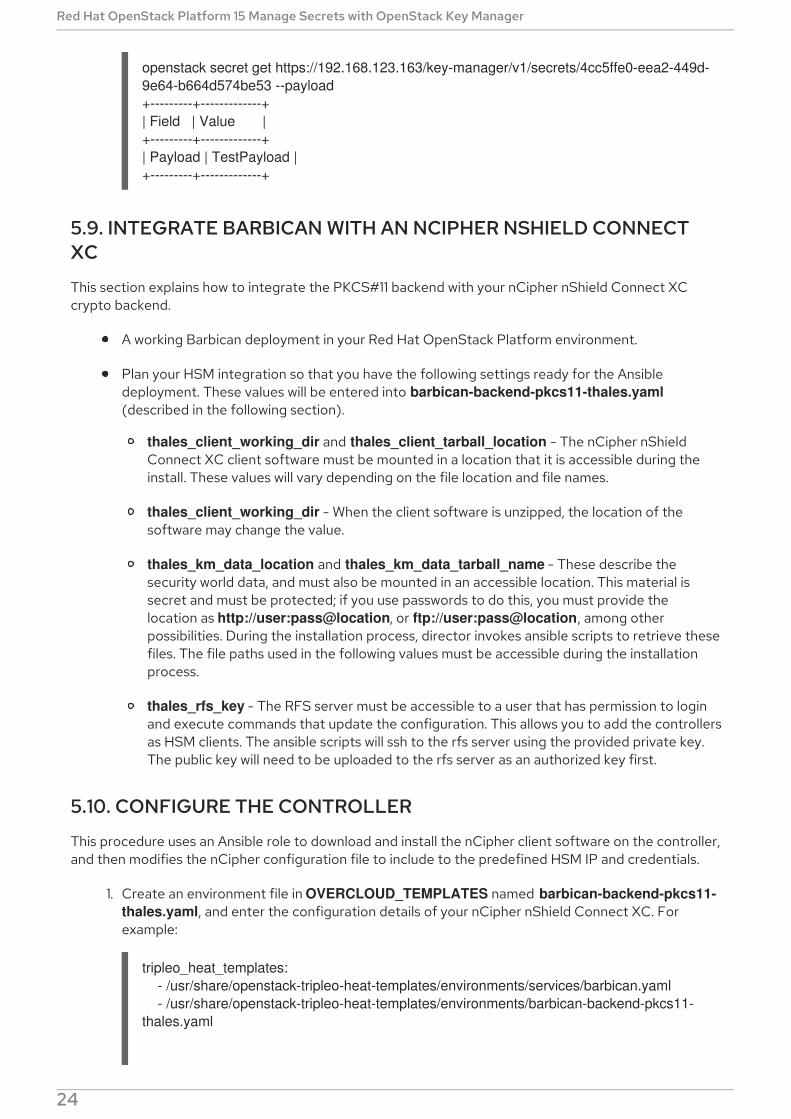
openstack secret get https://192.168.123.163/key-manager/v1/secrets/4cc5ffe0-eea2-449d-9e64-b664d574be53 --payload+---------+-------------+| Field | Value |+---------+-------------+| Payload | TestPayload |+---------+-------------+
5.9. INTEGRATE BARBICAN WITH AN NCIPHER NSHIELD CONNECTXC
This section explains how to integrate the PKCS#11 backend with your nCipher nShield Connect XCcrypto backend.
A working Barbican deployment in your Red Hat OpenStack Platform environment.
Plan your HSM integration so that you have the following settings ready for the Ansibledeployment. These values will be entered into barbican-backend-pkcs11-thales.yaml(described in the following section).
thales_client_working_dir and thales_client_tarball_location - The nCipher nShieldConnect XC client software must be mounted in a location that it is accessible during theinstall. These values will vary depending on the file location and file names.
thales_client_working_dir - When the client software is unzipped, the location of thesoftware may change the value.
thales_km_data_location and thales_km_data_tarball_name - These describe thesecurity world data, and must also be mounted in an accessible location. This material issecret and must be protected; if you use passwords to do this, you must provide thelocation as http://user:pass@location, or ftp://user:pass@location, among otherpossibilities. During the installation process, director invokes ansible scripts to retrieve thesefiles. The file paths used in the following values must be accessible during the installationprocess.
thales_rfs_key - The RFS server must be accessible to a user that has permission to loginand execute commands that update the configuration. This allows you to add the controllersas HSM clients. The ansible scripts will ssh to the rfs server using the provided private key.The public key will need to be uploaded to the rfs server as an authorized key first.
5.10. CONFIGURE THE CONTROLLER
This procedure uses an Ansible role to download and install the nCipher client software on the controller,and then modifies the nCipher configuration file to include to the predefined HSM IP and credentials.
1. Create an environment file in OVERCLOUD_TEMPLATES named barbican-backend-pkcs11-thales.yaml, and enter the configuration details of your nCipher nShield Connect XC. Forexample:
tripleo_heat_templates: - /usr/share/openstack-tripleo-heat-templates/environments/services/barbican.yaml - /usr/share/openstack-tripleo-heat-templates/environments/barbican-backend-pkcs11-thales.yaml
Red Hat OpenStack Platform 15 Manage Secrets with OpenStack Key Manager
24

custom_templates: parameter_defaults: SwiftEncryptionEnabled: true ComputeExtraConfig: nova::glance::verify_glance_signatures: true nova::compute::verify_glance_signatures: true BarbicanPkcs11CryptoLogin: 'sample string' BarbicanPkcs11CryptoSlotId: '492971158' BarbicanPkcs11CryptoGlobalDefault: true BarbicanPkcs11CryptoLibraryPath: '/opt/nfast/toolkits/pkcs11/libcknfast.so' BarbicanPkcs11CryptoEncryptionMechanism: 'CKM_AES_CBC' BarbicanPkcs11CryptoHMACKeyType: 'CKK_SHA256_HMAC' BarbicanPkcs11CryptoHMACKeygenMechanism: 'CKM_NC_SHA256_HMAC_KEY_GEN' BarbicanPkcs11CryptoMKEKLabel: 'barbican_mkek_10' BarbicanPkcs11CryptoMKEKLength: '32' BarbicanPkcs11CryptoHMACLabel: 'barbican_hmac_10' BarbicanPkcs11CryptoThalesEnabled: true BarbicanPkcs11CryptoEnabled: true ThalesVars: thales_client_working_dir: /tmp/thales_client_install thales_client_tarball_location: https://your server/CipherTools-linux64-dev-12.40.2.tgz thales_client_tarball_name: CipherTools-linux64-dev-12.40.2.tgz thales_client_path: linux/libc6_11/amd64/nfast thales_client_uid: 42481 thales_client_gid: 42481 thales_km_data_location: https://your server/kmdata_post_card_creation.tar.gz thales_km_data_tarball_name: kmdata_post_card_creation.tar.gz thales_hsm_ip_address: 192.168.10.10 thales_rfs_server_ip_address: 192.168.10.11 thales_hsm_config_location: hsm-C90E-02E0-D947 thales_rfs_user: root thales_rfs_key: | -----BEGIN RSA PRIVATE KEY-----Sample private key-----END RSA PRIVATE KEY-----
resource_registry: OS::TripleO::Services::BarbicanBackendPkcs11Crypto: /home/stack/tripleo-heat-templates/puppet/services/barbican-backend-pkcs11-crypto.yaml
BarbicanPkcs11CryptoGlobalDefault and BarbicanPkcs11CryptoEnabled - Theseoptions configure PKCS#11 as the global default backend.
BarbicanPkcs11CryptoMKEKLabel - Defines the name of the mKEK generated in theHSM. Director creates this key in the HSM using this name.
BarbicanPkcs11CryptoHMACLabel - Defines the name of the HMAC key generated inthe HSM. Director creates this key in the HSM using this name.
1. Execute the script by adding the path to your existing openstack overcloud deploycommand, and re-running it.
5.10.1. Test your HSM connection
1. Create a test secret. For example:
CHAPTER 5. BARBICAN HARDWARE SECURITY MODULE (HSM) INTEGRATION
25

$ openstack secret store --name testSecret --payload 'TestPayload'+---------------+------------------------------------------------------------------------------------+| Field | Value |+---------------+------------------------------------------------------------------------------------+| Secret href | https://192.168.123.163/key-manager/v1/secrets/4cc5ffe0-eea2-449d-9e64-b664d574be53 || Name | testSecret || Created | None || Status | None || Content types | None || Algorithm | aes || Bit length | 256 || Secret type | opaque || Mode | cbc || Expiration | None |+---------------+------------------------------------------------------------------------------------+
2. Retrieve the payload for the secret you just created:
openstack secret get https://192.168.123.163/key-manager/v1/secrets/4cc5ffe0-eea2-449d-9e64-b664d574be53 --payload+---------+-------------+| Field | Value |+---------+-------------+| Payload | TestPayload |+---------+-------------+
5.11. REVIEW TLS ACTIVITY BETWEEN BARBICAN AND THE HSM
Barbican communicates with the HSM through the vendor-provided PKCS#11 library. For example, foran ATOS Proteccio HSM, you can configure the HSM client to communicate with the HSM using TLS byconfiguring the proteccio.rc file.
For the Atos HSM, the files containing the CA, server certificate, and key are located on the controller,and are owned by the barbican user. Note that the barbican user does not exist on the controller, and isthe barbican user as defined in the Barbican container. As a result, this is indicated in the file as anumerical identifier. The files should be readable for the barbican user (0400); these files are then bindmounted by the Barbican container.
For the nCipher nShield Connect XC, to view additional logs on the pkcs#11 transactions between theHSM and the client software, add the following entries to /opt/nfast/cknfastrc:
CKNFAST_DEBUG=9CKNFAST_DEBUGFILE=/tmp/hsm_log.txt
5.12. KEY STORAGE CONSIDERATIONS
The Barbican MKEK and HMAC keys are generated using Barbican utilities that communicate with theHSM using the vendor’s PKCS#11 library. Therefore the MKEK and HMAC keys are generated in the HSMand never leave the HSM.
In a director-based deployment, these utilities are executed within containers on the first controller; theundercloud is never involved in this process.
Red Hat OpenStack Platform 15 Manage Secrets with OpenStack Key Manager
26

5.13. ROTATING THE KEYS
You can rotate the MKEK and HMAC keys using a director update.
NOTE
The MKEK and HMAC have the same key type. This is a limitation in Barbican, and iscurrently expected to be addressed at a later time.
1. To rotate the keys, add the following parameter to your deployment environment files:
BarbicanPkcs11CryptoRewrapKeys: true
2. Change the labels on the MKEK and HMAC keys For example, if your labels are similar to these:
BarbicanPkcs11CryptoMKEKLabel: 'barbican_mkek_10' BarbicanPkcs11CryptoHMACLabel: 'barbican_hmac_10'
You can change the labels by incrementing the values:
BarbicanPkcs11CryptoMKEKLabel: 'barbican_mkek_11' BarbicanPkcs11CryptoHMACLabel: 'barbican_hmac_11'
NOTE
Do not change the HMAC key type.
3. Re-deploy using director to apply the update. Director checks whether the keys that are labelledfor the MKEK and HMAC exist, and then creates them. In addition, with the BarbicanPkcs11CryptoRewrapKeys parameter set to True, director calls barbican-manage hsm pkek_rewrap to rewrap all existing pKEKs.
5.14. PLANNING BACKUP FOR BARBICAN AND THE HSM
The section describes the components you will need to consider when planning your Barbican and HSMbackup strategy.
Barbican secrets - These are stored in the database, and must be backed up regularly.
MKEK and HMAC keys - These are stored in the HSM. Check with your HSM vendor forrecommended practices.
HSM client certificates and keys - These are located on the controller, and must be included inyour controller’s file backup procedure. Note that these files are sensitive credentials.
Barbican configuration files
CHAPTER 5. BARBICAN HARDWARE SECURITY MODULE (HSM) INTEGRATION
27
CHAPTER 6. ENCRYPTING CINDER VOLUMESYou can use barbican to manage your Block Storage (cinder) encryption keys. This configuration usesLUKS to encrypt the disks attached to your instances, including boot disks. Key management istransparent to the user; when you create a new volume using luks as the encryption type, cindergenerates a symmetric key secret for the volume and stores it in barbican. When booting the instance(or attaching an encrypted volume), nova retrieves the key from barbican and stores the secret locallyas a Libvirt secret on the Compute node.
IMPORTANT
Nova formats encrypted volumes during their first use if they are unencrypted. Theresulting block device is then presented to the Compute node.
NOTE
If you intend to update any configuration files, be aware that certain OpenStack servicesnow run within containers; this applies to keystone, nova, and cinder, among others. As aresult, there are administration practices to consider:
Do not update any configuration file you might find on the physical node’s hostoperating system, for example, /etc/cinder/cinder.conf. The containerizedservice does not reference this file.
Do not update the configuration file running within the container. Changes arelost once you restart the container.Instead, if you must change containerized services, update the configuration filein /var/lib/config-data/puppet-generated/, which is used to generate thecontainer.
For example:
keystone: /var/lib/config-data/puppet-generated/keystone/etc/keystone/keystone.conf
cinder: /var/lib/config-data/puppet-generated/cinder/etc/cinder/cinder.conf
nova: /var/lib/config-data/puppet-generated/nova/etc/nova/nova.confChanges are applied after you restart the container.
1. On nodes running the cinder-volume and nova-compute services, confirm that nova andcinder are both configured to use barbican for key management:
$ crudini --get /var/lib/config-data/puppet-generated/cinder/etc/cinder/cinder.conf key_manager backendcastellan.key_manager.barbican_key_manager.BarbicanKeyManager
$ crudini --get /var/lib/config-data/puppet-generated/nova_libvirt/etc/nova/nova.conf key_manager backendcastellan.key_manager.barbican_key_manager.BarbicanKeyManager
2. Create a volume template that uses encryption. When you create new volumes they can bemodeled off the settings you define here:
Red Hat OpenStack Platform 15 Manage Secrets with OpenStack Key Manager
28
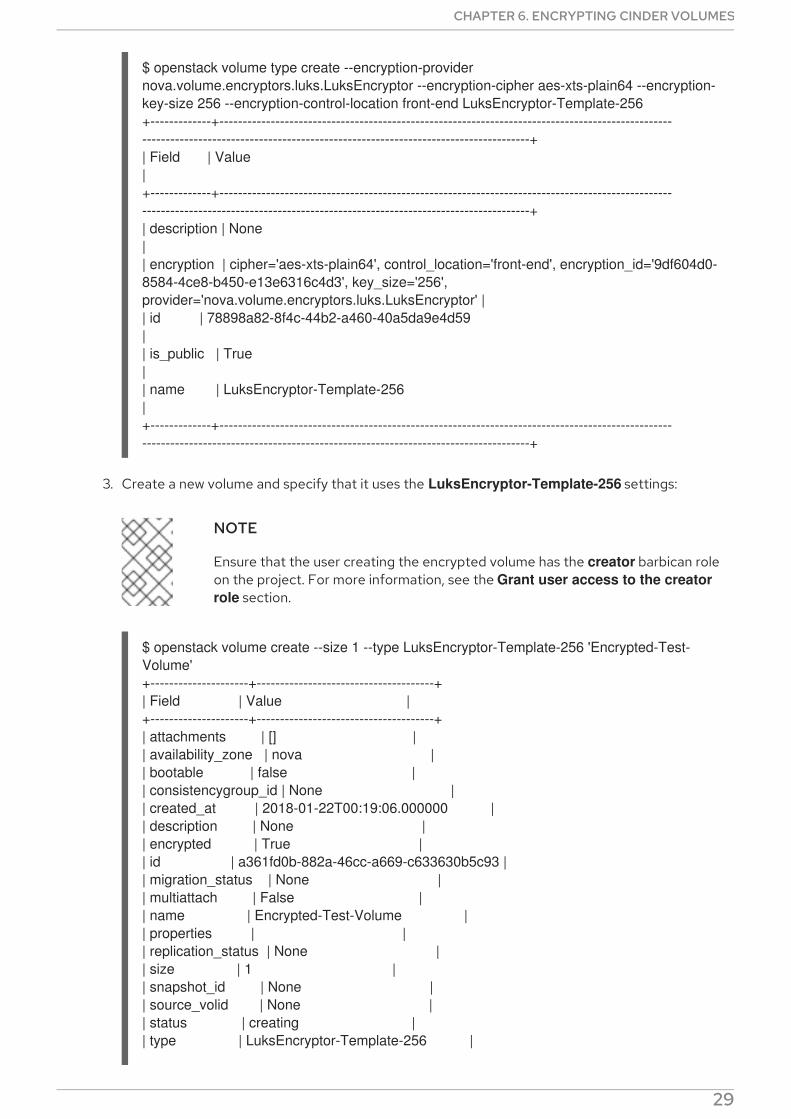
$ openstack volume type create --encryption-provider nova.volume.encryptors.luks.LuksEncryptor --encryption-cipher aes-xts-plain64 --encryption-key-size 256 --encryption-control-location front-end LuksEncryptor-Template-256+-------------+------------------------------------------------------------------------------------------------------------------------------------------------------------------------------------+| Field | Value |+-------------+------------------------------------------------------------------------------------------------------------------------------------------------------------------------------------+| description | None || encryption | cipher='aes-xts-plain64', control_location='front-end', encryption_id='9df604d0-8584-4ce8-b450-e13e6316c4d3', key_size='256', provider='nova.volume.encryptors.luks.LuksEncryptor' || id | 78898a82-8f4c-44b2-a460-40a5da9e4d59 || is_public | True || name | LuksEncryptor-Template-256 |+-------------+------------------------------------------------------------------------------------------------------------------------------------------------------------------------------------+
3. Create a new volume and specify that it uses the LuksEncryptor-Template-256 settings:
NOTE
Ensure that the user creating the encrypted volume has the creator barbican roleon the project. For more information, see the Grant user access to the creator role section.
$ openstack volume create --size 1 --type LuksEncryptor-Template-256 'Encrypted-Test-Volume'+---------------------+--------------------------------------+| Field | Value |+---------------------+--------------------------------------+| attachments | [] || availability_zone | nova || bootable | false || consistencygroup_id | None || created_at | 2018-01-22T00:19:06.000000 || description | None || encrypted | True || id | a361fd0b-882a-46cc-a669-c633630b5c93 || migration_status | None || multiattach | False || name | Encrypted-Test-Volume || properties | || replication_status | None || size | 1 || snapshot_id | None || source_volid | None || status | creating || type | LuksEncryptor-Template-256 |
CHAPTER 6. ENCRYPTING CINDER VOLUMES
29
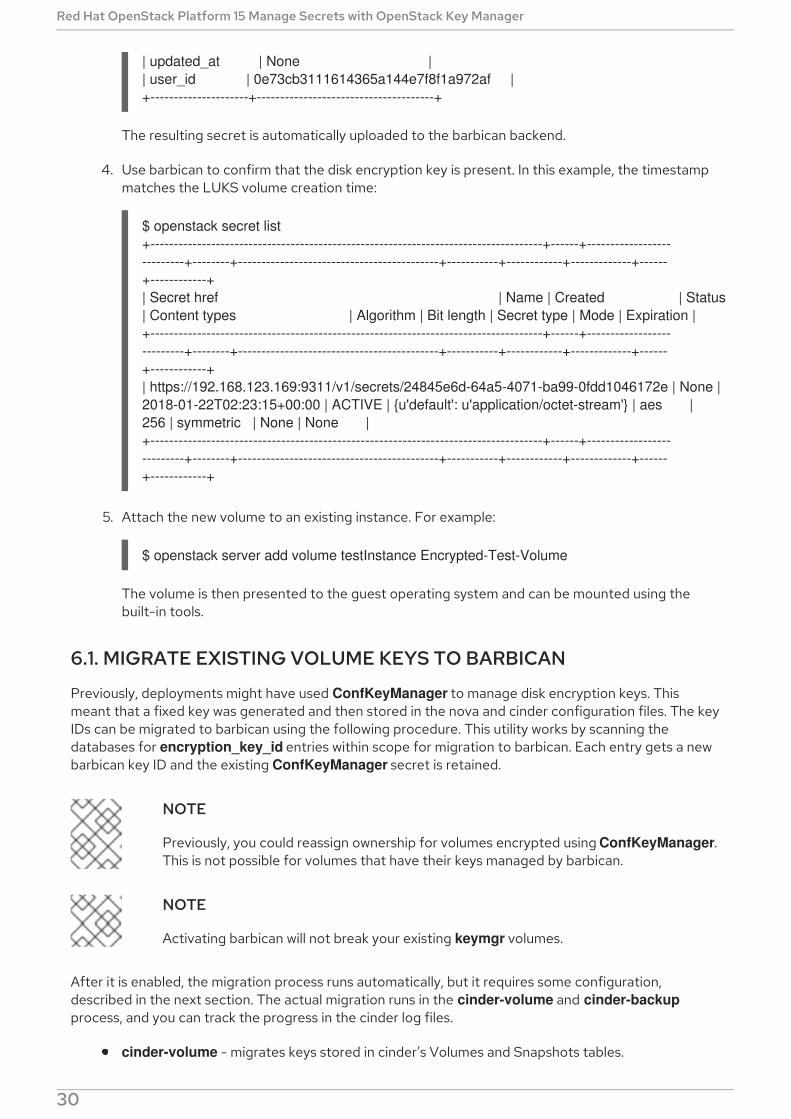
| updated_at | None || user_id | 0e73cb3111614365a144e7f8f1a972af |+---------------------+--------------------------------------+
The resulting secret is automatically uploaded to the barbican backend.
4. Use barbican to confirm that the disk encryption key is present. In this example, the timestampmatches the LUKS volume creation time:
$ openstack secret list+------------------------------------------------------------------------------------+------+---------------------------+--------+-------------------------------------------+-----------+------------+-------------+------+------------+| Secret href | Name | Created | Status | Content types | Algorithm | Bit length | Secret type | Mode | Expiration |+------------------------------------------------------------------------------------+------+---------------------------+--------+-------------------------------------------+-----------+------------+-------------+------+------------+| https://192.168.123.169:9311/v1/secrets/24845e6d-64a5-4071-ba99-0fdd1046172e | None | 2018-01-22T02:23:15+00:00 | ACTIVE | {u'default': u'application/octet-stream'} | aes | 256 | symmetric | None | None |+------------------------------------------------------------------------------------+------+---------------------------+--------+-------------------------------------------+-----------+------------+-------------+------+------------+
5. Attach the new volume to an existing instance. For example:
$ openstack server add volume testInstance Encrypted-Test-Volume
The volume is then presented to the guest operating system and can be mounted using thebuilt-in tools.
6.1. MIGRATE EXISTING VOLUME KEYS TO BARBICAN
Previously, deployments might have used ConfKeyManager to manage disk encryption keys. Thismeant that a fixed key was generated and then stored in the nova and cinder configuration files. The keyIDs can be migrated to barbican using the following procedure. This utility works by scanning thedatabases for encryption_key_id entries within scope for migration to barbican. Each entry gets a newbarbican key ID and the existing ConfKeyManager secret is retained.
NOTE
Previously, you could reassign ownership for volumes encrypted using ConfKeyManager.This is not possible for volumes that have their keys managed by barbican.
NOTE
Activating barbican will not break your existing keymgr volumes.
After it is enabled, the migration process runs automatically, but it requires some configuration,described in the next section. The actual migration runs in the cinder-volume and cinder-backupprocess, and you can track the progress in the cinder log files.
cinder-volume - migrates keys stored in cinder’s Volumes and Snapshots tables.
Red Hat OpenStack Platform 15 Manage Secrets with OpenStack Key Manager
30
cinder-backup - migrates keys in the Backups table.
6.1.1. Overview of the migration steps
1. Deploy the barbican service.
2. Add the creator role to the cinder service. For example:
#openstack role create creator#openstack role add --user cinder creator --project service
3. Restart the cinder-volume and cinder-backup services.
4. cinder-volume and cinder-backup automatically begin the migration process.
5. Monitor the logs for the message indicating migration has finished and check that no morevolumes are using the ConfKeyManager all-zeros encryption key ID.
6. Remove the fixed_key option from cinder.conf and nova.conf. You must determine whichnodes have this setting configured.
7. Remove the creator role from the cinder service.
6.1.2. Behavioral differences
Barbican-managed encrypted volumes behave differently than volumes that use ConfKeyManager:
You cannot transfer ownership of encrypted volumes, because it is not currently possible totransfer ownership of the barbican secret.
Barbican is more restrictive about who is allowed to read and delete secrets, which can affectsome cinder volume operations. For example, a user cannot attach, detach, or delete a differentuser’s volumes.
6.1.3. Reviewing the migration process
This section describes how you can view the status of the migration tasks. After you start the process,one of these entries appears in the logs. This indicates whether the migration started correctly, or itidentifies the issue it encountered:
Not migrating encryption keys because the ConfKeyManager is still in use.
Not migrating encryption keys because the ConfKeyManager's fixed_key is not in use.
Not migrating encryption keys because migration to the 'XXX' key_manager backend is not supported. - This message is unlikely to appear; it is a safety check to handle the code everencountering another Key Manager backend other than barbican. This is because the code onlysupports one migration scenario: From ConfKeyManager to barbican.
Not migrating encryption keys because there are no volumes associated with this host. -This may occur when cinder-volume is running on multiple hosts, and a particular host has novolumes associated with it. This arises because every host is responsible for handling its ownvolumes.
Starting migration of ConfKeyManager keys.
CHAPTER 6. ENCRYPTING CINDER VOLUMES
31
Migrating volume <UUID> encryption key to Barbican - During migration, all of the host’svolumes are examined, and if a volume is still using the ConfKeyManager’s key ID (identified bythe fact that it’s all zeros (00000000-0000-0000-0000-000000000000)), then this messageappears.
For cinder-backup, this message uses slightly different capitalization: Migrating Volume [...] or Migrating Backup [...]
After each host examines all of its volumes, the host displays a summary status message:
`No volumes are using the ConfKeyManager's encryption_key_id.``No backups are known to be using the ConfKeyManager's encryption_key_id.`
You may also see the following entries:
There are still %d volume(s) using the ConfKeyManager's all-zeros encryption key ID.There are still %d backup(s) using the ConfKeyManager’s all-zeros encryption key ID.Note that both of these messages can appear in the cinder-volume and cinder-backup logs.Whereas each service only handles the migration of its own entries, the service is aware of thethe other’s status. As a result, cinder-volume knows if cinder-backup still has backups tomigrate, and cinder-backup knows if the cinder-volume service has volumes to migrate.
Although each host migrates only its own volumes, the summary message is based on a globalassessment of whether any volume still requires migration This allows you to confirm thatmigration for all volumes is complete. Once you receive confirmation, remove the fixed_keysetting from cinder.conf and nova.conf. See the Clean up the fixed keys section below formore information.
6.1.4. Troubleshooting the migration process
6.1.4.1. Role assignment
The barbican secret can only be created when the requestor has the creator role. This means that thecinder service itself requires the creator role, otherwise a log sequence similar to this will occur:
1. Starting migration of ConfKeyManager keys.
2. Migrating volume <UUID> encryption key to Barbican
3. Error migrating encryption key: Forbidden: Secret creation attempt not allowed - please review your user/project privileges
4. There are still %d volume(s) using the ConfKeyManager's all-zeros encryption key ID.
The key message is the third one: Secret creation attempt not allowed. To fix the problem, update the cinder account’s privileges:
1. Run openstack role add --project service --user cinder creator
2. Restart the cinder-volume and cinder-backup services.
As a result, the next attempt at migration should succeed.
6.1.5. Clean up the fixed keys
IMPORTANT
Red Hat OpenStack Platform 15 Manage Secrets with OpenStack Key Manager
32
IMPORTANT
The encryption_key_id was only recently added to the Backup table, as part of theQueens release. As a result, pre-existing backups of encrypted volumes are likely to exist.The all-zeros encryption_key_id is stored on the backup itself, but it won’t appear in the Backup database. As such, it is impossible for the migration process to know for certainwhether a backup of an encrypted volume exists that still relies on the all-zeros ConfKeyMgr key ID.
After migrating your key IDs into barbican, the fixed key remains in the configuration files. This maypresent a security concern to some users, because the fixed_key value is not encrypted in the .conffiles. To address this, you can manually remove the fixed_key values from your nova and cinderconfigurations. However, first complete testing and review the output of the log file before youproceed, because disks that are still dependent on this value will not be accessible.
1. Review the existing fixed_key values. The values must match for both services.
crudini --get /var/lib/config-data/puppet-generated/cinder/etc/cinder/cinder.conf keymgr fixed_keycrudini --get /var/lib/config-data/puppet-generated/nova_libvirt/etc/nova/nova.conf keymgr fixed_key
2. IMPORTANT: Make a backup of the existing fixed_key values. This allows you to restore thevalue if something goes wrong, or if you need to restore a backup that uses the old encryptionkey.
3. Delete the fixed_key values:
crudini --del /var/lib/config-data/puppet-generated/cinder/etc/cinder/cinder.conf keymgr fixed_keycrudini --del /var/lib/config-data/puppet-generated/nova_libvirt/etc/nova/nova.conf keymgr fixed_key
CHAPTER 6. ENCRYPTING CINDER VOLUMES
33
CHAPTER 7. ENCRYPT AT-REST SWIFT OBJECTSBy default, objects uploaded to Object Storage are stored unencrypted. Because of this, it is possible toaccess objects directly from the file system. This can present a security risk if disks are not properlyerased before they are discarded. When you have barbican enabled, the Object Storage service (swift)can transparently encrypt and decrypt your stored (at-rest) objects. At-rest encryption is distinct fromin-transit encryption in that it refers to the objects being encrypted while being stored on disk.
Swift performs these encryption tasks transparently, with the objects being automatically encryptedwhen uploaded to swift, then automatically decrypted when served to a user. This encryption anddecryption is done using the same (symmetric) key, which is stored in barbican.
NOTE
You cannot disable encryption after you have enabled encryption and added data to theswift cluster, because the data is now stored in an encrypted state. Consequently, thedata will not be readable if encryption is disabled, until you re-enable encryption with thesame key.
7.1. ENABLE AT-REST ENCRYPTION FOR SWIFT
1. You can enable the swift encryption capabilities by including SwiftEncryptionEnabled: True inyour environment file, then re-running openstack overcloud deploy using /home/stack/overcloud_deploy.sh. Note that you still need to enable barbican, as described inthe Install Barbican chapter.
2. Confirm that swift is configured to use at-rest encryption:
$ crudini --get /var/lib/config-data/puppet-generated/swift/etc/swift/proxy-server.conf pipeline-main pipeline
pipeline = catch_errors healthcheck proxy-logging cache ratelimit bulk tempurl formpost authtoken keystone staticweb copy container_quotas account_quotas slo dlo versioned_writes kms_keymaster encryption proxy-logging proxy-server
The result should include an entry for encryption.
Red Hat OpenStack Platform 15 Manage Secrets with OpenStack Key Manager
34

CHAPTER 8. VALIDATE GLANCE IMAGESAfter enabling Barbican, you can configure the Image Service (glance) to verify that an uploaded imagehas not been tampered with. In this implementation, the image is first signed with a key that is stored inbarbican. The image is then uploaded to glance, along with the accompanying signing information. As aresult, the image’s signature is verified before each use, with the instance build process failing if thesignature does not match.
Barbican’s integration with glance means that you can use the openssl command with your private keyto sign glance images before uploading them.
8.1. ENABLE GLANCE IMAGE VALIDATION
In your environment file, enable image verification with the VerifyGlanceSignatures: True setting. Youmust re-run the openstack overcloud deploy command for this setting to take effect.
To verify that glance image validation is enabled, run the following command on an overcloud Computenode:
$ sudo crudini --get /var/lib/config-data/puppet-generated/nova_libvirt/etc/nova/nova.conf glance verify_glance_signatures
NOTE
If you use Ceph as the back end for the Image and Compute services, a CoW clone iscreated. Therefore, Image signing verification cannot be performed.
8.2. VALIDATE AN IMAGE
To configure a glance image for validation, complete the following steps:
1. Confirm that glance is configured to use barbican:
$ sudo crudini --get /var/lib/config-data/puppet-generated/glance_api/etc/glance/glance-api.conf key_manager backendcastellan.key_manager.barbican_key_manager.BarbicanKeyManager
2. Generate a private key and convert it to the required format:
openssl genrsa -out private_key.pem 1024openssl rsa -pubout -in private_key.pem -out public_key.pemopenssl req -new -key private_key.pem -out cert_request.csropenssl x509 -req -days 14 -in cert_request.csr -signkey private_key.pem -out x509_signing_cert.crt
3. Add the key to the barbican secret store:
$ source ~/overcloudrc$ openstack secret store --name signing-cert --algorithm RSA --secret-type certificate --payload-content-type "application/octet-stream" --payload-content-encoding base64 --payload "$(base64 x509_signing_cert.crt)" -c 'Secret href' -f valuehttps://192.168.123.170:9311/v1/secrets/5df14c2b-f221-4a02-948e-48a61edd3f5b
CHAPTER 8. VALIDATE GLANCE IMAGES
35
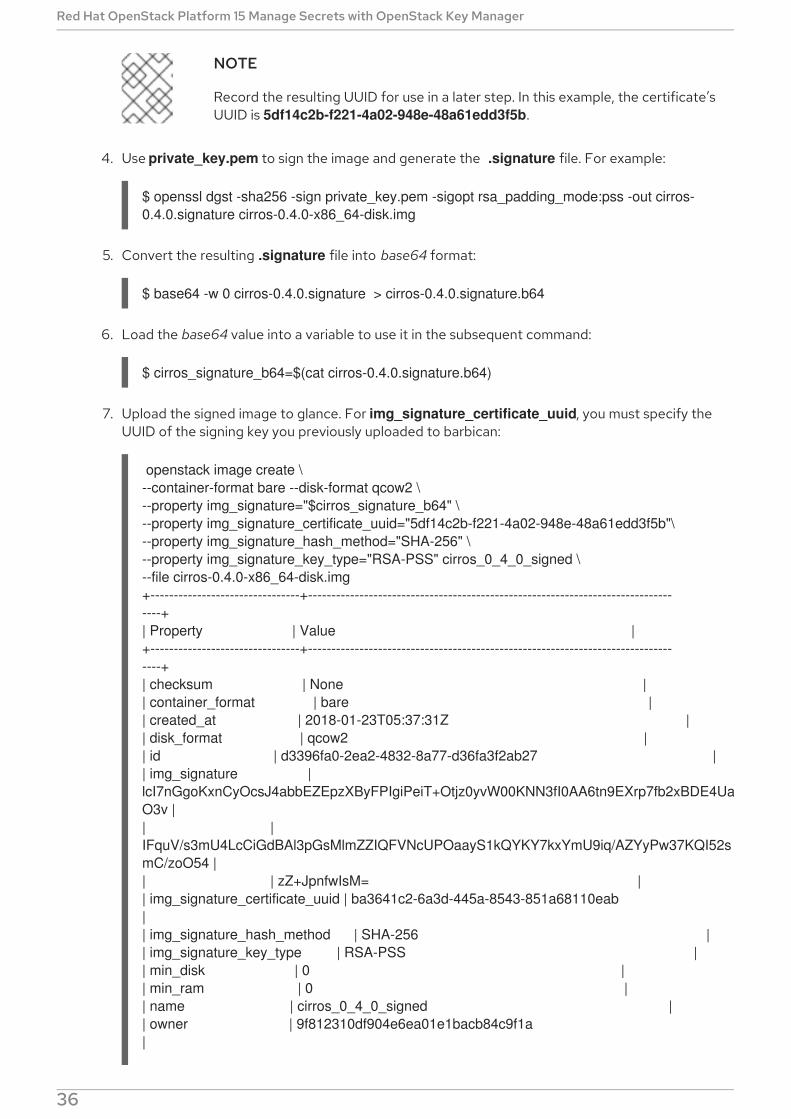
NOTE
Record the resulting UUID for use in a later step. In this example, the certificate’sUUID is 5df14c2b-f221-4a02-948e-48a61edd3f5b.
4. Use private_key.pem to sign the image and generate the .signature file. For example:
$ openssl dgst -sha256 -sign private_key.pem -sigopt rsa_padding_mode:pss -out cirros-0.4.0.signature cirros-0.4.0-x86_64-disk.img
5. Convert the resulting .signature file into base64 format:
$ base64 -w 0 cirros-0.4.0.signature > cirros-0.4.0.signature.b64
6. Load the base64 value into a variable to use it in the subsequent command:
$ cirros_signature_b64=$(cat cirros-0.4.0.signature.b64)
7. Upload the signed image to glance. For img_signature_certificate_uuid, you must specify theUUID of the signing key you previously uploaded to barbican:
openstack image create \--container-format bare --disk-format qcow2 \--property img_signature="$cirros_signature_b64" \--property img_signature_certificate_uuid="5df14c2b-f221-4a02-948e-48a61edd3f5b"\--property img_signature_hash_method="SHA-256" \--property img_signature_key_type="RSA-PSS" cirros_0_4_0_signed \--file cirros-0.4.0-x86_64-disk.img+--------------------------------+----------------------------------------------------------------------------------+| Property | Value |+--------------------------------+----------------------------------------------------------------------------------+| checksum | None || container_format | bare || created_at | 2018-01-23T05:37:31Z || disk_format | qcow2 || id | d3396fa0-2ea2-4832-8a77-d36fa3f2ab27 || img_signature | lcI7nGgoKxnCyOcsJ4abbEZEpzXByFPIgiPeiT+Otjz0yvW00KNN3fI0AA6tn9EXrp7fb2xBDE4UaO3v || | IFquV/s3mU4LcCiGdBAl3pGsMlmZZIQFVNcUPOaayS1kQYKY7kxYmU9iq/AZYyPw37KQI52smC/zoO54 || | zZ+JpnfwIsM= || img_signature_certificate_uuid | ba3641c2-6a3d-445a-8543-851a68110eab || img_signature_hash_method | SHA-256 || img_signature_key_type | RSA-PSS || min_disk | 0 || min_ram | 0 || name | cirros_0_4_0_signed || owner | 9f812310df904e6ea01e1bacb84c9f1a |
Red Hat OpenStack Platform 15 Manage Secrets with OpenStack Key Manager
36
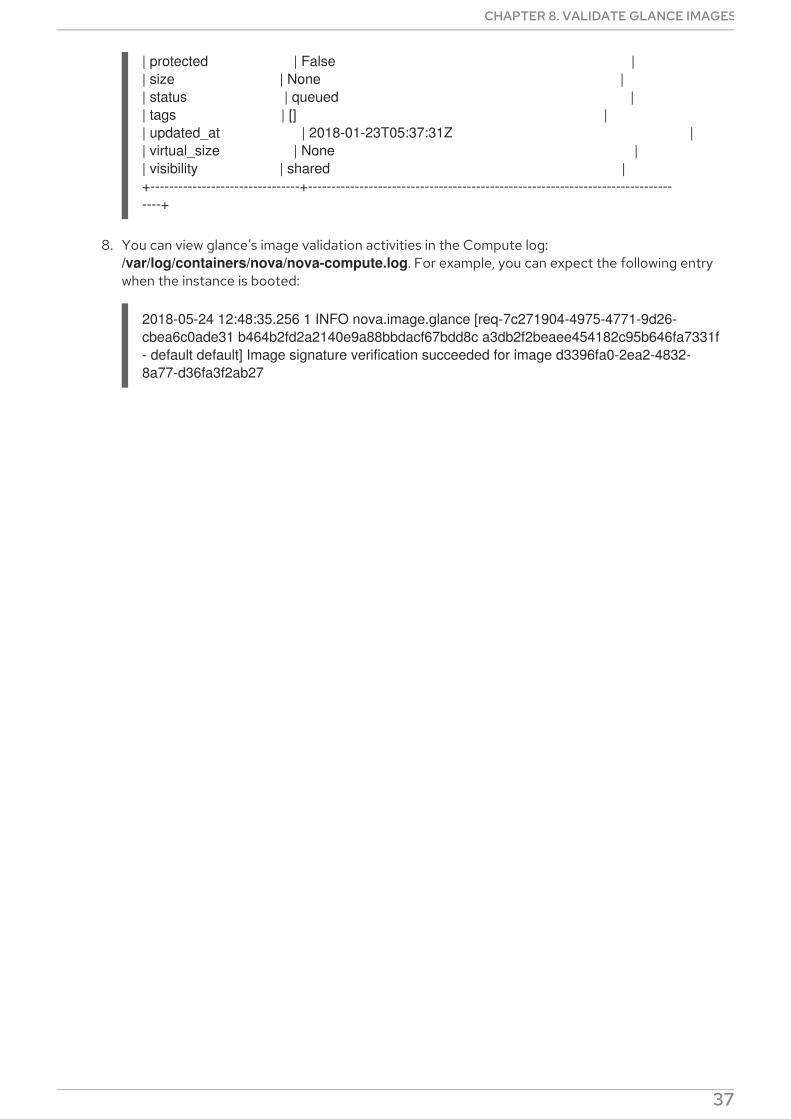
| protected | False || size | None || status | queued || tags | [] || updated_at | 2018-01-23T05:37:31Z || virtual_size | None || visibility | shared |+--------------------------------+----------------------------------------------------------------------------------+
8. You can view glance’s image validation activities in the Compute log: /var/log/containers/nova/nova-compute.log. For example, you can expect the following entrywhen the instance is booted:
2018-05-24 12:48:35.256 1 INFO nova.image.glance [req-7c271904-4975-4771-9d26-cbea6c0ade31 b464b2fd2a2140e9a88bbdacf67bdd8c a3db2f2beaee454182c95b646fa7331f - default default] Image signature verification succeeded for image d3396fa0-2ea2-4832-8a77-d36fa3f2ab27
CHAPTER 8. VALIDATE GLANCE IMAGES
37
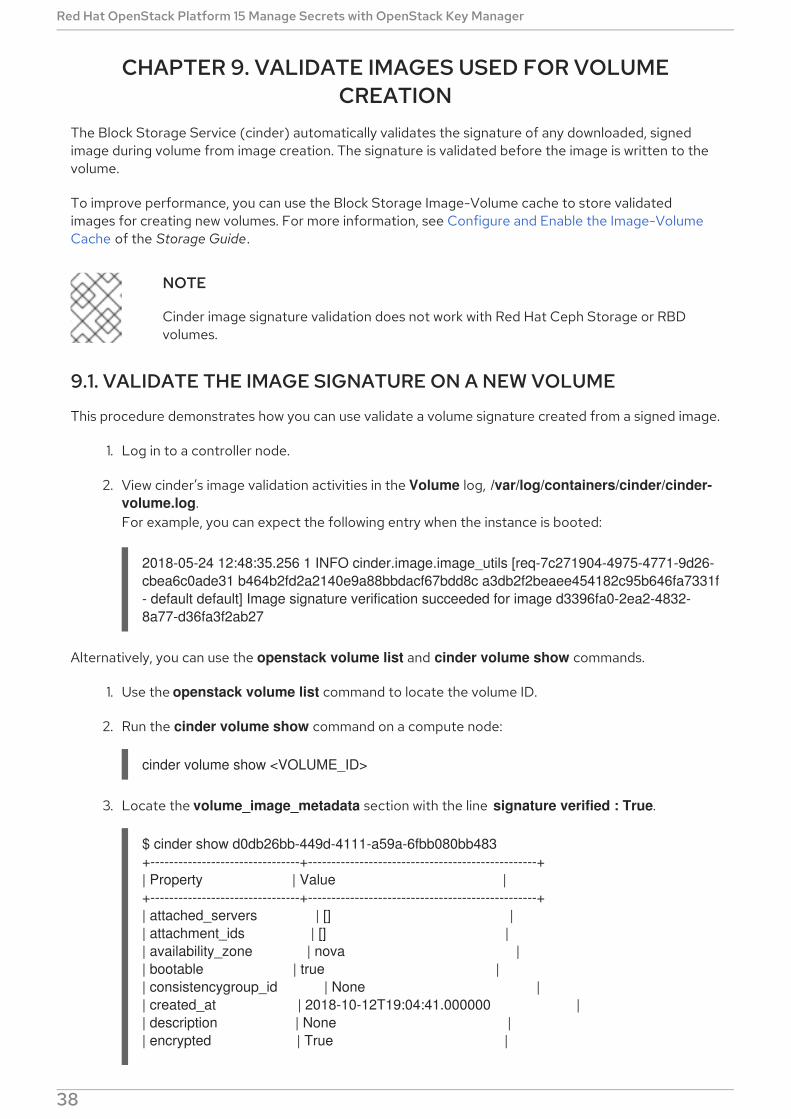
CHAPTER 9. VALIDATE IMAGES USED FOR VOLUMECREATION
The Block Storage Service (cinder) automatically validates the signature of any downloaded, signedimage during volume from image creation. The signature is validated before the image is written to thevolume.
To improve performance, you can use the Block Storage Image-Volume cache to store validatedimages for creating new volumes. For more information, see Configure and Enable the Image-VolumeCache of the Storage Guide.
NOTE
Cinder image signature validation does not work with Red Hat Ceph Storage or RBDvolumes.
9.1. VALIDATE THE IMAGE SIGNATURE ON A NEW VOLUME
This procedure demonstrates how you can use validate a volume signature created from a signed image.
1. Log in to a controller node.
2. View cinder’s image validation activities in the Volume log, /var/log/containers/cinder/cinder-volume.log.For example, you can expect the following entry when the instance is booted:
2018-05-24 12:48:35.256 1 INFO cinder.image.image_utils [req-7c271904-4975-4771-9d26-cbea6c0ade31 b464b2fd2a2140e9a88bbdacf67bdd8c a3db2f2beaee454182c95b646fa7331f - default default] Image signature verification succeeded for image d3396fa0-2ea2-4832-8a77-d36fa3f2ab27
Alternatively, you can use the openstack volume list and cinder volume show commands.
1. Use the openstack volume list command to locate the volume ID.
2. Run the cinder volume show command on a compute node:
cinder volume show <VOLUME_ID>
3. Locate the volume_image_metadata section with the line signature verified : True.
$ cinder show d0db26bb-449d-4111-a59a-6fbb080bb483+--------------------------------+-------------------------------------------------+| Property | Value |+--------------------------------+-------------------------------------------------+| attached_servers | [] || attachment_ids | [] || availability_zone | nova || bootable | true || consistencygroup_id | None || created_at | 2018-10-12T19:04:41.000000 || description | None || encrypted | True |
Red Hat OpenStack Platform 15 Manage Secrets with OpenStack Key Manager
38
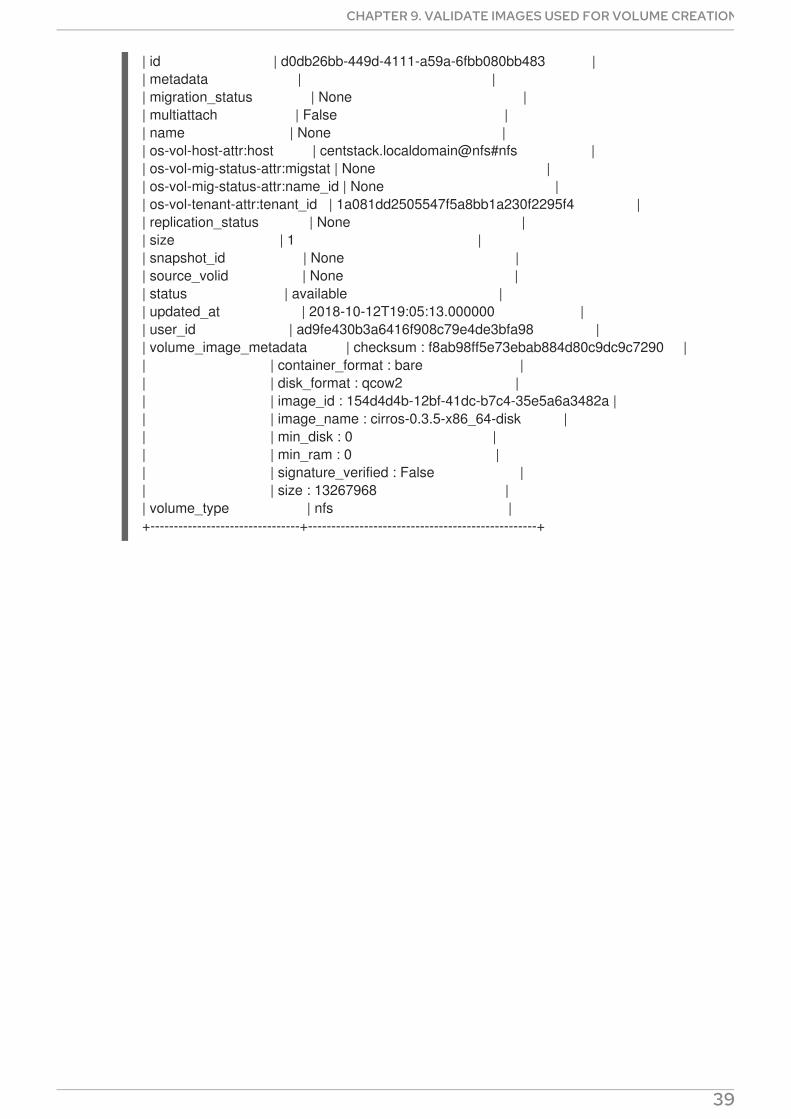
| id | d0db26bb-449d-4111-a59a-6fbb080bb483 || metadata | || migration_status | None || multiattach | False || name | None || os-vol-host-attr:host | centstack.localdomain@nfs#nfs || os-vol-mig-status-attr:migstat | None || os-vol-mig-status-attr:name_id | None || os-vol-tenant-attr:tenant_id | 1a081dd2505547f5a8bb1a230f2295f4 || replication_status | None || size | 1 || snapshot_id | None || source_volid | None || status | available || updated_at | 2018-10-12T19:05:13.000000 || user_id | ad9fe430b3a6416f908c79e4de3bfa98 || volume_image_metadata | checksum : f8ab98ff5e73ebab884d80c9dc9c7290 || | container_format : bare || | disk_format : qcow2 || | image_id : 154d4d4b-12bf-41dc-b7c4-35e5a6a3482a || | image_name : cirros-0.3.5-x86_64-disk || | min_disk : 0 || | min_ram : 0 || | signature_verified : False || | size : 13267968 || volume_type | nfs |+--------------------------------+-------------------------------------------------+
CHAPTER 9. VALIDATE IMAGES USED FOR VOLUME CREATION
39