red dragon depot training manual
TRANSCRIPT

Red Dragon Depot Training Manual
Table of Contents
• What is Red Dragon Depot
• Maximizing Site Performance: Email Notices
• Creating Orders:• Overview• Login• Non-Catalog• Catalog-Hosted and Punch out
• Checking Out• Converting cart to checkout• Finalizing Order
• Viewing Workflow
2
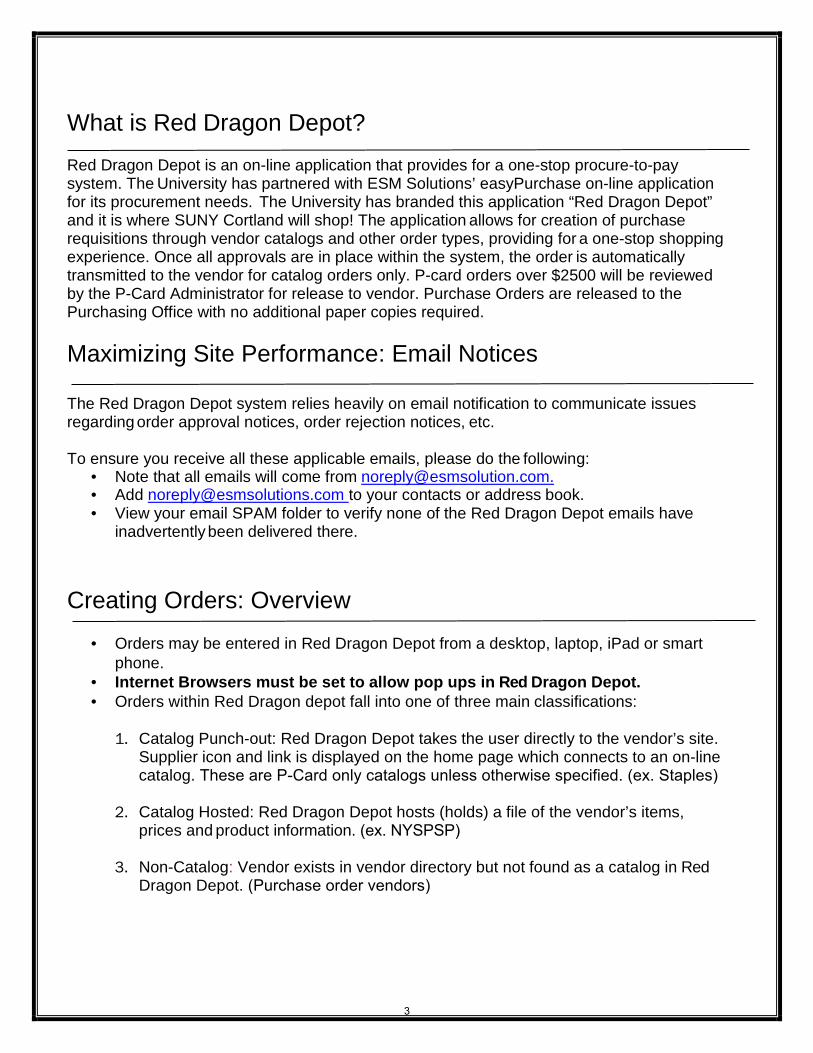
What is Red Dragon Depot? Red Dragon Depot is an on-line application that provides for a one-stop procure-to-pay system. The University has partnered with ESM Solutions’ easyPurchase on-line application for its procurement needs. The University has branded this application “Red Dragon Depot” and it is where SUNY Cortland will shop! The application allows for creation of purchase requisitions through vendor catalogs and other order types, providing for a one-stop shopping experience. Once all approvals are in place within the system, the order is automatically transmitted to the vendor for catalog orders only. P-card orders over $2500 will be reviewed by the P-Card Administrator for release to vendor. Purchase Orders are released to the Purchasing Office with no additional paper copies required.
Maximizing Site Performance: Email Notices
The Red Dragon Depot system relies heavily on email notification to communicate issues regarding order approval notices, order rejection notices, etc.
To ensure you receive all these applicable emails, please do the following: • Note that all emails will come from [email protected].• Add [email protected] to your contacts or address book.• View your email SPAM folder to verify none of the Red Dragon Depot emails have
inadvertently been delivered there.
Creating Orders: Overview
• Orders may be entered in Red Dragon Depot from a desktop, laptop, iPad or smart phone.
• Internet Browsers must be set to allow pop ups in Red Dragon Depot.• Orders within Red Dragon depot fall into one of three main classifications:
1. Catalog Punch-out: Red Dragon Depot takes the user directly to the vendor’s site. Supplier icon and link is displayed on the home page which connects to an on-line catalog. These are P-Card only catalogs unless otherwise specified. (ex. Staples)
2. Catalog Hosted: Red Dragon Depot hosts (holds) a file of the vendor’s items, prices and product information. (ex. NYSPSP)
3. Non-Catalog: Vendor exists in vendor directory but not found as a catalog in Red Dragon Depot. (Purchase order vendors)
3
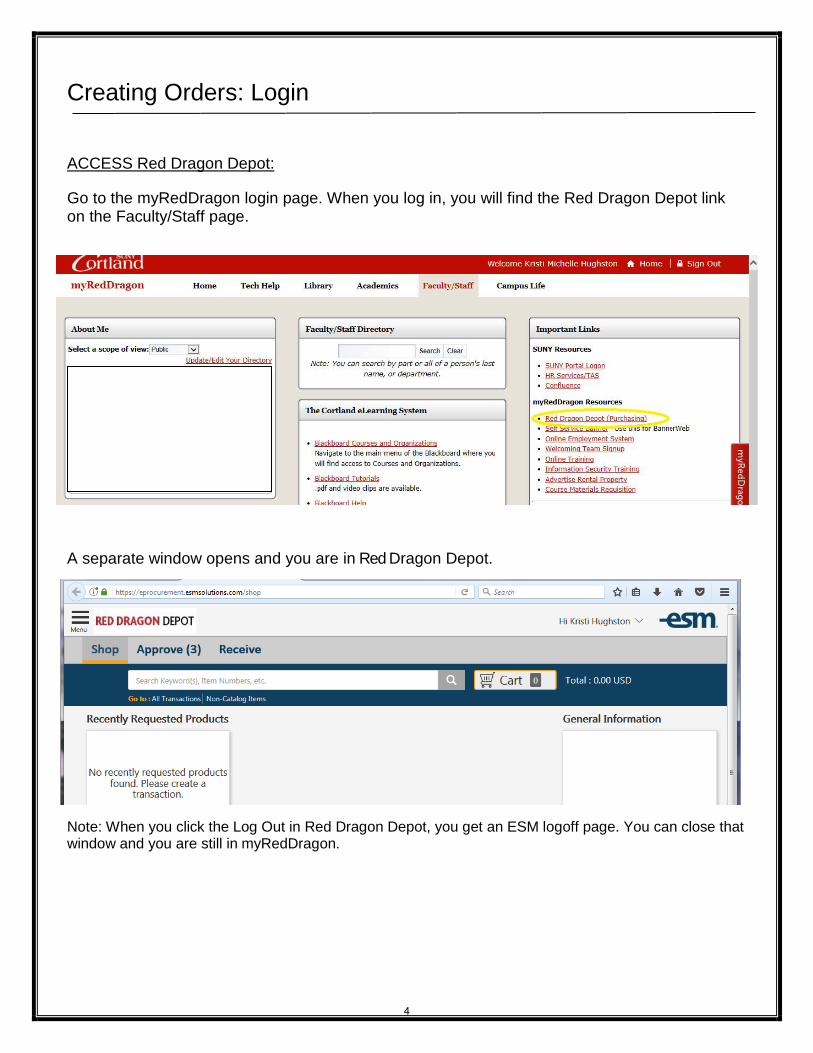
Creating Orders: Login
ACCESS Red Dragon Depot:
Go to the myRedDragon login page. When you log in, you will find the Red Dragon Depot link on the Faculty/Staff page.
A separate window opens and you are in Red Dragon Depot.
Note: When you click the Log Out in Red Dragon Depot, you get an ESM logoff page. You can close that window and you are still in myRedDragon.
4
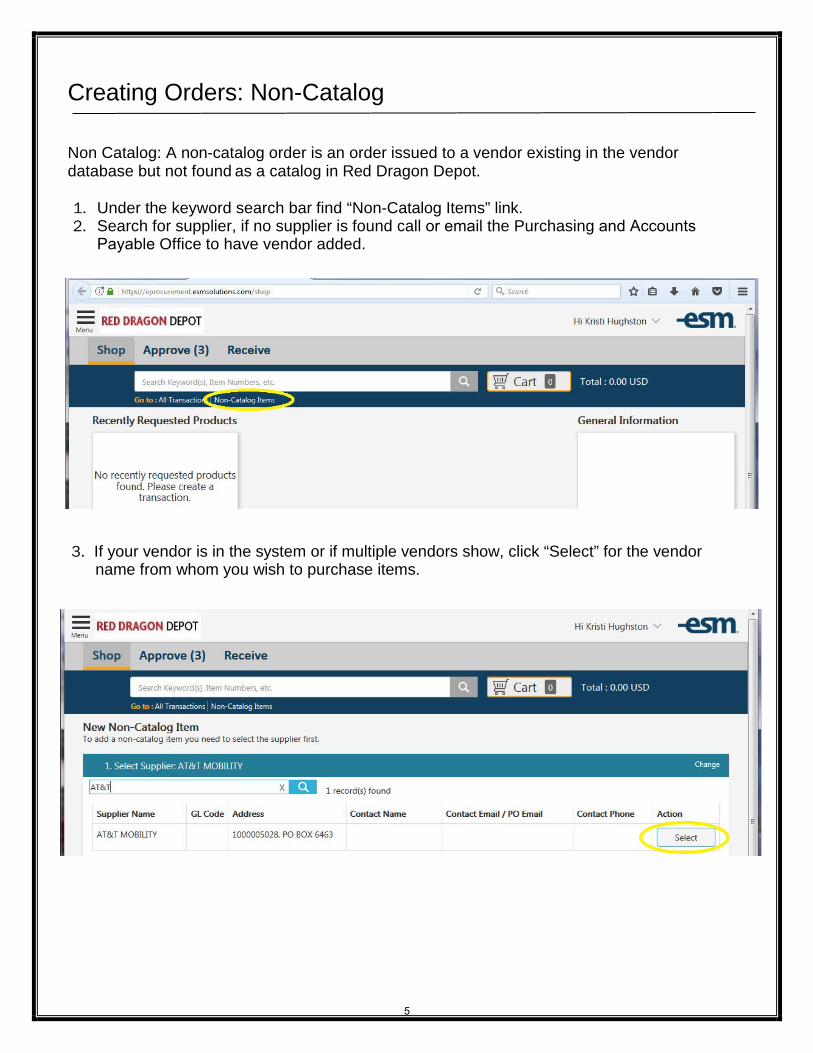
Creating Orders: Non-Catalog
Non Catalog: A non-catalog order is an order issued to a vendor existing in the vendor database but not found as a catalog in Red Dragon Depot.
1. Under the keyword search bar find “Non-Catalog Items” link.2. Search for supplier, if no supplier is found call or email the Purchasing and Accounts
Payable Office to have vendor added.
3. If your vendor is in the system or if multiple vendors show, click “Select” for the vendorname from whom you wish to purchase items.
5

4. Fill in “Add Item” menu:• Item/Service: Add a description of the purchase and “Per attached quote”.• Unit of Measure (UOM) does not change.• QTY is 1.• List Price is the total from the quote. (Unless you break out shipping &
handling)• S&H can be added or S&H can be $0 and included in the total.• No options on the right hand side are required to be included. You may add
information at your discretion.• Click “Add to cart”.
The order is now shown in your cart:
If you are ready to check out, refer to the section entitled “Checking out: Convert Cart to Order”.
Phone Accessories. Per attached quote #2131 dated 10/1/2017
6
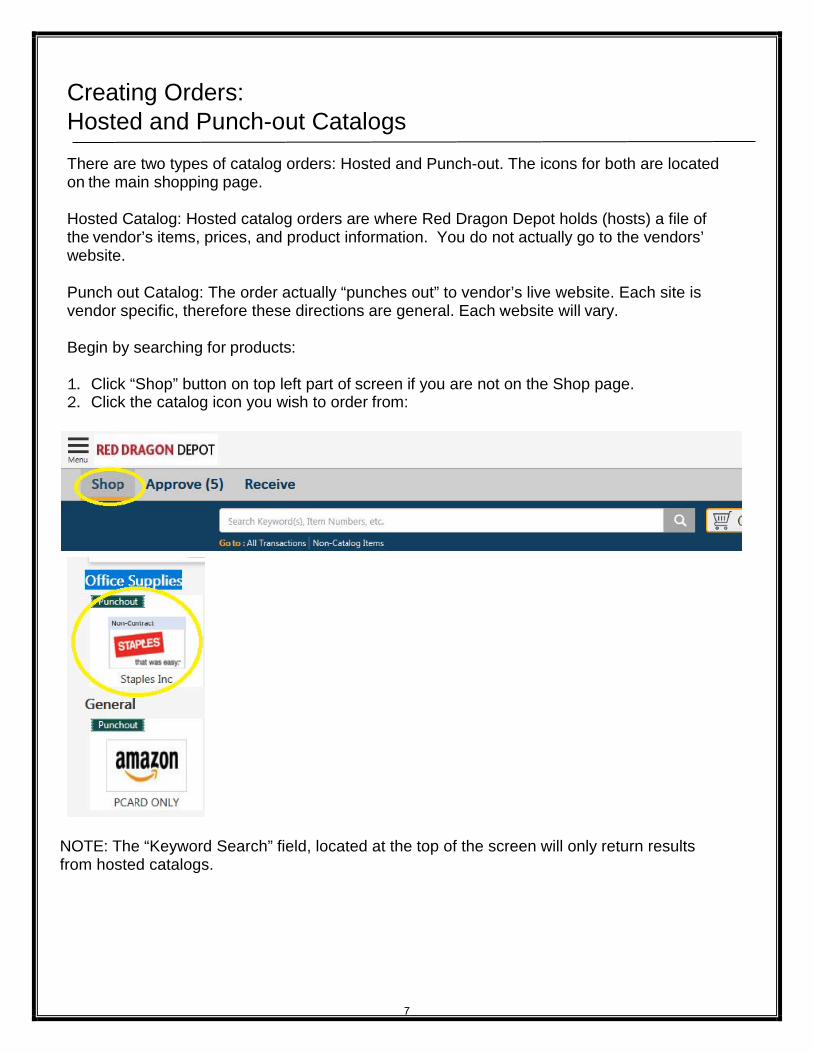
Creating Orders: Hosted and Punch-out Catalogs There are two types of catalog orders: Hosted and Punch-out. The icons for both are located on the main shopping page.
Hosted Catalog: Hosted catalog orders are where Red Dragon Depot holds (hosts) a file of the vendor’s items, prices, and product information. You do not actually go to the vendors’ website.
Punch out Catalog: The order actually “punches out” to vendor’s live website. Each site is vendor specific, therefore these directions are general. Each website will vary.
Begin by searching for products:
1. Click “Shop” button on top left part of screen if you are not on the Shop page.2. Click the catalog icon you wish to order from:
NOTE: The “Keyword Search” field, located at the top of the screen will only return results from hosted catalogs.
7
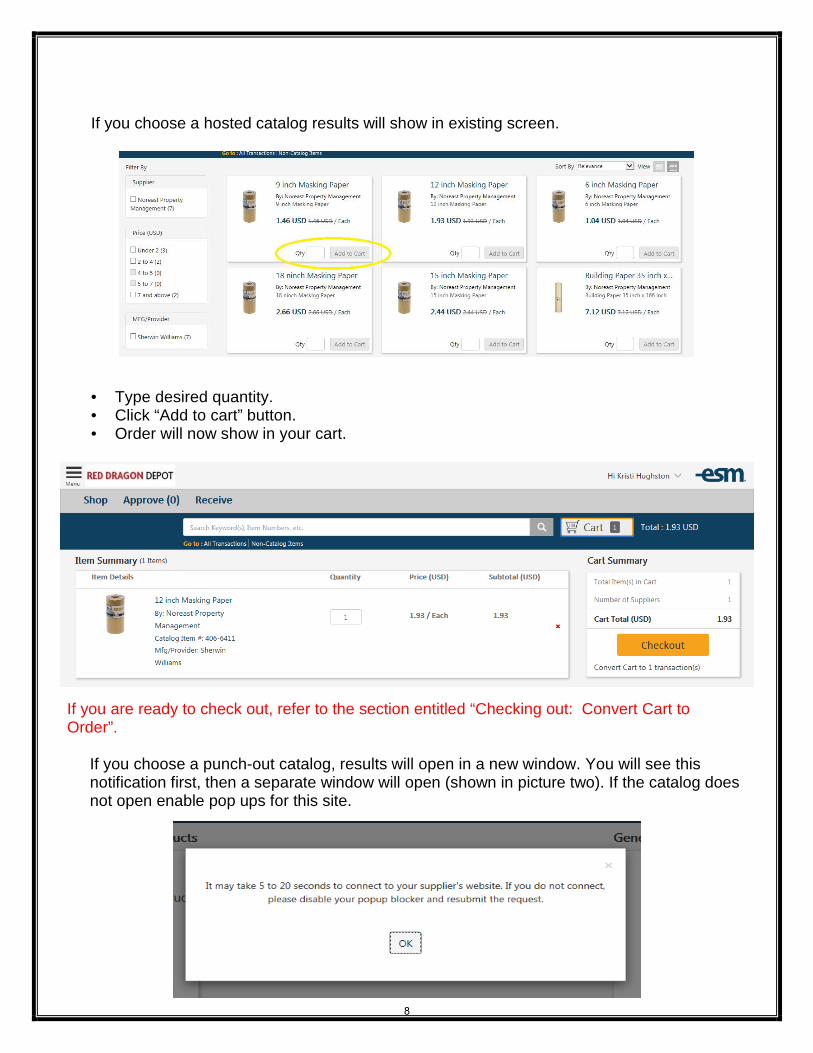
If you choose a hosted catalog results will show in existing screen.
• Type desired quantity. • Click “Add to cart” button.• Order will now show in your cart.
If you are ready to check out, refer to the section entitled “Checking out: Convert Cart to Order”.
If you choose a punch-out catalog, results will open in a new window. You will see this notification first, then a separate window will open (shown in picture two). If the catalog does not open enable pop ups for this site.
8
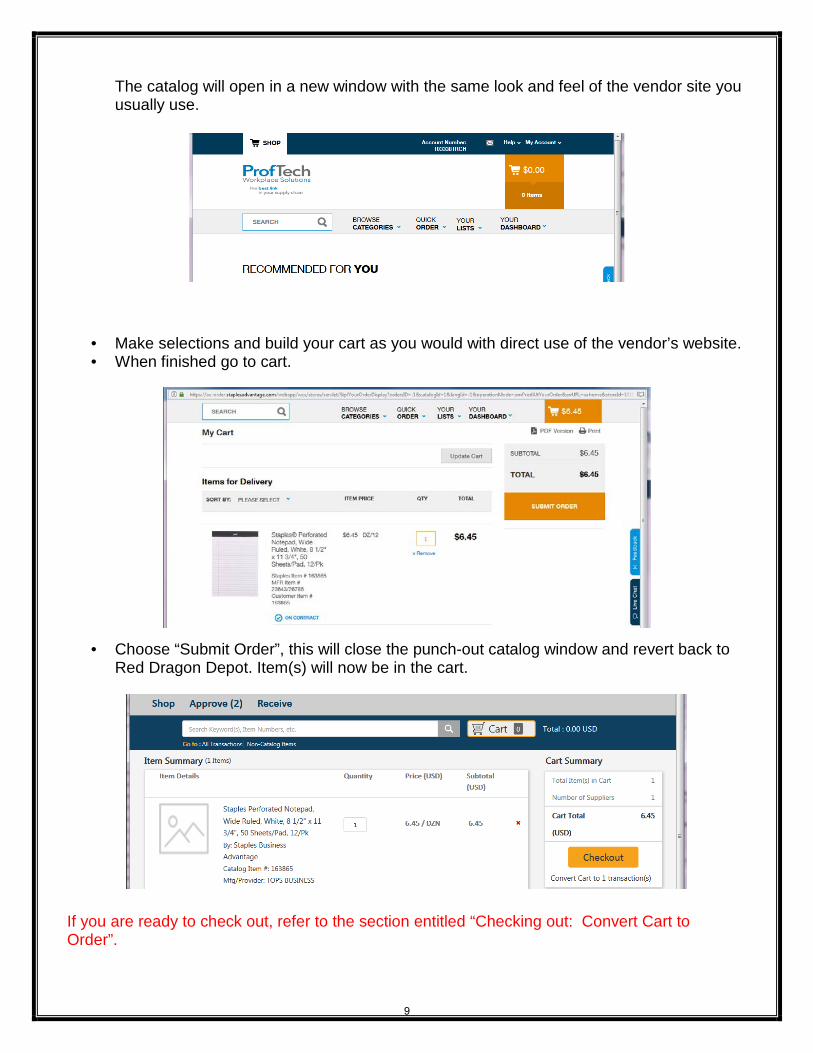
The catalog will open in a new window with the same look and feel of the vendor site you usually use.
• Make selections and build your cart as you would with direct use of the vendor’s website.• When finished go to cart.
• Choose “Submit Order”, this will close the punch-out catalog window and revert back toRed Dragon Depot. Item(s) will now be in the cart.
If you are ready to check out, refer to the section entitled “Checking out: Convert Cart to Order”.
9
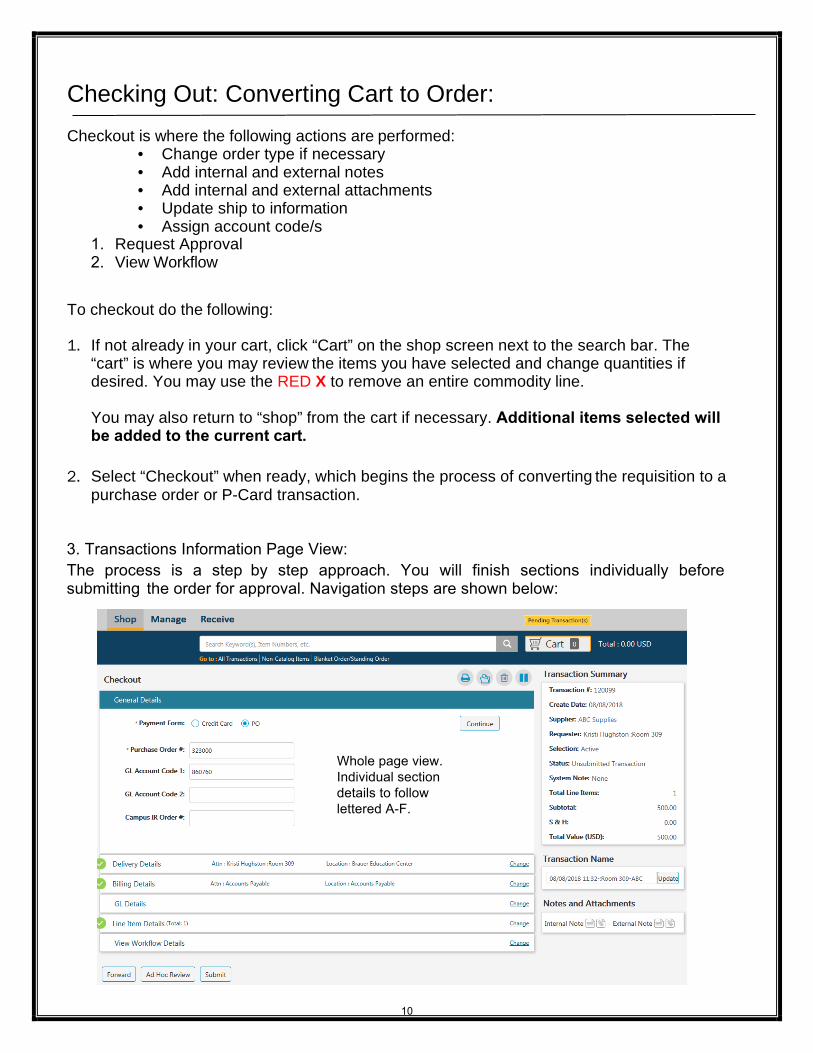
Checking Out: Converting Cart to Order: Checkout is where the following actions are performed:
• Change order type if necessary• Add internal and external notes• Add internal and external attachments• Update ship to information• Assign account code/s
1. Request Approval2. View Workflow
To checkout do the following:
1. If not already in your cart, click “Cart” on the shop screen next to the search bar. The“cart” is where you may review the items you have selected and change quantities ifdesired. You may use the RED X to remove an entire commodity line.
You may also return to “shop” from the cart if necessary. Additional items selected willbe added to the current cart.
2. Select “Checkout” when ready, which begins the process of converting the requisition to apurchase order or P-Card transaction.
10
3. Transactions Information Page View:The process is a step by step approach. You will finish sections individually before submitting the order for approval. Navigation steps are shown below:
Whole page view. Individual section details to follow lettered A-F.
14
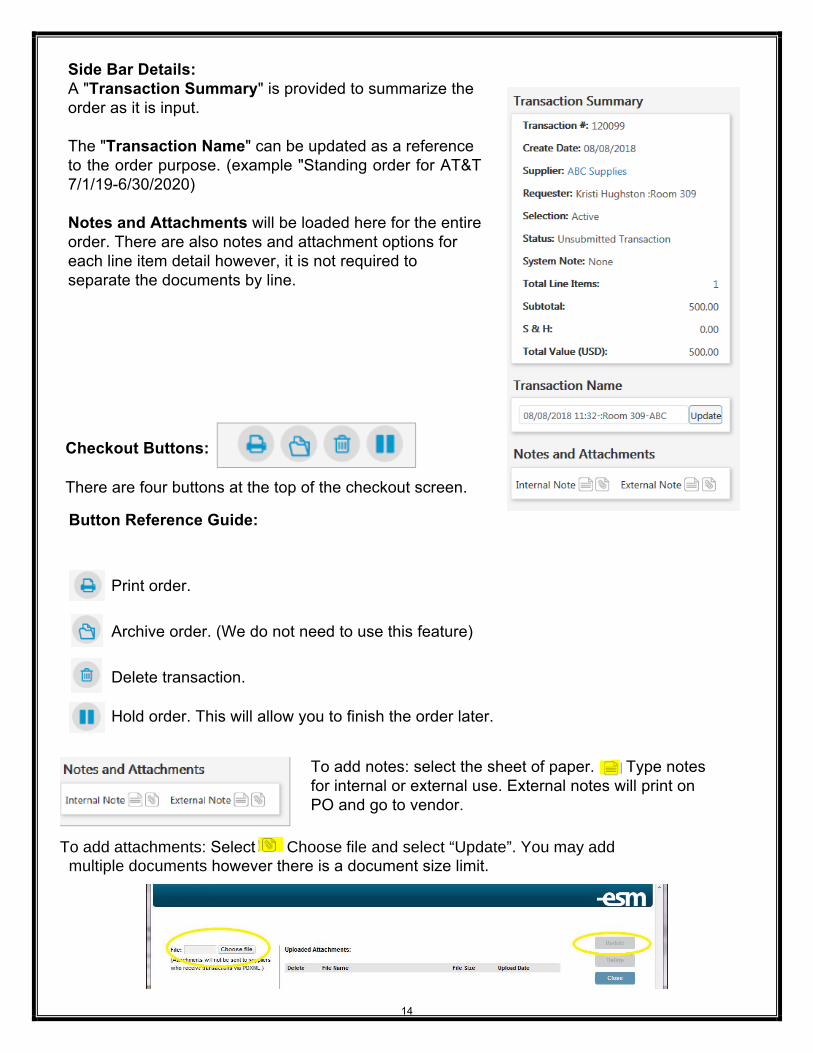
Side Bar Details: A "Transaction Summary" is provided to summarize the order as it is input.
The "Transaction Name" can be updated as a reference to the order purpose. (example "Standing order for AT&T 7/1/19-6/30/2020)
Notes and Attachments will be loaded here for the entire order. There are also notes and attachment options for each line item detail however, it is not required to separate the documents by line.
Checkout Buttons:
There are four buttons at the top of the checkout screen.
Button Reference Guide:
Print order.
Archive order. (We do not need to use this feature)
Delete transaction.
Hold order. This will allow you to finish the order later.
To add attachments: Select Choose file and select “Update”. You may add multiple documents however there is a document size limit.
To add notes: select the sheet of paper. Type notes for internal or external use. External notes will print on PO and go to vendor.
11
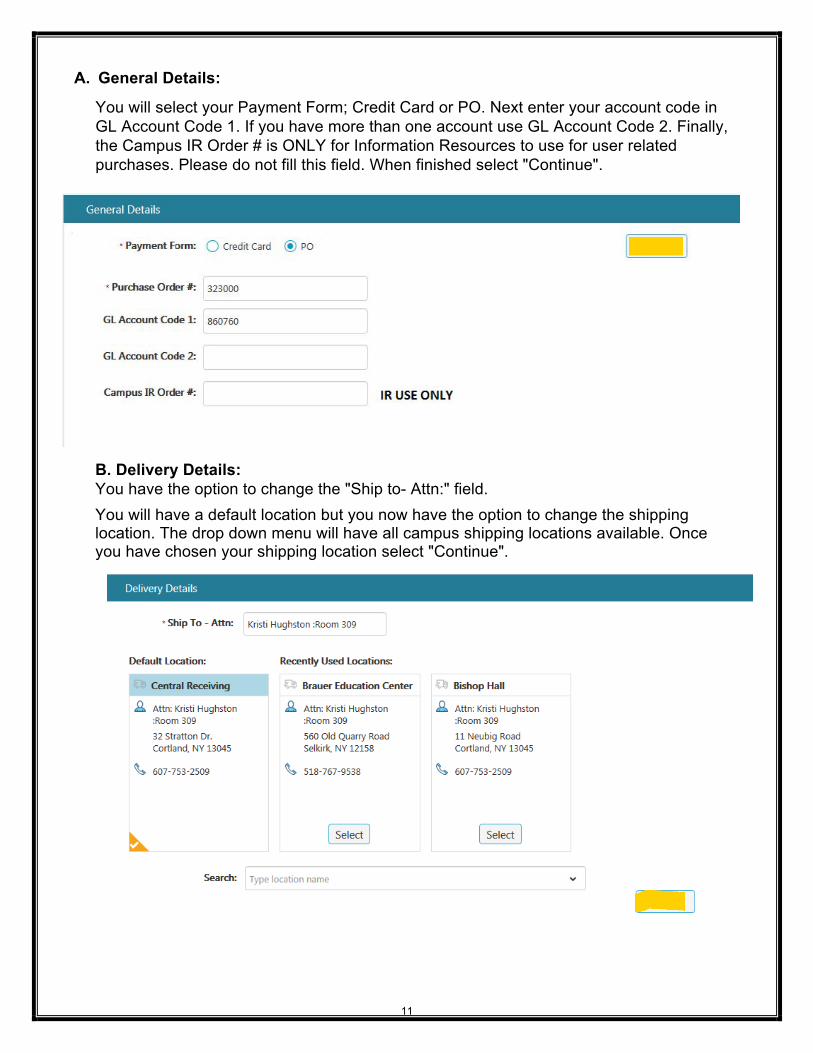
A. General Details:
You will select your Payment Form; Credit Card or PO. Next enter your account code inGL Account Code 1. If you have more than one account use GL Account Code 2. Finally,the Campus IR Order # is ONLY for Information Resources to use for user relatedpurchases. Please do not fill this field. When finished select "Continue".
B. Delivery Details:You have the option to change the "Ship to- Attn:" field.You will have a default location but you now have the option to change the shipping location. The drop down menu will have all campus shipping locations available. Once you have chosen your shipping location select "Continue".
12
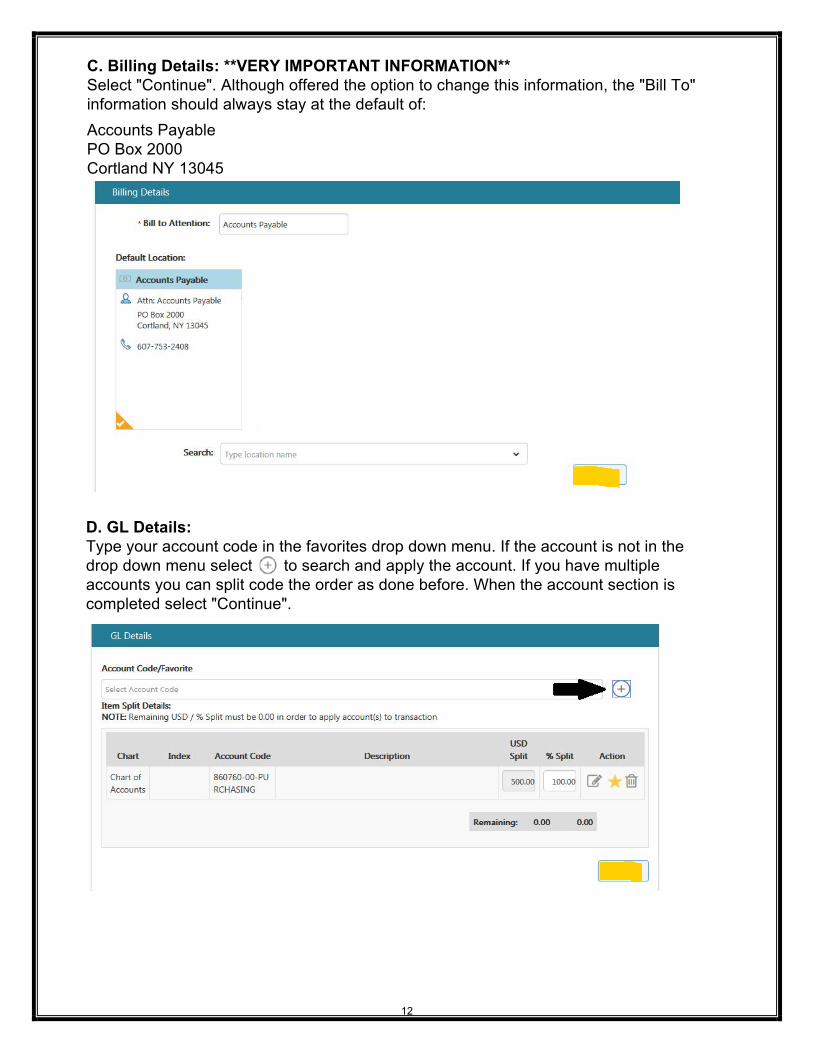
C. Billing Details: **VERY IMPORTANT INFORMATION**Select "Continue". Although offered the option to change this information, the "Bill To" information should always stay at the default of:Accounts PayablePO Box 2000Cortland NY 13045
D. GL Details:Type your account code in the favorites drop down menu. If the account is not in thedrop down menu select to search and apply the account. If you have multipleaccounts you can split code the order as done before. When the account section iscompleted select "Continue".
13
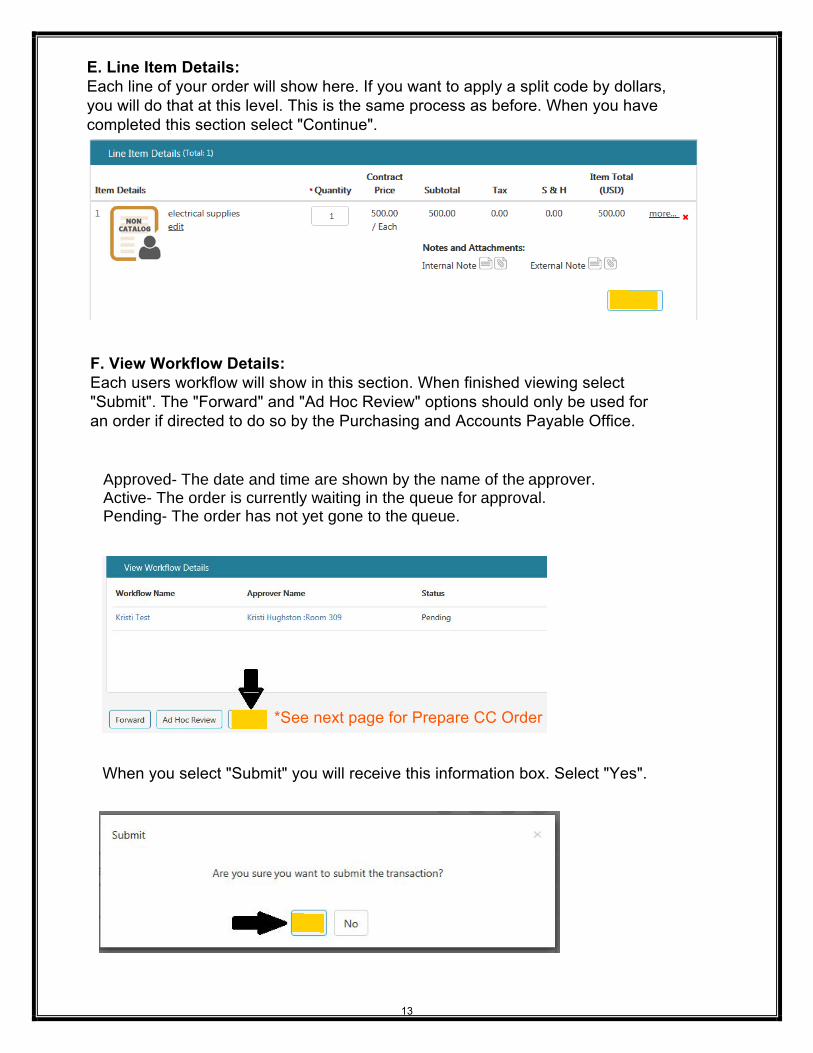
E. Line Item Details:Each line of your order will show here. If you want to apply a split code by dollars,you will do that at this level. This is the same process as before. When you havecompleted this section select "Continue".
F. View Workflow Details:Each users workflow will show in this section. When finished viewing select"Submit". The "Forward" and "Ad Hoc Review" options should only be used foran order if directed to do so by the Purchasing and Accounts Payable Office.
When you select "Submit" you will receive this information box. Select "Yes".
*See next page for Prepare CC Order
Approved- The date and time are shown by the name of the approver. Active- The order is currently waiting in the queue for approval. Pending- The order has not yet gone to the queue.

“Prepare CC Order” for P-Cards will open the screen below:
1. Choose card type. (P-cards are Visa)2. Enter P-Card number.3. Enter expiration date.4. Select “Continue”. You will see the box below.
5. “Place Order”. Your order is now complete.
15