recordts v4.0 for citrix xenapp 6.5 install guide
TRANSCRIPT

RecordTS Enterprise v4.0 for Citrix XenApp 6.5
Installation Guide
http://www.tsfactory.com
Copyright Notice and Trademark
2018 TSFactory LLC. All Rights Reserved.
RecordTS and the TSFactory logo are registered trademarks or trademarks of TSFactory LLC, or its affiliated entities.
Citrix, XenApp and the Citrix logo are registered trademarks or trademarks of Citrix, or its affiliated entities.
Information in this document is subject to change without notice. Companies, names, and data used in examples herein are fictitious unless otherwise noted. No part of this document may be reproduced or transmitted in any form or by any means, electronic or mechanical, for any purpose, without the express written permission of TSFactory LLC.
Every effort has been made to ensure the accuracy of this manual. However, TSFactory LLC makes no warranties with respect to this documentation and disclaims any implied warranties of merchantability and fitness for a particular purpose. TSFactory LLC shall not be liable for any errors or for incidental or consequential damages in connection with the furnishing, performance, or use of this manual or the examples herein. The information in this document is subject to change without notice.
Version 1.6 – Updated October 24th, 2018
End User License Agreement
RecordTS by TSFactory LLC is protected by an End User License Agreement. To view the agreement, visit the company website at www.tsfactory.com, under RecordTS Documentation

Contents
Introduction 6
What is RecordTS? .............................................................................................................. 6
Main Features ....................................................................................................................... 6
Security/Audit compliance .............................................................................................. 6
Developed for Citrix XenApp .......................................................................................... 6
Per user session recording ............................................................................................ 6
How does RecordTS work? .................................................................................................. 6
Quick Overview 9
Recorder ............................................................................................................................... 9
Dashboard .......................................................................................................................... 10
License Service .................................................................................................................. 10
Database ............................................................................................................................ 11
Installing Base Modules 12
Overview ............................................................................................................................. 12
WARNINGS: Read This Before You Start… ...................................................................... 13
Prerequisites ....................................................................................................................... 14
Step 1: Making a Place to Store Session Data .................................................................. 16
RecordTS Storage Server ............................................................................................ 16
How to Install the RecordTS Storage Server ............................................................... 16
Installing Microsoft SQL Server ................................................................................... 19
Installing PostgreSQL Server ....................................................................................... 19
Step 2: Installing the RecordTS License Service ............................................................... 20
How to install the RecordTS License Service .............................................................. 20
Step 3: Installing the Dashboard Console service.............................................................. 21
How to install the RecordTS Dashboard Console Service .......................................... 21
Step 4: Configuring Dashboard and the License Service .................................................. 22
Configuring Dashboard for MS SQL Server ................................................................ 23
Configuring Dashboard for PostgreSQL Server .......................................................... 25
Configuring Dashboard for RecordTS Storage Server ................................................ 27
Configuring Dashboard Security Access ..................................................................... 28
Configuring the RecordTS License Service ................................................................. 29
Installing Recorders 32
Overview ............................................................................................................................. 32
General process ........................................................................................................... 32
Recorder Types .................................................................................................................. 33
Prerequisites ....................................................................................................................... 34
RecordTS Recorder ............................................................................................................ 35
Pre-installation Requirements ...................................................................................... 35
Installing the Recorder ................................................................................................. 35
Configuring the Recorder ............................................................................................. 41
Playing Recorded Sessions 44
Optimizing RecordTS 46
Dashboard Features ........................................................................................................... 46
Remote Dashboard Access ......................................................................................... 46
Database Purging ........................................................................................................ 47
Setting up User Accounts ............................................................................................ 47

TSFactory LLC Introduction ● 4
Adding Users ................................................................................................................ 48
Editing Users ................................................................................................................ 49
Deleting User Accounts ............................................................................................... 49
Recorder Features .............................................................................................................. 50
RecordTS Storage Server Backup Tool ............................................................................. 53
Help .............................................................................................................................. 53
Backup ......................................................................................................................... 54
Restore ......................................................................................................................... 54
Check ........................................................................................................................... 55
Info ............................................................................................................................... 56
Backup Tool Examples ................................................................................................ 57
Mapping a Network Drive ............................................................................................. 57
Examples ..................................................................................................................... 59
Support ............................................................................................................................... 61
How to get support ............................................................................................................. 61
Dashboard Problems .......................................................................................................... 61
Licensing Problems ............................................................................................................ 62
Recorder Problems ............................................................................................................. 62
Database Problems ............................................................................................................ 64

This page intentionally left blank.

TSFactory LLC Introduction ● 6
Introduction
What is RecordTS?
RecordTS is a remote desktop session recorder for Windows Terminal Services and Citrix XenApp. What does it mean exactly? It means once installed on a server running Citrix XenApp v6.5, administrators will be able to record everything users are doing during their sessions for later playback and/or archiving. It’s pretty much the same as watching a video on your computer! Thanks to this product you can:
• Track who is connected to the server and see what they do.
• View selected recordings for a specific user, during a specific time period, etc.
• Track users actions that might have caused problems on a server.
• Save recorded sessions to a Microsoft SQL Server database, PostgreSQL Server database or RecordTS Storage Server.
Main Features
Security/Audit compliance
Instead of looking at hundreds of entries in log files, RecordTS allows you to actually see everything that was done - as it happened. You can archive all recorded sessions for later playback, and in case of an audit it is just a matter of finding a particular session and watching!
Developed for Citrix XenApp
Although other similar solutions do exist in the market, RecordTS is the first and only solution that works directly at the protocol level (RDP and ICA). This means increased performance and scalability, with much smaller recordings. RecordTS is NOT a screen capture program or screen scraper and is very difficult if not impossible to circumvent.
Per user session recording
Recorded sessions are saved individually on a per user basis. Recordings are stored in a database for later retrieval and replay.
How does RecordTS work?
RecordTS runs directly on the XenApp, intercepting all traffic through the ICA listener port. Once intercepted, the ICA session stream is recorded to

7 ● Introduction TSFactory LLC
a SQL database or the RecordTS storage server. As RecordTS was developed from the ground up specifically for Terminal Services, this process does not affect your XenApp server performance, scaling easily once more users and/or servers are added to the system.
Below are functional and network diagrams of typical network configurations for RecordTS v4.
The next section will discuss the individual components in detail.
The following diagram shows a typical network layout of the RecordTS components. Note that the Dashboard and License services are normally installed to the same machine and can be co-located with the database server. For larger installations the database should be located on a separate machine to minimize loading when viewing sessions and enhance security.
The diagram below shows only one Recorder, but there can be as many Recorders as needed. The upper limit on Recorders is mainly dictated by database loading. Multiple databases will be required to handle large server farms.

TSFactory LLC Introduction ● 8
9 ● Quick Overview TSFactory LLC
Quick Overview
Below is the list of basic components of RecordTS. Each component will be discussed more in depth further into the manual.
• Recording Service (Recorder)
• Dashboard
• License Service
• Database / Storage Server
Recorder
The basic component of RecordTS is the Recording Service or Recorder, installed on each of the target XenApp 6.5 machines to be recorded. Its main job is to record user sessions and store the video files to a central database. From the time RecordTS Recorder is installed and properly configured on a Citrix XenApp server, each user session (both RDP and ICA) will be recorded and saved to a database in the native RecordTS format. Recorded sessions will contain additional information about each session: computer name and IP address, user name, connection time and duration, etc. For each individual user, recorded sessions are stored separately in the database.
The recorded sessions can be viewed or played as a video using the RecordTS Webplayer. Sessions may be exported to a common video format which can be viewed in most media players.
It is an option not to record RDP sessions if so desired.

TSFactory LLC Quick Overview ● 10
Dashboard
The RecordTS Dashboard is a web console app that allows the admin to centrally manage recorders, licensing and view recorded sessions. The Dashboard is where the admin can configure and manage the RecordTS License Service and authorize recorder installs on XenApp servers and other components such as additional dashboards and modules. Sessions may be viewed and exported as well.
License Service
RecordTS implements a multi-mode based licensing scheme, where products can be purchased as a subscription, for use for a period of time (pay as you go), or perpetual license (pay one time) with the option for renewable support and upgrade plans. A software license or subscription must be purchased in order to authorize use of RecordTS software components.
NOTE: Trial subscriptions are available to allow advance testing of RecordTS on-site prior to purchase with no licensing required during the trial period.
The RecordTS License Service must be installed to authorize RecordTS components for use. The License Service can be configured from the Dashboard console. Once the License Service is properly configured, the customer will be directed to obtain a license key or subscription ID to authenticate the License service. Without the license key or subscription ID, the license service will not enable any RecordTS components.
For subscription licensing only:
Obtaining a subscription ID
The customer will need to create a customer account on the TSFactory website. The customer account will have subscription information, links to download the software and pertinent documentation. A TSFactory partner or one of our sales associates can assist you with this process. Once you have a customer account, you will log in and locate your subscription ID. You will need to copy and paste it into the appropriate field in the Dashboard license service configration when required.
Once the License Service is authenticated, it can authorize RecordTS component requests such as Recorders (servers), remote connections (users) and enable extended funtionality of the Dashboard itself as well as other components and products when they become available. The License service will solicit the TSFactory website for subscription information based on which products the customer has purchased, unless an offline license has been purchased.

11 ● Quick Overview TSFactory LLC
If none have been purchased and a trial period has been authorized for the customer, then the License server will allow as many servers and users as needed for the trial period (usually 30 days). Once the trial expires, the system will stop recording until additional time is purchased.
NOTE: It is strongly suggested to purchase or renew subscriptions prior to expiration to avoid disruption of service.
Database
RecordTS Recorders stream session data to a central location for safe keeping and easy session playback. There are three options available for storing sessions:
• Microsoft SQL Server 2012, 2014, 2016 or higher
• PostgreSQL v9 or higher
• RecordTS Storage Server (included)
One of these storage systems must be setup and configured for use prior to installation of Dashboard and the Recorders. It is recommended to locate the storage system on a machine that has sufficient drive space available for storing session videos.
NEW IN VERSION 4: RecordTS File Storage Server
What it does: Replaces database storage
Advantages: Free (no need to buy SQL Server Licenses), much faster and efficient than database storage (up to 40x faster), extremely simple to manage (no need for a SQL expert on staff).
If you prefer to use a database server, then Microsoft SQL Server 2012, 2014, 2016 or newer (full version) can be used, or alternatively PostgreSQL v9 or newer with appropriate ODBC database drivers installed on Dashboard and Recorder machines (not on database server itself unless it is on one of those machines). The PostgreSQL ODBC drivers are supplied with the RecordTS software. Installation instructions are posted later in this manual.
Session recording can be buffered in case the SQL/storage server becomes temporarily unavailable, slows down or the network becomes unstable, etc. Once connectivity to the database/storage is restored, buffered session data will be dumped to the SQL database/storage and normal operation will continue. If connectivity to the SQL database/storage is disrupted for extended periods of time, the buffers may fill completely and sessions will be suspended until connectivity to the SQL database is restored. There is now an option called Bypass Mode to allow sessions to continue recording even though licensing has been exceeded or the database/storage server has become inaccessible.
Database session purging is available to automatically remove session videos past a specified number of days.

TSFactory LLC Installing Base Modules ● 12
Installing Base Modules
Overview
RecordTS is made up of five major components: License service, Dashboard console, Database or storage server, various Recorders and a session player. It is assumed a database/storage server is preinstalled and ready for remote connections and that the prerequisite software and configurations have been made prior to installing the RecordTS components.
The order of installation is as follows:
1. RecordTS Storage Server or SQL Database Server
2. License service
3. Dashboard console
4. Recorders

13 ● Installing Base Modules TSFactory LLC
WARNINGS: Read This Before You Start…
Uninstall Older Versions
You cannot upgrade from older versions RecordTS (v1, v2 or v3) to RecordTS v4. You need to uninstall any older versions of RecordTS and reboot before installing v4.
Not on a RD or TS gateway
RecordTS is not intended to be installed on an RDGateway or TSGateway and may prevent either software from functioning properly.
Beware of AV, Backup and Dictation Software
Some third party software packages can interfere with the RecordTS recorder service installation and operation. Software such as antivirus, backup and dictation software can prevent RecordTS from installing or recording properly.
• These packages must be completely disabled during installation.
• Some dictation software may need to be disabled or completely removed in order for RecordTS to operate properly.
Backup, Backup, Backup!
As with any new software, you should make a complete backup of the machines before installing RecordTS. This will enable you to quickly return the systems back to the way they were if you run into any problems.
Read This Manual
RecordTS is server-grade software, meaning it is intended for professionals that have a working knowledge of server and network management. There is a lot of useful and important information in this manual. Read it and save yourself some headaches and time. Get help if you have questions or need help installing and configuring RecordTS. There are some great trouble shooting tools towards the end of this manual.
Ask Questions
We are here to help you. If you are not sure about any aspect of how RecordTS works or is installed, then please contact our support department or one of our partners. You are probably not the first person to ask your question or be confused about this type of software. Servers are complicated and can be tricky to program. Contact us before installing or configuring so we can explain the process and help you have a great experience.

TSFactory LLC Installing Base Modules ● 14
Prerequisites
A functioning database or storage server, configured to accept remote connections.
Choose from one of the following options:
MS SQL Server (v2012 or higher) Full Version (not Express) configured for Windows Authentication (preferred) and allowing remote connectivity
- OR -
PostgreSQL (v9.022 or later), configured for Windows Authentication (preferrred) and allowing remote connectivity
- OR -
RecordTS Storage Server Installed anywhere that all
components can access remotely

15 ● Installing Base Modules TSFactory LLC
Prerequisites (continued from previous page)
At least 1 or 2 server grade machines:
1. Dashboard and license services installed with Windows 2008R2 or Windows 2012R2 or Windows 2016
2. Windows server 2008R2 running Citrix XenApp v6.5
3. PostGreSQL ODBC 32-bit drivers for Windows, v9.3.4 (to be installed on any box that accesses the PostgreSQL database server). The ODBC drivers are included in the download package.
NOTE: it is not necessary to configure a data source; only install the drivers.
4. At least one Windows machine to log in remotely from (act as a client).
5. A domain admin account (or equiv) that has access to all machines in the test, especially the SQL database server and SQL server itself.
6. All machines must be part of the same domain under Active Directory IF you use Windows Authentication
7. All machines must have their firewalls either turned off or properly configured with firewall rules to permit access for the RecordTS components to communicate with each other.
8. Certain programs such as antivirus and backup software can interfere with the proper installation and operation of RecordTS software, especially the recorders. It is strongly recommended to completely disable these programs on the recorded machines prior to installation. The antivirus and backup programs should be configured to ignore the RecordTS working folders and the RecordTS program processes if they are to be enabled after installation.
9. Verify where your XenApp port is located and note if it has been moved.
NOTE: (for testing only) you can install all of the components onto the XenApp machine and have a single server install for your test environment. This is not a recommended configuration for production, especially if you intend on recording more than one machine. In this case it makes more sense to install the license service, Dashboard console and database/storage server on a separate machine during initial testing phases to verify operation and connectivity.
TSFactory LLC Installing Base Modules ● 16
Step 1: Making a Place to Store Session Data
RecordTS Recorders will stream session data to a central storage area that must be setup and configured prior to installing any other components. You have several options for storage:
• RecordTS Storage Server
• Microsoft SQL Server
• PostgreSQL Server
Installing and configuring each of these systems will be described in the following sections.
RecordTS Storage Server
The RecordTS Storage Server may be installed on a machine by itself (preferred) or colocated with the RecordTS Dashboard/License services.
The server should be domain joined and have its firewall either disabled or configured to accept connections from the other RecordTS components. Also, plan for enough drive space to store the amount of sessions you would like to retain. Usually a terabyte or more is required.
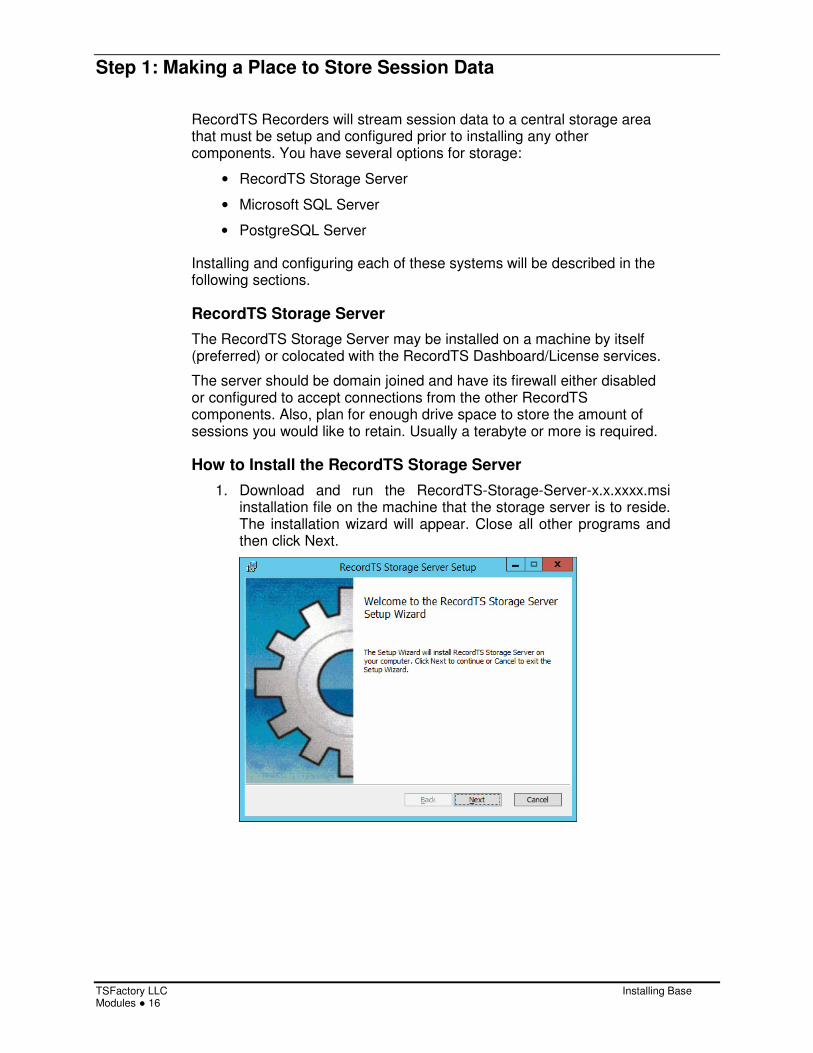
How to Install the RecordTS Storage Server
1. Download and run the RecordTS-Storage-Server-x.x.xxxx.msi installation file on the machine that the storage server is to reside. The installation wizard will appear. Close all other programs and then click Next.

17 ● Installing Base Modules TSFactory LLC
2. Carefully read the license agreement. If you agree to the terms, select the check box to confirm acceptance of the agreement. Click Next to continue installing. To exit Setup, click Cancel.
3. Select the directory where the RecordTS storage server program files will be installed and where the data will be stored. Only local directories on the local machine can be used. If you do not want to use the default directory suggested by the installer, click Browse... to choose another directory. Then click Next.

TSFactory LLC Installing Base Modules ● 18
4. Enter the credentials for a new admin account that will be created for you. This account will have sole access to the storage server and be required in the Dashboard and Recorder configurations.
Important: Write down the admin credentials and keep in a safe place!
5. Configure firewall rules. Select the firewall profiles to add then select the connection type. Secure connection will allow encrypted traffic to the Storage Server from other components. This option must be configured on all components; otherwise unencrypted traffic will be used. You may check both types if you are unsure which type will be implemented then later remove the unused firewall rule.
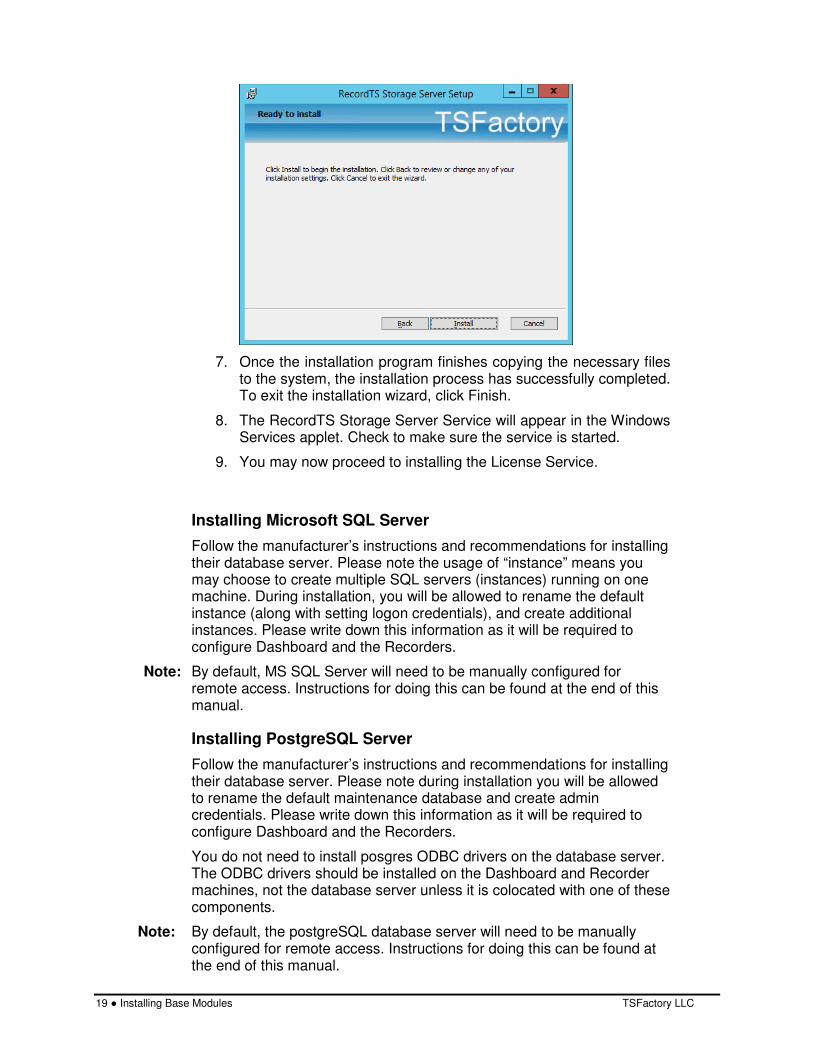
6. To start the installation program, click Install. To modify the installation options that are mentioned in the previous steps, click Back. To exit Setup, click Cancel.
19 ● Installing Base Modules TSFactory LLC
7. Once the installation program finishes copying the necessary files to the system, the installation process has successfully completed. To exit the installation wizard, click Finish.
8. The RecordTS Storage Server Service will appear in the Windows Services applet. Check to make sure the service is started.
9. You may now proceed to installing the License Service.
Installing Microsoft SQL Server
Follow the manufacturer’s instructions and recommendations for installing their database server. Please note the usage of “instance” means you may choose to create multiple SQL servers (instances) running on one machine. During installation, you will be allowed to rename the default instance (along with setting logon credentials), and create additional instances. Please write down this information as it will be required to configure Dashboard and the Recorders.
Note: By default, MS SQL Server will need to be manually configured for remote access. Instructions for doing this can be found at the end of this manual.
Installing PostgreSQL Server
Follow the manufacturer’s instructions and recommendations for installing their database server. Please note during installation you will be allowed to rename the default maintenance database and create admin credentials. Please write down this information as it will be required to configure Dashboard and the Recorders.
You do not need to install posgres ODBC drivers on the database server. The ODBC drivers should be installed on the Dashboard and Recorder machines, not the database server unless it is colocated with one of these components.
Note: By default, the postgreSQL database server will need to be manually configured for remote access. Instructions for doing this can be found at the end of this manual.

TSFactory LLC Installing Base Modules ● 20
Step 2: Installing the RecordTS License Service
The RecordTS Dashboard may be installed on the same machine as the RecordTS license service. The box should be domain joined and have its firewall set, if enabled, to allow connections from Dashboard, the database server and recorders (other terminal servers and Windows machines being recorded).
Note: after installing the RecordTS License Service, the service will appear in the Windows Services applet. It should be started.
How to install the RecordTS License Service
1. Download and run the RecordTS-LicenseServer-4.x.xxx.msi installation file on the machine that the license service is to reside. The installation wizard will appear. Close all other programs and then click Next.
2. Carefully read the license agreement. If you agree to the terms, select the check box to confirm acceptance of the agreement. Click Next to continue installing. To exit Setup, click Cancel.
3. Select the directory where the RecordTS license service program files will be installed. Only local directories on the local machine can be used. If you do not want to use the default directory suggested by the installer, click Browse... to choose another directory. Then click Next.
4. Select profiles to add firewall rules. This step will automatically add firewall rules to allow connections from other modules.
5. To start the installation program, click Install. To modify the installation options that are mentioned in the previous steps, click Back. To exit Setup, click Cancel.
6. Once the installation program finishes copying the necessary files to the system, the installation process has successfully completed. To exit the installation wizard, click Finish.
7. The RecordTS License Service will appear in the Windows Services applet. Check to make sure the service is started.
You may now proceed on to installing the Dashboard webconsole.

21 ● Installing Base Modules TSFactory LLC
Step 3: Installing the Dashboard Console service
The RecordTS Dashboard Console Service must be installed on a Windows Server machine. RecordTS Dashboard may be installed on the same machine as the license service. The box should be domain joined and have its firewall configured (if enabled) to allow connections to the database server and from the recorders (other terminal servers and/or Windows machines being recorded).
Note: after installing the RecordTS Dashboard Console Service, the service will appear in the Windows Services applet along with the RecordTS License Service, if installed, together on the same machine.
How to install the RecordTS Dashboard Console Service
1. Download and run the RecordTS-Dashboard-4.x.xxx.msi installation file on the machine that the license service is to reside. The installation wizard will appear. Close all other programs and then click Next.
2. Carefully read the license agreement. If you agree to the terms, select the check box to confirm acceptance of the agreement. Click Next to continue installing. To exit Setup, click Cancel.
3. Select the directory where the RecordTS Dashboard service program files will be installed. Only local directories on the local machine can be used. If you do not want to use the default directory suggested by the installer, click Browse... to choose another directory.
You may uncheck “Create WebUI Shortcut” to prevent installing shortcuts to each user’s application list. You can access the Dashboard webUI with this URL: http://localhost:8084.
4. Configure firewall rules to be installed.
5. To start the installation program, click Install. To modify the installation options that are mentioned in the previous steps, click Back. To exit Setup, click Cancel.
6. Once the installation program finishes copying the necessary files to the system, the installation process has successfully completed.
7. Uncheck the “Edit configuration now” checkbox.
8. To exit the installation wizard, click Finish.
9. The RecordTS Dashboard Service will appear in the Windows Services applet.
IMPORTANT: Set the service to “log on as” a domain admin user account (or equiv) that has access to the SQL server database (not necessary for RecordTS Storage Server). This user account needs administrative rights, specifically database creation and admin.
10. Restart the Dashboard service. You may now continue on with configuring the Dashboard and license services.

TSFactory LLC Installing Base Modules ● 22
Step 4: Configuring Dashboard and the License Service
The RecordTS Dashboard Console is used to configure the RecordTS license service and various other components to do the following:
Connect to the database server to create a database (if none exists), and manage it.
Authorize RecordTS software components for use, such as the recorders, remote user connections and all Dashboard instances, along with future RecordTS integrated products and components.
Display a list of recorded sessions for the user to browse and play back.
Setup user accounts to control access to Dashboard.
Display subscription licenses and usage information.
For Subscription Customers only:
Connect to the TSFactory website servers to obtain subscription license information using a subscription ID supplied from the online customer account (you need to create one).

23 ● Installing Base Modules TSFactory LLC
Configuring Dashboard for MS SQL Server
1. Display the Dashboard console by locating the program shortcut in the programs list and selecting it.
2. The Dashboard Console should display in the default browser window. If it fails, then a possible problem could be that another program is using the assigned port 8084. This can be changed in the base configuration. Contact support if you need help with this.
IMPORTANT: Set the Dashboard service to “log on as” a domain admin user account (or equiv) that has access to the SQL server database. This user account needs administrative rights, specifically database creation and admin.
3. The first thing to configure is the Database server settings. Microsoft SQL Server should be selected by default. (see figure 1-1).
4. Enter the database server name and instance like this: <sqlserver>\<instancename> substituting your SQL server names, such as <SQLSERVER2012\MSSQLSERVER> where the first name is the actual hostname of the server itself and the second name is the SQL server instance (there can be serveral SQL database server instances co-located on the same server). This is NOT the actual database file name - that will come later. Normally you can leave the instancename blank to use the default instance.
NOTE: Only SQL Server 2012, 2014 or 2016 FULL VERSION is supported (not the Express version due to 10 gig space limitations)
Figure 1-1: Database Server Settings – MS SQL Server
5. Select the type of authentication to the SQL server: either Windows Authentication (preferred method) or SQL Server Authentication. The latter will require entering a username and password with rights to create and manage a database.
6. Click Next

TSFactory LLC Installing Base Modules ● 24
Figure 1-2: Database Settings – MS SQL Server
7. Enter a name for the database (no filename extension is necessary).
8. Click Next
9. You may be prompted to create the database if it does not exist. Click the “Create database” button to proceed.
Figure 1-3: Confirming Database Settings – MS SQL Server
10. You should now be presented with a summary of the SQL Server database settings. Click Save if they are correct, otherwise click Previous to go back and change settings.
11. Move on to configuring Dashboard security access.

25 ● Installing Base Modules TSFactory LLC
Configuring Dashboard for PostgreSQL Server
1. Display the Dashboard console by locating the program shortcut in the programs list and selecting it.
2. The Dashboard Console should display in the default browser window. If it fails, then a possible problem could be that another program is using the assigned port 8084. This can be changed in the base configuration. Contact support for help with this.
3. First thing to configure is the Database server settings. Microsoft SQL Server should be selected. Change this to PostgreSQL Server by selecting the far right radio button (see figure 2-1).
Figure 2-1: Database Server Settings – PostgreSQL Server
4. Enter the database server name, admin username and password (usually “postgres” and the password for this account). You can safely use the default values for the server port and mainenance database fields. If they are different then enter them now.
NOTE: You will need to have installed the 32-bit Postgres ODBC database drivers (provided in the download zip) in order for Dashboard to communicate with the PostgreSQL database. If this is not completed, then an error will be raised when Dashboard attempts to communicate with the database server. Stop now and install the ODBC drivers if needed (do not configure a data source). You may also need to edit the Postgres config files to allow remote access from other machines to the Postgres database.
5. Click Next to continue.

TSFactory LLC Installing Base Modules ● 26
Figure 2-2: Database Settings – PostgreSQL Server
6. Enter a name for the database you wish to use. It will be created for you if it does not exist.
7. Click Next
8. You may be prompted to create the database if it does not exist. Click the “Create database” button to proceed.
Figure 2-3: Confirming Database Settings – PostgreSQL Server
9. You should now be presented with a summary of the PostgreSQL Server database settings. Click Save if they are correct, otherwise click Previous to go back and change settings.
10. Move on to configuring Dashboard security access.

27 ● Installing Base Modules TSFactory LLC
Configuring Dashboard for RecordTS Storage Server
1. Display the Dashboard console by locating the program shortcut in the programs list and selecting it.
2. The Dashboard Console should display in the default browser window. If it fails, then a possible problem could be that another program is using the assigned port 8084. This can be changed in the base configuration. Contact support for help with this.
3. First thing to configure is the storage server settings. Microsoft SQL Server should be selected. Change this to TSFactory Storage Server by selecting the far right radio button. (see figure 3-1)
Figure 3-1: Storage Server Settings
4. Enter the host server name where the Storage Server is installed, admin username and password that was used during install of the storage server. Click Next to continue.
5. You should now be presented with a summary of the PostgreSQL Server database settings. Click Save if they are correct, otherwise click Previous to go back and change settings.
Figure 3-2: Confirming Storage Server Settings
Move on to configuring Dashboard security access

TSFactory LLC Installing Base Modules ● 28
Configuring Dashboard Security Access
After saving the database settings, you will be required to enter administrative logon credentials for both Dashboard and License Server access. Enter a username and password for administrative access to the Dashboard webconsole (see figure 4-1).
Figure 4-1: Creating Dashboard Administrator Credentials
Log into the Dashboard webconsole using the credentials entered in the previous step. Make sure you write down the username and password and store them in a secure place (see figure 4-2).
Figure 4-2: Logging into the Dashboard Webconsole
After logging into the Dashboard webconsole, some warnings will be displayed. This is normal. Refer to figure 4.3.
NOTE: The warning messages will clear once the license service is configured properly.
1. Set the Security setting “Connections allowed” to “From any computer” to allow remote session playback from other computers.
2. Click Save Config
Continue on to configuring the License Server
29 ● Installing Base Modules TSFactory LLC
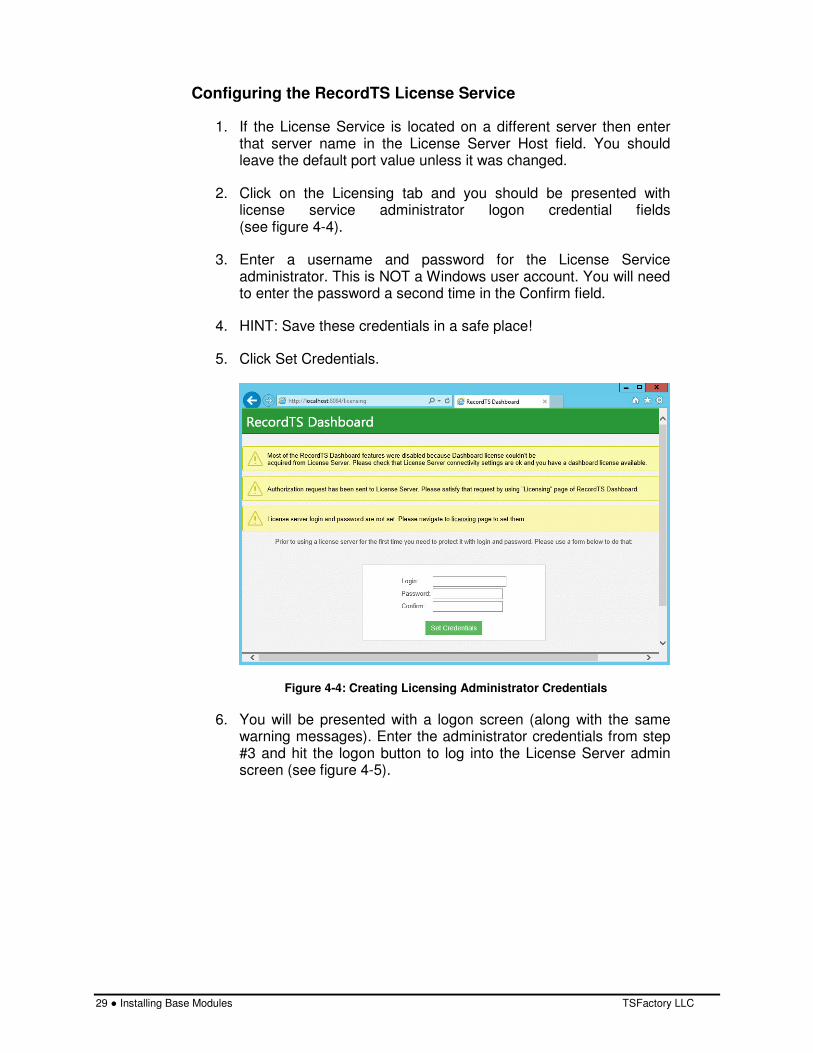
Configuring the RecordTS License Service
1. If the License Service is located on a different server then enter that server name in the License Server Host field. You should leave the default port value unless it was changed.
2. Click on the Licensing tab and you should be presented with license service administrator logon credential fields (see figure 4-4).
3. Enter a username and password for the License Service administrator. This is NOT a Windows user account. You will need to enter the password a second time in the Confirm field.
4. HINT: Save these credentials in a safe place!
5. Click Set Credentials.
Figure 4-4: Creating Licensing Administrator Credentials
6. You will be presented with a logon screen (along with the same warning messages). Enter the administrator credentials from step #3 and hit the logon button to log into the License Server admin screen (see figure 4-5).

TSFactory LLC Installing Base Modules ● 30
Figure 4-5: Logging into the Licensing Page
7. At this point the license service can run in Trial Mode for 30 days, unlicensed. After this it will require a license key OR subscription ID code. There are three license modes:
(a) Unlicensed, the license server goes into TRIAL MODE for 30 days, after which it will disable all modules if no license or subscription ID is entered.
(b) A license key permanently enables the license server.
(c) A subscription ID effectively links this license server to your customer account. (requires internet connection)
Figure 4-6: Authorizing the License Service
8. If you are running the Trial, then move on to step 12.
9. If you have a license key, enter it into the License Key field and click on Set License Key.
10. If you are using a subscription, log in to your customer account and locate your subscription ID or find the one issued by a
31 ● Installing Base Modules TSFactory LLC
TSFactory rep. Copy and paste it into the License Key field (no spaces or new lines after the last character which should be an equals ‘=’ sign) and click on Set License Key.
11. The license service should report it has been authorized and is up and running.
For subscriptions - if the license server reports authorization required then you may need to return to your customer account and manually authorize this license server. If you look at your subscription in your customer account, there should now be an “Authorize” button. Click on it to authorize your license server.
Refreshing the Dashboard window should clear the messages after manual authorization.
NOTE: This process can take up to 5 mins.
12. The license service should now have an authorization request for Dashboard itself. Refer to figure 4-6. Click on the Allow button.
This process can take several minutes so refresh the window periodically until all the warning messages dissappear.
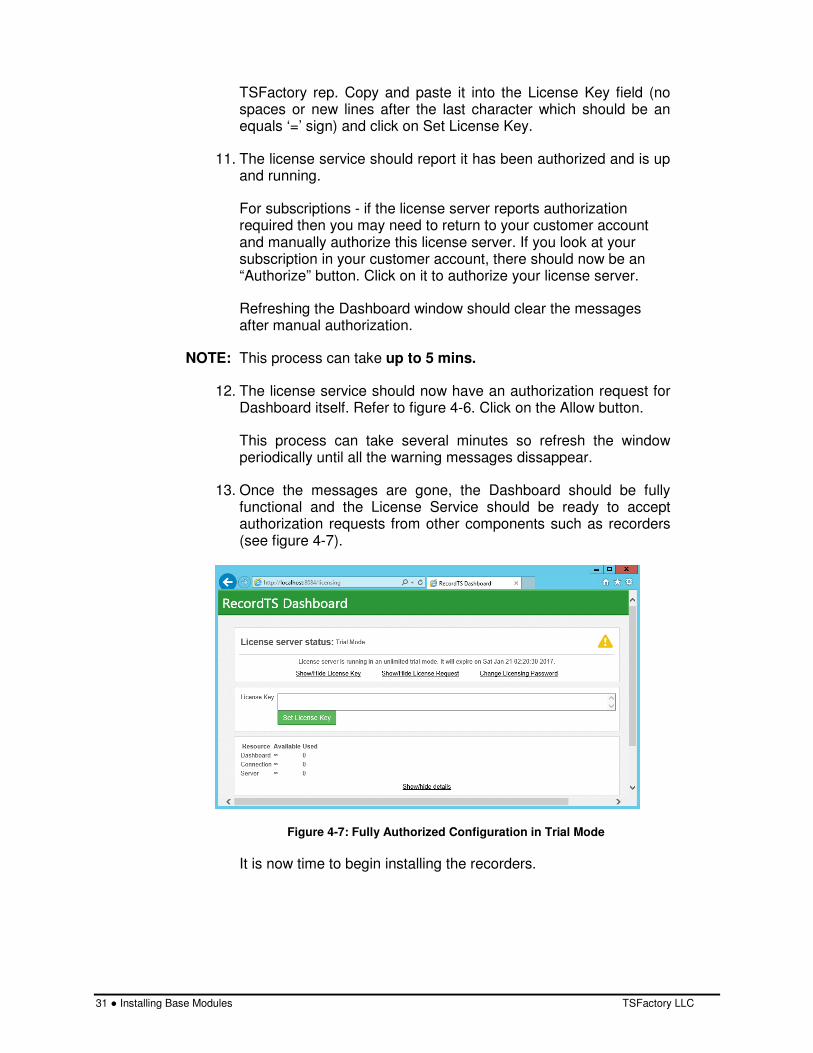
13. Once the messages are gone, the Dashboard should be fully functional and the License Service should be ready to accept authorization requests from other components such as recorders (see figure 4-7).
Figure 4-7: Fully Authorized Configuration in Trial Mode
It is now time to begin installing the recorders.

TSFactory LLC Installing Recorders ● 32
Installing Recorders
Overview
In order to record remote sessions on a Citrix XenApp server, a RecordTS “recorder” must be installed on each XenApp server you wish to record. Once a recorder is installed and properly configured, a recorder server license will be pulled from the general pool of recorder licenses held by the RecordTS license service.
There will be brief interruptions in service while the recorders are being authorized by the license service and the overall configuration process is completed.
Please plan for down time while installing recorders in a production environment.
General process
1. Update firewall rules and disable antivirus software
2. Install recorder software *
3. Configure and test database connectivity
4. Configure and test license server connectivity
5. Save the configuration (service will restart) *
6. Authorize recorder in Licensing tab of Dashboard console **
IMPORTANT: The RecordTS license service can take up to several minutes to verify and authorize the recorder.
* remote connections may be lost during these steps ** connections will not be accepted by the recorder until it is authorized

33 ● Installing Recorders TSFactory LLC
Recorder Types
There is currently one type of Recorder in RecordTS v4, a universal recorder that can record multiple protocols at once. This new universal recorder replaces the previous v3 recorders targeted toward specific protocols. Only one universal Recorder should be installed on each machine to be recorded.
NOTE: This document will ONLY cover installing the universal Recorder on a Windows Server 2008R2 running Citrix XenApp v6.5 with or without remote desktop (RDP) access enabled.
TSFactory LLC Installing Recorders ● 34
Prerequisites
RecordTS Dashboard and License Service installed and configured, ready to authorize and license recorders.
A functioning database server, configured to accept remote connections (the same one used with Dashboard).
A Citrix XenApp 6.5 server in a properly configured, fully tested Citrix XenApp environment with Storefront and Delivery Controller.
A domain admin or equivalent account to use as Recorder service logon as user account that has admin rights to access the SQL server database (not required for RecordTS Storage Server).
Appropriate postgreSQL database 32-bit ODBC drivers installed (do NOT configure a data source)
NOTE: Please refer to the TSFactory support website for up to date information or contact our support team with concerns or questions prior to installation.

35 ● Installing Recorders TSFactory LLC
RecordTS Recorder
Pre-installation Requirements
FIREWALL: On the machine to be recorded, verify the firewall is either turned off or let the installer create the necessary rules to allow the recorder service to operate (see support section at the end of this document).
Warning: you may lock yourself out of the machine remotely after the first restart if you don’t fix this beforehand.
ANTIVIRUS: Temporarily disable any antivirus programs that can interfere with the installation of the recorder service. Also, configure the antivirus program to ignore the recorder service and its working directories. Very important for Windows Server 2016!
Installing the Recorder
1. Download and run the RecordTS-Recorder-4.0.xxxx.msi installation file on the machine that is to be recorded. The installation wizard will appear. Close all other programs and then click Next.
Figure 5-1: Installing the Recorder
2. Carefully read the license agreement. If you agree to the terms, select the check box to confirm acceptance of the agreement. Click Next to continue installing. To exit Setup, click Cancel.

TSFactory LLC Installing Recorders ● 36
Figure 5-2: Accepting the License Agreement
3. Select the directory where the RecordTS recorder service program files will be installed. Only local directories on the local machine can be used. If you do not want to use the default directory suggested by the installer, click Browse... to choose another directory.
You may uncheck “Create WebUI Shortcut” to prevent installing shortcuts to each user’s application list. You can access the Dashboard webUI with this URL: http://localhost:8085.
Click Next to continue.
Figure 5-3: Selecting the Installation Directory
4. Select firewall rules to be created. Check the profiles to create firewall rules for this Recorder. The installer will automatically create the necessary rules to allow other components to communicate with the Recorder service.

37 ● Installing Recorders TSFactory LLC
Figure 5-4: Creating firewall rules.
Click on the Advanced settings button to view more firewall rules options. Select the types of traffic to be accommodated. The default settings are intended for Terminal Services protocol traffic and should not need to be altered. Check the bottom box if you want to connect remotely to the Recorder configuration Web UI.
Figure 5-5: Advanced firewall rules settings.
5. In this step, you can choose to enable Licensing Bypass Mode, which allows users to connect remotely without being recorded when RecordTS user licenses are not available. By default, users are not allowed to connect remotely if RecordTS user license are not available. This ensures that all sessions are recorded. Enabling bypass mode should be considered carefully and only used when user connectivity is more important than recording sessions.

TSFactory LLC Installing Recorders ● 38
Figure 5-6: Enabling Licensing Bypass Mode
6. In this step, you can choose to enable Database Bypass Mode, which allows users to connect remotely without being recorded when RecordTS cannot connect to the database server to store session data. By default, users are not allowed to connect remotely if the RecordTS recorder loses connection to the database server. This ensures that all sessions are recorded. Enabling bypass mode should be considered carefully and only used when user connectivity is more important than recording sessions.
Figure 5-7: Enabling Database Bypass Mode
7. To start the installation program, click Install. To modify the installation options that are mentioned in the previous steps, click Back. To exit Setup, click Cancel.

39 ● Installing Recorders TSFactory LLC
Figure 5-8: Beginning the Recorder Installation
8. Once the installation program finishes copying the necessary files to the system, the installation process has successfully completed. To exit the installation wizard, click Finish.
Figure 5-9: Completing the Recorder Installation

TSFactory LLC Installing Recorders ● 40
9. Windows will ask you to restart the server. Select Yes to restart the server.
NOTE: Restarting the server while logged in remotely will terminate your session. Please use the local console for the following steps.
Figure 5-10: Restarting the System
10. Once the system reboots, open the Windows Services applet. The RecordTS Recorder Service and Helper Service should be listed in the Windows Services applet. Check to make sure the Recorder Service is started. The Helper Service does not need to be started.
IMPORTANT: Find the RecordTS Recorder Service again. View the properties window and modify the service to “log on as” a domain admin or equivalent user account that has full access to the database server (not necessary for the RecordTS Storage Server). Save your changes. The service may warn that a restart is required. Restart the service.
WARNING: Restarting the Recorder service may terminate any remote sessions including yours if you are connected remotely.

41 ● Installing Recorders TSFactory LLC
Configuring the Recorder
11. Find and open the Recorder Configuration shortcut in the RecordTS program group. If you elected not to install shortcuts, then you can open a browser and enter this URL:
http://localhost:8085
12. You will be requested to configure authorization access to the Recorder Configuration console. Enter a login and password (twice), then click on Set Credentials. Keep this information in a safe place for future reference.
Figure 5-11: Recorder Configuration Console
13. You will be asked to enter the credentials from the previous step to gain access to the Recorder Configuration.
Figure 5-12: Accessing the Recorder Configuration
14. Once you gain access to the Recorder Configuration, you should see the configuration console appear as seen in figure 5-11 below.

TSFactory LLC Installing Recorders ● 42
Figure 5-13: Recorder Configuration Console
15. It is recommended to leave the Ports settings as they are unless the terminal server port has been changed. RDP recording may be disabled for this server by unchecking the Recording Enabled check box.
16. Enter the database/storage fields as they were entered in Dashboard and test for connectivity.
17. Enable the Database Bypass mode if so desired. Enabling this feature will allow remote connections and not record them if the system cannot access the database to store session data.
18. Set the Buffer Settings – enable if you intend to use this feature.
19. Enter the License Server hostname. You may leave “localhost” if the License Server is installed on this machine (not a recommended configuration).
20. It is not recommended to change the License Server port address unless it was changed during configuration at the Dashboard. Test for connectivity.
21. Enable License Bypass mode if so desired. Enabling this feature will allow unrecorded remote connections when licenses cannot be aquired from the RecordTS License Service.
22. Now that all the settings have been entered and tested, click on Save Config. The service will restart causing loss of connection, this time until the recorder is authorized at the Dashboard console.
23. After the service restarts, the recorder configuration console should raise a warning that the recorder requires authorization from the license server. If it does not, refresh the window.

43 ● Installing Recorders TSFactory LLC
24. Go to the Dashboard console and satisfy the recorder authorization request by clicking on the Allow button.
Figure 5-14: Recorder authorization request at Dashboard
25. Return to the recorder configuration console and refresh the window. DO NOT CLICK SAVE. When the error message clears, usually within 5 minutes, the recorder should be ready to accept connections and record.
26. Verify functionality by connecting remotely and look for a session to appear in the Dashboard console Sessions tab.
The recorder should be up and running now.

TSFactory LLC Playing Recorded Sessions ● 44
Playing Recorded Sessions
The WebPlayer is a handy tool for playback of recording files. It does not require installation and only requires a browser on any Windows machine for convenient playback. User must have security access to the Dashboard to play back sessions.
How to view sessions locally:
1. Enter the Dashboard Console and navigate to the Sessions tab.
2. Locate a session to view.
3. Click on Play and your session will begin playback in a new browser tab.
4. Click on Export to export a session to disk in a standard video format (.m2ts) [Blu-ray Disc Audio-Video (BDAV) MPEG-2 Transport Stream] which can be played in most media players.
5. Close the tab when done viewing.
How to view sessions remotely:
1. Make sure the Dashboard Security setting “Connections allowed” is set to “From any computer” to allow remote session playback from other computers
2. From a remote browser, enter the following URL:
http://Dashboard:8084
Where Dashboard should be replaced with the actual Dashboard hostname or IP address.
45 ● Playing Recorded Sessions TSFactory LLC
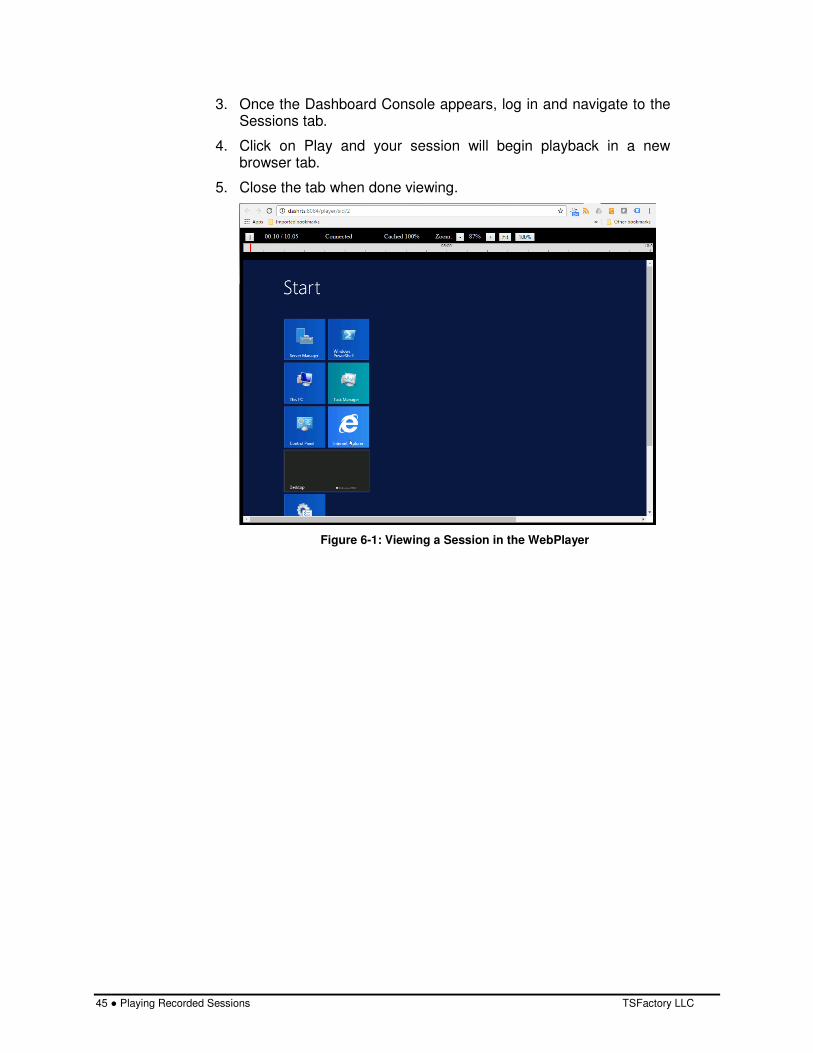
3. Once the Dashboard Console appears, log in and navigate to the Sessions tab.
4. Click on Play and your session will begin playback in a new browser tab.
5. Close the tab when done viewing.
Figure 6-1: Viewing a Session in the WebPlayer

TSFactory LLC Optimizing RecordTS ● 46
Optimizing RecordTS
Dashboard Features
There are many ways to optimize performance and take advantage of special features of RecordTS. Let’s start by looking at the Dashboard console:
Figure 7-1: Recorder authorization request at Dashboard
Remote Dashboard Access
The “Connections allowed” feature lets you connect remotely to Dashboard from another computer using a browser. Select the “From any computer” to allow connections from other computers.
NOTE: Changing this feature will reduce security by allowing foreign computers to have access to the Dashboard configuration pages.
This feature is useful if you want to manage Dashboard remotely or allow others the ability to view recorded sessions from their desktop. To view sessions remotely, the user will need security access to the Dashboard prior to viewing any sessions.
To connect remotely, the user will need access permission to connect to the Dashboard machine. In a browser on the user’s desktop, enter this
47 ● Optimizing RecordTS TSFactory LLC
URL: http://Dashboard:8084/config where Dashboard should be replaced with the actual Dashboard hostname or IP address.
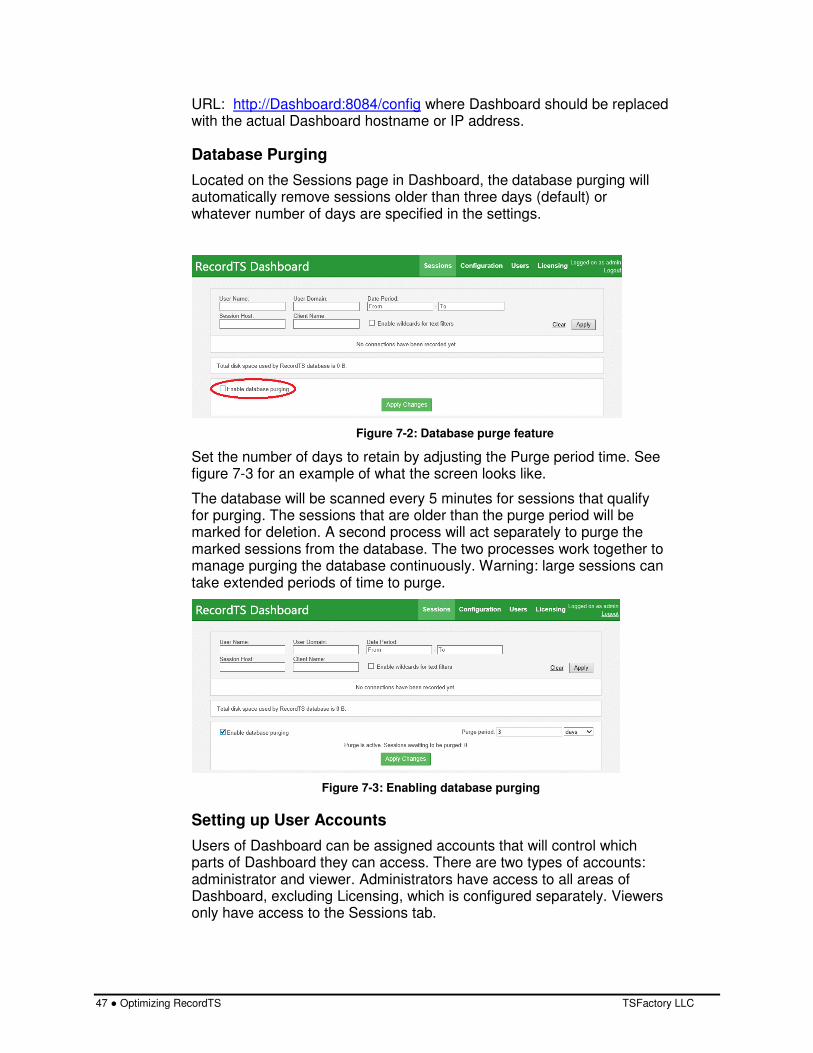
Database Purging
Located on the Sessions page in Dashboard, the database purging will automatically remove sessions older than three days (default) or whatever number of days are specified in the settings.
Figure 7-2: Database purge feature
Set the number of days to retain by adjusting the Purge period time. See figure 7-3 for an example of what the screen looks like.
The database will be scanned every 5 minutes for sessions that qualify for purging. The sessions that are older than the purge period will be marked for deletion. A second process will act separately to purge the marked sessions from the database. The two processes work together to manage purging the database continuously. Warning: large sessions can take extended periods of time to purge.
Figure 7-3: Enabling database purging
Setting up User Accounts
Users of Dashboard can be assigned accounts that will control which parts of Dashboard they can access. There are two types of accounts: administrator and viewer. Administrators have access to all areas of Dashboard, excluding Licensing, which is configured separately. Viewers only have access to the Sessions tab.
TSFactory LLC Optimizing RecordTS ● 48
To setup a user account, click on the User tab. You should see the User accounts page as displayed below.
Figure 7-4: Setting up User accounts
There is one master administrator account setup during installation which cannot be deleted. More accounts may be added using the Create User button. You may setup as many user accounts as needed. Existing user accounts may be edited or deleted using the appropriate buttons as depicted below.
Figure 7-5: Managing User accounts
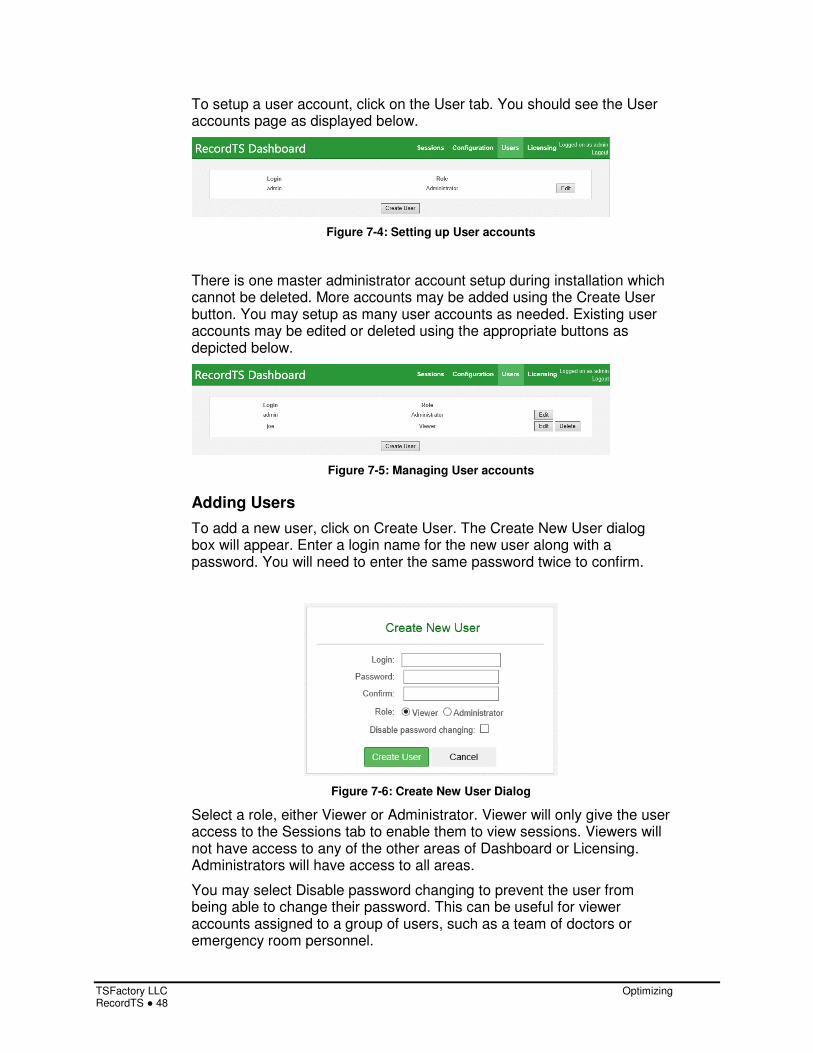
Adding Users
To add a new user, click on Create User. The Create New User dialog box will appear. Enter a login name for the new user along with a password. You will need to enter the same password twice to confirm.
Figure 7-6: Create New User Dialog
Select a role, either Viewer or Administrator. Viewer will only give the user access to the Sessions tab to enable them to view sessions. Viewers will not have access to any of the other areas of Dashboard or Licensing. Administrators will have access to all areas.
You may select Disable password changing to prevent the user from being able to change their password. This can be useful for viewer accounts assigned to a group of users, such as a team of doctors or emergency room personnel.

49 ● Optimizing RecordTS TSFactory LLC
Click on the Create User button to commit the changes and create the new user account.
Editing Users
Click the Edit button next to a user you wish to change their account settings.
Figure 7-7: Edit User Profile Dialog
You may change the user’s login name, password or disable/enable them from changing their password. You will need to enter your admin password in order to save changes.
Click Save changes to commit the modifications made or Cancel to disgard the changes and return to the previous screen.
Deleting User Accounts
To remove a user account, click on the Delete button next to their account login. You will be presented with a confirmation dialog box. Click on the Delete button to complete the process or Cancel to abort the mission and return to the previous screen.
Figure 7-8: Delete User Confirmation Dialog

TSFactory LLC Optimizing RecordTS ● 50
Recorder Features
RecordTS recorder service has a number of built-in features that can enhance performance and data integrity. Let’s take a look at the RecordTS Recorder for Citrix Configuration:
Figure 8-1: Recorder Configuration Dialog
Buffer Settings
This feature of the recorder is used to buffer session data during times of slow responsiveness or loss of connectivity to the database. In these instances, session data will continue to be streamed to local storages, depending on configuration settings. Once connectivity is restored, locally cached session data will be sent to the database and normal operation will continue.
The first place the recorder will store data is to local memory. The size of the buffer can be set in the Memory buffer size (MB) field. The default size is 256 MB. This option is always enabled allowing for brief moments of intermittant database connectivity.
The next place the recorder will store data is to a local file. This option is normally disabled and must be enabled for the recorder to take advantage of it. To enable, check the box labeled “Enable file buffer”.
This action will cause additional fields to be displayed as depicted in Figure 8-2 below.

51 ● Optimizing RecordTS TSFactory LLC
Figure 8-2: Enabling the File Buffer Feature
The file buffer size can be adjusted by entering a number in the Size (MB) field. The default buffer size is 1024 MB. The file buffer file name and path can be set in the File buffer path field. It is ok to leave the default values as they are.
To summarize, when connectivity to the database becomes intermittant or lost, immediately the recorder will buffer session data into local memory until it fills. Then if file buffering is enabled, the recorder will store session data into a local file. When the file is completely filled (i.e. the file size is met), the recorder will cease storing data and automatically terminate the session. The user will lose their connection to prevent further unrecorded activity and also to act as a passive alarm system for the admins (users will complain).
NOTE: There is a non-documented feature that can change the default behavior of the recorder when buffers are completely exhausted to allow session to continue without being recorded. Please contact support for instructions on how to set this option via registry edits.
Drain Mode
The drain mode feature allows users to continue working when a server reboot is initiated by Windows. The recorder will hold off the reboot until the last remaining user has logged off their session. Then the system reboot will commence and new RDP connections will be ignored until the recorder service has determined that Windows terminal services is ready to accept new connections. Normal operations will continue once the recorder is listening on port 3389 and ready to accept remote desktop connection requests.
To enable Drain Mode, click on the slider button labeled Drain mode as shown in figure 8-3 below.

TSFactory LLC Optimizing RecordTS ● 52
Figure 8-3: Drain Mode Option
Once Drain Mode has been enabled, a warning message will be displayed, indicating the number of users currently logged into the system and any actions that will be taken. Refer to figure 8-4 below.
Figure 8-4: Drain Mode Example Warning Message
Once the last user logs off their session, the all clear message will appear instructing the admin it is ok to proceed with rebooting the machine.
Disabling Drain Mode will dispense with the warning message and return operation back to normal.

53 ● Optimizing RecordTS TSFactory LLC
RecordTS Storage Server Backup Tool
The RecordTS Storage Server comes with scripts that allow you to back up and restore the database files. There are also options to check the integrity and display information on an existing archive.
WARNING: The RecordTS Storage Server service must be stopped before creating a backup of the database. This means all users must be logged off and no session recording is happening. Plan ahead for system to be offline while the backup or restore takes place.
Here are the basic modes for performing a backup of the storage database along with restoring it and operations to verify the integrity of an archive.
Help
This mode will display instructions on how to use the tool.
To display tool help:
On the machine that RecordTS Storage Server is installed, open a DOS command or Powershell window and navigate to the RecordTS Storage Server program files folder here:
C:C:C:C:\\\\Program Files (x86)Program Files (x86)Program Files (x86)Program Files (x86)\\\\TSFactoryTSFactoryTSFactoryTSFactory\\\\StorageServerStorageServerStorageServerStorageServer
Execute the following command:
> rtsrtsrtsrts----storagestoragestoragestorage----backup backup backup backup --------helphelphelphelp
Here is the output:

TSFactory LLC Optimizing RecordTS ● 54
Backup
This mode will copy the database files to a specified location using various command line switches to tailor the archive.
Simple backup procedures:
On the machine that RecordTS Storage Server is installed, first stop the storage server service, then open a DOS command or Powershell window and navigate to the RecordTS Storage Server program files folder here:
C:C:C:C:\\\\Program Files (x86)Program Files (x86)Program Files (x86)Program Files (x86)\\\\TSFactoryTSFactoryTSFactoryTSFactory\\\\StorageServerStorageServerStorageServerStorageServer
Execute the following command:
> > > > rtsrtsrtsrts----storagestoragestoragestorage----backup backup backup backup backup backup backup backup ----d d d d backupfolderbackupfolderbackupfolderbackupfolder
where: backupfolder is the directory to store the backup.
The backup process will take time to copy the database files so expect some down time while the process completes.
Command line switches include:
-d, --directory Directory to save an archive with backup data
-n, --name ARG Specify name of backup archive.
-c, --comment Include a comment with backup archive.
--compress Compress files in an archive.
--no-compression Store files without compression.
--bzip Pack data with BZip2 algorithm.
-f, --force Suppress user input requests.
-h, --help Display help.
If a custom name is not specified, the tool will generate a name for you with the format: RTS_Storage_ServerYYYYMMDD-XXXXXX.zip
The .zip file extension will automatically added if no extension was specified.
Where: YYYY = year, MM = month, DD = day, XXXXXX = internally generated timestamp suffix.
Restore
This mode restores data from an archive.
Simple restore procedures:

55 ● Optimizing RecordTS TSFactory LLC
On the machine that RecordTS Storage Server is installed on, first stop the storage server service, open a DOS command or Powershell window and navigate to the RecordTS Storage Server program files folder here:
C:C:C:C:\\\\Program Files (x86)Program Files (x86)Program Files (x86)Program Files (x86)\\\\TSFactoryTSFactoryTSFactoryTSFactory\\\\StorageServerStorageServerStorageServerStorageServer
Execute the following command:
> > > > rtsrtsrtsrts----storagestoragestoragestorage----backup restore backup restore backup restore backup restore ----a a a a archivearchivearchivearchive
where: archive is the path\filename of the archive.
The tool will warn you the existing configuration files will be removed. This is normal. Press Enter to continue restoring or type ‘n’ to quit.
The restore process will take time to extract and copy the database files from the archive so expect some down time while the process completes.
Command line switches include:
-a, --archive ARG Specify name of the archive file to restore.
-f, --force Suppress user input requests.
-h, --help Display help.
Check
This mode verifies archive integrity.
On the machine that RecordTS Storage Server is installed, open a DOS command or Powershell window and navigate to the RecordTS Storage Server program files folder here:
C:C:C:C:\\\\Program Files (x86)Program Files (x86)Program Files (x86)Program Files (x86)\\\\TSFactoryTSFactoryTSFactoryTSFactory\\\\StorageServerStorageServerStorageServerStorageServer
Execute the following command:
> > > > rtsrtsrtsrts----storagestoragestoragestorage----backup check backup check backup check backup check ----a a a a archivearchivearchivearchive
where: archive is the name and location of the archive file.
The integrity checking process may take time so plan accordingly.
Command line switches include:
-a, --archive ARG Specify name of the archive file to restore.
-h, --help Display help.

TSFactory LLC Optimizing RecordTS ● 56
Info
This mode reports information about an archive.
On the machine that RecordTS Storage Server is installed, open a DOS command or Powershell window and navigate to the RecordTS Storage Server program files folder here:
C:C:C:C:\\\\Program Files (x86)Program Files (x86)Program Files (x86)Program Files (x86)\\\\TSFactoryTSFactoryTSFactoryTSFactory\\\\StorageServerStorageServerStorageServerStorageServer
Execute the following command:
> > > > rtsrtsrtsrts----storagestoragestoragestorage----backup info backup info backup info backup info ----a a a a archivearchivearchivearchive
where: archive is the name and location of the archive file.
The information reporting process may take time so plan accordingly.
Command line switches include:
-a, --archive ARG Specify name of the archive file to restore.
-h, --help Display help.
57 ● Optimizing RecordTS TSFactory LLC
Backup Tool Examples
For the following examples, you should stop the storage server service before performing a backup or restore operation. All commands are executed from the RecordTS program files folder in a DOS command or Powershell window. See previous section for more information on this process.
To backup the database to another machine (network share) on your network, you will first need to map a local network drive to that machine.
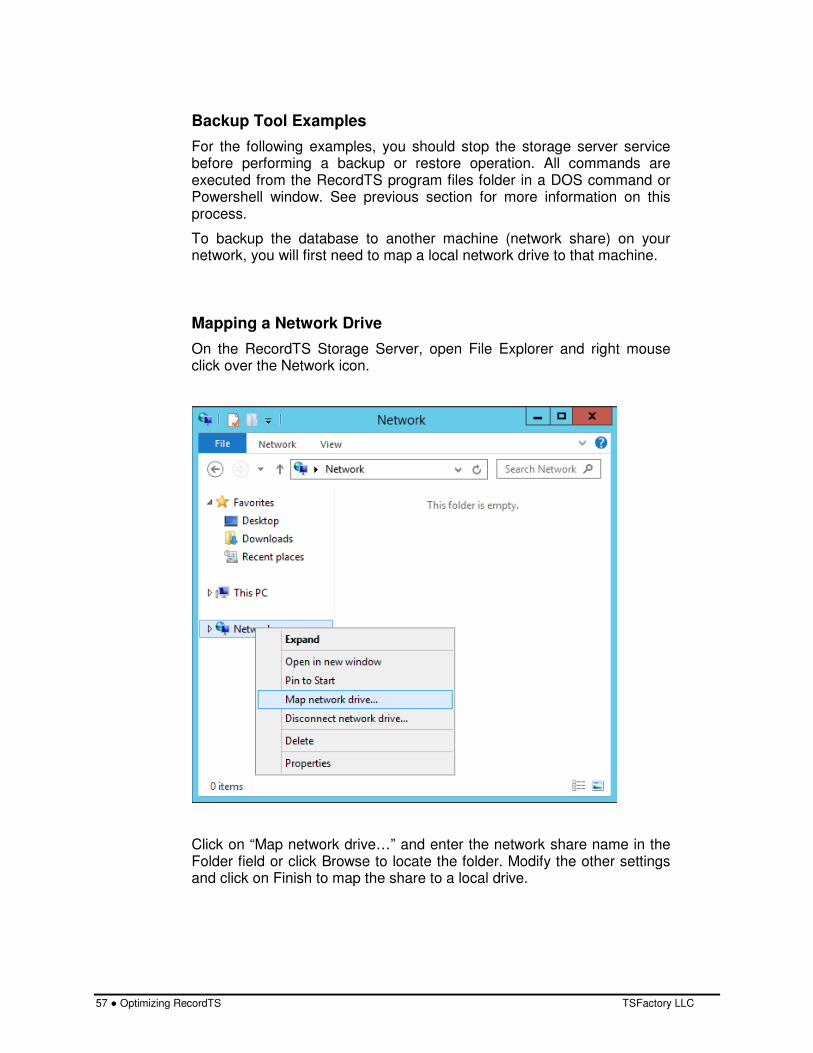
Mapping a Network Drive
On the RecordTS Storage Server, open File Explorer and right mouse click over the Network icon.
Click on “Map network drive…” and enter the network share name in the Folder field or click Browse to locate the folder. Modify the other settings and click on Finish to map the share to a local drive.

TSFactory LLC Optimizing RecordTS ● 58
The mapped drive should appear in the drive list. You are now ready to use it for backups. See below.

59 ● Optimizing RecordTS TSFactory LLC
Examples
Example #1:
Backup the database to mapped network drive Z: using archive name “rtsbackup2018.zip” and add a comment to the archive.
> > > > rtsrtsrtsrts----storagestoragestoragestorage----backup backup backup backup backup backup backup backup ----d d d d Z:Z:Z:Z: ----n rtsbacn rtsbacn rtsbacn rtsbackup2018.zipkup2018.zipkup2018.zipkup2018.zip ----cccc
“weekly video backup”“weekly video backup”“weekly video backup”“weekly video backup”
Here is a screen shot of the backup procedure:
Example #2:
Restore the database from an archive file located on a locally mapped network drive Z: with the archive file name “rtsbackup2018.zip”.
> rts> rts> rts> rts----ststststorageorageorageorage----backubackubackubackup p p p restorerestorerestorerestore ----aaaa zzzz::::\\\\rtsbackup2018.ziprtsbackup2018.ziprtsbackup2018.ziprtsbackup2018.zip
Here is a screen shot of the restore procedure:
Example #3:
Check the integrity of an archive file located on a locally mapped network drive Z: with the archive file name “rtsbackup2018.zip”.
> rts> rts> rts> rts----sssstoragetoragetoragetorage----backup backup backup backup chechechecheck ck ck ck ----a a a a zzzz::::\\\\rtsbackup2018.ziprtsbackup2018.ziprtsbackup2018.ziprtsbackup2018.zip
Here is a screen shot of the archive integrity check procedure:

TSFactory LLC Optimizing RecordTS ● 60
Example #4:
Display the information from an archive file located on a locally mapped network drive Z: with the archive file name “rtsbackup2018.zip”.
> > > > rtsrtsrtsrts----stostostostoragerageragerage----backup info backup info backup info backup info ----a a a a zzzz::::\\\\rtsbackup2018.ziprtsbackup2018.ziprtsbackup2018.ziprtsbackup2018.zip
Here is a screen shot of the archive information dump:
Note the last line will be the comment if one was specified during backup.

61 ● Optimizing RecordTS TSFactory LLC
Support
How to get support
Below are some solutions to the more common problems encountered during product installation and configuration. The TSFactory website is another excellent resource for solutions to commonly found problems.
If you cannot resolve your problem using these solutions, please contact our technical support team at [email protected].
Support Disclaimer:
Assistance is limited to providing suggestions for problem resolution and in some extreme cases, remote debug. The customer is expected to try any suggestions and use whatever resourses they have to resolve their problems. Customers are encouraged to work with local resellers and partners that are listed on our website to assist in problem resolution.
Dashboard Problems
Database connection errors:
Check that the Dashboard service is set to “log on as” a user account such as a domain admin or equivalent that has permissions to access and manage the database server. Rights should include database creation. The service will need restarting once the user account has been assigned.
Verify connectivity to the database server using a database admin tool. Sometimes SQL Server and postgreSQL need to be configured to accept remote connections. Refer to the Database Problems section below for more info on how to configure the databases to allow remote connections.
If you are using postgreSQL, make sure the postgres ODBC 32-bit drivers are installed. You do not need to create a data source, just install the drivers. The 64-bit drivers will not work so please use the drivers that are included in the download zip file.
License Server connection errors:
If you have installed the license service on the same machine as Dashboard, then you can leave the default settings for license server name as “localhost”. Otherwise you will need to enter the hostname or IP address of the server where the license server was installed. Make sure you have configured the firewall to allow connections to the license server, especially if it is in a DMZ.
TSFactory LLC Optimizing RecordTS ● 62
Dashboard console will not display:
Usually this is due to another program using port 8084. Either change the other program to use another port or contact support for instructions on changing the Dashboard port.
Licensing Problems
License server reports subscription in use by another license server or license server needs to be authenticated:
Please log into your customer account at www.tsfactory.com and navigate to the subscriptions page. There you should find the list of your subscriptions and in the list you should find a button named “Authorize”. If you cannot find the button to authorize the server, then check your external firewall is allowing connections to cla.tsfactory.com on port 27280. If the Authorize button is there, click on it to authorize the license server. Refresh the Dashboard window and the license server should acknowledge the authorization and within a minute report “License server is up and running.”
License server warnings are not clearing after configuration:
Usually they will disappear within 4-5 minutes. Please be patient and wait. Refresh the screen often. If they still are not clearing then contact support for assistance.
Recorder Problems
Database connection errors:
Check that the Recorder service is set to “log on as” a user account such as a domain admin or equivalent that has permissions to access and manage the database server. Rights should include database creation. The service will need restarting once the user account has been assigned.
Verify connectivity to the database server using a database admin tool. Sometimes SQL Server and postgreSQL need to be configured to accept remote connections. Refer to the Database Problems section below for more info on how to configure the databases to allow remote connections.
If you are using postgreSQL, make sure the postgres ODBC 32-bit drivers are installed. You do not need to create a data source, just install the drivers. The 64-bit drivers will not work so please use the drivers that are included in the download zip file.
Users cannot connect remotely after installation and rebooting:
There are several reasons why this can happen. First verify that the Recorder service has installed itself properly. They should match the port settings for the terminal services listener. You can check which ports are active by running the

63 ● Optimizing RecordTS TSFactory LLC
netstat command (see directions below). By default, RecordTS should be listening on port 1494 and terminal services should be listening on port 1495.
If you have other communication software such as accelerators or third party software that injects itself into the stream like transcription software, then you will need to find out how that software is configured and adjust the port settings appropriately. RecordTS moves the terminal services listening port from 1494 to 1495 and places itself on port 1494. If another software is trying to do the same thing or interfere with this configuration then the system will break.
Please make sure you completely disable all anti-virus software as it will see this port movement as an assault on the system and prevent RecordTS from installing properly.
Runing the netstat command
In a DOS command window or Windows powershell, run “netstat -bano” and verify that [recorder-ctx.exe] is listening on port 1494 and TermService is listening on port 1495.
Figure 9-1: Netstat command output
If the ports are not configured properly, then RecordTS will not operate correctly and you will need to uninstall RecordTS, reboot and look for culprits that can interfere with port assignment. Programs that are capable of doing this are antivirus programs, backup software and possibly any other program that can intercept or interrupt remote desktop connections or communications. Transcription software and terminal server add-on’s may also cause this problem.
Users can connect to their desktops, but no recordings are being made:
This is usually due to port misconfiguration. If the clients can connect to port 1494 and no recordings are made, then its usually because terminal services is still

TSFactory LLC Optimizing RecordTS ● 64
listening on that port and not RecordTS. You can verify port status by running “netstat –bano” in a DOS command window. RecordTS should be listening on port 1494 and terminal services should be listening on port 1495. If this is not the case then it is possible another program has intefered with the installation. If all else fails, reinstall the RecordTS recorder making sure you reboot before installing and again after installing. Refer to the previous sections on debugging port assignment problems.
Database Problems
Before we get into listing common problems, one of the first things to note is that by default, both MS SQL Server and PostgreSQL require additional configuration to allow remote access to the databases. Each product is different in its configuration and if you suspect this is the problem, then please refer to the sections below on how to configure the database to allow remote connections.
Database connection errors:
Check that the Recorder and Dashboard services are set to “log on as” a user account such as a domain admin or equivalent that has permissions to access and manage the database server. Rights should include database creation. The service will need restarting once the user account has been assigned.
Verify connectivity to the database server using a database admin tool. By default, SQL Server and postgreSQL need to be configured to accept remote connections. Refer to the sections below that describe how to configure the databases to allow remote connections.
If you are using postgreSQL, make sure the postgres ODBC 32-bit drivers are installed. You do not need to create a data source, just install the drivers. The 64-bit drivers will not work so please use the drivers that are included in the download zip file.
Database cannot be created or accessed:
This is usually because someone tried to create the database themselves. Please let the software create the database for you as it will create the necessary schema and tables that are required by RecordTS.
Verify that the user account that the Dashboard or Recorder service is set to “log on as” has the required permissions to create and manage a database.
Database schema needs to be updated:
Simply click on the upgrade button and RecordTS will make the current database format compatible with the new database schema.
Configuring PostgreSQL to Allow Remote Connections:

65 ● Optimizing RecordTS TSFactory LLC
PostgreSQL needs to be configured to allow connections from other machines on the network. By default it blocks all remote connections. You will need to edit the postgres configuration file “pg_hba.conf” to allow remote connections. This cannot be done from the database admin utility PGAdmin. You must edit the configuration file manually as shown below. The path to the file will look something like this:
C:\Program Files\PostgreSQL\9.6\data
Here is an example to allow connections from all machine IP’s for IPv4:
# IPv4 local connections:
host all all 127.0.0.1/32 md5
host all all 0.0.0.0/0 trust
Configuring MS SQL Server to Allow Remote Connections:
MS SQL Server needs to be configured to allow connections from other machines on the network. By default it blocks all remote connections. You will need to edit the configuration using the SQL Server Configuration Manager utility to allow remote connections. The TCP/IP protocol must be Enabled in the SQL network client protocol configurations. See below for an example.
Database cannot be created or accessed:
This is usually because someone tried to create the database themselves. Please let the software create the database for you as it will create the necessary schema and tables that are required by RecordTS.
Verify that the user account that the Dashboard or Recorder service is set to “log on as” has the required permissions to create and manage a database.

TSFactory LLC Optimizing RecordTS ● 66
Database schema needs to be updated:
Simply click on the upgrade button and RecordTS will make the current database format compatible with the new database schema.