records emergency planning & response for the alaska...
TRANSCRIPT
Records Emergency Planning & Response for the Alaska State Archives
D. Dawson, CRM State Records Manager
Records & Information Management Program *Division of Libraries, Archives & Museums
Department of Education & Early Development
1/2009
Records Emergency Planning & Response for the Alaska State Archives
i
Preface
Records Emergency Planning & Response for the Alaska State Archives was written to cover the types of emergencies that Alaskans are most likely to experience. Portions of this manual have been adapted from the National Archives & Records Administration, Records Emergency Planning & Response guidelines, the Disaster Preparedness Workbook for US Navy Libraries & Archives, and Disaster: Readiness, Response & Recovery Manual compiled for the state of Rhode Island. The purpose of Records Emergency Planning & Response for the Alaska State Archives is to enable staff to adequately and professionally protect, recover and salvage valuable state records under its care. This plan assigns staff responsibilities in the event of an emergency or disaster and provides essential information and skills required to identify, protect, and make readily available the intrinsically valuable records entrusted to the State Archives' custody under AS 40.21 (Public Records Act). This records emergency action plan may be used in conjunction with other guidelines, such as those produced by the Division of Homeland Security/Emergency Management, Enterprises Technology Services, and the Federal Emergency Management Administration. The State Archivist annually reviews this plan. Records Emergency Planning & Response for the Alaska State Archives focuses on protection and recovery of the archival holdings. However, the protection of human life and safety is the first priority at all times. Staff should never risk their personal safety to protect archival holdings. Further, staff must be aware of specific health risks related to recovery. All individuals involved with response and recovery should have an up-to-date tetanus shot; other immunizations may also be needed, based upon the nature of the emergency.
Records Emergency Planning & Response for the Alaska State Archives
ii
Table of Contents
Page Preface............................................................................................................................................ iii Introduction to Records Emergency Planning & Response ............................................................2 Emergency Instructions ................................................................................................................. 4
Fire ..................................................................................................................................... 4 Water .................................................................................................................................. 4 Bomb Threat ...................................................................................................................... 3 Civil Disturbance or Riot ................................................................................................... 5 Emergency Numbers .......................................................................................................... 6
Records Emergency Action Plan ................................................................................................... 7
Planning Guidelines ........................................................................................................... 7 Liaison with Other Units .................................................................................................... 8 Maintenance Inspections .................................................................................................... 8 Fire Safety .......................................................................................................................... 8 Security ...............................................................................................................................9 Storage Areas ..................................................................................................................... 9 Computer Backups ............................................................................................................. 9
Response Procedures
Water Damage (Routine) ................................................................................................. 10 Mold & Other Contaminants ............................................................................................ 12 Earthquake ....................................................................................................................... 14 Medium-to-Large Scale Disaster ..................................................................................... 15
Salvage Procedures
Salvage Procedures .......................................................................................................... 19 Pack-out ............................................................................................................... 19 Documentation ..................................................................................................... 21 Rinsing ................................................................................................................ 22 Freezing ............................................................................................................... 23 Fire Damage ......................................................................................................... 24
Charred Materials .................................................................................... 24 Smoke/Soot Deposits ............................................................................... 24 Smoke Odor Removal .............................................................................. 24
Fumigation ........................................................................................................... 25 State Archives’ Collection Restoration..........................................................................................25
Records Emergency Planning & Response for the Alaska State Archives
iii
Appendices Appendix A1: Records Emergency Action Team ....................................................................... 26
Emergency Team Responsibilities ....................................................................... 26 Administrative Unit ............................................................................................. 26 State Archives' Collections Unit ......................................................................... 28 Information Technology ....................................................................................... 29 Organizational Chart ............................................................................................ 29
Appendix A2. Staff List .............................................................................................................. 30 Appendix B1. Emergency Supply Stockpile ............................................................................... 31
Stockpile Inventory .............................................................................................. 32 Operational Supplies ............................................................................................ 32 Salvage Supplies .................................................................................................. 34 Site Clean-Up & Rehabilitation ........................................................................... 35
Appendix B2. Suppliers & Service Providers ............................................................................. 36
Supplies ................................................................................................................ 36 Services ................................................................................................................ 38 National Suppliers & Service Providers .............................................................. 41
Appendix C. Evacuation & Emergency Procedures ................................................................... 44
Appendix D. Bomb Threat .......................................................................................................... 45 Bomb Threat Form ................................................................................................ 46 Appendix E. Emergencies--Fire ................................................................................................. 47
Appendix F. Fire Safety............................................................................................................... 47 Appendix G. Electronic Information Systems Backup & Recovery Plans ................................. 49
Computer Backups ................................................................................................. 49 Recovery ................................................................................................................ 49
Appendix H. Floor Plans ............................................................................................................ 49 Appendix I. Packout Form ....................................................................................................... 50 Appendix J. Inspection Checklist...............................................................................................51
Records Emergency Planning & Response for the Alaska State Archives
iv
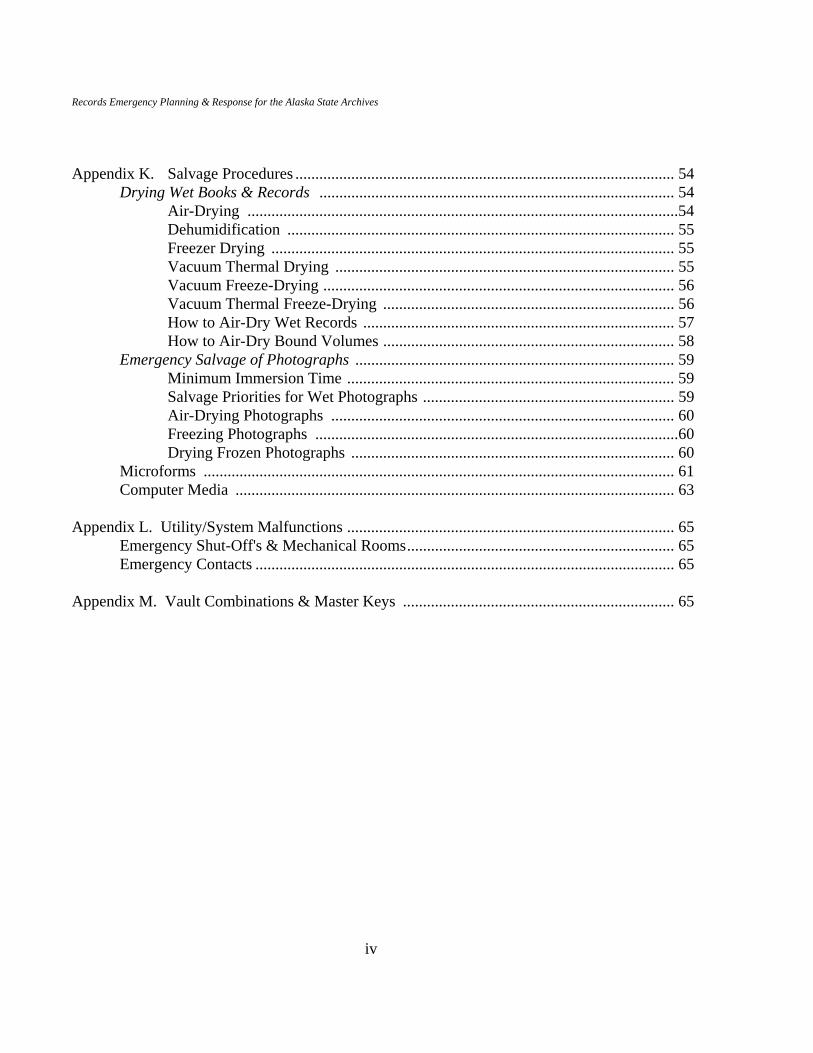
Appendix K. Salvage Procedures ............................................................................................... 54
Drying Wet Books & Records ......................................................................................... 54 Air-Drying ............................................................................................................54 Dehumidification ................................................................................................. 55 Freezer Drying ..................................................................................................... 55 Vacuum Thermal Drying ..................................................................................... 55 Vacuum Freeze-Drying ........................................................................................ 56 Vacuum Thermal Freeze-Drying ......................................................................... 56 How to Air-Dry Wet Records .............................................................................. 57 How to Air-Dry Bound Volumes ......................................................................... 58
Emergency Salvage of Photographs ................................................................................ 59 Minimum Immersion Time .................................................................................. 59 Salvage Priorities for Wet Photographs ............................................................... 59 Air-Drying Photographs ...................................................................................... 60 Freezing Photographs ...........................................................................................60 Drying Frozen Photographs ................................................................................. 60
Microforms ...................................................................................................................... 61 Computer Media .............................................................................................................. 63
Appendix L. Utility/System Malfunctions .................................................................................. 65
Emergency Shut-Off's & Mechanical Rooms................................................................... 65 Emergency Contacts ......................................................................................................... 65
Appendix M. Vault Combinations & Master Keys .................................................................... 65
Records Emergency Planning & Response for the Alaska State Archives
Page 2 of 65
Introduction to Emergency Planning & Response
Records Emergency Planning & Response describes strategies employed to protect the archival collection from incidents caused by either human or natural phenomena that requires response actions to prevent or minimize loss of life or damage to property and/or the environment. Examples of incidents include: fire; natural disasters such as earthquakes, floods, ice storms; human and animal disease outbreaks; and, criminal acts and crime-scene investigations. The three facets of emergency planning that we will address include: Planning, Response, and Recovery. The State Archives’ collection is irreplaceable at any price. If permanent archival holdings are lost in a disaster, they are gone forever. An emergency is an unplanned adverse incident that requires you to secure your operations and protect assets. Examples of emergencies include: broken pipes, system crashes, bomb threats, severe storms, etc. Emergencies are usually of the garden variety: a leaky roof or pipes; moldy, dusty, sooty, or smoky documents; a cracked wall; or a window broken by vandals. A disaster is an emergency incident that progresses from the realm of standard operating procedures and moves to conditions requiring resources beyond the State Archives' ability. Examples of disasters include: fire, flood, or earthquake. Response is the action taken when an emergency occurs to save lives, prevent injuries, and prevent or limit damage to the archival collection. During response, the impact of the emergency is assessed, and the level of containment and control activity is determined.
The primary response activity is to activate the Records Emergency Action Plan. Recovery involves the procedures and activities necessary to restore the State Archives' resources or resume operations following an emergency or other atypical disruption of routine activities. During recovery, efforts are made to reconstruct damaged business and operational records, in order to restore normal services; and to salvage archival records that have been damaged. Activating the Records Emergency Action Plan (REAP) is the first and most critical element prior to an emergency event. This REAP is a vital organizational tool and includes all actions to be taken to reduce the risk to records should an emergency arise. Benefits of the State Archives' REAP includes: rapid resumption of operations, appropriate and effective response, and increased appreciation of the importance of good records management practices. It consists of a discrete lists of facts, resources, procedures, priorities, and options that are brought together to form a coherent working document that guides policy and action. The plan includes lists of suppliers, personnel directories, and various resources and checklists. It guides the staff in recovering from emergencies of various magnitudes, and includes instructions and procedures that are relevant in various scenarios. The plan delineates the archive’s business plan for coping with incidents ranging from small water leaks and mold outbreaks to devastating fire or natural disaster.
Records Emergency Planning & Response for the Alaska State Archives
Page 3 of 65
The Response phase includes the immediate and short-term steps the State Archives will implement to assess and react to an emergency. Calling the fire department, organizing the recovery project by notifying necessary personnel, procuring supplies and services for recovery, stabilizing the building's environment, assessing the damage, and contacting recovery vendors, are Response phase activities. Time is of essence when it comes to recovering records so the Records Emergency Action Team must be prepared to respond quickly and effectively. This publication will articulate response procedures for four situations: Routine Water Damage, Mold, Earthquakes, and Medium-to-Large Scale Disasters. Recovery operations begin after an emergency has occurred and involves actions necessary to bring things back to normal as far as possible, including restoration of records and the resumption of business processes. Examples of
recovery operations include: resuming critical functions at a pre-established location, building reconstruction/remodeling, carpet and furniture replacement, etc. Salvage operations included in the Recovery phase may include packing and removing materials from the affected site, stabilizing them (most often through freezing), and drying them by any of a variety of processes (air-drying, dehumidification, and vacuum thermal- or freeze-drying). Rehabilitation or restoration includes such steps as cleaning, fumigation, repair, rebinding, affixing new labels, reshelving archival materials, and deodorization and removal of smoke or soot. Rehabilitation of non-paper materials such as photographic, magnetic media, and other electronic media often involves reprocessing and/or copying the salvaged object onto a new, stable medium. This manual provides guidance for recovery operations.
Records E mergency Planning & Response for the Alaska State Archives
Page 4 of 65
Emergency Instructions Fire 1. If you see fire or smell smoke, activate local fire alarm by pulling nearest manual alarm. 2. Determine the location and source of the fire, if that can be done quickly and safely. 3. Dial 911 to ensure that the Juneau Fire Department knows about the fire. 4. If fire has less than a 3-foot base and is not chemical, you may attempt to put it out using an
ABC fire extinguisher located in various locations throughout the building. 5. If fire has more than a 3-foot base, immediately evacuate the building and await arrival fire
department. 6. Note: Do not jeopardize safety to save archival materials.
7. Follow detailed instructions located in the records emergency action plan, page 7; a copy is kept at the front desk.
Water In routine emergencies, clean water may leak into stack areas. If there is any risk that the water is contaminated by sewage or other substances, responders should wear protective clothing (waterproof boots, clothing, and gloves). If there is any risk of electrocution, do not enter the area. 1. If easily done, attempt to determine the cause or source of the water. 2. Attempt to shut off water, if feasible. Contact Building Facilities to shut-off the water @ 465-5689 . 4. If archival materials are threatened by water, immediately notify State Archivist. 5. Protect the collections while awaiting assistance. Choose (a), (b), or (c), depending on the
situation:
a. If only a few items are in jeopardy and the water flow is minor, move any wet or vulnerable materials to a dry, secure location nearby.
Records Emergency Planning & Response for the Alaska State Archives
Page 5 of 65
b. If water is coming from above, place visqueen over the affected areas, stack ranges,
shelves, etc. c. If water is coming in on the floor, procure hand trucks and remove materials from
affected area, beginning with those in lower drawers/shelves, and move them to a safe location not subject to flood threat.
Bomb Threat 1. Keep the caller on the telephone if possible and gather information noted on the Bomb Threat
Report Form located in Appendix D of the disaster plan. 2. Call 911. 3. Evacuate building. See instructions under Evacuation (Appendix C). Civil Disturbance or Riot 1. Immediately call 911. 2. If State Archivist determines that fire, vandalism, water damage, or other damage to the State
Archives is likely, the response plan will be initiated.

Records Emergency Planning & Response for the Alaska State Archives
Page 6 of 65
FIRST RESPONDERS Emergency Telephone Numbers
NAME PHONE
Alaska Electric Light & Power . . . . . . . . . . . . . 586-9765
Ambulance . . . . . . . . . . . . . . 911; 586-5322
Bartlett Regional Hospital . . . . . . . . . . . . . . . 796-8900
Building Facilities (General Services) . . . . . . . . . . 465-5689
Building Security (General Services) . . . . . . . . . . 465-2100
Juneau Fire Department . . . . . . . . . . . 911
Juneau Police Department . . . . . . . . . . . . 911
Hazardous Materials: City & Borough of Juneau . . . . 586-0600
Otis Elevator . . . . . . . . . . . . . . . . . . 225-7244
State Museum Curator . . . . . . . . . . 465-4806
Risk Management Officer . . . . . . . . . . . . . . . 465-5723
Telephone (VoiceIP) . . . . . . . . . . . . . . . . . . 465-1818
Water/Sewer: City & Borough of Juneau . . . . . . . . . 789-8844; 789-8806

Records Emergency Planning & Response for the Alaska State Archives
Page 7 of 65
Records Emergency Action Plan Whether it is caused by nature, technical problems, or human error, an emergency or disaster could result in catastrophic consequences and enormous costs to the Alaska State Archives. The key to improving the probability for a successful recovery after an emergency rests with an effective Records Emergency Action Plan (REAP). This plan is the State Archives' insurance policy in an emergency or disaster and mitigates potential loss of records in the event of an incident. Staff awareness is one of the single most important measures to prevent and mitigate emergencies. Constant staff vigilance can often prevent an emergency or keep a minor disaster from becoming a major one. Every staff member should take the initiative to be a troubleshooter, noting building problems and anomalies that may occur. Problems such as leaky pipes, cracked windows, toilet problems, or unusual odors (particularly those that could indicate a fire) should be brought to the attention of the State Archivist. Correcting a problem before it develops into a full-blown emergency or disaster can save hundreds of staff hours and thousands of dollars. REAP Guidelines 1. The State Archivist will provide each new staff member a copy of Records Emergency Planning
& Response for the Alaska State Archives. New employees must read and become familiar with its content and focus.
2. The State Archivist will acquaint new staff members regarding building deficiencies and
vulnerabilities. He will also review the emergency evacuation procedures and evacuation routes with staff annually.
3. The Response & Recovery Coordinator will inventory the emergency supply kit annually, noting
the supplies on hand, those stored in locations outside the building, and those that would have to be purchased in case of emergency.
4. The list of vendors and consultants in Appendix B2, Suppliers & Service Providers, will be
updated annually by the Response & Recovery Coordinator 5. The State Archivist will review the Records Emergency Planning & Response document
annually, updating sections as necessary. 6. The State Archivist will arrange for inspections using the Inspection Checklist (Appendix I) and
authorize appropriate staff to ensure that problems are remedied.
Records Emergency Planning & Response for the Alaska State Archives
Page 8 of 65
Liaison with Other Units Regular communication will:
• Help emergency response staff minimize damage to collection • Increase responders’ salvage effectiveness
As necessary, the State Archivist will arrange for training/education sessions for personnel on the Records Emergency Action Team. Objectives of these sessions will be to help them understand how they can minimize damage to the State Archives and what special issues are involved in disaster recovery for archival materials. Maintenance Inspections Building Facilities will annually identify and inspect all areas and equipment that may cause or be subject to a disaster. These will include areas noted in the Inspection Checklist (Appendix J) that relate to:
a. Building structure b. Grounds c. HVAC system d. Electrical appliances and wiring e. Plumbing and drainage
Fire Safety The State Archivist will manage the fire safety program. This includes annual inspection and maintenance of fire protection systems and devices. Activities and inspections will include areas listed in the Inspection Checklist (Appendix J) that relate to:
a. Fire extinguishers b. Fire alarm system c. Smoke and heat detectors d. Fire suppression system (sprinklers, Halon) e. Liaison with the Fire Department f. Staff training
Further details about the fire safety program are outlined in Appendix F, Fire Safety.
Records Emergency Planning & Response for the Alaska State Archives
Page 9 of 65
Security The State Archivist will manage the security program. This includes ensuring that annual inspection and maintenance of security systems and devices occurs. Activities and inspections will include areas listed within the Inspection Checklist (Appendix J) that relate to:
a. Key control b. Maintenance and monitoring of security devices on interior and exterior doors.
Storage Areas The State Archivist will ensure annual inspection of archival storage areas according to criteria listed in the Inspection Checklist (Appendix I). Inspections will give particular attention to:
a. Signs of leaks, water damage, etc. b. Signs of mold, insect, or rodent infestation c. Fire hazards
Computer Backups An important element of disaster mitigation is routine backup and offsite storage of the State Archives' electronic information assets. Because computer backup tapes are stored offsite, the State Archives’ vulnerability to disaster is reduced. Information about computer backups and offsite storage of computer records is provided in Automation Backup & Recovery Plans (Appendix G).

Records Emergency Planning & Response for the Alaska State Archives
Page 10 of 65
Response Procedures: Water Damage (Routine) Emergency response procedures are the steps taken from the time an emergency situation is detected through the time when holdings are actually removed to begin packing, drying, or other salvage actions. The following procedures are for routine water damage from roof leaks, plumbing system malfunctions, minor flooding, etc. For area flooding and other major water events, follow the instructions in Response Procedures: Medium-to-Large Scale Disasters. Judgment, experience, and damage assessment may lead you to apply these instructions in a different order than listed here. For example, if a minor leak threatens only a single file cabinet, the prudent course may be to move the cabinet out of harm's way before initiating steps 2-6. 1. Attempt to determine the cause or source of the water. If you cannot determine the source, proceed
to step 2. 2. Attempt to turn off water if feasible. Refer to Appendix L. 3. Call Building Facilities @ 465-5689. 4. If collection materials are threatened by water, immediately notify the State Archivist.
5. Turn off all electrical circuits in the affected area. Due to risk of electrical shock and/or death, Do not come into contact with water until Building Facilities has declared the area safe.
6. If there is any danger of biological contaminants in the water, staff working in the area will wear
disposable gloves and boots located in the emergency supply kit. 7 If necessary, utilize the in-house emergency supply kit. 8. Protect archival holdings while awaiting assistance. Choose (a), (b), or (c), depending on the situation:
a. If only a few items are in jeopardy and the water flow is minor, move any wet or vulnerable
materials to a dry, secure location nearby. b. If water is coming from above, cover affected areas, stack ranges, cabinets, shelves with
visqueen.
c. If water is coming in on the floor, use hand trucks to remove materials from affected area, beginning with those on lower shelves, and move them to a safe location.

Records Emergency Planning & Response for the Alaska State Archives
Page 11 of 65
9. Remove any standing water with a wet/dry vacuum. 10. Take steps to reduce the temperature and humidity and to increase air circulation:
a. Measure the temperature and relative humidity using monitoring devices in the supply kit.
b. Contact Facilities to activate the air-conditioning or lower the temperature setting.
c. Increase air circulation in the affected area by running fans continuously. 11. Initiate salvage procedures detailed in the Salvage Procedures section of the plan.
Records Emergency Planning & Response for the Alaska State Archives
Page 12 of 65
Response Procedures: Mold & Other Contaminants Molds (fungal), bacteria, and other water- and air-borne contaminants can have an adverse effect on people, particularly individuals with allergies, asthma, or other respiratory problems. People with respiratory impairments and sensitivities should stay away from contaminated areas. Spores of mold and mildew are found almost everywhere and can cause irremediable damage to archival materials. Spores require the proper conditions--moisture, temperature, nutrients, and often darkness or dim light--to proliferate. Media such as paper, cloth, leather, and adhesives may be consumed or stained by many types of mold. The combination of temperature and humidity is the most critical factor. General cleanliness and the removal of dust and dirt reduce the risk of infestation, and good air circulation is helpful in avoiding a mold outbreak. When the temperature reaches 70° Fahrenheit and relative humidity is near 70%, conditions are optimal for growth and reproduction of most types of mold. Any rise in these levels creates an environment conducive to mold and mildew growth, and they may blossom within 48 to 72 hours. The absence of visible growth at low temperatures does not indicate the death of spores, but merely that they have gone dormant. Although a mold outbreak may occur anytime temperature and humidity controls are inadequate, mold is the most common category of contaminant in water-based emergencies. Recovery techniques for mold cause weakening and discoloration of the original records beyond the water and mold damage itself. When working with moldy records, wear a respirator, disposable rubber or plastic gloves, a lab coat, and eye protection. Response staff should wash exposed clothing in hot water and bleach and make sure that contaminated fingers do not come into contact with one's mouth, nose or eyes. Note that ordinary dust masks are not sensitive enough to filter mold spores and fit-tested respirators with a High Efficiency Particulate Air (HEPA) filter must be worn. In the event of a mold outbreak, take the following actions: 1. If mold is on a few isolated items:
a. Place items in appropriate-sized freezer bags. b. Place plastic freezer bags in a freezer. c. Contact the Operations & Collection Manager.
2. If mold is discovered in whole stack ranges, contact the State Archivist and building Facilities to
determine if the temperature and humidity must be adjusted; or, if the integrity of the building has been compromised.
Records Emergency Planning & Response for the Alaska State Archives
Page 13 of 65
3. Obtain appropriate supplies from the emergency supply kit located in the supply room. Wear
appropriate protective gear such as gloves and respirators. 4. Seal materials in garbage bags located in the supply room. 5. When dealing with a moderate or large-scale mold problem, keep air movement to a minimum,
since air currents spread mold spores to other, unaffected collections.
• Do not use fans in the area. • Minimize the opening and closing of doors. • If feasible, block off return air vents so spores are not spread into the air-handling system
and to other storage areas. 6. Transfer all infected materials to an isolation room in such a manner that other areas will not be
affected because of the transportation of materials. Extra space may be requested from the state library.
7. Immediately and thoroughly sterilize the affected storage area(s), including the climate control
system where possible. 8. Determine whether the affected items must be retained. If not, consider discarding,
photocopying, or microfilming. 9. If the items must be salvaged, consult a conservator or preservation specialist (see Suppliers &
Service Providers, Appendix B2) when dealing with severely affected materials. If the number of affected items is small, they may be treated in-house. Refer to instructions in Lois Price's Mold: Managing a Mold Invasion for detailed instructions.
10. Check materials periodically (at least monthly) for evidence of new or recurrent growth. Carry out these inspections for one year following the infestation. 11. If necessary, contact a health care professional to determine safety of the work environment.
Remember, black mold is a neurotoxin and attacks the central nervous system.
Records Emergency Planning & Response for the Alaska State Archives
Page 14 of 65
Response Procedures: Earthquake An earthquake may knock over shelves, storage units, and equipment; shelves, ceiling tiles, and overhead light fixtures may crash to the floor. In addition, structural supports may be twisted or broken. A potential serious problem may be water damage caused by broken pipes. Also, asbestos might get dislodged or exposed, and this could significantly delay implementation of recovery operations. The following instructions have been numbered for ease of reference. In reality, many of them should occur simultaneously. The more people are available, the more quickly the response can proceed. Remember, in all disasters the first priority is to protect human life and safety. 1. Move away from shelves or file cabinets quickly, if you are near them. 2. Take shelter in a doorway, under a sturdy desk or table, or in another well-protected area. After the main shock has occurred, take the following actions: 3. Be prepared for after-shocks. 4. Check for broken water pipes, shorted-out electrical circuits, or fuel leaks. 5. If you see water flowing, contact Building Facilities to turn off water at main valve. Turn off all
appliances. 6. Assist those who have been trapped or injured by falling debris, glass, etc. Do not move
seriously injured persons unless they are in obvious, immediate danger from fire or structure collapse.
7. Listen to a battery-powered radio for instructions. 8. Notify the fire department of any fires. 9. Open doors carefully and watch for falling objects. 10. Do not use the elevator. 11. Do not use the telephone, except in an emergency. The lines should be kept free for rescue
communications. 12. Evacuate the building when safe to do so. Do not re-enter until the building has been secured and
declared structurally sound by Building Facilities.
Records Emergency Planning & Response for the Alaska State Archives
Page 15 of 65
Response Procedures: Medium-to-Large Scale Disaster Coordination with other governmental agencies may be required for large-scale incidents that affect the downtown area or greater City & Borough of Juneau. If this is the situation the State Archives staff will collaborate with FEMA or other entities in the Incident Command System (ICS). The Operations & Collections Manager should be prepared to brief the ICS as to the State Archives' authorities, responsibilities, equipment, skills, experience, and capabilities with respect to archival holdings. This section outlines the basic steps that may be taken for a medium-to-large scale disaster. The order may be altered depending on the nature of the emergency, extent and type of damage, and available resources. 1. Perform initial damage assessment of the situation
The person who discovers the emergency will determine the nature of the damage; the number, type, format, and value of records affected; and, the extent of action and assistance needed.
a. Notify responsible staff
During working hours, contact the State Archivist, who will make the determination telephonically or through onsite inspection.
b. Assist the injured
Assist those who have been trapped or injured by falling debris or glass. Do not move seriously injured people unless they are in obvious, immediate danger from fire or structural collapse. Dial 911 if an ambulance is needed.
c. Determine damage
The Division Director will determine whether or not to declare a disaster.
(1) The situation will be deemed an emergency if the nature and extent of damage is of
limited severity and can be dealt with by available staff. An emergency is defined as an unforeseen combination of circumstances [or the resulting state] that calls for immediate action—an urgent need for assistance or relief. Refer to Salvage Priorities Appendix K (detailed salvage procedures) for instructions.
(2) A disaster, a sudden, calamitous event that brings great damage, loss, or destruction, will
be declared if the nature and extent of damage warrants doing so.
Records Emergency Planning & Response for the Alaska State Archives
Page 16 of 65
2. Notification
a. Determine personnel needed
If the Division Director declares a disaster, staff will be informed exactly when and where to report. b. Means of notification
If phones are working, refer to the phone numbers as per the Staff List (Appendix A2).
c. Establish personnel management system
The State Archivist will establish mechanisms for the following:
· Work hours for all staff, volunteers, ancillary personnel, and contractors and ensure
appropriate compensation. · Maintain hourly work records. · Train staff and volunteers. · Provide space, supplies, and other materials needed for refreshments, meals, and rest areas.
3. Establish a command center
In a routine emergency where the building is intact, functions will be controlled and coordinated through the State Archivist’s office. In larger disasters it may be necessary to establish an operations and control post offsite.
4. Procure/assemble the necessary supplies and services
The administrative manager will consult with the State Archivist to determine what supplies and services are required for the recovery operations.
Refer to the in-house supply/equipment stockpile inventory in Appendix B1, Emergency Supply Stockpile.
External suppliers and service providers are listed in Appendix B2, Suppliers & Service Providers.
If cash, purchase orders, or requisitions are needed contact the administrative manager.
Records Emergency Planning & Response for the Alaska State Archives
Page 17 of 65
5. Establish security measures
a. Building Facilities will secure the site commensurate with the level of damage.
b. Only authorized persons with identification will be allowed to enter the site.
c. Special security personnel may be required if the security system has been damaged, if doors or windows are damaged, or if the facility is not substantially intact. In such cases, the State Archivist will work with Building Facilities to arrange for adequate security.
d. Unauthorized persons in the disaster area should be reported immediately to the State
Archivist. 6. Get clearance to enter the site
After a fire or other major disaster, Building Facilities will evaluate the structural integrity of the building. Facilities will declare when the building is contaminant-free and safe for re-entry by staff. A security entry checkpoint may be established.
If there are asbestos, PCBs, or other hazardous materials, it may be several days before clean-up is complete and the staff are allowed to enter the building. Clearance may also be delayed if the disaster is a result of arson or vandalism, and the area may be declared a crime scene. If so, staff may not be allowed to enter until the forensic work is finished.
7. Make a detailed damage assessment
The Division Director and State Archivist constitute the Assessment Team and are responsible for a detailed assessment of damage. The Team will:
Record observations and recommend priorities for response and recovery.
Photograph, videotape, investigate, and document damage to the location/space and physical records.
Note the historical significance of impacted records.
Estimate the volume of records requiring response and recovery.
Note additional risks.
Records Emergency Planning & Response for the Alaska State Archives
Page 18 of 65
8. Stabilize the building
Building Facilities will supervise the stabilization of the building. First priority is to implement measures to remedy immediate threats to human safety or to the collection. Second priority will be for the restoration of power. Other actions will receive attention as soon as possible. Necessary actions may include the following:
Work with Departments of Health & Social Services and Environmental Conservation
regarding cleanup of sewage, biological agents, chemicals, and other contaminants.
Shut off and repair/restore water and electricity.
Stabilize leaning or collapsed shelving.
Establish priorities regarding removal of mud, water, ceiling tile debris, broken glass, sheetrock, carpet, etc.
9. Stabilize the environment
Building Facilities will supervise the restoration of environmental controls with the goal of providing a cool, dry climate in the affected area(s).
a. If the heating/chilling system is operable, settings will be adjusted to provide maximum
cooling and dehumidification, optimally with the temperature below 70°F and the relative humidity below 50%.
b. Building Facilities will monitor the temperature and humidity every 8 hours to measure
progress. 10. Develop a detailed plan of action
The Division Director, State Archivist and Building Facilities engineer will meet to review the extent of damage, status of building systems, and available personnel. They will develop a plan of action that addresses major issues in the recovery plan. In the event of a large-scale disaster, a key decision will be which recovery operations to handle with existing staff and which to contract to specialized disaster recovery companies.
Staff will be briefed on the action plan and their responsibilities. If appropriate, training in specific techniques such as packing, cleaning, or air-drying will be offered by the museum curator. The director may issue a press release to the media.
Records Emergency Planning & Response for the Alaska State Archives
Page 19 of 65
SALVAGE PROCEDURES Pack-out Pack-out is the phase of emergency response in which damaged records are identified, labeled, and moved for: immediate drying in a stable location within the State Archives; transport to a cleaning/salvage area off-site for immediate recovery processes; or, transport to frozen storage or a commercial drying facility until recovery operation can begin. If the option of on-site dehumidification is to be used, only soaked items need to be removed. Do not begin moving records until the staging and/or recovery area is prepared. Execute pack-out procedures in the order determined by the salvage coordinator, based on the degree of damage. If a full range of recovery services is available, begin working on the wettest materials, then deal with those that are merely damp. However, if the response is limited to air-drying using existing staff, it may be better to begin with those that are least damaged and therefore most easily salvaged. Pack-out procedures depend on whether materials are being transported to a nearby area for immediate drying or to an off-site freezer or drying facility. The latter requires more careful packing and more thorough documentation.
Depending on the nature of damage and possible logistical constraints, each work crew in the pack-out operation will generally consist of the following:
a. Crew leader: ensures smooth work flow and alleviates bottlenecks b. Box assembler: sets up boxes or other containers a. Retriever: removes materials from impacted areas b. Wrapper: cuts freezer/waxed paper e. Packer: takes items from retriever and wrapper, and boxes items f. Sealer: seals (working in concert with recorder) & labels containers; prepares packing list g. Transporter: moves containers from packing area to pallet, elevator, stairs, etc.
Take the following precautions if materials are to be transported in cardboard boxes: • Boxes should be no larger than 1.5 cubic feet. • Line the boxes with heavy-duty trash bags before placing wet materials inside. This will prevent
the boxes from becoming soggy and collapsing. • Do not stack boxes more than 4 high. Stack boxes on pallets and shrink-wrap the pallets to
prevent slippage during transportation. Use a fork lift or pallet-jack to move the pallets onto trucks or to the drying area.
If possible, loosely sort materials according to the degree of wetness (soaked, damp, or dry), packing like materials together.
Records Emergency Planning & Response for the Alaska State Archives
Page 20 of 65
Bound Volumes: It is preferable to quickly freeze and vacuum freeze-dry bound volumes, because this will help minimize the danger of distortion. Load into boxes for transport. Place normal-size volumes in a spine-down position. Pack large volumes flat in boxes. If time allows, loosely place sheets of freezer paper or waxed paper around every volume (or every other volume). Boxes should be packed only about 75% full to allow for swelling. Bound volumes can be successfully air-dried, but require attention to ensure that the spine is completely dry; book spines and covers are highly susceptible to mold. Small bound volumes with rigid covers which are only partially wet can be dried by standing them upright:
• Place the book upright and hold it open with blotter pieces to allow increased air circulation and to expose the tightly bound spine to air.
• If the book covers are sturdy enough, fan the pages open and interleave with small pieces
of pre-cut blotter paper placed close to the spine.
• Invert books to even the stress on the binding, rotating books upside-down to right-side-up while drying. Remove the blotters when the book is dry. See further details in Appendix K, How to Air-Dry Bound Volumes.
Files: Place folders in boxes. Place the folders vertically in boxes (standing as they would in a file drawer). Fill boxes only about 75% full to allow for swelling.
Photographic Film & Prints: Can be left in cool, clean water for a few hours until ready to dry or send for reprocessing. See further details in Appendix K, Emergency Salvage of Photographs.
Microforms: Place in cool, clean water until ready to transport for reprocessing. See further details in Appendix K, Salvage Procedures: Microforms.
Oversized Prints & Drawings: Pack in map drawers, bread trays, shallow flat boxes, or on heavy cardboard or plastic-covered plywood.
Records Emergency Planning & Response for the Alaska State Archives
Page 21 of 65
Audio & Videotapes: Keep wet. Pack vertically in plastic bags or containers with cold water.
Computer Diskettes: Keep wet. Pack vertically in plastic bags or containers with cold water. See further details in Appendix K, Salvage Procedures: Computer Media.
Computer Tapes: Pack vertically in a plastic container and fill with clean water. See further details in Appendix K, Salvage Procedures: Computer Media. Coated Papers: If the pages are stuck together, or blocked, place the record in a freezer and vacuum freeze-dry. If the pages are not stuck or blocked, gently place pre-cut pieces of spun-bond polyester fabric between the pages. Allow air to circulate and wait until record is completely dry to remove interleaving material (the absorbent material placed between leaves of paper to hasten drying; interleaving material should be thin, absorbent, ink-free, and acid-free). Encapsulated & Shrink-Wrapped Records: Although encapsulation and shrink-wrapping slow the intrusion of water, these records are not protected from water damage. If the records become wet, it is possible to successfully vacuum freeze-dry the encapsulation record. If possible to air-dry, staff should:
• Cut through the encapsulation bond or weld on all sides of the record with scissors. If the plastic sheet is clean, it can be re-used to support the wet record while it is carried to the drying site.
• If the record is fragile or the mylar is stuck to the paper, place the paper face down on a
piece of clean, dry absorbent paper and gently roll or peel the mylar sheet from the back of the record.
Documentation For inventory control as well as insurance purposes, it is necessary to know the condition and disposition of materials. Which materials were destroyed and which must be removed or replaced? Which were damaged but are salvageable? A computerized tracking system can be established for this purpose. The inventory tracking system should list:
• Unique identifier linked to content type. • Original location. • If necessary, include:
Destination during recovery. All actions performed and by whom.
Records Emergency Planning & Response for the Alaska State Archives
Page 22 of 65
As materials are removed, one person will label each container with a brief designation of its contents (location number, record group or series). If time allows, describe the damage (e.g., wet, dry, smoke, mud, etc.), and indicate the salvage priority. If materials are going to different areas (e.g., some to the rinsing stations, others to the air-drying area, and some to a freezer), also note the destination of each container. Use a written inventory/packing list to record detailed information regarding contents, damage, and priority. A sample packout list is included in Appendix I, Inspection Checklist. Documenting the process with photographs or via video recorder is optimal. Throughout the salvage operation, it is also useful to document various decisions made (particularly the decision to discard) and who made/authorized them. Rinsing Materials may be rinsed before drying or freezing if they have been compromised by mud or other dirty deposits and if adequate personnel, time, and running water are available. The objective of the cleaning is to remove gross deposits. Attempting to remove mud from wet paper records may force dirt farther into the paper if a rubbing action is used. [Mud may be easier to remove when dry.] Never use these rinsing techniques on materials with soluble inks (watercolors and many manuscripts), animal skins (leather, vellum, or parchment). Rinsing will be conducted on the loading dock. Personnel working in the rinsing area will be provided with rubber boots and gloves and waterproof clothing. If the water has been contaminated by sewage or other contaminants, workers will have additional protective gear as recommended public health officials and contractors that specialize in treatment of contaminated materials. Rinsing Stations
For light deposits, stations may consist of a garden hose with a spray nozzle. Rinse individual folders or volumes one at a time, holding the folder/volume tightly closed to avoid transferring dirt between the pages. If deposits are heavy: Set up several 30-50 gallon plastic garbage cans and run a garden hose into each can, with the nozzle resting at the bottom, and turn water on to provide a slow but continuous flow into each one.
Staff will immerse each item each item in succession through the line garbage cans. (Keep a supply of sponges at the last can, so that mud can be lightly dabbed off there). The last station will have a hose with spray nozzle so that workers can rinse materials under a fine spray. Gently squeeze excess water from volumes or folders.
Records Emergency Planning & Response for the Alaska State Archives
Page 23 of 65
Do not attempt to remove mud or stubborn stains during the rinsing process, for that would significantly slow down the operation. In addition, it might damage the materials, and it usually drives mud and stains even deeper into paper fibers, making restoration even more difficult. The same procedure may be used for photographic materials and computer media, except that shallow dish pans or photo processing trays may be placed on tables and used instead of garbage cans. Once materials have been rinsed, they may be transferred to the air-drying area or packed for transport to a freezer or drying facility as outlined above in the packing instructions. Freezing Freezing may be used as a stabilization technique for wet materials, especially paper-based ones. It should be used whenever materials cannot be dried within 48-72 hours, because wet materials are at great risk for developing mold if the temperature is above 70°F, especially in high-humidity conditions. In addition, bound volumes cease swelling and inks cease bleeding or diffusing once frozen. In a medium-to-large scale disaster, freezing buys time for the Archives: once the materials are stabilized by freezing, funds can be obtained, and drying options and vendors can be evaluated. There is no limit on the amount of time materials may remain frozen and paper dries somewhat when frozen.
Bound volumes and paper records are suitable for freezing. In a large-scale disaster, microfilm and most other photographic materials can also be frozen, though that is not ideal. Historic photographs (such as daguerreotypes, tintypes, ambrotypes) should never be frozen. Best results are attained by using a commercial blast freezer that freezes materials at -10°F or lower. In the event a local freezer facility is unavailable, staff may utilize a refrigerated truck for transporting materials to a remote facility or for temporary cool storage on-site. While a truck will not freeze the materials, it may keep them cool enough to prevent mold growth. Sources of refrigerated trucks are listed in Appendix B2, Suppliers & Service Providers.
Records Emergency Planning & Response for the Alaska State Archives
Page 24 of 65
Fire Damage Materials involved in a fire are likely also to suffer water damage, and recovery techniques outlined here may be used. They also may be charred (either completely or just around the edges), may have smoke/soot deposits, and are likely to have an odor. The following techniques are appropriate for bound volumes and paper records.
Charred Materials
Damage caused by extremely high temperatures is irreversible. However, the information on charred materials sometimes can be recovered through special photographic methods. These methods are usually carried out only in forensic science laboratories and are only available in exceptional circumstances. In the absence of professional help, do not attempt to open charred bundles, for such handling will result in further damage.
Even if materials are not charred beyond recognition, exposure to high temperatures will cause the paper to become extremely brittle. Such records should be evaluated. Some may be discarded, and others may be microfilmed or photocopied to preserve the information.
If edges of bound volumes are charred or badly smoke-damaged, they can be sent to a library binder, who will remove the binding, trim the edges of the paper, and rebind the volumes.
Smoke/Soot Deposits
If smoke/soot is deposited on the edges of materials, they can be treated in the following ways:
Send the materials to a binder who can guillotine off the smoke-damaged edges Treat the materials in-house, using natural latex sponges to remove the smoke from the
edges of bound volumes. Rare archival materials may be evaluated by a conservator before employing any general-
purpose smoke removal techniques.
Smoke Odor Removal
Professional companies can deodorize fire-damaged paper materials.
Some companies essentially perfume damaged materials to mask the odor.
Materials may be treated in an ozone chamber. Ozone effectively neutralizes the odor. However, ozone is a powerful oxidizing agent that irreversibly accelerates the aging of paper, so it generally should not be used on many archival materials.

Records Emergency Planning & Response for the Alaska State Archives
Page 25 of 65
Fumigation Water-related disasters, including water left from firefighting, create an environment ideal for mold growth. Give high priority to the fumigation and sterilization of mold-infested materials, and keep such materials segregated from those not yet infested. There are many divergent opinions about fumigating archival materials. If the decision is made to fumigate, every precaution must be taken to safeguard the collection materials and the health of personnel.
a. Area Fogging by Licensed Fumigator. If the mold infestation is widespread, fogging the area with a fungicide may be advised. Fogging kills only the mold that is growing on exposed surfaces, and the procedure may have to be followed up by more intensive fumigation.
b. Cleaning & Sterilization. The affected area must be cleaned and sterilized before replacement of
the archival materials. The contracted cleaning crew should wear protective clothing and eye-wear. The following procedures are recommended:
1. Thoroughly clean carpets with a germicidal cleanser. Remove as much moisture as
possible from the carpets.
2. Provide good air circulation in the room along with air-conditioning and dehumidification.
3. Thoroughly wash floors, ceilings, walls, shelves, fixtures, and furniture using a
germicidal cleaner. Disposable wipes should be used to avoid the spread of contamination.
State Archives Collection Restoration After materials have been salvaged, some further restoration work will probably be required before they can be reshelved or returned to other storage locations. 1. Storage. Materials that have been water-damaged or mold-infested will be kept apart from other
holdings for at least 3 months in a well-ventilated area (65° F and 35-45% relative humidity). 2. Assessment. The State Archivist will evaluate the materials and decide on the next steps:
• Discard/withdraw • Reprocess and/or duplicate • Replace by microfilming, photocopying, or purchasing another copy or edition • Repair, rebind, clean, or provide conservation treatment • Rehouse in new folders, boxes, etc. • Relabel boxes and oversize volumes, if necessary
Records Emergency Planning & Response for the Alaska State Archives
Page 26 of 65
Appendix A1: State Archives Records Emergency Action Team
The size, membership, and structure of the State Archives Records Emergency Action Team depends on the scope of the disaster—its nature, severity, and extent. Minor emergencies will be handled by a small group who will set up fans and dehumidifiers, dry materials, and document damage. In a significant disaster, the team will be expanded so that staff can focus on the recovery and functions such as supply and procurement will be handled by the division administrative manager. This appendix facilitates planning for functions that may need to be managed and jobs that may need to be done in the event of a disaster. In a disaster of moderate scope, the organization can be fairly simple, as illustrated in Figure 1. The Response & Recovery Coordinator will oversee the details of the recovery in consultation with the State Archivist and division director. Ancillary staff support will come from division personnel. It may also be necessary to contract with preservation specialists, conservators, or other specialized professionals as appropriate. Records Emergency Action Team Responsibilities This section describes the various responsibilities that may need to be discharged in an emergency event. Other staff in the Division of Libraries, Archives & Museums; and, in the Department of Education & Early Development will assist in necessary functions of the recovery operation. The Response & Recovery Coordinator, under supervision of the Operations & Collections Manager, will:
1. Gather information and develop initial strategy based on the nature of the emergency. 2. Establish a base of operations and announce its location. 3. Communicate staffing needs to Operations & Collections Manager. 4. Manage work crews. 5. Assign personnel as necessary to ensure efficient work flow. 6. Coordinate equipment and supply needs with administrative office. 7. Continually re-evaluate emergency priorities. 8. Regularly report to Operations & Collections Manager on progress and problems.
A. Administration Division of Libraries, Archives & Museums Director: Responsible for protection of life, facilities, and collections. In a large-scale disaster, these duties may fall to Division of Homeland Security/Emergency Management Director or designee. Also oversees external communications during the emergency.
Records Emergency Planning & Response for the Alaska State Archives
Page 27 of 65
The Division Director Will: 1. Keep top executive staff and/or federal government authorities informed of status and needs. 2. Coordinate assistance from other agencies. 3. Serve as major financial decision-making authority and authorize emergency expenditures. 4. Establish priorities for life, safety, physical security, and archival needs. 5. Issue press releases about the disaster or delegate this function to the Operations & Collections
Manager. The Operations & Collections Manager (State Archivist) manages and directs the entire recovery operation. The Operations & Collections Manager Will: 1. Assess emergency and declare disaster plan in effect. 2. Take immediate action to reduce or eliminate potential risks. 3. Manage and direct the entire recovery operation. 4. Appoint staff to carry out the recovery operations as per plan. 5. Purchase materials, supplies, and services; deploy necessary equipment. 6. Ensure effective workflow and coordinate the organizational units involved in recovery operations. 7. Protect human life, facilities, collection, and other state assets during recovery. 8. Assess need for off-site operations center or storage areas. 9. Cooperate with Building Facilities regarding the recovery operations center. 10. Develop business resumption plan as soon as practical. 11. Establish salvage priorities. 12. Appraise the value and importance of archival materials. 13. Provide guidance regarding disposition decisions and replacement options for unusable materials. 14. Refine established salvage priorities based on type and extent of damage. 15. Select salvage techniques and restoration strategies in consultation with Salvage Coordinator 16. Ensure long-term clean-up and restoration/rehabilitation operations are initiated. 17. Authorize discard of archival objects. 18. Provide findings to Response & Recovery Coordinator. 19. Report directly to the Division Director. 20. Declare that emergency is over when appropriate.
Records Emergency Planning & Response for the Alaska State Archives
Page 28 of 65
B. State Archives Collections Unit The Response & Recovery Coordinator (Archivist III) directs all recovery functions involving archival materials and reports to the Operations & Collections Manager. The Response & Recovery Coordinator is responsible for general supervision of packing and transportation of collections, drying and other salvage activities, storage arrangements, documentation of movement and treatment, and long-term restoration of collection materials. The Response & Recovery Coordinator Will: 1. Annually review the Records Emergency Planning & Response for the Alaska State Archives to
ensure that the archival collection is adequately protected. 2. Retrieve emergency materials/supply kit from storage. 3. Identify and ensure the protection or salvage of high-priority archival holdings. 4. Take immediate action to reduce or eliminate risk of damage to collection. 5. Estimate extent and type of damage to the archival holdings. 6. Prepare initial damage assessment. 7. Notify Operations & Collections Manager of support needs. 8. Refine salvage priorities based on type and extent of damage. 9. Oversee Salvage Coordinator functions. 10. Contact the Alaska State Museum curator or conservator for professional assistance. 11. Establish work areas for all parts of the recovery operation, with assistance from Division
administration and Building Facilities. 12. Establish safe storage locations on-site and off-site. 13. Recommend discard of archival holdings. 14. Initiate plans for long-term clean-up and restoration of collections. 15. Issue daily situation report to Operations & Collections Manager. The Salvage Coordinator (Archivist II) coordinates all salvage activities to minimize damage to the collections and reports to the Response & Recovery Coordinator. The Salvage Coordinator Will: 1. Report initial damage assessment to the Response & Recovery Coordinator. 2. Take immediate action to reduce or eliminate risk of damage to collection. 3. Obtain emergency supplies as necessary and advise Response & Recovery Coordinator of
additional needs. 4. Advise Response & Recovery Coordinator on the sequence and methods of salvage of collections. 5. Activate, supervise, and train salvage work crews. 6. Direct staff regarding archival material handling. 7. Recommend on-site and off-site storage areas to Response & Recovery Coordinator. 8. Arrange with Response & Recovery Coordinator for specific conservation documentation.

Records Emergency Planning & Response for the Alaska State Archives
Page 29 of 65
C. DEED IT Staff The DEED IT staff are responsible for the protection and recovery of the State Archives' server files and applications, backup tapes, and personal computers. The IT staff facilitate business resumption of essential functions and report to the Operations & Collections Manager. The DEED IT Staff Will: 1. Oversee routine daily system backups and provide off-site storage of weekly backups. 2. Supervise or contract for salvage/restoration of computer equipment, software, and files. 3. Plan and manage the relocation of computer equipment, files, etc. to off-site facilities.
STAFFING CHART
Response & Recovery Coordinator
Archivist III
Computer System DEED IT Staff
Salvage Coordinator Archivist II
(Packing, Drying, Cleaning/Repair)
Operations & Collections Manager
State Archivist
Figure 1. Organization Chart for a Small Scale Disaster Recovery Operation at the State Archives.
Records Emergency Planning & Response for the Alaska State Archives
Page 30 of 65
Appendix A2: Staff List
(Personal data available from State Archivist)
•Linda Thibodeau, Director •Division of Libraries, Archives & Museums •465-2911 •Glenn Cook, Operations & Collections Manager •State Archivist •465-2275 • Larry Hibpshman, Response & Recovery Coordinator • Archivist III •465-2241 • Tatyana Stepanova, Salvage Coordinator • Archivist II •465-2270 •Laura Wood •Archivist II •465-2230 •D. Dawson, CRM •State Records Manager •465-2276 •Abigail Focht • Library Assistant I •465-2270
•Chris Hieb •Records Analyst II •465-2245 •Wayne Norlund • Library Assistant II •465-2230 •Stan Hubbard, Micrographics Supervisor •465-2274
Records Emergency Planning & Response for the Alaska State Archives
Page 31 of 65
Appendix B1: Emergency Supply Stockpile Scope & Purpose of the Supplies Quick response can make the difference between a minor annoyance and a costly event. Having an emergency stockpile on hand can be a great help, so that staff can immediately respond rather than spending valuable time gathering supplies from the Department of Education & Early Development or in local stores. Refer also to the Emergency Supply Stockpile (Appendix B1). Since the emergency stockpile is essential in preparing for small-scale events, the State Archives administers a stockpile that will provide two to four weeks worth of recovery supplies. Storing the Stockpile The stockpile supplies are stored and sealed in waterproof containers on the dock. Inventory The supplies will be inventoried annually to determine that all materials are present and in good condition. Batteries and duct tape have a limited shelf life and may need to be replaced at regular intervals.
Records Emergency Planning & Response for the Alaska State Archives
Page 32 of 65
Appendix B1: Emergency Supply Stockpile
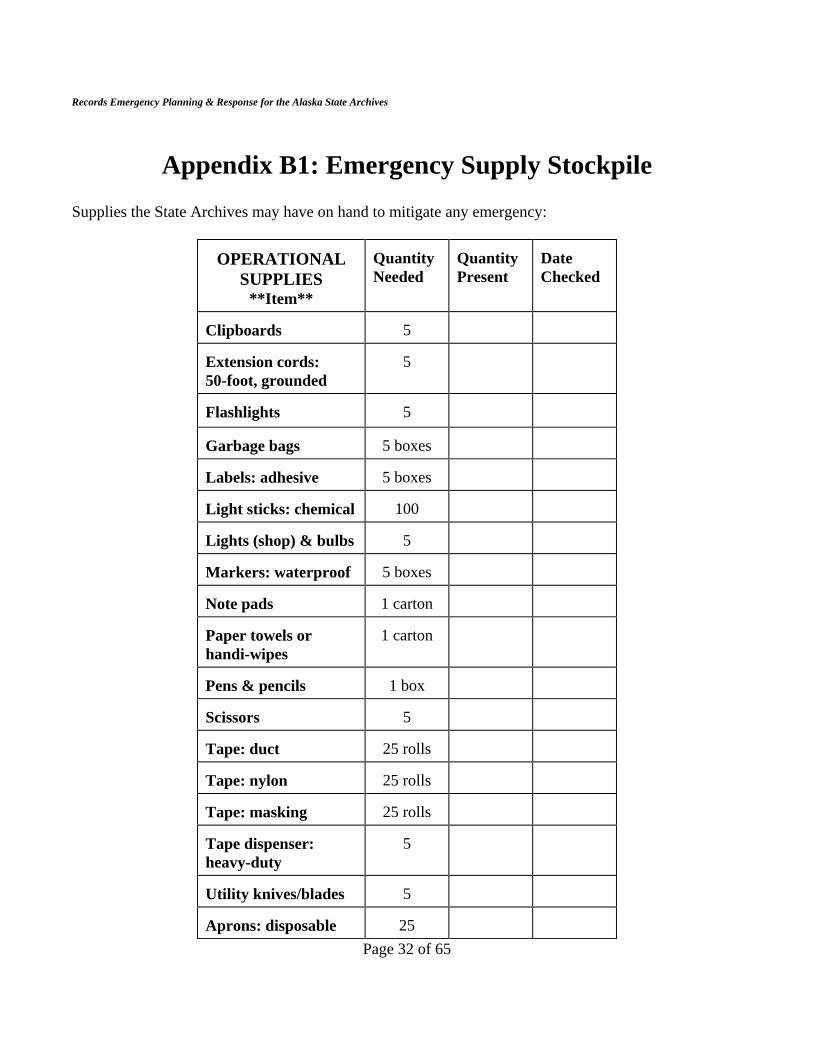
Supplies the State Archives may have on hand to mitigate any emergency:
OPERATIONAL
SUPPLIES **Item**
Quantity Needed
Quantity Present
Date Checked
Clipboards
5
Extension cords: 50-foot, grounded
5
Flashlights
5
Garbage bags
5 boxes
Labels: adhesive
5 boxes
Light sticks: chemical
100
Lights (shop) & bulbs
5
Markers: waterproof
5 boxes
Note pads
1 carton
Paper towels or handi-wipes
1 carton
Pens & pencils
1 box
Scissors
5
Tape: duct
25 rolls
Tape: nylon
25 rolls
Tape: masking
25 rolls
Tape dispenser: heavy-duty
5
Utility knives/blades
5
Aprons: disposable
25
Records Emergency Planning & Response for the Alaska State Archives
Page 33 of 65
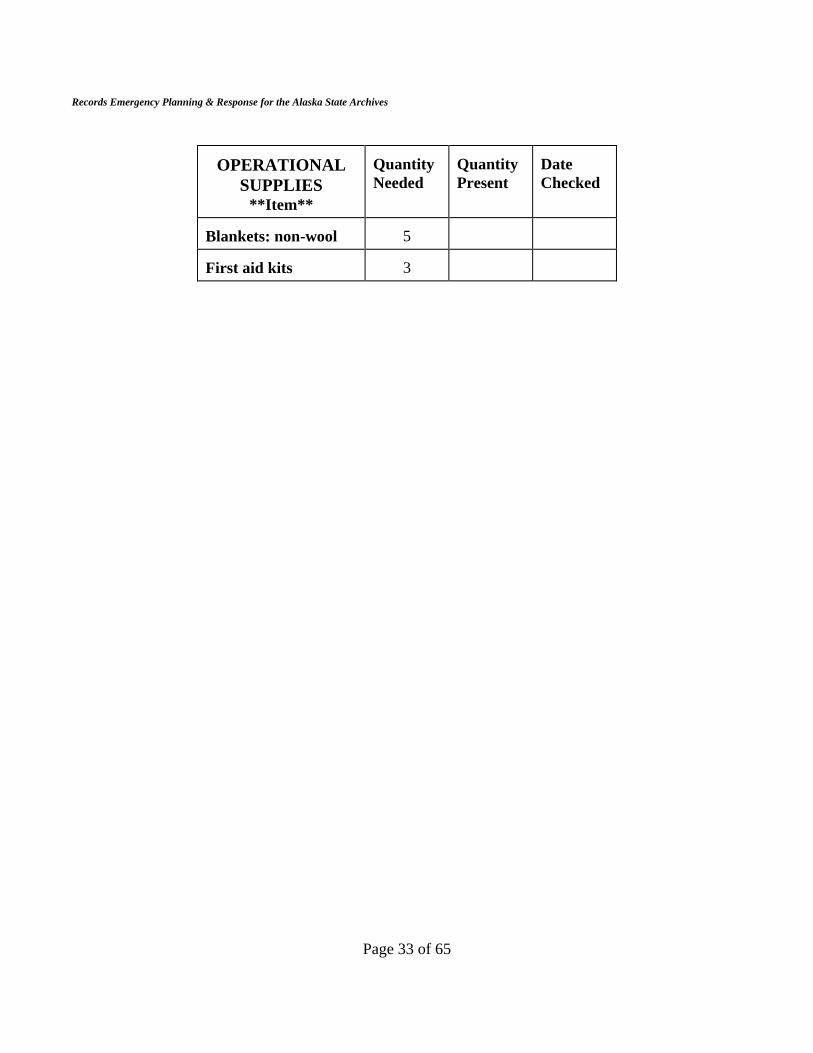
OPERATIONAL
SUPPLIES **Item**
Quantity Needed
Quantity Present
Date Checked
Blankets: non-wool
5
First aid kits
3
Records Emergency Planning & Response for the Alaska State Archives
Page 34 of 65
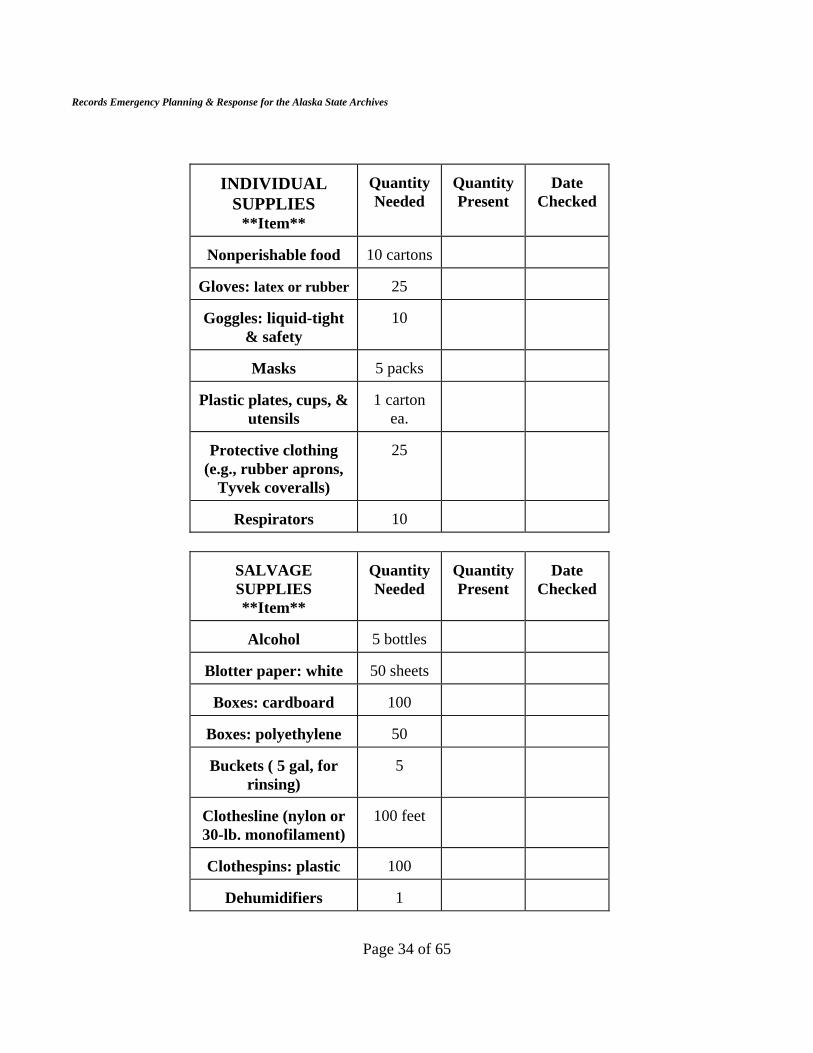
INDIVIDUAL SUPPLIES
**Item**
Quantity Needed
Quantity Present
Date
Checked
Nonperishable food
10 cartons
Gloves: latex or rubber
25
Goggles: liquid-tight
& safety
10
Masks
5 packs
Plastic plates, cups, &
utensils
1 carton
ea.
Protective clothing
(e.g., rubber aprons, Tyvek coveralls)
25
Respirators
10
SALVAGE SUPPLIES **Item**
Quantity Needed
Quantity Present
Date
Checked
Alcohol
5 bottles
Blotter paper: white
50 sheets
Boxes: cardboard
100
Boxes: polyethylene
50
Buckets ( 5 gal, for
rinsing)
5
Clothesline (nylon or 30-lb. monofilament)
100 feet
Clothespins: plastic
100
Dehumidifiers
1

Records Emergency Planning & Response for the Alaska State Archives
Page 35 of 65
SALVAGE SUPPLIES **Item**
Quantity Needed
Quantity Present
Date
Checked
Fans
1
Freezer bags: 1-gal.
50
Freezer/waxed paper
3 rolls
Garbage cans: plastic,30- to 50-gal.
5
Interleaving paper (paper towels or
uninked newsprint)
500
Mylar sheets: 3-mil, 12"×15"
500
Photo trays/shallow
dish pans (for rinsing)
3
Tables: 6-ft., folding
3
SITE CLEAN-UP & REHABILITATION
**Item**
Quantity Needed
Quantity Present
Date
Checked
Bleach
5 gal.
Brooms/squeegees
5
Mr. Clean
5
Disinfectant
5
Fungicide
5
Mops/buckets
5
Sponges: cleaning
5
Wet/dry vacuums 1 Work gloves 10 pair

Records Emergency Planning & Response for the Alaska State Archives
Page 36 of 65
Appendix B2: Suppliers & Service Providers
Supplies
A key part of disaster preparedness is the identification of emergency contacts, service providers, suppliers, and other resources vital in disaster recovery. This section lists the types of supplies that might be needed in a disaster, and provides some information about the types needed and, in some cases, the types of suppliers from which they can be acquired. Alcohol: Used to remove mold from covers of
books, but does not kill mold. Denatured and isopropyl alcohol are least toxic and most readily available. Alcohol should not be used on rare archival objects.
Art supply stores: Source of blotter paper and
some other specialized supplies. Bleach: Dilute water with 10% bleach to serve
as a disinfectant. Never use on archival materials, and be sure to ventilate the area.
Book press: Used for pressing dry or nearly-dry
bound volumes and papers to reduce cockling and distortion of pages. Available from conservation suppliers.
Bread trays: Used for stacking manuscripts,
maps, oversized documents, works of art on paper, and other loose documents for transport and air-drying.
Containers, cardboard: Used for packing
archival materials. Containers, plastic: Used for packing
collection materials.
Dehumidifiers, portable: Used to reduce
humidity in small, enclosed spaces to facilitate drying.
Dish pans: Used for rinsing photographic
materials, computer diskettes, and other small items.
Disinfectant: Used to clean shelves and other
surfaces, especially following water damage. Brand name cleaners such as Lysol are available. An economical option is bleach used in a 10% solution with water.
Dry ice: May be used to keep materials cool
during transport or while awaiting trans-port. Available from chemical suppliers. Handle carefully, and never with bare hands, as it can cause injury to unprotected skin.
Fans, industrial: Used to increase air circula-
tion, particularly in spaces where holdings are being dried, as air movement increases evaporation and reduces the risk of mold.
Fungicide: Used to treat mold-infested
materials and spaces.

Records Emergency Planning & Response for the Alaska State Archives
Page 37 of 65
Garbage bags: Prevents moldy materials from
spreading spores. Garbage cans, plastic: Used for cleaning or
rinsing dirty materials, for storing and transporting materials and supplies, and hauling debris. Tight-fitting lids are preferable.
Generator, portable: May be used to provide
temporary power. Generator, heavy-duty: Provides power
adequate to operate chillers and provide electricity. Coordinate with Building Facilities.
Gloves, work: Used for protection during
recovery processes and heavy lifting. Goggles, safety: Liquid-tight goggles should
be available when working when working with chemicals.
Hoses, garden: Used for cleaning dirt/mud
from material, and may have applications in site clean-up.
Humidity/temperature monitors (includes
hygrometer, hygrothermometer, hygro-thermograph, psychrometer): Monitors temperature and humidity levels, to ensure that they are sufficiently low. Hygro-thermographs provide a constant recording of temperature and relative humidity over time.
Labels, adhesive: May be used for labeling
boxes and other general purposes. Light sticks, chemical: Plastic tubes containing
nonflammable, non-toxic chemicals that provide temporary, low-level light when the
tubes are bent or shaken. Will emit light for 30 minutes to 12 hours, depending on the type. Long-lasting, low-intensity light sticks are useful for marking pathways and identifying obstacles in dark recovery sites. They have a shelf life of about four years.
Lighting, portable/shop: Provides lighting for
work crews when normal power and lights are unavailable.
Moisture meter: Measures the humidity inside
an object. Different types are available, including some that are electronic psy-chrometers with a special sensing probe. Flat or sword probes may be inserted between pages of a volume or papers in a file, then the device provides a read-out of the humidity. The devices are helpful in monitoring progress during drying, especially air-drying.
Mylar: Individual sheets for separating wet
paper documents. Available from conservation suppliers.
Newsprint, uninked: Used for interleaving wet
materials to increase evaporation. Roll ends may also be available from Juneau Empire for a minimal charge.
Office supplies: Clip boards, note pads,
markers, labels, scissors, utility knives, etc. necessary in recovery operations.
Pallets, wooden: Packed boxes may be stacked
on pallets to facilitate transport. Paper, blotter: Used in drying loose paper
materials. White blotter paper is preferred. Paper, freezer or waxed: Used to separate
individual volumes prior to freezing.
Records Emergency Planning & Response for the Alaska State Archives
Page 38 of 65
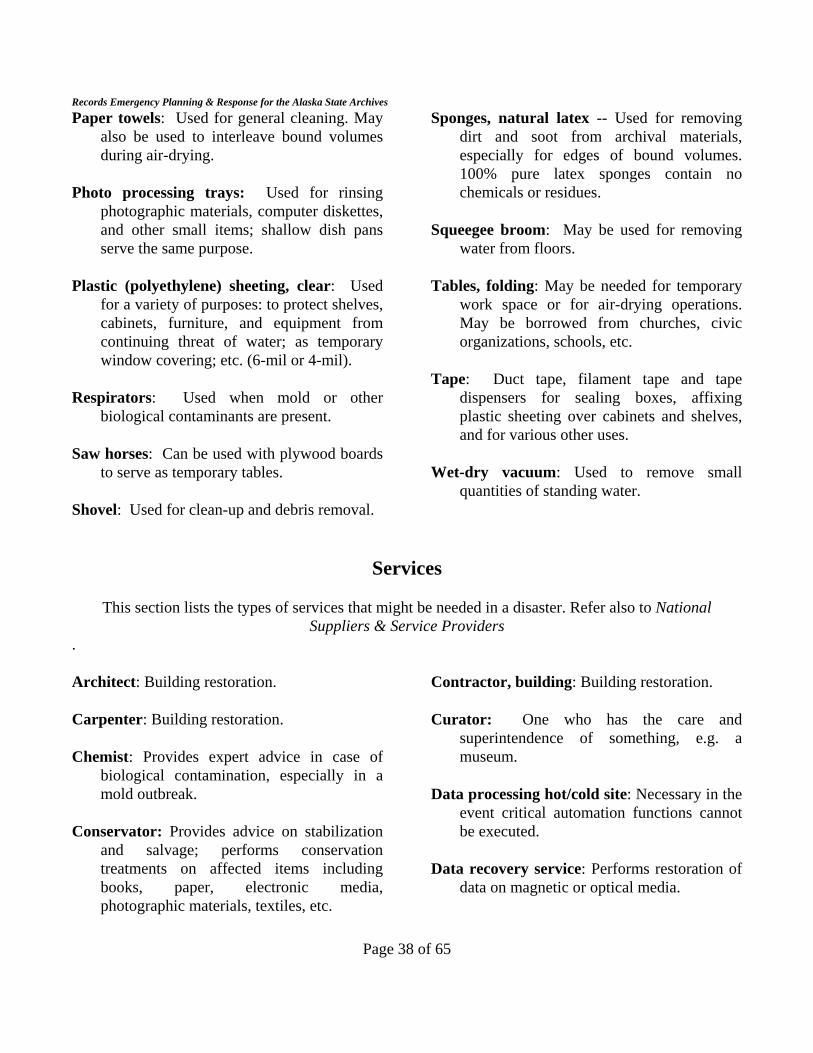
Paper towels: Used for general cleaning. May also be used to interleave bound volumes during air-drying.
Photo processing trays: Used for rinsing
photographic materials, computer diskettes, and other small items; shallow dish pans serve the same purpose.
Plastic (polyethylene) sheeting, clear: Used
for a variety of purposes: to protect shelves, cabinets, furniture, and equipment from continuing threat of water; as temporary window covering; etc. (6-mil or 4-mil).
Respirators: Used when mold or other
biological contaminants are present. Saw horses: Can be used with plywood boards
to serve as temporary tables. Shovel: Used for clean-up and debris removal.
Sponges, natural latex -- Used for removing dirt and soot from archival materials, especially for edges of bound volumes. 100% pure latex sponges contain no chemicals or residues.
Squeegee broom: May be used for removing
water from floors. Tables, folding: May be needed for temporary
work space or for air-drying operations. May be borrowed from churches, civic organizations, schools, etc.
Tape: Duct tape, filament tape and tape
dispensers for sealing boxes, affixing plastic sheeting over cabinets and shelves, and for various other uses.
Wet-dry vacuum: Used to remove small
quantities of standing water.
Services
This section lists the types of services that might be needed in a disaster. Refer also to National
Suppliers & Service Providers. Architect: Building restoration. Carpenter: Building restoration. Chemist: Provides expert advice in case of
biological contamination, especially in a mold outbreak.
Conservator: Provides advice on stabilization
and salvage; performs conservation treatments on affected items including books, paper, electronic media, photographic materials, textiles, etc.
Contractor, building: Building restoration. Curator: One who has the care and
superintendence of something, e.g. a museum.
Data processing hot/cold site: Necessary in the
event critical automation functions cannot be executed.
Data recovery service: Performs restoration of
data on magnetic or optical media.
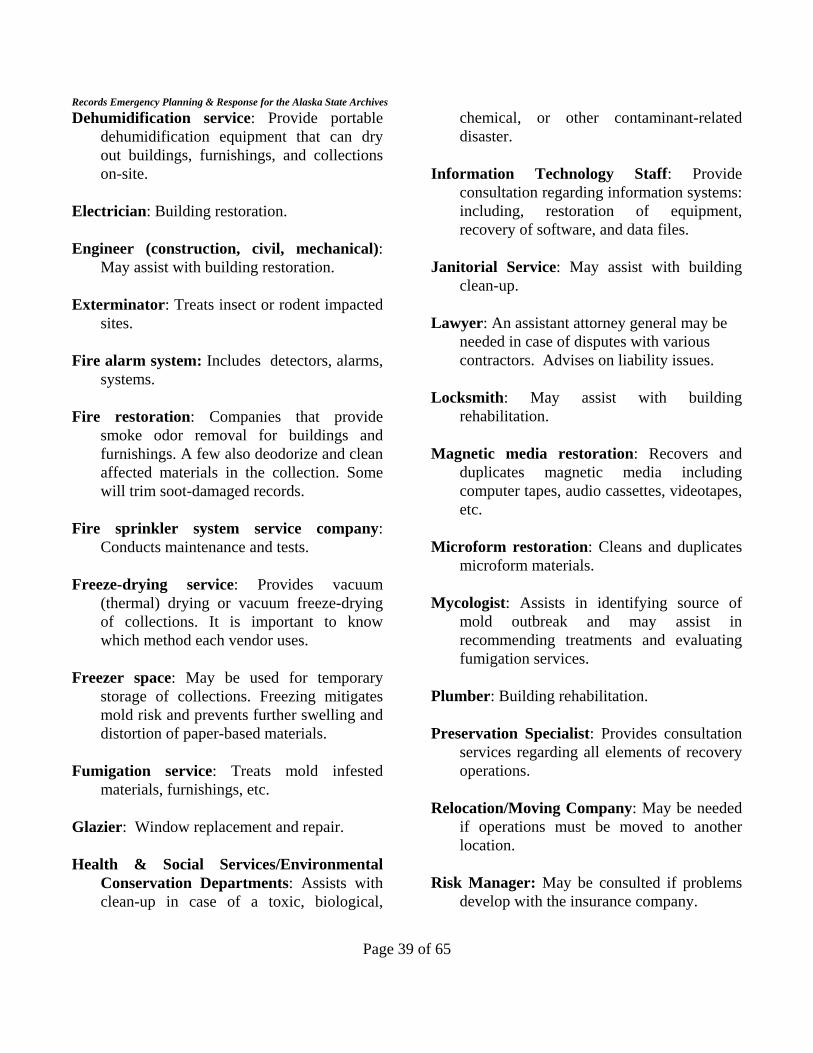
Records Emergency Planning & Response for the Alaska State Archives
Page 39 of 65
Dehumidification service: Provide portable dehumidification equipment that can dry out buildings, furnishings, and collections on-site.
Electrician: Building restoration. Engineer (construction, civil, mechanical):
May assist with building restoration. Exterminator: Treats insect or rodent impacted
sites. Fire alarm system: Includes detectors, alarms,
systems. Fire restoration: Companies that provide
smoke odor removal for buildings and furnishings. A few also deodorize and clean affected materials in the collection. Some will trim soot-damaged records.
Fire sprinkler system service company:
Conducts maintenance and tests. Freeze-drying service: Provides vacuum
(thermal) drying or vacuum freeze-drying of collections. It is important to know which method each vendor uses.
Freezer space: May be used for temporary
storage of collections. Freezing mitigates mold risk and prevents further swelling and distortion of paper-based materials.
Fumigation service: Treats mold infested
materials, furnishings, etc. Glazier: Window replacement and repair. Health & Social Services/Environmental
Conservation Departments: Assists with clean-up in case of a toxic, biological,
chemical, or other contaminant-related disaster.
Information Technology Staff: Provide
consultation regarding information systems: including, restoration of equipment, recovery of software, and data files.
Janitorial Service: May assist with building
clean-up. Lawyer: An assistant attorney general may be
needed in case of disputes with various contractors. Advises on liability issues.
Locksmith: May assist with building
rehabilitation. Magnetic media restoration: Recovers and
duplicates magnetic media including computer tapes, audio cassettes, videotapes, etc.
Microform restoration: Cleans and duplicates
microform materials. Mycologist: Assists in identifying source of
mold outbreak and may assist in recommending treatments and evaluating fumigation services.
Plumber: Building rehabilitation. Preservation Specialist: Provides consultation
services regarding all elements of recovery operations.
Relocation/Moving Company: May be needed
if operations must be moved to another location.
Risk Manager: May be consulted if problems
develop with the insurance company.
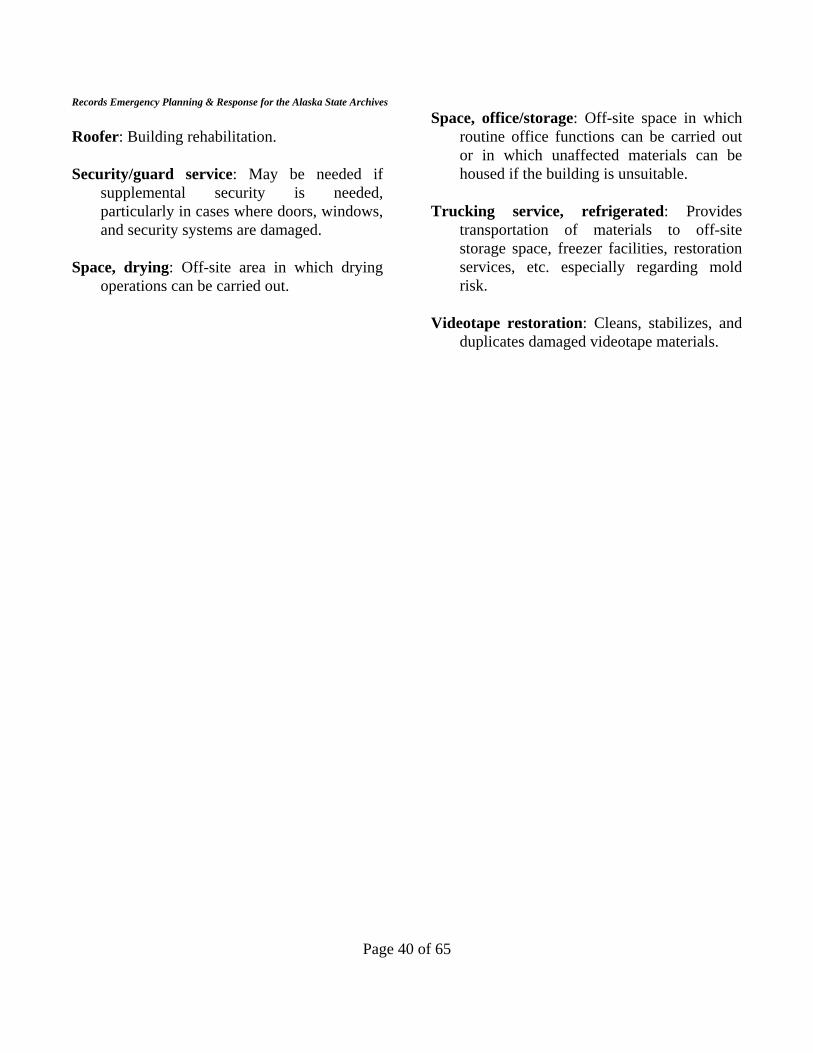
Records Emergency Planning & Response for the Alaska State Archives
Page 40 of 65
Roofer: Building rehabilitation. Security/guard service: May be needed if
supplemental security is needed, particularly in cases where doors, windows, and security systems are damaged.
Space, drying: Off-site area in which drying
operations can be carried out.
Space, office/storage: Off-site space in which routine office functions can be carried out or in which unaffected materials can be housed if the building is unsuitable.
Trucking service, refrigerated: Provides
transportation of materials to off-site storage space, freezer facilities, restoration services, etc. especially regarding mold risk.
Videotape restoration: Cleans, stabilizes, and
duplicates damaged videotape materials.
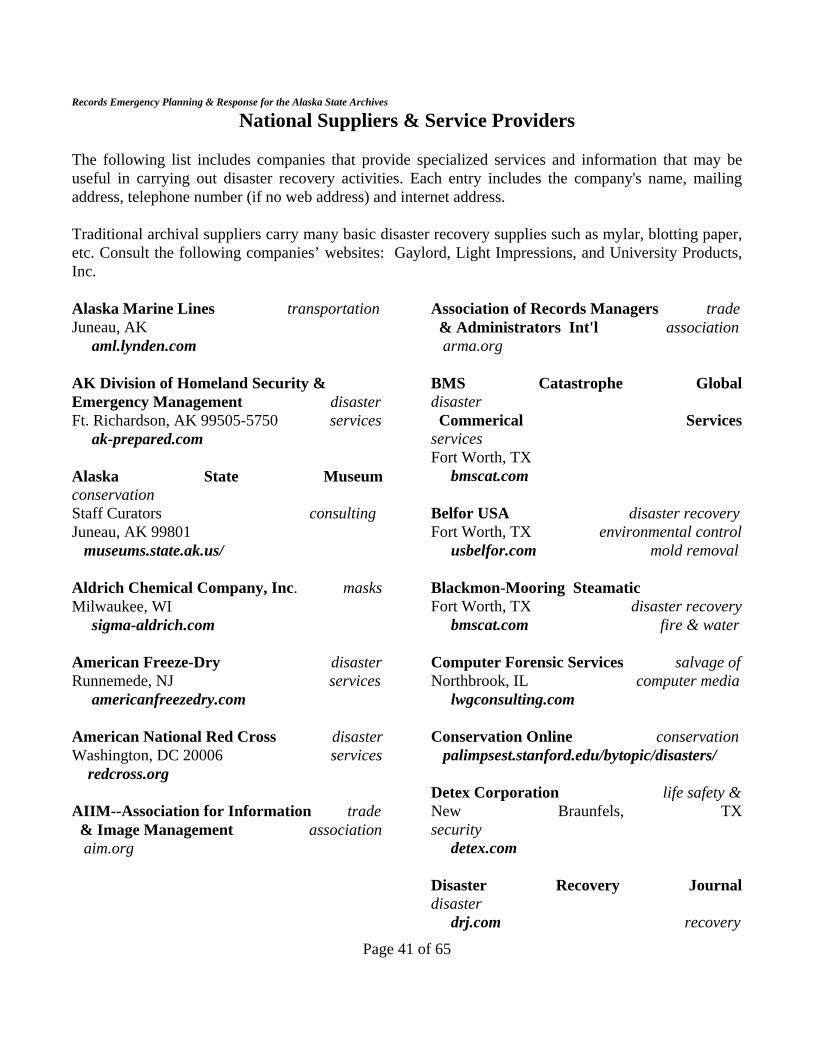
Records Emergency Planning & Response for the Alaska State Archives
Page 41 of 65
National Suppliers & Service Providers The following list includes companies that provide specialized services and information that may be useful in carrying out disaster recovery activities. Each entry includes the company's name, mailing address, telephone number (if no web address) and internet address. Traditional archival suppliers carry many basic disaster recovery supplies such as mylar, blotting paper, etc. Consult the following companies’ websites: Gaylord, Light Impressions, and University Products, Inc. Alaska Marine Lines transportation Juneau, AK aml.lynden.com AK Division of Homeland Security & Emergency Management disaster Ft. Richardson, AK 99505-5750 services ak-prepared.com Alaska State Museum conservation
bmscat.com
Staff Curators consulting Juneau, AK 99801 museums.state.ak.us/ Aldrich Chemical Company, Inc. masks Milwaukee, WI sigma-aldrich.com American Freeze-Dry disaster Runnemede, NJ services americanfreezedry.com American National Red Cross disaster Washington, DC 20006 services redcross.org AIIM--Association for Information trade & Image Management association aim.org
Association of Records Managers trade & Administrators Int'l association arma.org BMS Catastrophe Global disaster Commerical Services
services Fort Worth, TX
Belfor USA disaster recovery Fort Worth, TX environmental control usbelfor.com mold removal Blackmon-Mooring Steamatic Fort Worth, TX disaster recovery bmscat.com fire & water Computer Forensic Services salvage of Northbrook, IL computer media lwgconsulting.com Conservation Online conservation palimpsest.stanford.edu/bytopic/disasters/ Detex Corporation life safety & New Braunfels, TX security detex.com Disaster Recovery Journal disaster drj.com recovery
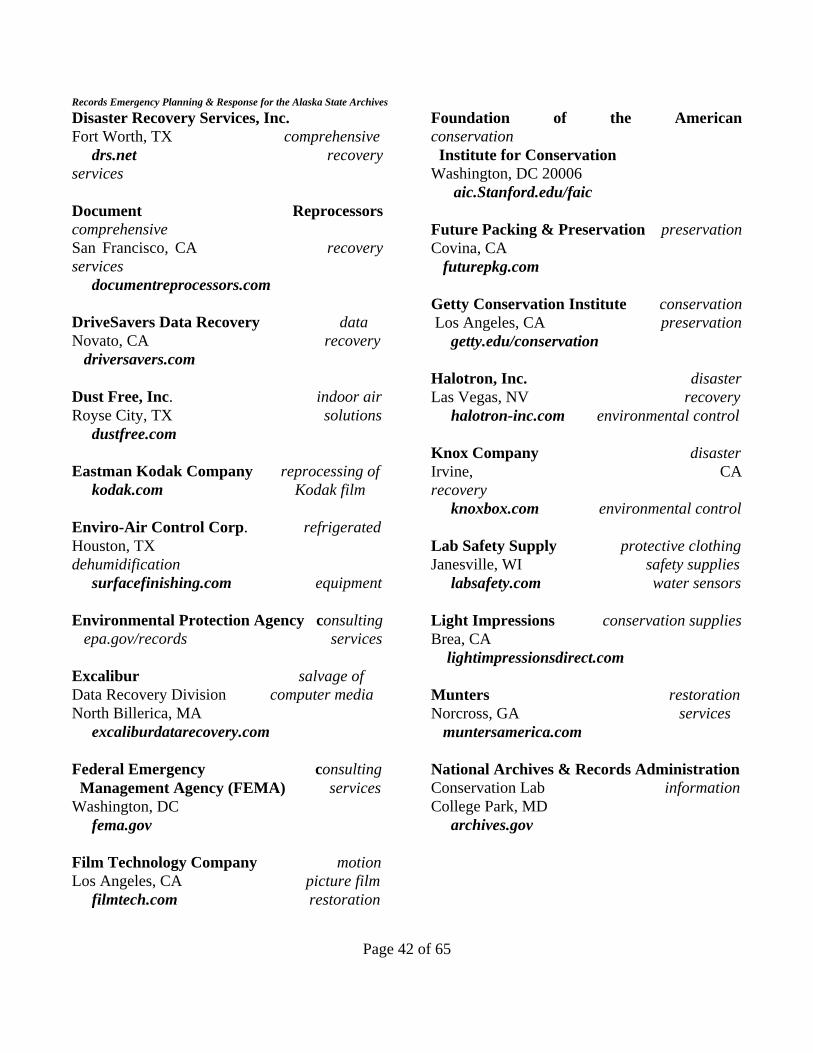
Records Emergency Planning & Response for the Alaska State Archives
Page 42 of 65
Disaster Recovery Services, Inc. Fort Worth, TX comprehensive drs.net recovery services Document Reprocessors comprehensive
San Francisco, CA recovery services documentreprocessors.com DriveSavers Data Recovery data Novato, CA recovery driversavers.com Dust Free, Inc. indoor air Royse City, TX solutions dustfree.com Eastman Kodak Company reprocessing of kodak.com Kodak film Enviro-Air Control Corp. refrigerated Houston, TX dehumidification surfacefinishing.com equipment Environmental Protection Agency consulting epa.gov/records services Excalibur salvage of Data Recovery Division computer media North Billerica, MA excaliburdatarecovery.com Federal Emergency consulting Management Agency (FEMA) services Washington, DC fema.gov Film Technology Company motion Los Angeles, CA picture film filmtech.com restoration
Foundation of the American conservation Institute for Conservation Washington, DC 20006 aic.Stanford.edu/faic
Future Packing & Preservation preservation Covina, CA futurepkg.com Getty Conservation Institute conservation Los Angeles, CA preservation getty.edu/conservation Halotron, Inc. disaster Las Vegas, NV recovery halotron-inc.com environmental control Knox Company disaster Irvine, CA recovery knoxbox.com environmental control Lab Safety Supply protective clothing Janesville, WI safety supplies labsafety.com water sensors Light Impressions conservation supplies Brea, CA lightimpressionsdirect.com Munters restoration Norcross, GA services muntersamerica.com National Archives & Records Administration Conservation Lab information College Park, MD archives.gov
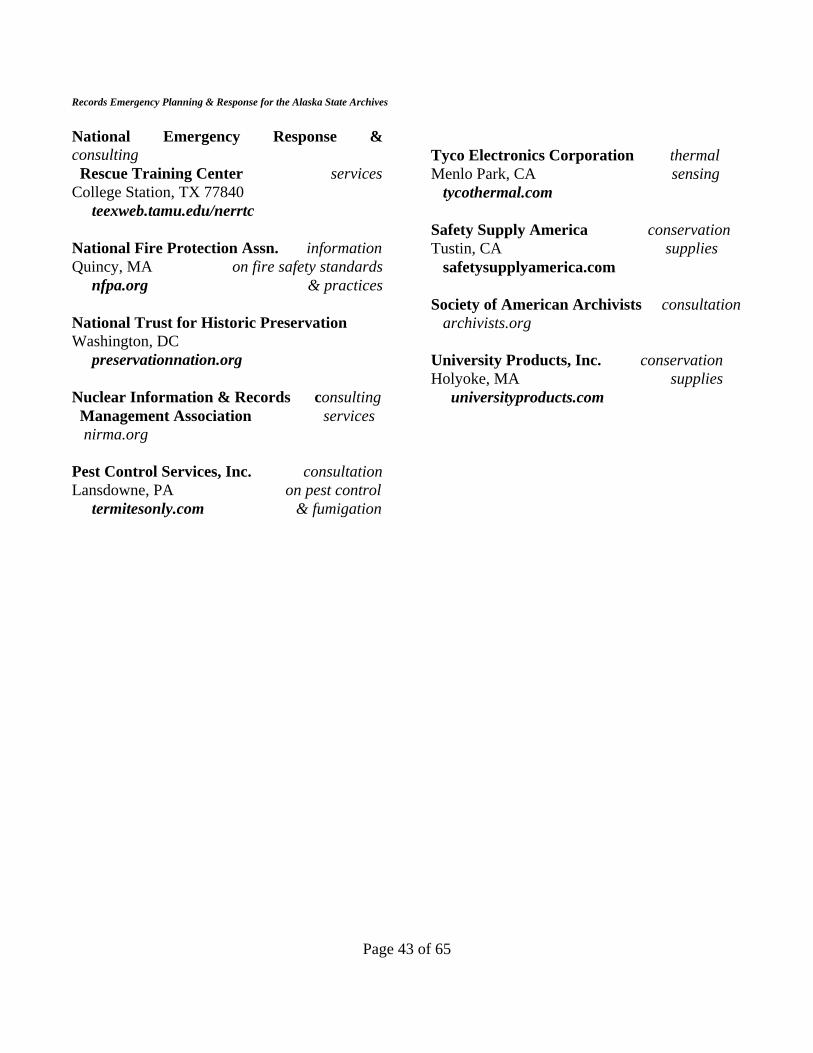
Records Emergency Planning & Response for the Alaska State Archives
Page 43 of 65
National Emergency Response & consulting Rescue Training Center services College Station, TX 77840 teexweb.tamu.edu/nerrtc National Fire Protection Assn. information Quincy, MA on fire safety standards nfpa.org & practices National Trust for Historic Preservation Washington, DC preservationnation.org Nuclear Information & Records consulting Management Association services nirma.org Pest Control Services, Inc. consultation Lansdowne, PA on pest control termitesonly.com & fumigation
Tyco Electronics Corporation thermal Menlo Park, CA sensing tycothermal.com Safety Supply America conservation Tustin, CA supplies safetysupplyamerica.com Society of American Archivists consultation archivists.org University Products, Inc. conservation Holyoke, MA supplies universityproducts.com
Disaster Preparedness & Response for the Alaska State Archives
Page 44 of 65
Appendix C: Evacuation & Emergency Procedures Use these instructions during emergency evacuations for the protection and safety of building occupants. Evacuation When Fire Alarm Sounds Notice to evacuate is indicated by the fire alarm system, which warns State Archives’ building occupants of imminent danger. When fire alarm sounds, follow these steps: 1. Evacuate to the nearest safe exit immediately. Walk rapidly; do not run. 2. Do not panic others. Do not use the elevator. 3. Turn off all lights and close all doors, if possible. Do not lock doors. 4. Before opening doors, feel the door and if it is hot, do not open it--choose an alternate route. If
you are in an area filled with smoke, take short breaths, breathe through your nose, crawl along the floor where the air is cooler and place a (damp) handkerchief over your mouth and nose. If forced to make a dash through smoke or flame, hold your breath.
5. Assemble at Centennial Hall and check in with the State Archivist or appointed delegate. 6. If safe to remain in the building, the State Archivist will locate the reason for the alarm while the
fire department is en route. 7. State Archivist will escort the fire department to the location of the problem. After evacuating the building, personnel will assemble at Centennial Hall for a head count. Once the fire department verifies that the building is safe to re-enter, the State Archivist will notify staff.
Disaster Preparedness & Response for the Alaska State Archives
Page 45 of 65
Appendix D: Emergencies--Bomb Threat
1. Upon receipt of a telephone threat, try to keep the caller on the line. Remain cool, calm and collected.
2. Obtain as much relevant information as possible (refer to the Bomb Threat Report Form on the
following page).
3. After the caller hangs up immediately dial 911 and provide requested data. Then, notify the State Archivist , Division Director, and Building Facilities.
4. Pull FIRE ALARM and follow evacuation procedures (refer to Appendix C). 5. All staff must scan their office areas prior to departing the building for unusual packages or
unfamiliar or unidentified items. Report findings to the State Archivist.
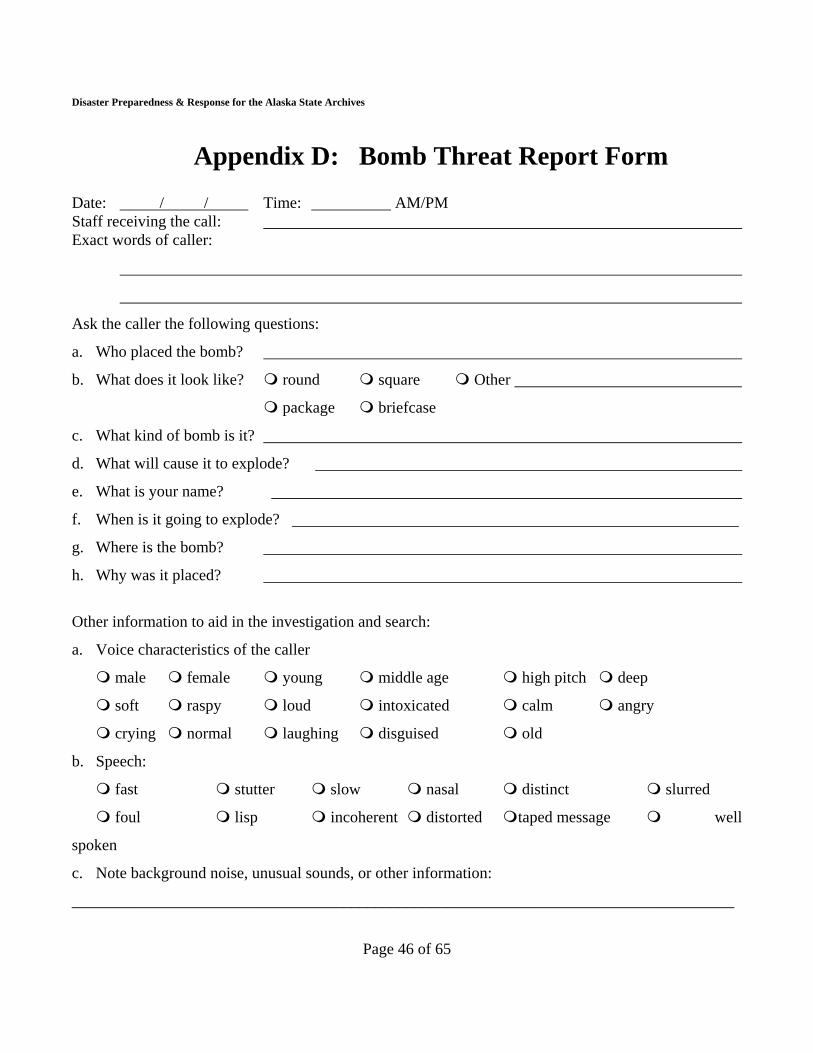
Disaster Preparedness & Response for the Alaska State Archives
Page 46 of 65
Appendix D: Bomb Threat Report Form Date: / / Time: AM/PM Staff receiving the call: Exact words of caller:
Ask the caller the following questions:
a. Who placed the bomb?
b. What does it look like? round square Other
package briefcase
c. What kind of bomb is it?
d. What will cause it to explode?
e. What is your name?
f. When is it going to explode?
g. Where is the bomb?
h. Why was it placed?
Other information to aid in the investigation and search:
a. Voice characteristics of the caller
male female young middle age high pitch deep
soft raspy loud intoxicated calm angry
crying normal laughing disguised old
b. Speech:
fast stutter slow nasal distinct slurred
foul lisp incoherent distorted taped message well
spoken
c. Note background noise, unusual sounds, or other information:
___________________________________________________________________________________
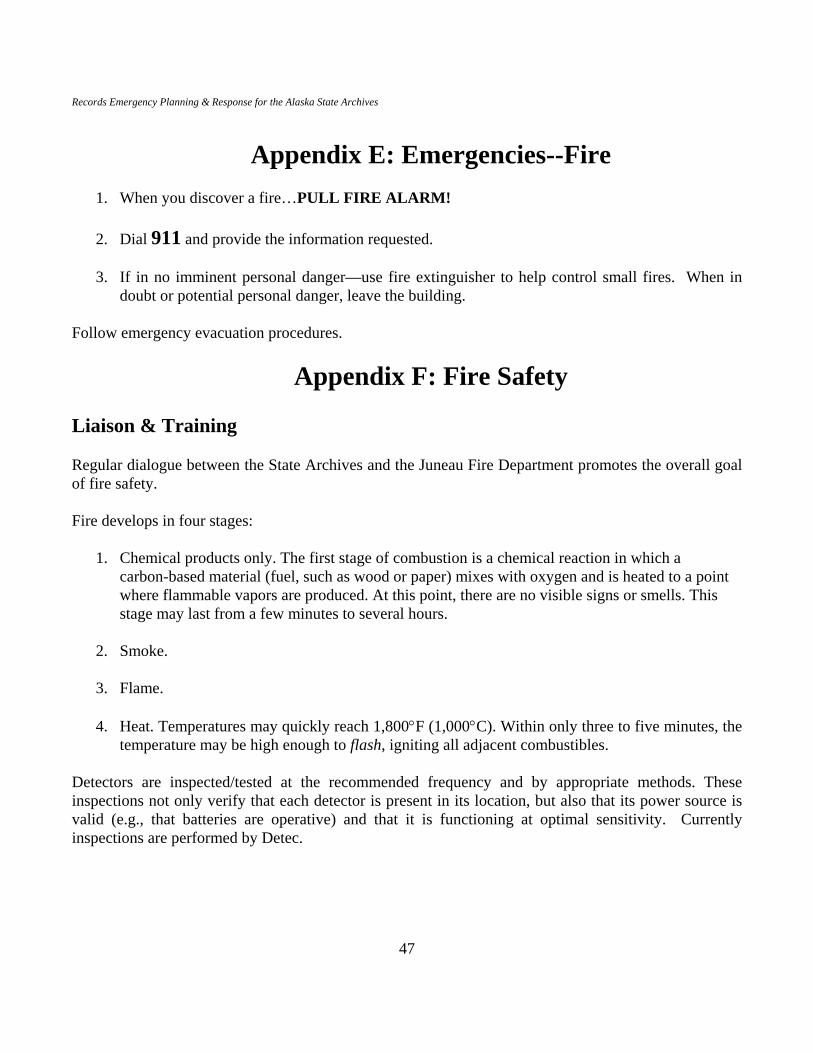
Records Emergency Planning & Response for the Alaska State Archives
47
Appendix E: Emergencies--Fire
1. When you discover a fire…PULL FIRE ALARM!
2. Dial 911 and provide the information requested.
3. If in no imminent personal danger—use fire extinguisher to help control small fires. When in
doubt or potential personal danger, leave the building. Follow emergency evacuation procedures.
Appendix F: Fire Safety Liaison & Training Regular dialogue between the State Archives and the Juneau Fire Department promotes the overall goal of fire safety. Fire develops in four stages:
1. Chemical products only. The first stage of combustion is a chemical reaction in which a carbon-based material (fuel, such as wood or paper) mixes with oxygen and is heated to a point where flammable vapors are produced. At this point, there are no visible signs or smells. This stage may last from a few minutes to several hours.
2. Smoke.
3. Flame.
4. Heat. Temperatures may quickly reach 1,800°F (1,000°C). Within only three to five minutes, the
temperature may be high enough to flash, igniting all adjacent combustibles. Detectors are inspected/tested at the recommended frequency and by appropriate methods. These inspections not only verify that each detector is present in its location, but also that its power source is valid (e.g., that batteries are operative) and that it is functioning at optimal sensitivity. Currently inspections are performed by Detec.
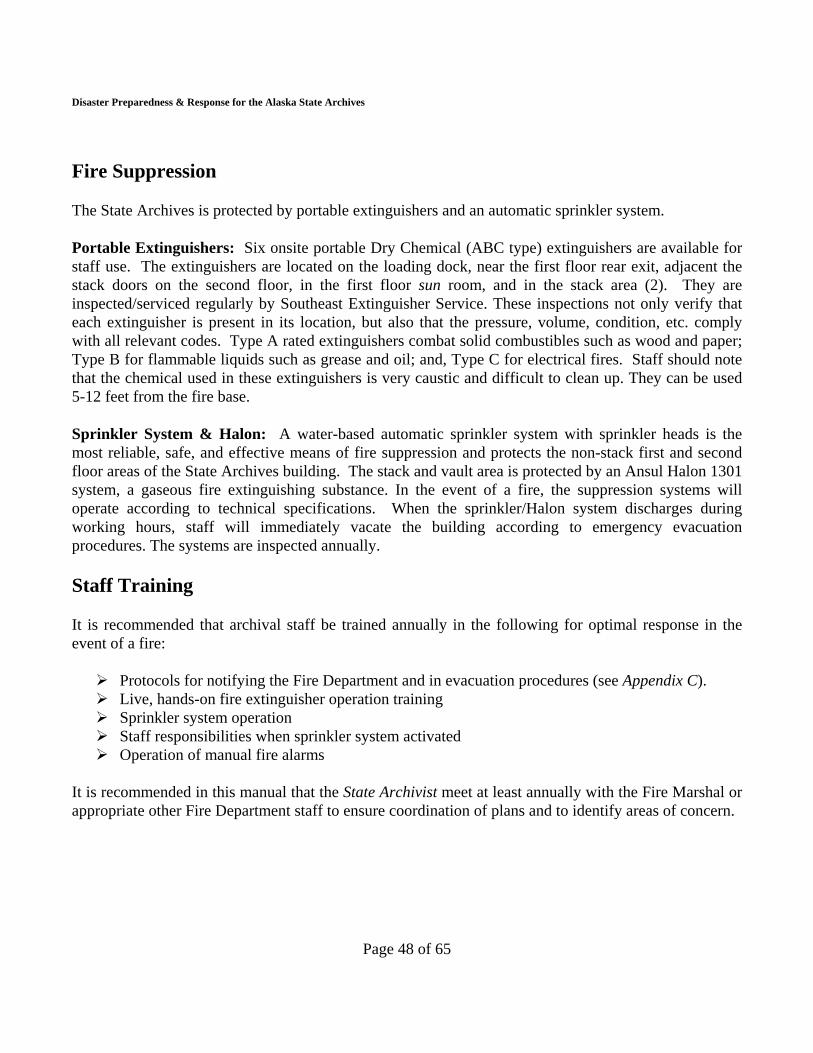
Disaster Preparedness & Response for the Alaska State Archives
Page 48 of 65
Fire Suppression The State Archives is protected by portable extinguishers and an automatic sprinkler system. Portable Extinguishers: Six onsite portable Dry Chemical (ABC type) extinguishers are available for staff use. The extinguishers are located on the loading dock, near the first floor rear exit, adjacent the stack doors on the second floor, in the first floor sun room, and in the stack area (2). They are inspected/serviced regularly by Southeast Extinguisher Service. These inspections not only verify that each extinguisher is present in its location, but also that the pressure, volume, condition, etc. comply with all relevant codes. Type A rated extinguishers combat solid combustibles such as wood and paper; Type B for flammable liquids such as grease and oil; and, Type C for electrical fires. Staff should note that the chemical used in these extinguishers is very caustic and difficult to clean up. They can be used 5-12 feet from the fire base. Sprinkler System & Halon: A water-based automatic sprinkler system with sprinkler heads is the most reliable, safe, and effective means of fire suppression and protects the non-stack first and second floor areas of the State Archives building. The stack and vault area is protected by an Ansul Halon 1301 system, a gaseous fire extinguishing substance. In the event of a fire, the suppression systems will operate according to technical specifications. When the sprinkler/Halon system discharges during working hours, staff will immediately vacate the building according to emergency evacuation procedures. The systems are inspected annually. Staff Training It is recommended that archival staff be trained annually in the following for optimal response in the event of a fire:
Protocols for notifying the Fire Department and in evacuation procedures (see Appendix C). Live, hands-on fire extinguisher operation training Sprinkler system operation Staff responsibilities when sprinkler system activated Operation of manual fire alarms
It is recommended in this manual that the State Archivist meet at least annually with the Fire Marshal or appropriate other Fire Department staff to ensure coordination of plans and to identify areas of concern.
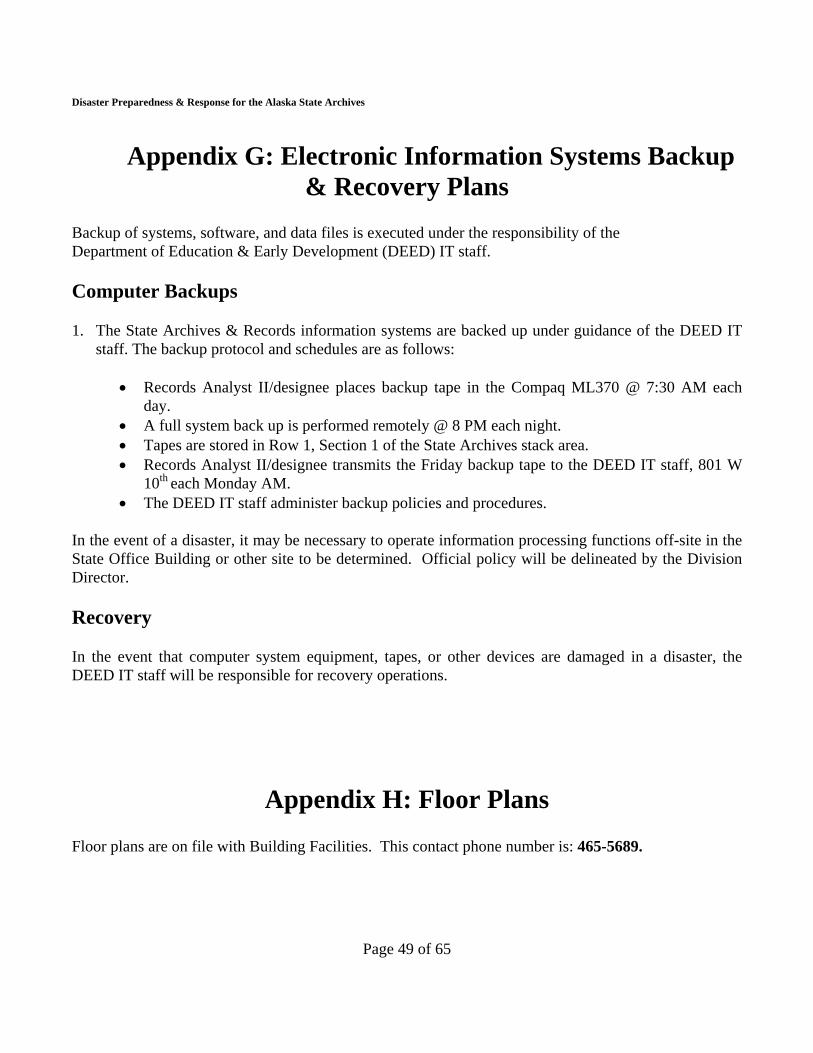
Disaster Preparedness & Response for the Alaska State Archives
Page 49 of 65
Appendix G: Electronic Information Systems Backup & Recovery Plans
Backup of systems, software, and data files is executed under the responsibility of the Department of Education & Early Development (DEED) IT staff. Computer Backups 1. The State Archives & Records information systems are backed up under guidance of the DEED IT
staff. The backup protocol and schedules are as follows:
• Records Analyst II/designee places backup tape in the Compaq ML370 @ 7:30 AM each day.
• A full system back up is performed remotely @ 8 PM each night. • Tapes are stored in Row 1, Section 1 of the State Archives stack area. • Records Analyst II/designee transmits the Friday backup tape to the DEED IT staff, 801 W
10th each Monday AM. • The DEED IT staff administer backup policies and procedures.
In the event of a disaster, it may be necessary to operate information processing functions off-site in the State Office Building or other site to be determined. Official policy will be delineated by the Division Director. Recovery In the event that computer system equipment, tapes, or other devices are damaged in a disaster, the
EED IT staff will be responsible for recovery operations. D
Appendix H: Floor Plans F loor plans are on file with Building Facilities. This contact phone number is: 465-5689.
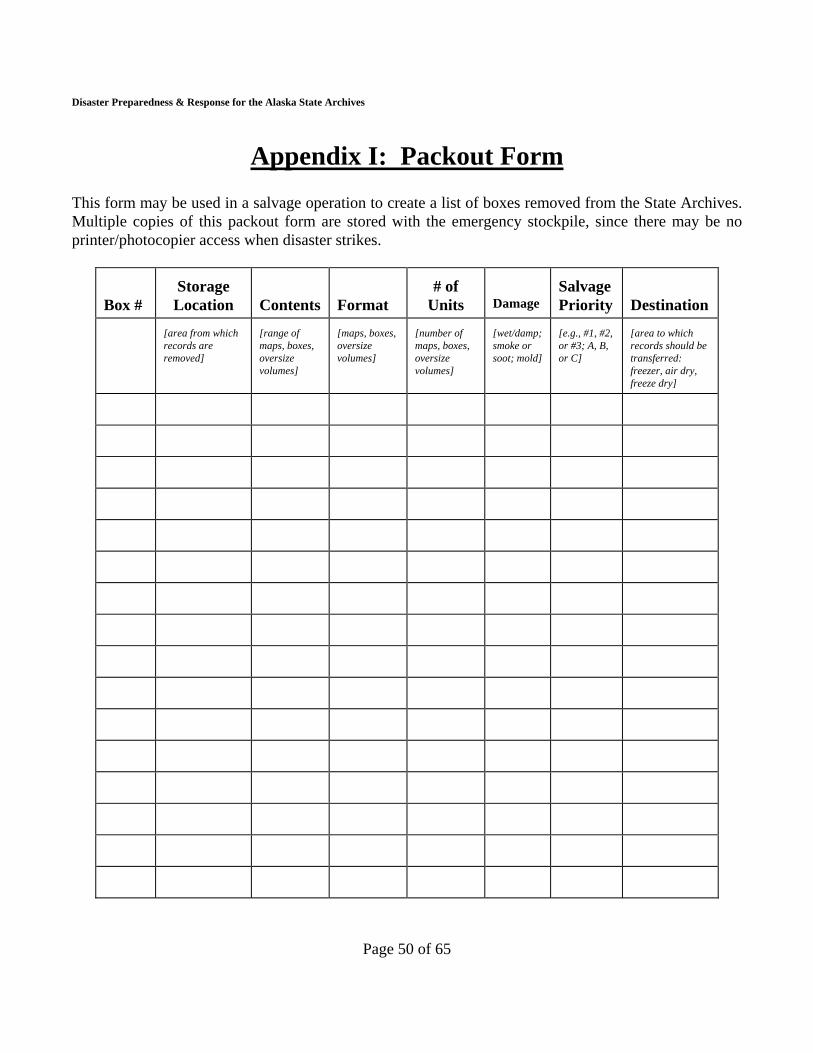
Disaster Preparedness & Response for the Alaska State Archives
Page 50 of 65
Appendix I: Packout Form This form may be used in a salvage operation to create a list of boxes removed from the State Archives. Multiple copies of this packout form are stored with the emergency stockpile, since there may be no printer/photocopier access when disaster strikes.
Box #
Storage Location
Contents
Format
# of
Units
Damage
Salvage Priority
Destination
[area from which records are removed]
[range of maps, boxes, oversize volumes]
[maps, boxes, oversize volumes]
[number of maps, boxes, oversize volumes]
[wet/damp; smoke or soot; mold]
[e.g., #1, #2, or #3; A, B, or C]
[area to which records should be transferred: freezer, air dry, freeze dry]
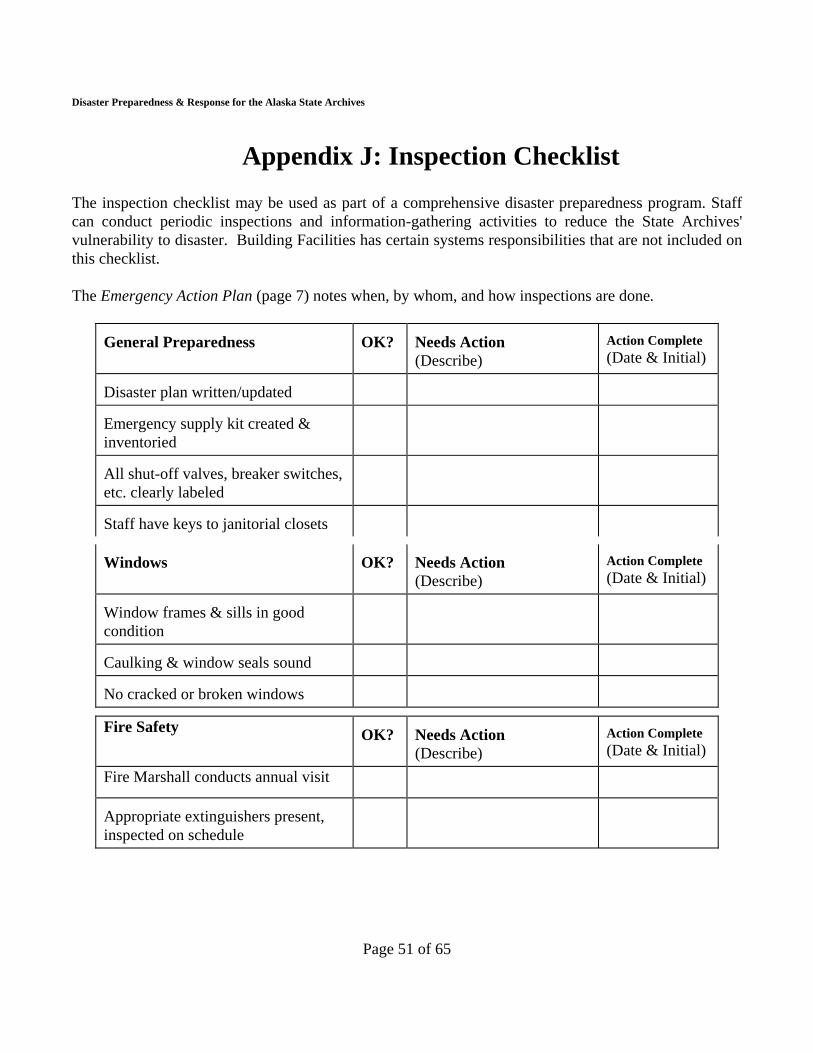
Disaster Preparedness & Response for the Alaska State Archives
Page 51 of 65
Appendix J: Inspection Checklist The inspection checklist may be used as part of a comprehensive disaster preparedness program. Staff can conduct periodic inspections and information-gathering activities to reduce the State Archives' vulnerability to disaster. Building Facilities has certain systems responsibilities that are not included on this checklist. The Emergency Action Plan (page 7) notes when, by whom, and how inspections are done.
General Preparedness
OK?
Needs Action (Describe)
Action Complete (Date & Initial)
Disaster plan written/updated
Emergency supply kit created & inventoried
All shut-off valves, breaker switches, etc. clearly labeled
Staff have keys to janitorial closets
Windows OK? Needs Action
(Describe) Action Complete (Date & Initial)
Window frames & sills in good condition
Caulking & window seals sound
No cracked or broken windows
Fire Safety
OK? Needs Action (Describe)
Action Complete (Date & Initial)
Fire Marshall conducts annual visit
Appropriate extinguishers present, inspected on schedule
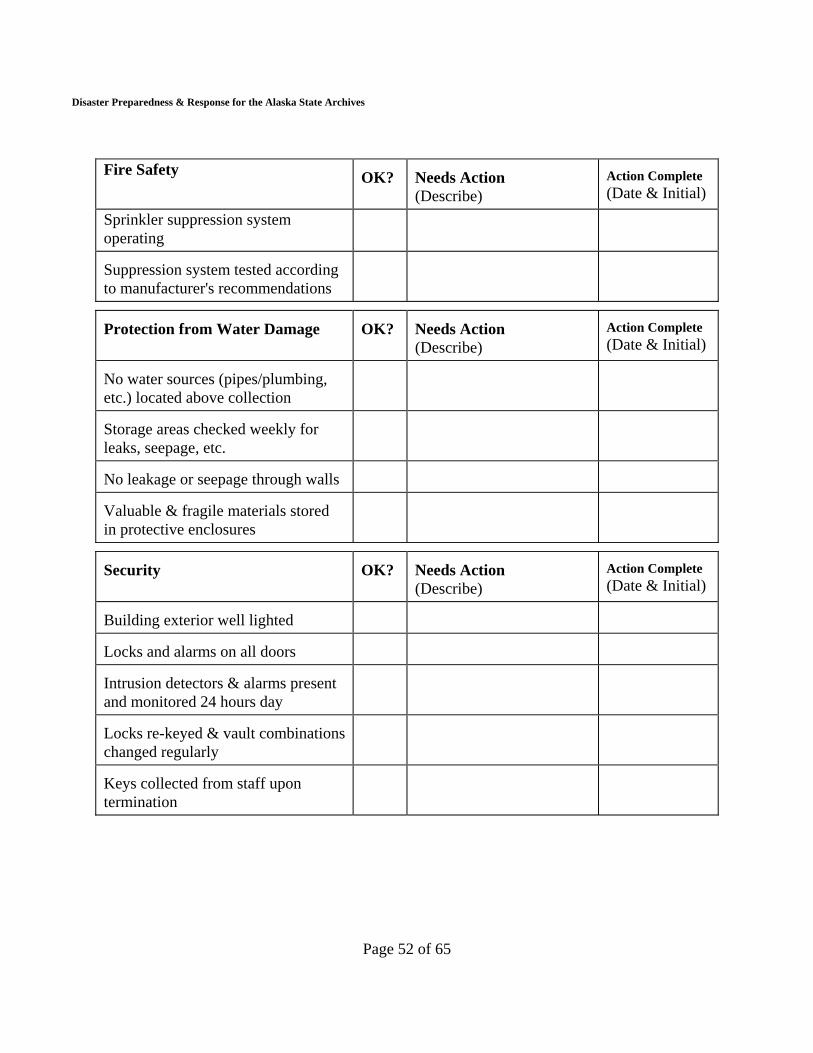
Disaster Preparedness & Response for the Alaska State Archives
Page 52 of 65
Fire Safety
OK? Needs Action (Describe)
Action Complete (Date & Initial)
Sprinkler suppression system operating
Suppression system tested according to manufacturer's recommendations
Protection from Water Damage
OK?
Needs Action (Describe)
Action Complete (Date & Initial)
No water sources (pipes/plumbing, etc.) located above collection
Storage areas checked weekly for leaks, seepage, etc.
No leakage or seepage through walls
Valuable & fragile materials stored in protective enclosures
Security
OK?
Needs Action (Describe)
Action Complete (Date & Initial)
Building exterior well lighted
Locks and alarms on all doors
Intrusion detectors & alarms present and monitored 24 hours day
Locks re-keyed & vault combinations changed regularly
Keys collected from staff upon termination

Disaster Preparedness & Response for the Alaska State Archives
Page 53 of 65
Housekeeping
OK?
Needs Action (Describe)
Action Complete (Date & Initial)
Cleaning supplies & other flammable materials stored safely
Trash removed nightly from the building
Food & drink prohibited and prohibition enforced
Pest management strategies in place and effective
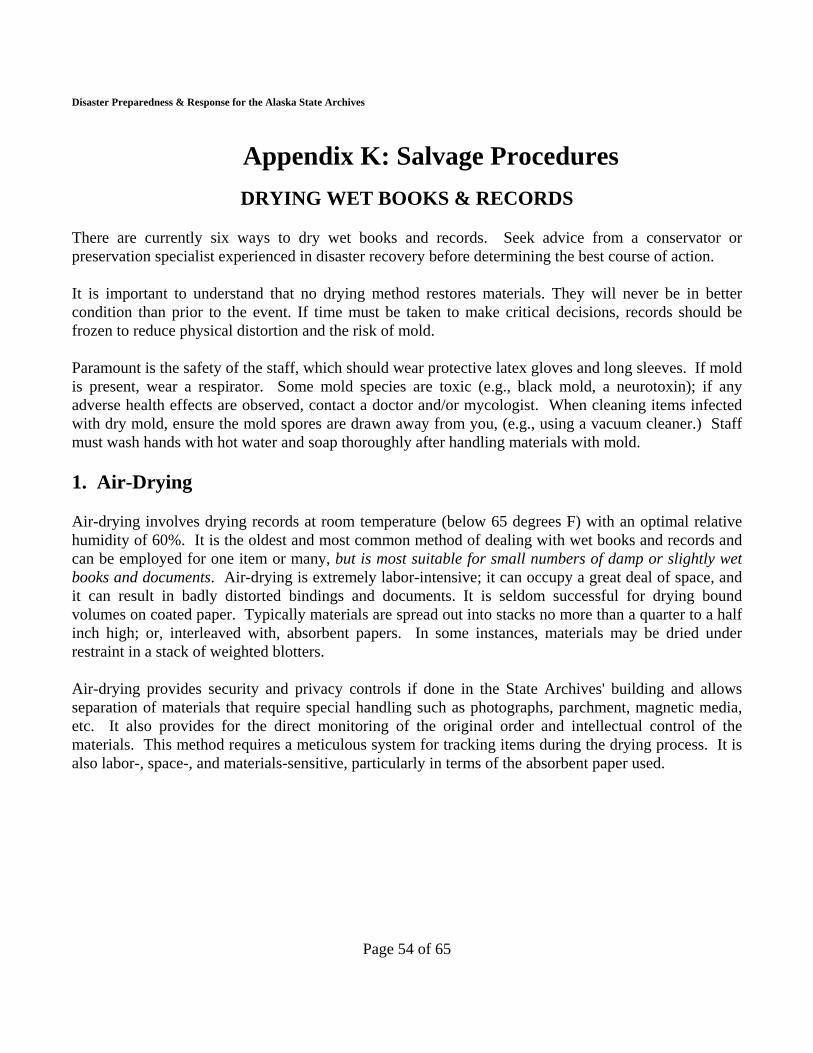
Disaster Preparedness & Response for the Alaska State Archives
Page 54 of 65
Appendix K: Salvage Procedures
DRYING WET BOOKS & RECORDS There are currently six ways to dry wet books and records. Seek advice from a conservator or preservation specialist experienced in disaster recovery before determining the best course of action. It is important to understand that no drying method restores materials. They will never be in better condition than prior to the event. If time must be taken to make critical decisions, records should be frozen to reduce physical distortion and the risk of mold. Paramount is the safety of the staff, which should wear protective latex gloves and long sleeves. If mold is present, wear a respirator. Some mold species are toxic (e.g., black mold, a neurotoxin); if any adverse health effects are observed, contact a doctor and/or mycologist. When cleaning items infected with dry mold, ensure the mold spores are drawn away from you, (e.g., using a vacuum cleaner.) Staff must wash hands with hot water and soap thoroughly after handling materials with mold. 1. Air-Drying Air-drying involves drying records at room temperature (below 65 degrees F) with an optimal relative humidity of 60%. It is the oldest and most common method of dealing with wet books and records and can be employed for one item or many, but is most suitable for small numbers of damp or slightly wet books and documents. Air-drying is extremely labor-intensive; it can occupy a great deal of space, and it can result in badly distorted bindings and documents. It is seldom successful for drying bound volumes on coated paper. Typically materials are spread out into stacks no more than a quarter to a half inch high; or, interleaved with, absorbent papers. In some instances, materials may be dried under restraint in a stack of weighted blotters. Air-drying provides security and privacy controls if done in the State Archives' building and allows separation of materials that require special handling such as photographs, parchment, magnetic media, etc. It also provides for the direct monitoring of the original order and intellectual control of the materials. This method requires a meticulous system for tracking items during the drying process. It is also labor-, space-, and materials-sensitive, particularly in terms of the absorbent paper used.
Disaster Preparedness & Response for the Alaska State Archives
Page 55 of 65
2. Dehumidification This is the newest method to gain credibility in the archival world, although it has been used for many years to dry out buildings and the holds of ships. Large commercial dehumidifiers are brought into the facility with all collections, equipment, and furnishings left in place. Temperature and humidity can be carefully controlled to specifications. This technique is successful for damp or moderately wet books, even those with coated paper, as long as the process is initiated before swelling and adhesion have taken place. The number of items that can be treated with dehumidification is limited only by the amount of equipment available and the expertise of the equipment operators. This method has the advantage of leaving the materials in place on the shelves and in storage boxes, eliminating the costly, time-consuming step of moving them to a freezer or vacuum chamber. 3. Freezer Drying
Books and records that are only damp or moderately wet may be dried successfully in a self-defrosting blast freezer if left there long enough. Materials should be placed in the freezer as soon as possible after becoming wet. Books will dry best if their bindings are supported firmly to inhibit initial swelling. The equipment should have the capacity to freeze very quickly, and temperatures must be below -10°F to reduce distortion and to expedite drying. Documents may be placed in the freezer in stacks or may be spread out for faster drying. This method will take from several weeks to several months, depending upon the temperature of the freezer and the extent of the water damage; leaves of coated paper may adhere to one another. 4. Vacuum Thermal Drying Vacuum thermal drying is similar to vacuum freeze-drying in the kind of chamber used, but different in that cycles of warm to hot air are used. Wet or frozen books and records may be dried in a vacuum thermal drying chamber into which they are placed. The vacuum is drawn, and heat is introduced. Drying typically occurs at temperatures above 100°F, but always above 32°F. This means that the materials stay wet while they dry. It is an acceptable manner of drying wet records, but often produces extreme distortion in books, and almost always causes adhesion of coated paper. For large quantities of materials, it is easier than air-drying and almost always more cost-effective. However, extensive rebinding or recasing of books should be expected. This method is a solution for materials that have suffered extensive water damage. Given the elevated temperature used in drying, the records may have to be photocopied, microfilmed, or reformatted in another manner for preservation purposes.
Disaster Preparedness & Response for the Alaska State Archives
Page 56 of 65
5. Vacuum Freeze-Drying This process utilizes sophisticated equipment and is suitable for large numbers of very wet books and records, as well as for coated paper. Books and records must be frozen, and then are placed in a vacuum chamber and dried at temperatures below 32°F. Sublimation occurs and ice crystals vaporize without melting—water passes from a frozen state to a vaporous state without passing through a liquid phase. There is no additional swelling or distortion of materials. Rare and unique materials can be dried successfully by vacuum freeze-drying, but leathers and vellums may not survive. Photographs should not be dried this way unless no other possibility exists. Consult a photograph conservator. If only a few documents are dried, vacuum freeze-drying can expensive. 6. Vacuum Thermal Freeze-Drying This technique is similar to vacuum freeze-drying in that a vacuum is used along with controlled heat to vaporize the water, but this method also has a patented procedure to compress the materials into shape. It is more expensive per cubic foot than vacuum freeze-drying.
Disaster Preparedness & Response for the Alaska State Archives
Page 57 of 65
How to Air-Dry Wet Records Wet records may be air-dried if care is taken to follow guidelines suggested by preservation experts. The technique is most suitable for small numbers of records that are damp or water-damaged only around the edges. If there are hundreds of single pages, or if the water damage is severe, other methods of drying will be more satisfactory and cost effective. Stacks of documents on coated, or shiny, paper must be separated immediately to prevent adhesion, or they must be frozen to await a later drying decision. Care must be taken with water-soluble inks as well. Records with running or blurred inks should be frozen immediately to preserve the written record. After the items are dry, conservators can be contacted for advice and assistance. If records must be air-dried, the following steps will help achieve satisfactory results. Wet paper is extremely fragile and easily torn or damaged, so care must be exercised. Once wet, records will never look the same, and at least some cockling or distortion should be expected. 1. Secure a clean, dry environment where the temperature and humidity are as low as possible. The
temperature must be below 70°F and the humidity below 50%, or mold will probably develop and distortion will be extreme.
2. Keep the air moving at all times using fans in the drying area. This will accelerate the drying
process and discourage the growth of mold. 3. Single leaves can be placed on tables, floors, and other flat surfaces, protected if necessary by
paper towels or clean, uninked newsprint. Alternatively, clotheslines may be strung close together (6-foot lengths spaced 1-inch apart) and lightweight records/photographs may be laid out or clothespinned.
4. If records are printed on coated paper, they must be tediously separated from one another to
prevent them from sticking together. Place a piece of polyester film (such as Mylar) on the stack of records. Rub it gently down on the top document. Then slowly lift the film while at the same time peeling off the top sheet. Hang the polyester film up to dry on the clothesline using clothespins. As the document dries, it will separate from the surface of the film. Before it falls, remove it and allow it to finish drying on a flat surface.
5. Once dry, records may be rehoused in clean folders and boxes. Or they may be photocopied or
reformatted onto microfilm. Dried records will always occupy more space than ones that have not been water damaged.
Disaster Preparedness & Response for the Alaska State Archives
Page 58 of 65
How to Air-Dry Bound Volumes Air-drying is most appropriate for books that are only damp or wet in places, such as along the edges. Books that are soaking wet should be vacuum freeze-dried to minimize cockling of leaves and distortion of bindings. Books containing coated paper should be frozen while still wet and vacuum freeze-dried. Books with running or blurred inks should be frozen immediately, then vacuum freeze-dried. 1. Refer to steps 1 and 2 of the previous section. 2. Volumes can be dried on any flat surface, but tables make far easier work. Cover the tables with
plastic or uninked newsprint. 3. Interleave with paper towels or clean, uninked newsprint at least every 50 pages; turn pages
carefully to avoid tearing them. Be careful not to interleave too much, or the spine will become concave and the volume distorted. Complete the interleaving by placing clean blotter paper inside the front and back covers. Stand the volume on its head, fan it open, and place it on several sheets of absorbent paper. Change the interleaving frequently. Turn the volume over each time it is interleaved.
4. When volumes are dry but still cool to the touch, they should be closed and laid flat on a table or
other horizontal surface, gently formed into the normal shape, with convex spine and concave front edge (if that was their original shape) and held in place with a light weight. Do not stack drying volumes on top of each other. In no case should they be returned to shelves until thoroughly dry; otherwise mold may develop, particularly along the inner margins.
5. Dampness will persist for some time in the inner margins, along the spine, and between boards
and flyleaves. You may use a moisture meter to determine whether the paper is dry. Normal dry paper generally has about 7% moisture content. Check often for mold growth while books are drying.
6. If the edges are only slightly wet, interleaving is not required. Stand the volume on end and fan it
open slightly in the path of a flow of air (as from a fan). To minimize distortion of the edges, lay volumes flat under light pressure (e.g., a book press or paper-covered bricks) just before drying is complete.
Disaster Preparedness & Response for the Alaska State Archives
Page 59 of 65
EMERGENCY SALVAGE OF PHOTOGRAPHS
Photographs, both negatives and prints, involve a wide variety of material types and encompass a long history of technological innovation. Some historical photographs are very sensitive to water damage and may not be recoverable. Most prints, negatives and color slides, however, can be air-dried; the emulsion (picture/image) side should be face up. Some photographic processes can withstand immersion in water for a day or more, whereas others would be permanently disfigured or even destroyed by a couple of minutes of exposure. In general, wet photographs should be air-dried or frozen as quickly as possible. Once they are stabilized by either of these methods, there is time to decide what course of action to pursue. Glass plate and cased photographs should not be vacuum freeze-dried. Ideally, salvage should occur under expert or conservator supervision. A conservator can minimize damage to a collection if s/he can direct the salvage and treat the collection immediately after the damage has occurred. Time is of the essence: the longer the period of time between the emergency and salvage, the greater amount of permanent damage that will occur. Minimum Immersion Time Photographs in water will quickly deteriorate: images can separate from mounts, emulsions can dissolve or stick together, and staining can occur. Mold can grow within 48 hours at 60% RH and 70°F, and it often causes permanent staining and other damage to photographs. For these reasons photographs need to be dried as quickly as possible. If photographs cannot be dried promptly, they should be frozen. Salvage Priorities for Wet Photographs In general, films (plastic-base materials) are more stable than prints (paper-base materials); therefore, prints should be salvaged first. Important exceptions include deteriorated nitrate and safety films, which are extremely susceptible to water damage. Some photographic processes will not survive immersion. Photographs made by the following processes should be salvaged first: ambrotypes, tintypes, collodion wet plate negatives, gelatin dry plate negatives, lantern slides, deteriorated nitrate or safety film, autochromes, carbon prints, woodburytypes, deteriorated or unhardened gelatin prints and color materials. Photographs that are more stable in water include: daguerreotypes, salted paper prints, albumen prints, collodion prints, platinum prints and cyanotypes.
Disaster Preparedness & Response for the Alaska State Archives
Page 60 of 65
Air-Drying Photographs If personnel, space, and time are available, photographs can be air-dried.
• Separate photographs from their enclosures, frames, and from each other. If the surface is not cracked or flaking, and the photographs have soot or mud on the surface, you may be able to rinse them in a tray of cool, clear water while they are still wet.
• Dry photographs image side up on clean blotters for at lest one hour.
• If the emulsion or surface of the photograph is tacky, interleave it between sheets of spun-bond
polyester to prevent disturbance of the surface during drying.
• Place the polyester and photographs between blotters to create a stack. Change blotters when they become damp. Remove photographs when they are completely dry.
• Put a flat sheet of Plexiglas or other heavy-weight flat material (e.g., plastic wrapped telephone
books or bricks) on top of the stack.
• If the photographs are stuck together or adhered to glass, set them aside for freezing and consultation with a conservator.
Freezing Photographs If immediate air-drying of photographs is not possible or if photographs are stuck together, freeze them. Place the photographs in small plastic bags before freezing, several to a bag. If possible, interleave photographs before freezing with a non-woven polyester material or wax paper. This will make them easier to separate when they are eventually treated. Drying Frozen Photographs Frozen photographs may be thawed and then air-dried. As a group of photographs thaws, individual photographs can be carefully peeled from the group and placed face up on a clean, absorbent surface to air-dry. Vacuum thermal drying, where the frozen material is thawed and dried in a vacuum, is not recommended for photographs. Gelatin photographs undergoing this procedure have a tendency to stick together. Wet collodion glass plates must never be freeze-dried; they will not survive. This is also true for all similar collodion processes such as ambrotypes, collodion lantern slides, and tintypes.
Disaster Preparedness & Response for the Alaska State Archives
Page 61 of 65
SALVAGE PROCEDURES: MICROFORMS Microforms subject to water damage will be professionally cleaned and dried by the Central Microfilm Laboratory within 48-60 hours. In most cases, the film will not be used again. Instead, a duplicate copy will be generated and damaged film discarded. Salvage Priority 1. Color microforms are most vulnerable. Valuable content film should receive highest priority. 2. Silver-gelatin and other emulsion film, while relatively stable, should generally be salvaged next. 3. Diazo and vesicular films are most stable and should generally be salvaged last. Procedures for Roll Microfilm If the film is a duplicate and replacements are readily available, do not attempt salvage. If salvage is required, follow these steps: 1. Fasten a rubber band around the box so the box, label, and roll will remain together. 2. If the film is dirty/muddy, place film in a 5-gallon bucket filled with clean, cold water. Agitate
gently to remove major dirt deposits. 3. Drain off water. Replace with fresh water that is clean (preferably distilled) and cool until ready
for packing to the Central Microfilm Laboratory. 4. Pack wet or damp reels of film in boxes lined with three layers of heavy duty plastic garbage
bags (10-gallon size). Fasten each plastic bag separately and seal all boxes, marking them WET FILM FOR REWASHING & DRYING. Each box may contain 40-50 reels of 35mm film (about 80-100 reels of 16mm film) with a maximum weight of 35 pounds.
5. Prepare and enclose a packing list in the container, and retain a copy of it. 6. Transfer film to the Central Microfilm Lab.
Disaster Preparedness & Response for the Alaska State Archives
Page 62 of 65
Procedures for Microfiche If the microfiche is a duplicate and replacements are readily available, do not attempt salvage. If salvage is required, follow these steps: 1. Keep the fiche in clean, cool water until ready to salvage. 2. Set up small buckets, shallow dish pans, or photo trays with clean, cool water. 3. Dip the microfiche in the series of water baths to rinse off dirt, mud, or other debris. 4. Hang individual microfiche sheets on clothesline to dry. Be sure clothespin is attached to edge of
sheet and does not contact the image area. Freezing If film cannot be salvaged within about 60 hours, freeze it.
Disaster Preparedness & Response for the Alaska State Archives
Page 63 of 65
SALVAGE PROCEDURES: COMPUTER MEDIA
Salvaging lost data and files is attained by restoring from backup tapes. If the following salvage techniques described here are implemented, place the salvaged media in older equipment to avoid the potential of damaging newer, more costly hardware. If in doubt, always consult a data recovery specialist. Appendix B2, Suppliers & Service Providers, lists some of those companies. CD-ROM & Optical Disk All types of disks are composed of several layers. Of these, the metal reflective layer is probably the most important and the most vulnerable to physical damage. Normally this layer is covered by a very thin protective coating. The metal reflective layer is usually unaffected by water unless it has been soaking for a week or longer. If time and resources permit, immediate response can save the information on the disks.
• Remove the disk from its case or cartridge. Cases that are not damaged can be thoroughly cleaned with water or soap/water and re-used.
• Rinse the disk in clean, room-temperature tap water followed by distilled water.
• If any residue remains, gently wipe the disk surface with a wet, soft cotton tissue—not paper
towels, as they are too abrasive. Wipe in a radial direction, not a circular direction, to remove the water and repeat rinse in clean, distilled water.
• After rinsing, gently blot off any excess water with a soft, lint-free tissue to prevent water spots
during the drying. Limit the time a disk is wet to minimize potential damage as it is optimal to recover disks immediately. If immediate recovery is impossible, rinse the disks in distilled water and store them in cool, clean water until they can be recovered. If the disks must be transported, seal them in zip-lock bags immersed in cold water in a portable cooler.
Disaster Preparedness & Response for the Alaska State Archives
Page 64 of 65
Computer Hard Drives & Magnetic Tapes Computer hard drives have a large number of components, so of which are metal and susceptible to rust and oxidation; others are soft plastics and materials prone to mold.
• Remove hard drives from computers.
• Keep hard drives wet, sealed in plastic, and do not let them dry out.
• Transmit hard drives to a contactor as soon as possible for recovery. Magnetic tapes are constructed of layers of water-resistant materials. Although water will not cause these layers to swell and break up (as would the layers in a photograph), tapes can still be damaged. Both the tape and the binder layer may be susceptible to degradation when exposed to water. A properly wound tape is less prone to water damage than a loosely would tape.
• Magnetic tape recovery should be highest priority if information is unable to be restored from off-site backups.
• Do not play or rewind a tape that is wet.
• Transmit magnetic tapes to a recovery specialist for salvage. Refer to companies listed in
Appendix B2, Suppliers & Service Providers Diskettes in Archival Storage The objective in salvaging diskettes is not to save the diskettes themselves, but to allow you to copy data from a wet disk to a new one. 1. Remove the disk from its plastic casing.
a. 3½" diskette: Gently pry up the metal door and remove the diskette inside. A spring will be visible, and it must be removed. The plastic disk will now be visible. Use a thin screwdriver to slide the end in slightly (do not touch the magnetic medium), and pry open each end to break the plastic seal that holds the two sides together.
2. Reach in (using clean hands or lint-free gloves) and gently remove the magnetic medium. 3. Gently rinse the magnetic medium in clean, cool water. Wipe with a lint-free cloth.

Disaster Preparedness & Response for the Alaska State Archives
Page 65 of 65
4. Open a new diskette, using the procedures outlined in step 1. Remove the magnetic disk from
within the casing. Place the salvaged magnetic medium into the new case. When salvaging 3½" diskettes, you do not need to reattach the metal door or spring, but be sure the plastic fits snugly together so it does not get jammed in your disk drive.
5. Insert the disk into the floppy drive of an older PC. 6. Copy the damaged disk onto new media and verify information. 7. Remove the salvaged magnetic medium and discard it. You can then continue using the diskette
housing for additional salvaged diskettes.
Appendix L: Utility/System Malfunctions Emergency Shut-Off’s & Mechanical Rooms For emergencies including the main water shut-off valve, heating/cooling system controls, main electrical cut-off switch contact: Building Facilities —465-5689 (wk); 242-1044 (cell)
Appendix M: Vault Combination & Master Keys The following staff know the combinations or have master keys for the external doors, dock doors and vault:
Name/Position Office Phone
Linda Thibodeau, Director 465-2911
Glenn Cook, State Archivist 465-2275
File: Records Emergency Planning & Response for the Alaska State Archives