rear door wire harness symptoms and diagnosis
TRANSCRIPT

T-SB-0053-18 June 26, 2018
Rear Door Wire Harness Symptoms and Diagnosis
Service Category Audio/Visual/Telematics
Section Audio/Video Market USA
© 2018 Toyota Motor Sales, USA Page 1 of 21
Applicability
YEAR(S) MODEL(S) ADDITIONAL INFORMATION
2016 - 2017 Tacoma
Introduction
Some 2016 – 2017 model year Tacoma D-Cab vehicles may exhibit one or more of the following
conditions (some conditions may be intermittent).
No sound from speakers
No bass from speakers
Muffled sound from speakers
Inoperative power door locks
Inoperative power windows
No answer-back (beep/chirp) after locking the doors via key fob Interior illumination inoperative (lighting within HVAC controls, instrument panel switches,
door panel switches, etc.)
Open fuses for one or more of the systems listed above Follow the Repair Procedure in this bulletin to address these conditions.
Production Change Information
This bulletin applies to vehicles produced BEFORE the Production Change Effective VINs
shown below.
MODEL CAB PLANT VDS PRODUCTION CHANGE EFFECTIVE VIN
Tacoma Double TMMBC
AZ5CN 3TMAZ5CN#HM047390
EZ5CN 3TMEZ5CN#HM047428
BZ5DN 3TMBZ5DN#HM010643
CZ5AN 3TMCZ5AN#HM103055
GZ5AN 3TMGZ5AN#HM103052
DZ5BN 3TMDZ5BN#HM030865

T-SB-0053-18 June 26, 2018 Page 2 of 21
Rear Door Wire Harness Symptoms and Diagnosis
© 2018 Toyota Motor Sales, USA
Warranty Information
OP CODE DESCRIPTION TIME OFP T1 T2
EL1806 R & R Rear Door Wire Harness (One Side) 0.9 82153-04130 and/or
82154-04030
72 73 Combo A Opposite Side 0.7
Parts Information
PART NUMBER PART NAME QTY
PREVIOUS NEW
82153-04130 Wire, Rear Door No. 1 1
82154-04030 Wire, Rear Door No. 2 1
Required Tools & Equipment
REQUIRED EQUIPMENT SUPPLIER PART NUMBER QTY
Techstream 2.0*
ADE
TS2UNIT
1 Techstream Lite TSLITEPDLR01
Techstream Lite (Green Cable) TSLP2DLR01
* Essential SST.
NOTE
Only ONE of the Techstream units listed above is required.
Software version 13.10.019 or later is required.
Additional Techstream units may be ordered by calling Approved Dealer Equipment (ADE) at 1-800-368-6787.
Use Techstream or an approved J2534 interface to perform flash reprogramming updates. Visit techinfo.toyota.com for more information regarding J2534 reprogramming.
APPLICABLE WARRANTY
This repair is covered under the Toyota Basic Warranty. This warranty is in effect for 36 months or 36,000 miles, whichever occurs first, from the vehicle’s in-service date.
Warranty application is limited to occurrence of the specified condition described in this bulletin.

T-SB-0053-18 June 26, 2018 Page 3 of 21
Rear Door Wire Harness Symptoms and Diagnosis
© 2018 Toyota Motor Sales, USA
Diagnosis
1. Confirm the condition exists.
Does the vehicle exhibit one or more of the conditions listed in the Introduction?
YES — Continue to step 2.
NO — This bulletin does NOT apply. Continue diagnosis using the applicable
Repair Manual.
2. Open the rear LH door and locate the rear door wire harness grommet.
Figure 1.
3. Separate the grommet from the B-pillar. Figure 2.
NOTE
Additional confirmation details can be found on page 6 in the Symptom Diagnosis Links subsection.

T-SB-0053-18 June 26, 2018 Page 4 of 21
Rear Door Wire Harness Symptoms and Diagnosis
© 2018 Toyota Motor Sales, USA
Diagnosis (continued)
4. Carefully pull the harness out of the B-pillar and disconnect the door/floor wire harnesses.
Figure 3. Figure 4.
5. Carefully inspect the rear door harness wire insulation for damage near the connector.
Do ANY of the wires show signs of cuts/chaffing/shorting to ground?
YES — Harness replacement is required due to B-pillar damage. Go to step 8.
NO — Continue to step 6.
6. Connect the door wire harness to the floor wire harness.
Figure 5.
T-SB-0053-18 June 26, 2018 Page 5 of 21
Rear Door Wire Harness Symptoms and Diagnosis
© 2018 Toyota Motor Sales, USA
Diagnosis (continued)
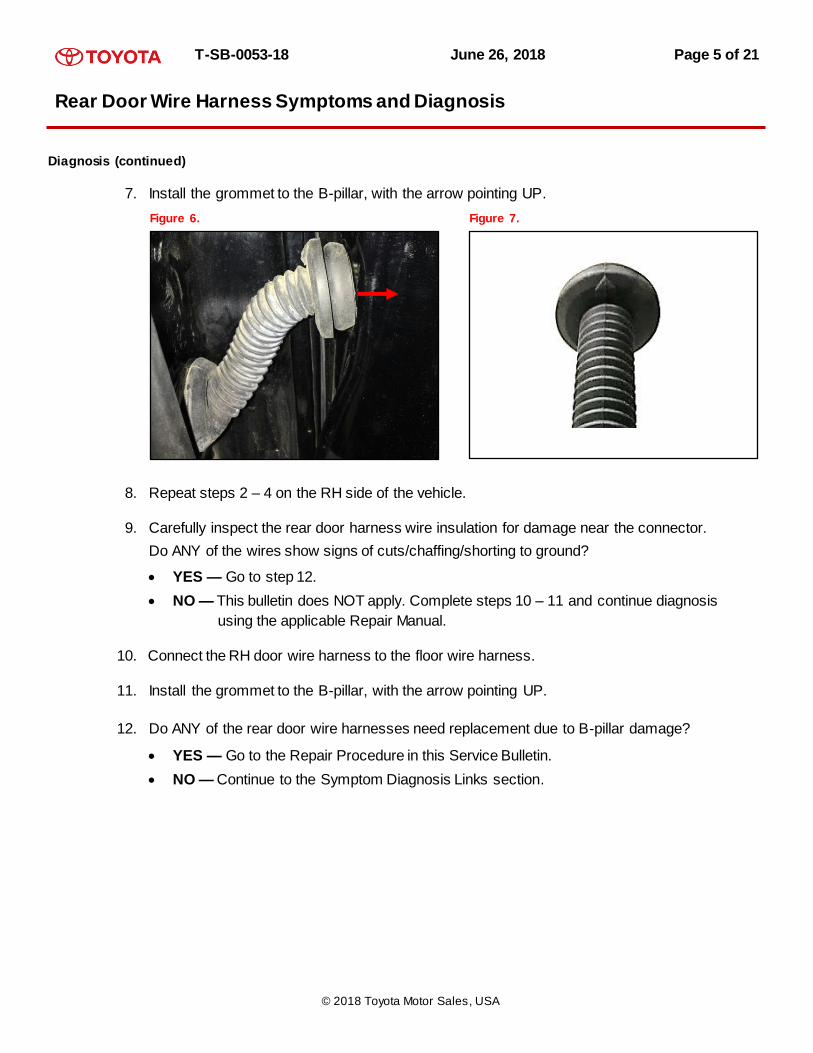
7. Install the grommet to the B-pillar, with the arrow pointing UP.
Figure 6. Figure 7.
8. Repeat steps 2 – 4 on the RH side of the vehicle.
9. Carefully inspect the rear door harness wire insulation for damage near the connector.
Do ANY of the wires show signs of cuts/chaffing/shorting to ground?
YES — Go to step 12.
NO — This bulletin does NOT apply. Complete steps 10 – 11 and continue diagnosis
using the applicable Repair Manual.
10. Connect the RH door wire harness to the floor wire harness.
11. Install the grommet to the B-pillar, with the arrow pointing UP.
12. Do ANY of the rear door wire harnesses need replacement due to B-pillar damage?
YES — Go to the Repair Procedure in this Service Bulletin.
NO — Continue to the Symptom Diagnosis Links section.
T-SB-0053-18 June 26, 2018 Page 6 of 21
Rear Door Wire Harness Symptoms and Diagnosis
© 2018 Toyota Motor Sales, USA
Diagnosis (continued)
Symptom Diagnosis Links
1. Condition: Muffled sound and no sound or bass from speakers.
Refer to TIS, applicable model and model year Repair Manual:
2016 – 2017 Tacoma:
Audio/Visual/Telematics – Audio/Video – “Audio / Video: Audio and Visual System:
Problem Symptoms Table”
2. Condition: Inoperative power door locks.
Refer to TIS, applicable model and model year Repair Manual:
2016 – 2017 Tacoma:
Vehicle Interior – Door Lock – “Door Lock: Power Door Lock Control System:
Problem Symptoms Table”
2016 – 2017 Tacoma:
Vehicle Interior – Door Lock – “Door Lock: Wireless Door Lock Control System
(w/ Smart Key System) / (w/o Smart Key System): Problem Symptoms Table”
3. Condition: Inoperative power windows.
Refer to TIS, applicable model and model year Repair Manual:
2016 Tacoma:
Vehicle Interior – All – “Window / Glass: Power Window Control System:
(w/ Jam Protection Function) / (w/o Jam Protection Function):
Problem Symptoms Table”
2017 Tacoma:
Vehicle Interior – All – “Window / Glass: Power Window Control System:
(w/ Jam Protection Function) / (w/o Jam Protection Function):
Problem Symptoms Table”
4. Condition: No answer-back (beep/chirp) after locking the doors via key fob.
Refer to TIS, applicable model and model year Repair Manual:
2016 – 2017 Tacoma:
Vehicle Interior – Door Lock – “Door Lock: Wireless Door Lock Control System
(w/ Smart Key System) / (w/o Smart Key System): No Answer-Back”
5. Condition: Inoperative interior illumination (lighting within instrument panel switches, door panel switches, etc.).
Refer to TIS, applicable model and model year Electrical Wiring Diagram:
2016 – 2017 Tacoma:
System Circuit – Body Electrical – “Body Electrical: Illumination”

T-SB-0053-18 June 26, 2018 Page 7 of 21
Rear Door Wire Harness Symptoms and Diagnosis
© 2018 Toyota Motor Sales, USA
Repair Procedure
1. Disconnect the cable from negative (–) battery terminal.
2. Remove the rear door frame garnish.
Disengage the four clips to remove the rear
door frame garnish.
Figure 8.
3. Remove the rear door inside handle bezel plug.
Figure 9.
NOTICE
Confirm that no clips remain on the door after the garnish is removed.
Transfer ANY remaining clips to the garnish side BEFORE installation.
HINT
Use the same procedure for the LH and RH sides.
The procedure described below is for the LH side.
NOTICE
AFTER turning the ignition switch OFF, waiting time may be required BEFORE disconnecting the cable from the negative (–) battery terminal.
Make sure to read the disconnecting the cable from the negative (–) battery terminal notices BEFORE proceeding.
Refer to TIS, applicable model and model year Repair Manual:
2016 – 2017 Tacoma: General – Introduction – “Introduction: Repair Instruction: Precaution”
Roll the window up (closed) BEFORE proceeding.

T-SB-0053-18 June 26, 2018 Page 8 of 21
Rear Door Wire Harness Symptoms and Diagnosis
© 2018 Toyota Motor Sales, USA
Repair Procedure (continued)
4. Remove the rear armrest base upper panel sub-assembly.
A. Disengage the two clips, four claws, and three guides.
Figure 10.
B. Disconnect the connector to remove the rear armrest base upper panel sub-assembly.
Figure 11.

T-SB-0053-18 June 26, 2018 Page 9 of 21
Rear Door Wire Harness Symptoms and Diagnosis
© 2018 Toyota Motor Sales, USA
Repair Procedure (continued)
5. Remove the rear door trim board sub-assembly.
A. Remove the clip and two screws.
Figure 12.
B. Disengage the eight clips.
Figure 13.
C. Disengage the two claws to remove the rear door trim board sub-assembly.
Figure 14.
T-SB-0053-18 June 26, 2018 Page 10 of 21
Rear Door Wire Harness Symptoms and Diagnosis
© 2018 Toyota Motor Sales, USA
Repair Procedure (continued)
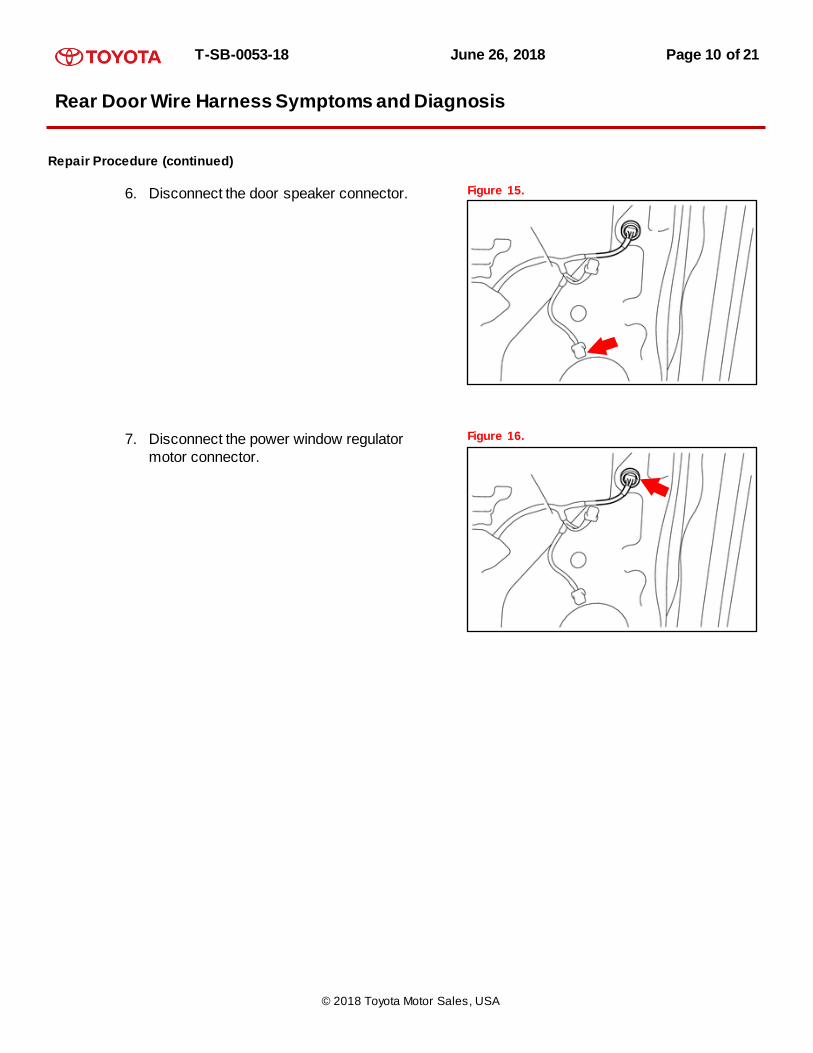
6. Disconnect the door speaker connector. Figure 15.
7. Disconnect the power window regulator
motor connector.
Figure 16.
T-SB-0053-18 June 26, 2018 Page 11 of 21
Rear Door Wire Harness Symptoms and Diagnosis
© 2018 Toyota Motor Sales, USA
Repair Procedure (continued)
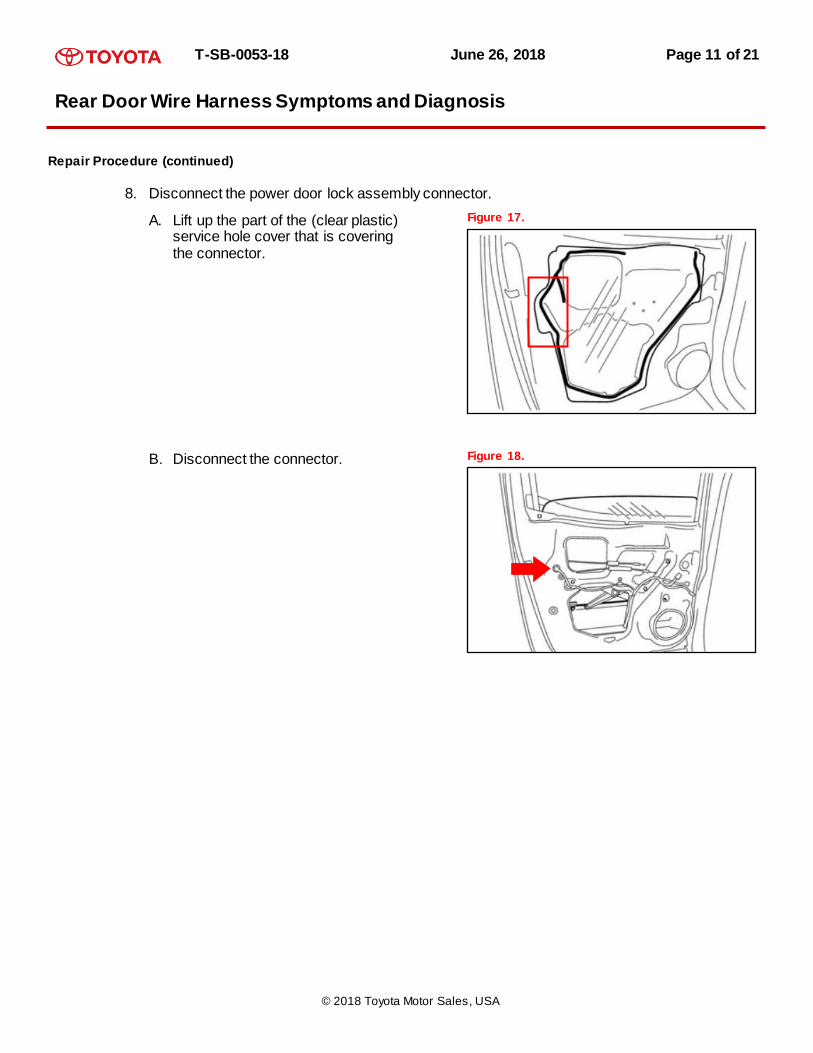
8. Disconnect the power door lock assembly connector.
A. Lift up the part of the (clear plastic) service hole cover that is covering the connector.
Figure 17.
B. Disconnect the connector. Figure 18.

T-SB-0053-18 June 26, 2018 Page 12 of 21
Rear Door Wire Harness Symptoms and Diagnosis
© 2018 Toyota Motor Sales, USA
Repair Procedure (continued)
9. Remove No. 2 rear door service hole cover.
A. Lift up the part of the (clear plastic) service hole cover that is covering the (foam) No. 2 rear door service hole cover.
Figure 19.
B. Using a clip remover, remove the clip and No. 2 rear door service hole cover.
Figure 20.
10. Disengage the rear door wire harness clips (eight).
Figure 21.

T-SB-0053-18 June 26, 2018 Page 13 of 21
Rear Door Wire Harness Symptoms and Diagnosis
© 2018 Toyota Motor Sales, USA
Repair Procedure (continued)
11. Push the rear door wire harness grommet into the door.
A. Squeeze the base of the grommet in.
Figure 22.
B. Push the base of the grommet into the door.
C. Squeeze and push the other end of the
grommet into the door as well.
Figure 23.
12. Remove the rear door wire harness through the service hole.
Repeat for the other side, if necessary.

T-SB-0053-18 June 26, 2018 Page 14 of 21
Rear Door Wire Harness Symptoms and Diagnosis
© 2018 Toyota Motor Sales, USA
Repair Procedure (continued)
13. Begin installing the NEW harness by routing the grommet-end of the harness through the service hole and out the
grommet pass-through hole.
Figure 24.
14. Seat the harness grommet at the door pass-through hole with the grommet arrow pointing UP.
Figure 25.
NOTICE
Make sure to not contaminate the
harness connectors and terminals with
butyl from the plastic service hole cover.
T-SB-0053-18 June 26, 2018 Page 15 of 21
Rear Door Wire Harness Symptoms and Diagnosis
© 2018 Toyota Motor Sales, USA
Repair Procedure (continued)
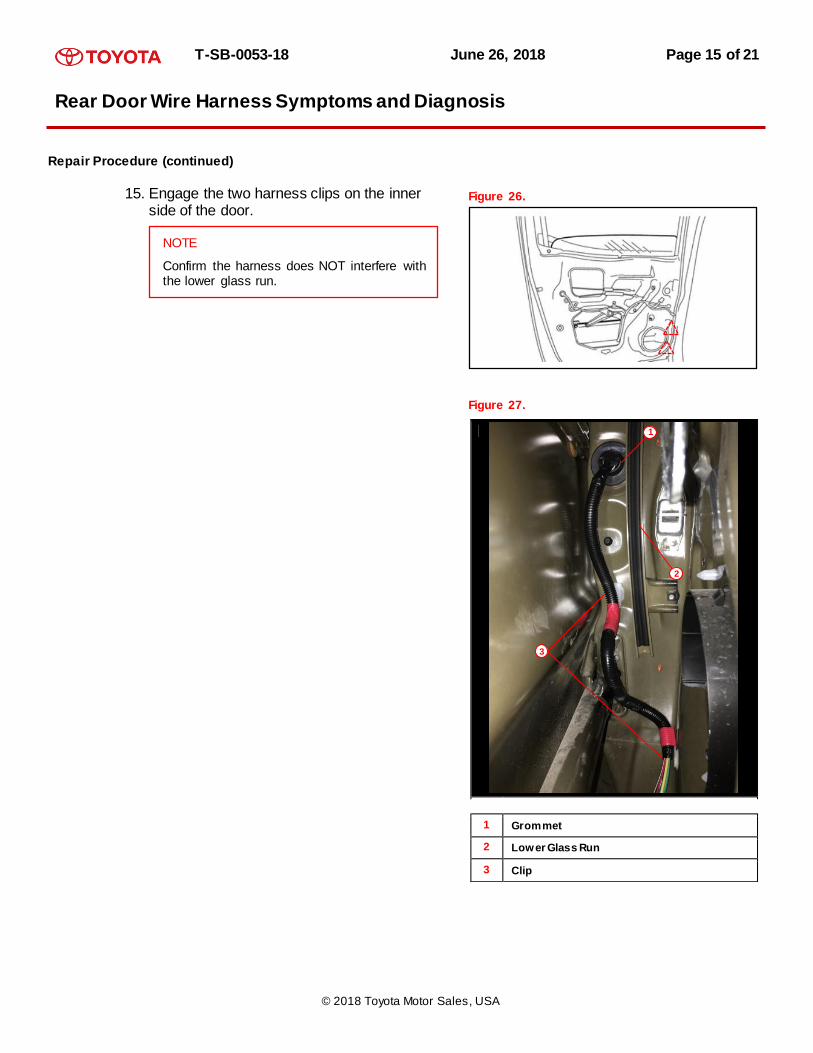
15. Engage the two harness clips on the inner side of the door.
Figure 26.
Figure 27.
1 Grommet
2 Lower Glass Run
3 Clip
NOTE
Confirm the harness does NOT interfere with the lower glass run.
1
c
2
c
3
c

T-SB-0053-18 June 26, 2018 Page 16 of 21
Rear Door Wire Harness Symptoms and Diagnosis
© 2018 Toyota Motor Sales, USA
Repair Procedure (continued)
16. Engage the remaining six harness clips. Figure 28.
17. Connect the power door lock assembly connector.
Figure 29.
18. Install the (foam) No. 2 rear door service
hole cover and clip.
Figure 30.

T-SB-0053-18 June 26, 2018 Page 17 of 21
Rear Door Wire Harness Symptoms and Diagnosis
© 2018 Toyota Motor Sales, USA
Repair Procedure (continued)
19. Place the (clear plastic) service hole cover back in its original location.
Figure 31.
20. Connect the power window regulator motor connector.
Figure 32.
21. Connect the door speaker connector. Figure 33.

T-SB-0053-18 June 26, 2018 Page 18 of 21
Rear Door Wire Harness Symptoms and Diagnosis
© 2018 Toyota Motor Sales, USA
Repair Procedure (continued)
22. Install the rear door trim board sub-assembly.
A. Engage the two claws to remove the rear door trim board sub-assembly.
Figure 34.
B. Engage the eight clips.
Figure 35.
C. Install the clip and the two screws. Figure 36.
T-SB-0053-18 June 26, 2018 Page 19 of 21
Rear Door Wire Harness Symptoms and Diagnosis
© 2018 Toyota Motor Sales, USA
Repair Procedure (continued)
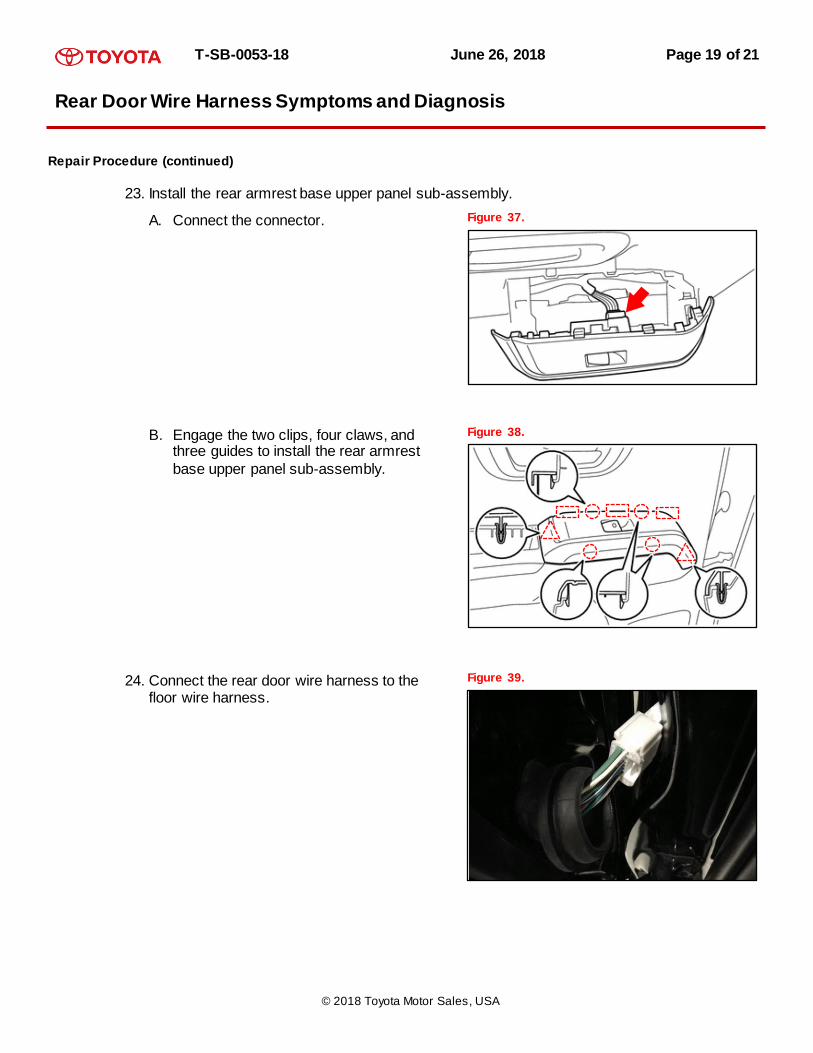
23. Install the rear armrest base upper panel sub-assembly.
A. Connect the connector.
Figure 37.
B. Engage the two clips, four claws, and three guides to install the rear armrest
base upper panel sub-assembly.
Figure 38.
24. Connect the rear door wire harness to the floor wire harness.
Figure 39.

T-SB-0053-18 June 26, 2018 Page 20 of 21
Rear Door Wire Harness Symptoms and Diagnosis
© 2018 Toyota Motor Sales, USA
Repair Procedure (continued)
25. Install the grommet to the B-pillar, with the arrow pointing UP.
Figure 40. Figure 41.
26. Engage the three claws to install the rear door inside handle bezel plug.
Figure 42.
27. Engage the four clips to install the rear
door frame garnish.
Figure 43.
NOTICE
Confirm that no clips remain on the
door BEFORE rear door frame garnish installation.
Transfer ANY remaining clips to the rear door frame garnish side BEFORE installation.
Installing the rear door frame garnish with ANY clips remaining on the door
side could cause the clips to drop inside the door.

T-SB-0053-18 June 26, 2018 Page 21 of 21
Rear Door Wire Harness Symptoms and Diagnosis
© 2018 Toyota Motor Sales, USA
Repair Procedure (continued)
28. Connect the cable from negative (–) battery terminal.
Torque: 5.4 N*m (55 kgf*cm, 48 in*lbf)
29. Confirm the repair and clear ANY DTCs.
NOTICE
ALWAYS replace open fuses with NEW fuses of the correct amperage.