real world example “goat story 3d” simple 3d hmdv blu-ray...
TRANSCRIPT

Real World Example “Goat Story 3D”
Simple 3D HMDV Blu-ray project
by
Christoph Schmidt, DVDesign GmbH, Germany
1. Introduction
Hi together, I would like to author a quite simple 3D HDMV project with you, beginning from the bit budgeting, the encoding, the authoring to the mastering process. In this documentation the authoring process will take up the most lines as this is the most interesting part. I will show you the real world example “Goat Story 3D” a GCI movie. All steps are done with Netblender software DSE, which is the encoder for 2D H.264 and also 3D MVC, DSA, which is of course the authoring software and IGEditor, which is the HDMV menu editor. We will do a plain HDMV title with no BD-J code because at the moment players still don’t support properly 3D and BD-J. With HDMV you’re on the safe side concerning 3D content.
If you have any questions you are invited to contact me: [email protected]
2. Bit Budgeting
First of all write down all your assets you have with length, number of audio tracks and if it’s SD or HD resolution. This is important as SD resolution video material doesn’t need as much bitrate as HD material. For “Goat Story 3D” we have:
- main movie, HD, 3D, 3 audio tracks, 82 min.
- Intros (copyright, FSK, logo animation), HD, 2D, 1 audio track, 20 sec.
- Extra “Making Of”, HD, 2D, 1 audio track, 11 min.
- Extra “Making Of 3D”, HD, 2D, 1 audio track, 7 minutes
- menu loop, HD, 3D, 3 audio tracks, 1 min.
The main menu loop should have as much audio tracks as the main video has, to be sure that the right audio track is maintained if the user presses the title button and then the resume button on the remote to get back to the main video.
So we have about 102 minutes of material for a BD-25 which is absolutely sufficient as you will see.
What we do first is to calculate an average bitrate for all materials:

A BD-25 can hold up to 25.000.000.000 bytes, but the BD-Rs we use (Sony) can only hold up to 24.220.000.000 bytes. So if you want to show your client the whole BD without explaining anything concerning the size of the medias (most clients don’t want to get involved with that) you better don’t exceed that size.
We also add any overhead to our projects, which is about 2 – 4% to be on the safe side.
So 98% of 24.220.000.000 is 23.735.600.000 bytes.
As the muxer adds additional information when creating the m2ts files you now have to subtract the information bits to get the real video and audio space for audio and video.
Following information is added:
- Header: per 180-192 bytes data block 8 bytes, we always chose 184 bytes for our calculation and we never went over the limit
- PSI/PMT data: for every 0,01 seconds 768 bytes
This means that actually 22,2 Gbytes are available for our 80 minutes, because:
- Header: 22.200.000.000/184*8 = 965.000.000 bytes
- PSI/PMT data: 102 * 60 / 0,01 * 768 = 470.000.000 bytes
- Total: 22,2 + 0,97 + 0,47 = 23,64 Gbytes
Now divide the 22,2 Gbytes by the number of seconds we have on our disc:
22.200 / (102 * 60) * 8(to get bits) = 29 Mbits/sec (for video and audio)
To get the individual bitrate for the video, decide which audio codec you want to have and which bitrate you want to have. In our case we chose AC3 in 256 bkit/s for the logo animation and the two making ofs, the menu loop gets three DTS-HD tracks (768 kbit/s) and the main movie has a DTS-HD (2046 kbit/s) a DTS (1509 kbit/s) and a DolbyDigital (640kbit/s) track. The main movie audio has therewith a bitrate of about 4,2 Mbit/s. Remains 24,8 Mbit/s for the video:
29 Mbit/s – 4,2 Mbit/s = 24,8 Mbit/s for an average bitrate for the main video.
The maximum data rate for video is 40 mbit/s, the maximum data rate for video and audio is 48 Mbit/s. For 3D the maximum bitrate for each eye is 40Mbit/s but must not exceed 60 Mbit/s together.
In this case we will encode the 3D main video and the 3D menu loop as well as the 2D assets with an average bitrate of 24,5 Mbit/s and a maximum of 35 Mbit/s.
Of course you can vary the bitrate of each asset in a case where you have more minutes to encode and/or SD and HD material mixed. As I said earlier you don’t need as much bitrate for

SD as for HD. Often the extra material is encoded with a lower bitrate although it is HD to have more bitrate available for the main video.
2. Encoding
Use DSE to encode the 2D and 3D assets to MVC or H.264 with the above calculated bitrate. Set chapter marks if required. Our 3D material is in full HD resolution, so only one frame rate is allowed, which is 23,976 fps. Any other frame rate has to be converted. At the moment DSE can’t handle large avi files as the frame rate isn’t read out properly. We’ve heard that FinalCut mov files are treated right. Normally 3D files are delivered as mov or avi files on hard disc as separate streams for left and right view. We recommend to check if left view and right view are really left and right. Import both streams into your NLE editing system and if you don’t have a 3D display, just switch from left to right view and back to get the right impression. If you have feature length avi files and DSE doesn’t handle them right, convert them into uncompressed avi files with a pixel order of “RGB888”. There’s a command line version of DSE which encodes those files properly. Please ask Denny Breitenfeld from Netblender in this case. The output mode of 3D video should be “Base + Dependent Stream” so that you get two separate streams for base and dependent view.
Encode your audio with your DTS or Dolby encoder with the above mentioned bitrates.
3. Menu Assets
Create your menu assets and have a PSD ready that’s in the DoStudio Mosaic format. Please refer to the DSA manual how to layout such an PSD file. It’s quite simple and easy to learn. If you have done it for BD-J menu creation, that’s exactly the same format.
Here’s our main menu with “Kapitel” in selected state:

and the chapter menu:
the setup menu:

and the extras menu:
The background is the 3D video loop.
We decided here not to have the main menu together with the sub menus, but of course this is possible. In case you want to have the main menu displayed together with the sub menus just

add the main menu graphic to the background graphic of the submenu layer and it will appear together with your submenu.
The chapter menu in our example has only one chapter per page. So each chapter is a single set of the submenu. We did it just because our graphic designer liked it in this case.
4. Authoring in DSA
We always begin with DSA although it is also possible to begin the creation of the HDMV menu with IGEditor. But as in IGEditor you e.g. have to know which title number your videos have you can’t complete your menu creation. That’s why we start with DSA.
We recommend to write down the general parameters you want to use as in HDMV they only have numbers and no names. On this paper you also can note in which playlist which video is and which movie object belongs to which title.
We will use following parameters:
[1]: Audio, stores the audio track of the main video
[2]: Page, tells the HDMV menu which page to display in menu loop or menu recall situation
[3]: Button, tells the HDMV menu which button to display in menu loop or menu recall situation
[5]: Chapter, holds the chapter number that should be played when entering the movie from the top menu, chapter page
[10]: Profile, is used to check if player is 3D player, means is profile 5
Open DSA and begin adding the segments you’re going to use. Arrange them in the order of usage because the muxer arranges the streams on the disc in the order of the segment list from top to end. Your Segment list looks like this then:

If you expand some segments you see that e.g. the “Copyright” segment has only a video and no audio. The 3D segments have as video the “Base” and “Dependent” streams and each has 3 audio tracks. The menu loop called “TitleMenu” has the same amount of audio tracks as the main movie to be sure that in a situation the user presses “Title” and then directly presses “Resume” on the remote the original audio track is played back. In HDMV the audio track isn’t changed although you jump from one title to another if both titles have the same audio track count.

Now put the segments in the playlists as you need them. If you start the Blu-ray you should see the FSK video, then the copyright video and then the logo video. So just put these three segments into one playlist called “Playlist – Intros”. Right click on the segments chose “Create Playlist from Segment” for the first segment and the right click and chose “Add Segment to Paylist” for the second and third one. You can also do this by creating an empty playlist and add the segments by drag and drop on the timeline.
Add a separate playlist for the main menu, the main video and the two extras. You now should have the following:

For the “Playlist – GoatStory” add 6 + 1 chapters. 6 as normal chapter marks and the 7th mark at the end to allow the user to skip also to the very end of the video.
Continue now to set up the Blu-ray disc titles. First disable the DSA BD-J menu to be sure you have a plain HDMV title by clicking the check box for the title called “DoStudio BD-J Menu”.
Add new titles for the Intros, the main menu, the main video and the two “Making Ofs”. Attach a movie object to each title starting by movie object #0 so that your first title “Intros” is assigned to MO#0 and the last title “MakingOf3D” is assigned to MO#4.

Now write down the mentioned Playlist, Title and MO numbers. You get a list like this:
Name Playlist Title MO#
Intros 1000 1 0
MainMenu 1001 2 1
Main Video 1002 3 2
MakingOf 1003 4 3
MakingOf3D 1004 5 4
Then chose the folder “Blu-ray Disc Titles” and set the loading screen to “Blank Black Screen”. If you don’t have BD-J code the player doesn’t need loading time and you don’t need a loading screen.
In the tab “Blu-ray Title Setup” select as “First Play Title” the title that should play first when the disc is inserted. That is the title called “Intros”. As “Top Menu Title” select the title that should be played when the “Top Menu” button is pressed on the remote. That is “TitelMenu” in our case.
Set the “BD 3D Initial Display Mode” to 2D as the first play title is not 3D. If you have a 3D video as the very first video you would set it to 3D together with the appropriate frame rate and resolution.
Click on the next tab “Movie Object Editor”. Now we begin writing our first HDMV code. You should have a list of possible commands and parameters like in the book “Blu-ray Demystified”, maybe there will be a also a complete list from Netblender. The syntax is very easy to learn, you’ll see.

Add the first Movie Object by clicking on the “+” button in the upper left corner. It has automatically the number 0.
Click on that movie object and write the code in the right window. Each action you type will be executed line by line. The command Move [1] 1 writes the value 1 in GPRM [1]. We will use this GPRM as our audio parameter. Write in the same manner the value 1 in GPRM [2] (Page) and value 0 in GPRM [3] (Button). These parameters will be used later to set the right button on the right page. Here the button #0 on page #1 will be set to selected when the menu appears the first time. Remember that this movie object #0 is attached to title 1 “Intros” which is our first play title. So of course our Intros have to be played. Look up the playlist number of our Intros playlist. It’s #1000. So write the command PlayPL 1000. The green number is set automatically by the compiler and shows the number 1000 on hexadecimal basis (3e8). After the Intro playlist is played we want to jump to our main menu. Our main menu is located in title #2. So write the command JumpTitle 2. The command after a PlayPL command is executed directly after the playlist has been played back completely. Now immediately press on the button above “Compile Commands” and directly after that press the save button which looks like the disc. The status window at the bottom tells you if there are any errors in your commands and that the movie object file is stored. Don’t switch to another title before having compiled your commands and saved it to the movie object. Otherwise your data may get lost. Compile and save every change you make.
Add movie object #1 by clicking on the “+” button. This is our main menu title.

In HDMV you can also have if conditions you might know. If your condition in the first line is met the following line is executed if not the third line is executed. If the condition is met and the second line is executed the next command that is executed is also the one in the third line. The first two lines make sure that the number of the audio track that is played in the main video is stored in GPRM [1]. GPRMs are in square brackets. System parameters are in curly brackets. In system parameter {36} the title number is stored that is played back right before this title is played back, but only if the “Resume Intention Flag” of the title before is set to 1. Later you will see, that this flag is set to 1 in MO#2 which is attached to title 3, which is my main video. Only if {36} has the value 3 the value of system parameter {1}, which holds the audio track number, is moved to GPRM [1]. You can write: If {36} == 3. The rest is added by the compiler.
Lines 3 to 6 which are executed then, force the Blu-ray player to switch to 3D output mode if the player is a 3D player, profile 5. First the system parameter {31} is read out and stored to GPRM [10]. It holds the profile version. Then a bitwise product (AND) is produced from GPRM and the value 1245760. Only if the result of the product has the value 1245760 you can be sure that the player is a profile 5 player. In this case the output mode is set to 1, which is the 3D mode. The player automatically switches back to 2D mode if a 2D title is played back, so you don’t have to switch it back by commands. We have to switch to 3D mode because our menu is a 3D menu.
Line 7 holds a name for this specific line which is called “Label_0:”. You normally use labels for jump commands. You can also jump to line numbers but to jump to labels is more clearly especially if you have several jump commands in a movie object. As you want to loop the menu you have to jump to this line later. First the playlist which holds the main menu is played back. At the end the actual page and button number is stored in our GPRM so that after the loop this button is selected that was selected before the jump. This is necessary because the HDMV menu is cleared when you jump to another playlist or even jump to the beginning of the same menu. If you have a 2D menu you can put your menu segments 10 or 100 times in the playlist so that the jump is only performed after a long period of time but if you have a 3D segment only one segment per playlist is allowed in DSA. The loop is performed by the command GoTo and the the name of the line “Label_0:”. Don’t forget to compile and save that movie object!

Next is movie object #2, the main movie.
GPRMs [2] and [3] (Page and Button) are set so that button 0 on page 1 is selected when the user presses the top menu button. Lines 3-6 set the player to 3D output. It’s the same as before. Just copy and paste the lines. Then in line 7 the audio track that is stored in GPRM [1] is set. The “ShowPG_textST” sets possible subtitles to on or off and has to be there although you don’t want to change the subtitles to on or off. Then the command PlayPLatMK is executed. That’s a play chapter command. As the chapter menu in the main menu is in another title you have to store the chapter you want to play back in a GPRM and then jump to the appropriate chapter when you’re in that title. So we will playback the main movie playlist which is #1002 at the chapter stored in GPRM [5]. After the movie is played back we store the actual audio track in GPRM [1] and then jump to title 2 which is the main menu. The “Resume Intention Flag” here is set to 1 a we want to have system parameter {36} set to 3 when we jump to the top menu.
Movie object #3 is the “MakingOf”.

Our page and button variables are set to the right value that you will see when programming the HDMV menu in IGEditor. The appropriate playlist is played back and at the end we jump to the main menu again.
Movie object #4, the “MakingOf 3D” looks the same except GPRM [3] is set to 1 and playlist #1004 s played back.
5. HDMV menu creation
Before we open the IGEditor and import the menu open your PSD file containing the menu. Create an empty layer at the bottom of the layers tab and an empty set just above the empty layer. Call that layer “mb: Init” and the set “Init”. The set don’t have to contain anything. This will be our first menu page which is executed, here we will code which page and button will be displayed as selected. This menu block can already contain the same graphic as the main menu, so the graphic is displayed as early as possible. In HDMV menus only buttons can contain actions. If you want an action automatically be executed you have to take care that the button containing these actions is automatically selected and executed.
In our project we want to have a main menu that is always displayed over our 3D menu loop and pop up menu that looks nearly the same when the main movie and the extras are played back.
Now open IGEditor.
Chose “File > Import DoStudio Format PSD File” and locate your menu PSD. IGEditor will now perform several actions like building button slices and color tables from your PSD. That will take some moments. The lower right window informs you if there are any errors like overlapping buttons. IGEditor automatically converts your 8 bit PSD file to GIF like portions with color tables for each menu page. A menu consist of pages and only one page can be shown at a time. These Pages contain our buttons. Pages and buttons are imported from the PSD file in the order bottom to top. So the first page in IGEditor is the last menu block in PSD. The first button of a page is the bottom most button in a set in PSD. This is important because the HDMV menu jumps automatically to the first page of your menu. There’s no way you can change that. In our case the first page is the “Init” page which at the moment has no buttons. These pages are grouped in the display set. Click on the display set and set the video frame rate to the frame rate of the underlying video. For the main menu the frame rate is 23,976 fps. The menu shall appear directly at the beginning of the main video loop, therefore “Stream Model” should be set to “Non-Multiplexed” . Our menu shall be always displayed if the main menu loop is played, therefore set the “User Interface Model” to “Always-On”.

Chose the first menu page “Init” it contains only a button with the background graphic. Add a new button with right-click “Add BOG”. BOG means button overlap group. A BOG can contain several buttons. Name the new BOG “Init”. It automatically contains one button and is placed at the upper left corner. This button shall contain the actions that are necessary to set the right page and button if the menu appears. This dummy button doesn’t have to have graphics and can stay in the upper left corner as it is. Now tell the page to automatically select the button “Init” by clicking on the page “Init” and set the “Default Selected Button Id Ref” to the button “Init”.

Expand the BOG “Init” so we can see the button inside and click on this button. In the parameter window set the “Auto Action Flag” to true. This means the button commands are executed as soon as the button is selected, and we took care that the button is selected by default. In the command window type the command:
SetButtonPage button:[3] page(effect:off):[2]
That causes the right button on the right page to be set as selected. Don’t forget to compile the command. In a situation where we are in the main movie (MO#2) and then press the top menu button we jump to title 2, the button in BOG “Init” is automatically executed and because in MO#2 we set [2] to 1 and [3] to 0 the button #0 on page #1 is set to selected. That is the button “HStart” on page “HHauptmenu”. Another example is when jumping from the “MakingOf3D” to the top menu we have the values 9 in [2] and 1 in [3], the selected button is on Page “HExtras” called “Extras2”. Keep in mind that the page and button ID start from 0. So first page is ID#0, first button is ID#0.
Switch to Page “HHauptmenu” and apply navigation to your buttons. For example the “Upper Button Id Ref” for button “HSetup” is “HKapitel”, the lower is “HExtras”.
For the “HStart” button enter the commands:
Move [5] 0 JumpTitle 3

We set the value 0 to GPRM [5] which is our chapter parameter. That means that in title 3 where you jump to the command “PlayPLatMK 1002 0” is executed. Means that the playlist 1002 is played back from marker 0 and that’s the first chapter mark at the very beginning of the playlist.
For the button “HKapitel” enter the command:
SetButtonPage page(effect:off):2
That causes the menu to switch to page ID#2 which is the page called “HKapitel1”. As we only have 1 chapter per chapter page we also have only one visible button. the others are background images or dummy buttons we have to add to apply navigation to the next chapter or back to the main menu page.
For the “HSetup” button enter the commands:
Move [6] [1] Sub [6] 1 SetButtonPage button:[6] page(effect:off):8
Remember that in [1] we store the audio track. Now on the setup page we want to set the appropriate button as selected. So we move [1] into [6] our new button parameter.We don’t use GPR [3] in this case in order to avoid conflicts with this GPR. As the audio track count starts at 1 and the button count start at 0 we have to subtract 1 from the button parameter to have the right button assigned.
For “HExtras” enter:
SetButtonPage button:0 page(effect:off):9
You always get to button 0 on page 9 if you enter it from the main menu.
Jump to Page “HKapitel1“. At the moment we only have one button that’s the chapter button itself. As there is always the button ID0 that should be selected set the default selected button for this page to button with the ID0. Now we want to apply automatic navigation when using the arrow keys in that manner that if you use the left/right arrows you get to the next/previous chapter page and if you use the down arrow you get to the main menu. For this we use empty buttons. Right-click on the page “HKapitel1” and chose “Add BOG”. Add one for the left arrow, one for the right arrow and one for the down arrow. You now have 3 new buttons. Call them “To6” for the one that leads to chapter page 6, “To2” for the one that leads to chapter page 2 and “ToMain” for the one that leads to the main menu page. For all buttons select the “Auto Action Flag” to “True”. Apply the navigation to these buttons. And then enter the button commands. For “To6”:
SetButtonPage page(effect:off):7
For “To2”:
SetButtonPage page(effect:off):3

And for “ToMain”:
SetButtonPage button:1 page(effect:off):1
Finally for the chapter button enter:
Move [5] 0 JumpTitle 3
Set the chapter variable [5] to 0, as marker 0 is the first chapter and jump to the main title numer 3.
The other chapter pages are handled the same way.
Now for the page “HSetup” add one auto action button that leads us to the main page as before and apply the navigation for all buttons. In this submenu we also link from the 3 audio buttons to the “ToMain” button when using the left arrow key. For the action of the first button enter:
Move [1] 1 SetButtonPage button:0 page(effect:off):1
Our audio variable [1] is set to 1, means that the first audio track will be selected when playing the main title number 3. After having chosen an audio track we automatically return to the main menu page with the focus on the first button “Start”. The other two audio buttons have the same actions except the number of the audio track.
For our extras menu add the same “ToMain” button as before and jump to title 4 or 5, depending on the button you chose.
Save the project as “TitleMenu.dlies” and export the project as pes file with the name “TitleMenu.pes”. These two files you need for DSA.
So we have a complete menu for the main menu loop. Now we need a Pop-Up menu that appears during the main feature. As some buttons are programmed in another way we can’t use the same HDMV menu. For example if you enter the chapter menu we want the right chapter to be displayed which is playing at the moment. Or if we select an audio track, that audio track has to be changed immediately. Fortunately we can use the just completed menu to build easily the Pop-Up menu. Just use the “Save Project As” command and save the dlies file as “PopUpMain”. Now we are ready to change the menu as needed. The first change are the button commands for the chapter button on the first page. As we want the right chapter to be displayed we have to read out the actual playing chapter which is stored in PSR {5}. As we want to display page ID2 when playing chapter 1 we have to add the value 1 to the value in PSR {5} and we’re done. Enter:
Move [6] {5} If [6] > 6 Move [6] 6 Add [6] 1 SetButtonPage page(effect:off):[6]

We use a different GPR [6] in order not to get in conflict with the other button GPR [3]. We also added a condition for the case that we’re in chapter 7, which is the last chapter at the very end of our stream. It gives us the possibility to jump from chapter 6 to the main menu by pressing the next button on the remote. As chapter 7 is at the very end of our stream it’s very unlikely that the chapter button is selected while chapter 7 is playing, but it’s only two additional lines and we’re safe also for this case.
Keep in mind that to jump to chapter 1 you have to playback marker 0, but the value PSR {5} returns is 1.
For the button that leads to the setup menu we also read out the actual audio track in case the audio track is changed via the remote control to display the right button. Therefore PSR {1} is read out. For the first audio track PSR {1} has the value 1, for the second it’s 2 and so on. Here’s the command list:
Move [6] {1} Move [1] {1} Sub [6] 1 SetButtonPage button:[6] page(effect:off):8
In addition we store the actual audio track to [1] so we’re safe if the user now presses the title button. The next change is the additional graphic at the bottom of the Pop-Up menu that signalizes that this menu can be switched off by just using the down arrow key when “Extras” is selected. Also the left arrow shall hide the menu. So first extract the graphic from the PSD file and add it as an object to the IGEditor. Create an empty button and assign the new object ID 75 to this button. Let the first palette be recalculated so that the button is presented in correct colors. Then add a new empty button as auto action button that hides the Pop-Up menu. That’s the simple command:
PopUpMenuOff
Don’t forget to assign the new navigation.
Now let’s change the chapter buttons. In the Pop-Up menu if you select a chapter we have to link to the appropriate chapter and at the same time hide the Pop-Up menu. As these two commands will produce a conflict when added to one action list we have to add an empty button in the BOGs “Kapitel1-6”. Right click on the BOG and add a new button. For BOG “Kapitel1” the new button has the ID 8. Change the action list of button “Kapitel1” to:
EnableButton 8 LinkMK 0
Add the command
PopUpMenuOff
to the new button with the ID 8 and set the “Auto Action Flag” to “True”. That’s how we can link to a new chapter and hide the menu at the same time. Set the Object ID for normal, selected

and activated state as well as the position to the same values as the button “Kapitel1” so that there is no visible change in the display of that button, when activated.
Change the other chapter buttons the same way.
The new actions for the first audio button in the setup menu look like:
Move [1] 1 SetStream ShowPG_textST:off audio:1 SetButtonPage button:0 page(effect:off):1
Set our variable for the audio to the appropriate value, set the audio track immediately to the selected track and jump to the main menu page. Audio button 2 and 3 look the same except the values.
Add to the “Extras1” and “Extras2” button in the extras menu the command:
Move [1] {1}
This is needed so that the GPR [1] has the right audio track stored and will be set automatically if you return to the main video.
Now declare this menu as Pop-Up in the DisplaySet parameter window and save the menu as dlies and pes.
For the Pop-Up menu that appears during the extras open the TitleMenu.dlies and save that as PopUpMakingOf.dlies. In this case following changes are needed. Add the arrow graphic to the main menu and add the PopupOff button together with the new navigation as before. Set the “User Interface Model” to 1 (Pop-Up). Save the menu as dlies and pes.
6. Finalizing the project
You should have 2 x 3 HDMV menu files. 2 for each menu, dlies and pes. Open you DSA project and add 3 “Subpath Segments” with the appropriate names.
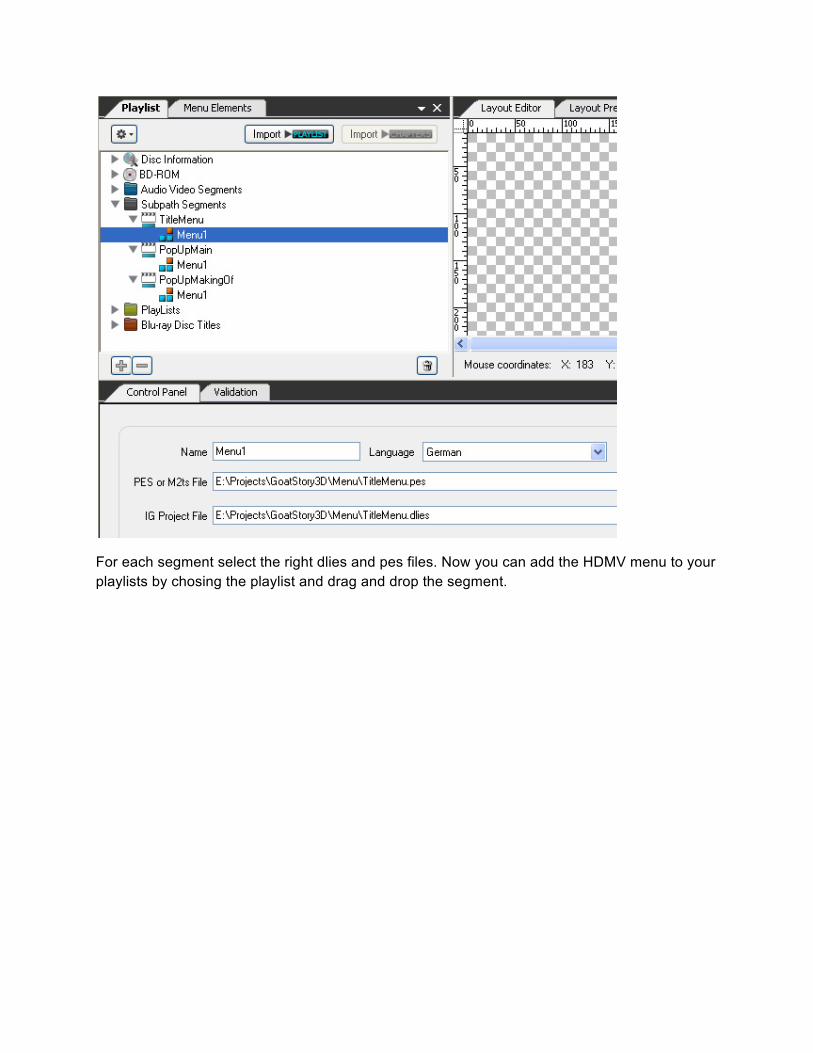
For each segment select the right dlies and pes files. Now you can add the HDMV menu to your playlists by chosing the playlist and drag and drop the segment.

For each Playlist select the user operations that you want to disable.

Select an output folder for the disc data and set the region code as your client needs it. For testing purposes you can set it to allowed for all regions but keep in mind to set it before formatting the CMF image.
Click the compile button. DSA writes the disc data and an ISO file that you use for burning onto BD-R. We use NERO to burn the ISO, but you can also use ImgBurn. You can test your project with Total Media Theatre version 5 on your PC without burning it. Just open the BDMV folder with TMT. Use the BD-R to do a final test on your 3D BD player.
If you and your client are satisfied with the project use the format button to output a CMF image for the replicator. Don’t forget to set the right regions and ISAN information if you have.
You’re ready!