**read important safety information in this...
TRANSCRIPT

**READ IMPORTANT SAFETY INFORMATION IN THIS MANUAL**

GETTING STARTEDBASIC MENU FLOWCHART..............................................................................................................................3BEFORE YOU BEGIN.......................................................................................................................................4CARB/EPA COMPLIANCE.................................................................................................................................5DOWNLOAD SPARK UPDATER TOOL...............................................................................................................6PRODUCT UPDATES USING SPARK..................................................................................................................8
TUNINGCONNECTING WITH THE VEHICLE...............................................................................................................10QUICK TUNE...............................................................................................................................................10TUNING LEVELS EXPLAINED........................................................................................................................12ADVANCED TUNING.....................................................................................................................................14ADVANCED TUNING OPTIONS EXPLAINED....................................................................................................16RETURNING YOUR VEHICLE TO STOCK.......................................................................................................18COMMON TUNING QUESTIONS.....................................................................................................................19
DIAGNOSTICSREAD DTC...................................................................................................................................................20CLEAR DTC.................................................................................................................................................21
DATA LOGGINGDATA LOGGING - SPEED..............................................................................................................................22DATA LOGGING - DISTANCE........................................................................................................................23DATA LOGGING - ADVANCED........................................................................................................................24
INFORMATION, OPTIONS, AND SETTINGSVEHICLE IDENTIFICATION...........................................................................................................................26VEHICLE FUNCTIONS...................................................................................................................................27TUNER INFORMATION.................................................................................................................................28VEHICLE INFORMATION..............................................................................................................................29VEHICLE OPTIONS.......................................................................................................................................30DISPLAY SETTINGS.....................................................................................................................................31
APPENDIXTROUBLE SHOOTING..................................................................................................................................33SAFETY WARNING AND CAUTION................................................................................................................36SAFETY GUIDELINES...................................................................................................................................37WARRANTY INFORMATION..........................................................................................................................38STORAGE AND MAINTENANCE......................................................................................................................41
2
TABLE OF CONTENTS

3
BASIC MENU LAYOUTSome of the menu options or features displayed in this manual arevehicle specific, and may not be available for your make and model.
MAIN MENU
TUNER INFO
VEHICLE INFO
VEHICLE OPTIONS
DISPLAY SETTINGS
ADDITIONAL FEATURES
DIAGNOSTICS
DATA LOGGING
IDENTIFY VEHICLE
VEHICLE FUNCTIONS
TUNER INFO & SETTINGS
QUICK TUNE
ADVANCED TUNE
TUNE VEHICLE

LIST OF COMPONENTS
DISPLAY DEVICE
USB CABLE
BUTTON FUNCTIONALITY
NAVIGATING TIPS:• To move back to the previous menu, press the button. • To move forward to the next menu, you can press either OK or button to enter the highlighted option. • The & buttons are used to select menu options, as well as adjust values for certain features.
Up or Increase
Right or
Nextor
Forward
Leftor
Backor
Exit
Down or Decrease
OK
4
BEFORE YOU BEGIN

5
CARB/EPA COMPLIANCE
NOTE: The stickers included in some products apply to products that have received CARB exemption for emissions compliance.
This product meets the emissions compliance requirements of the California Air Resources Board and Federal Environmental Protection Agency and is legal for sale and use on pollution-controlled vehicles operated on public streets and highways. It must be installed and operated according to the instructions provided in this user’s manual. Included with this product is a sticker like the one pictured for you to keep in your vehicle. You can either adhere it somewhere on the vehicle (e.g., the inside end of driver’s door) or simply store it in your glove box. The purpose of these stick-ers is to inform anyone who may have questions regarding the use of your Superchips product and how it affects emissions. For example, it would be something to show an emissions technician if questioned when taking your vehicle in for an emissions check to let him/her know the product is CARB emissions compliant.

1 Go to www.superchips.com
2 Move your mouse icon over the CUSTOMER SUPPORT tab located at the top of the page. A popup menu will appear.
3 In the drop down menu click Download Product Update Software.
4 Click the Download button located below the Flashpaq logo.
5 Click the Run button on the pop-up menu.
6 Read and click the box to accept the license agreement terms.
7 Click the Install Button, then the Finish button once the download is complete.
8 Double-click the Spark desktop icon.
9 Fill out the registration form.
10 Refer to the next section for performing product update
6
DOWNLOAD SPARK UPDATER TOOL
TIP: Use a wired internet connection vs. wireless, air card, or satellite connections. This will minimize potential connection issues that may affect the update process.

1
2
3
4
5
6
7
7
DOWNLOAD SPARK UPDATER TOOL
Download Product Update Software
CUSTOMER SUPPORT

1 Double-click the Spark Icon located on your computer’s desktop. 2 Connect your device to the computer using the supplied USB cable.
(Spark will automatically search for updates related to your device.)
3 Click the Update button.
(The update process will start and finish automatically. Once the update is com-plete, you may be directed to the Online Store. To further update your device using the online store, refer to the following steps.) 4 Click on any or all of the available options.
(A check mark will appear in the upper right corner.)
5 Click the Purchase button.
6 If required, read and Accept the disclaimer.
7 Fill in the required information and click Go to Review.
(Here you can check the information you filled in before submitting the order.)
8 Click the Place Order button to complete your order.
9 If a purchase was made, follow steps 1-3 above to complete the update.
8
PRODUCT UPDATES USING SPARK

1
2
4
5
3
6
7
8
CAUTION: Do not unplug the USB while the device is being updated. Once the update is complete, you will be informed that it is safe to disconnect.
9
PRODUCT UPDATES USING SPARK

1. Plug the device into the OBDII port.
(The device will automatically power-on once it has been connected.)
CAUTION: Do not remove or bump the OBD-II connector during any programming sequence. If you do, the vehicle may not start.
Quick Tune = Changes the power level of your vehicle using the most popular features and settings.
NOTE: Not all features are available on every make, model, and engine. CAUTION: We do not recommend programing your vehicle while parked in unsafe locations including heavy traffic, or places without cell phone service.
10
CONNECTING WITH THE VEHICLE
QUICK TUNE
Tune Vehicle
Quick Tune
Advanced Tune

11
2 Use the up/down arrows to highlight “Quick Tune”, then press OK.
3 Follow the on-screen instructions.
4 Follow the on-screen instructions (if applicable).
(The device will begin to read the files on your vehicle’s computer. This may take a few minutes.)
5 Highlight one of the available tuning levels, then Press OK.
SELECT TUNE LEVEL
PerformanceTow
87 OctaneStock w/ Options
6 Highlight “YES”, then press OK to start the installa-tion process.
1 Use the up/down arrows to highlight “Tune Vehicle”, then press OK.
7 Follow the on-screen instructions. (A screen will appear informing you that the vehicle has been updated with the tune, and lets you know how to proceed.)
QUICK TUNE CONT’D
TUNE VEHICLE
Quick TuneAdvanced Tune
Please make sure the following are off: Automatic Headlights,
Automatic Wipers, Factory Radio, Air conditioning
Press OK to Continue
SUPERCHIPS
Initialization. . .Please Wait. . .
SUPERCHIPS
Turn the Ignition ON Do NOT START Engine
Press OK to Continue
SUPERCHIPS
Install the Performance File?
NO YES
Main Menu
Tune VehicleAdditional Features
Tuner Info & Settings
SUPERCHIPS
Turn Ignition OFF
Press OK to Continue
SUPERCHIPS
Turn the Ignition ON Do NOT START Engine
Press OK to Continue

TUNING LEVELS EXPLAINEDKEY:x= Towing is not recommended for this tune S= Octane Requirements vary for gas vehicles. Follow recommended guidelines on the device.$= Tow rated up to Superchips recommended tow limits. See limits for your vehicle displayed by the Flashpaq during the programming process.0= Tow rated up to OEM max towing recommendation.
Availability of specific tunes may vary based on your vehicle’s make and model:---------------------------------------------------------------------------------------------------------------------------------xSPerformance - Provides maximum engine and transmission performance gains.---------------------------------------------------------------------------------------------------------------------------------x87 Performance - Requires the use of 87 octane gas and is used for extra horsepower, torque and driveability for on road and off road uses. The tune is calibrated for 2WD, 4WD-HI, and 4WD-LO uses.---------------------------------------------------------------------------------------------------------------------------------x91 Performance - Requires the use of 91 octane gas or better and is used for premium horsepower, torque, and driveability for on road and off road uses. The tune is calibrated for 2WD, 4WD-HI, and 4WD-LO uses.---------------------------------------------------------------------------------------------------------------------------------x93 Performance - Requires the use of 93 octane gas and is used for maximum horsepower, torque, and driveability for on road and off road uses. The tune is calibrated for 2WD, 4WD-HI, and 4WD-LO uses.---------------------------------------------------------------------------------------------------------------------------------x87 Octane - Allows you to run 87 octane regardless of the manufacturer’s recommendation.---------------------------------------------------------------------------------------------------------------------------------S$Light Load Tow - Optimizes engine and transmission performance for mid-weight range towing applications---------------------------------------------------------------------------------------------------------------------------------
12

TUNING LEVELS EXPLAINED0Heavy Load Tow - Requires the use of 91 octane gas or better and is used for optimized engine and transmission performance for heavy towing applications.---------------------------------------------------------------------------------------------------------------------------------Towing - Requires the use of 91 octane gas or better and is used for optimized towing up to the OEM recommended towing limits. This tune is safe to use in 4WD-HI or 4WD-LO and is available for all Jeeps covered by Superchips.NOTE: If a towing tune is not available, use 87 Tune with 91 Octane fuel.Crawling Tune - Is a Superchips exclusive tune offering low throttle response and high low-end torque designed for precision low-speed maneuvers. This tune is cur-rently only available for JK Jeep models.----------------------------------------------------------------------------------------------------------------------------------xExtreme - This is an aggressive tune used for maximum horsepower, torque, and driveability.----------------------------------------------------------------------------------------------------------------------------------Mileage XS - Requires 87 octane gas and is used for fuel mileage gains. Great for on road and off road use. The tune is calibrated for 2WD, 4WD-HI, and 4WD-LO uses----------------------------------------------------------------------------------------------------------------------------------Stock - Returns vehicle to factory stock. Removed all Superchips tuning from your vehicle. It is recommended that you calibrate your vehicle back to stock prior to taking it in for service or maintenance.
TIP FOR JEEP OWNERS:Your Flashpaq will work with the following:• Short or normal tube headers• Snorkels• An engine that has been changed to a 5.7L HEMI, as long as the factory HEMI ECU is installed.• Aftermarket cat back exhaust and cold air intake kits.For optimum Jeep performance, Superchips does NOT recommend the following:• Long tune headers• Over-bored or stroked engines
13

4 Follow the on-screen instructions.
14
Tune Vehicle
Quick Tune
Advanced Tune
ADVANCED TUNING
Please make sure the following are off: Automatic Headlights,
Automatic Wipers, Factory Radio, Air conditioning
Press OK to Continue
Advanced Tune = Changes the power level of your vehicle and allows you to select settings for advanced features and settings.
NOTE: Not all features/screens are available on every make, model, and engine. CAUTION: Do not remove or bump the OBD-II connector during any programming sequence. If you do, the vehicle may not start.
2 Use the up/down ar-rows to highlight “Advanced Tune”, then press OK.
3 Follow the on-screen instructions.
1 Use the up/down arrows to highlight “Tune Vehicle”, then press OK.
TUNE VEHICLE
Quick TuneAdvanced Tune
SUPERCHIPS
Turn the Ignition ON Do NOT START Engine
Press OK to Continue
Main Menu
Tune VehicleAdditional Features
Tuner Info & Settings
NOTE The device will begin to read the files on your vehicle’s computer.
SUPERCHIPS
Initialization. . .Please Wait. . .
Advanced Tune
Power Levels
5 Highlight “Power Levels”, then press OK.

12 Follow the on-screen instructions.
SUPERCHIPS
Turn the Ignition SwitchOFF and Remove Key
Press OK to Continue
15
ADVANCED TUNING6 Highlight one of the available power levels, then Press OK.
Power Levels
PerformanceTow
87 OctaneStock w/ Options
Advanced Tune
Power LevelsOptions
Save and Exit
7 Highlight “Options”, then press OK.
Select Options
Tire SizeRev LimiterGear Ratio
Save and Exit
8 Highlight an available Option, then press OK. (Availability depends on vehicle make and model)
10 Highlight “Continue”, then press OK. The tuning files will be built base on your specified settings.
11 Highlight “YES”, then press OK. The device will begin the installation process.
13 Once the programming is complete, press OK. (A screen will appear informing you that the vehicle has been updated with the tune, and lets you know how to proceed.)
9 Adjust the value of the option you chose using the arrow keys on the device, then press OK.
SUPERCHIPS
87 Octane TUNING is now Installed
SUPERCHIPS
Install the 87 Octane file?
NO YES
SUPERCHIPS
Tire Height Setting:27.00 inches
Press OK to save
Select Options
Tire SizeRev LimiterGear RatioContinue
SUPERCHIPS
Turn the Ignition ON Do NOT START Engine
Press OK to Continue

Availability of specific options may vary based on your vehicle’s make and model: ---------------------------------------------------------------------------------------------------------------------------------Speed Limiter - Adjusts the top speed limiter by increments or fixed values. i The vehicle must have appropriate speed rated tires.
i Do not exceed proper operating conditions i Obey all traffic laws i For use only on a controlled track. Never exceed legal limits on public roadways.---------------------------------------------------------------------------------------------------------------------------------Rev Limiter - Adjusts engine rev limiter by increments or fixed values. iDo not exceed proper operating conditions.-------------------------------------------------------------------------------------------------------------Tire Size - Corrects the speedometer, odometer, and automatic transmission shift points for wheel and tire changes.
NOTE: For 2003-2006 Wrangler TJ Rubicon with electronically adjustable tire sizes are limited to 26.25, 26.75, 27.50, 27.75, 28.50, 29.25, 33.00, 35.00 inch tire sizes.
TIP FOR MEASURING TIRE SIZE:Measure from the ground to the top of your tire. Place a ruler or flat level item on the top of your tire to measure accu-rately. Measure in 1/4 inch increments rounding up.
16
ADVANCED TUNING OPTIONS EXPLAINED
Increasing the height of your vehicle raises the center of gravity and can affect stability and control. Use caution on turns and when making steering corrections.

Axle (Gear) Ratio - Corrects the speedometer, odometer and automatic trans-mission shift points for rear end gear changes. i Confirm aftermarket parts are installed before adjusting this option. NOTE: 2005 – 2006 Wrangler TJ Rubicon Axle Types are limited to No Axle Type, 3.03, 3.07, 4.11 and 4.56. ------------------------------------------------------------------------------------------------------------------------------------
Automatic Transmission Shift Points - Adjusts transmission shift points for optimized driveability and operation.---------------------------------------------------------------------------------------------------------------------------------Automatic Transmission Shift Pressure - Adjust transmission shift pressure in PSI to allow for a more aggressive shifts.---------------------------------------------------------------------------------------------------------------------------------Cooling Fan - Adjusts fan turn ON temperature. ---------------------------------------------------------------------------------------------------------------------------------Manual Transmission Skip Shift (Chevrolet cars) - Enables or disables Com-puter Aided Gear Selection (CAGS) for manual transmissions.---------------------------------------------------------------------------------------------------------------------------------WOT Restriction (Nissan / Infiniti vehicles only) - Enables or disables fac-tory Wide Open Throttle (WOT) restriction. ---------------------------------------------------------------------------------------------------------------------------------Spark Advance Set - Reduces the spark timing.---------------------------------------------------------------------------------------------------------------------------------
17
ADVANCED TUNING OPTIONS EXPLAINED

2 Use the up/down arrows to highlight “Quick Tune”, then press OK.
3 Follow the on-screen instructions, then press OK.
NOTE The device will begin to read the files on your vehicle’s computer.
4 Highlight “Stock”, then Press OK.
Tune Vehicle
EconomyStock
5 Highlight “YES”, then press Enter. The device will start the installation process.
1 Use the up/down arrows to highlight “Tune Vehicle”, then press OK.
7 Once the programming is complete, press OK.6 Follow the on-screen instructions.
SUPERCHIPS
Turn the Ignition SwitchOFF and Remove Key
Press OK to Continue
18
RETURNING YOUR VEHICLE TO STOCK
TUNE VEHICLE
Quick TuneAdvanced Tune
SUPERCHIPS
Please Wait. . .
SUPERCHIPS
Turn the Ignition ON Do NOT START Engine
Press OK to Continue
SUPERCHIPS
RETURN the Vehicle toSTOCK?
NO YES
Main Menu
Tune VehicleAdditional Features
Tuner Info & Settings
SUPERCHIPS
Vehicle now has STOCK TUNING Installed

Questions and Answers
Q: Can my Flashpaq program more than one vehicle at a time?A: No, only after you return your first vehicle back to factory stock. -----------------------------------------------------------------------------
Q: Does Superchips support custom tuning?A: No, custom tuning will not be offered at this time.-----------------------------------------------------------------------------
Q: What aftermarket accessories will my Flashpaq work with?A: Flashpaq programmers are engineered to work with the following parts right out of the box: throttle body spacers, shorty headers, cat-back exhaust system, and cold air intake kits. Compatibility may vary by make and model. -----------------------------------------------------------------------------
Q: How do I change my vehicle’s calibration?A: Refer to the TUNING sections of this guide for detailed instructions.
CAUTION: Before taking your vehicle into a service center, return your vehicle to stock. The service center might reprogram your vehicle with an updated program without your knowledge. If you do not use this device to return your vehicle to factory stock and your vehicle is repro-grammed by the service center, the programmer will no longer be able to program your vehicle.
19
COMMON TUNING QUESTIONS
20
Diagnostics
Read DTCsClear DTCs
READ DTC
Main Menu
Tune VehicleAdditional Features
Tuner Info & Settings
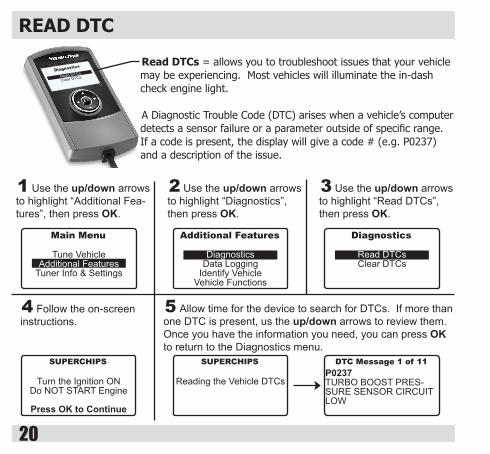
Read DTCs = allows you to troubleshoot issues that your vehicle may be experiencing. Most vehicles will illuminate the in-dash check engine light. A Diagnostic Trouble Code (DTC) arises when a vehicle’s computer detects a sensor failure or a parameter outside of specific range. If a code is present, the display will give a code # (e.g. P0237) and a description of the issue.
1 Use the up/down arrows to highlight “Additional Fea-tures”, then press OK.
Additional Features
DiagnosticsData Logging
Identify VehicleVehicle Functions
2 Use the up/down arrows to highlight “Diagnostics”, then press OK.
Diagnostics
Read DTCsClear DTCs
3 Use the up/down arrows to highlight “Read DTCs”, then press OK.
4 Follow the on-screen instructions.
SUPERCHIPS
Turn the Ignition ON Do NOT START Engine
Press OK to Continue
SUPERCHIPS
Reading the Vehicle DTCs
DTC Message 1 of 11P0237TURBO BOOST PRES-SURE SENSOR CIRCUIT LOW
5 Allow time for the device to search for DTCs. If more than one DTC is present, us the up/down arrows to review them. Once you have the information you need, you can press OK to return to the Diagnostics menu.

21
Diagnostics
Read DTCsClear DTCs
CLEAR DTC
Clear DTCs = allows you to clear the DTC and turns off the check engine light. NOTE: If a DTC persists, this could indicate a vehicle mal-function. We recommend seeking a qualified professional in resolving the issue. CAUTION: Program the vehicle back to stock prior to ser-vice.
Main Menu
Tune VehicleAdditional Features
Tuner Info & Settings
1 Use the up/down arrows to highlight “Additional Fea-tures”, then press OK.
Additional Features
DiagnosticsData Logging
Identify VehicleVehicle Functions
2 Use the up/down arrows to highlight “Diagnostics”, then press OK.
Diagnostics
Read DTCsClear DTCs
3 Use the up/down arrows to highlight “Clear DTCs”, then press OK.
4 Follow the on-screen instructions.
SUPERCHIPS
Turn the Ignition ON Do NOT START Engine
Press OK to Continue
SUPERCHIPS
Clearing DTCs Please Wait. . .
SUPERCHIPSVehicle DTCssucessfully Cleared
Press OK to Exit
5 Allow time for the device to clear the DTCs. (Once the DTCs have been cleared, press OK to return to the Diagnos-tics menu.)

DATA LOGGING - SPEED
Data Logging
Log by Speed
Log By Distance
Advanced
22
Log by Speed = allows you to test and log the time it takes to reach a predefined speed. The Flashpaq stores your Best Times as well as your Last Run information.
CAUTION: Do not exceed legal speed limits on public road-
ways. WARNING: Misapplication or misuse of this product could lead to a serious or fatal accident. Comply with all safety information in this manual, and your vehicle owner’s manual. Follow safety, installation and operating instruc-tions in this User Manual to assure proper use.
Main Menu
Tune VehicleAdditional Features
Tuner Info & Settings
1 Use the up/down arrows to highlight “Additional Fea-tures”, then press OK.
Additional Features
DiagnosticsData Logging
Identify VehicleVehicle Functions
2 Use the up/down arrows to highlight “Data Logging”, then press OK.
Data Logging
Log by Speed Log by Distance
Advanced
SUPERCHIPSStop Vehicle to Initialize Run
3 Use the up/down arrows to highlight “Log by Speed”, then press OK.
Log by Speed0 to 40 Time0 to 50 Time0 to 50 Time0 to 70 TimeBest Times
4 Use the up/down ar-rows to highlight a timed test, then press OK.
5 Follow the on-screen instructions.
SUPERCHIPS
Run will start whenvehicle moves.
Press OK to ABORT
SUPERCHIPS
Time 04.20Top Speed 040
Press OK to Exit
6 Once the time has stopped, press OK to exit to the Log by Speed menu.

DATA LOGGING - DISTANCE
Data Logging
Log by Speed
Log By Distance
Advanced
23
Log by Distance = allows you to test and log the time it takes to reach a pre-defined distance. The Flashpaq stores your Best Times as well as your Last Run information.
CAUTION: Do not exceed legal speed limits on public road-
ways. WARNING: Misapplication or misuse of this product could lead to a serious or fatal accident. Comply with all safety information in this manual, and your vehicle owner’s manual. Follow safety, installation and operating instruc-tions in this User Manual to assure proper use.
Main Menu
Tune VehicleAdditional Features
Tuner Info & Settings
1 Use the up/down arrows to highlight “Additional Fea-tures”, then press OK.
Additional Features
DiagnosticsData Logging
Identify VehicleVehicle Functions
2 Use the up/down arrows to highlight “Data Logging”, then press OK.
Data Logging
Log by Speed Log by Distance
Advanced
SUPERCHIPSStop Vehicle to Initialize Run
3 Use the up/down arrows to highlight “Log by Distance”, then press OK.
Log by Distance60 Foot Time
330 Foot Time1/8 Mile Time
1000 Foot Time1/4 Mile Time
4 Use the up/down ar-rows to highlight a timed test, then press OK.
5 Follow the on-screen instructions.
SUPERCHIPS
Run will start whenvehicle moves.
Press OK to ABORT
SUPERCHIPS
Time 01.55Distance 60
Press OK to Exit
6 Once the time has stopped, press OK to exit to the Log by Distance Screen.

Data Logging
Log by Speed
Log By Distance
Advanced
DATA LOGGING - ADVANCED
Advanced = data logging features can be used to monitor and record individual “live” sensor values of computer data. Specific features for your vehicle will automatically be available once the Flashpaq has identified your vehicle. You are allowed to monitor up to four (4) different parameters at a time.
Main Menu
Tune VehicleAdditional Features
Tuner Info & Settings
1 Use the up/down arrows to highlight “Additional Fea-tures”, then press OK.
Additional Features
DiagnosticsData Logging
Identify VehicleVehicle Functions
2 Use the up/down arrows to highlight “Data Logging”, then press OK.
Data Logging
Log by Speed Log by Distance
Advanced
3 Use the up/down arrows to highlight “Advanced”, then press OK.
AdvancedSelect BufferEngine Misc
Fuel Trim PressTime & DistanceMisc. Non-engine
4 Highlight the available parameter types (Availability depends on vehicle make and model). Press OK.
AdvancedCalc Eng LoadEngine Temp
In. Man PressureEngine RPM
Intake Air Temp
5 Look through the available parameters, and select up to four. Press OK to select. Once you have selected a param-eter, a double arrow will appear to the left of it. Press the Left arrow button to return to the screen shown in step 4.
AdvancedCalc Eng LoadEngine Temp
In. Man PressureEngine RPM
Intake Air Temp
24

DATA LOGGING - ADVANCED
Data Logging
Start DisplayClear SelectedSelect BufferEngine Misc
Fuel Trim Press
6 Once a parameter(s) is selected, “Start Display” will appear. Press OK to continue.
7 This first screen (left) means that if you press OK during the next screen (right), the data being displayed will be recorded until you hit OK again. While recording a progress bar will show at the top of the lower left gauge.
RPM TPS
IAT F
%
FECT
2400212 98
64
To Start Data LoggingPress Enter
To stop Press Enter again
The bar will build whilerecording
8 When you are done viewing the gauge screen, press the Left arrow button to return to the menu.
Advanced
Start DisplayClear SelectedSelect BufferEngine Misc
Fuel Trim Press
9 If you would like to view parameters other than what you selected, highlight “Clear Selected”, then press OK. This will de-select the four you previously selected, and allow you to choose the next set.
Advanced
Start DisplayClear SelectedSelect BufferEngine Misc
Fuel Trim Press
10 Contact Superchips tech support to learn more about how to retrieve your recorded data:
407.585.7000 8:00 am - 5:00 pm EST
25

Additional Features
Data Logging
Identify Vehicle
Vehicle Functions
VEHICLE IDENTIFICATIONIdentify Vehicle = displays specific information regarding your vehicle and it’s components:
•Vehicle Engine Control Unit (Vehicle ECU)•Diagnostic Communication (Diagnostic Comm)•Vehicle Identification Number (VIN)•Engine Control Module Engine Part Number (ECM Engine PN)
Main Menu
Tune VehicleAdditional Features
Tuner Info & Settings
1 Use the up/down arrows to highlight “Additional Fea-tures”, then press OK.
Additional Features
Data LoggingIdentify Vehicle
Vehicle Functions
2 Use the up/down arrows to highlight “Identify Vehicle”, then press OK.
3 Follow the on-screen instructions.
4 Review the information on each screen, then press OK.
26
SUPERCHIPS
Turn the Ignition ON Do NOT START Engine
Press OK to Continue
SUPERCHIPS
Vehicle ECU:Cummins 848
Press OK to Continue
SUPERCHIPS
Diagnostic Comm:J1850
Press OK to Continue
SUPERCHIPS
VIN: ######### ########
Press OK to Continue
SUPERCHIPS
ECM Engine PN:25321563AI
Press OK to Continue

Additional Features
Data Logging
Identify Vehicle
Vehicle Functions
VEHICLE FUNCTIONSVehicle Functions = allows you to adjust the values for specific functions to accommodate non-stock components that have been installed. Examples are as follows:•Tire Size •Tire Pressure•Axle Ratio •Engine Idle•T.Case High •Mobile Desoot Enable (Diesel only)•T.Case Low •Return To Stock
(NOTE: If your device does not have all or any of the Vehicle Functions mentioned above, your vehicle does not allow for these functions to be modified.)
Main Menu
Tune VehicleAdditional Features
Tuner Info & Settings
1 Use the up/down arrows to highlight “Additional Fea-tures”, then press OK.
Additional Features
Data LoggingIdentify Vehicle
Vehicle Functions
2 Use the up/down arrows to highlight “Identify Vehicle”, then press OK.
3 Follow the on-screen instructions.
4 Select an available op-tion from the list provided. Press OK to continue.
SUPERCHIPS
Turn the Ignition ON Do NOT START Engine
Press OK to Continue
TIRE DIAMETER29.50 Inches
22.50 42.00
Vehicle Functions
Tire SizeAxle Ratio
T.Case HighT.Case Low
5 Using the arrow keys, adjust the values, then press OK.
TIRE DIAMETER35.00 Inches
22.50 42.00
27

VEHICLE FUNCTIONS EXPLAINEDBased on the year and model of your Jeep, you may have the option to modify various features using the Flashpaq device. This section provides a brief explanation on what these functions are, and how they are used.
• Tire Size - may be used to improve the accuracy of the vehicle’s speedometer by compensating for non-stock tire sizes.
• Axle Ratio - is used to improve your Jeep’s 2WD shift points by modifying the axle gear ratio. • Transfer Case High (T.Case Hi) - is used to improve your Jeep’s 4 Hi shift points by modifying • Transfer Case Low (T.Case Lo) - is used to improve your Jeep’s 4 Lo • One Touch Lane Change (One Touch) - allows you to toggle this vehicle feature ON or OFF. When this feature is turned OFF, your blinker will only blink once after pressing the switch. • Head Lamp Flash on Lock (Lamp Flash) - may be used to toggle ON/OFF the keyless entry head lamp flash.
• Horn chirp on Lock (Horn Chirp) - may be used to toggle ON/OFF the keyless entry horn chirp. • Head Lamp Delay (Lamp Delay) - gives you the ability to adjust the time it takes for the head lamps to turn off after the engine has been turned off. • Street Legal Tire Pressure Monitoring System (Tire Pressure) - allows you to adjust the tire pressure threshold for the option of deflating your tires. Off-road options are available for download. • Daytime Running Lights (Run Lights) - allows you to adjust the daytime running light settings for 2007-13 vehicles (if the vehicle is equipped with this feature). The running lights are activated while the engine is running, and the transmission is in “drive”.
28

VEHICLE FUNCTIONS EXPLAINEDThere are six available running light settings: •High Beams •European •Turn Signals •Fog Lights •Low Beams •Turn Lights OFF • Engine Idle - allows you to increase the engine idle up to 1600 RPM. This is especially useful during extreme situations. (e.g. Winching, etc.) NOTE: The device must remain connected in order for this feature to continue working.
• Return to Stock - allows you to quickly change your vehicle back to stock with the original settings. The vehicle cannot be running in order to use this feature.
• Axle Lock Enable (2007-14 Rubicon Only) - allows you to lock the front OR rear axle. This feature can be used while the transfer case is in 4-Hi or 4-Lo.
• Electronic Stability Program (ESP) optimization (2011-14 w/Auto Trans) - adjusts the ESP system for vehicles equipped with this feature. When a non-stock tire size is entered, the device re-configures and optimizes the ESP.
• Speedometer Corrections - adjusts the speedometer value according to the inputs specified:
Tire Size Changes (For non-stock tire sizes (22.5”-44.25”)) - Once the tire height is entered, the speedometer will be updated.
Gear/Axle Swaps (for ratios up to 5.38) - Re-configures the speedometer once a modified gear or axle ratio is entered.
• Radio Delay (2011-14 models only) - allows you to adjust the time it takes for your radio to turn off, once the engine has been turned off.
29

TUNER INFORMATIONTuner Info & Settings = provides specific information related to the device. This information will be used during any phone conver-sation or online chats with our Technical Service Representatives. This information will allow them to understand how they can best serve you.
Main Menu
Tune VehicleAdditional Features
Tuner Info & Settings
1 Use the up/down arrows to highlight “Tuner Info & Settings”, then press OK.
Tuner Info & Settings
Tuner InfoVehicle Information
Vehicle OptionsDisplay Settings
2 Use the up/down arrows to highlight “Tuner Info”, then press OK.
Tuner Info & Settings
Tuner Info & Settings
Vehicle Information
Vehicle Options
Display Settings
Tuner Info & SettingsDodge 3842
V3.03.06SN 200357614
Press OK to Continue
Part Number (example)Version Number (example)Serial Number (example)
Tuner Info & SettingsDiesel DB V120
Car DB V200Gas Truck DB V584
Press OK to Continue
Tuner Info & Settings5.9 Diesel Cal DB
V1206.7 Diesel Cal DB
V080Press OK to Continue
3 Press OK to view each screen, then to return to the menu in step 2 above.
Car DatabaseVersion (example)
Gas Truck Database Version (example)
Diesel Database Version (example)
Calibration Database Version (example 1)Calibration DatabaseVersion (example 2)
30

VEHICLE INFORMATIONVehicle Information = provides specific information related to your vehicle. This information will be used during any phone con-versation or online chats with our Technical Service Representatives. This information will allow them to understand how they can best serve you.
Main Menu
Tune VehicleAdditional Features
Tuner Info & Settings
1 Use the up/down arrows to highlight “Tuner Info & Settings”, then press OK.
Tuner Info & Settings
Tuner InfoVehicle Information
Vehicle OptionsDisplay Settings
2 Use the up/down arrows to highlight “Vehicle Informa-tion”, then press OK.
Main Menu
Tuner Info & Settings
Vehicle Information
Vehicle Options
Display Settings
Tuner Status:Unused
Vehicle ID:05094402AL
Last 9 VIN: #########
Press OK to Continue
Tuner Status: the current status of the device in regards to tuning.1) Unused = not “locked” to a vehicle. When a programer is used to tune a vehicle, the device is locked to that vehicle until it is used to return that same vehicle back to stock.2) Locked Programmed OK = tuner has been used to program a vehicle and was successful in doing so.
Vehicle ID: displays the vehicle’s identification number.
Last 9 VIN: displays the last 9 digits of the Vehicle’s Identification Number (VIN).
3 Press OK to return to the menu in step 2 above.
31

VEHICLE OPTIONSVehicle Options = provides information regarding the custom options that are available for your vehicle and the current state they are in.
Main Menu
Tune VehicleAdditional Features
Tuner Info & Settings
1 Use the up/down arrows to highlight “Tuner Info & Settings”, then press OK.
Tuner Info & Settings
Tuner InfoVehicle Information
Vehicle OptionsDisplay Settings
2 Use the up/down arrows to highlight “Vehicle Options”, then press OK.
Main Menu
Tuner Info & Settings
Vehicle Information
Vehicle Options
Display Settings
Vehicle OptionsPower Level
Options
3 Highlight “Power Level”, then press OK. Press OK to exit.
Vehicle Options SUPERCHIPSLe
velPress OK to Exit
Economy
Displays what tune is currently installed.
4 Highlight “Options”, then press OK. Press OK to exit.
Vehicle OptionsPower Level
Options
Vehicle OptionsEDGE PRODUCTS
Le
Press OK to Exit
Rev L imi ter : StkSpd L imi ter : SktTi re Size: Stk
Displays the current status of the available
options provided in advanced
tuning.
32

Main Menu
Tuner Info & Settings
Vehicle Information
Vehicle Options
Display Settings
DISPLAY SETTINGSDisplay Settings = allows for adjustment of the visual settings of the display.
Main Menu
Tune VehicleAdditional Features
Tuner Info & Settings
1 Use the up/down arrows to highlight “Tuner Info & Settings”, then press OK.
Tuner Info & Settings
Tuner InfoVehicle Information
Vehicle OptionsDisplay Settings
2 Use the up/down arrows to highlight “Display Settings”, then press OK.
Display Settings
Set ContrastSet Backlight
Set Scroll Speed
3 Highlight the setting you would like to adjust, then press OK.
Adjusts the darkness of text and graphics
Adjusts the brightness of the display
Adjusts how fast menus can be navigated
4 Use the up/down arrows to adjust the setting, then press OK.
SUPERCHIPS
UP - IncreaseDOWN - Decrease
Enter - SaveD
Display Settings
Set ContrastSet Backlight
Set Scroll Speed
33

TROUBLE SHOOTINGFMy Flashpaq does not power up when plugged into the OBDII port? PYour vehicle’s OBDII port is powered through a fuse the fuse may be blown. (In most vehicles, this is the same fuse shared by the cigarette lighter) PTry the Flashpaq on another vehicle to make sure it powers up. If it does, then the wiring on the vehicle you are trying to program may be the issue (See your dealer for service).----------------------------------------------------------------------------FMy Flashpaq Says: “Non-Stock File Detected...” PYour vehicle may have been programmed by another device. Use that device to set your vehicle back to stock before using the Flashpaq.----------------------------------------------------------------------------FMy Flashpaq displays status G-6F? PThe error code is a ‘General Database Error’. It means your programmer does not have a complete database. Refer to the “Product Updates Using Spark” section of this manual and update your programmer.----------------------------------------------------------------------------FWhen reading the vehicle’s trouble codes (DTCs), I re-ceived a P1000 error code? PP1000 is a DTC that sometimes appears after a vehicle is programmed or the battery cables are unplugged from the battery. It will automatically clear after several drive cycles. It cannot be removed using the ‘DTC Clear’ function.----------------------------------------------------------------------------
34

FMy vehicle has several aftermarket part modifications and after I program it with the Flashpaq, the vehicle does not run well? PAn Flashpaq is designed for stock vehicles (factory stock calibrations and stock engine & transmissions). In some cases, upgrades like air filters, shorty headers, cold air intakes, or cat-back exhausts may not be supported. ----------------------------------------------------------------------------FI left Flashpaq tuning in my vehicle and went to my dealer for service, now my Flashpaq will not work? PThe dealership likely updated your vehicle’s calibrations, and saved over the tuning. The Flashpaq does not recognize the new files in your vehicle. Contact Superchips customer care at 407.585.7000 to correct the situation.----------------------------------------------------------------------------F My programmer did not complete programming and went into recovery mode? PFlashpaq programmers are designed with ‘Recovery Mode’ which means if, for any reason, the programming process does not finish, the programmer will automatically program your vehicle back to the factory stock settings. It is necessary to follow the screen prompts, possibly requiring several ‘Ignition On’ and ‘Ignition Off’ sequences. When recovery is complete your vehicle is at factory stock. You are now able to start your vehicle normally. You may now attempt to program your vehicle again. In the event that recovery is unsuccessful or fails to complete the
TROUBLE SHOOTING
35

programming cycle, a status message will display on the programmer. Please make note of the message displayed and contact Superchips Customer Care at 407.585.7000.----------------------------------------------------------------------------FMy programmer works fine on my vehicle, but after I re-turned my vehicle to stock and tried it on another vehicle I own, the screen showed E-6D “Needs Update – why? PThe Flashpaq is programmed at our factory with the latest databases meant to provide broad vehicle coverage. Your first vehicle’s calibrations (tuning files) were supported by our database, but your second vehicle’s calibrations are not. Update your device using the Spark update software. If an update is not available, you will receive an e-mail as soon as one is. ----------------------------------------------------------------------------F My programmer shows a ‘vehicle calibration not on file’ status. PThe Flashpaq is loaded with the latest databases meant to provide extremely broad vehicle coverage. ‘Vehicle calibration not on file’ status occurs when programmer does not have the necessary calibration files to program a vehicle. Update your programmer using the Spark update software. If your calibration is available it will be downloaded to your programmer for immediate use. If your calibration is not available, your calibration will be uploaded to Superchips’ R&D for tuning. You will receive an e-mail as soon as your calibration is available. Calibrations are usually available in 5 business days.
TROUBLE SHOOTING CONT’D
36

STORAGE AND MAINTENANCECAUTION: It is NOT recommended to store your programmer in your vehicle in extreme heat, direct sunlight or extreme cold (temperatures near or below freezing). These conditions can cause malfunction or damage to the programmer.
37

38
SAFETY TERMSThroughout this User Guide, you will see important messages regarding your safety or the protection of your vehicle. These messages are desig-nated by the words WARNING or CAUTION.
WARNING indicates a condition that may cause serious
injury or death to you, your passengers or others nearby. Pay careful attention to these Warning messages, and always comply with them. They could save a life.
CAUTION indicates a condition that could cause damage to your vehicle. It is important to install and operate your Superchips product in confor-mance with instructions in this Manual. Caution alerts you to particularly important things that will keep your vehicle operating properly.
The product you have bought is a high-performance product. As such, it does present some risks of which you should be fully aware. Do not use this product until you have carefully read the following safety information and the Owner Agree-ment.
SAFETY WARNING & CAUTION
WARNING Misapplication or misuse of this product could lead to a serious or fatal accident. Comply with all safety information in this manual, and your ve-hicle owner’s manual. Follow safety, installation and operating instruc-tions in this User Manual to assure proper use.

39
1. Do not exceed legal speed limits on public roadways. Use any enhanced speed capabilities of this product only in closed circuit, legally sanctioned racing environ-ments expressly for this purpose. Loss of control from speeding on a public road could seriously injure you, your passengers, or others on the roadway.
2. Do not operate the device while driving. Perform all adjustments or changes while stopped. Changing a setting while under way can interfere with your atten-tion to roadway conditions.
3. “Stacking” performance-enhancing devices or other improper installation can cause power train failure on the road. Other products may have features incompat-ible with your Superchips device. Follow all installation and operating instructions, and do not stack products.
4. Some modifications may affect other parts of your vehicle. For example, if you remove/adjust the speed limiter in your vehicle, be sure your tires and other components are rated for the increased speeds they will have to withstand. Not doing so can lead to loss of vehicle control. Modify the speed limiter only for use in closed circuit, legally sanctioned racing environments, not for use on public roadways.
CAUTION: Before taking your vehicle into a service center, return your vehicle to stock. The service center might reprogram your vehicle with an updated program without your knowledge. If you do not use this device to return your vehicle to factory stock and your vehicle is repro-grammed by the service center, the programmer will no longer be able to program your vehicle.
SAFETY GUIDELINES

40
LIMITED 1 YEAR WARRANTYSuperchips, (hereafter “SELLER”) gives Limited Warranty as to description, quality, merchant-ability, fitness for any product’s purpose, productiveness, or any other matter of SELLER’s product sold herewith. The SELLER shall be in no way responsible for the product’s open use and service and the BUYER hereby waives all rights other than those expressly written herein. This Warranty shall not be extended or varied except by a written instrument signed by SELLER and BUYER.
The Warranty is Limited to one (1) year from the date of sale and limited solely to the parts contained within the product’s kit. All products that are in question of Warranty must be re-turned shipping prepaid to the SELLER and must be accompanied by a dated proof of purchase receipt. All Warranty claims are subject to approval by Superchips.
Under no circumstances shall the SELLER be liable for any labor charged or travel time incurred in diagnosis for defects, removal, or reinstallation of this product, or any other contingent expenses.
If the BUYER sends back a failed unit that is out of warranty and chooses to buy a refurbished unit, the refurbished unit will only carry a 90 day warranty. If the BUYER purchases a new unit at a predetermined discounted rate, it will have the standard 1 year warranty.
Under no circumstances will the SELLER be liable for any damage or expenses insured by reason of the use or sale of any such equipment.
THE INSTALLATION OF THIS PRODUCT INDICATES THAT THE BUYER HAS READ AND UNDERSTANDS THIS AGREEMENT AND ACCEPTS ITS TERMS AND CONDITIONS.
IN THE EVENT THAT THE BUYER DOES NOT AGREE WITH THIS AGREEMENT, THE BUYER MAY PROMPTLY RETURN THIS PRODUCT, IN A NEW AND UNUSED CONDITION, WITH A DATED PROOF OF PURCHASE, TO THE PLACE OF PURCHASE WITHIN THIRTY (30) DAYS FROM DATE OF PURCHASE FOR A FULL REFUND. NOTE: This warranty is void for any new products purchased through auction web sites. Warranty is valid only for new products purchased through Authorized Deal-ers (proof of purchase required for all warranty claims).
WARRANTY INFORMATION

41
WARRANTY INFORMATIONIMPORTANT INFORMATION ABOUT YOUR VEHICLE’S WARRANTYMany of our customers ask, “Will your product void my vehicle’s manufacturer’s warranty?” While the answer is straightforward from a legal standpoint, it’s important to educate our customers (and all aftermarket consumers) on some industry realities and offer some com-mon sense precautions to minimize your risk. Superchips is committed to providing quality products that are safe to use. Our products do not cause damage to a vehicle when used as intended.
CAUTION: Operate your vehicle within manufactures recommended load and weight limits as shown in the Manufactures Operator Manual. Please keep in mind that towing in anything higher than the towing level (typically Level 2) and hard driving in race or extreme performance levels using Superchips is not recom-mended and can cause engine damage or failure. In particular, with the use of any diesel performance product, We strongly recommend the installation of an ex-haust gas temperature (EGT) gauge in order to ensure the engine operates within a safe temperature range. Failure to ensure safe operating engine temperature may result in engine damage or failure. Consumers of aftermarket products are protected by the Federal Magnusson-Moss Warranty Act. The Act states that if something breaks on your vehicle and you take it in for warranty repair, the dealer must honor your warranty unless whatever modifications you have added to your vehicle actually caused the problem in question.
However, the reality is that many dealerships have been known to void warranties on vehicles that use aftermarket products as a matter of policy. This applies in particular to those after-market products that produce horsepower, such as performance enhancement “chips,” modi-fied intake manifolds, or aftermarket exhaust systems, regardless of product brand.
You have strong legal protection as a consumer in regard to your vehicle’s warranty. However, we strongly recommend you always disconnect and remove your module/programmer and monitor when you take your vehicle to a dealer for warranty work. In addition, leaving the product connected may affect dealer diagnostic analysis and scan tool functions. Superchips makes every effort to produce product that can be easily removed.
NOTE: Even if you disconnect your unit, in some situations your dealer can detect the use of any programmer—even if the unit has been removed.

42
WARRANTY INFORMATION CONT’D
SERVICE CENTER AND COMPATIBILITY CAUTIONS
CAUTION: Return your vehicle to stock before taking it to a service center. All Superchips programmers are built to operate with OEM calibrations. If you take your vehicle to a service center they may, by your request or otherwise, update your vehicle’s calibrations. If this happens and your vehicle has not been returned to stock your device will no longer be capable of programming your vehicle. Therefore it is important that you return your vehicle to stock before taking it in for service. Superchips updates its active products (i.e. those currently being manufactured) to work effectively with updated OEM calibrations. However, this process can take some time as Superchips is not always made aware of calibra-tion changes made by the OEM. In the case of discontinued products, Superchips cannot ensure that your unit will work effectively if you take your vehicle to a dealership and you are given, by your request or otherwise, a new calibration.
CAUTION: If you have used another tuner/programmer on your vehicle, you will need to program the vehicle back to stock and remove the device before using the Superchips Product. Failure to return to stock may result in PCM failure or engine damage. Programming your vehicle may expose existing defects in the vehicle’s PCM that could disable your vehicle. It is advised that you do not program your vehicle in remote locations in case of vehicle failure. CAUTION: The Flashpaq programmer was developed on a stock vehicle with no aftermarket bolt-on parts; as such, the performance changes implemented by the Flashpaq may not be compatible with certain aftermarket power add-ons. Refer to the following for a brief explanation of how the Flashpaq tuning may be af-fected by certain aftermarket devices.
COLD AIR INTAKE (CAI) KITSMost modern-day vehicles use a Mass Air Flow (MAF) sensor. The MAF sensor is gener-ally located in the intake tube close to the factory air box. MAF sensors play a key role in determining the amount of fuel an engine needs at any given throttle position. MAF sensors are precisely calibrated for the factory intake systems; changes in intake tube diameter, sen-

43
WARRANTY INFORMATION CONT’D
sor placement, or filter flow characteristics can adversely affect the reading from the MAF sensor.
MECHANICAL MODIFICATIONSMechanical modifications such as headers, upgraded camshafts, displacement changes, cylinder head improvements etc., will change the airflow characteristics of an internal combustion engine. The Flashpaq is not tailored to take advantage of these modifications, for the best results we recommend vehicle specific custom tuning.
FORCED INDUCTION (TURBOCHARGERS OR SUPERCHARGERS)Turbochargers and Superchargers drastically change the dynamics/performance of the engine, and its fueling/timing needs. Additional hard parts and custom tuning are required to run a forced induction system on an engine that was originally designed as a Naturally Aspirated (NA) engine. The Flashpaq does not support the addition of an aftermarket forced induction kit.

1790 East Airport Blvd. | Sanford, FL 32773 | Ph: 407.585.7000
WWW.SUPERCHIPS.COM