read all instructions before you operate your grill. save ... · read all instructions before you...
TRANSCRIPT

Read all instructions before you operate your grill. Save these instructions!
For Residential Outdoor Use Only
To installer or person assembling grill: Leave this manual with grill for future reference. To consumer: Keep this manual for future reference.
www.sunstonegasgrills.com
42" Dual Zone 304 Stainless Steel
Charcoal Grill Item No. SUNCHDZ42
28" Dual Zone 304 Stainless Steel
Charcoal Grill Item No. SUNCHDZ28
Page 2
Welcome & Congratulations Congratulations on your purchase of a new grill! We are very proud of our product and we are completely committed to providing you with the best service possible. Your satisfaction is our #1 priority. Please read this manual carefully to understand all the instructions about how to install, operate and maintain for optimum performance and longevity. We know you’ll enjoy your new grill and thank you for choosing our product. We hope you consider us for future purchases.
How to Obtain Service
Before you call Have your read through this product manual? Please make sure you have the following information: Model Number | Date of Purchase
For warranty service, contact SUNSTONE Customer Service Department at (888)-934-9449 or email [email protected], we will response back within 24 hours.
.
1. Cut black plastic straps and lift grill from pallet (WARNING: Grill is very heavy, you will need help), and position grill near your island where the grill is being installed.
2. Remove the green straps from around the grill box carton. 3. Remove the plastic wrap that protects the grill. 4. Raise hood and unpack all parts 5. Cut plastic ties that hold the warming rack, side shelves and spit rod. 6. Remove warming rack at the back of grill by lifting up and sliding out. 7. Reposition the warming rack at the back of the grill
Unpacking and Assembly
Your grill arrives nearly ready to use and requires little assembly. Carefully follow these steps, unpack the grill, removing all packing material and protective film.
Must keep copy of your sales slip for proof of purchase.
YOU’RE NAME_________________________________ DATE OF PURCHASE _______________________
ADDRESS_______________________________________________________________________________
MODEL NO_____________________________
COMPANY THAT YOU PURCHASED FROM ________________________________________________

Page 3
INDEX DIRECTORY
Installation / Assembly
Grill Safety----------------------------- 4
Island Safety --------------------------
-
6
Prevailing Wind----------------------
--------
7
Positioning----------------------------- 8
Locating Grill--------------------------
-
9
Cooking Zones------------------------
-
11
Grill Start-up & Safety Checks
Pre-Grilling Guide -------------------
--------
12
Building your Fire -------------------
--------
13
Lighting the Grill
Charcoal Grill Starters --------------
-------------
14
Lighter Fluid Starting ---------------
------------
15
Electric Starter -----------------------
----
16
Chimney Starter ---------------------
------
17
Using Your Grill
Types of Cooking---------------------
------
18
Optional Components
Rotisserie Installation --------------
-------
21
Grill Specifications
28” Dimensions ----------------------
-----
22
28” Parts Diagram ------------------
------
23
28” Parts List -------------------------
-----
24
42” Dimensions ----------------------
-----
25
42” Parts Diagram ------------------
------
26
42” Parts List -------------------------
-----
27
Care & Maintenance
Rust-Brown Marks ------------------
---------
28
Annual Cleaning----------------------
--
29
Troubleshooting
Question & Answer -----------
-----------------
29 Product Warranty
Warranty -------------------------
--
31
ATTENTION: Indicates a potentially hazardous
situation which, if not avoided, may result in minor or moderate personal injury, or property damage.
WARNING: Indicates an imminently hazardous situation which, if not avoided, will result in death or serious injury.
EXPLOSION: Indicates an imminently hazardous situation which, if not avoided, will result in possible explosion and cause death or serious injury.
BODILY INJURY: Indicates a potentially hazardous situation which, if not avoided, may result in minor or moderate personal injury, or property damage.
HOT SURFACE: Indicates an imminently hazardous hot surface which, if not avoided, will result in serious burn or injury.
OPEN FLAME: Indicates an imminently hazardous situation which, if not avoided, will result in death or
serious injury.
31
33

Page 4
INSTALLATION AND ASSEMBLY - Grill Safety
Safety Tips
There are several ways to get the charcoal ready to use. Charcoal chimney starters allow you to start the
charcoal using newspaper as a fuel. If you use a starter fluid, use only charcoal starter fluid. Never add
charcoal fluid or any other flammable liquids to the fire. Keep charcoal fluid out of reach of children and
away from heat sources. There are also electric charcoal starters, which do not use fire. Be sure to use an
extension cord for outdoor use. When you are finished grilling, let the coals completely cool before
disposing in a metal container.
WARNINGS:
Do not add charcoal starter fluid or charcoal impregnated with charcoal lighter fluid to hot or warm coals. Cap starter fluid after using and place a safe distance away from the oven.
Barbecue mitts or hot pads should always be used to protect hands while barbecuing, opening the fire door, or adjusting the dual draft vents.
Do not use gasoline, alcohol, or other highly volatile fluids to ignite charcoal.
Use proper barbecue tools with long, heat resistant handles.
Do not leave infants, children, or pets unattended near a hot oven.
Never touch the cooking or charcoal grates, or the oven, to see if they are hot.
Do not remove ashes until all coals are completely burned out and are fully extinguished.
Burning charcoal inside can kill you. It gives off carbon monoxide, which has no odor. NEVER burn charcoal inside homes, vehicles, or tents .
Do not wear clothing with loose flowing sleeves while lighting or using the oven.
To extinguish coals, close the hood, fire door, and dual draft vents. Do not use water.
Do not use this charcoal grill in high winds.
To control flare ups, if necessary, close the hood and, the fire door and dual draft vents.
Do not store combustible materials (charcoal, Firelighters, etc.) in the storage area under the ash pan while using the oven.
Handle and store hot electric starters carefully. Keep electrical cords away from the hot surfaces of the oven
Open the lid of the oven while lighting and getting the coals started.
ATTENTION: Sunstone™ safety instructions are located on the front control panel face panel. Always read all instructions and warnings before proceeding, or serious safety hazards can occur. Read all instructions in this manual and front face of grill control panel before use. We recommend that a licensed contractor install your Sunstone™ grill.

Page 5
INSTALLATION AND ASSEMBLY - Island Safety
ATTENTION: Improper installation, adjustment, alteration, service or maintenance can cause injury or property damage. Read the installation, operating and maintenance instructions thoroughly before installing or servicing this equipment.
Placement and Location
Never locate this island in an enclosed room, under any sealed overhead structure, or any type of enclosed area such as a garage, shed, or breezeway, and keep clear of trees and shrubs.
Do not build or place island under or near windows or vents that can be opened into your home.
Maintain sufficient distance as to not overheat any overhead combustible material such as a patio cover.
The area surrounding your island should be kept clean and free from flammable liquids and other combustible materials such as mops, rags or brooms, as well as solvents, cleaning fluids, and gasoline.
Do not use the island cabinet for storage of flammable or plastic items.
Do not store the liquid propane (LP) cylinder in the vicinity of the grill or other appliance when it is not being used.
Do not block any island vent in such a way that will cause ventilation issue. Fresh air must be able to pass through installed vents to safeguard against residual gas accumulation.
WARNING: Either for Modular or Built-in island installation, you MUST install proper air ventilation at the upper side and lower side of island face wall, if adequate air ventilation is not installed, risk of fire, injury or explosion may result.
For Built-in Installations Outdoor Kitchen Island should be built with NON-Combustible applications, including masonry stone or brick. Never build deck below grill; grill is supported by counter edge. It is recommended that the enclosure have several ventilation holes or vents to prevent gas build-up in the event of a leak. (See Fig. A-page 7) The deck ledges and counter should be flat and level in reference to the floor. If your grill is equipped with a rotisserie or lights, electrical service should be provided. GFCI electrical plugs are required for outdoor use. If your grill is equipped with a rotisserie, a minimum of 24" (609.6mm) of clearance is needed on each side of the grill for the motor and skewer.
For Modular Installations Outdoor Kitchen Island should be built with Non-Combustible applications, including Steel Welded Frame, or Steel Stud Frame finished with Cement Board. For modular installations, a moisture barrier is recommended, using pressure treated composite board under base of island. Interior should be lined with ABS plastic liner as additional protection. No deck below grill is required; grill is supported by counter edge. It is recommended that the enclosure have several ventilation holes or vents to prevent gas build-up in the event of a leak. (See Fig. A-page 7) The deck ledges and counter should be flat and level in reference to the floor. If your grill is equipped with a rotisserie or lights, electrical service should be provided. GFCI electrical plugs are required for outdoor use. If your grill is equipped with a rotisserie, a minimum of 24" (609.6mm) of clearance is needed on each side of the grill for the motor and skewer.

Page 6
INSTALLATION AND ASSEMBLY - Island Safety
ATTENTION: Upper and lower air vents (20 sq. in. minimum each) MUST BE PROVIDED on both sides
of built-in construction. The height from upper air vent to top surface of island is 5", and the height from
lower air vent to the bottom is 5”.
Island units must have vents cut into the island sides. If no vent openings are made in the island unit, the grill will overheat and cause a fire hazard!
Do not use an extension cord to supply power to your island, or appliance. Such use may result in a fire, Electrical shock or other personal injury.
Do not install a fuse in the neutral or ground circuit. A fuse in the neutral or ground circuit may result in an Electrical shock hazard.
Use only Ground Fault Interrupter (GFI) protected circuit with this outdoor kitchen island.
Keep all electrical components covered and secured away from any water or other liquids.
Use only extension cords with a 3 prong grounding plug, rated for power of equipment, and approved for outdoor use with a W-A marking.

Page 7
INSTALLATION AND ASSEMBLY – Prevailing Wind
CAUTION: Wind blowing into or across the rear oven lid vent can cause poor performance and/or dangerous overheating. Orient the grill so that the prevailing wind blows toward the front of grill.
Windy Conditions Your Sunstone™ charcoal grill is specially designed to draw fresh air in through the front drawer face, and in direct to the interior burn trays. When grilling the hot gases are then released through the controlled side hood vents, or through back of grill through a venting system. Using your grill in windy conditions may disrupt the front-to-back air flow.
CAUTION: Any damage resulting from windy conditions causing overheating, including warping of steel components. Also any discoloration from heat buildup, is excluded from warranty coverage.
NOTICE: Ensure grill is installed with proper air flow for correct combustion air and cooling airflow. Airflow MUST be maintained for the grill to perform as it was designed. If airflow is blocked, poor combustion will result.
Location Locate the grill only in a well ventilated area. Never locate the charcoal grill in a building, garage, shed or other such enclosed areas without an approved ventilation system. During heavy use, the charcoal grill will produce a lot of smoke while hood is up. Ensure there is adequate area for it to dissipate.
Page 8
INSTALLATION AND ASSEMBLY – Positioning
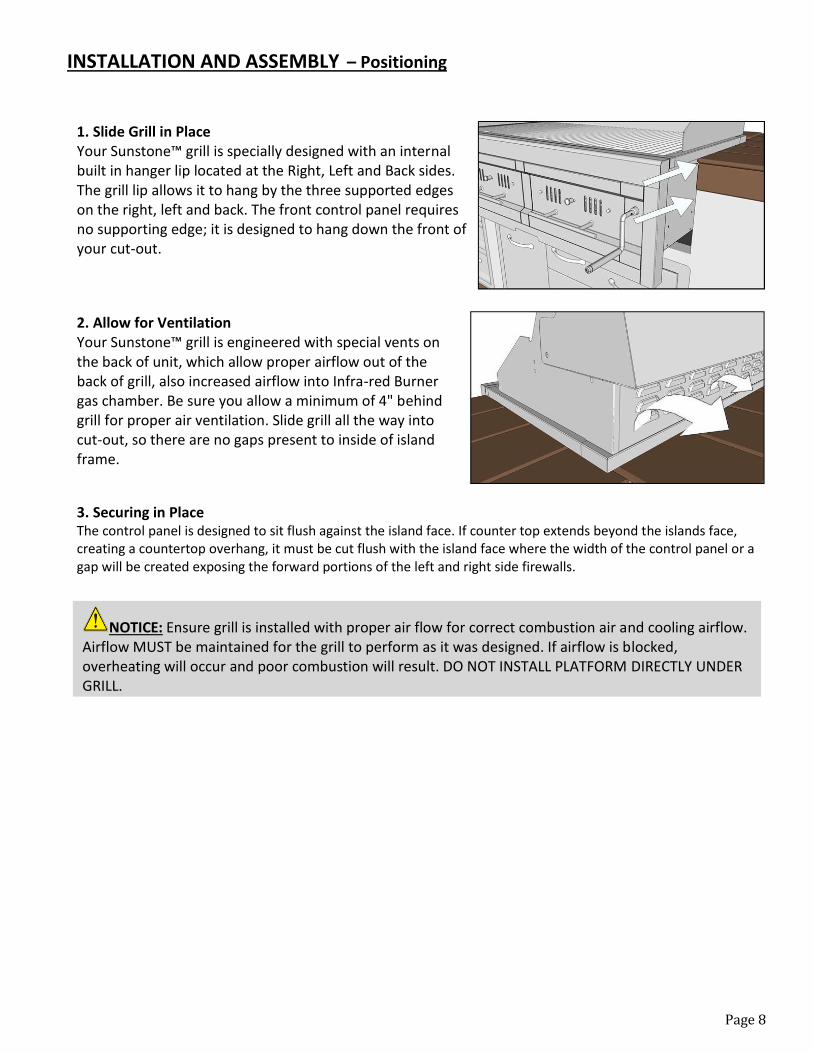
2. Allow for Ventilation Your Sunstone™ grill is engineered with special vents on the back of unit, which allow proper airflow out of the back of grill, also increased airflow into Infra-red Burner gas chamber. Be sure you allow a minimum of 4" behind grill for proper air ventilation. Slide grill all the way into cut-out, so there are no gaps present to inside of island frame.
1. Slide Grill in Place Your Sunstone™ grill is specially designed with an internal built in hanger lip located at the Right, Left and Back sides. The grill lip allows it to hang by the three supported edges on the right, left and back. The front control panel requires no supporting edge; it is designed to hang down the front of your cut-out.
3. Securing in Place The control panel is designed to sit flush against the island face. If counter top extends beyond the islands face, creating a countertop overhang, it must be cut flush with the island face where the width of the control panel or a gap will be created exposing the forward portions of the left and right side firewalls.
NOTICE: Ensure grill is installed with proper air flow for correct combustion air and cooling airflow. Airflow MUST be maintained for the grill to perform as it was designed. If airflow is blocked, overheating will occur and poor combustion will result. DO NOT INSTALL PLATFORM DIRECTLY UNDER GRILL.

Page 9
INSTALLATION AND ASSEMBLY – Locating Grill
Minimum Clearances When installing the charcoal grill in any area was an exterior wall, or overhead structure is nearby, pay close attention to the minimum distance requirements. For installations with a wall behind grill, it is especially important to allow enough room for adequate airflow, or issues may occur. For islands that are built using combustible materials, you must not surround same materials around any appliance, or risk fire. You MUST use Non-Combustible building materials within 24" around all sides of appliance, ie. Stone blocks, steel studs. Never locate the grill where the exhaust will be difficult to clean. If you wish to use the rotisserie option, the space is essential for motor and skewer clearance.
Minimum Requirements See Diagram (Page 10)
From Back Cut-Out Grill Line to Wall 8" Min. Clearance
From Counter to Outdoor Vent Hood 36" Min. Clearance
From Floor to Counter Top 38" Min. Clearance
From Grill to Vent Hood Width 4”-6" Min. Clearance
From Appliance to Appliance 12" Min. Clearance
From Appliance to Combustible Material 24" Min. Clearance
ATTENTION: This grill MUST NOT be located in any fully enclosed area of any kind. There should be a minimum of 4-6 feet clearance from the top hood of grill and any overhead combustible structure.
Vent Hood Exhaust
If installed or used under a patio roof, the cooking grid area must be fully covered by an exhaust hood
with a vent. An exhaust fan with a rating of a minimum 1,000 CFM (cubic feet per minute) (472 liters
per second) or more may be necessary to effectively remove smoke and other cooking by-products
from the area under the unprotected overhead combustible construction.

Page 10
INSTALLATION AND ASSEMBLY – Locating Grill

Page 11
INSTALLATION AND ASSEMBLY – Cooking Zones
ENTERTAINMENT ZONE: The best location for your entertainment zone is on one end of the island, far away from your cooking zone, but right next to your beverage zone. Make sure you have plenty of comfy chairs situated here.
SERVING ZONE: The best location for your serving zone is in the center or heart of the island, adjacent from the entertainment zone, and easily accessible to all your many guests at once.
PREP ZONE: The best location for your food preparation zone is the longest counter space that is near the sink and your grill top or near the ice chest.
CLEAN-UP ZONE: The best location for your cleanup zone is as close to your sink as possible. Items located near your cleanup zone will include not only items you'll use to clean up your outdoor kitchen and dishes, below
access storage, and trash drawer for easy clean-up.
BEVERAGE ZONE: The best location for your beverage zone is on one end of the island, far away from your cooking zone, but right next to your entertainment zone. This makes it far more ease of use for your many guests.
STORAGE ZONE: The best location for your storage zone is the either on one end of the island or right in the middle. This zone should always be in an area that is easily accessible, when multiple people are using the same space.
COOKING ZONE: For the best cooking zone location, position it nearest to the 'triangle' as possible either on one end, or opposite of entertainment zone. It's always best to give this area its own space, so the chef can be more focused on cooking great food.

Page 12
START-UP & SAFETY CHECKS – Pre-Grilling Guide
GRILLING
Charcoal is recommended, however, wood or a combination of both may be used as the fuel source for
grilling with the fuel source placed and ignited on the lower charcoal pan. Do not build too large of a fire.
We recommend starting a fire with no more than 2 pounds of charcoal (approximately 30 briquettes) and
adding more as needed during cooking. After allowing the fire to burn down, now you can place secondary
fuel source on top height adjustable tray, like wood logs or other type of briskets. Failure to read and follow
instructions for lighting charcoal may result in serious personal injury and/or property damage.
GRILL MAINTENANCE
Frequency of cleanup is determined by how often the grill is used. Make sure coals are completely
extinguished before cleaning inside of the unit. Thoroughly rinse with water and allow to air dry before
using again. Wipe out the interior of the unit with a cloth or paper towels.
When finished cooking, and the unit has adequately cooled, clean out all remaining ashes. Ashes collect
moisture, which can lead to premature rusting and decay. Periodically coating the interior surfaces with
vegetable oil will aid in the protection of your unit.
Cooking Surface: If a bristle brush is used to clean any of the grill cooking surfaces, ensure no loose bristles
remain on cooking surfaces prior to grilling. It is not recommended to clean cooking surfaces while grill is
hot.
Start Up Before you start cooking, clean the entire grill thoroughly with hot, soapy water. This is necessary to remove residual solvents. Follow the steps below to insure proper safety when using your Sunstone Charcoal Grill for the first time.
1. Brush all interior surfaces including grills and grates with vegetable cooking oil. 2. Slide Drip tray out, clean if necessary to remove any residual grease or oil build up. 3. Build a small fire on the charcoal pan, being sure not to lay coals against the walls. 4. Close lid; position the top side hood vent ports at approximately one quarter turn open. This
burn should be sustained for at least two hours.

Page 13
START-UP & SAFETY CHECKS –Building your Fire
Successful charcoal grilling depends on a good fire. The general rule for knowing when your coals are ready for grilling is to make sure that 80 percent or more of the coals are ashy gray. If you have less than that, the coals are not ready, and if all of them are glowing red hot, the fire is probably too hot. Building a charcoal fire maybe accomplished by sliding open either the left or right side drawer. The charcoal base should be built in the bottom tray. While the upper height adjustable tray is used for raising the heat, higher or lower using your choice of grilling fuel, like wood logs or briskets. Stack match light type of coals in center of charcoal pan. Light and let burn until coals are light white color. Spread coals and adjust cooking height by turning crank handle. Here are a few steps you can take to adjust the temperature of your fire:
If it is too hot, spread the coals out a bit more, which makes the fire less intense.
Raise or lower the adjustable charcoal grate.
Partially close the vents in the grill, which reduces the amount of oxygen that feeds the fire.
Use the indirect grilling method, with coals to either side of a drip pan and the food over the pan rather than directly over the coals.
In the event of a severe flare-up, spray the flames with water from a squirt bottle. Be careful, spraying with water tends to blow ashes around and make a mess.
Add briquettes 2 or 3 at a time to increase the burn time. Allow 10 minutes for coals to ash over before adding more.
Always use caution when handling hot coals to prevent injury
CAUTION: Always add the majority of the Charcoal Base to Upper Height Adjustable Burn Tray, too much Charcoal added to Lower Burn Tray of Drawer may cause warping to drawer track and make it more difficult to open and close tightly drawer system.

Page 14
LIGHTING THE GRILL – Charcoal Grill Starters
4. Self-Starting Briquettes
If you don’t want to fool around with lighter fluid, there is one
more alternative—self-lighting charcoal briquettes. With
these, all you do is pile the briquettes on the grill, light them
with a match or butane lighter, and you have an almost instant
fire. Some grillers like to use these as starters, with a mixture
of regular briquettes. One thing to note, however: self-lighting
briquettes are not recommended for use with chimney starters.
3. Charcoal Chimney Lighter
A charcoal chimney starter is essentially a metal tube, usually
steel, with a handle on the side. Inside is a grate to hold the
briquettes and to keep them above the crumpled newspaper,
which goes in under the charcoal and is what starts the
briquettes. Ventilation holes ring the bottom of the tube.
The goal is to start a charcoal fire without using lighter fluid or other petroleum based fuels. This is to avoid unpleasant taste to the food, environmental regulations or for other reasons.
2. Electric Charcoal Lighter
Electric charcoal lighters look like an elongated outline of
a Ping-Pong paddle. That outline is the lighter element
loop that, when plugged in, glows like the heating
elements in a toaster.
1. Lighter Fluid
The most common way to light charcoal briquettes is
with charcoal lighter fluid—an easily ignitable,
petroleum-based product.
Charcoal Starters are not included
CAUTION: Always add the majority of the Charcoal Base to Upper Height Adjustable Burn Tray after Igniting charcoal from lower burn tray. Too much Charcoal added to Lower Burn Tray of Drawer may cause warping to drawer track and make it more difficult to open and close tightly drawer system.

Page 15
LIGHTING THE GRILL – Lighter Fluid Starting
Depending on your cooking method, either leave the briquettes in a pile or spread evenly across the charcoal grate
using a long-handled poker.
Lighting Time 12 to 15 minutes
OPEN DRAWER
1. Stack charcoal briquettes or wood into
a pyramid-shaped pile on top of the
charcoal grate or pan. We recommend
using 2 pounds (approximately 30
briquettes) to start your fire, adding more
as needed.
2. Saturate the charcoal briquettes with
lighter fluid and let it soak in for
approximately 5 minutes.
3. After allowing the lighter fluid to
properly soak in, light the pile of
briquettes in several locations to ensure
an even burn. Always light the fire with
the grill drawer pan open. Leave grill
hood open until briquettes are fully lit.
Failure to do this could trap fumes from
charcoal
lighter fluid in grill and may result in a
flash fire when lid is opened.
4. You are ready to begin cooking when the pile of briquettes ashes over and produces a red glow (approximately 12 – 15 minutes).
WARNING: Never add charcoal lighter fluid to hot or warm coals as flashbacks may occur causing INJURY OR BURN.

Page 16
LIGHTING THE GRILL – Electric Starter
Lighting Time 8 to 10 minutes
OPEN DRAWER
1. Arrange a layer of briquettes on the
grill’s charcoal grate slightly larger than
the area of the starter’s element.
2. Place the lighter element on the
charcoal, arrange additional charcoal in a
pyramid shape on and over the loop, and
plug in the lighter.
3. After 8 to 10 minutes, when the coals
around the element are glowing red, pull
the lighter from the briquettes and
carefully set it in a heat-safe place to cool
down. Then, with tongs, redistribute the
briquettes for whatever fire you
require.could trap fumes from charcoal
lighter fluid in grill and may result in a
flash fire when lid is opened. 4. You are ready to begin cooking when the pile of briquettes ashes over and produces a red glow (approximately 12 – 15 minutes).
CAUTION: Remember to always add the majority of the Charcoal Base to Upper Height Adjustable Burn Tray after Igniting charcoal from lower burn tray. Too much Charcoal added to Lower Burn Tray of Drawer may cause warping to drawer track and make it more difficult to open and close tightly drawer system.

Page 17
LIGHTING THE GRILL – Chimney Starter
Lighting Time 15 to 20 minutes
OPEN DRAWER
1. Stuff 2 or 3 large newspaper, or scrap
paper sheets in the bottom cavity of the
chimney.
2. Load the top of the canister with
charcoal.
3. Light the paper with a match at
multiple points; convection sucks the
flame up the canister and will light all the
coals.
4. When the coals are glowing and covered in ash, in 20 to 30 minutes, they're ready to be turned out into the grill.
CAUTION: Remember to always add the majority of the Charcoal Base to Upper Height Adjustable Burn Tray after Igniting charcoal from lower burn tray. Too much Charcoal added to Lower Burn Tray of Drawer may cause warping to drawer track and make it more difficult to open and close tightly drawer system.

Page 18
USING YOUR GRILL- Types of Cooking
Dual Zone Cooking Your Sunstone Grill is divided into two individual cooking zones, each cooking zone is designed to be controlled individually by how the top adjustable rack is positioned, and the front air intake slider is adjusted. Depending on how you independently configure these components, will give you control over different types of cooking, including Smoking, Indirect, Slow Cooking and Direct Cooking.
Heat Distribution Knowing how to configure the different components will give you the very best possible food positioning while grilling. Depending on how you position you’re Charcoal or Wood, also if you for example, place large amounts of Charcoal base on bottom drawer tray, and neatly spaced Wood logs on top of upper adjustable tray, you will get varying effect to your grilling experience. It is important to play with many variations to find what way of grilling is best for you.
Grilling Combination Your Sunstone Grill is designed for an exquisite cooking experience with the use of three separate grilling surfaces in one. This enables you to be simultaneously searing your food on one side, while slow cooking or smoking on other side and slow simmer on top warming rack. The two individual drawer systems allow you to individual control how much either Charcoal or Wood materials you want to grill with also use multiple types, for some amazing flavors.
Indirect Cooking Indirect cooking is the process of cooking your food without the heat source directly under your food. You can sear meats over a high flame on one side of the grill while slow cooking on the other side of the grill. It is like cooking in an oven and is generally used for larger cuts of meats, but can also be used for cooking foods that are prone to flare ups. Indirect Cooking will result in tender foods every time you grill.

Page 19
USING YOUR GRILL- Types of Cooking
Direct Cooking Direct cooking is the process of cooking your food directly over hot coals. This method is also called Searing, Grilling or even Frying. Direct cooking is recommended for most grilling applications, and the best place to perform Direct Cooking is in the place where the cooking surface is the hottest. This type of cooking locks in flavor and juices while allowing the outer surface to absorb smoke and food aroma that is produced as grease and drippings are vaporized by the coals. The result is a crisp, flavorful outside with a tender, juicy inside.
TYPES OF WOOD CHIPS TO USE: Alder: Medium, tart smoke flavor. Excellent on fish, chicken or game.
Maple: Sweet, hearty smoke flavor. Best with fish, jerky or bacon.
Apple: Light, sweet smoke flavor. Superb with poultry, ham or sausage.
Hickory: Heavy smoke flavor. Best with beef, pork or game.
Mesquite: Light smoke flavor. Excellent on fish, poultry or beef.
Oak: Heavy smoke flavor. Best with beef, lamb or pork.
Pecan: Rich, sweet, versatile flavor. Good with any grilled foods.
Grapevine: Strong smoke flavor. Best with beef or poultry.
Smoker/Steamer Box Adding the smoker box to your cooking experience adds unique flavor to your food, you will come to enjoy. Use it for either a smoker box with wood chips, or by filling with Water it becomes a steamer box. While in use, remember to close the hood. There are many different wood chips available on the market, the most common are mesquite and hickory. Just remember to soak the chips for 30 minutes prior, for best results.

Page 20
OPTIONAL COMPONENTS – Rotisserie Installation
(Refer to the illustrations on this page, boxes 1-6) 1. Attach Motor Bracket Assembly to the side of the barbecue frame (can be mounted on either left
or the right side of the frame) using two screws and two nuts. 2. Insert Rotisserie Motor onto Motor Bracket Assembly. 3. Slide Prong Forks with the prongs facing away from the handle onto the Spit Rod. So that any
food item will be in the center between the two four prong forks. 4. Assemble Key Washer, Counter-balance and handle to Spit Rod. Slide Shaft Collar with long end
towards handle. 5. Insert motor extension cord three prong plug into an adjacent grounded GFCI receptacle outlet. 6. Before placing food item on forks when the rotisserie is being operated exclusively, it is strongly
recommended that a pan be placed on the grilling grids, beneath the food to catch the meat drippings. This will prevent excessive buildup of drippings on the grids and facilitate cleaning. When food item is placed on rotisserie, be sure that all Bolts are tightened securely.
Rotisserie assembly can be purchased individually either by individual item, or in a complete set, for your charcoal grill.
Name Qty
.
Part No.
Charcoal Rotisserie set for
42”Charcoal
1 P-RK-5B
Charcoal Rotisserie set for
28”Charcoal
1 P-RK-3B
NOTE: Close hood carefully and align Motor Bracket and Shaft Mounting Bracket so that Rotisserie Rod is in between the hood openings.

Page 21
OPTIONAL COMPONENTS – Rotisserie Installation
Optional Rotisserie Rod Stow-Away
1. Locate two left and right notches at back of grill. 2. Locate two removable brackets, and hook in place. 3. Un-mount Rotisserie Rod from grill, only removing
the Forks, and lift Rod over top and place in brackets.
Rotisserie is mostly used to cook large pieces of meat and poultry to assure slow, even cooking. The
constant turning provides a self-basting action, making food cooked on a rotisserie exceptionally
moist and juicy. Rotisserie cooking generally requires 1 ½ to 4½ hrs to cook depending on the size
and type of meat being cooked. You can have rotisserie cooking with indirect heat with infrared
rotisserie burner. Preferred by professional chefs over other methods, the intense heat is ideal for
searing in the natural juices and nutrients found in quality meats. For successful rotisserie, the meat
should be centered and balanced as evenly as possible on the spit rod to avoid overworking the
rotisserie motor.

Page 22
GRILL SPECIFICATIONS – SUNCHDZ28 Dimensions
GRILL Model Options
Material Specifications:
304 stainless steel for entire structure: 16 gauge
304 external hood layer; 20 gauge 304 internal
hood layer; 18 gauge firebox; and 18 gauge drawer
panel. Interior structure: 13 gauge lifting gear
device; 14 gauge charcoal tray; 18 gauge charcoal
drawer; 18 gauge drip tray; and 18 gauge ash tray.
Product Specifications
Hood Closed
Overall Width-------------------- 28"
Overall Height-------------------- 28"
Overall Depth-------------------- 27-1/8"
Control Panel Height----------- 13-3/4"
Hood Open Size
Counter to Top------------------ 26-1/4"
Overall Depth-------------------- 29-1/8"
Hood Overhang----------------- 2”
Cut out Size
Width------------------------------ 25-1/4”
Depth------------------------------- 22”
Height------------------------------ 12-3/4”
Product Details
Cooking Space-------------------
624 Sq. Inch
Product Weight------------------ 142 LBS
PRODUCT SPECIFICATIONS
CUT-OUT SPECIFICATIONS
INSTALLATION SPECIFICATIONS Non-Combustible Enclosure
Material Specifications:
304 stainless steel for entire structure: 16 gauge
304 external hood layer; 20 gauge 304 internal
hood layer; 18 gauge firebox; and 18 gauge drawer
panel. Interior structure: 13 gauge lifting gear
device; 14 gauge charcoal tray; 18 gauge charcoal
drawer; 18 gauge drip tray; and 16 gauge ash tray.

Page 23
GRILL SPECIFICATIONS – SUNCHDZ28 Parts Diagram

Page 24
GRILL SPECIFICATION – SUNCHDZ28 Parts List
NOTES
Item No. SUNCHDZ28 Parts List
No
.
Description Qty
.
Part No.
1 Burn Trays 8 P-BTrays
2 Cooking Grates 2 P-Gset4B
3 Warming Rack 1 P-WR4B
4 Charcoal 28” Back Body 1 P-CHUBB-28
5 Round Hood Vent 2 P-RHV
6 Hood Handle
1 Hood-5B-H
1
Han
dle
1
Hoo
d-
5B-
H
Hood-4B-H
1
Hood-5B-H
7 28” Charcoal Grill Hood
1 Hood-42CH
1
Cha
rco
al
Grill
Hoo
d
1
Hoo
d-
42C
H
Hood-28CH
8 Hood Thermometer 1 P-TMeter
9 Hood Axle Bolt 2 P-HAB
10 28” Back Hood Seal 1 P-CHHBS-28
11 28” Back Body Seal 1 P-CBBS-28
12 Rod Stow Away Brackets 2 P-RSAB
13 Warming Rack Brackets 2 P-WRB
14 28” Charcoal Control Panel 1 P-CP28
15 Locking Latch for Drawers 1 P-DLL
16 Upper Lift Shelf 28” 1 P-ULS-28
17 Pivot Lift Bars 4
Piv
ot
Lift
Bar
s
4
P-
RTR
LB
P-PLB
18 Right Crank Bracket 1 P-RCB
19 28” Drip Pan 1 P-DTray-28
20 Left Crank Bracket 1 P-LCB
21 Lift Crank 1 P-LCrank
22 Upper Basket Frame 1 P-UBFrame
23 Lower Basket Frame 1 P-LBFrame
24 Steamer/Smoker Box 28” 1 P-SSBox-28
25 Drawer Ash Tray -28” 1 P-DAT-28
26 Drawer Vent Pin Handle 1 P-VPH
27 Drawer Front Rod Handle 28” 1 P-DH28
28 Drawer Control Panel 28” 2 P-LCrank
If you do not see the required part in this list,
refer to other model parts page.

Page 25
GRILL SPECIFICATIONS - SUNCHDZ42 Dimensions
GRILL INSPECFICATION PARTS LIST-
SUNSTONE 42" Dual Zone Charcoal
Grill
Model Options
Material Specifications:
304 stainless steel for entire structure: 16 gauge
304 external hood layer; 20 gauge 304 internal
hood layer; 18 gauge firebox; and 18 gauge drawer
panel. Interior structure: 13 gauge lifting gear
device; 14 gauge charcoal tray; 18 gauge charcoal
drawer; 18 gauge drip tray; and 18 gauge ash tray.
Product Specifications
Hood Closed
Overall Width-------------------- 42"
Overall Height-------------------- 28"
Overall Depth-------------------- 27-1/8"
Control Panel Height----------- 13-3/4"
Hood Open Size
Counter to Top------------------ 26-1/4"
Overall Depth-------------------- 29-1/8"
Hood Overhang----------------- 2”
Cut out Size
Width------------------------------ 39-1/2”
Depth------------------------------- 22”
Height------------------------------ 12-3/4”
Product Details
Cooking Space-------------------
960 Sq. Inch
Product Weight------------------ 222 LBS
PRODUCT SPECIFICATIONS
CUT-OUT SPECIFICATIONS
INSTALLATION SPECIFICATIONS Non-Combustible Enclosure
Material Specifications:
304 stainless steel for entire structure: 16 gauge
304 external hood layer; 20 gauge 304 internal
hood layer; 18 gauge firebox; and 18 gauge drawer
panel. Interior structure: 13 gauge lifting gear
device; 14 gauge charcoal tray; 18 gauge charcoal
drawer; 18 gauge drip tray; and 16 gauge ash tray.

Page 26
GRILL SPECIFICATIONS - SUNCHDZ42 Parts Diagram

Page 27
GRILL SPECIFICATION – SUNCHDZ42 Parts List
NOTES
Item No. SUNCHDZ42 Parts List
No
.
Description Qty
.
Part No.
1 Hood Vent 2 Hood-Vent
2 Hood Handle 1 Hood-5B-H
3 Hood Thermometer 1 P-TMeter
4 42” Charcoal Grill Hood 1 Hood-42CH
5 Grill Upper Back Hood Seal 1 P-HBSeal-42
6 Warming Rack 1 P-WR5B
7 Right Front L-Bracket Lift 4 P-RBRLift
8 Right Top Rack Mount Bracket 2 P-RTRB
9 Top Rack Lift Rod 2 P-TRLR
10 Right Pivot Lift Bars 4 P-RTRLB
11 Right Crank Bracket 1 P-RCB
12 Center Heat Divider 1 P-CHD
13 Cooking Grates 3 P-Gset5B
14 Drawer Top Rack Grab Bar 2 P-TRGB
15 Grab Bar Bolts 4 P-TRGB-Bolt
16 Drawer Vent Pin Handle 2 P-VPH
17 Drawer Front Rod Handle 2 P-DHandle
18 Drip Tray 1 P-DTray
19 Drawer Control Panel Front 2 P-DCP42
20 Drawer Ash Tray 2 P-DATray
21 Steamer/Smoker Box 2 P-SSBox-42
22 Lower Basket Frame 2 P-LBFrame
23 Charcoal Baskets 0 P-CHBasket
24 Upper Basket Frame 2 P-UBFrame
25 Wood Trays 8 P-WDTrays
26 42” Fire Box 1 P-FB42
27 Upper Lift Shelf 2 P-ULShelf
28 Lift Crank 2 P-LCrank
29 Left Crank Bracket 1 P-LCB
30 Crank Pivot Bracket 2 P-CPB
31 Left Pivot Lift Bars 4 P-LTRLB
32 Left Pivot Lift Bars 4 P-LTRLB
33 Right Top Rack Mount Bracket 2 P-RTRB
34 Charcoal 42 Back Body Seal 1 P-CHBB-42
35 Charcoal 42 Back Hood Seal 1 P-CHHS-42
If you do not see the required part in
this list, refer to other model parts
page.

Page 28
CARE & MAINTENANCE – Rust-Brown Marks
When Rust-Brown marks staining occurs, it is very unlikely that the material itself is rusting. The rust marks are the result of small particles of “ordinary-steel” which have become attached to the surface; usually through the manufacturing process. These brown marks are only superficial stains, which will not harm the Grill; they should be removable using a soft damp cloth and a multi-purpose cream cleanser. We recommend "Naval Jelly" which is available from your local Home Depot. Occasionally, it may be necessary to resort to a proprietary stainless steel cleanser, to return the surface of the Grill to its original condition. Always first give grill full cleaning to remove all these impurities from the steel surface. Since these ordinary-steel particles have been on the surface for some time, it is common for them to show signs of Rust-Brown marks fairly quickly. Be sure to follow a regular practice of maintaining your BBQ grill, to avoid this in the future. See below Examples of the main three reasons for Rust-Brown Marks.
PITTING: Is often the result of impurities resting on the surface of the stainless steel from the manufacturing process. These impurities on the steel than can cause superficial rusting spots. When this corrosive attack occurs it can often happen after BBQ’s first exposure to the outside elements, or after the first use, when steel is heated then cooled causing stress to the steel reveling these impurities.
BLEACHES: Bleaches & sterilizing solutions contain chlorine in the form of sodium hypochlorite. Bleaches can attack the stainless steel, causing pitting of the surface and surface staining. In most cases, this happens when the proximity of BBQ to Pools or Spas with high chemical content that drifts onto surface of BBQ. All cleaning agents containing hypochlorite are unsuitable for long term contact with stainless steel and, even when used in the highly diluted form, they can give pitting under certain conditions.
FOODSTUFFS: Typically found in the groves along were two edges come together, creating an area were food stuffs collect. In general stainless steel is fully resistant to all foodstuffs in common use. Only in isolated cases, such as when concentrated salt and vinegar mixtures are allowed to remain in contact with the steel for a long period can any surface marking result.

Page 29
CARE & MAINTENANCE – Annual Cleaning
ANNUAL CLEANING OF GRILL HOUSING Burn-off the grill after use will keep it ready for instant use, however, once a year you should give the entire grill a thorough cleaning to keep it in top operating condition.
1. Remove and clean the cooking grids, 2. Remove top Wood Trays and wash with mild detergent and warm water. 3. Remove both drawers, and individually clean each part. 4. Brush the inside and bottom of the grill with a stiff wire brush, and wash down with a mild soap and
warm water solution. Wash thoroughly and let it dry.
MAINTENANCE GUIDELINES
1. Keep outdoor cooking charcoal grill area clear and free from combustible materials, gasoline and other flammable vapors and liquids.
2. Keep the ventilation opening(s) of the Burn Drawers free and clear from debris. 3. Clean outdoor charcoal grill, including special surfaces, with recommended cleaning agents, if
necessary.
CAUTION: All cleaning and maintenance should be done only when grill is cool. You should NOT line the bottom of the grill housing with aluminum foil, sand or any other grease absorbent substance. Grease will not be able to drip into the drip tray and a grease fire may occur.
Easy Disposal of Ash Drawer Waste
When you’re done grilling. Simply pull used drawer out, and remove inner components including
charcoal baskets & frame, also smoker box, so you’re left with just the bottom main ash drawer. Now
dump waste contents into any metal bin, making sure it is completely cooled.

Page 30
CARE & MAINTENANCE – Annual Cleaning
APPENDIX- Care and Maintenance
DRIP TRAY The drip tray located below the grill should be cleaned periodically to prevent heavy buildup of debris. NOTE: Allow the drip tray to cool before attempting to clean. IMPORTANT: Do not leave the grill outside during inclement weather unless it is covered (cover sold separately). Rain water can collect inside the grill, the grill cart or the drip tray if left uncovered. If the drip tray is not cleaned after use and the grill is left uncovered, the drip tray will fill with water causing grease and water to spill into the grill cart. We recommend cleaning and storing the drip tray after every use.
COOKING GRATES The cooking grates can be cleaned immediately after cooking is completed and after turning off the grill. Wear a barbecue mitt and scrub the cooking grates with a damp cloth. If the grill is allowed to cool down, cleaning the grates will be easier if removed from the grill and cleaned with a mild detergent.
STAINLESS STEEL After initial usage, areas of the grill may discolor from the intense heat given off by the burners. This is normal, use a mild stainless steel cleaner and rub in the direction of the grain of the metal. Specks of grease can gather on the surface of the stainless steel and bake on to the surface and give a worn appearance. For removal, use a nonabrasive oven cleaner in conjunction with a stainless cleaner. NOTE: Always scrub in the direction of the grain.
BURN TRAYS Washing the burn trays after every use is not necessary but periodically it is suggested you wash them in a soap and warm water solution. Use a wire brush to remove stubborn burned on cooking residue. Dry them thoroughly before you reinstall them in the cooking drawer and shelf.

Page 31
TROUBLESHOOTING – Question & Answer
QUESTION What should I do if a grease fire occurs?.
ANSWER
immediately close the hood, the dual front drawer vents, and the two hood side vents, to quickly
suffocate the fire. Keeping your grease and ash drawers emptied, will help reduce the possibility of this
happening.
QUESTION What should I do if my fire is beginning to die down?
ANSWER Whether your burning with either combination of Charcoal or Wood, they booth require oxygen to burn. By opening the front drawer vents and upper hood vents, you should be able to get your fire going again or you may simply need to add more Charcoal or Wood. If the fire has died down nearly all the way, you may simply need to relight the Charcoal base by opening the drawer.
QUESTION How much charcoal should I use?
ANSWER We recommend filling half of the top drawer shelf with charcoal, though you can also place charcoal baskets in bottom. If you are planning to sear using the entire grill, you can spread the charcoal to the other side after it has reached the desired heat intensity.
QUESTION What if I have charcoal left when I’m done cooking?
ANSWER Simply close your grill (lid, front drawers, draft vents) to smother the fire. You will be able to reuse the charcoal that is left in the fire box the next time you use your charcoal grill.

Page 32
TROUBLESHOOTING – Question & Answer
NOTES
QUESTION How do I regulate the heat in my Charcoal Grill?
ANSWER There are basically three ways to control the temperature of your charcoal grill. Outside factors such as humidity, wind and temperature are beyond your control, but you will quickly become experienced in controlling the inside temperature by using these methods: Amount of charcoal - The more charcoal you use, the higher the temperature. Position of the top burn tray - Lower the top burn tray to lower the temperature and raise the burn tray to raise the temperature. Dual Drawer draft vents - Fire requires oxygen to burn. Open the front drawer draft vents to raise the temperature and close the grill hood to lower the temperature.

Page 33
PRODUCT WARRANTY
SUNSTONE OUTDOOR CHARCOAL GRILL WARRANTY LIMITED LIFETIME WARRANTY Sunstone Stainless Rod Cooking Grids and Stainless Steel Housings (including liners, frames, ovens and barbecue faces) are warranted for as long as you own you’re Sunstone Barbecue Grill. LIMITED ONE-YEAR WARRANTY All other grill components including handles, thermometer, hand cranks, lift assemblies, all other moving parts and covers are warranted to be free from defects in material and workmanship for a period of one year from the original date of purchase. LIMITATIONS & EXCLUSIONS
1. SUNSTONE warranty applies only to the original purchaser and may not be transferred. 2. SUNSTONE warranty is in lieu of all other warranties expressed or implied and all other obligations or
liabilities related to the sale or use of its grill products. 3. SUNSTONE warranty shall not apply and SUNSTONE is not responsible for damage resulting from misuse,
abuse, alteration of or tampering with the appliance, accident, hostile environment, flare-up fires, improper installation, or installation not in accordance with the instructions contained in the User Manual, or the local codes.
4. SUNSTONE is not responsible for warping of component parts due to overheating or using in a way not in line with the product manual.
5. SUNSTONE shall not be liable for incidental, consequential, special or contingent damages resulting from its breach of this written warranty or any implied warranty.
6. Some states do not allow limitations on how long an implied warranty lasts, or the exclusions of or limitations on Consequential damages. This warranty gives you specific legal rights and you may have other rights, which vary from state to state.
7. No one has the authority to add to or vary SUNSTONE warranty, or to create for SUNSTONE any other obligation or liability in connection with the sale or use of its products.
8. SUNSTONE DOES NOT COVER FOR WARPING OF STEEL DRAWER, GRATES, OR ANY OTHER COMPONENT FROM THE RESULT OF MISUSE OR OVERHEATING OF COMPONETS.
WHAT IS NOT COVERED. & INTERNET PURCHASE DISCLAIMER 1. SUNSTONE shall not be responsible for and shall not pay for the following Installation or start-up. 2. Service by an unauthorized service provider; 3. Damage or repair due to service by an unauthorized service provider or use of unauthorized parts. 4. Damage caused by accidents, abuse, alteration, misuse, installation that is not in accordance with the
instructions contained in the User Manual, or local codes. 5. To correct normal adjustments or settings, due to improper installation, commissioning or local gas
supply properties. 6. Shipping and handling costs, export duties, or installation cost. 7. The cost of service calls to diagnose trouble; or Removal or re-installation cost.
This warranty applies to the original purchaser with invoice or proof of purchase and covers Sunstone products intended for personal, family or household usage only. It does not apply to rust, corrosion, oxidation or discoloration, which may occur due to moisture or overheating, unless the affected component becomes inoperable. This warranty does not cover parts becoming defective by misuse, accidental damage, improper handling and/or installation. It does not cover labor or labor related charges. It specifically excludes liability for indirect, incidental or consequential damages. Some states do not allow the exclusion or limitation of incidental or consequential damages, so the above exclusion or limitation may not apply to you. This warranty gives you specified legal rights and you may have other rights which may vary from state to state. For additional information regarding this warranty, or information on how to place a warranty claim, contact your
authorized Sunstone dealer or Texas BBQ Wholesalers.