raspberry pi mechatronics projects hotshot - sample chapter
DESCRIPTION
Chapter No.1 Hello WorldEnter the world of mechatronic systems with the Raspberry Pi to design and build 12 amazing projectsFor more information: http://bit.ly/1BbENXETRANSCRIPT
In this package, you will find: • The authors biography • A preview chapter from the book, Chapter 1 ‘Hello World’ • A synopsis of the book’s content • More information on Raspberry Pi Mechatronics Projects HOTSH T
About the Authors Sai Yamanoor is a mechatronics engineer working for a private start-up school in the San Francisco Bay Area where he builds devices that help students achieve their full potential. He completed his degree in mechanical engineering at Carnegie Mellon University, Pitt sburgh, PA, and his undergraduate work in mechatronics at Sri Krishna College of Engineering and Technology, Coimbatore, India. His interests, deeply rooted in DIY and open soft ware and hardware cultures, include developing gadgets and apps that improve quality of life, Internet of Things, crowdfunding, education, and new technologies. In his spare time, he plays with various devices and architectures such as Raspberry Pi, Arduino, Galileo, Android devices, and others. Sai shares his adventures with mechatronics at the aptly named "Mechatronics Craze" blog at http://mechatronicscraze.wordpress.com/.
I want to thank my parents for encouraging me in all my endeavors and for making me what I am today. I am grateful to my brother who has helped shape my career all these years. I look forward to working with Srihari on similar projects in the future. I sincerely thank Mr. S. Balaji Raghavendra who has been a great source of inspiration to me while pursuing my undergraduate degree. I am also thankful to Susmita Sabot and the entire support team at Packt Publishing who were patient and understood the circumstances during difficult times.
Srihari Yamanoor is a nature photographer and mechanical engineer with experience working in medical device design and CAD/CAM. He completed his master's in science as well as a degree in engineering from Stanford University. His work and interests in medical devices include women's health, cancer, orthopedics, and cardiovascular diseases, as well as newer areas such as digital health and electronic health records. He has several thousands of hours of CAD experience behind him and is also certified among other things as a SolidWorks expert, simulation professional, and a SolidWorks instructor. His interests range from engineering and education to social entrepreneurship, animal welfare, and crowdfunding.
I would like to thank my parents, Narasimhan and Yasoda Venakatakrishnan, for their steadfast support in my education and efforts throughout the years, culminating in projects such as this book. Over the course of the years, many friends have helped both Sai and me grow in many ways. For this reason, I would like to say a big word of thanks, in no particular order, to Rika Catherine Hirachi, Anna Liu Jao, Shirupa Gupta, Patrick Nguyen, Vishnu Prasad Ramachandran, Andrew Eib, Christopher Ma, and Karthik Palaniappan. I am sure I am missing some names, and for this, I apologize in advance. I would also like to thank my gracious mentors, Dr. Kevin Waldron, Dr. James Stubbs, Russell Sampson, Mukund Patel, and as I fondly call him, Cyril "Master", all of whom have given me advice and shown me the way. I would like to especially thank my first cat, Squeaky, and the felines Bob, Saxon, and Fishbone, that have followed me, for inspiring me and pushing me to stay on track and keep an eye on the big picture.
Raspberry Pi Mechatronics Projects HOTSH T The Raspberry Pi is a quaint example of technological innovations that come by once every two or three decades and set off a revolution that touches every aspect of human life from scientific exploration to entertainment to education. What is exciting this time around is that there are several such innovations happening simultaneously. They might sound like, and are in a way, buzzwords, but they are in fact real, and are changing our lives in so many ways, so few of which we are consciously aware of. We are speaking of innovations in entrepreneurship, such as crowdsourcing or the emergence of DIY with an almost cult-like following to innovations in technology that are current, such as 3D printing and Internet of Everything, and innovations that are impending such as 4D printing, smart manufacturing, and much more.
The Raspberry Pi has already found several uses as evidenced by hundreds of websites, project examples, and crowdsourcing campaigns. People have used the Pi to build robots, teach programming, restore old gaming consoles, stream videos, collect data, and do many other things. The Pi itself has gone through design iterations and continues to spur competing systems. People have taken advantage of this and have hooked up the Pi to many different ecosystems, expanding its ubiquity and utility.
The purpose of this book is to help those who are excited about the Raspberry Pi and have project ideas in mind, or would simply like to get their hands dirty and practice implementing projects so that they can then use that knowledge for other endeavors. We tried to take a practical approach, introducing the Pi in the first couple of project that you can skip if you are familiar with the Raspberry Pi and have used it before. We then discuss projects of increasing complexity. We have also attempted to diversify the projects to demonstrate various uses for the Pi throughout the book.
What This Book Covers Project 1, Hello World, will introduce the Raspberry Pi and remind you of things that you should know as you proceed through the book. We will set up the Raspberry Pi and blink an LED.
Project 2, A Raspberry WebIDE Example, will take you through Python development using a browser. We will use the Adafruit WebIDE and lead you through the development process using Adafruit products as props for the examples.

Project 3, The Arduino Raspberry Pi Interface, is inspired by the Harry Potter series, and in an effort to show our love for this series, we have created a clock similar to the innovative
and endearing Weasley clock using the Raspberry Pi and an Arduino. This project, of course, allows the clock to report back weather conditions.
Project 4, Christmas Light Sequencer, discusses holidays as the best time for DIY projects, and if you are ever starved of ideas, holidays are the best time to cook up ideas. We picked a Christmas-themed project to demonstrate controlling appliances connected to a local network using Raspberry Pi.
Project 5, Internet of Things Example – An E-mail Alert Water Fountain, follows the theme of the previous project. We will show you how to control a decorative fountain such that anytime you receive a new e-mail, your fountain's light will flash an alert (this can also be switched to receive Twitter alerts).
Project 6, Raspberry Pi as a Personal Assistant, will show you how you can use the Pi as your personal assistant, reminding you of chores, setting alarms, and doing everything at your command.
Project 7, Raspberry Pi-based Line Following Robot, will take you through the simplest of all robots, the line following bot, with Raspberry Pi at the helm. This project will show you the way for this and other complex robotics projects you wish to implement.
Project 8, Connect Four Desktop Game using Raspberry Pi, follows the instant-classic theme for the Raspberry Pi, which includes games. All manners of gaming applications, including the revival of archaic games to new ones and mods, are being created using the Raspberry Pi. We will implement the game using a push button interface.
Project 9, The Raspberry Pi-enabled Pet/Wildlife Monitor, will walk you through a fun example of a bird feeder monitor that allows you to trigger a photo capture each time the bird approaches the feeder. You can think of extending this to other pets, or say, the feral cats in your colony.
Project 10, Raspberry Pi Personal Health Monitor, is a project where we set up a simple web server to record our personal health parameters, build a simple tool to remind ourselves to remain physically active, and remind ourselves to refill a prescription via e-mail alerts.
Project 11, Home Automation using Raspberry Pi, is a project where we will show you how to control appliances using a twisted network where the appliance is connected to a platform such as an Arduino. The Raspberry Pi acts as a server that controls all such nodes in the network.
Project 12, Using a Raspberry Pi for Science and Education, is a project packed with examples, including a vocabulary learning tool, a web host for Khan Academy, and a windmill generator science exhibit. Have fun learning and teaching!
Project 13, Tips and Tricks, is a project packed with tips and tricks that will help you use the Raspberry Pi!
You can also get the videos, tips and tricks, and many more things related to the projects at http://diywithpi.com/.
Project 1Hello World
It is a Hotshot custom to begin learning anything new with a Hello World example. Since we will be doing really cool things in this book, we will say "Hello World" in a unique fashion. In this project, we will use the Raspberry Pi to cause an LED light to blink. This project is directed towards those who are relati vely new to the Raspberry Pi environment as a warm-up exercise. Feel free to skip ahead if you have already done this with your Pi, though we suggest you look through and make sure you haven't missed anything.
A quick introduction to the Raspberry Pi
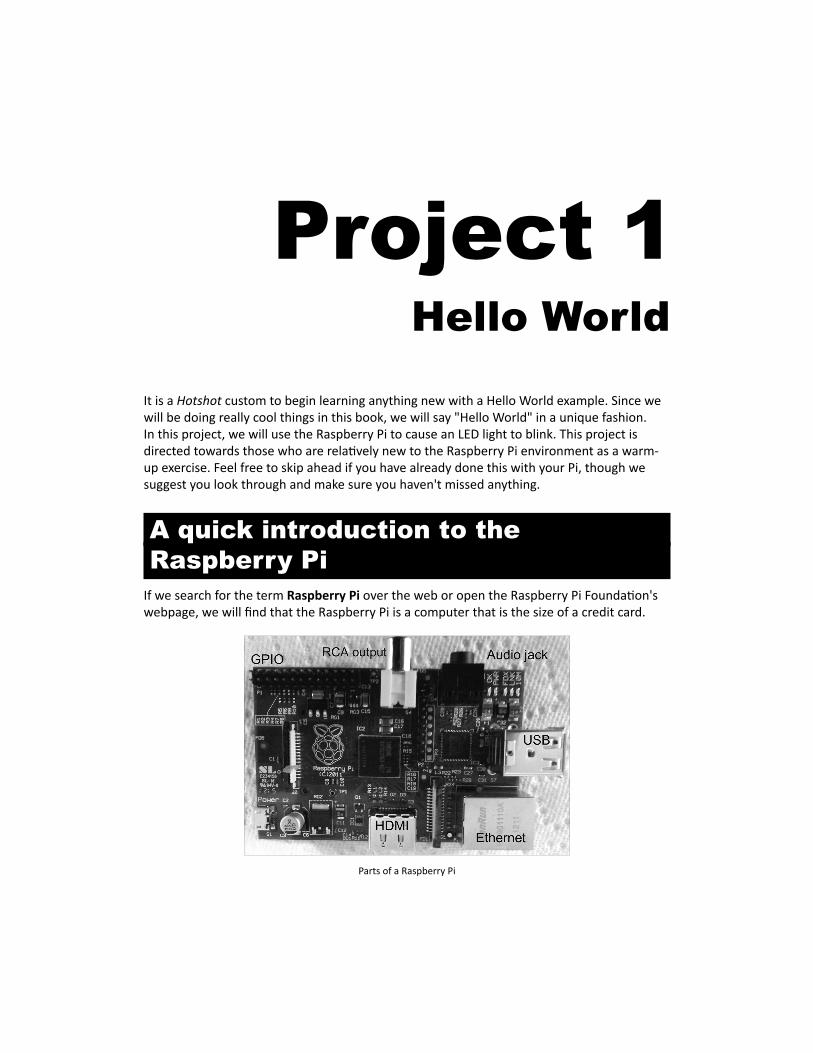
If we search for the term Raspberry Pi over the web or open the Raspberry Pi Foundati on's webpage, we will fi nd that the Raspberry Pi is a computer that is the size of a credit card.
Parts of a Raspberry Pi
Hello World
8
Features of a Raspberry PiThe Raspberry Pi Foundati on (http://www.raspberrypi.org/) initi ally released the Raspberry Pi model B. This was followed by the Raspberry Pi model A. In 2014, the Raspberry Pi foundati on released variants B+ and A+. The Raspberry Pi models A and A+ (costi ng 25 USD and 20 USD respecti vely) do not come with an Ethernet port, a USB port and 256 MB RAM. The model A+ replaced model A while the model B+ replaced model B. The model B (price: 35 USD) came with an Ethernet port, 2 USB ports, and 512 MB RAM; model B+, which supersedes model B, comes with 40 pin GPIO header as opposed to 26 in the earlier models, and has 4 USB ports and a micro SD card slot instead of the SD slot. Per the Raspberry Pi Foundati on website, model B+ (as well as model A+) consumes lower power, has bett er audio and a bett er form factor, which we certainly concur with. The model A+ also comes with a 40 pin GPIO header and a micro SD card slot. The models A+ and B+ have nine more GPIO pins than their predecessors.
The Raspberry Pi 2 was released aft er we fi nished writi ng the book. Please refer to the book's site to fi nd out more about getti ng started with model 2.
The objecti ve of this book is to build cool projects using the Raspberry Pi. We will discuss the components of Raspberry Pi from this perspecti ve. If you are interested in fi nding out more about the Raspberry Pi, the Raspberry Pi Foundati on's webpage has published the technical specifi cati ons of all the components.
First, we will discuss the components available on the Raspberry Pi and the use of these components in our projects. The components of the Raspberry Pi include:
2 USB ports (1 USB port available in model A)
Ethernet port (available only in models B and B+)
RCA output
HDMI output
Audio output
Low level peripherals, which include:
GPIO (General Purpose Input Output)
UART/Serial Port (Universal Asynchronous Receiver Transmitter)
I2C (two wire interface)
SPI (Serial Peripheral Interface)
Project 1
9
Where can I buy a Raspberry Pi?Element14 and RS Components are the most common distributors of the Raspberry Pi in the United States. The Raspberry Pi model A was roughly priced at 25 USD, while its successor model A+ was priced at 20 USD. The model B was priced at 35 USD and the model B+ is priced at 40 USD. There are also an ever increasing number of local distributors such as Adafruit and Fry's Electronics in the US that sell the Raspberry Pi for a margin. Please check the Raspberry Pi Foundati on website and other sources for more vendors.
Requirements to get started with the Raspberry PiIn this secti on, we will discuss the items required to get started with the Raspberry Pi. We will need all the same things that are required to use a computer/laptop. They are:
Display
Keyboard
Mouse
Wi-Fi Adapter / Ethernet cable
It is possible to use the Raspberry Pi via remote login using a secure shell. This might seem diffi cult to those who are new to the Linux environment. The setup of the Raspberry Pi for remote login is explained in Project 13, Tips and Tricks.
The Raspberry Pi eLinux wiki (http://elinux.org/RPi_Hub) has listed peripherals that have been tested and confi rmed to have worked on the Raspberry Pi. You have the freedom to choose peripherals according to your choice.
Display: The Raspberry Pi is provided with an HDMI output and an RCA output. It is possible to connect a monitor that has an HDMI input. It is also possible to connect monitors that have a DVI input with an HDMI to the DVI cable.
Power supply: Since the Raspberry Pi consumes 700 mA for its operati on, it is recommended that the reader uses powered USB hubs to use devices such as Wi-Fi adapters as opposed to plugging in devices such as the Wi-Fi adapters directly to the USB port of the Raspberry Pi to avoid the device resetti ng itself.

Hello World
10
Operating systems on the Raspberry PiThe Raspberry Pi foundati on recommends the following operati ng systems on the Raspberry Pi. They are:
Raspbian
Arch Linux ARM
RISC OS
You are welcome to choose any operati ng system of your choice. For beginners, we strongly recommend the Raspbian OS for projects. The Raspbian is equipped with tools to get started easily. The Raspberry Pi's fi rmware is implemented such that the operati ng system is loaded from an SD card.
Getting started with RaspbianIn this secti on, we will download an image from the Raspberry Pi Foundati on's webpage to a computer, fl ash an SD card with the image, and set up the operati ng system on the Raspberry Pi. We will also try to write and execute our fi rst example.
Downloading RaspbianThe latest Raspbian image is hosted on the Raspberry Pi Foundati on's webpage (http://www.raspberrypi.org/downloads/). The latest image at the ti me of writi ng this book was Raspbian wheezy. We need to download the image and extract it to the folder of our choice.
Raspbian wheezy on the Raspberry Pi Foundation's website
Project 1
11
Flashing image on to the SD cardWe will discuss fl ashing the SD card with the Raspbian image on both Windows and Linux machines.
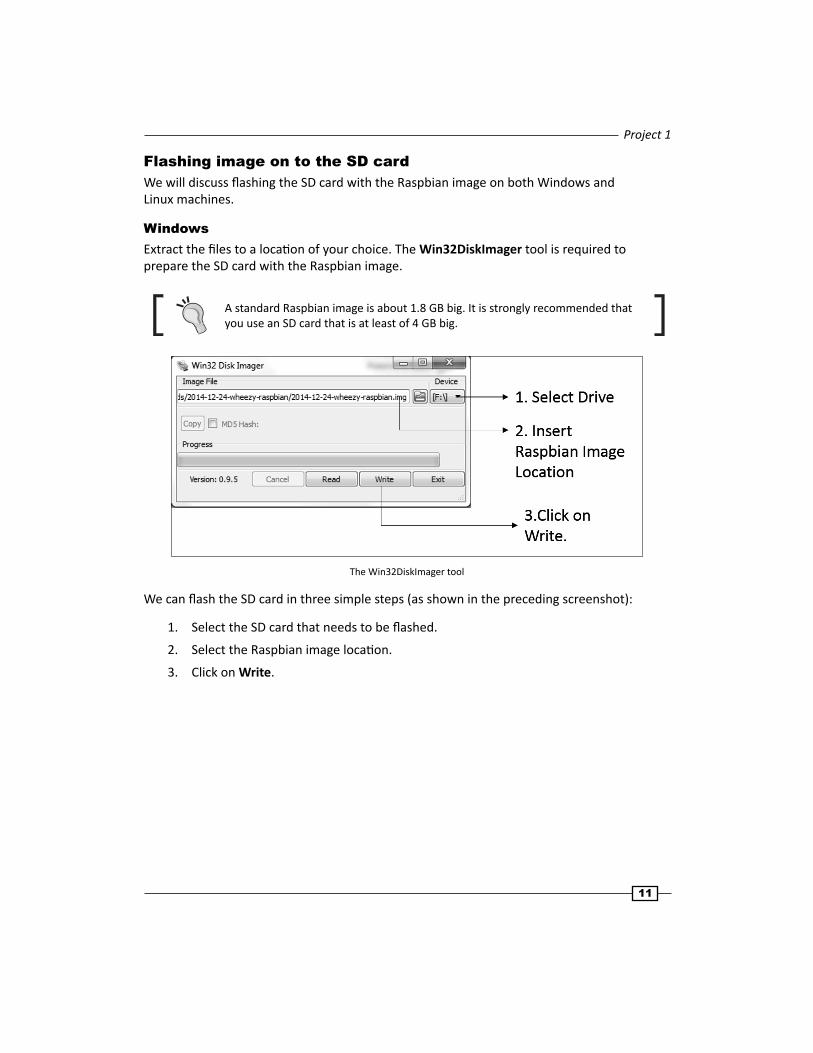
WindowsExtract the fi les to a locati on of your choice. The Win32DiskImager tool is required to prepare the SD card with the Raspbian image.
A standard Raspbian image is about 1.8 GB big. It is strongly recommended that you use an SD card that is at least of 4 GB big.
The Win32DiskImager tool
We can fl ash the SD card in three simple steps (as shown in the preceding screenshot):
1. Select the SD card that needs to be fl ashed.
2. Select the Raspbian image locati on.
3. Click on Write.
Hello World
12
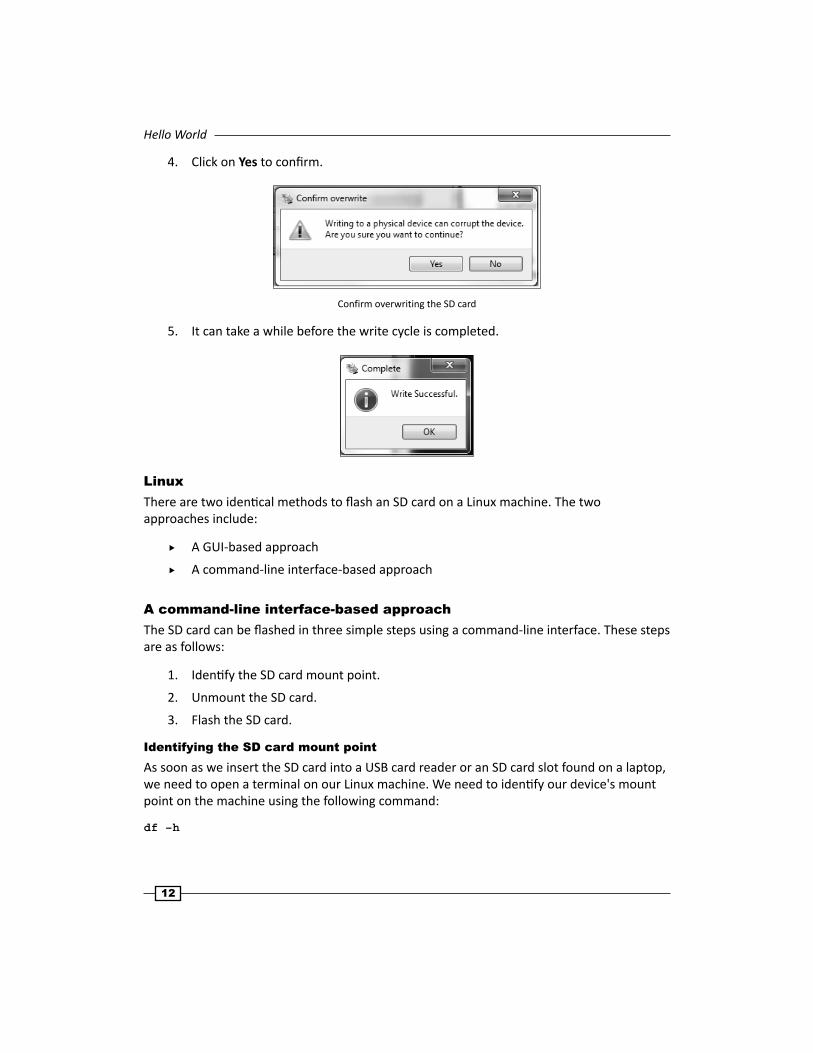
4. Click on Yes to confi rm.
Confirm overwriting the SD card
5. It can take a while before the write cycle is completed.
LinuxThere are two identi cal methods to fl ash an SD card on a Linux machine. The two approaches include:
A GUI-based approach
A command-line interface-based approach
A command-line interface-based approachThe SD card can be fl ashed in three simple steps using a command-line interface. These steps are as follows:
1. Identi fy the SD card mount point.
2. Unmount the SD card.
3. Flash the SD card.
Identifying the SD card mount pointAs soon as we insert the SD card into a USB card reader or an SD card slot found on a laptop, we need to open a terminal on our Linux machine. We need to identi fy our device's mount point on the machine using the following command:
df –h
Project 1
13
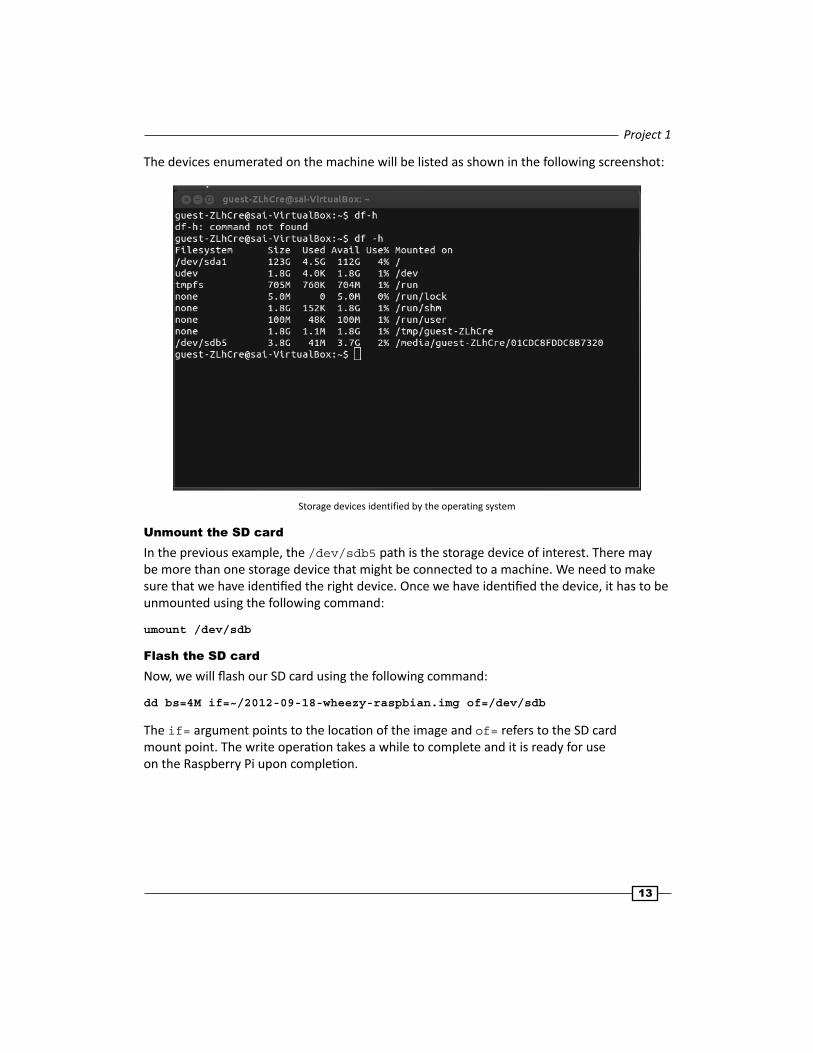
The devices enumerated on the machine will be listed as shown in the following screenshot:
Storage devices identified by the operating system
Unmount the SD cardIn the previous example, the /dev/sdb5 path is the storage device of interest. There may be more than one storage device that might be connected to a machine. We need to make sure that we have identi fi ed the right device. Once we have identi fi ed the device, it has to be unmounted using the following command:
umount /dev/sdb
Flash the SD cardNow, we will fl ash our SD card using the following command:
dd bs=4M if=~/2012-09-18-wheezy-raspbian.img of=/dev/sdb
The if= argument points to the locati on of the image and of= refers to the SD card mount point. The write operati on takes a while to complete and it is ready for use on the Raspberry Pi upon completi on.
Hello World
14
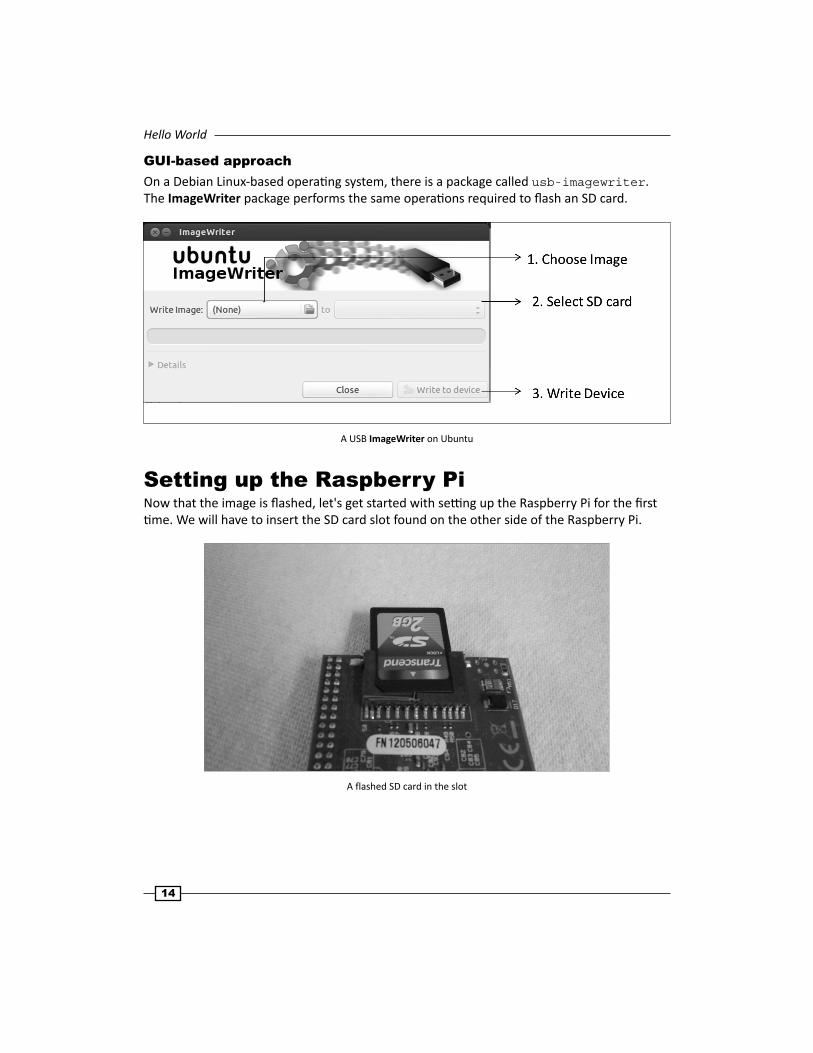
GUI-based approachOn a Debian Linux-based operati ng system, there is a package called usb-imagewriter. The ImageWriter package performs the same operati ons required to fl ash an SD card.
A USB ImageWriter on Ubuntu
Setting up the Raspberry PiNow that the image is fl ashed, let's get started with setti ng up the Raspberry Pi for the fi rst ti me. We will have to insert the SD card slot found on the other side of the Raspberry Pi.
A flashed SD card in the slot
Project 1
15
When the keyboard and the mouse are connected, we can get started by powering up the Raspberry Pi!
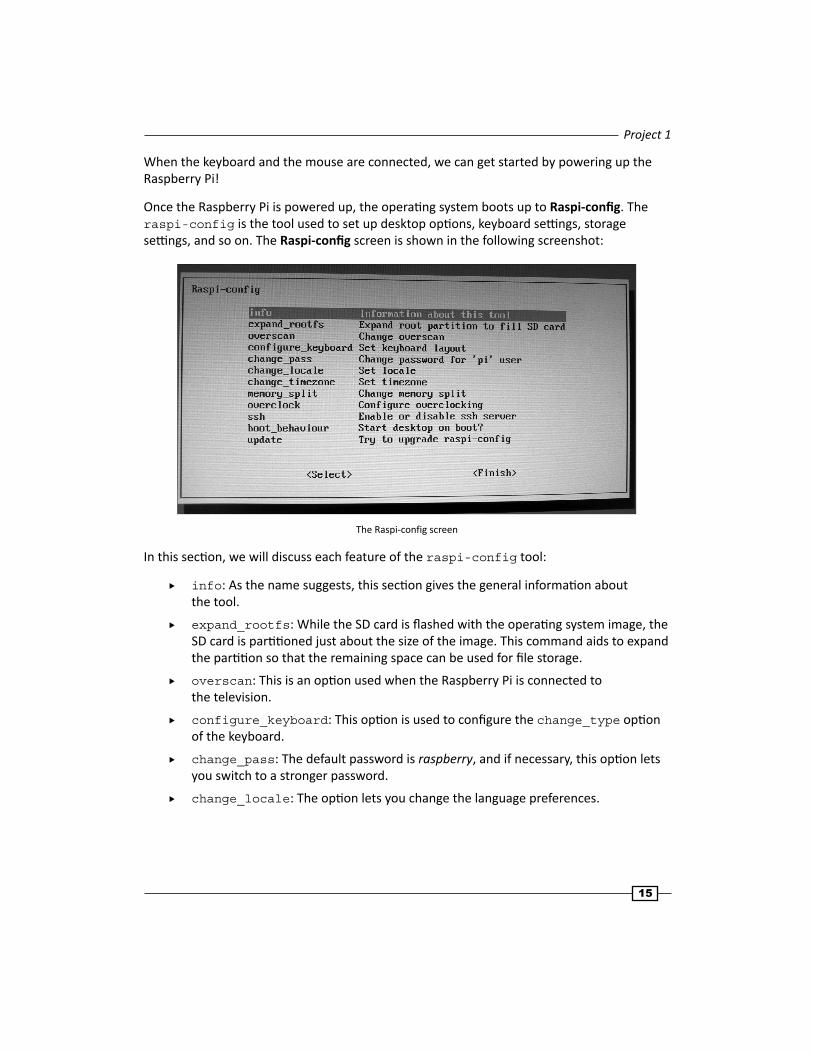
Once the Raspberry Pi is powered up, the operati ng system boots up to Raspi-confi g. The raspi-config is the tool used to set up desktop opti ons, keyboard setti ngs, storage setti ngs, and so on. The Raspi-confi g screen is shown in the following screenshot:
The Raspi-config screen
In this secti on, we will discuss each feature of the raspi-config tool:
info: As the name suggests, this secti on gives the general informati on about the tool.
expand_rootfs: While the SD card is fl ashed with the operati ng system image, the SD card is parti ti oned just about the size of the image. This command aids to expand the parti ti on so that the remaining space can be used for fi le storage.
overscan: This is an opti on used when the Raspberry Pi is connected to the television.
configure_keyboard: This opti on is used to confi gure the change_type opti on of the keyboard.
change_pass: The default password is raspberry, and if necessary, this opti on lets you switch to a stronger password.
change_locale: The opti on lets you change the language preferences.

Hello World
16
change_timezone: We can set our current ti me zone using this opti on.
memory_split: This opti on lets us split the memory between the ARM processor's CPU and the graphics processor.
overclock: The default clock speed is 700 MHz. This opti on lets you set the clock speed to 1 GHz. This might vary for Raspberry Pi 2.
ssh: This opti on enables the secure shell server. This is required to remotely log in the Raspberry Pi and control devices remotely. It is enabled by default on Raspbian.
boot_behaviour: This opti on enables you to boot directly into the desktop.
It is important that you enable this option on as the default option boots into a normal text-based console.
update: If the Raspberry Pi is connected to the Internet using an Ethernet cable, the raspi-config tool downloads any package that might be available.
Once we complete the setup process by selecti ng Finish, the Raspberry Pi reboots and expands the fi lesystem if necessary.
Mission briefi ngIn this project, we will set up the GPIO (General Purpose Input Output) peripheral on the Raspberry Pi and write our fi rst program to cause an LED to blink. At the end, we will repeat the same steps with a Raspberry Pi add-on board called PiCrust. This will allow you to get your feet wet and ensure you have all the right tools going forward, and should you need to, troubleshoot any problems you might identi fy.
Why is it awesome?Think of saying "Hello World" as both a nod to programming traditi on and a dry run to ensure you are well equipped!
Your Hotshot objectivesThe objecti ves for this mission are quite simple, and yet take us all several milestones further! Here are the objecti ves of the Hello World mission:
Collect all the necessary tools
Set up the GPIO peripheral
Introduce ourselves to the Raspberry Pi environment
Turn a light emitti ng diode (LED) on and off with a 1 second delay

Project 1
17
Mission checklistGo over the previous secti ons, and make sure you have all the tools. Download the GPIO libraries, and ensure you can log in to the Raspberry Pi remotely, and you are all set!
There are two diff erent ways to use a Raspberry Pi. They are:
Connecting a monitor to the HDMI port or the RCA jack and a keyboard to the USB port of the Raspberry Pi.
Remotely logging into the Raspberry Pi from the reader's workstation.
If you are a beginner, it is best to use the fi rst method while the second method can be used if you are familiar with the Linux operati ng system and remote login capabiliti es.
Once we complete the setup process by selecti ng Finish, the Raspberry Pi reboots and expands the fi le system if necessary.
Hunting and gatheringAs stated before, you will need to make sure you have all the tools. So, go ahead, hunt and gather away. Grab at least one of each of the following and more than one of each, if you, like us, are prone to accidents:
A laptop to download the Raspberry Pi image and set up everything
Raspberry Pi—Model B/B+ (preferred), a keyboard, and a mouse for the Raspberry Pi (opti onal)
SD card with 4GB memory (SD card preparati on was explained earlier in this project)
USB Power Adapter (Rated 1.0 A) and Micro USB power cable
Ethernet cable
Wi-Fi adapter—(opti onal) refer to the eLinux wiki for Raspberry Pi for verifi ed peripherals
Breadboard
Jumper wires
Discrete Resistor Values
A work bench (or a clean working surface—hopefully you have one)
Good thoughts and a can-do atti tude
Lots of coff ee, tea, or a safe beverage of your choice

Hello World
18
Engage thrustersYou will need all of the tools listed in the previous secti on to get through this project. Take your ti me and make sure you have everything handy!
Objective complete – mini debriefi ngDo you have all the tools? Ready to go? Then on to the next task!
Setting up the GPIOWe need to enable the GPIO peripherals in our Raspbian installati on to get started. In order to download the required tools and set things in moti on, the Raspberry Pi needs to be connected to the Internet.
The GPIO pin is a pin that is available from the Raspberry Pi's processor that enables interfacing input and output devices to the Raspberry Pi. In this secti on, we will talk about setti ng up the GPIO for interfacing an output device. There is a 26-pin interface (40 in Model B+) available on the Raspberry Pi and about 17 of those 26 pins are GPIO pins (26 of them in Model B+) while the others are miscellaneous pins such as power. The pins are driven by a 3.3 V rail and each GPIO pin is rated for about 17 mA and the total current draw not exceeding 50 mA.
Engage thrustersWe also need to know the GPIO peripherals available to conduct our experiment. The following fi gure shows the GPIO maps of the Raspberry Pi Rev 1 and Rev 2:
GPIO map for Models A, B, and B+. (Image published with permission from Raspi.tv)
Project 1
19
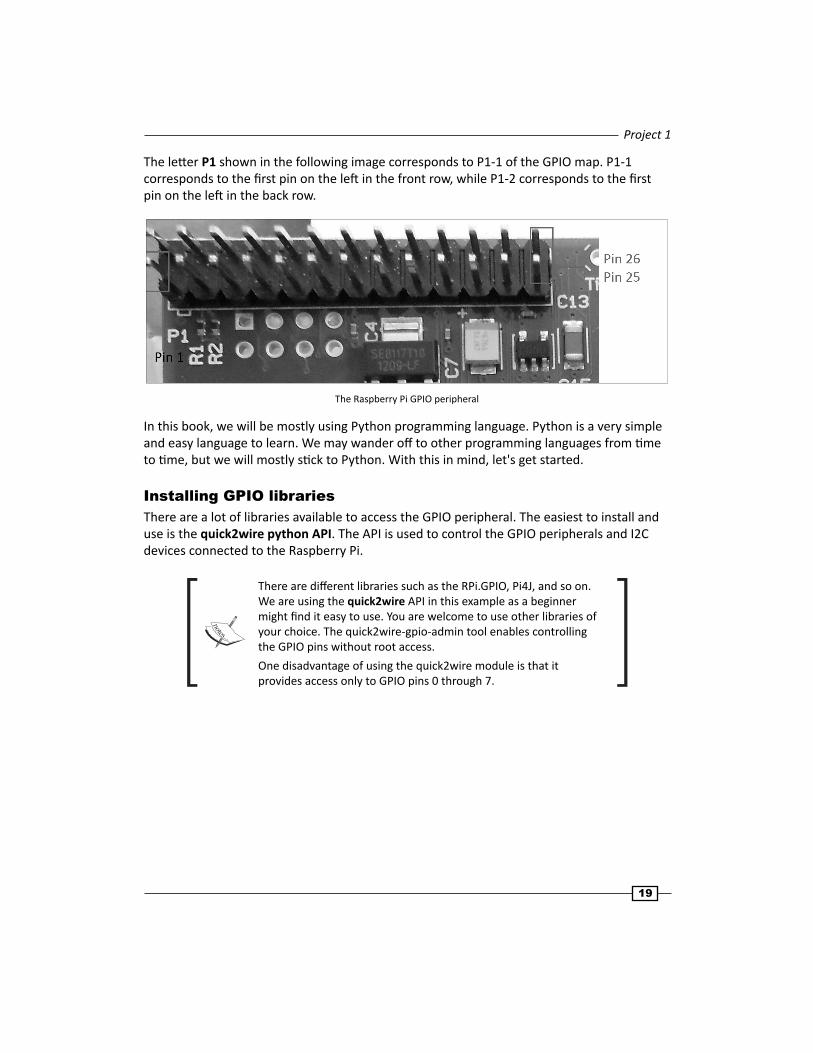
The lett er P1 shown in the following image corresponds to P1-1 of the GPIO map. P1-1 corresponds to the fi rst pin on the left in the front row, while P1-2 corresponds to the fi rst pin on the left in the back row.
The Raspberry Pi GPIO peripheral
In this book, we will be mostly using Python programming language. Python is a very simple and easy language to learn. We may wander off to other programming languages from ti me to ti me, but we will mostly sti ck to Python. With this in mind, let's get started.
Installing GPIO librariesThere are a lot of libraries available to access the GPIO peripheral. The easiest to install and use is the quick2wire python API. The API is used to control the GPIO peripherals and I2C devices connected to the Raspberry Pi.
There are diff erent libraries such as the RPi.GPIO, Pi4J, and so on. We are using the quick2wire API in this example as a beginner might fi nd it easy to use. You are welcome to use other libraries of your choice. The quick2wire-gpio-admin tool enables controlling the GPIO pins without root access.
One disadvantage of using the quick2wire module is that it provides access only to GPIO pins 0 through 7.
Hello World
20
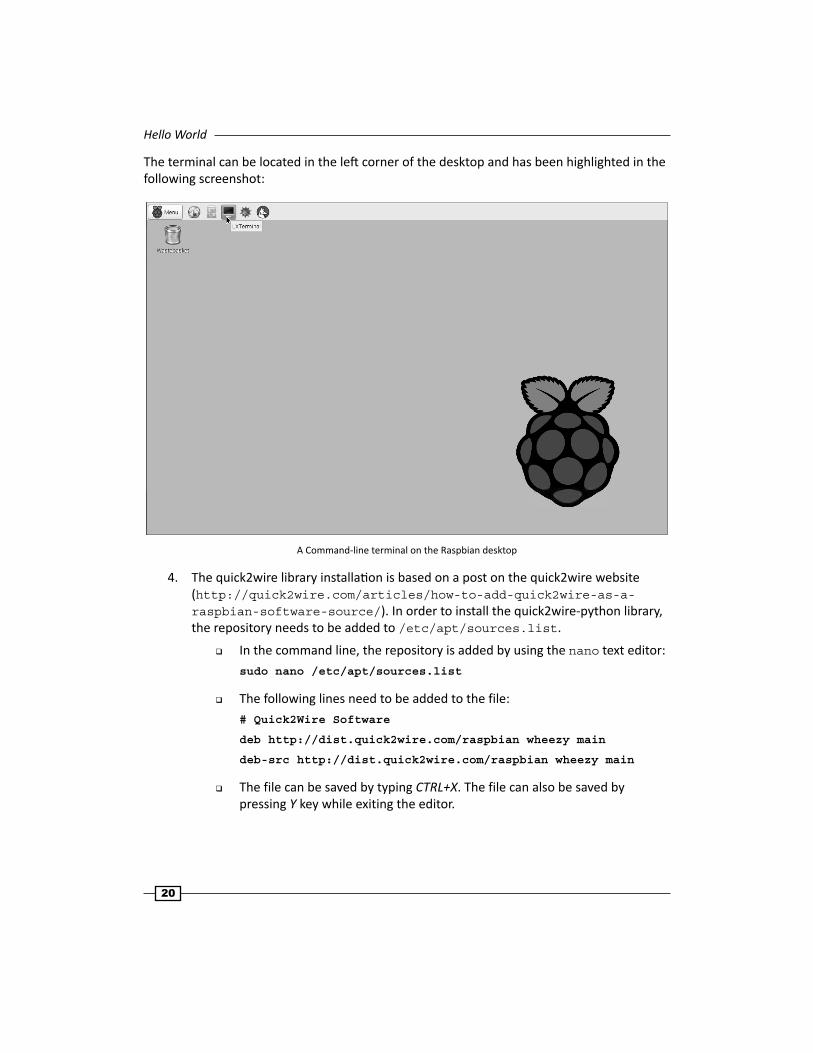
The terminal can be located in the left corner of the desktop and has been highlighted in the following screenshot:
A Command-line terminal on the Raspbian desktop
4. The quick2wire library installati on is based on a post on the quick2wire website (http://quick2wire.com/articles/how-to-add-quick2wire-as-a-raspbian-software-source/). In order to install the quick2wire-python library, the repository needs to be added to /etc/apt/sources.list.
In the command line, the repository is added by using the nano text editor:
sudo nano /etc/apt/sources.list
The following lines need to be added to the file:
# Quick2Wire Software
deb http://dist.quick2wire.com/raspbian wheezy main
deb-src http://dist.quick2wire.com/raspbian wheezy main
The file can be saved by typing CTRL+X. The file can also be saved by pressing Y key while exiting the editor.

Project 1
21
Alternatively, the lines can be added using a graphical text editor such as, leafpad and saving it:
sudo leafpad /etc/apt/sources.list
5. In order to ensure that the packages are downloaded from the quick2wire repository, we need to authenti cate the packages using a key available from quick2wire:
wget https://raw.githubusercontent.com/quick2wire/quick2wire-software-users/master/[email protected]
sudo apt-key add [email protected]
6. The cache is updated and the latest soft ware packages can be downloaded as follows:
sudo apt-get update
sudo apt-get upgrade
7. The quick2wire tool is installed as follows:
sudo apt-get install quick2wire-gpio-admin
sudo apt-get install quick2wire-python3-api
Objective complete – mini debriefi ngNow, wasn't that easy? Let's get more familiar with the GPIO input/output operati ons.
GPIO programming using PythonIn this secti on, we will ensure that the library is correctly installed and add the user to the group. This will enable the user to use the GPIO pins without having root privileges. This will be followed by the secti on on getti ng started with GPIO control programming in Python.
Hello World
22
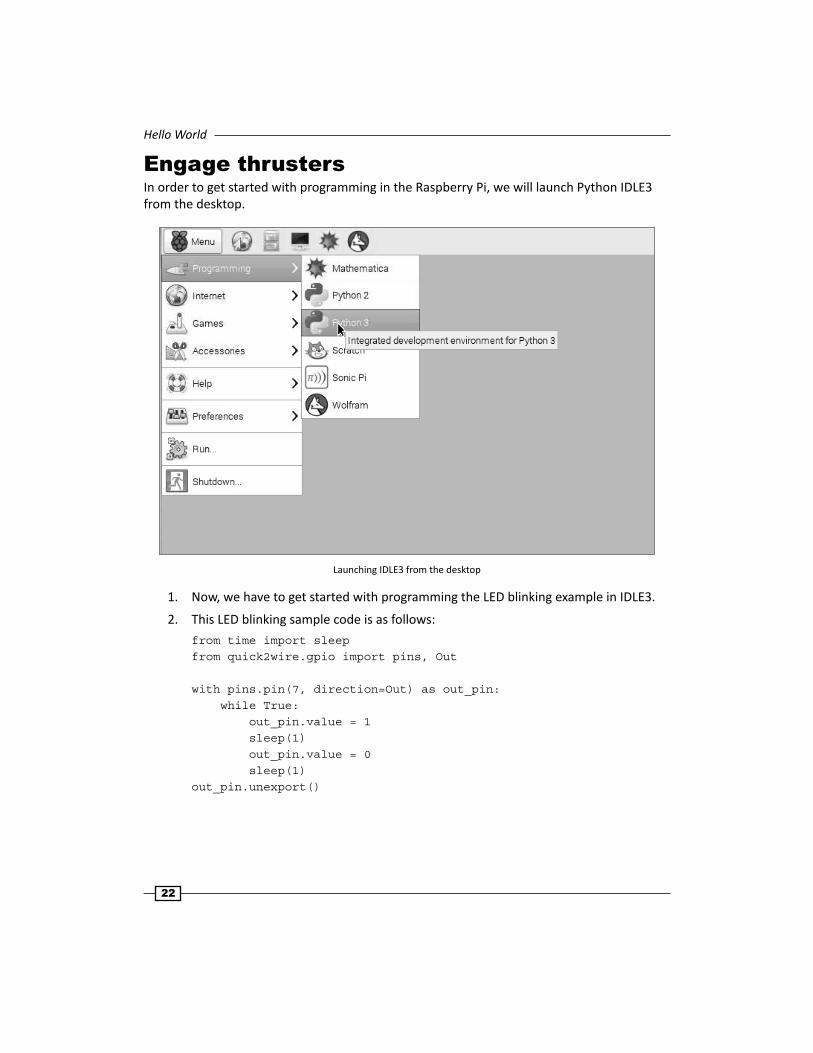
Engage thrustersIn order to get started with programming in the Raspberry Pi, we will launch Python IDLE3 from the desktop.
Launching IDLE3 from the desktop
1. Now, we have to get started with programming the LED blinking example in IDLE3.
2. This LED blinking sample code is as follows:
from time import sleepfrom quick2wire.gpio import pins, Out
with pins.pin(7, direction=Out) as out_pin: while True: out_pin.value = 1 sleep(1) out_pin.value = 0 sleep(1)out_pin.unexport()
Project 1
23
3. We will import the sleep class from the time module in the fi rst line. This is required to introduce a 1-second delay between turning the LED on and off every other second:
from time import sleep
4. We also need the pin class from the quick2wire GPIO library:
from quick2wire.gpio import Pin
5. We need to set the output pin that we will be using in the example:
LED_output = Pin(8, Pin.Out)
6. We can set the pin to the logical high (3.3 V) as follows:
LED_output=1
7. We will set the pin to the logical low (0 V) as follows:
LED_output=0
8. We will execute the same thing using an infi nite while loop:
while True: LED_output=1 sleep(1) LED_output=0 sleep(1)
9. This will make the LED blink with a 1-second delay. We should also note the indent on the blink sequence. The blink sequence has a diff erent indent compared to the while loop. Hence, the code that is at a diff erent indent is executed infi nitely.
10. When the program is interrupted (by pressing CTRL + C on the keyboard), we need to unexport the pins at exit:
out_pin.unexport()
An alternative to quick2wire – RPi.GPIO1. Another alternati ve is to use RPi.GPIO (https://pypi.python.org/pypi/RPi.
GPIO). It comes as a standard package along with the Raspbian Wheezy OS. Let's perform a quick review of the code:
import RPi.GPIO as GPIOfrom time import sleep
GPIO.setmode(GPIO.BCM)GPIO.setup(8,GPIO.OUT)
Hello World
24
GPIO.output(8,GPIO.LOW)
while True: GPIO.output(8,GPIO.HIGH) sleep(1) GPIO.output(8,GPIO.LOW) sleep(1)
GPIO.cleanup()
2. Aft er importi ng the required modules, we get started with setti ng up the pin numbering mode. There are two types of pin numbering modes, namely:
The BCM Pin numbering mode: The pin numbers are based upon the pin numbers of the BCM chip.
The Board numbering mode: The pin numbers are based upon the pin numbers of the Raspberry Pi GPIO header.
In this example, we will set the BCM numbering mode and set pin 8 as the output:
GPIO.setmode(GPIO.BCM)GPIO.setup(8,GPIO.OUT)
3. We can set the pin to logical high (3.3 V) as follows:
GPIO.output(8,GPIO.HIGH)
4. We can set the pin to logical low (3.3 V) as follows:
GPIO.output(8,GPIO.LOW)
5. Now, the LED can be made to blink with a 1 second delay:
while True: GPIO.output(8,GPIO.HIGH) sleep(1) GPIO.output(8,GPIO.LOW) sleep(1)
6. When the program is interrupted by typing CTRL + C, we have to clean up and release any occupied GPIO resources:
GPIO.cleanup()
Objective complete – mini debriefi ngIn this secti on, we fi nished writi ng a program to make an LED blink. In the next secti on, we will put a circuit together that makes an LED blink.
Project 1
25
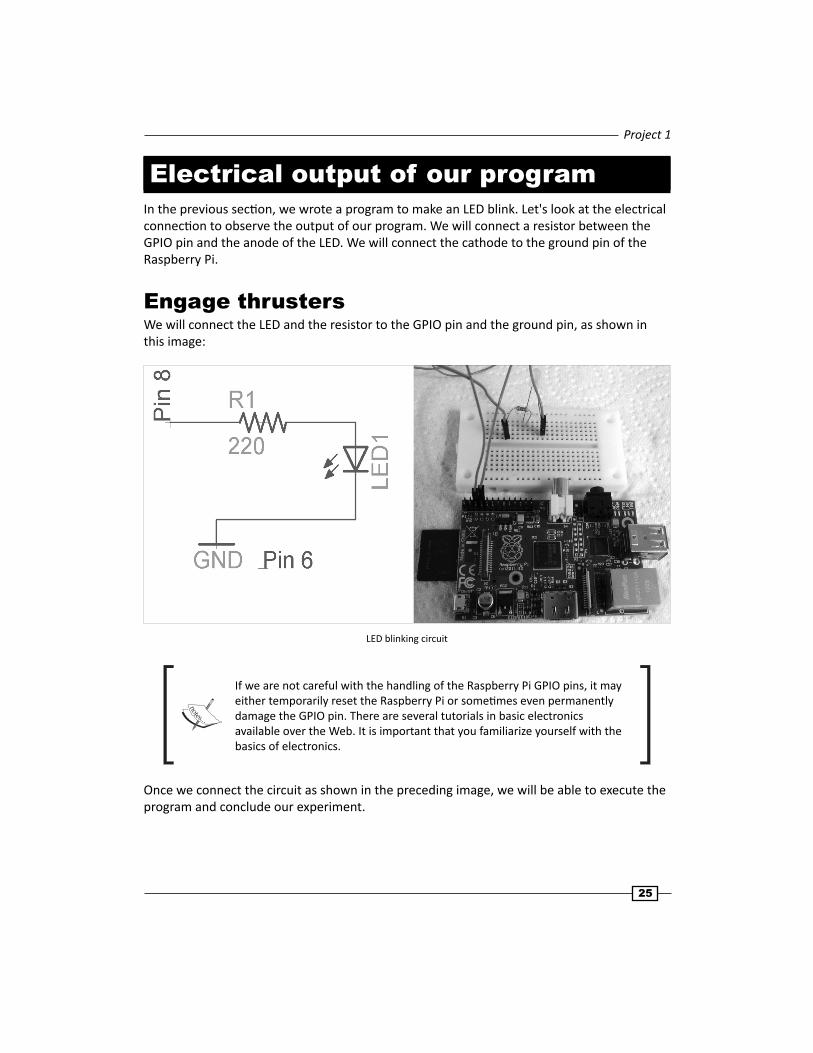
Electrical output of our programIn the previous secti on, we wrote a program to make an LED blink. Let's look at the electrical connecti on to observe the output of our program. We will connect a resistor between the GPIO pin and the anode of the LED. We will connect the cathode to the ground pin of the Raspberry Pi.
Engage thrustersWe will connect the LED and the resistor to the GPIO pin and the ground pin, as shown in this image:
LED blinking circuit
If we are not careful with the handling of the Raspberry Pi GPIO pins, it may either temporarily reset the Raspberry Pi or someti mes even permanently damage the GPIO pin. There are several tutorials in basic electronics available over the Web. It is important that you familiarize yourself with the basics of electronics.
Once we connect the circuit as shown in the preceding image, we will be able to execute the program and conclude our experiment.
Hello World
26
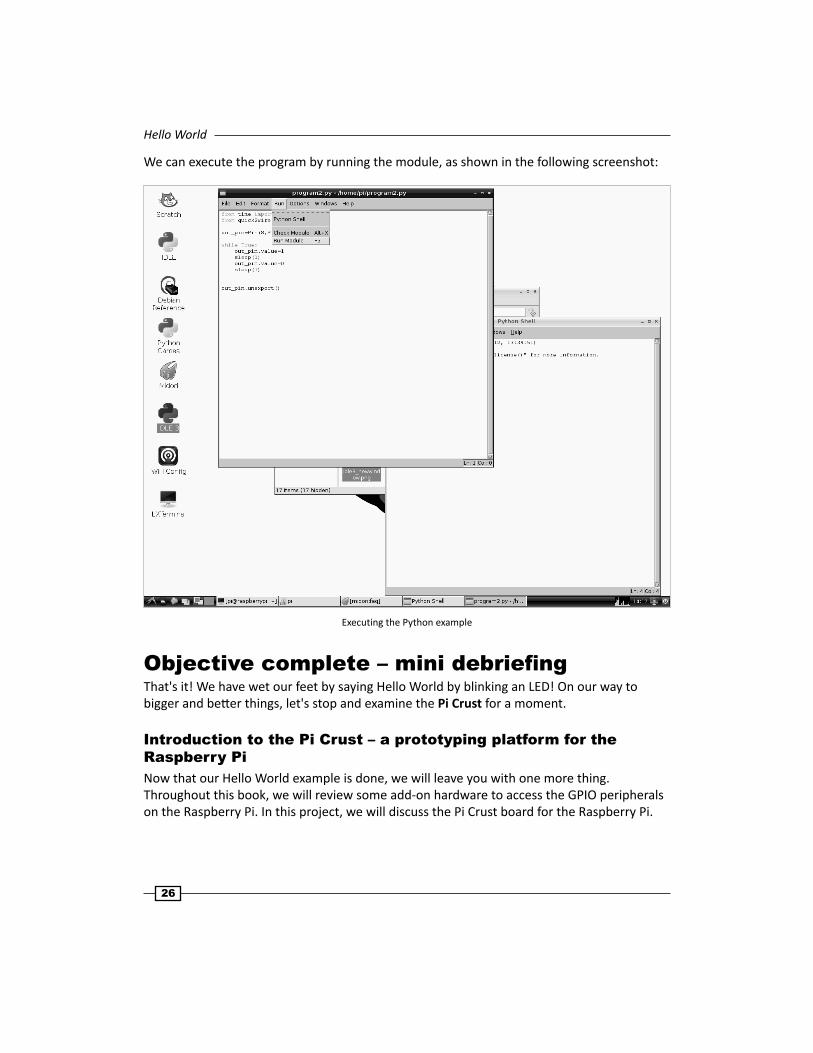
We can execute the program by running the module, as shown in the following screenshot:
Executing the Python example
Objective complete – mini debriefi ngThat's it! We have wet our feet by saying Hello World by blinking an LED! On our way to bigger and bett er things, let's stop and examine the Pi Crust for a moment.
Introduction to the Pi Crust – a prototyping platform for the Raspberry PiNow that our Hello World example is done, we will leave you with one more thing. Throughout this book, we will review some add-on hardware to access the GPIO peripherals on the Raspberry Pi. In this project, we will discuss the Pi Crust board for the Raspberry Pi.
Project 1
27
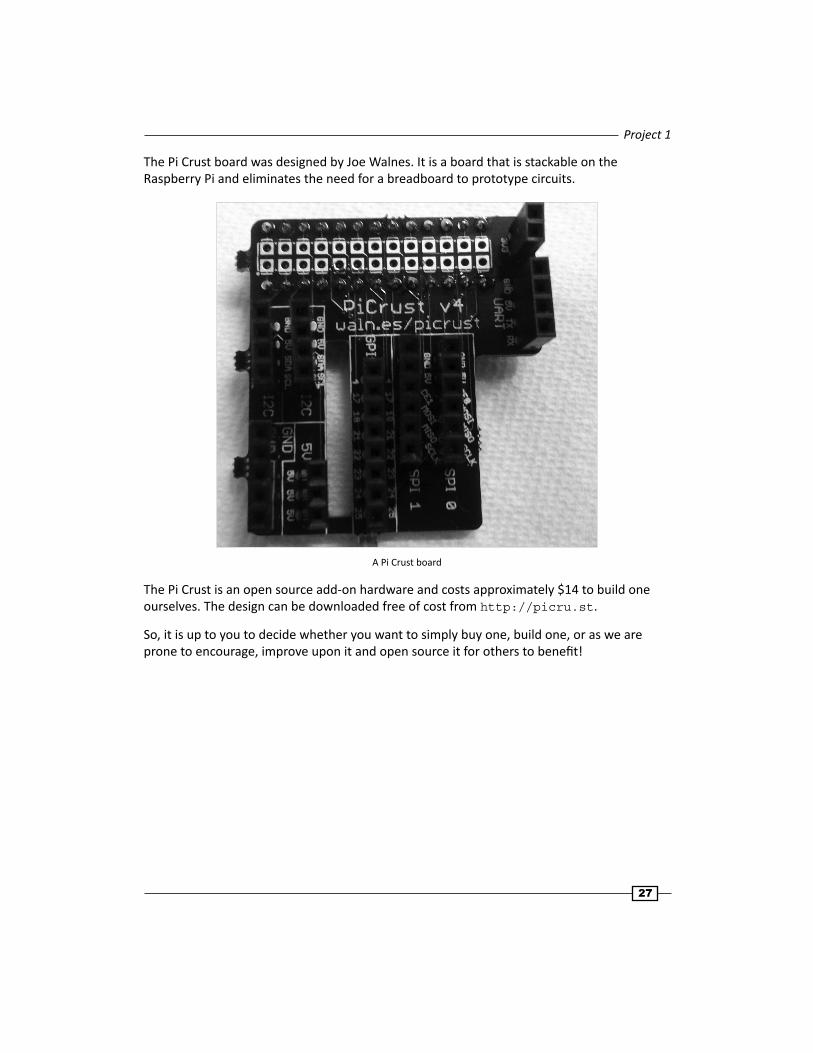
The Pi Crust board was designed by Joe Walnes. It is a board that is stackable on the Raspberry Pi and eliminates the need for a breadboard to prototype circuits.
A Pi Crust board
The Pi Crust is an open source add-on hardware and costs approximately $14 to build one ourselves. The design can be downloaded free of cost from http://picru.st.
So, it is up to you to decide whether you want to simply buy one, build one, or as we are prone to encourage, improve upon it and open source it for others to benefi t!
Hello World
28
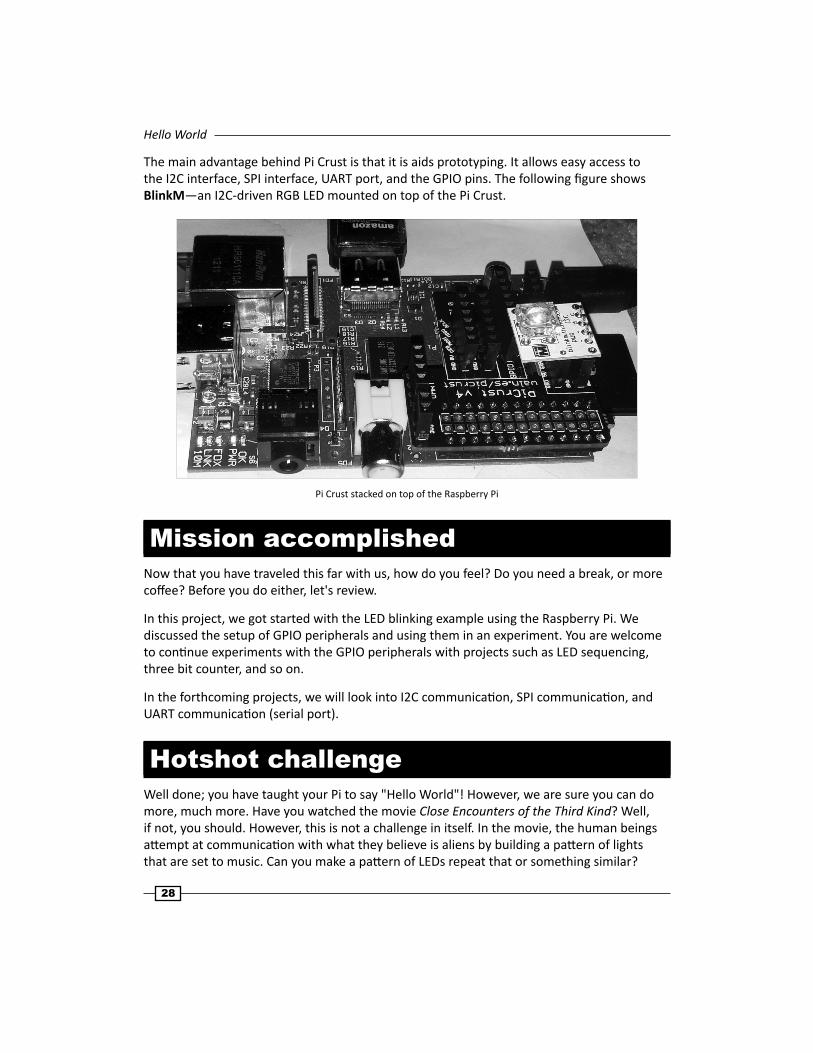
The main advantage behind Pi Crust is that it is aids prototyping. It allows easy access to the I2C interface, SPI interface, UART port, and the GPIO pins. The following fi gure shows BlinkM—an I2C-driven RGB LED mounted on top of the Pi Crust.
Pi Crust stacked on top of the Raspberry Pi
Mission accomplishedNow that you have traveled this far with us, how do you feel? Do you need a break, or more coff ee? Before you do either, let's review.
In this project, we got started with the LED blinking example using the Raspberry Pi. We discussed the setup of GPIO peripherals and using them in an experiment. You are welcome to conti nue experiments with the GPIO peripherals with projects such as LED sequencing, three bit counter, and so on.
In the forthcoming projects, we will look into I2C communicati on, SPI communicati on, and UART communicati on (serial port).
Hotshot challengeWell done; you have taught your Pi to say "Hello World"! However, we are sure you can do more, much more. Have you watched the movie Close Encounters of the Third Kind? Well, if not, you should. However, this is not a challenge in itself. In the movie, the human beings att empt at communicati on with what they believe is aliens by building a patt ern of lights that are set to music. Can you make a patt ern of LEDs repeat that or something similar?
Where to buy this book You can buy Raspberry Pi Mechatronics Projects HOTSH T from the Packt Publishing website. Alternatively, you can buy the book from Amazon, BN.com, Computer Manuals and most internet book retailers.
Click here for ordering and shipping details.
www.PacktPub.com
Stay Connected:
Get more information Raspberry Pi Mechatronics Projects HOTSH T