raised bed handbook - buckeye tractor co
TRANSCRIPT

RAISED-BED HANDBOOK
Outlined bed shaping principles apply to any scale of application. Regarding tractors and equipment, most
references are given to smaller-scale operations, typically with one-row or two-row equipment.

A ONE-PAGE REVIEW TO START QUICK
1) Bed shapers can be used with different soil-working strategies in different soils for the finest seedbed. Form beds before planting in seedbed soil. Form beds early for early planting or to avoid excessive tillage before bedding.
2) To form beds in loose seedbed soil, prepare field with conventional primary and secondary tillage equipment. Till deep enough for the bed height. Work-in field residue after harvest for most decomposition. If this did not occur, cut-up and work-in residue more, if needed. Field should be clean with no residue before bed shaping. This method is most common.
3) To form primary beds, prepare field with primary tillage to loosen soil and cut-up and work-in residue. Primary bedding helps bury residue. Field should basically appear clean after primary bedding. Bed height should be sufficient to allow for settling with time and weather.
4) Finish primary beds before planting with bed shapers equipped with tillage attachments. Tilling and leveling bed tops produces a fine seedbed. Additional soil should not be cut out of the furrows.
5) Sub-surface drip tape can be applied with the bed shaper. Various common irrigation, fertilizing and weed control methods are compatible with beds and bed shapers.
6) Be practical about bed height since higher is not necessarily better. Balance bed height with tractor size and/or tillage capabilities. If looking for a suggestion, a 6-in bed height is very practical and functional in North American climates. Consider a 4-in bed height for smaller tractors, which has less demand on tillage depth. Tractor power requirement most influences bed height, or vise versa. Hint: If tillage depth is insufficient with a higher bed and time is short, change to a lower bed and plan for a higher bed later. Then consider appropriate tractor power, the bed shaper, tillage equipment or primary bedding methods for more bed height.
7) Set bed shaper center-to-center width the same as tractor wheel track width. When forming beds in the field, bed row spacing is also typically the same as the tractor wheel track. Bed row spacing less bed top equals the furrow width. Furrow width need only be wide enough for tractor wheels or can be wider for people walking in the furrows. Wide or narrow furrows can provide various different benefits.
8) The bed top is usually equal-to or less-than the width in-between the tractor tires. Set the bed top at an appropriate width for planned row spacing(s). For most efficiency, coordinate different row spacings with one bed size. Many common crops are planted in one or two rows per bed. For multiple crop rows, be sure outside rows are not too close to the bed corner. A particular bed top width may be needed for plastic mulch.
Further reading will reveal many more common or not-so-common ideas and methods.
2
BEDDING IN DIFFERENT SOILS Use raised beds in nearly any soil. Soil preparation methods before, during or after bed shaping can vary since different soils can be appropriately managed for the finest seedbed. Shaping may be done after conventional tillage to prepare the seedbed. Or shaping may be done earlier with soil-working attachments integrated with bed shapers.
Sandy soil offers natural drainage properties, easy workability and a friendly environment for plant growth. More-blended soils with organics also have nutritional benefits. Soils with moderate amounts of clay are very common and more-particular tillage preparation may be preferred, compared to sand. Heavy clay soil still offers a more difficult growing environment, but principally benefits from raise beds. All-organic (muck) soil is highly unique, or difficult, to work with, depending on perspective. This soil is generally avoided for raised beds and this handbook does not fully cover it.
Growers often take advantage of soils that are conventionally easiest to grow specialty crops in. Raised beds do not necessarily equalize soil types, but the benefits of moisture control are universal, providing significant management controls across many soils.
Assuming any soil (except muck) is prepared to seedbed condition, tilled the proper depth for the bed height and dry, it flows and forms equally well for bed shaping. In reality, management of soil moisture in different soils primarily influences bedding practices to cultivate the finest seedbed – and at the preferred time. Demands on tractor power, tillage equipment and timing are relative to soil type. Lighter soils are generally tillable with more moisture and more tolerant to error. Heavier soils often require more tillage work, power or patience. Avoiding late or excessive tillage is important to plant on time. Soil management and moisture control is essential for early planting. In contrast, “late” planting allows much more flexibility for tillage.
Skillful tillage is timeless in agriculture. Consult local agricultural services if needed for personal assistance. Advice from other growers or direction from previous generations is priceless. In general, tillage in wet conditions is easily pointless, likely increasing compaction or making clods. Primary tillage loosens soil to sufficient depth for the bed height. Secondary tillage prepares the seedbed on top and does not till deep. Moist soil is generally best for any tillage to shatter clods, fracture hard soil or ease penetration. Patience with skillful field work is essential. Basic tillage know-how is further reviewed in this handbook.
Several bed shaping methods allow working with different soils or different conditions. Bed shaping after conventional seedbed preparation is basically an extra step before planting. This is sufficient and “quick” for new raised-bed users and best takes advantage of conventional equipment and tillage know-how. Other methods feature bed shaping earlier for less overall field work. Early bedding cuts furrows without excessive tillage and avoids turning wet, chunky soil out of the furrow into the seedbed at planting time. This is a particular benefit with higher beds (hint, deeper furrows) or in moderate soils with some clay, since moving a lot of soil for bed shaping can conflict with appropriate handling of the soil (moisture management). High soil displacement may matter less in sand but can make a cloddy mess in heavier soils. Early bed
3
shaping allows soil to mellow naturally. These “primary” beds are usually “finished” with bed shapers equipped for tilling the beds as well as shaping into final form. Less field work allows early planting as well.
Bed height and tractor power are relative. Higher beds generally require more tractor power for bed shaping or the tillage before it. Besides the soil moisture management benefits covered above, early bedding methods can require less tractor power. This can be a particular advantage for forming higher beds or using smaller tractors.
BED SHAPING METHODS
Several common or practical bed shaping methods allow forming the best seedbed in different types of soil. These also provide solutions for efficient use of time and equipment.
“Quick” bed shaping in loose seedbed soil: Quick-bedding is done after conventional primary and secondary tillage, which is easy and popular (Fig. 1). Growers using bed shapers for the first time tend to practice this for simplicity or by default to follow bedding methods from sandy or dry regions like Florida or California. This method is “quick” since more effort is put into field preparation and the bed shaping effort is minimal.
Till soil deep enough for the bed height. In soil not tilled deep enough, bed shapers can pull hard or turn wet, chunky soil out of the furrow into the seedbed. If tractor power is sufficient, use the power for appropriate tillage rather than forcing the bedder through hard soil. However, turning unfit soil into the seedbed may not be a problem in lighter, easy-working soils.
In practice, quick-bedding has the best results in lighter, easy-working soils, especially with higher beds. Other bedding methods make bed shaping and soil conditioning easier, require less tractor power and/or reduce spring tillage work, notably in heavier soils.
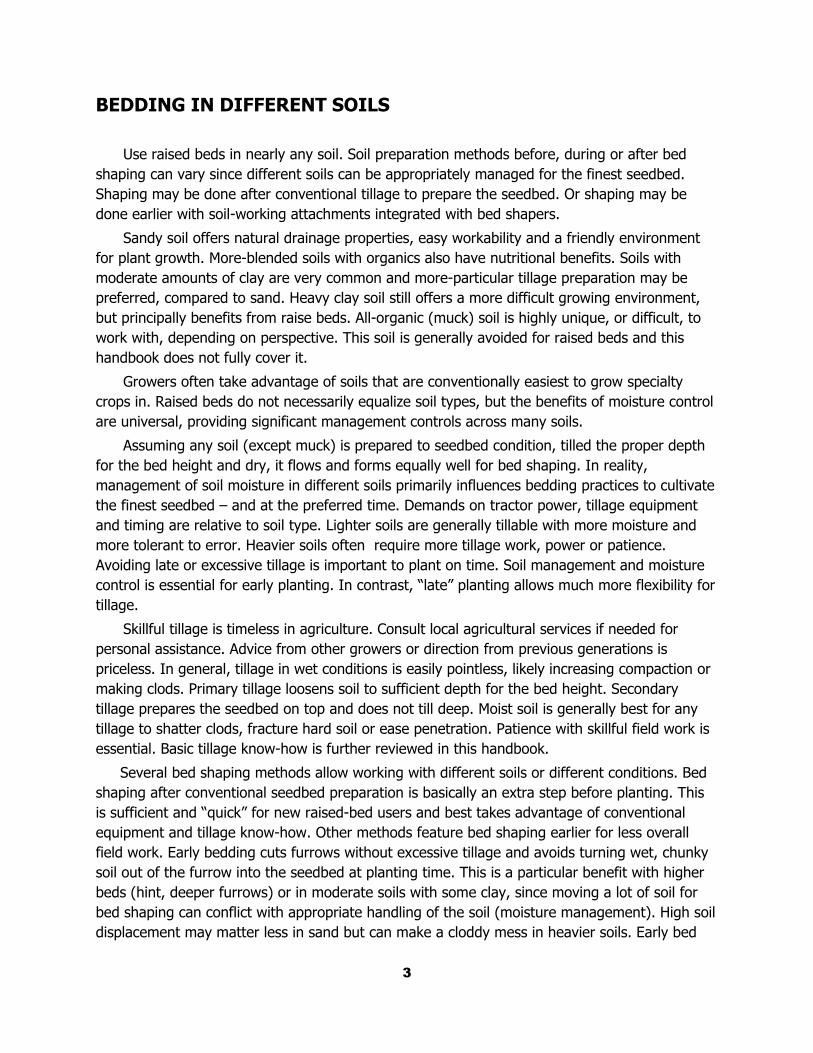
One-pass bed shaping: Form quick-beds in one field pass, which should be finished, firm and ready to plant (Fig. 1). One-pass bedding is necessary for machines that form beds and lay plastic mulch at the same time. And the proliferation of bedder-layer combination machines has made one-pass bedding rather common. For bedders and layers operated separately, other methods are available for various benefits.
FIG. 1
Two-pass bed shaping: First “rough-in” furrows then fully form beds with the second pass. This may be preferred for easier bed lay-out and/or faster tractor speeds. For any bed size, a smaller tractor can be used relative to one-pass bedding. These are benefits traded with the second field pass.
Some operators simply feel free to “re-bed” a second time for the best finish. But be sure hard soil below insufficient tillage depth does not prevent the bed shaper from operating properly.
4

Bed shaping with roto-tillers: Roto-tillers eliminate clods and/or make quick work of fields when time is short and allow the use of smaller tractors for tillage work. Attention to actual tillage depth applies as with any other tool. For roto-tillage before bedding, 4-in to 6-in beds are often most practical to avoid cutting below tillage depth. Roto-tillage after bedding tills bed tops of any bed height, which can offset soil conditioning problems with forming higher beds. The tiller gearbox can fit into the bed furrow. Finally, if the tiller cost is justified and provides satisfactory results, less attention may be paid, to a degree, to other field equipment, other field preparation methods and moisture management in general.
Primary bed shaping: This is also known as pre-bedding, disk bedding, fall bedding or roughing-in beds. As with roughing-in beds for two-pass quick-bedding, primary bedding “starts” beds in the field. Bed shapers for primary bedding move more soil more aggressively for efficiency. Primary bedding specifically refers to forming “rough” beds in soil not ready plant and is usually performed after primary tillage. Soil does not need to be dry. Primary bedders usually “scour” like plows. Work-in residue more if needed. This type of bed is intended to mellow and weather with the season and/or be finished later with a bed shaper equipped for bed finishing (Fig. 2).
FIG. 2
Moisture management and appropriate timing and tillage practices are integral parts of primary bedding, which is particularly useful in medium and heavier soils or to minimize tillage in any soil. This method allow quality specialty crops to be effectively and progressively grown in other soil types.
Fall bed shaping: In northern climates (in North America), the fall season is an ideal time for primary bedding. Winter freeze-out releases soil compaction. Come spring, new compaction is limited to the furrows since beds are already started - an ideal traffic control system. Bed tops dry quicker than flat fields. Significantly reduce spring tillage and plant earlier. Assuming these beds will be finished with a finishing bedder, fall beds should be made higher for mellowing and settling over winter. This avoids turning wet soil out of the furrows with the finishing bedder before planting.
Bed finishing: Also know as secondary bed shaping, finishing bedders essentially till and shape primary beds into final form (Fig. 3). Beds can be ready to plant with minimal and earlier field work in the spring. Note that traditional tillage tools may not be needed with this bedding method since secondary tillage attachments to finish the seedbed is integrated with the bedder.
FIG. 3
5
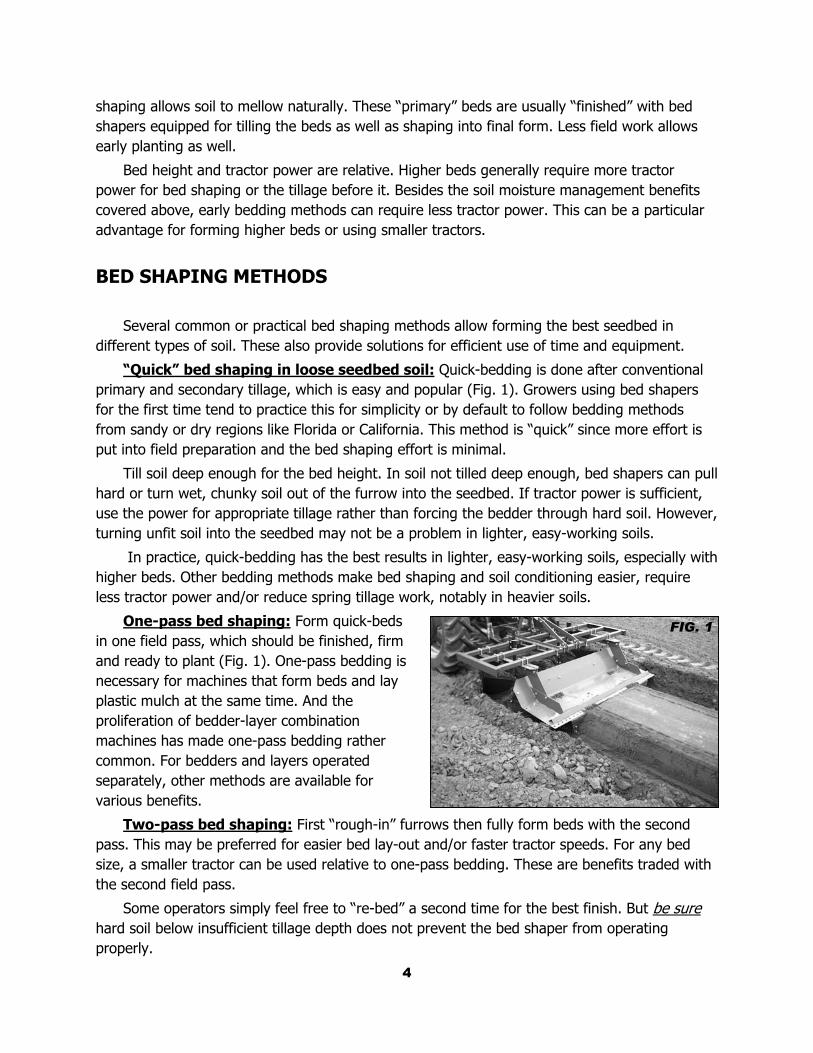
Bed cultivating and re-shaping: Finished beds made farther in advance of planting can crust over after rain and start weeds. Simply use the same finishing bedder to re-till and re-finish the beds (Fig. 4).
“Row-crop” bed shapers feature a shaper pan with a gap to allow the crop row(s) to pass through. Note that this is usually for beds without plastic mulch. Cultivate bed tops for weed control and aeration as well as re-forming the furrows. One benefit of maintaining furrow shape and a flat bed top is easier manual or mechanical harvesting.
FIG. 4
Conventional row crop cultivators or toolbars may be used with strategically placed tooling to cultivate beds. Without a pan, cultivators tend to knock down the bed corners and partly fill in the furrows, which may be acceptable. Furrow compaction can be relieved with rippers or sub-soilers. With plastic mulch on raised beds, weeds between the mulch rows can be checked with conventional weed control methods.
Perpetual beds: Beds are leveled by tilling the field with conventional equipment after harvest. If beds are used again in the same field for the next crop, bed shaping is fully redone, which is conventional practice.
With perpetual beds, special tillage equipment, essentially taking the shape of raised beds, works the bed top and furrows without fully leveling the field. This preserves bed lay-out and reduces the time and energy of repeatedly building and leveling beds. Note that this is a fully-invested bedding system with most conventional tillage equipment replaced with bed-style primary and secondary equipment. Perpetual beds also maintain bed row alignment with deep-placed irrigation lines and provide constant traffic control, which avoids any wheel compaction under the plant rows.
BED CONFIGURATIONS
After working the soil the best way, consideration bed configuration. Furrows can be arranged different ways for different alignments with tractor wheels, best use of field space or the right size for plastic mulch.
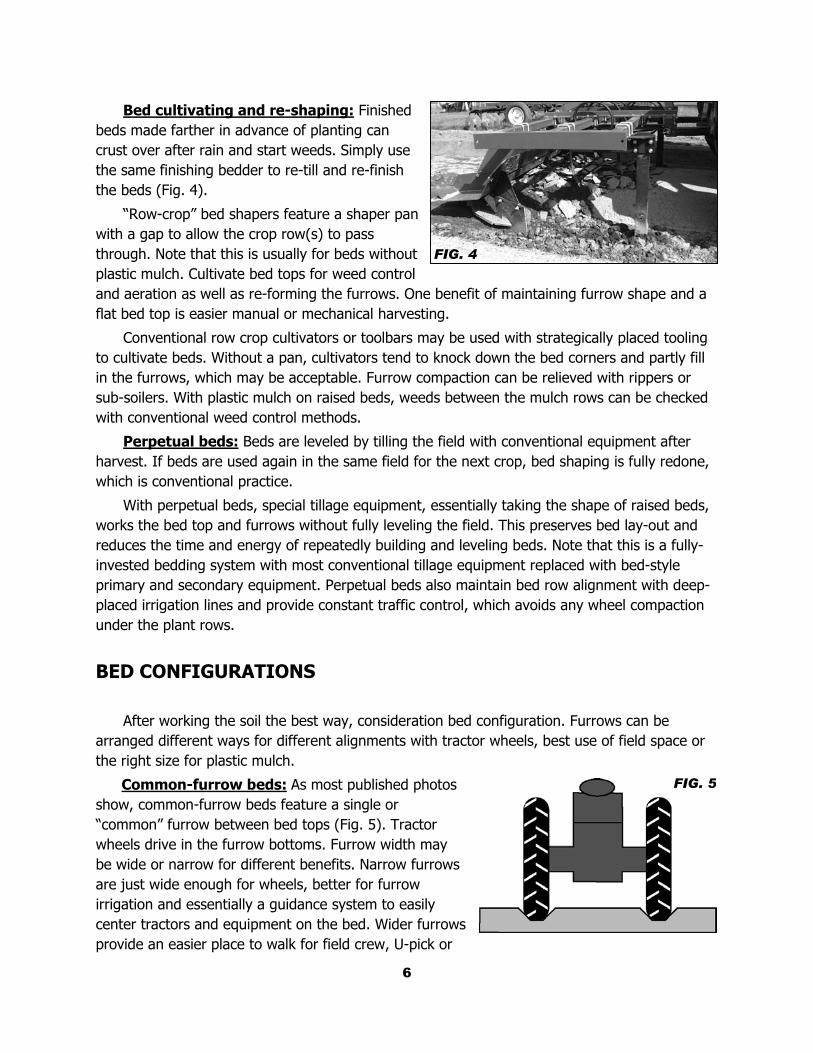
Common-furrow beds: As most published photos show, common-furrow beds feature a single or “common” furrow between bed tops (Fig. 5). Tractor wheels drive in the furrow bottoms. Furrow width may be wide or narrow for different benefits. Narrow furrows are just wide enough for wheels, better for furrow irrigation and essentially a guidance system to easily center tractors and equipment on the bed. Wider furrows provide an easier place to walk for field crew, U-pick or
FIG. 5
6
community agriculture.
With common furrows, bed top width can be maximized, which can typically be as wide as the inside of the tractor wheels. In forming each bed row, bed shapers usually form a half-furrow on each side. Successive bed rows completes each furrow. For multi-row bedders, the middle furrows are fully formed. Common-furrow beds are most common and practical for one-row, two-row and larger bedders.
Common-furrow beds and plastic mulch: Use wider furrows to “wrap” beds with plastic mulch (Fig. 6) and bury mulch in the furrow bottom, a common method that provides the most soil stability on mulch edges. Wider furrows have additional clearance for wheel clearance and mulch layers without contacting the previous mulch row.
FIG. 6
With narrow furrows, cut away the bed side and bury less deep in the furrow bottom (Fig. 7). Soil stability is still very good. Avoiding deeper furrow cuts may be a practical in heavier soils or when sufficiently loose soil for the mulch layer is not planned or expected. Covering mulch partly or fully on the bed side helps protect plastic from tractor wheels, notably if furrows are narrow. Furrows can be as narrow as possible with plastic mulch to maximize mulch coverage for weed control. See BED & MULCH CONFIGURATIONS HANDBOOK for details to coordinate bed size and mulch width.
FIG. 7
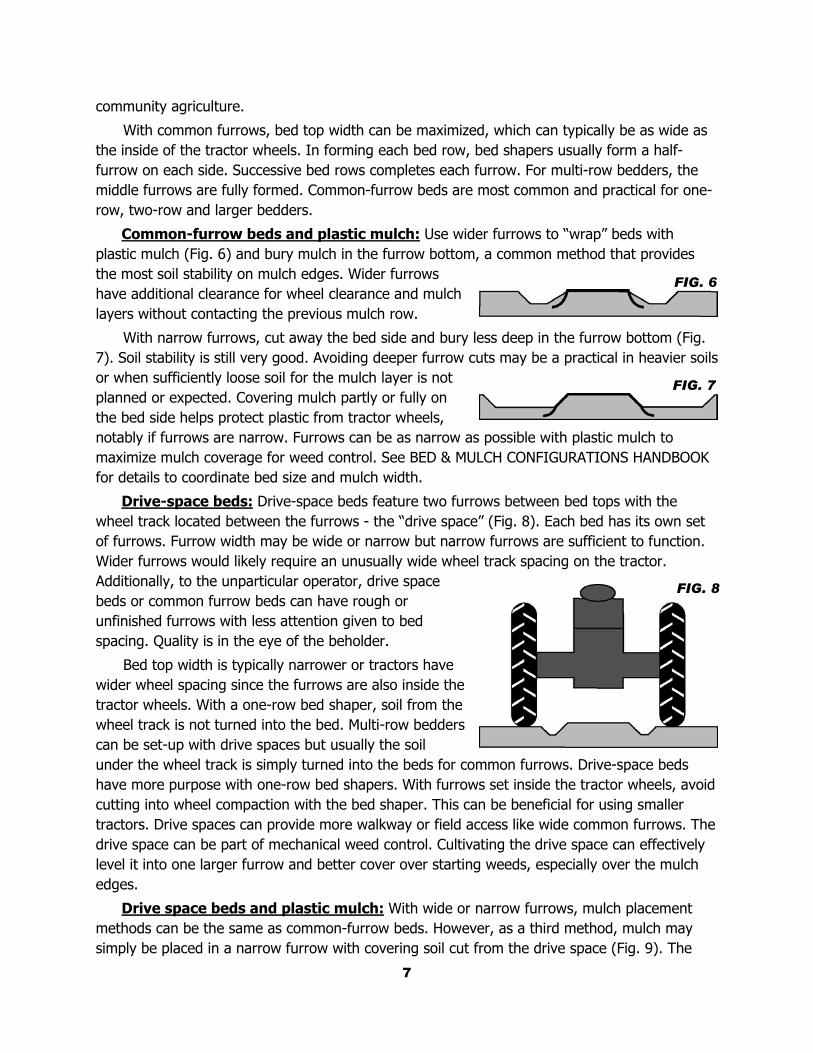
Drive-space beds: Drive-space beds feature two furrows between bed tops with the wheel track located between the furrows - the “drive space” (Fig. 8). Each bed has its own set of furrows. Furrow width may be wide or narrow but narrow furrows are sufficient to function. Wider furrows would likely require an unusually wide wheel track spacing on the tractor. Additionally, to the unparticular operator, drive space beds or common furrow beds can have rough or unfinished furrows with less attention given to bed spacing. Quality is in the eye of the beholder.
Bed top width is typically narrower or tractors have wider wheel spacing since the furrows are also inside the tractor wheels. With a one-row bed shaper, soil from the wheel track is not turned into the bed. Multi-row bedders can be set-up with drive spaces but usually the soil under the wheel track is simply turned into the beds for common furrows. Drive-space beds have more purpose with one-row bed shapers. With furrows set inside the tractor wheels, avoid cutting into wheel compaction with the bed shaper. This can be beneficial for using smaller tractors. Drive spaces can provide more walkway or field access like wide common furrows. The drive space can be part of mechanical weed control. Cultivating the drive space can effectively level it into one larger furrow and better cover over starting weeds, especially over the mulch edges.
FIG. 8
Drive space beds and plastic mulch: With wide or narrow furrows, mulch placement methods can be the same as common-furrow beds. However, as a third method, mulch may simply be placed in a narrow furrow with covering soil cut from the drive space (Fig. 9). The
7

drive space may initially need to be wider than the tractor tire to avoid cutting into wheel track compaction. Soil stability on the mulch edges is very good. Additionally, this is similar to how typical bedder-layer combination machines place plastic mulch. See BED & MULCH CONFIG-URATIONS for details to coordinate bed size and mulch width.
FIG. 9
Wide-spaced beds: Wide-spaced beds are similar to drive space-beds but have a bed row spacing wider than the tractor wheel track (see DRIVING PATTERNS below). Assuming the wheel track or furrow from the previous bed cannot be followed for the next bed, row markers may be necessary for consistent bed row spacing. In nurseries or orchards, the entire tractor may drive in the “drive space” between the beds after planting.
Use one-row bed shapers. Since neither furrows nor wheel tracks are connected, furrows can be aligned with or set inside the tractor wheels.
Wide-spaced beds and plastic mulch: Plastic mulch use is uncommon for this bed configuration. But any mulch laying methods for common-furrow or drive-space beds may be used. See BED & MULCH CONFIGURATIONS for details to coordinate bed size and mulch width.
Further consideration can be given to bed configuration with the following review of tractor driving patterns and matching bed shapers with tractors.
TRACTOR DRIVING PATTERNS & TRACTOR WHEEL SPACING
Bed shapers forming three, four, five, six or eight beds are often used with row markers to properly mate or space the furrows formed on the end of the machine, which extend beyond the tractor wheels. For forming one or two beds, different driving patterns are possible since the “end” furrows on the bed shaper are also behind the tractor wheels.
FIG. 10
Conventional methods: With drive-space beds, the tractor driving pattern is simple. Follow the wheel track from the previous bed row (Fig, 10) and form bed rows consecutively (Fig. 11). The wheel track remains in the drive space since the soil behind the wheels is not turned into the bed. Bed spacing matches wheel track width.
FIG. 11
Driving outside the wheel track, or wide-space beds, may require row markers for accurate bed row spacing (Fig. 12). Contrary to these configuration definitions, driving inside the wheel track can remove soil from behind the tractor wheels, depending on bed shaper settings. This intentional or unintentional “overlapping” practice may result in unnecessary complications, which
8
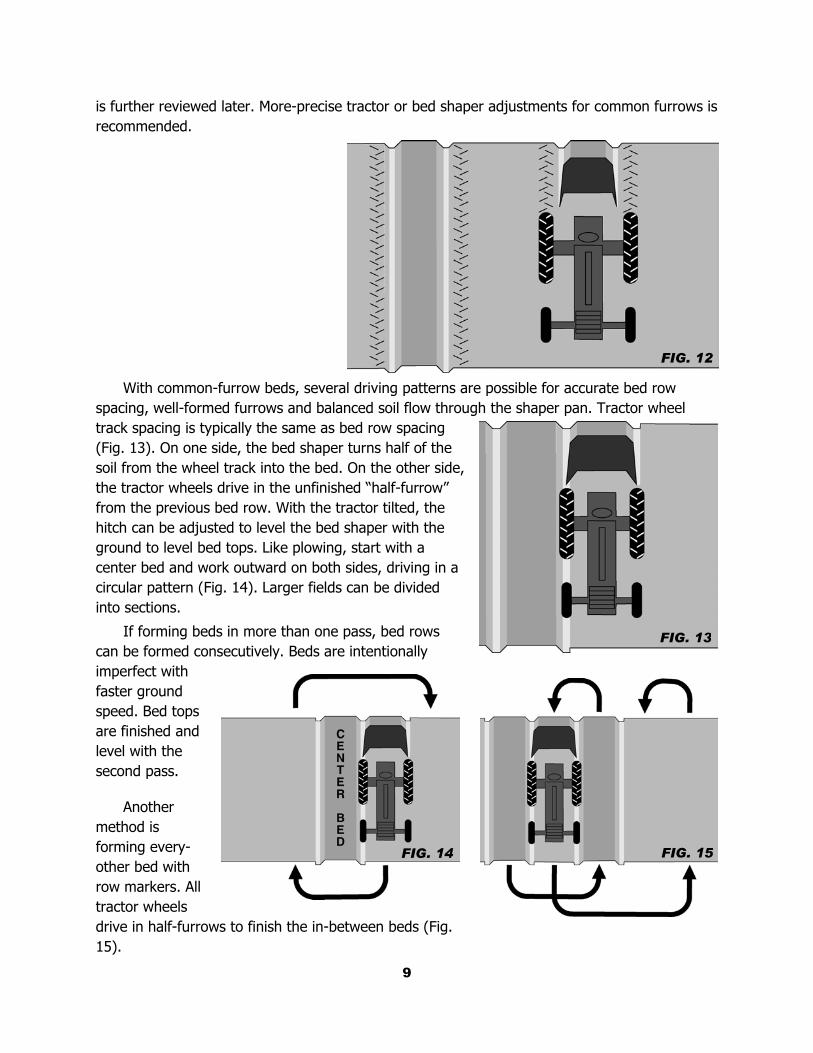
is further reviewed later. More-precise tractor or bed shaper adjustments for common furrows is recommended.
FIG. 12
With common-furrow beds, several driving patterns are possible for accurate bed row spacing, well-formed furrows and balanced soil flow through the shaper pan. Tractor wheel track spacing is typically the same as bed row spacing (Fig. 13). On one side, the bed shaper turns half of the soil from the wheel track into the bed. On the other side, the tractor wheels drive in the unfinished “half-furrow” from the previous bed row. With the tractor tilted, the hitch can be adjusted to level the bed shaper with the ground to level bed tops. Like plowing, start with a center bed and work outward on both sides, driving in a circular pattern (Fig. 14). Larger fields can be divided into sections.
FIG. 13 If forming beds in more than one pass, bed rows can be formed consecutively. Beds are intentionally imperfect with faster ground speed. Bed tops are finished and level with the second pass.
Another method is forming every-other bed with row markers. All tractor wheels drive in half-furrows to finish the in-between beds (Fig. 15).
FIG. 14 FIG. 15
9

These methods also apply to primary bedding, though the main objective is usually only accurate bed row spacing. Beds can be formed consecutively. Adjusting the hitch for level tops is not necessary since primary beds are usually rough or rounded on appearance.
Tractors pulling bed shapers that finish primary beds simply drive in common-furrows already formed or in drive-spaces, depending on the configuration.
“Over-wide” bed shapers: Cut wider furrows to turn all soil behind tractor wheels into the bed (Fig. 16). This allows all tractor wheels to drive on flat-land for forming common-furrow beds consecutively. Principally, the tractor wheel track width is narrower than the bed row spacing. The bed shaper is set for wide furrows to cut to the outside of the tractor wheels. The bed top width is less than the inside of the tractor wheels to allow the tractor to drive over the beds.
FIG. 16
Smaller tractors, possibly with non-adjustable wheels, can form a wider bed this way. Be sure tractor has sufficient power for the bed size. If the bed top is wider that the inside of the tractor wheels, the tractor cannot drive over the beds. This may not matter on smaller farms if further field work is done by manual labor.
FIG. 17
To avoid bed rows formed too wide, the tractor wheels can be narrowed for bed shaping and re-adjusted for driving over the beds to lay mulch, plant, etc. Larger farms with more tractors can dedicate a tractor with narrow wheel spacing for bed shaping.
“Overlapping” bed furrows: This is an intentional or unintentional effort to form closer bed rows with a wider tractor wheel spacing (Fig. 17). If narrowing the wheels or widening the bed shaper is not possible, be sure the tractor does not track on the other bed or contact plastic mulch, if used. Driving on buried mulch edges will likely make it harder to remove. Additionally, beds may not properly fill or the bed shaper may side-draft due to noticeably unbalanced soil flow into the shaper pan. Ironically, problems may not be apparent should an overly-large tractor be used.
FIG. 18
“Overlapping” with an “over-wide” bed shaper can again space bed rows to match tractor wheel spacing (Fig. 18). One side if the tractor drives in the furrow of the previous bed row. This is not wrong, provide the bed shaper fills the bed properly and does not side-draft.
10
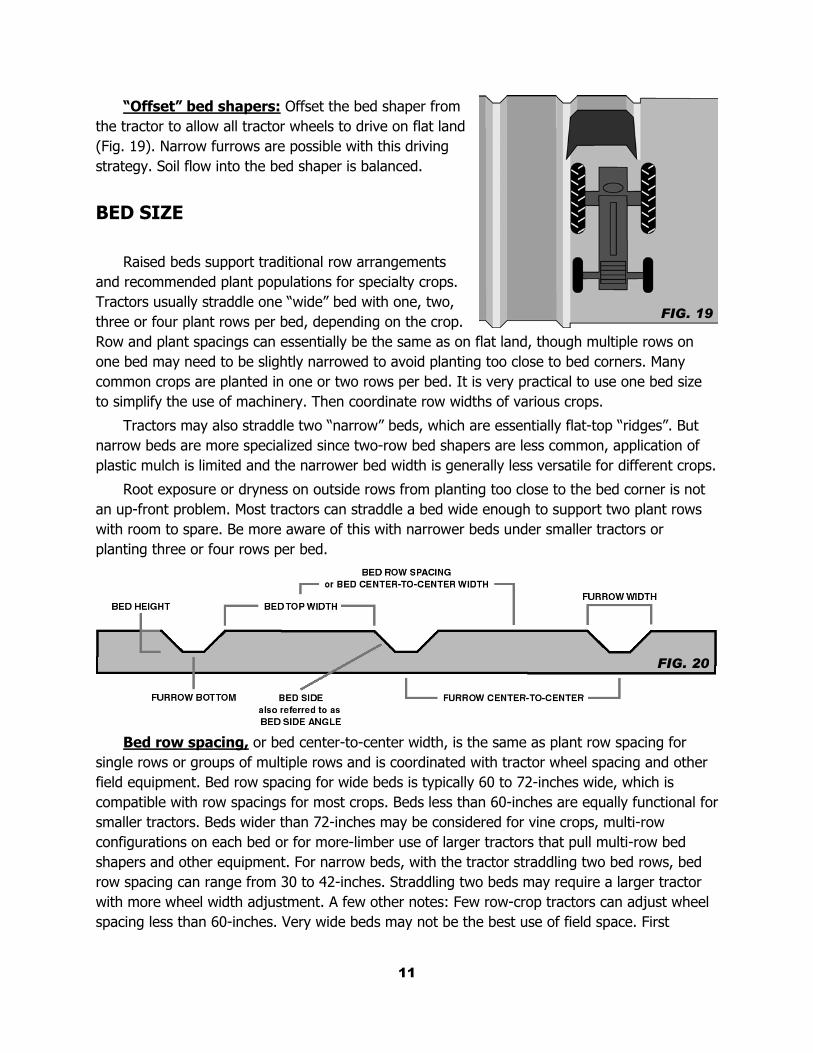
“Offset” bed shapers: Offset the bed shaper from the tractor to allow all tractor wheels to drive on flat land (Fig. 19). Narrow furrows are possible with this driving strategy. Soil flow into the bed shaper is balanced.
BED SIZE
Raised beds support traditional row arrangements and recommended plant populations for specialty crops. Tractors usually straddle one “wide” bed with one, two, three or four plant rows per bed, depending on the crop. Row and plant spacings can essentially be the same as on flat land, though multiple rows on one bed may need to be slightly narrowed to avoid planting too close to bed corners. Many common crops are planted in one or two rows per bed. It is very practical to use one bed size to simplify the use of machinery. Then coordinate row widths of various crops.
FIG. 19
Tractors may also straddle two “narrow” beds, which are essentially flat-top “ridges”. But narrow beds are more specialized since two-row bed shapers are less common, application of plastic mulch is limited and the narrower bed width is generally less versatile for different crops.
Root exposure or dryness on outside rows from planting too close to the bed corner is not an up-front problem. Most tractors can straddle a bed wide enough to support two plant rows with room to spare. Be more aware of this with narrower beds under smaller tractors or planting three or four rows per bed.
FIG. 20
Bed row spacing, or bed center-to-center width, is the same as plant row spacing for single rows or groups of multiple rows and is coordinated with tractor wheel spacing and other field equipment. Bed row spacing for wide beds is typically 60 to 72-inches wide, which is compatible with row spacings for most crops. Beds less than 60-inches are equally functional for smaller tractors. Beds wider than 72-inches may be considered for vine crops, multi-row configurations on each bed or for more-limber use of larger tractors that pull multi-row bed shapers and other equipment. For narrow beds, with the tractor straddling two bed rows, bed row spacing can range from 30 to 42-inches. Straddling two beds may require a larger tractor with more wheel width adjustment. A few other notes: Few row-crop tractors can adjust wheel spacing less than 60-inches. Very wide beds may not be the best use of field space. First
11
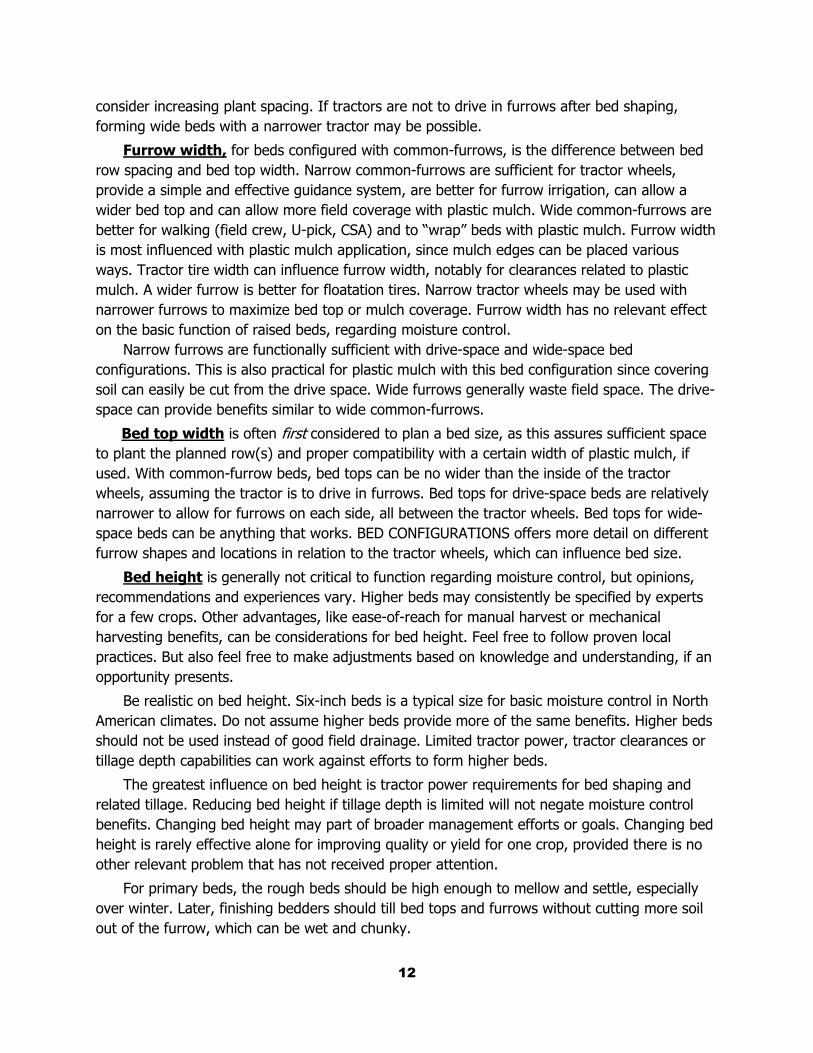
consider increasing plant spacing. If tractors are not to drive in furrows after bed shaping, forming wide beds with a narrower tractor may be possible.
Furrow width, for beds configured with common-furrows, is the difference between bed row spacing and bed top width. Narrow common-furrows are sufficient for tractor wheels, provide a simple and effective guidance system, are better for furrow irrigation, can allow a wider bed top and can allow more field coverage with plastic mulch. Wide common-furrows are better for walking (field crew, U-pick, CSA) and to “wrap” beds with plastic mulch. Furrow width is most influenced with plastic mulch application, since mulch edges can be placed various ways. Tractor tire width can influence furrow width, notably for clearances related to plastic mulch. A wider furrow is better for floatation tires. Narrow tractor wheels may be used with narrower furrows to maximize bed top or mulch coverage. Furrow width has no relevant effect on the basic function of raised beds, regarding moisture control. Narrow furrows are functionally sufficient with drive-space and wide-space bed configurations. This is also practical for plastic mulch with this bed configuration since covering soil can easily be cut from the drive space. Wide furrows generally waste field space. The drive-space can provide benefits similar to wide common-furrows.
Bed top width is often first considered to plan a bed size, as this assures sufficient space to plant the planned row(s) and proper compatibility with a certain width of plastic mulch, if used. With common-furrow beds, bed tops can be no wider than the inside of the tractor wheels, assuming the tractor is to drive in furrows. Bed tops for drive-space beds are relatively narrower to allow for furrows on each side, all between the tractor wheels. Bed tops for wide-space beds can be anything that works. BED CONFIGURATIONS offers more detail on different furrow shapes and locations in relation to the tractor wheels, which can influence bed size.
Bed height is generally not critical to function regarding moisture control, but opinions, recommendations and experiences vary. Higher beds may consistently be specified by experts for a few crops. Other advantages, like ease-of-reach for manual harvest or mechanical harvesting benefits, can be considerations for bed height. Feel free to follow proven local practices. But also feel free to make adjustments based on knowledge and understanding, if an opportunity presents.
Be realistic on bed height. Six-inch beds is a typical size for basic moisture control in North American climates. Do not assume higher beds provide more of the same benefits. Higher beds should not be used instead of good field drainage. Limited tractor power, tractor clearances or tillage depth capabilities can work against efforts to form higher beds.
The greatest influence on bed height is tractor power requirements for bed shaping and related tillage. Reducing bed height if tillage depth is limited will not negate moisture control benefits. Changing bed height may part of broader management efforts or goals. Changing bed height is rarely effective alone for improving quality or yield for one crop, provided there is no other relevant problem that has not received proper attention.
For primary beds, the rough beds should be high enough to mellow and settle, especially over winter. Later, finishing bedders should till bed tops and furrows without cutting more soil out of the furrow, which can be wet and chunky.
12

Bed side angle is usually only relevant to maximize bed top width and/or adjusting furrow width to apply plastic mulch. It is not otherwise critical to function.
Bed side angle should not be so straight to let soil fall down, which reduces the bed top. This error can cause confusion with mulch layer adjustments or inconsistent layer operation. A 45-degree bed side is functional and universal for raised bed without plastic mulch. Many soils will temporarily hold up to 60-degrees, which is acceptable if applying plastic mulch immediately afterward. Soil that holds straighter bed sides is highly dependent on soil type and moisture.
BED-LAYOUT FOR FIELD DRAINAGE & EROSION CONTROL
As bed tops are “moisture control zones” to allow soil around plants to dry first, bed furrows are basically surface drainage between plant rows to drain excess water, preventing water-logged soil as much as possible. Furrows offer protection from the potential of too much rain, if even once during the growing season, since many specialty crops are sensitive to standing in soil that is too wet for too long.
Avoid standing water in the furrows by allowing furrows to drain at the end of bed rows. In most North American climates, for most crops, a modest bed height is best with appropriate field drainage. Even with raised beds, basic field drainage problems will continue. Attempting to use higher beds to keeps crops “high and dry” from standing water requires a bed shaping effort that would likely be better spent utilizing timeless and proven surface drainage solutions.
Bed rows can simply be laid-out straight and square in flat fields with furrows drained at the end of the field. Water can simply drain to the low end of a sloping field. Break bed rows, if necessary, to allow water to drain through troughs. Field drainage features can usually be observed with the naked eye if water flow in a familiar or unfamiliar field is not already known. If necessary, use a transit. Take advantage of nearby ditches or creeks.
Surface drainage can be added with planers, graders or ditchers, which are low-tech solutions growers can do on their own. Shorten or break bed rows or sub-divide fields to add troughs or channels. Note that limiting row length and organizing rows may also be better for planting, irrigation or harvesting logistics. Proper use of the plow is a traditional method for basic surface drainage. Land-leveling eliminates water-holding pockets. Lazer-planing is a high-tech field planing solution that is becoming more popular. Tiling is effective sub-surface drainage and may not remove surface water quick enough.
Use raised beds with local erosion control efforts. Waterways can be grassed. Bed furrows can be mowed instead of cultivated to allow a “carpet” to form, which may be most beneficial with the use of plastic mulch.. Water can drain into a catch basin, which can also be used for irrigation. Beds can be angled or laid-out in different directions to take advantage of natural drainage features or for erosion control. Diking is very compatible with bed furrows to slow or prevent too much water run-off.
Use beds on the contour, but be sure water can drain where needed. Bed shapers, as with mulch layers and other equipment, usually need to be adjusted to compensate for effects from hillside sliding, often resulting in one-way operation.
13
Use cover crops on flat-land then till-in before bed shaping. However, these steps necessitate more conventional tillage, which can conflict with early planting. Cover cropping primary beds would be ideal, but equipment and experience is currently limited for both the proper application of cover crop and for effectively tilling and finishing beds for planting. However, growers currently find some predictability and satisfaction in cover-cropping a more finished bed then roto-tilling the bed top before planting.
No-till for vegetables has some interest and is an idea in-the-making. Different field equipment is necessary for some form of reduced tillage with raised-beds. Common bed shapers, mulch layers and transplanters are simply not equipped to work with field residue. Otherwise, residue and cover crops must be worked in thoroughly. Work-in crop residue early for the most residue decomposition to avoid plugging most specialty equipment.
In practice, proper field drainage and erosion control are separate strategies from raised beds, but requires integration. Field drainage improvements can be based on its own merit with its own timetable to avoid pointless standing water and to maximize benefits of raised beds. Like irrigation, field drainage is another tool to reduce natural risks.
BED SHAPERS
If one bed shaper was universal, soil would always be dry and loose. But since moisture and tillage are subject to reality, bed shaping is integral with soil management and tillage practices for the finest seedbed. Soil type and tillage equipment are basic considerations for using bed shapers effectively.
Bed shapers may be equipped for bedding in loose seedbed soil, primary bedding, finishing primary beds or bed cultivating and reshaping. Models may be specialized or perform more than one function. One bed shaper is commonly used for simple bed shaping in loose seedbed soil. One or more bed shapers may be used for integrated bedding and tillage.
A common sled-type shaper pan, or press pan, features a fixed flat plate in which soil flows underneath. A flat-top bed is leveled and pressed with a specific bed height, bed width and bed row spacing. A crowned pan may be preferred, but not required, for possible benefits when used with plastic mulch. Bed shapers for cultivating and reshaping can feature a shaper pan with a gap for crop row(s) to pass through. Typically, the shaper pan provides depth control for consistent beds height and to avoid cutting furrows below tillage depth.
A shaper pan is not essential for primary bedding. Beds formed without pans are usually rounded or rough in appearance. This is effective in wet conditions, especially with some residue. With more field preparation, seedbed quality can be finer if this is sufficient for some crops.
Attachments to fill the bed center include shaping disks and shaping wings. Furrows are typically cut with disks, furrowers or moldboards. Soil-moving features may be part of the shaper pan. A crowned pan should not be used to offset settling problems from a poorly filled bed.
14
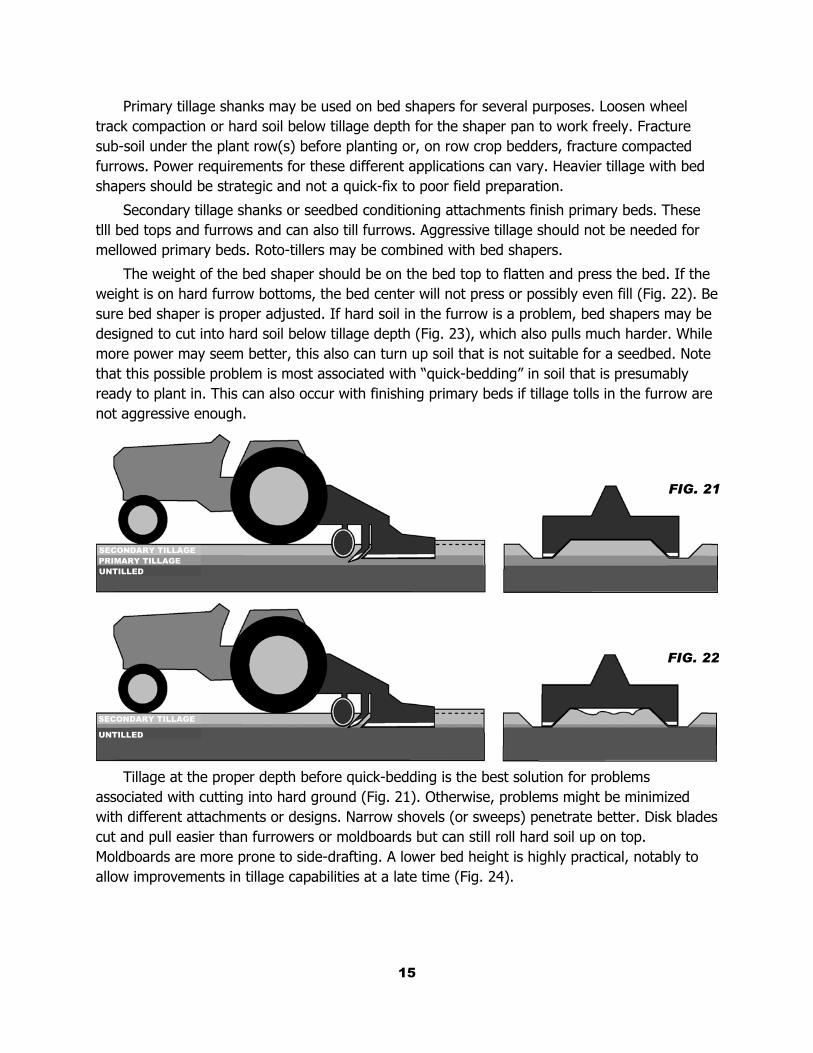
Primary tillage shanks may be used on bed shapers for several purposes. Loosen wheel track compaction or hard soil below tillage depth for the shaper pan to work freely. Fracture sub-soil under the plant row(s) before planting or, on row crop bedders, fracture compacted furrows. Power requirements for these different applications can vary. Heavier tillage with bed shapers should be strategic and not a quick-fix to poor field preparation.
Secondary tillage shanks or seedbed conditioning attachments finish primary beds. These tlll bed tops and furrows and can also till furrows. Aggressive tillage should not be needed for mellowed primary beds. Roto-tillers may be combined with bed shapers.
The weight of the bed shaper should be on the bed top to flatten and press the bed. If the weight is on hard furrow bottoms, the bed center will not press or possibly even fill (Fig. 22). Be sure bed shaper is proper adjusted. If hard soil in the furrow is a problem, bed shapers may be designed to cut into hard soil below tillage depth (Fig. 23), which also pulls much harder. While more power may seem better, this also can turn up soil that is not suitable for a seedbed. Note that this possible problem is most associated with “quick-bedding” in soil that is presumably ready to plant in. This can also occur with finishing primary beds if tillage tolls in the furrow are not aggressive enough.
FIG. 21
PRIMARY TILLAGESECONDARY TILL
D
UNTILLEFIG. 22
SECONDARY TILLAGE
AGE
D
UNTILLETillage at the proper depth before quick-bedding is the best solution for problems associated with cutting into hard ground (Fig. 21). Otherwise, problems might be minimized with different attachments or designs. Narrow shovels (or sweeps) penetrate better. Disk blades cut and pull easier than furrowers or moldboards but can still roll hard soil up on top. Moldboards are more prone to side-drafting. A lower bed height is highly practical, notably to allow improvements in tillage capabilities at a late time (Fig. 24).
15
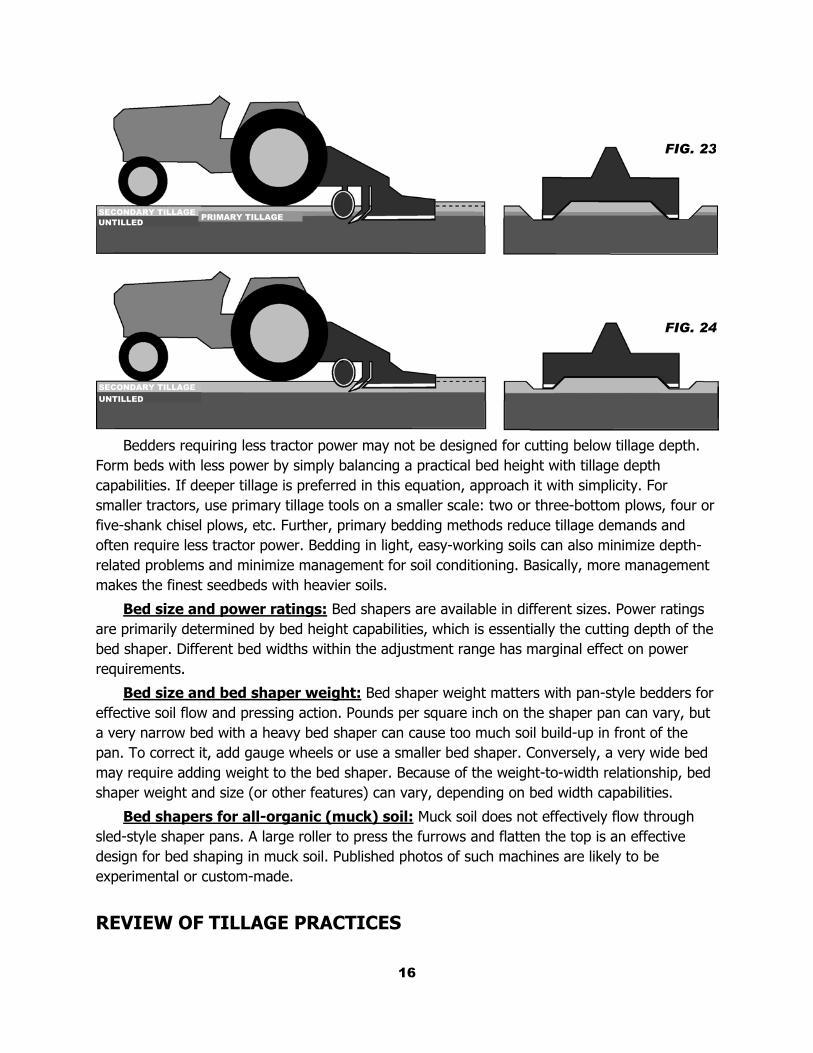
FIG. 23
D
FIG. 24
SECONDAUNTILLE
SECONDARY TILLAGE
Bedders reqForm beds withcapabilities. If dsmaller tractorsfive-shank chiseoften require lerelated problemmakes the fines
Bed size aare primarily debed shaper. Difrequirements.
Bed size aeffective soil floa very narrow bpan. To correctmay require adshaper weight a
Bed shapesled-style shapedesign for bed experimental or
REVIEW OF
PRIMARY TILLAGE
RY TILLAGE
UNTILLED
uiring less tractor power may not be designed for cutting below tillage depth. less power by simply balancing a practical bed height with tillage depth eeper tillage is preferred in this equation, approach it with simplicity. For , use primary tillage tools on a smaller scale: two or three-bottom plows, four or l plows, etc. Further, primary bedding methods reduce tillage demands and ss tractor power. Bedding in light, easy-working soils can also minimize depth-s and minimize management for soil conditioning. Basically, more management t seedbeds with heavier soils.
nd power ratings: Bed shapers are available in different sizes. Power ratings termined by bed height capabilities, which is essentially the cutting depth of the ferent bed widths within the adjustment range has marginal effect on power
nd bed shaper weight: Bed shaper weight matters with pan-style bedders for w and pressing action. Pounds per square inch on the shaper pan can vary, but ed with a heavy bed shaper can cause too much soil build-up in front of the it, add gauge wheels or use a smaller bed shaper. Conversely, a very wide bed ding weight to the bed shaper. Because of the weight-to-width relationship, bed nd size (or other features) can vary, depending on bed width capabilities.
rs for all-organic (muck) soil: Muck soil does not effectively flow through r pans. A large roller to press the furrows and flatten the top is an effective
shaping in muck soil. Published photos of such machines are likely to be custom-made.
TILLAGE PRACTICES
16

This section reviews basic tillage skills, a cornerstone for cultivated crops. Good tillage is effective and progressive for any bed shaping method. Pass this timeless knowledge to the next generation.
Primary tillage tools like plows, chisel plows and disk chisels loosen soil below the seedbed, provide greater fracturing and turnover of the topsoil and mix crop residue into soil. For growing specialty crops, this is also often necessary to loosen soil for deep-cutting equipment like bed shapers and transplanters to avoid interference with hard soil. Primary tillage depth is generally 8 to 10-inches deep.
Secondary tillage tools like cultivators, culti-mulchers, harrows, disks and roto-tillers finish the top level of soil to seedbed condition. A fine seedbed at the top level effectively closes soil and supports moisture around seeds, bare roots and root cells. Secondary tillage depth is generally 3 to 5-inches.
Secondary tillage equipment does not perform like primary tillage equipment. If using a bed shaper with no primary tillage, a bed up to four or six inches high is realistic. Primary tillage may be less demanding in light, easy-working soils, but do not assume.
Deep tillage with rippers and sub-soilers relieve compaction during the growing season. Wait for the right soil moisture to effectively shatter more soil between the shanks. If too wet, shanks only cut slots and compaction can be made worse. If too dry, tools likely pull too hard or may not penetrate the ground. These points are also relevant operating mulch lifters.
Also wait for the right soil moisture for secondary tillage. Conditions too wet form clods in soils with clay and soil re-compacts more below the seedbed, negating prior primary tillage efforts. All of these efforts are worthwhile since plant growth is remarkably better with roots in free soil. To the extreme, highly sophisticated farming practices avoid even normal wheel compaction under the plant row, notably in regions (in North America) where moisture management is more particular for tillage work.
Wet conditions with slabby soil turnover are often unavoidable for primary tillage. Soil may crumble more by waiting, if possible. Results vary with different soil types. Timing between primary and secondary tillage steps in essential to good tillage work.
On a different note, even in the right conditions, chisel plows can leave “ridges” of hard soil between shanks, which is not apparent on the surface. These ridges may become apparent with side-shifting bed shapers or mulch layers. Work the field at least once more, at a different angle from the first pass, to till the entire soil profile. Dig in the ground by hand to observe the results of each pass.
Soil type heavily influences moisture management and tillage timing. Lighter soils dry faster and till better, even in more-wet conditions. Heavier soils hold moisture longer and often till better with the right moisture conditions to best shatter the soil. More attachments on secondary tillage equipment, like packer wheels (these do not increase field compaction) and rolling baskets help break up the soil for a finer seedbed.
FIG. 25
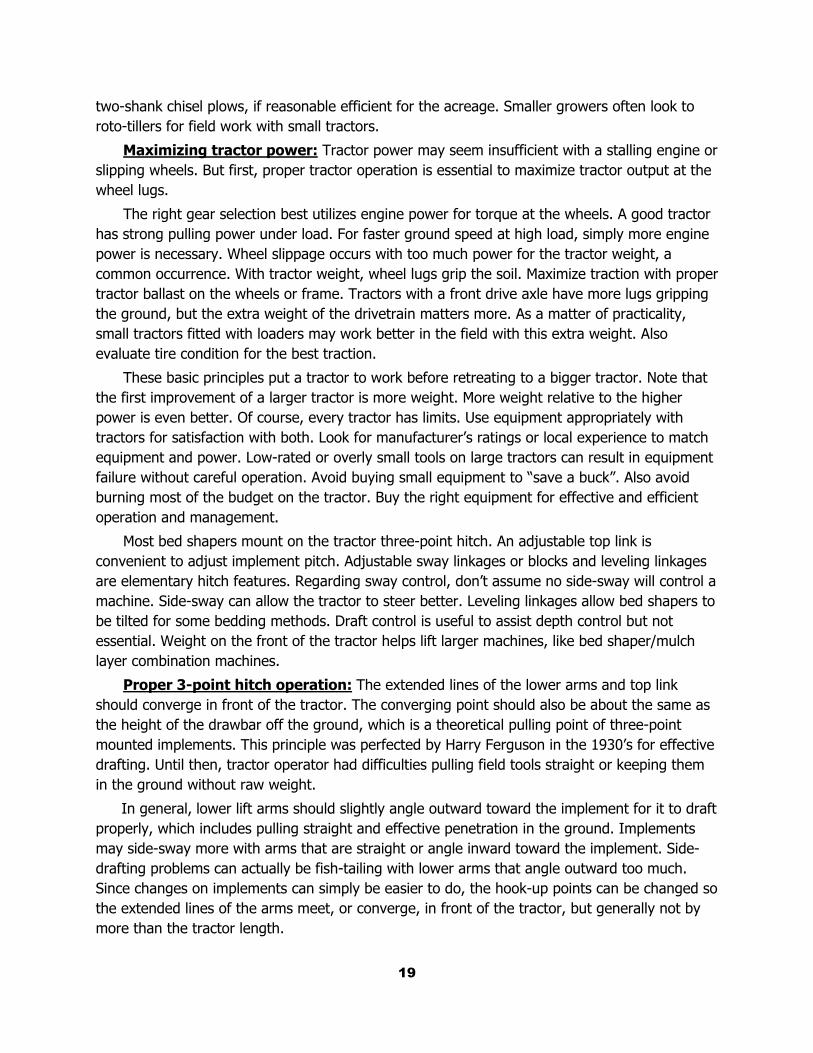
Measuring tillage depth: Measure tillage depth at the spot the shanks are in the ground and measure from the untilled ground ahead of it (Fig. 25).
17

Do not measure tilled soil behind the machine. The newly mixed state of the soil mistakenly adds to the measurement before the soil settles with time and weather. This also applies to measuring tillage depth with roto-tillers.
Perspective on no-till or reduced tillage: The ascendance of no-till or min-till in the production of grain crops initially minimized the use and presence of primary tillage equipment. Recent years have seen more interest in occasionally working the soil more. For specialty crops, regular primary tillage is as important as ever.
No-till strategy with cash grain crops principally sacrifices crop growth for considerably reduced tillage work. Ongoing experiments with equipment and crop varieties look to reduce this sacrifice. No-till also allows early planting since waiting for conventional field tillage is less needed. Specialty crop equipment today is not no-till oriented plus a cool, wet environment, typical of no-till conditions, can be hostile to fruits and vegetables. Like ridges, recently popular for growing corn in northern climates (in North America), raised beds offer solutions for early planting in a fine seedbed and a warm growth environment.
Lastly, grain farmers often intentionally or unintentionally sacrifice tillage depth in the reduced-tillage effort for wider equipment to cover more acres faster. For specialty crops, look to use more power or, more likely, narrower equipment with fewer shanks for relatively deeper tillage.
TRACTOR RECOMMENDATIONS
Tractor power requirements for bed shapers have many considerations. Start with these parameters for pulling one-row bedders. Tractors as low as 20 HP should form a typical 4-in high bed. Consider at least 30 or 35 HP for a typical 6-in high bed or at least 45 or 50 HP for a typical 8-in high bed. Less Horsepower may be needed with a tractor equipped with front-wheel-drive (FWD, MFWD, AWD, etc). Two-row bed shapers may need a little more power since three furrows are cut instead of two. Less power is generally needed for bedders designed with disks or for forming beds in more than one pass. Bedders may pull a little harder in heavier soils with more moisture. Power for three and four-row bed shapers can start at 80 HP.
Cutting into hard soil below tillage depth significantly increases power demand. How much can vary, depending on soil type, moisture and bed shaper design. At most , a tractor over 80 Horsepower should not be necessary for one-row bed shaping.
Bed shapers specially-equipped with primary tillage shanks will require more Horsepower, depending more on number of shanks and depth. Ripper shanks can require an additional 10 to 20 HP per shank. Sub-soiler shanks can require as much as 50 HP per shank.
More-typical bed shaping practices are power-friendly. Bed shaping is generally not a high-Horsepower operation, though more power may be preferred, but not essential, for field work before bedding. Look to use at least a 40 HP tractor for an effective primary tillage effort with small-scale equipment like two or three-bottom plows or three, four or five-shank chisel plows. These will perform as their wider counterparts. Smaller tractors can pull single-bottom plows or
18
two-shank chisel plows, if reasonable efficient for the acreage. Smaller growers often look to roto-tillers for field work with small tractors.
Maximizing tractor power: Tractor power may seem insufficient with a stalling engine or slipping wheels. But first, proper tractor operation is essential to maximize tractor output at the wheel lugs.
The right gear selection best utilizes engine power for torque at the wheels. A good tractor has strong pulling power under load. For faster ground speed at high load, simply more engine power is necessary. Wheel slippage occurs with too much power for the tractor weight, a common occurrence. With tractor weight, wheel lugs grip the soil. Maximize traction with proper tractor ballast on the wheels or frame. Tractors with a front drive axle have more lugs gripping the ground, but the extra weight of the drivetrain matters more. As a matter of practicality, small tractors fitted with loaders may work better in the field with this extra weight. Also evaluate tire condition for the best traction.
These basic principles put a tractor to work before retreating to a bigger tractor. Note that the first improvement of a larger tractor is more weight. More weight relative to the higher power is even better. Of course, every tractor has limits. Use equipment appropriately with tractors for satisfaction with both. Look for manufacturer’s ratings or local experience to match equipment and power. Low-rated or overly small tools on large tractors can result in equipment failure without careful operation. Avoid buying small equipment to “save a buck”. Also avoid burning most of the budget on the tractor. Buy the right equipment for effective and efficient operation and management.
Most bed shapers mount on the tractor three-point hitch. An adjustable top link is convenient to adjust implement pitch. Adjustable sway linkages or blocks and leveling linkages are elementary hitch features. Regarding sway control, don’t assume no side-sway will control a machine. Side-sway can allow the tractor to steer better. Leveling linkages allow bed shapers to be tilted for some bedding methods. Draft control is useful to assist depth control but not essential. Weight on the front of the tractor helps lift larger machines, like bed shaper/mulch layer combination machines.
Proper 3-point hitch operation: The extended lines of the lower arms and top link should converge in front of the tractor. The converging point should also be about the same as the height of the drawbar off the ground, which is a theoretical pulling point of three-point mounted implements. This principle was perfected by Harry Ferguson in the 1930’s for effective drafting. Until then, tractor operator had difficulties pulling field tools straight or keeping them in the ground without raw weight.
In general, lower lift arms should slightly angle outward toward the implement for it to draft properly, which includes pulling straight and effective penetration in the ground. Implements may side-sway more with arms that are straight or angle inward toward the implement. Side-drafting problems can actually be fish-tailing with lower arms that angle outward too much. Since changes on implements can simply be easier to do, the hook-up points can be changed so the extended lines of the arms meet, or converge, in front of the tractor, but generally not by more than the tractor length.
19

Also for proper drafting, lower arms should basically be level with implements in the ground. This satisfies the principle that the converging point be about drawbar height. The top link should angle downward from the implement toward the front, with the extended line also meeting at the same converging point. Lower arms that angle downward too much can tend to pull machinery out of the ground. This can be a problem if simply using an overly-large tractor with a small implement. Top links that angle downward toward the implement – in relation to the lower arms – can present several problems, like inability for implement to dig or inability to lift implements off the ground.
Many operators may not realize hitch problems and fault implement or fault it for the wrong reasons. Adding implement weight can solve some problems, but be sure this is within the manufacturer’s guideline for proper operation to avoid machine failure.
These principles should be verified since the anchor points for the two lower lift arms and top link vary between tractor models and brands. Thorough ASAE standards govern hitching point dimensions at the implement (Category-1, 2, etc) but there are no ASAE standards for hitch design at the tractor. Some tractors have top links that are anchored too high or lower arms that are anchored too narrow or too wide, to name some typical problems. Ideally, a problem hitch would be “fixed” on the tractor for universal improvement rather than making changes to each three-point implement.
A “buyer’s guide” for small tractors: Compare tractor designations, configurations or dimensions. By definition, “row-crop” tractors have fully adjustable wheels to adjust wheel spacing. Sliding forged hubs are infinitely adjustable on axle shafts. Stamped steel wheels on a fixed hub typically have rims with various flanges for different spacings. The front axle, whether 2WD or FWD, is also width-adjustable. The larger rims and tires on these tractors provide more clearance underneath the tractor frame for row crops. High-clearance “mudder” tractors have even larger wheels for more clearance, may have drop-boxes on the axles and usually have FWD (front wheel drive) for operating in wet field conditions, as the name suggests. “Utility” tractors often have the same drivetrain as row-crop models but fitted with smaller wheels and possibly a repositioned front axle for shorter wheelbase. Since wheel spacing is less important for utility work, often less wheel adjustment is built-in. In recent years, tractor manufacturers have put more effort into drivetrains and features on smaller tractors and offer them different ways for different jobs.
“Compact” tractors may be ideal for landscaping, golf courses, municipal or utility work, but are not the first choice for row-crop farming. While a typical 20 or 30 HP tractor can pull very small equipment, do not over-estimating abilities. Clearance under the tractor may be limited for bed height and crop growth. Wheel spacing adjustment may be very limited. A tractor size of 35 to 40 HP is a good starting point to perform the jobs that many farmers believe a farm tractor should do.
Tractor weight matters for proper traction. Small tractors often do not have the power-to-weight ratio as larger tractors and suffer from more wheel-slip in the field. Additional wheel or frame weight on newer small tractors is likely. Generally, older tractors weigh more than today’s models with similar power and have better traction. Small tractors with front-wheel-drive may have more lugs gripping the soil, but the additional weight of the front drivetrain matters more.
20

Different tire sizes can have different outside diameters. Don’t let price dictate the tire needed. Wheel companies offer wheels for specialized purposes. Use larger wheels for larger –diameter tires for more clearance. Narrow wheels track between the narrowest rows or in the narrowest furrows.
Note that clearance specifications “under the axle”, relevant for conventional row crops, is different than clearance under the drawbar, which is more relevant for crops placed down the center of wide beds.
If the tractor is in the field throughout the season, be sure tractor clearance is sufficient for bed height, plants and plant growth. Some operators of smaller farms or with certain crops, may not use tractors in the field after bed shaping or planting, which can fit the capabilities of a smaller tractor better.
Renting tractors is commonplace today. Renting a larger tractor to perform only one or two deeper tillage jobs is worthwhile. Let your local tractor dealer know months in advance what you would need since dealers network or need lead time for tractor availability. Before buying a newer tractor or upgrading in tractor size, rental is also an ideal way to test-drive and learn features and operation. Don’t buy a new tractor like the average person buys a car.
Don’t “drain” the equipment budget on the tractor. An additional primary or secondary tillage tool, buying the right planter or sprayer or adding options to any of these for more effectiveness can make a small farm “click” long before a classy tractor will. Learn tractor maintenance. Your own repairs to older tractors will pay for itself over and over. For new tractor buyers, consider models with little or no electronics and gadgets. A steering wheel, gear shift, throttle, good power and traction gets the job done.
IRRIGATION
Several irrigation methods are compatible with beds.
Apply sub-surface drip tape, generally up to 4-inches deep, with tape application equipment mounted on the bed shaper. Surface drip tape is not usually done at bed shaping time. Surface tape may be laid under plastic mulch, with the tape applicator mounted to the mulch layer. Combination machines shape beds, apply tape and apply mulch all at once.
Deep-placement tape or tubing, up to 12 or 16-inches deep, may be used. Perpetual beds is one way to maintain bed alignment with irrigation lines.
Run overhead irrigation parallel with bed rows. The use of plastic mulch can act as a barrier to water penetration, as with natural rainfall, without drip irrigation underneath. Center-pivot systems are often considered impractical with bed furrows since the drive train must cross the furrows at various angles.
Furrow irrigation floods furrows, starting at the high end. Plan on a narrow furrow width. And narrow beds may be more effective for water penetration to the plant rows. Furrow irrigation does not deliver water to young roots in the bed top and usually not used with plastic
21

mulch, considering possible erosion of mulch coverage soil or limitations on bed or mulch width configurations.
FERTILIZER APPLICATION
Fertilizer may be broadcast before bed shaping. Turning soil out of furrows then effectively “bands” the fertilizer as it is also moved toward the center of the bed row with the soil. Application rates may be adjusted accordingly.
Band fertilizer with fertilizer hoppers and drivers on the bed shaper. Use injection equipment during or after bed shaping.
The increasing popularity of drip tape also provides “fertigation”, a highly practical and effective method for delivering soluble fertilizer through the irrigation system. As with water, fertilizer can be applied when and where needed. Fertigation does not depend on driving in the field, notably when wet.
WEED CONTROL & BED MAINTENANCE
Weed control: Cultivation and herbicides can be utilized as on flat-land. No special spray equipment is required, but if custom-designing a spray rig, consider useful features like more height adjustment of the spray boom to allow for bed height and different crop clearances. To combine ideas, sprayers may be set-up to “band” herbicides on the bed top with a tillage strategy utilized in the furrows. Row crop bedders feature equipment to till bed tops well as furrows. A gap in the pan allows row(s) to pass through. Features can vary, but this usually also re-shapes the bed to maintain a flat bed top and original furrow shape, either of which can provide various benefits for particular growers. Tillage with a more conventional cultivator, with no shaper pan, tends to round off bed corners and fill in furrows, which would appear more like a wide “ridge”. The acceptability of this is by the discretion of the grower. Uniquely-shaped knives and sweeps are available to reach under vine crops. Since roots can spread differently with different crops, make adjustments to avoid root pruning.
Weed control with plastic mulch: Except for herbicides, one solution alone will likely prove insufficient. The inherent conflict with weed control and plastic mulch is weed growth in the soil that covers mulch edges and through the plant holes, which is difficult to approach other than herbicide. Ironically, growers using plastic mulch for weed control may not consider herbicide. Cultivators cannot till mulch covering soil, but can work the wheel track area through the center of the furrow. Cultivators with disks can cover sprouting weed on the mulch edge, but timing is critical for effectiveness. Weed burners are becoming more accepted and available but be sure to not burn the plastic. Mowing is highly effective, though such equipment is highly specialized for the best job. The resulting “carpet” may be ideal for erosion control or appreciated by U-pick customers or CSA members. Then consider aggressive tillage in the furrows after harvest.
22

To address other thoughts, fields with plastic mulch may not look “pretty” without herbicides or an otherwise comprehensive weed control effort. Negativity toward plastic mulch is not intended, since the benefits if it are significant for exceptional crop quality and yield. Mulch works very well for weed control within the row, except for possible piercing by some grasses. Mulch thickness and quality matters.
Weed control is a secondary purpose for fumigation, which is predominant in the south for the primary purpose of pest control. Mulch is used with fumigation to “tarp”, or temporarily trap, it in the soil for effectiveness. Fumigation is highly expensive and may be economically prohibitive, depending on outlook.
Relieving furrow compaction: Since growing specialty crops on a larger or more-mechanized scale generally means more field traffic, even when wet, furrows become more compacted. Wet, compacted furrows can hold water longer, especially in low spots. Sub-soilers or rippers with shanks placed in the furrows fracture the soil for better water penetration and soil aeration. Tools for deep penetration and weed control can be combined. Add either or both to row-crop bedders.
Bed shapers may perform deep tillage at each row and/or in the furrows before planting. Plants with deeper roots benefit most with loose soil in the root zone. Note that this is not a universal substitute for otherwise proper tillage depth before bedding and planting.
Many of these bed maintenance ideas and practices are not essential to utilizing raised beds. Smaller farms may be more labor intensive than mechanized. Practitioners of some level of sustainable agriculture may view that machinery seems to beget more machinery. In balance, reality holds the necessity of equipment when an operation grows beyond the energy of partners, a family or availability of the local labor force.
FUMIGATION
Fumigation is a long-standing practice in predominantly southern regions of North America for controlling pests and weeds. Such equipment is usually combined with bed shapers and mulch layers. Mulch “tarps” the soil to temporarily trap fumigant for its effectiveness.
The additional weight of fumigation tanks and attachments and necessitates a larger tractor to lift and pull it. For smaller tractors, tanks may be carried on the tractor.
Contrary to convention, some effective fumigants are available at much less cost when combined with other weed control strategies, which can be fully integrated with raised beds and bed shapers.
PURPOSES OF RAISED BEDS
Forming beds means cutting furrows as much or more than “raising” the soil. The field surface does rise a couple of inches but this is not a relevant benefit alone. Bed tops between furrows create growing zones that prevent even short periods of saturation and start to dry
23

first, which is the key feature of this moisture management “tool”. With sensitive specialty crops, stress and disease can be reduced and a quick-drying top insulates and warms the soil more. Planting can be done earlier. Raised beds are an ideal management tool for the best possible crop, but overall moisture conditions ultimately depend on irrigation, the other key moisture management tool, or the weather.
Raised beds have side benefits, including exceptional compatibility with the use of plastic mulch. Bed furrows can be used for irrigation, as a guidance system for precision farming and provide traffic control with primary beds or perpetual beds to avoid any compaction in the rows before planting.
Beds do not “over-dry” the soil and the effect of drought is the same. Raised beds offer only potential positive effect and no potential negative effect to the growing environment. The use of hills, raised beds, ridges, etc and their benefits date to ancient times. As with any proven agricultural method, raised beds can be affordable, efficient, profitable and progressive.
BEDS AND PLASTIC MULCH
Plastic mulch may or may not be used with raised beds, with considerations either way. Beds alone offer benefits similar to plastic. Since bed tops dry first, this also acts as an insulator to warm the bed soil. The dry top is friendly to laying fruit, though not as beneficial as mulch. Beds can improve on the application and removal of mulch. Feel free to use natural mulch, or straw, though obviously this is more practical on a smaller scale. Overhead irrigation and furrow irrigation is more compatible. Drip irrigation works with or without mulch. Many transplanters feature a shoe, which does not work with mulch. Pot-style and water-wheel planters do work with or without mulch.
The benefits of plastic mulch is proven; better crop quality, better growth and yields, faster maturation. The mechanization is worth the effort. Regarding laying fruit, plastic is only partly beneficial on vine crops since melons and squash also lay in furrows. Tomatoes mostly stay on the bed top.
Plastic can be beneficial for any crop, but it can be more beneficial for some than others. To look at it another way, it can be less practical for some crops. The choice to use mulch can be made crop-by-crop, as many smaller fresh market growers practice. Mulch use can easily be expanded or reduced with an experimental approach. Other field equipment can be used the same way on raised beds with or without mulch. Note that separate bed shaping and mulch laying machines may be preferred for this, rather than combined machines.
24