rac user manual - rockwell automationliterature.rockwellautomation.com/idc/groups/literature/...the...
TRANSCRIPT

RAC 6181 and VersaView 6181P-10, -12 Industrial Computers
User Manual

Publication 6181-UM001D-EN-P
Solid state equipment has operational characteristics differing from those of electromechanical equipment. "Safety Guidelines for the Application, Installation, and Maintenance of Solid State Controls" (Publication SGI-1.1) describes some important differences between solid state equipment and hard-wired electromechanical devices. Because of this difference, and because of the wide variety of uses for solid state equipment, all persons responsible for applying this equipment must satisfy themselves that each intended application of this equipment is acceptable.
In no event will Rockwell Automation be responsible or liable for indirect or consequential damages resulting from the use or application of this equipment.
The examples and diagrams in this manual are included solely for illustrative purposes. Because of the many variables and requirements associated with any particular installation, Rockwell Automation cannot assume responsibility or liability for actual use based on the examples and diagrams.
No patent liability is assumed by Rockwell Automation with respect to use of the information, circuits, equipment, or software described in this manual.
Reproduction of the contents of this manual, in whole or in part, without written permission of Rockwell Automation is prohibited.
Throughout this manual, we use notes to make you aware of safety considerations.
ATTENTION: Identifies information about practices or circumstances that can lead to personal injury or death, property damage, or economic loss.
Important: Identifies information that is especially important for successful application and understanding of the product.
European Union Compliance
The RAC6181 Computer meets the European Union Directive requirements when installed within the European Union or EEA regions and has the CE mark. A copy of the Declaration of Conformity is available at the Rockwell Automation / Allen-Bradley Internet site: www.ab.com
ATTENTION: The RAC6181 Computer is intended to operate in an industrial or control room environment, which utilizes some form of power isolation from the public low voltage mains. Some RAC6181 Computer configurations may not comply with the EN 61000-3-2 Harmonic Emissions standard as specified by the EMC Directive of the European Union. Obtain permission from the local power authority before connecting any RAC6181 Computer configuration that draws more than 75 watts of AC power directly from the public mains.
Important User Information

Using this Manual Preface
Who Should Use This Manual .................................................. P-1 Purpose of this Manual.............................................................. P-1 Contents of this Manual ............................................................ P-2 Manual Conventions ................................................................. P-3 Allen-Bradley Support .............................................................. P-3
System Features Chapter 1
Chapter Objectives .....................................................................1-1 6181 Computer Versions ............................................................1-1 6181 Computer Packing List......................................................1-2 Features of the 6181 Computer ..................................................1-3 LED Indicators ...........................................................................1-6 Backlight Dimming Control.......................................................1-7 Hazardous Location Certification ..............................................1-7
Installation Chapter 2
Chapter Objective.......................................................................2-1 European Union Compliance .....................................................2-1 Environmental Considerations ...................................................2-1 Mounting Hardware ...................................................................2-2 Tools Required ...........................................................................2-2 Mounting Clearances..................................................................2-3 Mounting Dimensions................................................................2-4 10.4 in. Mounting Cutout ...........................................................2-9 12.1 in. Mounting Cutout .........................................................2-10 12.1 in. with Keypad Mounting Cutout....................................2-11 Panel Mounting with Mounting Studs......................................2-12 Panel Mounting with Mounting Clips ......................................2-13 Connecting Equipment in Hazardous Locations ......................2-14 Connecting a Mouse & Keyboard (Side Panel) .......................2-15 Connecting a Mouse & Keyboard (12.1 in. Keypad Version)..2-16 AC Power Connections ............................................................2-17 DC Power Connections ............................................................2-18 Network Connections...............................................................2-18
Table of Contents

toc-ii Table of Contents
Publication 6181-UM001D-EN-P
Initial Operation and Setup Chapter 3
Chapter Objective ...................................................................... 3-1 Operating Recommendations..................................................... 3-1 Operator Access ......................................................................... 3-1 System Checkout ....................................................................... 3-2 System Reset.............................................................................. 3-2 Driver Installation...................................................................... 3-2 Using USB................................................................................. 3-3 Installing Windows NT® Networking....................................... 3-3 Installing a 6181 Computer Touchscreen Driver ....................... 3-4
Adding/Removing System Components
Chapter 4
Chapter Objectives..................................................................... 4-1 Safety Precautions ..................................................................... 4-1 Hazardous Locations ................................................................. 4-2 Thermal Considerations for Add-In Cards................................. 4-2 Removing the Back Cover and Top Cover ................................ 4-3 Adding/Removing CPU and Add-in Cards................................ 4-4
Installing/Removing the Power Supply
Chapter 5
Chapter Objective ...................................................................... 5-1 Safety Precautions ..................................................................... 5-1 Installing/Removing a Power Supply ........................................ 5-2
Installing/Removing the Hard Drive, Floppy Drive, or Expansion Bay
Chapter 6
Chapter Objective ...................................................................... 6-1 Available Drives ........................................................................ 6-1 Safety Precautions ..................................................................... 6-1 Installing/Removing a Hard Drive or Floppy Drive .................. 6-2 Installing/Removing an Expansion Bay .................................... 6-5
Connecting External Drives Chapter 7
Chapter Objective ...................................................................... 7-1 Safety Precautions ..................................................................... 7-1 Sample External Drives ............................................................. 7-1 Connecting an External Drive ................................................... 7-2

Table of Contents toc-iii
Publication 6181-UM001D-EN-P
Installing/Removing Memory Modules
Chapter 8
Chapter Objective.......................................................................8-1 Available RAM Memory............................................................8-1 Guidelines for Adding/Removing Memory................................8-2 Safety Precautions......................................................................8-3 Adding/Removing Memory Modules ........................................8-3
Replacing the Backlight Tubes
Chapter 9
Chapter Objective.......................................................................9-1 Safety Precautions......................................................................9-1 Disconnecting the Touchscreen Cable .......................................9-2 Replacing the Backlight Tubes
10.4-in. Display-Only Version.................................................9-3 12.1-in. Display-Only Version.................................................9-5 12.1-in Keypad Version ...........................................................9-7
12.1 in. Keypad Bezel Operation
Chapter 10
Chapter Objectives ...................................................................10-1 Installing Keypad Legend Strips ..............................................10-1 Setting Up and Using the Keypad Configuration Utility Software .............................10-4
System Troubleshooting Chapter 11
Chapter Objectives ...................................................................11-1 Hardware Diagnostics ..............................................................11-1 Troubleshooting Procedure ......................................................11-2 Troubleshooting Check Lists...................................................11-3
Maintenance Chapter 12
Chapter Objectives ...................................................................12-1 Cleaning the Display ................................................................12-1 Cleaning the Chassis Fan Filter................................................12-2 Replacing the Battery ...............................................................12-3 Replacement Parts ....................................................................12-4
Specifications Appendix A

toc-iv Table of Contents
Publication 6181-UM001D-EN-P
CPU Specifications and BIOS Settings
Appendix B
Pentium® CPU Card Specifications..........................................B-1 Pentium III CPU Card Specifications........................................B-2 BIOS Information ......................................................................B-3
Using a Touchscreen Appendix C
Appendix Overview...................................................................C-1 6181 Computers with Touchscreen............................................C-1 Resistive Touchscreen Technology............................................C-2 Calibrating the Touchscreen ......................................................C-2 Maintenance...............................................................................C-3
Index

Using this Manual
Read this preface to familiarize yourself with the rest of the manual. The preface covers the following topics:
• who should use this manual
• the purpose of the manual
• contents of the manual
• conventions used in this manual
• Allen-Bradley support
Use this manual if you are responsible for installing, using, or troubleshooting the RAC6181 Industrial Computer.
This manual is a user guide for the RAC6181 Industrial Computer. It gives an overview of the system and describes procedures you use to:
• install the RAC6181 Computer in a panel or enclosure
• install and remove system components
• run the system
• troubleshoot the system
Preface
Who Should Use This Manual
Purpose of this Manual

P–2 Using this Manual
Publication 6181-UM001D-EN-P
Chapter Title Contents
Preface Describes the purpose, background, and scope of this manual. Also specifies the audience for whom this manual is intended.
1 System Features Shows the different versions of the RAC6181 Computer and system features.
2 Installation Describes how to install the RAC6181 Computer in a panel or enclosure. Also tells how to connect devices (such a mouse/keyboard) to the system.
3 Initial Operation and Setup
Tells how to start and checkout the system.
4 Adding/Removing System Components
Gives procedures for adding/removing memory, add-in boards, hard drive, accessory drive, power supply and processor board.
5 Installing/Removing the Power Supply
Gives procedures for installing or removing a RAC6181 power supply.
6 Installing/Removing the Hard Drive, Floppy Drive, or Expansion Bay
Gives procedures for removing or installing a hard drive, floppy drive, or expansion bay into the RAC6181 Computer.
7 Connecting External Drives
Explains how to connect an external drive (such as a CD-ROM) to the RAC6181 Computer.
8 Installing/Removing Memory Modules
Gives procedures for installing or removing memory modules to the RAC6181 Computer.
9 Replacing the Backlight Tubes
Gives procedures for replacing the backlight tubes on the RAC6181 Computer display.
10 12.1 in Keypad Bezel Operation
Describes operations specific to the RAC6181 12.1 in. keypad version.
11 System Troubleshooting
Explains how to interpret and correct problems with the RAC6181 Computer.
12 Maintenance Gives procedures for cleaning the RAC6181 Computer display, and other components.
Appendix A Specifications Provides physical, electrical, environmental, and functional specifications.
Appendix B CPU Specifications and BIOS Settings
Provides information on the CPU card and BIOS settings of the RAC6181 Computer.
Appendix C Using a Touchscreen Provides information on using a touchscreen with the RAC6181 Computer.
Contents of this Manual
Using this Manual P–3
Publication 6181-UM001D-EN-P
The following conventions are used throughout this manual:
• Bulleted lists such as this one provide information, not procedural steps.
• Numbered lists provide sequential steps or hierarchical information.
Allen-Bradley offers support services worldwide, with over 75 Sales/Support Offices, 512 authorized Distributors and 260 authorized Systems Integrators located throughout the United States alone, plus Allen-Bradley representatives in every major country in the world.
Local Product Support
Contact your local Allen-Bradley representative for:
• sales and order support
• product technical training
• warranty support
• support service agreements
Technical Product Assistance
If you need to contact Allen-Bradley for technical assistance, please review the information in the System Troubleshooting chapter first. Then call your local Allen-Bradley representative or contact Allen-Bradley technical support at (440) 646-5800.
For additional product information and a description of the technical services available, visit the Rockwell Automation/Allen-Bradley Internet site at http://www.ab.com.
Manual Conventions
Allen-Bradley Support

P–4 Using this Manual
Publication 6181-UM001D-EN-P

System Features
This chapter provides an overview of the RAC6181 Industrial Computer including:
• available versions
• software
• additional catalog items
The following table summarizes the options for each version:
Table A RAC6181 Computer Product Options
Feature 10.4-inch Display
12-inch Display
12-inch Display
with Keypad
Non-Display
Processor Board x x x x
Hard Drive x x x x
1.44 Mbyte Floppy Drive x x x x
External Video Interface x x x x
Integral Flat Panel Display
x x x
Touchscreen Option x x x
Field Replaceable Backlight x x x
Keypad Option x
2-Slot Chassis x x x x
4-Slot Chassis x x x x
Chapter 1
Chapter Objectives
RAC6181 Computer Versions
1–2 System Features
Publication 6181-UM001D-EN-P
The RAC6181 Computer is delivered with the following items:
• Computer
• Mounting nuts (10, 8 required) or mounting clips (6) (12 in. keypad version only)
• Power cord retention clip and power cord (VAC version only)
• Operating system media with documentation, if ordered
• Touchscreen driver/utility diskette, if ordered
• Accessories CD with Video, Ethernet and Keypad drivers and Keypad Configuration Utility backup/installation
• VersaView recovery CD
• Keyboard jumper cable (12-inch keypad version only)
• This manual (Publication 6181-UM001)
RAC6181 Computer Packing List

System Features 1–3
Publication 6181-UM001D-EN-P
The following illustrations show the major features and controls of the display versions of the RAC6181 Computer.
RAC6181 Computer - Display Versions
RAC6181 Computer – Keypad/Display Versions
TFT LCD Display (with or without optional touchscreen)
LED Indicators
20 Relegendable Function Keys (K1-K10, K11-K20)
Control and Navigation Keys
Numeric Keypad
14 Relegendable Function Keys (F1-F14)
Optional Expansion Bay (DVD-ROM or Read/Write CD-ROM)
Bezel with Clip Mounting (NEMA Type 4X)
Features of the RAC6181 Computer

1–4 System Features
Publication 6181-UM001D-EN-P
RAC6181 Computer - Non-Display Version
RAC6181 Computer Connectors – 2 Slot Chassis
* The maximum processor speed available for 2-slot chassis is the Pentium III 600MHz option.

System Features 1–5
Publication 6181-UM001D-EN-P
RAC6181 Computer Connectors – 4 Slot Chassis
Video Port (HD-15)
Ethernet Connector (RJ45)
2 USB Ports
PS/2 Keyboard Connector(Mini Din)
PS/2 Mouse Connector(Mini Din)
Serial Port 1 (DB9)
Cooling Fan and Filter (Bottom)
Parallel Port (DB25)
3.5" Hard Drive (Internal)
3.5" Floppy Drive
Power Cord Connector Serial Port 2 (DB9)
(Non-Touchscreen Units Only)
CPU CardI/O Card
Backlight Dimming Control (Display Versions Only)
PCI Expansion Slots (2)
Shared PCI/ISA Expansion Slot*
ISA Expansion Slot
* For Pentium/AMD CPU card, the shared PCI/ISA expansion slot will only support an ISA card. The Pentium III CPU card can support either a PCI or ISA card in this slot.

1–6 System Features
Publication 6181-UM001D-EN-P
The following tables show the LED indicators on the RAC6181 Computer. Standard units have symbol indicator labels. Units with the optional stainless steel bezel have no labels.
Table B LED Indicators (Display Versions Only)
Indicator Position Color Indicates
Left Red Diagnostics. Indicates that one of the
following conditions exists:
• Overtemperature. Temperature inside the RAC6181 Computer enclosure is above defined threshold.
• Fan Sensor. System fan not operating within defined thresholds.
• Voltage. Voltages not within specification.
Refer to Chapter 11, System Troubleshooting, for information on resolving diagnostic conditions.
Center Green Hard Drive Access
Right Green Power On
Table C LED Indicators (Keypad Display Versions Only)
Indicator Position Color Indicates
Right Red Diagnostics. Indicates that one of the
following conditions exists:
• Overtemperature. Temperature inside the RAC6181 Computer enclosure is above defined threshold.
• Fan Sensor. System fan not operating within defined thresholds.
• Voltage. Voltages not within specification.
Refer to Chapter 11, System Troubleshooting, for information on resolving diagnostic conditions.
Center Green Numlock key activated
Left Green Power On
LED Indicators

System Features 1–7
Publication 6181-UM001D-EN-P
Use the backlight dimming control to vary the screen lighting for optimum viewing.
Turn the control clockwise to increase display backlight brightness. Turn it counter-clockwise to dim the display backlight.
Specific configurations of the RAC6181 Computer are certified for Class I, Division 2, Groups A, B, C, D, T4A temperature code, hazardous areas.
All options for RAC6181 Series B computers except for the following communication cards are available with Class I, Div 2 certification:
• 1784-PKTX
• 1784-PKTXD
• 1784-PKTS
• 2 Channel PCI Communication Card (6189-COMMCARD)
ATTENTION: The RAC6181 Series B computer is only certified for Class I, Div 2 environments in factory-shipped configurations. Adding PC cards or changing the factory-shipped configuration will nullify this certification.
Backlight Dimming Control
Hazardous Location Certification

1–8 System Features
Publication 6181-UM001D-EN-P

Installation
This chapter describes installation of the RAC6181 Industrial Computer including how to install the RAC6181 Computer in a panel using mounting studs or clips.
The RAC6181 Computer meets the European Union Directive requirements when installed within the European Union or EEA regions and has the CE mark. A copy of the Declaration of Conformity is available at the Rockwell Automation / Allen-Bradley Internet site: www.ab.com
ATTENTION: The RAC6181 Computer is intended to operate in an industrial or control room environment, which utilizes some form of power isolation from the public low voltage mains. Some RAC6181 Computer configurations may not comply with the EN 61000-3-2 Harmonic Emissions standard as specified by the EMC Directive of the European Union. Obtain permission from the local power authority before connecting any RAC6181 Computer configuration that draws more than 75 watts of AC power directly from the public mains.
Mount the RAC6181 Computer in a panel or enclosure to protect the internal circuitry. Versions with a gasketed bezel meet NEMA Type 1, 12, 13 and 4 (Indoor use) and IEC IP54, IP65 only when mounted in a panel or enclosure having an equivalent rating. The non-display version does not have a gasket and has a NEMA Type 1 and IEC IP2X rating.
Allow enough room within the enclosure for adequate ventilation. Also consider heat produced by other devices in the enclosure. The ambient temperature around the RAC6181 Computer must be maintained between 5o and 50 oC (41 o to 122 o F). The RAC6181 Computer is intended for use in Pollution Degree 2 environments.
Make sure you provide provisions for accessing the back and side panels of the RAC6181 Computer to install/remove components, and to access the floppy disk drive and optional CD-ROM type drives.
ATTENTION: The RAC6181 Industrial Computer is designed for vertical panel-mount installation. Do not mount the RAC6181 with DVD-ROM or CD-R/W option with an angle more than 5 degrees from vertical. This may cause operational problems with the DVD-ROM or CD-R/W drive, and may result in damage to your media.
Chapter 2
Chapter Objective
European Union Compliance
Environmental Considerations

2–2 Installation
Publication 6181-UM001D-EN-P
Versions of the RAC6181 Computer with a display are shipped with one of the following types of mounting hardware:
Table D Mounting Hardware
Item Description Quantity Use For
Self-locking nuts (#10-32)
10 (8 required)
Panel or enclosure mounting (display version)
Mounting clips 6 Panel or enclosure mounting (display/keypad version)
In addition to the tools required to make the cutout, you will need the following tools:
For Mounting Studs:
• 3/8 inch socket
• 6 inch (15 cm) extension rod (minimum)
• Socket driver (in/lb. torque wrench recommended)
• Ruler
For Mounting Clips:
• Flat blade screwdriver
• Ruler
Mounting Hardware
Tools Required

Installation 2–3
Publication 6181-UM001D-EN-P
Allow adequate space for mounting, air flow, and maintenance. The figure below shows recommended minimum clearances to other components within the rack or enclosure.
ATTENTION: The RAC6181 Computer should not be operated within a confined space of the dimensions shown below unless adequate ventilation or other cooling methods are used to lower the air temperature within the enclosure.
6181 Mounting Clearances
Mounting Clearances

2–4 Installation
Publication 6181-UM001D-EN-P
The following figures show the mounting dimensions for the RAC6181 Computer.
10.4 in. Version with Display
2-Slot Version (Side View) 4-Slot Version (Side View)
231.55 [9.116]
181.71 [7.154]
Mounting Dimensions

Installation 2–5
Publication 6181-UM001D-EN-P
12.1 in. Version with Display
2-Slot Version (Side View) 4-Slot Version (Side View)
189.64 [7.466]
231.55 [9.116]

2–6 Installation
Publication 6181-UM001D-EN-P
12.1 in. Version with Keypad and Display
2-Slot Version (Side View) 4-Slot Version
143.34 [5.643]
254.76 [10.030]
Height: 254.76 [10.030]Depth: 173.02 [6.811]

Installation 2–7
Publication 6181-UM001D-EN-P
Non-Display Version
2-Slot Version 4-Slot Version
Height: 231.7 [9.125]Depth: 153.44 [6.041]
2–8 Installation
Publication 6181-UM001D-EN-P
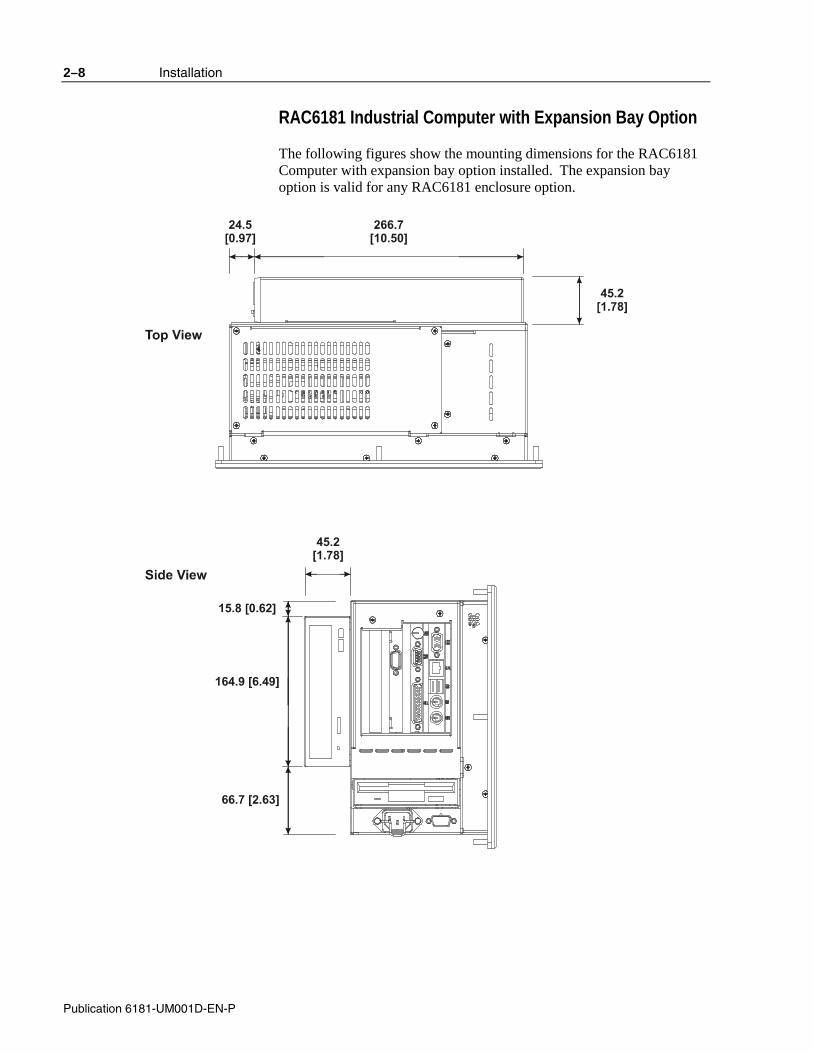
RAC6181 Industrial Computer with Expansion Bay Option
The following figures show the mounting dimensions for the RAC6181 Computer with expansion bay option installed. The expansion bay option is valid for any RAC6181 enclosure option.

Installation 2–9
Publication 6181-UM001D-EN-P
The following figure provides the dimensions for making the panel or enclosure cutout for the 10.4 in. RAC6181 Computer.
10.4 in. Mounting Cutout
2–10 Installation
Publication 6181-UM001D-EN-P
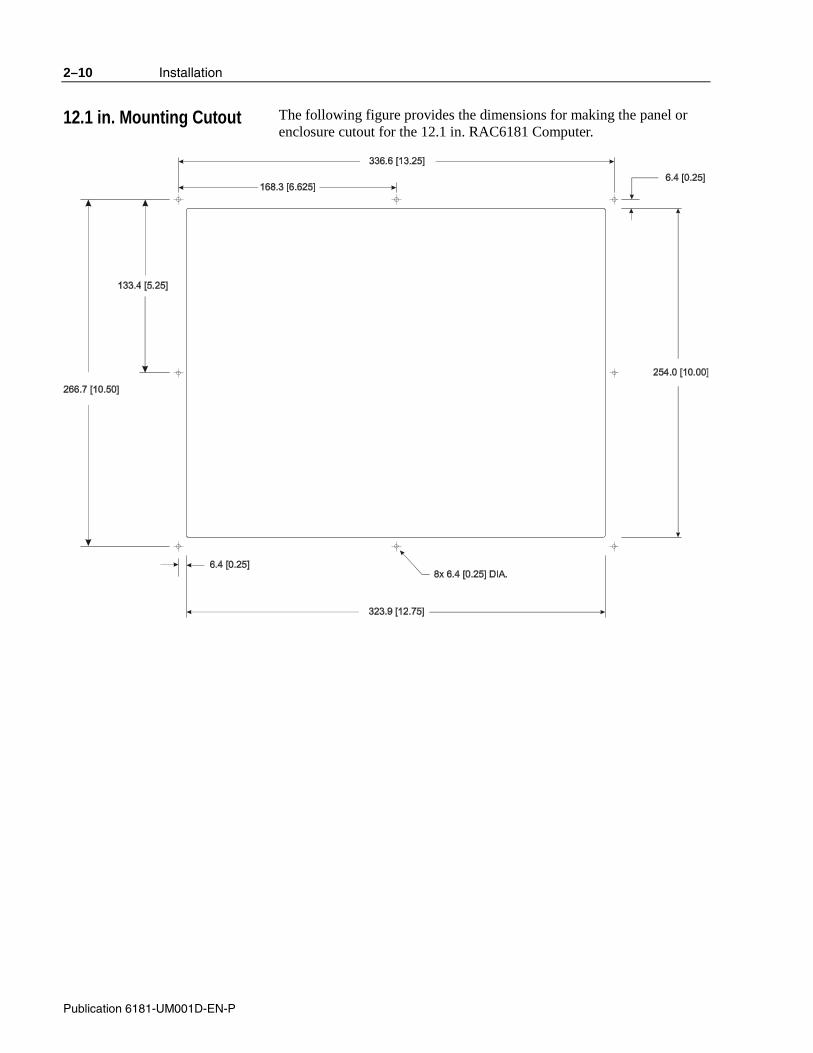
The following figure provides the dimensions for making the panel or enclosure cutout for the 12.1 in. RAC6181 Computer.
12.1 in. Mounting Cutout

Installation 2–11
Publication 6181-UM001D-EN-P
The following figure provides the dimensions for making the panel or enclosure cutout for the 12.1 in. RAC6181 Computer with keypad.
12.1 in. with Keypad Mounting Cutout

2–12 Installation
Publication 6181-UM001D-EN-P
To install the RAC6181 Computer in a panel using 8 mounting studs:
ATTENTION: Disconnect all electrical power from the panel before making cutout.
Make sure the area around the panel cutout is clear.
Take precautions so that metal cuttings do not enter any components that are already installed in the panel.
Failure to follow these warnings may result in personal injury or damage to the panel components.
To install the RAC6181 Computer in a panel using mounting studs:
1. Cut an opening in the panel using the appropriate panel cutout dimensions provided on Page 2-9 (10.4 in. version) or Page 2-10 (12.1 in. version). Carefully drill eight 6.4mm (0.25in.) holes for the mounting studs as indicated.
2. Make sure the sealing gasket is properly positioned on the terminal. This gasket forms a compression-type seal (NEMA Type 4), do not use sealing compounds.
3. Place the RAC6181 Computer in the panel cutout aligning the studs with the mounting holes.
4. Install the 8 self-locking nuts hand tight.
5. Alternately tighten the self-locking nuts (use 3/8 in. socket) until the RAC6181 Computer is held firmly against the panel (see recommended tightening sequence below). The amount of torque required increases significantly as the gasket reaches the proper compression. Tighten nuts to a torque of 2.7 N-m (24 in-lbs).
ATTENTION: Tighten mounting nuts to a torque of 2.7 N-m (24 in-lbs) to provide a proper seal and prevent damage to the RAC6181 Computer. Rockwell Automation assumes no responsibility for water or chemical damage to the terminal or other equipment within the enclosure because of improper installation.
Panel Mounting with Mounting Studs
Installation 2–13
Publication 6181-UM001D-EN-P
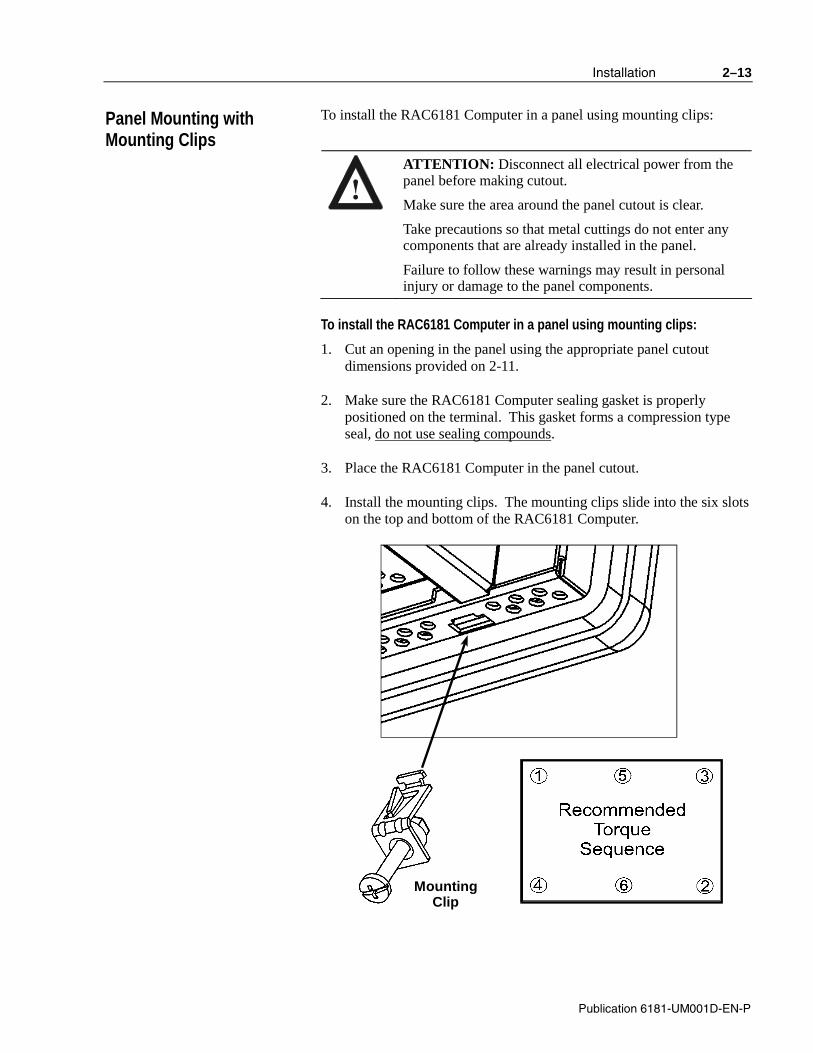
To install the RAC6181 Computer in a panel using mounting clips:
ATTENTION: Disconnect all electrical power from the panel before making cutout.
Make sure the area around the panel cutout is clear.
Take precautions so that metal cuttings do not enter any components that are already installed in the panel.
Failure to follow these warnings may result in personal injury or damage to the panel components.
To install the RAC6181 Computer in a panel using mounting clips:
1. Cut an opening in the panel using the appropriate panel cutout dimensions provided on 2-11.
2. Make sure the RAC6181 Computer sealing gasket is properly positioned on the terminal. This gasket forms a compression type seal, do not use sealing compounds.
3. Place the RAC6181 Computer in the panel cutout.
4. Install the mounting clips. The mounting clips slide into the six slots on the top and bottom of the RAC6181 Computer.
Mounting Clip
Panel Mounting with Mounting Clips

2–14 Installation
Publication 6181-UM001D-EN-P
5. Gradually tighten the clips one at a time around the bezel using the specified sequence. Repeat this process at least three times until the clips are hand-tight and the gasket is compressed uniformly against the panel.
6. Tighten mounting clips to a torque of 10 in–lbs (1.1 N•m) in the sequence shown above. Do not over–tighten.
ATTENTION: Tighten mounting clips to a torque of 10 in–lbs (1.1 N•m) to provide a proper seal and prevent damage to the RAC6181 Computer. Rockwell Automation assumes no responsibility for water or chemical damage to the terminal or other equipment within the enclosure because of improper installation.
Specific configurations of the RAC6181 Computer are certified for Class I, Division 2, Groups A, B, C, D, T4A temperature code, hazardous areas. When installing the RAC6181 Computer in a hazardous location, note the following safety considerations:
Installation Wiring
See the nameplate label on the computer for certifications on hazardous locations.
ATTENTION: In Class I, Div 2 hazardous locations, the RAC6181 Industrial Computer must be wired per the National Electric Code and/or Canadian Electric Code as it applies to hazardous locations.
Connecting and Disconnecting Equipment
When installing the RAC6181 Computer, note the following safety considerations:
ATTENTION: EXPLOSION HAZARD! Do not connect or disconnect equipment while circuit is live unless area is known to be non-hazardous.
Note: Do not connect or disconnect RAC6181 Computer
connections in the presence of possible hazardous materials. Making or breaking these connections may cause a spark.
Connecting Equipment in Hazardous Locations

Installation 2–15
Publication 6181-UM001D-EN-P
Peripheral Devices
ATTENTION: Peripheral devices attached to the RAC6181 Computer should not be operated in the presence of possible hazardous materials, unless that specific device is rated for Class I, Div 2 environments. Example devices are external keyboard, external mouse products, and external removable media drives.
The mouse and keyboard plug into the side panel mouse and keyboard ports as shown below.
Connecting a Mouse & Keyboard (Side Panel)
2–16 Installation
Publication 6181-UM001D-EN-P
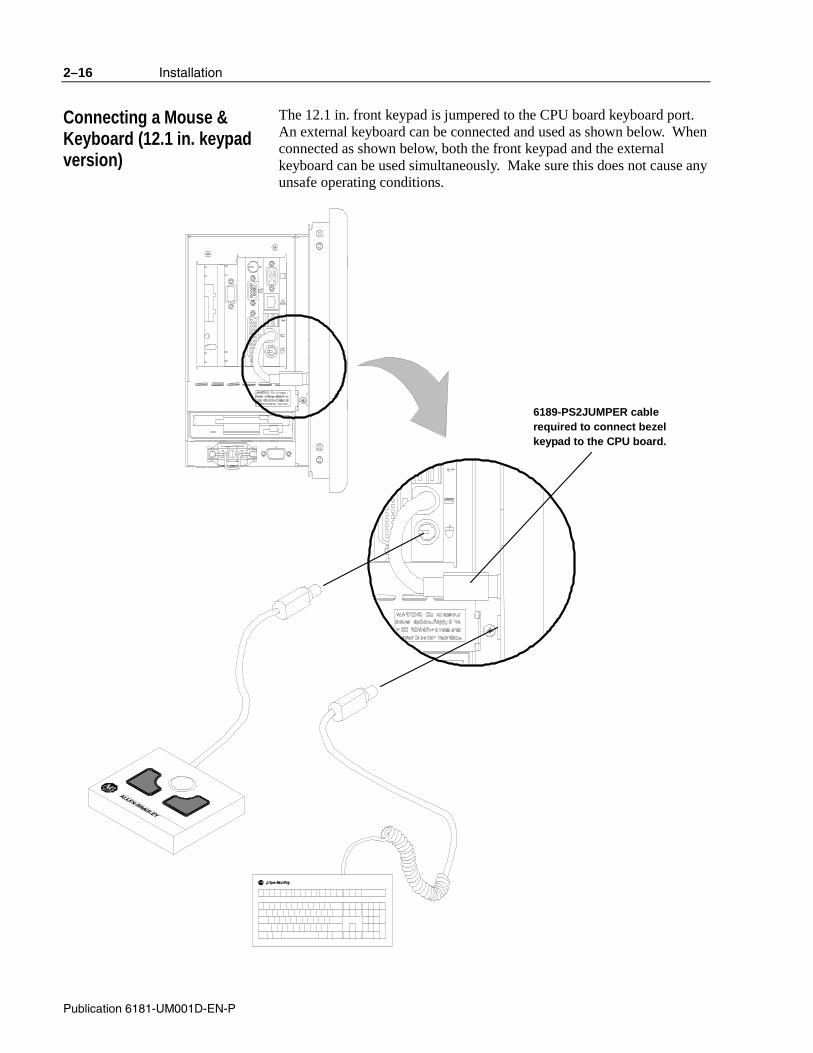
The 12.1 in. front keypad is jumpered to the CPU board keyboard port. An external keyboard can be connected and used as shown below. When connected as shown below, both the front keypad and the external keyboard can be used simultaneously. Make sure this does not cause any unsafe operating conditions.
6189-PS2JUMPER cable required to connect bezel keypad to the CPU board.
Connecting a Mouse & Keyboard (12.1 in. keypad version)

Installation 2–17
Publication 6181-UM001D-EN-P
A standard IEC 320 power cord provides power to the RAC6181 Computer AC version. The power supply input will accept 120/240V AC. The power supply is autoswitching.
ATTENTION: The power cord must be connected to an outlet having an earth ground (three-prong outlet). Failure to follow this warning could result in severe electrical shock.
Use the power cord retainer to prevent accidental interruption of power to the RAC6181 Computer. Pull the cord retainer over the cord plug as shown below.
ATTENTION: EXPLOSION HAZARD! You must install the power cord retainer clip to ensure safety in hazardous locations.
Failure to secure the power cord with the retainer clip could result in hazardous conditions if the power cord is accidentally disconnected.
AC Power Connections

2–18 Installation
Publication 6181-UM001D-EN-P
A standard three position terminal block is provided for connecting power. Use 12 or 14 AWG stranded wire to connect these terminals to a stable source of 24V DC power with 10A minimum rating available. Observe proper polarity and keep the wiring as short as possible (recommend less than 3 meters). Ensure that the wires are connected correctly using standard wiring practices. Twist the wires 1-3 twists per inch.
ATTENTION: The ground connection must be made to an adequate earth ground using as short a wire as possible to eliminate the possibility of radio frequency noise and interference.
The RAC6181 Computer accommodates CAT5 twisted pair Ethernet cabling with RJ45 connectors to support 100 Mbps network data transfer.
Important: Performance degradation of your Ethernet communications is likely to result if the unit or cables are subjected to extreme radiated or conducted high-frequency noise. It is the user’s responsibility to properly route cables and condition input power in order to improve communication reliability. Proper cable routing and power conditioning is required to ensure reliable Ethernet communications in industrial environments. Rockwell Automation recommends that all Ethernet cabling be routed through dedicated metal conduits. Installing ferrite bead filters at cable ends may also improve reliability.
DC Power Connections
Network Connections

Initial Operation and Setup
This chapter provides information on:
• operating recommendations
• boot-up sequence
• system reset and Power On Self Test (POST)
• Universal Serial Bus (USB)
• Windows NT networking
• Windows 2000 touchscreen driver installation
We recommend the following operating guidelines for the RAC6181 Computer:
• Avoid turning the system on and off frequently.
• Never turn the system off when the hard drive indicator light is illuminated.
• Always use the proper power down procedures as required by your operating system, such as the Shut Down command in Microsoft® Windows.
• Do not turn off the computer until a message appears telling you that it is safe to do so.
• Do not operate the RAC6181 Computer with covers removed. An electrical shock hazard exists. In addition, removing the covers will disrupt air flow and may result in overheating. All covers are required to maintain EMI shield.
ATTENTION: After shutting the system off, do not move the computer or turn it back on again until the hard drive has come to a complete stop (takes about 30 seconds).
If you are using an external monitor, turn on the monitor first.
Operator access is limited to the front panel of the RAC6181 Computer. This includes the display and touchscreen. Access to components behind the rack or panel that the RAC6181 Computer is installed in is restricted to authorized and properly trained personnel.
Chapter 3
Chapter Objective
Operating Recommendations
Operator Access

3–2 Initial Operation and Setup
Publication 6181-UM001D-EN-P
To boot up the system:
1. Apply power to the computer. The RAC6181 Computer performs a Power On Self Test (POST) in which it tests the processor board, memory, keyboard, and certain peripheral devices.
2. The RAC6181 Computer displays the progress of the POST and initialization of accessory devices.
3. If your system does not boot up, or you notice other problems, refer to Chapter 11, System Troubleshooting.
4. The RAC6181 Computer will then display the startup dialogs for the operating system that has been installed. If no software is installed, the following prompt is displayed:
Insert bootable media in the appropriate drive.
To reset the RAC6181 Computer, press [Ctrl] [Alt] [Delete] on an attached keyboard and follow the operating system instructions.
After resetting, the RAC6181 Computer will begin the Power On Self Test (POST). During reset, the RAC6181 Computer:
• clears RAM
• starts the POST
• initializes peripheral devices, such as drives and printers
• loads the operating system (if installed)
The RAC6181 Computer operating system usually selects the best device driver settings. However, you may want to ensure fully optimized performance by manually installing the device drivers included with your system. Refer to the Readme files on the software CD enclosed with your RAC6181 Computer for details on the latest device drivers and installation procedures.
System Checkout
System Reset
Driver Installation

Initial Operation and Setup 3–3
Publication 6181-UM001D-EN-P
The RAC6181 Computer has two USB connectors.
The Universal Serial Bus (USB) is an external bus standard that supports data transfer rates of 12Mbps (12 million bits per second). A single USB port can connect multiple peripheral devices, such as mice, modems, and keyboards. USB also supports Plug-and-Play installation and hot plugging.
For more information on installing or using USB, refer to the documentation for your USB peripheral device.
Note: Many USB devices only work with Windows 98 or Windows 2000, because these operating systems have native USB drivers. Make sure the selected USB peripheral has software drivers available for your target operating system.
Networking can be installed during the initial Windows NT Workstation Setup by choosing “This computer will participate on a network”, or networking can be installed at a later time by running the Network tool in Control Panel. Use the following guide:
1. When prompted for the network adapter, click the "Select from list..." button.
2. On the Select Network Adapter dialog, click the "Have disk…" button.
3. Insert the Ethernet Driver floppy disk (shipped with your RAC6181) into the floppy drive and click OK.
4. For 6181 Pentium and AMD versions: On the Select OEM Option dialog, select “Intel® PRO Adapter” and click OK. For Pentium III versions: Select “Intel PRO VE Adapter” and click OK.
5. Click Next to continue. Select the Protocols and Services that are suitable to your specific networking and application needs.
6. When prompted for the location of Windows NT files, enter the path c:\sources\i386.
7. Before networking can be used the system must be restarted.
If networking is installed by running the Network tool in Control Panel, the current Operating System Service Pack should be re-installed.
Using USB
Installing Windows NT Networking

3–4 Initial Operation and Setup
Publication 6181-UM001D-EN-P

Initial Operation and Setup 3–5
Publication 6181-UM001D-EN-P
Initial Startup and Service Packs
The initial system startup begins with the NT operating system at Service Pack 1, and enters Window NT Workstation Setup. During setup, the system is built, the drivers and applications are installed, user information is gathered via the start-up dialogs. At the end of setup, the current Service Pack is automatically installed and is visible when the system is restarted.
Installing device drivers alters the system and the current service pack should be re-installed by running the update tool. For example, if the current Service Pack is SP4, the update tool is c:\sources\SP4\i386\update\update.exe.
The 6181 display-only computers require an EloTouch Systems touch screen driver. The 6181 12.1 inch keypad bezel computers use a Touchko touch screen application.
EloTouch Systems Drivers
The touch screen drivers for the EloTouch Systems touchscreen are not pre-installed for Windows 2000. The first time you apply power to the 6181 Computer, you must complete the following steps to finish the touchscreen driver installation.
1. When you log on to Windows 2000 for the first time after completing the 6181 power-up, follow the prompts that are displayed to install the touchscreen driver.
2. When the touchscreen installation procedure displays the following screen, select COM2. The 6181 touchscreen is internally connected to the COM2 port on the CPU card.
Installing a RAC6181 Computer Touchscreen Driver

3–6 Initial Operation and Setup
Publication 6181-UM001D-EN-P
Touchko Touch Screen Application
The 6181 12.1 inch keypad bezel computer uses a Touchko WIN32 touchscreen application instead of an operating system driver. This means the touchscreen is not active until after the operating system is completely booted.
This application is factory configured to automatically start during the operating system boot. It is placed in the appropriate start-up folder for the Windows operating system.
If you have to reinstall the operating system, follow the instructions below to install the Touchko driver so that the touchscreen is activated when Windows starts.
1. Create a folder in Windows. This folder can be located anywhere on the hard disk. The folder should be called “Touch” or some other name that will be easily identifiable as the Touchko folder.
2. Copy the Touchko program into the folder.
3. Execute the Touchko program and step through the configuration and calibration steps. When finished, a .DAT file is created that contains the configuration and calibration information. This file is then stored in the directory with the Touchko program.
4. Copy a shortcut of the Touchko file into the Windows start-up directory. Each version of Windows locates the start-up folder in different locations. See the Windows help files to find the location of the start-up folder for the version of Windows you are running.
5. After the shortcut is placed in the startup folder, reboot the computer. When Windows boots, the Touchko program will execute using the .DAT file that was created in Step 3 and your touchscreen should be working.
If after following the steps listed above, the touchscreen does not startup when your computer boots, check to see that:
1. The Touchko program and the .DAT file are in the directory you created
2. The shortcut is in the proper startup folder
3. The shortcut correctly points to the directory where the Touchko program and .DAT file resides.
If the touchscreen still does not startup when Windows boots, call Tech Support.

Initial Operation and Setup 3–7
Publication 6181-UM001D-EN-P


Adding/Removing System Components
This chapter describes how to remove and install:
• back cover and top cover
• add-in cards
• CPU card
Note: Instructions for removing and installing additional components are included in additional chapters of this manual:
• Chapter 5, Installing/Removing the Power Supply
• Chapter 6, Installing/Removing the Hard Drive, Floppy Drive, or Expansion Bay
• Chapter 8, Installing/Removing Memory Modules
The RAC6181 Computer contains line voltages. Make sure you disconnect all power to the RAC6181 Computer before performing any of the operations described in this chapter.
ATTENTION: Disconnect all power from the RAC6181 Computer before removing components. Failure to disconnect power could result in severe electrical shock or damage to the RAC6181 Computer.
Internal RAC6181 Computer components may be damaged by Electrostatic Discharge (ESD). Make sure you wear a grounding strap whenever handling circuit boards, memory modules or other internal components.
ATTENTION: Wear a wrist strap (well grounded) and perform work in a static safe environment.
Electrostatic discharge can damage the RAC6181 Computer and components.
Chapter 4
Chapter Objectives
Safety Precautions

4–2 Adding/Removing System Components
Publication 6181-UM001D-EN-P
Specific configurations of the RAC6181 Computer are certified for Class I, Division 2, Groups A, B, C, D, T4A temperature code, hazardous areas. If you are using the RAC6181 in a hazardous location, review the following safety considerations:
ATTENTION: EXPLOSION HAZARD! Do not connect or disconnect equipment while circuit is live unless area is known to be non-hazardous.
Note: Do not connect or disconnect RAC6181 Computer
connections in the presence of possible hazardous materials. Making or breaking these connections may cause a spark.
ATTENTION: EXPLOSION HAZARD! Substitution of components may impair suitability for Class I, Div 2 hazardous locations.
ATTENTION: The RAC6181 Series B computer is only certified for Class I, Div 2 environments in factory-shipped configurations. Adding PC cards or changing the factory-shipped configuration will nullify this certification.
The RAC6181 2-Slot and 4-Slot Computers accommodate up to two or four additional ISA/PCI compatible add-in cards. Due to thermal considerations with the unit, total add-in power is limited to 15W of power dissipation (within the product enclosure).
Hazardous Locations
Thermal Considerations for Add-In Cards (2-Slot and 4-Slot Chassis)
Adding/Removing System Components 4–3
Publication 6181-UM001D-EN-P
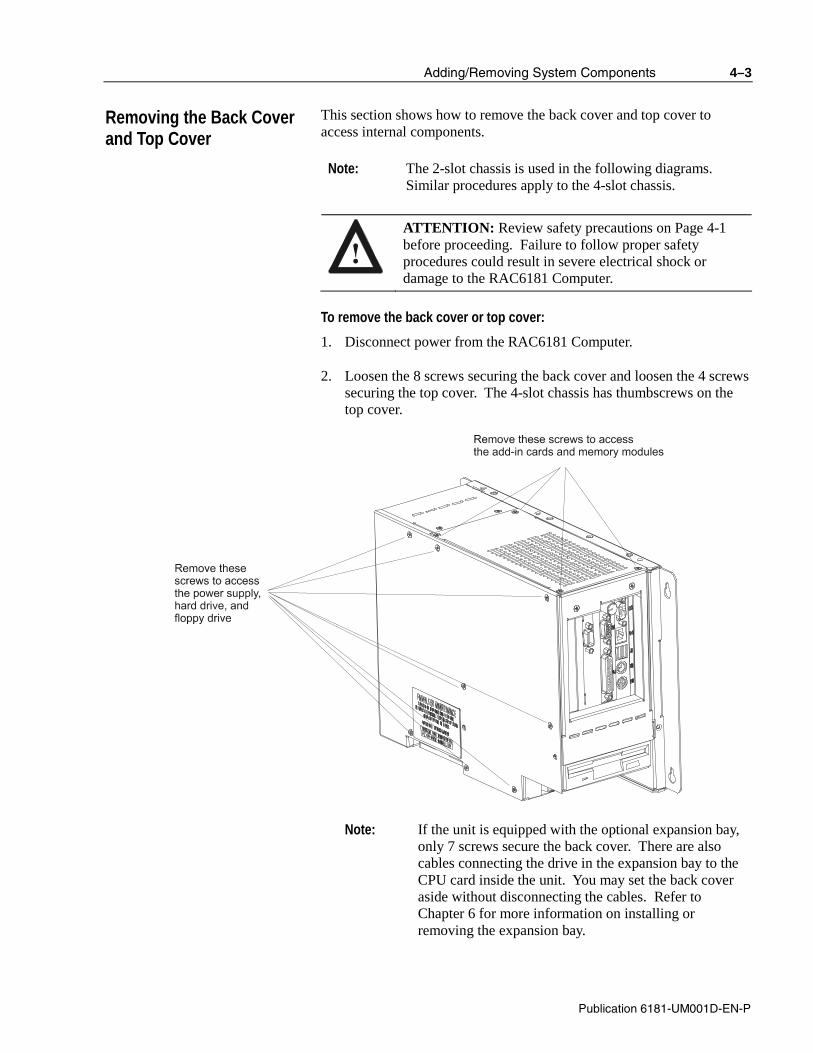
This section shows how to remove the back cover and top cover to access internal components.
Note: The 2-slot chassis is used in the following diagrams. Similar procedures apply to the 4-slot chassis.
ATTENTION: Review safety precautions on Page 4-1 before proceeding. Failure to follow proper safety procedures could result in severe electrical shock or damage to the RAC6181 Computer.
To remove the back cover or top cover:
1. Disconnect power from the RAC6181 Computer.
2. Loosen the 8 screws securing the back cover and loosen the 4 screws securing the top cover. The 4-slot chassis has thumbscrews on the top cover.
Note: If the unit is equipped with the optional expansion bay, only 7 screws secure the back cover. There are also cables connecting the drive in the expansion bay to the CPU card inside the unit. You may set the back cover aside without disconnecting the cables. Refer to Chapter 6 for more information on installing or removing the expansion bay.
Removing the Back Cover and Top Cover

4–4 Adding/Removing System Components
Publication 6181-UM001D-EN-P
3. To re-install the back cover, position the back cover over the chassis and tighten the screws. Align the two pins on the inside of the back cover that secure the hard drive bay.
ATTENTION: Be careful not to push the vibration dampers (grommets) on the drive bay out of the sheet metal.
Note: If the unit is equipped with the optional expansion bay,
ensure that the cables connecting the drive to the CPU card are positioned correctly. Position the cables so that:
• They do not obstruct the airflow around the internal fan.
• They are not pinched when you replace the back cover.
4. To re-install the top cover, position the top cover over the chassis and tighten the screws.
ISA compatible boards may be installed in the ISA slot or ISA/PCI shared slot. PCI compatible boards may be installed in either the PCI slot(s) or the ISA/PCI shared slot.
ATTENTION: Review safety precautions and information on thermal considerations for add-in cards on Page 4-1 before proceeding.
Failure to follow proper safety procedures could result in severe electrical shock or damage to the RAC6181 Computer.
ATTENTION: Add-in boards may be sensitive to ESD and require careful handling. Hold boards only by the edges--do not touch connectors, components or circuits. After removing a board, place the board on a flat static free surface, component side up. Do not slide the board over any surface.
Adding/Removing CPU and Add-in Cards

Adding/Removing System Components 4–5
Publication 6181-UM001D-EN-P
To remove a slot cover (to add a board):
1. Remove the top cover. See Page 4-3.
2. Locate the slot cover you want to remove.
3. Remove the screw securing the slot cover and remove the cover.
2-slot version 4-slot version
Slot Cover
Screw
CPU I/O Slot
CPU Slot
PCI Slots
Shared PCI/ISA Slot
ISA Slot
To install a slot cover (after removing a card):
1. Insert the end of the cover into the slot in the chassis.
2. Install the screw securing the slot cover, tighten to 0.7 - 0.9 N-m (6-8 in-lbs.)

4–6 Adding/Removing System Components
Publication 6181-UM001D-EN-P
To install a CPU or add-in card:
1. Remove the board from its anti-static packaging and place on a grounded, static free surface.
2. Set any board jumpers or switches as described in the instructions for the board.
Note: If you are replacing the CPU card, make careful note of the cables attached to the existing CPU card so that you can reconnect the cabling to the new card.
ATTENTION: The Pentium and Pentium III CPU cards each contain a video jumper setting specific to each version of the RAC6181 Computer with a display. If this jumper is set incorrectly, the RAC6181 video circuitry may be damaged.
12.1" Display
12.1" Display
10.4" Display10.4" Display
Jumper Settings
Jumper Settings
Jumper JP2
Jumper JP1
Pentium CPU Card Pentium III CPU Card
Note: For non-display units, this jumper can be set to either
setting.
ATTENTION: If you have a 2-slot RAC6181 Computer and you are installing a Pentium III CPU, you must install SODIMM memory modules before placing the CPU card into the slot. For instructions about how to remove and install memory modules, see Chapter 8, Installing/Removing Memory Modules.

Adding/Removing System Components 4–7
Publication 6181-UM001D-EN-P
3. Hold the board by the edges and firmly press the board into the
connector on the processor board.
Note: Be careful not to disturb the air flow director. It is required
to keep the CPU cool. The flow director for the 2-slot chassis should be routed behind the two add-in card slots and extend alongside the CPU heat sink.
4. Align the notch in the board retainer with the threaded hole and
install the screw. Hold the notch tightly against the screw before tightening.
Note: If you do not install the retainer tight against the screw, you may have problems inserting an adjacent board.
5. Connect any board cables (if required).
6. Install the top cover. See Page 4-3.

4–8 Adding/Removing System Components
Publication 6181-UM001D-EN-P
To remove a CPU or add-in card:
1. Remove the screw securing the board retainer.
2. Hold the board at each end and carefully rock the board back and forth until the edge connectors pull free.
Note: When removing the CPU card:
• Carefully remove all connecting wiring. Make notes of the location of all connectors to ensure that you can properly reconnect the wiring.
3. Store the board in an anti-static wrapper.
4. Remove any unused cable associated with the board.
5. Install a slot cover over the open slot.

Installing/Removing the Power Supply
This chapter provides instructions on how to remove or install a RAC6181 Industrial Computer power supply (AC or DC version). Removing the power supply involves the following procedures:
• Disconnecting the cables from six devices that are connected to the existing power supply (this requires partially removing the CPU card).
• Removing the power supply unit
• Disconnecting the touchscreen interface board (if installed) from the exterior of the power supply.
• Securing the touchscreen interface board (if installed) to the exterior of the new power supply
• Inserting the power supply into the bay
• Reconnecting the connectors
Internal components may be damaged by Electrostatic Discharge (ESD). Make sure you wear a grounding strap whenever handling circuit boards, power supply, memory modules or other internal components.
ATTENTION: Wear a wrist strap (well grounded) and perform work in a static safe environment.
Electrostatic discharge can damage the RAC6181 Computer and components.
Also observe the following precautions:
• Avoid touching the cable connectors.
• Always handle the power supply by its metal frame.
Chapter 5
Chapter Objective
Safety Precautions

5–2 Installing/Removing the Power Supply
Publication 6181-UM001D-EN-P
The power supply for the RAC6181 Industrial Computer accepts an input power and provides regulated lower voltages required for all internal components such as the processor board, card connectors, and chassis fan.
The RAC6181 Computer has the following power supply options:
• AC power version with a 120/240V AC power supply.
• DC power version with an 18-32 V DC power supply.
ATTENTION: Review safety precautions before proceeding. Failure to follow proper safety procedures could result in severe electrical shock or damage to the RAC6181 Computer.
To remove the power supply (AC and DC option):
1. Disconnect power from the RAC6181 Computer.
2. Remove the back cover and the top cover. Refer to procedures in Chapter 4 for details on removing the back cover and top cover.
Important: You must take note of the location of all connectors before you remove the existing power supply and cabling, so that you can attach the wires from the new power supply. Do not disconnect the wiring from the power supply itself unless specified. The replacement power supply comes with cabling attached.
3. Follow the wires as they exit the top (output side) of the power
supply and disconnect the wiring at the connectors of the other components (i.e., CPU card, backplane, drives, etc.). Pull on the connector to remove it: do not pull on the wires. Some connectors have a mechanical latch that must be disengaged before disconnecting. Make sure you adequately note the location of each connector.
Note: In order to access the large 14-pin connector (P2) on the 2-slot backplane, you must remove the top cover and partially remove the CPU card and I/O card. Refer to procedures in Chapter 4 for details on removing cards.
Installing/Removing a Power Supply

Installing/Removing the Power Supply 5–3
Publication 6181-UM001D-EN-P
4. Remove the 4 mounting screws that secure the power supply (2-slot chassis shown below).
5. Remove the power supply.
6. Disconnect the cables that connect the power supply to the input terminal strip:
• With the AC option, disconnect the cables from the bottom of the power supply.
• With the DC option, disconnect the red and black cables from the input terminal strip itself. Cut the tie strips that secure these cables around the fan.

5–4 Installing/Removing the Power Supply
Publication 6181-UM001D-EN-P
To install the power supply (AC option):
ATTENTION: Risk of Electrical Shock. Do not use screws exceeding 6.35mm (0.25 inches). Screws that are longer than recommended may come in contact with voltage sources within the power supply.
1. Connect the input cables to the bottom of the power supply.
2. Position the power supply in the chassis and secure with the 4 mounting screws. Torque screws to 0.7 to 0.9 N-m (6-8 in-lbs).
3. Connect the power supply cable connectors to the processor board and other internal components. The connectors are keyed so they cannot be installed the wrong way, do not force connectors.
4. Reinstall the CPU and any add-in cards you removed. Refer to procedures in Chapter 4 for details on how to install add-in cards.
ATTENTION: Make sure the air flow director is properly positioned. Failure to correctly install the flow director may result in excessive temperatures that can damage the RAC6181 Computer.
2-Slot Chassis 4-Slot Chassis
5. Install the back and top cover.
ATTENTION: Carefully engage the pins on the back cover and be careful not to push the vibration dampers (grommets) on the drive bay out of the sheet metal.

Installing/Removing the Power Supply 5–5
Publication 6181-UM001D-EN-P
To install the power supply (DC option):
1. Connect the two cables from the bottom of the power supply and fuse assembly to the appropriate connectors on the input terminal strip.
The red cable connects to +24V DC terminal. The black cable connects to the 0V DC middle terminal. (For an illustration of the DC power connection, refer to Page 2-19.)
2. Using the supplied tie strips, secure the cables from the terminal strip
around the base of the fan.
3. Position the power supply in the chassis and secure it with the 4 mounting screws. Torque screws to 0.7 to 0.9 N-m (6-8 in-lbs).

5–6 Installing/Removing the Power Supply
Publication 6181-UM001D-EN-P
4. Connect the power supply cable connectors to the processor board and other internal components. The connectors are keyed so they cannot be installed the wrong way, do not force connectors.
ATTENTION: Make sure the air flow director is properly positioned. Failure to correctly install the flow director may result in excessive temperatures that can damage the RAC6181 Computer.
2-Slot Chassis 4-Slot Chassis
5. Install the back and top cover.
ATTENTION: Carefully engage the pins on the back cover and be careful not to push the vibration dampers (grommets) on the drive bay out of the sheet metal.
Installing/Removing the Hard Drive, Floppy Drive, or Expansion Bay
This chapter describes how to install or remove the floppy drive and a hard disk from the RAC6181 Industrial Computer and how to install or remove the optional expansion bay.
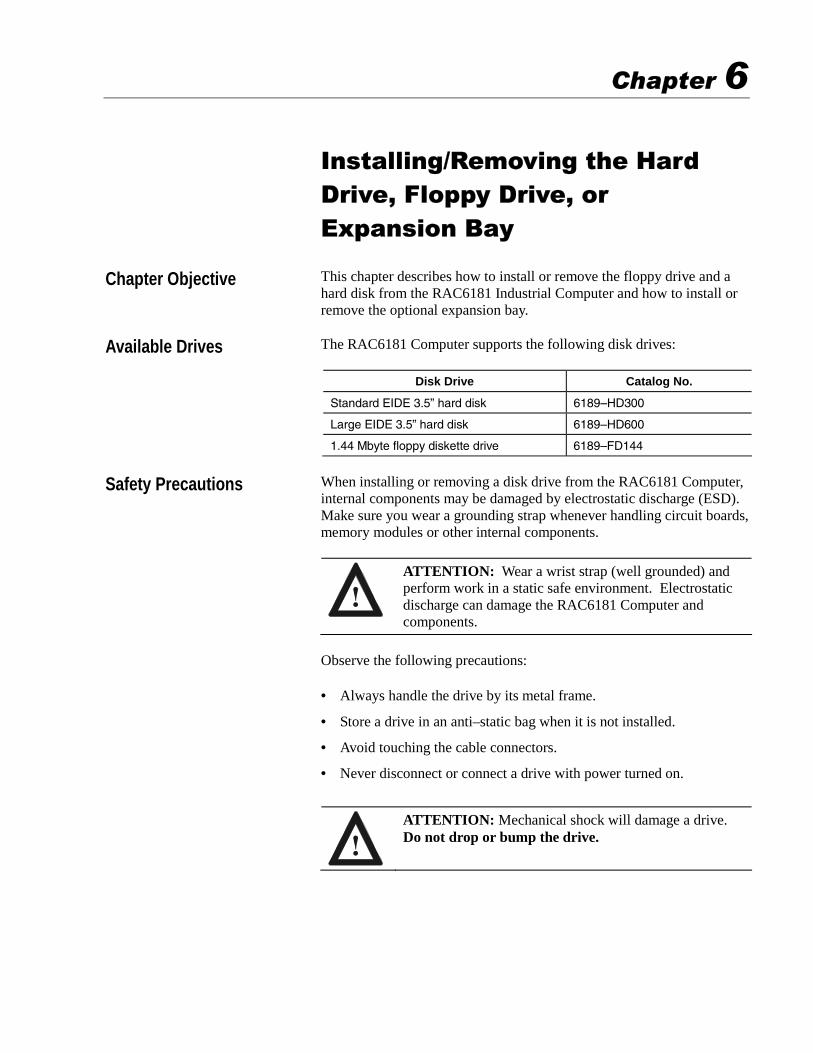
The RAC6181 Computer supports the following disk drives:
Disk Drive Catalog No.
Standard EIDE 3.5” hard disk 6189–HD300
Large EIDE 3.5” hard disk 6189–HD600
1.44 Mbyte floppy diskette drive 6189–FD144
When installing or removing a disk drive from the RAC6181 Computer, internal components may be damaged by electrostatic discharge (ESD). Make sure you wear a grounding strap whenever handling circuit boards, memory modules or other internal components.
ATTENTION: Wear a wrist strap (well grounded) and perform work in a static safe environment. Electrostatic discharge can damage the RAC6181 Computer and components.
Observe the following precautions:
• Always handle the drive by its metal frame.
• Store a drive in an anti–static bag when it is not installed.
• Avoid touching the cable connectors.
• Never disconnect or connect a drive with power turned on.
ATTENTION: Mechanical shock will damage a drive. Do not drop or bump the drive.
Chapter 6
Chapter Objective
Available Drives
Safety Precautions

6–2 Installing/Removing the Hard Drive, Floppy Drive, or Expansion Bay
Publication 6181-UM001D-EN-P
These instructions describe how to remove the drive bay and replace the hard drive or floppy drive.
To remove the drive bay:
1. Disconnect power from the RAC6181 Computer.
ATTENTION: Disconnect all power from the RAC6181 Computer before adding or removing components. Failure to disconnect power could result in severe electrical shock or damage to the RAC6181 Computer.
2. Remove the back cover of the RAC6181 Computer. Refer to
procedures in Chapter 4 for details on how to remove the back cover.
3. Remove the drive bay.
4. Disconnect the ribbon cable connector and the power connector from the hard drive and floppy drive.
5. Remove the hard drive from the drive bay (4 screws).
Installing/Removing a Hard Drive or Floppy Drive

Installing/Removing the Hard Drive, Floppy Drive, or Expansion Bay 6–3
Publication 6181-UM001D-EN-P
To install the drive:
1. Install the hard drive in the drive bay (4 screws)
2. Connect the ribbon cable connector and power cables to the hard drive and floppy drive.
Note: Make sure that the ribbon cable is installed correctly. The connector must be positioned so that the red wire of the cable is closest to the back of the unit.
3. Position the drive bay into the chassis so that the studs on the chassis
fit into the grommets on the drive bay.
ATTENTION: Be careful not to push the vibration dampers (grommets) on the drive bay out of the sheet metal.
4. Install the back cover.
5. Apply power and verify the operation of the drive. Refer to any additional instructions provided with the drive.

6–4 Installing/Removing the Hard Drive, Floppy Drive, or Expansion Bay
Publication 6181-UM001D-EN-P
Replacing the floppy drive in the hard drive bay:
1. Perform the steps to disconnect and remove the hard drive bay on Page 6-2.
2. Remove the four floppy drive mounting screws, loosen the hard drive mounting screws, and slide the drive from the drive bay.
Note: The floppy drive and hard drive screws require different tool bits.
3. Insert the floppy drive into the drive bay and secure the drive to the bay with the four mounting screws. Tighten all eight mounting screws to a torque of 0.7 to 0.9 N-m (6-8 in-lbs).
4. Replace the drive bay using the instructions on Page 6-3.

Installing/Removing the Hard Drive, Floppy Drive, or Expansion Bay 6–5
Publication 6181-UM001D-EN-P
These instructions describe how to install the optional 5.25-in. drive expansion bay (6189-1EXPBAY) on the RAC6181 Computer. The expansion bay can be used to house additional components such as a DVD-ROM or Read/Write CD-ROM drive.
Installing the expansion bay involves the following procedures:
• Removing the existing back cover
• Exchanging the IDE ribbon cable used for the existing hard drive with the new cable supplied with the expansion bay option
• Installing the drive in the expansion bay
• Installing the expansion bay as the new back cover
To exchange the hard drive and floppy drive cables:
1. Disconnect power from the RAC6181 Computer.
ATTENTION: Disconnect all power from the RAC6181 Computer before adding or removing components. Failure to disconnect power could result in severe electrical shock or damage to the RAC6181 Computer.
2. Remove the back cover and top cover of the RAC6181 Computer.
Refer to procedures in Chapter 4 for details on how to remove the back cover and top cover.
3. Partially remove the CPU card, I/O card, and any add-in boards so that you can access the IDE connector that connects to the hard drive and floppy drive. Refer to procedures in Chapter 4 for details on removing add-in cards.
4. Disconnect the IDE ribbon cable from the CPU card that leads to the hard drive and floppy drive and connect the replacement IDE ribbon cable.
5. Remove the drive bay.
6. Disconnect the ribbon cable from the hard drive and floppy drive and connect the replacement ribbon cable. The middle connector attaches to the hard drive.
Note: Make sure that the ribbon cable is installed correctly. The connector must be positioned so that the red wire of the cable is closest to the back of the unit.
Installing/Removing an Expansion Bay
6–6 Installing/Removing the Hard Drive, Floppy Drive, or Expansion Bay
Publication 6181-UM001D-EN-P
7. Disconnect the existing power cable attached to the hard drive.
8. Connect the power cable to the appropriate connector of the Y-shaped power cable provided with the expansion bay kit. Connect the other connector to the hard drive.
9. Leave hard drive jumper in default setting (Master).
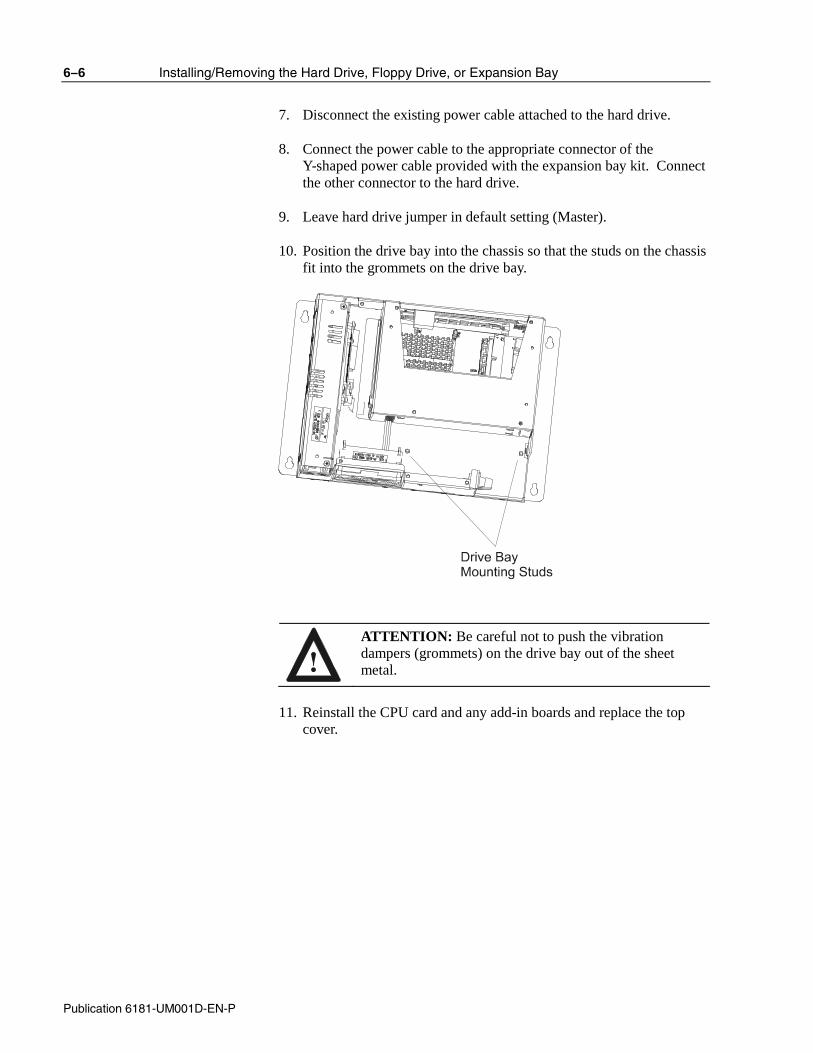
10. Position the drive bay into the chassis so that the studs on the chassis fit into the grommets on the drive bay.
ATTENTION: Be careful not to push the vibration dampers (grommets) on the drive bay out of the sheet metal.
11. Reinstall the CPU card and any add-in boards and replace the top
cover.

Installing/Removing the Hard Drive, Floppy Drive, or Expansion Bay 6–7
Publication 6181-UM001D-EN-P
To install the drive in the expansion bay:
1. Feed the power cable and ribbon cable through the slot on the bottom of the expansion bay.
2. Connect the power cable and ribbon cable to the expansion drive.
Note: If you are installing a CD-ROM drive, ensure that the jumper setting on the CD-ROM drive is set to "Slave."
3. Secure the drive to the expansion bay using the four screws
provided.
To install the expansion bay on the RAC6181 Computer:
1. Position the ribbon cable and power cable inside the unit to ensure that:
• The cables do not obstruct the air flow around the internal fan.
• The cables will not be pinched when you secure the expansion bay cover to the unit.
2. Secure the expansion bay to the back of the RAC6181 Computer using seven of the screws from the original cover.
ATTENTION: Be careful not to push the vibration dampers (grommets) on the drive bay out of the sheet metal.
3. Apply power and verify the operation of the drive. Refer to any
additional instructions provided with the drive.
To remove the expansion bay:
1. Disconnect power from the RAC6181 Computer.
ATTENTION: Disconnect all power from the RAC6181 Computer before adding or removing components. Failure to disconnect power could result in severe electrical shock or damage to the RAC6181 Computer.
2. Remove the screws that secure the expansion bay (back cover) to the
RAC6181 Computer. Refer to procedures in Chapter 4 for details on how to remove the back cover.

6–8 Installing/Removing the Hard Drive, Floppy Drive, or Expansion Bay
Publication 6181-UM001D-EN-P
3. Carefully remove the expansion bay.
Note: Depending on the expansion drive installed, the cables connecting the drive may be short. Be sure not to damage the drive or the connections.
4. If necessary, disconnect the ribbon cable connector and the power
connector from the expansion drive.

Connecting External Drives
This chapter shows how to connect an external drive to the RAC6181 Industrial Computer.
Note: Refer to Chapter 6 for instructions on installing the optional expansion bay for internal drives.
Observe the following precautions when connecting an external drive:
• Always handle the media by its case.
• Avoid touching the cable connectors.
• Remove disks before disconnecting power to the drive.
• Avoid exposing the external drive to severe shock or temperature.
• Operate the external drive only on a flat surface.
• Do not move the external drive while it is operating.
The following are a few examples of external drives:
• MicroSolutions Backpack CD-ROM drive (parallel port interface). (www.micro-solutions.com)
• Imation SuperDisk LS120 drive (parallel port or USB interface). Supports 120MB and standard high-density 1.44MB floppy diskettes. (www.superdisk.com)
• Iomega Zip drive (parallel port or USB interface). Available in 100MB and 250MB formats. (www.iomega.com)
Chapter 7
Chapter Objective
Safety Precautions
Sample External Drives

7–2 Connecting External Drives
Publication 6181-UM001D-EN-P
This section gives instructions for connecting an external drive to the RAC6181 Computer.
1. Before you apply power to the RAC6181 Computer, connect the parallel connector for the external drive to the parallel port on the RAC6181 Computer. For drives supporting a USB interface, connect the drive to the USB port on the RAC6181 Computer.
2. Connect the AC plug for the external drive to a power source.
3. Connect power to the RAC6181 Computer.
4. Follow the manufacturer’s instructions for loading any required software drivers and configuring the RAC6181 Computer to operate with the external drive.
Connecting an External Drive

Installing/Removing Memory Modules
This chapter describes how to add RAM Memory to the RAC6181 Computer processor board. Topics include:
• Available RAM memory
• Guidelines for adding/removing memory modules
• How to add/remove memory modules to processor board
The RAC6181 Pentium processor board has one 168–pin socket supporting a single or double–sided Dual In–Line Memory Module (DIMM):
Memory Module Catalog Number
128MB PC100 SDRAM DIMM 6189-DIMM128
256MB PC100 SDRAM DIMM 6189-1DIMM256
Note: If you use any type of memory module other than a
qualified Allen-Bradley part, you may encounter problems.
The RAC6181 Pentium III processor board has one 144-pin socket supporting a Small Outline Dual In-Line Memory Module (SODIMM):
Memory Module Catalog Number
128MB PC133 SDRAM SODIMM 6189-SODIMM128
256MB PC133 SDRAM SODIMM 6189-SODIMM256
Chapter 8
Chapter Objective
Available RAM Memory (Pentium CPU Card)
Available RAM Memory (Pentium III CPU Card)

8–2 Installing/Removing Memory Modules
Publication 6181-UM001D-EN-P
When adding memory to the RAC6181 Pentium processor board, follow these guidelines:
• Use only a standard, unbuffered 168–pin DIMM that conforms to both PC-100 and Serial Presence Detect (SPD) compliance industry standards.
• Use only Synchronous Dynamic Random Access Memory (SDRAM) type DIMMs.
• BIOS automatically detects memory size and type (i.e., SDRAM vs. EDO). It does not detect parity, however, so this must be manually configured by the end-user in BIOS Setup. The RAC6181 Computer ships with ECC-type memory, and the Memory Parity Check feature in BIOS Setup is programmed to “ECC” by default.
• If a non-ECC DIMM is installed, the Memory Parity Check in BIOS Setup must be changed/saved to “Disabled”. The system will fail to boot if ECC is enabled in Setup with a non-ECC DIMM installed.
• Use only gold-plated lead DIMMs.
When adding memory to the RAC6181 Pentium III processor board, follow these guidelines:
• Use only a standard, unbuffered, non-ECC 144-pin SODIMM that conforms to both PC-100/PC-133 and Serial Presence Detect (SPD) compliance industry standards.
• Use only Synchronous Dynamic Random Access Memory (SDRAM) type SODIMMs.
• BIOS automatically detects memory size and type (i.e. PC100 or PC133). Either non-ECC or ECC SODIMMs may be used, but ECC parity checking is not supported on this system board. The ECC memory will run in non-ECC mode.
• Use only gold-plated lead SODIMMs.
Guidelines for Adding/Removing Memory (Pentium CPU Card)
Guidelines for Adding/Removing Memory (Pentium III CPU Card)

Installing/Removing Memory Modules 8–3
Publication 6181-UM001D-EN-P
Internal RAC6181 Computer components may be damaged by Electrostatic Discharge (ESD). Make sure you wear a grounding strap whenever handling circuit boards, memory modules or other internal components.
ATTENTION: Wear a wrist strap (well grounded) and perform work in a static-safe environment. Electrostatic discharge can damage the RAC6181 Computer and components.
Also observe the following precautions:
• Always handle the memory cards by the ends not by the memory module contacts.
• Store memory in a sealed anti–static bag when it is not installed.
• Never install or remove memory with the power turned on.
This section gives instructions on how to change an installed memory module in the RAC6181 Pentium processor board. These instructions also apply to changing SODIMM memory on the 6181 Pentium III processor board.
To add or remove memory:
1. Disconnect power from the RAC6181 Computer.
ATTENTION: Disconnect all power from the RAC6181 Computer before adding/removing components. Failure to disconnect power could result in severe electrical shock or damage to the RAC6181 Computer.
2. Remove the top cover of the RAC6181 Computer. Refer to
“Removing the Back Cover and Top Cover” on page 4-3 for instructions.
Important: If you have a 2-slot chassis with a Pentium III CPU, you must remove the CPU card to install SODIMM memory modules. Refer to “Adding/Removing CPU and Add-in Cards” on page 4-4 for complete instructions.
3. The memory module is located at the top of the CPU card, just
below the top cover. Remove the existing memory module from the CPU card.
a. DIMM modules: remove by pressing down on the retaining latch.
b. SODIMM modules: remove by pulling the edges of the connector away from the SODIMM until the SODIMM pops up.
Safety Precautions
Adding/Removing Memory Modules

8–4 Installing/Removing Memory Modules
Publication 6181-UM001D-EN-P
4. To install a new DIMM, hold the module only by the edges as you remove it from its anti–static package.
5. Position the DIMM so that the small notches in the bottom edge of the DIMM align with the notches in the DIMM socket on the CPU card. The retaining latch should be fully disengaged when attempting to install a DIMM.
6. Press down firmly and uniformly on the DIMM to seat it in the socket. The latch should engage in the DIMM locking slot to secure the part in place.
7. Reinstall the CPU card if necessary (Refer to “Adding/Removing CPU and Add-in Cards” on page 4-4 for complete instructions), and reinstall the top access cover.

Replacing the Backlight Tubes
This chapter describes how to replace the backlight tubes on the RAC6181 Computer flat panel display. Topics include:
• Disconnecting the touchscreen cable
• Removing the flat panel display
• Replacing the backlight tubes
The RAC6181 Computer contains line voltages. Make sure you disconnect all power to the RAC6181 Computer before performing any of the operations described in this chapter.
ATTENTION: Disconnect all power from the RAC6181 Computer before removing components. Failure to disconnect power could result in severe electrical shock or damage to the RAC6181 Computer.
Internal RAC6181 components may be damaged by Electrostatic Discharge (ESD). Make sure you wear a grounding strap whenever handling circuit boards, memory modules or other internal components.
ATTENTION: Wear a wrist strap (well grounded) and perform work in a static safe environment.
Electrostatic discharge can damage the RAC6181 Computer and components.
You will have to uninstall the RAC6181 Computer and place it display side down, with the top of the unit facing you. Make sure to place the unit on a clean, flat surface to avoid scratching the display.
Chapter 9
Chapter Objective
Safety Precautions

9–2 Replacing the Backlight Tubes
Publication 6181-UM001D-EN-P
RAC6181 Industrial Computer 10.4-in. and 12.1-in. display-only versions may come equipped with a touchscreen. If so, you will have to disconnect the touchscreen cable before removing the flat panel display and replacing the backlight tubes.
Disconnecting the touchscreen cable:
1. Remove the back cover of the RAC6181 Computer. Refer to “Removing the Back Cover and Top Cover” on page 4-3 for complete instructions.
2. Disconnect the touchscreen cable from the touchscreen controller board.
ATTENTION: Make note of Pin #1 on the touchscreen cable, and its orientation to the touchscreen board, so that you can properly reconnect the cable at the end of this procedure.
Disconnecting the Touchscreen Cable (Display-Only Versions)

Replacing the Backlight Tubes 9–3
Publication 6181-UM001D-EN-P
Removing the flat panel display:
1. Remove the 10 screws that secure the flat panel to the RAC6181 Computer chassis.
2. Carefully pull the flat panel display away from the chassis and disconnect the following connectors from the flat panel display:
• LED connector from the LED board
• Power cable attached to the backlight power supply
Replacing the Backlight Tubes (10.4-in. Display-Only Version)

9–4 Replacing the Backlight Tubes
Publication 6181-UM001D-EN-P
3. Lift and pivot the chassis to the left. If you have a touchscreen unit, make sure the touchscreen cable comes out of the chassis without becoming snagged and damaged. Place the chassis on its edge to the left of the unit.
4. On the flat panel display, disconnect the backlight tube connectors from the backlight power supply.
5. Disconnect the display cable from the flat panel display by removing the 3 screws holding it to the small printed circuit board on the display.
Replacing the backlight tubes:
1. Press on the retention clip in the direction indicated by the arrow to release the backlight tube.
Note: There are backlight tubes on either side of the display, but only one side has an arrow.
2. Gently pull the tube out of the assembly.
3. Slide the replacement backlight tube into the slot until it snaps into place.
Reinstalling the flat panel display:
1. Reattach the display cable to the flat panel display by gently plugging the connector into the small printed circuit board and replacing the 3 screws that hold it in place.
ATTENTION: Do not overtighten the screws holding the display cable to the printed circuit board. Tighten to a torque of 1-2 in-lbs. (0.1-0.2 N-m)
2. Reattach the backlight tube connectors to the backlight power
supply.

Replacing the Backlight Tubes 9–5
Publication 6181-UM001D-EN-P
3. Place the chassis back onto the display assembly while:
• Reattaching the LED connector to the LED board
• Reattaching the power cable to the backlight controller board
• Threading the touchscreen cable (if necessary) back into the chassis
4. Reattach the touchscreen cable to the touchscreen controller board, if necessary.
5. Reattach the display assembly to the unit using the 10 screws.
6. Replace the back cover of the unit if necessary.
Removing the flat panel display:
1. Remove the 8 screws that secure the flat panel to the RAC6181 Computer chassis.
Backlight Power Supply Bracket
2. Remove the backlight power supply bracket from the right side of the unit. Lift the chassis, if necessary.
3. Remove the power cable and backlight tube connectors from the backlight power supply (the printed circuit board attached to the bracket).
4. Remove the LED connector from the LED board (the small printed circuit board attached to the display assembly).
Replacing the Backlight Tubes (12.1-in. Display-Only Version)

9–6 Replacing the Backlight Tubes
Publication 6181-UM001D-EN-P
5. Pivot the chassis to the left. If you have a touchscreen unit, make sure the touchscreen cable comes out of the chassis without becoming snagged and damaged.
6. Lift and pivot the chassis off of the display assembly and place the chassis on its side to the left of the display assembly.
7. Disconnect the display cable from the flat panel display by removing the 2 screws holding it to the small printed circuit board on the display (see figure below). The display assembly is now completely free of the unit.
Replacing the backlight tubes:
1. Remove the 2 screws holding each backlight tube in place.
Backlight Screws
Display CableRetainingScrews
Backlight Screws
BacklightRetaining Tabs
Backlights are shaded in gray.
2. Slide the tube to the right about 1/8 in. (3 mm) and gently pull the tube up and out of the assembly.
3. Insert the replacement backlight tube into the slot and slide it to the left until the holes for the screws are aligned.

Replacing the Backlight Tubes 9–7
Publication 6181-UM001D-EN-P
4. Replace the screws that hold the backlight in place.
Reinstalling the flat panel display:
1. Reattach the display cable to the flat panel display by gently plugging the connector into the small printed circuit board and replacing the 2 screws that hold it in place.
ATTENTION: Do not overtighten the screws holding the display cable to the printed circuit board. Tighten to a torque of 1-2 in-lbs. (0.1-0.2 N-m).
2. Lay the backlight tube connectors to the right of the unit and reattach them to the backlight power supply
3. Place the chassis back onto the display while threading the touchscreen cable back into the chassis, if necessary. Make sure that you have access to the LED connector and backlight power cable after the chassis is in place.
4. Reattach the LED connector to the LED board and the backlight power cable to the backlight controller board.
5. Place the backlight power supply bracket back into place on the unit.
6. Reattach the touchscreen cable to the touchscreen controller board, if necessary.
7. Reattach the display assembly and backlight power supply bracket to the unit using the 8 screws.
8. Replace the back cover of the unit if necessary.

9–8 Replacing the Backlight Tubes
Publication 6181-UM001D-EN-P
Removing the flat panel display
1. Remove the 6 screws that secure the flat panel to the RAC6181 Computer chassis.
Screws securingflat panel
Retaining screw
Hinged chassis
Flat panel display
2. Remove the retaining screw from just below the top hinge and open the hinged chassis enough to remove the chassis from the display assembly. Place the chassis on its side to the right of the display assembly.
3. Unplug the following connectors:
• Keyboard connector cable
• Backlight power/LED cable
• Touchscreen cable (if applicable)
4. Disconnect the display cable from the flat panel display by removing the 2 screws holding it to the small printed circuit board on the display (see figure on the following page). The display assembly is now completely free of the unit.
Replacing the Backlight Tubes (12.1 in. Keypad Version):
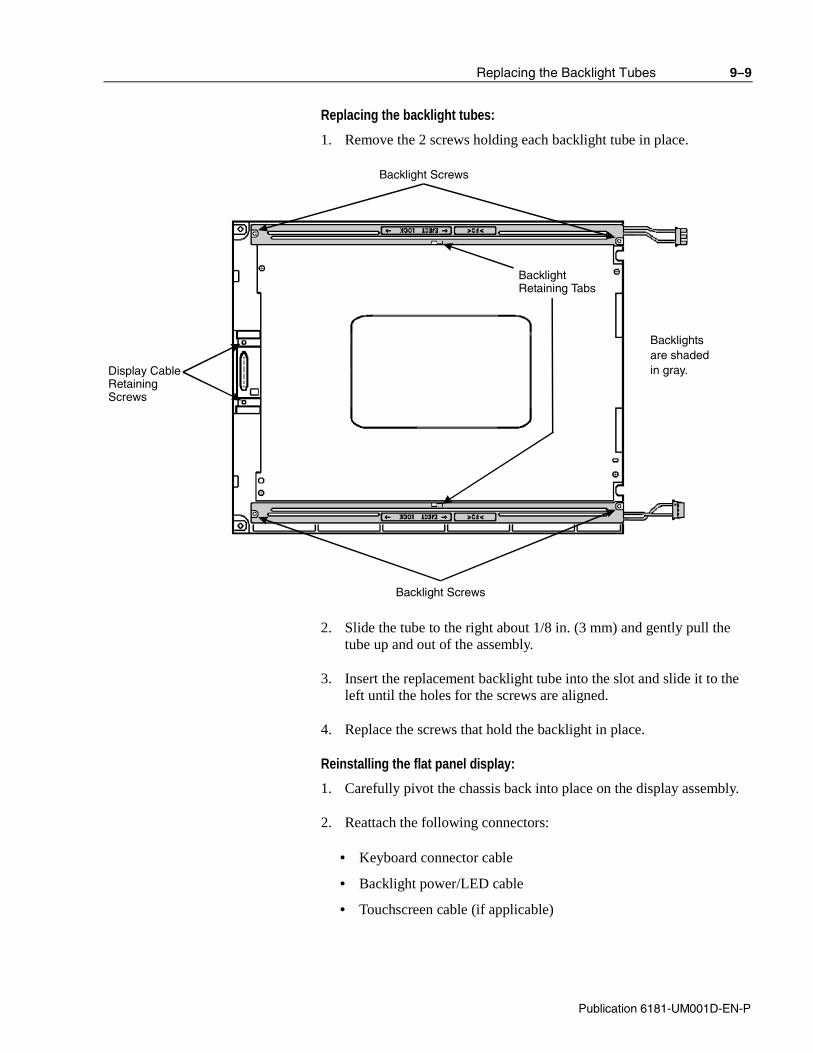
Replacing the Backlight Tubes 9–9
Publication 6181-UM001D-EN-P
Replacing the backlight tubes:
1. Remove the 2 screws holding each backlight tube in place.
Backlight Screws
Display CableRetainingScrews
Backlight Screws
BacklightRetaining Tabs
Backlights are shaded in gray.
2. Slide the tube to the right about 1/8 in. (3 mm) and gently pull the tube up and out of the assembly.
3. Insert the replacement backlight tube into the slot and slide it to the left until the holes for the screws are aligned.
4. Replace the screws that hold the backlight in place.
Reinstalling the flat panel display:
1. Carefully pivot the chassis back into place on the display assembly.
2. Reattach the following connectors:
• Keyboard connector cable
• Backlight power/LED cable
• Touchscreen cable (if applicable)

9–10 Replacing the Backlight Tubes
Publication 6181-UM001D-EN-P
3. Reattach the display cable to the flat panel display by gently plugging the connector into the small printed circuit board and replacing the 2 screws that hold it in place.
ATTENTION: Do not overtighten the screws holding the display cable to the printed circuit board. Tighten to a torque of 1-2 in-lbs. (0.1-0.2 N-m)
4. Reattach the display assembly to the unit using the 6 screws.
5. Replace the retaining screw below the top hinge.

12.1 in. Keypad Bezel Operation
This chapter describes operations specific to the RAC6181 12.1 in. keypad version. The RAC6181 front bezel assembly consists of a plastic bezel with overlay and a metal frame assembly that holds the LCD panel and associated interconnection circuit boards. The RAC6181 keypad version has removable function key legend strips. This chapter’s topics include:
• How to install the keypad legend strips
• Keypad Configuration Utility (KCU) software
The RAC6181 12.1 in. keypad versions contain three legend strips – one strip for the horizontal function keys located below the display and two strips for the vertical function keys located on either side of the display. Each of these legend strips can be removed and replaced with custom printed versions. Contact Rockwell Automation for more information on how to obtain customized legend strips.
The standard legend strips shipped with the product are configured as follows:
Horizontal strip F1-F14 printed on exposed side, user-writable surface on the reverse side.
Left vertical strip K1-K10 printed on exposed side, user-writable surface on the reverse side.
Right vertical strip K11-K20 printed on exposed side, user-writable surface on the reverse side.
The following replacement legend strips can be ordered from Rockwell Automation. Each kit contains one each of the three legend strips – horizontal, left vertical, and right vertical strips. They are configured as listed above with text printed on one side and a user-writable surface on the other side.
Part Number Description
6189-2KEYKIT12 12.1 in. bezel legend strip kit (3 pcs)
Chapter 10
Chapter Objective
Installing Keypad Legend Strips

10–2 12.1 in. Keypad Bezel Operation
Publication 6181-UM001D-EN-P
To replace the horizontal legend strip:
1. Locate the exposed legend strip tab on the lower left side of the RAC6181 unit.
Horizontal LegendStrip Tab
2. Carefully pull on the tab to remove the installed legend strip.
3. To insert the new legend strip, first slightly cup the strip and carefully push it into the bezel slot. Short pushes will help slide the new strip fully into place.
4. Verify the alignment of the legend strip text with the front overlay key windows. Adjust as needed by pushing or pulling slightly on the legend strip tab.

12.1 in. Keypad Bezel Operation 10–3
Publication 6181-UM001D-EN-P
To replace the vertical legend strips:
1. Remove the RAC6181 from the panel.
2. Remove the 6 adapter plate screws and open the hinged front (page 9-8).
3. Disconnect all cables between the bezel and computer chassis.
4. Close bezel to access the hinges on the outside of the unit. Remove the screw retaining the hinge halves together. This will allow you to separate the bezel from the chassis.
5. Separate the bezel assembly completely from the chassis.
6. Disconnect keypad and touchscreen cables from the small interconnect board. This is the circuit board with the two PS2 connectors extending out the back of the bezel.
7. Remove the 10 screws securing the metal frame and lift the metal frame away from the plastic bezel.
8. Place the front bezel plastic overlay facedown on a flat surface. Take care not to scratch the front overlay or display window. Locate the two exposed legend strip tabs as shown.
9. To remove the legend strips, carefully pull on the exposed tab.
10. To the insert new legend strip, first slightly cup the strip and carefully push it into the bezel slot. Short pushes will help slide the new strip fully into place.
11. Verify the alignment of the legend strip text with the front overlay key windows. Adjust as needed by pushing or pulling slightly on the legend strip tab.

10–4 12.1 in. Keypad Bezel Operation
Publication 6181-UM001D-EN-P
12. To reassemble the front bezel assembly, thread the keypad and touchscreen cables through the hole in the metal frame.
13. Reconnect the keypad cable, touchscreen cable, backlight tube connectors, and backlight power supply cable.
14. Reinstall the 10 screws to attach the metal frame to the plastic overlay assembly. Tighten the screws to a torque of 6 – 8 in-Lbs (0.7 – 0.9 N•m).
15. Attach the bezel and install the hinge retainer screw.
16. Reinstall the 6 adapter plate screws. Tighten the screws to a torque of 6 – 8 in-lbs. (0.7 – 0.9 N•m).
17. Reinstall the computer in the panel
The RAC6181 Keypad Configuration Utility (KCU) is a PC-based program that allows you to modify, view, print, and save keypad configurations for the 6181 12.1 inch keypad bezel. The keypad configuration can then be downloaded to the 6181 12.1 inch keypad Bezel Interface Controller (BIC) Card using a DOS-based jflash.exe utility.
For each keypad configuration you can:
• Enable or disable specific keys or selected key combinations.
• Configure the key functionality.
• Retrieve, modify, and save key codes associated with specific keys on the computer’s bezel.
The resultant codes for single key are often referred to as the definition or mapping of the key. The collection of all keys’ definitions is commonly called the Keypad Configuration.
Hint: If you modify the Keypad Configuration, you should save the new configuration to a Keypad Configuration File (*.KY3). This file can be downloaded into another 6181 computer to provide the same keypad behavior, or used to reload the desired configuration into a replacement 6181 computer.
Setting Up and Using the Keypad Configuration Utility Software
12.1 in. Keypad Bezel Operation 10–5
Publication 6181-UM001D-EN-P
System Requirements
The RAC6181 Keypad Configuration Utility is a 32-bit Microsoft Windows application that runs on the 6181 computer with Windows 95, Windows 98, Windows NT 4.0, or Windows 2000.
Installing the Keypad Configuration Utility
The Keypad Configuration Utility software is pre-installed on 6181 12.1 inch keypad versions. A backup copy of the application is distributed on CD-ROM with the 6181 computer. Refer to the readme file on that CD-ROM for instructions on re-installing the Keypad Configuration Utility.
Configuration Files
The RAC6181 Keypad Configuration Utility recognizes a file with the extension *.KY3 as a 6181 keypad configuration. Opening a file with this extension should launch the RAC6181 Keypad Configuration Utility.
Connecting a Keyboard to the 6181 Computer
To use the Keypad Configuration Utility, connect an IBM® AT® standard keyboard and mouse with PS/2® connectors to the 6181 computer. For instructions, refer to page 2-16. The external keyboard connects to the PS/2 port located on the back of the 6181 bezel. The external mouse connects to the PS/2 port located on the 6181 CPU card. The PS/2 jumper cable must be installed between the 6181 bezel and the 6181 CPU card. This cable connects the 6181 BIC Card to the CPU card, so that keypad configuration information can be downloaded into the BIC Card. This cable also connects the multiplexed 6181 keypad and external keyboard signals to the CPU card.
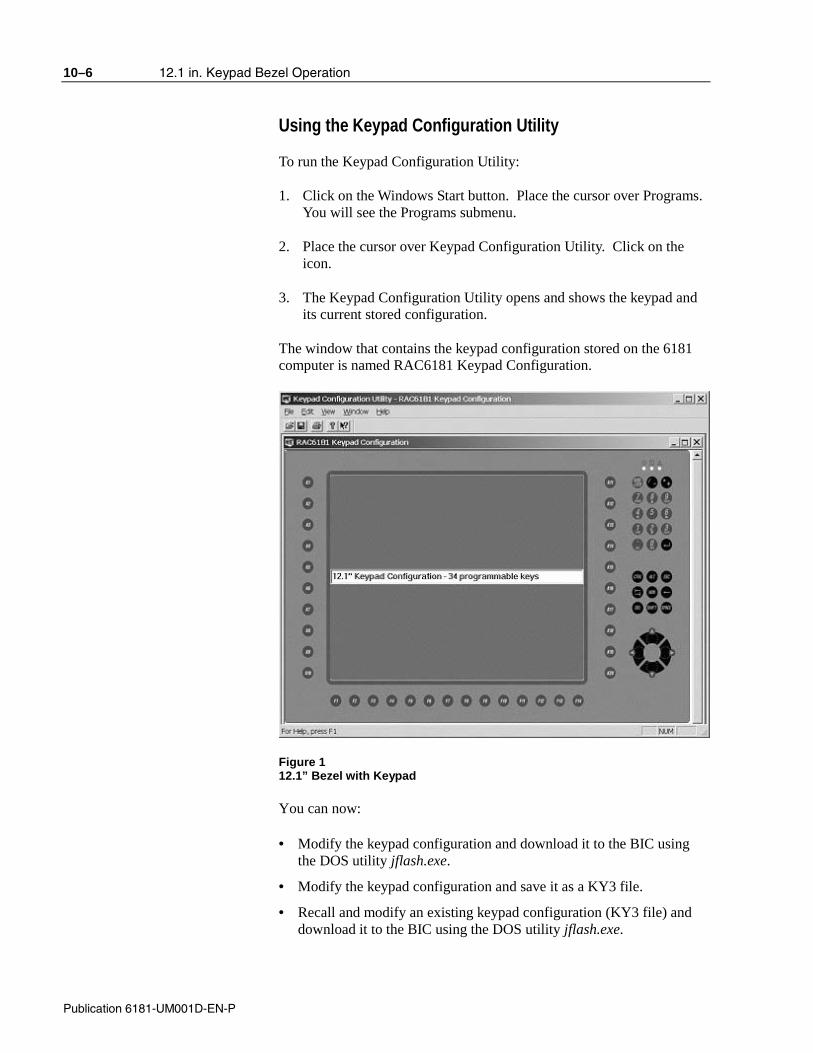
10–6 12.1 in. Keypad Bezel Operation
Publication 6181-UM001D-EN-P
Using the Keypad Configuration Utility
To run the Keypad Configuration Utility:
1. Click on the Windows Start button. Place the cursor over Programs. You will see the Programs submenu.
2. Place the cursor over Keypad Configuration Utility. Click on the icon.
3. The Keypad Configuration Utility opens and shows the keypad and its current stored configuration.
The window that contains the keypad configuration stored on the 6181 computer is named RAC6181 Keypad Configuration.
Figure 1 12.1” Bezel with Keypad
You can now:
• Modify the keypad configuration and download it to the BIC using the DOS utility jflash.exe.
• Modify the keypad configuration and save it as a KY3 file.
• Recall and modify an existing keypad configuration (KY3 file) and download it to the BIC using the DOS utility jflash.exe.

12.1 in. Keypad Bezel Operation 10–7
Publication 6181-UM001D-EN-P
Operations available from the menu bar are as follows.
Select commands on
this menu: To
File Menu Open, close, and save configuration files, print preview and print keypad configuration files.
Edit Menu Select all keys or just the programmable keys, enable/disable keys, restore default configuration, edit single key configurations, and set keypad behavior attributes.
View Menu Toggle the tool bar or status bar on or off, or view the keypad identifiers of the current Keypad Configuration.
Window Menu Opens a new window and arranges open windows and keypad icons.
Help Menu Display a list of help topics or the current version number of the 6181 Keypad Configuration Utility.
RAC6181 Keypad Configuration Window
A keypad configuration appears as a separate window. Most operations are done within this window.
You can:
• enter a description of the Keypad Configuration.
• open a saved Keypad Configuration file (*.KY3).
• select one or more keys.
• enable/disable all or specific keys.
• set the default configuration for all the programmable keys or all the keys.
• edit the definition of the programmable keys.
− change a programmable key to a new key; e.g. F1 ‘a’
− assign a macro string to a programmable key; e.g. F2 “RAC6181”

10–8 12.1 in. Keypad Bezel Operation
Publication 6181-UM001D-EN-P
Entering a Keypad Description
The text edit box appears near the center of the keypad configuration window and allows you to enter a description to identify the Keypad Configuration. The text edit box accepts up to 64 characters. To edit a description, simply click in the text edit box and start typing or editing the text. With the cursor in the text edit box, click the right mouse button to open the popup menu. Use the commands on this menu to copy/cut, paste and delete selected text. To select all the text in the description box, choose Select All from the popup menu. The new keypad description will be saved to a File when you select Save or Save As … on the File menu.
Figure 2 Text Description

12.1 in. Keypad Bezel Operation 10–9
Publication 6181-UM001D-EN-P
Selecting Keys
The table below shows how to select keys on the keypad. You must select a key before you can enable or disable the key or modify its configuration.
To Select: Do This: The result is:
Single key Click the left mouse button on the key.
The selected key is highlighted with handles.
Group of keys Click the left mouse button and drag the selection rectangle around the keys you want to select.
The selected keys are highlighted with handles.
All keys Choose Select All Keys from the Edit menu.
All keys are highlighted with handles.
All Programmable Keys Choose Select All Programmable Keys from the Edit menu.
All programmable keys are highlighted with handles.
Multiple Keys Click the left mouse button sequentially on the desired keys while holding down the Ctrl key.
The selected keys are highlighted with handles.
Enabling and Disabling Keys
You can enable/disable all or specific keys on the keypad. By default, all keys are initially enabled.
To disable one or more keys:
1. Select the key(s) you want to disable.
2. Choose Enable Key from the Edit Menu or click the right mouse button on the key and choose Enable Key from the popup menu.
A red X appears on the key, indicating that it is disabled and the check mark is removed from Enable Key on the Edit menu.
To enable a key:
1. Select the disabled key(s) that you want to enable.
2. Choose Enable Key from the Edit Menu or click the right mouse button on the key and choose Enable Key from the popup menu.
The red X is cleared from the key, and a check mark appears next to Enable Key on the Edit menu. If multiple keys are selected with some

10–10 12.1 in. Keypad Bezel Operation
Publication 6181-UM001D-EN-P
keys enabled and others disabled, choosing the Enable Key command will enable all the selected keys.
Opening a Saved Keypad Configuration
To open an existing keypad configuration file:
1. Choose Open from the File menu or click on the tool bar.
Figure 3 Open File
2. The dialog shows all keypad configuration files (.KY3) in the “Look
In:” folder.
3. Double-click the .KY3 file you want to open or click on a .KY3 file and then click the Open button. A window opens for the selected keypad configuration. The name of the .KY3 file shows in the title bar.
The window titled RAC6181 Keypad Configuration is the configuration stored on the 6181. If this window and all other keypad configuration windows are closed, you can reopen the 6181 Keypad Configuration from the File menu by selecting Open RAC6181 Keypad Configuration from the File menu.

12.1 in. Keypad Bezel Operation 10–11
Publication 6181-UM001D-EN-P
Set the Default Configuration for Programmable Keys
1. Select one or more programmable keys or use the edit menu Select All Programmable Keys. See “Selecting Keys” above.
2. Choose Set Default Configuration from the Edit menu.
Figure 4 Set Programmable Key Default
The selected programmable keys are set to their default assignments. The default key assignments are listed at the end of this chapter.

10–12 12.1 in. Keypad Bezel Operation
Publication 6181-UM001D-EN-P
Set the Default Configuration for Any Key
1. Select one or more keys or use the edit menu Select All Keys. See “Selecting Keys” above.
2. Choose Set Default Configuration from the Edit menu.
Figure 5 Set Key Default
The selected keys are set to their default assignments. Non-programmable keys are enabled by default. The default key assignments are listed at the end of this chapter.
To restore the factory defaults on the 6181 keypad configuration, select all keys (Edit menu / Select All Keys), then select the Set Default Configuration.
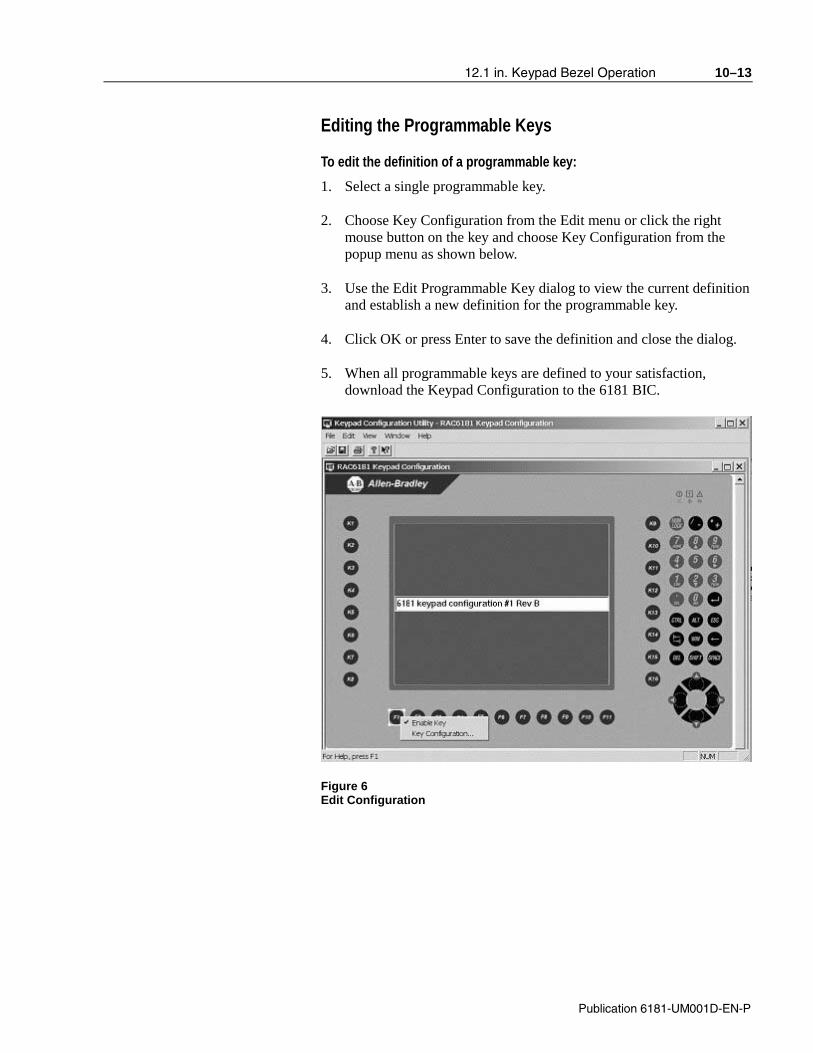
12.1 in. Keypad Bezel Operation 10–13
Publication 6181-UM001D-EN-P
Editing the Programmable Keys
To edit the definition of a programmable key:
1. Select a single programmable key.
2. Choose Key Configuration from the Edit menu or click the right mouse button on the key and choose Key Configuration from the popup menu as shown below.
3. Use the Edit Programmable Key dialog to view the current definition and establish a new definition for the programmable key.
4. Click OK or press Enter to save the definition and close the dialog.
5. When all programmable keys are defined to your satisfaction, download the Keypad Configuration to the 6181 BIC.
Figure 6 Edit Configuration

10–14 12.1 in. Keypad Bezel Operation
Publication 6181-UM001D-EN-P
The Edit Programmable Key dialog lets you modify the definition of the selected programmable key. The definitions are downloaded and stored in the 6181 BIC. Modifying a programmable key is not recommended unless required by the application software.
Figure 7 Select and Edit Programmable Key
When the Edit Programmable Key dialog box opens, it shows the current definition of the selected programmable key. Nonprintable key codes appear in brackets, for example, <F1> or <(L)Shift+F1>. Modifiers appear to the left of a “+” symbol. (L) or (R) denote left or right modifier keys. The current mode is indicated in the Select Mode grouping.

12.1 in. Keypad Bezel Operation 10–15
Publication 6181-UM001D-EN-P
Text Edit Box
The text box at the top of the dialog displays the current definition for a selected programmable key. You can enter a new definition directly into the edit box if the characters are printable (e.g., alphanumeric characters). You must enter nonprintable characters from the Add New Code list. While in the text edit box, use Backspace to remove existing characters and correct typing errors. The contents of the Text Edit Box are transformed into key codes and/or run commands that are emitted when the key is pressed. Note that one of the more powerful 6181 keypad features is to perform multiple key codes with a single key press.
Figure 8 Edit Programmable Key Dialog
Select Mode
Determines how the contents of the Text Edit Box will be handled by the 6181 when the selected key is pressed. There are 3 modes, established by radio buttons.
1. In Macro/String mode, the key is defined as non-repeating and all key codes are sent as a single string when the key is first pressed. A key defined as a Macro/String can submit a sequence of up to 31 key presses to the application that is currently in focus. In the following example, the programmable emits the well-known, DOS “DIR command” to the command prompt. The 6181 command prompt application window must be “in focus” on the 6181 before
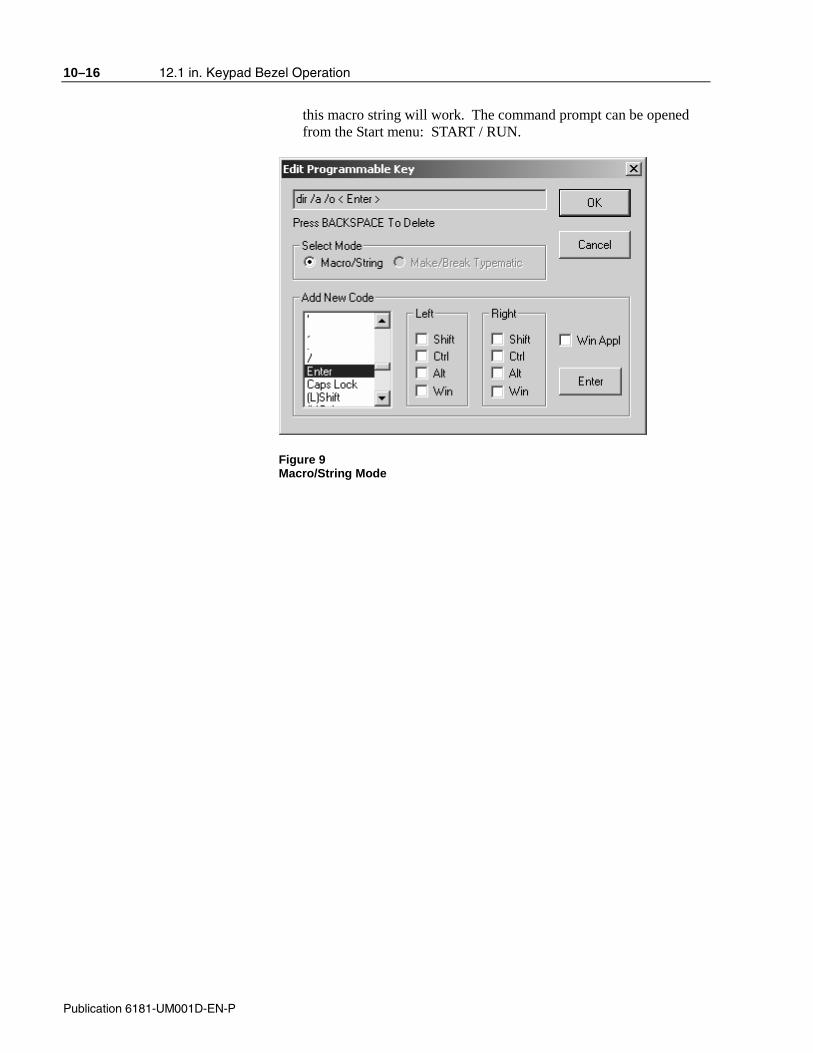
10–16 12.1 in. Keypad Bezel Operation
Publication 6181-UM001D-EN-P
this macro string will work. The command prompt can be opened from the Start menu: START / RUN.
Figure 9 Macro/String Mode

12.1 in. Keypad Bezel Operation 10–17
Publication 6181-UM001D-EN-P
2. In Make/Break Typematic mode, the key is defined as repeatable at the Repeat Rate established by the Keypad Properties Tool in 6181 Control Panel. The key “Make” codes are sent when the key is first pressed and the “Break” codes are sent when the key is released. If the key is held down, the “Make” codes repeat at the Repeat Rate. Make/Break Typematic mode is available only for a single key press definition including its modifiers, and as such is typically used to map a programmable key to a single alpha key. Thus the keypad can emulate a subset of a standard PC keyboard. In the following example the programmable key emits the character ‘a’ at the Repeat Rate.
Figure 10 Make/Break Typematic Mode
Add New Code
The Add New Code grouping on the dialog is a list of valid keys and modifiers that can be assigned to a programmable key. A modifier (Shift, Ctrl, Alt, Win or Win Appl) are enabled for a key code, by selecting the appropriate check boxes. These check boxes are dynamically updated so that only valid combinations are allowed. After selecting a key code and modifiers, click the Enter button to display the new code in the Text Edit box. You must click Enter after each new code selection. Non-printable codes are enclosed within ‘<’ and ‘>’.

10–18 12.1 in. Keypad Bezel Operation
Publication 6181-UM001D-EN-P
Hints for editing a programmable key definition:
• Select (or click on) a code in the Add New Code list.
• Under Left or Right, select the Shift, Ctrl, Alt, or Win check boxes to enable one or more modifiers for the new code.
• Click Enter to display the new code in the text box. If entering multiple codes, click Enter after each code selection or double-click each code selection. The text box is automatically updated.
• Type the characters in the Text box as you want them to appear using shifted or unshifted characters.
• To insert a nonprintable code in the text, select the code from the Add New Code list and then click Enter. The nonprintable code is inserted in the text with brackets.

12.1 in. Keypad Bezel Operation 10–19
Publication 6181-UM001D-EN-P
Examples of Editing Key Definitions
Example #1: Configure the K1 key as < (L)Win+e > which runs Windows Explorer:
1. Select the key labeled K1.
2. Choose Key Configuration from the Edit menu, or click the right mouse button on the key and choose Key Configuration from the popup menu.
3. In the text box, backspace to delete the current definition.
4. Under Select Mode, select Make/Break Typematic.
5. Select ’e’ from the Add New Code list.
6. Under Left, check Win check box.
7. Click the Enter button to display the new definition.
Figure 11 Example #1
8. Click OK to store the definition and exit the dialog.

10–20 12.1 in. Keypad Bezel Operation
Publication 6181-UM001D-EN-P
Example #2: Configure the K10 key perform a DIR /a /o /s command
1. Select the key labeled K10.
2. Choose Key Configuration from the Edit menu, or click the right mouse button on the key and choose Key Configuration from the popup menu.
3. In the text box, backspace to delete the current definition
4. Under Select Mode, select Macro/String
5. In the text box, type DIR /a /o /s
6. In the Add New Code list, select Enter and click the Enter button
Figure 12 Example #2
7. Click OK to store the definition and exit the dialog.

12.1 in. Keypad Bezel Operation 10–21
Publication 6181-UM001D-EN-P
Setting Keypad Preferences
You can configure a variety of general keypad features and operating functionality. Open the Keypad Preferences window by selecting “Preferences…” under the Edit menu.
Configuring Control Key Sequences
The top two check boxes in the Keypad Preferences window allow you to enable or disable the “Ctrl-Alt-Del” and “Ctrl-Shift-Esc” key sequences on the 6181 keypad or an external keyboard (if connected to the front bezel auxiliary keyboard PS/2 port). When disabled, the 6181 BIC Card will ignore these key sequences, locking out an operator from accidentally shutting down the operating system. Click on the appropriate box to enable or disable the selection. A “check” in the box indicates that the option is enabled.
The third check box allows you to enable or disable the 6181 front bezel auxiliary (external) keyboard port. When disabled, the 6181 BIC Card will not accept any input from an external keyboard connected to that port. Click on the box to enable or disable this selection. A “check” in the box indicates that the option is enabled.

10–22 12.1 in. Keypad Bezel Operation
Publication 6181-UM001D-EN-P
Make/Break Non-Repeat Mode
Selecting “Make/Break Non-Repeat Mode” functionality for either the Programmable Keys (F1-F14 and K1-K20) or the Fixed Keys (all other keys on the keypad) will determine how these keys operate during a continuous key press. All keys within the associated group that have the key mode “Make/Break Typematic” selected will be affected. Keys configured for Macro String mode are not affected by this setting.
If the Non-Repeat Mode is disabled, then the keys will repeat when held down as defined by the Make/Break Typematic mode. If the Non-Repeat Mode is enabled, then no repeat codes will be sent. The 6181 BIC Card will send a single “Make” code when the key is pressed, nothing will be sent while the key is held down, and a single “Break” code will be sent when the key is released.
Click on the box next to Programmable Keys to enable or disable the Make/Break Non-Repeat Mode for this group of keys (F1-F14, K1-K20). A “check” in the box indicated that the mode is enabled.
Click on the box next to Fixed Keys to enable or disable the Make/Break Non-Repeat Mode for this group of keys. A “check” in the box indicated that the mode is enabled.
Single Key Hold-Off Interval
This feature is used to “deactivate” a key immediately after it has been pressed and released, for a programmable time interval from 100 milliseconds up to 4 seconds. This is useful when specific keys are used for jogging type operations, to slow down the key code input stream from overrunning the operating system or application input buffers.
Use the pull-down menu next to the appropriate key group (Programmable Keys or Fixed Keys) to select the desired time interval. For example, select “1 sec” for the Programmable Keys. When a function key is pressed and released, another key press to that function key will be ignored for one second.
To disable the hold-off interval, select “disabled” from the pull-down menu.
Multi-Key Control
This feature is used to select the desired operation when multiple keys are pressed simultaneously. Select the desired mode by clicking on the circle or text for “None”, “Single Programmable Key Mode”, or Single Programmable Key Mode with Abort”.
The “None” selection does not inhibit any multi-key presses.
The “Single Programmable Key Mode” selection permits only one programmable key press at a time. If a programmable key, or the CTRL,

12.1 in. Keypad Bezel Operation 10–23
Publication 6181-UM001D-EN-P
ALT, or SHIFT key is pressed, all other programmable keys (F1-F14, K1-K20) are inhibited.
The “Single Programmable Key Mode with Abort” selection permits only one programmable key press at a time. It functions the same as the “Single Programmable Key Mode” selection, except a secondary programmable key press will immediately terminate the initial key press (sends a Break code, even if the initial key is physically still pressed). Any further key presses are inhibited until all keys are released.
Saving Keypad Configurations
You can save a keypad configuration under the existing name or under a new name.
Save
Choose Save from the File menu or click on the tool bar to save changes to a keypad configuration under the current name. The default filename for the keypad configuration is RAC6181.KY3. The first time you try to save a configuration, the Save As dialog opens.
Save As
Choose Save As from the File menu to save the keypad configuration under a new file name. The default file type for a 6181 keypad configuration files is *.KY3.
Previewing and Printing a Keypad Report
The 6181 Keypad Configuration Utility creates a printed report for each Keypad Configuration. You can print the report or preview the report first and then print it. Print Preview is a convenient way to view the keypad configuration.
To preview a keypad configuration:
1. Open the *.KY3 keypad configuration file you want to preview.
2. Choose Print Preview from the File menu.
The Preview workspace opens showing the keypad report. The report includes:
• keypad configuration file name .KY3.
• date/time report generated
• description field of the keypad configuration
• list of Non-programmable keys (enabled or disabled) on page 1.

10–24 12.1 in. Keypad Bezel Operation
Publication 6181-UM001D-EN-P
• definitions of programmable keys (enabled or disabled), and whether the key definition is Macro/String or Make/Break Typematic.
Macro/String definitions appear in double quotes; e.g. “String”. Make/Break Typematic definitions appear in single quotes; e.g. ‘a’. Disabled keys appear with a line through the key name and definition.
Figure 13 Print Preview

12.1 in. Keypad Bezel Operation 10–25
Publication 6181-UM001D-EN-P
3. Select one of the buttons at the top of the workspace.
Click this button: To:
Print Open a Print dialog allowing you to print the report. See the next page.
Zoom In Increase the magnification of the view so the report looks larger. You can increase the magnification several times.
Zoom Out Decrease the magnification of the view so the report looks smaller. You can decrease the magnification several times.
Close Exit the Preview workspace.

10–26 12.1 in. Keypad Bezel Operation
Publication 6181-UM001D-EN-P
12.1” Keypad Default Key Assignments for Programmable Keys
Key Legend Emulated Key(s) Make Scan Codes (Key Pressed)
Break Scan Codes (Key Released)
F1 F1 0x05 0xF0 0x05
F2 F2 0x06 0xF0 0x06
F3 F3 0x04 0xF0 0x04
F4 F4 0x0C 0xF0 0x0C
F5 F5 0x03 0xF0 0x03
F6 F6 0x0B 0xF0 0x0B
F7 F7 0x83 0xF0 0x83
F8 F8 0x0A 0xF0 0x0A
F9 F9 0x01 0xF0 0x01
F10 F10 0x09 0xF0 0x09
F11 F11 0x78 0xF0 0x78
F12 F12 0x07 0xF0 0x07
F13 Left Shift - F1 0x12 0x05 0xF0 0x05 0xF0 0x12
F14 Left Shift - F2 0x12 0x06 0xF0 0x06 0xF0 0x12
K1 Right Alt - F1 0xE0 0x11 0x05 0xF0 0x05 0xE0 0xF0 0x11
K2 Right Alt - F2 0xE0 0x11 0x06 0xF0 0x06 0xE0 0xF0 0x11
K3 Right Alt - F3 0xE0 0x11 0x04 0xF0 0x04 0xE0 0xF0 0x11
K4 Right Alt - F4 0xE0 0x11 0x0C 0xF0 0x0C 0xE0 0xF0 0x11
K5 Right Alt - F5 0xE0 0x11 0x03 0xF0 0x03 0xE0 0xF0 0x11
K6 Right Alt - F6 0xE0 0x11 0x0B 0xF0 0x0B 0xE0 0xF0 0x11
K7 Right Alt - F7 0xE0 0x11 0x83 0xF0 0x83 0xE0 0xF0 0x11
K8 Right Alt - F8 0xE0 0x11 0x0A 0xF0 0x0A 0xE0 0xF0 0x11
K9 Right Alt - F9 0xE0 0x11 0x01 0xF0 0x01 0xE0 0xF0 0x11
K10 Right Alt - F10 0xE0 0x11 0x09 0xF0 0x09 0xE0 0xF0 0x11
K11 Right Alt - F11 0xE0 0x11 0x78 0xF0 0x78 0xE0 0xF0 0x11
K12 Right Alt - F12 0xE0 0x11 0x07 0xF0 0x07 0xE0 0xF0 0x11
K13 Right Shift - F1 0x59 0x05 0xF0 0x05 0xF0 0x59
K14 Right Shift - F2 0x59 0x06 0xF0 0x06 0xF0 0x59
K15 Right Shift - F3 0x59 0x04 0xF0 0x04 0xF0 0x59
K16 Right Shift - F4 0x59 0x0C 0xF0 0x0C 0xF0 0x59
K17 Right Shift - F5 0x59 0x03 0xF0 0x03 0xF0 0x59
K18 Right Shift - F6 0x59 0x0B 0xF0 0x0B 0xF0 0x59
K19 Right Shift - F7 0x59 0x83 0xF0 0x83 0xF0 0x59
K20 Right Shift - F8 0x59 0x0A 0xF0 0x0A 0xF0 0x59

12.1 in. Keypad Bezel Operation 10–27
Publication 6181-UM001D-EN-P
Loading New 6181 Keypad Configuration
Once a new keypad configuration has been created, it must be downloaded from the PC into the 6181 Bezel Interface Controller (BIC) Card. The configuration data is downloaded from the CPU card to the 6181 BIC Card through the PS/2 connection. Because Windows NT and Windows 2000 protect against direct access to low-level hardware ports, a separate DOS-based “jflash.exe” utility must be used for the download. The “jflash.exe” utility is shipped on a DOS-bootable 3.5 inch diskette with every 6181 12.1 inch keypad computer. You will need this diskette to complete the keypad configuration download.
Download Procedure:
1. Create the desired RAC6181 Keypad Configuration file on the 6181 computer.
2. Copy your keypad configuration file (*.ky3) onto the DOS-bootable floppy diskette containing the “jflash.exe” utility. This 3.5 inch diskette is shipped with the 6181.
3. Keep the “jflash.exe” boot diskette in the 6181 floppy drive. Reboot the 6181 computer.
4. The 6181 will boot to DOS from the “jflash.exe” floppy diskette.
5. From the DOS prompt, enter the following command to run the download program: a:> jflash yourconfig.ky3 <enter>
6. The status will show its progress with text messages until the download is finished.
The “jflash.exe” program has the following options:
• jflash yourconfig.ky3
− Downloads “yourconfig” keypad configuration into 6181 BIC Card flash ROM
• jflash –v yourconfig.ky3
− Downloads “yourconfig” keypad configuration with data verification into the BIC card flash ROM.
• jflash –r yourconfig.ky3
− Reads the existing keypad configuration from the 6181 BIC Card, saving the keypad configuration in the “yourconfig.ky3” file.

10–28 12.1 in. Keypad Bezel Operation
Publication 6181-UM001D-EN-P

System Troubleshooting
This chapter describes the most common operating problems, the probable causes, and recommended corrective actions including:
• troubleshooting procedure
• troubleshooting checklists
• boot-up error messages
• general error and information messages
The RAC6181 Computer is equipped with a red LED indicator ( ) on the front panel that indicates when the unit has exceeded the defined thresholds for operation. When this LED indicator is lit, the RAC6181 Computer has exceeded one of the following threshold settings:
• Voltage ranges
• Temperature requirements
• Chassis fan speed
You need to perform the following procedure to determine which thresholds have been exceeded.
1. Shutdown the RAC6181 Computer using the appropriate method for your operating system.
2. Apply power to the RAC6181 Computer.
3. Press and hold the F2 key after the memory check is completed to enter BIOS Setup. The BIOS Setup Menu is displayed.
4. Press the right arrow key to select the Hardware menu.
5. Press the down arrow key to select each hardware submenu and press Enter. Check the Current value for each setting against the specified threshold to determine if the setting has exceeded the threshold.
Chapter 11
Chapter Objectives
Hardware Diagnostics

11–2 System Troubleshooting
Publication 6181-UM001D-EN-P
To help identify and isolate a problem, we recommend that you do the following when a problem occurs:
1. Disconnect power to the RAC6181 Computer.
2. Disconnect any peripheral devices such as printer or CD-ROM drive.
3. Connect the keyboard and mouse (if used) to the side panel connectors. These connectors are connected directly to the processor board.
4. Check the video connections if using an external monitor.
5. If the system normally boots from the hard drive, make sure there is not a diskette in the floppy drive.
6. Apply power and observe the LEDs on the front panel (if present). Make sure the power on indicator is illuminated.
7. Monitor the Power On Self Test (POST). One of 3 events will occur:
• The RAC6181 Computer will complete the boot-up process.
• An error message will occur indicating a non-fatal fault. You may have to acknowledge the message before the boot-up process is allowed.
• The boot-up process will terminate (fatal error).
8. If the system boots up, isolate the problem by connecting peripheral devices one at a time until the problem occurs. If the problem is with a specific software package or driver, you may want to re-install the software.
9. If there is a problem not related specifically to a software installation or peripheral device, refer to the following troubleshooting checklists.
Troubleshooting Procedure

System Troubleshooting 11–3
Publication 6181-UM001D-EN-P
The following are checklists of items that you may have overlooked.
If you are having problems during boot-up:
√ Are all connections secure?
√ Are the device drivers installed?
√ Are the jumpers on any add-in boards correctly positioned?
√ Is the hard drive formatted and set up in the BIOS?
√ Is the RAM memory (DIMM or SODIMM) properly installed? You may want to re-install it to ensure a good connection.
√ Is the EIDE cable from the hard drive properly connected? You may want to see if the system will boot from a floppy diskette.
√ Is BIOS properly configured (refer to Appendix B)?
If there is a problem after boot-up:
√ If you are running a software package, re-install the software.
√ If the problem is intermittent, you may have a loose connection. Check all connections including any ISA/PCI cards. Check that the memory module (DIMM) is fully installed.
√ Does your system have a computer virus? Run anti-virus software.
√ Try clearing CMOS by removing and reinstalling the battery (on backplane) and running BIOS Setup (refer to Appendix B).
√ Although the RAC6181 Computer has a regulated and protected power supply, a transient voltage in the power line or peripheral cable may cause a flickering display, unexpected reboots, or a locked up system. If so, exit the application and start over.
√ Is the EIDE cable from the hard drive properly connected? You may want to see if the system will boot from a floppy drive.
√ Is the system overheating? Look at the diagnostics light on the front panel display (if present). Verify that the chassis fan is working and the filter is clean.
Troubleshooting Check Lists

11–4 System Troubleshooting
Publication 6181-UM001D-EN-P
If there is a problem running new software:
√ Does the software have a hardware requirement that is not present?
√ Are you using an authorized copy of the software? Some copies of software will not work without proper activation.
√ Did the software install correctly? Re-install the software.
√ Are you following the software's instructions? Refer to the software vendor’s user manual.
√ If the new software installed system software (DLL files) or device drivers, reapply the current Service Pack (release) of the operating system. Refer to Chapter 3, Initial Operation and Setup.
If there is a problem with an add-in board:
√ Is the board installed and configured correctly? Recheck jumper and other configuration settings.
√ Are any cables incorrectly installed?
If the board is an ISA board (not Plug and Play) refer to the following suggestions:
√ If the board uses an interrupt, run BIOS Setup and set the interrupt used by the ISA board to Reserved. In the advanced BIOS menu, select the PCI Configuration PCI/PNP IRQ subscreen and then reserve the IRQ of the card.
√ If the board uses memory between 80000H and 9FFFFH, run BIOS setup and set conventional memory to 512K.
√ If the board uses memory between C8000H and DFFFH, run BIOS setup and reserve the appropriate memory space.
If incorrect characters are displayed or are distorted:
√ Are the display contrast and brightness controls properly adjusted? Refer to the operating system containing the video driver for setup functions.
√ Is the monitor compatible with the selected video mode? The 10.4-inch RAC6181 Computer display is 640x480 (VGA) resolution. The 12.1-inch display is 800x600 (SVGA) resolution.
√ If using the integrated display, disconnect the chassis from the bezel and check the connection to the display.

System Troubleshooting 11–5
Publication 6181-UM001D-EN-P
If characters are not displayed on an external monitor:
√ Is the monitor functioning properly?
√ Is the video cable properly installed?
√ Check that selected character color is not set the same as the background color.
√ Is the video driver properly installed?
√ Reboot the RAC6181 Computer with the external monitor connected and powered up.
If the hard drive active LED indicator does not come on when the hard drive is being accessed:
√ Check the EIDE cable connections to the drive.
√ Check BIOS Setup for proper configuration. Is drive enabled?
√ Check the connections on the I/O board.
√ Reboot the RAC6181 Computer.
If the Power On LED indicator does not come on:
√ Check the front panel connector on the processor board.
√ Check the power cord.
√ Check the connections on the I/O board.

11–6 System Troubleshooting
Publication 6181-UM001D-EN-P

Maintenance
This chapter describes routine maintenance procedures for:
• cleaning the display
• cleaning the chassis fan filter
Note: Procedures for replacing the RAC6181 Computer backlight are in Chapter 9.
To clean the display:
ATTENTION: Use of abrasive cleansers or solvents may damage the display window. Do not scrub or use brushes.
1. Disconnect power from the RAC6181 Computer at the power
source.
2. Using a clean sponge or a soft cloth, clean the display with a mild soap or detergent.
3. Dry the display with a chamois or moist cellulose sponge to avoid water spots.
ATTENTION: If the RAC6181 Computer has a touchscreen, be aware that it is possible for screen objects to activate during equipment wash-downs.
To remove paint and grease:
Remove fresh paint splashes and grease before drying by rubbing lightly with isopropyl alcohol. Afterward, provide a final wash using mild soap or detergent solution. Rinse with clean water.
ATTENTION: Make sure the isopropyl alcohol does not come in contact with the equipment labels.
Alcohol may cause the label printing to smear.
Chapter 12
Chapter Objectives
Cleaning the Display

12–2 Maintenance
Publication 6181-UM001D-EN-P
Clean the chassis fan filter at least once a month under normal conditions. You may need to clean the filter more frequently if the RAC6181 Computer is located in an area with high levels of dust.
Important: You must clean the chassis fan filter properly to maintain the thermal integrity of the RAC6181 Computer.
To clean the chassis fan filter:
ATTENTION: Disconnect all power from the RAC6181 Computer before removing components. Failure to disconnect power could result in severe electrical shock or damage to the RAC6181 Computer.
1. Disconnect all power from the RAC6181 Computer.
2. Snap out the filter and retainer.
3. Remove the filter pad and clean the filter and filter pad with soap
and water and allow it to dry before installing.
4. Press down on the filter retainer until it snaps firmly into place on the fan.
Note: A replacement filter kit is available (Catalog No. 6189-1FILTER). This kit contains 5 filter assemblies.
Cleaning the Chassis Fan Filter
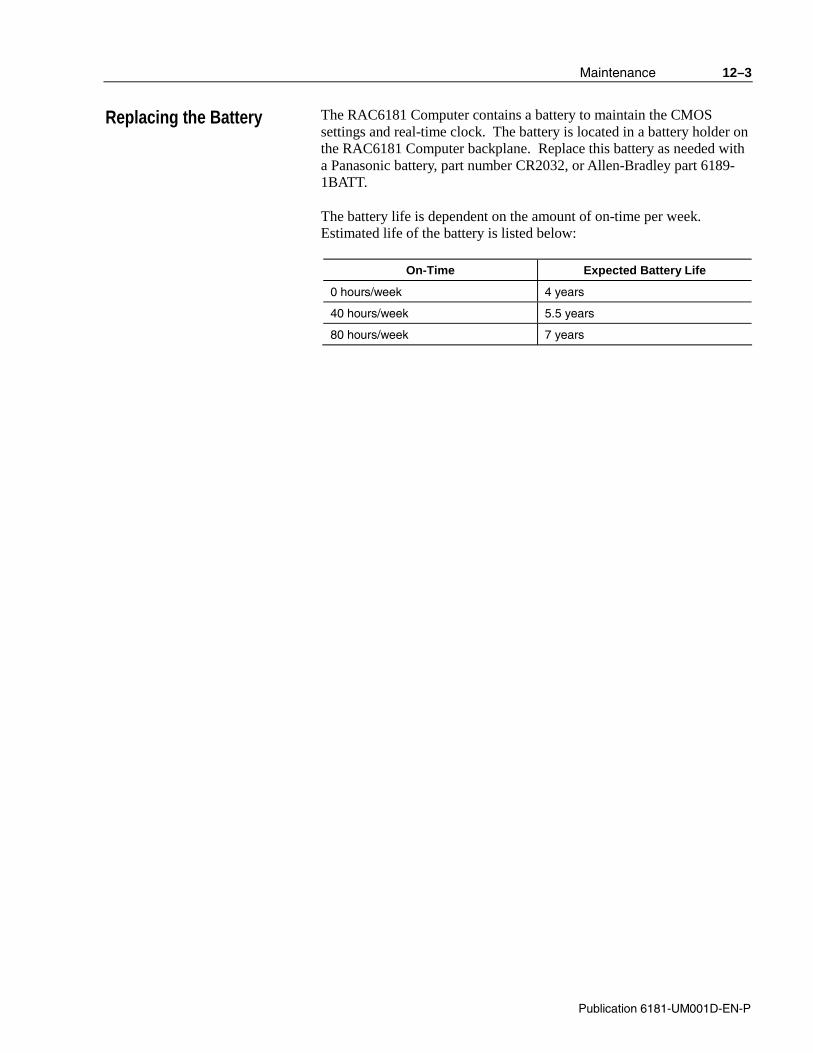
Maintenance 12–3
Publication 6181-UM001D-EN-P
The RAC6181 Computer contains a battery to maintain the CMOS settings and real-time clock. The battery is located in a battery holder on the RAC6181 Computer backplane. Replace this battery as needed with a Panasonic battery, part number CR2032, or Allen-Bradley part 6189-1BATT.
The battery life is dependent on the amount of on-time per week. Estimated life of the battery is listed below:
On-Time Expected Battery Life
0 hours/week 4 years
40 hours/week 5.5 years
80 hours/week 7 years
Replacing the Battery

12–4 Maintenance
Publication 6181-UM001D-EN-P
Description Catalog Number
ENCLOSURE:
System Fan replacement filters, 5 pcs 6189-1FILTER
System Fan with filter assembly 6189-1SYSFAN
Mounting nuts, bag of 10 (8 required, 2 spares) 6189-1MTGNUT
Mounting clips, bag of 4 (6 required for 12.1-in keypad bezel)
6189-2MTGKIT12
Enclosure screws, bag of 20 (6 for hdd, 14 common) 6189-1ESCREW
Expansion bay rear cover metal, power supply cable 6189-1EXPBAY
BEZEL:
10.4-in display anti-glare overlay kit (3 pcs) 6189-1AG104
10.4-in display bezel assembly, mtg screws 6189-1BEZEL104
10.4-in display & antiglare touchscreen bezel assembly, mtg screws
6189-1BZL104TA
10.4-in display & antiglare touchscreen stainless steel bezel assembly, mtg screws
6189-1SBZL104TA
10.4-in display replacement backlights, 2 pcs 6189-1BL104
12.1-in display anti-glare overlay kit (3 pcs) 6189-1AG121
12.1-in display bezel assembly, mtg screws 6189-1BEZEL121
12.1-in display & antiglare touchscreen bezel assembly, mtg screws
6189-1BZL121TA
12.1-in display & antiglare touchscreen stainless steel bezel assembly, mtg screws
6189-1SBZL121TA
12.1-in keypad bezel assembly (no display) 6189-2BZL12K
12.1-in keypad & touchscreen bezel assembly (no display)
6189-2BZL12KT
12.1-in keyad display bezel assembly 6189-2LCDBZL12K
12.1-in keypad display & touchscreen bezel assembly
6189-2LCDBZL12KT
12.1-in keypad legend strip kit 6189-2KEYKIT12
12.1-in display replacement backlights, 2 pcs 6189-BL12B
Replacement Parts

Maintenance 12–5
Publication 6181-UM001D-EN-P
Description Catalog Number
CPU CARD:
Intel Celeron 566MHz CPU card with CPU and heat sink for 10 inch unit
6189-1CPU566D10
Intel Celeron 566MHz CPU card with CPU and heat sink for 12 inch unit
6189-1CPU566D12
Intel Pentium III 600MHz CPU card with CPU and heat sink for 10 inch unit
6189-1CPU600D10
Intel Pentium III 600MHz CPU card with CPU and heat sink for 12 inch unit
6189-1CPU600D12
Intel Pentium III 866MHz CPU card with CPU and heat sink for 10 inch unit
6189-1CPU866D10
Intel Pentium III 866MHz CPU card with CPU and heat sink for 12 inch unit
6189-1CPU866D12
256 MB SDRAM DIMM 6189-1DIMM256
32 MB SDRAM DIMM 6189-1DIMM32
128 MB SDRAM DIMM 6189-DIMM128
64 MB SDRAM DIMM 6189-DIMM64
128 MB SDRAM Small Outline DIMM 6189-SODIMM128
256 MB SDRAM Small Outline DIMM 6189-SODIMM256
Pentium CPU I/O board and cables 6189-1DIOBRD
Battery 6189-1BATT
COMPUTER:
Power Supply, 120/240VAC 6189-1ACPS
AC power cord & retention bracket (USA plug) 6189-1ACCORD
Power Supply, 24VDC 6189-1DCPS
6181 COMMON PARTS:
5.25-in EIDE DVDROM drive with cables 6189-DVDROM
5.25-in EIDE Read/Write CDROM Drive with cables 6189-CDRW
1.44 MB Floppy Drive with cable 6189-FD144
Hard Drives (xxx = current hard drive size) 6189-HDxxx
2 chl high-speed RS232 PCI add-in card 6189-COMMCARD

12–6 Maintenance
Publication 6181-UM001D-EN-P

Specifications
Display
Type Active Matrix Color Thin Film Transistor (TFT) LCD
Display Size 10.4 12.1 12.1 Keypad
Nominal Display Area
Horizontal
Vertical
8.3in. (211mm)
6.2in. (158mm)
9.7in. (246mm)
7.3in. (185mm)
9.7in. (246mm)
7.3in. (185mm)
Resolution 640x480 pixels, 256K colors
800x600 pixels, 256K colors
800x600 pixels, 256K colors
Viewing Angle
Horizontal (typical)
Vertical (typical)
+/-70deg.
+40/-70deg.
+/-60deg.
+55/-45deg.
+/-60deg.
+55/-45deg.
Response Time 40 msec (typical) 30 msec (typical) 30 msec (typical)
Touchscreen (optional) Resistive analog Resistive analog Resistive analog
Mechanical
Enclosure
Display versions
Non-display version
NEMA 4 (indoor) when mounted (built to IP65 standards), NEMA 4X (stainless steel) optional
NEMA 1
LED Indicators
Display versions Non-display version
Red/green indicator None
Weight
10.4 version 12.1 version 12.1 keypad version Non-display version
2-Slot
15.9 lbs (7.2 kg) 16.2 lbs (7.4 kg) 16.2 lbs (7.4 kg) 13.2 lbs (5.6 kg)
4-Slot
21.9 lbs (9.9 kg) 22.2 lbs (10.1 kg) 22.2 lbs (10.1 kg) 19.2 lbs (8.7 kg)
Dimensions (overall) - 10.4 version
2-Slot
12.75 W x 10.25 H x 5.49 D (323.9mm x 260.4mm x 139.7mm)
4-Slot
12.75 W x 10.25 H x 7.15 D (323.9mm x 260.4mm x 181.7mm)
Cutout Dimensions - 10.4 version 11.75 W x 9.25 H (298.5mm x 234mm)
Dimensions (overall) - 12.1 version
2-Slot
13.75 W x 11.00 H x 5.81 D (349.3mm x 279.4mm x 147.6mm)
4-Slot
13.75 W x 11.00 H x 7.47 D (349.3mm x 279.4mm x 189.6mm)
Cutout Dimensions - 12.1 version 12.75 W x 10.00 H (323.9mm x 279mm)
Dimensions (overall) - 12.1 keypad version
2-Slot
16.36 W x 11.12 H x 5.64 D (415.8mm x 282.6mm x 143.3mm)
4-Slot
16.36 W x 11.12 H x 6.81 D (415.8mm x 282.6mm x 173.0mm)
Cutout Dimensions - 12.1 keypad version
15.35 W x 10.11 H (389.9mm x 256.8mm)
Dimensions (overall) - Non-display version
2-Slot
13.50 W x 9.13 H x 4.87 D (342.9mm x 231.7mm x 123.7mm)
4-Slot
13.50 W x 9.13 H x 6.04 D (342.9mm x 231.7mm x 153.4mm)
Expansion Bay Option Increases overall depth by 1.78 (45.2mm)
Appendix A
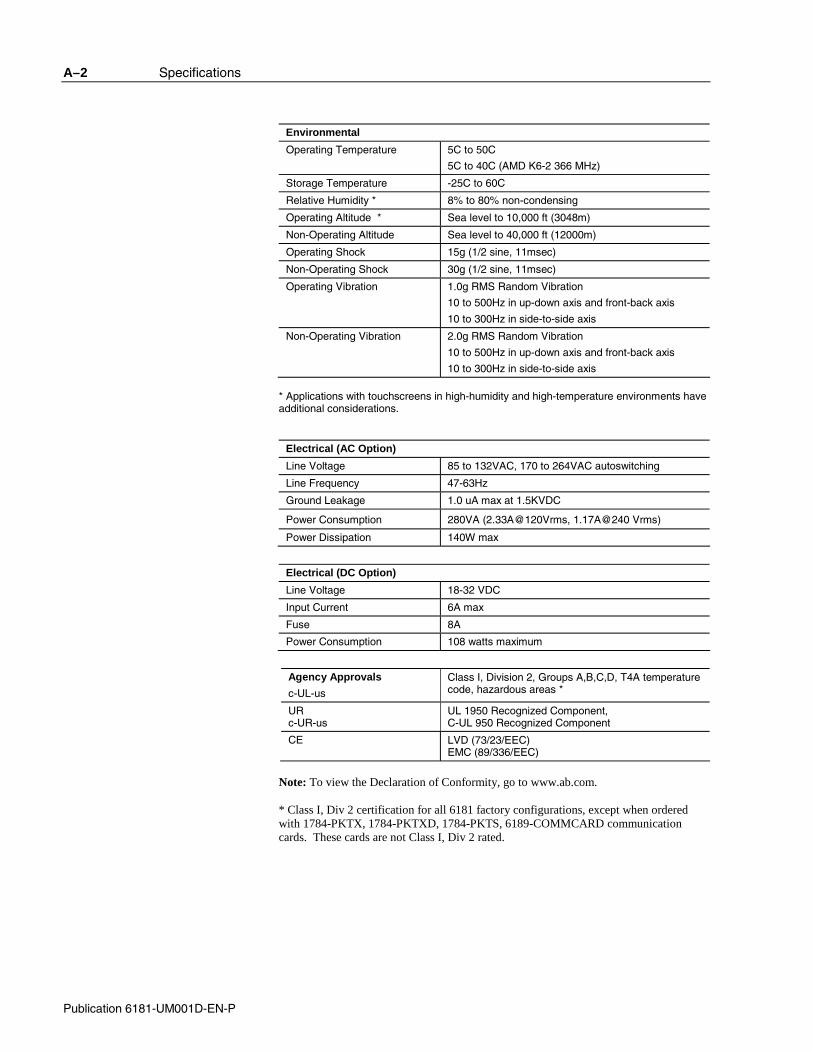
A–2 Specifications
Publication 6181-UM001D-EN-P
Environmental
Operating Temperature 5C to 50C
5C to 40C (AMD K6-2 366 MHz)
Storage Temperature -25C to 60C
Relative Humidity * 8% to 80% non-condensing
Operating Altitude * Sea level to 10,000 ft (3048m)
Non-Operating Altitude Sea level to 40,000 ft (12000m)
Operating Shock 15g (1/2 sine, 11msec)
Non-Operating Shock 30g (1/2 sine, 11msec)
Operating Vibration 1.0g RMS Random Vibration
10 to 500Hz in up-down axis and front-back axis
10 to 300Hz in side-to-side axis
Non-Operating Vibration 2.0g RMS Random Vibration
10 to 500Hz in up-down axis and front-back axis
10 to 300Hz in side-to-side axis * Applications with touchscreens in high-humidity and high-temperature environments have additional considerations.
Electrical (AC Option)
Line Voltage 85 to 132VAC, 170 to 264VAC autoswitching
Line Frequency 47-63Hz
Ground Leakage 1.0 uA max at 1.5KVDC
Power Consumption 280VA (2.33A@120Vrms, 1.17A@240 Vrms)
Power Dissipation 140W max
Electrical (DC Option)
Line Voltage 18-32 VDC
Input Current 6A max
Fuse 8A
Power Consumption 108 watts maximum
Agency Approvals
c-UL-us
Class I, Division 2, Groups A,B,C,D, T4A temperature code, hazardous areas *
UR c-UR-us
UL 1950 Recognized Component, C-UL 950 Recognized Component
CE LVD (73/23/EEC) EMC (89/336/EEC)
Note: To view the Declaration of Conformity, go to www.ab.com. * Class I, Div 2 certification for all 6181 factory configurations, except when ordered with 1784-PKTX, 1784-PKTXD, 1784-PKTS, 6189-COMMCARD communication cards. These cards are not Class I, Div 2 rated.

CPU Specifications and BIOS Settings
The following tables list the specifications for the CPU used on the RAC6181 Computer:
Item Description
Socket 7 Processor Intel Pentium 166MHz
Intel Pentium MMX 233MHz
AMD K6-2 366MHz
BIOS Phoenix OEM BIOS
256Kx8 flash EPROM (boot ROM)
Main Memory Up to 256Mbytes DRAM (one 168 pin DIMM socket)
60ns 3.3V EDO / SDRAM with ECC
60 and 66MHz bus speeds
L2 Cache Memory 512KB pipeline burst static RAM
Chipsets Acer M1531B North Bridge
Acer M1543B South Bridge
Video Interface Chips & Technologies CHIPS 65550
2Mbytes VGA local memory
Internal LVDS interface to LCD panel
External HD15 CRT (analog monitor) connector
Ethernet PCI 10/100BaseT
Intel 82559 MAC
Filtered RJ-45 connector
Other CPU I/O Two RS232 serial ports (COM1 and COM2*)
*COM2 is used by optional touchscreen interface
Parallel port (LPT1)
Two PS/2 ports for keyboard & mouse connections
Two USB ports
Appendix B
Pentium CPU Card Specifications

B–2 CPU Specifications and BIOS Settings
Publication 6181-UM001D-EN-P
Item Description
System Hardware Monitor
LM78 Monitor IC mapped to IRQ5, drives diagnostics LED
Monitors following items:
• 2.8V supply (CPU core)
• 3.3V supply
• ±5V supply
• ±12V supply
Internal temperature via DS1620 IC
User-Configured via BIOS
Other Features M5819 Real-Time-Clock chip with 256 bytes RAM
MAX705 Watchdog Timer
Item Description
Socket 370 Processor Celeron 300MHz (66MHz front side bus)
Pentium III 600MHz (100MHz front side bus)
Pentium III 733MHz (133MHz front side bus)
Pentium III 866MHz (133MHz front side bus)
BIOS Award Modular BIOS V6.00PG
Field upgradeable
Main Memory Up to 256MBytes DRAM (one 144-pin SODIMM socket)
100MHz and 133MHz 3.3V, non-ECC
L2 Cache Memory Integrated into Celeron and Pentium III processors
Chipsets Intel 815 chipset: • 82815E Graphic and Memory Controller Hub • 82801BA I/O Controller Hub • 82802AB Firmware Hub
Winbond W83C628F/W83C629D PCI-ISA Bridge
Winbond W83C627HF LPC Serial I/O
Video Interface Intel 82815E ACP, integral video memory (uses system RAM)
Internal LVDS interface to LCD panel
External HD15 CRT (analog monitor) connector
Ethernet PCI 10/100BaseT
Intel 82559 MAC
Filtered RJ-45 connector
Pentium III CPU Card Specifications

CPU Specifications and BIOS Settings B–3
Publication 6181-UM001D-EN-P
Item Description
Other CPU I/O Two RS232 serial ports (COM1 and COM2*)
*COM2 is used by optional touchscreen interface
Parallel Port (LPT1)
Two PS/2 ports for keyboard and mouse connections
Two USB ports
System Hardware Monitor
Winbond W83C627HF LPC Serial I/O chip
Monitors power supply voltages, fan speed, and temperature through application software or BIOS
Other Features Internal real-time clock
The RAC6181 Pentium CPU BIOS is a Phoenix OEM BIOS. The Pentium III CPU BIOS is an Award BIOS. It is contained in a flash EPROM, and can be upgraded in the field using a factory-provided DOS utility. The RAC6181 BIOS varies with the RAC6181 display option. The CPU card ships with the proper BIOS for the selected display. Note that exchanging CPU cards between units may cause BIOS incompatibilities.
Accessing the BIOS Setup Screen
The BIOS Setup screen can be entered during power-up by pressing the F2 key (Pentium CPU) or DEL key (Pentium III CPU) immediately following the RAM test. Because the keyboard is not buffered during this stage of power-up, the key may need to be repeatedly depressed to enter the BIOS Setup screen.
Note: You may need to determine the installed version of the BIOS before contacting technical support. The BIOS Setup screen displays the installed version of the BIOS.
BIOS Information

B–4 CPU Specifications and BIOS Settings
Publication 6181-UM001D-EN-P
Pentium CPU BIOS Setup Program
The BIOS Setup is a menu-driven program that allows the user to select from a variety of configurations. The set-up program contains descriptive information for each available configuration setting.
Because the RAC6181 Computer BIOS is field upgradeable, the exact BIOS settings may change with BIOS revisions. The following information may not include all the options in future BIOS revisions.
There are 5 main tabs in the BIOS Setup program:
• MAIN
• ADVANCED
• HARDWARE
• BOOT
• EXIT.
The following information shows the factory default settings for the RAC6181 Computer.
MAIN Tab
System Time (enter time here)
System Date (enter date here)
Legacy Diskette A: 1.44/1.25MB 3.5
Primary Master (shipped HDD size)
Primary Slave (none)
Cache RAM 512K
System Memory 640KB
Extended Memory (shipped RAM size)

CPU Specifications and BIOS Settings B–5
Publication 6181-UM001D-EN-P
ADVANCED Tab
Backlight Timeout 15 minutes (options are disabled, 30 seconds, 1 minute, 2 minutes, 4 minutes, 6 minutes, 8 minutes, 12 minutes, and 15 minutes)
PCI/PNP ISA DMA Resource Exclusion – all available
PCI/PNP IRQ Resource Exclusion – all available
PCI Configuration (allows user to reserve specific resources for ISA card)
PCI/PNP ISA UMB Region Exclusion – if KTCX15 then D000-D3FF Reserved, Not Shadowed. Otherwise, all available
I/O Device Configuration Serial Port A Auto
Serial Port B Auto
Mode Normal
Parallel Port Auto
Mode Bi-directional
Floppy Disk Controller
Enabled (Use this setting to disable the RAC6181 floppy diskette drive)
PS/2 Mouse Auto Detect
Reset Configuration Data No
Large Disk Access Mode DOS
Secured Setup Configurations
No
Memory Parity Check ECC
DMI Event Logging View DMI event log Enter
Event Logging Enabled
Mark DMI events as read
Enter
Clear all DMI event logs
No
Installed O/S Other
HARDWARE Tab
Enable Voltage Reading Yes
3.3 Volts: 3.17 to 3.43
5 Volts: 4.75 to 5.25
12 Volts: 11.4 to 12.6
-5 Volts: -4.25 to –5.75
-12 Volts: -10.8 to –12.35
Enable Fan Speed Yes
System Fan 2520 RPM minimum
Enable Temperature Yes
Temperature 60C maximum

B–6 CPU Specifications and BIOS Settings
Publication 6181-UM001D-EN-P
BOOT Tab
1 diskette drive
2 removable devices
3 hard drive
4 ATAPI CDROM drive
Hard Drive 1. (current hard drive)
2. bootable add-in card
Removable Format
EXIT Tab
Exit saving changes
Exit discarding changes
Load setup defaults (Use this setting to return to the RAC6181 BIOS to factory-default settings)
Discard changes
Save changes
Pentium III CPU Specifications and BIOS Settings
Pentium III SBC – BIOS Structure
Type: Award Modular BIOS V6.00PG
Version: 05/09/2001-i815E-W83627-6A69RD4JC-00
Menu: > Standard CMOS Features
> Advanced BIOS Features Load Fail-Safe Defaults
> Advanced Chipset Features Load Optimized Defaults
> Integrated Peripherals Set Supervisor Password
> Power Management Setup Set User Password
> PnP/PCI Configurations Save & Exit Setup
> PC Health Status Exit Without Saving

CPU Specifications and BIOS Settings B–7
Publication 6181-UM001D-EN-P
Standard CMOS Features
Fail-Safe Defaults
Optimized Defaults
Selections
Date N/C N/C
Time N/C N/C
IDE Primary Master Auto Auto None; Auto; Manual
IDE Primary Slave Auto Auto None; Auto; Manual
Drive A None Auto None; 360K/5.25in; 1.2M/5.25in; 720K/3.5in; 1.44M/3.5in; 2.88M/3.5in
Drive B None Auto None; 360K/5.25in; 1.2M/5.25in; 720K/3.5in; 1.44M/3.5in; 2.88M/3.5in
Video EGA/VGA EGA/VGA EGA/VGA; CGA40; CGA80; MONO
Halt On All, But Keyboard
All, But Keyboard All Errors; No Errors; All, But Keyboard; All, But Diskette; All, But Disk/Key
Advanced BIOS Features
Fail-Safe Defaults
Optimized Defaults
Selections
Virus Warning Enabled Disabled Enabled; Disabled
CPU Internal Cache Enabled Enabled Enabled; Disabled
External Cache Enabled Enabled Enabled; Disabled
CPU L2 Cache ECC Checking
Enabled Enabled Enabled; Disabled
Processor Number Feature
Enabled Disabled Enabled; Disabled
Quick Power On Self Test
Disabled Enabled Enabled; Disabled
First Boot Device Floppy Floppy Floppy; LS120; HDD-0; SCSI; CDROM; HDD-1; HDD-2; HDD-3; ZIP100; LAN; Disabled
Second Boot Device HDD-0 HDD-0 Floppy; LS120; HDD-0; SCSI; CDROM; HDD-1; HDD-2; HDD-3; ZIP100; LAN; Disabled
Third Boot Device CDROM CDROM Floppy; LS120; HDD-0; SCSI; CDROM; HDD-1; HDD-2; HDD-3; ZIP100; LAN; Disabled
Fourth Boot Device Disabled LAN Floppy; LS120; HDD-0; SCSI; CDROM; HDD-1; HDD-2; HDD-3; ZIP100; LAN; Disabled
Swap Floppy Drive Disabled Disabled Enabled; Disabled
Boot Up Floppy Seek Enabled Disabled Enabled; Disabled
Boot Up Numlock Status On On On; Off
Gate A20 Option Normal Fast Normal; Fast

B–8 CPU Specifications and BIOS Settings
Publication 6181-UM001D-EN-P
Typematic Rate Setting Disabled Disabled Enabled; Disabled
x Typematic Rate (Chars/sec)
6 6 6; 8; 10; 12; 15; 20; 24; 30
x Typematic Delay (Msec)
250 250 250; 500; 750; 1000
Security Option Setup Setup Setup; System
OS Select For DRAM >64MB
Non-OS2 Non-OS2 Non-OS2; OS2
HDD Smart Capability Disabled Enabled Enabled; Disabled
Report No FDD For WIN 95
No No No; Yes
Small Logo (EPA) Show Disabled Disabled Enabled; Disabled
Advanced Chipset Features
Fail-Safe Defaults
Optimized Defaults
Selections
SDRAM CAS Latency Time
3 3 2: 3
System BIOS Cacheable Disabled Disabled Enabled; Disabled
Video BIOS Cacheable Disabled Disabled Enabled; Disabled
Memory Hole At 15M-16M
Disabled Disabled Enabled; Disabled
CPU Latency Timer Enabled Enabled Enabled; Disabled
Delayed Transaction Disabled Enabled Enabled; Disabled
AGP Graphics Aperture Size
64MB 64MB 64MB; 32MB
On-Chip Video Window Size
64MB 64MB 64MB; Disabled
Display Device Select CRT & LCD CRT & LCD CRT; LCD; CRT & LCD

CPU Specifications and BIOS Settings B–9
Publication 6181-UM001D-EN-P
Integrated Peripherals
Fail-Safe Defaults
Optimized Defaults
Selections
On-Chip Primary PCI IDE Enabled Enabled Enabled; Disabled
IDE Primary Master PIO Auto Auto Auto; Mode 0; Mode 1; Mode 2; Mode 3; Mode 4
IDE Primary Slave PIO Auto Auto Auto; Mode 0; Mode 1; Mode 2; Mode 3; Mode 4
IDE Primary Master UDMA
Disabled Auto Auto; Disabled
IDE Primary Slave UDMA Disabled Auto Auto; Disabled
USB Controller Enabled Enabled Enabled; Disabled
USB Keyboard Support Disabled Enabled Enabled; Disabled
Init Display First PCI Slot Onboard/AGP Onboard/AGP; PCI Slot
IDE HDD Block Mode Disabled Enabled Enabled; Disabled
Onboard FDC Controller Enabled Enabled Enabled; Disabled
Onboard Serial Port 1 3F8/IRQ4 3F8/IRQ4 Disabled; 3F8/IRQ4; 2F8/IRQ3; 3E8/IRQ4; 2E8/IRQ3; Auto
Onboard Serial Port 2 2F8/IRQ3 2F8/IRQ3 Disabled; 3F8/IRQ4; 2F8/IRQ3; 3E8/IRQ4; 2E8/IRQ3; Auto
Onboard Parallel Port 378/IRQ7 378/IRQ7 Disabled; 378/IRQ7; 278/IRQ5; 3BC/IRQ7
Parallel Port Mode SPP EPP SPP; EPP; ECP; ECP & EPP
x EPP Mode Select EPP 1.7 EPP 1.9 EPP 1.9; EPP 1.7
x ECP Mode Use DMA 3 3 1; 3

B–10 CPU Specifications and BIOS Settings
Publication 6181-UM001D-EN-P
Power Management Setup
Fail-Safe Defaults
Optimized Defaults
Selections
Power Management User Define User Define User Define; Min Saving; Max Saving
Video Off Method Blank Screen DPMS Blank Screen; V/H Sync & Blank; DPMS
Video Off In Suspend No No Yes; No
Suspend Type Stop Grant Stop Grant Stop Grant; Pwr On Suspend
MODEM Use IRQ 3 3 NA; 3; 4; 5; 7; 9; 10; 11
Suspend Mode Disabled Disabled Disabled; 1 Min; 2 Min; 4 Min; 8 Min; 12 Min; 20 Min; 30 Min; 40 Min; 1 Hour
HDD Power Down Disabled Disabled Disabled; 1 Min; 2 Min; 3 Min; 4 Min; 5 Min; 6 Min; 7 Min; 8 Min; 9 Min; 10 Min; 11 Min; 12 Min; 13 Min; 14 Min; 15 Min
CPU Thermal-Throttling 87.5% 50.0% 87.5%; 75.0%; 62.5%; 50.0%; 37.5%; 25.0%; 12.5%
** Reload Global Timer Events **
Primary IDE 0 Disabled Disabled Enabled; Disabled
Primary IDE 1 Disabled Disabled Enabled; Disabled
FDD, COM, LPT Port Disabled Disabled Enabled; Disabled
PCI PIRQ[A-D]# Disabled Disabled Enabled; Disabled
PnP/PCI Configurations
Fail-Safe Defaults
Optimized Defaults
Selections
PNP OS Installed No No No; Yes
Reset Configuration Data Enabled Enabled Enabled; Disabled
Resources Controlled By Auto (ESCD) Auto (ESCD) Auto (ESCD); Manual
x IRQ Resources
IRQ-3 Assigned to PCI/ISA PnP PCI/ISA PnP PCI/ISA PnP; Legacy ISA
IRQ-4 Assigned to PCI/ISA PnP PCI/ISA PnP PCI/ISA PnP; Legacy ISA
IRQ-5 Assigned to PCI/ISA PnP PCI/ISA PnP PCI/ISA PnP; Legacy ISA
IRQ-7 Assigned to PCI/ISA PnP PCI/ISA PnP PCI/ISA PnP; Legacy ISA
IRQ-9 Assigned to PCI/ISA PnP PCI/ISA PnP PCI/ISA PnP; Legacy ISA
IRQ-10 Assigned to PCI/ISA PnP PCI/ISA PnP PCI/ISA PnP; Legacy ISA
IRQ-11 Assigned to PCI/ISA PnP PCI/ISA PnP PCI/ISA PnP; Legacy ISA
IRQ-12 Assigned to PCI/ISA PnP PCI/ISA PnP PCI/ISA PnP; Legacy ISA
IRQ-14 Assigned to PCI/ISA PnP PCI/ISA PnP PCI/ISA PnP; Legacy ISA
IRQ-15 Assigned to PCI/ISA PnP PCI/ISA PnP PCI/ISA PnP; Legacy ISA

CPU Specifications and BIOS Settings B–11
Publication 6181-UM001D-EN-P
x DMA Resources
DMA-0 Assigned to PCI/ISA PnP PCI/ISA PnP PCI/ISA PnP; Legacy ISA
DMA-1 Assigned to PCI/ISA PnP PCI/ISA PnP PCI/ISA PnP; Legacy ISA
DMA-3 Assigned to PCI/ISA PnP PCI/ISA PnP PCI/ISA PnP; Legacy ISA
DMA-5 Assigned to PCI/ISA PnP PCI/ISA PnP PCI/ISA PnP; Legacy ISA
DMA-6 Assigned to PCI/ISA PnP PCI/ISA PnP PCI/ISA PnP; Legacy ISA
DMA-7 Assigned to PCI/ISA PnP PCI/ISA PnP PCI/ISA PnP; Legacy ISA
Reserved Memory Base N/A N/A N/A; C800; CC00; D000; D400; D800; DC00
Reserved Memory Length
16K 16K 8K; 16K; 32K; 64K
PCI/VGA Palette Snoop Disabled Disabled Enabled; Disabled
PCI Slot 1 Assignment Auto Auto Auto; 3; 4; 5; 7; 9; 10; 11; 12; 14; 15
PCI Slot 2 Assignment Auto Auto Auto; 3; 4; 5; 7; 9; 10; 11; 12; 14; 15
PCI Slot 3 Assignment Auto Auto Auto; 3; 4; 5; 7; 9; 10; 11; 12; 14; 15
PC Health Status
Fail-Safe Defaults
Optimized Defaults
Selections
> Current System Temp Not settable Not settable High Limit = 60°C/140°F
> Current CPU Temperature Not settable Not settable High Limit = 75°C/165°F
> Current Fan Speed Not settable Not settable
Enable Chassis Fan Beep Enabled Enabled fixed
x Chassis Fan Low Limit Value
3500 RPM 3500 RPM fixed
> CPU (V) Not settable Not settable High Limit = 1.80 Low Limit = 1.40
> +1.5V Not settable Not settable High Limit = 1.65 Low Limit = 1.35
> +3.3V Not settable Not settable High Limit = 3.60 Low Limit = 2.90
> +5V Not settable Not settable High Limit = 5.50 Low Limit = 4.50
> +12V Not settable Not settable High Limit = 13.20 Low Limit = 10.80
> -12V Not settable Not settable High Limit = -13.20 Low Limit = -10.80
> -5V Not settable Not settable High Limit = -5.50 Low Limit = -4.50
> VBAT (V) Not settable Not settable High Limit = 4.00 Low Limit = 2.50

B–12 CPU Specifications and BIOS Settings
Publication 6181-UM001D-EN-P
Frequency/Voltage Control
Fail-Safe Defaults
Optimized Defaults
Selections
Auto Detect DIMM/PCI Clk
Enabled Enabled Enabled; Disabled
Spread Spectrum +/-0.5% +/-0.5% Disable; +/-0.5%; +/-0.25%; +/-0.38%
CPU Host/PCI Clock Default Default Default; 100/100/33MHz; 103/103/34MHz; 105/105/35MHz; 110/110/36MHz; 115/115/38MHz
CPU Clock Ratio x 3 x 3 x 3; x 3.5; x 4; x 4.5; x 5; x 5.5; x 6; x 6.5; x 7; x 7.5; x 8

Using a Touchscreen
This appendix describes how to configure a touchscreen to work with a RAC6181 Computer. Topics include:
• Installing touchscreen driver software
• Calibrating the touchscreen
• Touchscreen interface
The RAC6181 Computer can be ordered with an optional touchscreen. The following table describes the touchscreen and controller board used for the RAC6181 Computer:
Value Non-Keypad Version
Description
12.1” Keypad Version
Description
Manufacturer Elo TouchSystems Touchko, Inc.
Touchscreen AccuTouch 5-wire resistive touchscreen
Touchko 5-wire resistive touchscreen
Touchscreen Controller SmartSet Controller Model E271-2201
TKO 458r3
When a touchscreen is delivered with the RAC6181 Computer, the touchscreen is installed and the touchscreen controller is installed and connected.
Touchscreen Serial Port Usage
The optional touchscreen controller for a RAC6181 Computer connects internally to the COM2 serial port. The touchscreen is factory configured with the proper COM2 and touchscreen driver settings, so no user configuration is required. If for any reason these settings are corrupted, reset the COM2 serial port to 9600bps, 8 data bits, 1 stop bit, no parity.
Driver Software
The touchscreen driver is already loaded on the RAC6181 Computer. The driver software is also provided on a floppy diskette.
Note: The Elo TouchSytems touchscreen utility defaults to COM1 serial port setting. You must change this setting to COM2 when reloading the touchscreen driver.
Appendix C
Appendix Overview
RAC6181 Computers with Touchscreen

C–2 Using a Touchscreen
Publication 6181-UM001D-EN-P
Note: The 6181 12.1 inch keypad bezel computer uses a Touchko WIN32 touch screen application instead of an operating system driver. This means the touch screen is not active until after the operating system is completely booted. This application is factory configured to automatically start during the operating system boot. It is placed in the appropriate start-up folder for the Windows operating system. If you have to reinstall the operating system, follow the instructions on page 3-6 to install the Touchko driver so that the touchscreen is activated when Windows starts.
Obtaining Further Information
Important: For more information on setting up or operating a touchscreen or for future driver upgrades, refer to the Elo TouchSystems web site: www.elotouch.com, or to the Touchko website: www.touchko.com.
Resistive touchscreens are activated by pressure applied to the touchscreen by an operator’s finger. You can operate a resistive touchscreen while wearing gloves.
ATTENTION: Do not use sharp instruments to activate the touchscreen. Scratching the surface of the touchscreen could damage the unit.
Resistive touchscreens consist of two layers:
• A lower layer (glass substrate) with a resistive coating and a voltage applied
• An upper layer (cover sheet) with a conductive coating
• Clear spacer dots separate the two layers
When a user presses the upper layer onto the lower layer, the upper layer receives the voltage applied to the lower layer. The touchscreen controller detects the change in voltage on the upper layer and alternates voltage horizontally and vertically through the layers. The voltage transferred to the upper layer is proportional to the location of the touch on the screen.
The touchscreen supplied with the RAC6181 Computer is factory installed and calibrated. In the event that you need to recalibrate the touchscreen, use the following procedure:
Resistive Touchscreen Technology
Calibrating the Touchscreen

Using a Touchscreen C–3
Publication 6181-UM001D-EN-P
To calibrate the touchscreen:
1. Locate the Elo calibration utility in the Control Panel or insert the touchscreen driver diskette in the floppy drive of the RAC6181 Computer.
2. Using the appropriate commands for your operating system, run the Elo calibration utility.
3. Follow the instructions in the Elo calibration utility to complete the calibration process.
The touchscreen requires the following types of maintenance:
Routine Cleaning
Clean the surface of the touchscreen with any glass cleaning solution and a soft, nonabrasive cloth.
Note: Because the touchscreen is pressure-sensitive, directing a strong flow of water at the touchscreen during a washdown may activate the touchscreen.
Performing Field Service
If you must perform field service on the RAC6181 Computer, ensure that you plug the touchscreen cable into the controller board with the proper orientation:
Maintenance

C–4 Using a Touchscreen
Publication 6181-UM001D-EN-P

1
10.4 in display version
dimensions, 2-4
12 in version with keypad
dimensions, 2-6
12.1 in display version
dimensions, 2-5
12.1 in keypad bezel operation, 10-1
Connecting a keyboard, 10-5
Installing the Keypad Configuration Utility, 10-5
Keypad default key assignments for programmable keys, 10-26
Keypad legend strips, 10-1
Setting up and using the Keypad Configuration Utility (KCU) software, 10-4
Using the Keypad Configuration Utility, 10-6
6
6181 Computer
connectors, 1-4, 1-5
features, 1-3
installation, 2-1
operating recommendations, 3-1
removing covers, 4-3
specifications, A-1
system checkout, 3-2
versions, 1-1
A
Add-in cards
adding or removing, 4-1
thermal considerations, 4-2
Air flow director, 4-7
B
Back cover, removing, 4-3
Backlight
dimming controls, 1-7
removing the flat panel display, 9-2
replacing tubes, 9-1
replacing tubes, 12.1 in display version, 9-6
replacing tubes, 12.1 in keypad version, 9-8
BIOS
accessing the BIOS Setup screen, B-3
hardware diagnostics, 11-1
settings, B-3
C
CD-ROM
connecting, 7-1
expansion bay, 6-1
Clearances, 2-3
Connectors, 1-4, 1-5
CPU card. See also Add-in cards
CPU specifications, B-1
Cutout dimensions
10.4 in display version, 2-9
12.1 in display version, 2-10
12.1 in with keypad version, 2-11
D
Diagnostics, hardware, 11-1
Dimensions, 2-8
10.4 in display version, 2-4
12 in version with keypad, 2-6
12.1 in display version, 2-5
non-display version, 2-7
Drive bay
installing, 6-3
removing, 6-2, 6-7
replacing the floppy drive, 6-4
Drivers, touchscreen, 3-4, 3-5
Drives. See Drive bay, Hard drive, Floppy drive, Expansion bay
Index

I–2 Index
Publication 6181-UM001D-EN-P
E
Ethernet connections, 2-18
Expansion bay
exchanging drive cables, 6-5
installing drives, 6-7
installing or removing, 6-1
installing the expansion bay, 6-7
F
Filter, chassis fan, 12-2
Floppy drive
installing or removing, 6-1
removing the drive bay, 6-2, 6-7
replacing in the drive bay, 6-4
H
Hard drive
installing or removing, 6-1
removing the drive bay, 6-2, 6-7
I
Installation
12.1 in keypad version, 2-16
clearances, 2-3
cutout dimensions, 2-9, 2-10, 2-11
dimensions, 2-4, 2-5, 2-6, 2-7, 2-8
EloTouch Systems Drivers, 3-4
European Union Compliance, 2-1
Installing a 6181 Computer Touchscreen Driver, 3-4
keyboard, 2-15, 2-16
mounting clips, 2-13
mounting hardware, 2-2
mouse, 2-15, 2-16
network, 2-18
NT networking, 3-3
panel mounting, 2-12, 2-13
power, 2-17, 2-18
tools required, 2-2
Touchko touchscreen application, 3-5
K
Keyboard connections, 2-15, 2-16
Keypad, 10-7
Keypad Configuration Utility (KCU). See 12.1 in keypad bezel operation
L
LED indicators, 1-6, 11-1
description, 1-6
M
Maintenance, 12-1
cleaning the chassis fan filter, 12-2
cleaning the display, 12-1
Replacement parts, 12-4
replacing the battery, 12-3
Memory modules
installing or removing, 8-1
Mouse connections, 2-15, 2-16
N
Network connections, 2-18
Networking for NT workstations, 3-3
Non-display version
dimensions, 2-7
O
Operation
initial setup, 3-2
Operator access, 3-1
P
Panel mounting, 2-13
Power connections, 2-17, 2-18
Power supply
AC, 5-4

Index I–3
Publication 6181-UM001D-EN-P
DC, 5-5
installing or removing, 5-1, 5-2
R
RAM memory. See Memory modules
Replacement parts, 12-4
S
Setup, initial operation, 3-2
Specifications
CPU, B-1
General, A-1
T
Top cover, removing, 4-3
Touchscreen
Connecting, C-1
Drivers, 3-4, 3-5, C-1
Troubleshooting
check lists, 11-3
hardware diagnostics, 11-1
procedures, 11-2
U
Using, 10-6
V
Versions of 6181 Computers, 1-1. See also 10.4 in display version, 12.1 in display version, 12.1 in keypad version, Non-display version

IBM, AT and PS/2 are registered trademarks of IBM Corporation.
Microsoft, Windows and Windows NT are registered trademarks of Microsoft Corporation.
Pentium is a registered trademark of Intel Corporation.
Celeron is a trademark of Intel Corporation.
Publication 6181-UM001D-EN-P 41061-190-01(8) Copyright © 2003 Rockwell Automation. All rights reserved. Printed in USA.