quick start guide - time machine® linux for oracle 11g linux oracle 11g.pdf · oracle 11g...
TRANSCRIPT

WHITE PAPER
QUICK START GUIDE - TIME MACHINE® LINUX FOR ORACLE 11g
EVALUATING SOLUTION-SOFT’S TIME MACHINE WITH ORACLE 11G ON LINUX O/S
The following is a quick guide to evaluating Solution-Soft’s Time Machine with Oracle11g on Linux installed on an Intel machine. This paper will show how simple it is to integrate Time Machine to perform date & time (temporal) testing with two instances of Oracle11g running under separate user accounts with different virtual dates NOTE: This paper is specific to Time Machine for use with Linux. For those running on other platforms, please refer to the Time Machine manual or contact Solution-Soft support at [email protected]. Time Machine for Oracle 11g is supported on Windows, AIX, HP-UX, Linux, and Solaris System Configuration used in creating this paper: O/S: Oracle Enterprise Linux, 1 CPU, 2.4 Gb Ram Time Machine: Version 6.1, R6 for Linux Kernel 2.6 Oracle: Oracle 11g, Release 2
TABLE OF CONTENTS
Oracle 11g Installation ………………………………………………………………………………………………………..…………. 1 Post Install Configuration (SQL PLUS) ………………………………………………………………………..…………………... 12 Time Machine Configuration ………………………………………………………………………………..…………..…..….…… 12 Client/Listener Configuration (External Client Accessing DB ) ………………………………………………………… 13
ORACLE 11G INSTALLATION
1. Create 2 user accounts that will be using the Oracle db. We used “oracle1” and “oracle2” a. Create 2 folders for each user “u01” and “u02” outside of the user’s home directories. 2. Download the 2 CD’s for Oracle 11g on Linux a. Files we used were linux.x64_11gR2_database_1of2.zip, linux.x64_11gR2_database_2of2.zip 3. Unzip both files inside the same directory (for Oracle1 unzip in u01, for Oracle2 unzip in u02.) Do not unzip each CD in different directories otherwise you will receive the error below:
Invlid source path '../stage/Components/oracle.jdk/1.5.0.17.0/1/DataFiles' specified for unzip. Unzipcomand failed. Please check oraparam.ini and specify a valid source path. : No such file or directory
1
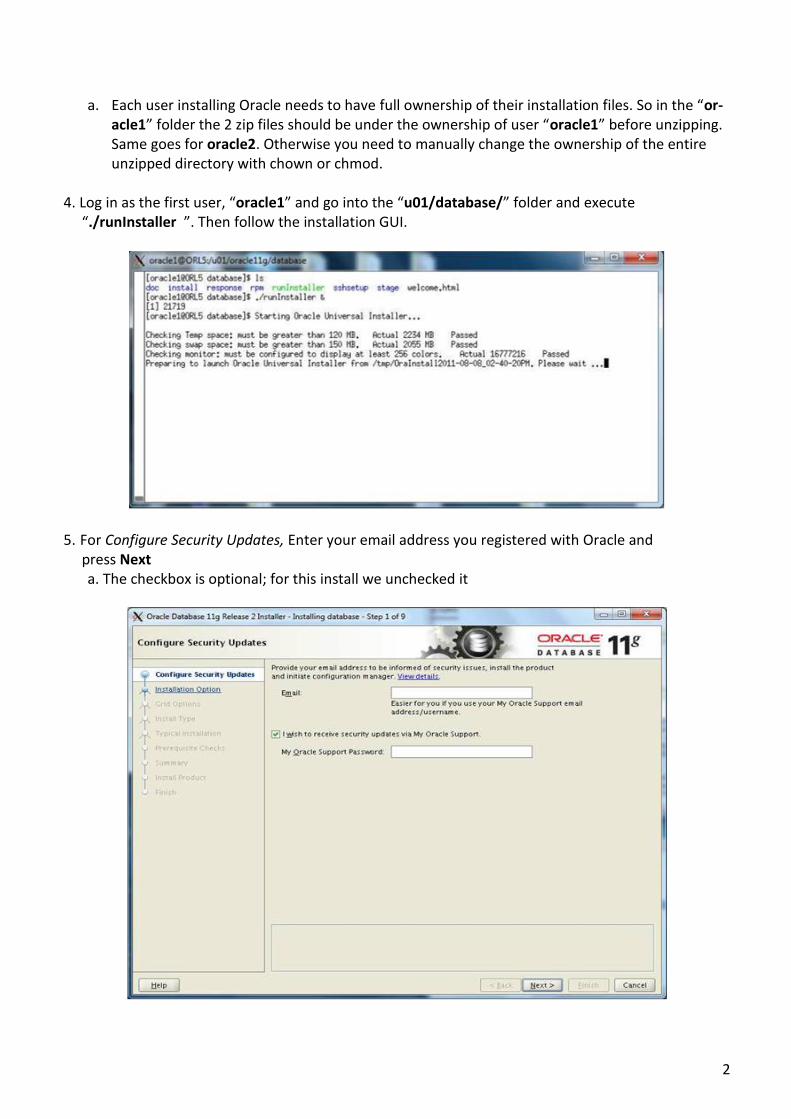
a. Each user installing Oracle needs to have full ownership of their installation files. So in the “or-acle1” folder the 2 zip files should be under the ownership of user “oracle1” before unzipping. Same goes for oracle2. Otherwise you need to manually change the ownership of the entire unzipped directory with chown or chmod.
4. Log in as the first user, “oracle1” and go into the “u01/database/” folder and execute “./runInstaller ”. Then follow the installation GUI.
5. For Configure Security Updates, Enter your email address you registered with Oracle and press Next a. The checkbox is optional; for this install we unchecked it
2
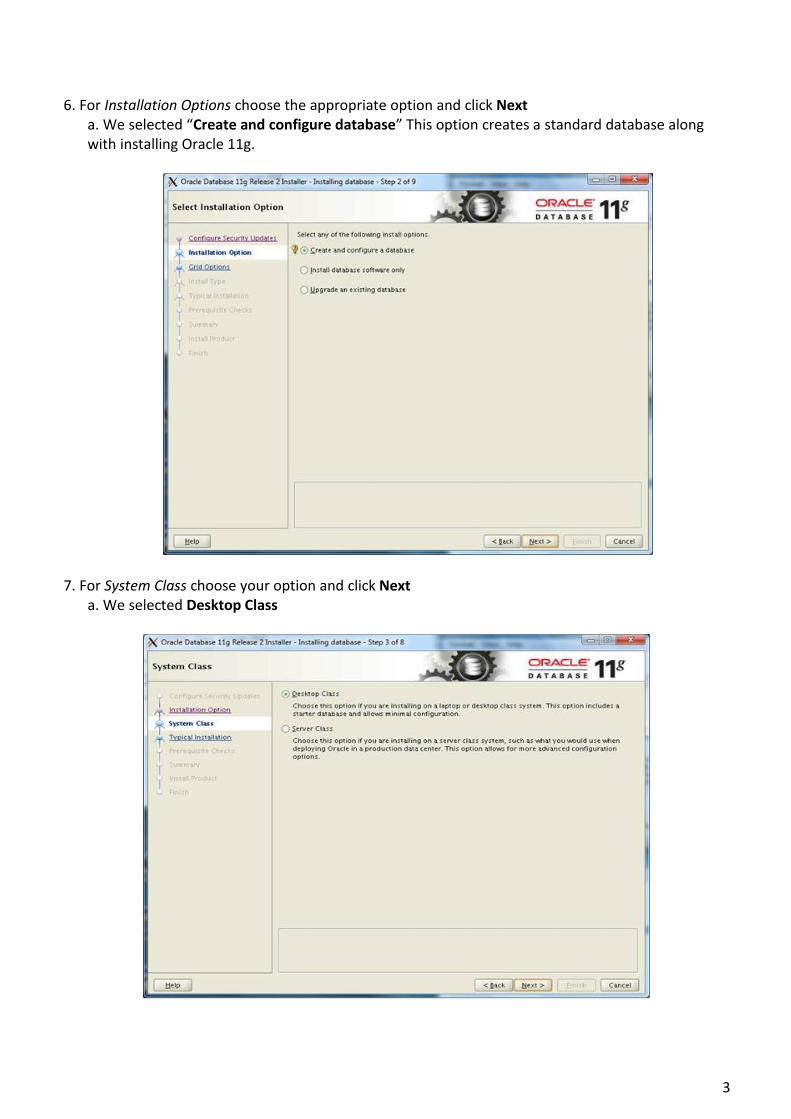
6. For Installation Options choose the appropriate option and click Next a. We selected “Create and configure database” This option creates a standard database along with installing Oracle 11g.
7. For System Class choose your option and click Next a. We selected Desktop Class
3

8. For Typical Installation, the fields will be populated. We kept the default locations and added a password
a. Password must be 8 characters minimum containing one upper case letter, one lower case let-ter, and one number.
b. If you receive the below error, change the “Global database name”
.
4
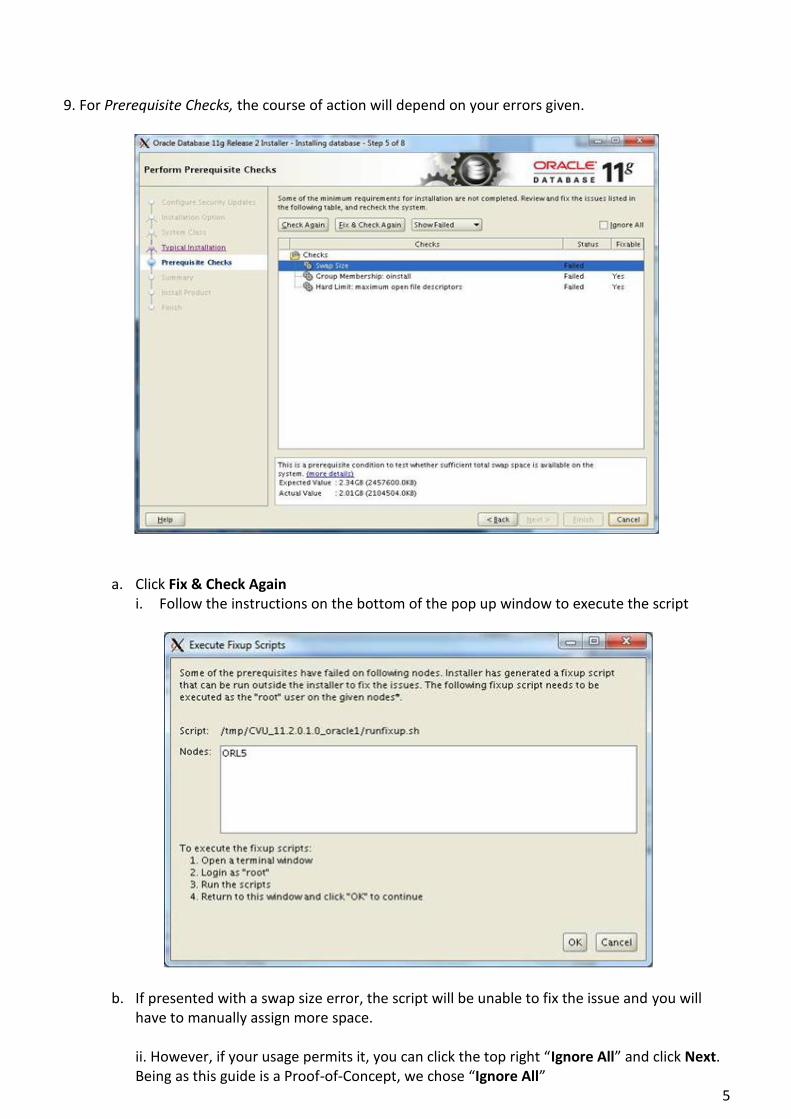
9. For Prerequisite Checks, the course of action will depend on your errors given.
a. Click Fix & Check Again i. Follow the instructions on the bottom of the pop up window to execute the script
b. If presented with a swap size error, the script will be unable to fix the issue and you will have to manually assign more space.
ii. However, if your usage permits it, you can click the top right “Ignore All” and click Next. Being as this guide is a Proof-of-Concept, we chose “Ignore All”
5
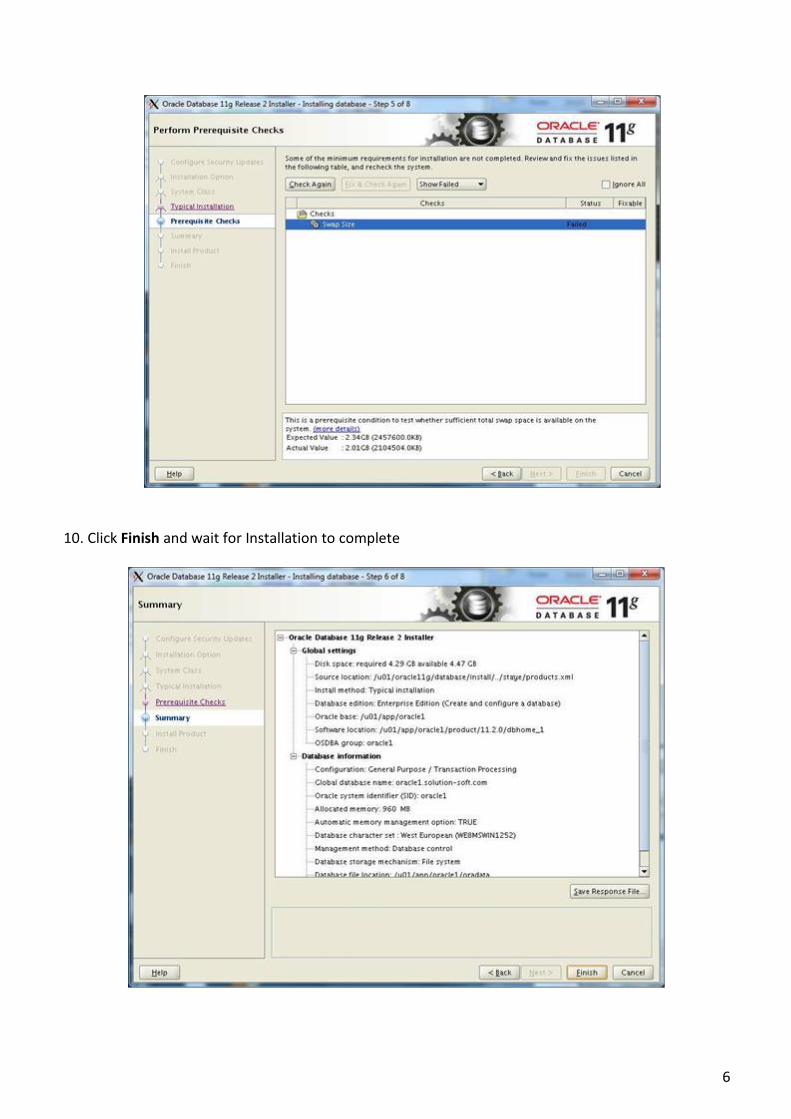
10. Click Finish and wait for Installation to complete
6
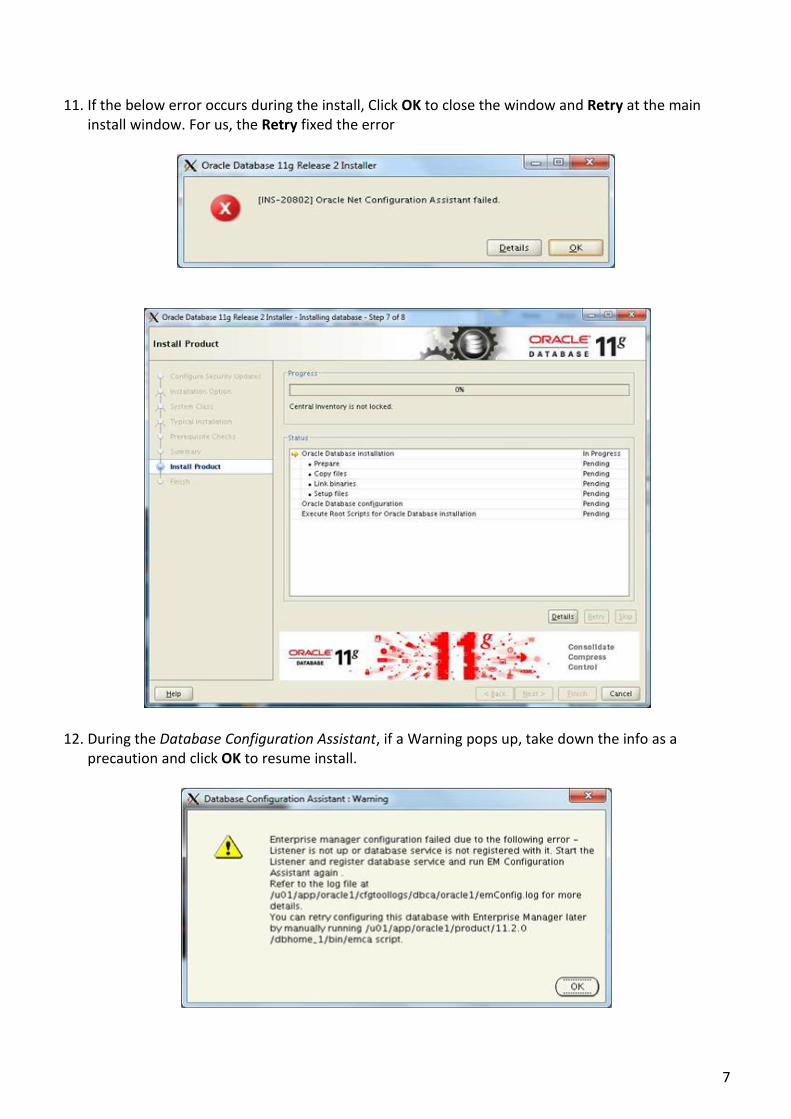
11. If the below error occurs during the install, Click OK to close the window and Retry at the main install window. For us, the Retry fixed the error
12. During the Database Configuration Assistant, if a Warning pops up, take down the info as a precaution and click OK to resume install.
7
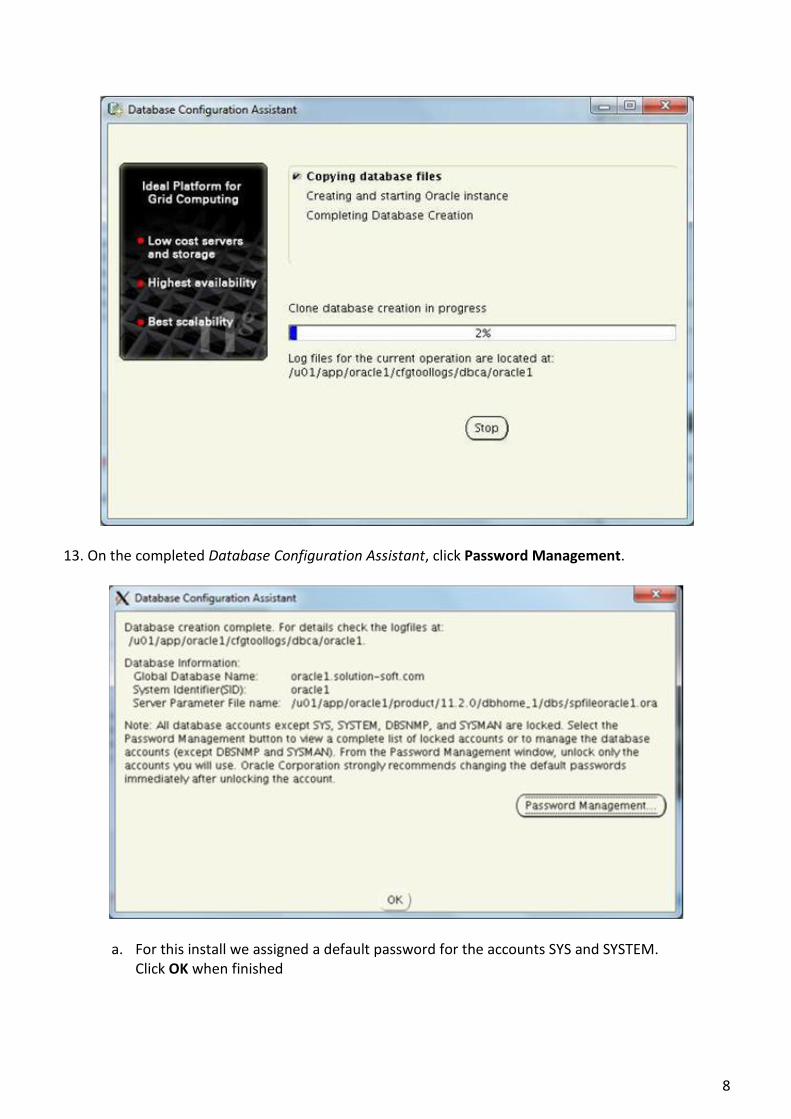
13. On the completed Database Configuration Assistant, click Password Management.
a. For this install we assigned a default password for the accounts SYS and SYSTEM. Click OK when finished
8
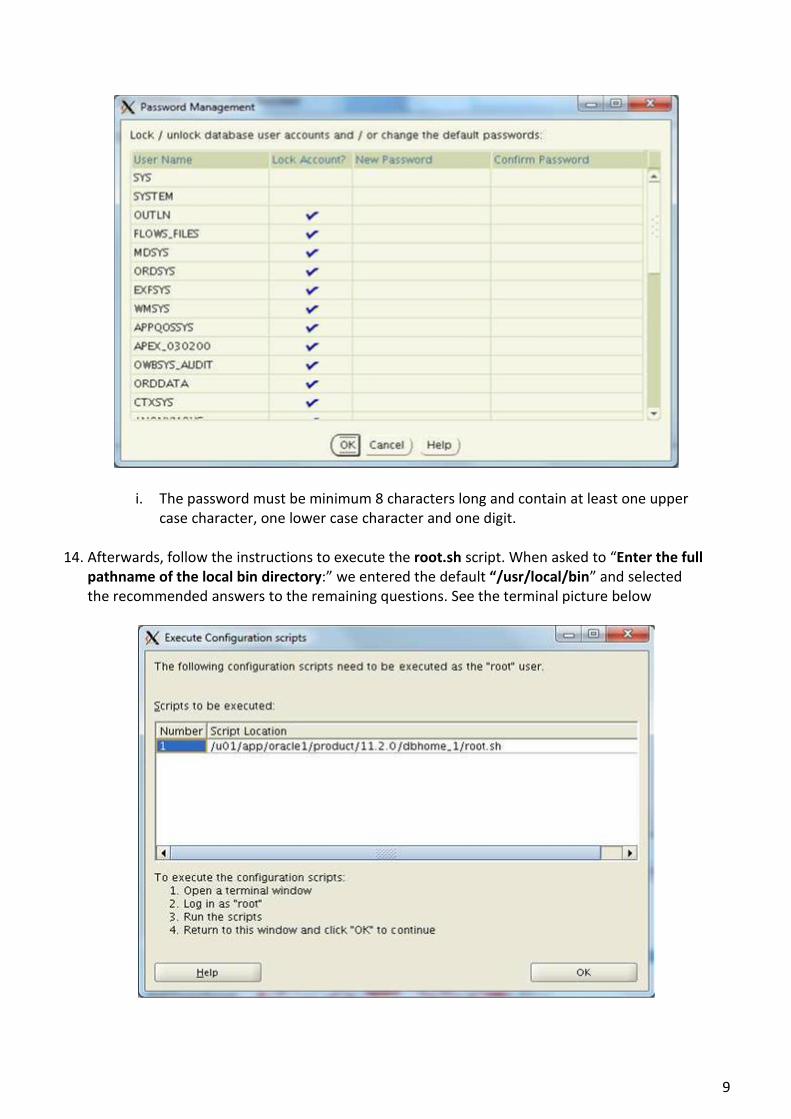
i. The password must be minimum 8 characters long and contain at least one upper case character, one lower case character and one digit.
14. Afterwards, follow the instructions to execute the root.sh script. When asked to “Enter the full pathname of the local bin directory:” we entered the default “/usr/local/bin” and selected the recommended answers to the remaining questions. See the terminal picture below
9

15. . Click Next and Close
10
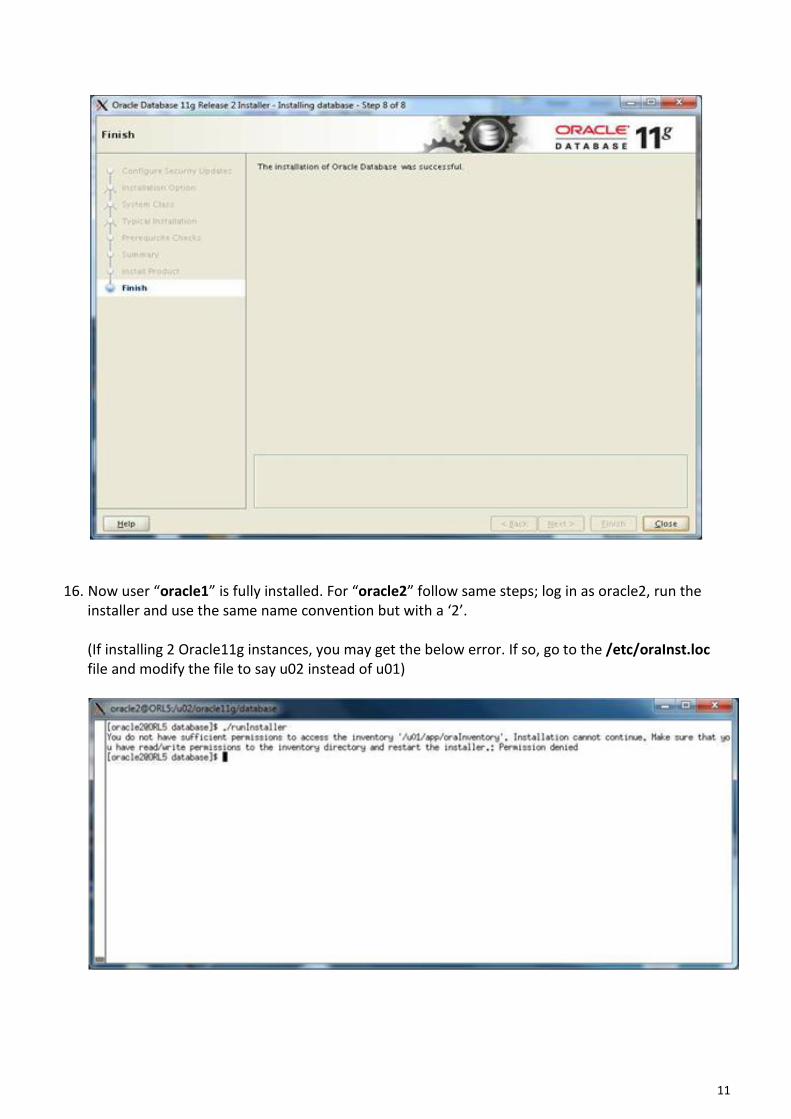
16. Now user “oracle1” is fully installed. For “oracle2” follow same steps; log in as oracle2, run the installer and use the same name convention but with a ‘2’.
(If installing 2 Oracle11g instances, you may get the below error. If so, go to the /etc/oraInst.loc file and modify the file to say u02 instead of u01)
11
POST-INSTALL CONFIGURATION (SQLPLUS)
Before starting up SQLPLUS to access your database you need to set up oracle shell environmental variables. 1. Execute the following commands depending on your shell. These values are derived from step 8 of
the “Oracle11g Install”. a. For csh
setenv ORACLE_SID "orcle" setenv ORACLE_BASE "/u01/app/oracle1" setenv ORACLE_HOME "/u01/app/oracle1/product/11.2.0/dbhome_1"
b. For bash
export ORACLE_SID=orcle export ORACLE_BASE=/u01/app/oracle1 export ORACLE_HOME=/u01/app/oracle1/product/11.2.0/dbhome_1 c. Type “env | grep ora” to check if the environment variables were loaded.
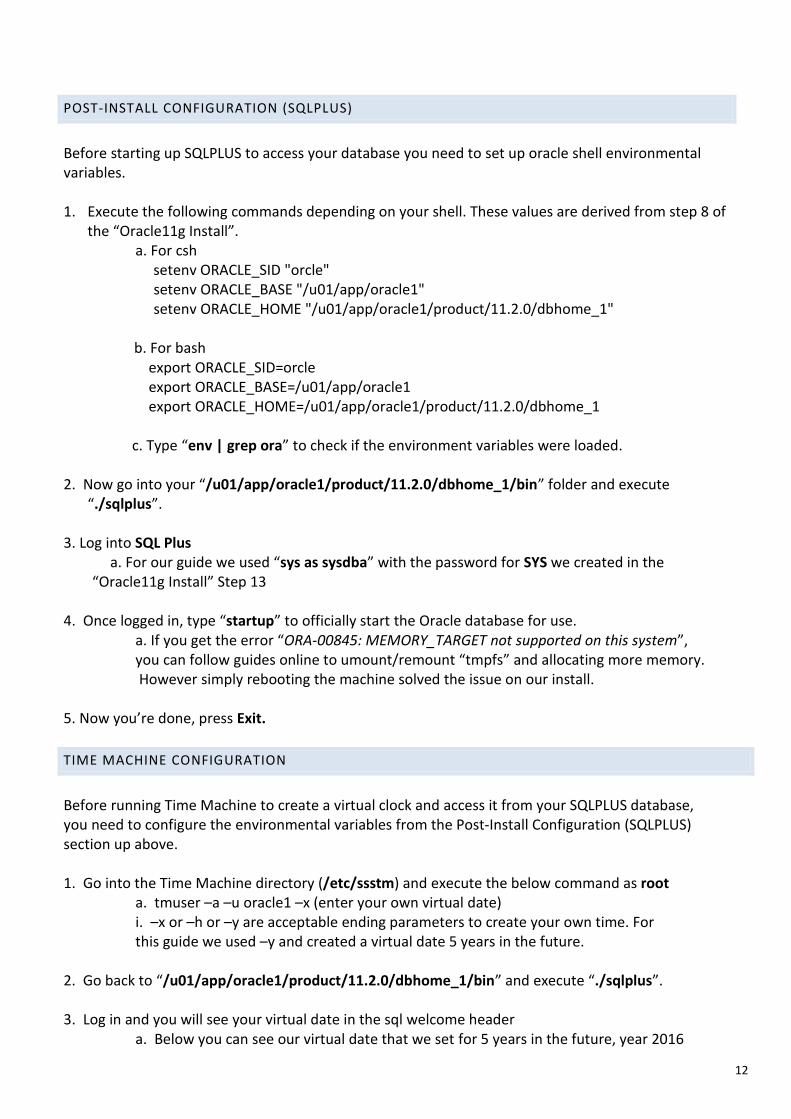
2. Now go into your “/u01/app/oracle1/product/11.2.0/dbhome_1/bin” folder and execute “./sqlplus”. 3. Log into SQL Plus
a. For our guide we used “sys as sysdba” with the password for SYS we created in the “Oracle11g Install” Step 13
4. Once logged in, type “startup” to officially start the Oracle database for use.
a. If you get the error “ORA-00845: MEMORY_TARGET not supported on this system”, you can follow guides online to umount/remount “tmpfs” and allocating more memory.
However simply rebooting the machine solved the issue on our install. 5. Now you’re done, press Exit.
TIME MACHINE CONFIGURATION
Before running Time Machine to create a virtual clock and access it from your SQLPLUS database, you need to configure the environmental variables from the Post-Install Configuration (SQLPLUS) section up above. 1. Go into the Time Machine directory (/etc/ssstm) and execute the below command as root a. tmuser –a –u oracle1 –x (enter your own virtual date) i. –x or –h or –y are acceptable ending parameters to create your own time. For this guide we used –y and created a virtual date 5 years in the future. 2. Go back to “/u01/app/oracle1/product/11.2.0/dbhome_1/bin” and execute “./sqlplus”. 3. Log in and you will see your virtual date in the sql welcome header a. Below you can see our virtual date that we set for 5 years in the future, year 2016
12
CLIENT/LISTENER CONFIGURATION (EXTERNAL CLIENT ACCESSING DB)
Before running the client you need to start the Listener service. Before running the Listener service
you need to make sure that you’ve started up the Oracle Database (“startup” in sqlplus).
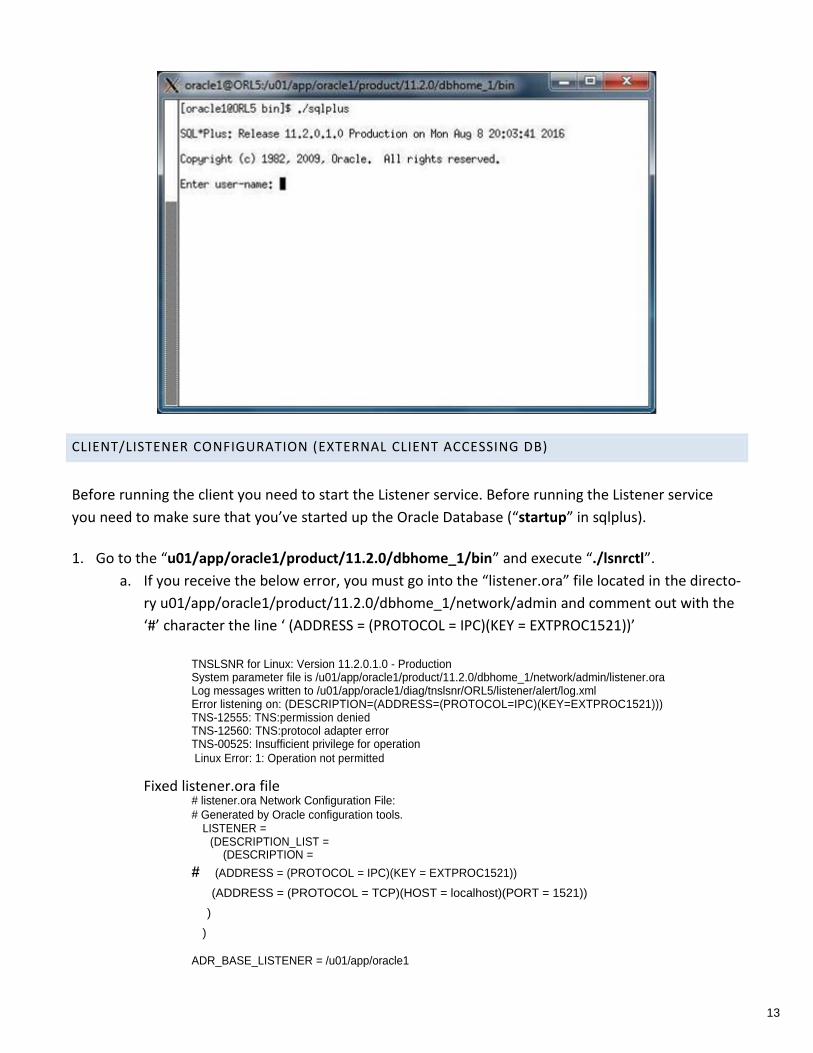
1. Go to the “u01/app/oracle1/product/11.2.0/dbhome_1/bin” and execute “./lsnrctl”.
a. If you receive the below error, you must go into the “listener.ora” file located in the directo-
ry u01/app/oracle1/product/11.2.0/dbhome_1/network/admin and comment out with the
‘#’ character the line ‘ (ADDRESS = (PROTOCOL = IPC)(KEY = EXTPROC1521))’
TNSLSNR for Linux: Version 11.2.0.1.0 - Production System parameter file is /u01/app/oracle1/product/11.2.0/dbhome_1/network/admin/listener.ora Log messages written to /u01/app/oracle1/diag/tnslsnr/ORL5/listener/alert/log.xml Error listening on: (DESCRIPTION=(ADDRESS=(PROTOCOL=IPC)(KEY=EXTPROC1521))) TNS-12555: TNS:permission denied TNS-12560: TNS:protocol adapter error
TNS-00525: Insufficient privilege for operation Linux Error: 1: Operation not permitted
Fixed listener.ora file # listener.ora Network Configuration File: # Generated by Oracle configuration tools.
LISTENER = (DESCRIPTION_LIST = (DESCRIPTION =
# (ADDRESS = (PROTOCOL = IPC)(KEY = EXTPROC1521))
(ADDRESS = (PROTOCOL = TCP)(HOST = localhost)(PORT = 1521))
)
)
ADR_BASE_LISTENER = /u01/app/oracle1
13
2. Enter “start”
3. Now the listener service is started and you can make outside client queries to the database. a. The Listener Configuration uses 3 files “listener.ora” “tnsnames.ora” “sqlnet.ora” located in “u01/app/oracle1/product/11.2.0/dbhome_1/network/admin” that can be configured as you wish. However the default configuration is fine and how we left it in this guide. For more details please refer to http://download.oracle.com/docs/cd/E11882_01/network.112/e10836/listenercfg.htm The next steps show how to install the Oracle client. This guide installs a 32bit Windows client and connects to the Oracle11g database. The below link has instructions for configuring the client for Unix/Linux/Windows.
http://download.oracle.com/docs/cd/E11882_01/server.112/e16604/apd.htm#SQPUG157 4. Download the “Oracle Instant Client” for your correct platform with the below link
http://www.oracle.com/technetwork/database/features/instant-client/index-097480.html a. Download the “Client Basic” and “Client Package – SQL *Plus” We used the packages below. Version 11.2.0.1.0
Instant Client Package - Basic: All files required to run OCI, OCCI, and JDBC-OCI applications
instantclient-basic-win32-11.2.0.1.0.zip (51,458,910 bytes)
*Instant Client Package - SQL*Plus: Additional libraries and executable for running SQL*Plus with Instant Client
instantclient-sqlplus-win32-11.2.0.1.0.zip (758,913 bytes)
5. Unzip both packages into the top directory, e.g. C:\instantclient_11_2 6. Make a copy of the “tnsnames.ora” file from the server directory “u01/app/oracle1/product/11.2.0/dbhome_1/network/admin” to the client directory C:\instantclient_11_2 a. If any problems occur connecting the client, make sure the HOST value inside the
“tnsnames.ora” is the explicit IP address of the server 192.xxx.xx.xxx b. You may also need to explicitly enter the address 192.xxx.xx.xxx in replace of “localhost” in the
listener.ora and tnsnames.ora files in the server directory
Before running the sqlplus.exe inside C:\instantclient_11_2, environment variables need to be set.
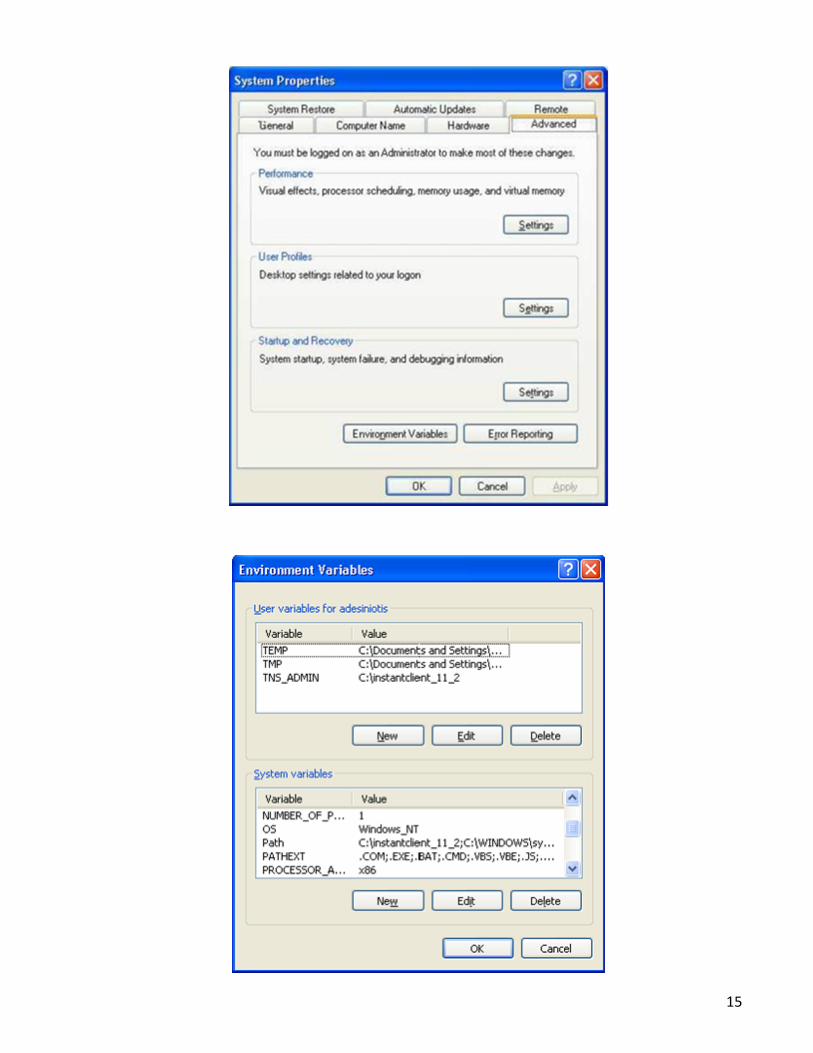
7. Right click My Computer and click the Advanced Tab and click Environmental Variables
14
15
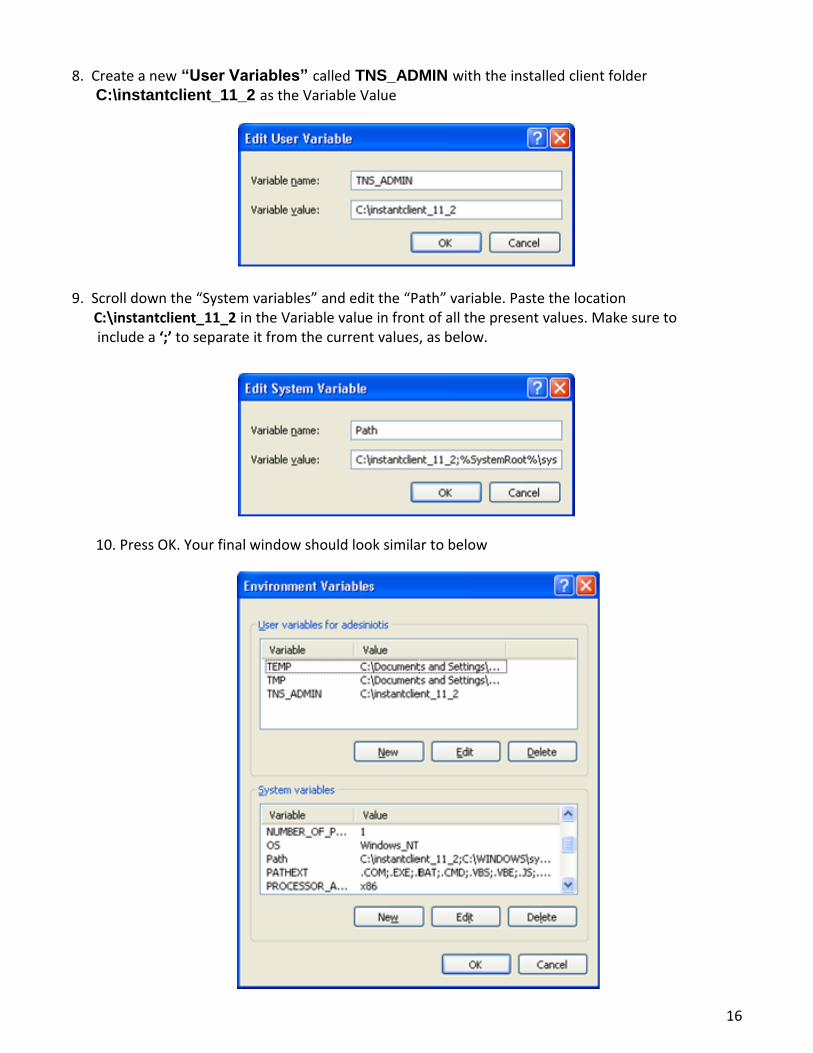
8. Create a new “User Variables” called TNS_ADMIN with the installed client folder C:\instantclient_11_2 as the Variable Value
9. Scroll down the “System variables” and edit the “Path” variable. Paste the location C:\instantclient_11_2 in the Variable value in front of all the present values. Make sure to include a ‘;’ to separate it from the current values, as below.
10. Press OK. Your final window should look similar to below
16
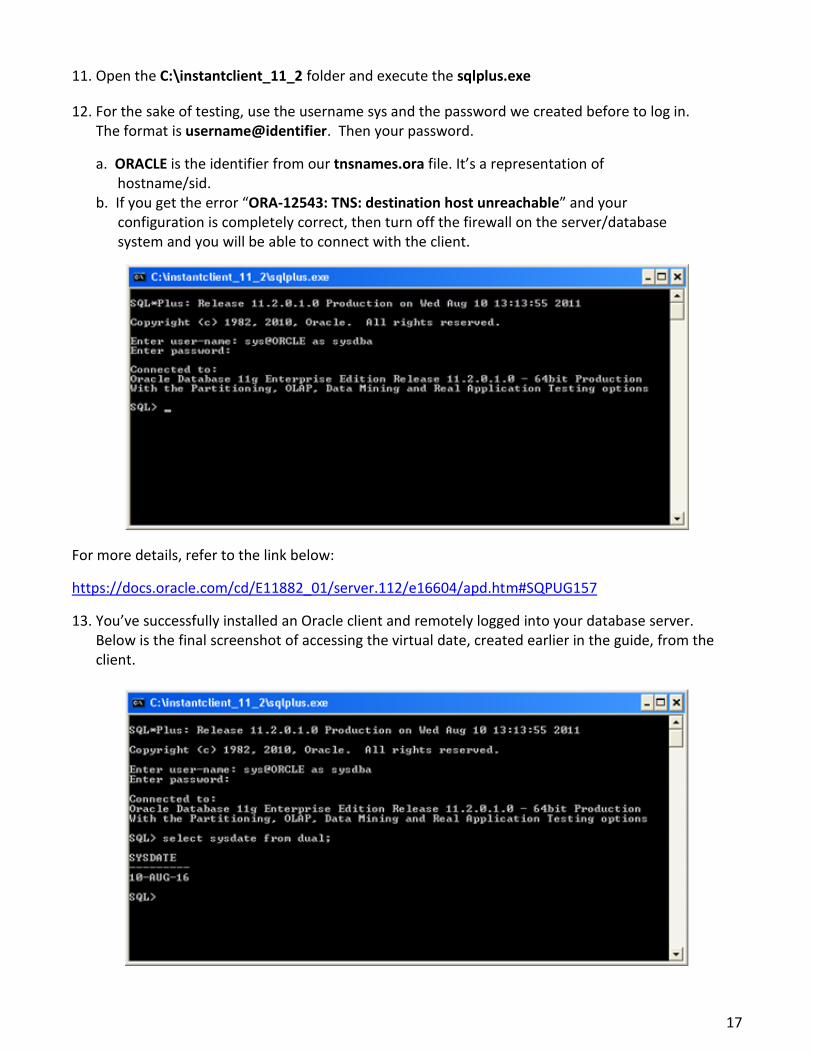
11. Open the C:\instantclient_11_2 folder and execute the sqlplus.exe
12. For the sake of testing, use the username sys and the password we created before to log in. The format is username@identifier. Then your password.
a. ORACLE is the identifier from our tnsnames.ora file. It’s a representation of hostname/sid. b. If you get the error “ORA-12543: TNS: destination host unreachable” and your
configuration is completely correct, then turn off the firewall on the server/database system and you will be able to connect with the client.
For more details, refer to the link below:
https://docs.oracle.com/cd/E11882_01/server.112/e16604/apd.htm#SQPUG157
13. You’ve successfully installed an Oracle client and remotely logged into your database server. Below is the final screenshot of accessing the virtual date, created earlier in the guide, from the client.
17
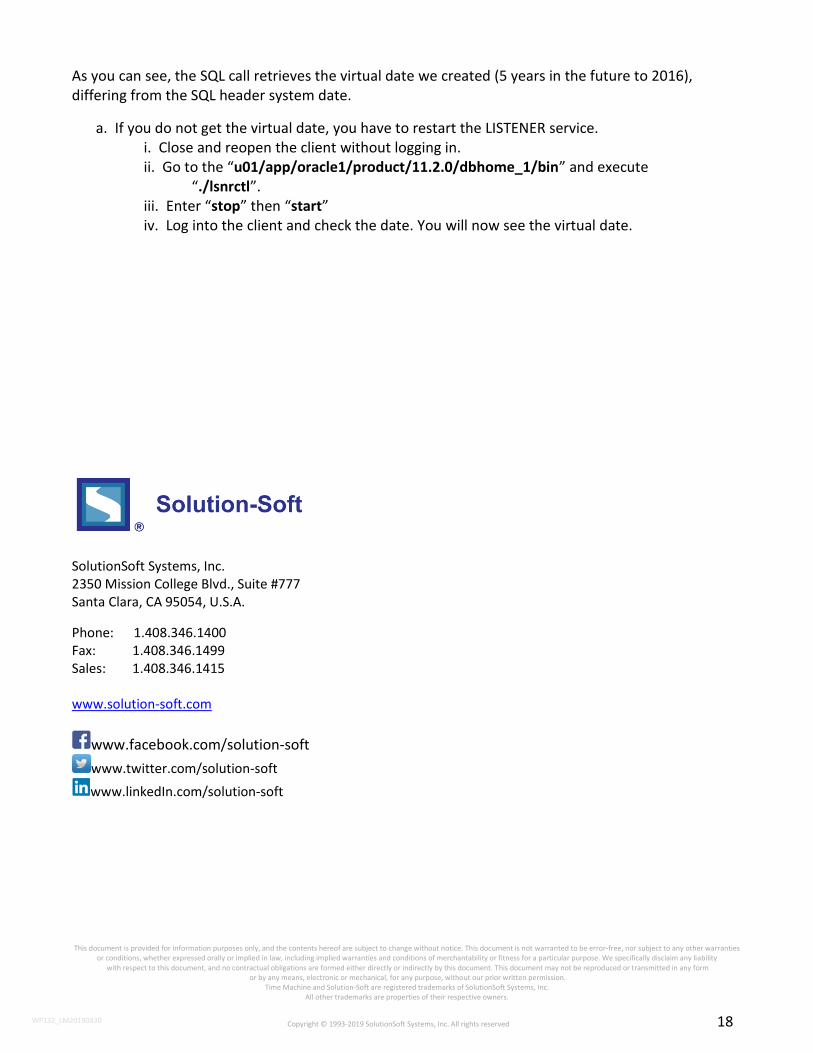
As you can see, the SQL call retrieves the virtual date we created (5 years in the future to 2016), differing from the SQL header system date.
a. If you do not get the virtual date, you have to restart the LISTENER service. i. Close and reopen the client without logging in. ii. Go to the “u01/app/oracle1/product/11.2.0/dbhome_1/bin” and execute “./lsnrctl”. iii. Enter “stop” then “start” iv. Log into the client and check the date. You will now see the virtual date.
SolutionSoft Systems, Inc. 2350 Mission College Blvd., Suite #777 Santa Clara, CA 95054, U.S.A.
Phone: 1.408.346.1400 Fax: 1.408.346.1499 Sales: 1.408.346.1415 www.solution-soft.com
www.facebook.com/solution-soft
www.twitter.com/solution-soft
www.linkedIn.com/solution-soft This document is provided for information purposes only, and the contents hereof are subject to change without notice. This document is not warranted to be error-free, nor subject to any other warranties
or conditions, whether expressed orally or implied in law, including implied warranties and conditions of merchantability or fitness for a particular purpose. We specifically disclaim any liability with respect to this document, and no contractual obligations are formed either directly or indirectly by this document. This document may not be reproduced or transmitted in any form
or by any means, electronic or mechanical, for any purpose, without our prior written permission. Time Machine and Solution-Soft are registered trademarks of SolutionSoft Systems, Inc.
All other trademarks are properties of their respective owners.
Copyright © 1993-2019 SolutionSoft Systems, Inc. All rights reserved 18 WP132_LM20190430