quick start guide - tibco software · pa ge 4 introduction tibco n imb us™ q ck s tr g de target...
TRANSCRIPT

TIBCO Nimbus
Quick Start Guide
™
Software Release 10.2.0November 2017

TIBCO Nimbus™ Quick Start Guide
SOME TIBCO SOFTWARE EMBEDS OR BUNDLES OTHER TIBCO SOFTWARE. USE OF SUCH EMBEDDEDOR BUNDLED TIBCO SOFTWARE IS SOLELY TO ENABLE THE FUNCTIONALITY (OR PROVIDE LIMITEDADD-ON FUNCTIONALITY) OF THE LICENSED TIBCO SOFTWARE. THE EMBEDDED OR BUNDLEDSOFTWARE IS NOT LICENSED TO BE USED OR ACCESSED BY ANY OTHER TIBCO SOFTWARE OR FORANY OTHER PURPOSE.
USE OF TIBCO SOFTWARE AND THIS DOCUMENT IS SUBJECT TO THE TERMS AND CONDITIONS OF ALICENSE AGREEMENT FOUND IN EITHER A SEPARATELY EXECUTED SOFTWARE LICENSE AGREEMENT,OR, IF THERE IS NO SUCH SEPARATE AGREEMENT, THE CLICKWRAP END USER LICENSE AGREEMENTWHICH IS DISPLAYED DURING DOWNLOAD OR INSTALLATION OF THE SOFTWARE (AND WHICH ISDUPLICATED IN THE LICENSE FILE) OR IF THERE IS NO SUCH SOFTWARE LICENSE AGREEMENT ORCLICKWRAP END USER LICENSE AGREEMENT, THE LICENSE(S) LOCATED IN THE LICENSE FILE(S) OF THESOFTWARE. USE OF THIS DOCUMENT IS SUBJECT TO THOSE TERMS AND CONDITIONS, AND YOUR USEHEREOF SHALL CONSTITUTE ACCEPTANCE OF AND AN AGREEMENT TO BE BOUND BY THE SAME.
This document contains confidential information that is subject to U.S. and international copyright lawsand treaties. No part of this document may be reproduced in any form without the written authorizationof TIBCO Software Inc.
TIBCO, Two-Second Advantage and TIBCO Nimbus are either registered trademarks or trademarks ofTIBCO Software Inc. in the United States and/or other countries.
All other product and company names and marks mentioned in this document are the property of theirrespective owners and are mentioned for identification purposes only.
THIS SOFTWARE MAY BE AVAILABLE ON MULTIPLE OPERATING SYSTEMS. HOWEVER, NOT ALLOPERATING SYSTEM PLATFORMS FOR A SPECIFIC SOFTWARE VERSION ARE RELEASED AT THE SAMETIME. SEE THE RELEASE NOTE FOR THE AVAILABILITY OF THIS SOFTWARE VERSION ON A SPECIFICOPERATING SYSTEM PLATFORM. THIS DOCUMENT IS PROVIDED AS IS WITHOUT WARRANTY OF ANY KIND, EITHER EXPRESS ORIMPLIED, INCLUDING, BUT NOT LIMITED TO, THE IMPLIED WARRANTIES OF MERCHANTABILITY,FITNESS FOR A PARTICULAR PURPOSE, OR NON-INFRINGEMENT.
THIS DOCUMENT COULD INCLUDE TECHNICAL INACCURACIES OR TYPOGRAPHICAL ERRORS. CHANGESARE PERIODICALLY ADDED TO THE INFORMATION HEREIN; THESE CHANGES WILL BE INCORPORATEDIN NEW EDITIONS OF THIS DOCUMENT. TIBCO SOFTWARE INC. MAY MAKE IMPROVEMENTS AND/ORCHANGES IN THE PRODUCT(S) AND/OR THE PROGRAM(S) DESCRIBED IN THIS DOCUMENT AT ANYTIME. THE CONTENTS OF THIS DOCUMENT MAY BE MODIFIED AND/OR QUALIFIED, DIRECTLY ORINDIRECTLY, BY OTHER DOCUMENTATION WHICH ACCOMPANIES THIS SOFTWARE, INCLUDING BUTNOT LIMITED TO ANY RELEASE NOTES AND "READ ME" FILES.
Copyright © 1997-2017 TIBCO Software Inc. ALL RIGHTS RESERVED. TIBCO Software Inc. Confidential Information
Important Information

TIBCO Nimbus™ Quick Start Guide
Table of Contents
................................................................................................... 4Introduction
....................................................................................................... 4Target Audience
....................................................................................................... 4About the Quick Start Guide
....................................................................................................... 4About TIBCO Nimbus
................................................................................................... 5Principles of Mapping
................................................................................................... 7Process Mapping Tips
................................................................................................... 8Creating Diagrams
....................................................................................................... 8Activities
....................................................................................................... 9Flow Lines
....................................................................................................... 11Free Text
....................................................................................................... 11Images
....................................................................................................... 12Resources (Roles)
....................................................................................................... 13Diagram Links
....................................................................................................... 14Formatting Diagrams
....................................................................................................... 16Working with Objects
....................................................................................................... 17Supporting Information
....................................................................................................... 19Diagram Levels
................................................................................................... 21Managing Content
................................................................................................... 23TIBCO Nimbus Support
....................................................................................................... 23Contact Details

Page 4
Introduction
TIBCO Nimbus™ Quick Start Guide
Target Audience
The intended audience for this Quick Start Guide is new Process Authors.
About the Quick Start Guide
This purpose of this guide is to assist new Process Authors in gaining a basic understanding of how tomap processes in TIBCO Nimbus. It is not intended as a full user guide as TIBCO Nimbus has a greatdeal of functionality that may or may not be used, depending upon the requirements of anorganization. Full instructions on using all of TIBCO Nimbus' functionality is covered in the TIBCONimbus User Guide.
About TIBCO Nimbus
TIBCO Nimbus is a process management mapping application that allows corporate information to bepresented graphically and hierarchically in the form of maps and diagrams. It provides a simple user-interface that enables any employee within an organization to access information that is relevant andessential to fulfil their role.
Maps are a collection of diagrams created by process authors. A map is initially created as a draftversion until it is promoted to a master. Maps may also comprise a number of scenarios. Accessrights can be assigned to individual users and groups, allowing or preventing access to an entire mapor parts of a map. Continuous improvement to processes is achieved through a number ofcollaboration features. Acknowledgement requests ensure users are aware of process content thataffects their roles. Reviews ensure that content is kept up-to-date. Feedback and change requestsallow users to suggest improvements. Users can also be notified when content changes through theuse of subscriptions.
Statement sets are a hierarchical set of regulatory and auditable statements that ensure complianceto specific business and legal requirements, such as ISO 9000/12001/17799, CMMi, internalcompany policies, etc. Statements can be linked to activities that are related to compliance andgovernance.

Page 5 TIBCO Nimbus™ Quick Start Guide
Principles of Mapping
Principles of Process Mapping
TIBCO Nimbus enables the capture and management of business processes within an enterprise. Thebest practice approach is to map hierarchically as illustrated in the diagram below. At the top level youhave a representation of the overall Enterprise. The core business processes and supporting businessprocesses can be simplified down to a single diagram. For some customers the logical top level isactually a representation of the organization's strategy, from which the required business processescascade. That is an equally valid approach.
Hierarchically Structured
A map represents the entire scope of the area in question (be that the enterprise, division ordepartment). The map is a collection of inter-related process diagrams, organized hierarchically.Diagrams are built from a collection of inter-related Activities. Activities can be explored in moredetail by creating a drill down to a lower-level diagram. Supporting information, in a number ofdifferent formats, can be associated with diagrams through attachments and links.
Activities
Activities describe how to undertake a particular step in a process. For each activity you have aresource, one or more inputs and outputs and often supporting information to assist users.
· Resources are the people (roles), department, company or system that is responsible forundertaking a particular activity.
· Drill downs provide links to lower-level diagrams that describe a specific activity in more detail.
· Inputs initiate an activity and are usually events or scheduled entries.
· Outputs describe the result of undertaking an activity and may form the input of the next activity,or link to another process diagram.
· Attachments/links provide links to related documents, diagrams or any file or application thatsupports a particular process.
· Measures display metrics associated with a particular activity and these can be linked to third-party systems.

Page 6
Principles of Mapping
TIBCO Nimbus™ Quick Start Guide
Page 7 TIBCO Nimbus™ Quick Start Guide
Process Mapping Tips
Process Mapping Tips
To measure the success of a process map is to measure the level of user adoption. Users are key whencreating process diagrams and a users perspective should always be considered. Diagrams that lookgood are easy to follow and provide the target audience with enough information to undertake aparticular process with no ambiguity. The following gives you a few basic pointers to consider whencreating your process diagrams.
Map from the top level down
Processes should be created from the top level (corporate level) down.
Map activities as Verb + Noun
Activities should be described with a verb and noun, in other words do this (action) to this (object).For example, Update (action) Employee record (object).
Create a corporate ‘look and feel’
Corporate colors improve process adoption. Note that in corporate installations, templates and stylesheets will be provided for you.
Use the ‘Assume it works’ principle
When you’re first mapping out a process, work on the assumption that it works. You can return tohandle any process exceptions at a later stage, once the process has been mapped out.
Tidy ‘loose ends’
All outcomes (outputs) of an activity should be described and either linked to another activity or to arelated process diagram (via a flow-line link).
Create tidy diagrams
Always consider the appearance of diagrams from a user's perspective. If a diagram is too cluttered,consider sending some of the detail to child diagrams. You can do this by selecting related activities,then from the Edit menu choose Send to child to export the selected activities down to a lower-leveldiagram.
Check diagrams are readable
Diagrams must be readable to users who zoom to fit. This option zooms in or out to fit the diagram tothe screen - press F8 to select this option. The screen resolution of a user's monitor may differ but youcan check the appearance of diagrams at different resolutions in the Author Client – from the Windowmenu choose Simulate and then choose a resolution. Resolutions include 640x480, 800x600 and1024x768.
Page 8
Creating Diagrams
TIBCO Nimbus™ Quick Start Guide
Creating Diagrams
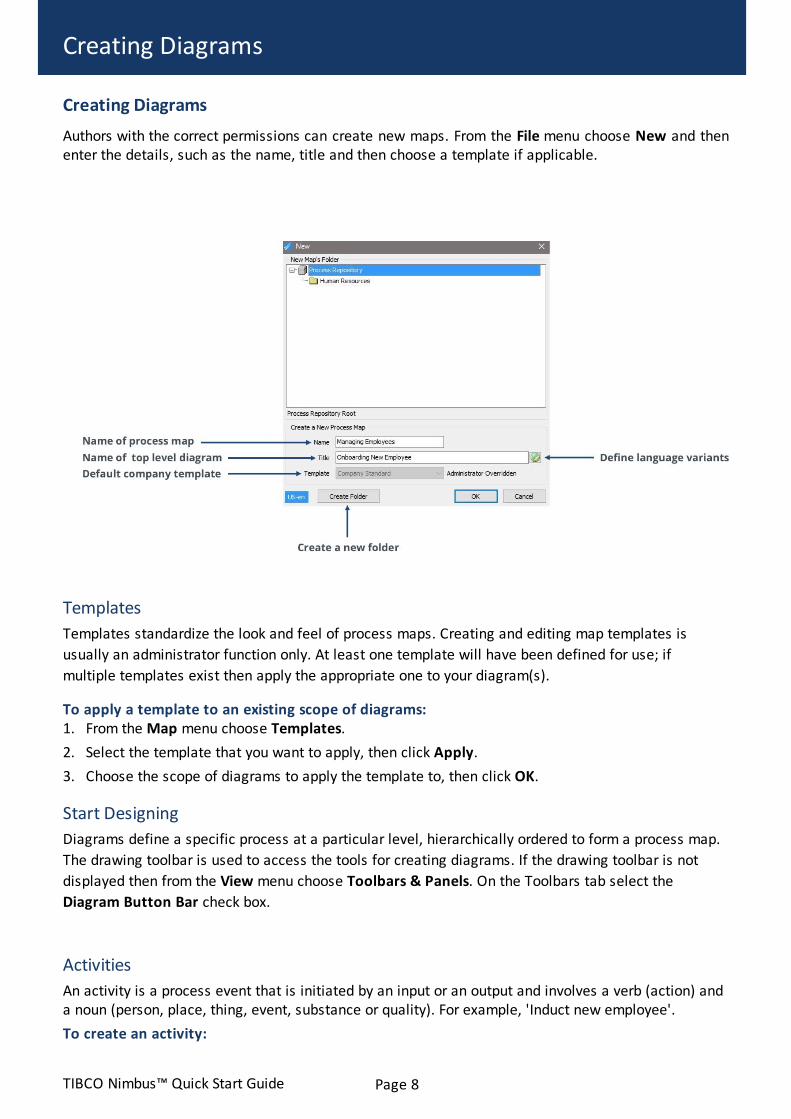
Authors with the correct permissions can create new maps. From the File menu choose New and thenenter the details, such as the name, title and then choose a template if applicable.
Templates
Templates standardize the look and feel of process maps. Creating and editing map templates is
usually an administrator function only. At least one template will have been defined for use; if
multiple templates exist then apply the appropriate one to your diagram(s).
To apply a template to an existing scope of diagrams:1. From the Map menu choose Templates.
2. Select the template that you want to apply, then click Apply.
3. Choose the scope of diagrams to apply the template to, then click OK.
Start Designing
Diagrams define a specific process at a particular level, hierarchically ordered to form a process map.
The drawing toolbar is used to access the tools for creating diagrams. If the drawing toolbar is not
displayed then from the View menu choose Toolbars & Panels. On the Toolbars tab select the
Diagram Button Bar check box.
Activities
An activity is a process event that is initiated by an input or an output and involves a verb (action) anda noun (person, place, thing, event, substance or quality). For example, 'Induct new employee'.
To create an activity:

Page 9 TIBCO Nimbus™ Quick Start Guide
Creating Diagrams
1. On the Drawing Toolbar click Draw Activity to access the Drawing mode. Your cursor will turnto crosshairs.
2. Hold the left mouse button down and draw the activity. Don’t worry about alignment, position orsize at this point as these can be adjusted later.
3. In the Text box enter the description of the activity, then click OK. Remember, where applicable,Verb + Noun.
Hint: If you’re creating multiple activities in one go, you may find it useful to prevent the Text box
appearing after creating each activity. To turn this option off select Tools > Users > Preferences,
then deselect Enter text immediately when new activity created. To edit the text of an activity,
simply double-click the activity and modify the text, as required.
Note: Once you have drawn an activity you will remain in Drawing mode. To create an activity of
the same size as the previous activity, left-click in any space on the diagram. When you are
finished drawing activities, right-click anywhere on the diagram to exit Drawing mode.
Automatically-generated ActivitiesActivities can be automatically generated by selecting Diagram > Auto Generate Activities. Select
the shape of the activity, the number of activities required and the layout, then click OK.
Flow Charts
If you are using TIBCO Nimbus to create a flow chart then you can use a range of alternative flow-
chart shapes. To display the Flowchart Shapes toolbar, choose View > Toolbars & Panels, and then
select the Flowchart Shapes Button Bar check box. Please note that this option may have been
disabled if your company has decided to limit the shapes palette in order to improve the readability
of diagrams for users.
Activity IDsEach activity is assigned a unique ID number; the first activity that is created will be assigned as '1',
the second activity '2', and so on. Activity IDs are useful as they clearly show the sequence of
activities to users. To toggle the display of activity IDs on or off, choose Map > Toggle IDs, and then
select the relevant check box. If an activity is moved within a diagram you can reset the ID sequence
by choosing Diagram > Reset ID Numbers.
Flow Lines
Flow lines form the inputs (triggers) and outputs (outcomes) of activities. For example, an activitydescribed as 'Managing Employees' might be triggered by 'Employee's first day', which forms theinput. The output might be 'Employee Understands the Business', which is the outcome of themeeting.
There are two forms of flow lines; straight lines and dog-leg lines. Straight flow lines connect parallel,i.e. aligned, activities, whereas dog-leg flow lines connect two activities that are not aligned.

Page 10
Creating Diagrams
TIBCO Nimbus™ Quick Start Guide
To draw a flow line:
1. On the Drawing Toolbar click either Straight Line or Dog-leg Line .
2. With the cursor as crosshairs , click and drag from the inside of one activity box to theinside of another activity box. If you want to create an external connection or flow-line link,drag the flow line into a space on the diagram.
Flow Line Text
Double-click a flow line and enter the text into the text box. Once text has been added to a flowline, you can move it by clicking it to select it and then clicking and dragging it to a new position.
Flow Line Links
Flow line links connect the output of one diagram to the input of one or more diagrams, thereby
supporting the capture of end-to-end processes. See Diagram Links for more information.
Detaching flow lines
Click the flow line to select it, then drag it away from the activity.
Dog Leg Lines
Dog-leg lines can be joined to one of four sectors on an activity box.

Page 11 TIBCO Nimbus™ Quick Start Guide
Creating Diagrams
For example, if you want to join the bottom of one activity to the top ofanother, you would click and drag from sector 3 of the first activity boxand release the mouse in sector 1 of the other activity box.
External Connections
When a part of a process resides outside of the process that you are mapping and it cannot be
mapped for whatever reason, for example if part of the process is the responsibility of a different
company, you can mark an input or output flow line as 'externally connected' to indicate this.
To externally connect a flow line, right-click it and choose Externally Connected.
Free Text
Free text is text that is not associated with any object on a diagram. Attachments, links and hints canbe associated with free text. See Supporting Information for more information.
To draw a free text box:
1. Click Draw Free Text on the Drawing Toolbar.
2. With the cursor as crosshairs, click and drag an area container to display the free text in, thenrelease the mouse button.
3. Enter the text and click OK.
Images
Images can be added to diagrams and images can be associated with attachments, links andcommentary text. See Supporting Information for more information.
To insert an image:1. Click New Image on the Drawing Toolbar.
2. With the cursor as crosshairs, click and drag an area container to display the image in, thenrelease the mouse button.
3. Find and select the image, then click Open.
Right-click on the image to access any of the following options:
Page 12
Creating Diagrams
TIBCO Nimbus™ Quick Start Guide
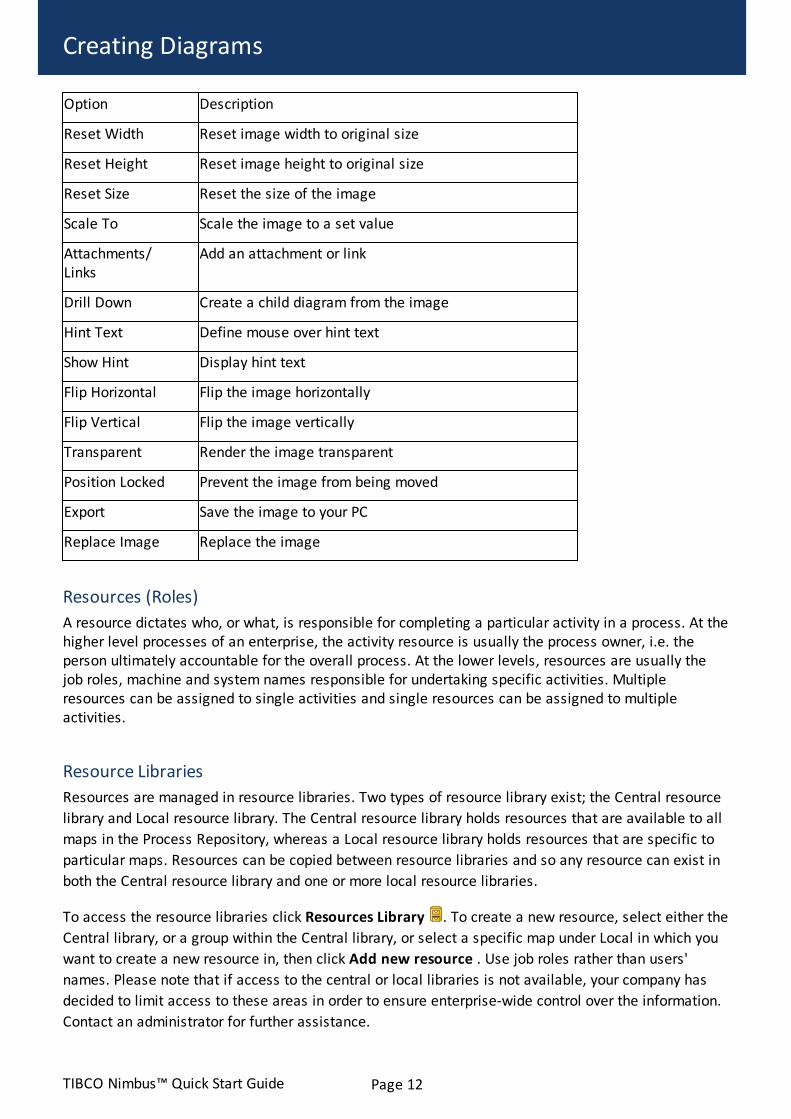
Option Description
Reset Width Reset image width to original size
Reset Height Reset image height to original size
Reset Size Reset the size of the image
Scale To Scale the image to a set value
Attachments/Links
Add an attachment or link
Drill Down Create a child diagram from the image
Hint Text Define mouse over hint text
Show Hint Display hint text
Flip Horizontal Flip the image horizontally
Flip Vertical Flip the image vertically
Transparent Render the image transparent
Position Locked Prevent the image from being moved
Export Save the image to your PC
Replace Image Replace the image
Resources (Roles)
A resource dictates who, or what, is responsible for completing a particular activity in a process. At thehigher level processes of an enterprise, the activity resource is usually the process owner, i.e. theperson ultimately accountable for the overall process. At the lower levels, resources are usually thejob roles, machine and system names responsible for undertaking specific activities. Multipleresources can be assigned to single activities and single resources can be assigned to multipleactivities.
Resource Libraries
Resources are managed in resource libraries. Two types of resource library exist; the Central resource
library and Local resource library. The Central resource library holds resources that are available to all
maps in the Process Repository, whereas a Local resource library holds resources that are specific to
particular maps. Resources can be copied between resource libraries and so any resource can exist in
both the Central resource library and one or more local resource libraries.
To access the resource libraries click Resources Library . To create a new resource, select either the
Central library, or a group within the Central library, or select a specific map under Local in which you
want to create a new resource in, then click Add new resource . Use job roles rather than users'
names. Please note that if access to the central or local libraries is not available, your company has
decided to limit access to these areas in order to ensure enterprise-wide control over the information.
Contact an administrator for further assistance.
Page 13 TIBCO Nimbus™ Quick Start Guide
Creating Diagrams
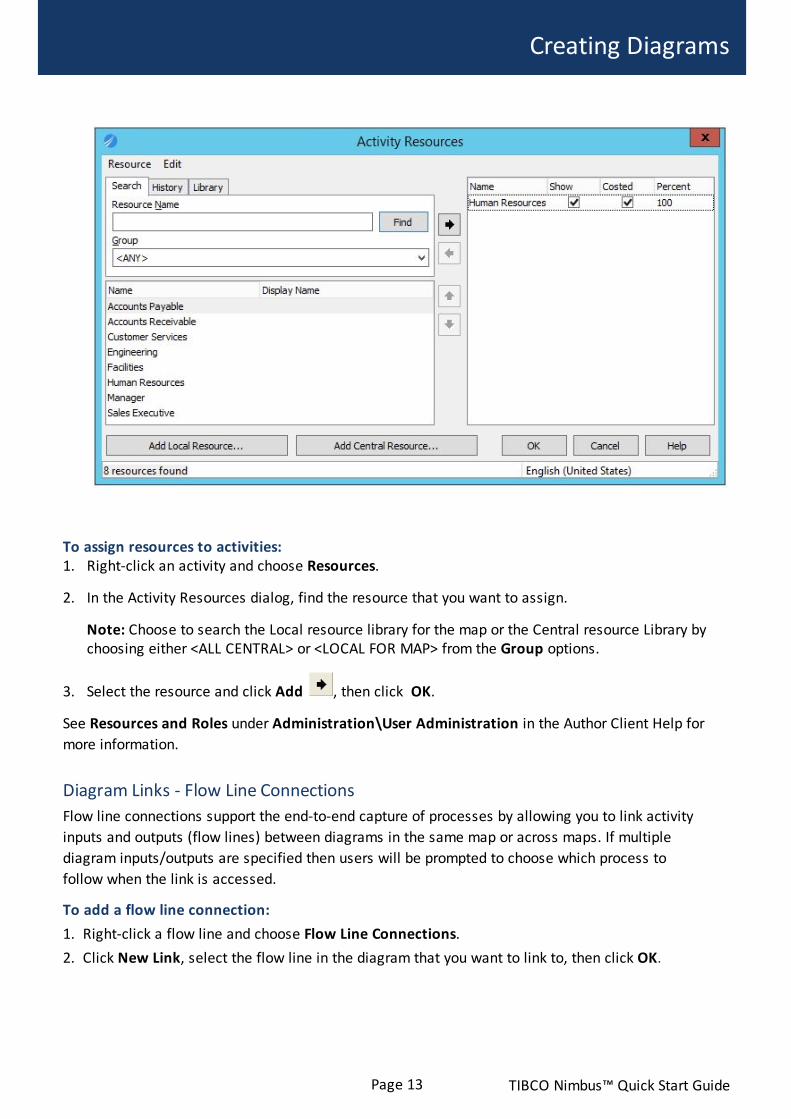
To assign resources to activities:1. Right-click an activity and choose Resources.
2. In the Activity Resources dialog, find the resource that you want to assign.
Note: Choose to search the Local resource library for the map or the Central resource Library bychoosing either <ALL CENTRAL> or <LOCAL FOR MAP> from the Group options.
3. Select the resource and click Add , then click OK.
See Resources and Roles under Administration\User Administration in the Author Client Help for
more information.
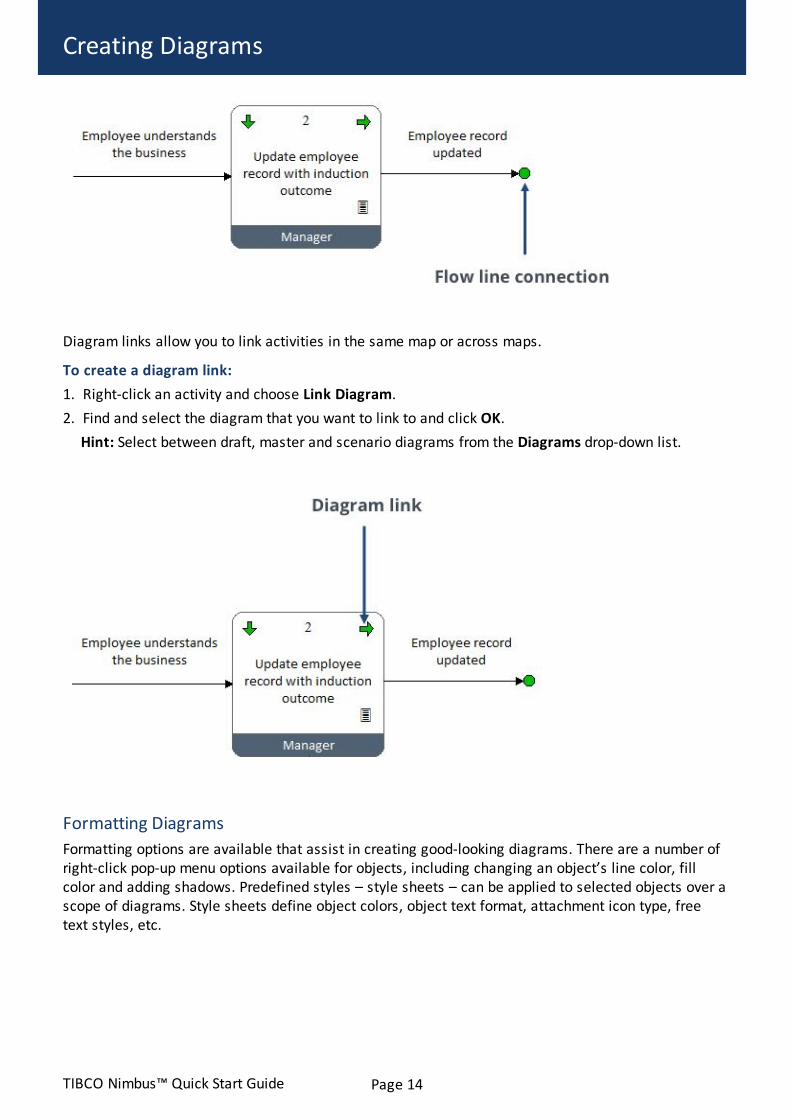
Diagram Links - Flow Line Connections
Flow line connections support the end-to-end capture of processes by allowing you to link activity
inputs and outputs (flow lines) between diagrams in the same map or across maps. If multiple
diagram inputs/outputs are specified then users will be prompted to choose which process to
follow when the link is accessed.
To add a flow line connection:
1. Right-click a flow line and choose Flow Line Connections.
2. Click New Link, select the flow line in the diagram that you want to link to, then click OK.
Page 14
Creating Diagrams
TIBCO Nimbus™ Quick Start Guide
Diagram links allow you to link activities in the same map or across maps.
To create a diagram link:
1. Right-click an activity and choose Link Diagram.
2. Find and select the diagram that you want to link to and click OK.
Hint: Select between draft, master and scenario diagrams from the Diagrams drop-down list.
Formatting Diagrams
Formatting options are available that assist in creating good-looking diagrams. There are a number ofright-click pop-up menu options available for objects, including changing an object’s line color, fillcolor and adding shadows. Predefined styles – style sheets – can be applied to selected objects over ascope of diagrams. Style sheets define object colors, object text format, attachment icon type, freetext styles, etc.

Page 15 TIBCO Nimbus™ Quick Start Guide
Creating Diagrams
Applying Colors and Styles
Creating and editing style sheets is usually an administrator function. At least one style sheet will
have been defined for use; if multiple style sheets exist then apply the appropriate one to your
diagrams.
To apply a style sheet:1. Right-click an object and from the Apply Style menu choose either Current, Default or Select to
select a particular style sheet.
Current will apply the last style used.Default will apply the default style, as specified by an administrator.Select will allow you to choose a style.
2. If you chose to apply a specific style – ‘Select’ - choose the style sheet from the list and click OK.
To modify the color and style of objects:1. Right-click an object and choose an option from the Color And Style menu.
To copy styles between objects:1. Right-click the object that you want to copy the style from and choose Pick Up Style.
2. Right-click the object that you want to copy the style to and choose Apply Style, then Current.
Resizing Objects
Objects can be resized against other objects.
To resize objects:1. Select the object that you want to resize other objects against.
2. Select the objects that you are resizing.
3. From the Drawing Toolbar click and choose one of the options.
Aligning and Merging Objects
Objects can be aligned and merged with other objects.
To align objects:1. Select the object that you want to align other objects against.
2. Hold Shift and select the objects that you are aligning.
3. From the Drawing Toolbar click and choose one of the options.
Note: The ends of floating flow lines can also be aligned using this method.
To merge flow lines:1. Select the flow lines that you want to merge.
2. Right-click the flow line that you want to merge with and choose Align > Merge Floating Start
Points or Merge Floating End Points.
To align flow lines:

Page 16
Creating Diagrams
TIBCO Nimbus™ Quick Start Guide
1. Select all flow lines that you want to align.
2. Right-click the flow line that you want to align against and choose Align > Align Selected Input/
Outputs.
Working with Objects - Selecting Objects
Click objects to select them. If an object is linked hold Alt when selecting it. Multiple objects can
be selected by holding Shift. You can also select a group of objects by clicking and dragging the
cursor around the objects. Alternatively, a number of shortcut keys are available:
Function Shortcut
All Objects Ctrl+A
Activities Shift+Ctrl+A
Resources Shift+Ctrl+R
Link Lines Shift+Ctrl+L
Link Text Shift+Ctrl+T
Free Text Shift+Ctrl+F
Activity Logos Shift+Ctrl+G
Activity Notes Shift+Ctrl+N
Drill Downs Shift+Ctrl+D
Attachment Logos Shift+Ctrl+H
Costing Boxes Shift+Ctrl+C
Images Shift+Ctrl+I
Adding Text
Text can be added to describe activities, free text and flow lines.
To add or modify object text:1. Double-click an object to open the Text Editor.
2. Enter or modify text, then click OK.
Copying Objects
Hold Ctrl and click and drag an object into space to copy them. Any attachments and note bubbles
must be copied separately when copying activities. To copy linked objects such as attachments,
signposts, linked free-text boxes, etc, hold Alt when selecting the object.
Deleting Objects
Select the objects that you want to delete and press Delete. If an object is linked, hold Alt when
selecting it.
Page 17 TIBCO Nimbus™ Quick Start Guide
Creating Diagrams
Hint: If you accidentally delete an item you can restore it by pressing Ctrl+Z.
Moving Objects
Click and drag objects to move them. Multiple objects can be moved by holding Shift to select multiple
objects. For linked objects, hold Alt when selecting them. Any attached flow lines, activity-associated
notes, attachments, etc, and flow-line links to other activities will be maintained. If an object does not
move then it may be locked (see Locking Objects).
Locking Objects
Lock diagram objects, including activity attachments and note bubbles, to prevent them from being
moved.
To lock an object:1. Right-click the object and choose Position Locked.
Note: To unlock an object deselect Position Locked.
Supporting Information
Documents - Word documents, media files (videos, audio files, etc), Word PowerPoint presentations,spreadsheets, etc - can be attached to a number of diagram objects.
Attachments and Links
Attachments and links can be assigned to activities, free text, images and flow lines. Objects can hold
multiple attachments - when a user clicks the link a popup list will allow them to choose which
attachment or link to access.
To create an attachment or link:1. Right-click an object and choose Attachments/Links.2. In the Attachments dialog click New and choose an attachment/link type.

Page 18
Creating Diagrams
TIBCO Nimbus™ Quick Start Guide
Document Registry Link Link to a document in the Document Registry
Data Table Link to a data table
Metric Link Link to metric (measure) data
TIBCO Link to AMX BPM Process, Formvine, Spotfire Analytics or
Tibbr
Applications Link to SAP, Salesforce.com or Oracle
Internal Image Create a new image in TIBCO Nimbus and link to it
Internal WP Document Create a new word-processed document in TIBCO Nimbus
and link to it
Diagram Link Link to a diagram in the same process map or a different
map
Email Link Link to an Email address
Storyboard Link Link to a storyboard
Scorecard Link Link to a scorecard
Menu Function Link Link to a TIBCO Nimbus menu function (for example,
navigation functions)
For more information on attachments and links, please refer to the TIBCO Nimbus User Guide.
Notes Bubbles
Notes bubbles provide additional information to users about a particular activity. When a user clicks a
notes bubble the note will be revealed.
To add a Notes Bubble:1. Right-click an activity and choose Notes Bubble.
2. Enter the note text and click OK.
Hint: To edit a notes bubble, right-click it and choose Edit Bubble Text.

Page 19 TIBCO Nimbus™ Quick Start Guide
Creating Diagrams
Commentary Text
Commentary text provides additional information to users when they mouse over an object (including
activities, free text, images, attachment logos, drill downs and notes bubbles).
To add commentary text:1. Right-click the object and choose Commentary.
2. Enter the commentary text and click OK.
Hint: To edit commentary text, repeat the steps above. You can hide commentary text by right-
clicking an object and choosing Show Commentary as Hint Text.
Diagram Levels
A drill down provides access from an activity to a lower-level diagram, also known as a child diagram.Since a single activity may involve a number of steps, child diagrams allow you to describe an activityin more detail to minimize the level of ambiguity.
Diagrams are uniquely numbered. The top-level diagram is level 1, a second-level diagram is 1.x,
where x is the parent activity ID number that drills down to the child diagram. For example, if a child
diagram is accessed from activity 3 on the top-level diagram, the child diagram will be 1.3. The third-
level diagrams are defined as 1.x.x, and so on.
Drill downs to lower levels appear as arrows on an activity, as shown below. When users click these
arrows they will navigate to the respective child diagram, assuming they have access.
Creating Child Diagrams:1. Right-click an activity and from the Drill down menu choose New.
A blank diagram will be created. You can now draw the child diagram to describe the parent activityin more detail.
Hint: Groups of activities can be sent to a child diagram. Select the group of activities that youwant to send down a level and choose Edit > Send To Child.

Page 20
Creating Diagrams
TIBCO Nimbus™ Quick Start Guide
The example below demonstrates that in order to update an employee record, the activity can bedescribed in further detail within a child diagram. In fact, it is likely that all of the Level 2 activitiesmay be described in more detail in Level 3 diagrams.

Page 21 TIBCO Nimbus™ Quick Start Guide
Managing Content
Managing Content
Now that you’ve been introduced to the basics of process mapping in TIBCO Nimbus, there are anumber of other functions that may be useful to know about. For detailed information on any of thefollowing topics, please refer to the Help menu in the Author Client.
Publishing Content To Users
To provide users with access to process content, diagrams and documents must first undergo an
authorization cycle that requires assigned users (authorizers) to agree to the content being published.
Following the authorization cycle, a diagram or document can then be promoted to a master version by
an assigned draft promoter.
Governing Access To Process Content
Not every user will require access to every process diagram or item of supporting information in anorganization, therefore access rights can be assigned to control who sees what. Default access rightsgovern the viewing rights of a diagram or document for all TIBCO Nimbus users and specific accessrights can be granted for individual users and user groups. For example, you may not want all users tobe able to view a particular high-level diagram, therefore you would deny access to default users andthen grant specific access to individual users or user groups.
In an organization it is usual practice to provide users with access to the authorized master versionsand allow only Process Authors and Administrators to access the draft diagram or document for editingpurposes.
Modifying Published Content
To edit a process diagram or document that has been promoted, you must edit the draft version, which
must first be unlocked. On completion of the editing, the draft diagram or document must undergo
another authorization cycle and promotion in order to replace the existing master version.
Content Collaboration
TIBCO Nimbus assists the continuous improvement of your processes through a number of
collaboration features. Acknowledgement requests ensure users are aware of process content that
affects their roles. Reviews ensure that content is kept up-to-date. Feedback and change requests
allow users to suggest improvements. Users can also be notified when content changes through the
use of subscriptions.
Data Capture
Data tables provide a flexible method for capturing process-related data within the context of
activities. Data tables are useful for capturing business requirements, system details, KPIs, audit
results, RACI charting, etc.
Content Searching
My Searches is a powerful search facility in the Web that allows users to retrieve information
(diagrams, documents and storyboards) that is relevant to their roles. This is achieved by associating
keywords and additional filter groups with process content. Making it easy for users to find
information assists in the process of user adoption.
My Searches offers the following benefits:
Page 22
Managing Content
TIBCO Nimbus™ Quick Start Guide
· Delivers relevant information to specific users and user groups.
· Provides access to recently-viewed processes, documents and storyboards.
· Allows users to add items to their favorites in order to quickly access them.
· Allows users to search for processes, documents and storyboards based on keywords
associated with their user account or user group(s).
Storyboarding
Storyboards provide an easy method for navigating users through an end-to-end process that may
traverse across diagrams or entire process maps. Storyboards can be used to implement the following:
· System implementation support testing
· Training aids
· Highlight process changes
· Highlight areas within a large process.
Document Storage
The Document Registry is a lightweight document management system used to store external
documents and files, such as Word documents, Excel spreadsheets, PowerPoint presentations,
multimedia files, images, drawings, etc. Documents can be attached to diagram objects, allowing
supporting information to be linked to relevant processes.
Governance and Compliance
Statement sets are a hierarchical set of regulatory and auditable statements that ensure compliance to
specific business and legal requirements, such as ISO 9000/12001/17799, CMMi, internal company
policies, etc. Statements can be linked to activities that are related to compliance and governance.
Process Costing
Processes can be costed, which is useful when exploring costs based on simple volume changes,
decision points, replacing resources or remodeling a process. Scenarios can be created, which are
essentially copies of a process diagram. Scenarios are useful when costing a process as they allow you
to modify a process to reduce the total cost without editing the main draft copy.

Page 23 TIBCO Nimbus™ Quick Start Guide
TIBCO Nimbus Support
Contact Details
Our specialized team are on hand to provide assistance with the TIBCO Nimbus product. TIBCOSupport is an online resource where you can log cases directly, 24 hours a day, 7 days a week. Youcan also view updates on current cases and search the TIBCO Nimbus Knowledge Base.
Use the links below to access the relevant service.
Requirement Contact Details
To register for a TIBCO Support account. Request an account for TIBCO Support
To log in to TIBCO Support. support.tibco.com
If your support issue is urgent and you havenot yet registered for an account please email.
For phone numbers and further information onservice level agreements.
TIBCO Support Services
Access the TIBCO Community site. TIBCO Community