quick installation guide - seh-technology.com · print & fax printer and print server will be...
TRANSCRIPT

fr
en de
es
ptit
Inhalt
• Information zur schnellen Funktionsbereitschaft . . . . . . . 7 - Drucken unter Windows . . . . . . . . . . . . . . . . . . . . . . . . . . . . . . . . . . . .7 - Drucken unter Mac OS X . . . . . . . . . . . . . . . . . . . . . . . . . . . . . . . . . . .8• Information zur Vergabe der IP-Adresse . . . . . . . . . . . . . . . . .9• Information zur Printserver Administration . . . . . . . . . 10
Informationen zu weiteren Druckmethoden unter anderen Betriebssystemen sowie weiterführende Informationen zur Administration des Printservers erhalten Sie in der Benutzer-dokumentation.
Content
• Information about a Fast Operational Readiness . . . . . . 3 - Printing in Windows . . . . . . . . . . . . . . . . . . . . . . . . . . . . . . . . . . . . . . . . . . . . . 3 - Printing in Mac OS X . . . . . . . . . . . . . . . . . . . . . . . . . . . . . . . . . . . . . . . . . . . . 4• Information about the Assignment of IP Addresses . . . . 5• Information about the Print Server Administration . . . 6
Information about further printing methods in other operating systems as well as additional information about the print server administration can be found in the User Manual.
Contenido
• Información acerca de la disposición rápida de funciones . . 15 - Impresión en Windows . . . . . . . . . . . . . . . . . . . . . . . . . . . . . . . . . . . . . . . . . 15 - Impresión en Mac OS X . . . . . . . . . . . . . . . . . . . . . . . . . . . . . . . . . . . . . . . . 16• Informaciónes acerca de la adjudicación de la dirección IP . . 17• Informaciónes acerca de la administración del servidor de impresión . . . . . . . . . . . . . . . . . . . . . . . . . . . . . . . . . . . . . . . . . . . . 18
En la documentación del usuario encontrará información acerca de otros métodos de impresión con otros sistemas operativos, así como información acerca de la administración del servidor de impresión.
Contenu
• Informations sur un fonctionnement rapide . . . . . . . . . . . 11 - Imprimer sous Windows . . . . . . . . . . . . . . . . . . . . . . . . . . . . . . . . . . . . . . 11 - Imprimer sous Mac OS X . . . . . . . . . . . . . . . . . . . . . . . . . . . . . . . . . . . 12• Informations sur l’attribution des adresses IP . . . . . . . 13 • Informations sur l’administration du serveur d‘impression . . . . . . . . . . . . . . . . . . . . . . . . . . . . . . . . . . . . . . . . . . . . . . . . . . . . . 14
Informations sur d’autres méthodes d’impression sous les systèmes d‘exploitation différents ainsi que des informations sur l’administration du serveur d‘impression se trouvent dans le Manuel d’utilisation.
Conteúdo
• Informações para obter rapidamente a operacionalidade . 23 - Imprimir em Windows . . . . . . . . . . . . . . . . . . . . . . . . . . . . . . . . . . . . . . . . 23 - Imprimir em Mac OS X . . . . . . . . . . . . . . . . . . . . . . . . . . . . . . . . . . . . . . . 24• Informações sobre a atribuição do endereço IP . . . . . 25• Informações acerca da administração do servidor de impressão . . . . . . . . . . . . . . . . . . . . . . . . . . . . . . . . . . . . . . . . . . . . . . . . . . . . . . 26
Na documentação do utilizador pode consultar informações so-bre outros métodos de impressão com outros sistemas operativos, assim como informações mais detalhadas acerca da admini-stração do servidor de impressão.
Quick Installation Guide
Print Server PS Series
Contenuto
• Informazioni sulla funzionalità veloce . . . . . . . . . . . . . . . . . . . .19 - Stampare in Windows . . . . . . . . . . . . . . . . . . . . . . . . . . . . . . . . . . . . . . . . 19 - Stampare in Mac OS X . . . . . . . . . . . . . . . . . . . . . . . . . . . . . . . . . . . . . 20• Informazioni sull’assegnazione dell’indirizzo IP . . . . 21• Informazioni sull‘amministrazione del server di stampa . . . . . . . . . . . . . . . . . . . . . . . . . . . . . . . . . . . . . . . . . . . . . . . . . . . . . . . . 22
Informazioni su altri metodi di stampa con diversi sistemi opera-tivi e approfondimenti sull’amministrazione del server di stampa sono disponibili nella documentazione per l’utente.

© 2010 SEH Computertechnik GmbHInterCon is a registered trademark of SEH Computertechnik GmbH.All trademarks, registered trademarks, logos and product names are property of their respective owners.Keep the documentation for further reference during the life cycle of the product. SEH Computertechnik GmbH has endeavoured to ensure that the information in all manuals is correct. If you detect any inaccuracies please inform us at the address indicated below. SEH Computertechnik GmbH will not accept any liability for any error or omission. The information in this manual is subject to change without notification. All rights are reserved. Copying, other reproduction or translation without the prior written consent from SEH Computertechnik GmbH is prohibited.
DocumentType: Quick Installation GuideTitle: Print Server – PS SeriesVersion: 1.2Order number: MHAB-QI-IV-SEH
en
3
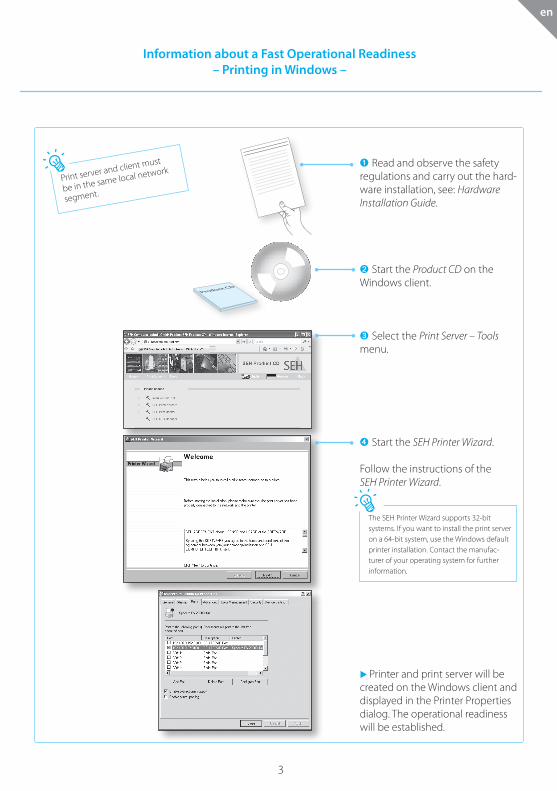
➊ Read and observe the safety regulations and carry out the hard-ware installation, see: Hardware Installation Guide.
➋ Start the Product CD on the Windows client.
➌ Select the Print Server – Tools menu.
➍ Start the SEH Printer Wizard.
Follow the instructions of the SEH Printer Wizard.
Printer and print server will be created on the Windows client and displayed in the Printer Properties dialog. The operational readiness will be established.
Print server and client must
be in the same local network
segment.
Information about a Fast Operational Readiness– Printing in Windows –
The SEH Printer Wizard supports 32-bit systems. If you want to install the print server on a 64-bit system, use the Windows default printer installation. Contact the manufac-turer of your operating system for further information.
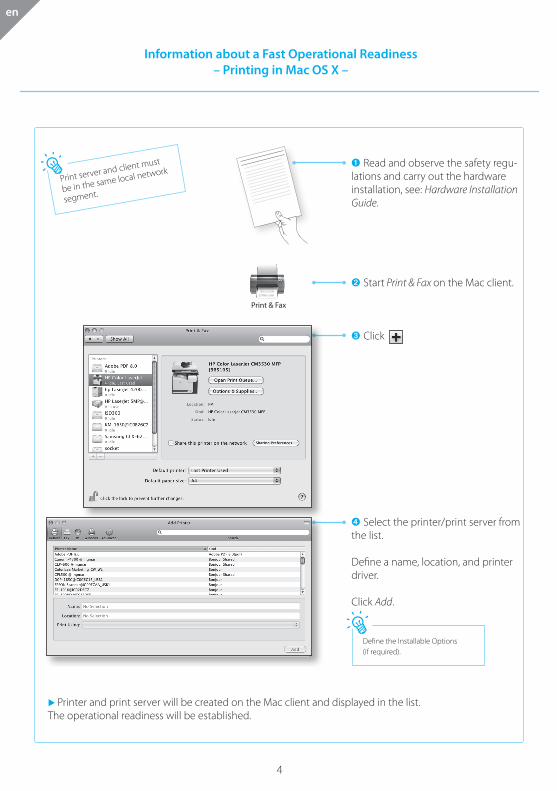
Print & Fax
Printer and print server will be created on the Mac client and displayed in the list. The operational readiness will be established.
4
Print server and client must
be in the same local network
segment.
Information about a Fast Operational Readiness – Printing in Mac OS X –
➊ Read and observe the safety regu-lations and carry out the hardware installation, see: Hardware Installation Guide.
➋ Start Print & Fax on the Mac client.
➌ Click
➍ Select the printer/print server from the list.
Define a name, location, and printer driver.
Click Add.
Define the Installable Options (if required).
en
DHCP/BOOTPZeroConf/Bonjour
192.168.0.67
192.168.0.67
5
en
Information about the Assignment of IP Addresses
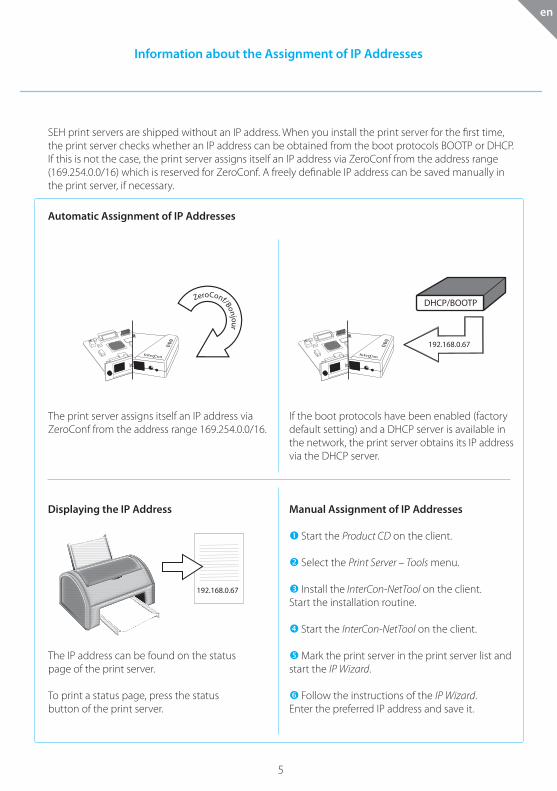
SEH print servers are shipped without an IP address. When you install the print server for the first time, the print server checks whether an IP address can be obtained from the boot protocols BOOTP or DHCP. If this is not the case, the print server assigns itself an IP address via ZeroConf from the address range (169.254.0.0/16) which is reserved for ZeroConf. A freely definable IP address can be saved manually in the print server, if necessary.
Automatic Assignment of IP Addresses
The print server assigns itself an IP address via ZeroConf from the address range 169.254.0.0/16.
If the boot protocols have been enabled (factory default setting) and a DHCP server is available in the network, the print server obtains its IP address via the DHCP server.
Manual Assignment of IP Addresses
Start the Product CD on the client.
Select the Print Server – Tools menu.
Install the InterCon-NetTool on the client. Start the installation routine.
Start the InterCon-NetTool on the client.
Mark the print server in the print server list and start the IP Wizard.
Follow the instructions of the IP Wizard. Enter the preferred IP address and save it.
Displaying the IP Address
The IP address can be found on the status page of the print server.
To print a status page, press the status button of the print server.
6
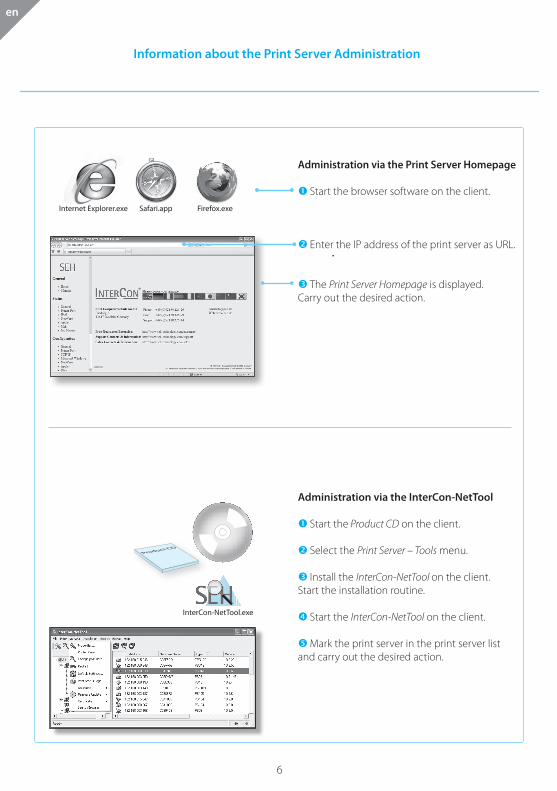
Information about the Print Server Administration
InterCon-NetTool.exe
Administration via the Print Server Homepage
Start the browser software on the client.
Enter the IP address of the print server as URL.
The Print Server Homepage is displayed. Carry out the desired action.
Administration via the InterCon-NetTool
Start the Product CD on the client.
Select the Print Server – Tools menu.
Install the InterCon-NetTool on the client. Start the installation routine.
Start the InterCon-NetTool on the client.
Mark the print server in the print server list and carry out the desired action.
Internet Explorer.exe Safari.app Firefox.exe
en
de
7
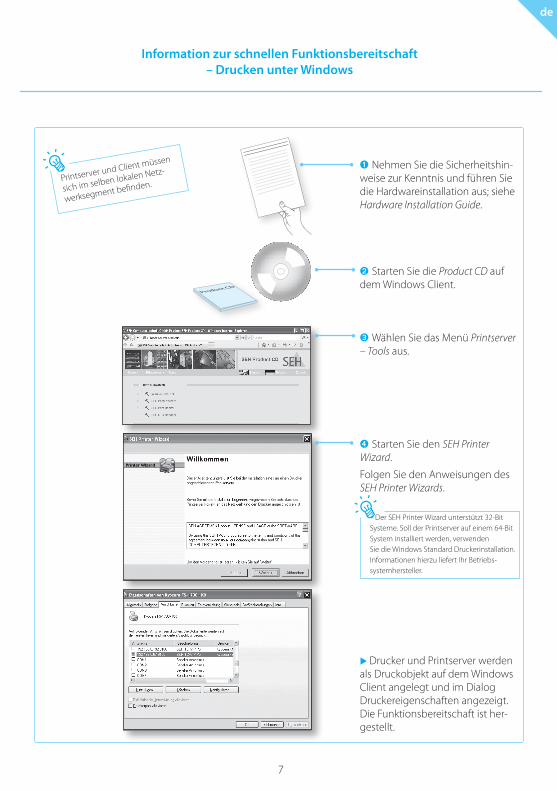
➊ Nehmen Sie die Sicherheitshin-weise zur Kenntnis und führen Sie die Hardwareinstallation aus; siehe Hardware Installation Guide.
➋ Starten Sie die Product CD auf dem Windows Client.
➌ Wählen Sie das Menü Printserver – Tools aus.
➍ Starten Sie den SEH Printer Wizard.
Folgen Sie den Anweisungen des SEH Printer Wizards.
Drucker und Printserver werden als Druckobjekt auf dem Windows Client angelegt und im Dialog Druckereigenschaften angezeigt. Die Funktionsbereitschaft ist her-gestellt.
Information zur schnellen Funktionsbereitschaft– Drucken unter Windows
Printserver und Client müssen
sich im selben lokalen Netz-
werksegment befinden.
Der SEH Printer Wizard unterstützt 32-Bit Systeme. Soll der Printserver auf einem 64-Bit System installiert werden, verwenden Sie die Windows Standard Druckerinstallation. Informationen hierzu liefert Ihr Betriebs-systemhersteller.

Drucker & Fax
8
➊ Nehmen Sie die Sicherheitshin-weise zur Kenntnis und führen Sie die Hardwareinstallation aus; siehe Hardware Installation Guide.
➋ Starten Sie Drucker & Fax auf dem Mac Client.
➌ Wählen Sie
➍ Markieren Sie den Drucker/ Printserver in der Liste.
Definieren Sie Name, Standort und Druckertreiber.
Wählen Sie die Schaltfläche Hinzufügen an.
Information zur schnellen Funktionsbereitschaft– Drucken unter Mac OS X –
Definieren Sie bei Bedarf verschiedene Installations optionen.
Printserver und Client müssen
sich im selben lokalen Netz-
werksegment befinden.
de
Drucker und Printserver werden auf dem Mac Client angelegt und in der Liste angezeigt. Die Funktionsbereitschaft ist hergestellt.

DHCP/BOOTPZeroConf/Bonjour
192.168.0.67
192.168.0.67
9
de
Informationen zur Vergabe der IP-Adresse
SEH Printserver werden ohne IP-Adresse ausgeliefert. Der Printserver überprüft bei der Erstinstallation, ob er eine IP-Adresse über die Bootprotokolle BOOTP oder DHCP erhält. Ist das nicht der Fall, gibt sich der Printserver über ZeroConf selbst eine IP-Adresse aus dem für ZeroConf reservierten Adressbereich (169.254.0.0/16). Bei Bedarf kann manuell eine frei definierbare IP-Adresse im Printserver gespeichert werden.
Automatische Vergabe der IP-Adresse
Der Printserver gibt sich über ZeroConf selbst eine IP-Adresse aus dem Adressbereich 169.254.0.0/16.
Sind die Bootprotokolle aktiviert (Werksein-stellung) und ist im Netzwerk ein DHCP Server vorhanden, erhält der Printserver seine IP-Adresse über den DHCP Server.
Manuelle Vergabe der IP-Adresse
Starten Sie die Product CD auf dem Client.
Wählen Sie das Menü Printserver – Tools aus.
Installieren Sie das InterCon-NetTool auf dem Client. Starten Sie die Installationsroutine.
Starten Sie das InterCon-NetTool auf dem Client.
Markieren Sie den Printserver in der Liste und starten Sie den IP-Assistent.
Folgen Sie dem IP-Assistenten. Geben Sie die bevorzugte IP-Adresse ein und speichern Sie diese.
IP-Adresse einsehen
Die IP-Adresse kann auf der Statusseite des Printservers eingesehen werden.
Zum Drucken einer Statusseite betätigen Sie den Statustaster am Printserver.
de
InterCon-NetTool.exe
Internet Explorer.exe Safari.app Firefox.exe
10
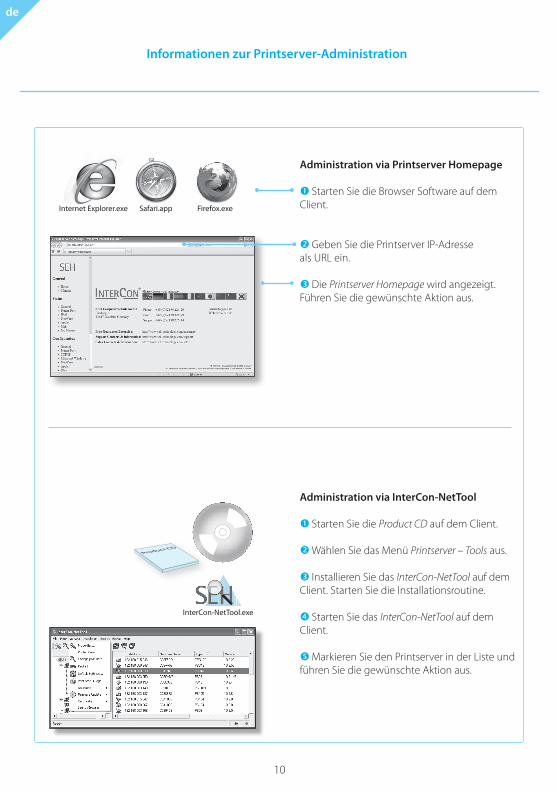
Informationen zur Printserver-Administration
Administration via Printserver Homepage
Starten Sie die Browser Software auf dem Client.
Geben Sie die Printserver IP-Adresse als URL ein.
Die Printserver Homepage wird angezeigt. Führen Sie die gewünschte Aktion aus.
Administration via InterCon-NetTool
Starten Sie die Product CD auf dem Client.
Wählen Sie das Menü Printserver – Tools aus.
Installieren Sie das InterCon-NetTool auf dem Client. Starten Sie die Installationsroutine.
Starten Sie das InterCon-NetTool auf dem Client.
Markieren Sie den Printserver in der Liste und führen Sie die gewünschte Aktion aus.
fr
11
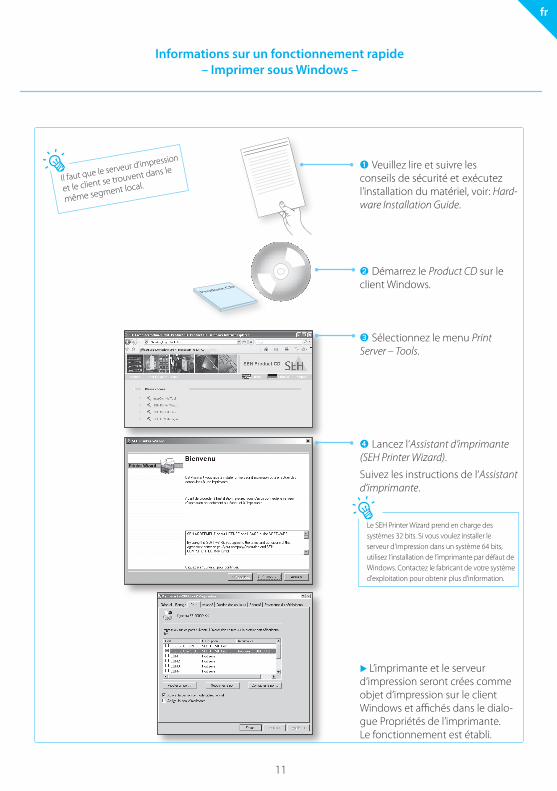
➊ Veuillez lire et suivre les conseils de sécurité et exécutez l’installation du matériel, voir: Hard-ware Installation Guide.
➋ Démarrez le Product CD sur le client Windows.
➌ Sélectionnez le menu Print Server – Tools.
➍ Lancez l‘Assistant d‘imprimante (SEH Printer Wizard).
Suivez les instructions de l‘Assistant d‘imprimante.
L’imprimante et le serveur d‘impression seront crées comme objet d‘impression sur le client Windows et affichés dans le dialo-gue Propriétés de l’imprimante. Le fonctionnement est établi.
Informations sur un fonctionnement rapide– Imprimer sous Windows –
Il faut que le serveur d‘impression
et le client se trouvent dans le
même segment local.
Le SEH Printer Wizard prend en charge des systèmes 32 bits. Si vous voulez installer le serveur d'impression dans un système 64 bits, utilisez l’installation de l’imprimante par défaut de Windows. Contactez le fabricant de votre système d'exploitation pour obtenir plus d’information.
Imprimantes et fax
12
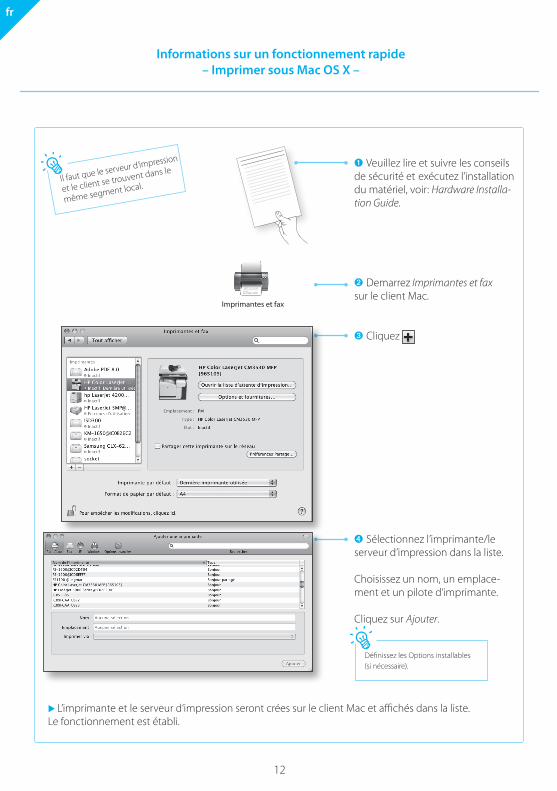
➊ Veuillez lire et suivre les conseils de sécurité et exécutez l’installation du matériel, voir: Hardware Installa-tion Guide.
➋ Demarrez Imprimantes et fax sur le client Mac.
➌ Cliquez
➍ Sélectionnez l’imprimante/le serveur d’impression dans la liste.
Choisissez un nom, un emplace-ment et un pilote d‘imprimante.
Cliquez sur Ajouter.
Informations sur un fonctionnement rapide– Imprimer sous Mac OS X –
Définissez les Options installables (si nécessaire).
Il faut que le serveur d‘impression
et le client se trouvent dans le
même segment local.
fr
L’imprimante et le serveur d‘impression seront crées sur le client Mac et affichés dans la liste. Le fonctionnement est établi.
DHCP/BOOTPZeroConf/Bonjour
192.168.0.67
13
fr
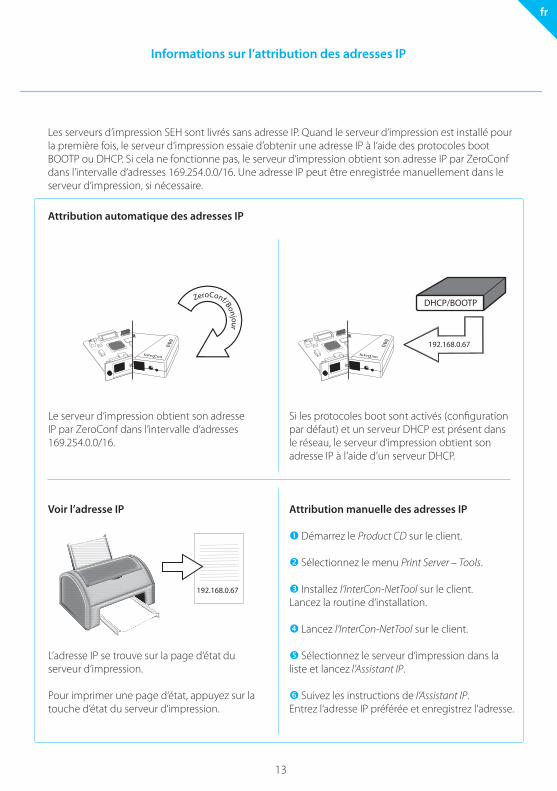
Informations sur l’attribution des adresses IP
Les serveurs d’impression SEH sont livrés sans adresse IP. Quand le serveur d‘impression est installé pour la première fois, le serveur d‘impression essaie d’obtenir une adresse IP à l‘aide des protocoles boot BOOTP ou DHCP. Si cela ne fonctionne pas, le serveur d‘impression obtient son adresse IP par ZeroConf dans l’intervalle d‘adresses 169.254.0.0/16. Une adresse IP peut être enregistrée manuellement dans le serveur d‘impression, si nécessaire.
Attribution automatique des adresses IP
Le serveur d‘impression obtient son adresse IP par ZeroConf dans l’intervalle d‘adresses 169.254.0.0/16.
Si les protocoles boot sont activés (configuration par défaut) et un serveur DHCP est présent dans le réseau, le serveur d‘impression obtient son adresse IP à l’aide d’un serveur DHCP.
Attribution manuelle des adresses IP
Démarrez le Product CD sur le client.
Sélectionnez le menu Print Server – Tools.
Installez l‘InterCon-NetTool sur le client. Lancez la routine d‘installation.
Lancez l‘InterCon-NetTool sur le client.
Sélectionnez le serveur d‘impression dans la liste et lancez l’Assistant IP.
Suivez les instructions de l‘Assistant IP.Entrez l‘adresse IP préférée et enregistrez l’adresse.
Voir l’adresse IP
L’adresse IP se trouve sur la page d‘état du serveur d‘impression.
Pour imprimer une page d‘état, appuyez sur la touche d‘état du serveur d‘impression.
192.168.0.67

InterCon-NetTool.exe
Internet Explorer.exe Safari.app Firefox.exe
14
Informations sur l’administration du serveur d‘impression
Administration par la Homepagedu serveur d‘impression
Lancez le logiciel du navigateur Web sur le client.
Entrez l‘adresse IP du serveur d‘impression comme URL.
La Homepage du serveur d‘impression est affichée. Exécutez l’action désirée.
Administration par l’InterCon-NetTool
Démarrez le Product CD sur le client.
Sélectionnez le menu Print Server – Tools.
Installez l‘InterCon-NetTool sur le client. Lancez la routine d‘installation.
Lancez l‘InterCon-NetTool sur le client.
Sélectionnez le serveur d‘impression dans la liste et exécutez l’action désirée.
fr

es
15
➊ Lea y siga las precauciones y ejecute la instalación de hardware, vea: Hardware Installation Guide.
➋ Inicie el Product CD en el cliente Windows.
➌ Elija el menú Print Server – Tools.
➍ Arranque el Asistente de la impre-sora (SEH Printer Wizard).
Sigue las instrucciónes del Asistente de la impresora.
La impresora y el servidor de im-presión se crearán como objeto de impresión en el cliente Windows y se mostrarán en el cuadro de diálogo de Propiedades de impre-sora. Así estarán disponibles las funciones.
Información acerca de la disposición rápida de funciones– Impresión en Windows –
El servidor de impresión y el
cliente deben encontrarse en el
mismo segmento de red local.
El SEH Printer Wizard admite sistemas de 32 bits. Si desea instalar el servidor de impresión en un sistema de 64 bits, utilice la instalación de impresora predeterminada de Windows. Póngase en contacto con el fabricante de su sistema operativo para obtener más información.
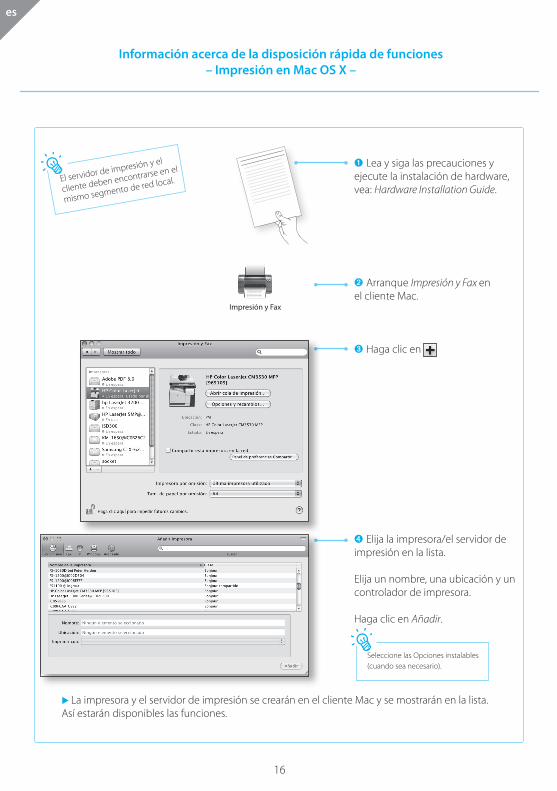
Impresión y Fax
16
➊ Lea y siga las precauciones y ejecute la instalación de hardware, vea: Hardware Installation Guide.
➋ Arranque Impresión y Fax en el cliente Mac.
➌ Haga clic en
➍ Elija la impresora/el servidor de impresión en la lista.
Elija un nombre, una ubicación y un controlador de impresora.
Haga clic en Añadir.
Información acerca de la disposición rápida de funciones– Impresión en Mac OS X –
Seleccione las Opciones instalables (cuando sea necesario).
El servidor de impresión y el
cliente deben encontrarse en el
mismo segmento de red local.
es
La impresora y el servidor de impresión se crearán en el cliente Mac y se mostrarán en la lista. Así estarán disponibles las funciones.
DHCP/BOOTPZeroConf/Bonjour
192.168.0.67
17
es
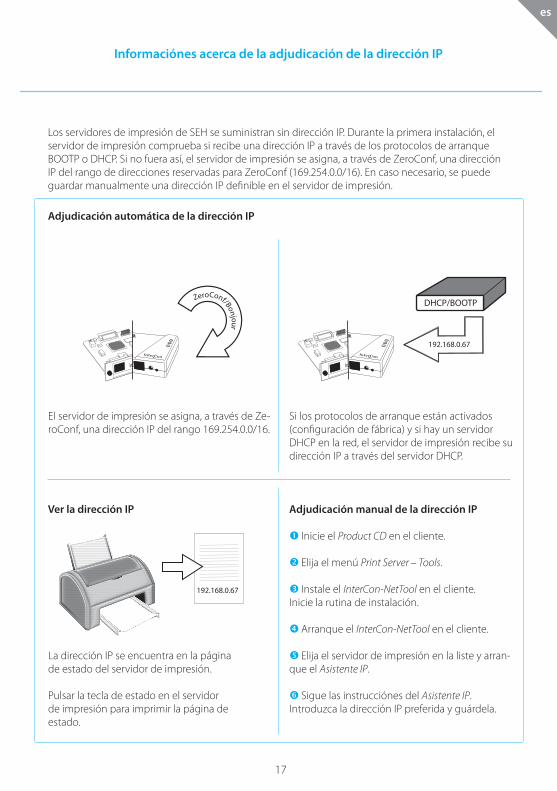
Informaciónes acerca de la adjudicación de la dirección IP
Los servidores de impresión de SEH se suministran sin dirección IP. Durante la primera instalación, el servidor de impresión comprueba si recibe una dirección IP a través de los protocolos de arranque BOOTP o DHCP. Si no fuera así, el servidor de impresión se asigna, a través de ZeroConf, una dirección IP del rango de direcciones reservadas para ZeroConf (169.254.0.0/16). En caso necesario, se puede guardar manualmente una dirección IP definible en el servidor de impresión.
Adjudicación automática de la dirección IP
El servidor de impresión se asigna, a través de Ze-roConf, una dirección IP del rango 169.254.0.0/16.
Si los protocolos de arranque están activados (configuración de fábrica) y si hay un servidor DHCP en la red, el servidor de impresión recibe su dirección IP a través del servidor DHCP.
Adjudicación manual de la dirección IP
Inicie el Product CD en el cliente.
Elija el menú Print Server – Tools.
Instale el InterCon-NetTool en el cliente. Inicie la rutina de instalación.
Arranque el InterCon-NetTool en el cliente.
Elija el servidor de impresión en la liste y arran-que el Asistente IP.
Sigue las instrucciónes del Asistente IP. Introduzca la dirección IP preferida y guárdela.
Ver la dirección IP
La dirección IP se encuentra en la página de estado del servidor de impresión.
Pulsar la tecla de estado en el servidor de impresión para imprimir la página de estado.
192.168.0.67
InterCon-NetTool.exe
Internet Explorer.exe Safari.app Firefox.exe
18
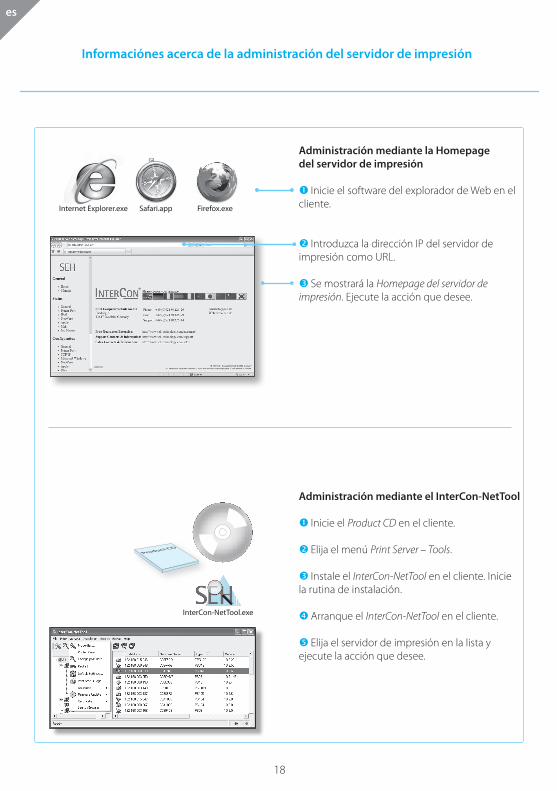
Informaciónes acerca de la administración del servidor de impresión
Administración mediante la Homepage del servidor de impresión
Inicie el software del explorador de Web en el cliente.
Introduzca la dirección IP del servidor de impresión como URL.
Se mostrará la Homepage del servidor de impresión. Ejecute la acción que desee.
Administración mediante el InterCon-NetTool
Inicie el Product CD en el cliente.
Elija el menú Print Server – Tools.
Instale el InterCon-NetTool en el cliente. Inicie la rutina de instalación.
Arranque el InterCon-NetTool en el cliente.
Elija el servidor de impresión en la lista y ejecute la acción que desee.
es

it
19
➊ Leggere e osservare le istruzioni di sicurezza e eseguire l’installazione hardware, vedi: Hard-ware Installation Guide.
➋ Avviare il Product CD sul cliente Windows.
➌ Selezionare il menu Print Server – Tools.
➍ Avviare l‘installazione guidata stampante (SEH Printer Wizard).
Seguire le istruzioni dell‘installazione guidata stampante.
La stampante e il server di stampa vengono creati come oggetti di stampa nel cliente Windows e vizualizzati nelle Proprietà stampante. La funzionalità è attiva.
Informazioni sulla funzionalità veloce– Stampare in Windows –
Il server di stampa e il cliente
devono trovarsi nello stesso
segmento di rete locale.
Il SEH Printer Wizard supporta sistemi a 32 bit. Per l’installazione del server di stampa in un sistema a 64 bit, utilizzare la installa-zione stampante predefinita di Windows. Contattare il produttore di vostro sistema operativo per ulteriori informazioni.

Stampa e Fax
20
➊ Leggere e osservare le istruzioni di sicurezza e eseguire l’installazione hardware, vedi: Hardware Installation Guide.
➋ Avviare Stampa e Fax sul cliente Mac.
Fare clic su
➍ Selezionare la stampante/il server di stampa nella lista.
Immettere un nome, una posizione ed un driver di stampa.
Fare clic su Aggiungi.
Informazioni sulla funzionalità veloce– Stampare in Mac OS X –
Definire le Opzioni Installabili (se necessario).
Il server di stampa e il cliente
devono trovarsi nello stesso
segmento di rete locale.
it
La stampante e il server di stampa vengono creati sul cliente Mac e visualizzati nell'elenco. La funzionalità è attiva.

DHCP/BOOTPZeroConf/Bonjour
192.168.0.67
21
it
Informazioni sull’assegnazione dell’indirizzo IP
I server di stampa SEH vengono consegnati senza indirizzo IP. Durante l’installazione iniziale, il server di stampa attende la ricezione dell’indirizzo IP dai protocolli BOOTP o DHCP. In caso contrario, il server si assegna autonomamente attraverso ZeroConf un indirizzo IP compreso nell’intervallo riservato a ZeroConf (169.254.0.0/16). Se necessario è possibile salvare manualmente un qualsiasi indirizzo IP nel server di stampa.
Assegnazione automatica dell’indirizzo IP
Il server si assegna autonomamente attraverso ZeroConf un indirizzo IP compreso nell’intervallo riservato a ZeroConf (169.254.0.0/16).
Se i protocolli di boot sono attivati (impostazioni di fabbrica) e se nella rete è presente un server DHCP, il server di stampa riceverà l’indirizzo IP dal server DHCP.
Assegnazione manuale dell’indirizzo IP
Avviare il Product CD sul cliente.
Selezionare il menu Print Server – Tools.
Installare il InterCon-NetTool sul cliente. Avviare la routine d’installazione.
Avviare il InterCon-NetTool sul cliente.
Selezionare il server di stampa nella lista ed avviare il Wizard IP.
Seguire le istruzioni del Wizard IP. Digitare l’indirizzo IP desiderato, quindi salvarlo.
Vedere l’indirizzo IP
L’indirizzo IP si trova sulla pagina di stato del server di stampa.
Per stampare una pagina di stato, premere il pulsante di stato del server di stampa.
192.168.0.67

it
22
Informazioni sull‘amministrazione del server di stampa
Amministrazione tramite la Homepage del server di stampa
Avviare il software del browser Web sul cliente.
Immettere l‘indirizzo IP del server di stampa come URL.
Verrà visualizzata la Homepage del server di stampa. Eseguire l’operazione desiderata.
Amministrazione tramite il InterCon-NetTool
Avviare il Product CD sul cliente.
Selezionare il menu Print Server – Tools.
Installare il InterCon-NetTool sul cliente. Avviare la routine d’installazione.
Avviare il InterCon-NetTool sul cliente.
Selezionare il server di stampa nella lista ed eseguire l’operazione desiderata.
InterCon-NetTool.exe
Internet Explorer.exe Safari.app Firefox.exe

pt
23
➊ Leia e observe os avisos de segurança e execute a instalação do hardware, ver: Hardware Installa-tion Guide.
➋ Inicie o Product CD no cliente Windows.
➌ Seleccione o menu Print Server – Tools.
➍ Inicie o Assistente da Impressora (SEH Printer Wizard).
Siga as instruções do Assistente da Impressora.
A impressora e o servidor de impressão são instalados no cliente Windows como objectos de im-pressão e exibidos no diálogo do Propriedades de impressão. Assim, a operacionalidade foi realizada.
Informações para obter rapidamente a operacionalidade– Imprimir em Windows –
O servidor de impressão e o
cliente têm de se encontrar no
mesmo segmento de rede local.
O SEH Printer Wizard suporta sistemas de 32 bits. Se deseja instalar o servidor de impressão em um sistema de 64 bits, use a instalação de impressora predefinida de Windows. Contacte o fabricante de seu sistema operativo para mais informações.

Impressão e Fax
24
➊ Leia e observe os avisos de segurança e execute a instalação do hardware, ver: Hardware Installation Guide.
➋ Inicialize Impressão e Fax no cliente Mac.
➌ Clique no botão
➍ Selecione a impressora/o servidor de impressão na lista.
Introduza um nome, uma locali-zação e um driver de impressão.
Clique no botão Adicionar.
Informações para obter rapidamente a operacionalidade– Imprimir em Mac OS X –
Configure as Opções Instaláveis (se necessário).
O servidor de impressão e o
cliente têm de se encontrar no
mesmo segmento de rede local.
pt
A impressora e o servidor de impressão são instalados no cliente Mac e exibidos na lista. Assim, a operacionalidade foi realizada.
DHCP/BOOTP
192.168.0.67
ZeroConf/Bonjour
25
pt
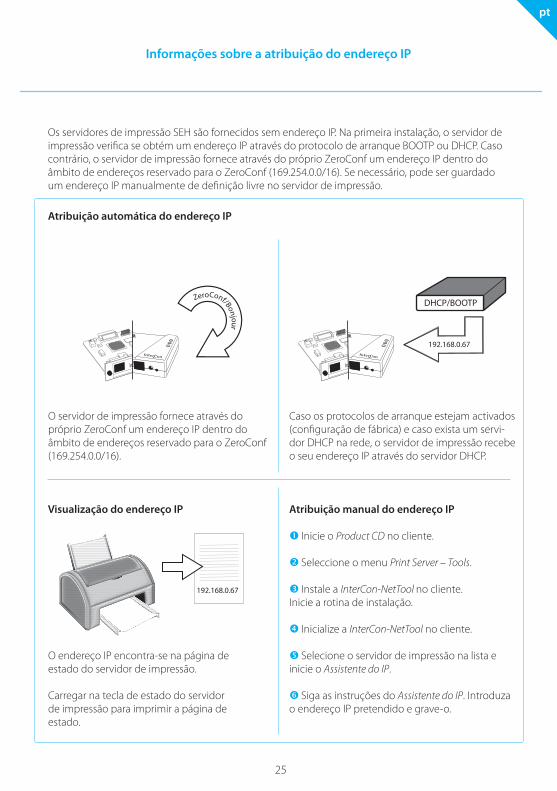
Informações sobre a atribuição do endereço IP
Os servidores de impressão SEH são fornecidos sem endereço IP. Na primeira instalação, o servidor de impressão verifica se obtém um endereço IP através do protocolo de arranque BOOTP ou DHCP. Caso contrário, o servidor de impressão fornece através do próprio ZeroConf um endereço IP dentro do âmbito de endereços reservado para o ZeroConf (169.254.0.0/16). Se necessário, pode ser guardado um endereço IP manualmente de definição livre no servidor de impressão.
Atribuição automática do endereço IP
O servidor de impressão fornece através do próprio ZeroConf um endereço IP dentro do âmbito de endereços reservado para o ZeroConf (169.254.0.0/16).
Caso os protocolos de arranque estejam activados (configuração de fábrica) e caso exista um servi-dor DHCP na rede, o servidor de impressão recebe o seu endereço IP através do servidor DHCP.
Atribuição manual do endereço IP
Inicie o Product CD no cliente.
Seleccione o menu Print Server – Tools.
Instale a InterCon-NetTool no cliente. Inicie a rotina de instalação.
Inicialize a InterCon-NetTool no cliente.
Selecione o servidor de impressão na lista e inicie o Assistente do IP.
Siga as instruções do Assistente do IP. Introduza o endereço IP pretendido e grave-o.
Visualização do endereço IP
O endereço IP encontra-se na página de estado do servidor de impressão.
Carregar na tecla de estado do servidor de impressão para imprimir a página de estado.
192.168.0.67
pt
26
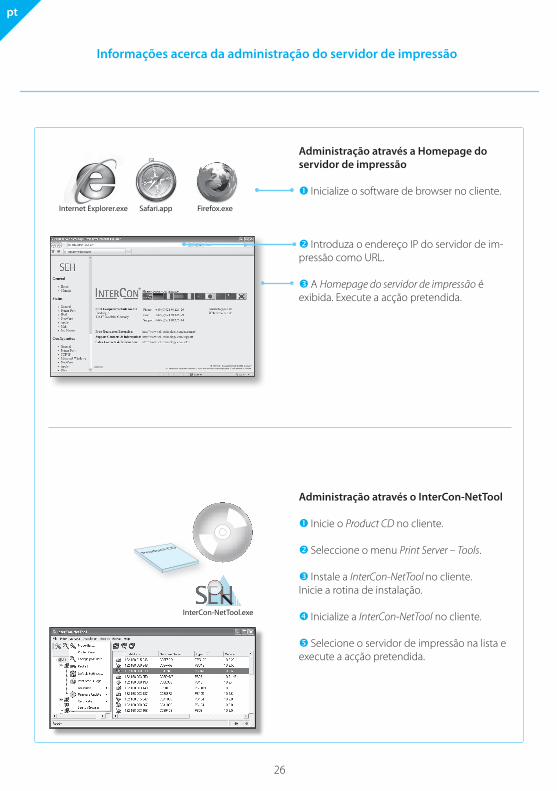
Informações acerca da administração do servidor de impressão
Administração através a Homepage do servidor de impressão
Inicialize o software de browser no cliente.
Introduza o endereço IP do servidor de im-pressão como URL.
A Homepage do servidor de impressão é exibida. Execute a acção pretendida.
Administração através o InterCon-NetTool
Inicie o Product CD no cliente.
Seleccione o menu Print Server – Tools.
Instale a InterCon-NetTool no cliente. Inicie a rotina de instalação.
Inicialize a InterCon-NetTool no cliente.
Selecione o servidor de impressão na lista e execute a acção pretendida.
InterCon-NetTool.exe
Internet Explorer.exe Safari.app Firefox.exe


SEH ComputErtECHnIk GmbHGermany (Headquarters)
Südring 1133647 BielefeldDeutschlandTelefon +49 (0) 5 21 - 9 42 26-29Fax +49 (0) 5 21 - 9 42 26-99Support +49 (0) 5 21 - 9 42 26-44Internet www.seh.deE-Mail [email protected]
SEH tECHnoloGy uk ltD.United Kingdom/Ireland
The Sussex Innovation Centre,Science Park Square, Falmer,Brighton, BN1 9SB, Great Britain
Phone +44 (0) 12 73 - 23 46-81Fax +44 (0) 12 73 - 23 46-82
Internet www.seh-technology.co.ukEmail [email protected]
SEH tECHnoloGy Inc.USA
518 Kimberton Rd. / PMB 410Phoenixville, PA 19460 USA
Phone +1 610 - 9 33-20 88Fax +1 484 - 2 29-06 97
Internet www.seh-technology.comEmail [email protected]