quick guide - student management system
TRANSCRIPT

PowerPro RTO – Operations Guide Page 1 of 43
About this Document
About PowerPro RTO
PowerPro RTO is a training management system designed to help registered training organisations manage
their records in an easy and effective manner.
About this guide
This guide is designed to provide a quick reference for PowerPro RTO users. It covers the RTO day-to-day
tasks used on the operational side of VET record keeping.
Other references
There is a Frequently Asked Questions web site for PowerPro RTO which is also accessible from the Help
menu.
This guide can also be found online using the link below:
https://powerprorto.com.au/tms/op-guide.pdf

PowerPro RTO – Operations Guide Page 2 of 43
Contents
1. FUNDAMENTAL CONCEPTS .................................................................................................... 3
2. GETTING STARTED ................................................................................................................. 4
2.1.1. Logging in to PowerPro RTO ..................................................................................................................................................... 4 2.1.2. Using shortcut keys ....................................................................................................................................................................... 5 2.1.3. Mandatory fields ............................................................................................................................................................................. 5
3. ACCREDITED COURSES ........................................................................................................... 6
3.1.1. Adding a new accredited course ............................................................................................................................................. 6 3.1.2. Editing an existing course .......................................................................................................................................................... 8 3.1.3. Deleting an existing accredited course ................................................................................................................................. 9 3.1.4. Creating a Master course ............................................................................................................................................................ 9 3.1.5. Cloning an existing course ...................................................................................................................................................... 10 3.1.6. Editing course units ................................................................................................................................................................... 11
4. NON-ACCREDITED COURSES ................................................................................................ 14
4.1.1. 4.1 Adding a new module into the system ....................................................................................................................... 14 4.1.2. 4.2 Attaching a new module to a course ........................................................................................................................... 15
5. ENROLMENTS AND RESULTS ................................................................................................ 16
5.1.1. Adding a new client to the system ....................................................................................................................................... 16 5.1.2. Adding clients to a course ....................................................................................................................................................... 17 5.1.3. Updating client results .............................................................................................................................................................. 19 5.1.4. Modifying client units selection ............................................................................................................................................ 21 5.1.5. Printing Certificates, Statements of Attainment and Certificates of Attendance ............................................ 22 5.1.6. Attaching documents to a client/enrolment ................................................................................................................... 28 5.1.7. Creating a Contact Log against a client/enrolment ..................................................................................................... 30 5.1.8. Emailing a client or a group of clients ................................................................................................................................ 31 5.1.9. Sending SMS messages to a client or group of clients ................................................................................................ 33 5.1.10. Using the Workflow/Check list function .......................................................................................................................... 36 5.1.11. Colour Coded Client Tags ......................................................................................................................................................... 38 5.1.12. Setting up Client Tags ................................................................................................................................................................ 38 5.1.13. Assigning tags to a Client ......................................................................................................................................................... 40
My notes 42

PowerPro RTO – Operations Guide Page 3 of 43
1. Fundamental concepts
PowerPro RTO allows you to track accredited and non-accredited training records. The main difference
between these is highlighted in the following table:
Accredited Courses Non-Accredited Courses
Subjects/Outcomes Units of Competence In-house Modules
Recognition National None
Document issued Qualification or Statement of Attainment Certificate of Attendance
Example of Course Name Certificate II in Music Employee Induction
Example of National Code CUS20105 N/A
Part of AVETMISS Collection Yes No
Other differences Units can be imported into the system Modules must be entered into the system
by the user
Accredited Courses can be made of a couple of Units (for licensing purposes for example, e.g. Responsible
Service of Alcohol, white card, operate a forklift, etc) or they can form a full Qualification. In the first case
(usually referred to as “Short Courses”) Clients are issued with a Statement of Attainment upon completion
of the Course. On the other hand, when completing a full Qualification Course Clients are issued a
Qualification (Certificate II, Diploma, etc) as well as a Transcript of Results.
The following table summarizes which document(s) are to be issued depending on the Course type as well
as the Client outcomes:
Course Type Documents Issued upon Completion Example
Full Qualification Qualification and Transcript of Results Certificate IV in Music
Short Course Statement of Attainment Course in First Aid
Non-Accredited Course Certificate of Attendance Course in Employee induction

PowerPro RTO – Operations Guide Page 4 of 43
2. Getting started
2.1.1. Logging in to PowerPro RTO
◼ Figure above – PowerPro RTO login screen
When logging in to PowerPro all fields must be entered. If you have an empty field for Database server or
the Database filename, please lookup these values on another PowerPro workstation in your organisation.
NOTE: These fields are not case sensitive.

PowerPro RTO – Operations Guide Page 5 of 43
2.1.2. Using shortcut keys
The PowerPro toolbar has shortcut keys set up by default to enable quick access:
The shortcut keys as shown in the following table.
Shortcut Key Outcome
Esc Close: close the current window
F1 Clients: maintain or search client details.
F2 Enrolments & Results: maintain course enrolments and results.
F3 Enquiries: maintain enquiries.
F4 To-do List: Maintain list of tasks to complete
F5 Accredited courses: maintain accredited course structures and units of competency.
F6 Non-Accredited courses: maintain non- accredited course structures and in-house modules
F7 Training Plans: maintain individual client/enrolment training plans
F8 Client companies: setup and maintain client company information.
F9 Trainers: setup and maintain trainer and assessor information.
F10 Scheduler: calendar-based trainer-scheduling tool.
◼ Table above - PowerPro shortcut keys
2.1.3. Mandatory fields
When entering data into PowerPro, mandatory fields are shown in red while optional fields are displayed in
black. You must enter a value for all mandatory fields to save a record in the database.

PowerPro RTO – Operations Guide Page 6 of 43
3. Accredited Courses
Use the Accredited Courses window to create/modify/clone any courses based on units of competence.
These courses can either be AQTF qualifications, licensing courses (e.g. First Aid, RSA) or accredited courses
(any of those with a National code such as 1234QLD). From the Accredited Courses screen, you can also
manage the mandatory and optional units in a course, maintain the list of units in the system and
view/modify unit details.
The Accredited Courses screen displays:
• A list of courses (active / archive courses)
• A list of the course units (for the selected course)
The course list panel appears at the top of the screen, just below the main menu, while the course units
shown for the selected course are further down.
◼ Figure above - Accredited courses screen
When a course is selected it is possible to add or delete units to or from the course. You can do this by
clicking on the “Add Units to the Course” or “Remove Units from the Course” button.
3.1.1. Adding a new accredited course
To add a new course to the database, click the New Course button to open a Course details window which
contains a number of tabs (see below) for adding new course information.
Tab Purpose
Main info Displays general course information including course ID, qualification/level, name, version, dates
and training organisation. Fields written in red are mandatory.
AVETMISS Displays Australian Vocational Education and Training Management Information Statistical Standard
(AVETMISS) information for the course.
RAPT Displays Resource Allocation Program for Training (RAPT) identification code for the course.
Web Displays web publishing options
◼ Table above - Accredited course tabs

PowerPro RTO – Operations Guide Page 7 of 43
To begin adding a new course to the database, select the Main Info tab. The input fields will contain no
data.
NOTE: Uncheck the “Master Course” field. This topic is covered in section 3.1.4.
The Course ID field will appear grey and cannot be altered because the computer will automatically assign a
Course ID.
Enter data for all mandatory fields (labelled in red) and any other relevant fields.
To the right of the Course ID field is a Qualification check box. If the course offers no qualification, leave
the box empty. The Qualification/Level field below will appear grey and contain the word ‘Course’. If the
course does offer a qualification, check the Qualification box and scroll through the options in the
dropdown list in the Qualification/Level field below to select the appropriate one.
◼ Figure above New course screen
In the National Code field, enter the appropriate national code for the qualification selected above. This
can be left blank if there is no qualification.
Enter the course version in the Version field.
Select the course’s Start Date and End Date from the dropdown calendars.
In the Completion Document field, to enter a completion document for a course with no qualification,
select the appropriate document from the dropdown list. If the course has a qualification, a completion
document will be automatically assigned when you selected a particular qualification. This cannot be
edited.

PowerPro RTO – Operations Guide Page 8 of 43
To choose a training organisation in the Training Org. field, click the dropdown list and select the desired
trainer. To the right of this field is a blue ‘cross’ icon that opens a window when clicked. The window
contains fields for inputting a training organisation’s contact information. Enter or edit the mandatory fields
(denoted by a red circle) and click Save to retain the information or Cancel and Yes to abandon changes
and return to the previous window. Click Delete to remove this training organisation from your database.
Use the Delivered at field to specify the course’s location. You can click on an option in the dropdown list or
create and a location by clicking the green ‘cross’ icon on the right of this field.
Select the AVETMISS tab to enter relevant Australian Vocational Education and Training Management
Information Statistical Standard data for this course.
Select the RAPT tab to enter the Resource Allocation Program for Training data for this course. You can
enter the CPD ID into the blank field and specify whether the course is an apprenticeship/traineeship.
Once you have finished entering data for the new course, click the Save button. A new course record will be
created in the database.
To view course lists, click on the List Courses dropdown menu, and click on Active courses, Archived
courses, or Both to display desired courses.
You can also enter Pattern Match and Version data in the fields on the top line of the unit-based courses
panel.
3.1.2. Editing an existing course
To view/modify course attributes just double-click on the relevant course in the course list panel. This will
open the Course details window with the following tabs.
Tab Purpose
Main info Displays general course information including course ID, qualification/level, name, version, dates
and training organisation. Fields written in red are mandatory.
Workflow Displays course stages and tasks structure for this course.
Scheduled Sessions Displays date, day, time, location, trainer and unit(s) studied.
Attendance Displays and allows editing the student attendance for the course.
Trainers/Resources Displays trainers and resources used for the course.
Docs Displays a list of any documents attached to this course. Good document candidates are student
and trainer signed class roles - do NOT use this to store course material/content documents
Invoicing Displays invoicing information, including by course or unit, GST option and total fee (exclusive of
GST).
Company invoices Displays invoice and payment details.
Units Displays units in the course.
AVETMISS Displays Australian Vocational Education and Training Management Information Statistical
Standard information (AVETMISS) for the course.
RAPT Displays Resource Allocation Program for Training (RAPT) identification code for the course.
WEB Information about if and how the course is to be displayed online.
◼ Table above - course tabs

PowerPro RTO – Operations Guide Page 9 of 43
Select the Scheduled Sessions tab to view and edit course session details. Here you can click New Session
to create an extra session. You can input and edit relevant information in the Trainer, Course, Units,
Location and Caption fields, and specify start and finish times for the session.
Select the Company Invoices tab to manage the creation or payment of any invoices for this course.
To view units in the course, select Units tab. This will display unit codes, names and dates. A red circle
signifies a mandatory unit; a blue circle denotes an optional unit.
3.1.3. Deleting an existing accredited course
Click the Delete Course button to remove a course.
A Confirm action dialogue box will appear to delete the course from the database.
◼ Figure above - Confirm action dialog box
NOTE: You cannot delete a course if it currently has students enrolled. Once this information has been
deleted, it cannot be retrieved.
3.1.4. Creating a Master course
What is a Master course?
Master Courses are used as models from which to clone from. The idea behind this concept is to ensure
consistency when cloning Courses.
Master Courses do not take enrolments and are not reportable. Master Courses are configured in the
Accredited Courses window and are omitted in the Enrolments window. RTOs are encouraged to create
Master Courses for all the Courses offered.

PowerPro RTO – Operations Guide Page 10 of 43
To create a master course. Follow 3.1.1 however this once tick the Master Course option:
▪ Figure above – Master Course Tick box location
Once the Master Course is created it becomes visible in Accredited Courses providing the Filter Course
Status drop down is set to All Master Courses.
▪ Figure above – Filter Course Status dropdown location
3.1.5. Cloning an existing course
To clone a course:
• Open the Accredited Courses window and set the Filter Course Status dropdown to All Master
Courses as per image above.
• Click on the Course actions dropdown button (top right of the window) and select Clone course.
• The Clone Course offer window is displayed as per image below:

PowerPro RTO – Operations Guide Page 11 of 43
◼ Figure above - Clone course date input window
• Select how many Course instances to be created (defaults to 1) and when should the new Course
start. The right panel shows the Course(s) about to be created as a result of this cloning process.
3.1.6. Editing course units
The course units table lists the units made available to students enrolling in the selected course. The units
are colour coded with a red circle to denote a mandatory course, and a blue circle to indicate an optional
unit.

PowerPro RTO – Operations Guide Page 12 of 43
◼ Figure above - Course Units of Competency panel
To add more units to the Course, click the Add Units to Course button:
Select the unit(s) you wish to add to the course.
PowerPro RTO – Operations Guide Page 13 of 43
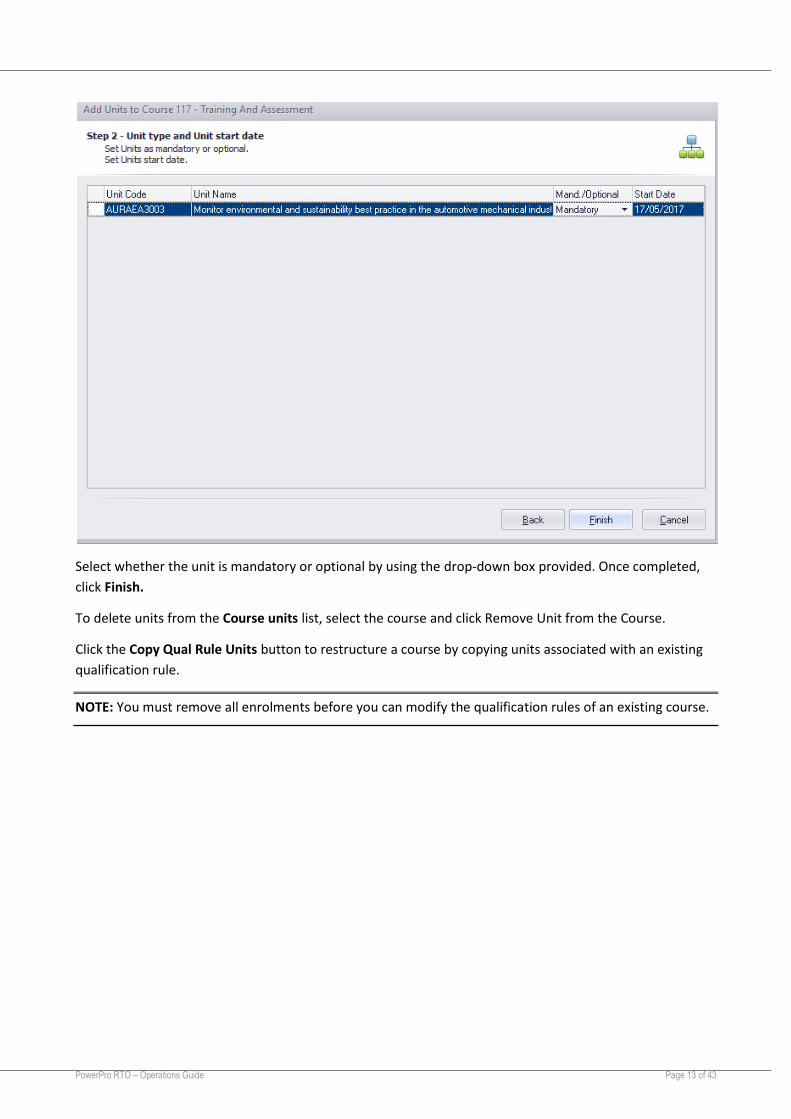
Select whether the unit is mandatory or optional by using the drop-down box provided. Once completed,
click Finish.
To delete units from the Course units list, select the course and click Remove Unit from the Course.
Click the Copy Qual Rule Units button to restructure a course by copying units associated with an existing
qualification rule.
NOTE: You must remove all enrolments before you can modify the qualification rules of an existing course.

PowerPro RTO – Operations Guide Page 14 of 43
4. Non-accredited Courses
The non-accredited courses component of PowerPro enables organisations to run in-house training courses
that are not nationally accredited. Examples of non-accredited courses are employee inductions, VOC’s and
Professional Development activities.
Non-accredited courses work in a very similar fashion to accredited courses except these courses are based
on modules instead of units of competence. For that reason, there is no option to import the modules,
since these are your own modules they need to be entered manually into the system.
4.1.1. 4.1 Adding a new module into the system
In the Configuration > Non-Accredited Modules, click on the plus symbol at the bottom left of the window.
Fill out the details in this area and then click the tick to complete adding the module.
Module Added!
▪ Figure above - Non-Accredited Module window

PowerPro RTO – Operations Guide Page 15 of 43
4.1.2. 4.2 Attaching a new module to a course
In the Non-Accredited Courses tab, ensure the course you wish to add a module/s too is selected. Once this
course has been selected, click on the Add Modules to the Course button – this will open the same window
as the Accredited Courses but of course with the modules that were created.
Too remove a module from a course, highlight the module and click Remove Modules from the Course
button.
▪ Figure Above – Adding modules to course area (Non-Accredited Courses)
▪ Figure above – Add modules to course box
PowerPro RTO – Operations Guide Page 16 of 43
5. Enrolments and results
5.1.1. Adding a new client to the system
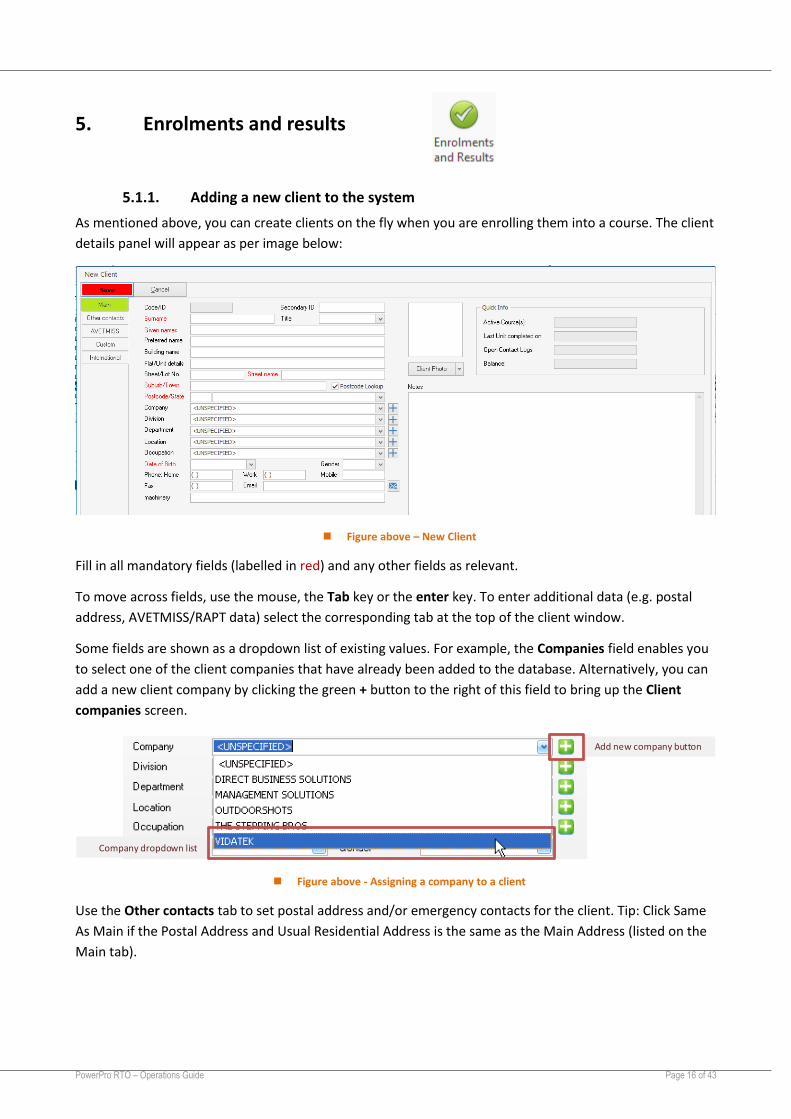
As mentioned above, you can create clients on the fly when you are enrolling them into a course. The client
details panel will appear as per image below:
◼ Figure above – New Client
Fill in all mandatory fields (labelled in red) and any other fields as relevant.
To move across fields, use the mouse, the Tab key or the enter key. To enter additional data (e.g. postal
address, AVETMISS/RAPT data) select the corresponding tab at the top of the client window.
Some fields are shown as a dropdown list of existing values. For example, the Companies field enables you
to select one of the client companies that have already been added to the database. Alternatively, you can
add a new client company by clicking the green + button to the right of this field to bring up the Client
companies screen.
◼ Figure above - Assigning a company to a client
Use the Other contacts tab to set postal address and/or emergency contacts for the client. Tip: Click Same
As Main if the Postal Address and Usual Residential Address is the same as the Main Address (listed on the
Main tab).
Company dropdown list
Add new company button
PowerPro RTO – Operations Guide Page 17 of 43
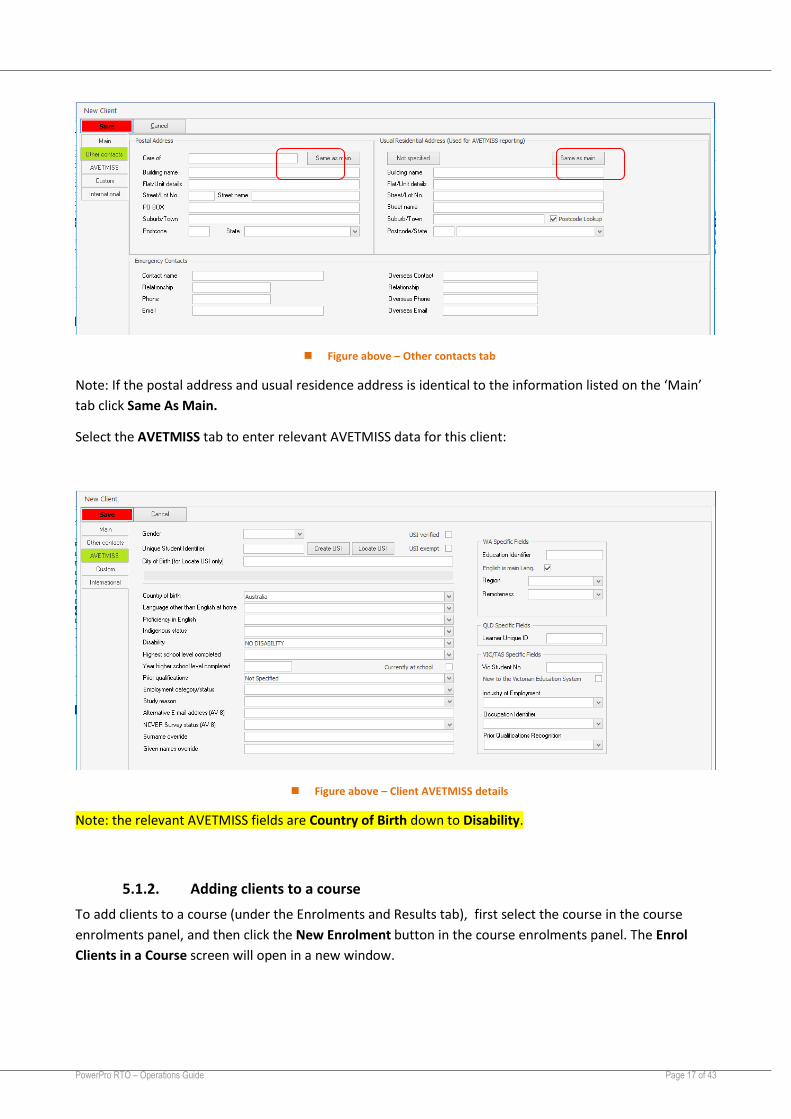
◼ Figure above – Other contacts tab
Note: If the postal address and usual residence address is identical to the information listed on the ‘Main’
tab click Same As Main.
Select the AVETMISS tab to enter relevant AVETMISS data for this client:
◼ Figure above – Client AVETMISS details
Note: the relevant AVETMISS fields are Country of Birth down to Disability.
5.1.2. Adding clients to a course
To add clients to a course (under the Enrolments and Results tab), first select the course in the course
enrolments panel, and then click the New Enrolment button in the course enrolments panel. The Enrol
Clients in a Course screen will open in a new window.

PowerPro RTO – Operations Guide Page 18 of 43
◼ Figure above - Enrol clients in a course screen
Select the clients to enrol from the client list (top section of the screen) and click the Enrol Selected Clients
button to add them to the clients to be enrolled list (bottom section of the screen).
You can search for the client using the Find function. Enter the given name/surname (or part of it) of the
client in the Name Pattern box and click the Find button to find any matches. Then click on the student
and hit the Enrol Selected Clients.
If you do not find the client in the list it means this is a new client and therefore needs to be entered in the
database. Click on Create New Client button. The new client screen will open in a new window. See the
above section (Adding a new client to the system) for further information.
Use the Enrolment Date field to set the date of enrolment for all clients you are about to enrol.
Once you have finished adding clients to the Clients to be Enrolled List, click the OK button.
If the course contains optional units, the Select Optional Units screen will appear after you have clicked the
OK button. Select the optional units that apply to the client(s) you are enrolling by checking the
corresponding checkboxes:
New Enrol. button to open Enrol clients in a course screen
Select clients to enrol from client list
Clients to be enrol led in the selected course

PowerPro RTO – Operations Guide Page 19 of 43
◼ Figure above - Select optional units screen
All the clients you selected will now appear in the course enrolments panel for the selected course.
Note: If you do not see the clients listed, your panel maybe hidden. Drag your cursor over the dots and
expand the window.
5.1.3. Updating client results
To award results by client, select the relevant course from the course list panel (under the Enrolments and
Results tab), then click the Bulk button and choose the Resulting & Dates – by Client option:
◼ Figure above – Bulk resulting by Client
The Bulk resulting screen will appear:

PowerPro RTO – Operations Guide Page 20 of 43
◼ Figure above – The bulk resulting by Client window
1. Check the boxes in the Set column for each unit/module you want to update. Click the Select All
button to check all the checkboxes if required.
2. Check the box to Set Outcome and Outcome Date.
3. Select the outcome/result (defaults to “Competent”) from the list and specify the result date.
4. Click the Set button to apply changes.
To update other results for other units or modules for this client, repeat the above steps. Once you have
finished updating results for the client you can navigate to the next client in the course by clicking on the
Next Client button.
PowerPro RTO – Operations Guide Page 21 of 43
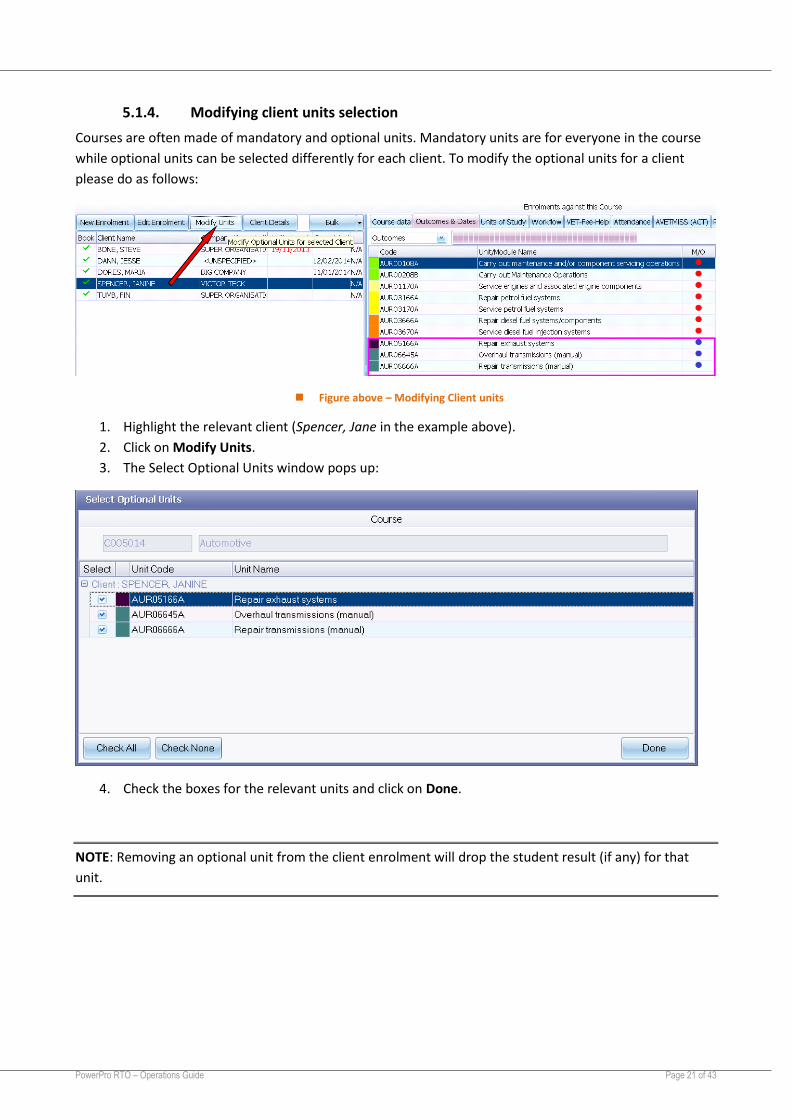
5.1.4. Modifying client units selection
Courses are often made of mandatory and optional units. Mandatory units are for everyone in the course
while optional units can be selected differently for each client. To modify the optional units for a client
please do as follows:
◼ Figure above – Modifying Client units
1. Highlight the relevant client (Spencer, Jane in the example above).
2. Click on Modify Units.
3. The Select Optional Units window pops up:
4. Check the boxes for the relevant units and click on Done.
NOTE: Removing an optional unit from the client enrolment will drop the student result (if any) for that
unit.
PowerPro RTO – Operations Guide Page 22 of 43
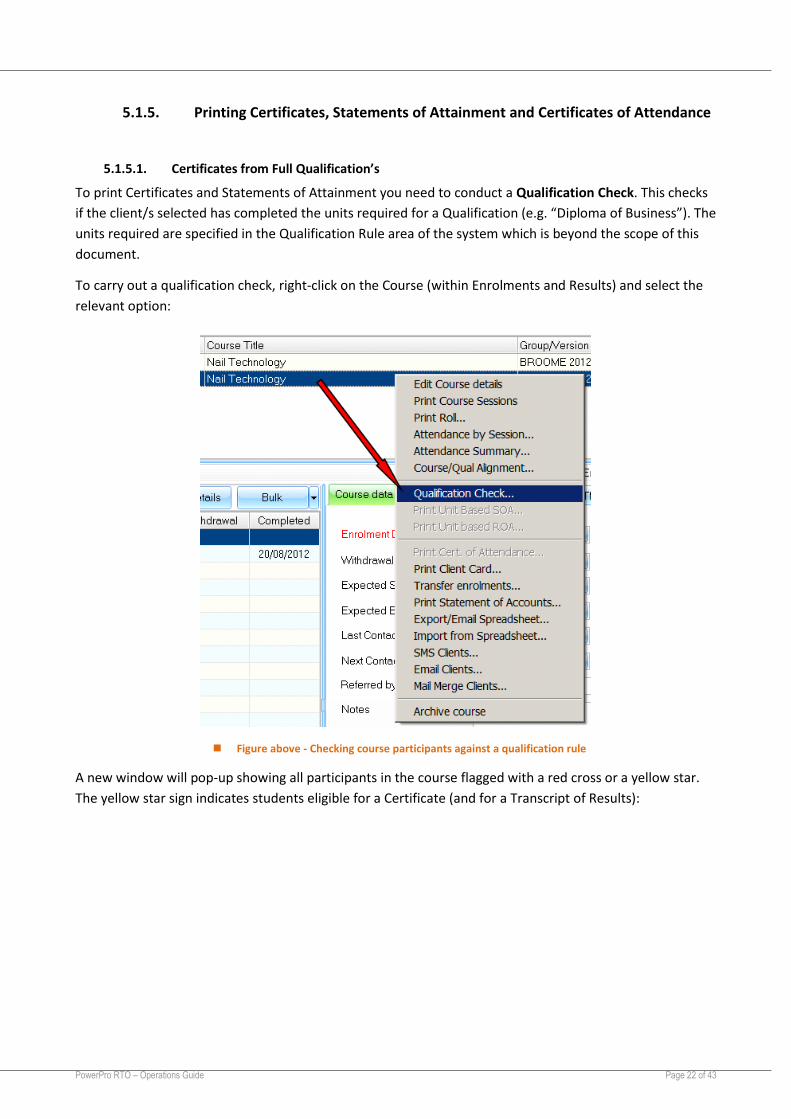
5.1.5. Printing Certificates, Statements of Attainment and Certificates of Attendance
5.1.5.1. Certificates from Full Qualification’s
To print Certificates and Statements of Attainment you need to conduct a Qualification Check. This checks
if the client/s selected has completed the units required for a Qualification (e.g. “Diploma of Business”). The
units required are specified in the Qualification Rule area of the system which is beyond the scope of this
document.
To carry out a qualification check, right-click on the Course (within Enrolments and Results) and select the
relevant option:
◼ Figure above - Checking course participants against a qualification rule
A new window will pop-up showing all participants in the course flagged with a red cross or a yellow star.
The yellow star sign indicates students eligible for a Certificate (and for a Transcript of Results):
PowerPro RTO – Operations Guide Page 23 of 43
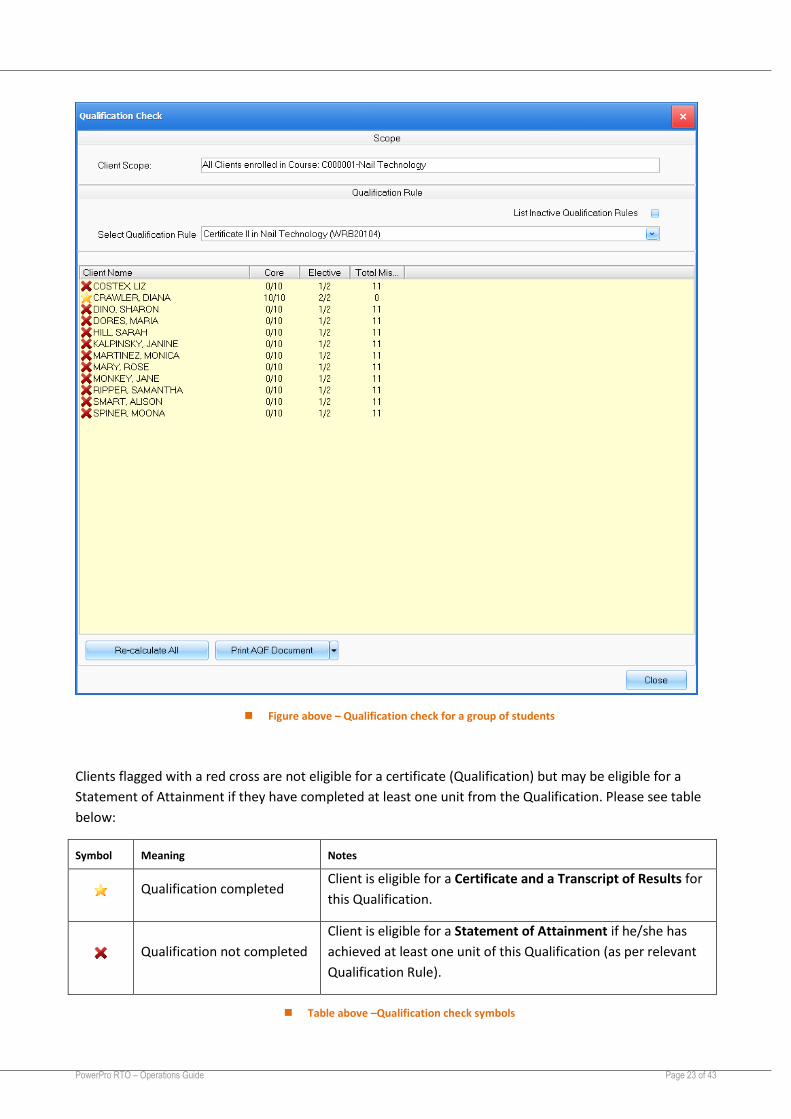
◼ Figure above – Qualification check for a group of students
Clients flagged with a red cross are not eligible for a certificate (Qualification) but may be eligible for a
Statement of Attainment if they have completed at least one unit from the Qualification. Please see table
below:
Symbol Meaning Notes
Qualification completed Client is eligible for a Certificate and a Transcript of Results for
this Qualification.
Qualification not completed
Client is eligible for a Statement of Attainment if he/she has
achieved at least one unit of this Qualification (as per relevant
Qualification Rule).
◼ Table above –Qualification check symbols

PowerPro RTO – Operations Guide Page 24 of 43
To print Certificates, Statements of Attainment and Transcripts of Results press the Print AQF Document
dropdown button and select the relevant option from the menu:
◼ Figure above – Printing AQF Documents
Selecting Qualification from the above menu will bring up a new window listing only Clients (from this
course/group) eligible for that document. Adjust the Client selection using the Select checkbox column if
required:
◼ Figure above – Adjust Client selection before printing certificates
This example is quite straight-forward – there is only one eligible client. Press OK to proceed. A new
window (Select Document Template) allows you to select the template to be used as well as the option of
attaching a copy of the document to the Client record in PowerPro:

PowerPro RTO – Operations Guide Page 25 of 43
◼ Figure above – User options when printing certificates
Finally press OK to generate the Certificate(s) as per Client selection and user options.
Use the procedure described above and select the relevant option from the Print AQF Document menu to
print Transcripts of Results and Statements of Attainment.
Full Qualifications – when achieved the Certificate and Transcript of Results need to be generated for the
client. You can print off individually or you can combine the two documents in one. To use this option the
template with these two documents needs to reside in the Transcript Template folder and when Printing
select the Transcript of Results and select the template to use.

PowerPro RTO – Operations Guide Page 26 of 43
5.1.5.2. Printing Statement of Attainments for Short Courses
Certificates for Short courses are Unit Based SOA. Right click on the Course (within Enrolments and Results)
and select “Print Unit based SOA
The next window will default to show only those that have not been issued SOA and select those that have
a verified USI. You can on the Client Filter dropdown select All Clients if needed.
Click OK, on the next screen select template to use and option of attaching document as PDF or Word.

PowerPro RTO – Operations Guide Page 27 of 43
5.1.5.3. Printing Certificate of Attendance
From the Course on the Enrolment & Results window, right click and select option “Print Cert of
Attendance”. Next window will preview clients that have completed and will be selected by default.
OPTIONS
Sort modules by- Module Code, Module Name, Module Start Date, Module Completion date
Select option to Attach as PDF or Word document.
Option to save Document copy when selected, is a folder outside of PowerPro if required.

PowerPro RTO – Operations Guide Page 28 of 43
5.1.6. Attaching documents to a client/enrolment
PowerPro RTO allows for document uploading. These documents are stored within the database and are
linked to the client or to the client enrolment.
To attach documents against a student enrolment please do as follows:
◼ Figure above – Attaching documents to a Client enrolment
1. Highlight the relevant client (Hill, Sarah in the example above).
2. Open the Documents tab.
3. Press the Attach Docs button (or drag and drop files from windows explorer).
4. The Multiple Document Attachment window comes up:

PowerPro RTO – Operations Guide Page 29 of 43
◼ Figure above – Options when attaching documents to a Client enrolment
5. Click on Select Documents/Files to choose the document(s) to attach (if you have not done that via
drag & drop).
6. Select an entry from the Document Type list to categorise the document(s).
7. Enter an optional description of the document(s) being attached.
8. If the document(s) relate to particular unit(s), check the appropriate boxes on the Select column.
9. Press Save to attach the document(s).
Note: It is a good principle not to attach large documents/files as the database will grow large fairly quickly.
Please check your scanner resolution and drop it so that any scanned document is reasonably small. As a
rule of thumb, a one-page PDF scanned document should be no more than 400kb in size.

PowerPro RTO – Operations Guide Page 30 of 43
5.1.7. Creating a Contact Log against a client/enrolment
The Contact Log is a multi-purpose student related event register. This can be used to record and track any
event related to the student. Some examples are:
• Student absentee
• Email or SMS sent to student
• Phone call
• Assessment
• Complaint
• WSE/OH&S incident
◼ Figure above – Creating a Contact Log record against a Client enrolment
To create a Contact Log against a client, please do as follows:
1. Highlight the relevant client (Sofoulis, Jack in the example above).
2. Open the Contact Log tab.
3. Press the New Contact button.
4. The Contact Log window comes up:

PowerPro RTO – Operations Guide Page 31 of 43
◼ Figure above – Creating a Contact Log for a student complaint
5. Fill in the mandatory fields.
6. Optionally enter a Follow up date.
7. Optionally select a Priority Flag.
8. Optionally enter any trainer or admin notes under User notes.
9. Press OK to save the Contact Log record.
Note: A built-in report exists on the Contact Log. Information entered in this area can easily be extracted on
that report. This report can be found under the Reports Tab > Client Reports> Contact Log
5.1.8. Emailing a client or a group of clients
PowerPro allows emailing course participants individually or in bulk. The advantage of doing it from
PowerPro is that you can keep a record that the email was sent (as well as the content of the email) as a
Contact Log. The other great advantage is the use of Email templates.

PowerPro RTO – Operations Guide Page 32 of 43
◼ Figure above – Emailing a group of clients
To email a group of students please do as follows:
1. Right-click on the relevant Course/Group (Course number 5014 in the example above).
2. Select the Email Clients… item from the pop-up menu.
3. The Email Clients window comes up:
PowerPro RTO – Operations Guide Page 33 of 43
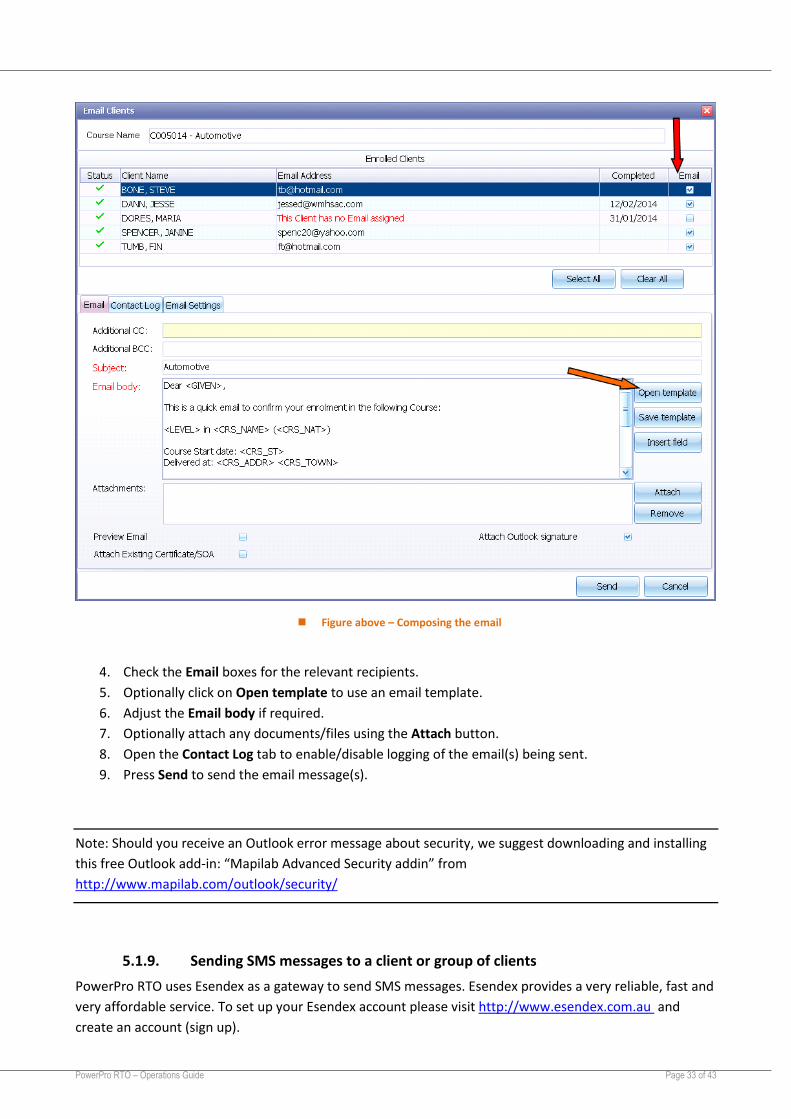
◼ Figure above – Composing the email
4. Check the Email boxes for the relevant recipients.
5. Optionally click on Open template to use an email template.
6. Adjust the Email body if required.
7. Optionally attach any documents/files using the Attach button.
8. Open the Contact Log tab to enable/disable logging of the email(s) being sent.
9. Press Send to send the email message(s).
Note: Should you receive an Outlook error message about security, we suggest downloading and installing
this free Outlook add-in: “Mapilab Advanced Security addin” from
http://www.mapilab.com/outlook/security/
5.1.9. Sending SMS messages to a client or group of clients
PowerPro RTO uses Esendex as a gateway to send SMS messages. Esendex provides a very reliable, fast and
very affordable service. To set up your Esendex account please visit http://www.esendex.com.au and
create an account (sign up).

PowerPro RTO – Operations Guide Page 34 of 43
Once your Esendex account has been created and activated, please enter the Esendex parameters into the
Configuration> Application options> SMS section in PowerPro RTO:
◼ Figure above – Setting up the Esendex SMS account parameters in PowerPro RTO
The above settings only take effect on subsequent logins. This means you will need to log out and back on
to PowerPro to see this taking effect.
Sending SMS to students is easy now – as long as they have a mobile number assigned.
To SMS multiple students in a course:
1. Right-click on the course and choose the “SMS Clients…” option

PowerPro RTO – Operations Guide Page 35 of 43
◼ Figure above – Sending SMS to clients in a course
This brings up the SMS window:

PowerPro RTO – Operations Guide Page 36 of 43
◼ Figure above – Composing the SMS
2. Use the SMS check boxes column to specify the SMS recipients.
3. Type in the message in the Message area.
4. Optionally choose to create a Contact Log – the contact log will contain a copy of the SMS message
sent to the student.
5. Click on Send to send the SMS messages. The Action Log window will contain any relevant
information returned from the SMS gateway which includes your current Clickatel credit.
Note: You can compose SMS messages longer than the traditional 160 characters. In that case PowerPro
will break it down in multiple parts and any recent mobile phone will display the multiple SMS message
parts as one.
5.1.10. Using the Workflow/Check list function
This function allows tracking student progress in the course from enrolment to completion using a pre-
defined check list. The check list is defined at the course level and is made of different stages. Each stage is
colour coded and can contain one or more tasks. Once all tasks are completed the stage is cleared.

PowerPro RTO – Operations Guide Page 37 of 43
To define a new Checklist or copy an existing one from another course please follow these steps:
1. Open the Course window (by double clicking on the course line from the Enrolments and results)
2. Select the Workflow tab.
◼ Figure above – Course workflow definition
3. Click on New Stage to define a new stage where you will enter the stage name and assign it with a
colour.
4. Enter as many tasks (right side) as you find relevant tracking for that Stage.
Note: If instead you want to use a Workflow structure already assigned to another course just use the
Import structure button to bring the existing structure across.
Now all students in that course have that same checklist:

PowerPro RTO – Operations Guide Page 38 of 43
◼ Figure above – Course workflow applied to a student
To modify tasks completed on a student checklist please follow these steps:
1. Highlight the relevant course (in Enrolments and results).
2. Highlight the relevant student within the course.
3. Click on Edit Enrolment.
4. Check the Task Status check boxes for the tasks the student has completed.
5. Press the Save button when done.
The student colour square will change automatically once you press the Save button. The colour indicates
the current stage within the workflow structure. We suggest having the initial stage in red and the final
stage in dark green.
Note: Two reports display the stage information:
- Course Reports>Course Stages
- Client Reports>Training Progress Report
5.1.11. Colour Coded Client Tags
Colour coded tags help you identifying Client groups. Create tags by associating a colour with a description. Examples of possible tags are: “International”, “Funded”, “Returning student”, “Fees outstanding”.
5.1.12. Setting up Client Tags
Open Configuration>Application options>Client>Client Tags to configure the different tags:

PowerPro RTO – Operations Guide Page 39 of 43
▪ Figure above – Client tags setup button
This opens a window where the different tags can be created. Each tag consists of a description, a colour and a status (Active/Inactive flag). Use the + button to add a new tag:
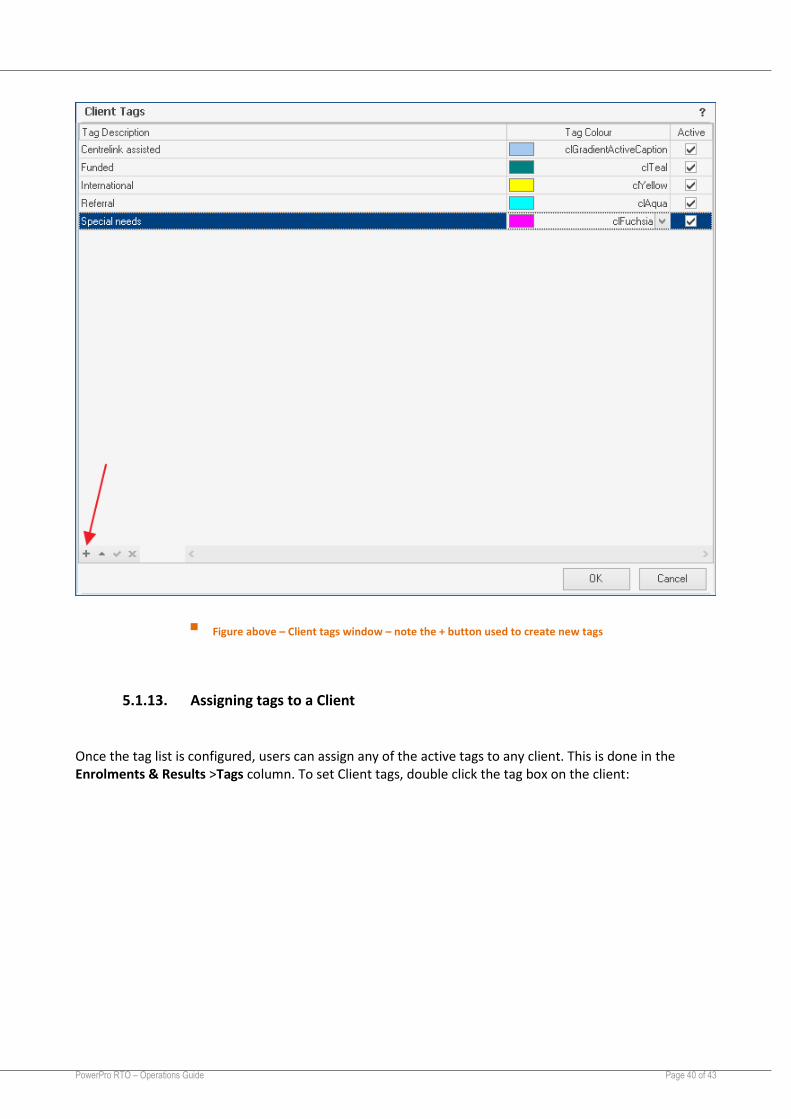
PowerPro RTO – Operations Guide Page 40 of 43
▪ Figure above – Client tags window – note the + button used to create new tags
5.1.13. Assigning tags to a Client
Once the tag list is configured, users can assign any of the active tags to any client. This is done in the Enrolments & Results >Tags column. To set Client tags, double click the tag box on the client:

PowerPro RTO – Operations Guide Page 41 of 43
▪ Figure above – Adding Tag(s) to a client
The Tags column (in Enrolments & Results) shows the different tags associated with a Client Mouse hover the Tags column to see the description of the tags set for that Client.

PowerPro RTO – Operations Guide Page 42 of 43
My notes