quick and easy adaptations and accommodations for early ... · quick and easy adaptations and...
TRANSCRIPT
Quick and Easy Adaptations and Accommodations for Early Childhood Students
Leisa M. Breitfelder
An Article Published in
TEACHING Exceptional Children Plus
Volume 4, Issue 5, May 2008
Copyright © 2008 by the author. This work is licensed to the public under the Creative Commons Attri-
bution License
Quick and Easy Adaptations and Accommodationsfor Early Childhood Students
Leisa M. Breitfelder
Abstract
Research-based information is used to support the idea of the use of adaptations and accommo-
dations for early childhood students who have varying disabilities. Multiple adaptations and ac-
commodations are outlined. A step-by-step plan is provided on how to make specific adaptations
and accommodations to fit the specific needs of early childhood students. Pictures of each adap-
tation and accommodation are also included. This will allow for better understanding when mak-
ing these materials. Areas that were researched include: autism, behavior disorders, learning dis-
abilities, sensory needs, communication disorders, developmental disorders, attention deficit dis-
order, and attention deficit hyperactivity disorder. Outlined are instructions to make visual sup-
ports, picture schedules, work systems, behavior modification charts, and picture exchange
communication (PECS) books.
KeywordsAccommodations, Adaptations, Autism, Attention Deficit Disorder, Attention Deficit Hyperactiv-
ity Disorder, Behavior Disorder, Communication Disorder, Developmental Disability, Learning
Disability, Preschool, Visuals, Work System
SUGGESTED CITATION:
Breitfelder, L. M. (2008). Quick and easy adaptations and accommodations for early childhood
students. TEACHING Exceptional Children Plus, 4(5) Article 2. Retrieved [date] from http://escholarship.bc.edu/education/tecplus/vol4/iss5/art2
!
2!
! As teachers, we know the best ways
students with special needs learn is by having
adaptations and accommodations that can be
used for that specific child, to meet their
needs, so they can be successful in the class-
room. We also know, as teachers, that we do
not have an endless budget that allows us to
buy every adaptation and accommodation that
we know would benefit our students. This
article will outline specific research-based
adaptations and accommodations to help stu-
dents be successful in the early childhood
classroom environment; and, will also outline
which type of student would most benefit
from them. Areas researched in-
clude: autism, behavior disor-
ders, learning disabilities, sen-
sory needs, communication dis-
orders, developmental disorders,
attention deficit disorder (ADD),
and attention deficit hyperactiv-
ity disorder (ADHD). Finally,
the article will present how you
could make the adaptations and
accommodations instead of pur-
chasing them.
One of the most effective ways to get
students to process language is through the
use of visual supports. A visual support is a
visually perceived stimulus that can assist an
individual in comprehending information or
demands. In a classroom setting this support
could be for direction following, schedules,
rules, and understanding instruction. Students
who would best be supported through the use
of visuals are: children with autism, ADD/
ADHD, developmental disabilities, or stu-
dents with a learning disability. Visual sup-
ports can also be used to help decrease behav-
iors. In one study, a picture schedule was
used, as well as, a reward of giving a pretzel
upon completion of the task on the schedule.
The results showed a decrease in behaviors
and an increase in compliance. After six days
of giving the pretzel reinforcer, this was re-
moved, and the schedule was used without
rewards (Dooley, Wilczenski, & Torem,
2001).
According to Tissot and Evans (2003),
visual supports as photographs, hand-drawn
pictures, graphics, or computer-generated
icons actually benefit all students especially
those who have difficulty reading. Quill
(1995) discusses students who need extra as-
sistance with organization, academic and life
skills, communication, social interaction, and
behavior management could benefit from us-
ing visual cues. Students with
autism, ADD/ADHD, develop-
mental disabilities, and students
with a learning disability all have
difficulty with the previously
stated tasks. These students can
display behavioral issues due to
an inability to understand and
process verbal language. By
placing visual supports in an
early childhood classroom setting
as part of the instructional program, students
who have difficulty with verbal language
(students who have autism, ADD/ADHD, de-
velopmental disabilities, learning disability,
behavioral disability) can have: eased transi-
tions, feeling of empowerment by having vis-
ual choices, clearly defined expectations
through the use of pictures, longer attention
span, reduced anxiety, concepts become more
concrete, and the ability to help express his or
her thoughts.
Children with autism are visual rather
than auditory learners and they prefer picture
communication verses written words (Cohen,
1998). When a teacher gives a direction and it
is not followed, they may follow up with an-
other verbal direction on top of another. Ac-
cording to Hodgdon (2000), the addition of
!
3!
One of the most
effective ways to
get students to
process language
is through the use
of visual supports.
verbal communications does not change the
fact that the student just doesn’t understand it.
In fact, when used correctly, visual supports
allow students with autism freedom to engage
in life, regardless of his or her impairment of
communication (Hodgdon, 2000).
Most students need structure in their
environment in order to be successful. As
teachers, it is our job to do what is best for
students and one way to help ensure success
is by implementing visuals to structure their
environment. One of the first visuals to set up
is a daily schedule. This schedule should only
include the largest transitions of their day.
When the student is at the activity, mini-
schedules can then be used to add even more
structure. One study completed showed pro-
gress in the performance of four students who
used a picture schedule to help with inde-
pendence during playtime. The participants in
this study demonstrated an increase in on-task
behavior and a decrease in prompting (Morri-
son et al., 2002). Another study also looked at
students’ participation during free play ses-
sions. These students were given picture cues
as well. The results of this study found two
students needed less intrusive procedures to
engage the child in play sessions and two stu-
dents needed the entire intervention to reach
the goal of engagement in play sessions (Bev-
ill et al., 2001).
Many students who have issues with
behavior need schedules in place so they have
a clear beginning and ending to the task at
hand. Without having a sense of time, stu-
dents do not know if they will be sitting at
circle time for the whole day or can sit only a
minute and then can leave. Setting up sched-
ules as well as mini-schedules give students a
sense of time as well as predictability. The
use of visuals progress students toward the
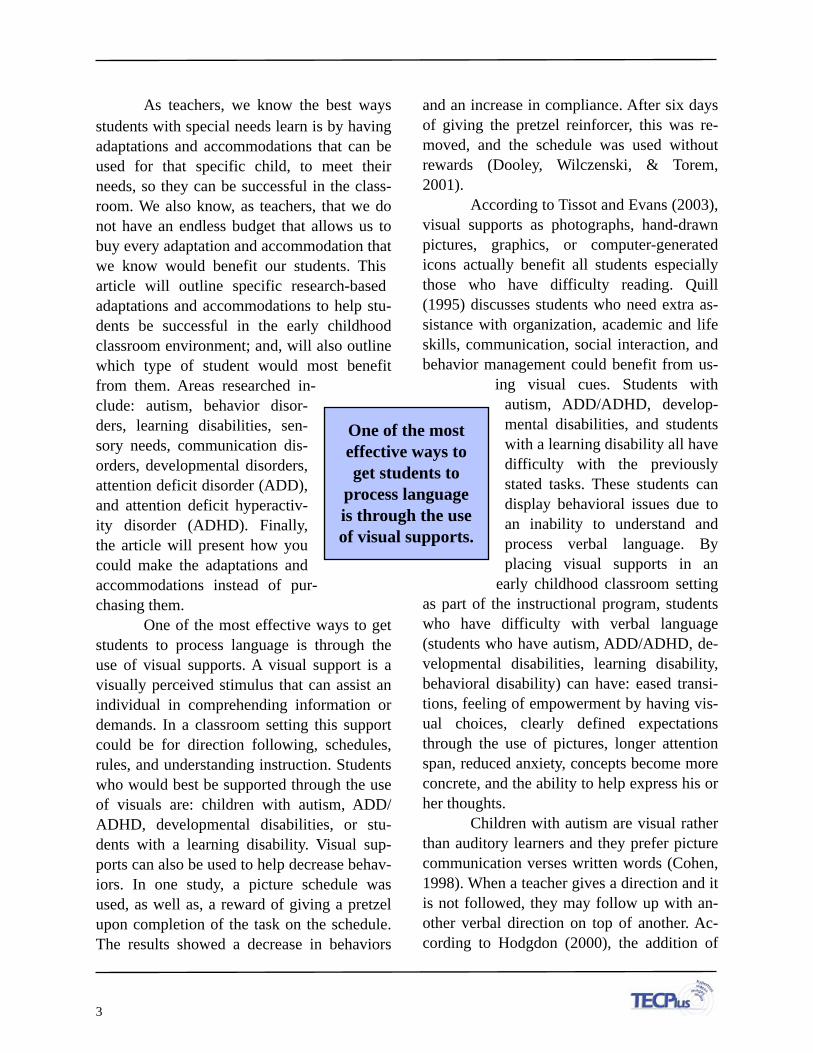
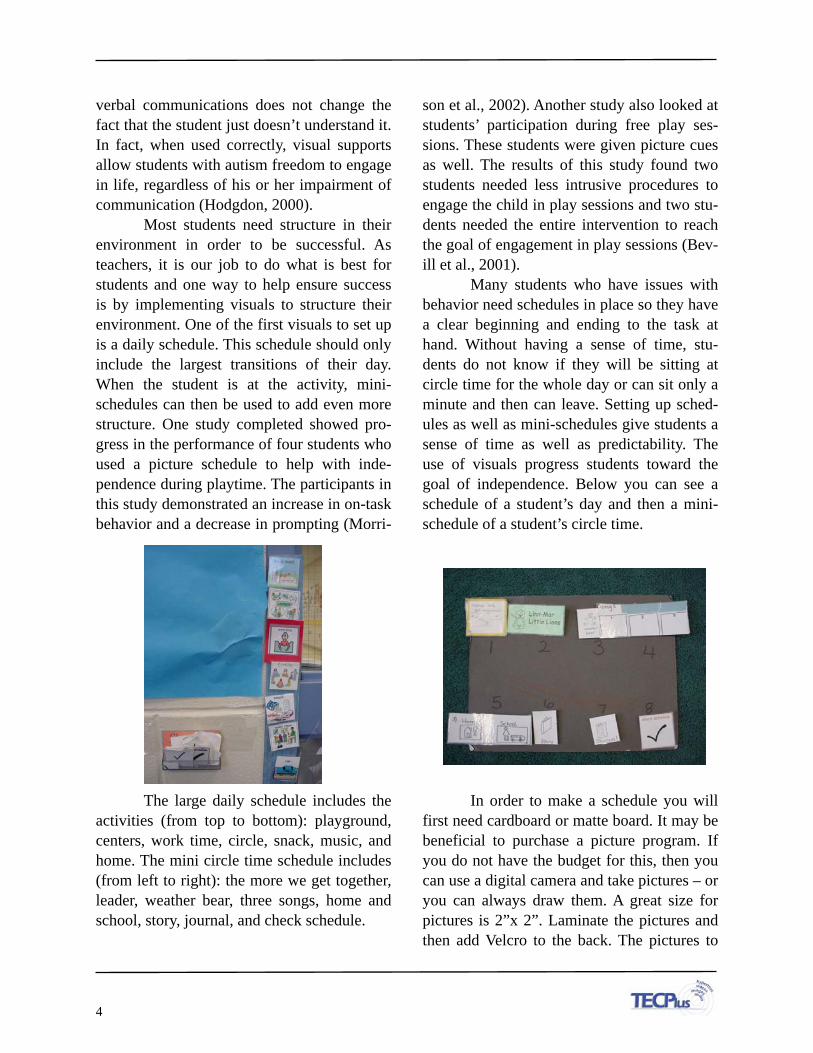
goal of independence. Below you can see a
schedule of a student’s day and then a mini-
schedule of a student’s circle time.
The large daily schedule includes the
activities (from top to bottom): playground,
centers, work time, circle, snack, music, and
home. The mini circle time schedule includes
(from left to right): the more we get together,
leader, weather bear, three songs, home and
school, story, journal, and check schedule.
In order to make a schedule you will
first need cardboard or matte board. It may be
beneficial to purchase a picture program. If
you do not have the budget for this, then you
can use a digital camera and take pictures – or
you can always draw them. A great size for
pictures is 2”x 2”. Laminate the pictures and
then add Velcro to the back. The pictures to
!
4!
include on the large daily schedule are the
large transition times throughout your day. On
mini schedules you should include pictures of
the small transitions throughout the large ac-
tivity. Add the opposite Velcro to the tag
board. You can hang the schedule horizontally
or vertically. If you have a student that is a
reader, you could have written words instead
of pictures. In this case, you should also hang
the schedule horizontally, so they follow from
left to right. To make the circle time board,
just use a square piece of matte board and at-
tach pictures to represent each activity (in or-
der) of your circle time.
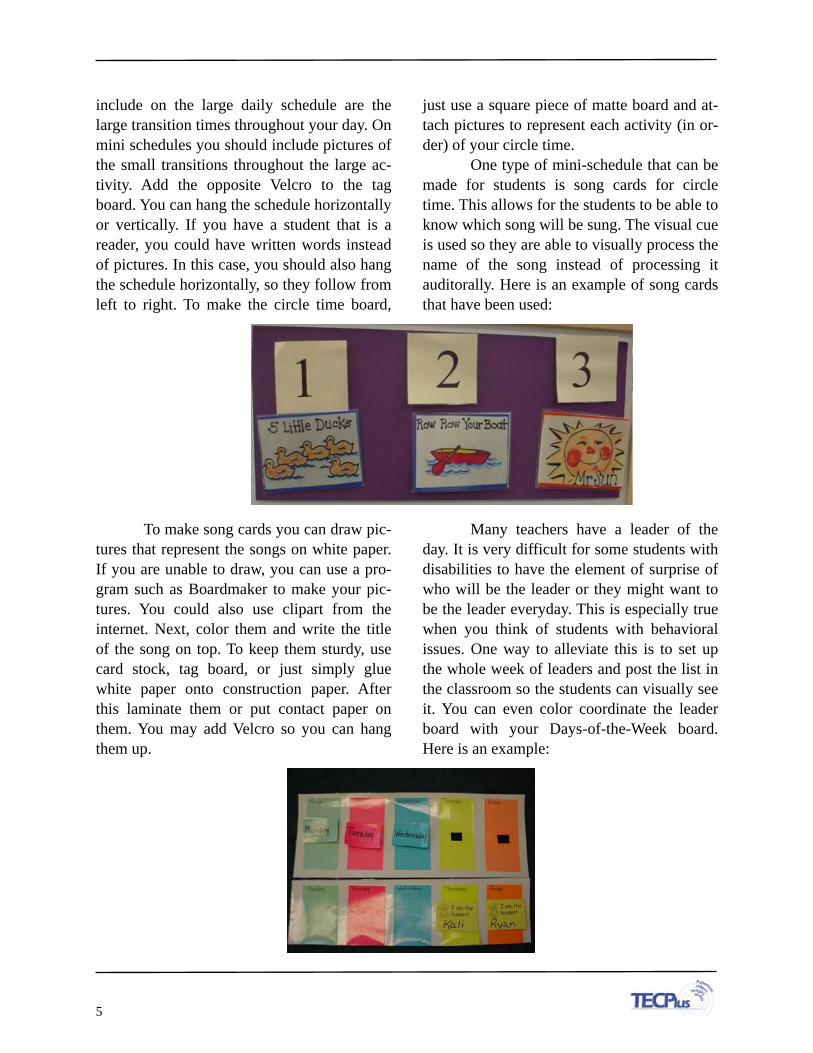
One type of mini-schedule that can be
made for students is song cards for circle
time. This allows for the students to be able to
know which song will be sung. The visual cue
is used so they are able to visually process the
name of the song instead of processing it
auditorally. Here is an example of song cards
that have been used:
To make song cards you can draw pic-
tures that represent the songs on white paper.
If you are unable to draw, you can use a pro-
gram such as Boardmaker to make your pic-
tures. You could also use clipart from the
internet. Next, color them and write the title
of the song on top. To keep them sturdy, use
card stock, tag board, or just simply glue
white paper onto construction paper. After
this laminate them or put contact paper on
them. You may add Velcro so you can hang
them up.
Many teachers have a leader of the
day. It is very difficult for some students with
disabilities to have the element of surprise of
who will be the leader or they might want to
be the leader everyday. This is especially true
when you think of students with behavioral
issues. One way to alleviate this is to set up
the whole week of leaders and post the list in
the classroom so the students can visually see
it. You can even color coordinate the leader
board with your Days-of-the-Week board.
Here is an example:
!
5!
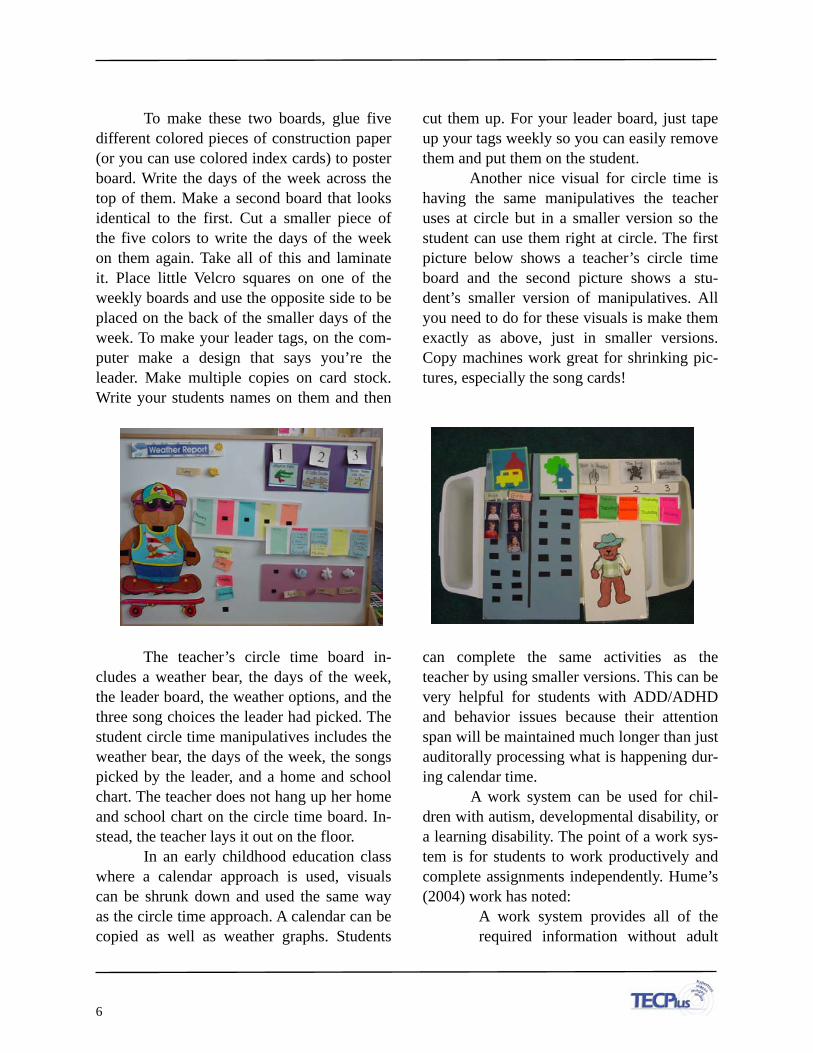
To make these two boards, glue five
different colored pieces of construction paper
(or you can use colored index cards) to poster
board. Write the days of the week across the
top of them. Make a second board that looks
identical to the first. Cut a smaller piece of
the five colors to write the days of the week
on them again. Take all of this and laminate
it. Place little Velcro squares on one of the
weekly boards and use the opposite side to be
placed on the back of the smaller days of the
week. To make your leader tags, on the com-
puter make a design that says you’re the
leader. Make multiple copies on card stock.
Write your students names on them and then
cut them up. For your leader board, just tape
up your tags weekly so you can easily remove
them and put them on the student.
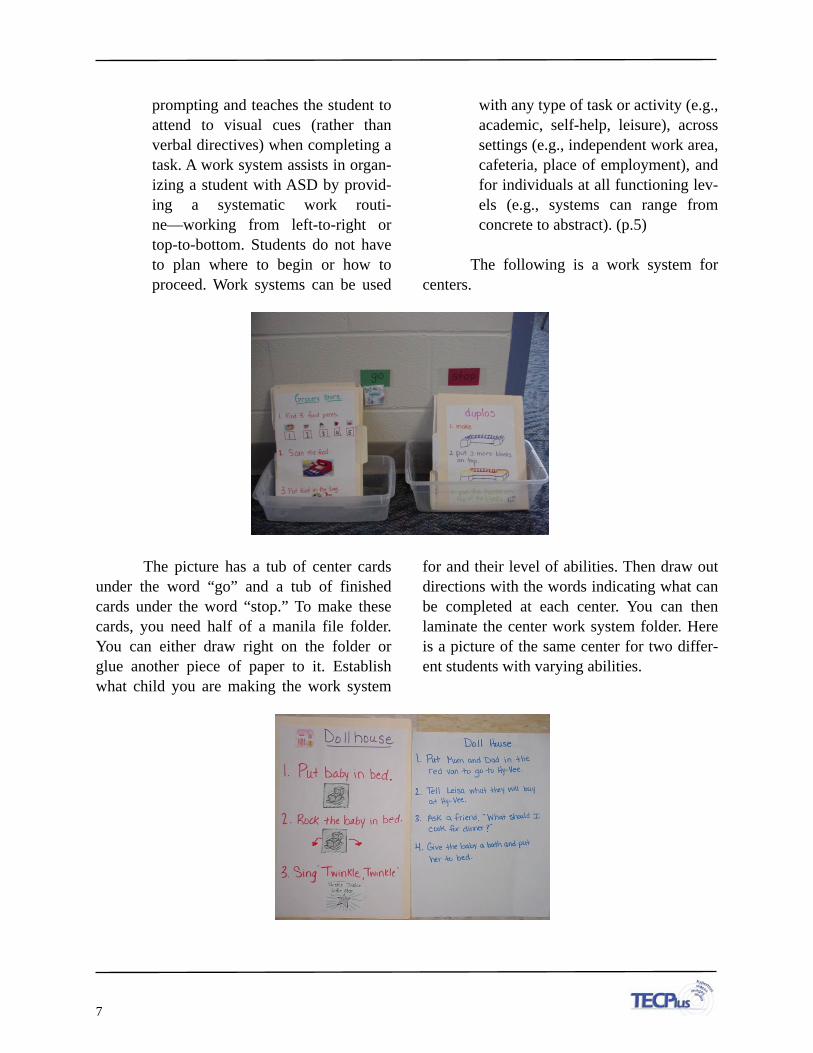
Another nice visual for circle time is
having the same manipulatives the teacher
uses at circle but in a smaller version so the
student can use them right at circle. The first
picture below shows a teacher’s circle time
board and the second picture shows a stu-
dent’s smaller version of manipulatives. All
you need to do for these visuals is make them
exactly as above, just in smaller versions.
Copy machines work great for shrinking pic-
tures, especially the song cards!
The teacher’s circle time board in-
cludes a weather bear, the days of the week,
the leader board, the weather options, and the
three song choices the leader had picked. The
student circle time manipulatives includes the
weather bear, the days of the week, the songs
picked by the leader, and a home and school
chart. The teacher does not hang up her home
and school chart on the circle time board. In-
stead, the teacher lays it out on the floor.
In an early childhood education class
where a calendar approach is used, visuals
can be shrunk down and used the same way
as the circle time approach. A calendar can be
copied as well as weather graphs. Students
can complete the same activities as the
teacher by using smaller versions. This can be
very helpful for students with ADD/ADHD
and behavior issues because their attention
span will be maintained much longer than just
auditorally processing what is happening dur-
ing calendar time.
A work system can be used for chil-
dren with autism, developmental disability, or
a learning disability. The point of a work sys-
tem is for students to work productively and
complete assignments independently. Hume’s
(2004) work has noted:
A work system provides all of the
required information without adult
!
6!
prompting and teaches the student to
attend to visual cues (rather than
verbal directives) when completing a
task. A work system assists in organ-
izing a student with ASD by provid-
ing a systematic work routi-
ne—working from left-to-right or
top-to-bottom. Students do not have
to plan where to begin or how to
proceed. Work systems can be used
with any type of task or activity (e.g.,
academic, self-help, leisure), across
settings (e.g., independent work area,
cafeteria, place of employment), and
for individuals at all functioning lev-
els (e.g., systems can range from
concrete to abstract). (p.5)
The following is a work system for
centers.
The picture has a tub of center cards
under the word “go” and a tub of finished
cards under the word “stop.” To make these
cards, you need half of a manila file folder.
You can either draw right on the folder or
glue another piece of paper to it. Establish
what child you are making the work system
for and their level of abilities. Then draw out
directions with the words indicating what can
be completed at each center. You can then
laminate the center work system folder. Here
is a picture of the same center for two differ-
ent students with varying abilities.
!
7!
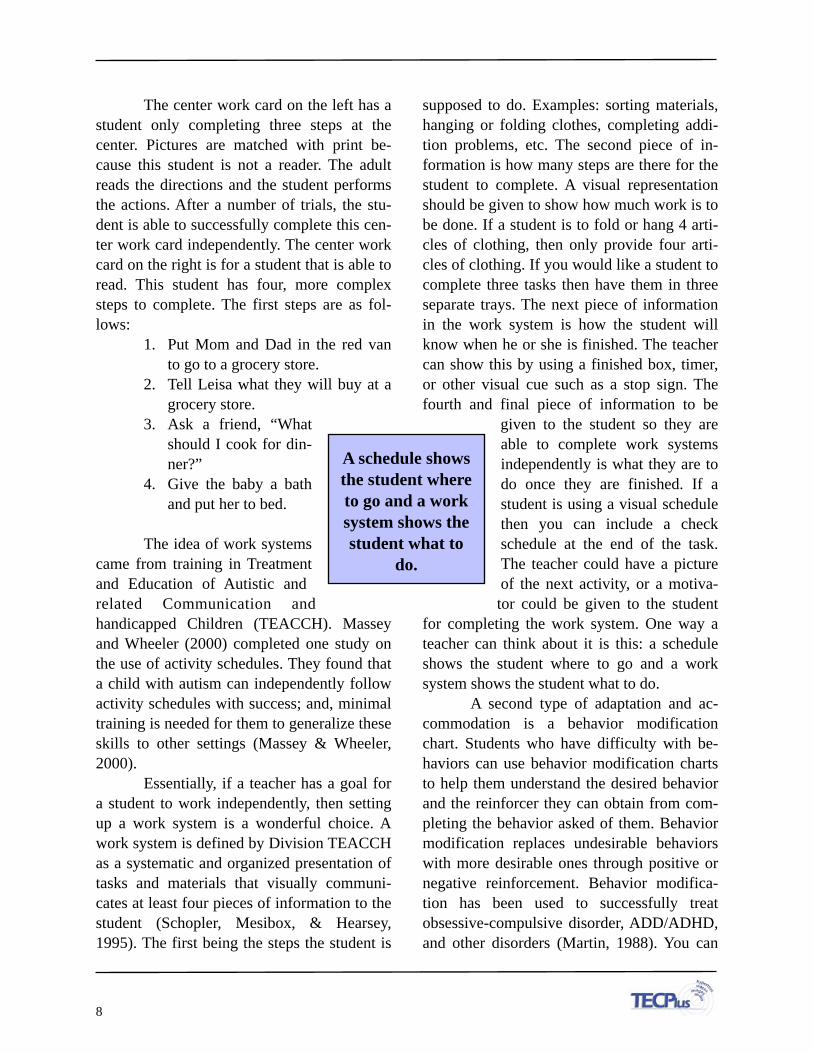
The center work card on the left has a
student only completing three steps at the
center. Pictures are matched with print be-
cause this student is not a reader. The adult
reads the directions and the student performs
the actions. After a number of trials, the stu-
dent is able to successfully complete this cen-
ter work card independently. The center work
card on the right is for a student that is able to
read. This student has four, more complex
steps to complete. The first steps are as fol-
lows:
1. Put Mom and Dad in the red van
to go to a grocery store.
2. Tell Leisa what they will buy at a
grocery store.
3. Ask a friend, “What
should I cook for din-
ner?”
4. Give the baby a bath
and put her to bed.
The idea of work systems
came from training in Treatment
and Education of Autistic and
related Communication and
handicapped Children (TEACCH). Massey
and Wheeler (2000) completed one study on
the use of activity schedules. They found that
a child with autism can independently follow
activity schedules with success; and, minimal
training is needed for them to generalize these
skills to other settings (Massey & Wheeler,
2000).
Essentially, if a teacher has a goal for
a student to work independently, then setting
up a work system is a wonderful choice. A
work system is defined by Division TEACCH
as a systematic and organized presentation of
tasks and materials that visually communi-
cates at least four pieces of information to the
student (Schopler, Mesibox, & Hearsey,
1995). The first being the steps the student is
supposed to do. Examples: sorting materials,
hanging or folding clothes, completing addi-
tion problems, etc. The second piece of in-
formation is how many steps are there for the
student to complete. A visual representation
should be given to show how much work is to
be done. If a student is to fold or hang 4 arti-
cles of clothing, then only provide four arti-
cles of clothing. If you would like a student to
complete three tasks then have them in three
separate trays. The next piece of information
in the work system is how the student will
know when he or she is finished. The teacher
can show this by using a finished box, timer,
or other visual cue such as a stop sign. The
fourth and final piece of information to be
given to the student so they are
able to complete work systems
independently is what they are to
do once they are finished. If a
student is using a visual schedule
then you can include a check
schedule at the end of the task.
The teacher could have a picture
of the next activity, or a motiva-
tor could be given to the student
for completing the work system. One way a
teacher can think about it is this: a schedule
shows the student where to go and a work
system shows the student what to do.
A second type of adaptation and ac-
commodation is a behavior modification
chart. Students who have difficulty with be-
haviors can use behavior modification charts
to help them understand the desired behavior
and the reinforcer they can obtain from com-
pleting the behavior asked of them. Behavior
modification replaces undesirable behaviors
with more desirable ones through positive or
negative reinforcement. Behavior modifica-
tion has been used to successfully treat
obsessive-compulsive disorder, ADD/ADHD,
and other disorders (Martin, 1988). You can
!
8!
A schedule shows
the student where
to go and a work
system shows the
student what to
do.
also use behavior modification charts for stu-
dents with autism. When using the following
suggestions keep in mind that you need to
teach the child how to use these first. To do
this, you need to make the request simple and
short, so the reinforcer can be received often.
Once the student understands the concept,
then more wait time can be given.
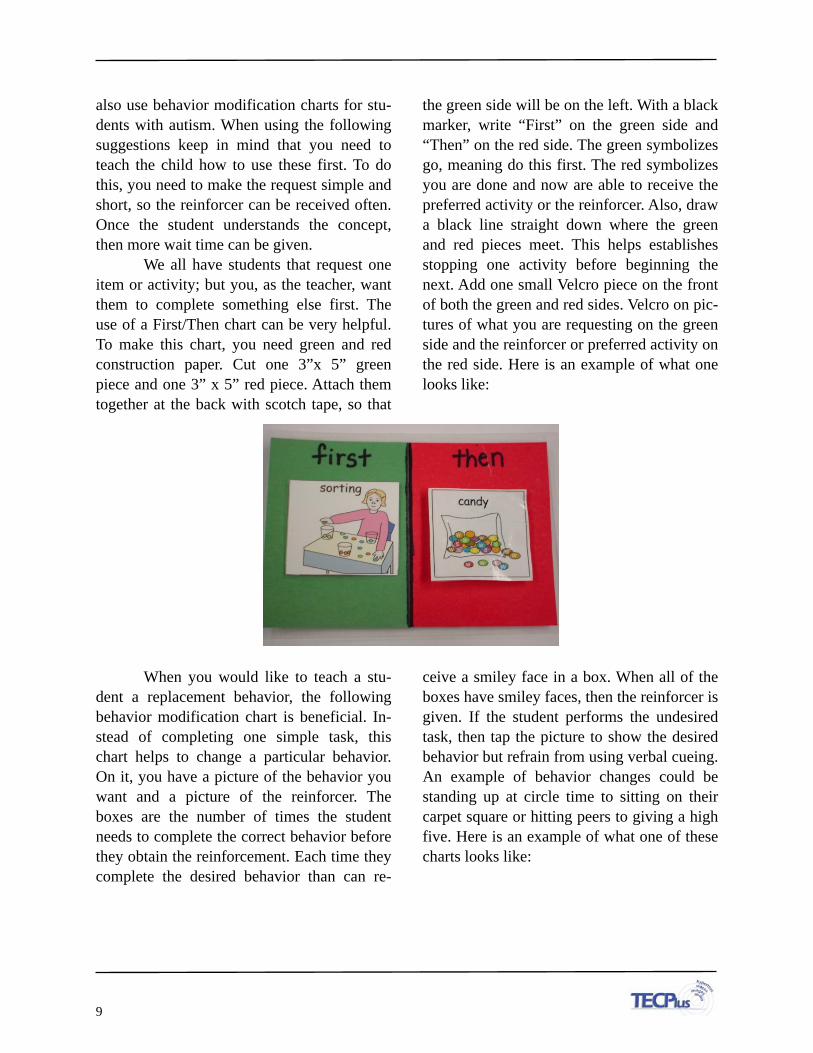
We all have students that request one
item or activity; but you, as the teacher, want
them to complete something else first. The
use of a First/Then chart can be very helpful.
To make this chart, you need green and red
construction paper. Cut one 3”x 5” green
piece and one 3” x 5” red piece. Attach them
together at the back with scotch tape, so that
the green side will be on the left. With a black
marker, write “First” on the green side and
“Then” on the red side. The green symbolizes
go, meaning do this first. The red symbolizes
you are done and now are able to receive the
preferred activity or the reinforcer. Also, draw
a black line straight down where the green
and red pieces meet. This helps establishes
stopping one activity before beginning the
next. Add one small Velcro piece on the front
of both the green and red sides. Velcro on pic-
tures of what you are requesting on the green
side and the reinforcer or preferred activity on
the red side. Here is an example of what one
looks like:
When you would like to teach a stu-
dent a replacement behavior, the following
behavior modification chart is beneficial. In-
stead of completing one simple task, this
chart helps to change a particular behavior.
On it, you have a picture of the behavior you
want and a picture of the reinforcer. The
boxes are the number of times the student
needs to complete the correct behavior before
they obtain the reinforcement. Each time they
complete the desired behavior than can re-
ceive a smiley face in a box. When all of the
boxes have smiley faces, then the reinforcer is
given. If the student performs the undesired
task, then tap the picture to show the desired
behavior but refrain from using verbal cueing.
An example of behavior changes could be
standing up at circle time to sitting on their
carpet square or hitting peers to giving a high
five. Here is an example of what one of these
charts looks like:
!
9!
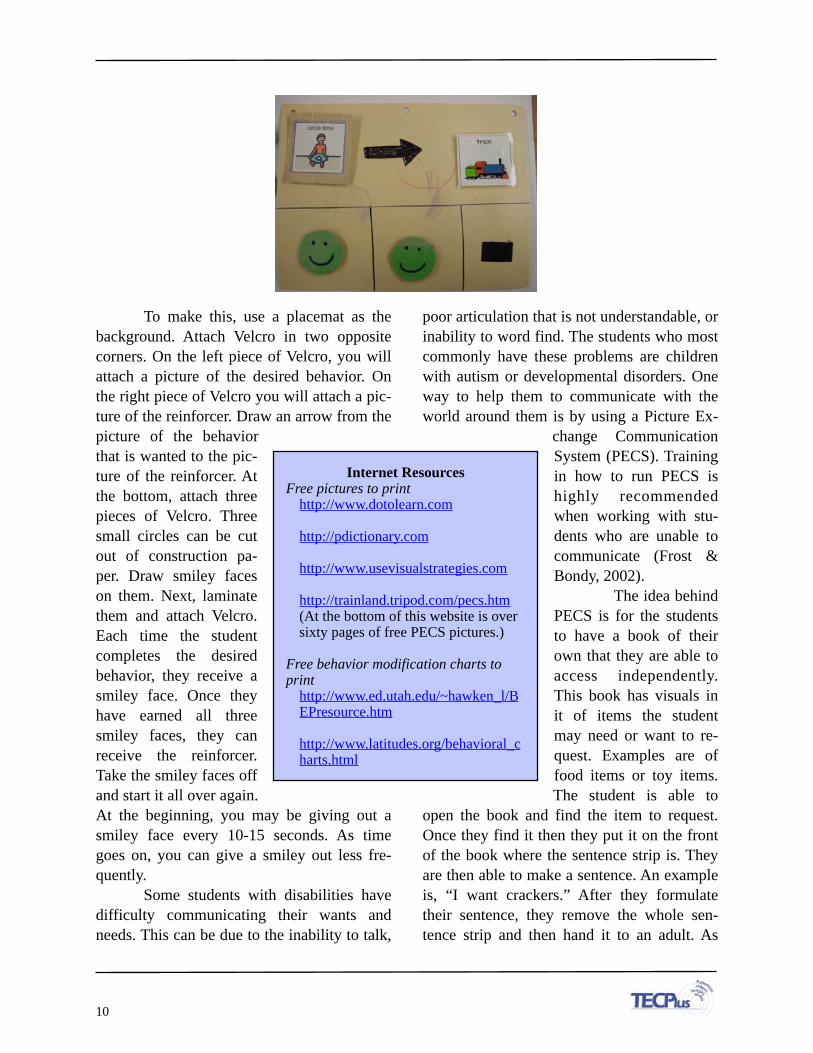
To make this, use a placemat as the
background. Attach Velcro in two opposite
corners. On the left piece of Velcro, you will
attach a picture of the desired behavior. On
the right piece of Velcro you will attach a pic-
ture of the reinforcer. Draw an arrow from the
picture of the behavior
that is wanted to the pic-
ture of the reinforcer. At
the bottom, attach three
pieces of Velcro. Three
small circles can be cut
out of construction pa-
per. Draw smiley faces
on them. Next, laminate
them and attach Velcro.
Each time the student
completes the desired
behavior, they receive a
smiley face. Once they
have earned all three
smiley faces, they can
receive the reinforcer.
Take the smiley faces off
and start it all over again.
At the beginning, you may be giving out a
smiley face every 10-15 seconds. As time
goes on, you can give a smiley out less fre-
quently.
Some students with disabilities have
difficulty communicating their wants and
needs. This can be due to the inability to talk,
poor articulation that is not understandable, or
inability to word find. The students who most
commonly have these problems are children
with autism or developmental disorders. One
way to help them to communicate with the
world around them is by using a Picture Ex-
change Communication
System (PECS). Training
in how to run PECS is
highly recommended
when working with stu-
dents who are unable to
communicate (Frost &
Bondy, 2002).
The idea behind
PECS is for the students
to have a book of their
own that they are able to
access independently.
This book has visuals in
it of items the student
may need or want to re-
quest. Examples are of
food items or toy items.
The student is able to
open the book and find the item to request.
Once they find it then they put it on the front
of the book where the sentence strip is. They
are then able to make a sentence. An example
is, “I want crackers.” After they formulate
their sentence, they remove the whole sen-
tence strip and then hand it to an adult. As
!
10!
Internet ResourcesFree pictures to print
http://www.dotolearn.com
http://pdictionary.com
http://www.usevisualstrategies.com
http://trainland.tripod.com/pecs.htm (At the bottom of this website is over sixty pages of free PECS pictures.)
Free behavior modification charts to print
http://www.ed.utah.edu/~hawken_l/BEPresource.htm
http://www.latitudes.org/behavioral_charts.html
stated before, it is highly recommended to
receive training in PECS in order to facilitate
the teaching properly.
One research study on PECS “demon-
strated the efficacy of the PECS protocol with
3 children with autism, the emergence of
speech, and the collateral gains in social-
communicative behaviors and concomitant
decreases in problem behavior” (Charlop-
Christy et al., 2002). This study showed that
PECS can be taught in a short amount of time
to children with autism. These children can
improve their use of communication by using
pictures to express their wants and needs to
others. This also resulted in decreased chal-
lenging behaviors because they were able to
communicate more effectively.
The PECS CD of pictures can be pur-
chased from their website at www.pecs.com
for only $35. These pictures can be used for
not only their PECS books but for all of the
other picture visuals that have been discussed
throughout this article. PECS books can also
be purchased commercially. In addition,
Mayer Johnson sells a number of software
and resources for visuals.
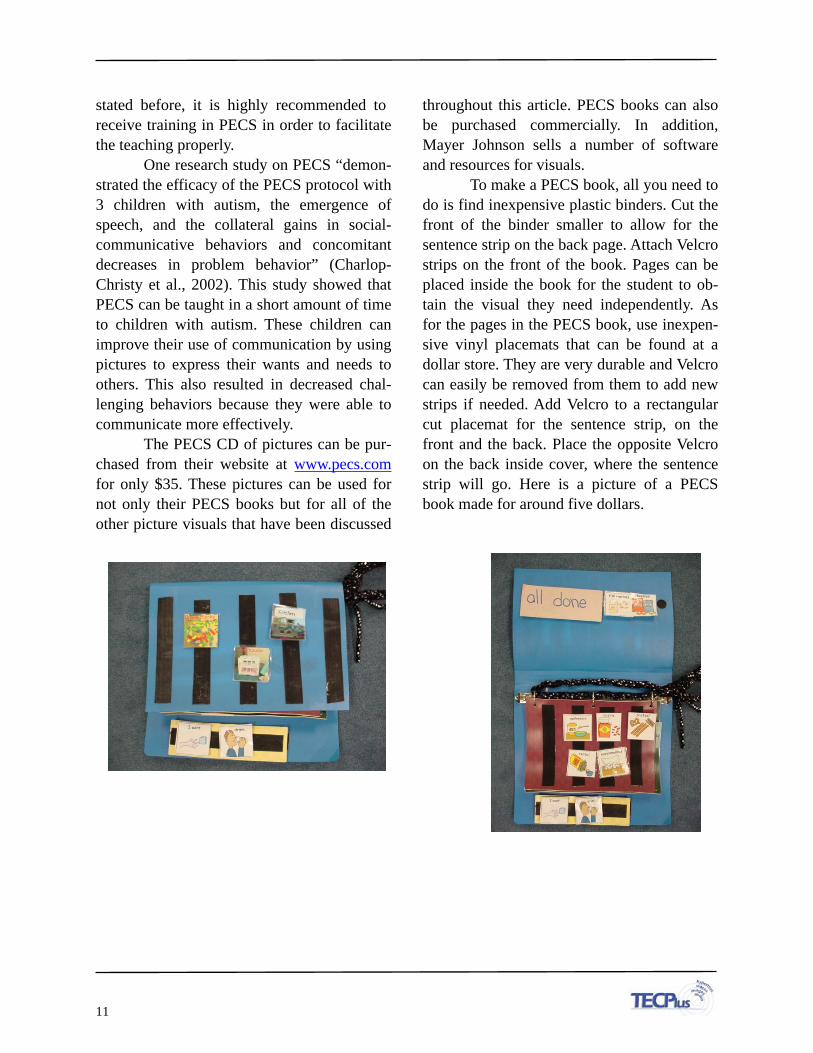
To make a PECS book, all you need to
do is find inexpensive plastic binders. Cut the
front of the binder smaller to allow for the
sentence strip on the back page. Attach Velcro
strips on the front of the book. Pages can be
placed inside the book for the student to ob-
tain the visual they need independently. As
for the pages in the PECS book, use inexpen-
sive vinyl placemats that can be found at a
dollar store. They are very durable and Velcro
can easily be removed from them to add new
strips if needed. Add Velcro to a rectangular
cut placemat for the sentence strip, on the
front and the back. Place the opposite Velcro
on the back inside cover, where the sentence
strip will go. Here is a picture of a PECS
book made for around five dollars.
!
11!

References
Bevill, A. R., Gast, D. L., Maguire, A. M., &
Vail, C.O. (2001). Increasing engage-
ment of preschoolers with disabilities
through correspondence training and
picture cues. Journal of Early Inter-
vention, 24 (2), 129-145.
Charlop-Christy, M. H., Carpenter, M., Le, L.,
LeBlanc, L. A., & Kellet, K. (2002).
Using the picture exchange communi-
cation system (PECS) with children
with autism: Assessment of PECS ac-
quisition, speech, social-
communication behavior, and problem
behavior. Journal of Applied Behavior
Analysis, 35 (3), 213-231. Retrieved
May 1, 2005, from Wilson Web Omni-
file.
Cohen, S. (1998). Targeting autism: What we
know, don’t know, and can do to help
young children with autism. Berkley,
CA: University of California Press.
Dooley, P., Wilczenski,F. L., & Torem, C.
(2001). Using an activity schedule to
smooth school transitions. Journal of
Positive Behavior Interventions, 3 (1),
57-61. Retrieved May 14, 2005, from
Expanded Academic ASAP.
Frost, L., & Bondy, A. (2002). The picture
exchange communication system
training manual, 2nd edition. Be-
thesda, MD: Woodbine House.
Hodgdon, L. (2000). Visual strategies for im-
proving communication: Practical
supports for school and home. Troy,
MI: Quirk Roberts.
Hume, K. (2004). "I can do it myself!" Using
work systems to build independence
in students with autism spectrum dis-
orders. The Reporter, 10(1), 4-6, 16.
Retrieved April 2, 2008 from
http://www.iidc.indiana.edu/IRCA/edu
cation/myself.html.
Martin, G. (1998). Behavior modification:
What it is and how to do it. Engle-
wood Cliffs, NJ: Prentice-Hall.
Massey, N. G., & Wheeler, J. J. (2000). Ac-
quisition and generalization of activity
schedules and their effects on task en-
gagement in a young child with
autism in an inclusive pre-school
classroom. Education & Training in
Mental Retardation & Developmental
Disabilities, 35 (3), 326-335.
Morrison, R. S., Sainato, D. M., Benchaaban,
D., & Endo, S. (2002). Increasing play
skills of children with autism using
activity schedules and correspondence
training. Journal of Early Interven-
tion, 25 (1), 58-72.
Quill, K. A. (1995). Visually cued instruction
for children with autism and pervasive
developmental disorders. Focus on
Autistic Behavior, 10, 10-20.
Schopler, E., Mesibov, G., & Hearsey, K.
(1995). Structured teaching in the
TEACCH system. In E. Schopler &
G. Mesibov (Eds.), Learning and
Cognition in Autism (pp. 243-268).
New York: Plenum Press.
!
12!
Tissot, C., & Evans, R. (2003). Visual teach-
ing strategies for children with autism.
Early Child Development and Care,
173, 425-433.
!
13!
About the Author:
Leisa M. Breitfelder, M.H.S. is an early childhood"educator for the Linn-Mar
Community School District in Marion, Iowa.
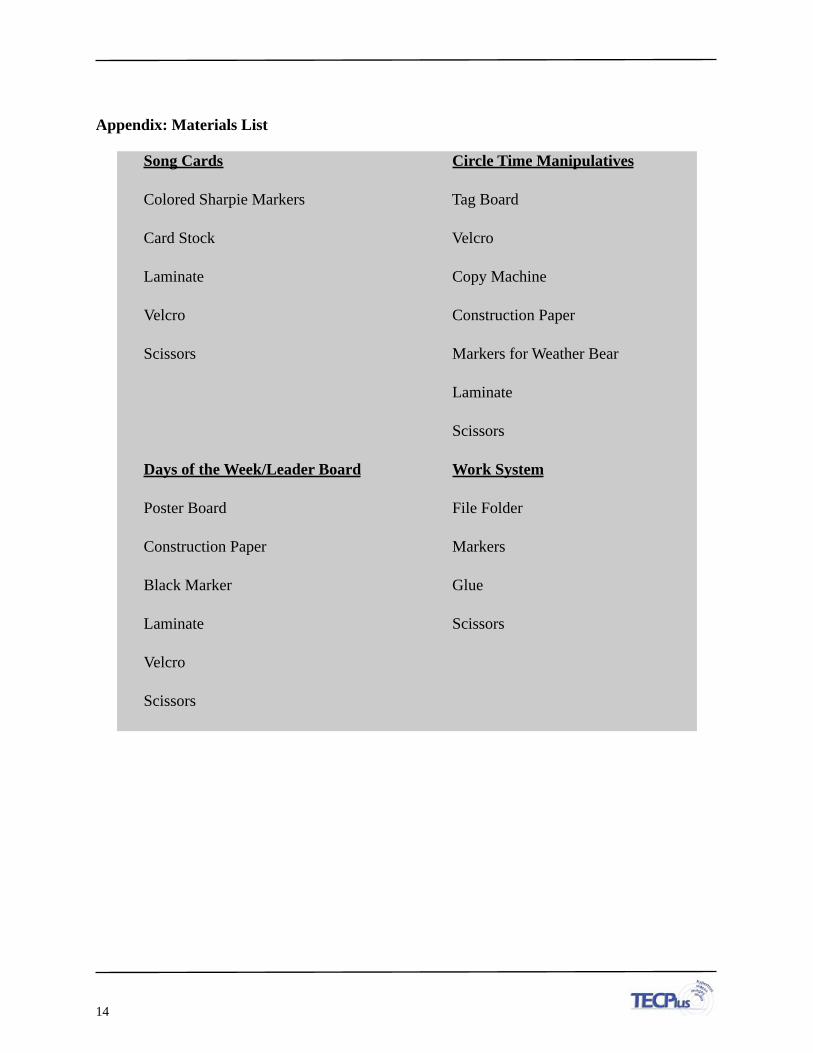
Appendix: Materials List
!
14!
Song Cards Circle Time Manipulatives
Colored Sharpie Markers Tag Board
Card Stock Velcro
Laminate Copy Machine
Velcro Construction Paper
Scissors Markers for Weather Bear
Laminate
Scissors
Days of the Week/Leader Board Work System
Poster Board File Folder
Construction Paper Markers
Black Marker Glue
Laminate Scissors
Velcro
Scissors

Appendix (continued): Materials List
!
15!
Schedules First/Then
Tag Board Green and Red Construction Paper
Laminated Schedule Pictures Black Marker
Laminate Laminate
Velcro Velcro
Scissors Laminated Picture Cards
Scissors
Behavior Modification Chart PECS Book
Placemat Plastic Binder
Velcro Laminated Picture Cards
Laminated Picture Cards Velcro
Construction Paper Placemats
Laminate Scissors
Velcro
Black Marker
Scissors