quantstudio 6 and 7 flex real-time pcr system...
TRANSCRIPT

USER GUIDE
QuantStudio™ 6 and 7 Flex Real-Time PCR System SoftwareGetting Started Guide
for use with: QuantStudio™ 6 and 7 Flex Real-Time PCR SystemsPublication Number 4489822
Revision A

For Research Use Only. Not for use in diagnostic procedures.The information in this guide is subject to change without notice.
DISCLAIMER
LIFE TECHNOLOGIES CORPORATION AND/OR ITS AFFILIATE(S) DISCLAIM ALL WARRANTIES WITH RESPECT TO THIS DOCUMENT, EXPRESSED OR IMPLIED, INCLUDING BUT NOT LIMITED TO THOSE OF MERCHANTABILITY, FITNESS FOR A PARTICULAR PURPOSE, OR NON-INFRINGEMENT. TO THE EXTENT ALLOWED BY LAW, IN NO EVENT SHALL LIFE TECHNOLOGIES AND/OR ITS AFFILIATE(S) BE LIABLE, WHETHER IN CONTRACT, TORT, WARRANTY, OR UNDER ANY STATUTE OR ON ANY OTHER BASIS FOR SPECIAL, INCIDENTAL, INDIRECT, PUNITIVE, MULTIPLE OR CONSEQUENTIAL DAMAGES IN CONNECTION WITH OR ARISING FROM THIS DOCUMENT, INCLUDING BUT NOT LIMITED TO THE USE THEREOF.
LIMITED USE LABEL LICENSE No. 477: Real-Time PCR System
Notice to Purchaser: This product is licensed for use under certain patent claims owned by the University of Utah Research Foundation and licensed to BioFire Diagnostics, Inc. No right is conveyed, expressly, by implication or by estoppel under any other patent claim.
TRADEMARKS
© 2013 Life Technologies Corporation. All rights reserved. The trademarks mentioned herein are the property of Life Technologies Corporation and/or its affiliate(s) or their respective owners.
RealTime StatMiner is a registered trademark of Integromics, S.L.. Cy is a registered trademark of GE Healthcare. Microsoft, Windows and Internet Explorer are registered trademarks of Microsoft Corporation. Apple, Macintosh and Safari are registered trademarks of Apple, Inc.. Mozilla and Firefox are registered trademarks of Mozilla Foundataion. Adobe, Reader and Acrobat are registered trademarks of Adobe Systems, Inc.. AmpErase and AmpliTaq Gold are registered trademarks of Roche Molecular Systems, Inc. as is TaqMan, which is used under permission and license.

5QuantStudio™ 6 and 7 Flex Real-Time PCR System Software: Getting Started Guide
Roadmap
BOOKLET 1 Getting Started with QuantStudio™ 6 and 7 Flex Real-Time PCR System Software Experiments
BOOKLET 2 QuantStudio™ 6 and 7 Flex Real-Time PCR System Software Getting Started Guide for Standard Curve Experiments
BOOKLET 3 QuantStudio™ 6 and 7 Flex Real-Time PCR System Software Getting Started Guide for Relative Standard Curve and Comparative CT Experiments
PART I: Running Relative Standard Curve Experiments
PART II: Running Comparative CT Experiments
BOOKLET 4 QuantStudio™ 6 and 7 Flex Real-Time PCR System Software Getting Started Guide for Genotyping Experiments
BOOKLET 5 QuantStudio™ 6 and 7 Flex Real-Time PCR System Software Getting Started Guide for Presence/Absence Experiments
BOOKLET 6 QuantStudio™ 6 and 7 Flex Real-Time PCR System Software Getting Started Guide for Melt Curve Experiments
BOOKLET 7 QuantStudio™ 6 and 7 Flex Real-Time PCR System Software Experiments - Appendixes

6 QuantStudio™ 6 and 7 Flex Real-Time PCR System Software: Getting Started Guide
USER GUIDE
Getting Started with QuantStudio™ 6 and 7 Flex Real-Time PCR System Software ExperimentsBooklet 1Publication Number 4489822
Revision A

For Research Use Only. Not for use in diagnostic procedures.

3Getting Started with QuantStudio™ 6 and 7 Flex Real-Time PCR System Software Experiments
Contents
About This Guide . . . . . . . . . . . . . . . . . . . . . . . . . . . . . . . . . . . . . . . . . . . . . . . . 5
Revision history . . . . . . . . . . . . . . . . . . . . . . . . . . . . . . . . . . . . . . . . . . . . . . . . . . . . . . . . . . . . . . . . . . . . . . . 5
Purpose . . . . . . . . . . . . . . . . . . . . . . . . . . . . . . . . . . . . . . . . . . . . . . . . . . . . . . . . . . . . . . . . . . . . . . . . . . . . . . 5
Prerequisites . . . . . . . . . . . . . . . . . . . . . . . . . . . . . . . . . . . . . . . . . . . . . . . . . . . . . . . . . . . . . . . . . . . . . . . . . 5
How to use these booklets as tutorials . . . . . . . . . . . . . . . . . . . . . . . . . . . . . . . . . . . . . . . . . . . . . . . . . . . 6
How to use the guides with your own experiments . . . . . . . . . . . . . . . . . . . . . . . . . . . . . . . . . . . . . . . . . 6
Assumptions . . . . . . . . . . . . . . . . . . . . . . . . . . . . . . . . . . . . . . . . . . . . . . . . . . . . . . . . . . . . . . . . . . . . . . . . . . 6
How to access an example experiment . . . . . . . . . . . . . . . . . . . . . . . . . . . . . . . . . . . . . . . . . . . . . . . . . . . 7Start the QuantStudio™ 6 and 7 Flex Software . . . . . . . . . . . . . . . . . . . . . . . . . . . . . . . . . . . . . . . . . 7Open an example experiment . . . . . . . . . . . . . . . . . . . . . . . . . . . . . . . . . . . . . . . . . . . . . . . . . . . . . . . 7
A note on system security . . . . . . . . . . . . . . . . . . . . . . . . . . . . . . . . . . . . . . . . . . . . . . . . . . . . . . . . . . . . . . . 9
User attention words . . . . . . . . . . . . . . . . . . . . . . . . . . . . . . . . . . . . . . . . . . . . . . . . . . . . . . . . . . . . . . . . . . . 9
■ CHAPTER 1 General Experiment Information and Instructions . . . . 11
Set up an experiment . . . . . . . . . . . . . . . . . . . . . . . . . . . . . . . . . . . . . . . . . . . . . . . . . . . . . . . . . . . . . . . . . 12Define experiment properties . . . . . . . . . . . . . . . . . . . . . . . . . . . . . . . . . . . . . . . . . . . . . . . . . . . . . . 12Define targets, samples, and biological replicate groups . . . . . . . . . . . . . . . . . . . . . . . . . . . . . . 15Assign targets, samples, and biological replicate groups . . . . . . . . . . . . . . . . . . . . . . . . . . . . . . 16Assign targets, samples, and biological replicate groups - alternate procedure . . . . . . . . . . . 19Define the run method . . . . . . . . . . . . . . . . . . . . . . . . . . . . . . . . . . . . . . . . . . . . . . . . . . . . . . . . . . . . 20
Prepare reactions . . . . . . . . . . . . . . . . . . . . . . . . . . . . . . . . . . . . . . . . . . . . . . . . . . . . . . . . . . . . . . . . . . . . . 22Supported reagents . . . . . . . . . . . . . . . . . . . . . . . . . . . . . . . . . . . . . . . . . . . . . . . . . . . . . . . . . . . . . . 22Precautions while preparing reactions . . . . . . . . . . . . . . . . . . . . . . . . . . . . . . . . . . . . . . . . . . . . . . 22Materials required while preparing the dilutions . . . . . . . . . . . . . . . . . . . . . . . . . . . . . . . . . . . . . 22Guidelines for preparing the dilutions, reaction mix, and plate . . . . . . . . . . . . . . . . . . . . . . . . . 23Seal the reaction plate . . . . . . . . . . . . . . . . . . . . . . . . . . . . . . . . . . . . . . . . . . . . . . . . . . . . . . . . . . . . 23Fill and seal the array card . . . . . . . . . . . . . . . . . . . . . . . . . . . . . . . . . . . . . . . . . . . . . . . . . . . . . . . . 25Capping and uncapping the 96-well reaction tubes and tube strips . . . . . . . . . . . . . . . . . . . . . 28
Start the experiment . . . . . . . . . . . . . . . . . . . . . . . . . . . . . . . . . . . . . . . . . . . . . . . . . . . . . . . . . . . . . . . . . . 30Prepare the instrument for use . . . . . . . . . . . . . . . . . . . . . . . . . . . . . . . . . . . . . . . . . . . . . . . . . . . . 30Load the reaction plate or array card into the instrument . . . . . . . . . . . . . . . . . . . . . . . . . . . . . . 33Start the experiment . . . . . . . . . . . . . . . . . . . . . . . . . . . . . . . . . . . . . . . . . . . . . . . . . . . . . . . . . . . . . 34Monitor the experiment . . . . . . . . . . . . . . . . . . . . . . . . . . . . . . . . . . . . . . . . . . . . . . . . . . . . . . . . . . . 35Unload the instrument . . . . . . . . . . . . . . . . . . . . . . . . . . . . . . . . . . . . . . . . . . . . . . . . . . . . . . . . . . . . 41Transfer experiment results . . . . . . . . . . . . . . . . . . . . . . . . . . . . . . . . . . . . . . . . . . . . . . . . . . . . . . . 42
Review experiment results . . . . . . . . . . . . . . . . . . . . . . . . . . . . . . . . . . . . . . . . . . . . . . . . . . . . . . . . . . . . . 44About analysis results . . . . . . . . . . . . . . . . . . . . . . . . . . . . . . . . . . . . . . . . . . . . . . . . . . . . . . . . . . . . 44To override calibration . . . . . . . . . . . . . . . . . . . . . . . . . . . . . . . . . . . . . . . . . . . . . . . . . . . . . . . . . . . . 44To display wells . . . . . . . . . . . . . . . . . . . . . . . . . . . . . . . . . . . . . . . . . . . . . . . . . . . . . . . . . . . . . . . . . . 45To display multiple plots . . . . . . . . . . . . . . . . . . . . . . . . . . . . . . . . . . . . . . . . . . . . . . . . . . . . . . . . . . 45To display an expanded view of a plot or wells . . . . . . . . . . . . . . . . . . . . . . . . . . . . . . . . . . . . . . . . 46To edit plot properties . . . . . . . . . . . . . . . . . . . . . . . . . . . . . . . . . . . . . . . . . . . . . . . . . . . . . . . . . . . . 46To save current settings as default . . . . . . . . . . . . . . . . . . . . . . . . . . . . . . . . . . . . . . . . . . . . . . . . . 47

4 Getting Started with QuantStudio™ 6 and 7 Flex Real-Time PCR System Software Experiments
Contents
To publish the analyzed data . . . . . . . . . . . . . . . . . . . . . . . . . . . . . . . . . . . . . . . . . . . . . . . . . . . . . . . 47
Export an experiment . . . . . . . . . . . . . . . . . . . . . . . . . . . . . . . . . . . . . . . . . . . . . . . . . . . . . . . . . . . . . . . . . 47About exporting an experiment . . . . . . . . . . . . . . . . . . . . . . . . . . . . . . . . . . . . . . . . . . . . . . . . . . . . 47Export procedure . . . . . . . . . . . . . . . . . . . . . . . . . . . . . . . . . . . . . . . . . . . . . . . . . . . . . . . . . . . . . . . . 48
■ CHAPTER 2 Experiment Shortcuts . . . . . . . . . . . . . . . . . . . . . . . . . . . . . 53
Using experiment templates . . . . . . . . . . . . . . . . . . . . . . . . . . . . . . . . . . . . . . . . . . . . . . . . . . . . . . . . . . . 53To create a template . . . . . . . . . . . . . . . . . . . . . . . . . . . . . . . . . . . . . . . . . . . . . . . . . . . . . . . . . . . . . . 53To create a new experiment using a template . . . . . . . . . . . . . . . . . . . . . . . . . . . . . . . . . . . . . . . . 54To create an experiment using a template on the QuantStudio™ 6 or 7 Instrument touchscreen 54Use a template to create a batch of experiments . . . . . . . . . . . . . . . . . . . . . . . . . . . . . . . . . . . . . 55
Run an experiment with QuickStart . . . . . . . . . . . . . . . . . . . . . . . . . . . . . . . . . . . . . . . . . . . . . . . . . . . . . 57QuickStart from the QuantStudio™ 6 and 7 Flex Software . . . . . . . . . . . . . . . . . . . . . . . . . . . . . . 57QuickStart from the QuantStudio™ 6 or 7 Instrument touchscreen . . . . . . . . . . . . . . . . . . . . . . 58
Import experiment setup . . . . . . . . . . . . . . . . . . . . . . . . . . . . . . . . . . . . . . . . . . . . . . . . . . . . . . . . . . . . . . 58Import plate setup for an experiment . . . . . . . . . . . . . . . . . . . . . . . . . . . . . . . . . . . . . . . . . . . . . . . 58Import sample information . . . . . . . . . . . . . . . . . . . . . . . . . . . . . . . . . . . . . . . . . . . . . . . . . . . . . . . . 59
Create an experiment using ReadiApp . . . . . . . . . . . . . . . . . . . . . . . . . . . . . . . . . . . . . . . . . . . . . . . . . . . 62
Index . . . . . . . . . . . . . . . . . . . . . . . . . . . . . . . . . . . . . . . . . . . . . . . . . . . . . . . . . 63

5Getting Started with QuantStudio™ 6 and 7 Flex Real-Time PCR System Software Experiments
About This Guide
CAUTION! ABBREVIATED SAFETY ALERTS. Hazard symbols and hazard types specified in procedures may be abbreviated in this document. For the complete safety information, refer to the instrument user guide.
IMPORTANT! Before using this product, read and understand the information in the instrument user guide.
Revision history
Purpose
The QuantStudio™ 6 and 7 Flex Real-Time PCR System Software Experiments Getting Started Guide functions as both a tutorial and as a guide for performing your own experiments on the QuantStudio™ 6 and 7 Flex Instruments.
Note: For differences between the QuantStudio™ 6 System and the QuantStudio™ 7 System, refer to the QuantStudio™ 6 and 7 Flex Real-Time PCR Systems Maintenance and Administration Guide (Pub. no. 4489821).
Prerequisites
This getting started guide is intended for personnel who have been specifically trained by Life Technologies. The manufacturer is not liable for damage or injury that results from use of this manual by unauthorized or untrained parties.
This guide uses conventions and terminology that assume a working knowledge of the Microsoft® Windows® operating system, the Internet, and Internet-based browsers.
Note: First-time users of the QuantStudio™ 6 and 7 Flex Real-Time PCR System Software, please read Getting Started with QuantStudio™ 6 and 7 Flex Real-Time PCR System Software Experiments thoroughly. The booklet provides information and general instructions that are applicable to all the experiments described in this binder.
Revision Date Description
A October 2013 New document

6 Getting Started with QuantStudio™ 6 and 7 Flex Real-Time PCR System Software Experiments
About This Guide How to use these booklets as tutorials
How to use these booklets as tutorials
Each booklet in this guide provides a tutorial for running an example experiment using QuantStudio™ 6 and 7 Flex Real-Time PCR System Software and the example data provided on the installation CD. The following booklets are provided:
• Getting Started with QuantStudio™ 6 and 7 Flex Real-Time PCR System Software Experiments – introductory information and experiment workflow common to all experiments.
• QuantStudio™ 6 and 7 Flex Real-Time PCR System Software Getting Started Guide for Standard Curve Experiments – designing, running, and analyzing a Standard Curve experiment.
• QuantStudio™ 6 and 7 Flex Real-Time PCR System Software Getting Started Guide for Relative Standard Curve and Comparative CT Experiments – designing, running, and analyzing Relative Standard Curve and Comparative CT experiments.
Note: This booklet also provides information on setting up, running, and analyzing a gene expression study of two Comparative CT experiments.
• QuantStudio™ 6 and 7 Flex Real-Time PCR System Software Getting Started Guide for Genotyping Experiments – designing, running, and analyzing a Genotyping experiment.
• QuantStudio™ 6 and 7 Flex Real-Time PCR System Software Getting Started Guide for Presence/Absence Experiments – designing, running, and analyzing a Presence/Absence experiment.
• QuantStudio™ 6 and 7 Flex Real-Time PCR System Software Getting Started Guide for Melt Curve Experiments – designing, running, and analyzing a Melt Curve experiment.
• QuantStudio™ 6 and 7 Flex Real-Time PCR System Software Experiments - Appendixes – common information such as ordering information, additional documentation, and glossary.
Note: In all booklets, the term “experiment” refers to the entire process of performing an experiment, including setup, run, and analysis.
How to use the guides with your own experiments
Each booklet contains instructions specific to an example experiment provided on the installation CD. However, you can use the booklets as guides for your own experiments; tips for running your own experiments are provided at various points in each booklet.
Assumptions
This guide assumes that you have access to the example experiments provided with the software.

7Getting Started with QuantStudio™ 6 and 7 Flex Real-Time PCR System Software Experiments
About This GuideHow to access an example experiment
How to access an example experiment
Start the
QuantStudio™ 6
and 7 Flex
Software
Double-click (QuantStudio™ 6 and 7 Flex Real-Time PCR System Software shortcut) to access the Home screen, shown in the following image.
Open an example
experiment
1. In the Home screen, select Open from the toolbar.
2. Navigate to the examples folder. The default path is: <drive>:\Program Files\Applied Biosystems\QuantStudio 6 and 7 Flex Software\examples\QS6Flex or <drive>:\Program Files\Applied Biosystems\QuantStudio 6 and 7 Flex Software\examples\QS7Flex.where, <drive> is the computer hard drive on which the QuantStudio™ 6 and 7 Flex Real-Time PCR System Software is installed. The default installation drive for the software is the C: drive.

8 Getting Started with QuantStudio™ 6 and 7 Flex Real-Time PCR System Software Experiments
About This Guide How to access an example experiment
3. Select an example experiment file to open, then click Open.
Experiment type Example experiment file name
Standard Curve QS6_96-Well Standard Curve Example.eds
QS6_384-Well_Standard Curve Example.eds
QS7_TaqMan_Array_Standard Curve Example.eds
QS7_TaqMan_Array_RNaseP_Example.eds
QS7_384-Well_Standard Curve Example.eds
QS7_96-Well Standard Curve Example.eds
Relative Standard Curve
QS6_96-Well Relative Standard Curve Example 2.eds
QS6_96-Well Relative Standard Curve Example.eds
QS6_384-Well_Relative Standard Curve Example 2.eds
QS6_384-Well_Relative Standard Curve Example.eds
QS7_96-Well Relative Standard Curve Example 2.eds
QS7_96-Well Relative Standard Curve Example.eds
QS7_384-Well_Relative Standard Curve Example 2.eds
QS7_384-Well_Relative Standard Curve Example.eds
Comparative CT QS6_96-Well Comparative Ct Example.eds
QS6_384-Well_Comparative Ct_Example_1.eds
QS6_384-Well_Comparative Ct_Example_2.eds
QS6_384-Well_Comparative Ct_Example.eds
QS7_96-Well Comparative Ct Example.eds
QS7_384-Well_Comparative Ct_Example_1.eds
QS7_384-Well_Comparative Ct_Example_2.eds
QS7_384-Well_Comparative Ct_Example.eds
QS7_TaqMan_Array_Comparative_Ct_Example.eds
Multiplex QS6_96-Well Multiplex Example.eds
QS6_384-Well_Multiplex_Example.eds
QS7_96-Well Multiplex Example.eds
QS7_384-Well_Multiplex_Example.eds
Genotyping QS7_96-Well SNP Genotyping Example.eds
QS7_384-Well_SNP_Genotyping_Example.eds
QS6_96-Well SNP Genotyping Example.eds
QS6_384-Well_SNP_Genotyping_Example.eds
Presence/Absence QS6_384-Well_Presence-Absence_Example.eds
QS6_96-Well Presence-Absence Example.eds
QS7_96-Well Presence-Absence Example.eds
QS7_384-Well_Presence-Absence_Example.eds

9Getting Started with QuantStudio™ 6 and 7 Flex Real-Time PCR System Software Experiments
About This GuideA note on system security
Note: In addition to the example experiment files, the following user sample files are located at: C:\Program Files\Applied Biosystems\QuantStudio 6 and 7 Flex Software\examples\User Sample Files
• Barcode template files• Copy-paste example file• Custom Sample Properties files• Sample setup files• Import custom fields file• Export files
For more information on using the above files, see Chapter 2, “Experiment Shortcuts” on page 53.
A note on system security
The Security, Auditing, and e-Signature (SAE) feature in QuantStudio™ 6 and 7 Flex Real-Time PCR System Software enables role-based access control to enforce data integrity and authentication of users logging into the system, to strengthen system security. The feature tracks actions performed by users on experiments, templates, and studies, and it tracks changes to the SAE settings. You can enable or disable this feature to accommodate your security needs.
To enable or disable the feature, from the toolbar select Tools�Security�Settings.
For more information on the SAE feature, please refer to the instrument user guide.
User attention words
Five user attention words may appear in this document. Each word implies a particular level of observation or action as described below:
Note: Provides information that may be of interest or help but is not critical to the use of the product.
IMPORTANT! Provides information that is necessary for proper instrument operation or accurate chemistry kit use.
Melt Curve QS6_96-Well SYBR Green PCR w Melt Example.eds
QS6_384-Well_SYBR_Green_PCR_with_Melt_Example.eds
QS6_384-Well_SYBR_Green_Melt_Example.eds
QS6_384-Well_Melt_ Example.eds
QS7_96-Well SYBR Green PCR w Melt Example.eds
QS7_384-Well_SYBR_Green_PCR_with_Melt_Example.eds
QS7_384-Well_SYBR_Green_Melt_Example.eds
QS7_384-Well_Melt_ Example.eds
Experiment type Example experiment file name
10 Getting Started with QuantStudio™ 6 and 7 Flex Real-Time PCR System Software Experiments
About This Guide User attention words
CAUTION! Indicates a potentially hazardous situation that, if not avoided, may result in minor or moderate injury. It may also be used to alert against unsafe practices.
WARNING! Indicates a potentially hazardous situation that, if not avoided, could result in death or serious injury.
DANGER! Indicates an imminently hazardous situation that, if not avoided, will result in death or serious injury.
Except for IMPORTANTs, the safety alert words in user documentation appear with an open triangle figure that contains a hazard symbol. These hazard symbols are identical to the hazard symbols that are affixed to the instrument. See the “Safety” appendix for descriptions of the symbols.
1
11Getting Started with QuantStudio™ 6 and 7 Flex Real-Time PCR System Software Experiments
General Experiment Informationand Instructions
This chapter covers:
■ Set up an experiment . . . . . . . . . . . . . . . . . . . . . . . . . . . . . . . . . . . . . . . . . . . . . . . . . . 12Define experiment properties . . . . . . . . . . . . . . . . . . . . . . . . . . . . . . . . . . . . . . . . . . . 12Define targets, samples, and biological replicate groups . . . . . . . . . . . . . . . . . . . . 15Assign targets, samples, and biological replicate groups. . . . . . . . . . . . . . . . . . . . 16Assign targets, samples, and biological replicate groups - alternate procedure. 19Define the run method. . . . . . . . . . . . . . . . . . . . . . . . . . . . . . . . . . . . . . . . . . . . . . . . . 20
■ Prepare reactions . . . . . . . . . . . . . . . . . . . . . . . . . . . . . . . . . . . . . . . . . . . . . . . . . . . . . 22Supported reagents . . . . . . . . . . . . . . . . . . . . . . . . . . . . . . . . . . . . . . . . . . . . . . . . . . . 22Precautions while preparing reactions . . . . . . . . . . . . . . . . . . . . . . . . . . . . . . . . . . . 22Materials required while preparing the dilutions . . . . . . . . . . . . . . . . . . . . . . . . . . 22Guidelines for preparing the dilutions, reaction mix, and plate . . . . . . . . . . . . . . 23Seal the reaction plate . . . . . . . . . . . . . . . . . . . . . . . . . . . . . . . . . . . . . . . . . . . . . . . . . 23Fill and seal the array card . . . . . . . . . . . . . . . . . . . . . . . . . . . . . . . . . . . . . . . . . . . . . 25Capping and uncapping the 96-well reaction tubes and tube strips . . . . . . . . . . 28
■ Start the experiment . . . . . . . . . . . . . . . . . . . . . . . . . . . . . . . . . . . . . . . . . . . . . . . . . . . 30Prepare the instrument for use . . . . . . . . . . . . . . . . . . . . . . . . . . . . . . . . . . . . . . . . . . 30Load the reaction plate or array card into the instrument . . . . . . . . . . . . . . . . . . . 33Start the experiment . . . . . . . . . . . . . . . . . . . . . . . . . . . . . . . . . . . . . . . . . . . . . . . . . . . 34Monitor the experiment. . . . . . . . . . . . . . . . . . . . . . . . . . . . . . . . . . . . . . . . . . . . . . . . 35Unload the instrument. . . . . . . . . . . . . . . . . . . . . . . . . . . . . . . . . . . . . . . . . . . . . . . . . 41Transfer experiment results. . . . . . . . . . . . . . . . . . . . . . . . . . . . . . . . . . . . . . . . . . . . . 42
■ Review experiment results . . . . . . . . . . . . . . . . . . . . . . . . . . . . . . . . . . . . . . . . . . . . . 44About analysis results . . . . . . . . . . . . . . . . . . . . . . . . . . . . . . . . . . . . . . . . . . . . . . . . . 44To override calibration. . . . . . . . . . . . . . . . . . . . . . . . . . . . . . . . . . . . . . . . . . . . . . . . . 44To display wells . . . . . . . . . . . . . . . . . . . . . . . . . . . . . . . . . . . . . . . . . . . . . . . . . . . . . . 45To display multiple plots. . . . . . . . . . . . . . . . . . . . . . . . . . . . . . . . . . . . . . . . . . . . . . . 45To display an expanded view of a plot or wells. . . . . . . . . . . . . . . . . . . . . . . . . . . . 46To edit plot properties . . . . . . . . . . . . . . . . . . . . . . . . . . . . . . . . . . . . . . . . . . . . . . . . . 46To save current settings as default . . . . . . . . . . . . . . . . . . . . . . . . . . . . . . . . . . . . . . . 47To publish the analyzed data . . . . . . . . . . . . . . . . . . . . . . . . . . . . . . . . . . . . . . . . . . . 47
■ Export an experiment. . . . . . . . . . . . . . . . . . . . . . . . . . . . . . . . . . . . . . . . . . . . . . . . . . 47About exporting an experiment . . . . . . . . . . . . . . . . . . . . . . . . . . . . . . . . . . . . . . . . . 47Export procedure . . . . . . . . . . . . . . . . . . . . . . . . . . . . . . . . . . . . . . . . . . . . . . . . . . . . . 48

12 Getting Started with QuantStudio™ 6 and 7 Flex Real-Time PCR System Software Experiments
Chapter 1 General Experiment Information and InstructionsSet up an experiment1
Note: For more information about any of the topics discussed in this guide, access the Help from within QuantStudio™ 6 and 7 Flex Real-Time PCR System Software by pressing F1, clicking in the toolbar, or selecting Help�QuantStudio™ 6 and 7 Flex Real-Time PCR System Software Help.
Set up an experiment
Note: To start the QuantStudio™ 6 and 7 Flex Software, see “Start the QuantStudio™ 6 and 7 Flex Software” on page 7.
Define experiment
properties
All experiments require the same general setup tasks; individual booklets supply specific parameters. The following procedures outline general steps to take to set up an experiment.
Access QuantStudio™ 6 and 7 Flex Software and click (Experiment Setup). Click Experiment Properties to access the Experiment Properties screen.
Define experiment name and type
1. Enter a unique experiment name in the Experiment Name field. The default is a date and time stamp, which you can change. For example, 2010-04-12 173730.
• Enter a name that is descriptive and easy to remember. You can enter up to 100 characters.
• You can only use the alpha-numeric, hyphen (-), underscore ( _ ), and spaces ( ) characters.
Note: Ensure each experiment name is unique. If you have named two different experiments with the same name, you cannot run them on the same instrument. You will receive the following error message when attempting to start the run:
2. (Optional) Enter or scan the barcode on the reaction plate. You can enter up to 100 characters in the Barcode field.
3. (Optional) Enter a user name to identify the owner of the experiment. You can enter up to 100 characters in the User Name field.
4. (Optional) Enter comments to describe the experiment.
5. Select the instrument type you are using to run the experiment• QuantStudio™ 6 Flex System• QuantStudio™ 7 Flex System
6. Select the block type you are using to run the experiment• 384-Well Block• Array Card Block (only applicable to the QuantStudio™ 7 Flex System)

13Getting Started with QuantStudio™ 6 and 7 Flex Real-Time PCR System Software Experiments
Chapter 1 General Experiment Information and InstructionsSet up an experiment 1
• 96-Well Block (0.2mL)• Fast 96-Well Block (0.1mL)
7. Select the experiment type:• Standard Curve• Relative Standard Curve• Comparative CT (��CT)• Melt Curve• Genotyping• Presence/Absence
Select the reagent
Select the reagent you are using to detect the target sequence:
• TaqMan® Reagents• SYBR® Green Reagents• Other
Note: If you select SYBR® Green as the reagent, then you have the option of including a melt curve for that experiment.
Define the instrument run properties
1. Select the ramp speed for the experiment:• Standard• Fast
2. For Genotyping and Presence/Absence experiments, select the options for the data collection to include in the experiment run:
• Pre-PCR Read - to include data before amplification occurs. Use the data collected during pre-PCR read to normalize fluorescence data collected during post-PCR read.
• Amplification - to include real-time data.• Post-PCR Read - to include data after amplification has taken place.
3. For the Melt Curve experiment, select the Include PCR check box, to include PCR.
Review the analysis settings
Analysis Settings are different for each experiment type. The software analyzes the data using the default analysis settings. If the default analysis settings in the QuantStudio™ 6 and 7 Flex Software are not suitable for your own experiment, you can change the settings in the Analysis Settings dialog box and save the changed analysis settings to the Analysis Settings Library
Note: For information on Analysis Settings Library, refer to Booklet 7, QuantStudio™ 6 and 7 Flex Real-Time PCR System Software Experiments - Appendixes.

14 Getting Started with QuantStudio™ 6 and 7 Flex Real-Time PCR System Software Experiments
Chapter 1 General Experiment Information and InstructionsSet up an experiment1
Enter the reagent information
In the Reagent Information panel you can enter detailed reagent information, including the part number, lot number, and expiration date of the reagents you will use in your experiment. This information can be entered before setting up your experiment or starting your calibration run.
1. In the Reagent Information panel, click New to add a line for reagent details, or Delete to remove an existing one.
2. Click within the first four fields to enter your reagent Type, Name, Part Number, or Lot Number, respectively:
3. Click the Expiration Date field, and click the "down arrow" to display the current month's calendar. Select the reagent's expiration date from that month, or click the "forward arrow" to select a future date.
Save the experiment
Save the experiment. The default file name (.eds extension) is the experiment name that you entered when you set up the experiment and saved it for the first time. Changes to the experiment name after the first save do not update the file name. To change the file name, select File � Save As.
The following is an image of the Experiment Properties screen for a Standard Curve experiment:

15Getting Started with QuantStudio™ 6 and 7 Flex Real-Time PCR System Software Experiments
Chapter 1 General Experiment Information and InstructionsSet up an experiment 1
Define targets,
samples, and
biological replicate
groups
Use the Define screen to define targets, samples and biological replicates for your experiment.
Note: You can start a run without these definitions, but there will be no real-time data (data will not be visible) in the amplification plots (the amplification plots can be seen only after you have set up the plate).
1. Click Define to access the Define screen.
2. Define targets.
Note: For Genotyping experiments, use this screen to specify the number of SNP assays to include in the experiment. For more information on defining SNP assays, refer to Booklet 4, QuantStudio™ 6 and 7 Real-Time PCR System Software Getting Started Guide for Genotyping Experiments.
a. Click New to add targets and define them.
b. In the target table, click a cell in the Target Name column for the target, then enter your target name. The default name is Target 1.
c. Select the Reporter and Quencher from the respective drop-down menu.
Note: The default reporter and quencher dyes used depend on the reagent selected during experiment setup. For example, if TaqMan® is the selected reagent, the default reporter FAM and default quencher is NFQ-MGB.
d. Select the target Color from the drop-down menu.
e. (Optional) Click Save to Library to save the newly added or existing edited targets to the target library.
Note: Use the targets from the Target Library to avoid re-entering the information. Refer to Appendix B, Supplemental Information in Booklet 7, QuantStudio™ 6 and 7 Flex Real-Time PCR System Software Experiments - Appendixes for information on target libraries.
f. (Optional) Click Import from Library to add targets from the target library.
3. Define samples.
a. Click New to add samples and name them.
b. In the samples table, click a cell in the Sample Name column for the sample to define and enter your sample name. The default sample name is Sample 1.
c. Select the sample Color from the drop-down menu.
d. (Optional) Click Save to Library to save the newly added or existing edited samples to the sample library.
Note: Use the samples from the Sample Library to avoid re-entering the information. Refer to Appendix B, Supplemental Information in Booklet 7, QuantStudio™ 6 and 7 Flex Real-Time PCR System Software Experiments - Appendixes for information on sample libraries.
e. (Optional) Click Import from Library to add samples from the sample library.
4. (Optional) Define biological replicates.
a. In the Define Biological Replicates Groups table, click New to add biological replicate group and name them. You can enter up to 100 characters in this field.

16 Getting Started with QuantStudio™ 6 and 7 Flex Real-Time PCR System Software Experiments
Chapter 1 General Experiment Information and InstructionsSet up an experiment1
b. Select the Color from the drop-down menu.
c. Click in the Comments column to add comments for that biological replicate group.
5. Select the Passive Reference dye from the drop-down menu.
6. Define custom task name.
Note: The Custom Task Name panel is visible only when the Hide the custom task name definition and assignment UI check box under the Setup tab in the Preferences dialog box is unselected.
The following is an image of the Define screen for a Standard Curve experiment:
Assign targets,
samples, and
biological replicate
groups
Use the Assign screen to assign targets, samples, and biological replicate groups to wells in the reaction plate. For Genotyping experiments, use this screen to assign SNP assays.
Note: You can start a run without these assignments, but there will be no real-time data in the amplification plots (the amplification plots can be seen only after you have set up the plate).
1. Click Assign to access the Assign screen.
2. Assign targets.
a. Select wells using the plate layout or the well table on the Assign screen.
b. Select a target and assign its task, in the plate, from the drop-down menu. Depending on the experiment type, options are:

17Getting Started with QuantStudio™ 6 and 7 Flex Real-Time PCR System Software Experiments
Chapter 1 General Experiment Information and InstructionsSet up an experiment 1
3. Assign Samples.
a. Select wells using the plate layout or the well table on the Assign screen.
b. Select the check box next to the sample to assign to the selected wells.
Note: You can assign only one sample to a well. If the selected wells contain mixed assignments (indicated by a ), remove existing sample assignments before you make the new sample assignment.
4. Assign Biological Replicate Groups.
a. Select wells using the plate layout or the well table on the Assign screen.
b. Select the check box next to the biological replicate group to assign to the selected wells.
Experiment type Legend Tasks
Standard Curve U Unknown
S Standard
N Negative Control
Relative Standard Curve U Unknown
S Standard
N Negative Control
Comparative CT U Unknown
N Negative Control
Genotyping U Unknown
1/1 Positive Control Allele 1/ Allele 1
2/2 Positive Control Allele 2/ Allele 2
1/2 Positive Control Allele 1/ Allele 2
N Negative Control
Presence/Absence U Unknown
I Internal Positive Control
N Negative Control
I Blocked Internal Positive Control
Melt Curve U Unknown
N Negative Control

18 Getting Started with QuantStudio™ 6 and 7 Flex Real-Time PCR System Software Experiments
Chapter 1 General Experiment Information and InstructionsSet up an experiment1
The following is an image of the Assign screen for a Standard Curve experiment:

19Getting Started with QuantStudio™ 6 and 7 Flex Real-Time PCR System Software Experiments
Chapter 1 General Experiment Information and InstructionsSet up an experiment 1
Assign targets,
samples, and
biological replicate
groups - alternate
procedure
As shown below, you can also paste assignment information from an *.xls file into the plate layout of the QuantStudio™ 6 and 7 Flex Software for wells with single targets.
Note: You must select the header and the Well Number column while copying information from the *.xls file.
Note: Any of the columns not copied are treated as NULL values for those columns.
Copy and paste

20 Getting Started with QuantStudio™ 6 and 7 Flex Real-Time PCR System Software Experiments
Chapter 1 General Experiment Information and InstructionsSet up an experiment1
Note: An example copy and paste file is provided with the QuantStudio™ 6 and 7 Flex Real-Time PCR System Software and is located at C:\Program Files\Applied Biosystems\QuantStudio 6 and 7 Flex Software\examples\User Sample Files.where, <drive> is the computer hard drive on which the QuantStudio™ 6 and 7 Flex Software is installed. The default installation drive for the software is the C: drive.
Define the run
method
Use the Run Method screen to set up the run method for your own experiments in the QuantStudio™ 6 and 7 Flex Software.
Note: Refer to the Booklet 7, QuantStudio™ 6 and 7 Real-Time PCR System Software Experiments - Appendixes for information on analysis settings.
1. Click Run Method to access the Run Method screen.
Note: You can save multiple run methods to the Run Method Library for later use. Refer to Appendix B, Supplemental Information in Booklet 7, QuantStudio™ 6 and 7 Flex Real-Time PCR System Software Experiments - Appendixes for information on run method libraries.
2. Enter a number for the reaction volume per well. See “Instrument consumables” on page 17 for maximum reaction volumes for the consumables supported by the QuantStudio™ 6 and 7 Flex Software.
3. In the Graphical View tab, review and, if necessary, edit the run method.• Make sure that the thermal profile is appropriate for your reagents.• Edit the default run method or replace it with one from the run method
library included in the QuantStudio™ 6 and 7 Flex Software. • Enable data collection by clicking .
Note: Enabling data collection is especially useful when you later need to analyze data collected in real-time during the various stages.
• Edit the ramp rate. You can increase or decrease the ramp rate for a stage.
Note: Ramp rates are decimal numbers from 0.015—3.4.
• Edit the PCR Stage.– Change the Number of Cycles for the PCR stage.– Select the Enable AutoDelta check box, to increase or decrease the
temperature and/or hold time for each subsequent cycle or to change the Starting Cycle for AutoDelta. Enabling AutoDelta displays the icon. Click the AutoDelta Off icon to change the AutoDelta settings for the cycling stage in the AutoDelta Settings dialog box. Then, click Save Setting to display the AutoDelta On icon.

21Getting Started with QuantStudio™ 6 and 7 Flex Real-Time PCR System Software Experiments
Chapter 1 General Experiment Information and InstructionsSet up an experiment 1
Note: If you selected SYBR® Green as the reagent, the Melt Curve stage automatically appears in the Run Method screen. If you delete the Melt Curve Stage section from the protocol, then the melt curve is active in the Add Stage drop-down menu.
4. (Optional) Complete the tasks on the Optical Filters tab:
IMPORTANT! Do not alter the optical filters for system dyes. This feature is optional when you use custom dyes, where you can select a filter set to match the profile of the dye. For more information on how to select the appropriate filter set, contact Life Technologies.
By default, the Optical Filters tab is not visible. To show the Optical Filters tab, go to Tools � Preferences, and select the Show optical filters for run method check box under the Default tab.
• To add a new filter set to the filter set library, click Save.• To load a saved filter set, click Load.• To go back to the original filter set combinations, click Revert to Defaults.

22 Getting Started with QuantStudio™ 6 and 7 Flex Real-Time PCR System Software Experiments
Chapter 1 General Experiment Information and InstructionsPrepare reactions1
Prepare reactions
Supported
reagents
Life Technologies supports the following reagents for experiments performed with the QuantStudio™ 6 and 7 Flex Software.
Note: The QuantStudio™ 6 and 7 Flex Software can accommodate other reagents, but performance claims have not been tested by Life Technologies.
Precautions while
preparing
reactions
• Do not prepare the reactions on a wet table. Wet surfaces lead to contamination of your reactions.
• Wear appropriate protective eyewear, clothing, and powder-free gloves.• Use the appropriate consumables. The quality of pipettors and tips and the care
used in measuring and mixing dilutions affect data accuracy.• Perform dilutions exactly as instructed. Mistakes or inaccuracies in making the
dilutions directly affect the quality of results.• Use a permanent marker or pen to mark a tube and the side of a plate or array
card. Do not use fluorescent markers.• Ensure that the arrangement of the PCR reactions matches the plate layout
displayed in the QuantStudio™ 6 and 7 Flex Software.
Materials required
while preparing the
dilutions
• DI water or DEPC water• Microcentrifuge tubes• Pipettors • Pipette tips• Vortex mixer• Centrifuge• Sample stock
Reagent Experiment type
TaqMan® reagents • Standard Curve • Relative Standard Curve• Comparative CT (∆∆CT)• Genotyping• Presence/ Absence
SYBR® Green reagents • Standard Curve • Relative Standard Curve• Comparative CT (∆∆CT)• Melt Curve
Other reagents • Standard Curve • Relative Standard Curve• Comparative CT (∆∆CT)• Genotyping• Presence/ Absence• Melt Curve

23Getting Started with QuantStudio™ 6 and 7 Flex Real-Time PCR System Software Experiments
Chapter 1 General Experiment Information and InstructionsPrepare reactions 1
• Standard stock• Reaction mix components• Plate or array card
Guidelines for
preparing the
dilutions, reaction
mix, and plate
• Include excess volume in your calculations to provide excess volume for the loss that occurs during reagent transfers.
• Use TE buffer or water to dilute the standards and samples.• Prepare the reagents according to the manufacturer’s instructions.• Keep the dilutions and assay mix protected from light, in the freezer, until you are
ready to use it. Excessive exposure to light may affect the fluorescent probes or dyes.
• Prior to use:– Mix the master mix thoroughly by swirling the bottle.– Resuspend the assay mix by vortexing, then centrifuge the tube briefly.– Thaw any frozen samples by placing them on ice. When thawed, resuspend
the samples by vortexing, then centrifuge the tubes briefly.• Do not allow the bottom of the reaction plate to become dirty. Fluids and other
contaminants that adhere to the bottom of the reaction plate can contaminate the sample block(s) and cause an abnormally high background signal.
• Place the reaction plate or array card at 4°C and in the dark until you are ready to load it into the instrument.
Seal the reaction
plate
If you use optical adhesive film to seal your reaction plates, seal each reaction plate as follows:
Note: The sealing instructions are applicable to 384-well and 96-well reaction plates.
1. Load the reaction plate using the plate layout described in “Assign targets, samples, and biological replicate groups” on page 16.
Note: For 96-well reaction plates, place the reaction plate onto the center of the 96-well base, then perform this step. Ensure that the reaction plate is flush with the top surface of the 96-well base.
2. Remove a single optical adhesive film (film) from the box. Bend both end-tabs upward. Hold the film backing side up.
Correct Incorrect
Liquid is at the bottom of the well.
Not centrifuged with enough force
Or
Not centrifuged for enough time

24 Getting Started with QuantStudio™ 6 and 7 Flex Real-Time PCR System Software Experiments
Chapter 1 General Experiment Information and InstructionsPrepare reactions1
3. In one swift movement, peel back the white protective backing from the center sealing surface. Do not touch the center sealing surface.
IMPORTANT! Improper peeling of the optical adhesive film may result in haziness, but it will not affect results. Haziness disappears when the film comes into contact with the heated cover in the instrument.
4. Holding the film by the end-tabs, lower the film onto the reaction plate (adhesive side facing the reaction plate). Ensure that the film completely covers all wells of the reaction plate.
5. Applying firm pressure, move the applicator slowly across the film, horizontally and vertically, to ensure good contact between the film and the entire surface of the reaction plate.
6. Using the applicator to hold the edge of the film in place, grasp one end of the end-tab and pull up and away sharply. Repeat for the other end-tab.
Note: Ensure clean removal of both end-tabs from the dotted line. Improper peeling of the end-tab can cause sticking of plate on the heated cover assembly.
7. To ensure a tight, evaporation-free seal, repeat step 5. Applying firm pressure, run the edge of the applicator along all four sides of the outside border of the film.
Note: Optical adhesive films do not adhere on contact. The films require the application of pressure to ensure a tight, evaporation-free seal.

25Getting Started with QuantStudio™ 6 and 7 Flex Real-Time PCR System Software Experiments
Chapter 1 General Experiment Information and InstructionsPrepare reactions 1
8. Inspect the reaction plate to ensure that all wells are sealed. You should see an imprint of all wells on the surface of the film. The perforated tab should be completely torn off to avoid plates from sticking to the instrument after a run.
IMPORTANT! Remove all excess adhesive from the perimeter of the optical adhesive cover. When the film is applied, the glue from the optical adhesive cover can adhere to the edges of the plate. If the excess glue is not removed, the plate may adhere to the sample block of the QuantStudio™ 6 or 7 Instrument.
Fill and seal the
array card
Fill and spin the array card
IMPORTANT! Wear powder-free gloves while preparing the Arrays.
1. Remove an array card from its box and place it on a clean, dry surface.
2. Using a permanent marker, mark the side of the empty array cards.
3. Transfer the experiment-related chemistries and solutions into the port of the array card.For each transfer:
a. Place the array card on a lab bench, with the foil side down.
b. Load 100 μL of fluid into a pipette.

26 Getting Started with QuantStudio™ 6 and 7 Flex Real-Time PCR System Software Experiments
Chapter 1 General Experiment Information and InstructionsPrepare reactions1
c. Hold the pipette in an angled position (~45 degrees) and place the tip into the fill port. The fill port is the larger of the two holes on the left side of the fill reservoir.
d. Dispense the fluid so that it sweeps in and around the fill reservoir toward the vent port. Pipet fluid into the fill reservoir, but do not go past the first stop of pipettor plunger when pipetting the reagents into the array card, or you may blow the solution out of the port.
IMPORTANT! Do not allow the tip to contact and possibly damage the coated foil beneath the fill port.
4. Place the filled array card(s) into a centrifuge array card carrier clip and place empty array card(s) in the remaining slots. Confirm that the labels on the buckets and clips are oriented in the same direction.
IMPORTANT! Balance the loads in opposite buckets in the centrifuge.
5. Place the filled carrier clips into the centrifuge buckets. Ensure that the array card fill reservoirs and bucket and clip labels face outward when loaded into the centrifuge. Balance the loads in opposite buckets.
IMPORTANT! You must run the centrifuge with all four buckets in place and each of the two carriers filled with the array card. Place empty array cards into unfilled slots.
6. Close the centrifuge cover, then spin the array card(s) for 1 minute at 1200 rpm.
Fillport
Vent port
Filled arrayEmpty array

27Getting Started with QuantStudio™ 6 and 7 Flex Real-Time PCR System Software Experiments
Chapter 1 General Experiment Information and InstructionsPrepare reactions 1
7. When the run is finished, stop the centrifuge, then spin the array card(s) again for 1 minute at 1200 rpm.
IMPORTANT! Do not try to save time by doing one spin for 2 minutes. The two sets of ramps are important for a good fill into the array card.
8. When the second run is finished, open the centrifuge and check that the fluid levels in the reservoirs of each array card have decreased by the same amount. Also, check for the formation of bubbles in all wells and note possible problems.
9. If necessary, centrifuge the array card(s) for an additional minute to fill any unfilled wells. Do not exceed three 1-minute runs or centrifuge the array card for longer than 1 minute at a time.
Note: Contact Life Technologies for more information on loading an array card.
Seal the array card(s)
1. With the carriage (roller assembly) of the Array Card Staker/ Sealer in the Start position, place a filled array card into the fixture with the foil side up so that the fill reservoirs are the farthest away from the carriage.
2. Press down on all four corners of the array card to ensure that it is fully seated within the fixture.
3. Use the two alignment pins in the fixture to position the array card correctly.
Correct Incorrect
Alignment pins

28 Getting Started with QuantStudio™ 6 and 7 Flex Real-Time PCR System Software Experiments
Chapter 1 General Experiment Information and InstructionsPrepare reactions1
4. Seal the array card by running the carriage slowly over it. Run the carriage over the array card in one direction only. Do not apply downward force on the carriage as you move it forward over the card.
5. Remove the sealed array card from the fixture and trim the fill reservoirs from the array card assembly using scissors. Trim the foil array card so that the edge is even with the plastic carrier.
IMPORTANT! Completely remove the fill reservoirs from the array card so that the edge is free of residual plastic. The plastic from the fill reservoirs that extends beyond the edge of the card can prevent the card from seating properly on the sample block and affect amplification.
IMPORTANT! As you seal the remaining filled array cards, store them in a dark place until you are ready to use them. The fluorescent dyes in the array card are photosensitive. Prolonged exposure to light can diminish the fluorescence of the dye.
Capping and
uncapping the 96-
well reaction tubes
and tube strips
WARNING! Use the flat caps for the 0.2 mL tubes and 0.1 mL tubes. Rounded caps can damage the heated cover.
Note: Ensure that you secure the caps on the tubes and tube-strips tightly to avoid sample evaporation.
Correct Incorrect

29Getting Started with QuantStudio™ 6 and 7 Flex Real-Time PCR System Software Experiments
Chapter 1 General Experiment Information and InstructionsPrepare reactions 1
If you use the 96-well MicroAmp® Optical 8-Tube Strips or MicroAmp® Optical Tubes without Cap, use the MicroAmp® Cap Installing Tool and use the following instructions:
• Applying the MicroAmp® Optical 8-Cap Strip or MicroAmp® Optical Tubes without Cap to the tubes
• Removing a cap string from a plate
Required materials:
• MicroAmp® Cap Installing Tool• MicroAmp® Optical 8-Tube Strips or MicroAmp® Optical Tubes without cap• MicroAmp® Optical 8-Cap Strip
Apply the MicroAmp® Optical 8-Cap Strip (flat)
1. Grasp the Cap Installing Tool so that the grooved side is exposed.
2. Hold the strip of caps over the tube strip or the row of tubes.
3. Use the grooved side (shown) of the Cap Installing Tool to push and seat each cap firmly in place. Use a rocking motion to properly seat each cap.
Remove a cap string from a plate
The MicroAmp® Cap Installing Tool is also used for removing the MicroAmp® Optical 8-Cap Strip from the 96-well optical plates and tray/retainer assemblies. To remove the cap or cap strip:
MicroAmp® Cap Installing Tool
Grooved side for flat cap strips
Recessed cups for rounded cap strips

30 Getting Started with QuantStudio™ 6 and 7 Flex Real-Time PCR System Software Experiments
Chapter 1 General Experiment Information and InstructionsStart the experiment1
1. Insert the small protrusions on the side of the Cap Installing Tool under the webbing between the caps on a cap strip.
2. Slowly pry the strip from the plate or Tray/Retainer assembly.
Start the experiment
To start an experiment:
1. Prepare the instrument for use as shown below.
2. Load the reaction plate or array card into the instrument, as shown on page 33.
3. Run the experiment as shown on page 34.
Prepare the
instrument for use
Start the QuantStudio™ 6 or 7 Instrument
1. Touch anywhere on the touchscreen to determine if the QuantStudio™ 6 or 7 Instrument is in standby mode. Does the touchscreen display the Standby screen after you touch it?
• Yes – The instrument is ready for use. Go to step 3 below.• No – Go to step 2 to power on the instrument.
2. Toggle the power button on the rear of the QuantStudio™ 6 or 7 Instrument, then wait for it to start.
The QuantStudio™ 6 or 7 Instrument is ready to use when the touchscreen displays the Main Menu.
3. Power on the monitor.
4. Power on the computer:
PWR
F1
F2
Ethernet
USB1
USB2 RS232
PWR

31Getting Started with QuantStudio™ 6 and 7 Flex Real-Time PCR System Software Experiments
Chapter 1 General Experiment Information and InstructionsStart the experiment 1
a. Press the computer power button, then wait for it to start.
b. When the Login screen appears, enter your user name and password, then click OK.
5. Start the QuantStudio™ 6 and 7 Flex Software:
a. From the desktop, double-click QuantStudio™ 6 and 7 Flex Software.
Note: If the shortcut is not present on the desktop, select Start� All Programs�Applied Biosystems�QuantStudio™ 6 and 7 Flex Software �QuantStudio™ 6 and 7 Flex Software to start the software.
IMPORTANT! If the QuantStudio™ 6 and 7 Flex Software will not start, confirm that no other instances of the instrument control software are open. If any instance of the software is open, close it before starting the QuantStudio™ 6 and 7 Flex Software.
b. From the Login dialog box, enter your user name and password, then click Log In.
Note: If the QuantStudio™ 6 and 7 Flex Software displays the License Central screen after you log into the software, your license file may be corrupt. Contact Life Technologies support to obtain a replacement license file.
Add the instrument to the My Instruments group
Before you can use the QuantStudio™ 6 or 7 Instrument, you must add the instrument to the “My Instruments” group in the QuantStudio™ 6 and 7 Flex Software.
1. Power on the instrument and start the software as explained in “Start the QuantStudio™ 6 or 7 Instrument” on page 30.
2. From the QuantStudio™ 6 and 7 Flex Software Home tab, click Instrument Console.
3. From the Instrument Console, confirm the instrument state:
a. Confirm that the instrument icon appears in the My Instruments group.

32 Getting Started with QuantStudio™ 6 and 7 Flex Real-Time PCR System Software Experiments
Chapter 1 General Experiment Information and InstructionsStart the experiment1
b. Confirm that a green check box appears in the upper-right corner of the instrument icon.
4. If your instrument does not appear within the My Instruments group, add it as follows:
a. From the Instrument Console, select your QuantStudio™ 6 or 7 Instrument from the list of instruments on the network.
b. Click Add to My Instruments.
Note: The details for a QuantStudio™ 6 or 7 Instrument in the My Preferred list can be exported even if the network connection has been interrupted. The exported details from the disconnected instrument would contain the data most recently downloaded from the instrument before the interruption.
Enable or change the Notification Settings
You can configure the QuantStudio™ 6 and 7 Flex Software to alert you by email when the QuantStudio™ 6 or 7 Instrument begins and completes a run, or if an error occurs during a run.
Note: For details on using the Notification Settings feature, refer to the instrument user guide.

33Getting Started with QuantStudio™ 6 and 7 Flex Real-Time PCR System Software Experiments
Chapter 1 General Experiment Information and InstructionsStart the experiment 1
Load the reaction
plate or array card
into the instrument
CAUTION! PHYSICAL INJURY HAZARD. During instrument operation, the temperature of the sample block(s) can exceed 100°C. Keep your hands away until the sample block(s) reaches room temperature.
IMPORTANT! Wear powder-free gloves when you handle the reaction plate or array card.
IMPORTANT! Plates and array cards should be loaded and unloaded by operators who have been warned of the moving parts hazard and have been adequately trained.
1. Eject the QuantStudio™ 6 or 7 Instrument tray by doing either of the following:• From the QuantStudio™ 6 or 7 Instrument touchscreen, touch . • From the QuantStudio™ 6 and 7 Flex Software, select Instrument �Instrument Console, select your instrument icon, then click Open Door.
2. Load the reaction plate or array card into the plate adapter. When you load the reaction plate or array card, ensure that:
• Well A1 is positioned at the top-left of the tray for any of the plate formats.• The barcode (for any of the plate formats) is facing the front of the
instrument.
• If using reaction tubes or tube strips, make sure you use adaptors. The adaptors are attached to the plate transport arm. The tray containing the tubes or tube strips must be placed on the adaptor and not into the sample block directly.
IMPORTANT! For optimal performance with partial loads, load at least 16 tubes in one of the following arrangements. You can load empty tubes if you do not have enough reaction volume to load the required number of tubes:Adjacent columns of 8 tubes, using rows A through H. For example, use wells in columns 6 and 7 (rows A through H).OrAdjacent rows of 8 tubes, using columns 3 through 10. For example, use wells in row D (columns 3 through 10) and row E (columns 3 through 10).
3. Close the QuantStudio™ 6 or 7 Instrument tray by doing either of the following:• From the instrument touchscreen, touch .• From the Instrument Console screen, click Close Door.

34 Getting Started with QuantStudio™ 6 and 7 Flex Real-Time PCR System Software Experiments
Chapter 1 General Experiment Information and InstructionsStart the experiment1
Start the
experiment
IMPORTANT! Ensure that instrument calibration is up-to-date. If a calibration has expired, you will get a warning when you start a run. For information on calibrating the QuantStudio™ 6 or 7 Instrument, refer to instrument user guide.
IMPORTANT! Do not attempt to open the access door during the run. The door is locked while the QuantStudio™ 6 or 7 Instrument is in operation.
Note: Ensure each experiment name is unique. If you have named two different experiments with the same name, you cannot run them on the same instrument. You will receive the following error message when attempting to start the run:
If you do not want to delete the existing experiment, rename the duplicate experiment and then proceed to the run.
You can run the experiment in either of the following two ways:
• Start the experiment from the QuantStudio™ 6 and 7 Flex Software• Start the experiment from the QuantStudio™ 6 or 7 Instrument touchscreen
Note: The example experiments in each of the getting started guide booklets start a run from the QuantStudio™ 6 and 7 Flex Software.
Start the experiment from the QuantStudio™ 6 and 7 Flex Software
1. In the QuantStudio™ 6 and 7 Flex Software, click Run in the navigation pane.
IMPORTANT! Ensure that the *.eds file you created is open before you start a run.
2. Click START RUN. Select the instrument for the run from the My Instruments drop-down menu.
IMPORTANT! If the preferred instrument for running the experiment is not present under My Instruments or the custom group, or if it is unavailable, clicking START RUN does not display instrument names in the drop-down menu. See “Add the instrument to the My Instruments group” on page 31 for instructions on adding an instrument to the My Instruments group.

35Getting Started with QuantStudio™ 6 and 7 Flex Real-Time PCR System Software Experiments
Chapter 1 General Experiment Information and InstructionsStart the experiment 1
Start the experiment from the QuantStudio™ 6 or 7 Instrument touchscreen
1. Touch the QuantStudio™ 6 or 7 Instrument touchscreen to awaken it.
Note: If the touchscreen is not at the Main Menu screen, touch .
2. In the Main Menu screen, touch Browse Experiments.
3. In the Browse screen, touch Folders, to display the folders containing the experiment setup files.
4. Touch any of the folder names to display the experiments in that folder.
Note: You can create and save new experiments from the QuantStudio™ 6 or 7 Instrument touchscreen, or transfer experiments created and saved in the QuantStudio™ 6 and 7 Flex Software to folders in the QuantStudio™ 6 or 7 Instrument touchscreen via a USB flash drive.
5. In the Experiments screen, select the desired experiment, then: to view or edit the experiment before starting the run.
• Touch View/Edit, then go to step 6 to view or edit the experiment before starting the run.
• Touch Save and Start Run, then go to step 7 to start the run immediately.
6. (Optional) Modify the experiment parameters as needed.
a. In the Edit Experiment screen, you can use the:• Add and Delete buttons to add and delete a stage or
step to the thermal profile.• Add Melt Curve button to add a melt curve to the thermal
profile.• Save button to save the experiment you modify.
b. In the Save Experiment screen, touch each field to edit the:• Experiment name• Folder to save the experiment• Reaction volume• Barcode Number• Notes
When finished, touch Save & Start Run to start the experiment.
7. In the Start Run screen, touch each field as needed to modify the associated parameter, then touch Start Run Now to start the experiment.
Monitor the
experiment
Note: If the connection between the QuantStudio™ 6 and 7 Flex Software and the QuantStudio™ 6 or 7 Instrument is disrupted while running an experiment, remove and then add the instrument to the My Instruments list in the Instrument Console. You may then resume monitoring the experiment.

36 Getting Started with QuantStudio™ 6 and 7 Flex Real-Time PCR System Software Experiments
Chapter 1 General Experiment Information and InstructionsStart the experiment1
You can monitor an experiment run in three ways:
• From the Run screen of the QuantStudio™ 6 and 7 Flex Software, while the experiment is in progress, as shown below.
• From the Instrument Console of the QuantStudio™ 6 and 7 Flex Software (to monitor an experiment started from another computer or from the QuantStudio™
6 or 7 Instrument touchscreen) as described in “From the QuantStudio™ 6 and 7 Flex Software Instrument Console” on page 36.
• From the QuantStudio™ 6 or 7 Instrument touchscreen, as described in “From the QuantStudio™ 6 or 7 Instrument touchscreen” on page 40.
From the QuantStudio™ 6 and 7 Flex Software Run screen
1. Click Amplification Plot from the Run Experiment Menu to monitor the amplification plot of the experiment you are running.
Note: For Melt Curve experiments, click Melt Curve Plot from the Run Experiment Menu.
2. Click Temperature Plot from the Run Experiment Menu to monitor the temperature plot of the experiment you are running.
From the QuantStudio™ 6 and 7 Flex Software Instrument Console
1. In the Instrument Console screen, select the icon of the instrument that you are using to run the experiment.
2. Click Manage Instrument.
3. On the Instrument Manager screen, click Monitor Running Instrument.
You can view the progress of the run in real time from the Run screen. During the run, periodically view the Amplification Plot, Temperature Plot and Run Method (see page 37, 38, and 38 respectively) available from the QuantStudio™ 6 and 7 Flex Software for potential problems.
To… Action
Stop the run • In the QuantStudio™ 6 and 7 Flex Software, click STOP RUN.
• In the Stop Run dialog, click one of the following:– Stop Immediately to stop the run immediately.– Stop after Current Cycle/Hold to stop the run after
the current cycle or hold.– Cancel to continue the run.
View amplification data in real time
Select Amplification Plot.
See “To monitor the Amplification Plot” on page 37.
View temperature data for the run in real time
Select Temperature Plot.
See “To monitor the Temperature Plot” on page 38.
View progress of the run in the Run Method screen
Select Run Method.
See “To monitor the Run Method” on page 38.

37Getting Started with QuantStudio™ 6 and 7 Flex Real-Time PCR System Software Experiments
Chapter 1 General Experiment Information and InstructionsStart the experiment 1
Note: The individual experiment booklets provide illustrations of the different experiments in real time.
Note: For Melt Curve experiments, click Melt Curve Plot from the Run Experiment Menu.
The following is an image of the Run screen for a Standard Curve experiment:
To monitor the Amplification Plot
To view data in the Amplification Plot, click Amplification Plot from the Run Experiment Menu, select the Plate Layout tab, then select the wells to view.
The Amplification Plot screen allows you to view sample amplification as your instrument collects fluorescence data during a run. If a method is set up to collect real-time data, the Amplification Plot screen displays the data for the wells selected in the Plate Layout tab. The plot contrasts normalized dye fluorescence (�Rn) and cycle number.
The Amplification Plot screen is useful for identifying and examining abnormal amplification, including:
• Increased fluorescence in negative control wells.• Absence of detectable fluorescence at an expected cycle (determined from
previous similar experiments run using the same reagents under the same conditions).
Note: If you notice abnormal amplification or a complete absence of fluorescence, refer to the instrument user guide to troubleshoot the error.
Enable/disable the Notification Settings
Select or deselect Enable Notifications.
See “Enable or change the Notification Settings” on page 32.
To… Action

38 Getting Started with QuantStudio™ 6 and 7 Flex Real-Time PCR System Software Experiments
Chapter 1 General Experiment Information and InstructionsStart the experiment1
To monitor the Temperature Plot
To view data in the Temperature Plot screen, click Temperature Plot from the Run Experiment Menu.
During a run, the Temperature Plot screen displays the temperatures of the sample block(s), the heated cover, and samples (calculated) in real-time.
The Temperature Plot screen can be useful for identifying hardware failures. When monitoring the Temperature Plot screen, observe the Sample and Block plots for abnormal behavior.
• The Sample and Block plots should mirror each other approximately. A significant deviation of the plots may indicate a problem.
• The Cover plot should maintain the constant temperature specified in the method. A departure from the constant temperature may indicate a problem.
Note: If you notice abnormal temperatures, refer to the instrument user guide to troubleshoot the error.
To monitor the Run Method
To view data in the Run Method screen, click Run Method from the Run Experiment Menu.
The Run Method screen displays the run method selected for the run in progress. The software updates the Run Status field throughout the run.
To… Action
Add or remove temperature plots Select Cover or Sample Block to view the presence of the associated data in the plot.
Change the time to display in the plot From the View drop-down menu, select the amount of time to display in the plot.
Display a fixed time window during the instrument run
Select Fixed View.
If the entire plot does not fit in the screen, the screen is not updated as the run progresses. For example, if you select 10 minutes from the View drop-down menu, the plot will show data for 10 minutes. If the Fixed View is:• Deselected, the plot updates as the run
progresses even after 10 minutes.• Selected, the plot does not update as the run
progresses even after 10 minutes.
To… Action
Change the number of cycles In the Adjust # of Cycles field, enter the number of cycles to apply to the Cycling Stage.
Add a melt curve stage to the end of the run
Select Add Melt Curve Stage to End.
Add a Hold stage to the end of the run
Select Add Holding Stage to End.

39Getting Started with QuantStudio™ 6 and 7 Flex Real-Time PCR System Software Experiments
Chapter 1 General Experiment Information and InstructionsStart the experiment 1
If an alert appears, click the error for more information and troubleshoot the problem as explained in the QuantStudio™ 6 and 7 Flex Software Help (click or press F1).
Editing the run method during a run
You can edit the run method while an experiment run is in progress on the Run Method screen from the Setup menu.
1. Increase or decrease the number of cycles by entering the cycle number in the Adjust # of Cycles box.
Note: Ensure that you select the stage for which you want to increase or decrease the number of cycles in the graphical view of the run method. The Adjust # of Cycles box appears disabled if the corresponding stage is not selected.
2. Select the appropriate check box to add a melt curve stage, holding stage, or infinite hold stage respectively, to the end of the run.
3. Click Send to Instrument.
Apply your changes Click Send to Instrument.
To… Action

40 Getting Started with QuantStudio™ 6 and 7 Flex Real-Time PCR System Software Experiments
Chapter 1 General Experiment Information and InstructionsStart the experiment1
To view the run data
After a run is complete, you can view a run report by clicking View Run Data. The View Run Data screen displays information about the completed run, as in the following image from a Standard Curve experiment:
The run report data helps in:
• Comparing two experiments of the same type run on two different instruments.• Troubleshooting. For example, after a firmware upgrade, you can compare an
experiment run before and after the upgrade to determine if the upgrade affected performance.
From the QuantStudio™ 6 or 7 Instrument touchscreen
The touchscreen displays the method for the experiment, the date and time at which the run started, the time remaining in the run, and other information.
The run method on the QuantStudio™ 6 or 7 Instrument touchscreen looks like this:
To… Action
Display the time elapsed and the time remaining in the run
Touch the Time View tab, then touch Experiment View tab to return to the Run Method screen.
Stop the run Touch STOP to stop the protocol run immediately.
View the Events Log Touch to view the list of run events that occurred during the run. Touch again to close the event list.

41Getting Started with QuantStudio™ 6 and 7 Flex Real-Time PCR System Software Experiments
Chapter 1 General Experiment Information and InstructionsStart the experiment 1
Experiment View
Time View
Unload the
instrument
When your QuantStudio™ 6 or 7 Instrument displays the Main Menu screen, unload the reaction plate from the instrument and transfer the experiment data to the computer for analysis.
Unload the reaction plate or array card
CAUTION! PHYSICAL INJURY HAZARD. During instrument operation, the temperature of the sample block(s) can exceed 100°C. Allow the consumable to cool to room temperature before removing.

42 Getting Started with QuantStudio™ 6 and 7 Flex Real-Time PCR System Software Experiments
Chapter 1 General Experiment Information and InstructionsStart the experiment1
When the QuantStudio™ 6 or 7 Instrument displays the Main Menu screen, you can unload the plate or array card as follows:
1. After the run, touch on the QuantStudio™ 6 or 7 Instrument touchscreen or click Open Door in the Instrument Console screen of the QuantStudio™ 6 and 7 Flex Software to eject the plate or array card.
2. Remove the reaction plate or array card from the instrument tray and dispose of it according to your laboratory regulations.
3. Touch on the QuantStudio™ 6 or 7 Instrument touchscreen or click Close Door to retract the plate adapter back into the instrument.If the QuantStudio™ 6 or 7 Instrument does not eject the plate, remove the plate as follows:
a. Power off the QuantStudio™ 6 or 7 Instrument.
b. Wait for 15 minutes, then power on the QuantStudio™ 6 or 7 Instrument and eject the plate.
c. If the plate does not eject, power off and unplug the QuantStudio™ 6 or 7 Instrument, then open the access door.
d. Wearing powder-free gloves, reach into the QuantStudio™ 6 or 7 Instrument and remove the plate from the heated cover, then close the access door.
Transfer
experiment results
You can transfer the experiment results in either of the following two ways:
Download the experiment from the QuantStudio™ 6 or 7 Instrument over the
network
When the QuantStudio™ 6 or 7 Instrument completes a experiment without a connection to the QuantStudio™ 6 and 7 Flex Software, the software allows you to download the results from the instrument through the network connection.
1. In the QuantStudio™ 6 and 7 Flex Software, select Instrument � Instrument Console.
2. Select the instrument icon of the QuantStudio™ 6 or 7 Instrument from the My Instruments list, then click Manage Instrument to open the Instrument Manager.
Note: If the Manage Instrument button is inactive, add your QuantStudio™ 6 or 7 Instrument to the My Instruments group as explained in “Add the instrument to the My Instruments group” on page 26.
3. From the Instrument Manager, click Manage Files, then click File Manager.
4. From the File Manager screen, download the file(s):
a. From the Folders field, select the folder that contains the files that you want to download.
b. From the Experiments field, select the files to download. To select multiple files, Ctrl-click or Shift-click files in the list.
c. From the Folders field, select the folder that contains the files that you want to download.
5. From the Save dialog box, select the folder to hold the experiment results and click Save. The experiments folder is located at:
43Getting Started with QuantStudio™ 6 and 7 Flex Real-Time PCR System Software Experiments
Chapter 1 General Experiment Information and InstructionsStart the experiment 1
C:\Applied Biosystems\QuantStudio 6 and 7 Flex Software\User Files\experiments
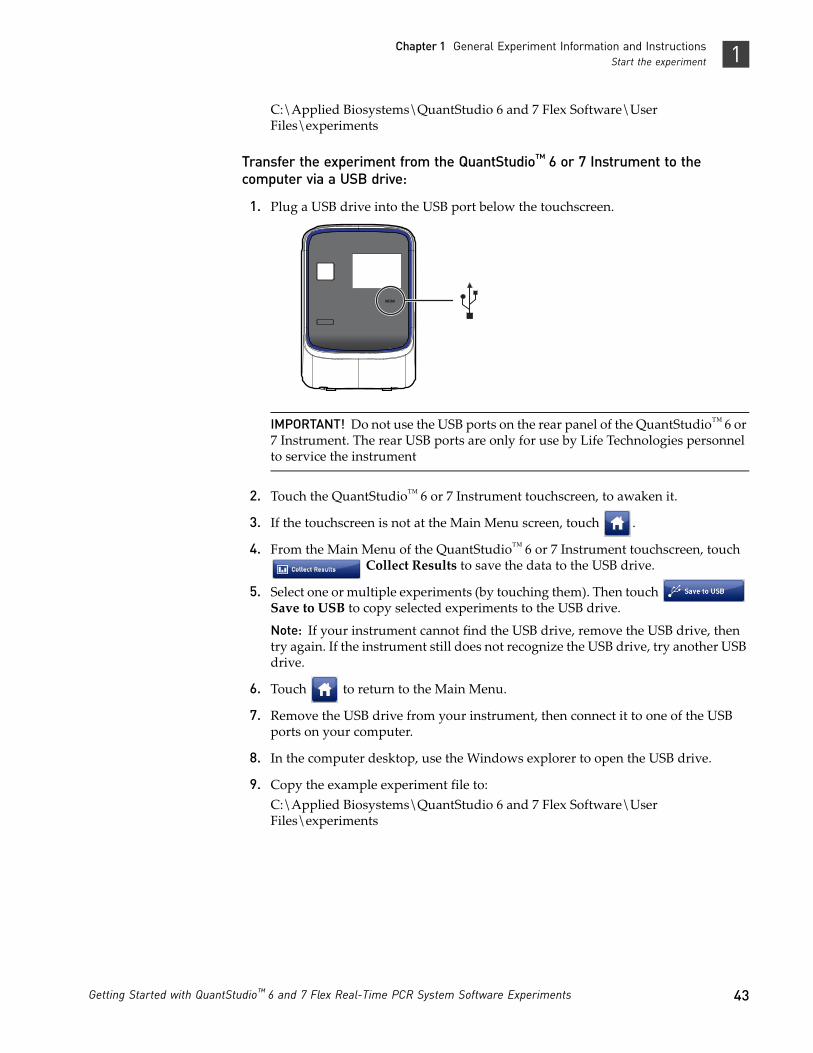
Transfer the experiment from the QuantStudio™ 6 or 7 Instrument to the
computer via a USB drive:
1. Plug a USB drive into the USB port below the touchscreen.
IMPORTANT! Do not use the USB ports on the rear panel of the QuantStudio™ 6 or 7 Instrument. The rear USB ports are only for use by Life Technologies personnel to service the instrument
2. Touch the QuantStudio™ 6 or 7 Instrument touchscreen, to awaken it.
3. If the touchscreen is not at the Main Menu screen, touch .
4. From the Main Menu of the QuantStudio™ 6 or 7 Instrument touchscreen, touch Collect Results to save the data to the USB drive.
5. Select one or multiple experiments (by touching them). Then touch Save to USB to copy selected experiments to the USB drive.
Note: If your instrument cannot find the USB drive, remove the USB drive, then try again. If the instrument still does not recognize the USB drive, try another USB drive.
6. Touch to return to the Main Menu.
7. Remove the USB drive from your instrument, then connect it to one of the USB ports on your computer.
8. In the computer desktop, use the Windows explorer to open the USB drive.
9. Copy the example experiment file to:C:\Applied Biosystems\QuantStudio 6 and 7 Flex Software\User Files\experiments

44 Getting Started with QuantStudio™ 6 and 7 Flex Real-Time PCR System Software Experiments
Chapter 1 General Experiment Information and InstructionsReview experiment results1
Review experiment results
About analysis
results
Immediately after a run, the QuantStudio™ 6 and 7 Flex Software automatically analyzes the data using the default analysis settings, then displays the Amplification Plot screen.
Note: For auto-analysis of data, after a run, go to Tools�Preferences�Experiment and select the Auto Analysis check box.
To reanalyze the data, select all the wells in the plate layout, then click Analyze.
To override
calibration
Each experiment file (.eds) stores the calibration data from the QuantStudio™ 6 or 7 Instrument it was run on. The calibration data can affect the analysis results of an experiment.
If you have run multiple experiments on different QuantStudio™ 6 or 7 Instruments and prefer the analysis results from a particular instrument, then you can choose to use the calibration data from another QuantStudio™ 6 or 7 Instrument.
To use the calibration data of another experiment
1. Open the experiment file (.eds), in which you want to import the calibration data from another QuantStudio™ 6 or 7 Instrument, in the QuantStudio™ 6 and 7 Flex Software.
2. Go to Analysis�Override Calibration �Use Calibration From Another File....
3. Browse to experiment file (.eds) from which you want to use the calibration data.
Note: You can choose to override the calibration data in an experiment with the calibration data of any other experiment type; however the calibration data being used must be from the same instrument type, QuantStudio™ 6 Instrument or the QuantStudio™ 7 Instrument. Calibration data from an experiment in the QuantStudio™ 7 Instrument can be used to override calibration data of an experiment in the QuantStudio™ 6 Instrument, but not vice-versa.
4. Click Open.
To revert to the original calibration data
1. Open the experiment file (.eds), in which you want to import the original calibration data, in the QuantStudio™ 6 and 7 Flex Software.
2. Go to Analysis�Override Calibration �Revert To Original Calibration.

45Getting Started with QuantStudio™ 6 and 7 Flex Real-Time PCR System Software Experiments
Chapter 1 General Experiment Information and InstructionsReview experiment results 1
The experiment file will display analysis results as per the calibration data of the QuantStudio™ 6 or 7 Instrument that the experiment was run on.
To display wells To display specific wells in the analysis plots, select the wells in the Plate Layout tab:
• To select wells of a specific type, use the Select Wells With drop-down menus: Select Sample, Target, or Task, then select the sample, target, or task name.
• To select a single well, click the well in the plate layout.• To select multiple wells, click and drag over the desired wells, press Ctrl-click, or
press Shift-click in the plate layout.• To select all the wells, click the upper left corner of the plate layout.
The following is an image of the plate layout for a Standard Curve experiment:
To display multiple
plots
Use the Multiple Plots View screen to display up to four plots simultaneously. To navigate within the Multiple Plots View screen, from the Experiment Menu pane, select Analysis�Multiple Plots View.
• To display four plots, click Show plots in a 2 ✕ 2 matrix.• Similarly, to display two plots in rows, click Show plots in two rows. and to
display two plots vertically, click Show plots in two columns.• To display a specific plot, select the plot from the drop-down menu above each
plot display.

46 Getting Started with QuantStudio™ 6 and 7 Flex Real-Time PCR System Software Experiments
Chapter 1 General Experiment Information and InstructionsReview experiment results1
The following is an image of the Multiple Plots View screen for a Standard Curve example experiment:
To display an
expanded view of a
plot or wells
• Click to expand the view of a plot, displayed on the left-hand side of the screen.• Click to expand the view of the Plate Layout or Well Table displayed on the
right-hand side of the screen.
To edit plot
properties
Use the Plot Properties dialog box on the Analysis screen to edit plot settings such as the font and color of the plot text, and the labels on the X axis and Y Axis.
1. Click on the Analyze screen (the icon appears above the plot) to open the Plot Properties dialog box
2. Edit the settings under the General, X Axis, and Y Axis tab.• Click the General tab to edit the plot title text, font, or color. You can also
select whether to show the plot title.• Click the X Axis tab to edit the x axis label text, font, or color; select the tick
marks and tick mark labels to display; and select the range to display.• Click the Y Axis tab to edit the y axis label text, font, or color; select the tick
marks and tick mark labels to display; and select the range to display.
3. Click OK.

47Getting Started with QuantStudio™ 6 and 7 Flex Real-Time PCR System Software Experiments
Chapter 1 General Experiment Information and InstructionsExport an experiment 1
To save current
settings as default
You can change the Plot Settings for the different analysis plots, and save them as defaults.
Select the Save current settings as the default check box on the respective plot screens under the Analysis Experiment Menu.
To publish the
analyzed data
Export an experiment
About exporting an
experiment
The Export feature of QuantStudio™ 6 and 7 Flex Software allows you to export:
To... Click
Save a plot as an image file
Print a plot
Copy a plot to the clipboard
Print a report
Export data
To... Go to Then
Print the plate layout File� Print... Select the background color, and click Print
Create slides File� Send to PowerPoint... Select the slides for your presentation, and click Create Slides
Print a report File� Print Report... Select data for the report, and click Print Report
Data type Description
Plate setup files for future experiments Plate setup files contain setup information such as the well number, sample name, sample color, target name, dyes, and other reaction plate contents.

48 Getting Started with QuantStudio™ 6 and 7 Flex Real-Time PCR System Software Experiments
Chapter 1 General Experiment Information and InstructionsExport an experiment1
Export procedure 1. Open the experiment file that contains the data to export, and from the Experiment Menu, click Export.
Note: If you want the data to be exported automatically after analysis, select the Auto Export check box during experiment setup or before running an experiment.
2. Select the format for exported data:• QuantStudio™ 6 and 7 Format - Supports .txt, .xls, and .xlsx data.• QuantStudio™ Dx/ ViiA™ 7 Format - Supports .txt, .xls, and .xlsx data.• 7900 Format - Supports only .txt data, where:
– Single experiments are exported in the SDS 2.4 detector centric export format of the 7900 Sequence Detection System.
– Studies are exported in the SDS 2.3 RQ manager detector centric export format of the 7900 Sequence Detection System
• RDML Format - RDML (Real Time Data Markup Language) - Supports only .xml type of data.
Analyzed data in different formats for further analysis
The data can be exported in the QuantStudio™ 6 and 7 format, QuantStudio™ Dx/ ViiA™ 7 format, the 7900 SDS format, and the RDML format.• The 7900 format is applicable only to
Standard Curve, Relative Standard Curve, Genotyping, Presence/Absence, and Melt Curve experiments.
• The RDML export format is applicable only to Standard Curve, Relative Standard Curve, Comparative CT, and Melt Curve experiments. The RDML format is available only in a single file format.
• For Standard Curve experiments, you can also export the analyzed data from the QuantStudio™ 6 and 7 Flex Software to the external applications, TaqMan® Protein Expression Data Analysis Software and CopyCaller® Software if they are installed on your computer before the QuantStudio™ 6 and 7 Flex Software is installed. The applications appear in the Tools menu.
Gene Expression studies These are used to carry out a comparative analysis.
Data type Description

49Getting Started with QuantStudio™ 6 and 7 Flex Real-Time PCR System Software Experiments
Chapter 1 General Experiment Information and InstructionsExport an experiment 1
3. Select to export all data in one file or in separate files for each data type.• One File - All data types are exported in one file.
– If you select the *.xls format, a worksheet is created for each data type.– If you select the *.txt format, the data are grouped by data type.
• Separate Files - Each data type is exported in a separate file. For example, if you select three different data types Results, Amplification, and Multicomponent to export, three separate files (one each for Results, Amplification, and Multicomponent) are created. You can select the type of file (*.xls, *.xlsx or *.txt) to export from the File Type drop-down menu.
Note: You cannot use an exported *.xls or an *.xlsx file when importing plate setup information.
4. (Optional) Select the Open file(s) when export is complete check box to automatically open the file when export is complete.
5. Enter a file name and location.
a. Enter a name for the export file in the Export File Name field.
b. Enter the Export File Location. Click Browse if you do not want to save the export file in the default export folder.
Note: To set up the Export File Location, go to Tools � Preferences, and select the Export tab. You can select the Use Last File Location or Use Default Folder check box.
6. Select the data to export:
Select... To export...
Sample setup Well, sample name, sample color, and target name of samples in the plate
Raw data Raw fluorescence data for each filter, for each cycle
Amplification data Amplification results, such as CT values, Rn, or ∆Rn

50 Getting Started with QuantStudio™ 6 and 7 Flex Real-Time PCR System Software Experiments
Chapter 1 General Experiment Information and InstructionsExport an experiment1
Note: Results data are not available for export until the run status is complete and the data are analyzed.
Note: The Technical Replicate Results, Biological Replicates Results, and Clipped Data are available only in Relative Standard Curve and Comparative CT experiments.
7. (Optional) For Standard Curve experiments, select the external application, TaqMan® Protein Expression Data Analysis Software or CopyCaller® Software if either Software is installed on your computer.
Note: For more information on the TaqMan® Protein Expression Data Analysis Software or CopyCaller® Software, contact Life Technologies.
8. (Optional) After you have defined the export properties or after moving the table headings order, you can save those export settings as an export set by clicking Save Export Set As. Later you can import the heading order into another file by clicking Load Export Set.
Note: It is advisable to keep the default order of the table headings if you are using the external Life Technologies applications, TaqMan® Protein Expression Data Analysis Software or CopyCaller® Software for further analysis.
9. Click Start Export.
Multicomponent data Fluorescence data for each dye, for each cycle
Results Results information, such as CT values, Rn, or calls
Technical Replicate Results (Tech. Rep. Results)
Technical replicates information, such as Sample name, Target name, Task, or RQ
Biological Replicate Results (Bio. Rep. Results)
Biological replicates information, such as Biogroup name, Target name, Task, or RQ
Clipped Data Information that is unique to the 7900 format. Data from the last three raw data points per step (clipped from the rest). The three data points are averaged to give you the final fluorescence data value for each step.
Reagent Information Information about the reagent selected for the experiment
Select... To export...

51Getting Started with QuantStudio™ 6 and 7 Flex Real-Time PCR System Software Experiments
Chapter 1 General Experiment Information and InstructionsExport an experiment 1
The following is an image of the Export screen for a Standard Curve experiment:
The following is an image of the exported file when opened in Notepad:

52 Getting Started with QuantStudio™ 6 and 7 Flex Real-Time PCR System Software Experiments
Chapter 1 General Experiment Information and InstructionsExport an experiment1

2
53Getting Started with QuantStudio™ 6 and 7 Flex Real-Time PCR System Software Experiments
Experiment Shortcuts
This chapter provides you with shortcuts to use in the QuantStudio™ 6 and 7 Flex Software after you have learned experiment basics.
You can reuse experiment settings and plate setup information by: directly importing and editing a template, using the QuickStart feature with a template, importing experiment setup information, or importing a sample definition file; you can also prepare several experiments at once or create a new experiment using the ReadiApp feature.
The chapter covers:
■ Using experiment templates . . . . . . . . . . . . . . . . . . . . . . . . . . . . . . . . . . . . . . . . . . . . 53
■ Run an experiment with QuickStart . . . . . . . . . . . . . . . . . . . . . . . . . . . . . . . . . . . . . 57
■ Import plate setup for an experiment . . . . . . . . . . . . . . . . . . . . . . . . . . . . . . . . . . . . 58
■ Import sample information. . . . . . . . . . . . . . . . . . . . . . . . . . . . . . . . . . . . . . . . . . . . . 59
■ Create an experiment using ReadiApp . . . . . . . . . . . . . . . . . . . . . . . . . . . . . . . . . . . 62
Using experiment templates
You can use a template (.edt) to create a new experiment. Templates are useful when you want to create many experiments with the same experiment parameters.
You can create an experiment from a template from the QuantStudio™ 6 and 7 Flex Software and from the QuantStudio™ 6 or 7 Instrument touchscreen.
Note: To access the QuantStudio™ 6 and 7 Flex Software example templates, navigate to the templates folder located at <drive>:\Program Files\Applied Biosystems\QuantStudio 6 and 7 Flex Software\examples\User Sample Files.where, <drive> is the computer hard drive on which the QuantStudio™ 6 and 7 Flex Software is installed. The default installation drive for the software is the C: drive.
To create a
template
1. Log in to the QuantStudio™ 6 and 7 Flex Software and, from the Home screen, open an existing experiment, or create a new experiment.
Note: To create a new experiment using the Experiment Setup, see “Set up an experiment” on page 12.
2. Select File�Save As Template.
Note: The information saved in a template includes plate setup information (defined targets and samples, plate assignment of targets and samples), reagent information, thermal protocol, and analysis settings such as quantification cycling method.
3. Enter a file name, select a location for the template, then click Save and Close.You can use that experiment as a template for similar experiments.

54 Getting Started with QuantStudio™ 6 and 7 Flex Real-Time PCR System Software Experiments
Chapter 2 Experiment ShortcutsUsing experiment templates2
To create a new
experiment using a
template
1. From the Home screen, click Template.
2. Locate and select the template file, then click Open.A new experiment is created using the setup information from the template.
3. Confirm that the following are correct before you prepare the reactions and run the experiment:
• Experiment properties (experiment name, experiment type, block type, reagent, run properties)
• Plate definitions (targets, samples, and biological replicates)• Plate assignments (targets, samples, and biological replicates)• Run method (thermal protocol)
4. Proceed to preparing reactions, running the experiment, and analyzing the data.
To create an
experiment using a
template on the
QuantStudio™ 6 or
7 Instrument
touchscreen
You can run experiments using templates from the QuantStudio™ 6 or 7 Instrument touchscreen by importing the templates from the QuantStudio™ 6 and 7 Flex Software instrument console or a USB drive. You can also modify the experiment parameters in the templates as per your requirement.
To edit a template before running the experiment
1. Touch New on the View Templates screen to create a new experiment from the existing template.
Note: Select a template before you touch New.
2. Edit the experiment parameters in the Create New Experiment screen.
3. Touch Save & Exit to save and exit the experiment or touch Save & Start Run to save and start an experiment run.
To run a pre-existing template
1. Touch View Templates on the Home screen of the QuantStudio™ 6 or 7 Instrument touchscreen.
2. Select a pre-existing template from the templates list on the View Templates screen.
3. Touch View to see the run profile before you start a run.
4. After confirming the template setup is correct, touch to go back to View Templates screen. Touch Start Run.

55Getting Started with QuantStudio™ 6 and 7 Flex Real-Time PCR System Software Experiments
Chapter 2 Experiment ShortcutsUsing experiment templates 2
Use a template to
create a batch of
experiments
Use the batch experiment utility to create multiple experiment files from the same template without using Experiment Setup.
1. In the menu bar, select Tools � Batch Experiment Setup. The following is an image of the Batch Experiment Setup Utility dialog box:
2. Select the file(s) to use to create the new experiments:
a. Click Browse in the Experiment Template File field.
Note: To use one of the example setup files, browse to <drive>:\Program Files\Applied Biosystems\QuantStudio 6 and 7 Flex Software\examples\User Sample Files
b. Locate an *.edt file to import, then click Select.
c. (Optional) Repeat steps 2a and 2b for the remaining setup file types to import (Assay Information File (*.txt or *.xml), Plate Setup File (*.txt)).

56 Getting Started with QuantStudio™ 6 and 7 Flex Real-Time PCR System Software Experiments
Chapter 2 Experiment ShortcutsUsing experiment templates2
3. Select the option to create experiment files. The selected option determines the number of experiment files created:
• Specify Number of Files - Enter a number from 1 to 100.• Barcode - Click Browse and select a Barcode File (*.txt) to import. The
software automatically adds the Plate Barcode attribute to the file name format. The number of experiments created equals the number of barcodes present in the barcode file.
Note: A Barcode File contains one barcode per line. An example Barcode File looks like the following image:
4. (Optional) Edit the file name format. Use the File Name Preview to verify your settings.
• Select the check box to include or exclude the Custom Name Field attribute from the file name. If included, click the Custom Name Field and enter up to 100 letters and/or numbers to identify the batch of experiments.
Note: The file name can contain a total of 100 characters, including all file name attributes.
• Click Move Up or Move Down to change the order of the selected file name attributes.
5. Select the location for the experiment files to be created:
a. Click Browse in the Export Setup Files to: field.
b. Review the location for the experiment files. Navigate to a new location if you do not want to export the experiment files to that folder, then click Select.
6. Click Create Experiments. A confirmation message appears when the batch of experiments has been created.

57Getting Started with QuantStudio™ 6 and 7 Flex Real-Time PCR System Software Experiments
Chapter 2 Experiment ShortcutsRun an experiment with QuickStart 2
Run an experiment with QuickStart
You can use a template to run an experiment with the QuantStudio™ 6 and 7 Flex Software QuickStart feature:
QuickStart from
the QuantStudio™ 6
and 7 Flex
Software
1. Prepare the reactions.
2. Log in to the QuantStudio™ 6 and 7 Flex Software and, from the Home screen, click QuickStart to access the QuickStart dialog box.
3. In the QuickStart dialog box, enter or select the:
a. Instrument icon of the instrument to perform the run on.
b. Experiment name.
c. Experiment template file.
d. (Optional) Barcode and User Name for the experiment.
4. (Optional) To review the experiment or to make changes to any of the experiment parameters, click Experiment Setup.The following is an image of the QuickStart dialog box:
5. Proceed to running the experiment and analyzing the data.

58 Getting Started with QuantStudio™ 6 and 7 Flex Real-Time PCR System Software Experiments
Chapter 2 Experiment ShortcutsImport experiment setup2
QuickStart from
the QuantStudio™ 6
or 7 Instrument touchscreen
You can QuickStart an experiment from the QuantStudio™ 6 or 7 Instrument touchscreen in the following ways:
• Start an experiment using a pre-defined template.• Start an experiment with a pre-defined short-cut button.
Start an experiment using a pre-defined template
You can use a pre-existing template from the default experiments folder or use a custom template from another folder to start a run.
Start an experiment with a pre-defined short-cut button
The QuantStudio™ 6 or 7 Instrument touchscreen displays up to 18 shortcut buttons to templates or folders that contain experiments to be run. The shortcut buttons are present under MY SHORTCUTS on the Home screen. To start a run, touch any of the pre-defined experiment or folder buttons.
To create a shortcut button for a preferred experiment or a folder that contains experiments:
1. Touch Settings to open the Settings Menu.
2. Touch Set Up Shortcuts to list the Shortcut Targets.
3. On the Shortcut Targets list screen, select an existing template Shortcut Target button or an unused button.
4. Touch Set Shortcut. If you selected an unused button, then touching Set Shortcut will list out the templates and folders to set the shortcut for.
5. Under the From Templates tab, select the templates for which you are creating the shortcut button.
6. (Optional) Create a shortcut button to show the templates or experiments in a particular folder for quick access, from those listed under the From Folders tab. You can touch Edit to create or edit shortcut buttons.
Import experiment setup
Import plate setup
for an experiment
You can import the plate setup for a new experiment from an exported file with one of the following formats:
• *.txt - Text format• *.xml - XML format• *.csv - Comma separated values format• *.eds - EDS file format• *.edt - EDS template files format• *.sdt - Sequence Detection System (SDS) template files format• *.sds - 7900 v2.4 format
IMPORTANT! Make sure the file you select contains only plate setup data and that the experiment types match.

59Getting Started with QuantStudio™ 6 and 7 Flex Real-Time PCR System Software Experiments
Chapter 2 Experiment ShortcutsImport experiment setup 2
Note: For instructions on exporting an experiment, see “Export an experiment” on page 47.
To Import the plate setup data:
1. Create a new experiment or open an existing experiment.
2. In the Experiment Setup screen, select File�Import Plate Setup or access the Import drop-down menu in the toolbar and select Import Plate Setup.
3. Click Browse, locate and select the file to import, then click Select.
Note: To use one of the example setup files, browse to C:\Program Files\Applied Biosystems\QuantStudio 6 and 7 Flex Software\examples\User Sample Files
4. Click Start Import. The setup data from the exported text file is imported into the open experiment.
Note: If your experiment already contains plate setup information, the software asks if you want to replace the plate setup with the data from the import file. Click Yes to replace the plate setup.
5. After importing plate setup information, use Experiment Setup to set up your experiment, and then run the experiment.
Note: You can import plate setup information from a 96-well plate into a 384-well plate, provided that the file you are importing the information from is a .txt file.
Import sample
information
You can import sample information from a sample definition file to include in the plate setup for your experiment. A sample definition file is a comma-delimited file (*.csv) or a tab-delimited text file (*.txt) that contains the following setup information: well number, sample name, and custom sample properties.
Note: Make sure that the sample definition file you select contains only sample information.
Create a sample definition file
1. Open a text editing program such as Notepad.
2. Enter the following column headers in the first row (press the Tab key between each entry if you are saving the file as *.txt or enter a comma between each entry if you are saving the file as *.csv):
• Well• Sample Name• (Optional) Column header names for up to 32 user-defined custom fields (for
example, Custom 1, Custom 2, etc.)

60 Getting Started with QuantStudio™ 6 and 7 Flex Real-Time PCR System Software Experiments
Chapter 2 Experiment ShortcutsImport experiment setup2
3. For each subsequent row, enter the well number, press the Tab key or enter a comma, then enter the sample name. Optionally, press the Tab key, then enter the custom properties for the sample.
4. Save the file with the .txt or .csv file extension.An example sample definition, saved with the .csv extension, file looks like this:
Import sample information from a sample definition file
1. Create a new experiment or open the experiment to receive the setup data (select File�Open, select the file to open, then click Open).
2. From the open experiment, select File�Import Plate Setup.
3. Click Browse to browse your computer for a sample definition text file (*.csv). After you locate the file and select it, click Select.
Note: To use one of the example setup files, browse to C:\Program Files\Applied Biosystems\QuantStudio 6 and 7 Flex Software\examples\User Sample Files
4. Click Start Import.
5. If your experiment already contains plate setup information, the software asks you if you want to replace the plate setup with the data from the file. Click Yes to replace the plate setup information.
The samples appear in the Samples table for the experiment. All samples and well assignments in the experiment are replaced with those in the file. If defined, the custom sample properties also appear in the Well Table of the Analysis Section, and also in the Plate Layout tooltips in both the Setup and Analysis screens. The custom fields can be exported with the results data.
Note: You cannot edit the custom sample properties from within the Well Table. To modify this information, edit the custom fields in the sample definition file and import the file again. All of the sample information in the experiment is replaced with the information in the new file.

61Getting Started with QuantStudio™ 6 and 7 Flex Real-Time PCR System Software Experiments
Chapter 2 Experiment ShortcutsImport experiment setup 2
The following is an image of the Assign screen with information from the above sample definition file:
The following is an image of the Well Table in the Analysis section:

62 Getting Started with QuantStudio™ 6 and 7 Flex Real-Time PCR System Software Experiments
Chapter 2 Experiment ShortcutsCreate an experiment using ReadiApp2
Create an experiment using ReadiApp
You can use the ReadiApp feature to set up an experiment in the QuantStudio™ 6 and 7 Flex Software. The ReadiApp feature provides a shortcut to create experiments for the assays purchased from Life Technologies.
The default ReadiApp templates available in the QuantStudio™ 6 and 7 Flex Software include:
• TaqMan® Gene Signature Array Cards• Custom TaqMan® Array Cards• TaqMan® Gene Expression Assays• TaqMan® Drug Metabolism Assays• TaqMan® Array MicroRNA Cards• TaqMan® Copy Number Assays (CNV)• TaqMan® SNP Genotyping Assays
1. Log in to the QuantStudio™ 6 and 7 Flex Software and, from the Set Up menu on the Home screen, click ReadiApp.
2. Click the assay to use to set up an experiment.
Note: Click Cancel to exit the ReadiApp dialog box.
A new experiment is created using the setup information from the template.
3. (Optional) Edit the experiment properties.
4. Proceed to preparing reactions, running the experiment, and analyzing the data.

63Getting Started with QuantStudio™ 6 and 7 Flex Real-Time PCR System Software Experiments
Numerics7900 Format 48
Aarray card, filling and sealing 25assigning targets, samples, and biological replicate
groups 16, 19auto-analysis 44
Bbatch experiment utility 55batch of experiments, from template 55biological replicates
assigning 17, 19defining 15
block type384-Well Block 1296-Well Block (0.2mL) 13Array Card Block 12Fast 96-Well Block (0.1mL) 13
Ccolumn in .xls file
Well Number 19Well Position 19
comma delimited file 59custom task name, defining 16
Ddata collection options, settings
Amplification 13Post-PCR Read 13Pre-PCR Read 13
default reporter 15default run method 20defining custom task name 16defining instrument run properties 13defining run method 20defining targets, samples, and biological replicates 15dilutions
guidelines for preparing 23materials for preparing 22
Eentering reagent information 14
experimentexporting 47preparing reactions 22reviewing results 44setting up 12shortcuts 53start 34starting 30
experiment name 12experiment properties, defining 12experiment setup, import 58experiment templates, using 53experiment type 13
Comparative CT (��CT) 13Genotyping 13Melt Curve 13Presence/Absence 13Relative Standard Curve 13Standard Curve 13
experiment, starting 34export data type
Amplification data 49Biological Replicate Results (Bio. Rep. Results) 50Clipped Data 50Multicomponent data 50Raw data 49reagent information 50Results 50Sample setup 49Technical Replicate Results (Tech. Rep.
Results) 50exporting
exporting experiments 47saving export data as 50selecting export data 49
Hheated cover 38
Iimport experiment setup 58importing experiment data
plate setup 58sample information 59
installation CD 6instrument
adding to My Instruments 31
Index

64 Getting Started with QuantStudio™ 6 and 7 Flex Real-Time PCR System Software Experiments
Index
preparation for use 30preparing for use 30
instrument run properties, defining 13instrument type
QuantStudio 6 Flex System 12QuantStudio 7 Flex System 12
instrument, starting 30
Mmaterials for dilutions
master mix 23melt curve 13monitoring the experiment 35multiple plots, displaying 45My Instruments group 31
Nnotification settings, enable or change 32NULL, values in well assignments 19
Ooptical adhesive film 23overriding calibration data 44
Ppassive reference 16PCR Stage, editing during experiment design 20plate adapter 33plate setup data, importing 58plot properties 46preparing instrument for use 30
QQuantStudio™ Dx/ ViiA™ 7 Format 48quencher 15QuickStart 53, 57
Rramp speed 13RDML Format 48reaction plate, sealing 23reaction tubes and strips, capping and uncapping 28reactions
precautions 22
preparing 22reagent
information 14selection 13
reagent information, entering 14reagent, selecting 13reagents, selecting
supported reagents 22SYBR® Green Reagents 13TaqMan® Reagents 13
reporter 15results, reviewing 44roller assembly 27run properties, defining 20Run screen 36
View Run Data 40
Ssample block(s) 38sample definition file, creating 59sample information, importing 59samples
assigning 17, 19defining 15
selecting reagents 13shortcuts, experiments 53starting the experiment 34starting the instrument 30storage conditions, photosensitive 28system security 9
Ttab-delimited text file, for sample definitions 59targets
assigning 16, 19defining 15
templatecreating batch of experiments from template 55
thermal profile 20transferring experiment results 42
Uunloading an experiment 41USB
drive 43

65Getting Started with QuantStudio™ 6 and 7 Flex Real-Time PCR System Software Experiments
Wwells, displaying 45

Headquarters
5791 Van Allen Way | Carlsbad, CA 92008 USA | Phone +1 760 603 7200 | Toll Free in USA 800 955 6288
For support visit lifetechnologies.com/support or email [email protected]
lifetechnologies.com
October 2013