qualys consulting edition getting started guidequalys consulting edition provides consultants,...
TRANSCRIPT

Consulting EditionGetting Started Guide
April 29, 2019
Verity Confidential

Copyright 2018-2019 by Qualys, Inc. All Rights Reserved.
Qualys and the Qualys logo are registered trademarks of Qualys, Inc. All other trademarks are the property of their respective owners.
Qualys, Inc. 919 E Hillsdale Blvd 4th Floor Foster City, CA 94404 1 (650) 801 6100

3
Table of Contents
Welcome to the Qualys Consulting Edition .............................................. 4About Qualys ........................................................................................................................... 4Contact Qualys Support.......................................................................................................... 4
Get Started ........................................................................................................ 5Define networks....................................................................................................................... 5Add assets ................................................................................................................................ 6Create asset groups (manage networks from here)............................................................. 7Add a Virtual Scanner Appliance .......................................................................................... 7Configure scan settings ........................................................................................................ 10Setup host authentication.................................................................................................... 10Run/Schedule scans .............................................................................................................. 11PCAP Scans............................................................................................................................. 15Discover Your Network......................................................................................................... 16
Deploy Cloud Agents................................................................................... 20Overview................................................................................................................................. 20What do I need to know?...................................................................................................... 20Get Started ............................................................................................................................. 21
Analyze, Query & Report ............................................................................. 25How to Query Assets ............................................................................................................. 25
View Asset Details anytime ........................................................................................... 26Save Query....................................................................................................................... 26Download and export results ........................................................................................ 26Create widget................................................................................................................... 27
Create Reports ....................................................................................................................... 28Review Certificates and SSL Grade...................................................................................... 31
PCI Compliance .............................................................................................. 32PCI Scan Requirements......................................................................................................... 32PCI Readiness Reports........................................................................................................... 32What are the steps? .............................................................................................................. 33
Wait, there’s more! ....................................................................................... 34Policy Compliance ................................................................................................................. 34Web Application Scanning ................................................................................................... 34Self Assessment Questionnaire ........................................................................................... 34Qualys API .............................................................................................................................. 34

4
Qualys Consulting EditionWelcome to the Qualys Consulting Edition
Welcome to the Qualys Consulting EditionQualys Consulting Edition provides consultants, auditors, and managed service providers (MSPs) with the ease of use, scalability, precision and centralized management of the Qualys Cloud Platform. This guide is intended to highlight the unique features of the Qualys Consulting Edition and walk you through the initial set up steps.
About QualysQualys, Inc. (NASDAQ: QLYS) is a pioneer and leading provider of cloud-based security and compliance solutions. The Qualys Cloud Platform and its integrated apps help businesses simplify security operations and lower the cost of compliance by delivering critical security intelligence on demand and automating the full spectrum of auditing, compliance and protection for IT systems and web applications.
Founded in 1999, Qualys has established strategic partnerships with leading managed service providers and consulting organizations including Accenture, BT, Cognizant Technology Solutions, Deutsche Telekom, Fujitsu, HCL, HP Enterprise, IBM, Infosys, NTT, Optiv, SecureWorks, Tata Communications, Verizon and Wipro. The company is also a founding member of the Cloud Security Alliance (CSA). For more information, please visit www.qualys.com.
Contact Qualys SupportQualys is committed to providing you with the most thorough support. Through online documentation, telephone help, and direct email support, Qualys ensures that your questions will be answered in the fastest time possible. We support you 7 days a week, 24 hours a day. Access support information at www.qualys.com/support/.

Qualys Consulting EditionGet Started
Get StartedThe main addition to the Qualys Consulting Edition is the Networks feature, which is the cornerstone of multi-tenancy within the platform. Because of this, the first step when starting with Consulting Edition is to add a network for your clients. This feature silos network space for your individual clients and prevents the overlapping of data for assets which share the same IP address. Generally, this is only necessary for client engagements in which you are performing an ongoing assessment.
The Clients Tab associates individual scan instances with the applicable client. This will aid in keeping data organized between all your clients and is especially useful for clients who require ad hoc or periodic scans.
Here’s the starting workflow of the platform:
Define networks
Add assets
Create asset groups (manage networks from here)
Add a Virtual Scanner Appliance
Configure scan settings
Setup host authentication
Run/Schedule scans
Define networksConsultants can manage overlapping IP ranges within a single Qualys subscription. Define discrete private networks for each client to keep overlapping blocks isolated from each other. This allows you to easily manage ongoing engagements with clients and track trending information without confusion between environments.
Go to Assets > Networks > New > Network (Manager only), and give your network a friendly name. Save the network. We’ll add appliances to it later.
The Global Default Network is used to scan assets that do not belong to custom networks. Want to scan your network perimeter? You’ll need to choose the Global Default Network.
5
Qualys Consulting EditionGet Started
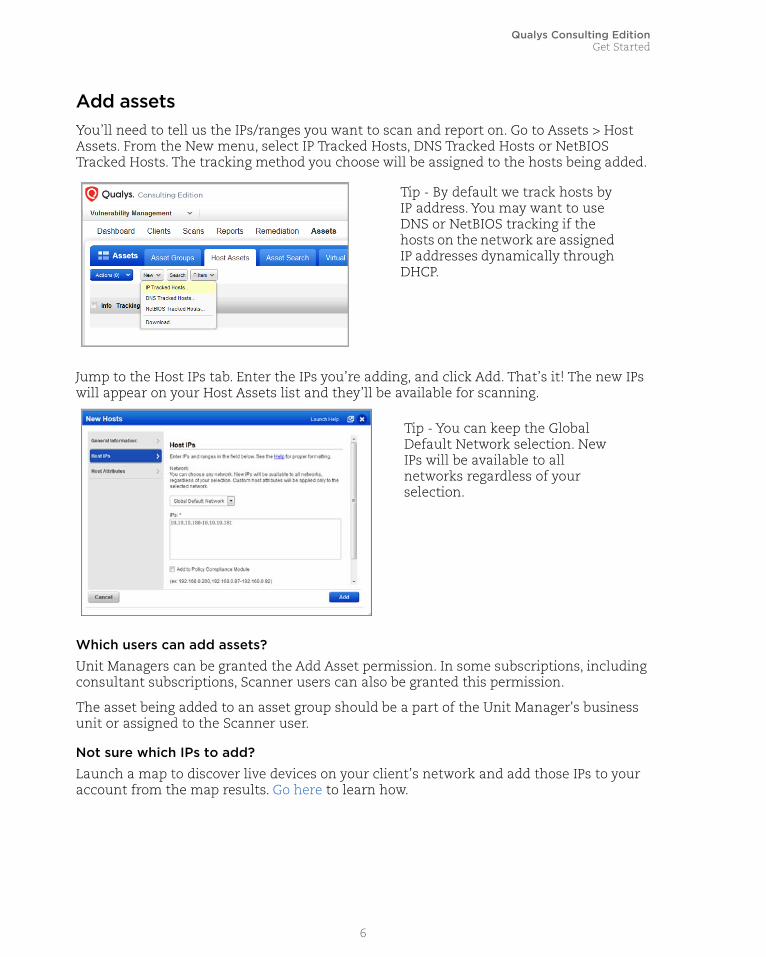
Add assetsYou’ll need to tell us the IPs/ranges you want to scan and report on. Go to Assets > Host Assets. From the New menu, select IP Tracked Hosts, DNS Tracked Hosts or NetBIOS Tracked Hosts. The tracking method you choose will be assigned to the hosts being added.
Jump to the Host IPs tab. Enter the IPs you’re adding, and click Add. That’s it! The new IPs will appear on your Host Assets list and they’ll be available for scanning.
Which users can add assets?
Unit Managers can be granted the Add Asset permission. In some subscriptions, including consultant subscriptions, Scanner users can also be granted this permission.
The asset being added to an asset group should be a part of the Unit Manager's business unit or assigned to the Scanner user.
Not sure which IPs to add?
Launch a map to discover live devices on your client’s network and add those IPs to your account from the map results. Go here to learn how.
Tip - By default we track hosts by IP address. You may want to use DNS or NetBIOS tracking if the hosts on the network are assigned IP addresses dynamically through DHCP.
Tip - You can keep the Global Default Network selection. New IPs will be available to all networks regardless of your selection.
6
Qualys Consulting EditionGet Started
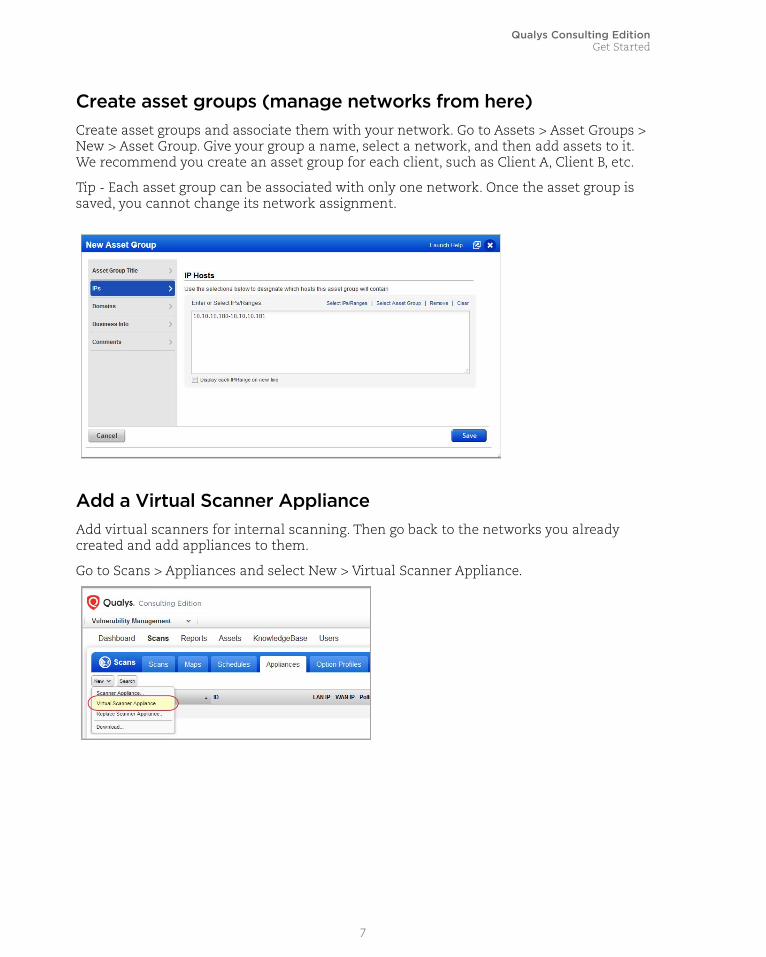
Create asset groups (manage networks from here)Create asset groups and associate them with your network. Go to Assets > Asset Groups > New > Asset Group. Give your group a name, select a network, and then add assets to it. We recommend you create an asset group for each client, such as Client A, Client B, etc.
Tip - Each asset group can be associated with only one network. Once the asset group is saved, you cannot change its network assignment.
Add a Virtual Scanner ApplianceAdd virtual scanners for internal scanning. Then go back to the networks you already created and add appliances to them.
Go to Scans > Appliances and select New > Virtual Scanner Appliance.
7

Qualys Consulting EditionGet Started
Click Start Wizard and we’ll walk you through the steps.
Give your scanner a name, choose a virtualization platform, get your personalization code.
Be sure activation is successfulYour appliance needs to make a connection to our cloud platform. You’ll see the friendly name and IP address when the activation is complete. It may take a few minutes for the appliance activation to occur.
Complete the configuration using the virtual scanner console or cloud platform (this is when you’ll need the personalization code).
8

Qualys Consulting EditionGet Started
Check your virtual scanner status
Your appliance must be connected to our cloud platform. Go to Scans > Appliances to check your appliance status. Select your scanner and you’ll see the preview pane.
1 - tells you the virtual scanner is ready. Now you can start internal scans! Next to this you’ll see the busy icon is grayed out until you launch a scan using this scanner.
2 - This shows you it’s a virtual appliance.
3 - Latest software versions - these are installed as part of the activation.
4 - The available capacity will be 100% until you launch a scan.
Add the scanner to a networkGo to Assets > Networks, identify the network you’re interested in and choose Edit from the Quick Actions menu. Then go to the Scanner Appliances tab to add your appliance to the network.
Good to Know
- The scanner appliances you assign to the network will be used to scan the IP addresses in the network.
9

Qualys Consulting EditionGet Started
- Each scanner appliance can be included in only one network. That means when you add a scanner appliance to a network, it will be removed from its previous network and any asset groups that it belonged to, if applicable.
- Be sure the scanner appliances you add to the network will be able to phone home to the Qualys Cloud Platform and can access the IP addresses that you will be scanning.
Configure scan settingsAn option profile includes scan settings that you’ll choose at scan time. We provide the “Initial Options” profile to get you started but you can also create your own. Go to Scans > Option Profiles. Create a profile from the New menu or edit a default profile to save a copy with customized settings.
Setup host authenticationUsing host authentication (trusted scanning) allows our service to log in to each target system during scanning. For this reason we can perform in depth security assessment and get better visibility into each system’s security posture. Running authenticated scans gives you the most accurate results with fewer false positives. How to setup authentication:
Enable authentication in the option profile In the option profile, go to the Scan tab, scroll down to Authentication, and select each type of authentication you want to use. We’re always adding new technologies.
10

Qualys Consulting EditionGet Started
Add authentication records
Add authentication records for the host technologies you’re interested in. Go to Scans > Authentication and create new records from the New menu. For each record you’ll provide login credentials that our service will use to log in to each host at scan time.
Run/Schedule scansGo to Scans > Scans > New Scan. (Want to schedule your scan?)
11

Qualys Consulting EditionGet Started
Choose your scan settings.
(1) Client - Choose the client you want to scan. Click Create to add a client at this time. You’ll provide client information like name, email and company address.
(2) Option Profile - You can select one of the default profiles provided or a custom profile that you previously saved.
(3) Network - Choose the network you want to scan. You can scan one network at a time. If you didn’t set up networks then you won’t see this option.
(4) Scanner Appliance - If you added a virtual scanner then you can choose the scanner for an internal scan. If you don’t have a scanner, we’ll use external scanners for a perimeter scan.
(5) Scan Target - Click Assets to select a combination of asset groups and IP addresses to scan. Or Click Tags to select one or more asset tags to scan.
That’s it - just click Launch and you’re done.
You’ll see your scan in the scans list where you can track its progress.
means results are processed and available in your account.
12

Qualys Consulting EditionGet Started
means the scan is finished but the results are not processed. Go to Filters > Processing Tasks to see the status.
Want to schedule your scan?You can schedule the scan to run Daily, Weekly or Monthly. Just choose New > Schedule Scan. Like with an on demand scan, you’ll select the client, an option profile, scanner appliance and target hosts. You’ll also need to tell us when you want the scan to start and how often it should run. Make these settings on the Scheduling tab.
Go to the Notifications tab if you want to be notified by email before the scan starts or when it’s finished. You can even customize the message included in the email body.
Note - You are the task owner. Notifications will be sent to the email address saved in your account.
13

Qualys Consulting EditionGet Started
Hit Save to save your scheduled scan. It will appear on the Schedules list. When the scan starts running (at its next scheduled launch time) you’ll see it on the Scans list where you can track the status and view results when it’s finished.
View scan results by client
Go to your Clients list to see all scan instances conducted for all of your clients in one location. Quickly view scan results for any client by clicking the “Show scans” link.
14

Qualys Consulting EditionGet Started
PCAP ScansWith a PCAP Scan you’ll get vulnerability scan results plus a PCAP (Packet Capture) file that contains all TCP network traffic captured between the scanner and the target host.
Good to Know
- The PCAP Scanning feature must be enabled for your account. Please contact your Technical Account Manager or Support to get it.
- A scanner appliance (physical or virtual) is required.
- You can scan one IP address at a time.
- The PCAP file will be available for 7 days. You’ll need a PCAP Viewer to read file contents.
Start a PCAP Scan
Go to Scans > New > PCAP Scan.
Give your scan a name, select a client, select an option profile, and choose a scanner appliance. Then tell us the host you want to scan (a single IP) and click Launch.
Important - The scanner appliance you use will not be available for any other scan tasks until your PCAP scan is finished. Scan processing may be delayed for other scans.
When the scan is finished, you can view scan results and download the PCAP file. Choose PCAP File from the Quick Actions menu. After 7 days the file is no longer available for download.
15

Qualys Consulting EditionGet Started
Discover Your NetworkLaunch maps to discover network devices and report comprehensive information about them. After discovering live devices on a network you can add them to your account and start scanning them for vulnerabilities.
Add domains for mapping
Qualys uses a domains concept for its network mapping process. “Domain” in this context is our name for a DNS entry, for a netblock, or for a combination. Go to Assets > Domains and select New > Domain.
Enter one or more domains and netblocks (see the help for proper formatting). Click Add.
Qualys provides a demo domain called “qualys-test.com” for network mapping. This domain may already be in your account. If not you can add it yourself. Note that the devices in the demo domain reside in Qualys Security Operations Centers, so the Qualys Internet scanners can be used for mapping this domain.
Start your map
Go to Scans > Maps, then select New > Map (or Schedule Map).
16

Qualys Consulting EditionGet Started
Choose your map options.
Option Profile - Choose an option profile with the map settings you want to use. Tip - For mapping IPs/ranges without a domain, be sure to enable the map option “Perform live host sweep” in the option profile applied to the task.
Target Domains - Specify any combination of asset groups, domains and IPs/ranges for your map target. Enter asset groups in the Asset Groups field, and enter domains and IPs in the Domains/Netblocks field.
We’ll create a separate map report for each target. That means we’ll create a separate map for each domain plus a map for any IPs entered. These maps will run sequentially - one at a time - and each map will use a single scanner appliance.
When the map status is Finished, choose View Report from the Quick Actions menu.
17

Qualys Consulting EditionGet Started
In the Results section you’ll see a list of the hosts detected on the mapped domain. For each host, you’ll see the IP address, DNS and NetBIOS hostnames, the router being used by the host and the operating system.
Map results are closely integrated with scan capabilities. There are several actions you can perform on the hosts listed in your map results. For example, you can scan hosts right away, you can add newly discovered hosts to your account. Select the check box next to each host to include in the action, select an action from the Actions drop-down menu (at the top of the report), and then click Apply.
18

Qualys Consulting EditionGet Started
Your map results will appear in a graphical view like shown below. Use the Summary on the left to drill-down into results or enter a search query at the top of the page.
Go to View > Graphic Mode to change the format of your map results to graphic mode.
19

Qualys Consulting EditionDeploy Cloud Agents
Deploy Cloud AgentsUsing our revolutionary Qualys Cloud Agent platform you can deploy lightweight cloud agents for continuous security and compliance assessments. Group agents using asset tags that are based on the asset groups you created for your clients earlier.
OverviewWith Qualys Cloud Agent you’ll get continuous network security updates through the cloud. As soon as changes are discovered on your hosts they’ll be assessed and you’ll know about new security threats right away. All you have to do is install lightweight agents on your hosts - we’ll help you do this quickly!
Install lightweight agents in minutes on your IT assets. These can be installed on your on-premise systems, dynamic cloud environments and mobile endpoints. Agents are centrally managed by the cloud agent platform and are self-updating (no reboot needed).
Scanning in the Cloud We’ll start syncing asset data to the cloud agent platform once agents are installed. Agents continuously collect metadata, beam it to the cloud agent platform where full assessments occur right away. Since the heavy lifting is done in the cloud the agent needs minimal footprint and processing on target systems.
Stay updated with network security Scanning in the cloud uses the same signatures (vulnerabilities, compliance datapoints) as traditional scanning with Qualys scanners. You’ll get informed right away about new security threats using your Qualys Cloud Platform applications - Vulnerability Management (VM), Policy Compliance (PC), Continuous Monitoring (CM), AssetView (AV) and more!
What do I need to know?There are a few things to know before you install agents on hosts within your network.
We recommend these resources
Cloud Agent requirements
- We support: Windows, Linux/Unix (.rpm), Linux (.deb), Apple Mac OSX (.pkg)
- Your hosts must be able to reach the Qualys Cloud Platform (or the Qualys Private Cloud Platform) over HTTPS port 443. Go to Help > About for the URL your hosts need to access.
Cloud Agent Platform Introduction (2m 10 s)
Getting Started Tutorial (4m 58s)
Qualys Cloud Platform
Qualys Cloud Agent Getting Started Guide
20

Qualys Consulting EditionDeploy Cloud Agents
- To install Windows Agent you must have local administrator privileges on your hosts. Proxy configuration is supported
- To install Linux Agent, Unix Agent, Mac Agent you must have root privileges, non-root with Sudo root delegation, or non-root with sufficient privileges (VM scan only). Proxy configuration is supported.
Steps to install agents
- Create an activation key. This lets you group agents and bind them to your account.
- Download the agent installer to your local machine.
- Run the installer on each host from an elevated command prompt, or use group policy or a systems management tool.
- Activate agents for modules in your subscription (i.e. VM, PC, etc). A license will be consumed for each agent activated.
Get StartedSelect the Cloud Agent app from the app picker.
Check out the Quick Start Guide (you can go to user name menu and select this option anytime). You’ll see step by step instructions with links to the right places to take actions.
21

Qualys Consulting EditionDeploy Cloud Agents
It’s easy to install agents
It just takes a few minutes to install an agent. Our wizard will help you do it quickly.
You’ll need an activation key. Select New Key to create one.This key provides a way to group agents and bind them to your account.
We recommend you create different keys for different clients. Give your key a name (e.g. Client A) and assign the key an asset tag (e.g. Client A). We’ll automatically add the same tag to the agents installed using that key.
Did you know? We’ve defined certain tags for you. You’ll have one asset tag for each asset group in your account. That means if you created asset groups for your clients (Client A, Client B, etc.) then you already have asset tags for your clients.
Next, provision the key for the VM application. If you have additional apps like PC, FIM and IOC then you’ll see them listed as well. Click Generate.
22

Qualys Consulting EditionDeploy Cloud Agents
Review requirements and click Install Instructions for the target agent host.
You’ll download the agent installer and run it on your hosts. To run the installer you just copy and paste the command shown - it’s that simple.
Run the installer on each host from an elevated command prompt, or use group policy or a systems management tool.
Our installation guides will help you with additional options like setting up proxy support, and more.
Installation Guides:
Windows Agent
Linux Agent
Unix Agent
Mac Agent
23

Qualys Consulting EditionDeploy Cloud Agents
Want to create more tags?
As previously mentioned we’ve defined certain tags for you like tags that correspond to your asset groups. You can also create your own custom tags. To get started, choose the AssetView app from the app picker. Then go to the Tags section and click New Tag.
In the Tag Creation wizard, enter the settings for your tag. You’ll give the tag a name and configure a tag rule. The rule is used to evaluate asset data returned by scans. When asset data matches a tag rule we’ll automatically add the tag to the asset.
Tip - Turn help tips on (in the wizard title bar) and we’ll show you help as you hover over the settings.
24

Qualys Consulting EditionAnalyze, Query & Report
Analyze, Query & ReportIn this section we’ll cover how to query assets, build widgets and dashboards in AssetView and how to create reports in VM.
How to Query Assets
Go to the Assets tab. This is where you’ll see an inventory of all your scanned assets.
Start typing in the search field and you’ll see a list of asset properties (tokens) you can use to search. Hover over the token name to see syntax help to the right.
Select the AssetView app from the app picker.
25

Qualys Consulting EditionAnalyze, Query & Report
View Asset Details anytimeThe latest vulnerability data is always available in your assets inventory. Just select the asset name and choose View Asset Details from the quick actions menu.
Save QueryEasily save your searches for reuse and share them with others.
Download and export resultsIt just takes a minute to export search results. Select Download from the Tools menu. Next choose an export format and click Download.
26

Qualys Consulting EditionAnalyze, Query & Report
Create widgetYou can create a widget based on your query and add it to your dashboard. First search for assets and then choose Create widget. Add a title, you’ll see your query is populated for you, just one click to add to your dashboard.
27

Qualys Consulting EditionAnalyze, Query & Report
Create ReportsThere are several reporting options available. Different reports provide different views of client data.
Consultant Reports
Create reports specific to your clients’ needs. You can add a custom cover page to your report to include client and consultant contact information plus a summary.
To get started, you’ll need to create a consultant report template. Go to Reports > Templates > New > Consultant Template. See the help for help with template settings.
Now go to Reports > Reports > New > Consultant Report.
28

Qualys Consulting EditionAnalyze, Query & Report
Choose the report template you created, a report format, and the client.
Click Next. You’ll be prompted to choose client scan results to include in the report, then click Run. Your report will run in a new window.
Tip - By running the report in DOCX format you can edit the report to focus on the details most important to each of your clients.
29

Qualys Consulting EditionAnalyze, Query & Report
Template Based Scan Reports
Go to Reports > New > Scan Report > Template Based...
Choose a report template and pick a report format. If you configured client networks then choose the network you want to report on and your report target. Then click Run.
There are many report templates to choose from. For example:
The Executive Report provides a global view of your network security. This report is ideal for CIO or executive level managers. This report does not include detailed scan results or details like vulnerability descriptions and verified fixes.
The Technical Report provides detailed scan results including the most current vulnerability information for each host. This report does not show vulnerability trends over time.
You can use a template provided by Qualys or create your own custom templates.
30

Qualys Consulting EditionAnalyze, Query & Report
Review Certificates and SSL GradeDid you know there’s a lot of information you can see in Qualys VM without running reports? Under Assets, go to the Certificates, Applications and Ports/Services tabs for easy to search inventories based on your vulnerability scan data.
Let’s take a closer look at certificates. Go to VM > Assets > Certificates. You’ll see a list of certificates installed on hosts. Newly discovered certificates are added automatically to the inventory as new scan results become available in your account.
When the SSL Labs Grade feature is enabled for your subscription, you’ll see a grade (A+, A, A-, B, C, D, E, F, T, M, NA) for each certificate on your certificates list. Grades are updated automatically each time new vulnerability scan results are processed for your hosts.
How do I get this feature?
Please contact your Technical Account Manager or Support to have the SSL Labs Grade feature enabled for your subscription.
Not seeing a grade?Make sure the Grade column is shown by selecting it from the Tools menu above the list. If this feature was recently enabled, be sure to run new vulnerability scans on your hosts in order for grades to be calculated.
How are grades calculated?
We first look at the certificate to verify that it is valid and trusted. Then we inspect SSL configuration in three categories: 1) Protocol Support, 2) Key Exchange and 3) Cipher Strength. Each category is given a score and we combine these scores for an overall score of 0-100. (A zero in any category results in an overall score of zero.) The overall numerical score is translated into a letter grade (A-F) using a look-up table. Your A grade will be upgraded to A+ for exceptional configurations, and downgraded to A- when there are one or more warnings. Other grades you might see: T (certificate is not trusted), M (certificate name mismatch), and NA (not applicable, SSL server information not retrieved).
Want to learn more? Check out the SSL Server Rating Guide here: https://www.ssllabs.com/projects/rating-guide/index.html
31

Qualys Consulting EditionPCI Compliance
PCI Compliance
PCI Scan RequirementsQualys is certified to help merchants and their consultants achieve compliance with the PCI Data Security Standard (DSS) including these scan requirements:
Per PCI DSS v3.0 requirement 11.2.2, the PCI Council requires merchants to perform quarterly external vulnerability scans via an Approved Scanning Vendor (ASV), approved by the PCI Security Standards Council (PCI SSC). Qualys is a certified ASV. Every part of cardholder data system components needs to be scanned.
What systems should I scan?Hosts that store cardholder data must be scanned. Also every part of cardholder data system components must be scanned. We recommend you refer to the PCI Data Security Standard (DSS) for details. Check to see these hosts are in your account by going to Assets > Host Assets.
Do I need to whitelist the scanners?
Our scanners must be able to reach the hosts being scanned. You may need to whitelist our scanners to allow access. Go to Help > About to see the IP addresses for our external scanners. You’ll also see URLs that your scanner appliance must be able to contact.
Avoid scanning through a firewall from the inside out
Problems can arise when scan traffic is routed through the firewall from the inside out, i.e. when the scanner appliance is sitting in the protected network area and scans a target which is located on the other side of the firewall. See Scanning and Firewalls.
PCI Readiness ReportsPrepare customers of all sizes for ASV certifications and QSA audits by running PCI readiness reports.
Commonly integrates with:
- PCI Readiness Assessments
- PCI Compliance Road Mapping
- Payment Infrastructure Assessments
- Payment Infrastructure Strategy
32

Qualys Consulting EditionPCI Compliance
What are the steps?Step 1: Run a Scan
Under VM, go to Scans > New > Scan. Tell us the IPs you want to scan, and select a PCI option profile like “Payment Card Industry (PCI) Options”. This profile has scan settings required according to the PCI DSS standard.
Step 2: Fix Vulnerabilities and Re-ScanRun the PCI Technical Report to see whether your scan is compliant. Go to Reports > Templates, find the “Payment Card Industry (PCI) Technical Report” and select Run from the Quick Actions menu.
In your report you’ll see the PCI compliance status (PASS or FAIL) for the overall report, for each host and each vulnerability detected. Vulnerabilities with the FAIL status must be fixed to pass the PCI compliance requirements. (Vulnerabilities with no PCI status are not required for compliance, however we do recommend you fix them in severity order.) See the online help to better understand the Qualys KnowledgeBase and severity levels.
After fixing vulnerabilities, be sure to re-scan to verify that all PCI vulnerabilities are fixed and the overall status is PASS.
33

34
Qualys Consulting EditionWait, there’s more!
Wait, there’s more!
Policy ComplianceUse Qualys Policy Compliance (PC) to reduce the risk of internal and external threats while providing proof of compliance demanded by auditors and government regulations.
Qualys Policy Compliance Getting Started Guide
Web Application ScanningQualys Web Application Scanning (WAS) is the most powerful web application scanner available. Set up your web application and run discovery and vulnerability scans.
Qualys Web Application Scanning Getting Started Guide
Self Assessment QuestionnaireQualys Self Assessment Questionnaire (SAQ) is our automated questionnaire service. SAQ helps you automate your risk and compliance through campaigns. Collect risk data and compliance evidence from all the right people, then analyze and report on compliance and vendor risk.
Qualys APIYou’ll get the Qualys API with your Consultant subscription. Run up to 25 API calls per day (additional packages available).
Check out these API user guides
Qualys API (VM, SCA, PC) User Guide
Qualys API (VM, SCA, PC) XML/DTD Reference