quad dental implants - dentack catalog - dentack implants 2013.pdf · 1 company profile dentack...
TRANSCRIPT
QUAD Dental Implants

Dental ImplantsQUAD Dental ImplantsQUAD
1
Company Profile
DenTack creates and markets innovative high-stability, short expandable
implants that carry the same load as longer implants, offering clinicians
a viable and cost-effective alternative to bone augmentation for dental
implant candidates.
The DenTack QUAD Implant
Unlike existing short implants, DenTack’s expandable QUAD implants have an
integral compensation mechanism that enhances initial and long-term stability
and load-carrying ability.
Enabling effective, timely implant placement in patients with low bone height,
QUAD implants eliminate the need for bone augmentation and sinus lift
procedures- significantly lowering treatment cost and duration. Moreover, the
load-carrying performance of QUAD implants allows for immediate loading -
shortening the overall time to restoration.
Without preliminary surgical intervention, DenTack implants are placed in the
jaw as per current common procedure, and behave like standard long implants.
During expansion, the implant’s apical portion and folded foils spread out into
the surrounding bone, maximizing bone contact area. As it reaches maximum
expansion, the apical portion inclines slightly inward to reduce total pressure on
the bone.
With an uncompromising commitment to maintaining highest standards of
quality in manufacturing, all DenTack implants are CE Mark certified, and are
registered under the ISO 13485:2003 international quality standards.
2
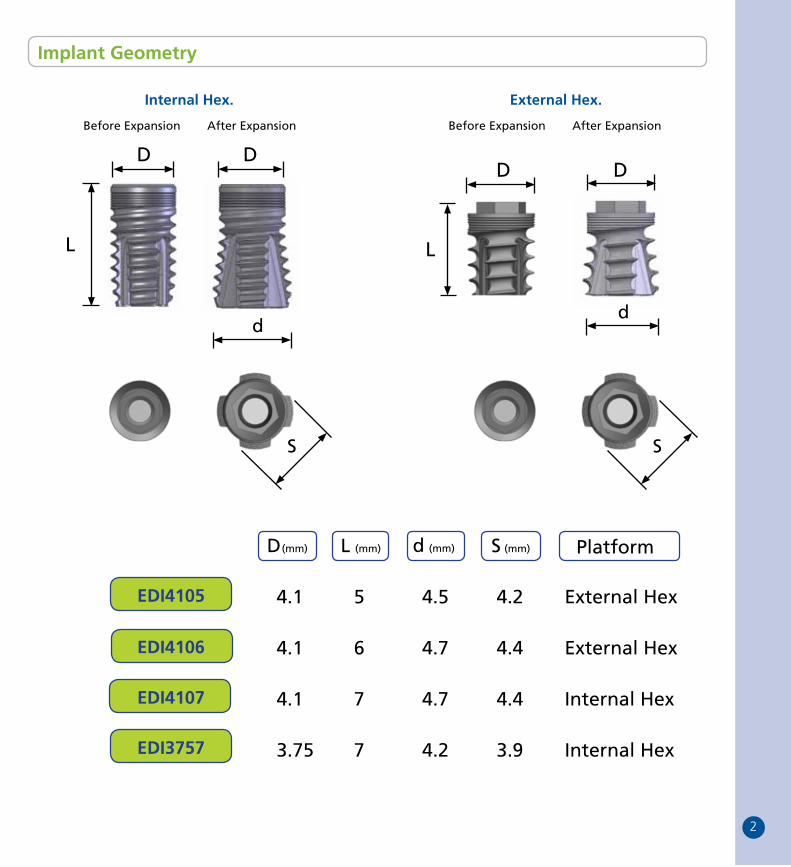
Implant Geometry
Before Expansion
Internal Hex.
S
D(mm)
EDI4105 4.1
4.1
4.1
3.75
EDI4106
EDI4107
EDI3757
L (mm)
5
6
7
7
4.5
4.7
4.7
4.2
S (mm)
4.2
4.4
4.4
3.9
Platform
External Hex
External Hex
Internal Hex
Internal Hex
d
L
After Expansion
d
L
D DD D
d (mm)
Before Expansion
External Hex.
After Expansion
S
3
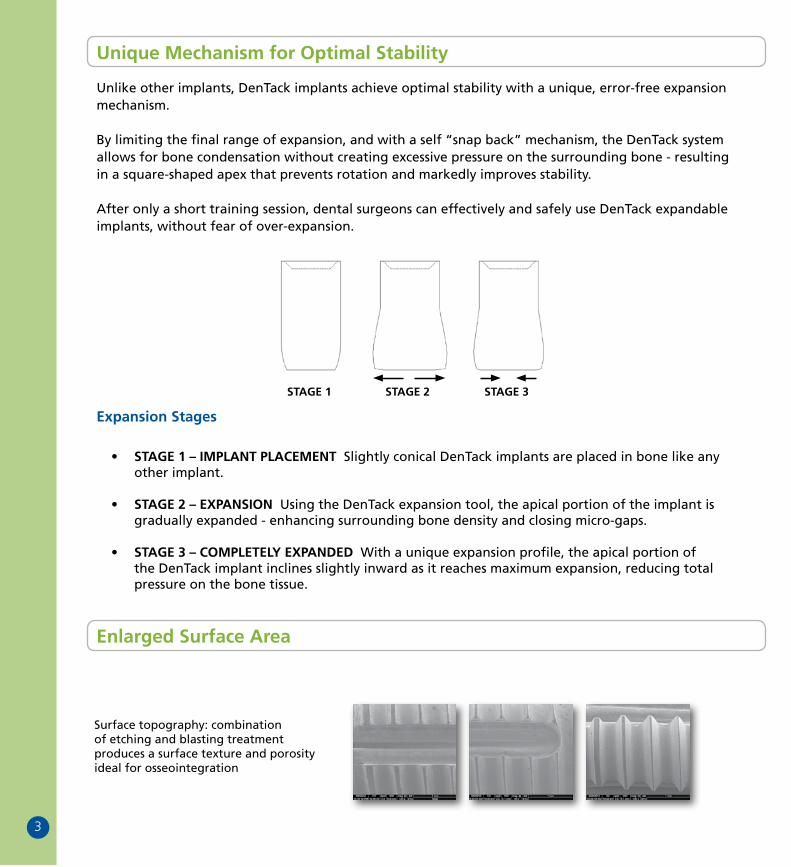
Unique Mechanism for Optimal Stability
Expansion Stages
Unlike other implants, DenTack implants achieve optimal stability with a unique, error-free expansion mechanism.
By limiting the final range of expansion, and with a self “snap back” mechanism, the DenTack system allows for bone condensation without creating excessive pressure on the surrounding bone - resulting in a square-shaped apex that prevents rotation and markedly improves stability.
After only a short training session, dental surgeons can effectively and safely use DenTack expandable implants, without fear of over-expansion.
• STAGE 1 – IMPLANT PLACEMENT Slightly conical DenTack implants are placed in bone like any other implant.
• STAGE 2 – EXPANSION Using the DenTack expansion tool, the apical portion of the implant is
gradually expanded - enhancing surrounding bone density and closing micro-gaps.
• STAGE 3 – COMPLETELY EXPANDED With a unique expansion profile, the apical portion of the DenTack implant inclines slightly inward as it reaches maximum expansion, reducing total pressure on the bone tissue.
STAGE 1 STAGE 2 STAGE 3
Enlarged Surface Area
Surface topography: combination of etching and blasting treatment produces a surface texture and porosity ideal for osseointegration
4
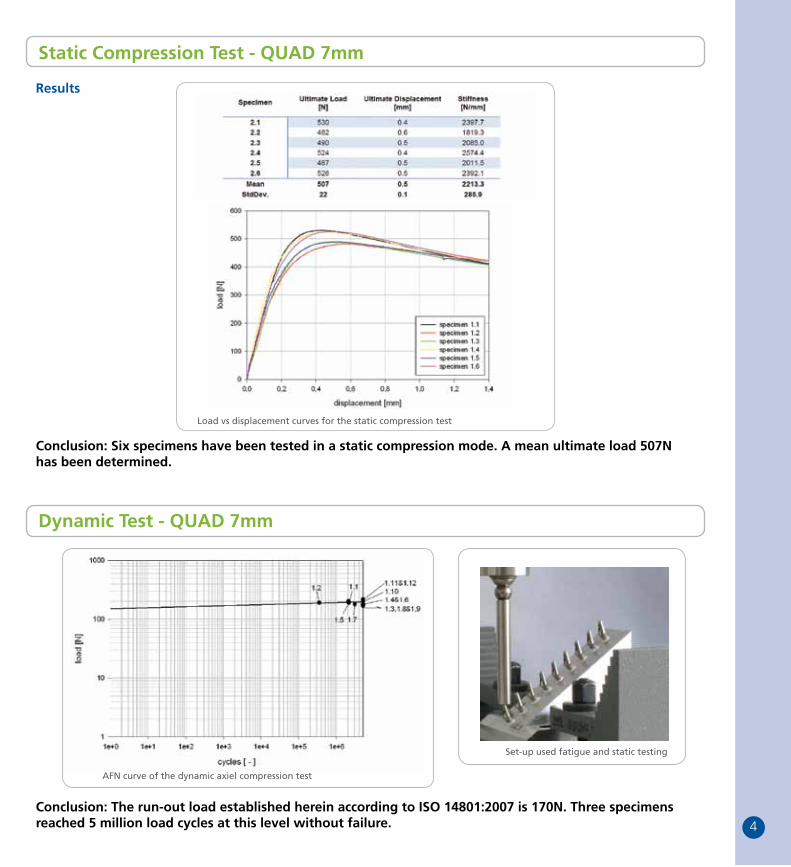
Static Compression Test - QUAD 7mm
Dynamic Test - QUAD 7mm
Conclusion: Six specimens have been tested in a static compression mode. A mean ultimate load 507N has been determined.
Conclusion: The run-out load established herein according to ISO 14801:2007 is 170N. Three specimens reached 5 million load cycles at this level without failure.
Results
Load vs displacement curves for the static compression test
AFN curve of the dynamic axiel compression test
Set-up used fatigue and static testing
5
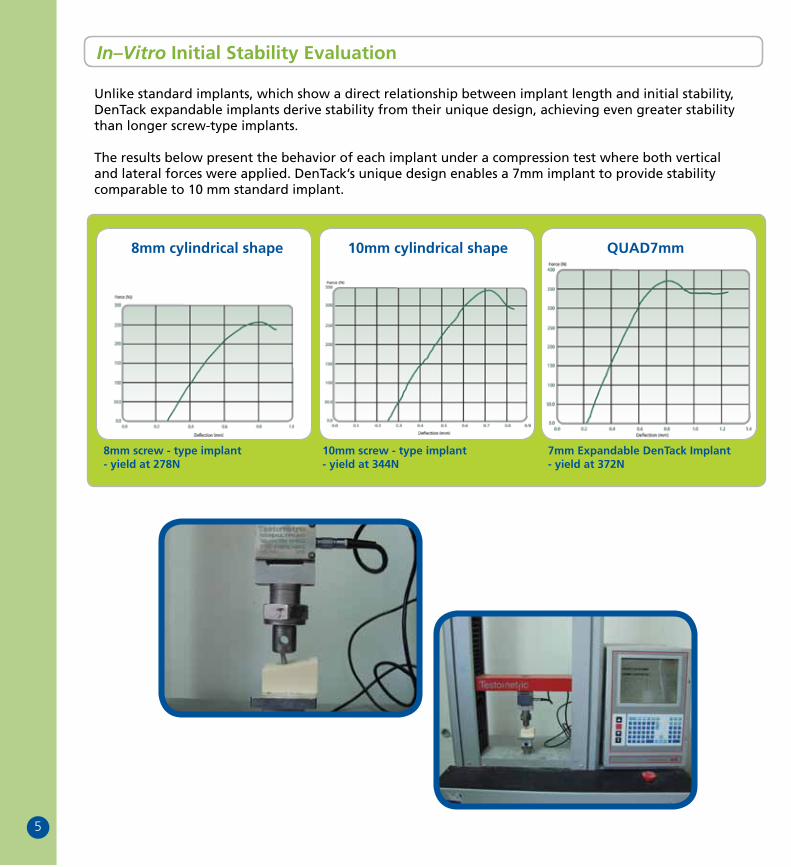
In–Vitro Initial Stability Evaluation
Unlike standard implants, which show a direct relationship between implant length and initial stability, DenTack expandable implants derive stability from their unique design, achieving even greater stability than longer screw-type implants.
The results below present the behavior of each implant under a compression test where both vertical and lateral forces were applied. DenTack’s unique design enables a 7mm implant to provide stability comparable to 10 mm standard implant.
8mm screw - type implant - yield at 278N
10mm screw - type implant - yield at 344N
7mm Expandable DenTack Implant - yield at 372N
8mm cylindrical shape 10mm cylindrical shape QUAD7mm
6
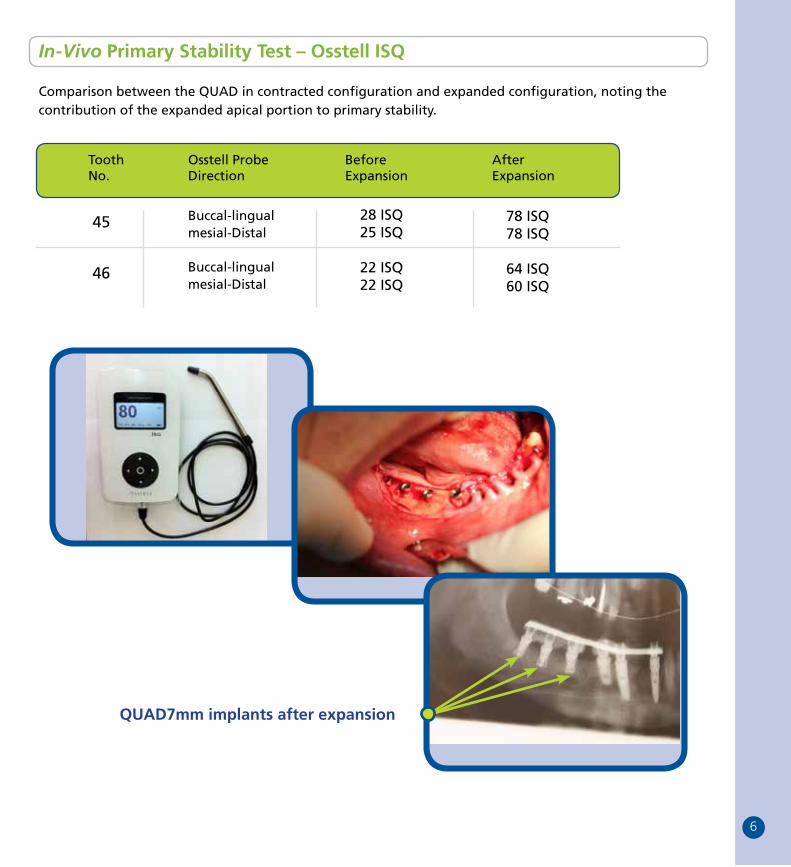
In-Vivo Primary Stability Test – Osstell ISQ
Comparison between the QUAD in contracted configuration and expanded configuration, noting the contribution of the expanded apical portion to primary stability.
Tooth No.
45
46
Buccal-lingualmesial-Distal
28 ISQ25 ISQ
22 ISQ22 ISQ
Buccal-lingualmesial-Distal
78 ISQ78 ISQ
64 ISQ60 ISQ
Osstell ProbeDirection
Before Expansion
After Expansion
QUAD7mm implants after expansion

7
Surgical Protocol
Packaging:
DenTack’s implant is packed in a double vial package, which contains also a cover screw.
A blue mount, allowing for simple differentiation between mount and implant, is attached to the implant.
Implant Placement:
A torque ratchet is used for the placement of the implant. Torque should not exceed 35Ncm while placing the implant. If higher torque is required, the implant should be removed gently, and the next drill size used to enlarge the ossteotomy. Then, the implant may be re-inserted.
NOTE: See implant position.
After implant placement, the blue mount is removed, and the expansion tool attached to the implant, noting correct fit to the internal implant hex.
8
Optimal Implant Position
During implant placement, clinicians are required to maintain a minimum spacing of 1.5mm from adjacent tooth and buccal and lingual plates. When two implants are necessary, a spacing of 3 mm is required.
The apical portion of the implant becomes wider after expansion, and must be considered for appropriate spacing.
Surgical Protocol
While holding the handle to prevent any implant movement, the torque ratchet is attached to the expansion tool and rotated slowly clockwise. The torque should not exceed 35 Ncm. The expansion tool’s two yellow bands will come into close contact when expansion is completed. Rotating the inner screw counterclockwise while holding the handle detaches the torque ratchet from the implant.
see page 21.5mm 1.5mm
9
Surgical Drilling Sequences
Maximilla Ø 3.75 Implant Dia.
Maximilla Ø 4.1 Implant Dia.
Mandible Ø 3.75 Implant Dia.
Mandible Ø 4.1 Implant Dia.
For Hard Bone
For Hard Bone
Ø 2.0 Ø 2.8 Ø 3.2 Ø 3.5 Ø 3.65
Ø 2.0 Ø 2.8 Ø 3.2 Ø 3.5 Ø 3.65
Ø 3.8
Ø 3.8
For Hard Bone
For Hard Bone

11
Impression Taking
1. In order to take an impression, remove the healing screw by rotating it counterclockwise.2. Clean the internal compartment of the implant.3. Place an impression coping by adjusting the hex connection to the compartment of the implant and by
securing the screw clockwise.
4. Take a standard impression, making sure that wash type impression material covers the impression coping completely.
5. After setting, take the impression out of the mouth.6. Attach an implant analog to the impression coping, and place it back on the impression, making sure
that the coping fits its original position.
1
4
2
5
3
6
Prosthetic Components - IFU
Although DenTack implants feature a standard hex connection, DenTack’s prosthetic components are uniquely manufactured and designed to fit and complement DenTack’s implants. Abutments are made of a biocompatible titanium alloy Ti6Al4V ELI. Abutments, impression and laboratory components of the DenTack System are designed for single use only. Healing screws, abutments and all other prosthetic components are delivered decontaminated but non-sterile.
Warning:Users of the DenTack system must be trained dentists. All users must have a background which includes specific training in implant dentistry and implant prosthodontics. Prosthetic components are small objects, and therefore may present inhalation hazards to the patients. Special care should be used when handling these components.
P00011/1Rev. 01/2013
DenTack Implants Ltd.24 HaTa`as St., Kfar Saba, Israel 44641Tell:+972-9-7660379Fax:+972-9-7738280Email: [email protected]
MedNet GmbH Borkstraße 10D - 48163 Münster GermanyTel +49 251 32266-0Fax +49 251 32266-22Email:[email protected]
12
1. In order to place an abutment, remove the healing screw by rotating it counterclockwise.
2. Clean the compartment of the implant.
3. Place the abutment by adjusting the hex connection to the internal compartment of the implant and by securing the screw clockwise.Using a torque wrench, apply torque of 20 Ncm.
Abutment Connection
1. In order to place an ball attachment, remove the healing screw by rotating it counterclockwise.
2. Clean the compartment of the implant.
3. Place the ball attachment by adjusting internal compartment of the implant and by securing the screw clockwise. Using a torque wrench apply torque of 20 Ncm.
4. Insert a nylon ball attachment cap into its housing.
5. Adhere the housing to the denture following standard procedures.
Ball Attachment
1, 2, 3
1
2
3
4, 5

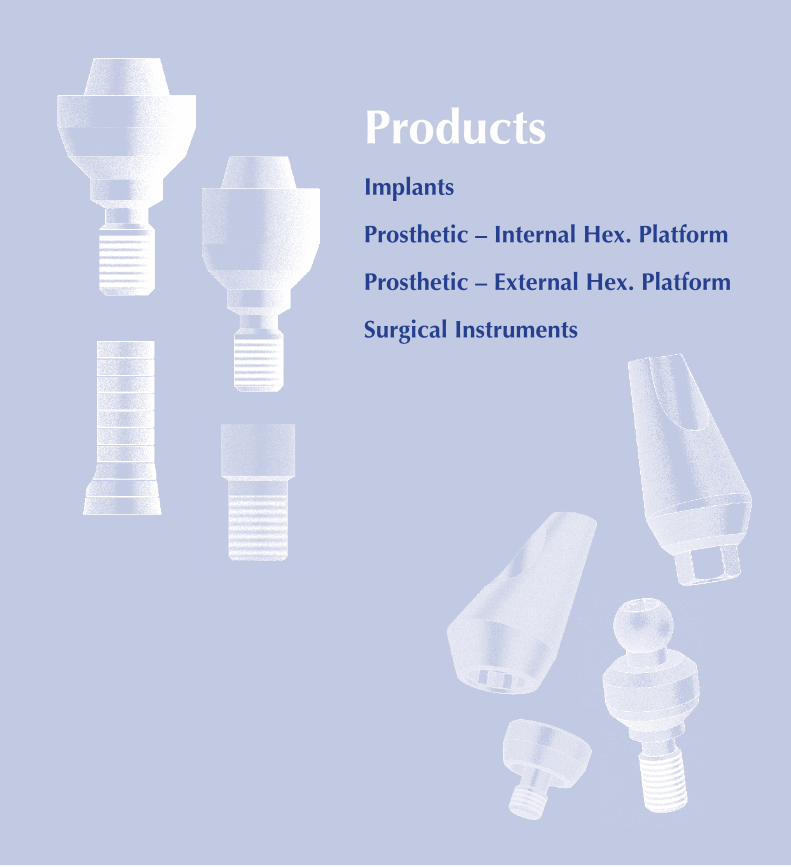
ProductsImplants
Prosthetic – Internal Hex. Platform
Prosthetic – External Hex. Platform
Surgical Instruments
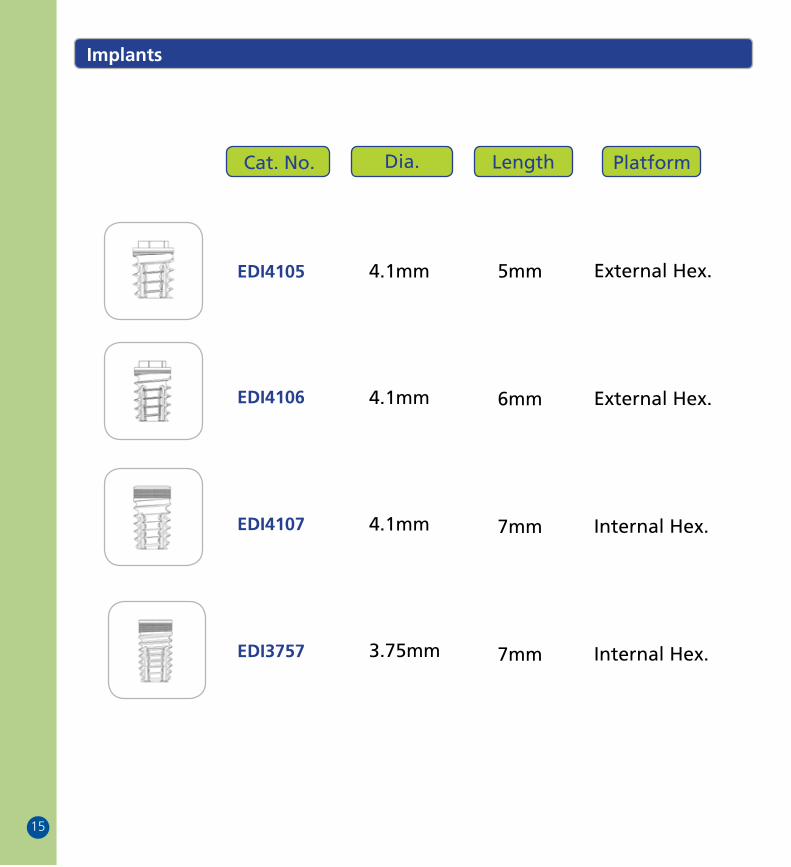
15
EDI4105
EDI4106
EDI4107
EDI3757
4.1mm
4.1mm
4.1mm
3.75mm
5mm
6mm
7mm
7mm
Platform
External Hex.
External Hex.
Internal Hex.
Internal Hex.
Cat. No. Dia. Length
Implants
16
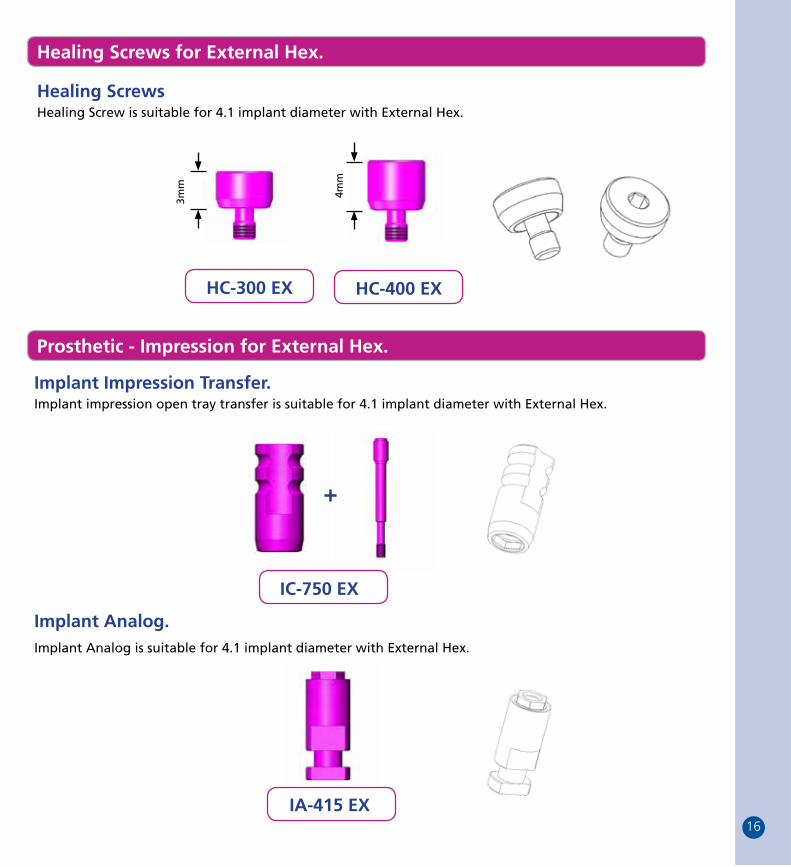
Healing Screws for External Hex.
Prosthetic - Impression for External Hex.
Healing ScrewsHealing Screw is suitable for 4.1 implant diameter with External Hex.
HC-300 EX HC-400 EX
Implant Impression Transfer.Implant impression open tray transfer is suitable for 4.1 implant diameter with External Hex.
IC-750 EX
Implant Analog.Implant Analog is suitable for 4.1 implant diameter with External Hex.
IA-415 EX
+
3mm
4mm
17
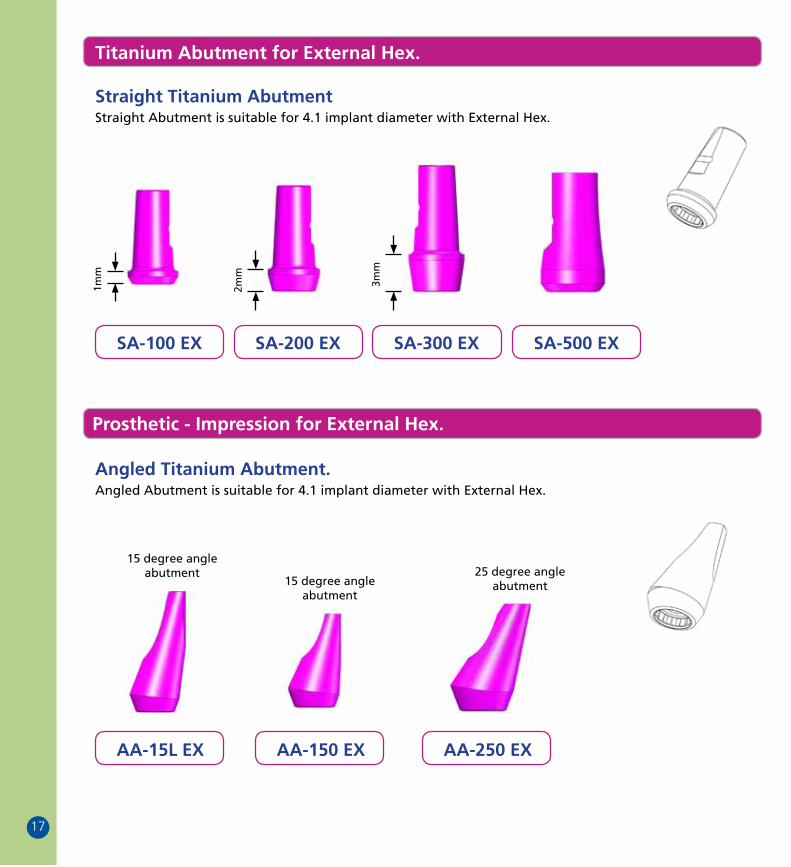
Titanium Abutment for External Hex.
Prosthetic - Impression for External Hex.
Straight Titanium AbutmentStraight Abutment is suitable for 4.1 implant diameter with External Hex.
SA-100 EX SA-200 EX SA-300 EX
Angled Titanium Abutment.Angled Abutment is suitable for 4.1 implant diameter with External Hex.
SA-500 EX
AA-15L EX AA-150 EX AA-250 EX
1mm
2mm
3mm
15 degree angle abutment
15 degree angle abutment
25 degree angle abutment
18
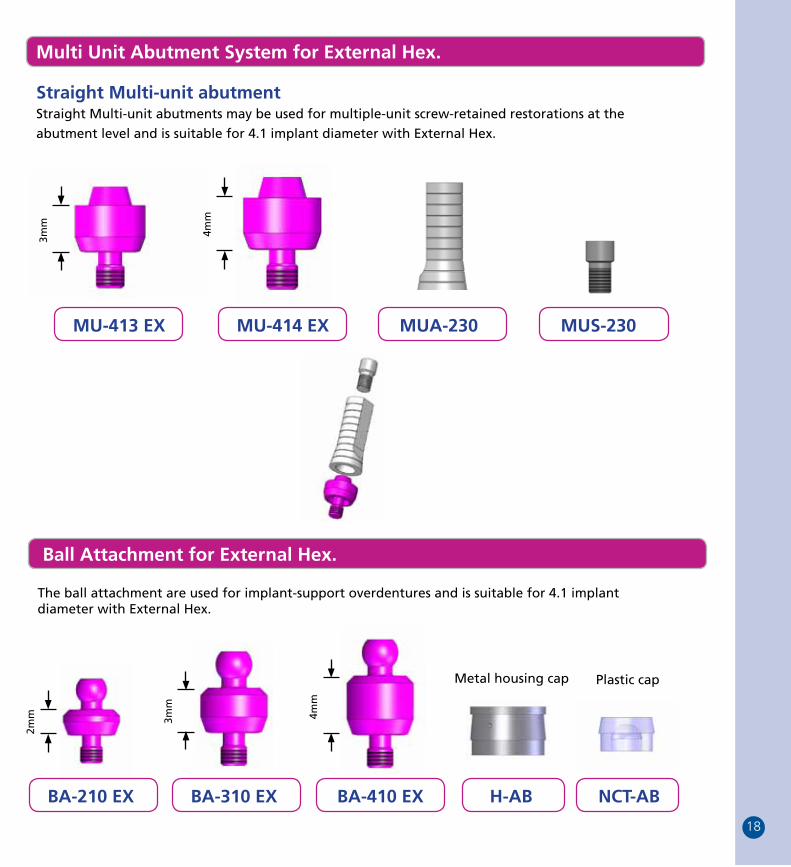
Multi Unit Abutment System for External Hex.
Straight Multi-unit abutmentStraight Multi-unit abutments may be used for multiple-unit screw-retained restorations at the
abutment level and is suitable for 4.1 implant diameter with External Hex.
MUA-230MU-414 EXMU-413 EX MUS-230
H-AB NCT-AB
Metal housing cap Plastic cap
Ball Attachment for External Hex.
The ball attachment are used for implant-support overdentures and is suitable for 4.1 implant diameter with External Hex.
BA-410 EXBA-310 EXBA-210 EX
3mm
4mm
2mm 3m
m
4mm
19
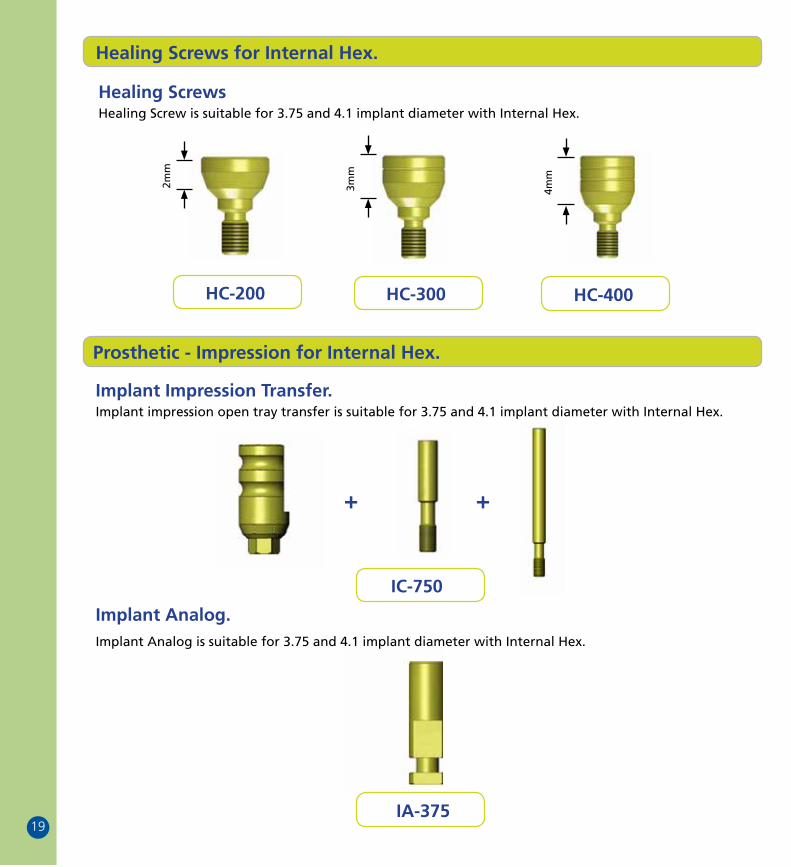
Healing Screws for Internal Hex.
Prosthetic - Impression for Internal Hex.
Healing ScrewsHealing Screw is suitable for 3.75 and 4.1 implant diameter with Internal Hex.
HC-200 HC-300 HC-400
Implant Impression Transfer.Implant impression open tray transfer is suitable for 3.75 and 4.1 implant diameter with Internal Hex.
IC-750
Implant Analog.Implant Analog is suitable for 3.75 and 4.1 implant diameter with Internal Hex.
IA-375
2mm
3mm
4mm
+ +
20
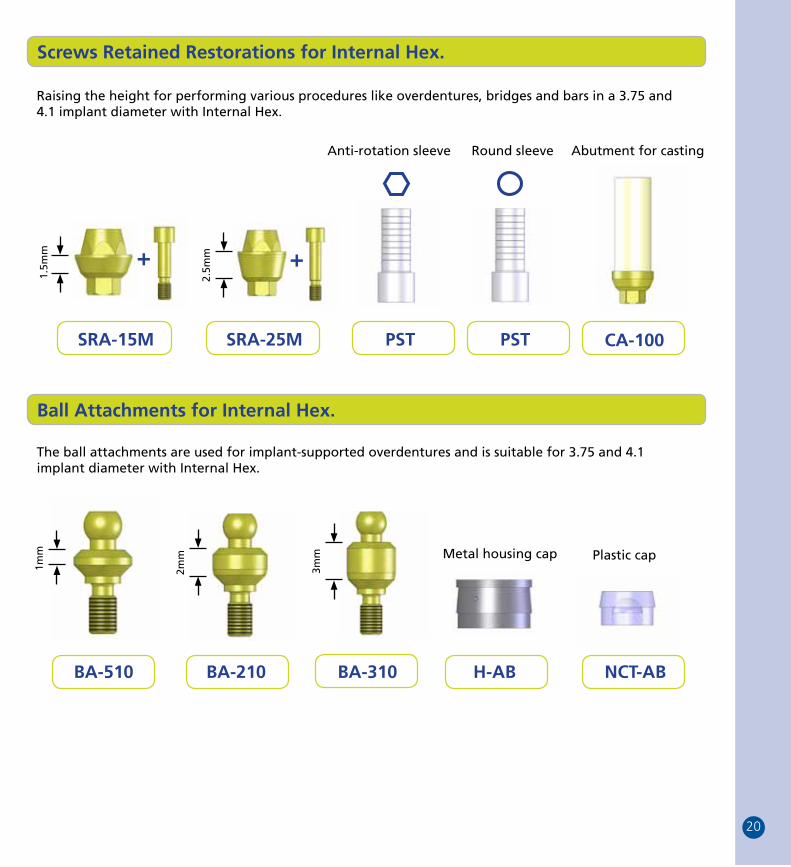
Screws Retained Restorations for Internal Hex.
Ball Attachments for Internal Hex.
Raising the height for performing various procedures like overdentures, bridges and bars in a 3.75 and 4.1 implant diameter with Internal Hex.
SRA-15M SRA-25M PST PST CA-100
++
The ball attachments are used for implant-supported overdentures and is suitable for 3.75 and 4.1 implant diameter with Internal Hex.
BA-510 BA-210 BA-310 H-AB NCT-AB
Metal housing cap Plastic cap
Anti-rotation sleeve Round sleeve Abutment for casting
1mm
1.5m
m
2.5m
m
2mm
3mm
21
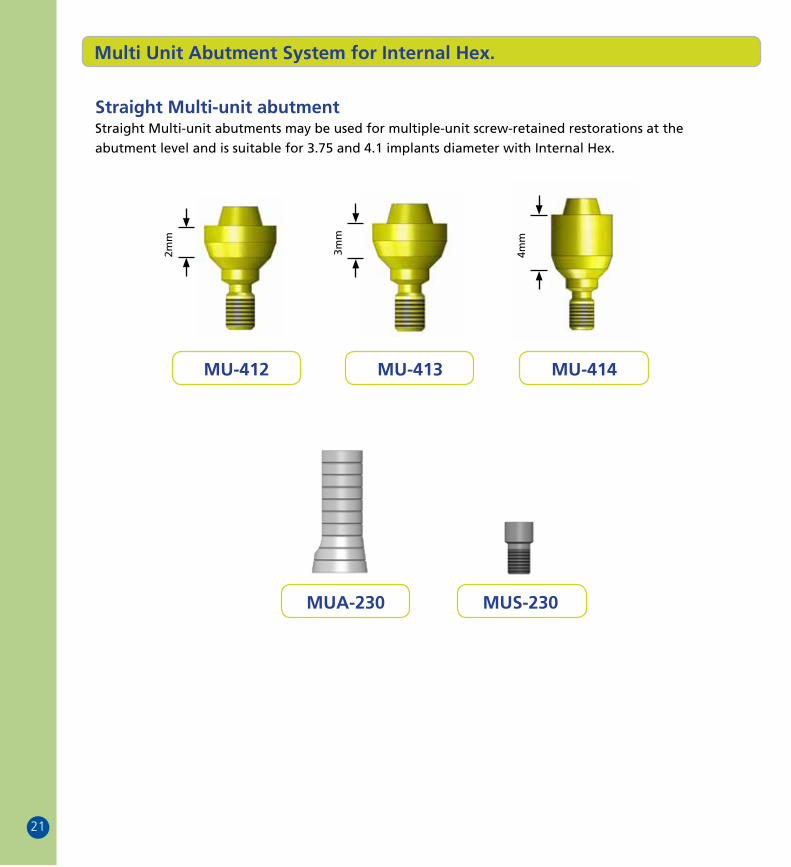
Multi Unit Abutment System for Internal Hex.
Straight Multi-unit abutmentStraight Multi-unit abutments may be used for multiple-unit screw-retained restorations at the
abutment level and is suitable for 3.75 and 4.1 implants diameter with Internal Hex.
MU-412 MU-413
MUA-230 MUS-230
MU-414
2mm
3mm
4mm
22
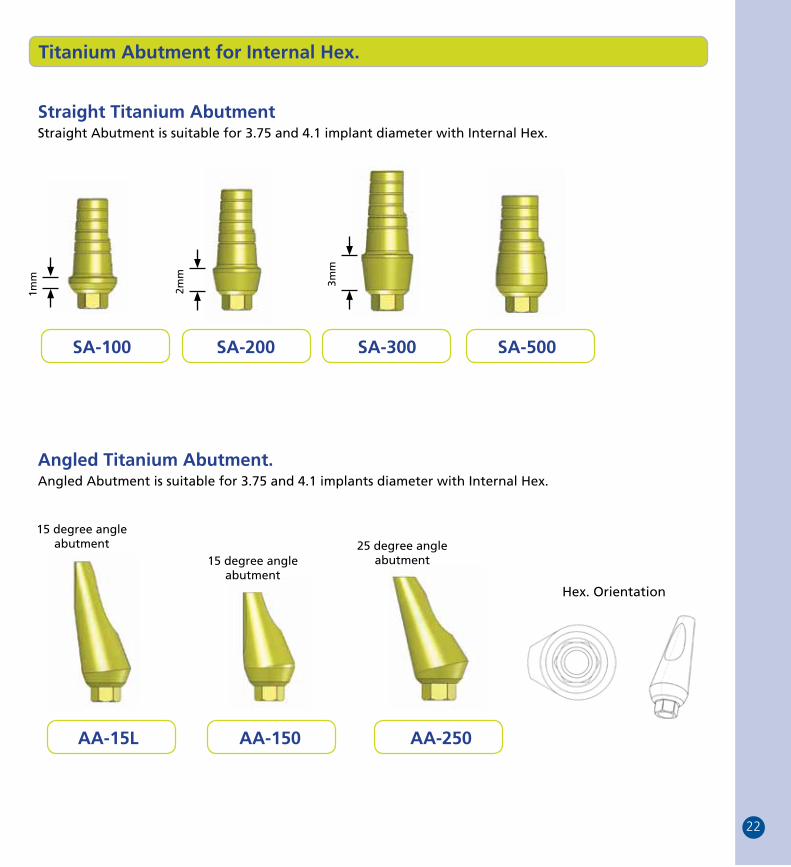
Titanium Abutment for Internal Hex.
Straight Titanium AbutmentStraight Abutment is suitable for 3.75 and 4.1 implant diameter with Internal Hex.
SA-100 SA-200 SA-300
Angled Titanium Abutment.Angled Abutment is suitable for 3.75 and 4.1 implants diameter with Internal Hex.
SA-500
AA-15L AA-150 AA-250
Hex. Orientation
1mm
2mm
3mm
15 degree angle abutment
15 degree angle abutment
25 degree angle abutment
23
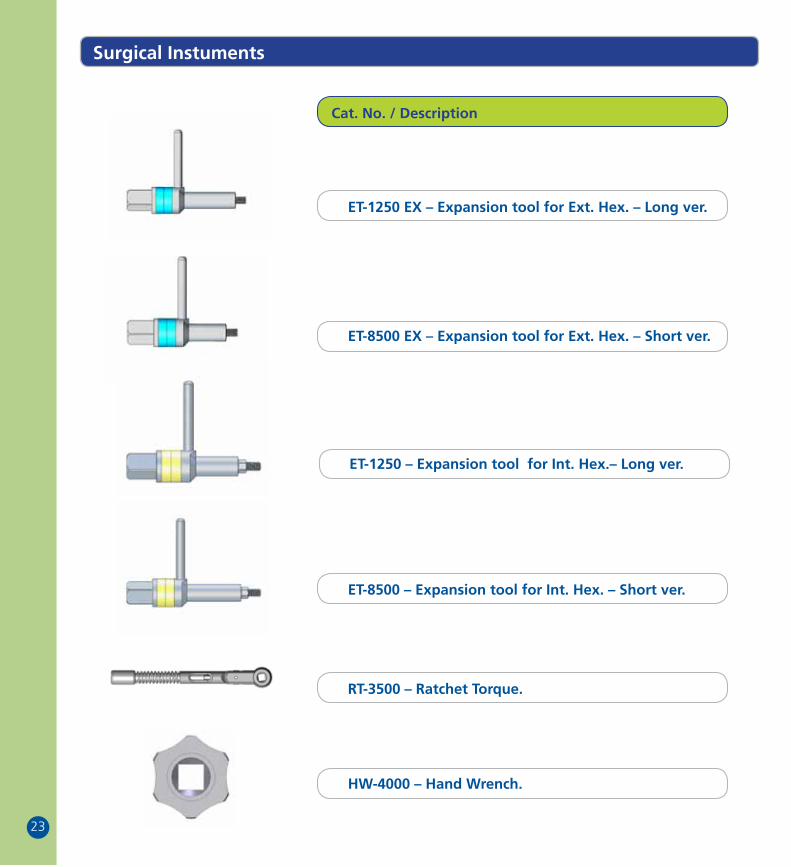
Surgical Instuments
Cat. No. / Description
ET-1250 EX – Expansion tool for Ext. Hex. – Long ver.
ET-8500 EX – Expansion tool for Ext. Hex. – Short ver.
RT-3500 – Ratchet Torque.
HW-4000 – Hand Wrench.
ET-1250 – Expansion tool for Int. Hex.– Long ver.
ET-8500 – Expansion tool for Int. Hex. – Short ver.

B00001 Rev 01/2013 0483 ISO 13485:2003
24 HaTa’as Street, P.O.B 2405Kfar Saba ISRAEL, 44641Tel. +972-9-7660379 Fax [email protected] www.dentack.com