qrs pno3 quick guide r12 pg1-16qrsmusic.com/downloads/pdf/qrs pno3 quick guide.pdf · qrs pno3 user...
TRANSCRIPT
QRS PNO3 User Guide
QRS Music Technologies, Inc. Technical Support - 800-247-6557 www.qrsmusic.com
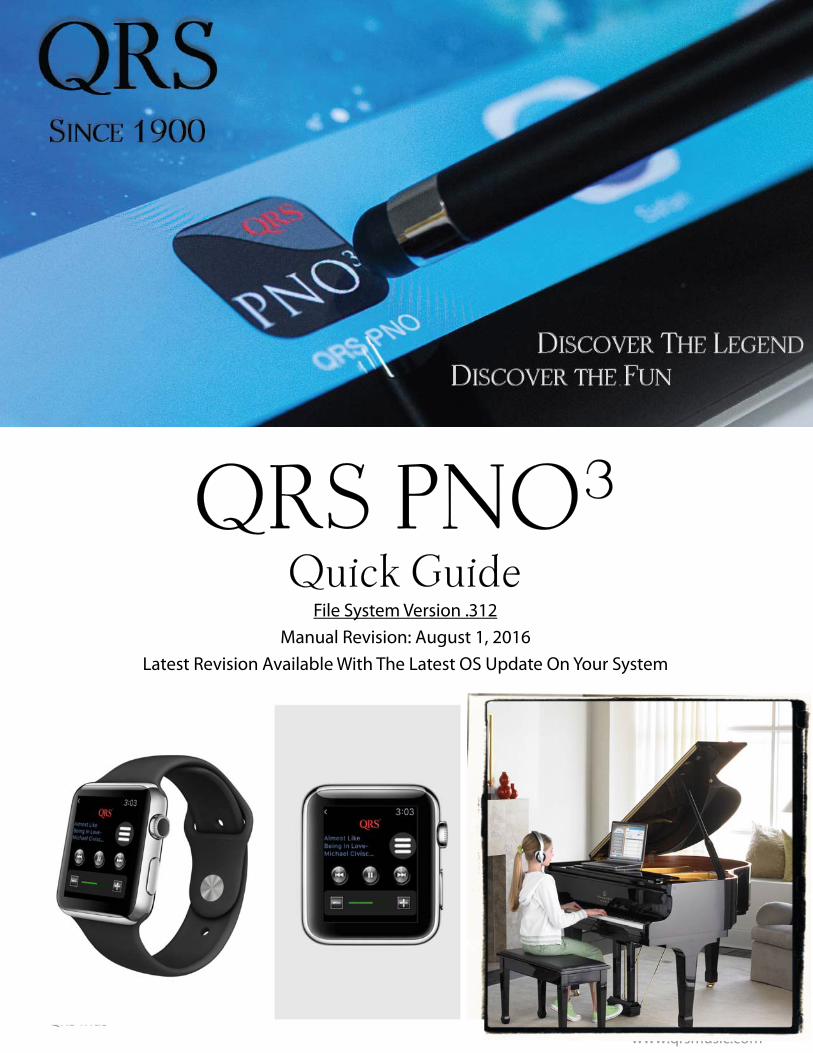
QRS PNO3
Quick Guide File System Version .312
Manual Revision: August 1, 2016 Latest Revision Available With The Latest OS Update On Your System
QRS PNO3 User Guide
QRS Music Technologies, Inc. Technical Support - 800-247-6557 www.qrsmusic.com
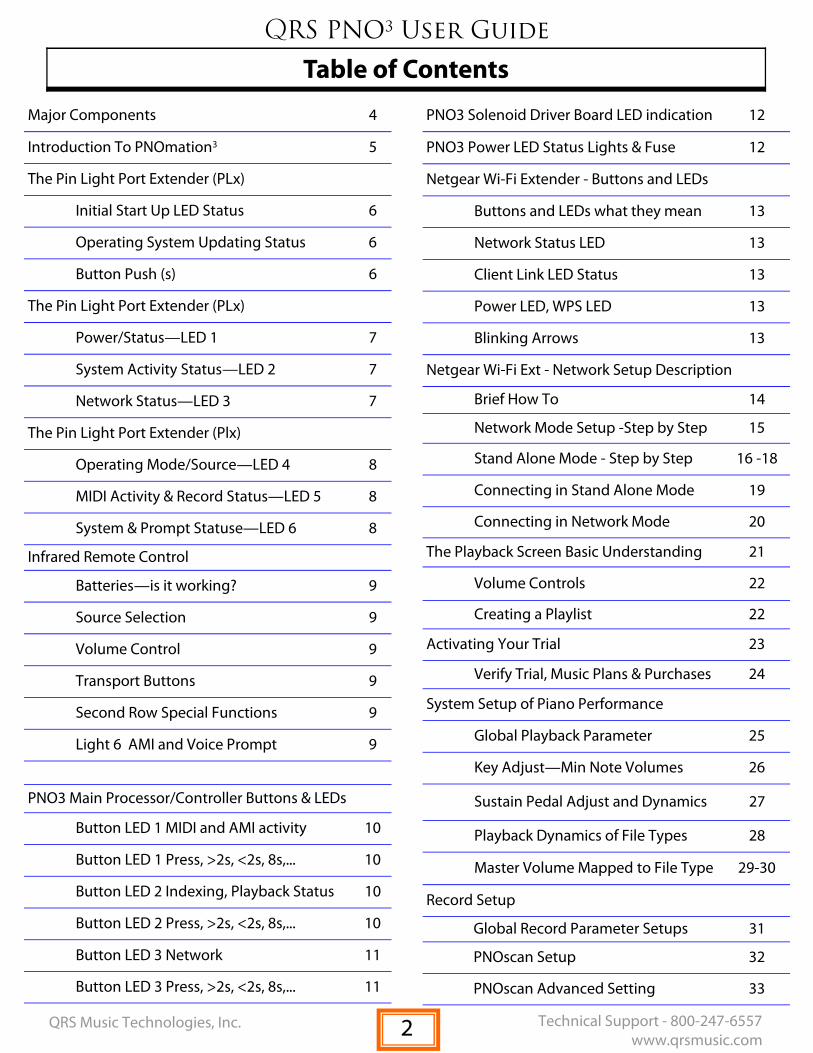
Table of Contents
Major Components 4
Introduction To PNOmation3 5
The Pin Light Port Extender (PLx)
Initial Start Up LED Status 6
Operating System Updating Status 6
Button Push (s) 6
The Pin Light Port Extender (PLx)
Power/Status—LED 1 7
System Activity Status—LED 2 7
Network Status—LED 3 7
The Pin Light Port Extender (Plx)
Operating Mode/Source—LED 4 8
MIDI Activity & Record Status—LED 5 8
System & Prompt Statuse—LED 6 8
Infrared Remote Control
Batteries—is it working? 9
Source Selection 9
Volume Control 9
Transport Buttons 9
Second Row Special Functions 9
Light 6 AMI and Voice Prompt 9
PNO3 Main Processor/Controller Buttons & LEDs
Button LED 1 MIDI and AMI activity 10
Button LED 1 Press, >2s, <2s, 8s,... 10
Button LED 2 Indexing, Playback Status 10
Button LED 2 Press, >2s, <2s, 8s,... 10
Button LED 3 Network 11
Button LED 3 Press, >2s, <2s, 8s,... 11
PNO3 Solenoid Driver Board LED indication 12
PNO3 Power LED Status Lights & Fuse 12
Netgear Wi-Fi Extender - Buttons and LEDs
Buttons and LEDs what they mean 13
Network Status LED 13
Client Link LED Status 13
Power LED, WPS LED 13
Blinking Arrows 13
Netgear Wi-Fi Ext - Network Setup Description
Brief How To 14
Network Mode Setup -Step by Step 15
Stand Alone Mode - Step by Step 16 -18
Connecting in Stand Alone Mode 19
Connecting in Network Mode 20
The Playback Screen Basic Understanding 21
Volume Controls 22
Creating a Playlist 22
Activating Your Trial 23
Verify Trial, Music Plans & Purchases 24
System Setup of Piano Performance
Global Playback Parameter 25
Key Adjust—Min Note Volumes 26
Sustain Pedal Adjust and Dynamics 27
Playback Dynamics of File Types 28
Master Volume Mapped to File Type 29-30
Record Setup
Global Record Parameter Setups 31
PNOscan Setup 32
PNOscan Advanced Setting 33
2
QRS PNO3 User Guide
QRS Music Technologies, Inc. Technical Support - 800-247-6557 www.qrsmusic.com
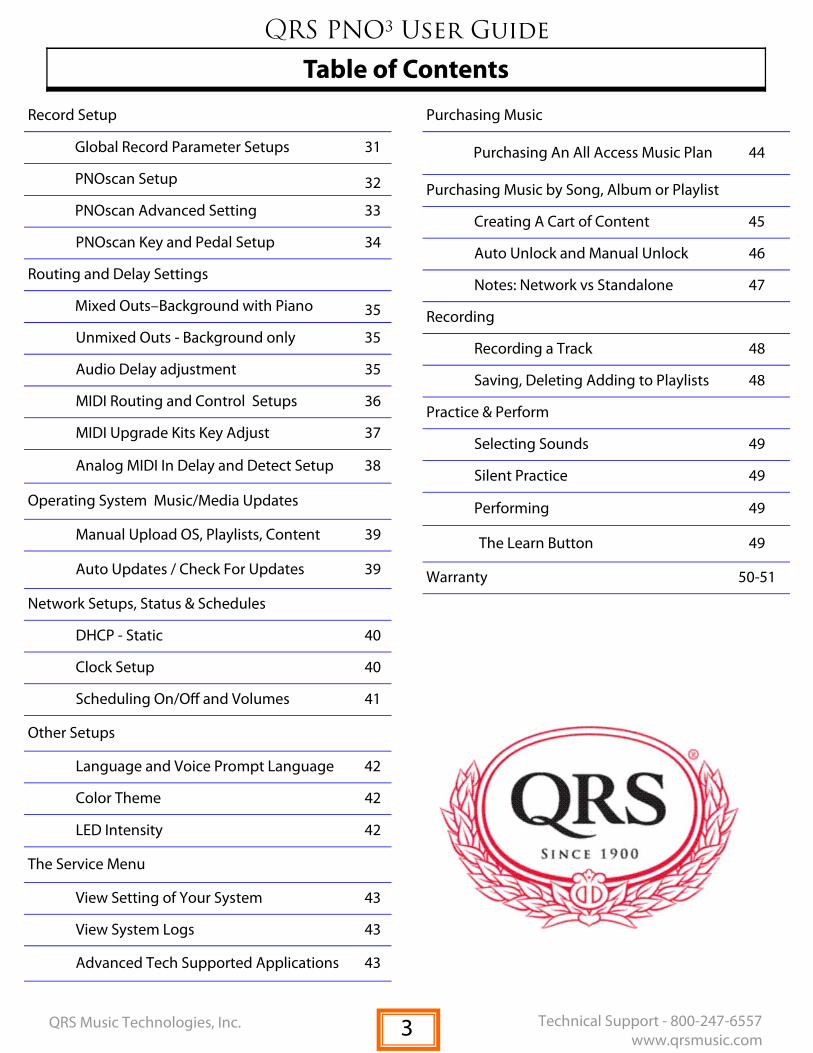
Table of Contents
Record Setup
Global Record Parameter Setups 31
PNOscan Setup 32
PNOscan Advanced Setting 33
PNOscan Key and Pedal Setup 34
Routing and Delay Settings
Mixed Outs–Background with Piano 35
Unmixed Outs - Background only 35
Audio Delay adjustment 35
MIDI Routing and Control Setups 36
MIDI Upgrade Kits Key Adjust 37
Analog MIDI In Delay and Detect Setup 38
Operating System Music/Media Updates
Manual Upload OS, Playlists, Content 39
Auto Updates / Check For Updates 39
Network Setups, Status & Schedules
DHCP - Static 40
Clock Setup 40
Scheduling On/Off and Volumes 41
Other Setups
Language and Voice Prompt Language 42
Color Theme 42
LED Intensity 42
The Service Menu
View Setting of Your System 43
View System Logs 43
Advanced Tech Supported Applications 43
Purchasing Music
Purchasing An All Access Music Plan 44
Purchasing Music by Song, Album or Playlist
Creating A Cart of Content 45
Auto Unlock and Manual Unlock 46
Notes: Network vs Standalone 47
Recording
Recording a Track 48
Saving, Deleting Adding to Playlists 48
Practice & Perform
Selecting Sounds 49
Silent Practice 49
Performing 49
The Learn Button 49
Warranty 50-51
3
QRS PNO3 User Guide
QRS Music Technologies, Inc. Technical Support - 800-247-6557 www.qrsmusic.com
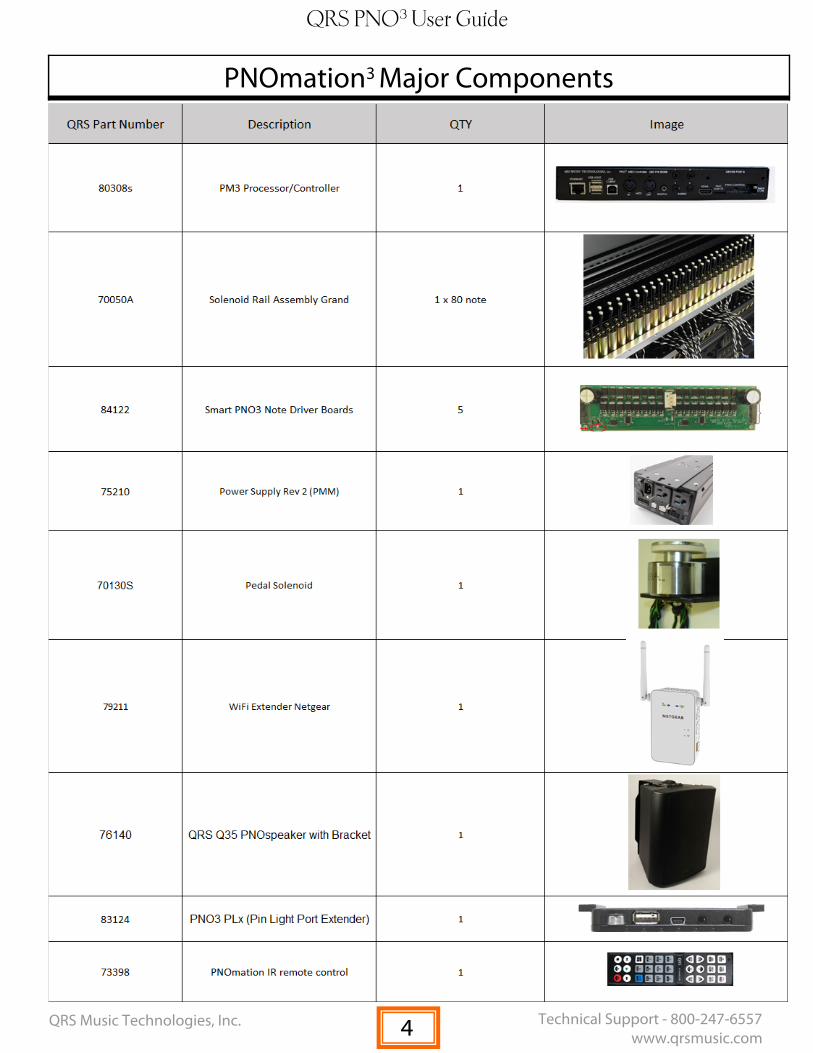
PNOmation3 Major Components
4
QRS PNO3 User Guide
QRS Music Technologies, Inc. Technical Support - 800-247-6557 www.qrsmusic.com
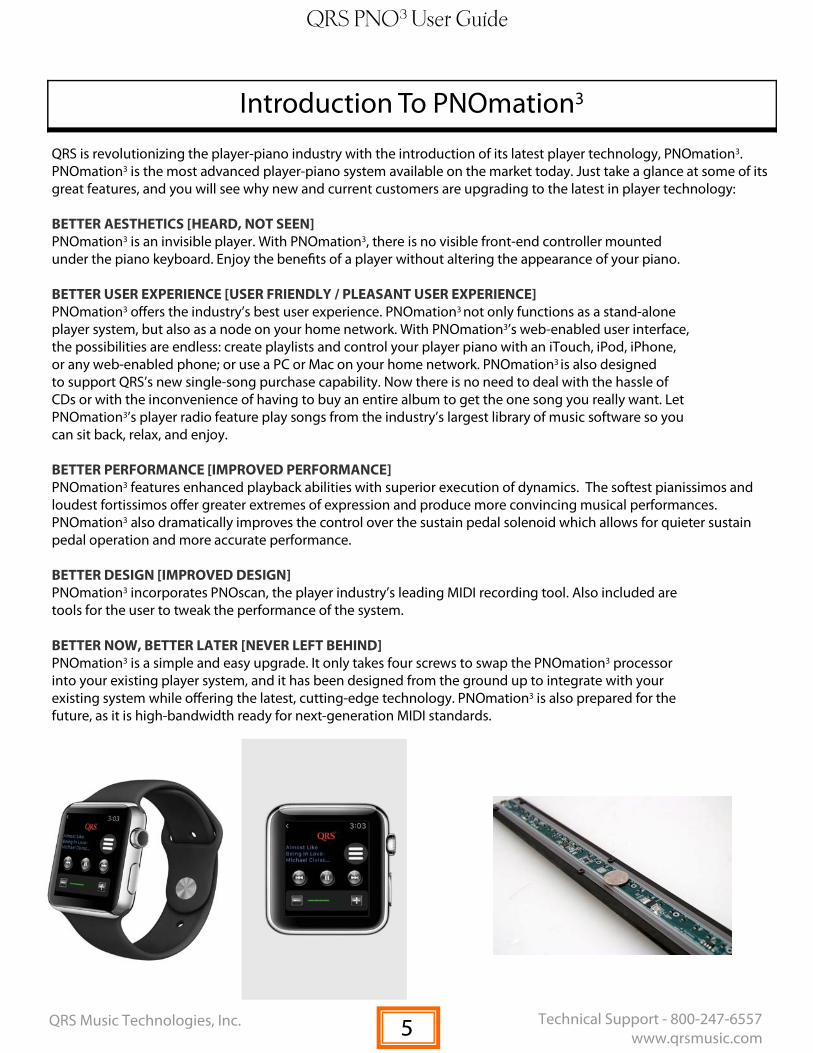
QRS is revolutionizing the player-piano industry with the introduction of its latest player technology, PNOmation3. PNOmation3 is the most advanced player-piano system available on the market today. Just take a glance at some of its great features, and you will see why new and current customers are upgrading to the latest in player technology: BETTER AESTHETICS [HEARD, NOT SEEN] PNOmation3 is an invisible player. With PNOmation3, there is no visible front-end controller mounted under the piano keyboard. Enjoy the benefits of a player without altering the appearance of your piano. BETTER USER EXPERIENCE [USER FRIENDLY / PLEASANT USER EXPERIENCE] PNOmation3 offers the industry’s best user experience. PNOmation3 not only functions as a stand-alone player system, but also as a node on your home network. With PNOmation3’s web-enabled user interface, the possibilities are endless: create playlists and control your player piano with an iTouch, iPod, iPhone, or any web-enabled phone; or use a PC or Mac on your home network. PNOmation3 is also designed to support QRS’s new single-song purchase capability. Now there is no need to deal with the hassle of CDs or with the inconvenience of having to buy an entire album to get the one song you really want. Let PNOmation3’s player radio feature play songs from the industry’s largest library of music software so you can sit back, relax, and enjoy. BETTER PERFORMANCE [IMPROVED PERFORMANCE] PNOmation3 features enhanced playback abilities with superior execution of dynamics. The softest pianissimos and loudest fortissimos offer greater extremes of expression and produce more convincing musical performances. PNOmation3 also dramatically improves the control over the sustain pedal solenoid which allows for quieter sustain pedal operation and more accurate performance. BETTER DESIGN [IMPROVED DESIGN] PNOmation3 incorporates PNOscan, the player industry’s leading MIDI recording tool. Also included are tools for the user to tweak the performance of the system. BETTER NOW, BETTER LATER [NEVER LEFT BEHIND] PNOmation3 is a simple and easy upgrade. It only takes four screws to swap the PNOmation3 processor into your existing player system, and it has been designed from the ground up to integrate with your existing system while offering the latest, cutting-edge technology. PNOmation3 is also prepared for the future, as it is high-bandwidth ready for next-generation MIDI standards.
Introduction To PNOmation3
5
QRS PNO3 User Guide
QRS Music Technologies, Inc. Technical Support - 800-247-6557 www.qrsmusic.com
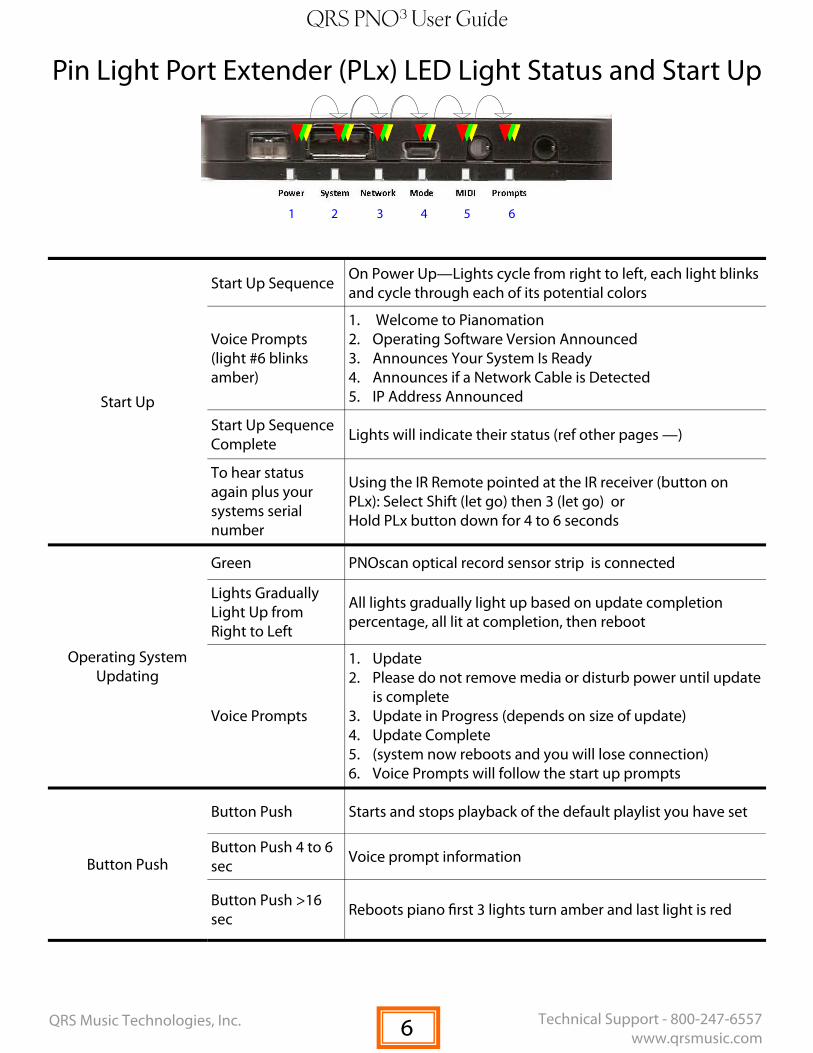
1 2 3 4 5 6
Start Up
Start Up Sequence On Power Up—Lights cycle from right to left, each light blinks and cycle through each of its potential colors
Voice Prompts (light #6 blinks amber)
1. Welcome to Pianomation 2. Operating Software Version Announced 3. Announces Your System Is Ready 4. Announces if a Network Cable is Detected 5. IP Address Announced
Start Up Sequence Complete Lights will indicate their status (ref other pages —)
To hear status again plus your systems serial number
Using the IR Remote pointed at the IR receiver (button on PLx): Select Shift (let go) then 3 (let go) or Hold PLx button down for 4 to 6 seconds
Operating System Updating
Green PNOscan optical record sensor strip is connected
Lights Gradually Light Up from Right to Left
All lights gradually light up based on update completion percentage, all lit at completion, then reboot
Voice Prompts
1. Update 2. Please do not remove media or disturb power until update
is complete 3. Update in Progress (depends on size of update) 4. Update Complete 5. (system now reboots and you will lose connection) 6. Voice Prompts will follow the start up prompts
Button Push
Button Push Starts and stops playback of the default playlist you have set
Button Push 4 to 6 sec Voice prompt information
Button Push >16 sec Reboots piano first 3 lights turn amber and last light is red
Pin Light Port Extender (PLx) LED Light Status and Start Up
6

QRS PNO3 User Guide
QRS Music Technologies, Inc. Technical Support - 800-247-6557 www.qrsmusic.com
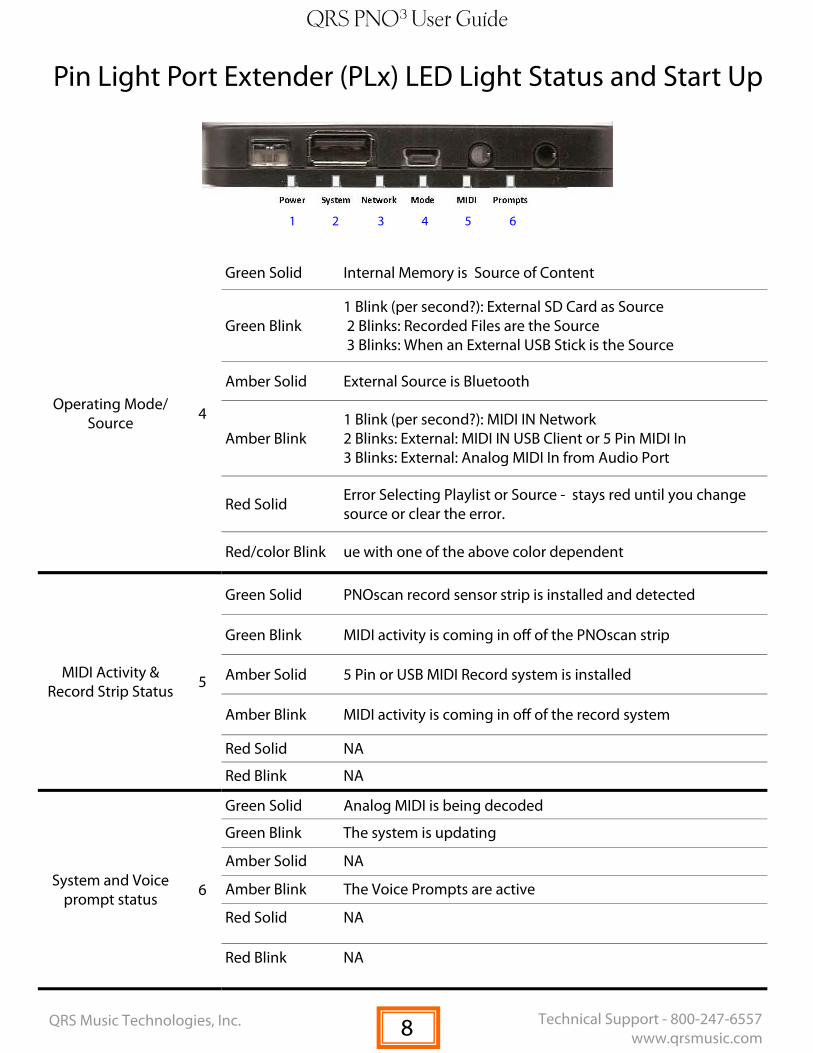
1 2 3 4 5 6
Power/Status 1
Green Solid Power to the solenoid rail is on, the high power light on the power supply is on, system is ready to be played.
Green Blink MIDI Control Data is being sent to the piano as a PWM signal. The piano should be playing.
Amber Solid The piano is in Stand By Mode, power to the solenoid rail is off, the high power light on the power supply is off, the piano is awaiting a signal to wake up before playing.
Amber Blink NA
Red Solid There is a Key Solenoid or Pedal Solenoid Over-Current status which will shut the high power to the system down.
Red Blink NA
System Activity 2
Green Solid The Pin Light Port Extender (PLx) has initialized, the controller under the piano has successfully initialized, and the low power light is on the power supply.
Green Blink NA
Amber Solid NA
Amber Blink The light will wink at you if the system is receiving an IR control signal.
Red Solid There is a power issue/failure on the solenoid rail.
Red Blink There is a power issue/failure on the pedal solenoid.
Network Status 3
Green Solid The system is in Stand-Alone Mode, which means it is acting as a router (hands out IP addresses) and belongs to its own network (QRSPNOxxx)
Green/ Red Blink
The system is setup to be in Stand-Alone Mode but there is no network device or cable connected.
Amber Solid The system is in Network Mode, which means it is acting as a node on an existing network (typically your homes). In this case the home router will assign an IP address to the PNO3 system.
Amber/Red Blink
The system is in Network Mode but there is no network device or cable connected
Pin Light Port Extender (PLx) LED Light Status and Start Up
7
QRS PNO3 User Guide
QRS Music Technologies, Inc. Technical Support - 800-247-6557 www.qrsmusic.com
1 2 3 4 5 6
Operating Mode/Source 4
Green Solid Internal Memory is Source of Content
Green Blink 1 Blink (per second?): External SD Card as Source 2 Blinks: Recorded Files are the Source 3 Blinks: When an External USB Stick is the Source
Amber Solid External Source is Bluetooth
Amber Blink 1 Blink (per second?): MIDI IN Network 2 Blinks: External: MIDI IN USB Client or 5 Pin MIDI In 3 Blinks: External: Analog MIDI In from Audio Port
Red Solid Error Selecting Playlist or Source - stays red until you change source or clear the error.
Red/color Blink ue with one of the above color dependent
MIDI Activity & Record Strip Status 5
Green Solid PNOscan record sensor strip is installed and detected
Green Blink MIDI activity is coming in off of the PNOscan strip
Amber Solid 5 Pin or USB MIDI Record system is installed
Amber Blink MIDI activity is coming in off of the record system
Red Solid NA
Red Blink NA
System and Voice prompt status 6
Green Solid Analog MIDI is being decoded
Green Blink The system is updating
Amber Solid NA
Amber Blink The Voice Prompts are active
Red Solid NA
Red Blink NA
Pin Light Port Extender (PLx) LED Light Status and Start Up
8
QRS PNO3 User Guide
QRS Music Technologies, Inc. Technical Support - 800-247-6557 www.qrsmusic.com
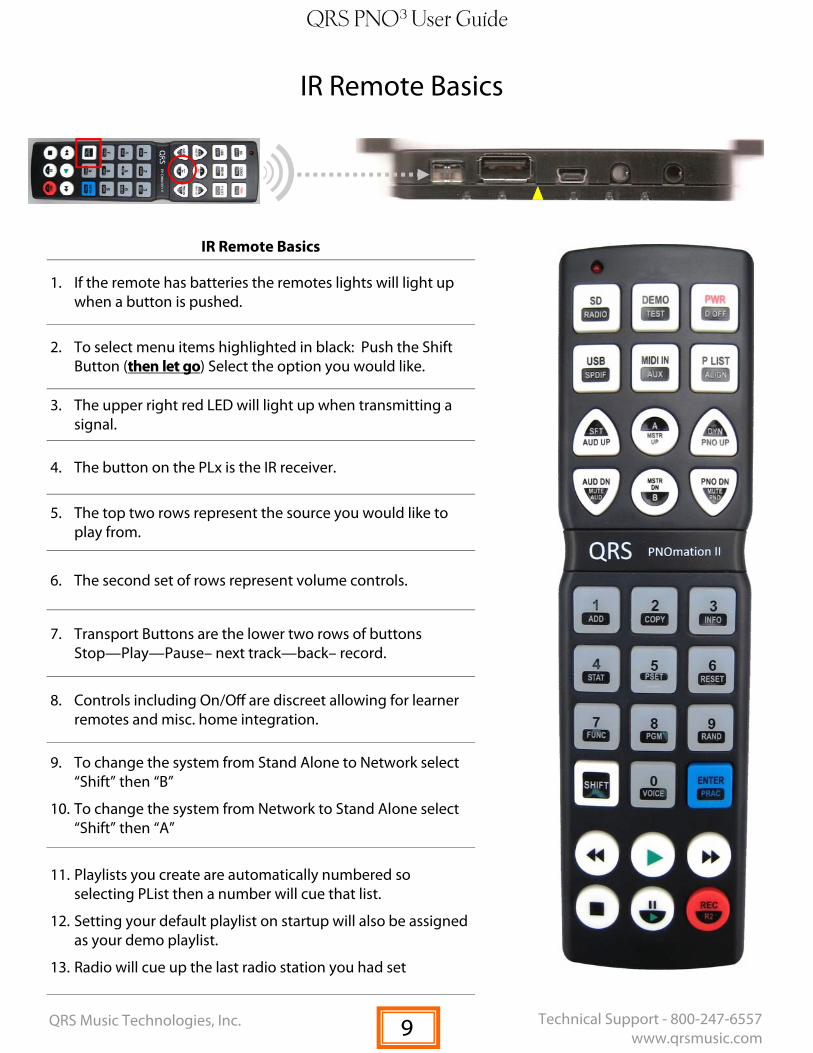
IR Remote Basics
1. If the remote has batteries the remotes lights will light up when a button is pushed.
2. To select menu items highlighted in black: Push the Shift Button (then let go) Select the option you would like.
3. The upper right red LED will light up when transmitting a signal.
4. The button on the PLx is the IR receiver.
5. The top two rows represent the source you would like to play from.
6. The second set of rows represent volume controls.
7. Transport Buttons are the lower two rows of buttons Stop—Play—Pause– next track—back– record.
8. Controls including On/Off are discreet allowing for learner remotes and misc. home integration.
9. To change the system from Stand Alone to Network select “Shift” then “B”
10. To change the system from Network to Stand Alone select “Shift” then “A”
11. Playlists you create are automatically numbered so selecting PList then a number will cue that list.
12. Setting your default playlist on startup will also be assigned as your demo playlist.
13. Radio will cue up the last radio station you had set
IR Remote Basics
9

QRS PNO3 User Guide
QRS Music Technologies, Inc. Technical Support - 800-247-6557 www.qrsmusic.com
Bu on LED 1
Mode Precedence Meaning
Flashes on each event Flashes with MIDI Data
Solid ‐‐‐ Reliable AMI If DISPLAY AMI ON LED is enabled Flashes with AMI notes
Bu on LED 1 ‐ Bu on Presses
Opera on Func on Requirement
Press Informa on (Audio IP Address, Serial #, Version)
Pressed for > 2 seconds Volume Increase If Playing
Pressed for < 2 seconds Go to Previous Track If Playing
Hold for 8 seconds Standby (Low power)
Hold 1 and 3 on Power Up Factory Reset On Boot Up
Proc Light 3 then light 1 then you can let go
Bu on LED 2
Mode Precedence Meaning
Solid During Playback
1 Flash Per Sec Indexing Music
Bu on LED 2– Bu on Presses
Opera on Func on Requirement
Pressed for < 2 seconds Play/Stop Track playing for pause
Pressed for < 2 seconds High Power Turn On If in Standby
Hold for 8 seconds Reboot
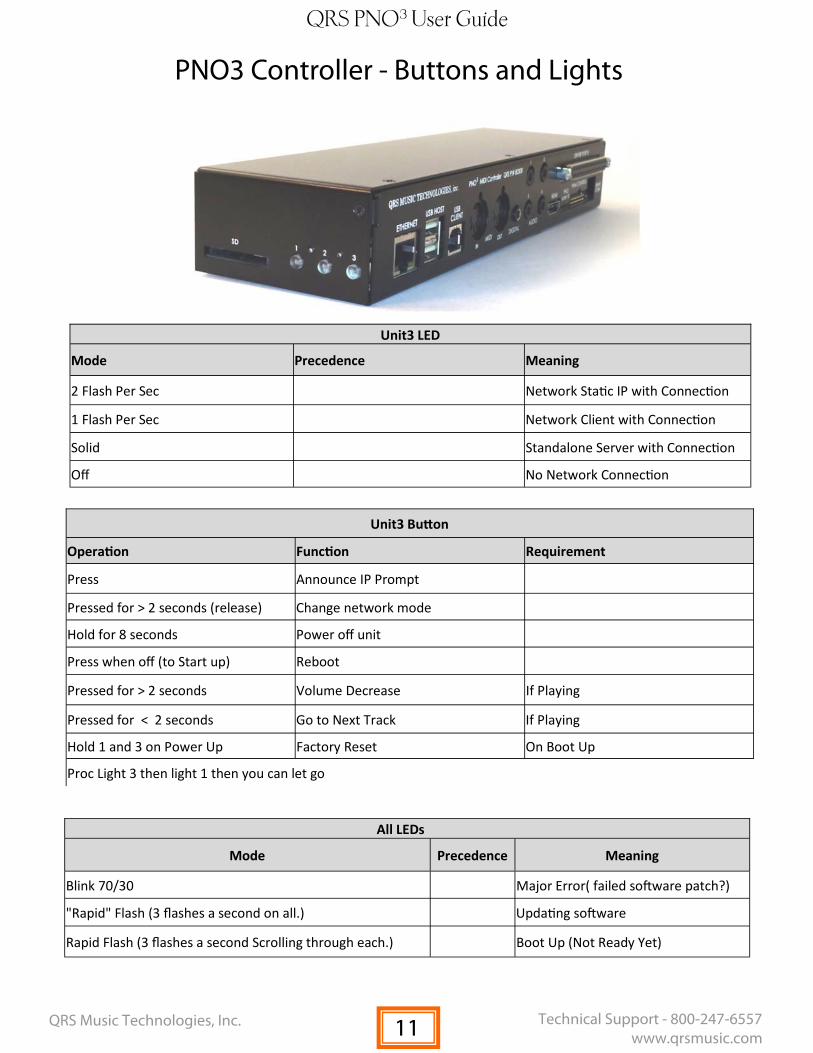
PNO3 Controller - Buttons and Lights
10
QRS PNO3 User Guide
QRS Music Technologies, Inc. Technical Support - 800-247-6557 www.qrsmusic.com
Unit3 LED
Mode Precedence Meaning
2 Flash Per Sec Network Sta c IP with Connec on
1 Flash Per Sec Network Client with Connec on
Solid Standalone Server with Connec on
Off No Network Connec on
Unit3 Bu on
Opera on Func on Requirement
Press Announce IP Prompt
Pressed for > 2 seconds (release) Change network mode
Hold for 8 seconds Power off unit
Press when off (to Start up) Reboot
Pressed for > 2 seconds Volume Decrease If Playing
Pressed for < 2 seconds Go to Next Track If Playing
Hold 1 and 3 on Power Up Factory Reset On Boot Up
Proc Light 3 then light 1 then you can let go
Mode Precedence Meaning
Blink 70/30 Major Error( failed so ware patch?)
"Rapid" Flash (3 flashes a second on all.) Upda ng so ware
Rapid Flash (3 flashes a second Scrolling through each.) Boot Up (Not Ready Yet)
All LEDs
PNO3 Controller - Buttons and Lights
11

QRS PNO3 User Guide
QRS Music Technologies, Inc. Technical Support - 800-247-6557 www.qrsmusic.com
Smart Solenoid Driver Board LED Status (req ver .311) units shipped from QRS after 8/1/2016
1. Power Led Solid Amber The High Power Light on the power supply is on, PLx power light is green, Solenoids are ready to go
2. Logic LED Solid Green No light 1 Blink Green
Control data line is connected and all is good Driver Board is bad or cable is out A solenoid is bypassed—run test
3. Solenoid Activity LED Blinks either amber or green When control signal is received
4. Programming Boot Up LED No Lights – Something Wrong with Driver Board or No bootloader (must be programmed) Fast Blinking – Test Mode, Dip switch 0 position. Slow Blinking – Has bootloader but needs programmed Fast Blink number of times then stops to indicate board position
QRS PNOmation Solenoid Driver Board (cat #: 84122) The information below is provided for your convenience and varies depending on the version of driver
board you have. The Solenoid driver boards are located under a cover and typically not seen. We recommend a certified QRS technician service the system.
Power Toggle: Turns On and Off the power to the system—same result as pulling the plug.
Fuse: 7Amp - 250V
Hi and Low Power Lights - Low means that the processor is receiving power, Hi means that there is power going to the solenoid driver boards and the PLx power light is solid green.
QRS PNOmation Power Supply (cat #:75210) The power supply is typically located under the piano on a grand, inside on an upright and inside the
Dip 1 2 3 4 5 6 7
Board 1 1 0 0 0 0 0 0
Board 2 0 1 0 0 0 0 0
Board 3 1 1 0 0 0 0 0
Board 4 0 0 1 0 0 0 0
Board 5 1 0 1 0 0 0 0
8
0
0
0
0
0 1 2 4
3
5
5
12

QRS PNO3 User Guide
QRS Music Technologies, Inc. Technical Support - 800-247-6557 www.qrsmusic.com
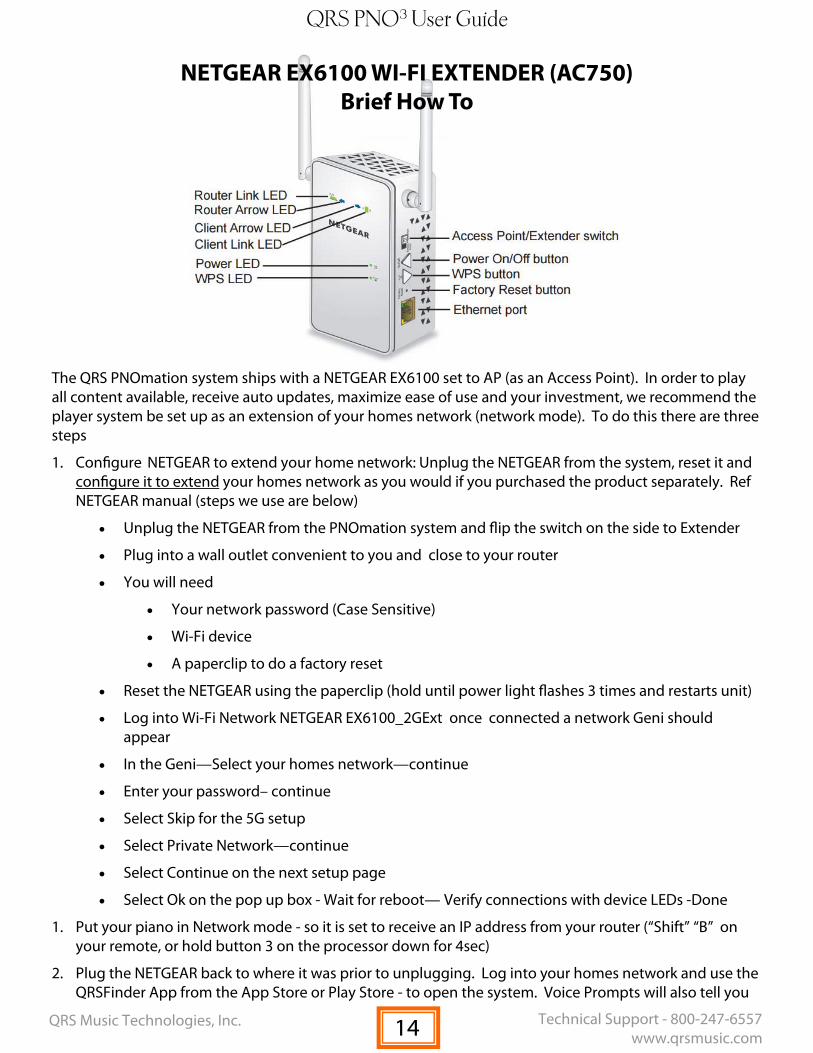
NETGEAR EX6100 WI-FI EXTENDER (AC750) LED above the N in Netgear is the Router Link LED - this indicates status between the extender and the router or access point
Solid Green Solid Amber Solid Red Off
Best Connection Good Connection Poor Connection No Connection
When green it is talking to your home network, when amber it has a weak connection to your WiFi Network
LED above the R in NETGEAR is the Client Link LED. It indicates the connection between the extender and a computer or mobile device.
Solid Green Solid Amber Solid Red Off
Best Connection Good Connection Poor Connection No Connection
When Green a device is logged into the Netgear, usually we will be logged into your homes network.
Power LED Solid Amber Solid Green Off
The extender is booting The extender is powered on The extender is powered off
WPS LED Solid Green Blinking Green Off
Wi-Fi security is enabled (WPA or WPA2) A WPS connection is in progress Wi-Fi security is not enabled
Blinking Arrows Indicate that the extender or client are not in an optimal reception location.
NETGEAR EX6100 WI-FI EXTENDER (AC750) Buttons and LEDs
13
QRS PNO3 User Guide
QRS Music Technologies, Inc. Technical Support - 800-247-6557 www.qrsmusic.com
The QRS PNOmation system ships with a NETGEAR EX6100 set to AP (as an Access Point). In order to play all content available, receive auto updates, maximize ease of use and your investment, we recommend the player system be set up as an extension of your homes network (network mode). To do this there are three steps
1. Configure NETGEAR to extend your home network: Unplug the NETGEAR from the system, reset it and configure it to extend your homes network as you would if you purchased the product separately. Ref NETGEAR manual (steps we use are below)
Unplug the NETGEAR from the PNOmation system and flip the switch on the side to Extender
Plug into a wall outlet convenient to you and close to your router
You will need
Your network password (Case Sensitive)
Wi-Fi device
A paperclip to do a factory reset
Reset the NETGEAR using the paperclip (hold until power light flashes 3 times and restarts unit)
Log into Wi-Fi Network NETGEAR EX6100_2GExt once connected a network Geni should appear
In the Geni—Select your homes network—continue
Enter your password– continue
Select Skip for the 5G setup
Select Private Network—continue
Select Continue on the next setup page
Select Ok on the pop up box - Wait for reboot— Verify connections with device LEDs -Done
1. Put your piano in Network mode - so it is set to receive an IP address from your router (“Shift” “B” on your remote, or hold button 3 on the processor down for 4sec)
2. Plug the NETGEAR back to where it was prior to unplugging. Log into your homes network and use the QRSFinder App from the App Store or Play Store - to open the system. Voice Prompts will also tell you
NETGEAR EX6100 WI-FI EXTENDER (AC750) Brief How To
14
QRS PNO3 User Guide
QRS Music Technologies, Inc. Technical Support - 800-247-6557 www.qrsmusic.com
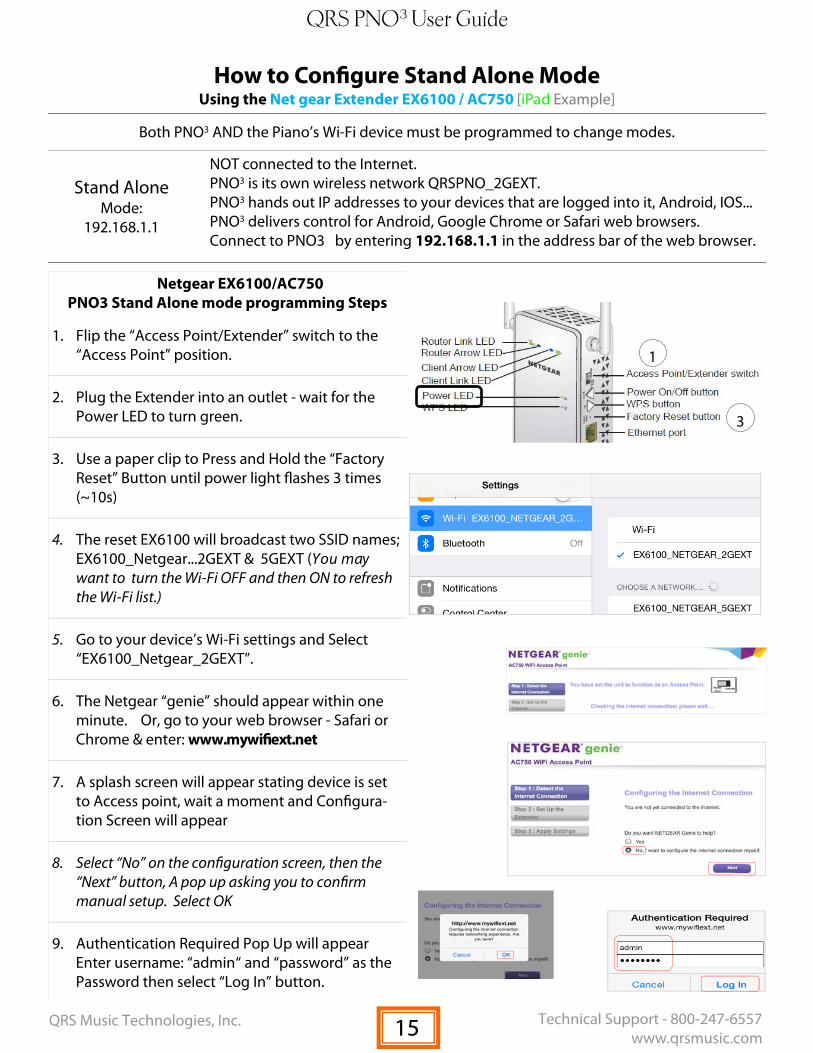
Both PNO3 AND the Piano’s Wi-Fi device must be programmed to change modes.
Stand Alone Mode:
192.168.1.1
NOT connected to the Internet. PNO3 is its own wireless network QRSPNO_2GEXT. PNO3 hands out IP addresses to your devices that are logged into it, Android, IOS... PNO3 delivers control for Android, Google Chrome or Safari web browsers. Connect to PNO3 by entering 192.168.1.1 in the address bar of the web browser.
How to Configure Stand Alone Mode Using the Net gear Extender EX6100 / AC750 [iPad Example]
Netgear EX6100/AC750 PNO3 Stand Alone mode programming Steps
1. Flip the “Access Point/Extender” switch to the “Access Point” position.
2. Plug the Extender into an outlet - wait for the Power LED to turn green.
3. Use a paper clip to Press and Hold the “Factory Reset” Button until power light flashes 3 times (~10s)
4. The reset EX6100 will broadcast two SSID names; EX6100_Netgear...2GEXT & 5GEXT (You may want to turn the Wi-Fi OFF and then ON to refresh the Wi-Fi list.)
5. Go to your device’s Wi-Fi settings and Select “EX6100_Netgear_2GEXT”.
6. The Netgear “genie” should appear within one minute. Or, go to your web browser - Safari or Chrome & enter: www.mywifiext.net
7. A splash screen will appear stating device is set to Access point, wait a moment and Configura-tion Screen will appear
8. Select “No” on the configuration screen, then the “Next” button, A pop up asking you to confirm manual setup. Select OK
9. Authentication Required Pop Up will appear Enter username: “admin“ and “password” as the Password then select “Log In” button.
1
3
15
QRS PNO3 User Guide
QRS Music Technologies, Inc. Technical Support - 800-247-6557 www.qrsmusic.com
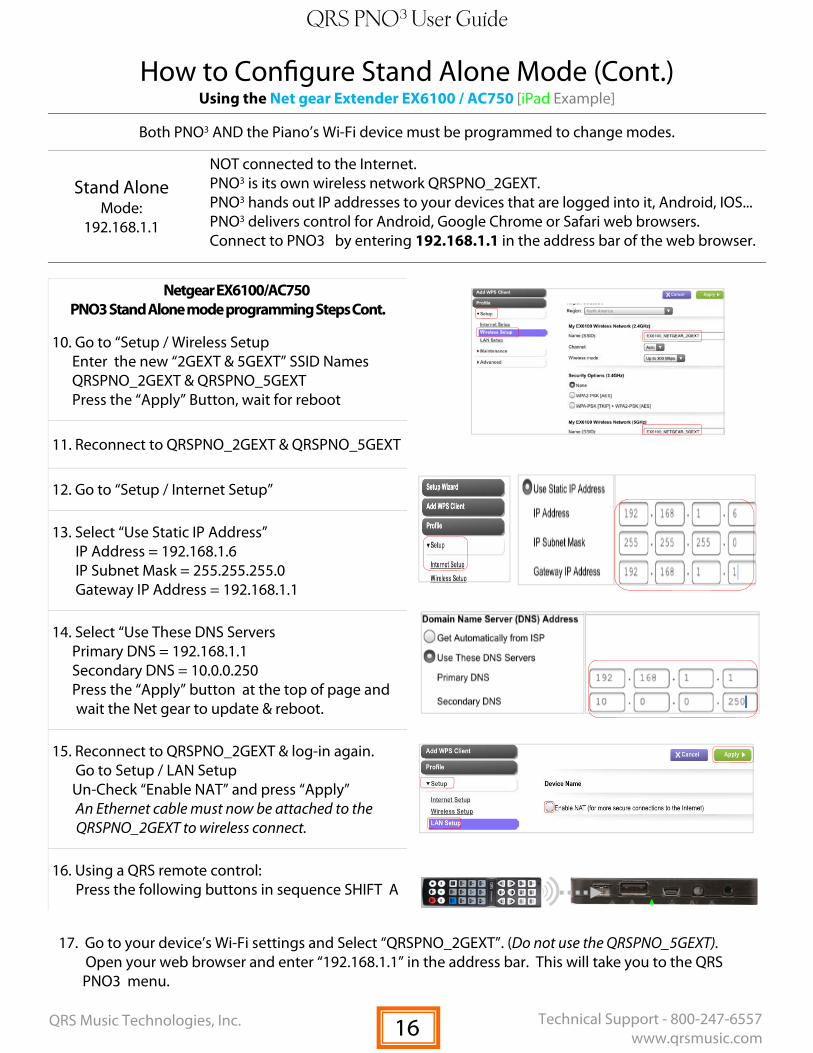
Both PNO3 AND the Piano’s Wi-Fi device must be programmed to change modes.
Stand Alone Mode:
192.168.1.1
NOT connected to the Internet. PNO3 is its own wireless network QRSPNO_2GEXT. PNO3 hands out IP addresses to your devices that are logged into it, Android, IOS... PNO3 delivers control for Android, Google Chrome or Safari web browsers. Connect to PNO3 by entering 192.168.1.1 in the address bar of the web browser.
How to Configure Stand Alone Mode (Cont.) Using the Net gear Extender EX6100 / AC750 [iPad Example]
Netgear EX6100/AC750 PNO3 Stand Alone mode programming Steps Cont.
10. Go to “Setup / Wireless Setup Enter the new “2GEXT & 5GEXT” SSID Names QRSPNO_2GEXT & QRSPNO_5GEXT Press the “Apply” Button, wait for reboot
11. Reconnect to QRSPNO_2GEXT & QRSPNO_5GEXT
12. Go to “Setup / Internet Setup”
13. Select “Use Static IP Address” IP Address = 192.168.1.6 IP Subnet Mask = 255.255.255.0 Gateway IP Address = 192.168.1.1
14. Select “Use These DNS Servers Primary DNS = 192.168.1.1 Secondary DNS = 10.0.0.250 Press the “Apply” button at the top of page and
wait the Net gear to update & reboot.
15. Reconnect to QRSPNO_2GEXT & log-in again. Go to Setup / LAN Setup Un-Check “Enable NAT” and press “Apply” An Ethernet cable must now be attached to the
QRSPNO_2GEXT to wireless connect.
16. Using a QRS remote control: Press the following buttons in sequence SHIFT A
17. Go to your device’s Wi-Fi settings and Select “QRSPNO_2GEXT”. (Do not use the QRSPNO_5GEXT). Open your web browser and enter “192.168.1.1” in the address bar. This will take you to the QRS
PNO3 menu.
16
QRS PNO3 User Guide
QRS Music Technologies, Inc. Technical Support - 800-247-6557 www.qrsmusic.com
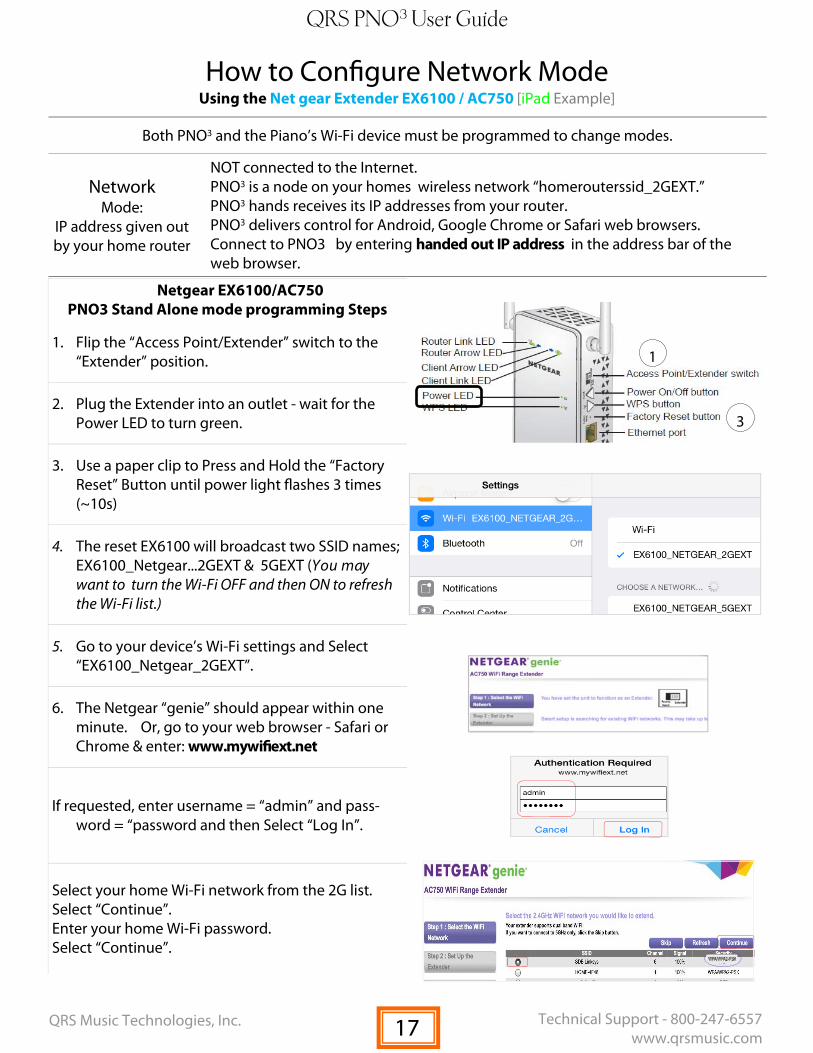
How to Configure Network Mode Using the Net gear Extender EX6100 / AC750 [iPad Example]
Netgear EX6100/AC750 PNO3 Stand Alone mode programming Steps
1. Flip the “Access Point/Extender” switch to the “Extender” position.
2. Plug the Extender into an outlet - wait for the Power LED to turn green.
3. Use a paper clip to Press and Hold the “Factory Reset” Button until power light flashes 3 times (~10s)
4. The reset EX6100 will broadcast two SSID names; EX6100_Netgear...2GEXT & 5GEXT (You may want to turn the Wi-Fi OFF and then ON to refresh the Wi-Fi list.)
5. Go to your device’s Wi-Fi settings and Select “EX6100_Netgear_2GEXT”.
6. The Netgear “genie” should appear within one minute. Or, go to your web browser - Safari or Chrome & enter: www.mywifiext.net
If requested, enter username = “admin” and pass-word = “password and then Select “Log In”.
Select your home Wi-Fi network from the 2G list. Select “Continue”. Enter your home Wi-Fi password. Select “Continue”.
1
3
Both PNO3 and the Piano’s Wi-Fi device must be programmed to change modes.
Network Mode:
IP address given out by your home router
NOT connected to the Internet. PNO3 is a node on your homes wireless network “homerouterssid_2GEXT.” PNO3 hands receives its IP addresses from your router. PNO3 delivers control for Android, Google Chrome or Safari web browsers. Connect to PNO3 by entering handed out IP address in the address bar of the web browser.
17
QRS PNO3 User Guide
QRS Music Technologies, Inc. Technical Support - 800-247-6557 www.qrsmusic.com
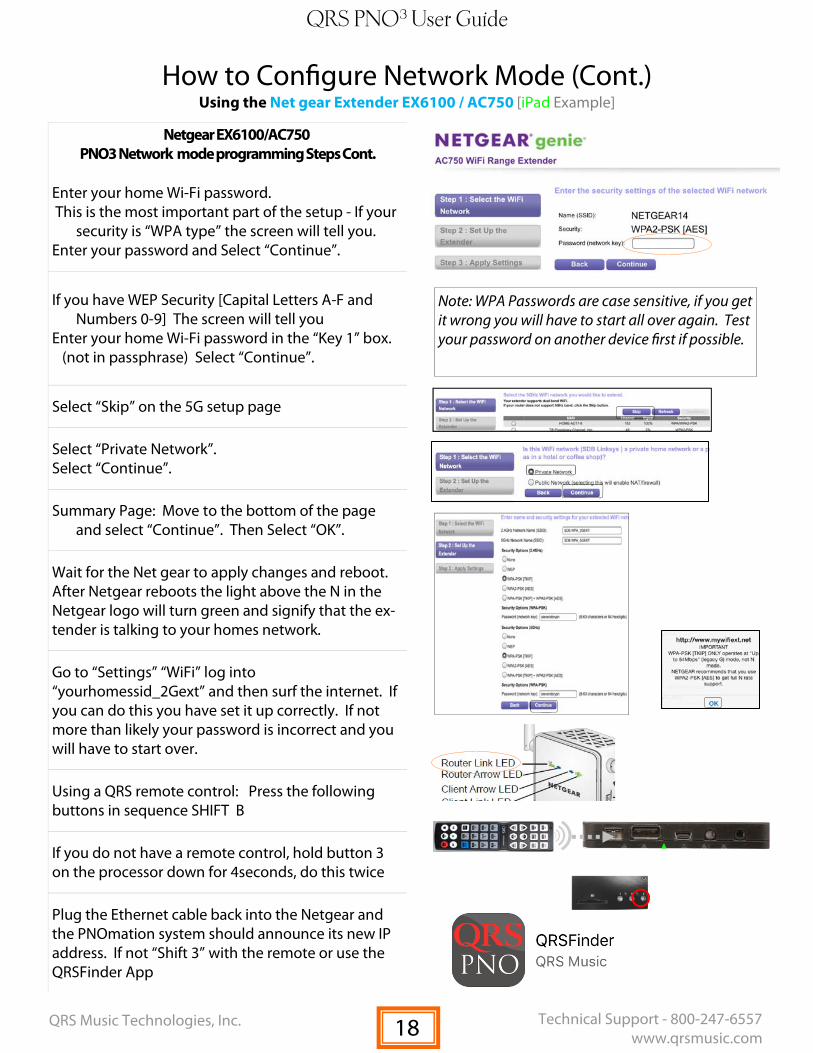
How to Configure Network Mode (Cont.) Using the Net gear Extender EX6100 / AC750 [iPad Example]
Netgear EX6100/AC750 PNO3 Network mode programming Steps Cont.
Enter your home Wi-Fi password. This is the most important part of the setup - If your
security is “WPA type” the screen will tell you. Enter your password and Select “Continue”.
If you have WEP Security [Capital Letters A-F and Numbers 0-9] The screen will tell you
Enter your home Wi-Fi password in the “Key 1” box. (not in passphrase) Select “Continue”.
Select “Skip” on the 5G setup page
Select “Private Network”. Select “Continue”.
Summary Page: Move to the bottom of the page and select “Continue”. Then Select “OK”.
Wait for the Net gear to apply changes and reboot. After Netgear reboots the light above the N in the Netgear logo will turn green and signify that the ex-tender is talking to your homes network.
Go to “Settings” “WiFi” log into “yourhomessid_2Gext” and then surf the internet. If you can do this you have set it up correctly. If not more than likely your password is incorrect and you will have to start over.
Using a QRS remote control: Press the following buttons in sequence SHIFT B
If you do not have a remote control, hold button 3 on the processor down for 4seconds, do this twice
Plug the Ethernet cable back into the Netgear and the PNOmation system should announce its new IP address. If not “Shift 3” with the remote or use the QRSFinder App
Note: WPA Passwords are case sensitive, if you get it wrong you will have to start all over again. Test your password on another device first if possible.
18
QRS PNO3 User Guide
QRS Music Technologies, Inc. Technical Support - 800-247-6557 www.qrsmusic.com
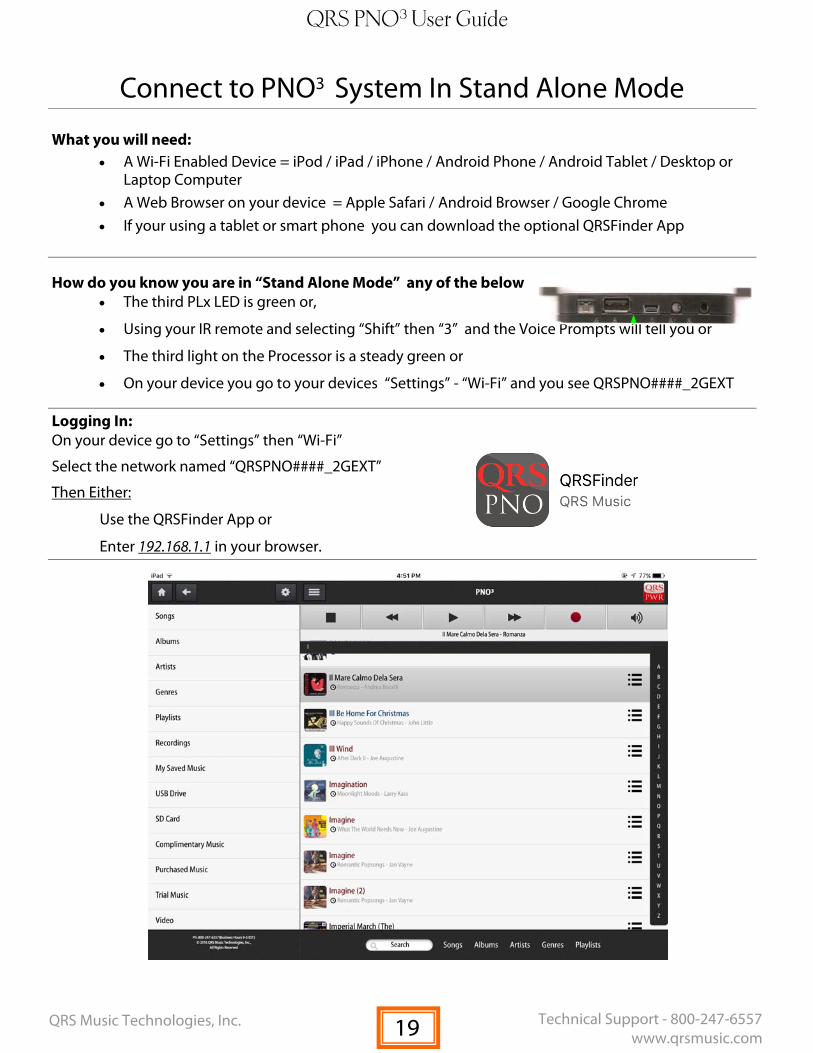
Connect to PNO3 System In Stand Alone Mode
What you will need: A Wi-Fi Enabled Device = iPod / iPad / iPhone / Android Phone / Android Tablet / Desktop or
Laptop Computer A Web Browser on your device = Apple Safari / Android Browser / Google Chrome If your using a tablet or smart phone you can download the optional QRSFinder App
How do you know you are in “Stand Alone Mode” any of the below The third PLx LED is green or,
Using your IR remote and selecting “Shift” then “3” and the Voice Prompts will tell you or
The third light on the Processor is a steady green or
On your device you go to your devices “Settings” - “Wi-Fi” and you see QRSPNO####_2GEXT
Logging In: On your device go to “Settings” then “Wi-Fi”
Select the network named “QRSPNO####_2GEXT”
Then Either:
Use the QRSFinder App or
Enter 192.168.1.1 in your browser.
19
QRS PNO3 User Guide
QRS Music Technologies, Inc. Technical Support - 800-247-6557 www.qrsmusic.com
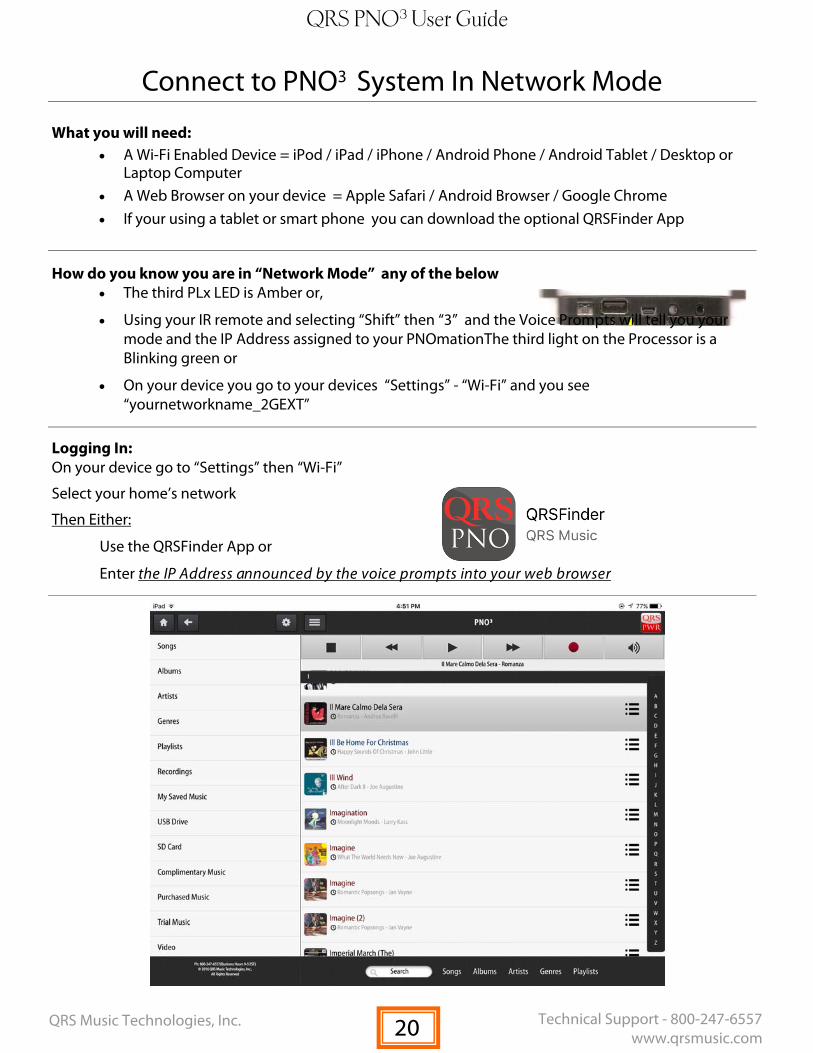
Connect to PNO3 System In Network Mode
What you will need: A Wi-Fi Enabled Device = iPod / iPad / iPhone / Android Phone / Android Tablet / Desktop or
Laptop Computer A Web Browser on your device = Apple Safari / Android Browser / Google Chrome If your using a tablet or smart phone you can download the optional QRSFinder App
How do you know you are in “Network Mode” any of the below The third PLx LED is Amber or,
Using your IR remote and selecting “Shift” then “3” and the Voice Prompts will tell you your mode and the IP Address assigned to your PNOmationThe third light on the Processor is a Blinking green or
On your device you go to your devices “Settings” - “Wi-Fi” and you see “yournetworkname_2GEXT”
Logging In: On your device go to “Settings” then “Wi-Fi”
Select your home’s network
Then Either:
Use the QRSFinder App or
Enter the IP Address announced by the voice prompts into your web browser
20

QRS PNO3 User Guide
QRS Music Technologies, Inc. Technical Support - 800-247-6557 www.qrsmusic.com
Touch/Click on a song name to play that song.
To scroll through the list: Use finger or PC Mouse [Click & Hold left button then drag mouse up/down].
Stops Playback
Back & Forward Track
Play/Pause Playback
Volume Controls
Jump to Home Screen
Go back one screen
Jump to System Setup
Displays Menu
Record Menu
Jump To Letter
Playlist Popup
Add Song To Playlist
Add Album To Playlist
Go To Album
Go To Artist
Track Status Temporary Unlock Expires on 1/20/2017
Music trial or subscription time is active.
Indicates Complimentary song.
Newly released song with in last year
Sing-Along Song. Select Microphone icon to display lyrics.
Black Songs
Piano with Audio Accompaniment - Original Artist’s Audio
Sync Along Series
Blue Songs
Piano with Audio Accompaniment - QRS Produced
Concert Series
Red Songs
Piano Only - QRS Produced
Nostalgic/Performance
Understanding The Playback Screen
21
QRS PNO3 User Guide
QRS Music Technologies, Inc. Technical Support - 800-247-6557 www.qrsmusic.com
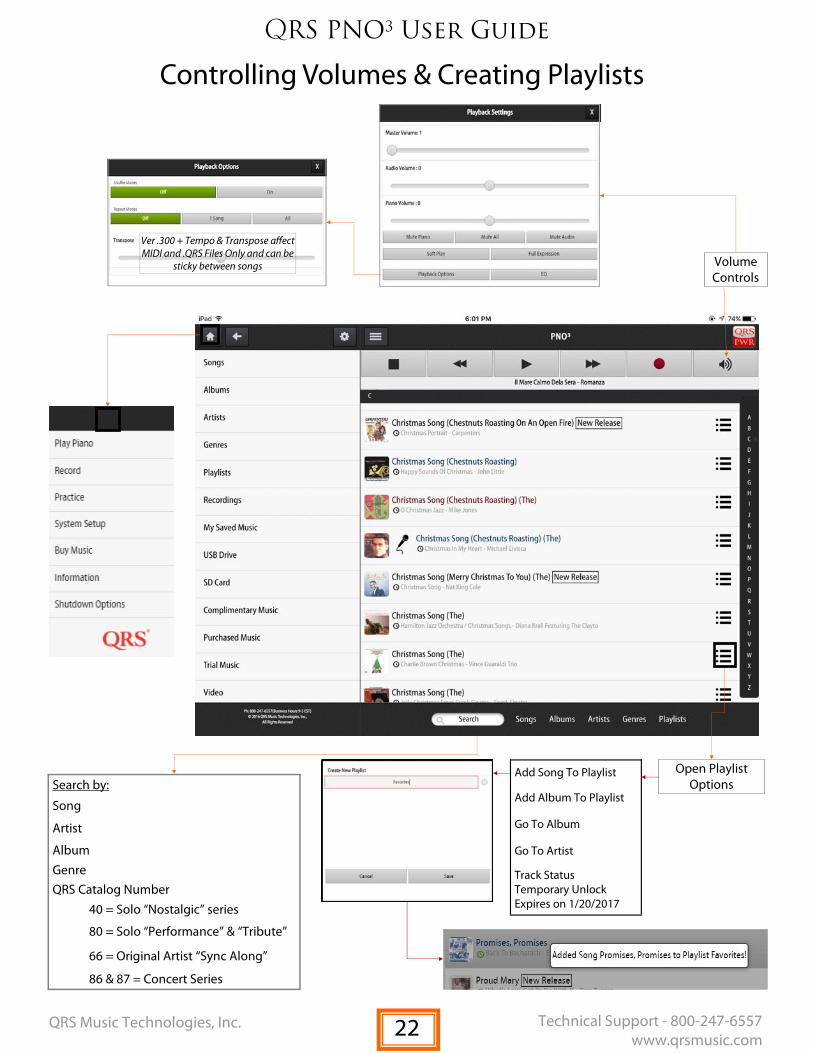
Ver .300 + Tempo & Transpose affect MIDI and .QRS Files Only and can be
sticky between songs
Search by:
Song
Artist
Album Genre QRS Catalog Number
40 = Solo “Nostalgic” series
80 = Solo “Performance” & “Tribute”
66 = Original Artist “Sync Along”
86 & 87 = Concert Series
Volume Controls
Open Playlist Options
Add Song To Playlist
Add Album To Playlist
Go To Album
Go To Artist
Track Status Temporary Unlock Expires on 1/20/2017
Controlling Volumes & Creating Playlists
22
QRS PNO3 User Guide
QRS Music Technologies, Inc. Technical Support - 800-247-6557 www.qrsmusic.com
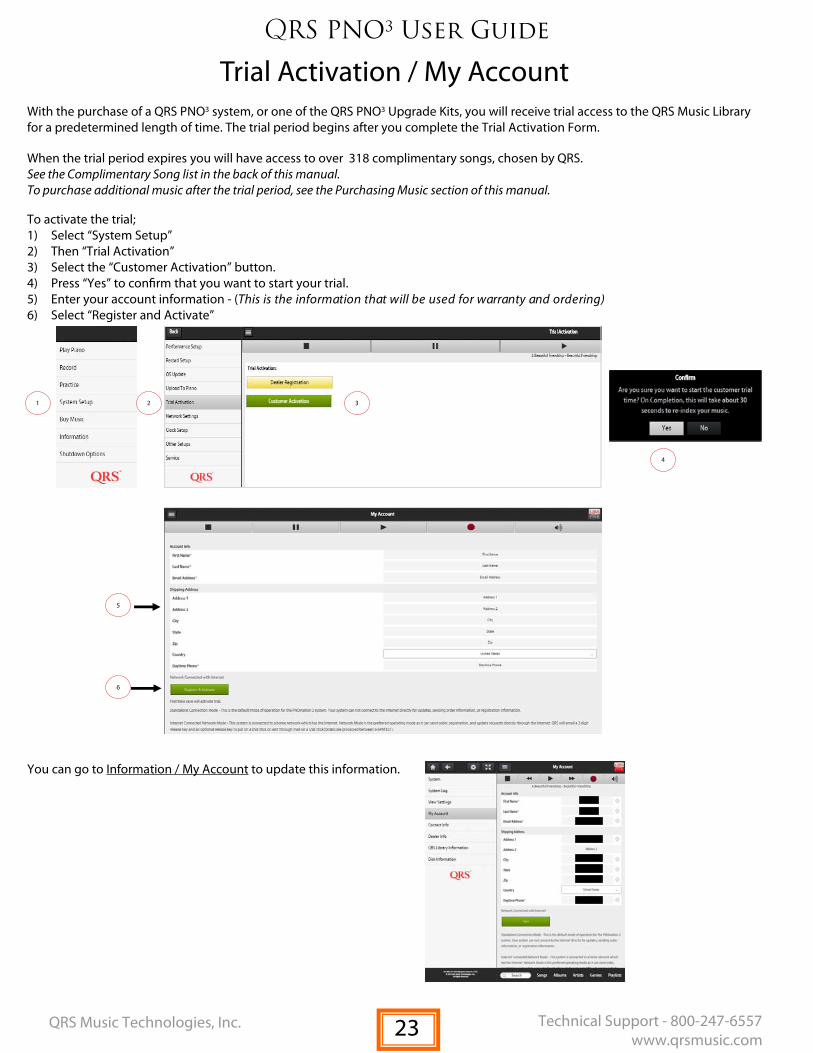
Trial Activation / My Account With the purchase of a QRS PNO3 system, or one of the QRS PNO3 Upgrade Kits, you will receive trial access to the QRS Music Library for a predetermined length of time. The trial period begins after you complete the Trial Activation Form.
When the trial period expires you will have access to over 318 complimentary songs, chosen by QRS. See the Complimentary Song list in the back of this manual. To purchase additional music after the trial period, see the Purchasing Music section of this manual.
To activate the trial; 1) Select “System Setup” 2) Then “Trial Activation” 3) Select the “Customer Activation” button. 4) Press “Yes” to confirm that you want to start your trial. 5) Enter your account information - (This is the information that will be used for warranty and ordering) 6) Select “Register and Activate”
You can go to Information / My Account to update this information.
1 2 3
4
5
6
23

QRS PNO3 User Guide
QRS Music Technologies, Inc. Technical Support - 800-247-6557 www.qrsmusic.com
318
6000
Permanent Unlock represents Complimentary and Purchased Music.
Temporary represents a Dealer or Customer trial or a purchased QRS
Access Plan
Complimentary Music
Purchased music: Playlist and Orders. QRS catalog number 662053 has been
Dealer Trial
Customer Trial
Special Trial
Expired Trial or QRS Access Plans. Available QRS Access Plans are for Two,
Four or Ten year periods
Verify Trial, Access Plan and Purchased Music Status
To view the status of the music on the system, go to; System Setup / Service / View Settings.
24
QRS PNO3 User Guide
QRS Music Technologies, Inc. Technical Support - 800-247-6557 www.qrsmusic.com
1
2
3
4
5
6
7
8
9
11
12
13
14
10
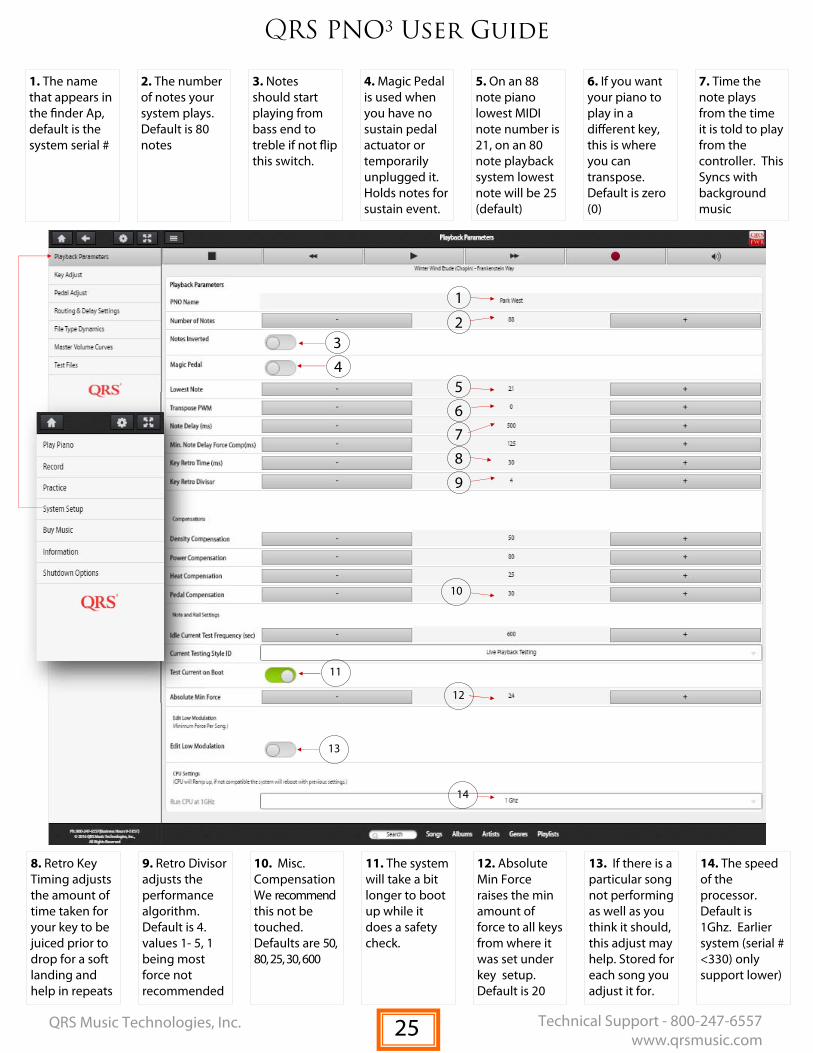
1. The name that appears in the finder Ap, default is the system serial #
2. The number of notes your system plays. Default is 80 notes
3. Notes should start playing from bass end to treble if not flip this switch.
4. Magic Pedal is used when you have no sustain pedal actuator or temporarily unplugged it. Holds notes for sustain event.
5. On an 88 note piano lowest MIDI note number is 21, on an 80 note playback system lowest note will be 25 (default)
6. If you want your piano to play in a different key, this is where you can transpose. Default is zero (0)
7. Time the note plays from the time it is told to play from the controller. This Syncs with background music
8. Retro Key Timing adjusts the amount of time taken for your key to be juiced prior to drop for a soft landing and help in repeats
9. Retro Divisor adjusts the performance algorithm. Default is 4. values 1- 5, 1 being most force not recommended
10. Misc. Compensation We recommend this not be touched. Defaults are 50, 80, 25, 30, 600
11. The system will take a bit longer to boot up while it does a safety check.
12. Absolute Min Force raises the min amount of force to all keys from where it was set under key setup. Default is 20
13. If there is a particular song not performing as well as you think it should, this adjust may help. Stored for each song you adjust it for.
14. The speed of the processor. Default is 1Ghz. Earlier system (serial # <330) only support lower)
25
QRS PNO3 User Guide
QRS Music Technologies, Inc. Technical Support - 800-247-6557 www.qrsmusic.com
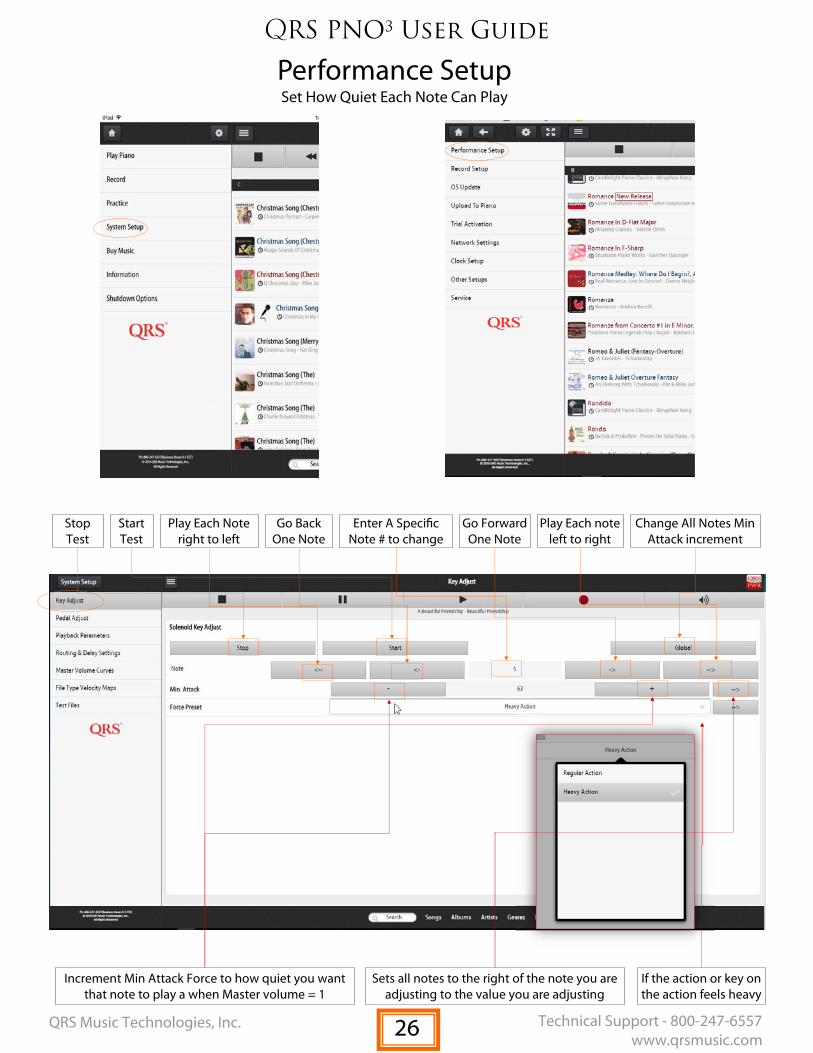
Performance Setup Set How Quiet Each Note Can Play
Sets all notes to the right of the note you are adjusting to the value you are adjusting
If the action or key on the action feels heavy
Increment Min Attack Force to how quiet you want that note to play a when Master volume = 1
Play Each Note right to left
Go Back One Note
Enter A Specific Note # to change
Play Each note left to right
Stop Test
Start Test
Go Forward One Note
Change All Notes Min Attack increment
26
QRS PNO3 User Guide
QRS Music Technologies, Inc. Technical Support - 800-247-6557 www.qrsmusic.com
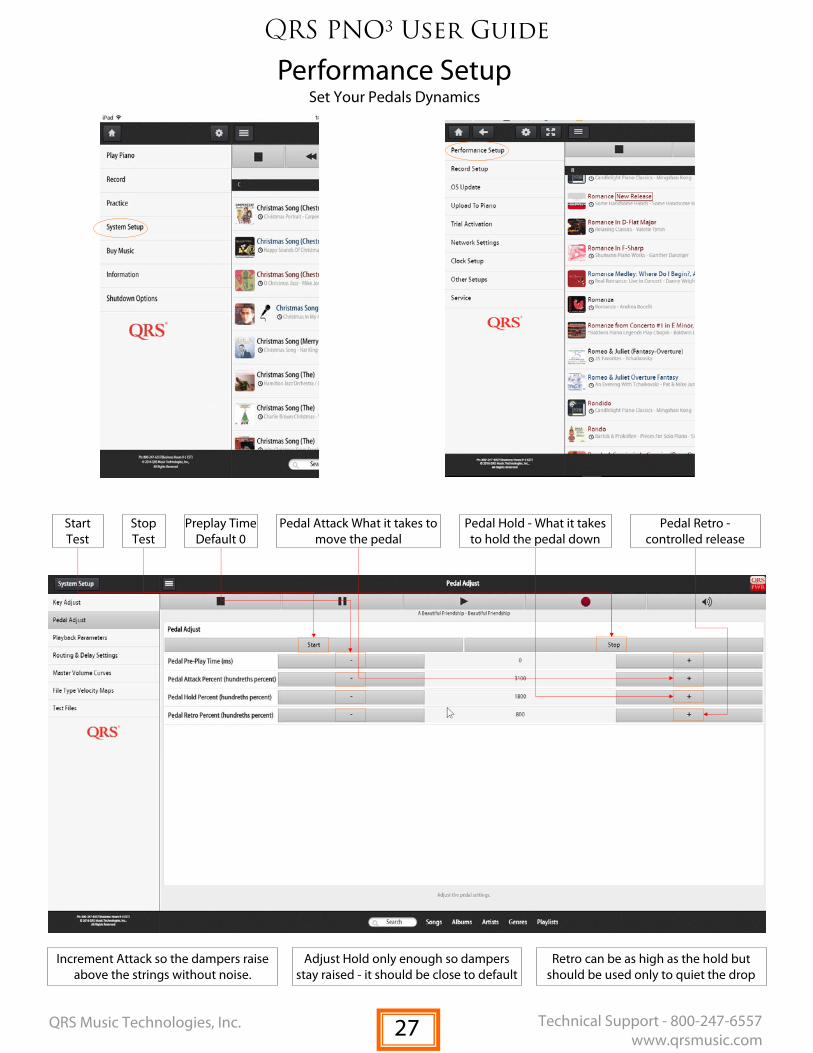
Performance Setup Set Your Pedals Dynamics
Adjust Hold only enough so dampers stay raised - it should be close to default
Retro can be as high as the hold but should be used only to quiet the drop
Increment Attack so the dampers raise above the strings without noise.
Preplay Time Default 0
Pedal Attack What it takes to move the pedal
Pedal Hold - What it takes to hold the pedal down
Start Test
Stop Test
Pedal Retro - controlled release
27
QRS PNO3 User Guide
QRS Music Technologies, Inc. Technical Support - 800-247-6557 www.qrsmusic.com
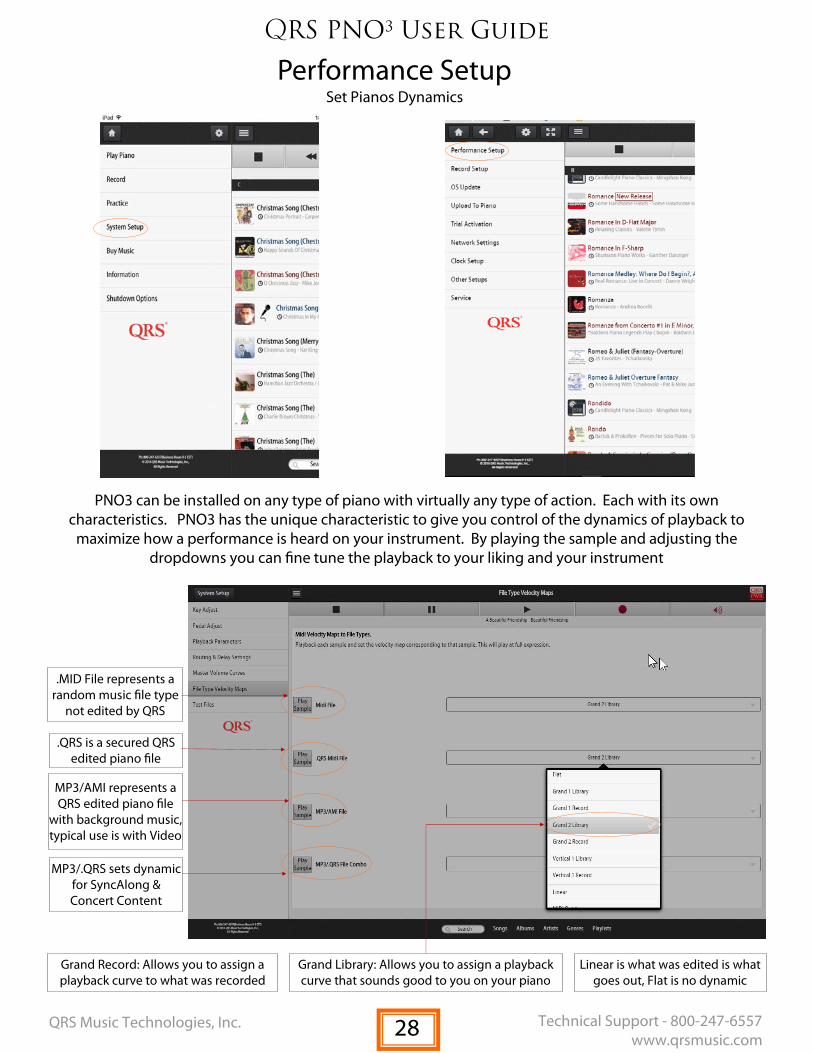
Performance Setup Set Pianos Dynamics
Grand Library: Allows you to assign a playback curve that sounds good to you on your piano
Linear is what was edited is what goes out, Flat is no dynamic
Grand Record: Allows you to assign a playback curve to what was recorded
.MID File represents a random music file type
not edited by QRS
.QRS is a secured QRS edited piano file
MP3/AMI represents a QRS edited piano file
with background music, typical use is with Video
MP3/.QRS sets dynamic for SyncAlong & Concert Content
PNO3 can be installed on any type of piano with virtually any type of action. Each with its own characteristics. PNO3 has the unique characteristic to give you control of the dynamics of playback to
maximize how a performance is heard on your instrument. By playing the sample and adjusting the dropdowns you can fine tune the playback to your liking and your instrument
28
QRS PNO3 User Guide
QRS Music Technologies, Inc. Technical Support - 800-247-6557 www.qrsmusic.com
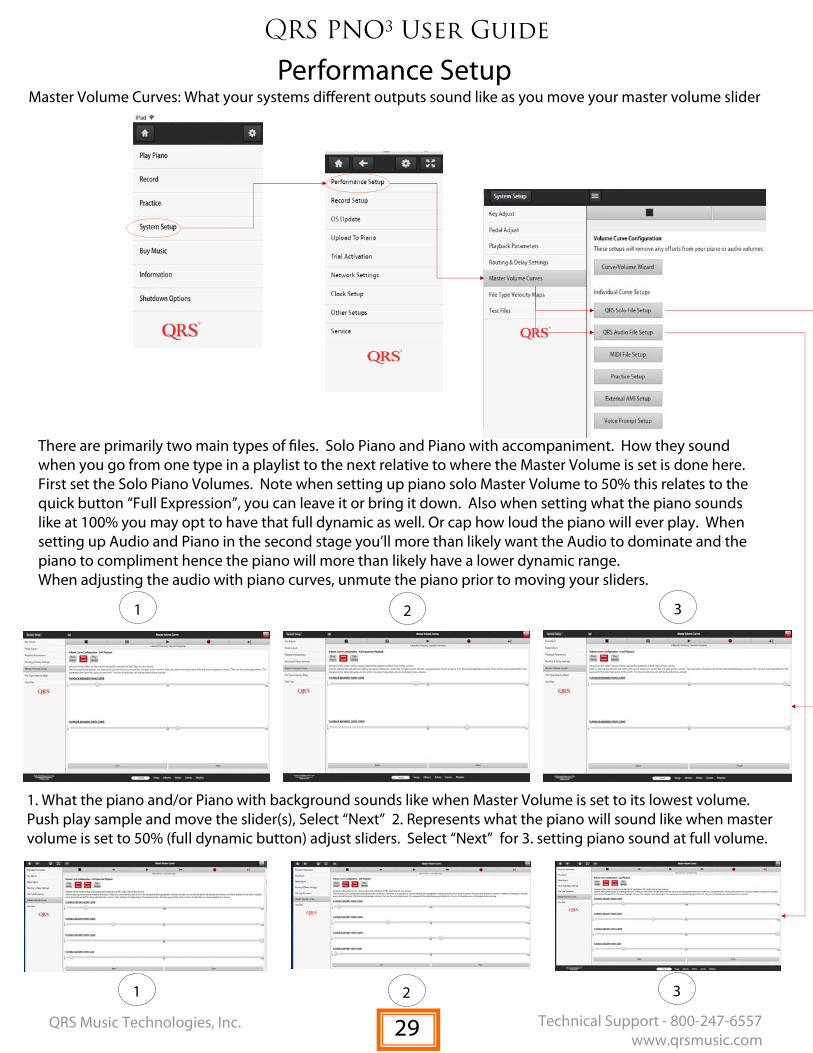
Performance Setup Master Volume Curves: What your systems different outputs sound like as you move your master volume slider
1 2 3
1 2 3
1. What the piano and/or Piano with background sounds like when Master Volume is set to its lowest volume. Push play sample and move the slider(s), Select “Next” 2. Represents what the piano will sound like when master volume is set to 50% (full dynamic button) adjust sliders. Select “Next” for 3. setting piano sound at full volume.
There are primarily two main types of files. Solo Piano and Piano with accompaniment. How they sound when you go from one type in a playlist to the next relative to where the Master Volume is set is done here. First set the Solo Piano Volumes. Note when setting up piano solo Master Volume to 50% this relates to the quick button “Full Expression”, you can leave it or bring it down. Also when setting what the piano sounds like at 100% you may opt to have that full dynamic as well. Or cap how loud the piano will ever play. When setting up Audio and Piano in the second stage you’ll more than likely want the Audio to dominate and the piano to compliment hence the piano will more than likely have a lower dynamic range. When adjusting the audio with piano curves, unmute the piano prior to moving your sliders.
29

QRS PNO3 User Guide
QRS Music Technologies, Inc. Technical Support - 800-247-6557 www.qrsmusic.com
Performance Setup Master Volume Curves: What your systems different outputs sound like as you move your master volume slider
1 2 3
1 2 3
MIDI File Setup—is done the same way as QRS Solo File Setup is done, but represents how an off the shelf MIDI file will be treated relative to Master Volume setting.
Practice Setup—is how the Synth Piano or other General MIDI sound will sound relative to the Master Volumes setting. Setup is done similar to the three step process.
Voice Prompts—This is where you can set the voice prompt volume you hear when updating the system, boot up or “Shift Info” on the remote
External AMI—is how the Piano and background will sound from an external input similar to SyncAlong DVD and performance Videos.
30

QRS PNO3 User Guide
QRS Music Technologies, Inc. Technical Support - 800-247-6557 www.qrsmusic.com
Record Setup Set Record Parameters
PNOcloud Login: This is where you set up your PNOcloud account, setting its username and password
PNOcloud will save your performance to the cloud in your free PNOcloud account.
Plays back your recording with
background synth sound out of the piano’s speaker.
Listen to and record the synth
instrument heard out of pianos
speakers while recording.
When auto record and auto save is turned on there is no need to start record or stop, recording. Time out is how
long the system waits before it saves your recording.
AutoSave Recordings will automatically save
recordings without selecting save from
dropdown menu after recording
Always Recording will automatically record
your performance without having to start or stop record, log in...
31
QRS PNO3 User Guide
QRS Music Technologies, Inc. Technical Support - 800-247-6557 www.qrsmusic.com
Record Setup Set Record Parameters
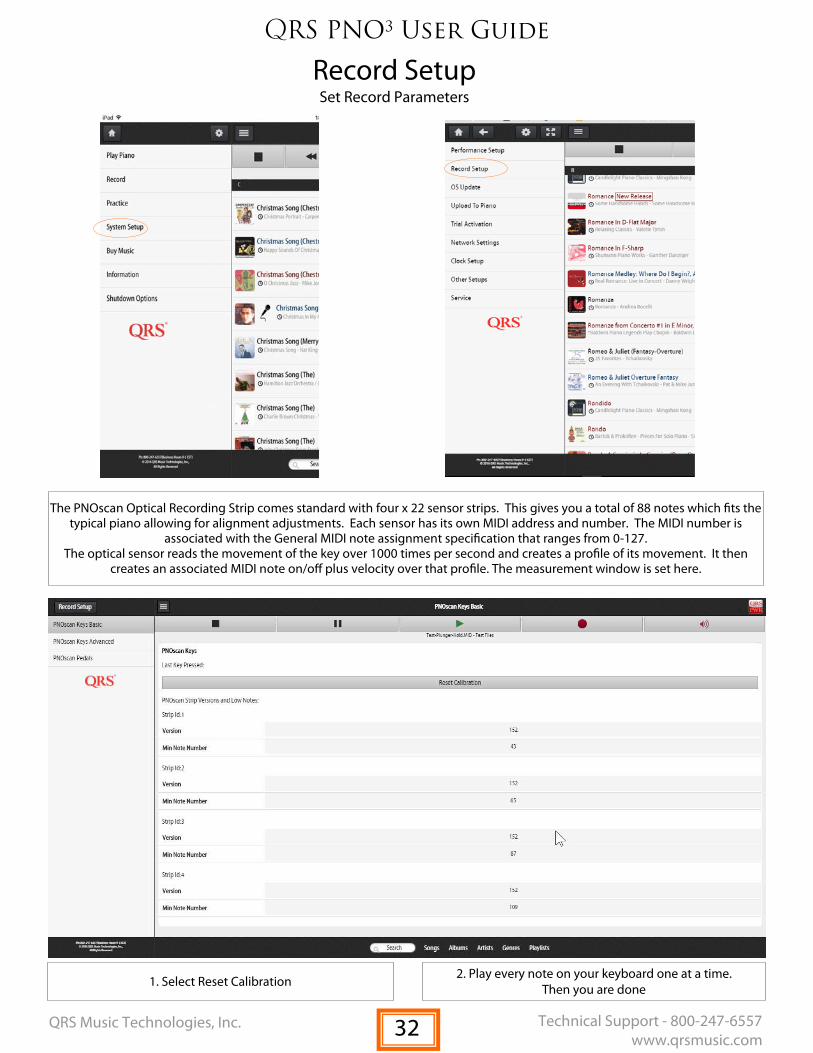
2. Play every note on your keyboard one at a time. Then you are done
1. Select Reset Calibration
The PNOscan Optical Recording Strip comes standard with four x 22 sensor strips. This gives you a total of 88 notes which fits the typical piano allowing for alignment adjustments. Each sensor has its own MIDI address and number. The MIDI number is
associated with the General MIDI note assignment specification that ranges from 0-127. The optical sensor reads the movement of the key over 1000 times per second and creates a profile of its movement. It then
creates an associated MIDI note on/off plus velocity over that profile. The measurement window is set here.
32

QRS PNO3 User Guide
QRS Music Technologies, Inc. Technical Support - 800-247-6557 www.qrsmusic.com
Record Setup Set Record Parameters
Expo Velocity Gain: Do not touch
Velocity Offset: Linear Velocity Gain: Represents how the
optical sensor profile is mapped to MIDI.
Release Position allows you to set the retrigger position, when the
Key Retrigger Window represents the size of your profile sensing window, wider more accurate velocity, smaller more accurate trills.
Aftertouch range talks to how far you can push the key down past the profile.
Hysteresis - filters out any anomalies in response time in the sensors: we recommend not to touch it.
Min Velocity Transmitted: will always send a note on and velocity of 1 regardless of how slow the key is depressed.
Expo Velocity Shape works with Expo Velocity Gain—we recommend leaving it alone.
33
QRS PNO3 User Guide
QRS Music Technologies, Inc. Technical Support - 800-247-6557 www.qrsmusic.com
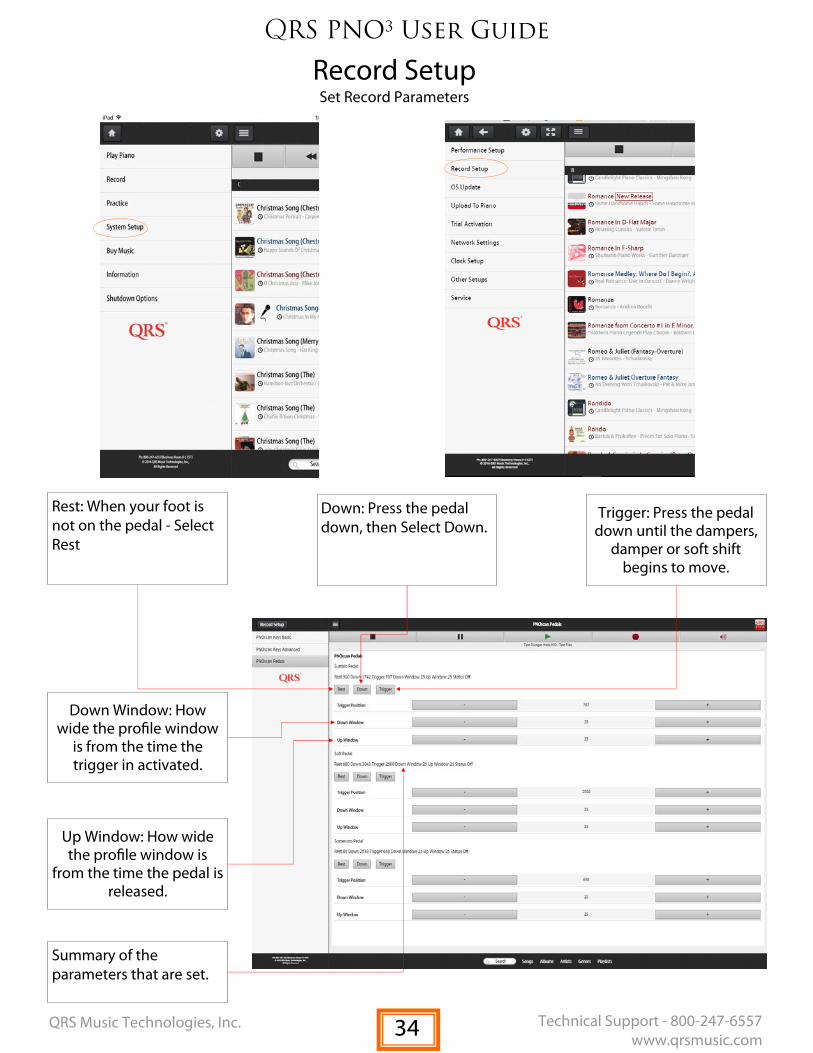
Record Setup Set Record Parameters
Down: Press the pedal down, then Select Down.
Rest: When your foot is not on the pedal - Select Rest
Trigger: Press the pedal down until the dampers,
damper or soft shift begins to move.
Summary of the parameters that are set.
Down Window: How wide the profile window
is from the time the trigger in activated.
Up Window: How wide the profile window is
from the time the pedal is released.
34

QRS PNO3 User Guide
QRS Music Technologies, Inc. Technical Support - 800-247-6557 www.qrsmusic.com
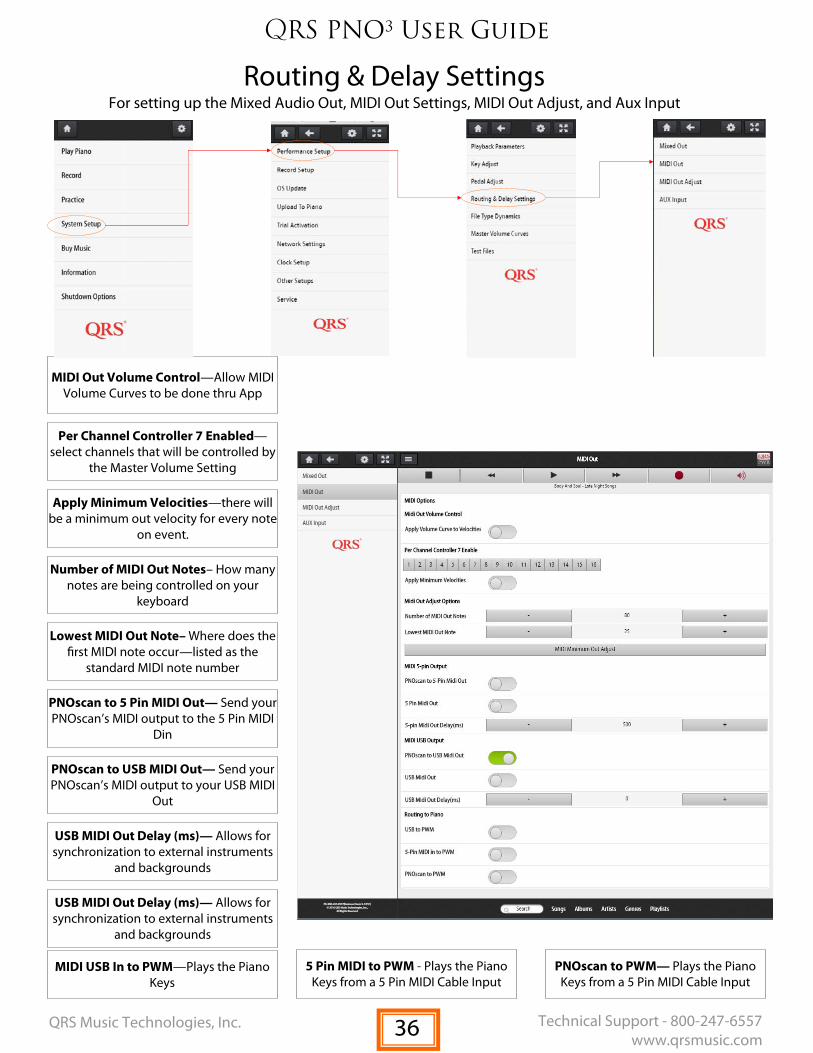
Routing & Delay Settings For setting up the Mixed Audio Out, MIDI Out Settings, MIDI Out Adjust, and Aux Input
There are four analog ports—similar to the kind you see on your headphones. Port 1 and Port 4 are routed to the Pin Light Port Extender, Port 1 is for your Microphone Input, and Port 4 is for use with headphones. The setup page allows you to designate if you would like the audio output to include a Piano Sound created by a Sound Module to replicate what the piano is playing as a solo or mixed with background music. Piping the music through your home without a Mic and Mixer: Set Upper Right to On and send that
output to the customers home speaker.
The lower left is off by default, sending only background music to the speaker under the piano. If the piano is setup with PNOscan and has a Key Stop rail Lower Right Port 4 output set to on will allow
you to practice in silence.
Synth Delay is used when the system is set up as an upgrade to a third party player system or there are some delay issues when sending through another audio system.
35
QRS PNO3 User Guide
QRS Music Technologies, Inc. Technical Support - 800-247-6557 www.qrsmusic.com
MIDI Out Volume Control—Allow MIDI Volume Curves to be done thru App
Routing & Delay Settings For setting up the Mixed Audio Out, MIDI Out Settings, MIDI Out Adjust, and Aux Input
Per Channel Controller 7 Enabled—select channels that will be controlled by
the Master Volume Setting
Apply Minimum Velocities—there will be a minimum out velocity for every note
on event.
Number of MIDI Out Notes– How many notes are being controlled on your
keyboard
Lowest MIDI Out Note– Where does the first MIDI note occur—listed as the
standard MIDI note number
PNOscan to 5 Pin MIDI Out— Send your PNOscan’s MIDI output to the 5 Pin MIDI
Din
PNOscan to USB MIDI Out— Send your PNOscan’s MIDI output to your USB MIDI
Out
USB MIDI Out Delay (ms)— Allows for synchronization to external instruments
and backgrounds
USB MIDI Out Delay (ms)— Allows for synchronization to external instruments
and backgrounds
MIDI USB In to PWM—Plays the Piano Keys
5 Pin MIDI to PWM - Plays the Piano Keys from a 5 Pin MIDI Cable Input
PNOscan to PWM— Plays the Piano Keys from a 5 Pin MIDI Cable Input
36
QRS PNO3 User Guide
QRS Music Technologies, Inc. Technical Support - 800-247-6557 www.qrsmusic.com
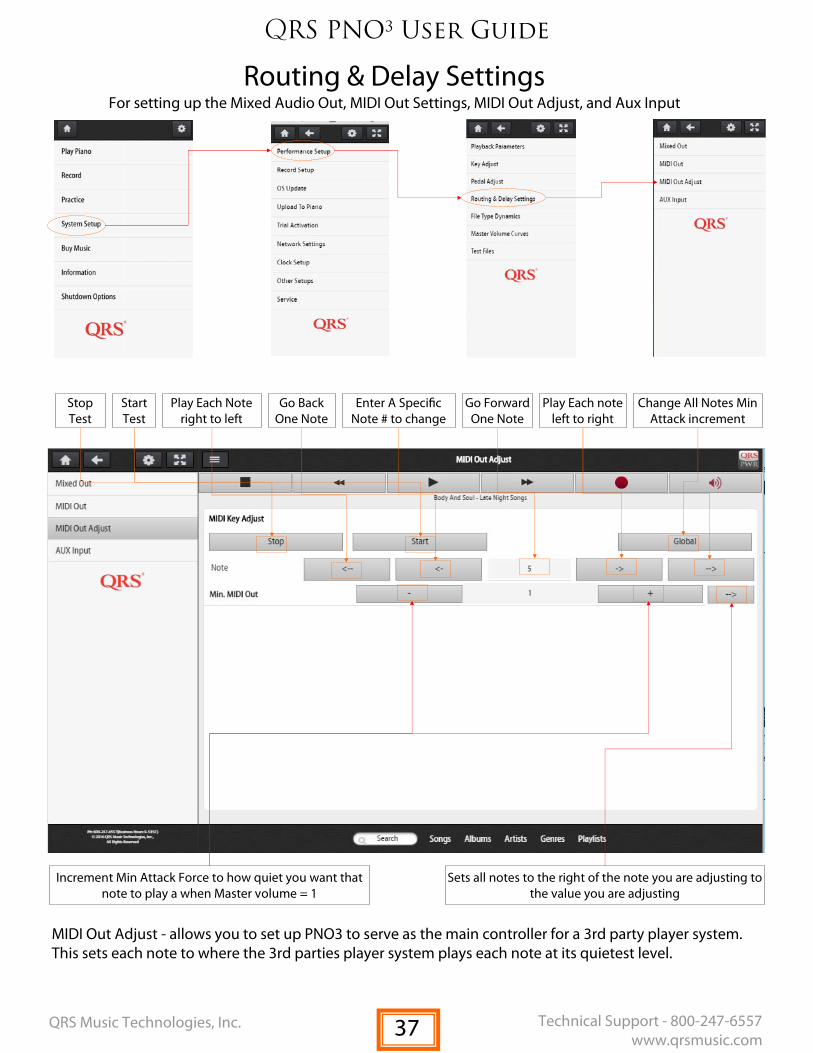
Routing & Delay Settings For setting up the Mixed Audio Out, MIDI Out Settings, MIDI Out Adjust, and Aux Input
Sets all notes to the right of the note you are adjusting to the value you are adjusting
Increment Min Attack Force to how quiet you want that note to play a when Master volume = 1
Play Each Note right to left
Go Back One Note
Enter A Specific Note # to change
Play Each note left to right
Stop Test
Start Test
Go Forward One Note
Change All Notes Min Attack increment
MIDI Out Adjust - allows you to set up PNO3 to serve as the main controller for a 3rd party player system. This sets each note to where the 3rd parties player system plays each note at its quietest level.
37
QRS PNO3 User Guide
QRS Music Technologies, Inc. Technical Support - 800-247-6557 www.qrsmusic.com
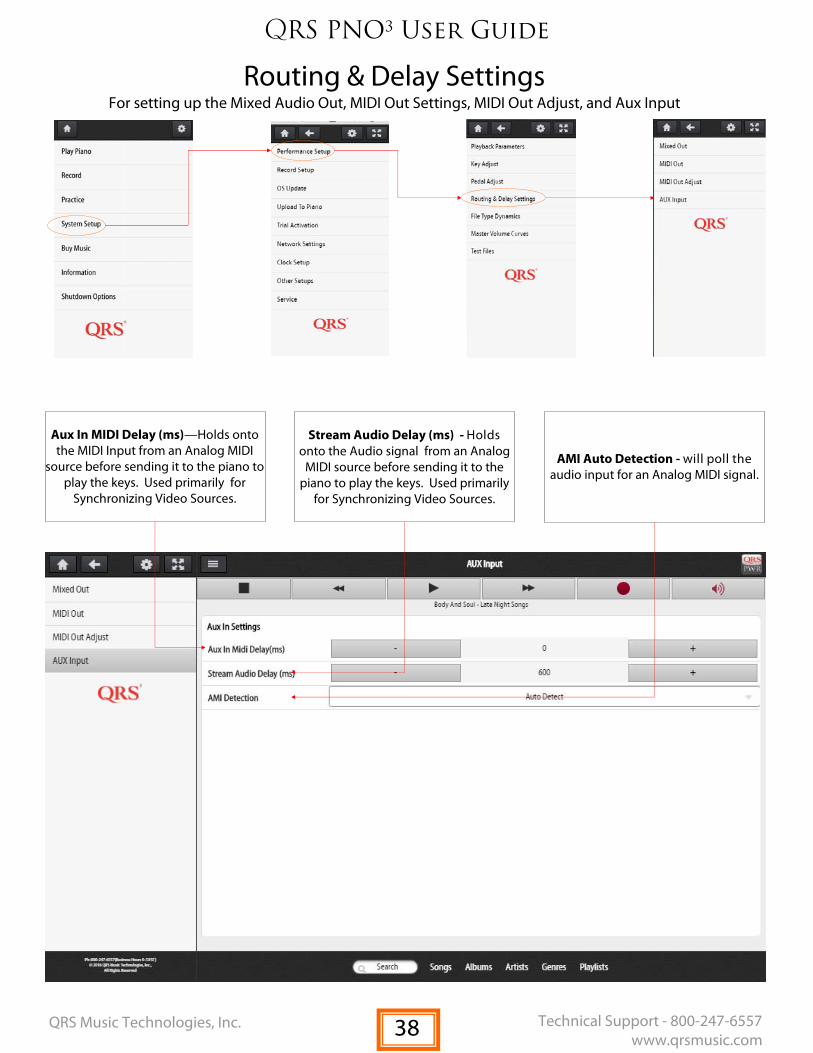
Routing & Delay Settings For setting up the Mixed Audio Out, MIDI Out Settings, MIDI Out Adjust, and Aux Input
Stream Audio Delay (ms) - Holds onto the Audio signal from an Analog
MIDI source before sending it to the piano to play the keys. Used primarily
for Synchronizing Video Sources.
Aux In MIDI Delay (ms)—Holds onto the MIDI Input from an Analog MIDI
source before sending it to the piano to play the keys. Used primarily for
Synchronizing Video Sources.
AMI Auto Detection - will poll the audio input for an Analog MIDI signal.
38
QRS PNO3 User Guide
QRS Music Technologies, Inc. Technical Support - 800-247-6557 www.qrsmusic.com
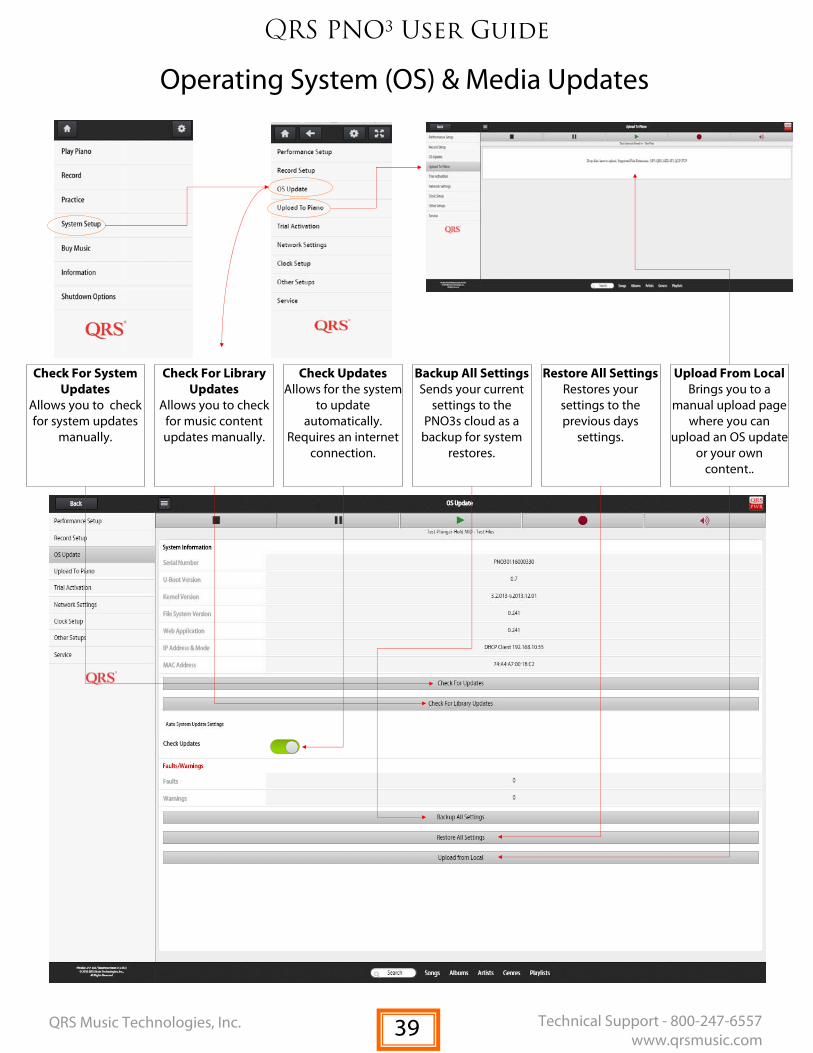
Check For System Updates
Allows you to check for system updates
manually.
Operating System (OS) & Media Updates
Check For Library Updates
Allows you to check for music content updates manually.
Check Updates Allows for the system
to update automatically.
Requires an internet connection.
Backup All Settings Sends your current
settings to the PNO3s cloud as a
backup for system restores.
Restore All Settings Restores your settings to the previous days
settings.
Upload From Local Brings you to a
manual upload page where you can
upload an OS update or your own
content..
39
QRS PNO3 User Guide
QRS Music Technologies, Inc. Technical Support - 800-247-6557 www.qrsmusic.com
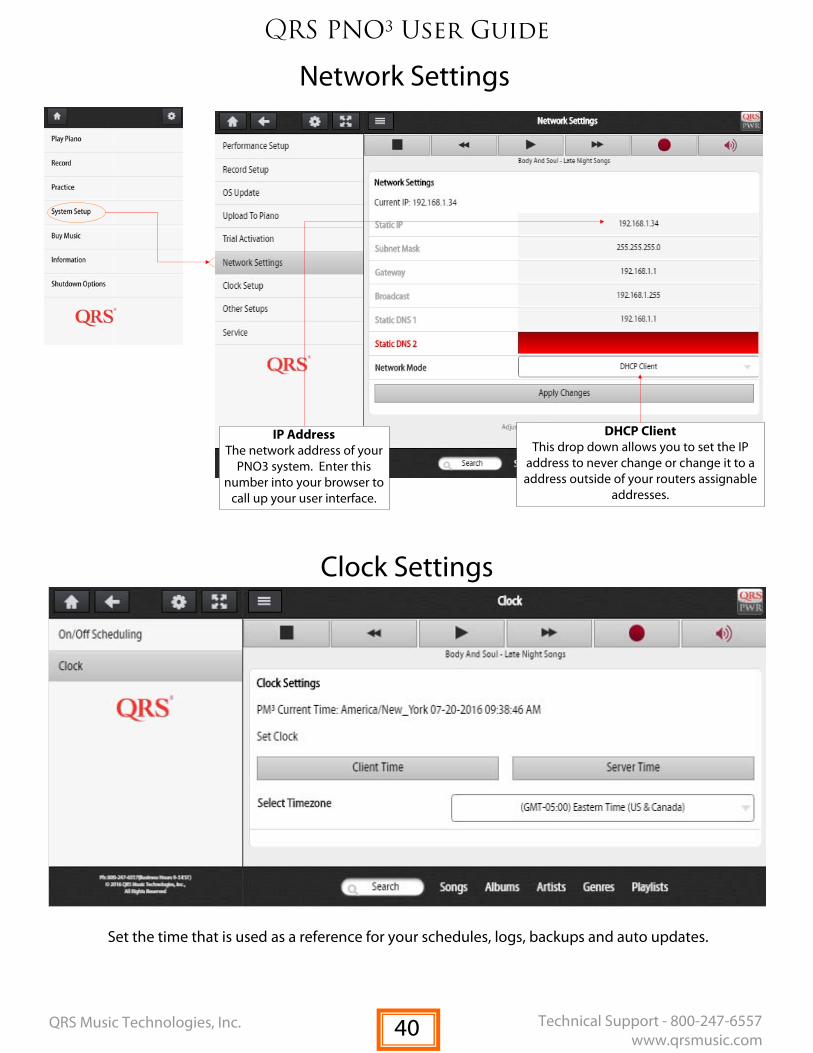
Network Settings
IP Address The network address of your
PNO3 system. Enter this number into your browser to
call up your user interface.
DHCP Client This drop down allows you to set the IP
address to never change or change it to a address outside of your routers assignable
addresses.
Clock Settings
Set the time that is used as a reference for your schedules, logs, backups and auto updates.
40
QRS PNO3 User Guide
QRS Music Technologies, Inc. Technical Support - 800-247-6557 www.qrsmusic.com
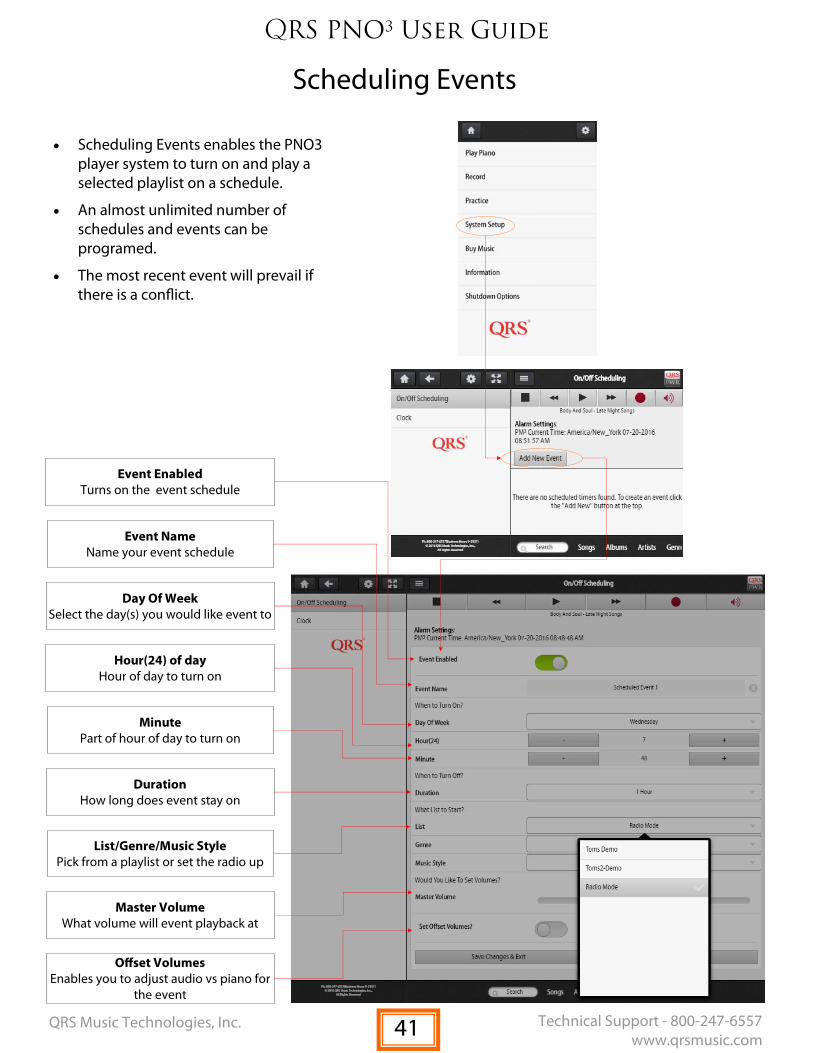
Scheduling Events
Event Enabled Turns on the event schedule
Event Name Name your event schedule
Day Of Week Select the day(s) you would like event to
Hour(24) of day Hour of day to turn on
Minute Part of hour of day to turn on
Duration How long does event stay on
Master Volume What volume will event playback at
List/Genre/Music Style Pick from a playlist or set the radio up
Offset Volumes Enables you to adjust audio vs piano for
the event
Scheduling Events enables the PNO3 player system to turn on and play a selected playlist on a schedule.
An almost unlimited number of schedules and events can be programed.
The most recent event will prevail if there is a conflict.
41
QRS PNO3 User Guide
QRS Music Technologies, Inc. Technical Support - 800-247-6557 www.qrsmusic.com
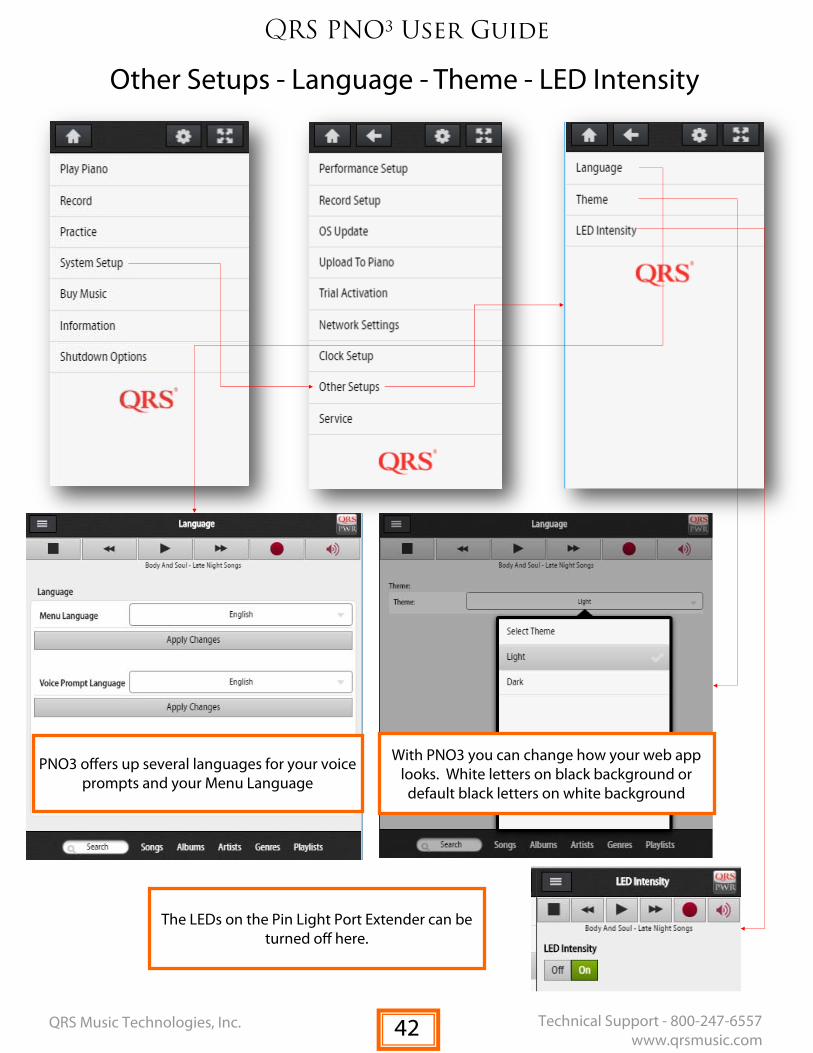
Other Setups - Language - Theme - LED Intensity
PNO3 offers up several languages for your voice prompts and your Menu Language
With PNO3 you can change how your web app looks. White letters on black background or
default black letters on white background
The LEDs on the Pin Light Port Extender can be turned off here.
42
QRS PNO3 User Guide
QRS Music Technologies, Inc. Technical Support - 800-247-6557 www.qrsmusic.com
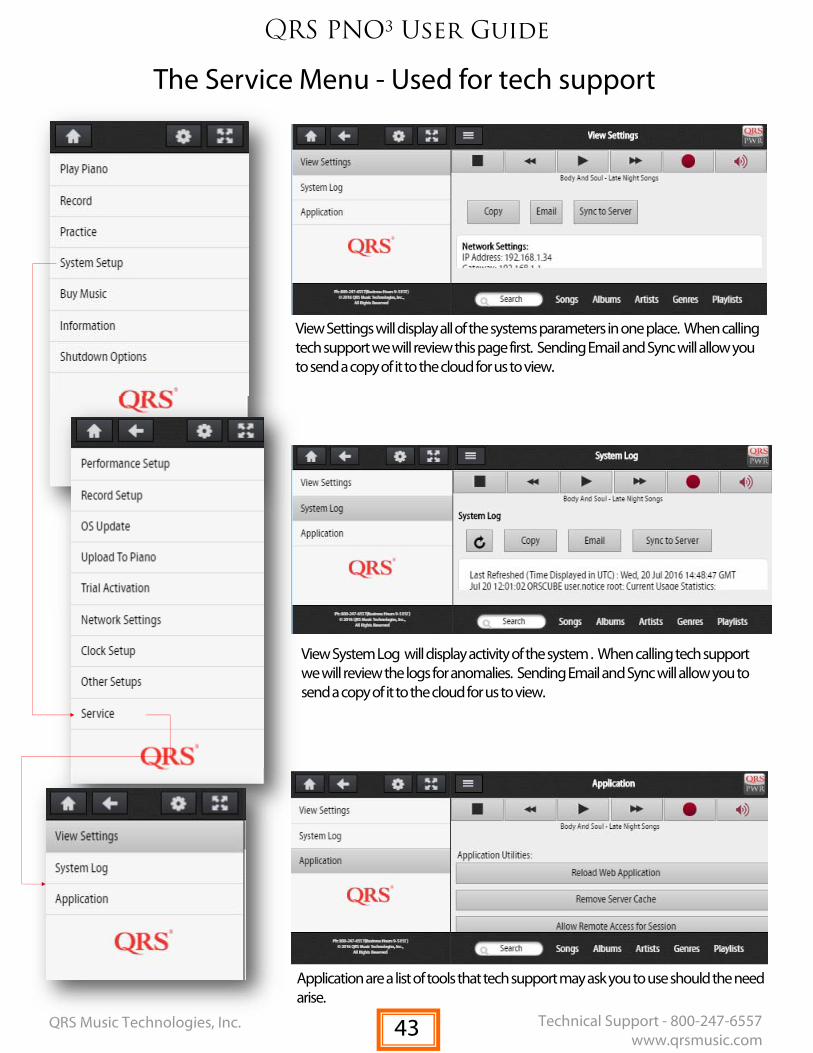
The Service Menu - Used for tech support
View System Log will display activity of the system . When calling tech support we will review the logs for anomalies. Sending Email and Sync will allow you to send a copy of it to the cloud for us to view.
View Settings will display all of the systems parameters in one place. When calling tech support we will review this page first. Sending Email and Sync will allow you to send a copy of it to the cloud for us to view.
Application are a list of tools that tech support may ask you to use should the need arise.
43
QRS PNO3 User Guide
QRS Music Technologies, Inc. Technical Support - 800-247-6557 www.qrsmusic.com
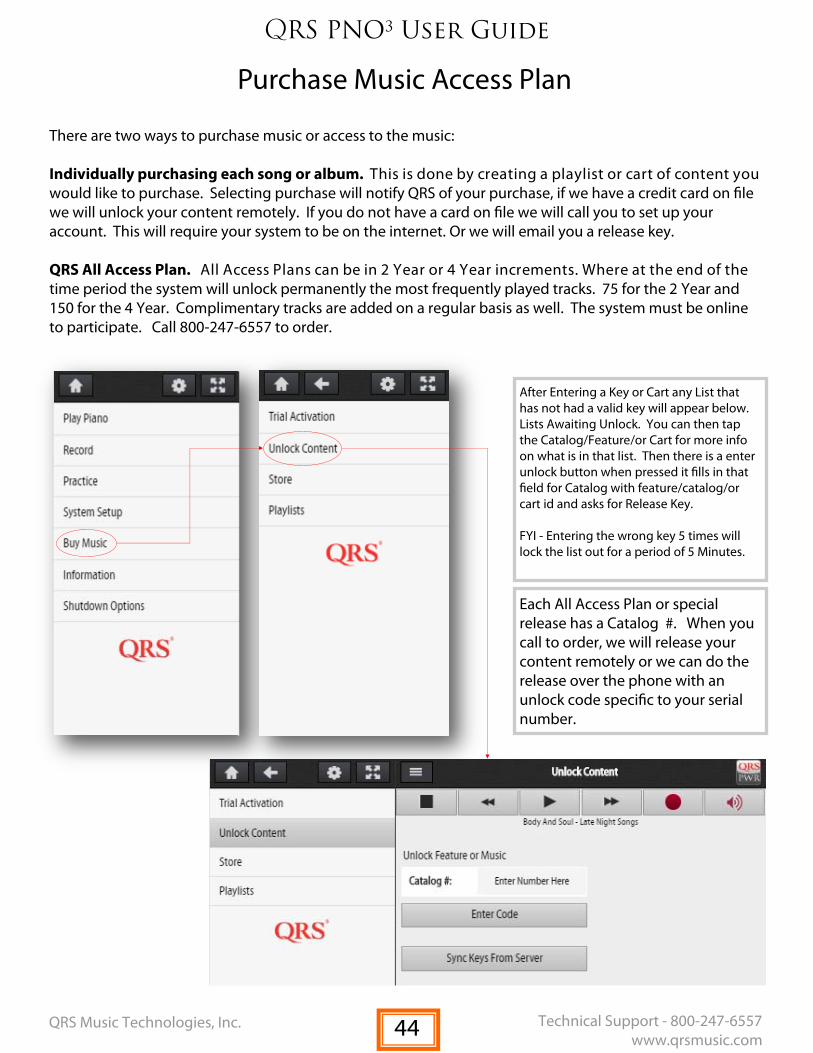
Purchase Music Access Plan
There are two ways to purchase music or access to the music: Individually purchasing each song or album. This is done by creating a playlist or cart of content you would like to purchase. Selecting purchase will notify QRS of your purchase, if we have a credit card on file we will unlock your content remotely. If you do not have a card on file we will call you to set up your account. This will require your system to be on the internet. Or we will email you a release key. QRS All Access Plan. All Access Plans can be in 2 Year or 4 Year increments. Where at the end of the time period the system will unlock permanently the most frequently played tracks. 75 for the 2 Year and 150 for the 4 Year. Complimentary tracks are added on a regular basis as well. The system must be online to participate. Call 800-247-6557 to order.
Each All Access Plan or special release has a Catalog #. When you call to order, we will release your content remotely or we can do the release over the phone with an unlock code specific to your serial number.
After Entering a Key or Cart any List that has not had a valid key will appear below. Lists Awaiting Unlock. You can then tap the Catalog/Feature/or Cart for more info on what is in that list. Then there is a enter unlock button when pressed it fills in that field for Catalog with feature/catalog/or cart id and asks for Release Key. FYI - Entering the wrong key 5 times will lock the list out for a period of 5 Minutes.
44
QRS PNO3 User Guide
QRS Music Technologies, Inc. Technical Support - 800-247-6557 www.qrsmusic.com
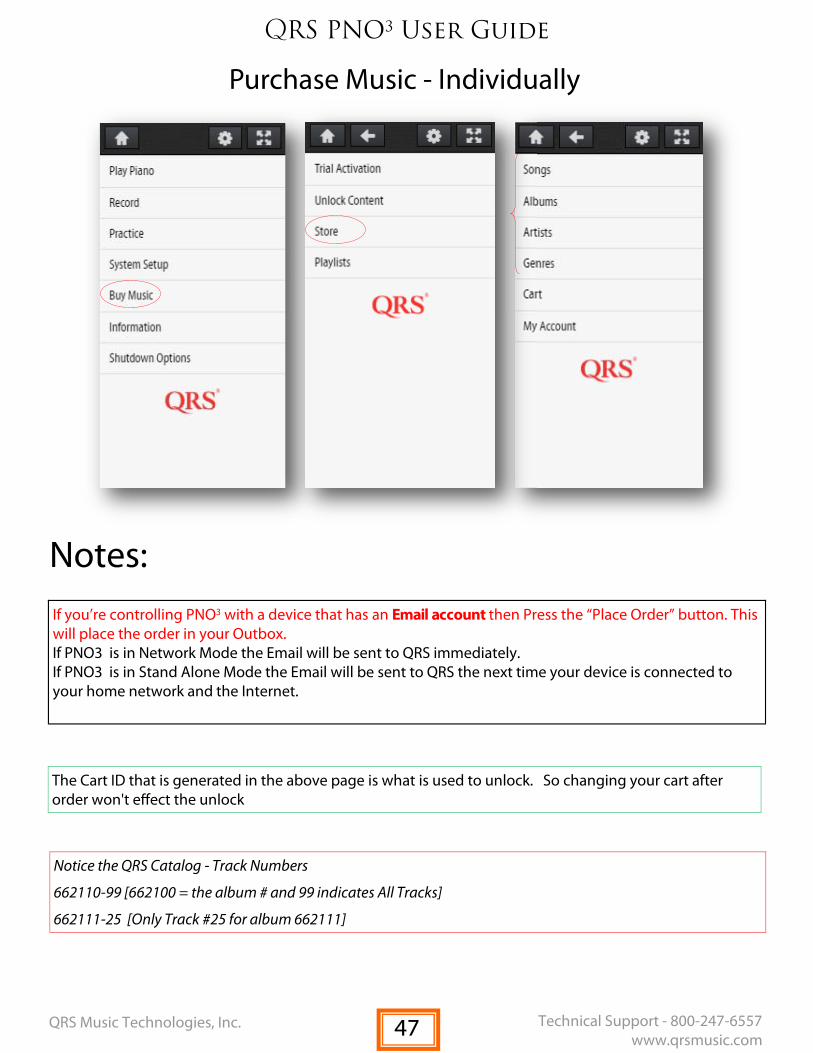
Purchase Music - Individually
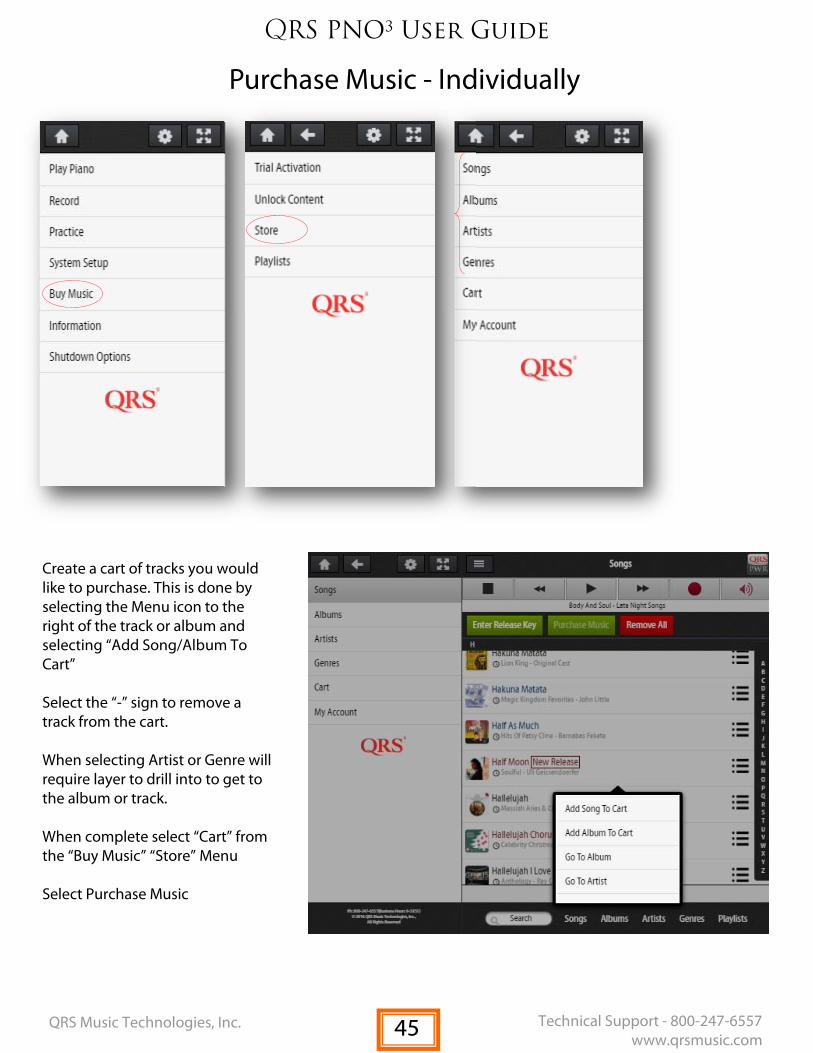
Create a cart of tracks you would like to purchase. This is done by selecting the Menu icon to the right of the track or album and selecting “Add Song/Album To Cart” Select the “-” sign to remove a track from the cart. When selecting Artist or Genre will require layer to drill into to get to the album or track. When complete select “Cart” from the “Buy Music” “Store” Menu Select Purchase Music
45
QRS PNO3 User Guide
QRS Music Technologies, Inc. Technical Support - 800-247-6557 www.qrsmusic.com
Purchase Music - Individually
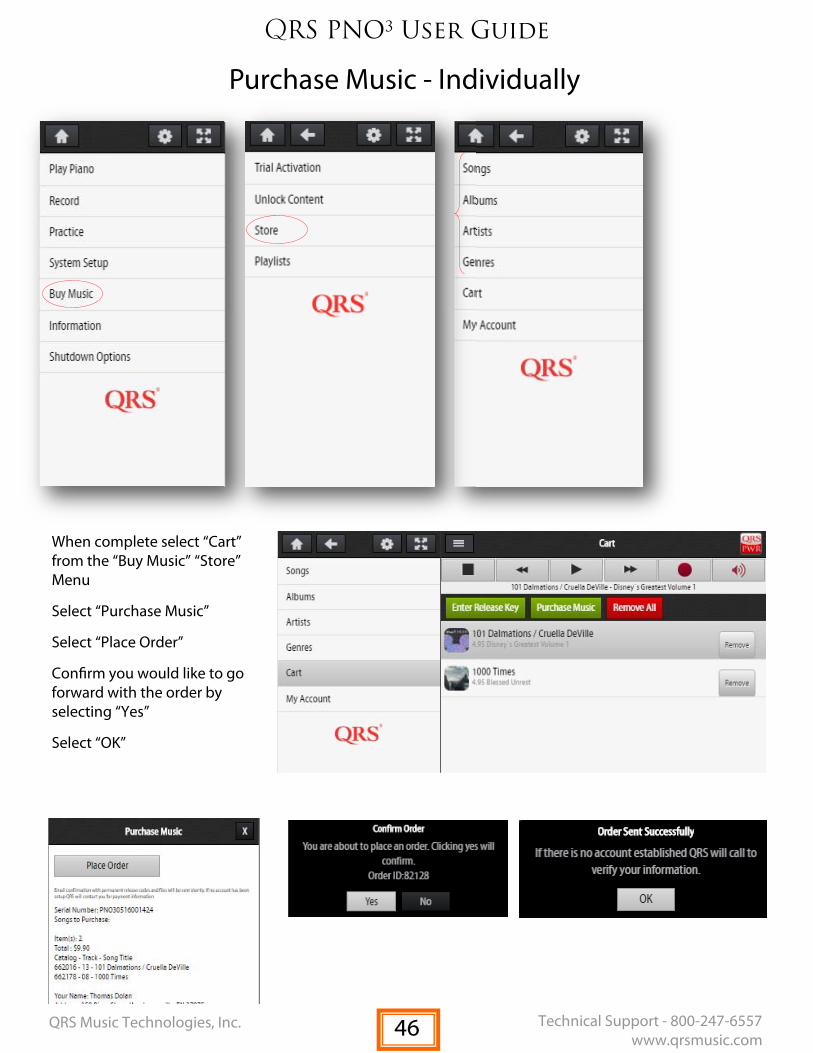
When complete select “Cart” from the “Buy Music” “Store” Menu
Select “Purchase Music”
Select “Place Order”
Confirm you would like to go forward with the order by selecting “Yes”
Select “OK”
46
QRS PNO3 User Guide
QRS Music Technologies, Inc. Technical Support - 800-247-6557 www.qrsmusic.com
The Cart ID that is generated in the above page is what is used to unlock. So changing your cart after order won't effect the unlock
Notice the QRS Catalog - Track Numbers
662110-99 [662100 = the album # and 99 indicates All Tracks]
662111-25 [Only Track #25 for album 662111]
If you’re controlling PNO3 with a device that has an Email account then Press the “Place Order” button. This will place the order in your Outbox. If PNO3 is in Network Mode the Email will be sent to QRS immediately. If PNO3 is in Stand Alone Mode the Email will be sent to QRS the next time your device is connected to your home network and the Internet.
Purchase Music - Individually
Notes:
47

QRS PNO3 User Guide
QRS Music Technologies, Inc. Technical Support - 800-247-6557 www.qrsmusic.com
Recording A Track
1
1. Select Record from the transport menu 2. Play the piano 3. When done performing Select “Save”
1. Select Record from the transport menu 2. Play the piano 3. When done performing Select “Save”
Assumes Auto Record and Auto Save is not turned on
Default Name of the track
Can add to your playlist delete
What to do with your recorded track. 1. Select the Menu Icon
to the right of the recorded track
2. Select from the list - Add to Playlist, Play the track, Delete the track, or delete all tracks.
48

QRS PNO3 User Guide
QRS Music Technologies, Inc. Technical Support - 800-247-6557 www.qrsmusic.com
Practice & Perform
Standard General MIDI Sound Font - good balance with all
sounds
General MIDI HD Sound Font - More memory devoted to
Piano sound
Piano Only Sound HD All the memory is devoted to a high end piano sound sample
Selecting Silent Practice will mute the audio going to your
speakers and route a piano sound to your headphone
outputs. 1. Select Silent Practice 2. Engage the Key Stop Rail 3. Plug in your headphones 4. Play the piano Requires a sensor strip like PNOscan
Selecting Perform will route a live performance using a
sensor strip similar or QRS’s PNOscan. This will route the
MIDI note events from PNOscan to the sound set
built into the system and out to the speaker. Selecting a
sound can convert your piano to the selected sound source
instrument. 1. Select Perform 2. Engage or not engage
(your choice) the Key Stop Rail
3. Select a Sound 4. Play the Piano
Selecting Learn will launch your free year of Piano Marvel Lessons. Requires an iPad or Web Browser and an internet
connection on your piano. Any sounds will come from the
device you connect, internal PNO3 sounds will be muted
1. Select Learn - If you have set up your free account now is the time. If you have the PIanoMarvel site will log you in.
2. Connect your PC,Mac, or iPad to the USB output on the Pin Light Port Extender (PLx)
3. Take your lesson—Enjoy
Drill down sounds
Quick Sounds
49
PNOmation3® Electronics/Electromechanical System
1Year and Optional Extended Limited Warranty For The
PNOmation3® Playback Engines Electronics
W0216_01
QRS Music Technologies, Inc. (“QRS”) warrants to you for the Warranty Period that there are no defects in the materials of this Product (as identified at the end of this warranty certificate). The “Warranty Period” expires (except as explained below) One (1) year from the date of your purchase of the Product. In order to determine the date of your purchase of the Product, you will need to provide to us a credit card receipt, a purchase agreement, a sales slip, a warranty registration or some other form of proof that you are the original purchaser and the date of your purchase of the Product.
If you are not able to provide us with some form of proof of purchase date, the Warranty Period will be a shorter period (the “Shorter Warranty Period”) which is one year from the date that your dealer purchased the Product from QRS. If you cannot provide a proof of purchase date, you may contact us in the manner described below and we will assist you in determining the date that your dealer purchased the Product from us and determining the Shorter Warranty Period. This is a warranty for parts only and does not include shipping or labor.
This warranty does not apply to any accessories you may have purchased with the product and does not apply to any piano or components of the piano with which the product is used or any piano in which the product is installed. In addition, this warranty does not cover scratches, dents or other defects in the cosmetic finish of the product. Accessories used in connection with the system and sold through QRS are covered by the original manufacturers warranty. The warranty does not cover connectivity issues with your existing network.
The warranty is issued solely to the original purchaser of the product. THIS WARRANTY IS NOT TRANSFERABLE. If, during the Warranty Period, parts incorporated in this product are found to be defective in material or workmanship, and the original purchaser provides Purchase Documents to QRS, then QRS or its authorized dealer will provide replacement parts without charge. We may, at our discretion, provide reconditioned parts or assemblies as warranty replacements. You as the original purchaser will be responsible to pay labor costs incurred in connection with any repair.
EXTENDED WARRANTY
As long as the customer has their piano networked and part of a QRS Music Access Plan, their warranty will remain in effect.
LIMITATION IN CONNECTION WITH OBSOLETE PRODUCTS If at the time you make a claim pursuant to this warranty, we no longer manufacture or sell the same model of Product, we may, at our discretion, rather than repair or replace defective parts in the Product, offer to sell you a more current version of a similar Product. If we offer to sell you a more current model of the Product, you will be responsible to pay the difference between the Manufacture’s Suggested Retail Price (“MSRP”) of the more current version of a similar Product and the price you paid for the Product you purchased. If you choose not to accept such offer, we will have no further obligations pursuant to this warranty.
THIS WARRANTY IS IN LIEU OF ANY OTHER WARRANTY, EXPRESS OR IMPLIED, MADE BY THE MANUFACTURER IN CONNECTION WITH THIS PRODUCT. INCLUDING, BUT NOT LIMITED TO, WARRANTIES OR MERCHANTABILITY OR FITNESS FOR A PARTICULAR PURPOSE. TO THE EXTENT ALLOWED BY THE LAW, QRS SHALL NOT BE RESPONSIBLE FOR LOSS OF THE PRODUCT, LOSS OF TIME, INCONVENIENCE, COMMERCIAL LOSS, SPECIAL OR CONSEQUENTIAL DAMAGES, EVEN IF THE MANUFACTURER HAS BEEN ADVISED OF THE POSSIBILITY OF SUCH DAMAGES.
This warranty gives you specific legal rights. Some states provide other rights, and some states do not allow excluding or limiting liability for incidental or consequential damage. Consequently, the limitations and exclusions in this warranty may not apply to you. In addition, some jurisdictions have consumer protection rules, regulations and statutes that may apply to you.
50
PNOmation3® Electronics/Electromechanical System
1Year and Optional Extended Limited Warranty For The
PNOmation3® Playback Engines Electronics
W0216_01
Exclusions There is no express warranty on the Product and this warranty is void if: 1. You did not purchase this Product from an authorized QRS reseller. 2. This Product has been serviced, modified or tampered with by anyone other than an QRS Authorized
Service Representative. 3. The name, trademark or serial number has been modified, defaced or removed from the product. 4. This Product has been damaged as a result of abuse, abnormal force or strain, failure to reasonably
maintain and protect, modification, accident or exposure to extreme temperature or humidity. 5. Parts, supplies or other accessories which have not been approved by QRS have been used with this
Product. 6. Radio frequency interference is generated by uncertified and/or illegal equipment. 7. This Product has been moved or delivered without reasonable preparation and packaging or QRS
reasonably determines, after inspection that there has been modification of this Product which adversely affects the reliability of the product or component.
8. If the system was not installed by a Certified QRS installer the warranty will be the “Shorter Warranty Period”.
9. Replacement of the SD or Micro SD card and its contents.
Owner’s Responsibility In order to have rights under this warranty, you have the following responsibilities:
1. Retain your proof of purchase and purchase date and register your system either online at qrsmusic.com or through your internet connected networked player system’s registration.
2. Notify QRS or any authorized dealer of any warranty claim within ten (10) days after discovery and provide a detailed explanation of the problem.
3. Maintain current content and software updates - (best achieved by placing your system on a secure internet connected network)
General If any provision herein shall be unlawful, void or for any reason unenforceable, then that provision shall be deemed severable from this warranty certificate and shall not affect the validity of and enforceability of the remaining provisions.
QRS reserves the right to make changes in design and/or improvements to its products without any obligation to retrofit products previously manufactured.
INSTRUCTIONS FOR OBTAINING WARRANTY SERVICE 1. If you cannot provide proof of purchase, contact QRS at 800-247-6557 and we will attempt to determine
the date on which your dealer purchased the Product and assist you in determining the Shorter Warranty Period. For warranty service, contact the dealer from whom you purchased the product, or your nearest dealer.
2. If no dealer is near you, contact QRS by phone at 800-247-6557. 3. Do not ship the product without prior written Return Authorization from QRS. Do not attempt to repair or
disassemble the product yourself. 4. Please record your model number and serial number and your date of purchase below for your records.
Keep this information with your proof of purchase in case your product requires service. Do not dispose of the warranty after it expires. In the event your product ever requires service, these instructions should be helpful in enabling you to obtain proper service.
Product Model #_______________ Product Serial #________________ Purchase Date ______________
51

QRS PNO3 User Guide
QRS Music Technologies, Inc. Technical Support - 800-247-6557 www.qrsmusic.com