qnap 1263u network attached storage (nas)/ storage area ... · a network attached storage(nas) and...
TRANSCRIPT

ARL-TN-0804 ● NOV 2016
US Army Research Laboratory
QNAP 1263U Network Attached Storage (NAS)/ Storage Area Network (SAN) Device User’s Guide
by Benjamin Kenawell, Brian Phelan, Kelly D Sherbondy, and Ram Narayanan Approved for public release; distribution is unlimited.

NOTICES
Disclaimers
The findings in this report are not to be construed as an official Department of the Army position unless so designated by other authorized documents. Citation of manufacturer’s or trade names does not constitute an official endorsement or approval of the use thereof. Destroy this report when it is no longer needed. Do not return it to the originator.

ARL-TN-0804 ● NOV 2016
US Army Research Laboratory
QNAP 1263U Network Attached Storage (NAS)/ Storage Area Network (SAN) Device User’s Guide
by Benjamin Kenawell Science and Engineering Apprentice Program (SEAP), Adelphi, MD Brian Phelan General Technical Services (GTS), Wall, NJ Kelly D Sherbondy Sensors and Electron Devices Directorate, ARL Ram Narayanan The Pennsylvania State University (PSU), State College, PA Approved for public release; distribution is unlimited.

ii
REPORT DOCUMENTATION PAGE Form Approved OMB No. 0704-0188
Public reporting burden for this collection of information is estimated to average 1 hour per response, including the time for reviewing instructions, searching existing data sources, gathering and maintaining the data needed, and completing and reviewing the collection information. Send comments regarding this burden estimate or any other aspect of this collection of information, including suggestions for reducing the burden, to Department of Defense, Washington Headquarters Services, Directorate for Information Operations and Reports (0704-0188), 1215 Jefferson Davis Highway, Suite 1204, Arlington, VA 22202-4302. Respondents should be aware that notwithstanding any other provision of law, no person shall be subject to any penalty for failing to comply with a collection of information if it does not display a currently valid OMB control number. PLEASE DO NOT RETURN YOUR FORM TO THE ABOVE ADDRESS.
1. REPORT DATE (DD-MM-YYYY)
November 2016 2. REPORT TYPE
Technical Note 3. DATES COVERED (From - To)
07/2016 4. TITLE AND SUBTITLE
QNAP 1263U Network Attached Storage (NAS)/ Storage Area Network (SAN) Device User’s Guide
5a. CONTRACT NUMBER
SEAP/CQL 5b. GRANT NUMBER
5c. PROGRAM ELEMENT NUMBER
6. AUTHOR(S)
Benjamin Kenawell, Brian Phelan, Kelly D Sherbondy, and Ram Narayanan 5d. PROJECT NUMBER
Cognitive Radar 5e. TASK NUMBER
5f. WORK UNIT NUMBER
7. PERFORMING ORGANIZATION NAME(S) AND ADDRESS(ES)
US Army Research Laboratory ATTN: RDRL-SER-U 2800 Powder Mill Road Adelphi, MD 20783-1138
8. PERFORMING ORGANIZATION REPORT NUMBER
ARL-TN-0804
9. SPONSORING/MONITORING AGENCY NAME(S) AND ADDRESS(ES)
10. SPONSOR/MONITOR'S ACRONYM(S)
11. SPONSOR/MONITOR'S REPORT NUMBER(S)
12. DISTRIBUTION/AVAILABILITY STATEMENT
Approved for public release; distribution is unlimited.
13. SUPPLEMENTARY NOTES
14. ABSTRACT
A network attached storage (NAS) and storage area network (SAN) are 2 methods of allowing access to information over a standard Ethernet network. Operating either a NAS or SAN is vital for the integrity of the data stored on the drives found in the device. Redundant array of independent disks (RAID) configurations are possible with such a device and allow for data backup in case of drive failure as well as increased capacity beyond a single disk. Differing RAID configurations and different types of disks help determine the speed of the system as much as the speed of the network itself. Many standards are in place for transferring data, including more standard ones such as File Transfer Protocol and Server Message Block, and newer standards such as Internet Small Computer Systems Interface. The differences in the protocols also play an important role in determining the most effective setup for a NAS to SAN.
15. SUBJECT TERMS
network attached storage, NAS, storage area network, SAN, Cognitive Radar
16. SECURITY CLASSIFICATION OF: 17. LIMITATION OF ABSTRACT
UU
18. NUMBER OF PAGES
24
19a. NAME OF RESPONSIBLE PERSON
Kelly D Sherbondy a. REPORT
Unclassified b. ABSTRACT
Unclassified c. THIS PAGE
Unclassified 19b. TELEPHONE NUMBER (Include area code)
301-394-2533 Standard Form 298 (Rev. 8/98) Prescribed by ANSI Std. Z39.18

Approved for public release; distribution is unlimited. iii
Contents
List of Figures iv
1. Introduction 1
2. Purpose 1
3. Connecting to the NAS Administrative Web Page 2
4. Creating Pools, Volumes, and LUNs 4
5. Mapping the Network Drive 4
5.1 Windows 7 4
5.2 Windows 10 6
6. Connecting to the iSCSI on the NAS 6
7. Adding a New IQN to iSCSI ACL 7
8. Adding a New LUN 9
9. Finding an Initiator IQN for ACL 11
10. Virtualization Station 12
11. Code 12
11.1 iscsi setup.bat 13
11.2 reconnect iscsi.bat 13
12. Conclusion 14
13. References 15
List of Symbols, Abbreviations, and Acronyms 16
Distribution List 17

Approved for public release; distribution is unlimited. iv
List of Figures
Fig. 1 Entering in the user names and password on the NAS web page ..........3
Fig. 2 QFinder Pro ............................................................................................3
Fig. 3 Creating a new storage pool, volume, or iSCSI LUN ............................4
Fig. 4 Map network drive button ......................................................................5
Fig. 5 Credentials box ......................................................................................5
Fig. 6 Network drives .......................................................................................6
Fig. 7 iSCSI ACL button ..................................................................................7
Fig. 8 Add a Policy button ...............................................................................8
Fig. 9 Read/write access controls .....................................................................8
Fig. 10 Create button ..........................................................................................9
Fig. 11 Mapping the LUN ..................................................................................9
Fig. 12 Selecting a LUN type ...........................................................................10
Fig. 13 Advanced settings for cache ................................................................11
Fig. 14 CogRad IQN target ..............................................................................11
Fig. 15 Initiator Name box ...............................................................................12
Approved for public release; distribution is unlimited. 1
1. Introduction
This report documents instructions and guidance on how to use the QNAP 1263U network attached storage (NAS) device. Included are notes on what worked and where we struggled. This report can be used as a set of instructions to store information and to reformat the NAS using other specifications.
At the writing of this, the QNAP 1263U NAS is set up in a redundant array of independent disks (RAID) 0 configuration, with one disk of cache and one storage volume half the size of the overall pool with 3 Internet small computer systems interface (iSCSI) logical unit numbers (LUNs), each thin provisioned with 500 GB each, as well as 2 shared folders, Public and CogRad. It is our hope that reading through this guide will give users some insight into what that last sentence means. Note that the purpose in Section 2 does provide insight on our approaches for going beyond what is written here, but understand that doing so is not necessary to perform any of the tasks expressly laid out in this guide.
2. Purpose
NAS and storage area networks (SANs) are 2 approaches to what is essentially the same problem: how to remotely store and access files. To the general user, they serve the same purpose in a functionally identical manner. However, the 2 implementations differ greatly, and it is simply the final abstraction that makes them appear to be similar. NAS uses File Transfer Protocol (FTP) and server message block (SMB) transfer protocols to send data over the network. These protocols have a lot of overhead and generally make the files transfer more slowly. The file system on the storage container is commonly a network file system (NFS), which uses a file-locking system so files are not simultaneously written and accidentally overwrite part of another file. This aspect is unavoidable to ensure data integrity, but is implemented somewhat inefficiently with an NFS. A NAS server appears slightly differently, as network drives instead of local hard drives like a SAN setup or removable storage on Windows, but are still assigned a drive letter, so they can still be used by most programs without additional programming. Due to the file locking, the NAS will transfer data at a file level.
A SAN uses the iSCSI transfer protocol to open the disks to the computer as local hard drives. As such, a SAN has very little overhead, because it does not care/know what data it is transferring, unlike the NAS. SANs are generally a block-based storage, identical to how local hard drives work, which helps whittle down the overhead, making transferring files much quicker. Disks must be formatted as if they were a local hard drive, so for a Windows computer, a SAN would use the

Approved for public release; distribution is unlimited. 2
New Technology File System. This file system and block-based transfer ring do not support any file locking and do not recognize when multiple initiators are writing files. For this reason, only one computer should ever have write access to a LUN, which is viewed as a local hard drive by the connected computer. All other computers can be given read access. However, other connected computers will not update their file table when new files have been added. To view updates on a read-only machine, users must disconnect and reconnect to the iSCSI target. To give multiple computers access to a drive where they can write, multiple drives must be created and attached to a single iSCSI Qualified Name (IQN) target, one drive for each initiator that needs write access.
SAN with iSCSI is a relatively new technology, compared to traditional SCSI, which is over a fiber channel or NAS. In the beginning, we planned on using a NAS because the SAN seemed to need more components and was more complex than necessary. In the end, we decided to use a NAS, since none of the computers we used had room for the additional hardware. The 10-GbE cards for the network were difficult to fit in some of the boxes. However, since a SAN is much faster, after working out some of the kinks, in the near future, it would be beneficial to switch over to a SAN storage instead of a NAS to avoid protocol overhead and speed up data transfers.
3. Connecting to the NAS Administrative Web Page
The following are the procedures for connecting to the NAS administrative web page:
1) Open a web browser and browse to 192.168.40.8:8080.
2) Enter the username and password, which can be found on top of the NAS. (in this case, admin / ARLcograd15!%) (Fig. 1).

Approved for public release; distribution is unlimited. 3
Fig. 1 Entering in the user names and password on the NAS web page
Alternatively, there is software called QFinder Pro (Fig. 2), which can be downloaded from the QNAP website1 (or via the installer found in the Public folder on the NAS). This software finds all the QNAP NAS systems on the network, making connecting just a double-click away. The advantage to this is if the QNAP NAS’s IP address ever changes, it will be easier to find where it is. There are also some network adapter settings (such as setting a static IP) that are very easily done in this software.
Troubleshooting: If the NAS does not appear upon opening up the program, go to the QFinder Pro menu and click Refresh.
Fig. 2 QFinder Pro

Approved for public release; distribution is unlimited. 4
4. Creating Pools, Volumes, and LUNs
The following are procedures for creating storage pools, volumes, and LUNs in the QNAP NAS system:
1) Navigate to the administrator page and open the Storage Manager.
2) Select the Storage Space tab on the left-hand side.
3) Clicking the Create button brings up a menu to create a new Storage Pool, a new Volume, or a new iSCSI LUN (Fig. 3).
Fig. 3 Creating a new storage pool, volume, or iSCSI LUN
4) If creating a storage pool or volume, go to Section 4 for details about both.
5) If creating a LUN, go to Section 8 for more information.
5. Mapping the Network Drive
5.1 Windows 7
Use the following procedures to map the network drive:
1) Open up My Computer.
2) Click the button “Map Network Drive” in the top toolbar (Fig. 4).

Approved for public release; distribution is unlimited. 5
Fig. 4 Map network drive button
3) Type in the URL when asked (in this case, \\192.168.40.8\CogRad).
4) Check the box to specify other credentials (Fig. 5).
Fig. 5 Credentials box
5) Click Next, when prompted enter the credentials on the NAS (in this case, admin/ ARLcograd15!%).

Approved for public release; distribution is unlimited. 6
All the utilities and support documentation, we have created can be found in the Public folder, instead of the CogRad one. The method is the same to connect, just type “Public” instead of “CogRad”.
5.2 Windows 10
Use the following procedures to map the network drive:
1) Open up a File Explorer and navigate to This PC.
2) Find the Computer ribbon menu.
3) Click the button “Map Network Drive” in the Locations group.
4) Leave the drive letter alone. In the Folder box, type “\\192.168.40.8\Public” (without the quotes).
5) Follow the onscreen instructions. There is no need to reconnect at sign in.
6) Check the box to log in with other credentials. Enter the credentials found on the NAS (in this case, admin / ARLcograd15!%).
6. Connecting to the iSCSI on the NAS
Use the following procedures to connect to the iSCSI:
1) Map network drive (in this case, \\192.168.40.8\CogRad).
2) Copy iscsi setup.bat from the network drive to local storage.
3) Run the batch file. It will request admin privileges; it will only work with admin rights.
4) A bunch of local hard drives should appear on the computer (Fig 6).
Fig. 6 Network drives
Approved for public release; distribution is unlimited. 7
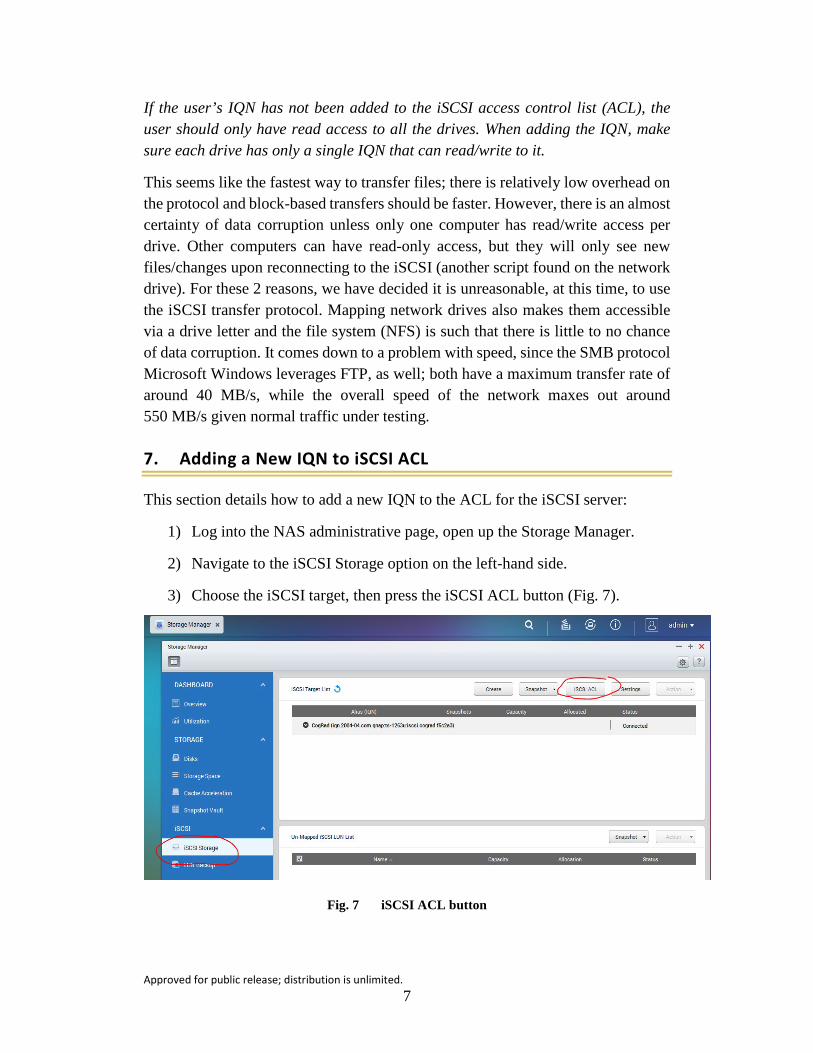
If the user’s IQN has not been added to the iSCSI access control list (ACL), the user should only have read access to all the drives. When adding the IQN, make sure each drive has only a single IQN that can read/write to it.
This seems like the fastest way to transfer files; there is relatively low overhead on the protocol and block-based transfers should be faster. However, there is an almost certainty of data corruption unless only one computer has read/write access per drive. Other computers can have read-only access, but they will only see new files/changes upon reconnecting to the iSCSI (another script found on the network drive). For these 2 reasons, we have decided it is unreasonable, at this time, to use the iSCSI transfer protocol. Mapping network drives also makes them accessible via a drive letter and the file system (NFS) is such that there is little to no chance of data corruption. It comes down to a problem with speed, since the SMB protocol Microsoft Windows leverages FTP, as well; both have a maximum transfer rate of around 40 MB/s, while the overall speed of the network maxes out around 550 MB/s given normal traffic under testing.
7. Adding a New IQN to iSCSI ACL
This section details how to add a new IQN to the ACL for the iSCSI server:
1) Log into the NAS administrative page, open up the Storage Manager.
2) Navigate to the iSCSI Storage option on the left-hand side.
3) Choose the iSCSI target, then press the iSCSI ACL button (Fig. 7).
Fig. 7 iSCSI ACL button

Approved for public release; distribution is unlimited. 8
4) Click the Add a Policy button to add a new access control (Fig. 8).
Fig. 8 Add a Policy button
5) Find the IQN of the initiator and type it into the box.
6) Name the system in order to remember what it is.
7) Give the system read/write access to any LUNs that do not already have an IQN with read/write access.
8) Change the rest to read only (Fig. 9).
Fig. 9 Read/write access controls
It is important that only a single computer has write access to a LUN to avoid data corruption. There are some other issues with data corruption, as well. For example, disconnecting the LUN at any time has the potential to corrupt data.

Approved for public release; distribution is unlimited. 9
8. Adding a New LUN
The following are the procedures for adding a new LUN:
1) Log in to the NAS administrative page, open up the Storage Manager.
2) Navigate to the iSCSI control panel on the left-hand side.
3) In the top-right corner, click “Create” (Fig. 10).
Fig. 10 Create button
4) In the pop up, choose “iSCSI LUN only”; here it is mapped to the existing iSCSI target (Fig. 11).
Fig. 11 Mapping the LUN
5) Pick a LUN type, preferably the first choice (Fig. 12). File-based LUNs are slower, but less prone to data corruption than the block-based LUNs, which are slightly faster.

Approved for public release; distribution is unlimited. 10
Fig. 12 Selecting a LUN type
6) Give it some space, choose “Thin Provisioning”, which will only allocate space as it is used.
Thin provisioning vs. instant allocation: Instant allocation sets aside the memory as soon as the LUN is created. There is no flexibility in the size of the LUN. Thin provisioning allocates space as it is used, up to the maximum. The maximum can be changed easily so long as it is not smaller than the already allocated space.
7) Under Advanced Settings (Fig. 13), also choose to flush memory from cache (“Report volatile write cache”), which will help avoid data corruption.

Approved for public release; distribution is unlimited. 11
Fig. 13 Advanced settings for cache
8) Click Next, then uncheck the “Do not map to Target”, which will promptly bring up the CogRad IQN target (Fig 14).
Fig. 14 CogRad IQN target
9) Now that the LUN has been mapped, change the Default Policy of the ACL to read-only access (it is read/write by default) and add the new IQN initiator to the ACL with read/write access to the new LUN (or give one of the existing initiators access).
9. Finding an Initiator IQN for ACL
The following are the procedures for finding a initiator IQN for the ACL:
1) On the Windows machine, open up the Run... box (Win + R), type “iscsicpl” and hit Enter.
Note: The user will need administrator privileges to continue.
2) If the service is not already running, it should ask to start it. Please do.

Approved for public release; distribution is unlimited. 12
3) Go to the Configuration tab. The initiator name should be in a box labeled “Initiator Name:” (Fig. 15).
Fig. 15 Initiator Name box
4) If the box is empty, double check the service is running. One can start the service by typing “net start msiscsi” into a command prompt with administrator privileges.
10. Virtualization Station
The Virtualization Station2 allows the NAS to run an operating system. This could make the NAS the brains of the operation, although the processor in the NAS is not powerful enough to do any heavy calculations itself.
Currently, the Virtualization Station has not been installed on the NAS. To install it, download the Virtualization Station app from QNAP’s website, use another computer to upload it (go through the App Center found on the NAS for specific instructions on how to add applications), and then the Virtualization Station will prompt the user on how to add an operating system.
11. Code
The code in this section pertains to elevating the command prompt to have administrator privileges is courtesy of a post on TechGainer.3

Approved for public release; distribution is unlimited. 13
11.1 iscsi setup.bat
This batch file requests administrator privileges, turns on iSCSI, sets iSCSI to turn on at startup, and connects to a iSCSI LUN with the identifier iqn.2004-04.com.qnap:ts-1263u:iscsi.cograd.f5c2a3. @echo off :: BatchGotAdmin (Run as Admin code starts) REM --> Check for permissions >nul 2>&1 "%SYSTEMROOT%\system32\cacls.exe" "%SYSTEMROOT%\system32\config\system" REM --> If error flag set, we do not have admin. if '%errorlevel%' NEQ '0' ( echo Requesting administrative privileges... goto UACPrompt ) else ( goto gotAdmin ) :UACPrompt echo Set UAC = CreateObject^("Shell.Application"^) > "%temp%\getadmin.vbs" echo UAC.ShellExecute "%~s0", "", "", "runas", 1 >> "%temp%\getadmin.vbs" "%temp%\getadmin.vbs" exit /B :gotAdmin if exist "%temp%\getadmin.vbs" ( del "%temp%\getadmin.vbs" ) pushd "%CD%" CD /D "%~dp0" :: BatchGotAdmin (Run as Admin code ends) :: Your codes should start from the following line REG add "HKLM\SYSTEM\CurrentControlSet\services\MSiSCSI" /v Start /t REG_DWORD /d 2 /f REG add "HKLM\SYSTEM\CurrentControlSet\services\MSiSCSI" /v DelayedAutostart /t REG_DWORD /d 0 /f net start msiscsi iscsicli QAddTargetPortal 192.168.40.8 ::The only part that should ever need changed here ::is where it says "cograd".The rest is NAS dependent iscsicli qlogintarget iqn.2004-04.com.qnap:ts-1263u:iscsi.cograd.f5c2a3 iscsicli PersistentLoginTarget iqn.2004-04.com.qnap:ts-1263u:iscsi.qnapdisk.f5c2a3 T * * * * * * * * * * * * * * * 0 start "" /wait cmd /c "echo You will need to restart your computer for these changes to take effect.&echo(&pause"
11.2 reconnect iscsi.bat
The batch file requests administrator privileges, disconnects from all iSCSI connections, and then reconnects to them. The code to elevate the command prompt to administrator privileges is courtesy of Lokesh Kumar via Stack Overflow.4
@echo off :: BatchGotAdmin (Run as Admin code starts) REM --> Check for permissions >nul 2>&1 "%SYSTEMROOT%\system32\cacls.exe" "%SYSTEMROOT%\system32\config\system" REM --> If error flag set, we do not have admin. if '%errorlevel%' NEQ '0' ( echo Requesting administrative privileges... goto UACPrompt ) else ( goto gotAdmin ) :UACPrompt echo Set UAC = CreateObject^("Shell.Application"^) > "%temp%\getadmin.vbs" echo UAC.ShellExecute "%~s0", "", "", "runas", 1 >> "%temp%\getadmin.vbs" "%temp%\getadmin.vbs" exit /B :gotAdmin if exist "%temp%\getadmin.vbs" ( del "%temp%\getadmin.vbs" ) pushd "%CD%" CD /D "%~dp0" :: BatchGotAdmin (Run as Admin code ends) :: Your codes should start from the following line :: Get the Session ID and some other stuff iscsicli ReportTargetMappings > info.txt :: Pull the Session ID out itll be stored in varID
Approved for public release; distribution is unlimited. 14
for /f "tokens=1-5" %%E in (info.txt) do @set var%%F=%%H :: remove the leading space from the Session ID set var=%varID:~-33% :: log out of the target iscsicli LogoutTarget %var% :: reconnect to the target :: iscsicli QLoginTarget iqn.2004-04.com.qnap:ts-1263u:iscsi.cograd.f5c2a3 iscsicli QLoginTarget %varName% :: should be all done! :: clean up del info.txt
12. Conclusion
There are many different ways to set up a NAS and an SAN. Within those 2 very different setups for this device, there are a variation of RAID configurations and connection protocols that make choosing a setup for this kind of device an involved process. For this application, given the limited time, the best solution was a NAS using SMB and FTP protocols for file transfer, as file-based protocols are more corruption resilient than block-based. Since the bottleneck is the transfer protocol, it made no difference which type of RAID was used. Given more time, the optimal solution would be a SAN, since the block-based iSCSI protocol would provide faster upload and download times for data. However, there are too many problems faced when using this kind of system, namely, data corruption and what data are seen across multiple computers, since iSCSI only expects a single computer connected with write access to a drive at any one time.

Approved for public release; distribution is unlimited. 15
13. References
1. QNAP: utilities. Pomona (CA): QNAP; 2016 [accessed 2016 Jul]. https://www.qnap.com/en/utility.
2. QNAP: virtualization station. Pomona (CA): QNAP; 2016 [accessed 2016 Jul]. https://www.qnap.com/event/station/en/virtualization.php.
3. Al Nahian J. TechGainer, method 1 section header. Dhaka (Bangladesh): TechGainer; 2014 Oct 17 [accessed 2016 Jul]. http://www.techgainer.com/create-batch-file-automatically-run-administrator/.
4. Kumar L. Stack Overflow: how to create a batch file to run cmd as administrator. New York (NY): Stack Overflow; 2015 Mar 13 [accessed 2016 Jul]. http://stackoverflow.com/questions/11525056/how-to-create-a-batch-file-to-run-cmd-as-administrator.
Approved for public release; distribution is unlimited. 16
List of Symbols, Abbreviations, and Acronyms
ACL access control list
FTP File Transfer Protocol
IP Internet Protocol
IQN iSCSI Qualified Name
iSCSI Internet small computer systems interface
LUN logical unit number
NAS network attached storage
NFS network file system
RAID redundant array of independent disks
SAN storage area network
SMB server message block

Approved for public release; distribution is unlimited. 17
1 DEFENSE TECHNICAL (PDF) INFORMATION CTR DTIC OCA 2 DIRECTOR (PDF) US ARMY RESEARCH LAB RDRL CIO L IMAL HRA MAIL & RECORDS MGMT 1 GOVT PRINTG OFC (PDF) A MALHOTRA 1 DIRECTOR (PDF) US ARMY RESEARCH LAB RDRL SER U L SHERBONDY

Approved for public release; distribution is unlimited. 18
INTENTIONALLY LEFT BLANK.