qc ip camera & nvr bundle quick start guide
TRANSCRIPT

QUICK START GUIDEQC IP Camera & NVR Bundle
ENGLISH
2
WelcomeTable of ContentsCongratulations on your latest purchase and welcome to the Q-See family. This packet includes everything you will need to help get your smart security system up and running. We are excited to have you on board and thank you for choosing Q-See!
Sincerely,
Priti SharmaPresident
Connect with us on social media.
WelcomeWhat’s Included ..............................................................3Understanding Your NVR ................................................4
Get Connected Registration ....................................................................5Connect Your Cameras ..................................................5Connect NVR to Display .................................................6Connect Mouse ..............................................................7Connect to the Router ....................................................8Powering Up the NVR & Cameras ..................................8Startup Wizard ...............................................................9Setting Up the QC View Mobile App .............................14Adding Wi-Fi Cameras..................................................16
QC View On Your ComputerOS X, Mac Users ..........................................................16Windows, PC Users .....................................................18Adding Your NVR to QC View .......................................22Adding Multiple Mobile Devices ....................................25
Understanding the QC SystemPlayback ......................................................................26Backing Up Recordings ................................................29
Get the Most Out of Your Q-See System Tips on Camera Placement ..........................................32Troubleshooting ............................................................34Glossary .......................................................................35Warranty and Support ..................................................35

3
What’s Included
NVR
Mouse
Your system will include one of the options below
Not included with every system
Number of cameras included vary by system
Actual NVR will vary by system
Products shown in this section may vary by system
100 feet of Network cable per IP camera
HDMI Cable Network (Ethernet) Cable
SATA Cable
A B
NVR Cables
Power SupplyCameras Camera Network Cables

4
Understanding Your NVR: Rear PanelNOTE: Connections on the back of your system may vary based on your model.
VGA MONITOR
VGA 19” +
NETWORKUSB
CAMERA POE
POWER SUPPLY HD DISPLAY
HDTV
EXTERNALMICROPHONE
EXTERNALSPEAKER
ALARM OUT
ALARM IN
IMPORTANT: Go through all of the steps to setup and test your system before mounting any cameras or hardware. Always visit www.q-see.com/support to find the most recent guides and up-to-date support for your Q-See products.

5
Get ConnectedStep 2: Connect Your CamerasA. Plug the camera network cable into the camera
by connecting the Ethernet cable into the camera network port. You should hear a clicking sound as you connect to the port.
B. Move the white weather-proof housing up and twist to secure the cover over the port. Tighten the base of the cover to complete the weather-proof seal.
Step 1: RegistrationBefore installing, please register your device on the Q-See Support Portal at www.q-see.com/register to receive critical updates and support for your system. Registering will also help us to assist you with any technical or warranty issues if ever necessary.
Please be sure to keep a record of your model number(s) and to save this guide, as you will need this information if you are ever in need of technical or warranty support.
NOTE: Your username and password used to register your device are not the same as those you use to log in to your system. Please write down your username, password, and model number(s) in the spaces provided below:
Username:
Password:
Model #:

6
C. Plug the other end of the camera cable into an available PoE port on the back of your NVR. Again, you will hear a clicking noise when cables are inserted correctly. Repeat steps A through C for each camera.
Step 3: Connect NVR to DisplayThere are two options to connect the NVR to a display.
Option A: HDMIA1. Plug the included HDMI cable into the NVR’s HDMI port.
A2. Connect the other end of the HDMI cable to the monitor or TV.
A3. Plug the monitor or TV into a surge protector.
NOTE: Channels are assigned to cameras in the order they are connected. Port numbers do not indicate the channel that will be assigned to the camera.

7
Option B: VGA MonitorB1. Plug a VGA cable (not included) into the NVR’s VGA
port. VGA might not support full high definition output.
B2. Connect the other end of the VGA cable to the monitor. A 19” monitor or larger with 1280 x 1024 resolution is highly recommended.
B3. Plug the monitor into a surge protector.
Step 4: Connect MousePlug the included mouse into the USB port on the back of the NVR. If your model has two USB ports on the back, either one will work.
19” Monitor or Larger

8
B. Connect the other end of the cable to an open port on your router (not included). You will hear a click when the cable is properly connected.
Step 5: Connect to the RouterA. Plug the included Network (Ethernet) cable into the
Network (LAN) port on the back of the NVR.
Step 6: Powering Up the NVR & CamerasA. Plug the NVR power supply cable into the DC Port
on the back of the NVR.
B. Plug the NVR power supply cable or power adapter into a surge protector (not included).

9
C. Turn on the NVR’s power switch (if present). The NVR may beep as it powers up. The Startup Wizard will appear on-screen after a few minutes.
NOTE: The camera will make a faint clicking sound when the power is activated. The cameras will take about one minute after powering on to begin displaying on the monitor.
DISPLAY COMPATIBILITY: While the system boots, the Q-See logo will appear. If the logo appears on your monitor but goes blank, your display may not be compatible with your NVR. This NVR requires a display capable of support-ing 1024 x 768, 1280 x 720, 1280 x 1024, or 1920 x 1080.
Step 7: Startup Wizard
A. In order to effectively use the search functions and maintain accurate recordings, you must complete the Startup Wizard. Click on Next Step to begin.

10
B. Set the current Date and Time in the screen below and then click Next Step.
C. Click on EmailSet to add an email address to recover a lost/forgotten password. When you click EmailSet it will ask you for login credentials, use the default username “admin” and default password “admin”.
11
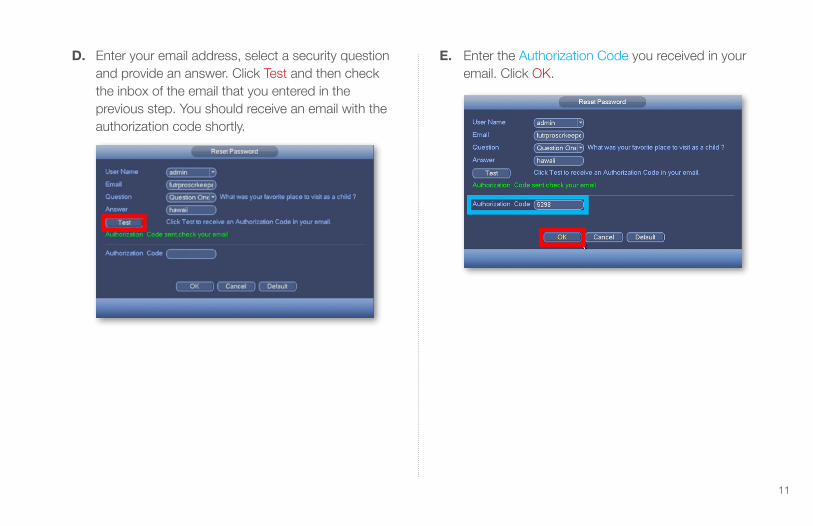
D. Enter your email address, select a security question and provide an answer. Click Test and then check the inbox of the email that you entered in the previous step. You should receive an email with the authorization code shortly.
E. Enter the Authorization Code you received in your email. Click OK.

12
Please write down your new password in the space provided below:
Username: adminPassword:
NOTE: Password is case sensitive and can not exceed eight characters.
F. Check Modify Password to change the existing default password which is “admin”.
G. Click Next Step to start the remote monitoring setup.

13
H. Once the network connection has been successfully established, click Next Step. If the connection is not successful, try powering off the NVR for 30 seconds and going through all of Step 7 again. If this does not work, check www.q-see.com/support for additional troubleshooting.
I. Select Local & Internet to connect to your NVR remotely

14
Step 8: Setting Up the QC View Mobile AppDownload our free QC View mobile app to your mobile device, available for both Android and iOS.
NOTE: Please do not log in to the app yet.
A. Select your desired mobile device in the following window and click Next Step.

15
B. Follow the steps shown on screen to configure your mobile device and get to the Live Preview screen. After the Live Preview is successful, click Next Step.
NOTE: To add multiple mobile devices to your system, first complete the Startup Wizard suc-cessfully and then refer to page 25 of this quick start guide.
Screenshot of Live Preview from the QC View app on iOS.
C. The Q-See Startup Wizard is complete. To prevent the wizard from appearing after each reboot, uncheck the Startup box and click OK.
NOTE: If the Live Preview is unsuccessful and no camera feed is available, check the Troubleshooting section on page 34 of this guide to verify the camera is receiving power.

16
OS X, Mac UsersStep 1Go to www.q-see.com/support and search for answer ID “2799” to download the latest QC View software. Click the Downloads button and, once fully downloaded, double-click QC View.pkg to open the file.
If your system includes Wi-Fi cameras or you have purchased Q-See Wi-Fi cameras separately, you should add them to your NVR now. Please reference the Wi-Fi camera quick start guide that was included with your device before proceeding to the next step.
If your system does not involve Wi-Fi cameras then you may proceed to the next section.
QC View On Your Computer
Adding Wi-Fi Cameras
NOTE: For information about adding your Wi-Fi cameras to a Wi-Fi network, please visit www.q-see.com/support and refer-ence answer ID 3009. You may also reference answer ID 2812 for information about adding Wi-Fi cameras to your NVR.

17
NOTE: If during the install process you see a message that the file is from an unidentified developer, click OK and refer to answer ID 2634 at www.q-see.com/support for info on allowing installations from unidentified developers.
Step 2The QC View Installer will appear. Click Continue to proceed with the installation.
Step 3QC View will be located in your Applications Folder. Double-click QC View to launch the app.

18
Step 4QC View will open to the Login Screen. Enter the default Username & Password below and click Login to continue. These credentials are independent of those used on the NVR. Username: adminPassword: admin
NOTE: Adding the NVR to QC View has been elaborated further on page 22 of this guide.
Windows, PC UsersStep 1Go to www.q-see.com/support and search for answer ID “2502” to download the latest QC View software.
Internet Explorer UsersDownload QC View and click Run.
Chrome UsersIn the Downloads bar at the bottom of the browser window click QCView_Setup.exe to open the file.

19
Step 2Proceed with the Installation by clicking Next.
Step 3Review and Accept the License Agreement. Click Next.

20
Step 4Ensure both QC View and QC PC-NVR are checked.Click Next.
Step 5Click Install to begin the installation.
NOTE: You must have full administrator privileges to install the software on your computer. If you receive any permission errors please contact your system administrator.

21
Step 6Please be patient, the installation may take a couple of minutes to complete.
Step 7Once completed, ensure Run QC View is checked. Click Finish.

22
Step 8QC View will open to the Login Screen. Enter the default Username and Password listed below and click Login to continue. These credentials are independent of those used on the NVR. Username: adminPassword: admin
Adding Your NVR to QC ViewStep 1Select Devices from the Home Page.
Step 2Click Manual Add to add your NVR to QC View.

23
Step 3Device Name: Create a new name for your deviceRegister mode: SN (For a device with Scan N’ View)SN: Enter the device serial number located on the top
panel of the NVRUsername: admin (unless changed on page 12)Password: admin (unless changed on page 12)Once completed, click Add and then click OK.
Step 4Please be patient, it can take up to 1 minute for the State to change from Offline to Online.
Step 5Click the Home Page tab then select LiveView.

24
Step 6Click the + to display your device(s).
Step 7Double click the Device(s) you wish to display.

25
Step 8The camera feeds will display automatically.
Adding Multiple Mobile DevicesStep 1After completing the Startup Wizard, to add additional devices, first download the QC View app on your new device. On the NVR, go to the Main Menu and click QR Code. You will need to reference the steps from the screenshot in Step 8B on page 15 of this guide for mobile setup.

26
Step 2In the screenshot shown on Step 8B on page 15 of this guide, when you reach step 4 (scanning QR code) you can now scan the QR code shown on screen.
NOTE: You can also scan the QR code from the label located on the top of your NVR.
PlaybackStep 1In Live View mode, right-click the mouse to open the Shortcut Menu. Select Search.
Understanding the QC System
27
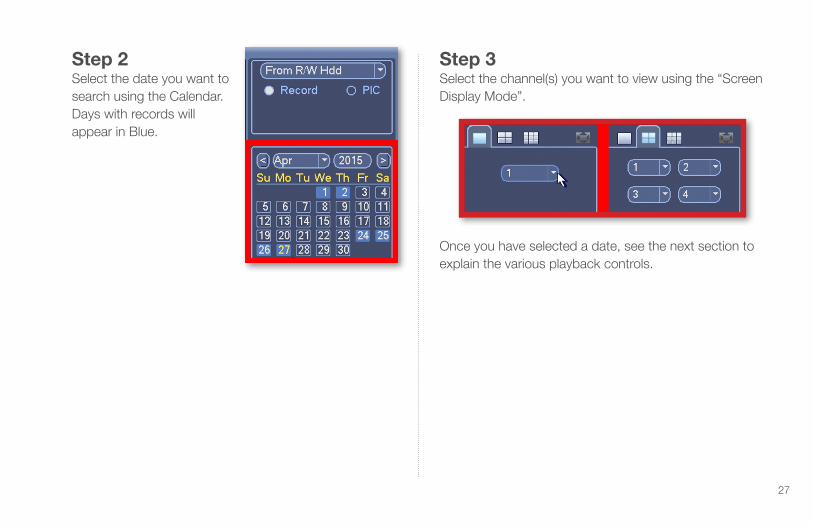
Step 2Select the date you want to search using the Calendar. Days with records will appear in Blue.
Step 3Select the channel(s) you want to view using the “Screen Display Mode”.
Once you have selected a date, see the next section to explain the various playback controls.

28
A. PlayClick Play to start playback from the beginning of the records.
D. Time SegmentsClick the Segments you want to playback for each channel. Playback will begin automatically.
B. StopTo refine your search (Date & Channels), click Stop.
C. SyncTo playback different times from multiple channels, uncheck Sync.
E. Time ScaleTo select a more specific time frame, use the Time Scale and click where to start.
A
B C D E
29
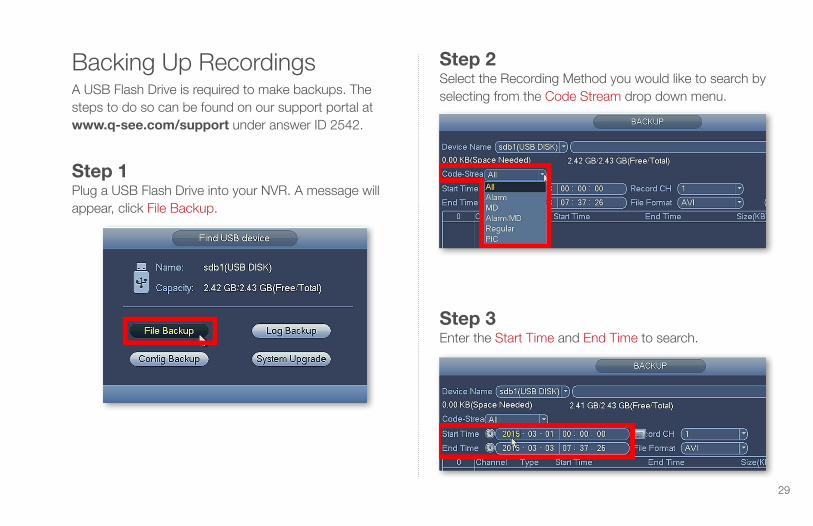
Backing Up RecordingsA USB Flash Drive is required to make backups. The steps to do so can be found on our support portal at www.q-see.com/support under answer ID 2542.
Step 1Plug a USB Flash Drive into your NVR. A message will appear, click File Backup.
Step 2Select the Recording Method you would like to search by selecting from the Code Stream drop down menu.
Step 3Enter the Start Time and End Time to search.

30
Step 4Select the Record Channel to search.
Step 5Select the File Format you want the records saved as.
Step 6Click Add to display the records.
DAV: Supports audio, requires playback software download.AVI: Playable with standard video programs. (Windows Media Player, Quicktime, etc.)
NOTE: Channels starting with “A” are the smaller, lower resolution, versions of the video saved in the corresponding channel.

31
Step 7Check the records you want to backup.
Step 9Once complete, the contents of the flash drive will be displayed. Click OK to backup more files or to go back.
NOTE: If you wish to backup files using a web browser, visit www.q-see.com/support and search for answer ID 2501.
Step 8Click Backup.
NOTE: The length and number of records you choose will impact the time required to complete the backups.

32
Get the Most Out of Your Q-See CamerasDistance From Viewing/Recording DeviceWalls & floors will affect signal strength, especially concrete.
Mounting Surface ThicknessMount your camera on a wall that is at least 2.5" thick.
Avoid direct exposure to weatherMount your camera under an eave or awning if possible.
Follow these tips to maximize the life and performance of your cameras.
Camera Distance from NVR
33
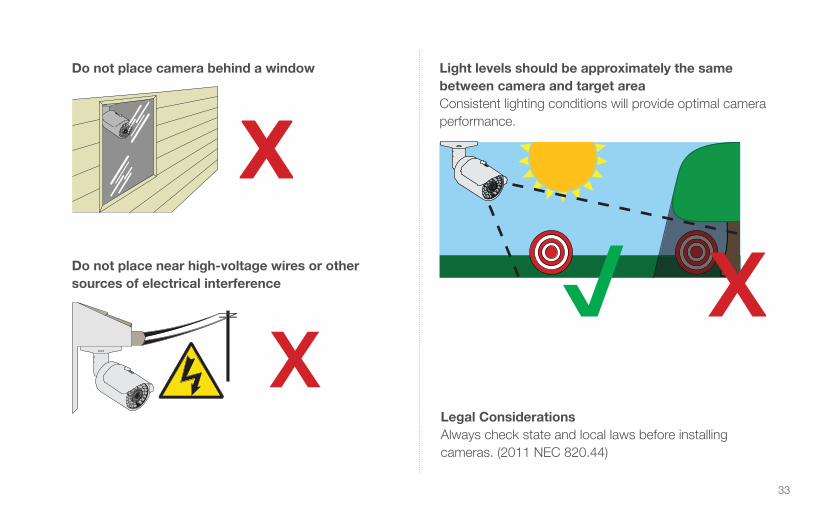
Legal ConsiderationsAlways check state and local laws before installing cameras. (2011 NEC 820.44)
Light levels should be approximately the same between camera and target areaConsistent lighting conditions will provide optimal camera performance.
Do not place near high-voltage wires or other sources of electrical interference
Do not place camera behind a window
34
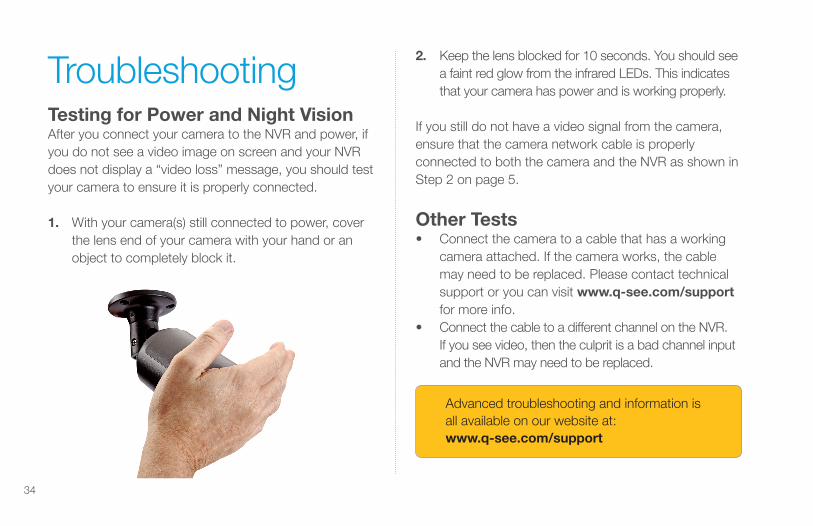
2. Keep the lens blocked for 10 seconds. You should see a faint red glow from the infrared LEDs. This indicates that your camera has power and is working properly.
If you still do not have a video signal from the camera, ensure that the camera network cable is properly connected to both the camera and the NVR as shown in Step 2 on page 5.
Other Tests• Connect the camera to a cable that has a working
camera attached. If the camera works, the cable may need to be replaced. Please contact technical support or you can visit www.q-see.com/support for more info.
• Connect the cable to a different channel on the NVR. If you see video, then the culprit is a bad channel input and the NVR may need to be replaced.
TroubleshootingTesting for Power and Night VisionAfter you connect your camera to the NVR and power, if you do not see a video image on screen and your NVR does not display a “video loss” message, you should test your camera to ensure it is properly connected.
1. With your camera(s) still connected to power, cover the lens end of your camera with your hand or an object to completely block it.
Advanced troubleshooting and information is all available on our website at:www.q-see.com/support

35
GlossaryIP (Internet Protocol): IP devices communicate with each other via a local network or over the Internet.
Language: This is the language the NVR will use.
Local IP Address: The NVR’s address on your local area network (LAN).
NTP (Network Time Protocol): This maintains the accuracy of the NVR’s clock.
NVR (Network Video Recorder): IP and Wi-Fi cameras connect to the recorder over the network directly via network (Ethernet) cables.
Please do not hesitate to call us at 1-877-998-3440 Monday-Friday 6:00 AM - 7:00 PM PST.
Visit www.q-see.com/support for 24/7 support and access to our online Support Portal.
Warranty & Support Q-See is always here to answer your questions and take your valued suggestions. Our focus is providing excellent customer support and always working to improve our customers’ experience.
DISCLAIMER: Although Q-See has made every effort to ensure that the information in this guide was correct at the time of printing, Q-See does not assume any liability to any party for any loss, damage, or disruption caused by any errors, omissions, or typos that may occur.
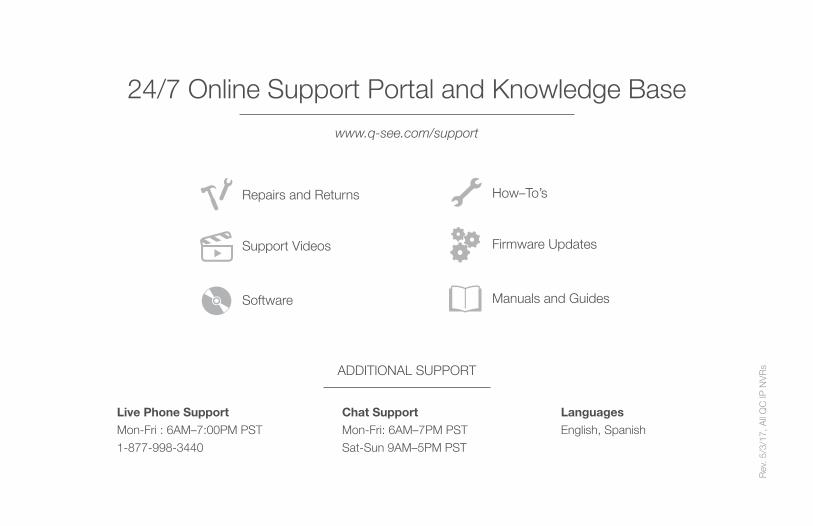
Live Phone SupportMon-Fri : 6AM–7:00PM PST1-877-998-3440
24/7 Online Support Portal and Knowledge Base www.q-see.com/support
ADDITIONAL SUPPORT
Rev.
5/3/
17, A
ll QC
IP N
VRs
Firmware Updates
How–To’s
Manuals and Guides
Repairs and Returns
Software
Support Videos
Chat SupportMon-Fri: 6AM–7PM PSTSat-Sun 9AM–5PM PST
LanguagesEnglish, Spanish