purse - choly knight · pdf file2 se es e ttt.f⅛⅜⅛.f⅜ // 20 holy night // tems made...
TRANSCRIPT

kittypurse
a free sewing pattern by

2
sew desu ne?| www.cholyknight.com |
// ©2017 Choly Knight // Items made using this pattern may be sold. Credit to “Choly Knight” or “Sew Desu Ne?” is appreciated. You may not reproduce, share, freely distribute, or sell this pattern as your own in digital or printed form.
kitty purse free sewing tutorial
kitty purseThis project is an upgraded version of my previous kitty purse. But it still has the same gusseted bottom with kitty ears, appliqued whiskers, zippered hidden pocket and loads of other inner pockets. The upgrades are in the form of a zippered opening and an adjustable strap that were absent in the first version.The simple shape is a sweet statement for all kinds of cat lovers.
difficulty:
This project takes more skill than most of my other free patterns. Sewing the bag requires some careful hand coor-dination since the layers are so thick. And there are lots of little details to get through.
makes:One purse: 12" wide, 11" tall, and 3" deep
skills used:•Fusible web applique•Zipper sewing•Edge stitching•Using interfacing•Curved sewing
sew desu ne?| www.cholyknight.com |
// ©2016 Choly Knight // Items made using this pattern may be sold. Credit to “Choly Knight” or “Sew Desu Ne?” is appreciated. You may not reproduce, share, freely distribute, or sell this pattern as your own in digital or printed form.

3
sew desu ne?| www.cholyknight.com |
// ©2017 Choly Knight // Items made using this pattern may be sold. Credit to “Choly Knight” or “Sew Desu Ne?” is appreciated. You may not reproduce, share, freely distribute, or sell this pattern as your own in digital or printed form.
kitty purse free sewing tutorial
suggested fabrics:outer bag:lightweight fabrics: Quilting cotton, light twill, and other lightweight fabrics work nicely for this bag design, but it will need 2 layers of interfacing to bring it up to the needed body and stiffness. One lightweight layer (I like Pellon SF101), and one heavyweight layer (such as Pellon Decor Bond) produce the best result.medium-weight fabrics: Fabrics such as twill or canvas are good medium-weight options. These will likely need one layer of lightweight interfacing (such as Pellon SF101) to eliminate any flimsiness.vinyl: Stiff fabrics such as vinyl will likely not need any help from interfacing. Though some of the sharp corners and multiple layers in the pattern may be difficult to sew. Be sure to trim away extra bulk and use alternate methods for sewing the straps if necessary.
bag lining:light to medium-weight fabrics: Quilting cotton is the best bet for the lining of the bag, as it's easy to sew and keeps its shape better than typical apparel and bag lining fabrics. You'll have a much easier time in the long run.
materials & tools:•¾ yd. of 45” wide or ½ yd. of 60” wide fabric for outer purse•¾ yd. of lightweight fabric for lining•1½ yds. of lightweight fusible interfacing (optional; see tip below) I used Pellon SF-101•¾ yd. of heavyweight interfacing (optional; see tip below) I used Pellon Decor Bond•¼ yd. of thin cotton quilt batting•11" separating zipper (for opening)•10" zipper (for hidden pocket)•1¼” wide strap adjuster•Two 1¼" wide square rings•4” x 6” of appliqué fabric•4” x 6” of light or heavy duty fusible web•sewing thread to match main fabric and applique fabrics•basic sewing tools (sewing machine, scissors, iron, needles, pins, fabric marker, seam
ripper)

4
sew desu ne?| www.cholyknight.com |
// ©2017 Choly Knight // Items made using this pattern may be sold. Credit to “Choly Knight” or “Sew Desu Ne?” is appreciated. You may not reproduce, share, freely distribute, or sell this pattern as your own in digital or printed form.
kitty purse free sewing tutorial
printing the pattern:To print the pattern, set your computer to print pages 18-27. If you’re unfamiliar with printing and assembling a .pdf pattern, read the steps below.
1At the print dialog box, check the box that says print at “Actual Size” or 100%. Any other selection (such as “Fit to page”) will distort the pattern so it’s slightly larger or smaller and we don’t want that.
4 5To line up the pattern pages, match up the corresponding diamond shapes. Each diamond will have a letter, so it’s simply a matter of matching A1 to A2, B3 to B4 and so on. The faint gray lines indicate the border of every page, you should be able to line those up as well. When the diamond goes together, tape it in place.If you have many pages, it’s easier to tape up the pages into rows first. Then tape the rows together into a full block.
You can trace the patterns onto a different paper, or you can also just cut them straight from the printer paper -- be sure that each piece is fully taped together along the joins so they don’t fall apart when you cut them.
3It’s likely your printer will have a margin that ensures your image doesn’t print to the very edge. Assembly will be easier if you trim off this blank margin edge. This will give you pages that overlap slightly during assembly. If you trim across the gray outline boxes, this will give you pages that don’t overlap but rather butt against each other.
2Print the pages needed for the file. You might have one or more. Either way, be sure you have the full collection by noting the page numbers in the corner.

5
sew desu ne?| www.cholyknight.com |
// ©2017 Choly Knight // Items made using this pattern may be sold. Credit to “Choly Knight” or “Sew Desu Ne?” is appreciated. You may not reproduce, share, freely distribute, or sell this pattern as your own in digital or printed form.
kitty purse free sewing tutorial
before you begin:•Briefly read the project instructions so you know what to expect.•If desired, mark the cut fabric pieces with the markings and symbols from the pattern. Or wait
until the applicable step before transferring.•Note that the seam allowance used throughout the project is ½" unless otherwise noted.
A
B C C
G
I
ID D
F
A
A
H
HA
G
G
EE
E
C C
¾ yd.; 27” long
cutting the fabric:
outer purse fabric lining fabric
lightweight interfacing
heavyweight interfacing
quilt batting
22” wide (after fold) 22” wide (after fold) 20” wide
20” wide
25” wide
cutting layout:
27” long
27” long
1½ yd.; 54” longG
RA
INL
INE
GR
AIN
LIN
E
FA
BR
IC F
OL
D
FA
BR
IC F
OL
D
FABRIC FOLD
FABRIC FOLD
¼ yd.; 9” long
2 3 41Fold fabric in half, meeting selvedge edges.
Place pattern on the fabric, and make sure the grain line is parallel to the selvedges. Each end of the line should be equally distant to the selvedge.
Pin the pattern in place, use pattern weights, or trace the outline of the pattern with a washable marker.
Using the paper as a template, cut out the fabric. Cut the required amount according to the pattern.
6
sew desu ne?| www.cholyknight.com |
// ©2017 Choly Knight // Items made using this pattern may be sold. Credit to “Choly Knight” or “Sew Desu Ne?” is appreciated. You may not reproduce, share, freely distribute, or sell this pattern as your own in digital or printed form.
kitty purse free sewing tutorial
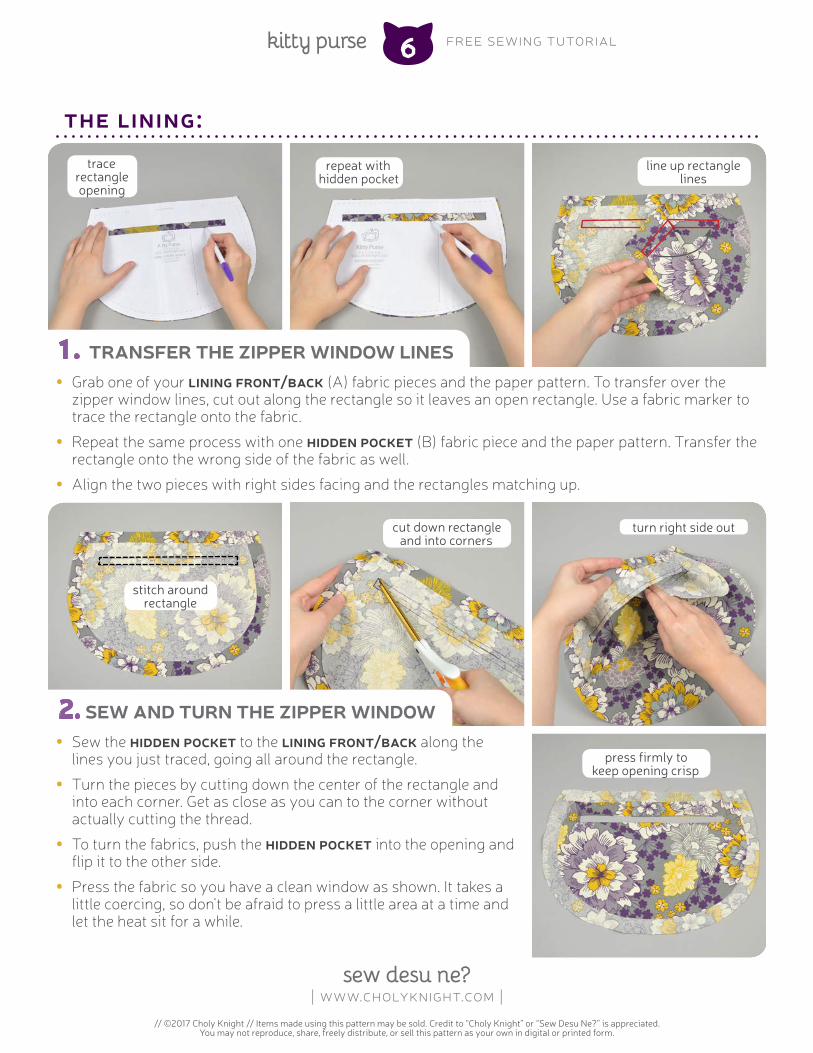
• Grab one of your lining front/back (A) fabric pieces and the paper pattern. To transfer over the zipper window lines, cut out along the rectangle so it leaves an open rectangle. Use a fabric marker to trace the rectangle onto the fabric.
• Repeat the same process with one hidden pocket (B) fabric piece and the paper pattern. Transfer the rectangle onto the wrong side of the fabric as well.
• Align the two pieces with right sides facing and the rectangles matching up.
• Sew the hidden pocket to the lining front/back along the lines you just traced, going all around the rectangle.
• Turn the pieces by cutting down the center of the rectangle and into each corner. Get as close as you can to the corner without actually cutting the thread.
• To turn the fabrics, push the hidden pocket into the opening and flip it to the other side.
• Press the fabric so you have a clean window as shown. It takes a little coercing, so don't be afraid to press a little area at a time and let the heat sit for a while.
1. transfer the zipper window lines
the lining:
2. sew and turn the zipper window
trace rectangle opening
repeat with hidden pocket
line up rectangle lines
stitch around rectangle
cut down rectangle and into corners
turn right side out
press firmly to keep opening crisp

7kitty purse free sewing tutorial
sew desu ne?| www.cholyknight.com |
// ©2017 Choly Knight // Items made using this pattern may be sold. Credit to “Choly Knight” or “Sew Desu Ne?” is appreciated. You may not reproduce, share, freely distribute, or sell this pattern as your own in digital or printed form.
• Take your closed-bottom zipper (not the separating one, which is for the purse opening). If it isn't already 10" long, trim it down. Ideally, trim off the metal stops at the top and bottom of the zipper since you can't sew over those.
• Place your lining piece on your work space with the hidden pocket (B) facing up. Lay the zipper over the window with the right side facing down over the window. Center the zipper teeth within the rectangular window.
• Hold the zipper with pins, tape, or even glue stick works well.
• Flip the piece over and make sure the zipper slider and teeth are inside the window.
• Using a zipper foot (if you have one), sew around the zipper window, as close to the edge as you can. Be careful when sewing over the teeth at the short ends.
• Flip the piece over so the hidden pocket (B) is facing up once again. Take your remaining hidden pocket (B) piece and align it over the sewn one with right sides facing and edges matching up.
• Sew around the edges of the pocket with a ¼" seam allowance. Be sure not to sew through the lining front/back (A), just the two pocket pieces.
3. align the zipper
4. sew the hidden pocket
trim zipper to 10" remove zipper stops
place zipper over opening
tape, glue, or pin zipper in place
keep zipper slider in window
stitch close to window edge
align pocket layers
sew pocket with ¼" seam allowance

8
sew desu ne?| www.cholyknight.com |
// ©2017 Choly Knight // Items made using this pattern may be sold. Credit to “Choly Knight” or “Sew Desu Ne?” is appreciated. You may not reproduce, share, freely distribute, or sell this pattern as your own in digital or printed form.
kitty purse free sewing tutorial
• Grab your lining pocket pieces (C). Take two of them and align them with right sides facing and raw edges matching up.
• Sew them together along the straight edge. Flip the pieces right side out and press the seam.
• Grab the (C) pieces you cut from the quilt batting. Take one and tuck it between the pocket pieces up against the seam you've just sewn. It has no seam allowance so the lining fabric will stick out.
• Top stitch the seam you've just sewn and it should anchor the batting in place. Repeat this step with the remaining pocket pieces for 2 complete pockets total.
• Retrieve your hidden pocket section. Flip up the hidden pocket so it's out of the way of the rest of the lining.
• Place your lining pocket and align it along the bottom of the lining piece (right sides up) so the raw edges match up. Sew the pocket along this curved edge within the seam allowance.
• With a fabric marker, draw lines down the length of the pocket to divide the pocket up. The size is up to you.
• Sew down the line through the pocket and lining to create the divisions. I opted to sew right down the middle for this side, leaving about 5" pockets on each side.
5. sew the pockets
6. attach the pocket
nestle quilt batting between pocket
top stitch batting in place
fold hidden pocket out of the way
sew pocket below zipper
draw dividing lines
sew along lines

9kitty purse free sewing tutorial
sew desu ne?| www.cholyknight.com |
// ©2017 Choly Knight // Items made using this pattern may be sold. Credit to “Choly Knight” or “Sew Desu Ne?” is appreciated. You may not reproduce, share, freely distribute, or sell this pattern as your own in digital or printed form.
• Retrieve your remaining lining front/back (A) piece. Repeat step 6 with this piece and the remaining pocket. Line up the pocket along the bottom edge of the lining piece with right sides facing up.
• Sew the pocket in place within the seam allowance to hold it for future steps. Draw lines down the length of the pocket to divide up the space.
• Sew down the lines you've drawn to create the dividers. For this half, I split the pocket into thirds, a good size for a phone to fit in the middle.
• Grab your zipper panel pieces (E). If you're using anything less than heavy-weight fabric, your zipper panels will need a layer of lightweight interfacing. Take an interfacing piece and fuse it to the wrong side of one of the zipper panel pieces. Repeat with the remaining interfacing and panel piece for two pieces total.
• Place your zipper panel right side up on your workspace. Take your sepa-rating zipper and align the tape to the long edge of the panel with the right side facing down. Nudge the zipper so the bottom end is ½" from the short edge of the panel. The top end of the zipper should bend off so it's ½" from the short edge. Pin or glue the zipper in place as you prefer.
• Baste the zipper in place here about ⅛-¼" from the edge to hold it in place for the next step.
7. attach the second pocket
8. sew the zipper panel
basting:A form of temporary
sewing meant to hold pieces in place. A long stitch length is often used for this reason. The
finished result is not meant to be seen and sometimes
is even removed later (depending on your
project).
place second pocket baste pocket in place sew dividing lines
fuse interfacing to two panels
bend zipper off the edge
baste zipper to panel
½" away from edge

10
sew desu ne?| www.cholyknight.com |
// ©2017 Choly Knight // Items made using this pattern may be sold. Credit to “Choly Knight” or “Sew Desu Ne?” is appreciated. You may not reproduce, share, freely distribute, or sell this pattern as your own in digital or printed form.
kitty purse free sewing tutorial
• Layer another panel piece (without interfacing) over the zipper right side down. Line up the raw edges with the zipper tape.
• Sew the second panel piece in place along the zipper edge and the short ends. Use a ¼" seam allow-ance when sewing the zipper, and a ½" seam allowance when sewing the short ends. Trim the seam allowance at the corner and turn the panel right side out. Press the panel so it's flat and crisp.
• Repeat steps 8 & 9 with the remaining zipper panel pieces and the other half of the separating zipper. When complete, you should have a matching pair as shown in the photo.
• Take one of your lining pieces so far and align the raw edge of the zipper panel with the top straight edge of the lining. Both right sides should be facing up.
• Grab your inner facing pieces (D). If you're using anything lighter than heavyweight fabric, be sure to take this time to fuse your lightweight interfacing to the wrong side of the piece.
• Layer the straight edge of the inner facing piece over the zipper panel (right side facing down). Pin the layers together and sew through all three of them with the regular ½" seam allowance.
9. finish the zipper panel
10. attach the zipper panel
¼" seam allowance on zipper
repeat with both sides
place zipper panel on lining sew all 3 layers
½" seam allowance on short ends

11kitty purse free sewing tutorial
sew desu ne?| www.cholyknight.com |
// ©2017 Choly Knight // Items made using this pattern may be sold. Credit to “Choly Knight” or “Sew Desu Ne?” is appreciated. You may not reproduce, share, freely distribute, or sell this pattern as your own in digital or printed form.
• Repeat step 10 with the other side of the zipper panel and the remaining lining and inner facing pieces.
• When complete, you should have two lining pieces with cat ear inner facings on top. The zipper panel bridges them together -- but of course can be separated since it's a separating zipper.
• Grab your gusset piece (G) from your lining fabric. If you haven't already, locate the corner circle markings from the paper pattern for both the lining front/back (A) and the gusset (G). Transfer them over to the right side of your fabric. Wrap the long curved edges of the gusset around the curved edge of the lining. The circle markings should match up in the corners. Pin the gusset in place along this edge.
• If you haven't already, refer to the paper pattern to find the opening for turning markings on the lining front/back pattern. Transfer them over to the wrong side of the fabric. Sew the gusset to the lining, starting at the circle marking and stopping at the opposite one. Be sure to leave the opening where you marked earlier. Repeat this step with the other side of the lining and the other side of the gusset, but without leaving an opening.
→ This completes your lining! Set it aside until step 19.
11. sew the other side
12. attach the gusset
line up circle
markings
leave open for turning

12
sew desu ne?| www.cholyknight.com |
// ©2017 Choly Knight // Items made using this pattern may be sold. Credit to “Choly Knight” or “Sew Desu Ne?” is appreciated. You may not reproduce, share, freely distribute, or sell this pattern as your own in digital or printed form.
kitty purse free sewing tutorial
• Take your fusible web and trace all of the whisker pieces onto the smooth (paper) side. You should have 6 whiskers total.
• Fuse the bumpy (adhesive) side onto the wrong side of your applique fabric.
• Cut out the whiskers and arrange them one of the outer front/back pieces (F). You can do this by setting your paper pattern on top of the fabric piece (right sides up), align the whisker piece on top where the placement markings are, then carefully pull the paper pattern away while holding the applique piece in place.
• Fuse the whiskers in place with your iron.
• If you used heavy duty fusible web, you can keep the pieces fused without sewing, or you can sew them in place a number of ways. I’ve used a zigzag stitch here. This is now your outer front.
• If your fabric is anything lighter than heavyweight, take this time to fuse your lightweight interfacing to the wrong side of the fabric. Do this for both the outer front and back.
• If your fabric is lightweight, it will also need a layer of heavy-weight interfacing to keep it holding its shape. Fuse (or sew, if you prefer) this layer in place, centered within the shape. The piece shouldn't have seam allowances in order to reduce bulk.
13. prepare the applique
14. sew the applique
the outer bag:
trace onto paper side
fuse onto applique fabric
hold applique while pulling paper away
fuse whiskers in place
sew around shape edge

13kitty purse free sewing tutorial
sew desu ne?| www.cholyknight.com |
// ©2017 Choly Knight // Items made using this pattern may be sold. Credit to “Choly Knight” or “Sew Desu Ne?” is appreciated. You may not reproduce, share, freely distribute, or sell this pattern as your own in digital or printed form.
• Grab your gusset piece (G) from your outer fabric. Fuse interfacing to it the same as the outer front/back. If it's less than heavyweight it will need a layer of lightweight interfacing.
• If it's lightweight fabric, it will need an extra layer of heavyweight interfacing. Center this along the piece so it doesn't cover the seam allowances.
• To easily wrap the gusset around the front/back, make short ⅜" clips into the seam allowance about every 2" or so. This will give the piece more flexibility when it's wrapped around the front/back.
• Wrap the gusset around the outer front piece much the same way you did with the lining in step 12. Locate the circle markings on the paper pattern and transfer them. Then match up the circle markings when pinning the gusset to the front.
• Sew the gusset to the outer front, starting at the circle marking and ending at the opposite one.
• For extra stability and a bit of polish, fold the seam allowance toward the gusset. Then edge stitch the seam allowance in place about ⅛" away from the gusset. Once complete, repeat this step with the other curved edge of the gusset and the outer back piece.
15. prep the gusset
16. sew the gusset
clip ⅜" into edge, about every 2"
sew between circles
edge stitch seam allowance
to gusset
edge stitching:
A form of top stitching where the seam is sewn ⅛" away from a seam or folded
edge. Usually done for strengthening and deco-
rative purposes.

14
sew desu ne?| www.cholyknight.com |
// ©2017 Choly Knight // Items made using this pattern may be sold. Credit to “Choly Knight” or “Sew Desu Ne?” is appreciated. You may not reproduce, share, freely distribute, or sell this pattern as your own in digital or printed form.
kitty purse free sewing tutorial
• Grab your ring tab pieces (H). If you're using anything less than heavyweight fabric, take this moment to fuse some lightweight interfacing onto the wrong side of the fabric.
• Fold the longer edges toward the wrong side by ½" and press them flat. Repeat with the other side of the tab piece.
• Finally, fold the whole tab in half with wrong sides together and the folds meet up. It should make a skinny, 1¼" wide rectangle.
• Edge stitch along each long edge of the tab. This should secure the fold and also add a bit of polish to the finished look.
• Loop the tab through one of your rings.
• Baste the raw edges of the tab so the ring is now securely held. Repeat steps 17 and 18 with your remaining tab piece and metal ring so you have two complete tabs total.
17. fold the ring tabs
18. sew the ring tabs
fold long edges by ½"
bring folded edges together
edge stitch along long edges
loop tab through ring

15kitty purse free sewing tutorial
sew desu ne?| www.cholyknight.com |
// ©2017 Choly Knight // Items made using this pattern may be sold. Credit to “Choly Knight” or “Sew Desu Ne?” is appreciated. You may not reproduce, share, freely distribute, or sell this pattern as your own in digital or printed form.
• Take the newly sewn edge of the ring tab and line it up with the short end of the gusset on the outer purse. Baste the tab to the side of the purse as shown, one on each side.
• Retrieve your purse lining and make sure it's wrong side out and the zipper is separated. Take your outer purse and place it inside the lining. Match up the raw upper edges of the outer purse with the lining. The ears should match up, as well as the short ends of the gusset (with the ring tabs in between). Pin the edges in place.
• Sew around this edge of the purse. Be sure to stop at the corners and pivot, especially at the sides. Sew one section at a time if they give you trouble.
• Clip the seam allowances near the inner corners of the purse, especially at the short ends of the gusset. Get as close as you can to the corner without actually cutting the threads.
• Turn the purse right side out through the opening in the lining. Define the cat ears with a chopstick or similar turning tool. Give them a press for a crisp finish.
19. sew the outer purse to the lining
20. clip and turn the purse
baste tabs to gusset place outer purse
inside lining sew along top edge
clip into corners
press upper edge

16
sew desu ne?| www.cholyknight.com |
// ©2017 Choly Knight // Items made using this pattern may be sold. Credit to “Choly Knight” or “Sew Desu Ne?” is appreciated. You may not reproduce, share, freely distribute, or sell this pattern as your own in digital or printed form.
kitty purse free sewing tutorial
• Grab your strap piece (I). If you're using anything less than heavyweight fabric, take this time to fuse your lightweight interfacing to the wrong side of the fabric.
• Just like the ring tab, fold under the long edges of the strap by ½" toward the wrong side. Press the folds in place.
• Fold under the short ends by ½" as well and press in place. If necessary, trim the extra fabric in the folds to reduce bulk.
• Fold the entire strap in half lengthwise with wrong sides together so the folded edges match up. Press the fold in place.
• Edge stitch around the perimeter of the strap to both secure the fold and for a polished finish.
21. fold the strap
22. sew the strap
finishing:
fold long edges under by ½"
fold short edges under by ½"
fold strap in half lengthwise
edge stitch around entire strap

17kitty purse free sewing tutorial
sew desu ne?| www.cholyknight.com |
// ©2017 Choly Knight // Items made using this pattern may be sold. Credit to “Choly Knight” or “Sew Desu Ne?” is appreciated. You may not reproduce, share, freely distribute, or sell this pattern as your own in digital or printed form.
• To attach the strap to the bag, start by taking one short end and looping it through one of the rings. Fold it over on itself by about 1½" and take it to your machine.
• Secure the strap in place by sewing a square where the strap overlaps, then sew an X in the middle. This offers the best strength.
• Take the other end of your strap and loop it through the strap adjuster, going up one opening and back down the other opening.
• Next, take that same end and loop it through the other ring on the opposite side of the purse. Be sure the strap doesn't get twisted anywhere along the way.
• Finally, take that same end and loop it through the adjuster like the first time. You'll be going underneath the loop you made before. Fold the strap back on itself so it overlaps like in step 23.
• Take this to your machine and sew the square stitch with the X in the middle the same as before.
23. loop the strap
24. secure the strap
loop strap through ring
loop through other ring
loop through adjuster again
stitch strap at overlap
stitch strap at overlap
loop strap through adjuster
congrats!this completes
your purse! Now go try it on!

pg. 1/10
pg. 6/10
A1 A2
B1
B2
Kitty PurseP
AT
TE
RN
ww
w.ch
olykn
ight.co
m
LININ
G PO
CKET
(C)Cut 4 from
lining fabricCut 2 from
quilt batting (without seam
allowance)
½” seam
allowance
GR
AIN
LINE

pg. 1/10 pg. 2/10
pg. 6/10 pg. 7/10
A1 A2
B3
B4
A3 A4
Kitty
Pur
seP
AT
TE
RN
ww
w.c
ho
lykn
igh
t.co
m
GU
SSET
(G)
Cut 1
on
fold
of o
uter
fabr
icCu
t 1 o
n fo
ld o
f lin
ing
fabr
icCu
t 1 o
n fo
ld o
f lig
htw
eigh
t fus
ible
inte
rfac
ing
Cut 1
on
fold
of h
eavy
wei
ght i
nter
faci
ng (w
ithou
t sea
m a
llow
ance
s)½
” sea
m a
llow
ance
GR
AIN
LIN
E

pg. 2/10 pg. 3/10
pg. 7/10 pg. 8/10
B5
B6
A3 A4 A5 A6
Kitty PursePATTERN
www.cholyknight.com
INNER FACING (D)Cut 2 from outer fabric
Cut 2 from lightweight fusible interfacing½” seam allowance
Kitty PurseP A T T E R N
www.cholyknight.com
OUTER FRONT/BACK (F)Cut 2 from outer fabric
Cut 2 of lightweight fusible interfacingCut 2 of heavyweight interfacing (without seam allowances)
½” seam allowance
GR
AIN
LINE

pg. 3/10 pg. 4/10
pg. 8/10 pg. 9/10
B7
B8
A5 A6
A7 A8

pg. 4/10 pg. 5/10
pg. 9/10 pg. 10/10
B9
B10
A7 A8 Kitty PurseP A T T E R N
www.cholyknight.com
LINING FRONT/BACK (A)Cut 2 from lining fabric
½” seam allowanceG
RA
INLIN
E
opening for turning
zipper opening

pg. 6/10
B1
B2
C1 C2CUT
ON
FOLD
RING TABS (H)Cut 2 from outer fabric
Cut 2 of lightweight fusible interfacing½” seam allowance
GRAINLINEWHISKER APPLIQUE
trace & cut 6

pg. 6/10 pg. 7/10
B3
B4
C1 C2 C3 C4Kitty PurseP A T T E R N
www.cholyknight.com
STRAP (I)Cut 1 on fold of outer fabric
Cut 1 on fold of lightweight fusible interfacing½” seam allowance
Kitty
Pur
seP
AT
TE
RN
ww
w.c
ho
lykn
igh
t.co
m
GU
SSET
(G)
Cut 1
on
fold
of o
uter
fabr
icCu
t 1 o
n fo
ld o
f lin
ing
fabr
icCu
t 1 o
n fo
ld o
f lig
htw
eigh
t fus
ible
inte
rfac
ing
Cut 1
on
fold
of h
eavy
wei
ght i
nter
faci
ng (w
ithou
t sea
m a
llow
ance
s)½
” sea
m a
llow
ance
CUT ON FOLD
applique placement

pg. 7/10 pg. 8/10
B5
B6
C3 C4
C5 C6
applique placementapplique placement

pg. 8/10 pg. 9/10
B7
B8
C5 C6
C7 C8
zipper opening
GRAINLINE
zipper placement
applique placement

pg. 9/10 pg. 10/10
B9
B10
C7 C8
Kitty PursePATTERN
www.cholyknight.com
HIDDEN POCKET (B)Cut 2 from lining fabric
¼” seam allowance
GRAINLINE
zipper opening
ZIPPER PANEL (E)Cut 4 from outer fabric
Cut 2 from lightweight fusible interfacing½” seam allowance
zipper placement