purifier manual cover - university of california, santa...
TRANSCRIPT
Purifier® Delta® Series Biological Safety Cabinets
Models36204 Series 36205 Series36208 Series 36209 Series36212 Series 36213 Series
User’s Manual
Labconco’s Mascot,Labby the LABster


TTAABBLLEE OOFF CCOONNTTEENNTTSS CHAPTER 1: INTRODUCTION 1 About This Manual 2 Typographical Conventions 3 Your Next Step 4 CHAPTER 2: PREREQUISITES 5 Location Requirements 6 Space Requirements 6 Clearance 6 Exhaust Requirements 7 Electrical Requirements 7 Service Line Requirements 8 Your Next Step 9 CHAPTER 3: GETTING STARTED 11 Unpacking Your Biosafety Cabinet 12 Purifier Components 13 Moving the Delta 14 Preparing the Purifier for Operation 14 Installing the Purifier on an Existing Work Surface 14 Installing the Purifier on the Labconco Base Stand 15 Telescoping Base Stands 15 Manual or Electric Hydraulic Lift Base Stands 17 Connecting the Purifier to Service Lines 18 Optional Exhaust System Connections 19 Drain Valve Installation 20 Initial Certification 22 Your Next Step 22

CHAPTER 4: THEORY OF OPERATION AND SAFETY PRECAUTIONS 23
HEPA Filters 24 Laminar Airflow 25 Directional Airflow 26 Motor/Blower 27 Cabinet Air Intakes (Grilles), Ductwork & Air Balance Controls 27 Safety Precautions 28 Your Next Step 31 CHAPTER 5: USING YOUR PURIFIER 33 Operating the Sliding Sash 33 If The Alarm Activates 36 Resetting the Alarm 36 Working in Your Purifier 36 Safety and Comfort 39 Arranging Your Work Area 42 Your Next Step 46 CHAPTER 6: MAINTAINING YOUR PURIFIER 47 Routine Maintenance Schedule 47 Service Operations 48 Downflow Velocities 52 Downflow Velocity Grid Patterns 52 Inflow Velocity Calculation – Primary Method 53 Inflow Velocity Calculation – Secondary Method 53 Calibration of the Type A2 Inflow Alarm 56 Calibration of the Type B3 Face Velocity Alarm 57 Electronics Module Access 59 Measuring Line and Motor Voltage 60 Speed Control Adjustment 62 Exhaust Control System Adjustment 63 Canopy Airflow Adjustment 66 Measuring the Total Exhaust Volume 66 Use of the Access Tube for DOP Testing 67 HEPA Filter Replacement 68 Motor/Blower Maintenance & Replacement 72 Diffuser Removal 73 Storage 75 Decontamination 75 Your Next Step 76 CHAPTER 7: MODIFYING YOUR BIOSAFETY CABINET 77 Installing a UV Lamp 77 Installing Additional Service Fixtures 80

Installing the IV Bar for the 3' and 4' 82 Installing the IV Bar for the 6' 83 Exhaust System Requirements 85 Installing the Canopy Kit 86 On Delta Models with the Variable Orifice System 87 On Delta Models already equipped with Guillotine Damper 88 Your Next Step 89 CHAPTER 8: TROUBLESHOOTING 91 APPENDIX A: PURIFIER COMPONENTS 93 APPENDIX B: DIMENSIONS 95 APPENDIX C: BIOSAFETY CABINET SPECIFICATIONS 97 Electrical Data 97 Motor Specifications 97 Environmental Conditions 98 APPENDIX D: PURIFIER ACCESSORIES 105 Safety Orange Air Foil 105 Telescoping Base Stands 105 Manual or Electric Hydraulic Lift Base Stands 106 Service Valve Kit 106 Ultraviolet Lamp Kits 106 IV Bar Kits 106 Damper -Canopy Kit 107 Canopy Kit 107
Remote Blower 107 Ergonomic Chair 108 Adjustable Footrest 108 APPENDIX E: QUICK CHART FOR THE DELTA PURIFIERS 109 APPENDIX F: REFERENCES 111 DECLARATION OF CONFORMITY 113

1
CCHHAAPPTTEERR 11
IINNTTRROODDUUCCTTIIOONN Congratulations on your purchase of a Labconco Purifier Delta Series Biosafety Cabinet. Your Purifier is designed to protect you, your product and your laboratory environment from biohazardous aerosols. The Delta is the result of years experience of manufacturing biohazard cabinetry, and many of its features were suggested to us by users like you. The Purifier offers many unique features to enhance safety, performance and ergonomics. To take full advantage of them, please acquaint yourself with this manual and keep it handy for future reference. If you are unfamiliar with how biosafety cabinets operate, please review Chapter 4: Theory of Operation and Safety Precautions before you begin working in the cabinet. Even if you are an experienced biosafety cabinet user, please review Chapter 5: Using Your Purifier; it describes your Purifier’s features so that you can use the cabinet efficiently. Copies of this manual and other technical information is available at our website: www.labconco.com.

2
Chapter 1: Introduction
About This Manual This manual is designed to help you learn how to install, use, and maintain your biosafety cabinet. Instructions for installing optional equipment on your cabinet are also included. Chapter 1: Introduction provides a brief overview of the biosafety cabinet, explains the organization of the manual, and defines the typographical conventions used in the manual. Chapter 2: Prerequisites explains what you need to do to prepare your site before you install your biosafety cabinet. Electrical and service requirements are discussed. Chapter 3: Getting Started contains the information you need to properly unpack, inspect, install, and certify your biosafety cabinet. Chapter 4: Theory Of Operation And Safety Precautions explains how the Purifier operates and the appropriate precautions you should take when using the cabinet. Chapter 5: Using Your Purifier discusses the basic operation of your cabinet. Information on how to prepare, use and shut down your Purifier is included. Chapter 6: Maintaining Your Purifier explains how to perform routine maintenance on your biosafety cabinet. Information on how to safely disinfect the interior of your cabinet and replace the lamps is included. Chapter 7: Modifying Your Biosafety Cabinet describes how to install the optional equipment on the cabinet. Chapter 8: Troubleshooting contains a table of problems you may encounter while using your biosafety cabinet including the probable causes of the problems and suggested corrective actions.

3
Chapter 1: Introduction
Appendix A: Purifier Components contains labeled diagrams of some of the components of the biosafety cabinets. Appendix B: Biosafety Cabinet Dimensions contains comprehensive diagrams showing all of the dimensions for the 3, 4 and 6-foot models of the biosafety cabinet. Appendix C: Biosafety Cabinet Specifications contains the electrical requirements for the biosafety cabinet. Wiring diagrams for both the 115V and 230V units are also included. Appendix D: Purifier Accessories lists the part number and descriptions of all of the accessories available for your biosafety cabinet. Appendix E: Quick Chart for the Delta Purifiers provides useful operating specifications. Appendix F: References lists the various resources available that deal with biosafety.
Typographical Conventions Recognizing the following typographical conventions will help you understand and use this manual: • The biosafety icon presents critical biosafety
information. Failure to comply with the information following a biosafety icon may result in illness or death.
• The exclamation icon refers to critical information Failure to comply with the information following an exclamation icon may result in injury to the user or permanent damage to your biosafety cabinet.
• The wrench icon means that these operations should only be performed by a trained certifier or contractor. Failure to comply with the information following a wrench icon may result in injury to the user or permanent damage to your biosafety cabinet.
!

4
Chapter 1: Introduction
• The pointer icon indicates important information. It
is imperative that the information contained in these paragraphs be thoroughly read and understood by the user.
• A number icon indicates information that is specific to a particular model of Biosafety Cabinet.
Your Next Step If your Purifier needs to be installed, proceed to Chapter 2: Prerequisites to ensure your installation site meets all of the requirements. Then, go to Chapter 3: Getting Started for instructions on how to install your biosafety cabinet and make all of the necessary connections. If you would like to review how biosafety cabinets operate, go to Chapter 4: Theory Of Operation And Safety Precautions. For information on the operational characteristics of your biosafety cabinet, go to Chapter 5: Using Your Purifier. If your biosafety cabinet is installed and you need to perform routine maintenance on the cabinet, proceed to Chapter 6: Maintaining Your Purifier. For information on making modifications to the configuration of your unit, go to Chapter 7: Modifying Your Biosafety Cabinet. Refer to Chapter 8: Troubleshooting if you are experiencing problems with your Purifier.
☞ 115V 230V

5
CCHHAAPPTTEERR 22
PPRREERREEQQUUIISSIITTEESS Before you install your biosafety cabinet, you need to prepare your site for installation. Carefully examine the location where you intend to install your cabinet. You must be certain that the area is level and of solid construction. In addition, a dedicated source of electrical power must be located near the installation site. Carefully read this chapter to learn:
• the location requirements for your installation site.
• the electrical power requirements for your installation site.
• the exhaust requirements for your installation site.
• the service line requirements for your installation site.
• the space requirements for your installation site. Refer to Appendix C: Biosafety Cabinet Specifications for complete biosafety cabinet electrical and environmental conditions, specifications and requirements.

6
Chapter 2: Prerequisites
Location Requirements
The Purifier should be located away from traffic patterns, doors, fans, ventilation registers, fume hoods and any other air-handling device that could disrupt its airflow patterns. All windows in the room should be closed. Figure 2-1 shows the optimum location for the Purifier.
Space Requirements The dimensions for the different models are shown in Appendix B: Biosafety Cabinet Dimensions.
Clearance Deltas not connected to an exhaust system should have at least six inches (150 mm) clearance from any overhead obstructions when the cabinet is in its final operating position. A clearance of at least 6 inches (150 mm) should be maintained on both sides of the cabinet, as well as 12 inches behind the unit.
!
Figure 2-1
7
Chapter 2: Prerequisites
Exhaust Requirements
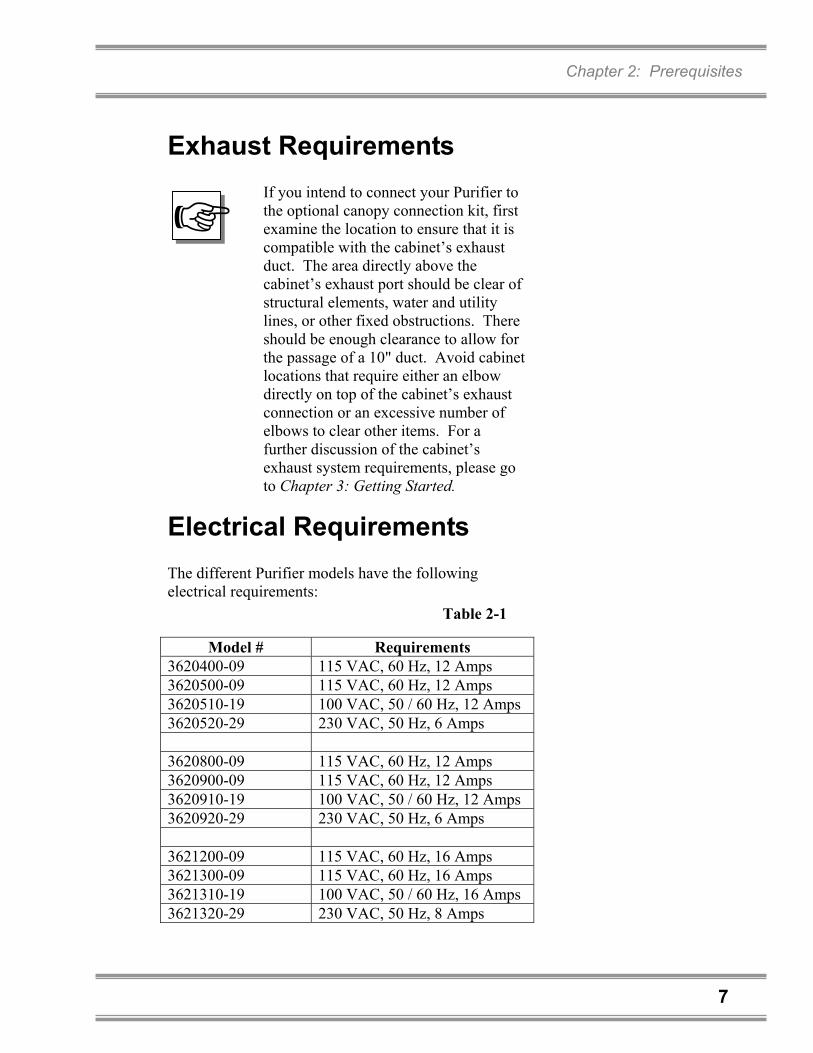
If you intend to connect your Purifier to the optional canopy connection kit, first examine the location to ensure that it is compatible with the cabinet’s exhaust duct. The area directly above the cabinet’s exhaust port should be clear of structural elements, water and utility lines, or other fixed obstructions. There should be enough clearance to allow for the passage of a 10" duct. Avoid cabinet locations that require either an elbow directly on top of the cabinet’s exhaust connection or an excessive number of elbows to clear other items. For a further discussion of the cabinet’s exhaust system requirements, please go to Chapter 3: Getting Started.
Electrical Requirements The different Purifier models have the following electrical requirements:
Model # Requirements 3620400-09 115 VAC, 60 Hz, 12 Amps 3620500-09 115 VAC, 60 Hz, 12 Amps 3620510-19 100 VAC, 50 / 60 Hz, 12 Amps 3620520-29 230 VAC, 50 Hz, 6 Amps 3620800-09 115 VAC, 60 Hz, 12 Amps 3620900-09 115 VAC, 60 Hz, 12 Amps 3620910-19 100 VAC, 50 / 60 Hz, 12 Amps 3620920-29 230 VAC, 50 Hz, 6 Amps 3621200-09 115 VAC, 60 Hz, 16 Amps 3621300-09 115 VAC, 60 Hz, 16 Amps 3621310-19 100 VAC, 50 / 60 Hz, 16 Amps 3621320-29 230 VAC, 50 Hz, 8 Amps
☞
Table 2-1

8
Chapter 2: Prerequisites
All Purifiers with model numbers ending in –00 to –09 are designed for operation at 115 volts 60Hz, alternating current. Models with numbers ending in –10 to –19 are designed for operation at 100 to 120 volts 50/60Hz. Purifiers with model numbers ending in –20 to –29 are designed for operation at 230 +/- 20 volts, 50 Hz alternating current. A dedicated outlet with a circuit breaker rated at 20 amps should be located as close as possible to the right rear side of the cabinet, at a height even with, or higher than, the bottom of the cabinet in its final location.
For 230-volt models, the cord is not equipped with a plug. When installing the user supplied plug always follow the plug manufacturer’s instructions for the proper assembly and testing of the plug and power cord. Both electrical outlets of the 100 and 115 volt Purifier are protected by a ground fault interrupter circuit (GFIC). Labconco does not recommend plugging the Purifier into a GFIC outlet.
Service Line Requirements All service lines to the Purifier should be ¼ inch outside diameter, metal, and equipped with an easily accessible shut-off valve, should disconnection be required. If the service line pressure exceeds 40 PSI, it must be equipped with a pressure regulator to reduce the line pressure.
The use of flammable gases or solvents should be avoided in the Purifier. Open flames in the cabinet will disrupt the laminar airflow in the cabinet and may damage the HEPA filters. Flammable gases or solvents may reach explosive concentrations in the cabinet or ductwork. If you feel
230V
☞
!

9
Chapter 2: Prerequisites
that your procedure requires the use of an open flame or flammable materials, contact your institution’s safety office. The use of air or gases under high pressure should be avoided as they may seriously disrupt the airflow patterns in the cabinet.
Your Next Step After you have determined that the location you have selected accommodates the installation and operational requirements of your biosafety cabinet, you are ready to begin installation. Proceed to Chapter 3: Getting Started.

10
Chapter 2: Prerequisites

11
CCHHAAPPTTEERR 33
GGEETTTTIINNGG SSTTAARRTTEEDD Now that the site for your biosafety cabinet is properly prepared, you are ready to inspect, install, and certify your unit. This chapter covers how to:
• unpack and move your Purifier. • set up the cabinet. • connect the electrical supply source. • connect the service lines. • connect to an exhaust system (optional). • arrange certification of your Purifier.
Tools required to install your Purifier include, two 1/2" wrenches, a 7/16" wrench, a flat-blade screwdriver, a Phillips screwdriver, and a carpenter’s level.
The Purifier models weigh between 400 – 700 lbs. (182-318 kg). The carton allows for lifting with a mechanical lift truck or floor jack. If you must lift the Purifier manually, use at least six (6) persons and follow safe-lifting guidelines.
!

12
Chapter 3: Getting Started
Unpacking Your Biosafety Cabinet Carefully remove the outer carton and inspect it for damage that may have occurred in transit. If your unit is damaged, notify the delivery carrier immediately and retain the entire shipment intact for inspection by the carrier.
Do not return goods without the prior authorization of Labconco. Unauthorized returns will not be accepted. If your cabinet was damaged in transit, you must file a claim directly with the freight carrier. Labconco Corporation and its dealers are not responsible for shipping damages.
Do not discard the carton or packing material for your Purifier until you have checked all of the components and installed and tested the unit.
The United States Interstate Commerce Commission rules require that claims be filed with the delivery carrier within fifteen (15) days of delivery.
☞

13
Chapter 3: Getting Started
Purifier Components Labconco manufactures biosafety cabinets with an 8-inch or a 10-inch sash opening. Each of these cabinets is available in a 3-foot, 4-foot and 6-foot model. Models are available in 115V, 100V or 230V. Locate the cabinet model you received in the following tables. Verify that the components listed are present and undamaged. Catalog # Purifier Description 3620400 3 foot Purifier, 10 inch sash opening, 115 VAC 3620404 3 foot Purifier with UV lamp & fixture, 10 inch sash opening, 115 VAC 3620500 3 foot Purifier, 8 inch sash opening, 115 VAC 3620504 3 foot Purifier with UV lamp & fixture, 8 inch sash opening, 115 VAC 3620510 3 foot Purifier, 8 inch sash opening, 100 VAC 50/60 Hz 3620514 3 foot Purifier with UV lamp and fixture, 8 inch opening, 100 VAC 50/60 Hz 3620520 3 foot Purifier, 8 inch sash opening, 230 VAC 3620524 3 foot Purifier with UV lamp & fixture, 8 inch sash opening, 230 VAC 3620800 4 foot Purifier, 10 inch sash opening, 115 VAC 3620804 4 foot Purifier with UV lamp & fixture, 10 inch sash opening, 115 VAC 3620900 4 foot Purifier, 8 inch sash opening, 115 VAC 3620904 4 foot Purifier with UV lamp & fixture, 8 inch sash opening, 115 VAC 3620910 4 foot Purifier, 8 inch sash opening, 100 VAC 50/60 Hz 3620914 4 foot Purifier with UV lamp and fixture, 8 inch opening, 100 VAC 50/60 Hz 3620920 4 foot Purifier, 8 inch sash opening, 230 VAC 3620924 4 foot Purifier with UV lamp & fixture, 8 inch sash opening, 230 VAC 3621200 6 foot Purifier, 10 inch sash opening, 115 VAC 3621204 6 foot Purifier with UV lamp & fixture, 10 inch sash opening, 115 VAC 3621300 6 foot Purifier, 8 inch sash opening, 115 VAC 3621304 6 foot Purifier with UV lamp & fixture, 8 inch sash opening, 115 VAC 3621310 6 foot Purifier, 8 inch sash opening, 100 VAC 50/60 Hz 3621314 6 foot Purifier with UV lamp and fixture, 8 inch opening, 100 VAC 50/60 Hz 3621320 6 foot Purifier, 8 inch sash opening, 230 VAC 3621324 6 foot Purifier with UV lamp & fixture, 8 inch sash opening, 230 VAC Plus the Following: Part # Component Description 3737100 User’s Manual Drain Valve Assembly Power Cord
14
Chapter 3: Getting Started
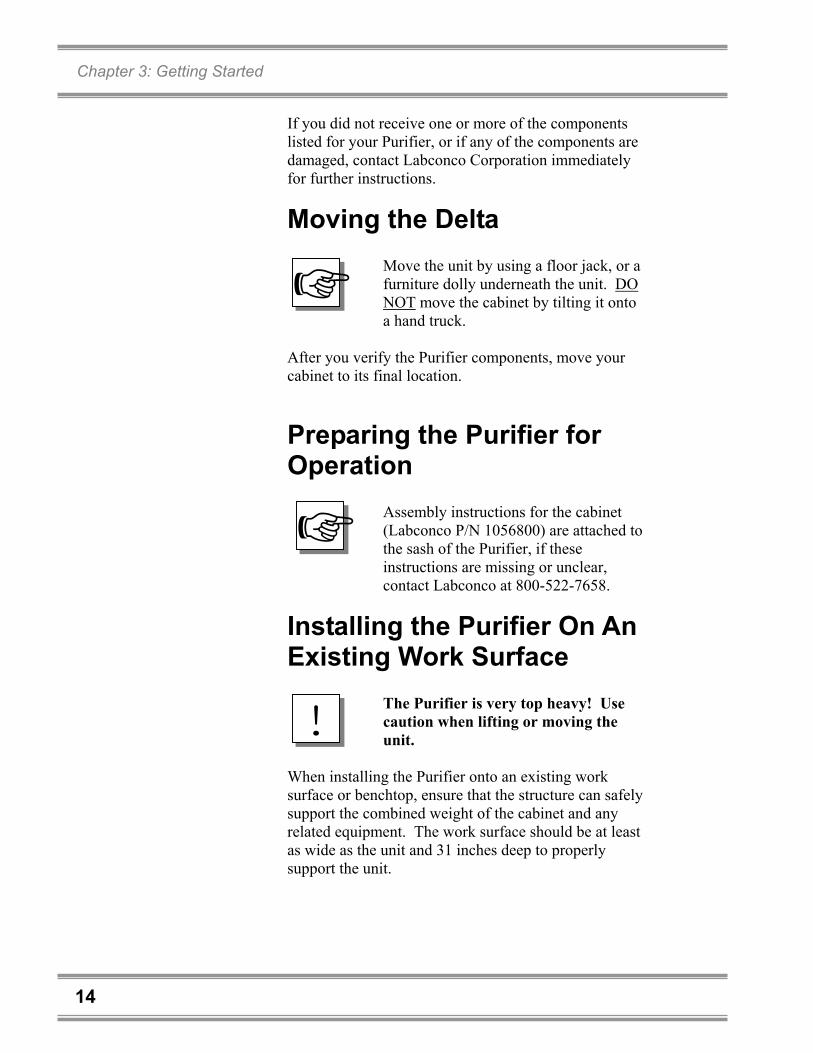
If you did not receive one or more of the components listed for your Purifier, or if any of the components are damaged, contact Labconco Corporation immediately for further instructions.
Moving the Delta
Move the unit by using a floor jack, or a furniture dolly underneath the unit. DO NOT move the cabinet by tilting it onto a hand truck.
After you verify the Purifier components, move your cabinet to its final location.
Preparing the Purifier for Operation
Assembly instructions for the cabinet (Labconco P/N 1056800) are attached to the sash of the Purifier, if these instructions are missing or unclear, contact Labconco at 800-522-7658.
Installing the Purifier On An Existing Work Surface
The Purifier is very top heavy! Use caution when lifting or moving the unit.
When installing the Purifier onto an existing work surface or benchtop, ensure that the structure can safely support the combined weight of the cabinet and any related equipment. The work surface should be at least as wide as the unit and 31 inches deep to properly support the unit.
!
☞
☞

15
Chapter 3: Getting Started
The work surface should be smooth and durable. The surface should be nonporous and resistant to the disinfectants and chemicals used in conjunction with the Purifier. This will allow a proper seal to form between the bottom of the Purifier and the work surface. A hole or notch may need to be cut in some work surfaces in the right front corner to accommodate the drain valve.
Installing the Purifier on a Labconco Base Stand Labconco offers a variety of accessory base stands in a number of configurations to suit your particular needs. Stands can be ordered with preset telescoping legs or, with a manually or electrically adjustable hydraulic lift stand. Telescoping Base Stands These stands are available with either fixed feet or caster wheels. The height of these stands are set before installation of the Delta. The height can be set at 27.5 to 33.5 inches in 1-inch intervals, providing a work surface height of 30.0 to 36.0 inches. The Base Stands for each Delta model are listed in Table 3-1 below.
Width Delta
Series # Base Stand
w/Feet Model #
Base Stand w/wheels Model #
3' 36204-xx 36205-xx
3730300 3730310
4' 36208-xx, 36209-xx
3730400 3730410
6' 36212-xx 36213-xx
3730600 3730610
Table 3-1
16
Chapter 3: Getting Started
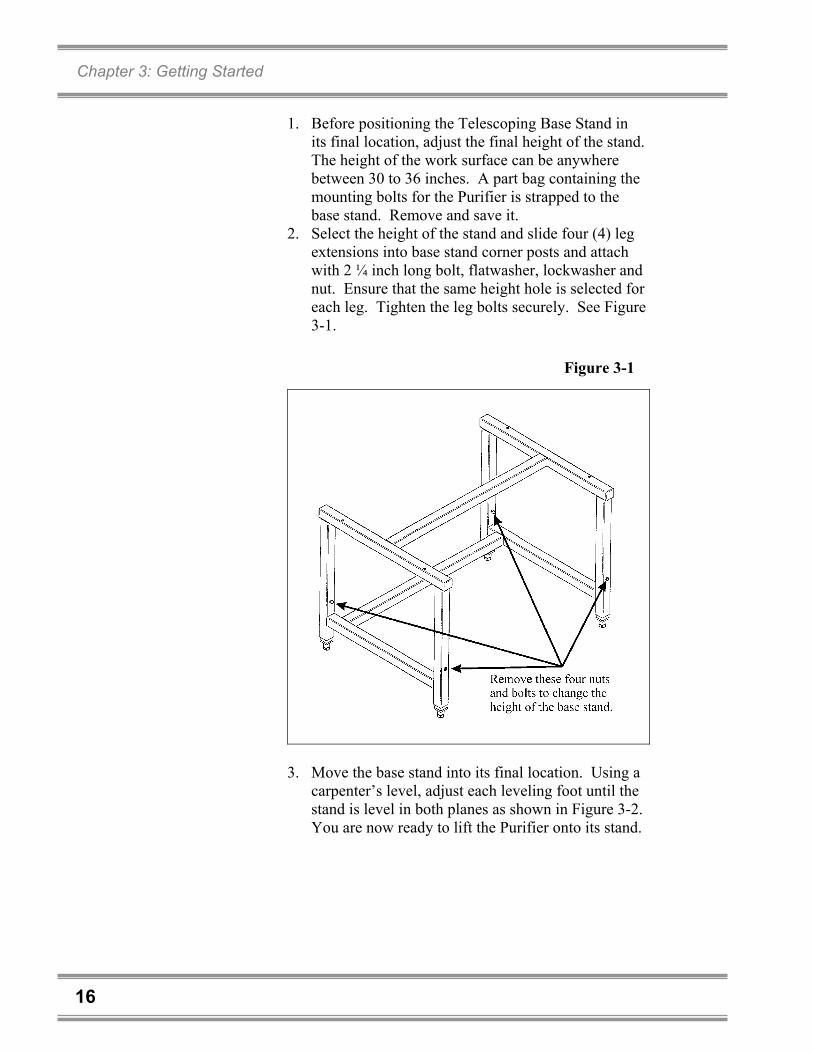
1. Before positioning the Telescoping Base Stand in
its final location, adjust the final height of the stand. The height of the work surface can be anywhere between 30 to 36 inches. A part bag containing the mounting bolts for the Purifier is strapped to the base stand. Remove and save it.
2. Select the height of the stand and slide four (4) leg extensions into base stand corner posts and attach with 2 ¼ inch long bolt, flatwasher, lockwasher and nut. Ensure that the same height hole is selected for each leg. Tighten the leg bolts securely. See Figure 3-1.
3. Move the base stand into its final location. Using a
carpenter’s level, adjust each leveling foot until the stand is level in both planes as shown in Figure 3-2. You are now ready to lift the Purifier onto its stand.
Figure 3-1

17
Chapter 3: Getting Started
Manual or Electric Hydraulic Lift Base Stands These base stands offer infinitely adjustable height between 25.5 and 33.5 inches, giving a work surface height of 28.0 to 36.0 inches. The height is adjusted either by a manual (hand crank) or electric pump that drives hydraulic rams in the legs of the stands. All of the hydraulic stands are equipped with fixed feet, but can be converted to caster wheels with the addition of Caster Wheel Kit #3784000. The Base Stands for each Delta model is listed in Table 3-2 below.
Figure 3-2

18
Chapter 3: Getting Started
Width Delta Series #
Manual Lift
Stand #
Electric (115V) Lift
Stand #
Electric (230V) Lift
Stand # 3' 36204-xx
36205-xx 3780200 3780100 3780103
4' 36208-xx, 36209-xx
3780201 3780101 3780104
6' 36212-xx, 36213-xx
3780202 3780102 3780105
When installing the hydraulic lift base stand, ensure that the hydraulic lines and the electrical cord are clear of any obstructions BEFORE installing the cabinet on the stand or operating the lift system.
Connecting The Purifier to Service Lines The service lines (if any) should be connected to the tube fitting(s) on the outside of the liner wall as shown in Figure 3-3. To install the tubing, follow these steps: 1. Ensure that the tubing is ¼ inch outside diameter,
soft metal, and that the end has been deburred completely.
2. Route the tubing from the rear of the cabinet, ensuring that it will line up with the slot in the back of the side panel.
Make sure that the tube routing will not contact any electrical wires. Ensure that the tubing will not interfere with the sash weight when the sash is raised or lowered.
3. Make sure that the nut on the tube fitting is loose,
but do not remove it. Look inside the fitting to make sure the tube ferrule is there.
!
!
Table 3-2

19
Chapter 3: Getting Started
4. Push the tube into the fitting until it is properly
seated. The tube will go approximately ¾ inch into the fitting.
5. Tighten the tube fitting nut hand tight and then, using a 7/16 inch wrench, tighten it at least ¾ turn more.
6. Close the service valve in the Purifier and then slowly open the shutoff valve on the service valve. Inspect the fitting for leakage. Tighten the tube nut slightly if needed.
Optional Exhaust System Connections Unless specially modified by Labconco at your request, all Purifier Delta Series Biosafety Cabinets are shipped in the “Type A mode,” meaning they recirculate their HEPA filtered exhaust air back into the laboratory.
Figure 3-3

20
Chapter 3: Getting Started
Certain applications such as working with odorous products or volatile toxic materials will require the connection of your Purifier to an exhaust system.
The canopy connection, also referred to as a thimble or air gap connection, allows single or multiple biohazard cabinets to be connected to an exhaust system. During operation, the exhaust system draws all of the cabinet’s exhaust air, plus a volume of room air (through the slots in the canopy) into the exhaust duct. Canopy connections function as a “shock absorber” allowing the system to function properly during changes in room air pressure. For information on selecting and installing a canopy connection go to Chapter 7: Modifying Your Biosafety Cabinet. To certify the canopy operation, go to Chapter 6: Maintaining Your Purifier.
If your research involves the use of toxic compounds or volatile materials, contact your facility’s safety officer or Labconco to ensure that your Purifier and its exhaust system are compatible with the materials you will be working with.
Drain Valve Installation In order to prevent damage during shipping, the drain valve assembly has not been installed in the unit. If desired, the valve should be installed after the unit is in its final location. To install the valve assembly, follow these steps:
The work surface is heavy. Use caution when handling it.
☞
!
!

21
Chapter 3: Getting Started
1. Lift the work surface out of the Purifier by
removing the thumbscrews at the front of the work surface and loosening those at the rear of the pan.
2. Using a putty knife, carefully remove and discard the stainless steel cover that is sealed over the drain mounting holes. Scrape out remaining sealant that is around the holes.
3. Apply a light coating of the silicone sealant (user supplied) to the mounting surface of the drain assembly. Attach the drain assembly as shown in Figure 3-4 Wipe off any excess sealant from the cabinet bottom. Ensure that the center drain hole is unobstructed.
4. Make sure the drain valve is in the closed position. 5. Reinstall the work surface. 6. Allow the silicone sealant to cure for at least eight
hours before exposing it to liquid.
Figure 3-4

22
Chapter 3: Getting Started
Initial Certification Prior to use, all Purifier cabinets should be certified by a qualified certifier. Under normal operating conditions, the Purifier cabinet should be recertified at least annually, and when relocated or serviced. The certifier should perform the following tests, as recommended in NSF International Standard Number 49:
• Downflow Velocity Profile Test • Inflow Velocity Test • Airflow Smoke Patterns • HEPA Filter Leak Test • Vibration Test * • Noise Level Test * • Lighting Intensity Test *
*These tests are user comfort related tests and may be omitted at the user’s or certifier’s discretion.
If you have any questions regarding certification agencies or need assistance in locating one, contact Labconco’s Product Service Department at 1-800-522-7658 or 816-333-8811.
Your Next Step After your Purifier has been installed and certified, you are ready to proceed to Chapter 4: Theory Of Operation And Safety Precautions.

23
CCHHAAPPTTEERR 44
TTHHEEOORRYY OOFF OOPPEERRAATTIIOONN AANNDD
SSAAFFEETTYY
PPRREECCAAUUTTIIOONNSS All biohazard cabinets operate using the following principles:
• Filtration and retention of particulates by High Efficiency Particulate Air (HEPA) filter(s)
• Laminar airflow (sometimes) • Directional airflow
The major components in a Biohazard Cabinet are:
• The HEPA filter(s) • The motor/blower to force air through the unit • Cabinet air intakes (grilles), ductwork and air
balance controls

24
Chapter 4: Theory Of Operation And Safety Precautions
HEPA Filters HEPA filters are disposable, dry-type particulate filters. The filter material or media is typically made of borosilicate microfibers formed into a thin sheet, in a process similar to the production of paper. This sheet is folded, or pleated to increase its surface area. The pleats are held in place by aluminum diffusers or by beads of glue that add rigidity to the media pack. The pack is then set into a frame, and sealed as shown in Figure 4-1.
The HEPA filter media is very fragile. DO NOT touch the media. If you think the media of a HEPA filter is damaged, DO NOT USE THE CABINET. Have the HEPA filter integrity tested by a certifier before using the cabinet. HEPA Filters are only effective against particulate material. Gases will pass through the filter.
Figure 4-1
!

25
Chapter 4: Theory Of Operation And Safety Precautions
Laminar Airflow Laminar airflow is defined as the movement of a body of air in a single direction, with a uniform velocity. In practice, the laminar downflow of air in the cabinet captures any aerosol generated in the work area of the cabinet, and directs it to the HEPA filters. In order to be true laminar downflow, a number of individual downflow velocity test points (The Downflow Velocity Profile) must be +/- 20 % of the average of all the test points. This is illustrated in Figure 4-2.
Figure 4-2

26
Chapter 4: Theory Of Operation And Safety Precautions
Directional Airflow Directional airflow also plays a key role in biosafety cabinet performance. Air is drawn into the front of the cabinet at the front grille. This “curtain” of air makes it more difficult for aerosols to escape out of the work area of the cabinet and into the outside environment. This airflow is often calculated and referred to as the Inflow Volume or Average Inflow Velocity. This is illustrated in Figure 4-3.
Figure 4-3

27
Chapter 4: Theory Of Operation And Safety Precautions
Motor/Blower The motor/blower assembly pulls air into the front of the cabinet, and recirculates it internally. During its recirculation, the air is split into two separate streams. One path leads through the exhaust HEPA filter and out of the unit. The second path flows through the supply HEPA filter, which then flows down through the work area, as shown in Figure 4:4 .
Cabinet Air Intakes (Grilles), Ductwork and Air Balance Controls Cabinet containment and performance are affected by the location, size, and pattern of the grilles at the front and rear of the work area.
Figure 4-4

28
Chapter 4: Theory Of Operation And Safety Precautions
Never block or obstruct the grilles of the Purifier.
The internal ductwork of the Purifier conveys the air from the work area to the blower, and then from the blower to the filters. The positive pressure plenum of the Purifier is unique in the industry, utilizing perfect manifold technology to deliver a more uniform airflow to both HEPA filters, optimizing filter loading and operational life.
Safety Precautions
The Purifier Biohazard Cabinet should be certified by a certification technician before its initial use. The cabinet should be recertified whenever it is relocated, serviced or at least annually thereafter. Some internal components of the Purifier may become contaminated during operation of the unit. Only experienced personnel competent in decontamination procedures should decontaminate the cabinet before servicing these components. If you have any questions regarding certification agencies, or need assistance in locating one, contact Labconco’s Product Service Department at 800-522-7658 or 816-333-8811. Ensure that the unit is connected to electrical service in accordance with local and national electrical codes. Failure to do so may create a fire or electrical hazard. Do not remove or service any electrical components without first disconnecting the Purifier from electrical service.
!
!
29
Chapter 4: Theory Of Operation And Safety Precautions
Avoid the use of flammable gases or solvent in the Purifier. Care must be taken to ensure against the concentration of flammable or explosive gases or vapors. An open flame should NOT be used in the Purifier. Open flames may disrupt the airflow patterns in the cabinet, burn the HEPA filter and/or damage the filter’s adhesive. Gases under high pressure should not be used in the Purifier cabinet, as they may disrupt the airflow patterns of the cabinet. HEPA filters only remove particulate matter. Operations generating volatile toxic chemicals or radionuclides must be evaluated carefully. The media of HEPA filters is fragile and should not be touched. Avoid puncturing either HEPA filter during installation or normal operation. If you suspect that a HEPA filter has been damaged, DO NOT use the cabinet; contact a local certification agency or Labconco at 800-821-5525 or 816-333-8811 for re-certification information. The HEPA filters in the Purifier cabinet will gradually accumulate airborne particulate matter from the room and from work performed in the cabinet. The rate of accumulation will depend upon the cleanliness of the room air, the amount of time the cabinet is operating and the nature of work being done in the cabinet. In typical usage HEPA filters will last approximately five years OR MORE before requiring replacement. Proper operation of the cabinet depends largely upon its location and the operator’s work habits. Consult
☞
☞
!
!

30
Chapter 4: Theory Of Operation And Safety Precautions
the Installation and Normal Operation sections of this manual for further details. Avoid direct exposure of plastic or coated materials to Ultraviolet (UV) radiation. NEVER bypass the UV safety interlock. That only allows the UV light to work when the sash is closed.
When surface disinfecting the Purifier:
• Avoid splashing the disinfecting solution
on skin or clothing. • Ensure adequate ventilation. • Carefully follow the disinfectant’s safety
instructions • Always dispose of disinfecting solutions
in accordance with local and national laws.
• DO NOT allow disinfectants with high concentrations of free chlorine to contact the stainless steel components of the Purifier for a long period of time. Free chlorine will corrode stainless steel after extended contact. The electrical receptacle cover may be difficult to surface decontaminate. In the event of gross contamination, the cover should be removed, sterilized and/or decontaminated as required and discarded. The receptacle cover should then be replaced with the repair part listed in Appendix A: Purifier Components. Biohazard cabinets should be decontaminated for any of the following reasons:
• Maintenance work requiring entry
into contaminated areas. • Before HEPA filter changes.
☞

31
Chapter 4: Theory Of Operation And Safety Precautions
• Before performing certification tests
requiring entry into contaminated areas.
• Before relocating the cabinet. • Before changing research programs. • After the gross spill of biohazardous
material.
The procedures for performing a gaseous decontamination are thoroughly outlined in the U.S. Department of Health, Education and Welfare booklet entitled “Formaldehyde Decontamination of Laminar Flow Biological Safety Cabinets,” which is available from The National Institutes of Health, Division of Safety, Bethesda, Maryland 20892, or from Labconco Corporation.
Your Next Step After you understand the theory of operation and safety precautions, you are ready to proceed to Chapter 5: Using Your Purifier.
☞

32
Chapter 4: Theory Of Operation And Safety Precautions

33
CCHHAAPPTTEERR 55
UUSSIINNGG YYOOUURR
PPUURRIIFFIIEERR Operating the Sliding Sash The Purifier's counterbalanced, anti-racking sash mechanism requires only a few pounds of force to move the sash up or down. You can open or close the sash smoothly with one or two hands positioned any where along the handle. The sash position alarm and safety interlock system senses the sash position and acts appropriately. Your Purifier is designed to operate with either an 8- or 10-inch sash opening, depending on model. Raising the sash above its operating height will activate the audible and visual alarms. The audible alarm can be temporarily muted (for approximately five minutes) by depressing and releasing the alarm silence button. Closing the sash back to its operating position will reset the alarm and defeat the muting of the alarm. The safety interlock system senses when the sash is closed, and will shut off the cabinet blower (to prevent it from overheating). The interlock also allows the optional ultraviolet (UV) lamp to operate only when the sash is closed, to protect the operator from irradiation.

34
Chapter 5: Using Your Purifier
1. To start the Purifier, raise the sash until you feel the
sash tactile position indicator (TPI). The TPI functions by increasing the resistance you feel on the sash as it nears its proper operating position. Once in position, the TPI will 'set', requiring additional upward force to be raised further. The correct sash position can be confirmed by aligning the handle of the sash with the indicator decal located on the left side of the opening. The indicator decal is shown in Figure 5-1.
Figure 5-1

35
Chapter 5: Using Your Purifier
2. Turn the blower switch to the 'On' position, as
shown in Figure 5-2. The audible and visual alarms will self-test and be activated for approximately three seconds. The alarms will then shut off. If the alarms continue after three seconds, recheck the sash position. If the sash is too high, the sash audible alarm and the alarm indicator LED will activate.
Some model Purifier Cabinets are equipped with an optional face velocity alarm system that monitors the volume of air exhausting from the cabinet. If the exhaust volume drops below the minimum requirement, the following occurs:
• An audible alarm sounds. • The red "Low" indicator light illuminates.
Figure 5-2

36
Chapter 5: Using Your Purifier
If The Airflow Alarm Activates The most common causes of alarm activation are:
• Mechanical failure of the cabinet blower. • Loading of the exhaust HEPA filter.
If the alarm sounds during use, immediately take appropriate action to prevent contamination to you and other personnel in the area.
Resetting The Alarm System Once the cause of the face velocity alarm has been determined and corrected, the alarm will reset automatically.
Working In Your Purifier Planning
• Thoroughly understand procedures and equipment required before beginning work.
• Arrange for minimal disruptions, such as room traffic or entry into the room while the cabinet is in use.
Start-up
• Turn off UV light if included. • Slowly raise the sash until the TPI engages at
the proper height. Confirm the sash is at its proper height by examining the sash indicator decal located on the left side of the work area.
• Turn on fluorescent light and cabinet blower.

37
Chapter 5: Using Your Purifier
• Check the air grilles for obstructions, and note
the pressure gauge reading. • Allow the cabinet to operate unobstructed for 5
minutes. • Wash hands and arms thoroughly with
germicidal soap. • Wear a long sleeved lab coat with knit cuffs and
over-the- cuff rubber gloves. Use protective eyewear. Wear a protective mask if appropriate.
Wipe-Down
• Raise the sash to its full open position (approximately 19 inches open). Mute the alarm by depressing the "Alarm Silence" switch.
• Wipe down the interior surfaces of the cabinet with 70% ethanol, or a suitable disinfectant, and allow to dry.
Loading Materials and Equipment
• Only load the materials required for the procedure. Do not overload the cabinet.
• Do not obstruct the front, side, or rear return air grilles.
• Large objects should not be placed close together.
• Slowly close the sash until the TPI is engaged correctly.
• After loading the cabinet, wait two to three minutes to purge airborne contaminants from the work area.
Work Techniques
• Keep all materials at least 4 inches inside of the sash, and perform all contaminated operations as far to the rear of the work area as possible.
• Segregate all clean and contaminated materials in the work area.
• Arrange materials to minimize the movement of contaminated materials into clean areas.
• Keep all discarded contaminated material to the rear of the work area.
• Avoid moving materials or the operator's hands and arms through the front access opening during use.

38
Chapter 5: Using Your Purifier
• Avoid the use of an open flame. • Use proper aseptic technique. • Avoid using techniques or procedures that
disrupt the airflow patterns of the cabinet. • If there is a spill or splatter during use, all
objects in the cabinet should be surface decontaminated before removal. Thoroughly disinfect the working area of the cabinet WHILE IT IS STILL IN OPERATION. This will prevent the release of contaminants from the cabinet.
Final Purging
• Upon completion of work, the cabinet should be allowed to operate for two to three minutes undisturbed, to purge airborne contaminants from the work area.
Unloading Materials and Equipment
• Objects in contact with contaminated material should be surface decontaminated before removal from the cabinet.
• All open trays or containers should be covered before being removed from the cabinet.
Wipe-Down
• Wipe down the interior surfaces of the cabinet with 70% ethanol, or a suitable disinfectant, and allow to dry.
• Periodically lift the work surface and wipe down the area beneath it.
• Inspect and clean the towel catch located at the rear of the work area, beneath the work pan.
• Dispose of rubber gloves appropriately, and have lab coat laundered properly.
• Wash hands and arms thoroughly with germicidal soap.
Shutdown
• Turn off the fluorescent light and cabinet blower, close the sash, and turn on the UV light if appropriate.

39
Chapter 5: Using Your Purifier
Safety and Comfort Many factors in our work environment determine whether we work efficiently and in a manner that promotes good health and safety. By considering, acting on, and periodically reevaluating the recommendations in this section, it is possible to create a safer, more comfortable, healthful, and efficient work environment.
Working intensely or for a long time in uncomfortable or unnatural positions poses risks.
Organizing Your Adjustments The order in which you make various adjustments to your body position and work area may vary depending on the adjustability of your furniture.
Labconco offers an optional ergonomic chair and adjustable footrest for further information see Appendix D: Purifier Accessories. Pay particular attention to adjusting your posture in the afternoon when you may tend to get fatigued. When you reposition any one part of your body, you may need to adjust other parts as well. Don’t sit in one fixed posture all day.
Feet, Knees, and Legs Make sure your feet can rest solidly and comfortably on the floor or footrest while sitting. Use an adjustable chair that allows your feet to rest firmly on the floor, or
!
☞
!

40
Chapter 5: Using Your Purifier
use a footrest. If you use a footrest, be sure it is wide enough to accommodate different leg positions within your comfort zone.
Rest your feet firmly on the floor or a footrest. Don’t dangle your feet and compress your thighs.
Providing Enough Leg Room Be sure you have sufficient space under your work surface for your knees and legs. Avoid concentrated pressure points along the underside of your thigh near the knee and the backside of your lower leg. Stretch your legs and vary your leg posture throughout the day. Leg Comfort Vary your leg positions throughout the day.
Avoid placing boxes or other items under the cabinet that limit your leg room. You should be able to pull your chair all the way up to your Purifier without interference.
Walk Get up from your Purifier periodically and take brief walks. Back Use your chair to fully support your body. Distribute your weight evenly and use the entire seat and backrest to support your body. If your chair has adjustable low back support, match the contours of the chair's backrest to the natural curve of your lower spine. Always make sure your lower back is well supported. Make sure it feels comfortable in the position in which you are working.
!
☞
!

41
Chapter 5: Using Your Purifier
Distribute your weight evenly and use the entire seat and backrest to support your body. Don’t slouch forward.
Adjust often If your chair is adjustable, experiment with the adjustments to find numerous comfortable positions, then adjust the chair frequently.
If you are using a chair for the first time, or if you share a chair with someone else, don’t assume the settings are properly set for you.
Forearms, Wrists, and Hands Keep your forearms, wrists, and hands aligned in a straight, natural position. Avoid bending or angling your wrists while working. Don't Anchor Your Wrists When working, do not anchor or rest your wrists on the work surface. Resting your palms while working may be harmful because it can cause you to bend your wrists back and can apply pressure to the undersides of your wrists.
Maintain a straight, natural wrist position while working.
Shoulders and Elbows Adjust your chair height or Purifier height so that your shoulders are relaxed and your elbows hang comfortably at your sides. Relax Remember to relax, particularly in areas where muscle tension often builds, such as your shoulders.
☞ !
!
☞
42
Chapter 5: Using Your Purifier
Eyes Working at your Purifier for long periods can be a visually demanding task and may cause your eyes to become irritated and fatigued. Give special attention to vision care, including the following recommendations: Resting Your Eyes Give your eyes frequent breaks. Periodically look away from the work area and focus at a distant point. This may also be a good time to stretch, breathe deeply, and relax. Cleaning Your Sash and Glasses Keep your sash and glasses clean. Having Your Eyes Examined To be sure that your vision is adequately corrected, have your eyes examined regularly by a vision care specialist. If you wear bifocals or trifocals, you may find monofocal glasses more comfortable for cabinet use. Eye comfort While working in your Purifier, and also while resting your eyes, remember to blink. This helps keep your eyes naturally protected and lubricated, and helps prevent dryness, a common source of discomfort.
Give your eyes frequent rests by focusing them on a distant point.
Arranging Your Work Area Eliminating Glare and Reflections on the Sash Take the time to eliminate glare and reflections. To control daylight, use blinds, shades, or drapes, or try other glare-reducing measures. Use indirect or reduced lighting to avoid bright spots on the sash. If glare is a problem, consider these actions:
☞
43
Chapter 5: Using Your Purifier
• Turn off or reduce ceiling lights and use task
lighting (one or more adjustable lamps) to illuminate your work.
Avoid compromising your posture to compensate for glare or reflections.
Positioning Work Materials Position work materials directly in front of you to avoid twisting your neck and torso. This makes it possible to work with your shoulders relaxed and your upper arms hanging freely at your sides. Minimizing Your Reach Arrange your frequently used materials to minimize the distance you reach for them. Hand Manipulation Notice how you use your fingers and hands while working. Avoid keeping any unnecessary tension in your thumbs and fingers. Observe whether you have a heavy touch or a light touch while working. Reaching for Materials To reach material that is not near your hands, move your whole arm; avoid stretching your fingers and angling your wrists.
RELAX YOUR THUMBS AND FINGERS WHILE WORKING; NOTICE AND RELEASE EXCESS TENSION. Don't work with unnecessary tension in your thumbs and fingers.
Wrist Position Use your whole arm and shoulder to move objects, not just your wrist. Don't rest or anchor your wrist while moving items; keep your wrist, arm, and shoulder free to move.
!
☞
!

44
Chapter 5: Using Your Purifier
Aligning Forearms, Wrists, and Hands When working in the Purifier, keep your forearms, wrists, and hands comfortably aligned with each other in a straight, natural line. Avoid bending or angling your wrists. Taking Breaks and Varying Your Tasks As noted earlier, your furniture placement, lab equipment, and lighting are only a few of the factors that determine comfort. Your work habits are also very important. Remember the following:
• Take breaks. • When you work at your Purifier for long
periods, take short breaks at least once per hour and preferably more often. You may find that frequent, short breaks will benefit you more than fewer, longer breaks.
• If you find that you forget to take breaks, use a timer.
• During your breaks, stand up and stretch, especially any muscles and joints you may have held in an extended static posture while working.
Vary Your Tasks Examine your work habits and the types of tasks you perform. Break up the routine and try to vary your tasks during the day. By doing so, you may avoid sitting in one position or performing the same activities continuously for several hours using your hands, arms, shoulders, neck, or back. Reduce Sources of Stress Take an inventory of things at work that are stressful to you. If you perceive that your physical or psychological health is being affected, take time to evaluate what changes you can make to reduce or eliminate the sources of stress.
Breathe fresh air deeply and regularly. The intense mental concentration that may accompany work in a Biosafety Cabinet may tend to cause breath-holding or shallow breathing.
☞

45
Chapter 5: Using Your Purifier
Self-Check To increase your comfort and reduce potential safety risks, use this checklist to help you evaluate your work posture and habits. Seated Position
• Have you found a range of seated postures that are most comfortable for you?
• Are you changing postures within your "comfort zone" throughout the day, especially in the afternoon?
• Are your feet firmly planted? • Are the undersides of your thighs near your
knees free of pressure? • Are the backs of your lower legs free of
pressure? Is there sufficient space under your cabinet for your knees and legs?
• Is your lower back supported? Shoulders, Arms, Wrists, and Hands
• Are your shoulders relaxed? • Are your hands, wrists, and forearms aligned in
a straight, natural position? • Are your elbows in a relaxed position near your
body? • Are items you use frequently easy to reach?
Eyes
• Do you rest your eyes frequently by focusing on a distant point?
• Do you get your eyes examined regularly by a vision care specialist?
• Do you blink enough? • If you wear bifocals or trifocals, do you avoid
tilting your head back to see your work?
46
Chapter 5: Using Your Purifier
Working Style
• Are you training your fingers to relax when they become tense?
• Do you use your whole arm to reach for objects not located near your fingers?
• Is your work positioned directly in front of you? • Are your wrists straight and your shoulders
relaxed? • Have you eliminated glare and bright reflections
on the sash, without compromising your posture?
General Prevention
• Do you take breaks and walk around briefly, preferably once per hour?
• Do you exercise regularly? • Periodically, do you take inventory of the stress
in your life and change what is within your control to change?
Your Next Step After you understand how to operate and work in the Purifier, you are ready to proceed to Chapter 6: Maintaining Your Purifier.
47
CCHHAAPPTTEERR 66
MMAAIINNTTAAIINNIINNGG YYOOUURR
PPUURRIIFFIIEERR Now that you have an understanding of how to work in the Purifier, we will review the suggested maintenance schedule and the common service operations necessary to maintain your Purifier for peak performance.
Many of the service operations should be performed only by trained and experienced certification technicians after the cabinet has been properly decontaminated. DO NOT attempt to perform these operations if you are not properly trained. The service operations that require qualified certifiers are preceded by the wrench icon.
Routine Maintenance Schedule Weekly
• Using 70% ethanol, or a suitable disinfectant, surface disinfect the inside of the cabinet, and the work surface.
!

48
Chapter 6: Maintaining Your Purifier
• Using an appropriate glass cleaner, clean the
sash and the surface of the UV lamp, if so equipped.
• Operate the cabinet blower, noting the pressure reading in an operational log.
Monthly (or more often as required)
• Using a damp cloth, clean the exterior surfaces of the cabinet, particularly the front and top of the cabinet, to remove any accumulated dust.
• Disinfect and lift the work surface. Surface disinfect the lower plenum with a solution of 70% ethanol, or a suitable disinfectant. Check the towel catch for retained materials.
• Check all service valves, if so equipped, for proper operation.
• All weekly activities. Annually
• Have the cabinet re-certified by a qualified certification technician.
• Replace the UV lamp, if so equipped. • All monthly activities.
Biannually
• Replace the fluorescent lamp.
Service Operations Work Surface Removal:
The work surface of the cabinet must be thoroughly decontaminated before removing it.
1. Loosen and remove the thumbscrews located at the
front of the work surface, as shown in Figure 6-1. 2. Only loosen the thumbscrews located at the rear of
the work surface. 3. Lift the front edge of the work surface up and pull it
out of the cabinet work area.

49
Chapter 6: Maintaining Your Purifier
Towel Catch Removal: Although not normally required, the towel catch can be removed for cleaning, inspection, etc.
The work surface of the cabinet and the towel catch must be thoroughly decontaminated before removing either.
1. Remove the work surface as described above. 2. Loosen and remove the thumbscrews located at the
rear of the work surface. 3. Surface decontaminate the towel catch before
removing it.
Figure 6-1

50
Chapter 6: Maintaining Your Purifier
Front Panel Removal: 1. Locate and remove the two Phillips screws that
secure the front panel as shown in Figure 6-2. 2. Swing the bottom of the dress panel out to clear the
fluorescent light and then lift the front dress panel straight up and away from the cabinet.
Figure 6-2

51
Chapter 6: Maintaining Your Purifier
Changing the Fluorescent Lamp for 3' and 4': 1. Unplug the cabinet. 2. Remove the front dress panel as noted in Figure 6-2. 3. Remove the fluorescent lamp by rotating it 90
degrees and pulling it straight up and out of its sockets.
4. Install the new lamp by reversing the removal procedure.
Changing the Fluorescent Lamp for 6': 1. Unplug the cabinet. 2. Remove the front dress panel as noted in Figure 6-2. 3. Remove the fluorescent lamp by pushing it to the
left and swinging it out of the right lamp socket. 4. Install the new lamp by reversing the removal
procedure. Changing the Optional UV Lamp for 3' and 4':
For optimum performance, the UV lamp should be changed on an annual basis. The UV lamp and the work area of the cabinet must be thoroughly decontaminated before removing the lamp.
1. Start the cabinet and let it operate for 5 minutes. 2. Raise the sash to its full open position. 3. Thoroughly surface decontaminate the UV lamp
and the work area of the cabinet. 4. Unplug the cabinet. 5. Remove the UV lamp by rotating it 90 degrees and
lifting it straight up and out of its sockets. 6. Install new lamp by reversing the removal
procedure.
☞
52
Chapter 6: Maintaining Your Purifier
Changing the Optional UV Lamp for 6':
For optimum performance, the UV lamp should be changed on an annual basis. The UV lamp and the work area of the cabinet must be thoroughly decontaminated before removing the lamp.
1. Start the cabinet and let it operate for 5 minutes. 2. Raise the sash to its full open position. 3. Thoroughly surface decontaminate the UV lamp
and the work area of the cabinet. 4. Unplug the cabinet. 5. Remove the UV lamp by pushing it to the left and
swinging it out of the right lamp socket. 6. Install new lamp by reversing the removal
procedure. Resetting a Circuit Breaker: To reset any of the circuit breakers located on the front of the electronics module, depress the white button until it sets.
The service operations listed in the rest of this chapter should only be performed by a qualified certifier.
Downflow Velocities The average downflow velocity for all model Purifiers should be set at 55 ±5 FPM.
Downflow Velocity Grid Patterns The downflow velocity test grid pattern for all model Purifiers is listed on the data plate on the front right side of the grille. If the label is missing or obliterated, contact Labconco AT 1-800-522-7658.
☞

53
Chapter 6: Maintaining Your Purifier
Inflow Velocity Calculation - Primary Method The average inflow velocity for all Purifiers is 105 ±5 FPM, and should be determined by converting the inflow volume to the average inflow velocity. The inflow volume is measured directly by sealing a direct inflow measuring flowmeter to the face of the unit. When corrected for local conditions, dividing the inflow volume by the opening area will yield the average inflow velocity.
Purifier Model
Sash Height (inches)
Avg. Inflow Velocity (FPM)
Work Opening
Area (sq. ft.)
Inflow Volume (CFM)
3620400 10 105 ±5 2.53 266 3620500 8 105 ±5 2.03 213 3620800 10 105 ±5 3.37 354 3620900 8 105 ±5 2.69 283 3621200 10 105 ±5 5.03 529 3621300 8 105 ±5 4.03 423
Inflow Velocity Calculation - Secondary Method If the primary method cannot be performed, the secondary inflow calculation method should be performed. The secondary method uses a hot wire thermal anemometer. In this method, the sash is lowered until the open area of the sash equals one square foot, and a series of velocity readings are taken at the front of the unit.
Table 6-1

54
Chapter 6: Maintaining Your Purifier
1. For each model Purifier, the sash height should be
adjusted and measured such that a vertical line from the lowest surface of the sash handle to the front grille should equal the following height:
Purifier Models Sash height opening 3620400, 3620500 3.95 in (100 mm) 3620800, 3620900 2.97 in (75 mm) 3621200, 3621300 1.99 in (51 mm) 2. Start the Purifier, and let it operate for at least 5
minutes. 3. Establish the necessary correction factor to the
thermal anemometer to ensure compliance with its performance in a calibrated wind tunnel. This data should be available from the calibrator of the thermoanemometer.
4. Calculate the manufacturer’s recommended correction factor(s) to correct for local conditions of temperature, humidity, barometric pressure, altitude, etc.
5. Measure a number of test points, 4 inches from each side wall, and at intervals of the following distance for each of these models:
Model Numbers Distance Between each Test Point (inches)
Total Number of Test Points
3620400, 3620500 4.07 8 3620800, 3620900 4.05 11 3621200, 3621300 4.03 17
6. Take a series of inflow velocities by placing the
sensor of the thermal anemometer at the test points, in the center of the opening, leaning the body of the probe against the front of the grille.
7. Apply the wind tunnel correction and local condition correction factors to the thermal anemometer readings.
8. Multiply the individual readings by the following Purifier correction factor:
Table 6-3
Table 6-2

55
Chapter 6: Maintaining Your Purifier
Model Numbers Purifier Correction Factors
(CFM/FPM) 3620400* 1.08 3620500* 1.06 3620800 1.13 3620900 1.12 3621200 1.30 3621300 1.24
Average the corrected readings.
9. The resulting value is the inflow volume in cubic feet per minute (CFM). In order to convert this value to the average inflow velocity of feet per minute (FPM), divide the volume by the sash open area given in Table 6-5 below.
Model Numbers Sash Open Area (square feet)
3620400 2.53 3620500 2.03 3620800 3.37 3620900 2.69 3621200 5.03 3621300 4.03
10. The resulting value will be the calculated average
inflow velocity in FPM.
Table 6-4
Table 6-5
*On models with serial #99xx, 0001 through 0007, the correction factor for model 36204 is 1.13 and for 36205 is 1.11.

56
Chapter 6: Maintaining Your Purifier
Calibration of the Type A2 Inflow Alarm Some Delta Type A2 models are equipped with a flow switch located on the exhaust cover and two indicator LEDs on the control panel. To calibrate the flow alarm do the following:
1. Ensure the flow switch is installed and operational.
2. Allow the Delta unit to operate for at least 10 minutes.
3. Referring to the Table 6-6, adjust the inflow volume to the alarm set point volume for the model being tested. The alarm should not sound.
4. If the “LOW” LED is on and the audible alarm is sounding: Remove the flow switch cable housing, located to the right of the flow switch. Using a small screwdriver, turn the flow switch adjustment screw located on the end of the switch near the wiring clockwise (facing the screw), as shown in Figure 6-3. Reposition the housing to its original position. Repeat this procedure until the red “LOW” LED goes out the green airflow monitor “OK” LED illuminates, and the audible alarm does not sound WITH THE CABLE CONNECTOR HOUSING IN PLACE.
If the “OK” LED is on: Remove the flow switch cable housing, located to the right of the flow switch. Use the screwdriver to turn the adjustment screw on the flow switch counterclockwise (facing the screw). Reposition the housing to its original position. Repeat this procedure until the “LOW” airflow LED lights and the audible flow alarm sounds.
5. Adjust the exhaust volume to the nominal value in the table below. The red “LOW” LED goes out and the “OK” green LED is illuminated and the audible alarm turns off.

57
Chapter 6: Maintaining Your Purifier
Model Alarm set point volume (CFM) (=90 FPM Avg.
Inflow)
Nominal volume (CFM) (=100-110 FPM Inflow)
3620400 228±5 253-278 3620500 183±5 203-223 3620800 303±5 337-370 3620900 242±5 269-296 3621200 453±5 503-554 3621300 363±5 403-443 3800000 303±5 323-364 3810000 453±5 483-544
Calibration of the Type B3 Face Velocity Alarm
Type B3 exhaust systems were available on Delta cabinets manufactured through 2003.
Table 6-6
☞
Figure 6-3

58
Chapter 6: Maintaining Your Purifier
A qualified certification technician
should calibrate the Face Velocity Alarm. The alarm switch is set at the factory at its lowest pressure setting and it will need to be calibrated before using the Purifier.
1. Set the exhaust damper so that the exhaust volume is at the alarm setpoint as indicated in Table 6-7, and mark the damper position.
2. With the Purifier running, turn the adjusting screw, as shown in Figure 6-4 very slowly clockwise (increasing the pressure setting) until the alarm is activated. This is the alarm setpoint.
3. Confirm the alarm operation by opening the damper slightly and pressing the “Alarm Silence” switch. The cabinet will operate normally. While the cabinet is running, slowly return the damper to its setpoint. If the alarm does not sound at the setpoint, repeat steps 2 and 3 until proper operation is obtained.
4. Open the exhaust damper until the exhaust volume is at the normal exhaust volume, as indicated in Table 6-7.
5. With the exhaust volume set, the downflow can be established.
Figure 6-4

59
Chapter 6: Maintaining Your Purifier
Purifier Airflow Data Model
Number Average Inflow Velocity (FPM)
Work Opening Area (sq. ft.)
Exhaust Volume of Cabinet (CFM)
Alarm Setpoint Volume (CFM)
36204-0x 105 2.53 253-278 228 ±5 36205-0x 105 2.03 203-223 183±5 36205-1x 10⁵ 2.03 203-223 183 ±5 36205-2x 10⁵ 2.03 203-223 183 ±5 36208-0x 105 3.37 337-370 303 ±5 36209-0x 105 2.69 269-296 242 ±5 36209-1x 10⁵ 2.69 269-296 242 ±5 36209-2x 10⁵ 2.69 269-296 242 ±5 36212-0x 105 5.03 503-554 453 ±5 36213-0x 105 4.03 403-443 363 ±5 36213-1x 10⁵ 4.03 403-443 363 ±5 36213-2x 10⁵ 4.03 403-443 363 ±5
Electronics Module Access
The electronics module assembly should be serviced by a qualified certification technician.
The electronics module houses the speed control, the lamp ballasts, the circuit breakers, as well as the motor capacitor. 1. Unplug the cabinet. 2. Remove the two 7/16" acorn nuts that secure the
electronics module to the top of the cabinet, shown in Figure 6-5.
3. Pivot the module onto its back surface to access the electronic components within.
Table 6-7

60
Chapter 6: Maintaining Your Purifier
Measuring Line and Motor Voltage
Line and motor voltage contact points are high voltage connections. Use caution when measuring either voltage. A voltage connector can be fabricated from commercially available electronics hardware, or one is available to qualified certifiers from Labconco Corporation. Contact Labconco's Product Service Department for further details.
Figure 6-5
☞

61
Chapter 6: Maintaining Your Purifier
1. Remove the access panel located on the front of the
electronics module by removing the right hand Phillips screw, and loosening the left hand screw as shown in Figure 6-6. Pivot the panel out of the way.
2. Locate the voltage test points on the electrical panel. The test points are identified by Figure 6-7, shown below.
3. Using a voltmeter and probes, measure the desired voltage by connecting the voltmeter probes to the appropriate points.
Figure 6-6
Figure 6-7

62
Chapter 6: Maintaining Your Purifier
Speed Control Adjustment
The Purifier blower speed should only be adjusted by a qualified certification technician. Adjustment of the blower speed will affect the containment efficiency of the unit. The Purifier’s blower speed is adjusted and its setpoint is maintained by a solid state electronic circuit. There is no potentiometer as on traditional biosafety cabinets. The blower speed setting is adjusted and protected by an electronic interlock that must be released to reset the motor voltage.
1. Remove the access panel located on the front of the
electronics module by removing the right hand Phillips screw, and loosening the left hand screw as shown in Figure 6-6. Pivot the panel out of the way.
2. Locate the voltage test points on the electrical panel. The test points are identified by Figure 6-7.
3. Using a voltmeter and probes, measure the motor voltage by connecting the voltmeter probes to the appropriate points.
4. Shut the Purifier off. 5. While holding down the "alarm silence" button, turn
the "System Power" switch on. 6. The blower will start, and the audio and visual
alarm will operate in an alternating mode. The blower speed can now be adjusted.
7. The blower speed can be increased by pressing the button on the right; pressing the button on the left decreases the blower speed as shown in Figure 6-6.
8. Once the proper blower speed has been established by inflow and downflow testing, the new blower voltage can be programmed into the speed controller by depressing the "Alarm Silence" button again. The audio alarm will sound a single long tone, and then shut off, indicating the new voltage is properly programmed.
!

63
Chapter 6: Maintaining Your Purifier
If you wish to cancel the new blower voltage setting, simply turn the “system Power” switch off before depressing the “alarm silence” button. This will cancel the new setting, and return the speed controller to its previous value.
Exhaust Control System Adjustment
Adjusting the exhaust control system will have an effect on the air velocities and the efficiency of the cabinet. The exhaust control system should only be adjusted by a certification technician as part of the recertification procedure.
Some early 3-foot wide Purifiers with serial numbers beginning in 99xx or 0001 through 0007, were equipped with a single piece, orange exhaust cover. As shown in Figure 6-8. 1. Locate the exhaust filter cover located on the top of
the cabinet. 2. To increase the flow of exhaust air, remove one or
more of the exhaust hole plugs. The plugs "lock" into the cover. To remove the plug, reach through an adjacent hole, and depress the tabs that secure the plug into the cover.
3. To decrease the exhaust flow, insert one or more plugs back into the vacant holes in the exhaust cover. Additional plugs are stored in the parts bag shipped with the cabinet.
☞
!

64
Chapter 6: Maintaining Your Purifier
4. Reestablish the inflow, making sure it meets the
specification mentioned in Table 6-1.
If you need additional exhaust control system plugs, contact Labconco's Product Service Department.
Later 3-foot units, as well as all 4-foot and 6-foot wide Purifiers manufactured through October 2003 utilize a two-piece exhaust cover system shown in Figure 6-9. 1. Remove the four nuts that secure the orange exhaust
diffuser cover from the top of the Purifier.
Do not remove or attempt to adjust the angled deflector blades on the primary exhaust cover.
2. To increase the exhaust flow, remove blocking
strip(s) from the primary exhaust cover, install them in the storage areas at the front or rear of the cover. Reinstall the exhaust diffuser cover.
3. To decrease the exhaust flow, remove surplus blocking cover strip(s) from the front or back storage area, and install them over an open row of holes. Reinstall the exhaust diffuser cover.
4. Reestablish the inflow, making sure it meets the specifications in the chapter.
☞
Figure 6-8
!

65
Chapter 6: Maintaining Your Purifier
All Type A2 Delta Purifiers manufactured after October 2003 are equipped with an external guillotine-style damper to control the volume of air exhausting from the cabinet. To adjust the damper:
1. Using a 7/16" nut driver or socket, locate the damper adjustment bolt on the front of the damper assembly, as shown in Figure 6-10.
2. Turn the bolt clockwise to open the damper and increase the volume of air being exhausted. Turn the bolt counterclockwise to reduce the exhaust flow.
3. If using a direct read instrument or flow hood to establish the exhaust volume, allow the instrument’s readings to stabilize at least 30 seconds before readjusting the damper.
Figure 6-9

66
Chapter 6: Maintaining Your Purifier
Canopy Airflow Adjustment
Balancing of airflows in the cabinet is accomplished by adjustment of the cabinet’s exhaust control system and speed control. The exhaust system should be considered a separate system, distinct from the Purifier. Changing the damper setting or the speed control will affect the inflow and downflow values. Both must be checked after any adjustment. Downflow and inflow values and measurement procedures for the Purifier are described fully in Chapter 6: Maintaining Your Purifier. After adjusting the cabinet inflow and downflow to specifications, the airflow in the exhaust duct can be determined by calculating the Total Exhaust volume and subtracting the cabinet inflow volume from it.
Measuring the Total Exhaust Volume
Measure the airflow in the exhaust duct in accordance with American Society of Heating, Refrigerating and Air-Conditioning Engineers (ASHRAE) recommended procedures. It should correspond to the airflow values shown in Appendix E.
☞

67
Chapter 6: Maintaining Your Purifier
Use of the Access Tube For DOP Testing
The Purifier utilizes a unique access tube for sampling the upstream concentration of DOP. If after reading these instructions, you have further questions, please contact Labconco's Product Service Department.
☞
Figure 6-10

68
Chapter 6: Maintaining Your Purifier
The access tube contains contaminated air under positive pressure. DO NOT access this line until the cabinet has been decontaminated. DOP scanning of the HEPA filters should only be performed by a qualified certification technician as part of the recertification procedure.
1. Remove the work surface as shown in Figure 6-1. 2. Locate the access tube on left side of the rear
plenum wall, behind the towel catch. 3. Pull the tube toward the front of the unit. Remove
the access tube's cover. 4. Using an appropriate photometer, connect the unit's
upstream line to the access tube. 5. After completing the DOP test of the filters, replace
the access tube cover, ensuring that it is sealed properly.
6. Replace the access tube, and the work surface.
HEPA Filter Replacement
The cabinet must be properly decontaminated before servicing the supply HEPA filter. The HEPA filters should only be serviced by a qualified certification technician. Following replacement of a HEPA filter, the cabinet MUST be recertified by a qualified certification technician.
1. Unplug the cabinet. 2. Remove the front dress panel as shown in Figure
6-2. 3. Remove the sash pocket by loosening the two
Phillips screws on the left side of the pocket. Support the sash pocket while removing the two screws on the right side of the sash pocket. Swing the sash pocket out and away from the unit as shown in figure 6-11.

69
Chapter 6: Maintaining Your Purifier
4. Loosen and remove all of the Phillips screws on the
blower chamber cover. Gently rock the cover, slide it to the left or right, and swing it out and away from the unit.
5. Using a 1/2 inch wrench, loosen the four locking bolts that contact each corner of the plenum box at least 1/2 inch, as shown in Figure 6-12.
6. Loosen the four exhaust filter sealing bolts located at each corner of the exhaust filter tray, as shown in Figure 6-12 at least 1/2 inch. This releases the exhaust HEPA filter from the cabinet.
Figure 6-11

70
Chapter 6: Maintaining Your Purifier
To Remove the Exhaust HEPA Filter:
The exhaust HEPA filter is awkward to handle and heavy. Use appropriate lifting techniques to remove and handle it. Use two people to remove the filter if possible.
1. Slide the exhaust HEPA filter out of the filter pan. To Remove the Supply HEPA Filter:
The supply HEPA filter is awkward to handle and heavy. Use appropriate lifting techniques to remove and handle it. Use two people to remove the filter if possible.
1. With the exhaust filter removed, use a 1/2-inch
socket or wrench to tighten the three plenum lift bolts located as noted in Figure 6-12. This will lift the plenum box off the supply HEPA filter.
2. Slide the supply HEPA filter straight out the unit.
!
!
Figure 6-12
71
Chapter 6: Maintaining Your Purifier
3. With the HEPA filters removed, inspect the filter
shelf and the exhaust filter tray for damage. To Install a Supply HEPA Filter: 1. Install a new supply HEPA filter by pushing it
straight into the cabinet, ensuring that it is correctly oriented, and that the filter is centered on the filter shelf.
2. Use a 1/2-inch socket or wrench to sequentially loosen the three plenum lift bolts located as noted in Figure 6-12. When properly positioned, the plenum box will be aligned with the supply HEPA filter frame, and there will be an approximately 1/4 inch gap between the bottom of the plenum lift bolt head and the top of the lift bracket. This will allow the plenum box to properly seat as the filter gasket is compressed.
3. Using a 1/2-inch wrench, tighten the four locking bolts located at each corner of the plenum box, as shown in Figure 6-12 until the supply HEPA filter gasket is compressed to approximately 50% of its thickness.
The locking bolts should only be tightened enough to ensure a proper seal of the supply HEPA filter. At maximum tightness, the supply filter's gasket should be compressed to 50% of its original thickness. NEVER tighten the locking bolts beyond this setting.
To Install an Exhaust HEPA Filter: 1. Slide the new exhaust HEPA filter all the way into
the pan. 2. Sequentially tighten the four exhaust filter sealing
bolts located at each corner of the exhaust filter tray, as shown in Figure 6-12 until the exhaust filter gasket is compressed approximately 50%.
!

72
Chapter 6: Maintaining Your Purifier
The exhaust filter sealing bolts should only be tightened enough to ensure a proper seal of the exhaust HEPA filter. At maximum tightness, the exhaust filter's gasket should be compressed to 50% of its original thickness. NEVER tighten the bolts beyond this setting.
3. Install the blower chamber cover, uniformly
tightening the screws on the cover until the gasket has formed a proper seal.
4. Install the sash pocket. 5. Install the front dress panel. 6. Plug in the cabinet and have it recertified before
use.
Motor/Blower Maintenance and Replacement
The cabinet must be properly decontaminated before servicing the motor/blower. The motor/blower should be serviced by a qualified certification technician. The cabinet blower motor's bearings are sealed and require no lubrication. DO NOT attempt to lubricate them.
To replace the Motor/Blower: 1. Unplug the cabinet. 2. Remove the front dress panel as shown in Figure
6-2. 3. Remove the sash pocket as shown in Figure 6-11. 4. Loosen and remove all of the Phillips screws on the
blower chamber cover. Gently rock the cover, slide it to the left or right, and swing it out and away from the unit.
!
☞
73
Chapter 6: Maintaining Your Purifier
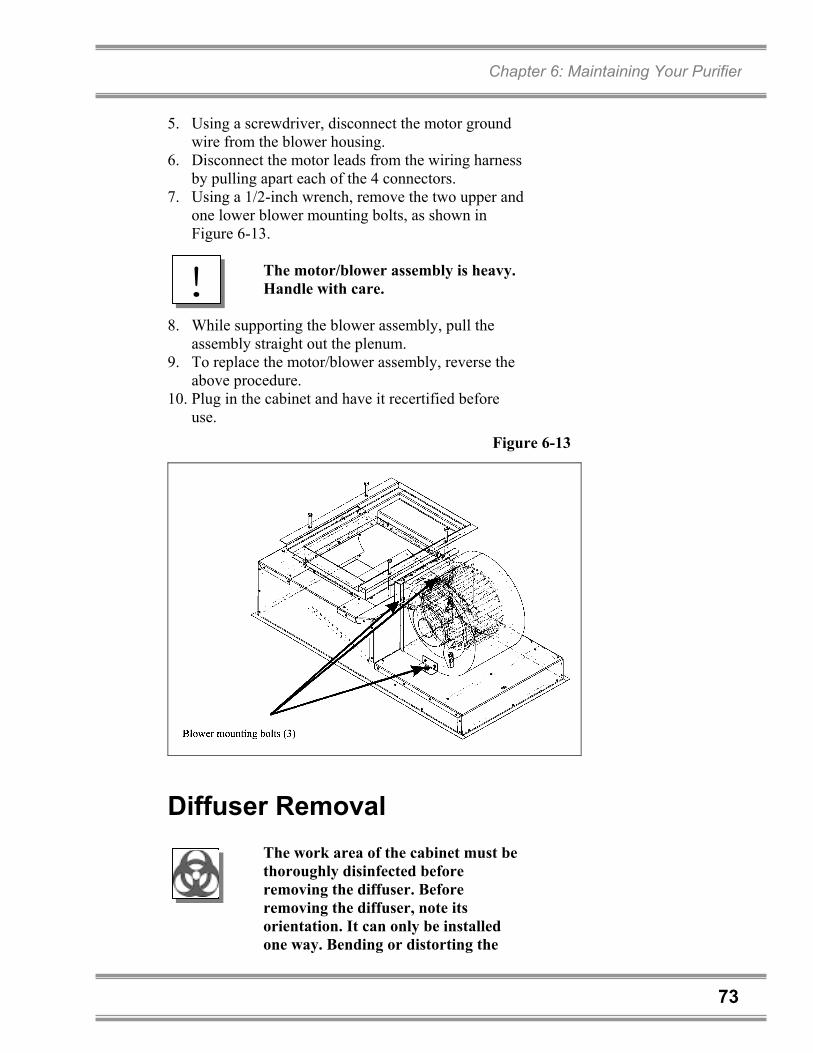
5. Using a screwdriver, disconnect the motor ground
wire from the blower housing. 6. Disconnect the motor leads from the wiring harness
by pulling apart each of the 4 connectors. 7. Using a 1/2-inch wrench, remove the two upper and
one lower blower mounting bolts, as shown in Figure 6-13.
The motor/blower assembly is heavy. Handle with care.
8. While supporting the blower assembly, pull the
assembly straight out the plenum. 9. To replace the motor/blower assembly, reverse the
above procedure. 10. Plug in the cabinet and have it recertified before
use.
Diffuser Removal
The work area of the cabinet must be thoroughly disinfected before removing the diffuser. Before removing the diffuser, note its orientation. It can only be installed one way. Bending or distorting the
!
Figure 6-13
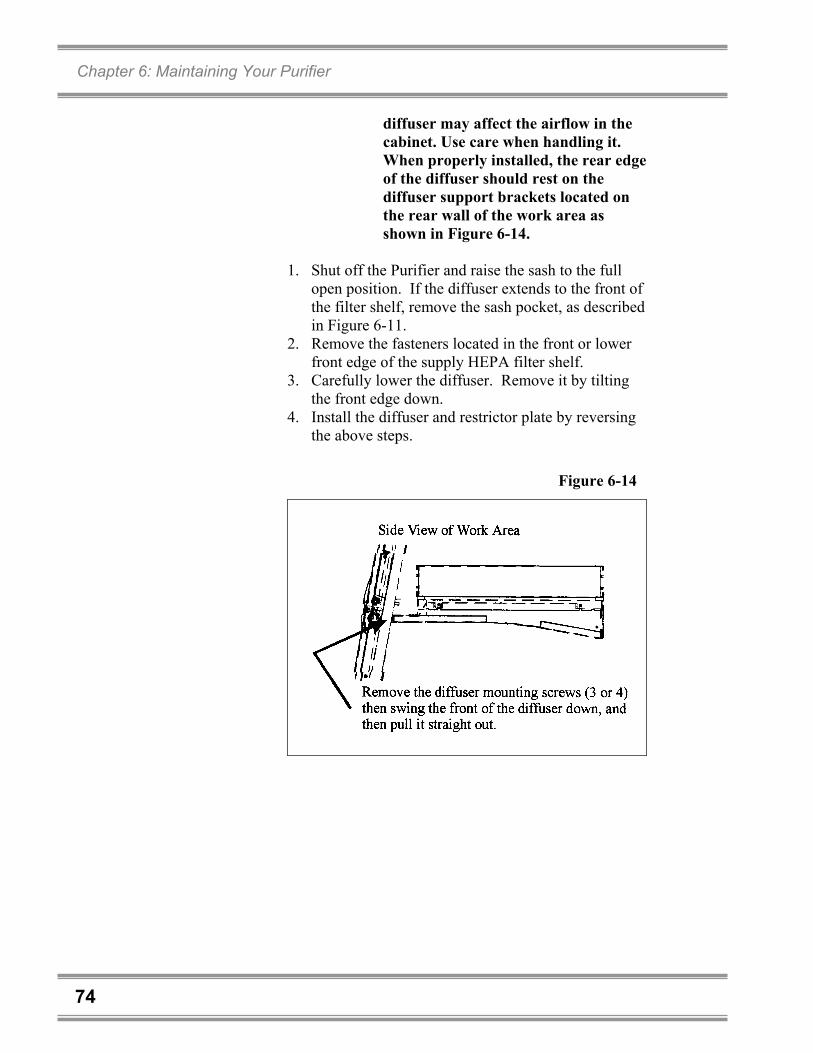
74
Chapter 6: Maintaining Your Purifier
diffuser may affect the airflow in the cabinet. Use care when handling it. When properly installed, the rear edge of the diffuser should rest on the diffuser support brackets located on the rear wall of the work area as shown in Figure 6-14.
1. Shut off the Purifier and raise the sash to the full
open position. If the diffuser extends to the front of the filter shelf, remove the sash pocket, as described in Figure 6-11.
2. Remove the fasteners located in the front or lower front edge of the supply HEPA filter shelf.
3. Carefully lower the diffuser. Remove it by tilting the front edge down.
4. Install the diffuser and restrictor plate by reversing the above steps.
Figure 6-14

75
Chapter 6: Maintaining Your Purifier
Storage If the Purifier cabinet is to be left unused for more than one month, the unit should be prepared for storage.
The cabinet should not be stored in areas of excess humidity or temperature extremes. If the cabinet is moved during storage, it must be recertified before use.
1. Close the sash completely and seal the bottom edge
and the exhaust outlet with plastic sheeting. 2. Unplug the unit. 3. Ensure that the cabinet will not be moved or
disturbed while in storage.
Decontamination
Gaseous decontamination should only be performed by trained personnel.
To seal the Purifier follow these steps: 1. Remove the front dress panel as shown in Figure
6-2. Remove the sash pocket as shown in Figure 6-11. Place decontamination equipment inside the work area of the Purifier. Remove the sash stops from the lower front edge of the unit. Raise the sash until the diffuser is uncovered.
The outlets on the interior of the Purifier are energized as long as the Purifier is plugged in. Unplug the Purifier before decontamination equipment is plugged into these outlets.
2. Remove the grille by loosening and removing the
thumbscrews on the front of the grille and at the
!
!

76
Chapter 6: Maintaining Your Purifier
front edge of the worksurface. Place the grille within the work area.
3. Use duct tape and 5 to 8 mil plastic sheeting to seal the front opening.
4. Remove the exhaust control system from the top of the cabinet and seal the exhaust filter opening with plastic sheeting and duct tape.
5. Perform the decontamination as described in NSF Standard 49:2002, Annex G.
Your Next Step After you understand the maintenance procedures, you are ready to proceed to Chapter 7: Modifying Your Biosafety Cabinet.

77
CCHHAAPPTTEERR 77
MMOODDIIFFYYIINNGG YYOOUURR
BBIIOOSSAAFFEETTYY CCAABBIINNEETT There are several ways to modify your Purifier for your individual requirements. These include the addition of a UV lamp, service fixtures or an intravenous (IV) bar or a canopy connection kit.
Installing a UV Lamp All Labconco Purifier Delta Series Safety Cabinets are pre-wired for the installation of a UV lamp. 3- and 4-foot units require the installation of a UV lamp kit, consisting of the UV lamp, its ballast, and fasteners. The kit is part number 37450-00 for 115 Volt models, 37450-01 for 230 Volt units.
The UV lamp kit should be installed by a qualified electrician or certifier. Completely surface decontaminate all interior work surfaces of the Purifier before beginning the installation of the UV lamp.

78
Chapter 7: Modifying Your Biosafety Cabinet
To install the UV lamp kit for the 3' and 4' do the following: 1. Unplug the unit. 2. Using a 7/16-inch wrench or socket, remove the two
acorn nuts that secure the electronics module to the top of the Purifier as shown in Figure 6-3.
3. Tilt the electronics module back to access the underside of the module.
4. Locate the fluorescent lamp ballast in the module. The UV lamp ballast mounts next to the fluorescent ballast.
5. Using the Phillips screws and locking nuts, secure the UV ballast to the enclosure as shown in Figure 7-1.
6. Wire the UV ballast into the wiring harness, following the wiring diagram located in Figure 7-1.
7. Raise the sash, and install the UV lamp by rotating the lamp pins into the sockets.
8. Lower the sash to fully closed position, plug in the unit, and turn the system power switch to the "UV" position. The UV lamp will illuminate.

79
Chapter 7: Modifying Your Biosafety Cabinet
Figure 7-1

80
Chapter 7: Modifying Your Biosafety Cabinet
6-foot units only require the installation of the UV lamp. The lamp is part number 12713-00.
Completely surface decontaminate all interior work surfaces of the Purifier before beginning the installation of the UV lamp.
To install the UV lamp kit for the 6' do the following: 1. Unplug the unit, and raise the sash to the full open
position. 2. Install the UV lamp by pushing it into the left
socket, and compress the socket, swinging it into the right lamp socket.
3. Lower the sash to fully closed position, plug in the unit, and turn the system power switch to the "UV" position. The UV lamp will illuminate.
Installing Additional Service Fixtures
Completely surface decontaminate all interior work surfaces of the Purifier before beginning the installation of the service valve.
Additional service fixtures can be installed in any of the four available service fixture holes in both side walls. The service fixture kit is Labconco part number 36933-00. To install the service fixture: 1. Decide into which of the available locations you
want to install the service fixture. 2. Remove the side panel on that side of the unit as
shown in Figure 3-2. 3. Remove as much of the silicone sealant as possible
from around the outside of the service fixture hole plug.
4. Placing a block of wood or plastic against the outside edge of the plug, and using a small hammer, gently tap the plug out of the hole.

81
Chapter 7: Modifying Your Biosafety Cabinet
Do not use excessive force in attempting to remove the hole plug. Damage to the side wall of the cabinet could occur.
5. Carefully remove any remaining sealant from both
sides of the service fixture hole. 6. Using the Teflon tape supplied, wrap two to three
turns of tape on the male pipe thread of the valve, and the tube fitting.
7. Put the threaded end of the fixture through the hole, orienting the valve as shown in Figure 3-6. Using the silicone sealant, apply a bead of silicone on the outside surface of the cabinet side, around the valve body. This will provide a pressure tight seal around the valve body. Place the two washers on the valve thread, then install the coupler. Holding the valve body in position, use a wrench or pliers to thread the coupling on until the valve is captured on the side panel.
8. Thread the tubing connector onto the coupling until it can no longer be turned by hand. Holding the coupling secure with a wrench or pliers, turn the tube fitting approximately one more revolution, using pliers or a wrench. Orient the tube fitting such that it is easy to access it with the incoming service tube.
9. Connect the service tube to the tube fitting by pressing the tube all the way into the fitting, turning the tubing nut until hand tight, and then approximately one more turn using pliers or a wrench.
Make sure the service tubing does not obstruct the wiring or sash weights or cables.
10. Make sure the service fitting in the Purifier is in the
off position before pressurizing the service line. Once pressurized, check the valve body, the coupling, and the tube fitting for leaks. Tighten any leaking joints.
11. Reattach the side panel.
!
!

82
Chapter 7: Modifying Your Biosafety Cabinet
12. The valve is shipped with a white plastic index disc.
This disc can be replaced with the orange or yellow disc supplied by unscrewing it and replacing it with the new one.
Installing the IV Bar for the 3' and 4'
Completely surface decontaminate all interior work surfaces of the Purifier before beginning the installation of the IV bar.
1. Shut off the Purifier and raise the sash to the fully
open position. 2. Remove the four black protective caps on the side
walls and discard them. 3. Mount one of the IV brackets on the two studs on
either side wall. Orient the bracket so that the center section of the bracket is offset away from the side of the Purifier side wall. Secure the bracket using the flat washers, lock washers, and acorn nuts as shown in Figure 7-2.
4. Slide the other bracket onto the IV bar, and install it to the side wall in the same position as the bracket on the other side wall, as shown in Figure 7-2.
5. Secure the end brackets by tightening all of the fasteners.
Figure 7-2

83
Chapter 7: Modifying Your Biosafety Cabinet
Installing the IV Bar for the 6' 1. Shut off the Purifier and raise the sash to the fully
open position. 2. Remove the four black protective caps on the side
walls and discard them. 3. Mount one of the IV brackets on the two studs on
either side wall. Orient the bracket so that the center section of the bracket is offset away from the side of the Purifier side wall. Secure the bracket using the flat washers, lock washers, and acorn nuts as shown in Figure 7-2.
4. Insert the center support brace on the IV Bar. Slide the other bracket onto the bar and install it to the side wall in the same position as the bracket on the other wall, as shown in Figure 7-3.
5. Secure the center support brace and the end brackets by tightening all of the fasteners.
Canopy Connection Kits The canopy kit needed depends on the configuration of the exhaust control system of your Delta. Biosafety Cabinets manufactured on or before September 2003, with a serial number starting at 0309 or lower may be equipped with a variable orifice exhaust control system,
Figure 7-3

84
Chapter 7: Modifying Your Biosafety Cabinet
as shown in Figure 7-4. Deltas equipped with this type of exhaust control system must be updated to a newer guillotine-style damper system and canopy. The part numbers for these kits are: Damper-Canopy Kit Number Purifier Width
3808000 3 feet 3802800 4 feet 3802900 6 feet
If your Delta was manufactured during or after September 2003, with a serial number of 0309 or higher, it may be equipped with the guillotine-style damper, as shown in Figure 7-5. They only require the canopy connection itself. The part numbers for these kits are:
Canopy Kit Number Purifier Width 3794400 3 Feet 3794500 4 Feet 3794600 6 Feet
Verify the kit you have ordered is the correct one for your Purifier.
Table 7-1
!
Table 7-2
Figure 7-4

85
Chapter 7: Modifying Your Biosafety Cabinet
Exhaust System Requirements The Canopy Connection Kit is sized to accept 10-inch ductwork. The exhaust system’s blower should be sized to handle the exhaust volume of each cabinet, as shown in Table 3-3, with a static pressure equal to or greater than the system pressure, plus 0.2 inches of water.
The exhaust system should be fitted with a backdraft damper to prevent the reversing of airflow in the system. Labconco manufactures exhaust blowers with integral backdraft dampers, part number 36680-00 and 36680-01, that are suitable for most single cabinet installations. The remote blower is discussed further in Appendix D.
!
☞
Figure 7-5

86
Chapter 7: Modifying Your Biosafety Cabinet
Purifier Canopy Airflow Data Model
Number Average Inflow Velocity (FPM)
Work Opening Area (sq. ft.)
Exhaust Volume of Cabinet (CFM)
Exhaust Volume of Thimble (CFM)
362040x 105 2.53 253-278 303-334 362050x 105 2.03 203-223 244-268 362051x 105 2.03 203-223 244-268 362080x 105 3.37 337-370 404-444 362090x 105 2.69 269-296 323-355 362091x 105 2.69 269-296 323-355 362092x 105 2.69 269-296 323-355 362120x 105 5.03 503-554 654-720 362130x 105 4.03 403-443 524-576 262131x 105 4.03 403-443 524-576 362132x 105 4.03 403-443 524-576
Installing the Canopy Kit
The Canopy Kit and its connection to the exhaust duct should be installed by a qualified certifier or contractor.
Installing a canopy connection and exhaust system will impact the performance of the Purifier. DO NOT attempt to use the cabinet until it has been properly certified as described in this chapter.
Use caution when removing or installing components on top of the exhaust filter. When exposed, the surface of the HEPA filter is very fragile and can be damaged easily. If you suspect that the exhaust filter has been damaged during the installation of the canopy, DO NOT use the cabinet; have it certified by a qualified certifier before using it.
Table 7-3
!
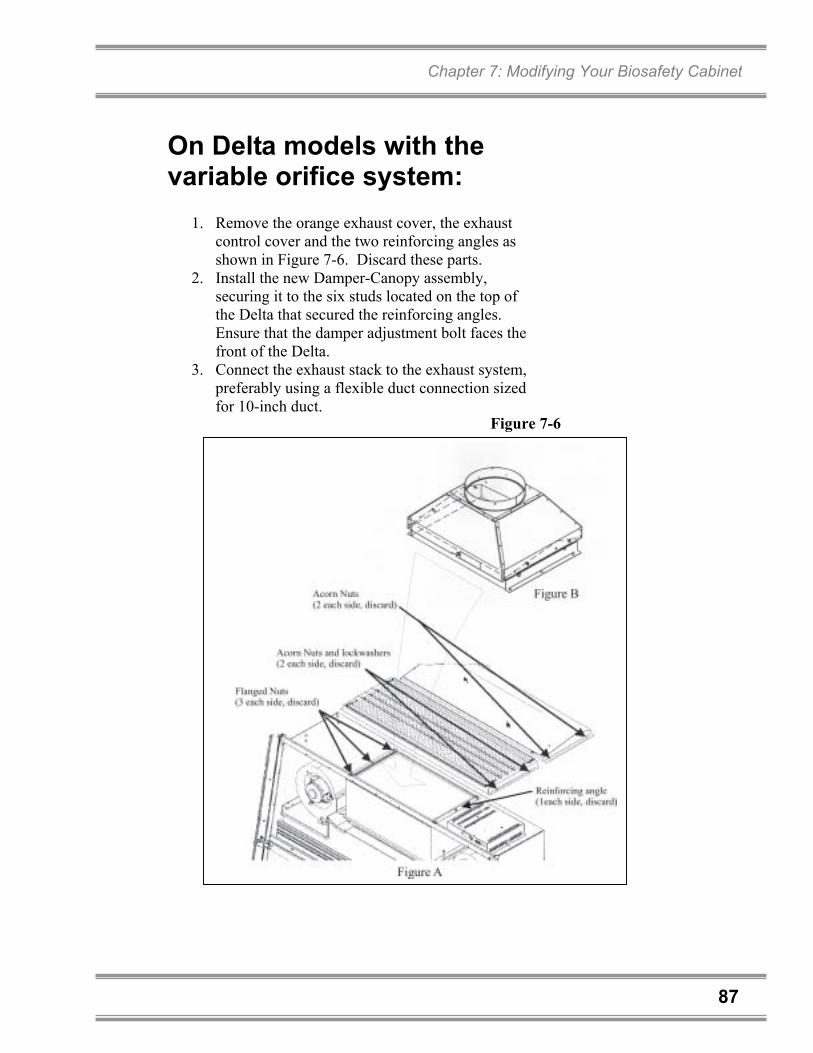
87
Chapter 7: Modifying Your Biosafety Cabinet
On Delta models with the variable orifice system:
1. Remove the orange exhaust cover, the exhaust control cover and the two reinforcing angles as shown in Figure 7-6. Discard these parts.
2. Install the new Damper-Canopy assembly, securing it to the six studs located on the top of the Delta that secured the reinforcing angles. Ensure that the damper adjustment bolt faces the front of the Delta.
3. Connect the exhaust stack to the exhaust system, preferably using a flexible duct connection sized for 10-inch duct.
Figure 7-6

88
Chapter 7: Modifying Your Biosafety Cabinet
On Delta models already equipped with the guillotine damper:
1. Remove the orange exhaust cover as shown in Figure 7-7. Retain the four screws for later use. Retain the exhaust cover if the Delta will be converted back to recirculating operation in the future.
2. Install the new Canopy assembly securing it to the damper assembly by using the four screws removed from step #1. Ensure that the damper adjustment label faces the front of the Delta.
3. Connect the exhaust stack to the exhaust system, preferably using a flexible duct connection sized for 10-inch duct.
Figure 7-7

89
Chapter 7: Modifying Your Biosafety Cabinet
Your Next Step After you understand the maintenance procedures, you are ready to proceed to Chapter 8: Troubleshooting.

90
Chapter 7: Modifying Your Biosafety Cabinet

91
CCHHAAPPTTEERR 88
TTRROOUUBBLLEESSHHOOOOTTIINNGG Refer to the following table if your Purifier fails to operate properly. If the suggested corrective actions do not solve your problem, contact Labconco for additional assistance. PROBLEM CAUSE CORRECTIVE ACTION Cabinet blower and lights won’t turn on
Unit not plugged into outlet
Plug the Purifier into appropriate electrical service.
Check connection to control box on top
of unit. Circuit breakers
tripped Reset circuit breakers.
Blower won’t turn on but lights work
Sash closed Raise sash.
Blower wiring is
disconnected Inspect blower wiring.
Blower motor is
defective Replace blower motor.
Cabinet blower turns on but lights don’t work
Lamp not installed correctly
Inspect lamp installation.
Lamp is defective Replace lamp. Lamp circuit breaker
tripped Reset the lamp circuit breaker.

92
Chapter 8: Troubleshooting
PROBLEM CAUSE CORRECTIVE ACTION Cabinet blower turns on but lights don’t work (cont.)
Lamp wiring is disconnected
Inspect lamp wiring.
Defective lamp
ballasts Replace lamp ballasts.
Slight increase in pressure reading
HEPA filter loading The pressure reading will steadily increase as the unit is used.
Blockage of the
return air slots or grille
Check all return air slots and grilles to ensure that they are not blocked or restricted.
Blockage of the
exhaust outlet Ensure that the exhaust outlet is not blocked or restricted.
Blockage or
restriction under the work surface
Ensure that the plenum beneath the work surface is unobstructed.
Contamination of work in the cabinet
Improper technique or procedure for the biohazard cabinet
See “Use of the Cabinet” section in the manual.
Restriction of the
return air slots or grille – blockage of the exhaust outlet
Ensure that all return air slots, grilles and the exhaust outlet are unobstructed.
External factors are
disrupting the cabinet airflow patterns or acting as a source of contamination
See “Installation” section of this manual.
Cabinet is out of
adjustment/HEPA filter(s) are defective
Have cabinet recertified.

93
AAPPPPEENNDDIIXX AA
PPUURRIIFFIIEERR
CCOOMMPPOONNEENNTTSS Illustration A-1 indicates the location of the following service parts: Item Quantity Part No. Description
1 1 3734000 Side Panel, R.H. 2 1 3734001 Side Panel, L.H. 3 1 3739500 Exhaust HEPA Filter 3-foot
3A 1 3739501 Exhaust HEPA Filter 4-foot 3B 1 3739502 Exhaust HEPA Filter 6-foot 4 1 3731100 Motor/Blower Assembly, 115 VAC 3-foot
4A 1 3731101 Motor/Blower Assembly, 115 VAC 4-foot 4B 1 3731102 Motor/Blower Assembly, 115 VAC 6-foot 4C 1 3757100 Motor/Blower Assembly, 100 VAC 3-foot 4D 1 3757101 Motor/Blower Assembly, 100 VAC 4-foot 4E 1 3757102 Motor/Blower Assembly, 100 VAC 6-foot 4F 1 3751900 Motor/Blower Assembly, 230 VAC 3-foot 4G 1 3751901 Motor/Blower Assembly, 230 VAC 4-foot 4H 1 3751902 Motor/Blower Assembly, 230 VAC 6-foot 5 1 1211200 Motor, 115 VAC 3- and 4-foot
5A 1 1211200 Motor, 115 VAC 6-foot 5B 1 1210503 Motor, 100 VAC 3- and 4-foot 5C 1 1210501 Motor, 100 VAC 6-foot 5D 1 1210502 Motor, 230 VAC 3- and 4-foot 5E 1 1210500 Motor, 230 VAC 6-foot 6 1 3739400 Supply HEPA Filter 3-foot
6A 1 3739401 Supply HEPA Filter 4-foot 6B 1 3739402 Supply HEPA Filter 6-foot 7 1 9721901 Lamp, Fluorescent, 3-foot
7A 1 9721900 Lamp, Fluorescent, 4-foot 7B 1 1278400 Lamp, Fluorescent, 6-foot 8 1 1271300 Lamp, UV, 3- and 4-foot (not shown)
8A 1 1231900 Lamp, UV, 6-foot (not shown) 9 2 1287900 Receptacle Cover
Purifier Replacement Parts
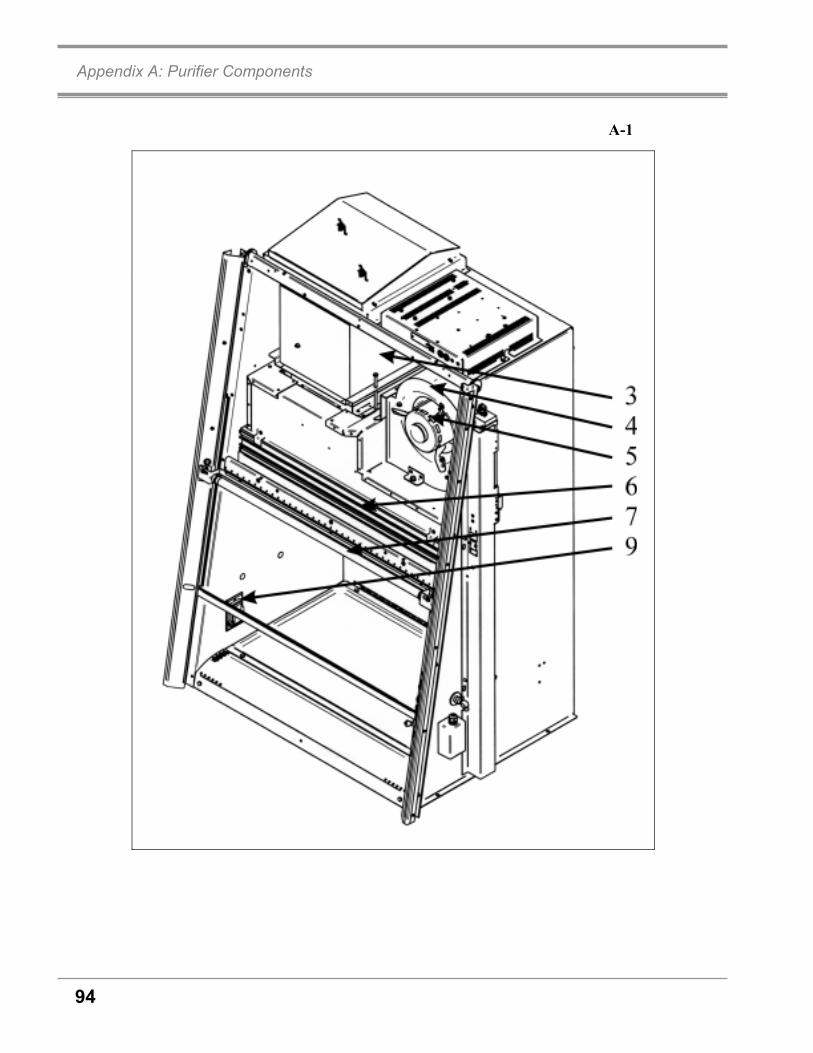
94
Appendix A: Purifier Components
A-1

95
AAPPPPEENNDDIIXX BB
DDIIMMEENNSSIIOONNSS Canopy Connection
B-1

96
Appendix B: Biosafety Cabinet Dimensions

97
AAPPPPEENNDDIIXX CC
BBIIOOSSAAFFEETTYY CCAABBIINNEETT
SSPPEECCIIFFIICCAATTIIOONNSS Cabinet Model Electrical Requirements 3620400 to –09 & 3620500 to –09 115 VAC – 60 Hz, 1 Phase – 12 Amps 3620800 to –09 & 3620900 to –09 115 VAC – 60 Hz, 1 Phase – 12 Amps 3621200 to –09 & 3621300 to –09 115 VAC – 60 Hz, 1 Phase – 16 Amps Cabinet Model Electrical Requirements 3620510 to –19 100 VAC – 50/60 Hz, 1 Phase – 12 Amps 3620910 to –19 100 VAC – 50/60 Hz, 1 Phase – 12 Amps 3621310 to –19 100 VAC – 50/60 Hz, 1 Phase – 16 Amps Cabinet Model Electrical Requirements 3620520 to –29 230 VAC – 50/60 Hz, 1 Phase – 7 Amps 3620920 to –29 230 VAC – 50/60 Hz, 1 Phase – 7 Amps 3621320 to –29 230 VAC – 50/60 Hz, 1 Phase – 8 Amps Cabinet Model Electrical Requirements 3620400 to –09 & 3620500 to –09 3620800 to –09 & 3620900 to –09 3621200 to –09 & 3621300 to –09
115 VAC – 60 Hz, 3.8 Full Load Amps 1/3 H.P. 1625 RPM Automatic Thermal Protection
Cabinet Model Electrical Requirements 3620510 to –19 3621310 to –19
115 VAC – 50/60 Hz, 3.9 Full Load Amps 1/3 H.P. 1625 RPM Automatic Thermal Protection
Electrical Data
Motor Specifications

98
Appendix C: Biosafety Cabinet Specifications
Cabinet Model Electrical Requirements 3620910 to –19 115 VAC – 50/60 Hz, 6 Full Load Amps
1/2 H.P. 1625 RPM Automatic Thermal Protection
Cabinet Model Electrical Requirements 3620520 to –29 3621320 to –29
230 VAC – 50/60 Hz, 1.9 Full Load Amps 1/3 H.P. 1625 RPM Automatic Thermal Protection
Cabinet Model Electrical Requirements 3620920 to –29 230 VAC – 50/60 Hz, 2.8 Full Load Amps
1/2 H.P. 1625 RPM Automatic Thermal Protection
Environmental Conditions
• Indoor use only. • Maximum altitude: 6562 feet (2000 meters). • Ambient temperature range: 41° to 104°F (5° to
40°C). • Maximum relative humidity: 80% for
temperatures up to 88°F (31°C), decreasing linearly to 50% relative humidity at 104°F (40°C).
• Main supply voltage fluctuations not to exceed ±10% of the nominal voltage.
• Transient overvoltages according to Installation Categories II (Overvoltage Categories per IEC 1010). Temporary voltage spikes on the AC input line that may be as high as 1500V for 115V models and 2500V for 230V models are allowed.
• Used in an environment of Pollution degrees 2 (i.e., where normally only non-conductive atmospheres are present). Occasionally, however, a temporary conductivity caused by condensation must be expected, in accordance with IEC 664.

99
Appendix C: Biosafety Cabinet Specifications
C-1

100
Appendix C: Biosafety Cabinet Specifications
C-2

101
Appendix C: Biosafety Cabinet Specifications
C-3

102
Appendix C: Biosafety Cabinet Specifications
C-4

103
Appendix C: Biosafety Cabinet Specifications
C-5

104
Appendix C: Biosafety Cabinet Specifications
C-6
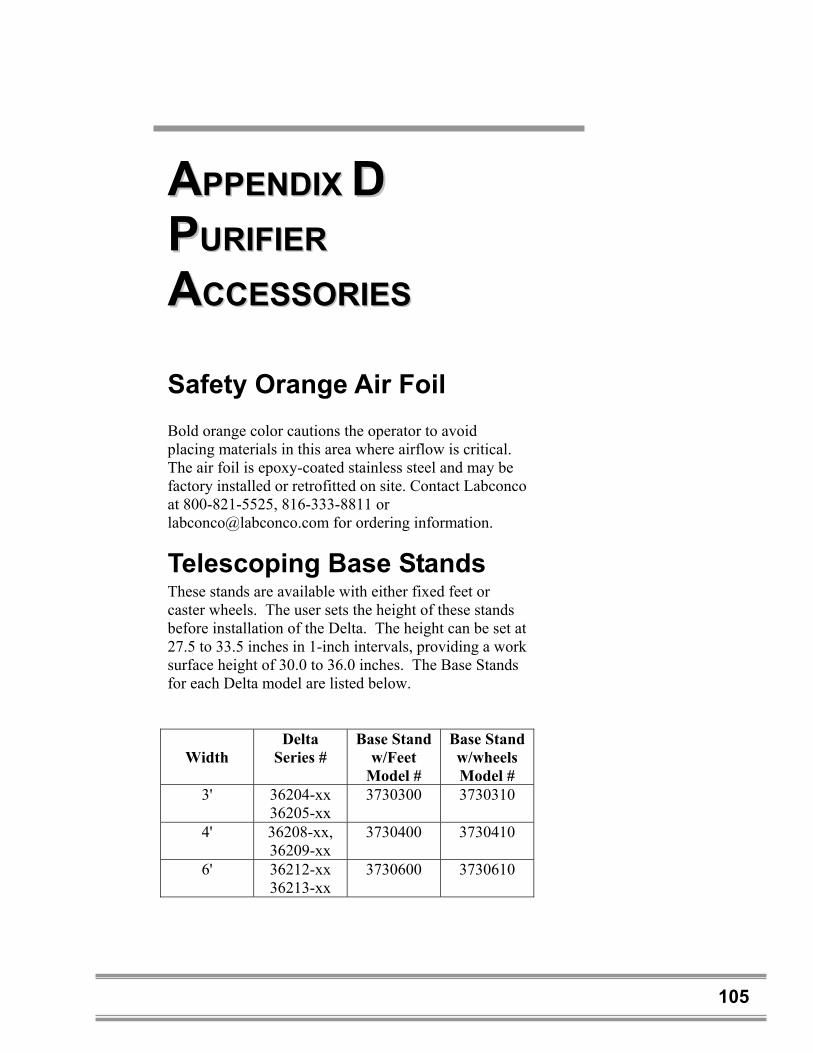
105
AAPPPPEENNDDIIXX DD
PPUURRIIFFIIEERR
AACCCCEESSSSOORRIIEESS Safety Orange Air Foil Bold orange color cautions the operator to avoid placing materials in this area where airflow is critical. The air foil is epoxy-coated stainless steel and may be factory installed or retrofitted on site. Contact Labconco at 800-821-5525, 816-333-8811 or [email protected] for ordering information.
Telescoping Base Stands These stands are available with either fixed feet or caster wheels. The user sets the height of these stands before installation of the Delta. The height can be set at 27.5 to 33.5 inches in 1-inch intervals, providing a work surface height of 30.0 to 36.0 inches. The Base Stands for each Delta model are listed below.
Width Delta
Series # Base Stand
w/Feet Model #
Base Stand w/wheels Model #
3' 36204-xx 36205-xx
3730300 3730310
4' 36208-xx, 36209-xx
3730400 3730410
6' 36212-xx 36213-xx
3730600 3730610

106
Appendix D: Purifier Accessories
Manual or Electric Hydraulic Lift Base Stands These base stands offer infinitely adjustable height between 25.5 and 33.5 inches, giving a work surface height of 28.0 to 36.0 inches. The height is adjusted either by a manual (hand crank) or electric pump that drives hydraulic rams in the legs of the stands. All of the hydraulic stands are equipped with fixed feet, but can be converted to caster wheels with the addition of Caster Wheel Kit #3784000. The Base Stands for each Delta model is listed below.
Width Delta Series #
Manual Lift
Stand #
Electric (115V) Lift
Stand #
Electric (230V) Lift
Stand # 3' 36204-xx
36205-xx 3780200 3780100 3780103
4' 36208-xx, 36209-xx
3780201 3780101 3780104
6' 36212-xx, 36213-xx
3780202 3780102 3780105
Service Valve Kit (# 3747500) Includes serrated hose tip valve with quarter turn handle, hardware and instructions for plumbing to services mounts on left or right side interior. All cabinets are factory prepared to accept up to 4 fixtures. Shipping weight 4 lbs. (2 kg).
Ultraviolet Lamp Kits Includes 254 nm UV lamp. Kit # 3745000 also includes a 115 volt ballast. Catalog # For use with Shipping Weight 3745000 3- & 4-foot Purifier Delta Series 5 lbs. (2.3 kg) 3745001 6-foot Purifier Delta Series 3 lbs. (1.4 kg)
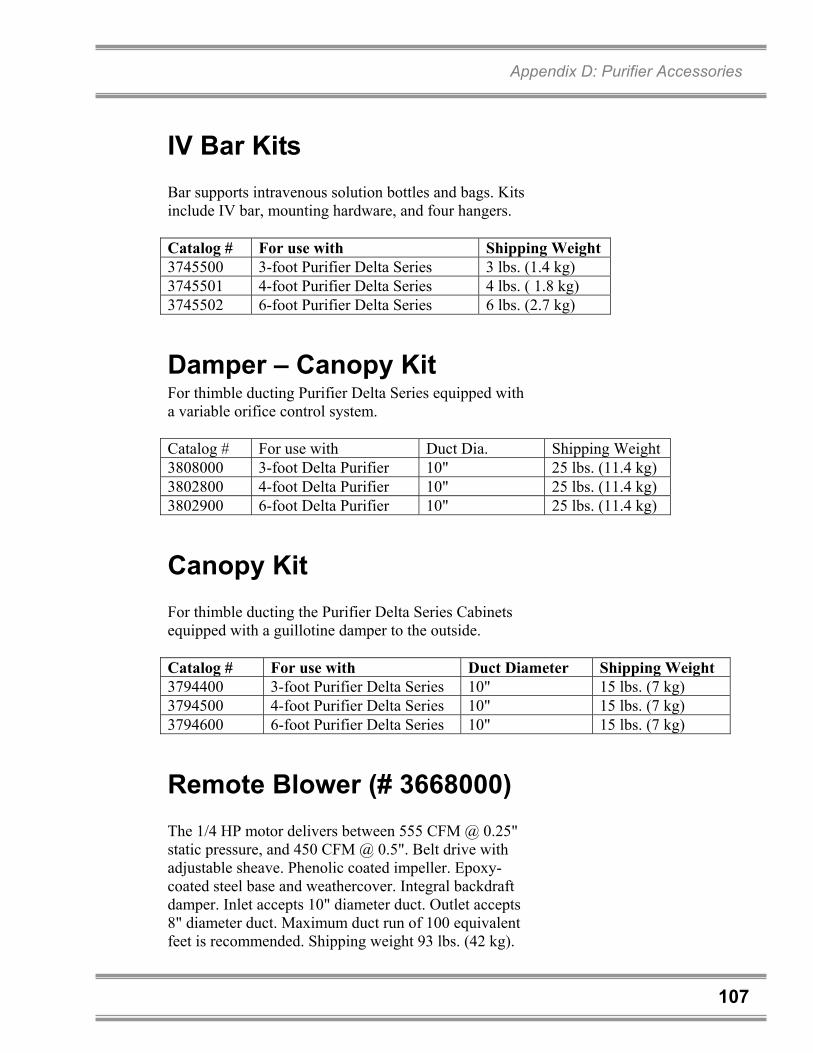
107
Appendix D: Purifier Accessories
IV Bar Kits Bar supports intravenous solution bottles and bags. Kits include IV bar, mounting hardware, and four hangers. Catalog # For use with Shipping Weight 3745500 3-foot Purifier Delta Series 3 lbs. (1.4 kg) 3745501 4-foot Purifier Delta Series 4 lbs. ( 1.8 kg) 3745502 6-foot Purifier Delta Series 6 lbs. (2.7 kg)
Damper – Canopy Kit For thimble ducting Purifier Delta Series equipped with a variable orifice control system. Catalog # For use with Duct Dia. Shipping Weight 3808000 3-foot Delta Purifier 10" 25 lbs. (11.4 kg) 3802800 4-foot Delta Purifier 10" 25 lbs. (11.4 kg) 3802900 6-foot Delta Purifier 10" 25 lbs. (11.4 kg)
Canopy Kit For thimble ducting the Purifier Delta Series Cabinets equipped with a guillotine damper to the outside. Catalog # For use with Duct Diameter Shipping Weight 3794400 3-foot Purifier Delta Series 10" 15 lbs. (7 kg) 3794500 4-foot Purifier Delta Series 10" 15 lbs. (7 kg) 3794600 6-foot Purifier Delta Series 10" 15 lbs. (7 kg)
Remote Blower (# 3668000) The 1/4 HP motor delivers between 555 CFM @ 0.25" static pressure, and 450 CFM @ 0.5". Belt drive with adjustable sheave. Phenolic coated impeller. Epoxy-coated steel base and weathercover. Integral backdraft damper. Inlet accepts 10" diameter duct. Outlet accepts 8" diameter duct. Maximum duct run of 100 equivalent feet is recommended. Shipping weight 93 lbs. (42 kg).

108
Appendix D: Purifier Accessories
Remote Blower (3668000) The ½ HP motor delivers between 760 CFM @ 25" static pressure and 700 CFM @ 0.5". Drive belt with adjustable sheave. Phenolic coated impeller. Epoxy-coated steel base and weathercover. Integral backdraft damper. Inlet accepts 10" diameter duct. Outlet accepts 8" diameter duct. Maximum duct run of 100 equivalent feet is recommended. Shipping Weight 99 lbs. (45 kg).
Ergonomic Chair with Armrests (# 3744000) Designed to Biosafety Guidelines. Lab chair has 6-way articulating seat and back control for personalized adjustment. Pneumatic mechanism adjusts seat height from 18 1/4" to 25 3/4". Five-leg black reinforced composite base rests on 2" ball bearing casters. Aluminum support ring. Removable arm rests. Black vinyl upholstery. Shipping weight 35 lbs. (15.9 kg).
Adjustable Footrest (# 3746000) Elevates feet and permits angle repositioning while in use. 18 1/2"w x 11 1/2"d x 8"h. Shipping weight 6 lbs. (2.7 kg).

109
AAPPPPEENNDDIIXX EE
QQUUIICCKK CCHHAARRTT FFOORR
TTHHEE DDEELLTTAA
PPUURRIIFFIIEERRSS
Model 3620400 3620500 3620800 3620900 3621200 3621300 Type A2 A2 A2 A2 A2 A2
Sash Height (inches) 10 8 10 8 10 8 NSF Listed Downflow (FPM) 50-60 50-60 50-60 50-60 50-60 50-60
Sash Open Area (ft2) 2.53 2.03 3.37 2.69 5.03 4.03 *Direct Read NSF Listed Inflow (FPM) 100-110 100-110 100-110 100-110 100-110 100-110
*Direct Read Exhaust Volume (CFM) 253-278 203-223 337-370 269-296 503-554 403-443 Type B3 Exhaust Volumes (CFM) 253-278 203-223 337-370 269-296 503-554 403-443
Type B3 Alarm Setting Volume (CFM) 228 ±5 183 ±5 303 ±5 242 ±5 453 ±5 363 ±5 ** Canopy Exhaust Volume (CFM) 278-306 223-245 371-408 296-325 553-609 443-488 ***Canopy Exhaust Volume (CFM) 303-334 244-268 404-444 323-355 654-720 524-576
Approximate Settings for new Filters Motor Voltage 88-90 85-87 100-102 96-99 87-90 85-88
Mag Gauge Reading 0.8-1.1 0.8-1.1 0.8-1.1 0.8-1.1 0.8-1.1 0.8-1.1 Total Air Volume Displacement (CFM) 548 601 728 798 1088 1193
Number of Laskin Nozzles Needed 1 1 2 2 2 2 Supply HEPA Filter Dims. (in.) 36x18x3 36x18x3 48x18x3 48x18x3 72x18x3 72x18x3 Exhaust HEPA Filter Dims (in.) 12x18x12 12x18x12 24x18x12 24x18x12 30x18x12 30x18x12
Motor HP 1/3 1/3 1/3 1/3 2 ea. 1/3 2 ea. 1/3 Speed Winding Used High High High High High High Capacitor (uF, Volts) 15 15 15 15 2 ea. 15 2 ea. 15 Fluorescent Light(s) F25T8/
TL741 F25T8/ TL741
F32T8/ TL741
F32T8/ TL741
F72T12/ CW
F72T12/ CW
UV Light(s) G30T8 G30T8 G30T8 G30T8 G64T5L/ CB
G64T5L/ CB
Secondary Inflow Method Data Sash Height (in.) 3.95 3.95 2.97 2.97 1.99 1.99
Distance Between Points 4.07 4.07 4.05 4.05 4.03 4.03 Number of Test Points 8 8 11 11 17 17
Purifier Correction Factor 1.08 1.06 1.13 1.12 1.30 1.24 *The Direct Read instrument is sealed to the face or the exhaust opening. The following calculation is used: Air Volume (CFM) / Sash opening area (Ft2) = Average Face Velocity (FPM).

110
Appendix E: Quick Chart for the Delta Purifiers
**This canopy has a single slot in front 1 inch wide x 7 inches long. ***This canopy has full width 1 inch slots at the front and back of the canopy. For further details on the secondary inflow method, consult the inflow velocity calculation – Secondary Method section of Chapter 6: Maintaining Your Purifier. Use the downflow velocity test grid as described on the cabinet data plate when checking the downflow air velocity. The individual downflow velocity readings may vary no more than ± 20% from the downflow average.
111
AAPPPPEENNDDIIXX FF
RREEFFEERREENNCCEESS Many excellent reference texts and booklets are currently available. The following is a brief listing: Primary Containment for Biohazards: Selection, Installation and Use of Biological Safety Cabinets. September 1995. U.S. Department of Health and Human Services, Public Health Service, Centers for Disease Control and Prevention and National Institutes of Health. Biosafety in Microbiological and Biomedical Laboratories. 4th Edition, May 1999. U.S. Department of Health, Education, and Welfare, National Institutes of Health, Division of Safety, Bethesda, MD 20892. Biosafety in the Laboratory. 1989. National Research Council, National Academy Press, Washington, D.C. Laboratory Safety: Principles and Practices. 2nd Edition 1995. American Society for Microbiology, Washington, D.C. National Sanitation Foundation Standard Number 49 for Class II (Laminar Flow) Biohazard Cabinetry. 1992, Ann Arbor, Michigan. ASHP Technical Assistance Bulletin on Handling Cytotoxic and Hazardous Drugs. 1990. American Society of Hospital Pharmacists. American Journal of Hospital Pharmacy. 47: 1033-1049. The Foundations of Laboratory Safety. 1990. Stephen R. Rayburn. Springer-Verlag, New York.

112
Appendix F: References
Formaldehyde Decontamination of Laminar Flow Biological Safety Cabinets. U.S. Department of Health, Education, and Welfare, National Institutes of Health, Division of Safety, Bethesda, MD 20892. Websites of Interest: www.absa.org www.cdc.gov www.labconco.com

113
