puppets - eek! environmental education for kidseekwi.org/teacher/wee/weecrafts/crafts 15-22...
TRANSCRIPT

15
PuppetsPuppetry can be an effective and entertaining means for conveying simple messages. Use some of the puppets
featured here to teach various activities found in the Wee Recyclers Activity Guide. Encourage children to speak their own messages through puppets. The puppets are made with a variety of reusable materials. Discuss with your children the materials being used, what the items were before becoming puppet parts and what other items could be reused to make puppets.
Paper Bag PuppetsMaterials:
clean, used paper bags
scissors
glue
scraps of construction paper
pieces of yarn and ribbon
crayons or markers
buttons cut from old shirts
paperboard tubes from paper toweling or food wrap
patterns** Patterns for some of the puppets can be found in the
Wee Recyclers Online Resources, http://dnr.wi.gov/eek/teacher/weerecyclers.htm. These patterns are for a standard lunch bag that will fit an adult’s hand. Little children will still be able to manipulate the “mouth” of the standard lunch bag, but they will not be able to use the finger holes for arms. You may want to look for smaller bags that will fit your children’s hands and reduce the size of the patterns.
Wee Reggie puppet
Procedure:1. Find the patterns for
Wee Reggie in the Wee Recyclers Resources, reproduce them and cut out.
2. Trace the patterns using crayons or markers.
3. Glue Reggie’s head to the bottom of a small paper bag and glue the Wee Recycler logo to the front of the bag.
4. Insert your hand into the bag and mark where your “pinky” finger and thumb touch the side of the bag. Cut out two “arm” holes in the sides of the paper bag.
5. Your “pinky” finger and thumb will be Reggie’s arms.
Rocky Raccoon*
Procedure:1. Find the patterns for Rocky Raccoon in the Wee
Recyclers Online Resources http://dnr.wi.gov/eek/teacher/weerecyclers.htm.
2. Trace the patterns on pieces of colored construction paper and cut them out.
3. Glue the construction paper pieces in place on a small paper bag.
4. Use small dark buttons for the center of Rocky’s eyes.
5. Use a brown and black crayon or marker to color the rings on Rocky’s tail and the inside of his ears.
6. Insert your hand into the bag and mark where your “pinky” finger and thumb touch the side of the bag. Cut out two “arm” holes in the sides of the paper bag.
7. Your “pinky” finger and thumb will be Rocky’s forepaws.
* Adapted from materials developed by Karen Fiedler, Waukesha County Solid Waste Supervisor.
16
Freddy Fox
Procedure:1. Find the
patterns for Freddy Fox in the Wee Recyclers Online Resources http://dnr.wi.gov/eek/teacher/weerecyclers.htm.
2. Trace the patterns on pieces of colored construction paper and cut them out.
3. Glue the construction paper pieces in place on a small paper bag.
4. Using crayons, color the inside of Freddy’s eyes yellow and shade the outside of his ears orange.
5. Insert your hand into the bag and mark where your “pinky” finger and thumb touch the side of the bag. Cut out two “arm” holes in the sides of the paper bag.
6. Your “pinky” finger and thumb will be Freddy’s forepaws.
Frog
Procedure:1. Take a small paper bag and fold the bottom of the
bag in half. This is the frog’s mouth.
2. Help children cut out a long tongue from construction paper and glue it to the bottom of the frog’s mouth.
3. Cut out two half-circles from construction paper and make small folds along the straight edge to make tabs. Children can color in the pupil with a dark crayon and glue the eyes onto the bag so that they stand upright.
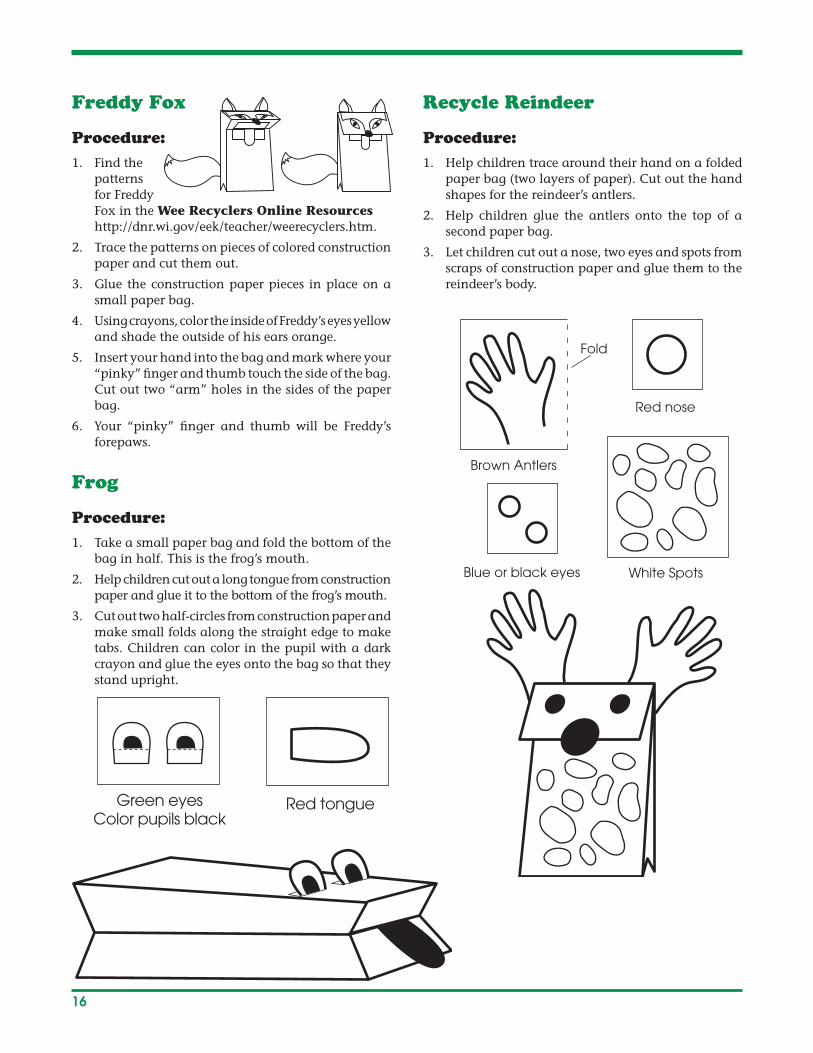
Recycle Reindeer
Procedure:1. Help children trace around their hand on a folded
paper bag (two layers of paper). Cut out the hand shapes for the reindeer’s antlers.
2. Help children glue the antlers onto the top of a second paper bag.
3. Let children cut out a nose, two eyes and spots from scraps of construction paper and glue them to the reindeer’s body.
Green eyesColor pupils black
Red tongue
Red nose
Brown Antlers
Blue or black eyes White Spots
Fold

17
Wee RecyclerProcedure:1. Have your children draw a face on a small paper
bag with crayons, or cut facial features from scraps of construction paper and glue them in place.
2. Open a small paper bag and let children stuff it tightly with wads of newspaper.
3. Insert a paperboard tube into the open end of the bag and tie the bag securely to the tube with a piece of string.
4. Help children cut yarn into short pieces and glue them to the bag for hair.
5. For a collar, cut the bottom of the bag into strips.
Paper Plate PuppetsMaterials:
unwanted paper plates
scraps of construction paper
pieces of yarn, ribbon, string
buttons
paperboard tubes
scissors
glue
masking tape
crayons
patterns** Pattern for Olivia Owl found in the Wee Recyclers On-
line Resources http://dnr.wi.gov/eek/teacher/weerecyclers.htm.
Olivia Owl
Procedure:1. Two paper plates will be needed to make this
puppet. Find the patterns for Olivia Owl in the Wee Recyclers Online Resources.
2. Trace all patterns (except the wings) onto scrap pieces of paper and color designated areas. Cut out the patterns.
3. Trace the wing pattern twice along the edge of a paper plate. Cut out the wings.
4. Color the wings and the second paper plate with brown and orange crayons.
5. Glue the construction paper pieces and wings in place on the whole paper plate.
6. Attach a paperboard tube to the back of the plate using masking tape.
Trace and cut out wingsColor brown

18
Recycle Lion
Procedure:1. Let children color a paper plate yellow or gold.
2. Help children trace and cut out circles, half-circles and triangles from scraps of construction paper to make Recycle Lion’s face. Help them glue the shapes onto the paper plate as shown in the picture.
3. To make Recycle Lion’s mane, cut rectangular strips of yellow construction paper. Show children how to roll each strip around a pencil to make it curl. Have children glue the curled strips around the edge of the paper plate. Variations: Yarn or ribbon may also be used to make the mane.
4. Attach a paperboard tube to the back of the plate using masking tape.
Turtle
Procedure:1. One and a half paper plates will be needed to
make each turtle. On the back of one paper plate, let children draw a turtle shell design with green crayons.
2. Help children cut out a head, tail and legs for the turtle from green paper. Glue these pieces to the under edge of the shell.
4. Cut a second paper plate in half and staple or glue one half to the bottom of the turtle shell so that a pocket is formed in which to insert your hand.
Big Mouth
Procedure:1. Help children fold a paper plate in half.
2. Have children cut out features from scraps of paper and glue them to the paper plate. Glue on pieces of yarn or ribbon for hair.
3. Children should place their thumb on the lower half of the plate, and their fingers on the top half. Open and close the hand to open and close the mouth.
Brown
White mouth Yellow ears& eyes & strips for mane
Black nose
Top Bottom
Green head & Green tail
Green legs

19
Mitten or Sock Puppets
Materials: worn-out socks or mittens
felt or material scraps
construction paper scraps
yarn scraps
scissors
glue
buttons
needle and thread
3. Children can glue a cotton ball on the lower back edge of the tube for a tail.
4. Cut strips of paper for whiskers and glue them in place.
5. Insert fingers into the bottom of the tube to make the bunny hop.
Materials: toilet paper tubes
scraps of construction paper
yarn scraps
scissors
glue
crayons or markers
pipe cleaners or drinking straws
Recycle Bunny
Procedure:1. Let children use a crayon or marker to draw a
rabbit face near the top of the toilet paper tube. The rest of the bunny can also be colored.
2. Help children cut two long ears from construction paper and glue them to the inside upper edge of the tube.
Procedure:Using scraps of paper, felt, and yarn, glue or sew features
onto socks or mittens to make a variety of puppets.
Toilet Paper Tube Puppets
White paper for earsand strips for tail

20
Tube TotsProcedure:1. Let children draw a face near the top of the tube
and color in the rest of the tube using crayons or markers.
2. Help children make hair. Cut 20 pieces of yarn about five inches long. Lay pieces of yarn together on a flat surface and tie them together in the middle with another piece of yarn. Children can spread glue around the upper edge of tube. Place the yarn bundle on top of the tube and spread the yarn out around the top of the tube. Press the yarn down so that it adheres to the glue. Trim long strands away from the face.
4. To make arms, poke two small holes on either side of the tube about half way down. Insert a 5-inch long pipe cleaner or straw into one hole and out the other. Let children bend ends to form hands.
5. Optional feet: Cut two strips of construction paper about one and one half inches long. Round off one end of each strip. Glue the straight end of the strips inside the tube and bend the rounded ends upwards.
6. To work puppets, insert fingers into bottom of tube.
Finger PuppetsMaterials:
discarded cereal boxes or other paperboard
scissors (and a small manicure scissors)
crayons or markers
Wee Recycler
Procedure:1. Trace the Wee Recycler pattern onto a piece of poster
board and cut it out.
2. Use manicure scissors to cut out finger holes.
3. Use crayons or markers to color face, hair and clothes.
4. Fingers form legs when the puppet is operated.
Glue
Hair
Feet

21
Procedure:1. Trace the elephant pattern onto a piece of poster
board and cut it out.
2. Use a manicure scissors to cut out the trunk hole.
3. Use crayons to draw a face and to color the elephant.
4. A finger forms the trunk when the puppet is operated.
Elephant
CutOut

22
Envelope Puppets Materials:
used envelopes (from junk mail)
crayons or markers
scraps of paper or paperboard
paper plates
pom-pom
Procedure:1. To make the head, put flap of envelope inside and
slide hand into corners of envelope.
2. To form mouth, “bite” your other hand with the envelope.
3. Let children draw a face onto the top of the envelope using crayons or markers.
4. Attach a paper plate to the bottom of the envelope for a body.
5. Help children cut out arms, legs, wings, ears or a tail from paper or paperboard. Glue them to the paper plate and envelope.