pulse vpn update fix - northern trust
TRANSCRIPT

NTAC:3NS-20
Pulse VPN Update Fix Partners connecting to Pulse Secure VPN through personal Windows 10 devices or NT-provided Non-
Standard laptops need to complete the following steps to update Pulse Secure on their computer. This
update is necessary to address the current connectivity issues and eliminates the need to use the
system-date workaround.
Estimated time to complete: 20 minutes
Part 1: Uninstall Pulse Secure on your personal Windows 10 devices or
NT-provided Non-Standard laptop
1. Use Windows search to look for the “Control Panel” app and launch it

NTAC:3NS-20
2. When the Control Panel app opens, change the “View by” option to “Large
icons”
3. Find and click on “Programs and Features”

NTAC:3NS-20
4. On the Program and Features screen, first click on “Name” to make sure all the
programs are listed alphabetically by name. This will make it easier to identify all
the Pulse Secure applications that need to be uninstalled.
5. Scroll through the list to find the Pulse Secure applications. You will need to
uninstall of the applications with “Pulse Secure” in their name.

NTAC:3NS-20
6. Select an application by clicking on it. When selected, the application will be
highlighted in blue.
7. After selecting the application, click on the “Uninstall” button at the top

NTAC:3NS-20
8. Select “Yes” or “Close” for any prompts from Windows during the uninstall
process
9. Repeat these steps until all Pulse Secure applications have been removed
10. Close the Programs and Features Window
Part 2: Restore system time 1. Confirm that your computer is back to automatically setting the time and date
2. Right click on the time/date in the task tray
3. Click on “Adjust date/time”

NTAC:3NS-20
4. Confirm that “Set time automatically” is set to On
Part 3: Install updated version of Pulse Secure
To install the updated version of Pulse Secure and re-connect to the VPN,
Commented [JR1]: updated the number sequence in part 2

NTAC:3NS-20
1. Launch Edge Browser (do not use any other browser)
2. Go to http://www.northerntrust.com/remoteaccess NORTH AMERICA
Europe, Middle East and Africa (EMEA)

NTAC:3NS-20
3. Click on your device under Connect from
4. Enter your Northern Trust Lan ID
5. Enter your Northern Trust Lan Password

NTAC:3NS-20
6. Enter the security code from your registered Symantec Token
7. Click Sign In
8. if you are stuck on the below screen , Please click on "Click here" option as shown below
9. If the below prompts shows, Click Yes to Switch apps

NTAC:3NS-20
10. Click Always
11. Host Check will install
12. Network Connect will start
NTAC:3NS-20
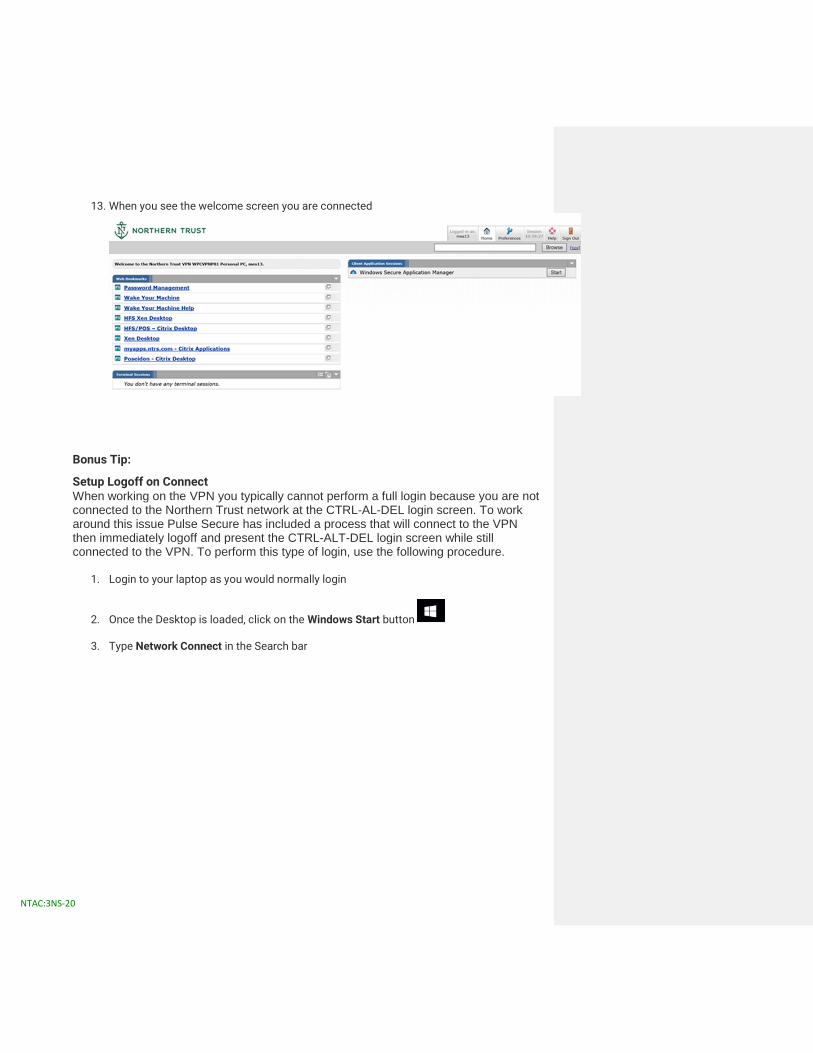
13. When you see the welcome screen you are connected
Bonus Tip:
Setup Logoff on Connect When working on the VPN you typically cannot perform a full login because you are not connected to the Northern Trust network at the CTRL-AL-DEL login screen. To work around this issue Pulse Secure has included a process that will connect to the VPN then immediately logoff and present the CTRL-ALT-DEL login screen while still connected to the VPN. To perform this type of login, use the following procedure.
1. Login to your laptop as you would normally login
2. Once the Desktop is loaded, click on the Windows Start button
3. Type Network Connect in the Search bar

NTAC:3NS-20
4. Click on the Network Connect Desktop App
5. Click Tools
6. Click Connection Options
7. Click Logoff on Connect

NTAC:3NS-20
8. Click Ok
Do you have a Blurry Laptop screen after connecting to the VDI?
Under Display settings on your terminal please check the below box for “Font Smoothing”
Tips
• Please ensure that you have a strong internet connection during the installation process
• Ensure all the components of Pulse secure are removed before installing the new version
• Ensure all the windows for remote access page are closed and open a fresh session