pulmaario practical guide - cs.helsinki.fi
TRANSCRIPT

pulmaarioMathematics and programming
Practical guide


pulmaarioMathematics and programming
Practical guide

First edition (2016) edited byUniversity of Helsinki LumA Science Education CentreRäsänen Jenni, coordinator, Math Lab SummamutikkaSumu Virpi, coordinator, Science Lab LinkkiTuominen Jenna, coordinator, Science Lab Linkki
Helmet librariesTerrihauta Pia, Helsinki City Library
Produced by Pulmaario projectPublished by Helsinki City Library Ministry of Education and CultureLayout Hautala Marja, Muuks CreativeIllustrations Hautala Marja and University of Helsinki LumA Science Education Centre
Updated second edition (2019) edited by Sumu Virpi, coordinator, Science Lab LinkkiTuominen Jenna, coordinator, Science Lab Linkki
Published by University of Helsinki Science Education Centre
Helsinki 2019
ISBN 978-951-51-4987-9 (pdf)DOI https://doi.org/10.31885/9789515149879

Preface ...............................................................6
Materials and Tools for the Workshops ...............8
Introduction to the Mathematical Tasks .............10
Introduction to the Programming Tasks .............12
Pulmaario Workshops ........................................22 Workshop 1: Jewel Thief .............................25 Workshop 2: Adventures at Sea ...................33 Workshop 3: Astronomers ...........................43 Workshop 4: Detectives ...............................47 Workshop 5: Around the World ....................53
Appendices ........................................................58
Table of Contents

6
Preface

7
Pulmaario is a series of workshops that aims to teach mathematics and programming in a fun and active way in an environment that is perhaps not often used for teaching such subjects, such as a library. It is geared towards primary and lower secondary school students, but is suitable for also older age groups.
This guide contains instructions for five mathematics workshops and two programming workshops. The workshops revolve around five different themes. Each theme also has a list of book recommendations, which can be used to further motivate the participants. Each workshop is designed to last around an hour. Organizing these workshops does not require previous experience in teaching mathematics or programming.
Pulmaario was created in a joint project by the Helsinki Metropolitan Area Libraries and the University of Helsinki LumA Science Education Centre. The project was funded by the Finnish Ministry of Education and Culture.
We wish you an engaging journey in the world of mathematics and programming!
Helsinki, June 2017
Pulmaario Team
Updated second editionThe need to update the Pulmaario Practical Guide arose from the changes made to the Scratch programming environment. The instructions in this booklet refer to Scratch version 3.0. This new version works also with tablet computers, but we consider it easier to program with a more traditional computer-and-mouse setup. Therefore this guide does not address touch-screen devices. If you are using an older version of Scratch, we recommend the earlier edition of this guide.
We wish you very rewarding programming moments with the updated guide!
Helsinki, December 2019
Virpi Sumu and Jenna Tuominen

8
Materials and Tools for the Workshops

9
The workshop series is designed so that the individual workshops can be organized with minimal materials. In order to carry out the series of workshops in this guide, you will need the following materials:
• 1 bag (500 g) of dried peas• 1,000 pcs of cocktail sticks• 1 roll of transparent tape• 1 roll of masking tape (width approx. 1–2 cm)• 2 transparent plastic cups• a few deep paper plates or other containers• a cardboard box or other large container• paper fasteners • cardboard or paperboard• coloured printer paper• A4-sized paper• scissors• glue• a permanent marker• pens• a book or a stuffed toy (for use as a playing piece)• (a drawing compass)• task templates to be copied for the participants
(included as appendices to this guide)
In addition to these materials, for the programming workshops you will need computers and mice, a video projector or a large display screen and an internet connection. You should have at least one computer and mouse per each pair of participants. For example, you would need at least 10 computers and mice for a workshop with 20 participants.
We will use the Scratch programming environment, which works in the browser. If the computers can be connected to the Internet during the workshops, you do not have to install anything on the computers for the programming exercises. If a network connection cannot be arranged, you can pre-install the Scratch program on the computers. For more information, see page 18.

10
Introduction to the Mathematical Tasks

11
Pulmaario’s mathematical tasks are problem-solving exercises that develop thinking skills and cooperation. Their purpose is to provide challenges and experiences of success for mathematics learners of all types. Mathematics can be fun and inspiring, and learners can unleash their creativity when solving the tasks.
In Pulmaario’s mathematical tasks, the main focus is on physical activity and gaining insights. In practice, this can mean handicrafts, games, solving puzzles and contemplation. Some tasks can be solved alone, some in pairs or in small groups. The problems solved together teach not only problem-solving skills but also cooperation skills and taking others into consideration.
The most important elements to bear in mind when instructing pupils in the mathematical tasks are clarity and consistency; most of the problem-solving process will be carried out independently by the participants. You should go over the rules of the challenges and games with examples and conclude by asking if the participants have any questions. It is also recommended to provide instructions for the tasks before distributing the materials to the participants in order to ensure that they do not lose concentration.

12
Introduction to the Programming Tasks

13
THE SCRATCH DEVELOPMENT ENVIRONMENT
Scratch is a visual programming language and development environment especially geared towards children and young people who are learning programming for the first time. Using Scratch is always free and does not require installation or signing up. Scratch can be found at the address http://scratch.mit.edu. While you are reading this guide we recommend you open that page and try out the features mentioned to become familiar with Scratch.
Like all modern applications and software suites, Scratch is never completely ready. It is revised and updated constantly, which means that eventually this guide will become outdated as new features are incorporated into Scratch. The basic principles and most common structures in programming have not changed for decades, however. The ideas behind the instructions in this guide will remain relevant even though some details in the execution change. All in all, Scratch is an excellent tool for learning the basics of programming. Scratch has been translated into many languages. The language setting can be changed with the drop-down menu at the bottom of the main page. You can also create a free user account by clicking the “Join Scratch” link at the top of the page. Scratch automatically saves your work in the Scratch cloud if you are signed in. If you do not want to create a user account, you can still download and save your projects offline (Note: private browsing sessions, which are often the default setting on public computers, sometimes prohibit saving projects). We recommend instructors create a Scratch account for themselves, as signing in protects your work against accidents and browser crashes, which would otherwise mean your progress was lost. Registered users can also share the projects they’ve created.
Let’s begin by clicking “Create”.

14
Scratch User InterfaceThe Scratch user interface looks like this:
You can change the language setting by clicking the globe icon in the toolbar (next to the Scratch logo in the image above).
StageTop right is the Stage, where you can test your program. The green flag above the stage starts the program, whereas the red button stops it.
The Stage also has a full-screen “presentation mode”, which you can access by clicking the icon above the top right corner of the stage.
Backdrops and Sprites PaneThe backdrops and sprites in the project are listed beneath the Stage. You can add as many sprites and backdrops as you like. New sprites are added with the icon in the bottom right corner of the pane. Clicking the cat’s face takes you to the Sprites Library, which we recommend using in these short workshops. By hovering over the cat icon you will see the other options, which include drawing your own sprites, choosing a random sprite from the library and uploading images from your computer.

15
You can also change the name of a sprite. If you click on the thumbnail image of a sprite in the Sprite Pane, a blue border appears around it. Now you can see some features of the sprite in the area above the sprite list. Among these is a text field with the name of the sprite, which you may edit. Sprites can be deleted with the bin icon when the sprite is selected in the sprite list. You should be very careful when deleting anything in Scratch, however. If you delete a sprite, all the programmed code and any other added features will be deleted as well. Workshop participants may sometimes delete a sprite and create a brand new one if they want to change the way the sprite looks. What they should do instead is change the costume of the sprite; more about this a little later. If a participant has accidentally removed an important element of the project, it can sometimes be brought back with the “Restore Sprite” operation in the Edit menu in the toolbar. Scratch can only undo the single latest deletion, however.
You can also add new backdrops to your Stage with the icons at the bottom of the column to the right of the sprite list. The photo icon takes you to the Backdrop Library. The other icons function like the ones for creating sprites.
Block PaletteIn the left-hand side of the user interface is the block palette. Above it are the tabs of the different editors in Scratch: Code, Costumes (or Backdrops) and Sounds. In this guide we will concentrate on the first tab, which concerns programming and contains all the command blocks Scratch understands, as well as the Code Area. The other two tabs can be used to edit the appearance of sprites and backdrops, and any sounds they should make.
Using BlocksThe Scratch Blocks represent the commands given to the computer. They are divided into different categories and colour-coded based on their functions. The blocks pictured or mentioned in this guide can be found with the same colours in the Scratch environment.
When you find a block you want to use in your program drag it to the empty gray Code Area to the right of the Block Palette. The blocks always belong to a certain sprite, so you should first make sure you’ve selected the correct sprite in the Sprite Pane. The currently selected sprite is indicated by the blue border around its thumbnail in the Sprite Pane. The Stage itself can also be selected. Note: the Stage cannot do certain things that the sprites can, so for instance the blocks controlling movement are missing from the Stage’s Block Palette.
Blocks connect to each other like jigsaw puzzle pieces. Most series of blocks, which we will from now on call scripts, begin with a yellow Events block, with a rounded top. These “hat” blocks indicate when a certain script should be

16
run. When the event described by the “hat” block happens, the blocks attached to it are executed in order from top to bottom. Some of the blocks may contain loops and conditions, which will alter the order the blocks are run in. You will see some of these later on when we get to the workshop instructions.
Unnecessary blocks can be dropped back into to Block Palette. If you remove a block by accident, right-clicking the Code Area opens a menu where you can undo the deletion. This should be done as soon as possible, because e.g. clicking on a different sprite will reset the undo function.
Drawing and SoundsMany young programmers enjoy drawing their own characters for their games. Likewise sound effects and music bring important liveliness into programming projects. In Pulmaario workshops there is unfortunately very rarely enough time to delve deeper into artistic pursuits. It may also happen that the computer equipment used in the workshops does not support all features. This is why we have chosen not to go very deeply into these topics in this guide. However, if some workshop participant advances quickly and would like to draw their own characters and/or add sounds, there are a few points to consider.
The costumes for the sprites must always be centred. Open the Costumes tab to access the Paint Editor. The image of the sprite should be positioned as near the centre of the Paint Editor window as possible. The circular symbol in the very middle of the area should help with positioning. If a workshop participant’s game suffers from seemingly inexplicable bugs, very often these can be fixed by positioning the image correctly. Any “go to”, “glide” and “set x/y” blocks used in the program will likely have to be updated after repositioning the image.
TO SAVE SPACE WE DO NOT MENTION THE COLOURS IN
THE WORKSHOP INSTRUCTION TEXTS. INSTEAD THE IMAGES OF EXAMPLE SCRIPTS PROVIDED IN THE INSTRUCTIONS SHOULD BE USED AS A GUIDE FOR FINDING
THE RELEVANT BLOCKS.
THE INSTRUCTOR CAN MAKE THE CODE AREA LARGER, SO THAT THE
WORKSHOP PARTICIPANTS CAN SEE THE BLOCKS BETTER.
THERE ARE TWO BUTTONS ABOVE THE STAGE WHICH YOU
CAN USE TO TOGGLE THE RELATIVE SIZES OF THE DIFFERENT
ELEMENTS OF THE USER INTERFACE.

17
In the Costumes tab you can add or remove costumes in the same way as you can add or remove sprites, with the cat icon in the bottom left, and the small bin icons that appear when a costume is selected.
There are two different modes of editing images in Scratch: a Paint-style Bitmap Mode and a Vector Mode. The Vector Mode can be used to create sleek logo-style images, and its advantages include better scalability, but sometimes there are problems with using vector images in projects. For instance, occasionally checking whether Vector Mode sprites touch each other doesn’t work correctly. If that happens, it usually helps to convert the finished image to Bitmap Mode with the button below the Paint Editor window.
The size of a sprite can be changed, but we recommend doing this either through the sprite’s features in the Sprite Pane, or with programmed code. Changing the size of the drawn image in the Paint Editor can affect the quality of the image. NB: some of the features of a sprite may be hidden, depending on what size setting is chosen for the interface (see tip on the previous page). The default size of a sprite is 100, so it is useful to think of sizes as percentages.
In addition to the Sprite (or Costume) Library, Scratch has a vast Sound Library, which you can access through the Sounds tab. It includes sound effects, scales for different instruments and ready-made samples of songs. You can also import sound files from your computer or record your own sounds if there is a microphone attached. Note: if you are using a private or incognito browsing session, playing and recording sounds and/or transfer of sound files might not always work. If you intend to use sounds in your workshops, we recommend testing all hardware in advance to make sure they can handle sounds. To use sounds in your program you will need the programming blocks in the magenta Sound category.
Backup PlansThe Scratch website may occasionally be unreachable due to updates, network issues or other unexpected faults. You can prepare for this in advance by downloading the Scratch Offline Editor, which can be found through the Download link at the bottom of the Scratch main page. There are several versions of the editor available. If possible, we recommend installing version 3.0 or newer. The layout of Scratch has changed significantly from version 2.0, and the older 1.4 version does not support
THE INSTRUCTOR CAN ALSO ZOOM IN ON THE BLOCKS IN THE SCRIPTS
AREA. THE ZOOM TOOLS ARE IN THE BOTTOM RIGHT CORNER OF
THE CODE AREA.
THE TIPS WINDOW OCCASIONALLY POPS UP ON
TOP OF THE ZOOM TOOLS, SO THE TIPS WINDOW MUST BE MINIMISED TO ACCESS THEM.
NOTE: ZOOMING ONLY AFFECTS THE BLOCKS DRAGGED INTO THE CODE AREA. THE BLOCKS IN THE BLOCK PALETTE ALWAYS REMAIN
THE SAME SIZE.

18
clones or custom blocks, which means the code in the programming project in Workshop 1 needs to be adjusted if using this version.
Another possibility is to try Snap!, which is very similar to Scratch, but built using different technologies (http://snap.berkeley.edu/). Snap! functions a little differently to Scratch, so we only recommend this if the instructor has had a chance to familiarise themselves with Snap! beforehand.
RUNNING A PROGRAMMING WORKSHOP
It is a good idea to start the programming session by showing an example of the game to the group. Links to ready-made games can be found at the pulmaario.luma.fi -website, but feel free to use your own versions. After showing the game, always start from a blank project when beginning the programming itself.
We recommend the instructor in charge of the session is kept free to instruct from the screen, pointing out the necessary blocks to the participants. There should be another instructor (or a volunteer) at the computer attached to the screen slowly showing the participants what should be done.
Do not be alarmed if you do not manage to cover everything mentioned in the instructions in your workshop. The most important thing is that all participants manage to get something of their very own moving on the screen, and have a good time while programming.
How to Talk While Coding
Colours, positions and shapesScratch comes with helpfully colour-coded blocks that can always be found in the same place. Colours and positions are very useful tools when giving instructions. The shape of the block also helps when trying to deduce its purpose.
The instructor can verbalize dragging the first code blocks to the Code area, for example like this:
“Let’s begin by going to the yellow Events category. It can be found around the middle of the Block Palette.” [meanwhile the instructor points to the correct spot on the screen. A volunteer at the instructor’s computer clicks on the correct category]
“The Events category contains blocks that we use to start scripts with. You will recognize them by their rounded tops - they can not be attached underneath any other block, so they must always be at the beginning of a script.

19
Let’s drag the first yellow block from the Events category to the Code Area. It says ‘when the green flag is clicked’...” [meanwhile the instructor points to the correct block on the screen; the volunteer at the computer drags the correct block to the Scripts Area]
The structure of scripts can also be commented on, for example in this fashion:
“The sprite should move continuously. We could put copies of the same block after each other indefinitely, but that is a lot of work. Computers are good at repeating things automatically, so we will use a ready-made loop here. We want the sprite to move all through the game, that is, forever. Therefore we will use the light orange forever block. The block has a C-shape. The blocks we want to repeat go inside it.”
The goal is that the participants can complete the programming tasks by only listening to the instructions. Some kids like to program simultaneously with the instructions, only occasionally checking the front screen. Some like to program from the model they see on the screen, largely ignoring the verbal instructions. Others like to follow the instructions to the end, and only then continue with their own programming. Instructors can support multiple learning styles by giving the instructions in different formats at a suitably slow pace.
The Structure of the Programming ProjectWhile instructing it is also useful to talk about how the project as a whole is formed. When starting a new script you can point out that in order to keep the code clear and easily readable, we aim to make each script responsible for a single task. For example, when finishing a script concerning the sprite’s movement, it is logical to start a whole different script when moving on to dealing with how the sprite interacts with other sprites. Another important aspect is to make sure the scripts are in the correct sprites, especially when dealing with sprites interacting with each other. In order for the program to work it may not be that important that the code is easily readable and systematically composed. In order for the program to be understood by another programmer, it is essential. In this frame of mind, we do not write code for the computers to read, but for other programmers to understand and expand upon. The games presented in the workshop instructions of this guide are all ready to implement and presented with example code. The instructor of the workshop does not need to come up with designs by themselves. We understand that it may feel difficult to start talking about the structure and reasons for the programming choices when the plan is not your own. The most important thing, however, is to take the bull by the horns and just try organising your own workshops. In the beginning your “code talk” can naturally revolve around describing the mechanics of dragging the blocks

20
around, and that level is perfectly sufficient for these workshops. As you gather more experience and confidence you can include elements describing the logic of what you are doing as you become more comfortable with the concepts.

21

Pulmaario Workshops


25
WORKSHOP 1
Jewel ThiefYou are cunning jewel thieves who have heard that the rich duchess in the city has deposited a large number of beautiful green gems in the local bank. You are planning to rob the bank, but you still need a suitable sack for transporting the gems. Build as large a sack as possible with the pieces available. The sack must be durable and free of holes to keep gems from spilling out all over the floor. What shape should the sack be to fit in the largest number of gems possible? Will the heist succeed or will you get caught in the laser trap?
Planning the gem sack is this workshop’s mathematical problem. It is called the Volume Challenge. Participants must build the largest sack possible with the materials provided. This trains their perception of volume in addition to their cooperation skills. The heist itself is programmed into a game. The thief, who must stay in the middle of the game stage, throws mirror dust at the approaching motion detection lasers to remain undetected.
PULMAARIO BOOK CLUB• Robert Arthur: The Mystery of the Vanishing Treasure (Three Investigators, book 5)• Alex Carter: The Mayfair Mysteries: The Case of the Ruby Necklace• Martin Widmark: The Diamond Mystery• Hergé: The Castafiore Emerald (The Adventures of Tintin 21)• Elen Caldecott: Diamonds and Daggers• Carolyn Keene: The Case of the Disappearing Diamonds
(Nancy Drew, book 80)• Brough Girling: The Mystery of Lydia Dustbin’s Diamonds• Aby King: The Adventures of a Royal Dog series• Elisabetta Dami: The Giant Diamond Robbery• Hope McLean: Jewel Society series

26
VOLUME CHALLENGEMaterials• 1 bag (500 g) of dried peas• coloured printer paper• 1 roll of transparent tape• scissors• 2 transparent plastic cups• a permanent marker• a cardboard box or other container for the peas• the Volume Challenge sheet (appendix on page 59)
PreparationsCopy the Volume Challenge sheet (included as an appendix) on coloured printer paper. Cut the paper in half along the dotted line. The Volume Challenge is to be carried out in groups of 3 or 4 people. Each group needs one half of a Volume Challenge sheet. For example, a workshop with 20 participants would divide into 5 or 6 groups, in which case you would need 3 copies (i.e. 5–6 halves) of the Volume Challenge sheet.
Put the peas inside the cardboard box or other large container. In the measurement phase, the containers built by the groups are filled with peas. These containers should be filled on top of the large container to prevent peas from spilling onto the floor.

WO
RKS
HO
P 1
JEW
EL T
HIE
F
27
Instructions for the task
Building phase
1. Divide the participants into groups of 3 or 4.
2. Give each group one half of a Volume Challenge sheet, approximately one metre of tape and a pair of scissors. To keep the tape from sticking to itself, one end can be attached to the corner of a table and the other to the floor. The groups may cut their metre of tape into smaller pieces.
3. Instruct the groups to cut out the six pieces on their Volume Challenge sheet. Each group should now have 2 square-shaped A pieces, 2 triangle-shaped B pieces and 2 rectangle-shaped C pieces.
4. The groups must use the materials provided to build a container with as large a volume as possible. The groups may fold the pieces of paper or cut them into smaller pieces, and they may use their imagination with the tape. However, the groups should keep in mind that they have a limited amount of tape and the container must be sturdy with no holes. After the building phase, the containers will be filled with peas and their volume measured.
5. The groups may begin building once the instructions have been explained. They have 15 minutes of building time.
Measurement phase
6. When time has run out, the containers must be finished. Instruct the groups to go to the measurement location, one group at a time.
7. The groups fill their containers with as many peas as they can, making sure that the peas stay inside the container.
8. The peas inside the filled container are then carefully poured into the plastic cups. Write down how many full cups each group was able to fill with peas. For the remainder of the group’s peas, use a permanent marker to draw a small line on one of the cups to indicate how much of the cup is filled. Also mark down the name or number of the group in question.
9. Once each group’s container has been measured, announce the results. Check together which group had the most spacious container and what were its advantages. You can also ask the groups to tell everyone what type of different ideas each group had.

28
DIAMOND HEIST
The thief is stuck in the middle of the screen. Motion detectors are in action, and laser beams approach from the edges. The thief must throw mirror dust in front of the laser beams to escape detection. How long can the thief keep on thieving without being caught?
Example game: https://scratch.mit.edu/projects/159999606/

WO
RKS
HO
P 1
JEW
EL T
HIE
F
29
1. Create a new sprite: Thief. Give it a name (see page 15).
2. The thief turns on the spot when the left or right arrow keys are pressed, all through the game. Create the necessary code for this. At the beginning of the game the thief should go to the centre of the stage, that is, the origo, where x = 0 and y = 0.
3. Create a new sprite: Mirror Dust. Give it a name. Hide the original sprite and create clones of it whenever the space key is pressed. Add a restriction to how fast new clones can be created with the wait-block. This process should go on throughout the game as well.
4. As a new Mirror Dust clone is created, it turns in the direction the thief is facing. Then it becomes visible and starts moving until it hits the edge of the stage. After this it is deleted. Hiding it again would not suffice, because there is a limit to how many clones the Scratch motor can support - the clones would eventually run out.

30
5. Create a new sprite: Laser Beam. Give it a name. Hide the original and create clones of it every 1 to 2 seconds all through the game.
6. Laser Beams should appear from all the different edges of the stage. This is easiest to achieve by first moving the clone to the origo at the centre of the stage. Then the clone repeatedly chooses a random position until it touches any edge of the stage. At this point the clone is still hidden, so the player will not see the search happening. After reaching the edge in this fashion, the clone turns towards the Thief, becomes visible and begins to move slowly. If the clone touches Mirror Dust, movement stops and the clone is deleted.
7. Switch to the Thief’s scripts. Add a new script which checks whether the Thief touches a Laser Beam. If a Laser Beam reaches the Thief, the thief is caught and the game ends.

WO
RKS
HO
P 1
JEW
EL T
HIE
F
31
8. Optional extra: Mirror Dust can also disappear when it hits a Laser Beam. Concurrent events don’t always work well in Scratch, so both parties must wait for a short time before being deleted. This allows the other party to also detect the collision. Add a wait-block to the script that controls the Laser Beam’s movement. Then add a new script for the Mirror Dust. The Mirror Dust clones should wait until they touch a Laser Beam, and then be deleted.
Laser Beam Mirror Dust


33
WORKSHOP 2
Adventures at SeaYour peaceful adventure at sea takes an exciting turn when the flag of an enemy ship rises from beyond the horizon. The enemy is ready to sink all the ships in your fleet. Will you be able to sink your opponent’s ships before they can sink yours? While you battle, your pet fish gathers sunken treasures from the bottom of the sea. How much treasure will it be able to gather before the local coastguard scares it away for good?
The theme of this workshop is the coordinate system. In the mathematical section, the participants will find out about the coordinate system by playing the traditional Battleship game. In the programming section, the participants make a sea-themed collecting game in which the player moves a pet fish by changing its coordinates.
PULMAARIO BOOK CLUB
• Mintie Das: The Sinking World (Storm Sisters, book 1)
• Rob Kidd: The Siren Song
(Pirates of the Caribbean: Jack Sparrow, book 2)
• Sue Mongredien: Underwater Magic
(The Secret Mermaid, book 3)
• Justin Somper: Vampirates: Demons of the Ocean
• Julia Golding: Cat O’Nine Tails (Cat Royal, book 4)
• Robert Louis Stevenson: Treasure Island
• Rose Impey: Pirate Patch and the Great Sea Chase
• Dale Peck: Drift House: The First Voyage
• Tove Jansson: Moomin and the Sea
• Herman Melville: Moby Dick
• Hergé: The Red Sea Sharks (The Adventures of Tintin 19)
• Alex Irvine: The Adventures of Tintin
• Jules Verne, Lisa Church: 20 000 Leagues Under the Sea
(Classic Starts series)

34
BATTLESHIPMaterials• pens• Battleship grids (appendix on page 60)
PreparationsCopy the appendix “Battleship grids” for each participant. The appendix includes separate grids for both players.

WO
RKS
HO
P 2
ADV
ENTU
RES
AT
SEA
35
Instructions for the task The game is played in pairs. Each player needs one set of grids and a pen.
Marking the player’s own ships on the grid
1. Before play begins, each player marks their ships on their own grid. In the basic version of the game, ships can be positioned either horizontally or vertically, but they may not touch each other. The rules can be changed according to the workshop participants’ wishes, but they should be explained to everyone with examples before the ships are drawn.
2. A total of eight ships are drawn, each occupying a number of consecutive spaces on the grid:• 1 aircraft carrier (five spaces)• 1 battleship (four spaces)• 2 cruisers (three spaces)• 3 destroyers (two spaces)• 1 submarine (one space)
3. Once the ships have been drawn, the game can begin!
The ships are positioned correctly in the image on the left. In the image on the right, however, some of the ships are positioned incorrectly: the green ships overlap, the corners of the yellow ships touch each other, and the blue ships are positioned side by side, touching each other.

36
My grid Opponent’s grid
Gameplay
4. The youngest player starts the game. The player chooses a square on the opponent’s grid to call a shot there. The player says the coordinates of this square, for example x2, y5.
5. If one of the opponent’s ships is located in the square called by the player, the opponent says “hit” and the player draws a cross mark in the square in question on the opponent’s grid of their sheet. The opponent also draws a cross in the square that was hit on their own grid.
6. If there is no ship in the square, a circle is drawn on the opponent’s grid. If a ship is hit, the player gets to call another shot. If the shot misses, it becomes the opponent’s turn to take a shot.
7. If every single square space of a ship is hit, the ship sinks. If a ship sinks, the player must announce it. Any sunken ships can be marked off by drawing a circle around the crosses indicating hits, as no other ships can be located next to the sunken ship.
8. The winner of the game is the player who sinks all the opponent’s ships first.
Image of the player’s grids: ships that have been hit on the opponent’s grid are indicated with a cross, while missed shots are indicated with circles. One of the opponent’s ships has been sunk and circled. The player’s own grid shows cross marks where the player’s own ships have been hit.

WO
RKS
HO
P 2
ADV
ENTU
RES
AT
SEA
37

38
UNDERWATER TREASURES
Underwater treasures await the brave player! Use the arrow keys to move around and score points by collecting treasures from random spots around the sea. But beware, a villain lurks in the deep...
Example game: https://scratch.mit.edu/projects/160001470/

WO
RKS
HO
P 2
ADV
ENTU
RES
AT
SEA
39
1. Create a new sprite: Player. Give it a name (see page 15).
2. The Player moves forever according to arrow keys pressed. The coordinate plane is used for moving around. Whenever an arrow key is pressed, the Player’s x- or y-coordinate is changed accordingly. The example script can be found below. It may seem complicated, but actually consists of four similar blocks of code, one for each direction on the arrow keys.
2.1. Optional fine tuning: if the costume of the Player has a definite direction it should be facing when moving around, when turning left or right it can also be made to point in that direction. Additionally, you can set the rotation style when the game begins.
3. Create a new sprite: Treasure. Give it a name.

40
4. At the beginning of the game the Treasure should appear in a random spot on the stage. It waits there until the Player catches it. Then it jumps to a new spot.
The example script can be found after the next step.
5. Make a variable “Points” for all Sprites. Variables are under the darker orange Variables-category. Whenever the Player catches the Treasure, change Points by 1. Set Points to 0 at the beginning of the game.
If you only have a very limited amount of time left at this point, you may finish here, and any remaining time can be used for testing the game. The workshop participants can also experiment with the Player’s speed (by changing the value in the “change x/y by” -blocks), or change how many points are awarded for each Treasure (by changing the value in the “change Points by” -block)
6. Create a new sprite: Villain. Give it a name.

WO
RKS
HO
P 2
ADV
ENTU
RES
AT
SEA
41
7. The Villain points towards the Player and then moves a short distance forward. These two steps are repeated forever all through the game.
8. The game ends when the Villain catches the Player. All scripts are stopped.
9. Test your game, and let the Villain catch the Player. When you click the green flag again, nothing much seems to happen! You may notice the Villain is right on top of the Player already at the very beginning of the game. This triggers the ending we programmed in step 8 immediately.
Let’s give the Player and the Villain better starting positions. Use your mouse to drag the Player into a corner. Then drag the “go to x:_ y:_” -block to the very beginning of the script you created in step 4.
Do the same for the Villain and the script from step 8.
Note: the values in the “go to x:_ y:_” -block need not be exactly the same as in the example below. The values in the block in your Block Palette update automatically as you drag the sprite to a new spot. Below is an example of how the blocks should be placed in your scripts.
Player Villain

43
WORKSHOP 3
AstronomersThere are many different celestial objects in space, such as planets, stars and asteroids. Asteroids are rocky celestial bodies that can be observed from Earth as small pinpoints of light with a good telescope. Attempts to deduce the shape of asteroids can be made based on the rays from the Sun reflected off their surface. Jump into an astronomer’s shoes and go on an exciting journey through space. Examine the silhouettes shown and deduce what they represent.
The imaginary asteroids are shown only as silhouettes. The participants’ task is to deduce what type of object forms each silhouette and try and build it using peas and cocktail sticks.
PULMAARIO BOOK CLUB
• Alexandra Bracken: The Princess, the Scoundrel and the
Farm Boy (Star Wars series)
• Antoine de Saint-Exupéry: The Little Prince
• Michael Kogge: Star Wars Rebels: Rise of the Rebels
• Nick Arnold: Space, Stars and Slimy Aliens
(Horrible Science series)
• Louie Stowell & Peter Allen: The Story of Astronomy and
Space (Science Stories series)
• Build Your Own Galaxy: The Big Unofficial Lego Builder’s
Book
• Kate Agnew: Space Saver
• Scoular Anderson: Space Pirates and the Treasure of
Salmagundy
• Georgie Adams: The Three Little Astronauts
• Jamie Thomson: The Wrong Side of the Galaxy

44
SECRET OBJECTS
Materials• 1 bag (500 g) of dried peas (soak overnight before use – you can use the
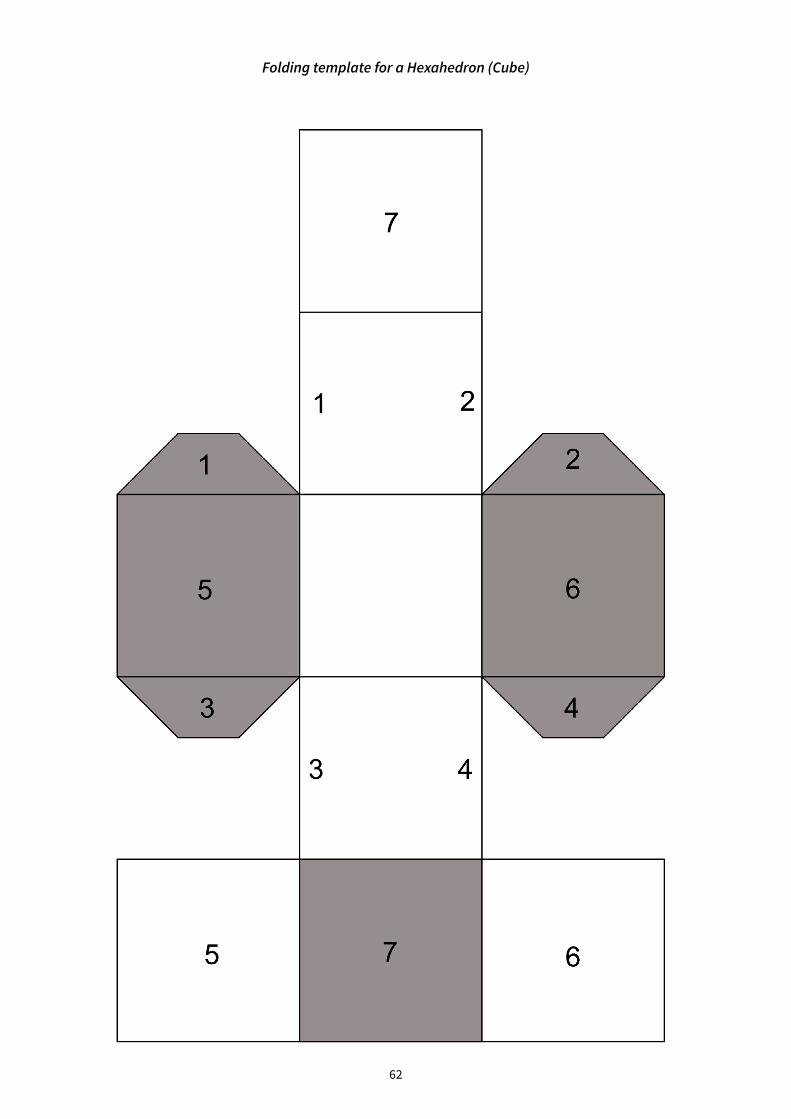
same peas used in the Volume Challenge in Workshop 1)• 1,000 pcs of cocktail sticks• deep paper plates or other containers• cardboard or paperboard• glue • scissors• silhouette videos (can be found at https://pulmaario.luma.fi/)• folding template for a tetrahedron (appendix on page 61) • folding template for a hexahedron, i.e. cube (appendix on page 62) • folding template for an octahedron (appendix on page 63)
PreparationsSoak the peas overnight in plenty of water. Divide the peas and cocktail sticks onto paper plates so that one table group of approximately 4 to 6 people has one plate of peas and one plate of sticks.
Cut out and fold cardboard models of the Platonic solids. There exist a total of five Platonic solids, but this exercise includes only the three simplest: tetrahedron, octahedron and hexahedron (that is, cube). These three objects are comprised of only equilateral triangles or squares.
The Platonic solids tetrahedron, octahedron and hexahedron, i.e. cube.

45
PLATONIC SOLIDS CAN ALSO BE FOLDED FROM THE PAGES OF BOOKS REMOVED FROM CIRCULATION. JUST GLUE THE FOLDING TEMPLATE
TO A PAGE OF A REMOVED BOOK AND FOLD THE OBJECT
ACCORDING TO THE DIRECTIONS.
Start by copying the following appendices: the folding templates for the tetrahedron, hexahedron and octahedron. Glue the templates to cardboard or thick paper. Carefully cut out each shape. Fold along the lines on each shape. Numbers are shown on each shape to indicate which parts should be glued onto each other, i.e. ones onto ones, twos onto twos, etc. The shaded flap will always be covered. Spread glue onto the shaded area and join it to the corresponding number. The solids should be assembled in numerical order. Keep the cardboard models hidden at the beginning of the workshop.
Instructions for the taskBuilding instructions
1. First, practise building with cocktail sticks and peas. Ask the participants to start by building a triangle, a square and a pentagon.
2. Then play the tetrahedron video (video 1). Instruct the participants to concentrate on building their own object rather than follow another participant’s example. Everyone perceives the objects in a different way, so the other participants may have a wholly different shape in mind.
3. When everyone has built their own version of the solid, reveal the correct shape by showing the participants the cardboard model of the tetrahedron.
4. Next, play the hexahedron video (video 2). Once all participants have finished building, reveal the correct shape.
5. Then play the octahedron video (video 3). Show the cardboard model of the octahedron only when all participants have finished their construction.
6. Finally, you can let the participants build any shapes and objects they want freely.
WO
RKS
HO
P 3
ASTR
ON
OM
ERS


47
PULMAARIO BOOK CLUB• Enid Blyton: The Secret Seven & The Famous Five series
• Carolyn Keene: Nancy Drew & Dana Girls series• Dominic Barker: How to Catch a Criminal• Justin Richard: Sorted! (Agent Alfie, book 2)• Cope Andrew: Spy Dog series• H.L. Dennis: Secret Breakers series
• Martin Oliver: The Boys’ Book of Spycraft• Jack Lugar: Katz Pajamas: The Miss Kitty Mystery• Maggie M. Larche: The Mardi Gras Chase• S.D. Brown: Code Orange Cancun
WORKSHOP 4
DetectivesThere is always much to do and plenty of crimes to solve at a detective agency. This time, the detectives have found some obscure messages, the contents of which are pure gibberish! The cipher must be decrypted in order for the detectives to get a lead on the thieves. What is the thieves’ next target?
The theme of this workshop is detectives. The mathematical task introduces the participants to the Caesar cipher, which they will attempt to solve with the help of a cipher wheel. The encrypted message will give the detectives a lead on the gang of thieves.

48
ENCRYPTED MESSAGESMaterials• cardboard or paperboard• paper fasteners (1 per participant)• pens• paper• scissors• glue• (a drawing compass)• Cipher Wheel template (appendix on page 64)• Encrypted Messages 1 (appendix on page 65)• Encrypted Messages 2 (appendix on page 66)• solutions to the deciphering tasks (appendix on page 67)
PreparationsCopy the “Cipher Wheel template’ and “Encrypted Messages 1” for each par-ticipant. Additionally, make a copy of “Encrypted Messages 2” for each group, and cut out the encrypted words along the dotted lines.
Copy and prepare one Cipher Wheel template to show as an example to the participants (see the more detailed instructions below).
The correct answers to the decryption tasks can be found in the appendices.

49
Instructions for the task
Preparing the Cipher Wheels
1. Each participant prepares their own Cipher Wheel. First, glue the parts of the Cipher Wheel onto cardboard. Then carefully cut out the pieces.
2. Using the needle point of a compass or a sharp pen, make a hole in the exact centre of each wheel. Instruct the participants to make the holes carefully to ensure that the wheels overlap precisely. This significantly improves the Cipher Wheel’s readability.
3. Position the wheels on top of each other so that the smaller wheel lies on top. Join the wheels together with a paper fastener. Push the fastener through the holes in the centre and spread the metal legs along the back of the larger wheel.
4. Your Cipher Wheel is now ready for action!
Deciphering the message
5. Practise using the Cipher Wheel by deciphering the prepared coded messages in the task Encrypted Messages 1. Once these words have been deciphered, divide the participants into groups of 3 or 4 and tell each group to solve the words in the task Encrypted Messages 2. The aim is to use the deciphered words in this task to form a sensible sentence in English.
6. In order to decipher a message, the encryption key must be known. The encryption key is a number between 1 and 29, shown inside parentheses after the message. For example, the encrypted message HSK (5) means “dog”.
7. In order to decipher a message encrypted by someone else, turn the shaded letter A on the smaller wheel to the number corresponding to the encryption key on the larger wheel.
8. Keep the wheels precisely in the same position in relation to each other – they should not be allowed to turn at this stage. Find the first letter of the encrypted message on the larger wheel. The first letter of the original message can be found in the same spot on the smaller wheel.
WO
RKS
HO
P 4
DET
ECTI
VES

50
9. Continue deciphering the message one letter at a time until you have deciphered the entire message.
10. Once you have deciphered all the encrypted words, arrange them into a sentence. Where do the thieves intend to hit next?
Encrypting a message
11. Try to encrypt your own messages. Each participant may encrypt a word or short message and give it to another participant to solve.
12. Encryption follows the same process as decryption, but in reverse order. First, choose an encryption key. Turn the shaded letter A on the smaller wheel to the number corresponding to the encryption key on the larger wheel.
13. Find the first letter of the message you want to encrypt on the smaller wheel. The letter used in the encrypted message is found in the corresponding spot on the larger wheel.
14. Continue like this until you have encrypted the entire message.

51
WO
RKS
HO
P 4
DET
ECTI
VES


53
PULMAARIO BOOK CLUB• The 39 Clues series• Clive Gifford: The Great Global Puzzle Challenge with
Google Earth• Jules Verne: Around the World in Eighty Days• Michael Grant: The Call (The Magnificent 12, book 1)
• Michael Dupin: Not For Parents Travel Book• Astrid Lindgren: Pippi in the South Sea
• Charles Conway: The Kids’ Book of Great Cities• Anette Roeder: 13 Buildings Children Should Know
• Clotilde Perrin: At the Same Moment, Around the World
WORKSHOP 5
Around the WorldYou are about to go travelling. The train ticket in your hand tells you which city you are travelling to. The train network connects countries from Europe to Asia, but the network is old and the rails are congested to travel on. The rails can only fit one train at a time. Train stations are also congested, and they too can only fit one traveller at a time. How can the eager travellers get to their destinations safely?
The mathematical problem of this workshop is a Train Network game that develops problem-solving skills and requires cooperation to solve.

54
TRAIN NETWORKMaterials• 1 roll masking tape (width approx. 1–2 cm)• a book or a stuffed toy (for use as a playing piece)• A4-sized paper • a pen
PreparationsPrepare the playing cards for the Train Network game by cutting the A4-sized sheets in half. A total of 22 playing cards are needed for each game. Write the name of one country or city on each playing card. The countries and cities are: Burkina Faso, Ouagadougou; Mali, Bamako; New Zealand, Wellington; Peru, Lima; Argentina, Buenos Aires; Canada, Ottawa; India, New Delhi; Japan, Tokyo; Finland, Helsinki; USA, Washington, D.C.; Italy, Rome.
Clear some space on the floor for the game area. You will need a floor area of approximately 2 m x 3 m for each train network. Use masking tape to tape a network on the floor as shown in the image. Attach the country cards to the network with masking tape as shown in the image.
Note! One train network can fit up to ten participants at a time. If there are more than ten participants, you should make two separate networks.

55
Instructions for the task
Game progression
1. Instruct the participants to stand on top of the country cards in the network so that each participant is standing on a different card. At least one country must be left empty.
2. Distribute one city card to each participant. The city on the card should not be the city of the country on which the player is standing at the beginning of the game. Extra cards are left out of the game.
3. The card in each player’s hand tells them their travel destination. The purpose is to have each player travel safely to their destination. However, there are precise rules for travelling on the train network:• Each country may only be occupied by one player at a time.• Only one player may move at a time. The player on the move is
indicated with a playing piece, which is always handed over to the next player whose turn it is to move.
• The turns are determined based on who can and should move on any given turn. In other words, only a player who can travel by rail directly to an unoccupied country can move.
• Even if a player makes it to their destination, they may still have to move away from there to help all players reach their destina-tions. This requires cooperation!
4. The game ends when all players have made it to their own destination country.
THE TRAIN NETWORK GAME CAN ALSO BE PLAYED WITH DIFFERENT THEMES. FOR EXAMPLE, THE TRAIN
NETWORK CAN BECOME THE FLOO NETWORK, WITH THE PLAYERS REPRESENTING CHARACTERS FROM THE HARRY
POTTER BOOKS TRYING TO GET TO THEIR FAVOURITE LOCATIONS. IN THIS SCENARIO, CORNELIUS FUDGE IS HEADED FOR THE MINISTRY OF MAGIC, WHILE MOLLY WEASLEY WANTS TO HEAD HOME TO THE BURROW.
WO
RKS
HO
P 5
ARO
UN
D T
HE
WO
RLD

56
More Puzzles

57
Do you want to organize more Pulmaario workshops than this guide caters for? Or do you need instructions for workshops without the use of computers? The web page http://pulmaario.luma.fi/ offers additional materials to support the workshops, including a PDF of this guide.
The Science Education Centre at the University of Helsinki offers teaching materials and support for teaching STEM subjects, mainly in Finnish thus far. You can find out more about the centre at https://www.helsinki.fi/en/science-education.
The Science Education Centre’s mathematics materials are hosted by Math Lab Summamutikka at http://blogs.helsinki.fi/summamutikka/.
The Science Education Centre’s programming materials are hosted by Science Lab Linkki at http://linkki.cs.helsinki.fi/.

58
AppendicesWorkshop 1• Volume Challenge sheet
Workshop 2• Battleship grids
Workshop 3• Folding template for a Tetrahedron• Folding template for a Hexahedron (Cube)• Folding template for an Octahedron
Workshop 4• Cipher Wheel template• Encrypted Messages 1• Encrypted Messages 2• Solutions to the deciphering tasks
Other Appendices• Programming Without a Computer: CS Unplugged• Binary Numbers template

A
A
A
A
BB
BB
CCCC

60
Battleship grids
My grid
Opponent’s grid

60 61
Battleship gridsFolding template for a Tetrahedron
62
Folding template for a Hexahedron (Cube) Folding template for an Octahedron

62 63
Folding template for an Octahedron

64
Cipher Wheel template

64 65
A gang of three wily thieves has had the detectives running in circles for months. What crimes has the gang committed so far? Decipher the encrypted words and help the detectives to finally catch the villains.
1. What was the target of their first robbery?
Answer: SQWÅS (9)
2. What did the thieves steal?
Answer: NSZNZWLBP (12)
3. What was the thieves’ latest target?
Answer: ÖHFUHÖ (17)
4. What did the thieves forget at the crime scene in their latest heist? VAnswer: KPSZIW (5)
5. How many thieves did the police catch in the latest heist?
Answer: ADY (11)
Encrypted Messages 1

66
What could be the thieves’ next target? Decipher these words together in a group and form a sentence. This sentence will help the detectives catch the thieves red-handed.
UDXSPK (16)
LVJÄZL (22)
KFDEQ (27)
EXQJDORZ (4)
TKAZ (7)
JT (2)
Encrypted Messages 2

66 67
PART 1
A gang of three wily thieves has had the detectives running in circles for months. What crimes has the gang committed so far? Decipher the encrypted words and help the detectives to finally catch the villains.
1. What was the target of their first robbery? Solution: KIOSK
2. What did the thieves steal? Solution: CHOCOLATE
3. What was the thieves’ latest target? Solution: MUSEUM
4. What did the thieves forget at the crime scene in their latest heist? Solution: GLOVES
5. How many thieves did the police catch in the latest heist? Solution: TWO
PART 2
What could be the thieves’ next target? Decipher these words together in a group and form a sentence. This sentence will help the detectives catch the thieves red-handed.
UDXSPK (16) Solution: FRIDAYLVJÄZL (22) Solution: TARGETKFDEQ (27) Solution: NIGHTEXQJDORZ (4) Solution: BUNGALOWTKAZ (7) Solution: NEXTJT (2) Solution: IS
The words form the following sentence: “Next target is bungalow Friday night.”
Solutions to the deciphering tasks

68
CS Unplugged is a website where you can find many exercises that deal with programming and computational thinking. You can find it at http://csunplugged.org/.
The exercises do not require a computer. Many of them are quite similar to the mathematical tasks in this guide, but presented from a programmer’s viewpoint. The following task is modified from the Binary Numbers task on the CS Unplugged website.
BINARY NUMBERSMaterials: • copies of the Binary Numbers template, one for each participant (the
template can be found after these instructions)• scissors• a large empty sheet of paper and a marker pen for the instructor
The idea of the task:In this task we try out representing numbers in binary format, that is, in base-2 numeral system. While in the decimal system we can use the numbers 0-9, in the binary system we only have 0 and 1. This is also the idea behind the bits used by computers - a bit is either off or on, i.e. 0 or 1. If we want to write the decimal system number 2, one bit is not enough. In the binary system it is written as 10.
The cards cut out by the participants represent bits. Bits can be either on, with the side with dots facing up (1), or off, with the blank side up (0). When you count the number of dots facing up, you have the decimal value represented by the bits on the table.
Instructions for the task:1. Participants cut the 8 rectangles on their sheet into separate cards. We
will first use only 5 cards, so put aside cards F, G and H.
2. Each participant sets cards A-E in a row on the table in front of them so that they read EDCBA from left to right. The cards should be set so that there is more dots on the left and only a single dot on the rightmost card.
3. All cards are turned around so that the blank side is facing up (but their positions on the table do not change!).
4. As a warm-up, let’s start counting up from 0. The instructor calls out the decimal numbers, then writes down the decimal number and the binary number formed by the cards side by side on the large sheet.
CS Unplugged

68 69
0 - do nothing to the cards, as there are only blank sides facing up. The binary number is 0, or using all available bits, 00000. 1 - turn the rightmost card (A) face up. One dot is visible. The binary number is 00001. 2 - the rightmost card is not enough for this! Turn over the next card to the left (B). Now there are three dots, so turn card A back face down. Two dots are visible. The binary number is 00010. 3 - turn the rightmost card back face up. Three dots are visible. The binary number is 00011. 4 - we need yet another bit! Turn the next card to the left face up (C). Now there are seven dots visible. Turn cards A and B back face down. Four dots are visible. The binary number is 00100.
Continue in this fashion until all participants seem confident in turning the cards around.
5. Ask the participants what some familiar decimal system numbers are in binary format. For example 7, 11, 16 or the participant’s age.
6. Ask the participants to write the decimal number 31 in binary format. (Answer: 11111)
7. Ask the participants to write the decimal number 32 in binary format.(Answer: we need yet another bit! Let’s put the card F to the left of the other cards. It has 32 dots, so the other cards must be turned face down. The binary representation is 100000.)
8. If the participants feel up to the task, you can also include cards G and H. With 8 cards we have a byte of space at our disposal. A byte is a basic unit within the computer, used for example to denote hard drive size. One gigabyte is a billion bytes, that is, 8 billion bits.
Here is a table for checking some conversions from decimal to binary system.
Decimal Binary Decimal Binary Decimal Binary
1 00000001 11 00001011 30 00011110
2 00000010 12 00001100 40 00101000
3 00000011 13 00001101 50 00110010
4 00000100 14 00001110 60 00111100
5 00000101 15 00001111 70 01000110
6 00000110 16 00010000 80 01010000
7 00000111 17 00010001 90 01011010
8 00001000 18 00010010 100 01100100
9 00001001 19 00010011 128 10000000
10 00001010 20 00010100 255 11111111

70

70
