public health writing guide
TRANSCRIPT

1
Public Health
Writing Guide
Table of Contents Part I: Introduction ........................................................................................................................................ 3
Part II: General Writing Strategies and Utilizing Feedback ........................................................................... 3
The Writing Process ................................................................................................................................... 3
Prewriting .............................................................................................................................................. 3
Writing ................................................................................................................................................... 5
Revising and Editing ............................................................................................................................... 6
Structure and Flow..................................................................................................................................... 9
Communicating Data ............................................................................................................................... 11
Incorporating and Describing Data ...................................................................................................... 11
Using Figures and Tables ..................................................................................................................... 11
Phrasing and Word Choice ...................................................................................................................... 14
Conditional Language .......................................................................................................................... 14
Casual vs. Academic/Professional Tone .............................................................................................. 15
General Tips for Writing ...................................................................................................................... 15
Writing as a Team .................................................................................................................................... 18
Tips for Effective Team Writing ........................................................................................................... 18
Resources for Non-Native English Speakers ............................................................................................ 20
Part III: Specific Types of Writing in Public Health....................................................................................... 21
Abstracts .................................................................................................................................................. 22
Critiques (including Book Reviews).......................................................................................................... 24
Executive Summaries ............................................................................................................................... 25
Fact Sheets ............................................................................................................................................... 26
Formal Emails ........................................................................................................................................... 27
Grant Proposals ....................................................................................................................................... 29
2
Letters to the Editor ................................................................................................................................. 31
Literature Reviews ................................................................................................................................... 32
Needs Assessments ................................................................................................................................. 34
Policy Briefs .............................................................................................................................................. 35
Policy Memos ........................................................................................................................................... 37
Professional Communication and Career Documents............................................................................. 39
Resumes ............................................................................................................................................... 39
Cover Letters ........................................................................................................................................ 41
Curricula Vitae ..................................................................................................................................... 44
Project Plans ............................................................................................................................................ 46
Project Reports ........................................................................................................................................ 48
Reflections ............................................................................................................................................... 50
Research Papers ....................................................................................................................................... 52
Part IV: Finding and Using References ......................................................................................................... 54
Finding Sources ........................................................................................................................................ 54
When to Cite ............................................................................................................................................ 54
How to Cite .............................................................................................................................................. 56
Understanding Plagiarism ........................................................................................................................ 57
Part V: Additional Resources ....................................................................................................................... 58
Recommended Writing Books and Websites ...................................................................................... 58
Grammar Resources ............................................................................................................................ 58
Part VI: Acknowledgements......................................................................................................................... 59
Part VII: References ..................................................................................................................................... 60

3
Part I: Introduction
Are you feeling unsure about how to get started on a public health writing project? Are you unclear on the difference between a policy brief and a literature review? Do you need to improve your online research skills? Would you like to start using an online citation management program? Whether you are a confident or anxious writer, the Public Health Writing Guide has something for you.
A core function of public health is to inform, educate, and empower. As such, writing is an essential tool for public health professionals, and strong written communication skills are critical for addressing the health needs of the communities served by public health professionals. Writing in public health requires evidence-based and clear communication to multiple audiences, including communities, researchers, policy-makers, health care providers, and other public health practitioners.
We hope the Public Health Writing Guide will become a key resource for public health studetns, teachers, professionals. Our goal is to provide you with writing guideliens that can be useful to you over the course of your career, any time you are looking for encouragement, structure, or advice about how to get started.
Part II: General Writing Strategies and Utilizing Feedback
The Writing Process Writing is a process that can generally be divided into three stages: prewriting, writing, and revising/
editing. This section will provide strategies to help you move though each stage. While this information
is presented in a linear format, be aware that the writing process is often not so simple. Writers typically
move in and out of each stage as their writing and content develop. The most important key to a
successful writing process is time; give yourself enough time to write and revise your drafts several
times!
Prewriting
Prewriting is the first stage of writing that focuses on planning and organizing your writing (1). Tasks
associated with this stage include (1):
• Determining your purpose,
• Developing a thesis, and
• Organizing your paper.
Devoting time to the prewriting stage can clarify your purpose, strengthen your argument, and improve
your organization.
Determining your Purpose
Before you begin to write, be sure you clearly understand your purpose (1,2). If you are writing for a
course, review the assignment’s description and rubric. Be sure to clarify any questions you may have
about the assignment with your professor or TA. When determining your purpose, ask yourself:

4
• What is my general topic?
• Who is my audience?
• What does my audience know about my topic?
• What style and tone of writing will help me communicate with my audience?
• What will I be arguing?
• What evidence is needed to support my argument (1,2)?
If you are having trouble deciding on your purpose, try these methods to help you refine your ideas:
• Brainstorming. Brainstorming is an approach that allows yourself space to freely generate ideas
and hone your topic (1). One type of brainstorming is listing everything that comes to mind
when thinking about writing your paper (1). After creating the list, ask yourself critical questions
about each item you listed. Responding may help you think through each idea. For more ways to
creatively brainstorm, check out this video.
• Discuss. Find a trusted peer, classmate, or mentor and talk through your ideas. You may find
that one topic naturally becomes easier to talk about or is more intriguing to you.
• Start with the Data. Look at related tables, graphs, and maps. Think about what the data is
saying and if you see any interesting trends or patterns.
Thesis Development
After careful consideration of your evidence, you should revisit your aims and develop a strong thesis
statement. Your thesis should clearly identify the public health problem and your purpose (3). It should
address your audience, establish a clear position, and outline your key points (3,4).
For more information about developing a thesis, visit:
• Developing a Thesis from Purdue OWL
• Tips and Examples for Writing a Thesis from Purdue OWL
• Thesis Statement Handout from UNC Writing Center
Organization
After determining your purpose, gathering your research, and developing your thesis, you should
consider organizing and planning your paper before diving into writing it. First, you should understand
the format of your paper. This step can help you discern how to arrange and present your argument.
Reviewing your assignment’s instructions and strong examples are excellent ways to learn the format of
your paper. For in-class assignments, if you need clarity on how to format your paper, check with your
instructor. Your instructor’s guidelines should always take priority over general suggestions found in this
guide. For more general information on typical types of writing in public health, visit the Specific Types
of Public Health Writing section.
Once you are familiar with the type of writing you will be doing, reflect on how your research will fit into
this format. Exercises such as outlining your argument or creating lists of your main points can help you
create a writing plan (3,5). After you have created a plan, reflect on it. Make sure your points flow
logically and that they support your overall thesis (3). Reconsider your audience and make sure the

5
points would be appealing and easy for them to understand. After you create a plan, see how your
research fits into it. All of your research may not stay in your draft; interesting findings may not always
naturally fit into your paper (3,5).
Need new ways to think about organizing your information? Try these strategies:
• Clustering. Make a diagram with the central topic in the middle. List words you associate with
the topic. Diagram how the sub-topics each relate to the central topic and draw branches that
show relationships (1).
• Storyboard. Write your thesis and your main supporting topics at the top of different note
cards. On each topic card, describe your evidence that supports the claim or note the evidence
you will need to gather to support it. Arrange each card on a wall or desk to visually see how the
topics relate logically together (5).
Below are some videos that demonstrate some prewriting techniques:
• Understanding Assignments
• Outlining
• Webbing
• Color Coding
• Comparing and Contrasting
• Drawing Relationships
Writing
In Mastering Public Health, Mary E. Northridge notes two keys to a positive writing experience for public
health practitioners: making a plan for writing, and making writing social (6). Likewise, these two
suggestions can help you create successful writing habits in graduate school. Creating a writing plan can
help you stay motivated and disciplined. To create a writing plan, follow these simple steps:
1. Create a S.M.A. R. T goal (Specific, Measurable, Action-Oriented, Realistic and Time-Sensitive).
o Identify what you want to accomplish on the assignment.
o Also consider other ongoing goals in your life that you will need to balance when
creating your writing plan (job, health, family, etc.).
2. Break down your overarching goal into smaller goals. Base the smaller goals on tasks that you
will need to complete to achieve your main goal. In identifying smaller tasks, be sure to include
time to revise, edit, and re-write the paper several times and time to meet with others for
feedback.
3. Given your deadline and other commitments, estimate how much time you will need to
complete each task. Create mini-deadlines for each task in addition to your overall deadline for
your paper. Do not procrastinate! Give yourself enough time to really engage with your writing.
4. Now that you have created a plan, prioritize time to write. Set aside the appropriate amount of
time each week or day to work on the paper (7).

6
In addition to carving out time for writing, make writing a social activity (5,6). Talking to your instructors,
peers, or other public health practitioners about your writing can help you stay focused on your goal.
Consider forming a writing group with your peers to-review each other’s work or simply share your
experiences with writing.
Lastly, make your writing sessions productive by minimizing distractions. Download apps and software
to help you log off and stay focused on your tasks (8). Find a productive space that allows you to focus
(8). Some writers need the silence of a library while others work best in a bustling café. If you have few
external distractions but still feel restless, consider getting up and moving around. A five minute walk
can do wonders for a distracted mind (9). Finally, get a full night’s rest (8)! Staying focused is difficult if
you are sleep-deprived.
Tailoring Writing to an Audience
An important step in writing is tailoring your language, tone, and style to your audience. To understand
your audience, ask yourself:
• What type of message is effective for the audience?
• What level of health literacy does the audience have?
• What is the audience’s culture and language?
• What are effective ways to engage your audience?
• Would visuals or written text be more effective for the audience?
• How does the audience feel about your topic?
If you don’t know the answers to these questions, research your audience. Once you have a stronger
understanding of your audience, write your paper with them in mind. Continually revisit your answers to
the above questions to ensure that you address your audience at the appropriate level. You can also
plug portions of your paper into a readability-score software to see if your language is appropriate.
Revise as necessary until you have the correct messaging for your reader
For more information on tailoring your writing to your audience, visit:
• CDC’s Health Communication Piece on Audience
• Clear Communication by the National Health Institute
• Clear & Simple: Developing Effective Print Materials for Low-Literate Readers by the National
Cancer Institute
Revising and Editing
Global-level Revisions
Global-level revisions should be your first step in reviewing and revising your paper (1). When
conducting global-level revisions, you should think of the “big picture” of your paper, including your
audience, argument, organization, flow, and presentation (1). When reviewing the paper, always keep
your audience in mind. The paper should be easy for your audience to comprehend, address the

7
expectations they may have, and be written at the appropriate language level (2,5). Here are other
general tips on reviewing your paper for global issues:
1. Review your paper’s framework. Your reader should be able to easily identify your introduction,
body, and conclusion. Check to make sure that the introduction and conclusion states your main
argument clearly (5).
2. Evaluate your argument. Is your argument convincing and high-quality? Have you provided
enough evidence to sustain your argument? Have you addressed counterarguments (2,3,5)?
3. Revise your organization and flow. Your argument should be clearly presented, structured, and
supported by the organization your paper. Is each section clearly defined? Do the ideas within a
paragraph connect? Does each paragraph link to each other? Do the ideas presented in each
paragraph build on each other? Is it clear how each section relates to the whole (2,3,5)? Try
these strategies to help you analyze and evaluate your organization:
o You can improve your organization by using linking phrases and keywords to help your
reader understand the connections between points (5).
o Consider outlining again after you finish the first draft. Create a new outline directly
from the draft by identifying main section headings, major points, and supporting facts.
Use this visual tool to identify areas that need better connections, to rearrange your
points to improve your flow, or to remove points that do not tie into your overarching
purpose (3).
o Write a one-page summary of your paper without referencing your draft, boiling down
your paper to the essential points. Next, create an outline from your summary. Does
your outline match the organization of your current draft? If not, would changing your
organization to reflect the new outline improve the paper (3)?
4. Assess your paper’s presentation. The paper should have clear paragraphs, section headers,
appropriate line spacing, and standard font and font sizes. Consult your assignment guidelines
to make sure your formatting is appropriate. In addition to a simple layout, review any figures,
tables, or graphs you included to make sure they are visually appealing and easy to understand
(2).
In addition to these general suggestions, if you are writing for an assignment, check your work against
the requirements and instructions given by your teacher. Pay attention to the details given in the
assignment description and/or rubric. Did you answer every question posed by the instructor? Are you
sections the appropriate length? Did stay within the word count or page length given by your instructor?
If you have questions about your assignment’s requirements, please check with your instructor.
Sentence-level Revisions
Sentence-level revisions are revisions that improve your clarity and conciseness. They include refining
your sentence structure, eliminating wordiness, examining your style, and correcting your grammar,
punctuation, and spelling (1).

8
Reading your paper out loud or upside down are a great ways to check for sentence-level revisions. The
act can help you spot areas that are wordy or awkwardly phrased. Reading each word also forces you to
slow down and pay attention to grammar, punctuation, and spelling.
Another strategy to help strengthen your sentence structure is the Paramedic Method of Editing. The
method is particularly effective at identifying wordiness and passive voice.
When using both methods, be sure to check for these most common offenders in public health writing:
• Be specific. When describing your data, do not use vague descriptions such as “number of”,
“several”, or “many.” Choose words that accurate describe your statistics (5).
o Needs Improvement: “Many people are obese.” How many? Who are “people”?
o Improved: “More than one-third of U.S. adults (34.9%) are obese.” This statement is
more precise because it tells us how many people are obese (34.9%) and specifies the
population (U.S. adults).
• Eliminate Unnecessary Phrases. Examine your words and phrases and revise them for more
concise structures. In your writing, every word should have a purpose. Be wary of redundant or
vague phrases. Some common phrases to remove are “in my opinion”, “it is important to note
that…”, and “there is/ there are” (5).
o You should also avoid flowery prose, as it distracts from effectiveness. Never use a long
word or phrase when a short one is just as powerful. For example, choose “use” instead
of “utilize” and “consider” instead of “take into consideration.”
• Jargon. When writing for the general public, avoid overusing jargon (5). For examples of jargon
overuse in public health writing, read this short article and corresponding letter from the British
Medical Journal.
• Watch your Tone. In public health writing, tone is a critical tool to persuade your reader. Be
careful of exaggerating your findings, judging your population, or being condescending. You
should approach your subject matter with sensitivity and humility, keeping in mind how your
audience would react to your language.
• Acronyms. When using a technical term or acronym, define it on the first mention in the text.
Avoid overusing acronyms, particularly when writing to lay audiences (5).
Below are some videos that demonstrate some self-editing techniques:
• Proofreading
• Conciseness
• Reading Aloud
• Flow
• Reverse Outline
9
Structure and Flow While each type of public health writing has a slightly different structure, there are several universal
components to ensuring your writing flows logically.
Structure
In some capacity, your writing will include the following:
• Introduction. Introduce your topic, briefly frame the background research, and provide a thesis
statement that identifies your key points. The thesis will provide an outline and a framework for
the rest of your writing. Use the introduction to engage the reader and present why your topic
is important without being overly dramatic or catastrophic. Furthermore, do not start with a
definition of a term or topic.
• Body. Using your thesis statement as a guide, the body of your assignment should present your
arguments in a logical order. This section is the most variable, as each type of public health
writing is slightly different. Visit the Specific Types of Public Health Writing section for more
information on how to construct this section for individual assignments.
• Conclusion. The conclusion should serve as a recap of the points you made in the body section.
The arguments in the body should build up to a culmination in the conclusion, so you should
not introduce new topics or arguments in this section. Many forms of public health writing
require that the conclusion includes a call to action or the final recommendation.
Flow
The flow of your writing should be logical and build upon itself throughout your writing. Below are some
examples of ways to enhance the flow of your writing.
• Build a foundation in your early paragraphs and then build your arguments successively.
• Subheadings can be helpful to both guide your reader and provide a roadmap for your writing.
After each subheading, you should ensure that each successive paragraph addresses the
subheading theme.
• Include only one major point or idea per paragraph. Make sure that each argument is well-
supported by research, data, or other explanation.
• Arrange related arguments/topics together. For example, if you wish to address the
socioecological determinants of health, you should address all individual constructs together,
followed by the interpersonal determinants, and so on. It can be confusing for the reader to
jump back and forth between different construct levels, so it is best to group your arguments
accordingly.
• Provide transitions between paragraphs and sections of your writing. Never leave your audience
wondering where you have gone, or why you have taken them there. Check out these
Transition Phrases that may be useful in your writing.
• Ensure that each paragraph or argument relates back to your thesis or desired goal. You may
have many arguments, but they should all lead to and support your
conclusions/recommendations. If you cannot justify that an argument significantly contributes

10
to your conclusion (or if it is only included to increase your word count or paper length), you
should remove it.
While there is not a “correct” way for your writing to flow, arranging arguments in a logical manner can
improve both your ability to make substantive claims and the reader’s ability to understand your
conclusions.
11
Communicating Data Integrating data and research into your writing can strengthen your argument in public health. You must
clearly present and communicate how the data fits into your paper. This section can help you discern
the best way to communicate your data and engage readers in your research.
The first step to communicating data is deciding how to display them. Generally, data are displayed in
either tables or graphs. Tables are better for communicating precise numbers, while figures are better
for displaying patterns and relationships (5). For information on how to choose the best visual
representation for your data, visit:
• BUSPH Data Presentation Module
• Making Data Talk: A Workbook by National Cancer Institute
• Flow Chart for Choosing a Chart
• Perceptual Edge – Selecting the Right Graph for Your Message
Incorporating and Describing Data
After choosing and creating visuals for your data, you should include remarks about how the data
relates to your paper. Never insert a table without referencing it in the text either by name or table
number. When writing about data, be sure to go beyond describing it; instead, your writing should
incorporate an analysis and discussion of how the data fits into the purpose of your paper (2). Academic
Writing for Graduate Students states the following elements should be included in your data
commentary:
• “Location elements and/or summary statements” (2). Include the location and timeframe of the
data.
o Example: Figure 2 illustrates the trends of health care spending from 2007-2010.
• “Highlighting statements – generalizations that you can draw from the details of the data
displayed” (2).
o Example: According to these results, health care spending is rising.
• “Discussion of implications, problems, exceptions and/or recommendations”(2).
o Example: Increases in hospital spending are a major driver of health care spending;
therefore, health care policy should focus on reducing this area of health care
expenditures.
When writing about data, consider including statements that address these three points to enhance
your discussion.
Using Figures and Tables
For both figures and tables, it is essential to include a title and include the figure/table number. For
example, “Figure 3: Competing Academic Services by Program Type” or “Table 5: Percent of Program
Participants by Number of Credits, 2010-2014.” You should refer to the data in the main text by
explaining a key point, then referencing the chart. For example, you might say “For both programs, most
students sought out a professor or TA for additional academic assistance (see Figure 3).” With both
12
types of data presentation, you should include the date/year whenever appropriate, particularly if
you’re comparing trends across time periods.
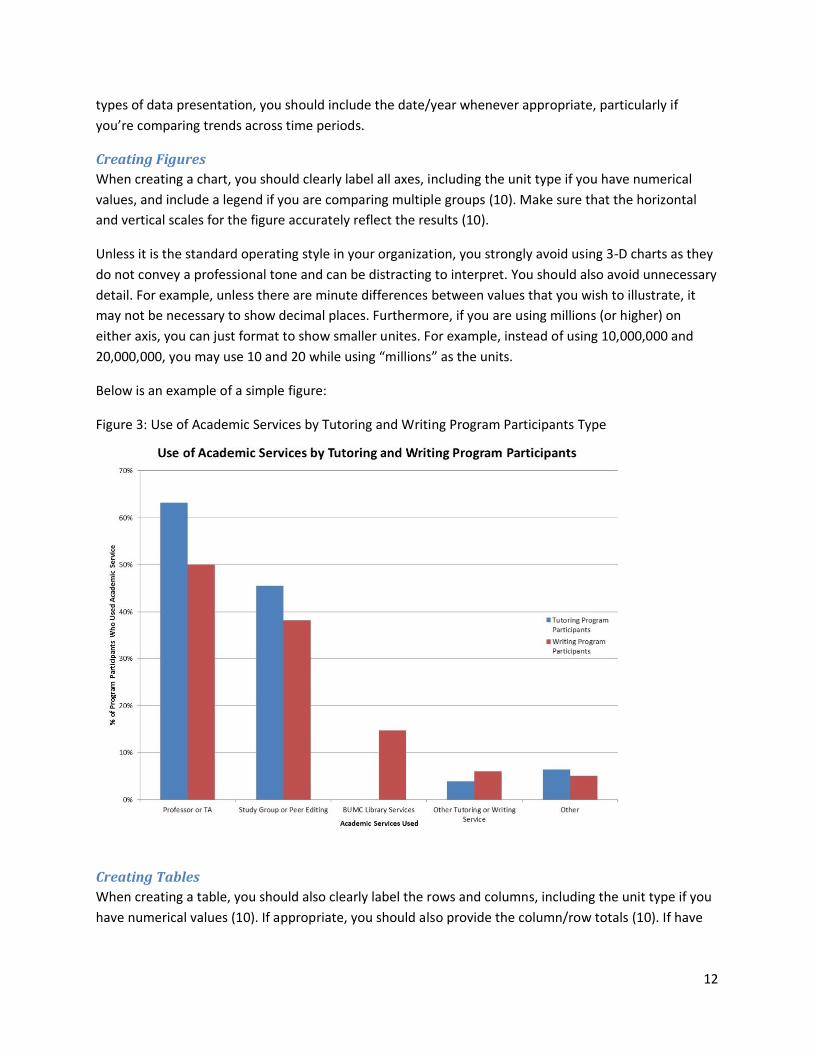
Creating Figures
When creating a chart, you should clearly label all axes, including the unit type if you have numerical
values, and include a legend if you are comparing multiple groups (10). Make sure that the horizontal
and vertical scales for the figure accurately reflect the results (10).
Unless it is the standard operating style in your organization, you strongly avoid using 3-D charts as they
do not convey a professional tone and can be distracting to interpret. You should also avoid unnecessary
detail. For example, unless there are minute differences between values that you wish to illustrate, it
may not be necessary to show decimal places. Furthermore, if you are using millions (or higher) on
either axis, you can just format to show smaller unites. For example, instead of using 10,000,000 and
20,000,000, you may use 10 and 20 while using “millions” as the units.
Below is an example of a simple figure:
Figure 3: Use of Academic Services by Tutoring and Writing Program Participants Type
Creating Tables
When creating a table, you should also clearly label the rows and columns, including the unit type if you
have numerical values (10). If appropriate, you should also provide the column/row totals (10). If have

13
many columns of data, you might consider keeping the gridlines on or utilizing row shading to ensure
that the reader can follow the trends.
Below is an example of a simple table:
Table 5: Percent of Program Participants Per Year by Number of Credits, 2010-2014
For more information, visit the following resources:
• Six Simple Techniques for Presenting Data
• Descriptive Epidemiology Module on Data Presentation
• University of Leicester – Presenting Numerical Data
• Information on creating graphs and charts:
o Creating a Line Graph
o Creating a Chart

14
Phrasing and Word Choice Public health writing requires a certain level of nuanced writing. There are two main aspects that make
public health writing unique: conditional language and casual vs. academic/professional tone. While it
may seem nitpicky, terminology is very important to convey an urgent and honest but not alarmist tone.
Conditional Language
The strength of scientific proof is often based on statistical analysis, and the relationship between
evidence and hypotheses. How the evidence is interpreted is dependent on many factors from study
design to assumptions and beliefs of the investigators and the audience. Our data and findings may
suggest strong correlations or even a causal direction, but it is usually not possible to state definitively
that x causes y.
Therefore, as with most scientific writing, there is nothing that we can absolutely prove in public health;
our data and findings suggest strong correlations or causations, but we cannot say that X proves Y.
Moreover, using certain language can cause unnecessary alarm for communities that may not have a
solid understanding of scientific data.
It is often more appropriate to use conditional language to make it clear that the evidence is revealing
correlations or (in the case of a randomized controlled trial) suggesting a causal mechanism, but that
other explanations are possible. To emphasize a point, you should consider using conditional language,
such as the following (11):
• May
• Could
• Might
• Potential
• Probable
• Likely
• Estimated
• Data suggest
• Research indicates
• Evidence supports the idea that
• The evidence suggests a relationship between…
You should avoid using the following terms:
• Proves
• Will (certainly)
• Causes
Using conditional language should not be confused with always be neutral and not taking a position.
Public health writing should be objectively critical and make claims when supported by reasoning and
evidence. We will discuss this further in other sections. However, no matter the strength of the
15
association, you should always leave room for the possibility of being incorrect. For example, you should
say “Drinking sugar-sweetened beverages may lead to increased rates of obesity” rather than
“Researchers have proven that sugar-sweetened drinks cause to obesity.”
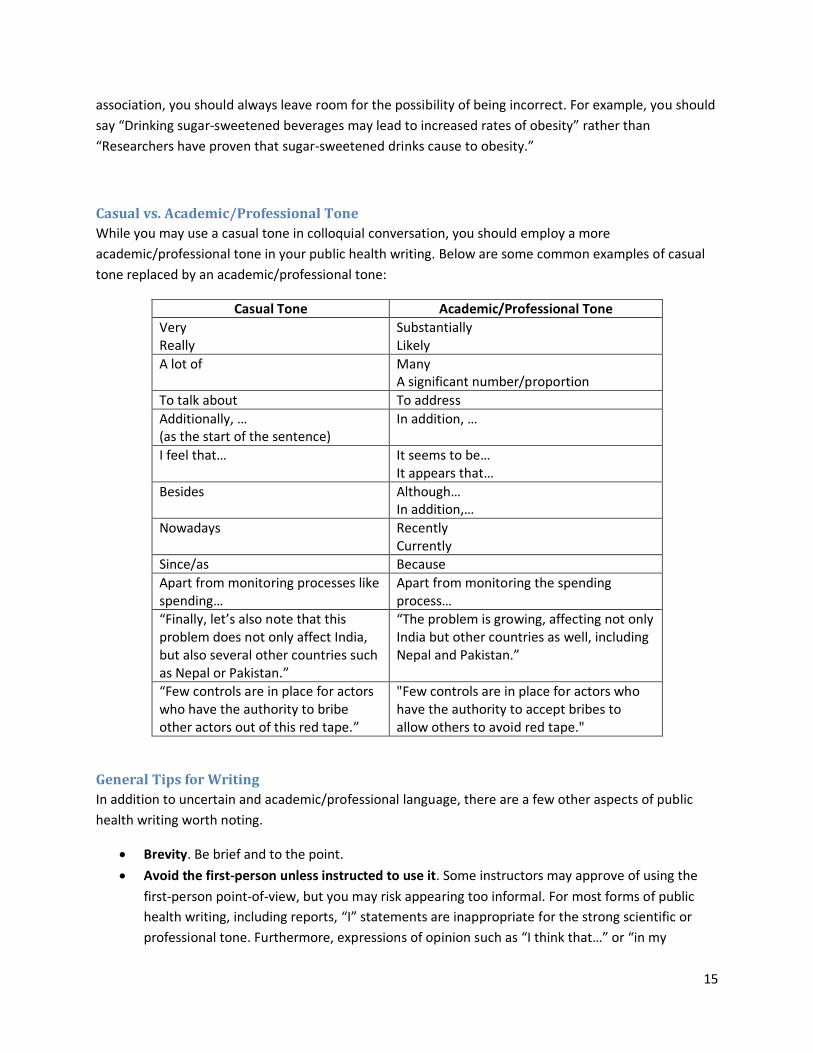
Casual vs. Academic/Professional Tone
While you may use a casual tone in colloquial conversation, you should employ a more
academic/professional tone in your public health writing. Below are some common examples of casual
tone replaced by an academic/professional tone:
Casual Tone Academic/Professional Tone
Very Really
Substantially Likely
A lot of Many A significant number/proportion
To talk about To address
Additionally, … (as the start of the sentence)
In addition, …
I feel that… It seems to be… It appears that…
Besides
Although… In addition,…
Nowadays Recently Currently
Since/as Because
Apart from monitoring processes like spending…
Apart from monitoring the spending process…
“Finally, let’s also note that this problem does not only affect India, but also several other countries such as Nepal or Pakistan.”
“The problem is growing, affecting not only India but other countries as well, including Nepal and Pakistan.”
“Few controls are in place for actors who have the authority to bribe other actors out of this red tape.”
"Few controls are in place for actors who have the authority to accept bribes to allow others to avoid red tape."
General Tips for Writing
In addition to uncertain and academic/professional language, there are a few other aspects of public
health writing worth noting.
• Brevity. Be brief and to the point.
• Avoid the first-person unless instructed to use it. Some instructors may approve of using the
first-person point-of-view, but you may risk appearing too informal. For most forms of public
health writing, including reports, “I” statements are inappropriate for the strong scientific or
professional tone. Furthermore, expressions of opinion such as “I think that…” or “in my

16
opinion…” should not be included. Let the evidence, literature, or arguments speak for
themselves.
o Note: Some approve of the first-person point-of-view, such as “In this paper, I will
discuss…” By removing the first-person viewpoint, you risk using the passive voice (see
below). For example, switching “I analyzed” may require you to use “Data were
analyzed.” Decisions like this will depend on they type of writing your are doing and who
your audience is.
o Needs Improvement: “In this paper, I will discuss the following barriers to health….”
o Improved: “This paper addresses the following barriers to health…”
o Needs Improvement: “I think that...”
o Improved: “The evidence illustrates that…”
• Avoid contractions. It is best to avoid using contractions in academic/professional writing. You
should generally use the expanded form.
o Needs Improvement: “The community doesn’t have access to healthy food options.”
o Improved: “The community does not have access to healthy food options.”
• Use active over passive voice. Write in the active voice and use the passive voice sparingly (6).
For an in-depth review of active vs. passive voice and appropriate use of the passive voice, visit
these links:
o Needs Improvement: “Refugees are provided medical attention by the U.N.”
o Improved: “The U.N. provides medical attention to the refugees.”
o More resources:
▪ Active/Passive Voice Video
▪ Active and Passive Voice from Purdue OWL
▪ Active Voice Versus Passive Voice from Grammar Girl
• Avoid clichés, idioms, and purple prose. Clichés often convey a casual tone at the expense of
succinct academic writing (12). Replace clichés with direct language.
o Needs improvement: “jumped on the bandwagon”
o Improved: “followed the cultural trend”
o Needs Improvement: “Problems plaguing the community”
o Improved: “Problems affecting the community”
o Needs Improvement: "deadly/disastrous consequences”
o Improved: “consequences”
• Avoid quotes. You should avoiding quoting when citing other works. The general convention is
to quote only when the language is too complex or unique so that you cannot paraphrase it.
o Needs improvement: Savedoff and Hussman point out, “susceptibility to corruption is a
systemic feature of health systems,” (Savedoff & Hussman, 2005), in part because of
large amounts of public money and the sheer number of people involved in operating
and regulating a health system (13).
o Improved: Health systems are susceptible to corruption in part because of the large
amounts of public money and numbers of people involved in operating and regulating
health systems (Savedoff & Hussman, 2005) (13).

17
• Consider reading level. According to the CDC, one-third of US adults have trouble reading health
information(14), highlighting the importance of adapting materials to the reading level of the
audience.
o You can turn on reading level information on Microsoft Word rather than downloading
external software. Simply enable the following: File > Options > Proofing > When
correcting spelling and grammar in Word > Show readability statistics. These results
show reading level.
o If the reading level is too high, consider using simpler words, reducing jargon, and
implementing shorter sentences. Visit Plain Language for more information on altering
the reading level.
For more information on strong language and word choice, visit the following resources:
• Simply Put: A Guide for Creating Easy-to-Understand Materials from the CDC
• Common Expressions in Academic Writing – Online Writing Lab
• Common Mistakes and Tricky Choices

18
Writing as a Team An essential skill in public health is the ability to effectively collaborate with teams to produce quality
products, reports, or deliverables. The public health workforce is collaborative in nature and requires
most work to be done within groups. Working in teams allows you to develop your own writing and
analytical skills by collaborating with your peers.
For more information on working in teams, check out this module. This section will specifically discuss
the team writing process, but you are strongly encouraged to review module to strengthen your team
skills.
Tips for Effective Team Writing
• Timeline. One of the most overlooked team challenges is setting deadlines and establishing a
timeline for the products. Many teams often follow the predetermined deadlines for the
project, leaving minimal time for editing and causing unnecessary stress. To maximize
effectiveness and minimize stressfulness, your team should set early deadlines. For example, if a
project is due on Friday, your team should set the team deadline of Wednesday so that the final
product may be compiled, edited, and reviewed by the entire team with ample time prior to
submission. Furthermore, if the project is rather large, setting periodic team deadlines for
smaller tasks along the way can maximize efficiency. Most importantly, stick to your schedule!
• Formatting and organization. Naturally, each team member will approach the assignment with
a different writing style. As early as possible, your team should agree upon a specific formatting
style and organization for the paper. This includes citations, style of writing (such as avoiding
passive voice or using first-person), whether to include headings or bullet points, argument
structure, length of each section, how to arrange arguments, and any other relevant formatting
elements. Having this discussion early will streamline the process of compiling everything and
allow the final team editor to focus on overall voice of the paper.
• Team Strengths and Task Delegation. Your team would benefit from initially assessing the
strengths and weaknesses of each team member. Determining who has a strong editing
background, communication skills, data analysis skills, or organizational skills will be useful in
delegating tasks. However, while each person may have a particular strength, each team
member should contribute equitably to the overall project. Furthermore, your team should
thoroughly discuss the organization of the paper so that arguments are not repeated in each
team member’s respective section (15).
• Co-writing. Your entire team should write the introduction, transitions, and conclusion together
(16). The introduction will establish a skeleton and purpose for the rest of the paper, the
transitions will assist in the logical flow of the paper, and the conclusion will be the final
synthesis of your arguments. Therefore, these elements require that the entire team is on the
same page with their understanding of the project, that there is a shared vision, and that there
is a clear direction for the final product.
• Final editing. Do not leave all the final editing to one person, as it can be very time consuming
and the editor may not fully comprehend the entire vision of the project (17). At every step of
the process, each team member should provide feedback, edits, and suggestions for the project.
This is especially important at the end of the process with the semi-final product, prior to
submitting the final version. Your team should have a final editor to provide one final scan of the

19
document and ensure one voice, but each team member should review and edit prior to this
final scan. Each person should approve the final product before it is submitted (15).
• Have fun! The team process can be stressful at times, so it is important to counterbalance the
stress with fun. Maintain your sense of humor and take every opportunity to share the funny
side of your challenges. The writing process may actually benefit from the comradery and
enthusiasm (17). As the team becomes comfortable with one another, critiquing the work of
your group becomes easier and could ultimately lead to a stronger final product.
Additional Resources:
• Team Writing Checklist – OU College of Business
• Group Writing – UNC Writing Center
• Tips for Successful Writing Groups
• Approaching Group Writing Projects – Washington
• Writing the Paper Together - CSU
• Writing as a Team – Corporate Writing Pro

20
Resources for Non-Native English Speakers Many resources exist for non-native English speakers. Below are a variety of resources to accompany
you with your graduate-level writing.
Grammar Resources
• Online Writing Lab ESL Student Resources. For a comprehensive look at English grammar and
mechanics, visit this page.
• Grammar Lessons. Visit this page for a review of grammar lessons.
• Grammar Exercises. If a tutor suggested you work on a specific area, try to practice with these
resources.
• Grammar/Usage Frequently Asked Questions. This includes resources on homonyms, when to
capitalize, idioms, and more.
English Writing Resources
• American vs. British English. Many non-native English speaking students attend American
universities having learned the British form of English. Not only are there pronunciation
differences, but some vocabulary and spelling is slightly different from American English. While
many professors will not count these differences against you, it is helpful to learn some of the
differences to ensure your messages are clear.
o Spelling Differences. ESOL students commonly use the British spelling of words, such as
“recognise” rather than “recognize” or “learnt” rather than “learned.”
o Vocabulary Differences. ESOL students may use terms like “petrol” instead of “gas” or
“gasoline” and “maths” instead of “math.”
• Transitional Phrases. To help with the flow of your paper, consider using these phrases.
• English Idioms. Avoid these phrases in an effort to keep your writing professional.
Academic Integrity and Social Practices in U.S. Universities
• Academic Integrity
• American Classrooms Practices
• Plagiarism and ESL Writers

21
Part III: Specific Types of Writing in Public Health Writing for specific audiences to achieve public health objectives is not limited by a single genre or
purpose. The most common types of documents we need to write run a broad gamut that includes:
emails, policy briefs, white papers, grant proposals, research protocols, scientific reports, articles for
peer-reviewed journals, abstracts, scopes of work, standard operating procedures, budget justifications,
public service announcements, op-eds, letters to the editor, blog posts, tweets, and the list goes on.
Each type of document has some standard expectations about language and organization. And over the
course of our careers, we get familiar with some of the basic formulas. But we are never on completely
firm ground because reader expectations can differ, sometimes dramatically. For instance, a policy brief
can look very different depending on the subject matter, purpose, and audience expectations. And,
while some readers assume you will know what they expect without them having to tell you, others will
provide detailed instructions. So you, the author, are always adapting, relying on formulas that (if you
write often) eventually become second nature, but being equally ready to set aside your outline when
you receive detailed instructions.
The most common types of public health writing include:
• Abstracts
• Critiques (including Book Reviews)
• Executive Summaries
• Fact Sheets
• Formal Emails
• Grant Proposals
• Letters to the Editor
• Literature Reviews
• Needs Assessments
• Policy Briefs
• Policy Memos
• Project Plans
• Project Reports
• Professional Communication
• Reflections
• Research Papers

22
Abstracts An abstract is a short summary of a larger work, such as a research paper, presentation, or poster (18).
As a graduate student, you will be required to write an abstract as part of your practicum experience.
Public health students and professionals also frequently submit abstracts as part of a selection process
to present at professional conferences including American Public Health Association’s (APHA) annual
meeting. Therefore, understanding how to write an abstract is crucial for your educational and
professional development.
The guidelines for writing an abstract vary depending on the conference or assignment. “In general, an
abstract should tell the reader these five things: 1) What you did; 2) Why you did it; 3) How you did it; 4)
What you found; and 5) What it means” (19). It usually has the following sections (19,20):
• Introduction/ Background: What is the purpose of your paper/presentation? What public health
problem does it address? Define the public health problem and its scope.
• Method: Describe your research method or program.
• Results: Describe your specific results or projected outcomes.
• Discussion: What is your conclusion/ recommendation? What is the significance of your
program/ research? What its impact on the public health problem?
Stylistically, abstracts should follow the four Cs:
• Complete. Cover major parts of project/case/study
• Concise. Contains no wordiness or extra information
• Clear. Readable, well organized, and not jargon-laden
• Cohesive. Flows smoothly between parts (21).
It is important to stay within the prescribed word limit. If you are instructed to stay within 250 words, do
not exceed the limit. Many conferences will only accept the abstract up to the word limit; the rest will
be ignored.
Tips for Writing an Abstract for a Conference
Writing an abstract for acceptance to a conference or journal is similar to writing a sales pitch (21). You
are trying to convince the reviewers what you can give them and why you should be selected. Here are
some tips to writing a successful abstract:
• Research the conference
o What types of abstracts have they accepted in the past?
o What are their guidelines?
o What are the conference theme and learning objectives? How can you tie your abstract
into their overall goals?
• Research the field
o What are the buzz topics in your field?
o How is your research innovative and unique?
23
• Make your title descriptive and catchy
• Once you have written your abstract, proofread your work! Reviewers often reject abstracts
with grammar, punctuation, or spelling errors.
For more resources on writing abstracts, visit:
• Writing Scientific Abstracts Presentation by Purdue OWL
• Abstract Handout from UNC Writing Center
• Preparing and Submitting an Abstract to APHA by BUSPH

24
Critiques (including Book Reviews) Critiques provide insightful reflection on a written piece, often a journal article or book (including book
reviews). They allow you the opportunity to express your thoughts on another person’s work, and either
contribute or scholastically disagree with the author’s main points. You should use a critical eye to
examine the article or book by integrating previous knowledge, course content, applied practice, or
other aspects of critical thinking.
Prior to beginning the critique, read the source material several times (22). This ensures that you have a
comprehensive understanding of the source material, but also provides an opportunity to catch missing
pieces or gaps in logic.
General Structure
While specific critiques may vary, they generally follow the same structure (22):
• Summary. Your critique should start with a brief summarization of the source material, including
the title, author, and main concepts. It is not necessary to spend a substantial amount of time to
summarize the content of the article or book; rather, the primary objective (and therefore the
largest component of the critique) is to analyze and critique the information presented.
• Areas of success and insights. While it may be easier to identify what the author of the source
material has forgotten, it is important to acknowledge what the author has done well. Perhaps
they had compelling arguments, or identified unique needs in the community. The author of the
source material had an objective in writing their piece, and it is important to acknowledge this
contribution to the field.
• Areas for improvement and controversies. After identifying areas of success, it then becomes
easier to highlight areas for improvement. For example, an author may have had compelling
conclusions, but perhaps the data did not support the arguments or there was significant bias in
the study design that went unaddressed. In articles, you can discuss flaws in the study design or
analysis of the results. In books, you can discuss unsuitable jumps in logic or inadequate
assessment of the community’s needs.
The critique should offer criticism of the author’s ideas or role rather than attacking the author’s
personality (22). Furthermore, avoid using language that is too casual. While your opinion is present in
the critique, it should be become apparent based on your criticism rather than explicitly stating “I did
not like the article.”

25
Executive Summaries Executive Summaries are similar to an abstract in that they provide an overview, but executive
summaries are typically longer. They are often included at the beginning of Project Reports as an overall
summary for the entire project and serve as a “stand alone” document (23). The audience is typically an
organization itself (if they requested the project) or those who may be familiar with the organization
and its efforts.
Executive Summaries should be succinct and discuss only the most important factors of the project. No
background information is necessary, as the audience likely knows the background of the organization
or could read about the background in later sections of the report. You should, however, introduce the
problem presented by the organization and the purpose of the report.
If you are developing recommendations in the report, focus on these recommendations in the summary.
If you are investigating a program or policy, discuss the major findings. Your readers are looking to the
Executive Summary for a very quick summation of your findings and can defer to the rest of the report
for more specific details.
Therefore, an Executive Summary does not exist to replace the Project Report, but rather allows the
reader to quickly understand the results and persuade them to read the report (24).
General Tips
• Emphasize the following components(24):
o The purpose and aim of your report.
o The results and recommendations you discovered.
• Most executive summaries are no more than one page. However, some instructors prefer that
the Executive Summary be about 5-10% of the total pages in the report (i.e. if the project report
is 50 pages, the Executive Summary should be 2.5-5 pages long).
• Use bullet points and bolding to emphasize your main points. Bullet points can be helpful to list
several findings in a clear fashion. Bolding can draw attention to a point you wish to emphasize,
so you should use it sparingly to be effective.
• Use your best judgement to eliminate unnecessary information (24). Think about the following:
What would the reader want to know about the report? What findings would the reader be
most interested in? How can I convince them to read the entire report?
• Avoid copying/pasting sentences from the report itself (24). This can become repetitive and
deter the audience from reading further.
For more information on writing Executive Summaries, check out these resources:
• Writing Executive Summaries – UMUC
• Executive Summaries Complete the Report - CSUN
• Good and Poor Examples of Executive Summaries
26
Fact Sheets Fact sheets are typically one-page documents that emphasize the abbreviated arguments of an issue
(25). Space is typically very limited, so you should focus on only the most compelling points.
Typically, fact sheets are provided to reporters or politicians, people who must make informed decisions
with little time to review in-depth reports or articles (25). Keep in mind that the reader will spend very
little time reviewing the fact sheet, so make it short and easy to understand (26).
While the fact sheet is an abbreviated report, citing reputable sources for data is still incredibly
important (26). The goal of fact sheets is to present the facts or statistics, but also to interpret the
significance of these data to the audience (26).
Audience
You should keep your target audience in mind as you create the fact sheet. The audience may be a
legislator, an NGO, the general public, or any member of a community. Each of these audiences
deserves a tailored fact sheet that utilizes the audience’s common language.
Keep in mind that main points may also shift depending on the audience. A politician may be more
interested in state-level statistics, while an anecdote may make an issue more salient for a member of
the general community member. It is best to determine what information will best engage and inform
the audience prior to creating the fact sheet (26).
Layout
While creating a fact sheet, keep these important tips in mind (25):
• Avoid jargon and simplify complex topics where possible.
• Use 12-14 point font so that the text is readable.
• Use bolding, bullet points, and other key formatting choices to emphasize arguments.
• Text boxes, tables, charts, infographics, and other visual representations of data may help to
draw attention to key statistics in an easily understandable manner.
• The community should be able to contact the creator or an alternative for more information and
so the fact sheet should a contact (name and phone/e-mail).
For more information, visit the following resources:
• Creating Fact Sheets - Community Tool Box at University of Kansas

27
Formal Emails In both academic and professional settings, formal emailing is a requirement. Email etiquette can
drastically change the recipient’s perception of the sender, and thereby their subsequent interaction.
Formal emailing can be applied to many situations, including a meeting request, an informational
interview request, a job application, reaching out to a professor, a request for a recommendation, a
request for information to complete a project, or any other academic or professional electronic
correspondence.
Academic Emailing
Regardless of the relationship with a superior or the superior’s casual demeanor in person, you should
use formal emailing when reaching out regarding the course (27). It is safest to initiate the conversation
with a formal tone, although a relationship may become more casual as you get to know each other
better (27).
• Needs Improvement: “Hey Jane” or “Hey Prof”
• Improved: “Dear Professor Doe”
Professional Emailing
Email is frequently used to apply for jobs or collaborate with others in a professional setting. If the
sender and recipient are not familiar with each other, a formal tone should be utilized to maintain a
professional relationship. Again, the relationship may become more casual over time, but a formal tone
should be initially adopted.
Structure:
• Subject Line. Use a clear, concise subject line (28). The recipient may utilize this to prioritize
opening the message and may also use keywords to search for the message.
o The person receiving your email should be able to tell what it is about from the subject
line. Many of us receive hundreds of emails a day so it’s important to make yours stand
out. A clear subject line is what helps the person you are writing to decide to open and
read your email.
• Greeting. Formal greetings should always be included (28). If the recipient is unknown, it is best
to use “To Whom It May Concern.” If the recipient is known, it is best to use “Dear Name.” In a
public health context, try to find out the preferred title of the individual (e.g. Dr., Ms.). If you
cannot find the title, it is better to err on the side of giving people a higher title (i.e. Dr.) or their
job title (i.e. Director, Commissioner, or Professor).
• Body. Maintain a friendly tone and a concise message (28). Avoid jokes and sarcasm, as these
are easily misinterpreted and can appear inappropriate via email. Similarly, keep the message
very concise as excessively long messages may be viewed as a waste of time (no page-long
emails).
• Agenda/Deadlines. Be very clear with the proposed agenda or deadlines in the message. If you
are requesting a meeting time, provide some days and times that may work for you.
• Closing/Signature. While closing the message, end with “Sincerely,” “Best Regards,” or simply
“Thank you,” followed by your name, class/school/job affiliation, and title if appropriate.

28
• Attachments. If there are attachments, be sure to address the attachment in the body of the
message. For example, it is acceptable to say “Attached please find the document you
requested.” Alternatively, it is also acceptable to write “Enclosed: contract, budget” after the
closing of the message.
Best Practices
• Use a professional account or an academic account. The most accepted practice is to use an
account with your name, such as a “[email protected].”
• Always double-check the message for spelling errors and clarity (28).
• It is best to include the relationship to the recipient. For example, include the class number if
sending a message to an instructor or the job title if reaching out to another organization.
• If you are writing someone you do not know, but have been referred by a mutual contact, be
sure to reference that contact early in the message. For example, you may wish to say, “Dr.
Carter suggested that I reach out to you with my questions about healthcare reform.”
A Note on Calendar Invites
Calendar invites can be a useful tool when collaborating with colleagues. Many of the same rules from
formal emails apply to calendar invites. For example, you should be specific in the appointment subject
line, and always include a location. Furthermore, be cognizant of your language settings on your
account. If your computer system is in another language and you send a calendar invite, the recipient’s
account may mark it as spam.

29
Grant Proposals Grant proposals are in-depth plans that seek monetary sponsorship from external funders. Many public
health projects are funded through governmental or foundational grants. Diagram 1 below illustrates
the general grant writing process (29).
Source: University of North Carolina at Chapel Hill Writing Center (29)
Writing the Grant
While each funder has different requirements for a proposal, there are some general tips that can be
applied to all grants. The most important aspect to writing a grant is to precisely adhere to the
guidelines and answer all required questions (29); many funders will not review proposals that do not
strictly follow the instructions.

30
It is crucial to be both specific and realistic while answering questions and designing the project (29).
Funders want to understand exactly how the project will address gaps in care or provide a service to the
target population; make sure the grant proposal delineates a clear link between the project design and
expected outcomes.
Tailoring the grant to the funder also includes writing to a specific audience. It is safe to assume that the
reader will be knowledgeable in the general topic addressed in the proposal. However, the reader may
not be knowledgeable about your proposed program design (29). Keep in mind that the funding
organization has its own mission, goals, and principles; these should be included as much as possible in
the proposal.
General Structure
Headings, subheadings, and other organizational strategies can help to clarify the proposal and guide
the reader through the proposal, thus increasing the chances of acceptance. For longer proposals, a
table of contents is necessary (29). In addition, each funder will have a precise format to follow, but
there are some general components included in grant proposals (29):
1. Title page.
2. Abstract.
3. Introduction.
4. Literature review.
5. Project narrative.
6. Personnel.
7. Budget and budget justification.
8. Timeline.
For more information on grant writing, visit the following resources:
• UNC at Chapel Hill Grant Proposals
• Foundation Center Proposal Writing
• Writing A Grant Application for Funding – Community Tool Box at University of Kansas

31
Letters to the Editor Letters to the editor are effective tools of public health advocacy because they allow access to a general
audience. The opinion pages are some of the most frequently-read sections of news sources. In fact,
many news sources will publish letters both online and in print, increasing dissemination and reaching
larger audiences.
Guidelines
Each individual news agency will have its own submission guidelines, including word limits, but there are
some general guidelines to follow:
• Select an article/paper. Letters to the editor are in response to a piece that has been published.
Read various news sources to find an article that you find noteworthy or which elicits a strong
reaction.
• React! You should always begin by indicating that your letter is in response to a specific article
that the newspaper published. For example, you might start with “I am writing in response to…”
(11). You should also do a quick, one or two sentence recap of issue (11).
• Be timely. The world of news moves quickly, and a controversial topic can quickly fade out of
mind when the next big news story appears. You should aim to have your response written and
submitted within a week of the publication of the original article.
• Be succinct. Most news agencies impose a maximum of 150-200 words, though letters are often
edited to be shorter.
• Focus on one strong argument. You have limited space to react, choose one particularly salient
point (11). It may be beneficial to provide a statistic, cite a study, or discuss an experience to
reframe the argument in your favor (11).
• Use simple language. While your topic may be complex or political, avoid using jargon so as to
appeal to the average reader (11). Use strong language that conveys an emotion, but avoid
sensationalizing your arguments.
• Provide a call to action. To close your letter, leave your audience with a call to action. This can
take several forms depending on your topic. For example, you might close by saying, “I call upon
the governor to veto this bill” or “For more information on transgender rights, visit the
Massachusetts Transgender Political Coalition.”
• Sign the letter. Include your first and last name, and often your city. If relevant, cite your job
title.
For more information on letters to the editor, visit the following resources:
• Writing Letters to the Editor – Community Tool Box at University of Kansas
• Boston Globe Letter to the Editor Submission Guidelines

32
Literature Reviews A literature review is systematic examination of existing research on a proposed topic (30). Public health
professionals often consult literature reviews to stay up-to-date on research in their field (30–32).
Researchers also frequently use literature reviews as a way to identify gaps in the research and provide
a background for continuing research on a topic (30,31). This section will provide an overview of the
essential elements needed to write a successful literature review.
Collecting Articles
A literature review is systematic examination of existing research on a proposed topic (30). Public health
professionals often consult literature reviews to stay up-to-date on research in their field (30–32).
Researchers also frequently use literature reviews as a way to identify gaps in the research and provide
a background for continuing research on a topic (30,31). This section will provide an overview of the
essential elements needed to write a successful literature review.
Reviewing the Research
After selecting the articles for your review, read each article and takes notes to keep track of each paper
(32). One way to effectively take notes is to create a table listing each article’s research question,
methods, results, limitations, etc. Once you have finished reading the articles, critically think about why
each one is important to your discussion (30,31,33). Try to group articles based on similar content, such
as similar study populations, methods, or results (33). Most literature reviews do not require you to
organize your articles in a certain manner; however, you should think about how you would logically tie
your articles together so that you are analyzing them, not simply summarizing each article (33).
Organizing your Review
While there is no standard organization for a literature review, literature reviews generally follow this
structure (30,32):
1. Introduction. The introduction should identify a research question and relate it to a public
health topic. The significance of the public health problem and topic should be described.
2. Body. The body of a literature review should be organized so that the review flows logical from
one subtopic to another subtopic. Consider breaking this section into the following sections:
a. Methods. Describe how you obtained your articles. Be sure to include the names of
search engines and key words used to generate searches. Detail your inclusion and
exclusion criteria (i.e. did not fit your definition of your outcome). Consider creating a
flow chart to illustrate your search process.
b. Results/Discussion. Explain what the literature says about your question. What did the
studies find? Is their conflicting evidence? What are the limitations of the current
studies? What gaps exist in the literature? What are the outstanding research
questions? A table of your studies can be a great tool to summarize of the essential
information.
B. Conclusion. Review your findings and how they relate to your research questions. Use this space
to propose needs in the research, if appropriate.
33
Collecting articles, reviewing your research, and organizing your review are the first steps toward writing
a literature review. Reading examples of peer-reviewed literature reviews is an excellent way to
brainstorm how to organize your research and tables. The following resources also provide a more in-
depth discussion on writing literature reviews:
• Handout on Writing Literature Reviews from UNC Writing Center
• Tips for Writing a Public Health Literature Review from Tulane University
• Get the Lit: The Literature Review Video from Texas A&M University Writing Center

34
Needs Assessments Needs assessments are implemented prior to taking action or designing a program as they provide
information about the extent of the health problem(s). Furthermore, they describe the current situation
in the community as you simultaneously identify current assets and existing gaps. Needs assessments
serve as a first step to having a comprehensive understanding of a community and its health status.
Please note: This section will instruct you on writing the results of a needs assessment, not conducting a
needs assessment.
Components:
• Data. You should clearly describe how, where, and when you collected the data on which the
assessment is based. Be sure to identify the sources of data. Data presented in a needs
assessment may include both basic demographic information of the community as well as the
prevalence of the health outcome. For sources of data, it may be beneficial to consult local,
state, or national databases depending on your particular outcome or demographic information
of interest. Use tables and figures if appropriate to present the data.
• Current Assets. While the primary objective of a needs assessment is to identify gaps of service
in the community, it is also important to identify and clearly describe current assets within the
community. For example, a community may pride itself on its abundance of parks or strong civil
society (many non-governmental organizations active in local governance issues). These assets
should be examined and viewed as opportunistic for the community rather than overlooked in
light of the gaps.
• Current Gaps. Gaps in services should also be clearly identified, referring to the data that has
revealed these gaps. These gaps may vary depending on the health outcome, but generally
encompass structural barriers or a lack of services. For example, a community may exist in a
food desert or may not have adequate public transportation. In addition to nonexistent services,
services that are deficient should also be mentioned. For example, a community may have a
health center but it may be over-capacity and cannot accommodate additional patients.
Overall, it is important to consider all determinants of health when conducting and subsequently writing
a needs assessment. The individual, community, institutional, and structural levels all contribute to
health outcomes and should be examined and discussed.
For more information, visit the following resources:
• Comprehensive Needs Assessments – Office of Migrant Education
• Principles to Consider for the Implementation of a Community Health Needs Assessment -
George Washington University

35
Policy Briefs Policy briefs serve to describe the rationale and evidence behind a specific programmatic or policy
decision (34). Policy briefs are usually very short, spanning about one page, and typically target
policymakers who have limited time to make a practical decision (34). The policy brief is similar to a
policy memo, but the policy brief focuses more on an argument (35). Each instructor might have specific
information that would like included in the brief, so be sure to inquire with the instructor or the
assignment rubric.
Though policy briefs address a specific policy recommendation, they often examine the issue from a
broad perspective and consider different policy options (34). They should be broad enough that anyone
involved in the policy-making process, including policymakers, NGOs, and lobbyists, can both understand
and utilize them to make policy decisions (36).
Contents
Policy briefs should include the following components (34):
• A brief, catchy title.
• Background on the problem/topic, including the importance of the issue and why it must be
addressed urgently.
• Information about the evidence or alternatives of the policy.
• Realistic (and limited) recommendations that can be easily understood.
o Be sure to include who is in charge of implementing the recommendations and what is
required to implement them.
• A clear path for readers to make a decision on the policy.
Approaching a Policy Brief:
A good policy brief contains a well-organized argument that is based on a careful analysis of relevant
facts. It is intended to convey your conclusions effectively and persuasively. However, it is not a simple
list of issues, nor is it a one-sided propaganda piece. It must reflect a rational, defensible, and well-
organized thought process. Here are some tips to approaching a policy brief (3):
• Solve the policy problem before you start to write.
• Organize your brief in a persuasive, logical manner. Your goal should be to lead your audience to
the same conclusion you have reached. Building a detailed outline of your brief after you have
solved the problem but before you start writing may help you organize your arguments.
• Clearly identify the problem you are addressing, your approach to solving it, and the major
factors you have considered during your analysis. Do all of this in the first paragraph of the
policy brief. It may also be appropriate to briefly state your recommendation or conclusion in
this first paragraph.
• Only include relevant information in your brief. Extraneous information will distract your
audience and detract from your effectiveness.

36
• Graphics and data can be very effective but only if they directly support your arguments and are
well explained. Before using fancy graphs, tables and charts ask yourself if they will mean
anything at all to your audience and if they support your argument.
• Ensure that your thought process is logical and the conclusion you reach is consistent with all of
the information you have presented.
• The conclusion of your brief is not the time to raise additional questions or to introduce new
ideas.
For more information, visit the following resources:
• Writing Effective Reports from the Food and Agriculture Organization of the UN
• Policy Brief Guidelines from the International Debate Education Association

37
Policy Memos A policy memo is a paper written to provide an analysis or recommendation of an issue to a specific
audience (37). In public health, they are frequently used as a tool to inform and influence busy decision-
makers (38). This section provides a brief overview of the organization and style of a policy memo.
Organization
In contrast to an academic paper, the organization of a memo is an “inverted pyramid”– the essential
information is emphasized first and is followed by the less important points in order of significance
(37). The organization of a memo is generally as follows (38–40):
Format and Style
Memos are known for a clear, professional format and style. Make your memo into a “mini roadmap” to
guide your reader through it (39). Each section should have a header that summarizes the main point of
the section and keeps the reader’s interest (39,41). Likewise, paragraphs should have a topic sentence

38
that summarizes the main point. Your reader should be able to skim the memo to understand your main
ideas (39).
Bullet points, tables, and figures can also simplify your message to the reader (39,41). When displaying
data, explicitly link how the data fits into your argument (41). When writing about data, emphasize the
claim rather than the source and methods (41,42):
• Needs Improvement: The Health of Boston Report derived from the Youth Risk Behavior Survey
2009 reported that 10% of public high school student smoke (43).
• Improved: Ten percent (10%) of public high school students in Boston smoke (43).
Your reader can check your references for more specifics about the numbers and sources.
For more resources on writing policy memos, visit:
• Worksheet : Planning and Outlining Your Policy Memo
• Memo Writing by Purdue OWL
• Policy Memos by Harvard Kennedy School
• Policy Memo by Duke Writing Center
• Tips on Writing Policy Memos by Peter Wilcoxen
• How to Write a Policy Memo by University of Michigan-Dearborn
• Framing Memo: The Affirmative Action Debate by Certain Trumpet Program

39
Professional Communication and Career Documents The Professional Communication section provides guidance on the following topics:
• Resumes
• Cover Letters
• Curricula Vitae
You may also wish to visit the Formal Emails section for more information on professionally
communicating via email.
Resumes
Resumes are an important component of the job search. Employers glean a sense of your skills and
experiences from your resume, and often utilize it to determine if they would like to interview you. It is
important that your resume conveys the most professional and skillful version of yourself possible.
Formatting a Resume
When designing your resume, consider these points:
• Generally, resumes should be about two pages with some white space for ease of reading.
o Note: In global health, employers are used to longer resumes which highlight the types
of responsibilities you have engaged in and locations in which you have worked.
• Fonts should be consistent. Recommended fonts include Ariel, Times Roman, Calibri. For font
size, 10 and 11 point are optimal, and headers may be 12 point.
• Formatting of employer names, titles, dates, bullets should be consistent, easy to read and
visually appealing.
Bold may be used for headers, titles, degrees, employer names, and college/institution names. Italics are
not recommended except for employer descriptions.
A resume may be divided into the following sections:
Headers
At minimum, these should include:
1. Summary or Profile
2. Experience
3. Education (and Certifications if applicable)
Note: Other categories such as Objective, Research Experience, Skills, Volunteer Experience, Interests,
Publications, Presentations or Other can also be used, but this is optional. Global health applications
should clearly list language abilities and countries you have lived and worked.
Summary or Profile Statement
Describes "who you are" and "what value you bring.” It can be a subset of your elevator pitch. It should
highlight the specific experiences, skills, strengths and attributes you possess that differentiate you from
others. Note: An Objective may be embedded into the Summary or Profile statement OR have its own

40
separate header above the summary. This is often recommended for career changers where goals are
not obvious.
Experience (includes former/current employer and jobs titles)
Employer Organizations – Include a description after the name of lesser-known organizations (can be in
italics). This should include highlights of the organization’s location, size, service and/or product, and
target clients/populations.
Note: Descriptions should also be used for well-known organizations if they make a connection to your
target employer. For example, Hewlett Packer might not need a description. But, if you worked in a
division of HP that services government clients, and you are targeting government jobs, it is helpful to
describe the specific division of HP.
Job Titles – If you have received promotions within organizations, new job titles with corresponding
dates should be clear.
Bullets
• Focus on results, outcomes, your contributions/improvements - quantify/use metrics wherever possible. Provide context - how your work contributed to success of project, deadline, deliverables, standards, compliance, regulations, etc.
• Correct tenses must be used consistently.
• Action verbs are powerful and diverse (i.e. there should not be two bullets under one job that start with the same verb).
Education – Degrees and anticipated degrees are clear with concentrations/majors or specific, relevant
courses highlighted. Leadership roles in student clubs, projects/deliverables, honors/awards received
and other relevant information are included in a brief, concise way. It is recommended that you only
include a GPA if it is 3.5 or above.
Additional Resume Tips
Using More Headers – When using other headers such as Research Experience, Skills, Volunteer
Experience, etc., information should be concise and follow the formatting of the rest of the resume.
Personal Information – While this is required in many cultures, the use of birth dates, marital status and
photos is not customary in the United States.

41
Cover Letters
In the job search, cover letters are just as important as the resume. While the resume lists your skills,
experiences, and accomplishments, the cover letter is an opportunity for you to discuss these
components. The goal of the cover letter is to communicate why you in particularly are a good fit for the
position. It is an opportunity for you to connect your skills and abilities with the needs of the
organization or position as well as demonstrate your ability to write in a professional capacity.
Formatting a Cover Letter
When designing your cover letter, make sure that:
• It is no more than one page. Margins should be no smaller than .5 inches.
• Fonts are consistent with the resume. Recommended fonts include Ariel, Times Roman, or Calibri. For the font size, 11 point is optimal.
• Proofread for spelling errors, missing words, and missing punctuation. All sentences should end with a period.
• Vary your verbs and sentence openings. Try to not begin more than 3 sentences with the word “I.”
• Grammar, tenses, sentence structure and punctuation are important. Use the same verb tenses throughout the letter-be consistent.
A cover letter may be divided into the following sections:
Header (optional)
In the top margin of the page, you can include your name and contact information. It should be the
same as on your resume.
Date
Write today’s date on left margin.
Contact Information for Recipient of Letter (under date, skip a line, and then write)
*If you don’t have name, only use organization and address.
Ms., Mr. or Dr. First Name & Last Name
Job title of person
Organization
Address (street, city and zip code)
Salutation
Address your letter to Dr., Ms. or Mr. and LAST NAME ONLY. If you do not know the name of the person
you are addressing, you can write: “To Whom It May Concern.”
Paragraph #1 – Why Are You Interested in Them?
This is the paragraph where you should highlight the role you are applying to, why you are interested in
the position, and (if applicable) the person you that referred you. It should showcase that you have
researched the organization by including your knowledge of the organization’s mission statement,

42
strategy and/or key focus areas, etc. It should show your passion for the organization and role.
Showcase why this opportunity aligns with your interests and goals. This is even more important if they
have a powerful mission. This should be one paragraph, no more than two paragraphs.
Paragraph #2 – Why Should They Be Interested in You?
This is where you should highlight the value that you bring based on the job posting as opposed to what
this job could do for you. This part of your cover letter is often considered the most important. Use
bullets to talk about your experiences/skill sets, and be sure they address the introductory line before it.
For example, “The following examples of my background highlight the value I would bring to your
team:” Note: We recommend using the “T” framework to match your target job. (See next section.)
Paragraph #3 – Your Wrap-Up Section
This paragraph should include a) comments that you would like the reader to know about you that are
different from what was addressed above, b) a reiteration of your interest, and c) a closing statement
that includes thanking them for their consideration.
Closing
Be formal. We recommend using “Sincerely.”
Signature
Write your full name 2 spaces below your closing.
Writing a Targeted Cover Letter: Using the “T” Framework
Many job searchers share that cover letters take them two hours to write, as they spend this time
tailoring their cover letters for each target position. Not only can this be exhausting, it can often hold
you up in sending out applications in a timely manner. To create a tailored cover letter more efficiently,
we recommend using the “T” framework as a guide. See details below.
On a sheet of paper, create a “T” with the job posting’s primary job responsibilities on one side and
what you bring that matches those responsibilities on the other side.
JOB POSTING’S PRIMARY JOB RESPONSIBILITIES AND
REQUIREMENTS
WHAT YOU BRING THAT MATCHES THE
RESPONSIBILITIES AND REQUIREMENTS
1. Plan annual conference 1. Planned educational conferences for high school
students to encourage exercise and healthy eating
habits.
2. Manage community partnerships 2. Collaborated with hospitals, neighborhood
groups, and advocacy organizations to promote
events and share best practices.
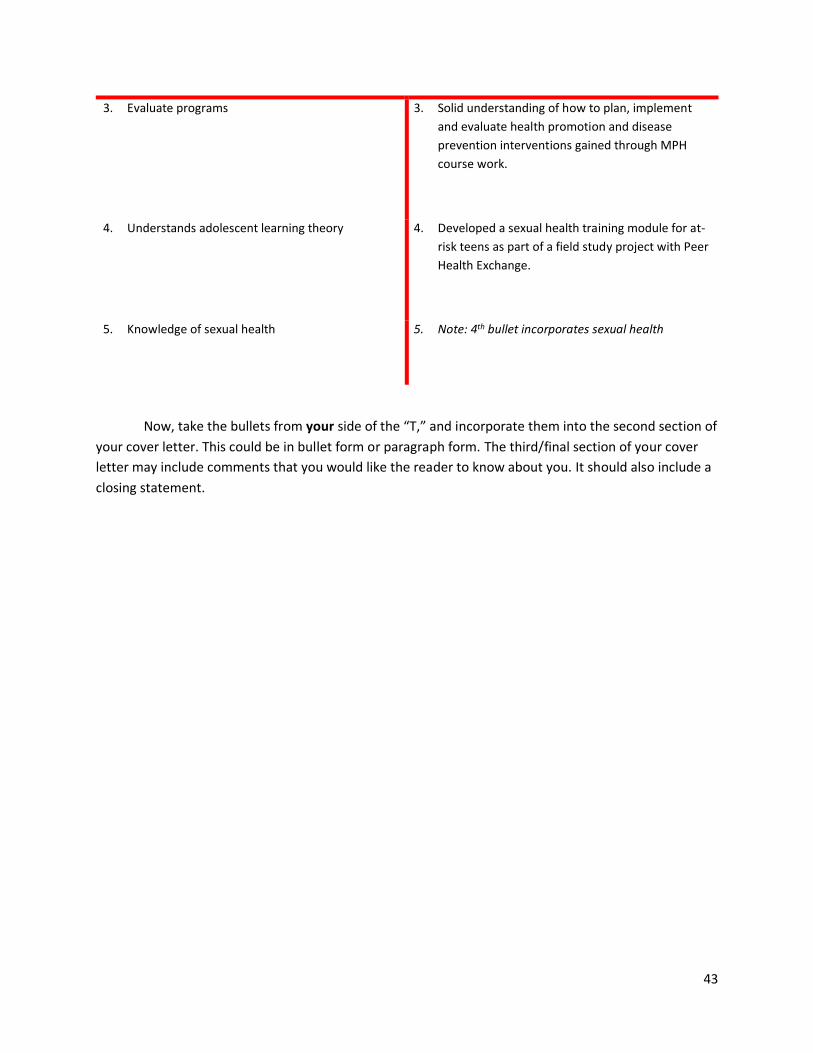
43
3. Evaluate programs 3. Solid understanding of how to plan, implement
and evaluate health promotion and disease
prevention interventions gained through MPH
course work.
4. Understands adolescent learning theory 4. Developed a sexual health training module for at-
risk teens as part of a field study project with Peer
Health Exchange.
5. Knowledge of sexual health 5. Note: 4th bullet incorporates sexual health
Now, take the bullets from your side of the “T,” and incorporate them into the second section of
your cover letter. This could be in bullet form or paragraph form. The third/final section of your cover
letter may include comments that you would like the reader to know about you. It should also include a
closing statement.

44
Curricula Vitae
This section has been adapted from the BU Center for Career Development.
The curriculum vitae, commonly called a CV or vita, is a scholarly representation of you that details your
academic achievements, including publications, awards, and honors. While similar to a resume, the CV is
most appropriate if you are pursuing a PhD-level position, a research opportunity, or admission to
graduate school.
Format and Appearance
There is no one standard look or order for a CV, but it can generally be treated as a longer resume with
your address and contact information at the top, and the different areas you list separated with
headings. A CV can be as few as two pages, but can be ten or more.
CV Sections:
Sections can vary widely and largely depend on both the type of position you are applying for (professor,
researcher, etc.) and the field. For example, biochemistry and literature may have different formats. The
main sections of a CV are below.
• Header/Contact Info: Like in a standard resume, this section tells the employer who you are and
how to reach you. Your name, street address, phone number, and email address should all be
included.
• Education: This listing should appear in reverse chronological order. Include institution name,
degree, specialty or major, and year (or expected date) for all your degrees. You may opt to
include your undergraduate GPA.
• Dissertation or Thesis: Include the title, a brief description, and your advisor and committee
names. For science fields, you might choose to describe research more fully in the Experience
section and just list the dissertation/thesis title here. It is also possible to include a dissertation
abstract—anywhere from two paragraphs to a few pages—in an addendum.
• Fellowship: This section can also be expanded to include grants, honors, and awards (but do not
forget to label appropriately, i.e., Fellowships and Honors). Give the reader a clear
understanding of each fellowship, grant, or award, particularly if the honor or award’s
significance is not stated in the title or was given in another country.
• Related Professional Experience: You can subdivide this section into several categories, such as
Research Experience, Teaching Experience, Consulting, Fieldwork, Postdoctoral Work, etc.,
depending on your discipline.
o List any experience relevant to the position for which you are applying. Start with your
most recent activity and move backward.
o Include volunteer experience, student teaching, internships, research projects, summer
or part-time jobs, and other work experience. If you are writing a CV for a research-
intensive position, we recommend listing Research as its own section.
o Include the name of the organization, city and state, dates of employment, job title, and
a brief description of accomplishments and responsibilities.

45
o Use short descriptive phrases, beginning with action words to highlight your skills and
accomplishments.
• Teaching/Research Interests: If you are applying for a professorial or lecture position, this
section should list the areas where you have strong specialized knowledge. For researchers, list
areas where you have done solid work, published, or co-authored—or areas into which you wish
to transition. You can include your teaching philosophy or research goals in detail in an
addendum.
• Languages: List each of your languages and corresponding levels of proficiency, whether
beginner, basic comprehension, intermediate reading and writing, conversant, fluent, native, or
a combination of these.
• Papers and Lectures: This should include talks and papers you have presented at conferences
and other events, with names, dates, and locations (for conferences/ meetings). Indicate invited
talks. If you don’t have many presentations, you can combine them with your publications.
• Publications/Creative Work: List publications in the citation format appropriate for your field.
This section can be subdivided into Journal Articles, Book Reviews, Monographs, Art Exhibits,
Poems, Musical Performances, etc. If you choose to list works in progress, you should note their
status as "submitted for publication.”
• Academic Service: List all departmental and university groups, committees and task forces, and
student groups.
• Graduate Coursework: List any coursework relevant to your degree. You can break this area into
subsections based on the types of courses (e.g. foreign language, literature, science, teaching,
research). You have the option of listing the names of your professors, which is especially an
asset if you have worked with leaders in the field.
• Additional Sections: Sections may include the following as well as others you find relevant to
your academic career. When in doubt, ask a professor or colleague in your field for best
practices and some examples.
o Special training. This can include certifications, specialized post-graduate courses, or
technical training.
o Professional affiliations and memberships. Mention any officer roles in an organization
here.
o Relevant interests/activities. This can include hobbies and informal clubs.
o Travel. This includes study abroad experiences, research trips, and teaching overseas.
Be sure to list cities, states or regions, and countries. Describe the value and purpose of
the experience in a few words.
o References. You can choose to list references within the CV itself or in a separate
document. Make sure the individuals you list are willing to be contacted and
recommend you strongly. You may also wait for the prospective employer to request
references.

46
Project Plans Project plans are used to ensure coordination, communication, and timely completion of a project. They
may be used to delegate tasks to certain team members or to keep the project on the right track
(44).Ultimately, project plans outline the details of the project to ensure that all components are
completed by the target deadline (44).
Components
Project plans may vary somewhat, but there are four main aspects to address (45):
• What are the requirements for the project?
• How will the team accomplish these requirements?
• Who will take on which task?
• When will the tasks be completed?
Project plans include the following components (44,45):
• Executive Summary.
• Staffing/Team Members.
• Scheduling (Gantt Charts).
• Communication plans.
• Activities, milestones, and reviews.
• Deliverables.
Gantt Charts
Gantt charts are often included in project plans. They delineate the schedule of the project through two
major components:
• Tasks. While there is one overarching goal, tasks should be smaller, specific, measureable,
achievable subgoals that lead to the overall goal.
• Timeframes. Whether weeks or years, realistic timeframes should be included to ensure
timeliness and measure the status of project completion.
In addition to tasks and timeframes, many Gantt Charts display delegated tasks to specific team
members. Diagram 1 below features a sample Gantt chart.
Diagram 1. Sample Gantt Chart.

47
For more information on Project Plans, visit the following resources:
• How To Write a Killer Project Plan That Gets Results
• How to Write a Successful Project Plan

48
Project Reports Progress reports and final activity reports are common professional documents. The progress report is
an interim report which describes activities undertaken to date, problems encountered, and actions
taken to overcome them. It ends with a description of the remaining timeframe and steps, assigned
responsibilities, or other reflections which need to be conveyed to managers or others who will read the
report.
The final report serves to communicate the results of the project to others (46).You should be succinct
in your report and avoid providing every detail of the project so as not to make the report too lengthy
(46). Be sure to remain neutral (rather than too passive) in your writing, including being professional and
direct with your recommendations.
Structure
In general, the structure of a project report should include the following components (46,47). Consider
using headings and subheadings, as they may help guide the reader throughout the report and
emphasize important topics.
• Cover Page. Title, name of organization, name of author of the report or team implementing the
project.
• Abstract or Executive Summary. Briefly summarize your project and accomplishments. An
abstract should be around 150-200 words, while an Executive Summary is no longer than a
single page. Visit the Abstract and Executive Summary sections for more information.
• Introduction. Introduce your project and its importance. Be sure to emphasize the need for the
project and summarize your purpose and the timeframe.
• Activities. Describe the activities undertaken. Include information here about your strategy or
approach, location, timing, pricing strategy or technology used, etc. Describe any significant
barriers to completing the project and actions taken to overcome them.
• Results. Report the results of the project, including quantitative results, financial performance,
and whether the project achieved its goals and purpose. Include diagrams, figures, tables, and
charts that succinctly illustrate the results.
• Discussion/Conclusions/Recommendations. Demonstrate that you have a solid understanding
of all factors of the project by drawing conclusions and reflecting on the level of success of the
project. Describe what worked well, what lessons were learned for others who may tackle a
similar issue. If appropriate, you may wish to also include recommendations for replication of
the project or to expand or sustain the activities or partnerships started. If the project report is
for an external audience, you should try to emphasize positive ways in which you overcame
difficulties. If individual staff were a problem, this is generally not the place to raise such issues
(a private email to the director, or better yet a phone call, is better).
• References. Include any references you utilized to complete the project.
• Appendices. If the project involves elaborate diagrams or tables, particularly if they occupy
more than half the page, place them in an appendix and refer the reader to them in the main
text.

49
For more information, visit the following resources:
• University of Exeter Guide to Writing a Project Report
• Northwestern University Writing Effective Project Reports

50
Reflections Reflective writing is useful for making connections, clarifying concepts, examining successes and failures,
and becoming more self-aware (48). Some reflections may address specific topics, while others address
specific (and often personal) experiences. You may find reflections more challenging than other types of
writing because it involves a more introspective approach to writing and some degree of self-awareness
(49).
Reflective writing often involves two main components (48,49):
1. A personal response, emotion, or reaction to new or previous experiences or information.
2. Integration or “processing” the response and relating it to theory or practice.
Reflections are not just a regurgitation of course material or the simple retelling of a story. They involve
profound integration of these experiences or opinions with new course theories and perspectives (48).
While each instructor has different requirements for such writing assignments, below are some general
guidelines on reflecting reflections.
Structure
Here is the general structure your reflection should assume (50):
1. Description. Briefly describe the experiences or reactions to events.
2. Application and Interpretation. Examine how the situation or reaction relates to course
material, theories, or concepts.
3. Conclusion. Describe what has been learned from the reflection and how this knowledge can be
applied moving forward.
Best practices:
• While reflections are inherently personal, you should still ensure that the writing maintains a
professional tone. It is easy to slip into a casual tone when describing personal feelings or
experiences, but this is still an academic document.
• Some instructors prefer that the assignment is written entirely in third-person, so it is best to
check in with the instructor or the assignment instructions.
• Use the past tense to describe particular experiences or moments, and use the present tense to
describe new information/theories (49). For example, one might say, “I worked as a cashier for
many years…” to describe their previous experiences, but would alternatively say “The author
explores this theory by…” in order to describe integrated course content.
• Be sure to focus on interpretations and conclusions. While it is important to discuss a specific
story or reaction, the main purpose of a reflection is to arrive at a conclusion after interpreting
personal experiences through course concepts.

51
Example
Below is an example that reflects on foundational knowledge gained in the course and discusses what
was learned, how it was learned, examples of learning and the significance of learning.
I came into this course with minimal knowledge of anything related to finances. Therefore,
every term, fact, formula or concept I have been taught in this course has been a gain in
foundational knowledge for me. What was most helpful in learning foundational knowledge was
the practice and examples. I can read conceptually about a term or concept or formula, but
unless I can see an example of it or practice an application of it, then I won’t learn it. Therefore,
all the practice examples (including assignments) were very helpful in understanding the
material presented. Taking the in-class quizzes and the midterm showed me that I was
remembering and understanding the concepts we were learning in class. Doing well on the
midterm, and feeling confident throughout taking it, built confidence that I could use my
foundational knowledge. The significance of this learning, for me, is to end with a fuller
understanding of finances coming from a base knowledge of nothing and a perspective of not
really being interested in finances. However, after coming to a fuller understanding, I see the
value and importance of this learning and knowledge.
For more information on writing reflections, visit:
• UNSW Reflective Writing
• University of Reading Reflective Writing

52
Research Papers Research papers are very common in public health writing. They represent a culmination of systematic
investigation of a topic in order to establish facts and reach conclusions. A research paper may include
literature reviews, presentation of data and analysis, critical thinking, integration and explanation (51).
Research papers are not simply a regurgitation of the research, nor are they an interpretation of just
one source (51). Instead, they offer critical thought and draw conclusions from many sources.
Topics and Problem Statements
The first step in writing a research paper is selecting a topic and developing it into a problem or purpose
statement. While individual courses may dictate a range of topics, you are often at liberty to choose
your own topic to research. It is important to select a topic for which an adequate amount of
documentation exists. Avoid selecting a topic or population in which little is known, as this may limit
your analysis or interpretations. For example, a student once tried to write a paper on alternative
treatment of infertility in Egypt, but found there was little publish literature on the topic and so she
could not adequately explore the issues or draw conclusions.
Regardless of the topic, the problem statement or research question should be very clear and
mentioned in the introduction of the paper.
Below is a five-step process for analyzing problems (52), which can applied to writing a problem
statement:
• Define the central conflict or key issue (e.g. convey the conflict between too goods—how to
encourage greater medication adherence while respecting patient autonomy)
• Place the problem in a larger context (e.g. look for a larger concern you and your reader share,
that greater medication adherence could increase health outcomes and reduce disease
transmission)
• Make the problem definition more operational (e.g. which medications, which population etc.)
• Identify major subissues and how they may fit into the hierarchy as parts of the larger problem
Research
You should include literature from peer-reviewed journals whenever possible. Depending on the topic,
there may be a dearth of peer-reviewed research. In these instances, it is generally acceptable to review
secondary source documents (such as newspaper articles) from reputable sources.
For tips on references, check out the Writing Guide, Section IV: Finding and Using References.
Components
Research papers typically include the following components:
• Introduction. Establish why the topic is important and include a clear research question. Take a
stand on the topic and form a problem statement or arguable thesis.

53
• Body. Build the arguments of the thesis in the body of the paper. This may include
strengthening arguments with corroborating research, or weakening arguments with critiquing
research.
o Note: Depending on the type of research paper, this section may include a Methods
section and a Results section.
• Conclusion. Remind the audience of the strongest arguments, and reemphasize how these
arguments strengthen or weaken the central thesis.
• References. Acknowledge the sources used to write the paper.
For additional information on writing research papers, visit the following resources:
• Research Papers – Online Writing Lab
54
Part IV: Finding and Using References A critical part of a well-written public health paper is utilizing appropriate sources to support your
argument. In today’s world of information overload, selecting reliable sources and correctly referencing
them can be challenging. This section will help you get started on finding and referencing quality sources
to enhance your writing, support your arguments with credibility and context, and ensure that you avoid
plagiarism.
Finding Sources Finding sources involves careful search queries and evaluating the literature for relevant and reliable
information (5). The following are frequently used databases when beginning literature searches:
• Pub Med – the premier source for biomedical information. For more information on searching
PubMed, watch this tutorial or participate on the online training.
• Web of Science – another excellent source for multi-disciplinary scientific information. For more
information on using Web of Science, watch this tutorial.
• Google Scholar – a great search engine for finding grey literature.
Evaluating Relevance, Quality, and Credibility
Once you have a list of sources to review, you should assess them for their relevance to your paper, the
quality of information, and the credibility of the source. To quickly check for relevance, read the article’s
abstract. If you are still unsure, skim the introduction, conclusion, and section headings. Check for key
words related to your topic. The quality and credibility of an article can be assessed by asking critical
questions about the article (5,53). These questions include:
• By whom is the piece written, and what is their institutional affiliation?
• Is it published by a peer-reviewed journal or well-reputed press?
• Is it up-to-date or timely?
• Does it include references?
• Is it frequently cited or influential?
• Is the author well-known in the field?
Thinking critically about a source’s legitimacy can help you collect quality resources (5) as well as
support your arguments (53).
When to Cite Now that you have consulted the literature and are ready to synthesize your information, be careful to
adequately give credit to original authors by citing appropriately. This is a critical skill that all public
health professionals must develop. The general convention is: “when in doubt, cite” (54). There is no
such thing as “over-citing,” so cite the original source as much as possible.

55
You must cite the source every time you incorporate research, words, ideas, data, or information that is
not your own (55). While you are synthesizing and often summarizing many pieces of information, you
must cite any concept that is not your own. This includes any source that contributes, either directly or
indirectly, to your knowledge and understanding of the material and the formulation of your arguments
(56).
Here are five basic principles to guide in you in the citing process:
1. Quoting (54). Any time that you use the exact words of the source author, you must provide in-
text citations. The wording should be in quotations to denote that it is not your original work.
Use quoting sparingly, as instructors want to read your understanding and synthesis of the
material, not your ability to extract meaningful quotes. The general convention is to quote only
when you could not possibly explain the concept any better in your own words. You should not
quote more than three lines of text (54).
2. Paraphrasing (54). Paraphrasing requires that you rephrase or restate the original idea. You
should not simply substitute key phrases with synonyms and call it your own idea. Even if you do
not directly quote a sentence and instead choose to paraphrase it, this still requires a citation.
Paraphrased sentences are generally the same length as the original text (54).
3. Summarizing (54). Summaries also require a citation, as you are still borrowing original ideas
from the author. Summaries are generally shorter than the original text, and address salient
topics presented by the original author (54). Citations should occur in each sentence that
includes unoriginal material. Even if your entire paragraph is a summary, you should cite in each
sentence rather than at the end of the paragraph.
4. Facts, statistics, dates, and information (54). Any time you use facts, statistics, dates, or
unoriginal information, you should cite the source. It is particularly important to build your
arguments from reliable sources. For example, a statistic from the U.S. Census holds more
weight than a Facebook poll. Seek out credible sources when including these items in your
writing (see Evaluating Relevance, Credibility, and Quality section).
• Note: For general knowledge or well-known facts, you may not need to cite a source.
See the “When NOT to Cite” section below.
5. Indebtedness (56). If a particular text contributed to your understanding of the material or in
the formulation of your arguments, you must cite the source even if you do not directly
reference it in the text. This includes anyone that helped you in clarifying your arguments, such
as key informants or other correspondents (56). This can be in your bibliography, or in the form
of an acknowledgements section (56).
When NOT to Cite
It is best practice to cite whenever possible. However, there are certain instances in which citing may
not be necessary. Below are some examples in which you may not need to cite. However, if you are in
doubt, it is best to cite the source and consult your instructor.
• Common knowledge (55,56). Common knowledge includes facts that are found in many
sources. In general, if a fact can be found in five credible sources, a citation is not necessary (57).

56
For example, you would not need to cite that the Declaration of Independence was signed in
1776, or that water is comprised of hydrogen and oxygen.
• Generally accepted or observable facts (55,57). When a fact is generally accepted or easily
observable, you do not need a citation. For example, “smoking may be bad for your health” or
“most people use cell phones” are both generally accepted and easily observable. Be careful,
however; if you venture into more specific knowledge, you should cite a source. For example, if
you want to provide specific numbers of teenagers that text while driving or the incidence of
lung cancer among smokers, these require citations.
• Original ideas and lived experiences (57). When writing about yourself or your lived
experiences, a citation is not necessary. Original ideas, including the write-up of results from
your own research or projects, do not require citations.
For more information on avoiding plagiarism, visit the Understanding Plagiarism section of the Writing
Guide.You may also wish to check out these resources:
• Princeton: When to Cite Sources
• Columbia: When to Cite Sources
• Emory: Citing Your Sources
• Is It Plagiarism Yet?
How to Cite Integrating sources properly into your writing is an essential writing skill. Both students and public
health professionals are expected to properly references sources in their writing. Public health
frequently uses four styles of citation (3):
• The Vancouver System
• The Author/Date (Harvard) System
• The American Medical Association (AMA) System
• The American Psychological Association (APA) System
If your intended reader does not specify what system they would like you to use, choose one and
consistently use it in your writing (3). Reference software can help you easily reference while writing
Two types of software are most commonly used:
• Zotero – Watch this tutorial for information on how to install and use Zotero.
• Mendeley – Watch these tutorials for information on how to install and to use Mendeley.
If you would like an in-depth overview on citing and using citation software, view this Citation
Management Software Comparison. However, be sure to check the references for completeness as the
citation software sometimes does not capture all the necessary information.

57
The BU Libraries offer a Citing Your Sources Guide with resources on various citation styles, online
citation software, and other citation manuals. In addition, the University of Washington Libraries also
offer a comprehensive Citation Styles & Tools Guide.
Finally, if you would like a quick snapshot comparison of AMA, APA, MLA, Chicago Author-Date and
Chicago Humanities, this Elements of a Journal Citation video compares all five styles and addresses the
building blocks necessary for journal citations.
Understanding Plagiarism Below are some helpful resources on avoiding plagiarism:
• Understanding Common Knowledge
• Avoiding Plagiarism – Paraphrasing
• Avoiding Plagiarism – Quoting
• “You Quote It, You Note It!” Plagiarism Tutorial

58
Part V: Additional Resources This guide is intended to begin your exploration in writing for public health. Developing strong writing
skills takes time and ongoing conversations with your professors, colleagues, and peers.
Recommended Writing Books and Websites
These books can provide more in-depth discussions about the writing process, writing style, and
grammar.
• Academic Writing for Graduate Students, Second Edition: Essential Tasks and Skills (Michigan
Series in English for Academic & Professional Purposes) by John M. Swales and Christine Feak. A
writing guide for graduate students on the writing process and tips for common writing
assignments.
• The Elements of Style, Fourth Edition by William Strunk Jr., E. B. White and Roger Angell. A
classic, quick guide to writing clearly.
• A Pocket Style Manual 6th by Diana Hacker and Nancy Sommers. A quick reference book on
clarity, grammar, punctuation, mechanics, research and citation styles.
• Purdue OWL. Produced by Purdue University, this online writing lab contains grammar,
referencing, and subject-specific resources.
• Clarity Conciseness, Zing and More: 262 Ways to Take Business Writing Beyond the Basics by
Syntax Training. A brief guide on how to strengthen professional communication.
• Words Fail Me: What Everyone Who Writes Should Know about Writing by Patricia T. O’Conner.
A humorous book that highlights strategies for writing clearly and concisely.
• The Craft of Research, Third Edition (Chicago Guides to Writing, Editing, and Publishing) by
Wayne C. Booth, Gregory G. Colomb and Joseph M. Williams. A guide on the writing process for
research papers.
Grammar Resources
• Grammar Choices for Graduate and Professional Writers (Michigan Series in English for
Academic & Professional Purposes) by Nigel A. Caplan. A grammar workbook written for
academic writing for graduate students.
• Grammar Handbook by University of Illinois at Urbana-Champaign. Online handbook arranged
by topic area.
• Hypergrammar by University of Ottawa’s Writing Centre. Another online handbook arranged by
topic area.
• Guide to Grammar and Writing by Capital Community College Foundation. A website that
arranges their topics by “level” such as paragraph-level, sentence-level, etc.
• Common Errors in English Usage. Explains differences in commonly confused words in the
English language. For instance, it explains the difference between “affect” and “effect.”
• UNC Writing Center. Includes references on writing papers, citation styles, and grammar.

59
Part VI: Acknowledgements
This guide represents the work of many people. It has evolved over the years and is currently
maintained by Jennifer Beard and Mahogany Price. The earliest versions of the Pubic Health Writing
Guide were developed by Alexandra May, MPH, and Colbey Ricklefs, MPH, in the Education Office at
Boston University School of Public Health. They had assistance and encouragement from many
colleagues including: Allyson Coniglione, MPH; Eric Delgizzo, BA; Valerie Aw, MPH; Vanessa Edouard,
MPH, MBA; Alexis Marbach, MPH; Taryn Vian, PhD, MSc; Gouri Gupte, PhD; David Flynn, MS; Sophie
Godley, MPH; Victoria Parker, DBA, EdM; Lisa Sullivan, PhD, MA; Rich Feeley, JD; Anne Fidler, ScD;
Veronika Wirtz, PhD, MSc; Lisa Toby, MSc; Wayne LaMorte, MD, PhD, MPH; Mary Murphy-Phillips, MS;
Chris Paal, EdM; Emily Katz, MPH, BA; Travis DiJoseph, EdM; and Anna McKay, BS.

60
Part VII: References
1. Ryan L, Zimmerelli L. The Bedford guide for writing tutors. 5th ed. United States of America: Bedford/St. Martin’s; 2010.
2. Swales J, Feak C. Academic writing for graduate students. 2nd ed. United States of America: University of Michigan Press; 2004.
3. Hoing L. Writing resource guide. Boston, Massachusetts: Boston University School of Public health; 2002.
4. University of North Carolina at Chapel Hill. Thesis Statements [Internet]. The Writing Center. 2013 [cited 2014 Jul 15]. Available from: http://writingcenter.unc.edu/handouts/thesis-statements/
5. Booth W, Colomb G, Williams J. The craft of research. 3rd ed. United States of America: University of Chicago Press; 2008.
6. Levy B, Gaufin J. Mastering public health: Essential skills for effective practice. New York, New York: Oxford University Press, Inc.; 2012.
7. Make a Plan and Stick to It [Internet]. WriteOut! Dissertation Writing Retreat. 2012 [cited 2014 Jul 15]. Available from: http://writeoutretreat.weebly.com/make-a-writing-plan.html
8. Learning Center. Take charge of distractions [Internet]. University of North Carolina at Chapel Hill; [cited 2014 Jul 15]. Available from: http://learningcenter.unc.edu/files/2013/06/Take-Charge-of-Distractions.pdf
9. O’Conner P. Words fail me: What everyone who writes should know about writing. Orlando, FL: Harcourt, Inc.; 1999.
10. Lamorte W. Data Presentation [Internet]. Descriptive Epidemiology. [cited 2015 Apr 1]. Available from: http://sphweb.bumc.bu.edu/otlt/MPH-Modules/EP/EP713_DescriptiveEpi/EP713_DescriptiveEpi7.html#datapresentation
11. Rothman E. Writing a successful public health letter to the editor. 2015 Mar; Boston University School of Public Health.
12. Taylor DB. Style Tips. Writ Health Sci Compr Guide [Internet]. 2007 Sep 1 [cited 2015 Apr 1];1(1). Available from: http://hswriting.library.utoronto.ca/index.php/hswriting/article/view/3337
13. Transparency International. Global corruption report 2006. London; Ann Arbor, MI; Berlin: Pluto Press; Transparency International; 2006.
14. Simply Put: A guide for creating easy-to-understand materials [Internet]. Centers for Disease Control and Prevention; 2009 [cited 2015 Jun 19]. Available from: http://www.cdc.gov/healthliteracy/pdf/Simply_Put.pdf
15. Writing@CSU [Internet]. [cited 2015 Jul 17]. Available from: http://writing.colostate.edu 16. Business Communication Center. Team Writing Checklist [Internet]. University of Oklahoma,
Price College of Business; 2010 [cited 2015 Jul 17]. Available from: http://www.ou.edu/dam/price/BCC/files/Team%20Writing%20Checklist-1.pdf
17. Group Writing [Internet]. The Writing Center. [cited 2015 Jul 17]. Available from: http://writingcenter.unc.edu/handouts/group-writing/
18. University of North Carolina at Chapel Hill. Abstracts [Internet]. The Writing Center. 2013 [cited 2014 Jul 15]. Available from: http://writingcenter.unc.edu/handouts/abstracts/
19. Student practicum handbook [Internet]. Boston University School of Public Health Office of Public Health Practice; 2013 [cited 2014 Jul 15]. Available from: http://www.bu.edu/sph/files/2012/02/2013-14-Practicum-Handbook-FINAL.pdf

61
20. Brizee H. Writing scientific abstracts presentation [Internet]. Online Writing Lab. 2007 [cited 2014 Jul 15]. Available from: https://owl.english.purdue.edu/owl/resource/706/01/
21. Murphy-Phillips M. Preparing and submitting an abstract to APHA. [Internet]. [cited 2014 Jul 15]; Boston University School of Public Health. Available from: http://www.bu.edu/sph/files/2013/02/Preparing-and-Submitting-an-Abstract-to-APHA-SPH.pdf
22. How to Write a Critique – Writing Goals [Internet]. [cited 2015 Mar 26]. Available from: http://www.creative-writing-now.com/how-to-write-a-critique.html
23. Effective Writing Center. Writing Executive Summaries [Internet]. University of Maryland University College. 2015 [cited 2015 Jun 24]. Available from: https://www.umuc.edu/writingcenter/writingresources/exec_summaries.cfm
24. Writing an Executive Summary [Internet]. Griffith University; 2011 [cited 2015 Jun 24]. Available from: http://www.griffith.edu.au/__data/assets/pdf_file/0003/320178/writing-an-executive-summary.pdf
25. Communication Tools: Fact Sheets [Internet]. Center for Rural Health, University of North Dakota School of Medicine and Health Sciences. [cited 2015 Mar 23]. Available from: http://ruralhealth.und.edu/communication/factsheets
26. Hampton C. Creating Fact Sheets on Local Issues [Internet]. Community Tool Box, University of Kansas. [cited 2015 Mar 23]. Available from: http://ctb.ku.edu/en/table-of-contents/participation/promoting-interest/fact-sheets/main
27. Rock D. A College Student’s Guide to Emailing Professors [Internet]. [cited 2015 Mar 20]. Available from: http://www.bdcwire.com/list/a-college-students-guide-to-emailing-professors/
28. Stolley K, Brizee A. Email Etiquette [Internet]. Online Writing Lab. 2010 [cited 2015 Mar 20]. Available from: https://owl.english.purdue.edu/owl/resource/636/01/
29. Grant Proposals (or Give me the money!) [Internet]. The Writing Center. [cited 2015 Mar 25]. Available from: http://writingcenter.unc.edu/handouts/grant-proposals-or-give-me-the-money/
30. University of North Carolina at Chapel Hill. Literature Reviews [Internet]. The Writing Center. [cited 2014 Jul 15]. Available from: http://writingcenter.unc.edu/handouts/literature-reviews/
31. Tips for writing a public health literature review [Internet]. Tulane University School of Public Health and Tropical Medicine 1. Department of Community Health Sciences; [cited 2014 Jul 15]. Available from: http://tulane.edu/publichealth/mchltp/upload/Writing-Lit-review.pdf
32. Pautasso M. Ten Simple Rules for Writing a Literature Review. PLoS Comput Biol. 2013 Jul 18;9(7): e1003149.
33. Get Lit: The Literature Review [Internet]. 2011 [cited 2014 Jul 15]. Available from: http://www.youtube.com/watch?v=Y1hG99HUaOk&feature=youtube_gdata_player
34. Preparing Policy Briefs [Internet]. Food and Agriculture Organization of the United Nations; [cited 2015 Mar 23]. Available from: http://www.fao.org/docrep/014/i2195e/i2195e03.pdf
35. Guobadia O, Pogue J. From Memo to Brief [Internet]. The Writing Center at Georgetown Univeristy Law Center; 2004 [cited 2015 Jun 19]. Available from: http://www.law.georgetown.edu/academics/academic-programs/legal-writing-scholarship/writing-center/upload/memotobrief.pdf
36. Writing Guidelines: Policy Brief [Internet]. idebate.org. [cited 2015 Mar 23]. Available from: http://gdppc.idebate.org/content/writing-guidelines-policy-brief
37. Writing Studio. Policy memo [Internet]. Thompson Writing Program, Duke University; [cited 2014 Jul 15]. Available from: http://twp.duke.edu/uploads/media_items/policy-memo.original.pdf
38. Perkins C, Brizee H. Memos [Internet]. Online Writing Lab. 2014 [cited 2014 Jul 15]. Available from: https://owl.english.purdue.edu/owl/resource/590/1/

62
39. Thrall A. How to write a policy memo [Internet]. University of Michigan; 2006 [cited 2014 Jul 15]. Available from: http://www-personal.umd.umich.edu/~atthrall/writememo.pdf
40. Herman L. Policy memos [Internet]. Harvard Kennedy School; 2012 [cited 2014 Jul 15]. Available from: http://shorensteincenter.org/wp-content/uploads/2012/07/HO_Herman_Policy- Henderson M, Chetkovich C. A public policy guide to style for authors of policy memos, theses, and reports [Internet]. Mills College Public Policy Program; 2008 [cited 2014 Jul 15]. Available from: http://people.mills.edu/mhenderson/syllabi/PPOL_Style_Sheet.pdf
41. Wilcoxen P. Tips on writing policy memos [Internet]. The Maxwell School, Syracuse University; 2013 [cited 2014 Jul 15]. Available from: http://wilcoxen.maxwell.insightworks.com/pages/275.html
42. Shah S. Health of Boston 2011 [Internet]. Boston, Massachusetts: Boston Public Health Commission Research and Evaluation Office; 2011 [cited 2014 Jul 15]. Available from: http://www.bphc.org/healthdata/health-of-boston-report/Documents/HOB-2011/Health%20of%20Boston%202011_Final_Print_Revised_30Nov11.pdf
43. How to Write a Project Plan [Internet]. Small Business – Chron.com. [cited 2015 Mar 25]. Available from: http://smallbusiness.chron.com/write-project-plan-56603.html
44. How to Write a Killer Project Plan That Gets Results [Internet]. Leadership Thoughts. [cited 2015 Mar 25]. Available from: http://www.leadershipthoughts.com/how-to-write-a-project-plan/
45. Barnes WL. Guide to Writing a Project Report [Internet]. University of Exeter; 2000 [cited 2015 Mar 27]. Available from: https://newton.ex.ac.uk/handbook/PHY/forms/WLB010919-4.pdf
46. Hazen G. Writing Effective Project Reports [Internet]. Northwestern University; 2004 [cited 2015 Mar 27]. Available from: http://users.iems.northwestern.edu/~hazen/Writing%20Project%20Reports%202004a.pdf
47. Reflective Writing Guide [Internet]. [cited 2015 Mar 20]. Available from: https://student.unsw.edu.au/reflective-writing
48. Reflective Writing [Internet]. University of Reading. [cited 2015 Mar 20]. Available from: http://www.reading.ac.uk/internal/studyadvice/StudyResources/Practicebasedlearning/sta-reflectivewriting.aspx
49. Memos_9_24_12.pdf 50. Hampton M. Reflective writing: A basic introduction [Internet]. University of Portsmouth
Department for Curriculum and Quality Enhancement; 08/10 [cited 2015 Mar 20]. Available from: http://www.port.ac.uk/media/contacts-and-departments/student-support-services/ask/downloads/Reflective-writing—a-basic-introduction.pdf
51. Research Papers [Internet]. Online Writing Lab. [cited 2015 Mar 25]. Available from: https://owl.english.purdue.edu/owl/resource/658/01/
52. Flower L. Problem-solving strategies for writing. 4th ed. Fort Worth: Harcourt Brace Jovanovich College Publishers; 1993. 331 p.
53. Evaluating the Credibility of Your Sources [Internet]. Columbia College. [cited 2015 Jun 24]. Available from: https://www.college.columbia.edu/academics/integrity-sourcecredibility
54. Academic Integrity. When to Cite Sources [Internet]. Princeton University. 2012 [cited 2015 Jun 24]. Available from: http://www.princeton.edu/pr/pub/integrity/pages/cite/
55. Oxford College Library. Citing Your Sources [Internet]. Emory Libraries & Information Technology. [cited 2015 Jun 24]. Available from: http://oxford.library.emory.edu/research-learning/citation-plagiarism/citing.html
56. When to Cite Sources [Internet]. Columbia College. [cited 2015 Jun 24]. Available from: https://www.college.columbia.edu/academics/whentocite
57. Stolley K, Brizee A, Paiz J. Is It Plagiarism Yet? [Internet]. Online Writing Lab. 2013 [cited 2015 Jun 24]. Available from: https://owl.english.purdue.edu/owl/resource/589/2/