project portfolio tool user guide
TRANSCRIPT

Project Portfolio Tool User Guide
PREPARED BY QUEENSLAND TREASURY CORPORATION
MAY 2015
Project Portfolio Tool User Guide © Queensland Treasury Corporation Page 1
Introduction
This User Guide for the Queensland Treasury Corporation Project Portfolio Tool has been
developed in conjunction with the Project Decision Framework (‘PDF’). This guide has been
designed to assist users in the day-to-day use of the tool, including guidance on how to input
data and effectively use the reports. It is not an extensive guide as to the methodology or
calculations used in the tool, however, commentary around these points is provided where
necessary to assist with the use of the tool.
The PDF is an overarching system through which decision making for new projects can be
disciplined, robust and in the best interests of the community. It has a deliberate and specific
focus on the time invested at the start of a project in order to maximise cost efficiencies,
optimise resource allocation and achieve positive community outcomes while minimising risks
and uncertainties. The PDF provides a scaffold of information, tools and templates from
which a local government can build, or improve upon its existing decision making processes.

Project Portfolio Tool User Guide © Queensland Treasury Corporation Page 2
Table of contents
1 Introducing the Project Portfolio Tool 3
1.1 Overview 3
1.2 Microsoft Excel Settings 3
1.2.1 Enable macros 3
1.2.2 Automatic calculations 4
1.3 Navigation 5
1.4 Conditional formatting 5
2 Populating the Tool 6
2.1 General Project Inputs (sheet ‘GenIn’) 6
2.2 Project Inputs (sheet ‘ProjIn’) 6
2.3 Concept Selection Stage Inputs (sheet ‘ConSelIn’) 7
2.4 Pre-Feasibility Stage Inputs (sheet ‘PreFeasIn’) 9
2.5 Feasibility Stage Inputs (sheet ‘FeasIn’) 11
2.6 Planning Stage Inputs (sheet ‘PlanIn’) 13
3 Outputs 15
3.1 Project Dashboard (‘ProjDash’) 15
3.2 Options Comparison Report (‘OptDash’) 16
Appendix A: Key Terms 17
Appendix B: TECOP Example Risk Categorisation 18

Project Portfolio Tool User Guide © Queensland Treasury Corporation Page 3
1 Introducing the Project Portfolio Tool
1.1 Overview
The Project Portfolio Tool (‘the Tool’) has been developed as part of Queensland Treasury
Corporation’s Project Decision Framework (‘PDF’) to assist local governments to make better
project decisions.
The Tool is designed for use by local governments (‘the User’) to act as the central depository
of key information for up to 50 proposed projects. It summarises information and presents key
information in a format that allows ease of comparison for decision makers.
Inputs are clearly identified and are divided between six worksheets, two for general inputs and
one for each project stage in the PDF. Outputs include a project summary dashboard and an
options comparison dashboard.
� The project summary report summarises key information for a single project option.
� The options comparison report provides decision makers with a side by side comparison of the key information for different project options.
To reduce the chance of accidental changes to critical elements and calculations, the Tool has
been locked with the exception of input cells. The calculations remain visible and accessible for
examination.
1.2 Microsoft Excel Settings
The Tool uses a number of Microsoft Excel (‘Excel’) settings which may not be set by default
on the User’s system. These settings may also reset to a different default setting without user
intervention and will need to be returned to the required setting.
1.2.1 Enable macros
For the Tool to operate effectively, macros are required to be enabled. By default, macros in
Excel are either not permitted or a warning message (a message box or yellow message bar at
the top of the screen) will ask whether the user wishes to enable macros. Excel can be
configured to always accept macros to prevent the User having to enable macros each time the
Tool is opened, however, your System Administrator may not allow this.

Project Portfolio Tool User Guide © Queensland Treasury Corporation Page 4
FIGURE 1 – MACRO SECURITY WARNING
1.2.2 Automatic calculations
The Tool requires Excel’s calculation mode to be set to ‘Automatic’. This is achieved by
navigating to File>Options>Formulas>Workbook Calculations. The Tool will not function
correctly if this is not enabled. FIGURE 2 – LOCATION OF THE AUTOMATIC CALCULATION OPTION

Project Portfolio Tool User Guide © Queensland Treasury Corporation Page 5
1.3 Navigation
The Tool includes easy navigation links between the project stages (input worksheets) and to
the dashboard reports (output worksheets). The Index is the primary method of navigation. It
has links to each section of the Tool, grouped into input and output worksheets.
The Index can be navigated to by clicking on the index button in the standardised header at
the top of each worksheet.
FIGURE 3 – INDEX BUTTON
1.4 Conditional formatting
The Tool uses conditional formatting to assist the User with entering valid data.
Input cells have a yellow background for ease of identification. All inputs in the tool are
formatted in this way.
Cells with a white background have pre-determined inputs or will auto-calculate based on user
inputs as the User moves through the Tool.
Conditional formatting is used throughout the Tool for input fields which require earlier
project stages to be approved before input cells become active. Input cells are shaded out as
the proposed project has not been approved at a prior stage.
FIGURE 4 – INPUT AND PRE-DETERMINED CELLS AND CONDITONAL FORMATTING

Project Portfolio Tool User Guide © Queensland Treasury Corporation Page 6
2 Populating the Tool
2.1 General Project Inputs (sheet ‘GenIn’)
The General Project Inputs worksheet captures inputs for risk definitions, ratings and
categories as well as the units that will be used in the Tool (eg, thousands). The General
Project Inputs worksheet also has input cells for the User to define the project origin, asset
types, department and agency types, cost estimates and funding sources.
Default inputs have been included in this section based on the standard PDF methodology,
however, they can be redefined or customised by the User to fit a local government’s existing
definitions. The User may return to the General Project Inputs worksheet to include additional
inputs as they are required at each stage of the PDF.
Please note where an input has been assigned a ranking, the scale must be maintained if
alternative categories are used instead of the defaults (ie, 1 remains as the least likely or severe
and 5 the most likely or severe).
FIGURE 5 – RISK SCALING
2.2 Project Inputs (sheet ‘ProjIn’)
The Project Inputs worksheet allows for the creation of up to 50 different projects. For each
project, it identifies the primary contact, sponsor, concept origin, the business unit or agency
the project will fall into (if successful), asset type and a brief description of the proposed
project.
The Project Inputs worksheet also tracks the stage of the project lifecycle for each proposed
project. The project stage inputs and approval details for any given stage cannot be entered
until the previous stage approval has been completed. For example, pre-feasibility approval
details cannot be entered if concept selection approval has not been completed.
The Tool allows the User to expedite a project through one or more approval stages. If it is
necessary to expedite a project though to an approval stage, the prior stage can be skipped by
selecting ‘Yes’ from the drop down box in the expedited column. This will activate the next
stage worksheet and approval section for completion.
FIGURE 6 – EXPEDITING A PROJECT APPROVAL STAGE PART A

Project Portfolio Tool User Guide © Queensland Treasury Corporation Page 7
FIGURE 7 – EXPEDITING A PROJECT APPROVAL STAGE PART B
2.3 Concept Selection Stage Inputs (sheet ‘ConSelIn’)
The Concept Selection worksheet provides the user with a central place to input information
for the concept selection stage of a proposed project. The inputs may come from the PDF
Concept Approval Template or other Council documentation. It is assumed that they will be
high level estimates given the preliminary stage of the proposed project.
Step One
The PDF methodology recognises there can be multiple options for developing the same
project. Up to eight different options can be created for each proposed project by using the
‘Add Option’ button located in the standardised header and following the prompts. At least
one project option is required for each proposed project in each stage. At each project stage,
proposed project options are to be input by the user.
FIGURE 8 – ADD OPTION BUTTON
Each option created will appear under the relevant project name with the ability to give each
option a unique and meaningful name in addition to the Option Number provided by the
Tool.
FIGURE 9 – PROPOSED PROJECT OPTIONS
The feasibility approval
section can now be
completed.

Project Portfolio Tool User Guide © Queensland Treasury Corporation Page 8
Step Two
The User selects the most appropriate initial project risk rating from the drop down box and
nominates a realistic contingency value.
FIGURE 10 – RISK ASSESSMENT INPUTS
Step Three
In the Cost Estimates section, the User inputs the capital expenditure, annual operations &
maintenance costs, expected economic useful life of the assets and the project delivery dates.
In addition, the User can enter any general comments applicable to each project option.
FIGURE 11 – COST ESTIMATE INPUTS
FIGURE 12 – PROJECT DELIVERY AND GENERAL COMMENT INPUTS

Project Portfolio Tool User Guide © Queensland Treasury Corporation Page 9
Step Four
Once the concept selection stage has been approved by the project decision making group, the
User inputs the approval details in the Project Input worksheet.
FIGURE 13 – CONCEPT SELECTION STAGE APPROVAL
2.4 Pre-Feasibility Stage Inputs (sheet ‘PreFeasIn’)
Once formal concept approval has been provided and the details entered into the Project
Input worksheet, the Pre-Feasibility Stage worksheet will become active and will allow the User
to complete the inputs.
The Pre-Feasibility Stage worksheet follows on from the Concept Selection worksheet by
collating key information considered at the Pre-Feasibility Stage of a proposed project. The
inputs may come from the PDF options analysis template, or QTC’s Project Risk Assessment
tool, Whole of Life costing tool1 or Lease vs Buy tool2. The inputs may also come from council
risk registers, costing tools or other council documentation.
Step One
For each proposed project option the User can input relevant treated TECOP risk
assessments, a contingency value and a basis of contingency estimate. The ‘project risk rating’
is automatically determined to be equivalent to the highest TECOP risk.
FIGURE 14 – TREATED RISK ASSESSMENT INPUTS
1 Available through QTC Connect 2 Available from your QTC Account Manager

Project Portfolio Tool User Guide © Queensland Treasury Corporation Page 10
Step Two
The User inputs the ‘Total risk count by risk score’ for each option. The total risk count is a
summary of all risks identified for the project option.
FIGURE 15 – TOTAL RISK COUNT BY RISK SCORE INPUTS
Step Three
The User enters the top five risks for each option in the five risk sections in order of
importance. The TECOP type and risk score are selected from the available drop down boxes
and a brief description is identified for each risk.
FIGURE 16 – TOP 5 RISK INPUTS
Step Four
The User inputs the capital expenditure, annual operations & maintenance costs, expected
economic useful life of the assets, the discounted Whole of Life Cost (‘WOLC’) and project
funding details in line with the column headings.
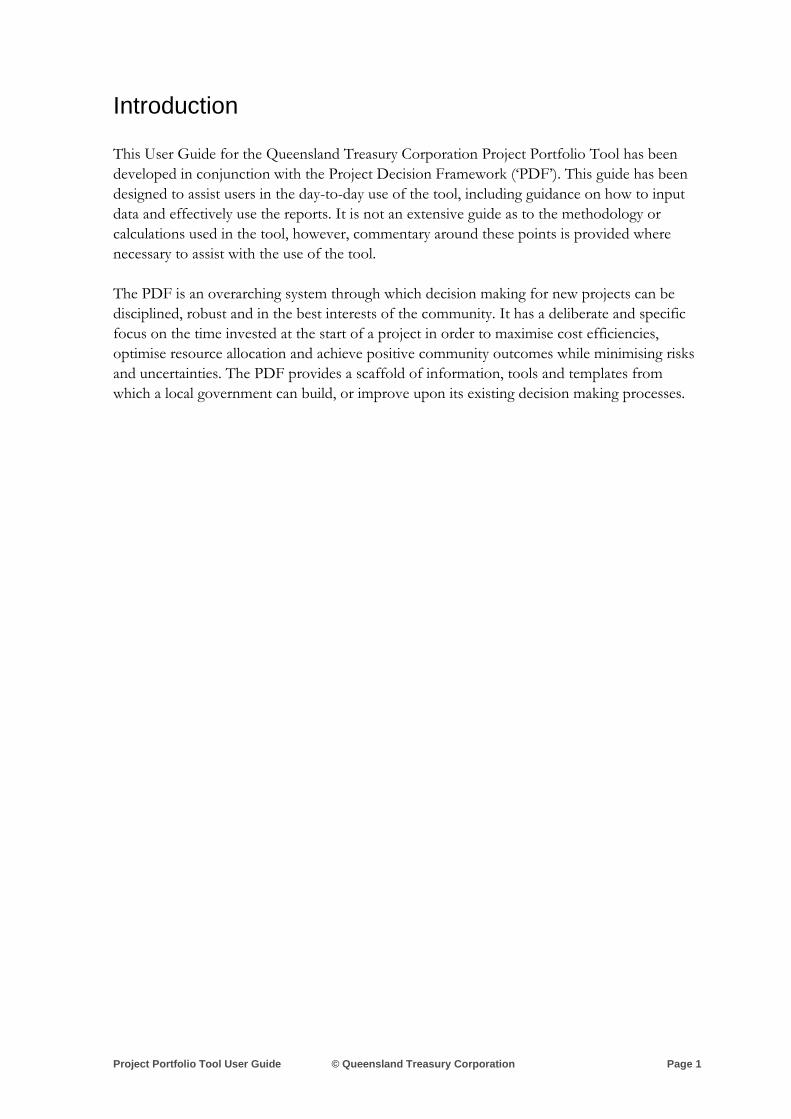
FIGURE 17 – COST ESTIMATE AND VALUE ESTIMATE INPUTS
Project Portfolio Tool User Guide © Queensland Treasury Corporation Page 11
FIGURE 18 – PROJECT FUNDING INPUTS
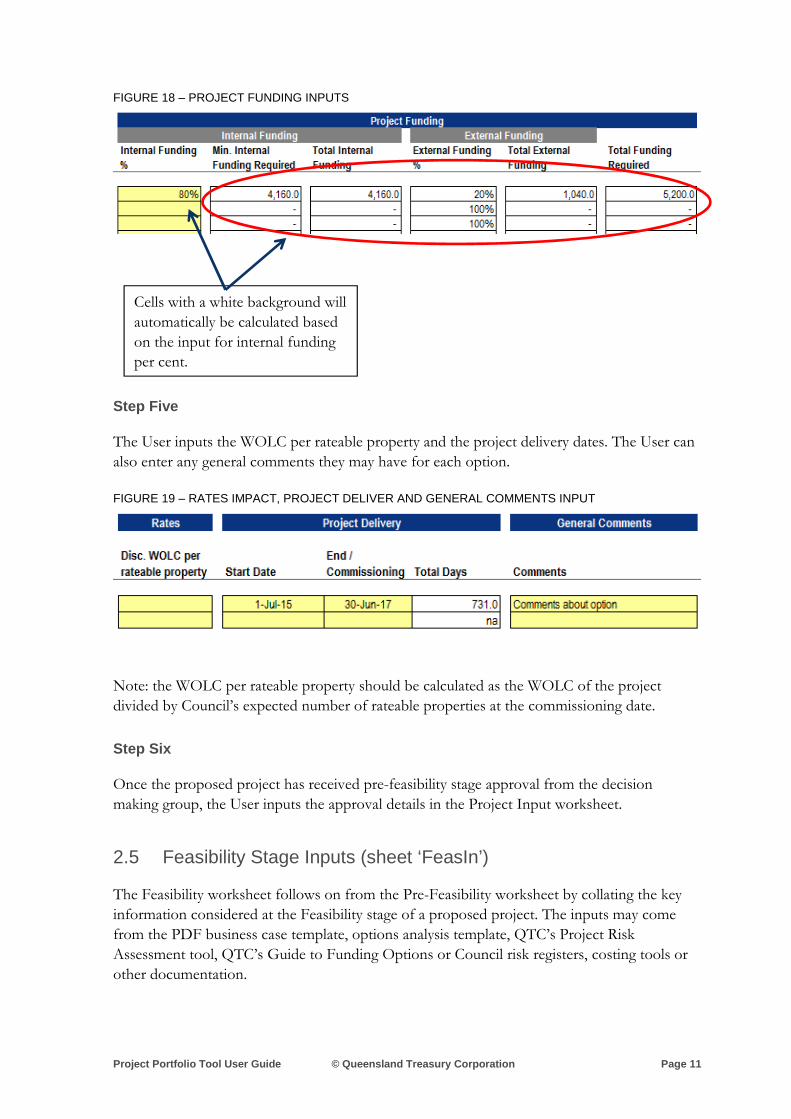
Step Five
The User inputs the WOLC per rateable property and the project delivery dates. The User can
also enter any general comments they may have for each option.
FIGURE 19 – RATES IMPACT, PROJECT DELIVER AND GENERAL COMMENTS INPUT
Note: the WOLC per rateable property should be calculated as the WOLC of the project
divided by Council’s expected number of rateable properties at the commissioning date.
Step Six
Once the proposed project has received pre-feasibility stage approval from the decision
making group, the User inputs the approval details in the Project Input worksheet.
2.5 Feasibility Stage Inputs (sheet ‘FeasIn’)
The Feasibility worksheet follows on from the Pre-Feasibility worksheet by collating the key
information considered at the Feasibility stage of a proposed project. The inputs may come
from the PDF business case template, options analysis template, QTC’s Project Risk
Assessment tool, QTC’s Guide to Funding Options or Council risk registers, costing tools or
other documentation.
Cells with a white background will
automatically be calculated based
on the input for internal funding
per cent.

Project Portfolio Tool User Guide © Queensland Treasury Corporation Page 12
Step One
The User should review all the options, the risk assessments, the total risk count and the top
five risks for each project and make any required amendments.
Step Two
The User inputs the capital expenditure for up to five years, the basis of the capital expenditure
estimate, the date of the capital expenditure estimate, the annual operating & maintenance
costs, the economic useful life of the assets, the WOLC, the NPV and the payback period in
years.
FIGURE 20 – CAPEX, OPEX AND VALUE COST ESTIMATES
Step Three
The User inputs the internal funding percentage to calculate the minimum internal funding
requirement. There is also an internal funding override in dollars should the User wish to enter
an internal funding amount different to the auto-calculated minimum internal funding
required. If the override is left blank, the calculated minimum internal funding required will be
used.
FIGURE 21 – INTERNAL FUNDING INPUTS
Step Four
Auto-calculated minimum
internal funding required from
the 80% internal funding per
cent input entered.
Internal funding requirement input that
has overridden the minimum internal
funding requirement of 80%.

Project Portfolio Tool User Guide © Queensland Treasury Corporation Page 13
The User inputs detailed external funding in line with the column headings. This includes the
primary and secondary funding sources as well as any other external funding and debt funding
from QTC.
FIGURE 22 – EXTERNAL FUNDING INPUTS
Step Five
The User inputs the ongoing resourcing requirements in terms of full-time equivalent staff
(‘FTEs’). The ongoing resourcing requirements segment identifies the ongoing internal and
external FTEs required for the successful operation of the project once the delivery stage is
complete.
FIGURE 23 – ONGOING RESOURCING INPUTS
Step Six
The User inputs the WOLC per rateable property, ongoing resourcing requirements and
project delivery details. The User can also enter any general comments for the project options.
Step Seven
Once the Feasibility Stage has been approved by the project decision making group, the
approval details in the Project Input worksheet can be completed.
2.6 Planning Stage Inputs (sheet ‘PlanIn’)
The Planning Stage worksheet is the final input worksheet in the Tool and provides a summary
of the key planning details for the successful project option. The inputs may be drawn from
the tools and templates used throughout the PDF and identified in the earlier stages of this
document.
At the planning stage, all previously identified inputs should be reviewed for the successful
project option and any relevant amendments entered. Note that QTC considers it unlikely that

Project Portfolio Tool User Guide © Queensland Treasury Corporation Page 14
inputs for each project option, for example the risk assessment, will have remained static
across the four stage worksheets as further research, investigation, and analysis will have been
undertaken for each of the project options.
Step One
The User inputs any project interdependencies. A project option would be dependent on
another project if it is unable to begin until the first project is completed. Up to three
dependent projects can be identified in the Planning Stage worksheet using the drop down
menus in the input cells.
FIGURE 24 – PROJECT INTERDEPENDENCY INPUTS
Step Two
When the Planning Stage of a proposed project is approved by the project decision making
group, input the approval details in the Project Inputs worksheet. As the planning stage is the
final stage in the Project Decision Framework, this is the final input worksheet of the Tool.

Project Portfolio Tool User Guide © Queensland Treasury Corporation Page 15
3 Outputs
3.1 Project Dashboard (‘ProjDash’)
The Project Dashboard Report provides a consolidated summary view of each stage of a
proposed project option. The outputs are presented in data tables and charts that will change
dynamically depending on which stage of the PDF is selected. This allows for easy analysis and
quick reference by decision makers.
The project, option and stage can be selected from the drop down boxes in the ‘general
information’ section at the top of the page. The project stage selection is limited to the
approved stages plus the stage immediately following the highest approved stage.
FIGURE 25 – PROJECT SUMMARY REPORT OUTPUTS
A Project Summary Report can be printed using the print button located in the standardised
header at the top of the worksheet.

Project Portfolio Tool User Guide © Queensland Treasury Corporation Page 16
3.2 Options Comparison Report (‘OptDash’)
The Options Comparison Report is designed to easily compare multiple project options at a
particular project stage.
The proposed project and project stage can be selected from the drop down boxes in the
‘general information’ section at the top of the page. The outputs are presented in table format
and consist of data and charts detailing the key information for each option of a proposed
project.
FIGURE 26 – OPTIONS COMPARISON REPORT OUTPUTS
An Options Comparison Report can be printed using the print button located in the
standardised header at the top of the worksheet.

Project Portfolio Tool User Guide © Queensland Treasury Corporation Page 17
Appendix A: Key Terms
CAPEX
Capital expenditure is the total cost of developing, planning and delivering a project.
OPEX
Operating expenditure includes the ongoing costs of operating and maintaining the new
asset/project deliverable.
TECOP
A method of categorising identified risk factors into one of five broad risk categories,
Technical, Economic, Commercial, Organisational and Political. A table of example risk
categorisation using the TECOP method is available at Appendix B.

Project Portfolio Tool User Guide © Queensland Treasury Corporation Page 18
Appendix B: TECOP Example Risk Categorisation
Category Underlying Risk Low Risk Extreme Risk
Technical Project location
Climate
Location
Scope definition
Existing infrastructure
Project complexity
Technology
Safety
Standard
Temperate
Level/open
Well defined
Reliable
Simple
Conventional
Safe
New frontier
Remote desert
Mountainous
Poorly defined
Non-existent
Complex
New/ unproven
Dangerous
Economic Schedule
Inflation
Currency
Realistic
Favourable
Single major
Unrealistic
Unfavourable
Multiple
Commercial Operations
Contract strategy
Contractor competition
Contractual interfaces
Risk ownership
Local content requirement
Group
Optimum
Multiple bidders
No contractors
Clear and appropriate
None
Joint Venture/ inexperience
Undefined
Single source
Multiple contractors
Unclear and inappropriate
High
Organisational Cross business
Number of locations
Project team competence
Single business unit
Single
Good
Multiple business units
Multi
Poor
Political Government involvement
Joint Venture involvement
Environmental issues
Community issues
Industrial relations
Reputational issues
Passive
Passive
None
None
Good
Standard
Active
Active
Major
Many
Poor
High profile

Project Portfolio Tool User Guide © Queensland Treasury Corporation Page 19
Disclaimer
Queensland Treasury Corporation (QTC) has prepared the QTC Project Portfolio Tool (Tool)
for use solely by Queensland local governments (the User) to assist in the tracking and
reporting of projects across the Project Decision Framework (PDF) pre-execution stages. The
Tool should not be used for any other purpose.
As use of the Tool is intended for Queensland local government only, it should not be
provided to or disclosed to, nor relied upon by, any other party without QTC’s express written
consent.
The accuracy of the Tool and its outputs is significantly determined by the accuracy, currency,
completeness and applicability of the information entered by the User. It is also determined by
the User’s understanding of the Tool’s underlying methodology and its appropriateness to the
User’s business. QTC is not in a position to review and verify the suitability of the Tool or its
inputs to specific situations being examined by the User and, therefore, QTC accepts no
responsibility for the incorrect application of the Tool by the User or the entry of incorrect
information into the Tool. The outputs of the Tool should be used as a guide only. Specific
advice should be obtained before acting on the basis of any output of the Tool.
Neither QTC nor any of its employees or agents accepts any liability for any loss or damage
suffered by any person as a result of that person or any other person placing reliance on, or
acting on the basis of, the contents of the Tool or the financial statements and reports
generated by the Tool. To the extent permitted by law, QTC expressly excludes any
representation or warranty in relation to the accuracy, currency and completeness of the Tool.
To the extent permitted by law, QTC limits its liability to the amount of fees received by QTC
in relation to the Tool.
QTC does not provide legal, tax or accounting advice. Such advice should be sought from an
independent expert practitioner before applying the information contained in the Tool.
© Queensland Treasury Corporation