project gargoyle - hoap.co.uk · objectives of project gargoyle leicestershire and rutlandchurches...
TRANSCRIPT

Project Gargoyle
A guide to photographing and recordingmedieval carvings in the churches of Leicestershire and Rutland

Contents
Objectives of Project Gargoyle 3
Who is running Project Gargoyle? 3
The scope of Project Gargoyle 4
Photographing and recording carvings for Project Gargoyle 5
Photography for Project Gargoyle 6
Documenting the photographs 9
Describing the location of carvings 11
Preparing and ‘improving’ photographs 13
Submitting images and records to Project Gargoyle 14
Contact details 15
Project Gargoyle copyright assignment and consent form 16
What next? 17
© copyright Bob Trubshaw 2010–2017
Grateful thanks to Bill Nash for permission to use his photographs of Diseworthtaken during the first 'shoot' for Project Gargoyle.
Front cover: Gargoyle on Tilton on the Hill church; photograph by Bob Trubshaw.
These guidelines published February 2010; minor amendments May, June and November 2010;December 2011; April and June 2012, July 2013; March; June 2014; January 2017.
2

Objectives of Project Gargoyle
Leicestershire and Rutland churches are home to a wealth of surviving medieval sculpture,predominately of the twelfth to fifteenth centuries. However this has hitherto not been systematicallyrecorded or studied. Project Gargoyle was set up in Spring 2009 to photograph, document and studysuch carvings in Leicestershire and Rutland.
Photographs and associated descriptions will be stored electronically in the Leicestershire and RutlandHistoric Environment Record (HER) maintained by Leicestershire County Council, the successor to theformer Sites and Monument Records (SMR). In the future some or all of this information will beaccessible online through English Heritage’s ‘Heritage Gateway’ and other web sites.
Who is running Project Gargoyle?
Project Gargoyle was instigated by Bob Trubshaw. who is currently Project Co-ordinator
Other members of the committee are:
Peter Liddle Leicestershire Fieldworkers
Kathy Elkin Leicestershire Fieldworkers
Richard Clark Leicestershire County Council
Helen Wells Leicestershire County Council
Mike Hawkes Diocese of Leicester Archaeological Advisor
Jill Bourn Leicestershire Archaeological and Historical Society
Several former Leicestershire County Council staff had key roles: Liz Blood, Kay Snowdon and GrahamWalley. Dr Alan McWhirr represented Leicestershire Archaeological and Historical Society until hisdeath Spring 2010.
3
The scope of Project Gargoyle
Project Gargoyle is an attempt to make a photographic record of the important church carvings inLeicestershire and Rutland. This will help in monitoring the wear and tear on them, and will help torecord the changing styles over the centuries and may even allow individual masons to be recognized.The information you record will be entered on the county’s Historic Environment Record (HER) whichis the main historic archive for present and future generations.
Strictly speaking gargoyles are a special type of carving designed to throw water from a roof, but‘Project Gargoyle’ aims to record all the figurative carvings inside and outside churches inLeicestershire and Rutland. ‘Figurative’ carvings are those which feature the faces and/or bodies ofhumans or animals. This project won’t be recording the other types of decorative church carvings suchas geometrical designs, or monuments or gravestones. Most of the carvings you record will be stone butinterior ones may also be in wood.
The carvings of the twelfth to fifteenth centuries have not been adequately recorded before so ProjectGargoyle will be especially useful here. But to avoid missing any we are interested in all figurativecarvings, from Anglo-Saxon and Romanesque to Gothic and Gothic revivals – including those inrestorations of medieval churches or from the nineteenth century. For practical reasons the project willinitially concentrate on churches in Leicestershire (i.e. within the diocese of Leicester) althoughRutland’s churches (in the diocese of Peterborough) will be covered in due course.
Once there is a more-or-less complete photographic record for Leicestershire and Rutland it is hoped tocommence an analysis of motifs and styles. As far as we know Project Gargoyle is a first in the countieswhere good quality medieval carvings are well preserved. In practice this is the zone following the‘Jurassic spine’ of England where oolitic limestones are readily available; i.e. Somerset through toLincolnshire.
Although not within the scope of Project Gargoyle, the archaeological adviser for Leicester diocese iskeen to see a complete photographic and documentary inventory of all churches in the diocese,including stained glass windows, sepulchral wall monuments, communion vessels, ecclesiasticalembroidery, and such like. In due course Leicestershire County Council’s may consider promotingsuch comprehensive church recording if the Heritage Wardens want it and this project goes well.
4

Photographing and recording carvings for Project Gargoyle
Who can help?
The aim is to involve people willing to record their local area and who have the access to the necessaryphotographic equipment and expertise. It is expected that any one church will be photographed andrecorded by a team of two or more people who between them combine the necessary skills. Possiblyone photographer will work with several parish-based Heritage Wardens, enabling several churches inan area to be successfully recorded. Simply put, there are no rules about who does what, and whoworks with whom, other than liaising with Bob Trubshaw to avoid duplication of effort.
Getting started
1 Firstly look at the latest version of the 'Leicestershire and Rutland village-by-village' PDF file(online at www.leics.gov.uk/gargoyle) to see if the church(es) you wish to record have beenallocated. Please note that this document is frequently updated to always check the current onlineversion.
2 Email Bob Trubshaw (see page 15 for contact details) promptly to avoid duplication of effort.
3 If there are no initials for a Heritage Warden, visit the church(es) to see if there are any carvingseither inside or out. Project Gargoyle is mostly concerned with ‘figurative carvings’ (those withhuman or animal faces or bodies) although medieval foliate carvings (e.g. roof bosses or bench/pewends) should also be recorded. If you need phone numbers for church key holders or clergy thenBob Trubshaw has the current diocesan directory.
3. Make initial enquiries as to whether the church was heavily restored or rebuilt in the nineteenthcentury. Although good examples of Victorian restoration will be included in Project Gargoylethere is no need to record ‘routine’ foliate decoration or simple heads around doors and windowswhen these are known to be all nineteenth century or more recent.
4. If there are medieval carvings then discuss the intentions to photograph them with the relevantclergy. Explain that the Project Gargoyle committee includes Mike Hawkes, the Diocese ofLeicester archaeology advisor (for Rutland churches say that the project has the formal support ofPeterborough Diocese) and the photographs will form part of Leicestershire County Council’sHistoric Environment Record.
6. If you do not have suitable photographic equipment (see next page) then ideally approach localphotographers who may be willing to help. Make sure they have read and seem to understand thetechnical notes on the following pages (sadly owning the right sort of equipment does not alwaysmean the owner knows how to use it effectively!). If local assistance proves difficult then BobTrubshaw may be able to introduce you to photographers willing to travel.
5
Photography for Project Gargoyle
Project Gargoyle will use photographs taken by many different photographers. The fairly detailedguidance on photography which follows is to ensure that:
¬ minimum technical standards are met; ¬ there is a reasonable level of consistency; ¬ the data will transfer easily to the Historic Environment Record database.
The aim of the guidance is to be sufficiently detailed to cover what can be reasonably expected whenrecording carvings. However inevitably unusual situations will be encountered. Any attempt toprovide guidance to cover all possible situations would be prohibitively complex. In practice some‘gumption’ is needed, although Bob Trubshaw should be contacted for guidance if time permits.
Photographic equipment
You will need: ¬ a digital SLR (or DSLR) camera with minimum 10 megapixels resolution (although 12 megapixels
or more is preferred) ¬ a ‘typical’ wide angle lens (about 18 mm focal length) ¬ a zoom telephoto with 300 mm or greater maximum focal length ¬ a sturdy tripod ¬ ideally a laptop to complete the Excel spreadsheet onsite
A remote release is advantageous, although the self-timer function (ideally set to about 3 to 5 seconds)can be used instead to avoid camera shake.
You will need to know how to: ¬ ‘bracket’ exposures ¬ change the speed (ISO) and white balance ¬ assess exposures using the histogram display ¬ enter data into Excel (including how to copy-and-paste repeated information) ¬ how to add text (numbers) to photographs using Photoshop Elements or other photo editing
software
Photographing carvings outside churches
Avoid shooting into the sun. For outside carvings on the north walls bright overcast days are muchbetter.
For preference save as TIFF format (or shoot in RAW and convert to TIFF) as JPG compresses the tonalrange of shadows. However if your camera has no RAW or TIFF option then save to the highest-resolution JPG.
Set ISO to 100 or 200.
If your camera has an option for colour space (some don’t) then select sRGB.
6

Set the white balance to ‘noon sunlight’ or ‘auto’. If using ‘auto’ check that the colour of the stone looksmore-or-less accurate. On rather overcast days a very slight warming effect can be achieved by usingthe white balance for ‘flash’ (even though you will not be using flash!).
When using a telephoto lens always mount the camera on a tripod and either use a remote release orthe self-timer set to three seconds or longer (however lenses with vibration-reduction may besufficiently stabilised to operate on a tripod at long focal lengths without a remote release.
Note that the displays on the backs of DSLRs need to be zoomed to full magnification to reveal blurcaused by camera movement. If your shots are blurred by camera shake they will not be acceptablefor the Project Gargoyle records and a re-shoot will be required.
If in doubt ‘bracket’ shots at different exposures and select the best later. The displays on the backs ofDSLRs are not always a good indication of how well the shadow areas will look on a better display.Using the histogram function is often a more reliable indication of how much ‘depth’ there is to shadowdetail.
How to ‘frame’ shots
The aim is to record all figurative carving (i.e. with humans or animals as the main motifs). Ignore ‘ballflower’ or foliate decoration where it regularly alternates with figurative carvings, but photograph andnumber (see page 11) foliate decoration when it is an ‘occasional’ variant in a set.
Every figurative carving should be photographed more-or-less ‘square on’ and from as far away asspace allows (i.e. no ‘looking up the nose’ shots unless space is unusually restricted). Zoom in so asingle carving more-or-less fills the frame (although this may not be possible for carvings at the top oftowers; in such situations it is acceptable for a telephoto lens at 300mm focal length to capture two ormore carvings per carvings). Turn the camera body to use ‘portrait format’ for carvings which arehigher than they are wide.
All carvings with any ‘depth’ should also be photographed from one side, both from about 450 and asnear to 900 as practical. If the carving is asymmetrical then photograph from both sides, where possible.
Left and centre: Examples of acceptable square on and oblique views of the same carving. Right: Unacceptable 'looking up the nose' viewpoint.(Photographs by kind permission of Bill Nash; contrast adjusted for reproduction by Bob Trubshaw.)
7

One or more wide-angle views should be taken of all walls where there are figurative carvings to:
(a) show where carvings are on or in the building
(b) enable the photograph to be annotated with the numbering system (see page 11).
Photographing carvings inside churches
Before starting photographing inside the church do not forget to take wide-angle views of the outsideshowing where the carvings are situated on the building. Take a few moments to check that everyphotograph is free from camera shake and is in focus. Photographs which do not meet these criteriawill not be accepted into the Project Gargoyle archive and you will be asked to take replacementphotographs. Before starting to photograph the interior complete the Excel spreadsheet (see next page)for the exterior carvings.
Set ISO to 100 or 200. Do not use faster speeds as shadow detail will be lost. All interior shots willrequire a tripod so longer exposure times are not a problem.
If your camera has no RAW or TIFF option then duplicate all interior shots with deep shadows with asecond photo taken one stop lighter as JPG compresses shadow detail. If in doubt ‘bracket’ shots atdifferent exposures and select the best later. The displays on the backs of DSLRs are not always a goodindication of how well the shadow areas will look on a better display. Using the histogram function isoften a more reliable indication of how much ‘depth’ there is to shadow detail.
Set the white balance to ‘noon sunlight’ or, on overcast days’, ‘flash’ (even though you will not be usingflash). Never take photographs inside a church using ‘auto’ white balance as this will change thecolour of the stone to a neutral grey. If saving to RAW format be sure to include some colour referencein one or more shots to enable a suitable white balance to be selected when editing.
Turn off any artificial lighting in the church as this will cause strong colour casts. No matter how darkyour eyes think the darkest corners of a church are, during daylight hours there is always enough lightfor a time exposure!
Left: A corbel photographed by available light.Right: The same corbel photographed with flash. The hidden detail revealed by flash makes this one of the fewoccasions when the use of flash is essential. However photographs by available light are also required.(Photographs by Bob Trubshaw.)
8

Do not use flash except when there is hidden detail which would otherwise be invisible (and in suchinstances a set of photographs taken without flash is essential). If your camera has the capability toshoot in HDR mode (most don't!) then this is an alternative option. Again, a non-HDR shot is essential.
Avoid shooting into the sun. Bright overcast days are much better, and probably essential, for interiorcarvings near south-facing windows. Small carvings close to bright windows may prove impossible tophotograph in daylight without excessive ‘lens flare’ spoiling the image. In such cases photograph afterdusk using the church’s artificial lights and the white balance set to ‘incandescent lighting’ (for oldfashioned light bulbs) or 'fluorescent lighting' (for most types of energy-saving bulbs)
See page 7 for advice on how to ‘frame’ shots.
Do not forget to take wide-angle views showing where the carvings are situated in the building.
Update March 2014: At the request of Helen Wells of Leicestershire County Council pleasealso include a 'general view' of the exterior, showing as much of the building as isreasonable, and one or two 'general views' of the interior. These are in addition to the morespecific exterior shots which are then annotated by you as part of the recording process.Please do *not* go to immense trouble taking these shots – they are very much secondary tothe main purpose of Project Gargoyle.
Before leaving check that every photograph is free from camera shake and is in focus. Photographswhich do not meet these criteria will not be accepted into the Project Gargoyle archive. Alsocomplete the Excel spreadsheet.
Documenting the photographs
Please see ‘Project Gargoyle record sheet (dummy).xls’ (download from www.leics.gov.uk/gargoyle/);part of this is shown overleaf.
Open 'Project Gargoyle record sheet (master).xls' (also download from www.leics.gov.uk/gargoyle/)and 'save as' with the name of the parish. Do not change the structure of this spreadsheet – at somefuture date it will be automatically incorporated into a large database; the information will be corruptedif columns have been moved or extra columns added.
The Excel spreadsheet must list carvings in strict filename order (even if this means that differentphotographs of the same carving are separated by photographs of other carvings).
1. Record the file names of all photographs as generated by the camera(s).(Hint: copy the unchanging ‘leading characters’ then paste into the appropriate cell before typing inthe last 2 or 3 digits.)
Each filename must be on separate row.
Only omit a filename if the image (file) is not part of the submission to Project Gargoyle.
Do not leave an empty row between file names – rows must be consecutive.
2. Record the parish where the church is situated (hint: use copy and paste)
3. Record the dedication of the church (hint: use copy and paste)
5. Describe where each set/sequence of carvings is located – see pages 11 and 12 for a glossary ofterminology.
6. Include the wide-angle views of all parts of the building showing where the figurative carvings aresituated. As soon as possible digitally annotate a copy of these views (see page 13).
9
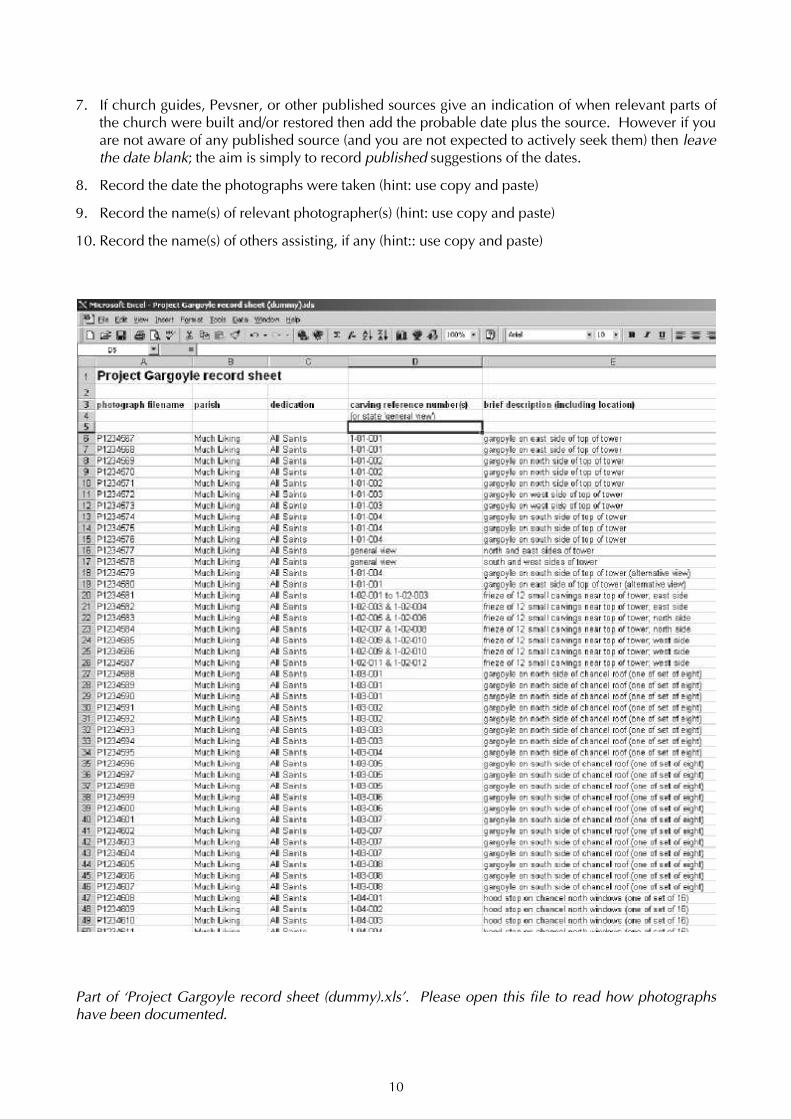
7. If church guides, Pevsner, or other published sources give an indication of when relevant parts ofthe church were built and/or restored then add the probable date plus the source. However if youare not aware of any published source (and you are not expected to actively seek them) then leavethe date blank; the aim is simply to record published suggestions of the dates.
8. Record the date the photographs were taken (hint: use copy and paste)
9. Record the name(s) of relevant photographer(s) (hint: use copy and paste)
10. Record the name(s) of others assisting, if any (hint:: use copy and paste)
Part of ‘Project Gargoyle record sheet (dummy).xls’. Please open this file to read how photographshave been documented.
10

Note that exceptionally large churches may have transepts and private chapels. If at all possibleconsult a church guide or Pevsner for the nomenclature previously used to describe such parts ofthese buildings.
Please use the following terminology when describing the locations of carvings.
aisle Used here not to refer to the central walkway in the nave but to the extensions on thenorth and/or south sides of the nave, separated by arcades.
arcade A series of arches on columns or piers, usually between the nave and the aisles.
aumbry A small cupboard built into the wall of the chancel for storing the chalice and otherliturgical vessels.
bellcote An open structure on which the bells are hung, sometimes known as a bell turret.Twin bellcotes are especially common on Rutland churches.
bench end The decoration at one or both ends of wooden pews.
box pew Enclosed seating, often with doors, usually dating from the seventeenth or eighteenthcentury. They often were reserved for the use of specific families. Victorian churchrestorers were keen to remove these and replace them with 'open' pews.
capitals The large blocks on top of a column or pillar, directly beneath the arch. They areoften decorated, sometimes with stylised foliage, occasionally with figures or othermore elaborated motifs.
chancel The eastern part of a church (please do not refer to as ‘the choir’).
chancel screen A carved screen separating the nave and chancel; pre-reformation examples areoften referred to as a ‘rood screen’ as they were originally surmounted by a rood loft.Please record all instances as chancel screens.
Schematic plan of a typical church. See Glossary for a moredetailed explanation of terms used.
North aisle
South aisle
NaveTower
Arcade (with clerestory above)Porch
Chancel
Describing the location of carvings
Getting your bearings
In all medieval churches inLeicestershire and Rutlandthe chancel is at the eastend of the building.However the porch issometimes on the northside rather than the south.Towers are usually but notalways at the west end.
11

clerestory Windows high up in the nave. They are often more recent than the rest of the nave,becoming very fashionable in the fifteenth century.
corbel Blocks of masonry partially set into walls and originally supporting roof timbers(although many are now function-less if the roof height has been raised to form aclerestory).
crockets Rows of hook-like or leaf-like projections, usually on the edges of a spire.
frieze A continuous band of decorative carving with, usually, rather small figures of faces,animals or vegetation. Note that some types of frieze are referred to by art historians(such as Pevsner) as ‘corbel tables’ but for the purposes of Project Gargoyle should bereferred to as a ‘frieze’.
gargoyle To be found on the outside of churches, around the tower and along the nave andaisle roofs. 'Gargoyle' is a term often used indiscriminately for any grotesque carving;for Project Gargoyle it should be used in its strict sense of a carving designed to drainrainwater off the roof away from the wall. However there are ‘pseudo-gargoyles’(usually restorations post-dating gutters and downpipes) which occupy the locationof a functioning gargoyle but which are purely decorative. Please record these alsosimply as ‘gargoyles’ as the non-functional design will be apparent from thephotographs and can be considered at a later stage of the project.
label stop The technical term for where the arch of a window or doorway meets the verticalsides. Sometimes known as a ‘hood stop’; please use ‘label stop’ when recording.See also ‘springer’
nave The part of the church where the congregation sit.
piscina Washing basin for the chalice and other sacred vessels, often richly carved.
reredos An ornamental screen covering the wall behind an altar.
roof boss Decorative carving along the centre of a roof.
sedilia Seats built into the wall, often in the form of beautifully carved niches. Usually thereare three, one each for the priest, deacon and sub-deacon who assisted with theliturgy. The three seats are often ranked, with the tallest nearest the altar.
springer Where two arches meet (e.g. in an arcade). Frequently decorated with heads. Pleaserecord as springer rather than label stop (use label stop only where the arches do notmeet, as with doors and windows).
squint A hole or window through the masonry that enabled priests at side altars to see themain altar, so that key events of the Mass could be synchronised when celebratedsimultaneously at the different altars. Also known as a hagioscope; please record assquint.
stoup A stone basin for holy water.
tower screen A wooden screen separating the nave from the base of the tower; often achancel/rood screen which has been moved.
tympanum A carved semi-circular stone intended to fill the gap between the door lintel and thearch above (often removed from its original location).
12

Preparing and ‘improving’ photographs
Check that every photograph is free from camera shake and is in focus. Photographs which do notmeet these criteria will not be accepted into the Project Gargoyle archive.
Check that the colour balance looks ‘realistic’. There is no need to get obsessed about colourmanagement but do not submit images where the same carving or wall looks grey in some shots andwarm brown in others! Reread the guidance on white balance (see page 8) if necessary. Note thatslight colour casts to white-painted walls are not a problem – it is quite acceptable for them to lookslightly blue on overcast days or warm at sunrise/sunset.
All files submitted to the Project Gargoyle ‘archive’ must be in JPG or TIFF format – no RAWs please.Convert RAW files to TIFF format using sRGB colour space.
Original JPG files must never be changed and re-saved (except for using the loss-less rotation functionin Photoshop or Paint Shop Pro) as re-saving JPGs causes degradation of image quality. All ‘derived’photographs (e.g. improved contrast or cropping) should be saved as TIFF format.
A copy of the unchanged JPG or TIFF file must accompany any derived/improved versions.
Keep all photographs (originals or derived/improved copies) of the same church in the same folder.
File names of derived/improved versions must start with all the original filename e.g. if the cameragenerated ‘P1234567.JPG’ then any versions should be ‘P1234567_01.TIF’ or ‘P1234567_04.TIF’ orsuch like. There is no need for such filenames to be an unbroken sequence – if there are two suchderived files then P1234567_04.TIF’ and ‘P1234567_10.TIF’ are just as acceptable asP1234567_01.TIF’ and ‘P1234567_02.TIF’.
Please do not use spaces in filenames – use hyphen or underscore instead.
Check that every filename/image being sent to Project Gargoyle appears on the Excel spreadsheet.However do not create a new row for derived/improved files – the description of P1234567.JPG will beassigned automatically to ‘P1234567_01.TIF’, ‘P1234567_04.TIF’ and such like.
Also check that any images deleted from the submission to Project Gargoyle have been deleted fromthe spreadsheet.
Annotating wide angle general views
Make TIFF format copies of the wide-angle views in photo-editing software (Photoshop; Paint Shop Pro;GIMP; etc). These copies must start with all the original filename e.g. if the camera generated‘P1234567’ then any versions should be ‘P1234567_01.TIF’ or ‘P1234567_02.TIF’ etc. Make sure thesoftware is set to save as TIFF format. Files created in proprietary formats such as PSD or PSP cannot beaccepted.
Use photo-editing software to add reasonably small lettering identifying the locations of the first andlast carvings in a set (usually the most westerly and easterly carvings) and the locations of ‘one-off’carvings not considered to be part of a set. When there is more than one image of the first and lastcarvings in a set add only the filename of the first (lowest numbered) image. See examples on next page.
Use a clear sans-serif font such as Arial. White coloured lettering will usually stand out sufficiently, butin some instances red or black lettering may be clearer. Do not use ‘outlined’ lettering.
With complex arrangements of carvings it will be clearer to make a separate copy for each set ofcarvings rather than adding lots of numbers to one image.
13
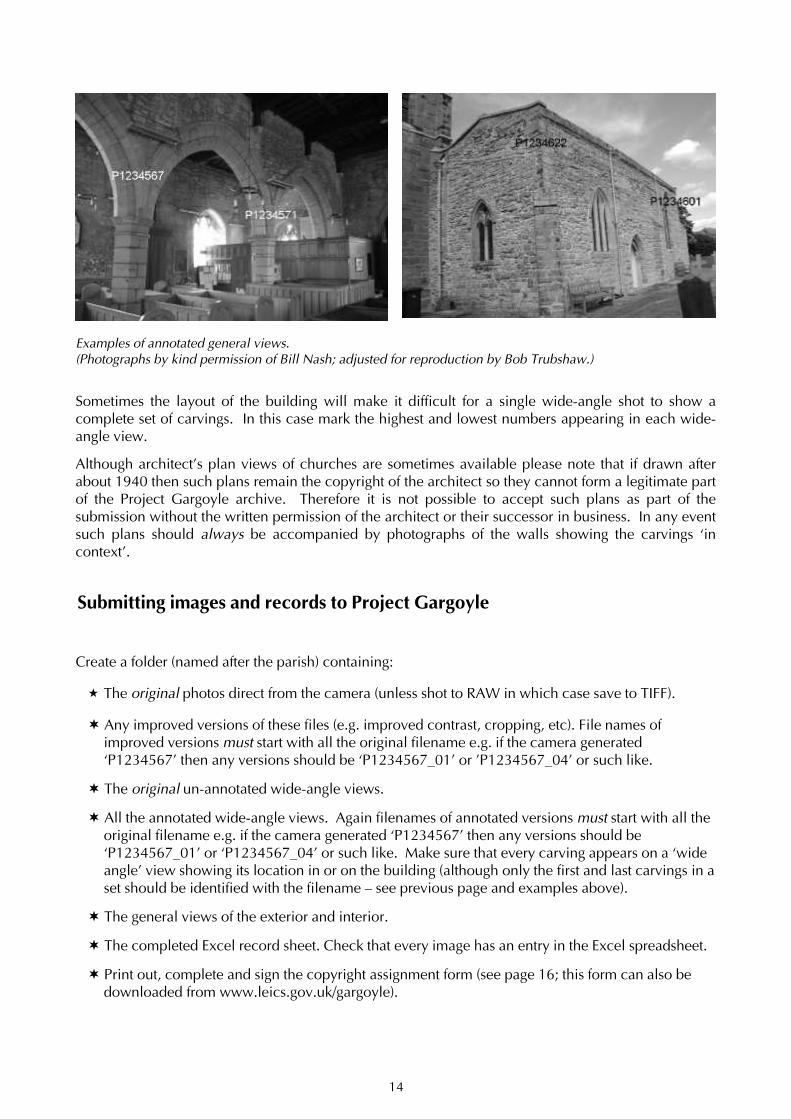
Sometimes the layout of the building will make it difficult for a single wide-angle shot to show acomplete set of carvings. In this case mark the highest and lowest numbers appearing in each wide-angle view.
Although architect’s plan views of churches are sometimes available please note that if drawn afterabout 1940 then such plans remain the copyright of the architect so they cannot form a legitimate partof the Project Gargoyle archive. Therefore it is not possible to accept such plans as part of thesubmission without the written permission of the architect or their successor in business. In any eventsuch plans should always be accompanied by photographs of the walls showing the carvings ‘incontext’.
Examples of annotated general views.(Photographs by kind permission of Bill Nash; adjusted for reproduction by Bob Trubshaw.)
Submitting images and records to Project Gargoyle
Create a folder (named after the parish) containing:
« The original photos direct from the camera (unless shot to RAW in which case save to TIFF).
¬ Any improved versions of these files (e.g. improved contrast, cropping, etc). File names ofimproved versions must start with all the original filename e.g. if the camera generated‘P1234567’ then any versions should be ‘P1234567_01’ or 'P1234567_04’ or such like.
¬ The original un-annotated wide-angle views.
¬ All the annotated wide-angle views. Again filenames of annotated versions must start with all theoriginal filename e.g. if the camera generated ‘P1234567’ then any versions should be‘P1234567_01’ or ‘P1234567_04’ or such like. Make sure that every carving appears on a ‘wideangle’ view showing its location in or on the building (although only the first and last carvings in aset should be identified with the filename – see previous page and examples above).
¬ The general views of the exterior and interior.
¬ The completed Excel record sheet. Check that every image has an entry in the Excel spreadsheet.
¬ Print out, complete and sign the copyright assignment form (see page 16; this form can also bedownloaded from www.leics.gov.uk/gargoyle).
14

Contact details
Bob Trubshaw is now at:
2 Cross Hill Close
Wymeswold
Loughborough
LE12 6UJ
01509 881342
Under no circumstances should photographs be emailed to Bob Trubshaw.
In the event of any changes then current contact details will be online at www.hoap.co.uk/gargoyle/Note that the projects's web page hosted at leics.gov.uk was last updated in 2010 and should beignored.
Send a copy of all the files on DVD-R, USB memory stick, SD card, or CompactFlash card to BobTrubshaw (contact details below). The memory device will be returned promptly.
Update March 2014: I am also willing to download images from Dropbox or a similar 'cloud' service ifthat is more convenient.
15

Project Gargoyle
Copyright assignment and consent form
The purpose of this assignment and consent is to enable Leicestershire County Council and theirsuccessors to permanently retain and use the photographs and records created as part of ‘ProjectGargoyle’.
As present owner of the copyright of the photographs and associated written records contributed by meto Project Gargoyle, I hereby assign non-exclusive copyright to Leicestershire County Council. Iunderstand that no payment is due to me for this assignment and consent. I understand that I am givingLeicestershire County Council the right to make available the photographs and written records in thefollowing ways:
l as part of the Leicestershire and Rutland Historic Environment Record (HER) and any successor
l use in Council-funded publications, including print, audio or video cassettes or CD-ROMs
l publication worldwide on the Internet
l public performance, lectures or talks
l public reference purposes in libraries, museums and record offices
l use on radio or television to promote the Council’s activities
l use in schools, universities, colleges and other educational establishments, including use in athesis, dissertation or similar research
All other uses of this material, including use by commercial organisations where a reproduction feemight reasonably be expected, are excluded from this agreement.
I retain the right to make available these photographs and written records to any other persons ororganisations.
Do you want your name to be disclosed? YES/NO
Signed:
Print name:
Date:
Address (including postcode):
Brief details of deposited material (e.g. names of parishes whose churches have
been recorded). Continue overleaf if necessary.
16

What next?
After you’ve had great fun photographing and documenting medieval carvings, what next? Well youcould become part of the team that looks in more detail at the historical background of the carvings andmakes a start on an analysis of motifs and styles.
Above all make local people aware of the wealth of medieval art in their midst. When there are villageevents and other church open days provide a simple display about the carvings and set up a ‘gargoyleworkshop’ for children, encouraging them to draw or model the carvings in clay. Most children willalso want to design their own grotesque, write a song that might have been sung by a gargoyle, or tell astory about what a gargoyle gets up to when it pops down off the roof after midnight. What follows is apage from the Gargoyle Hunting Guide prepared by Bob Trubshaw for a Heritage Wardens event in2008.
How to hunt gargoyles 1 Pack binoculars, camera, sketch pad and pens, map, Good Gargoyle Guide, water,
sandwiches, umbrella, suncream, mobile phone ...
2 Find a church where gargoyles are likely to lurk.
3 LOOK UP!
Repeat steps 1 to 3 until successful.
What to do in the event of a successful gargoyle hunt
1 Try saying 'Hello' to the gargoyle. This takes them by surprise as few people speak tothem. If they do start a conversation then write down what they say.
2 Ask them if it's OK to draw their portrait or take a photo. They very rarely so 'No' butthey do like being asked first.
3 If they are looking a bit tatty, do another drawing showing how you think they lookedwhen the stonemason had just finished.
4 Do a drawing showing how they may have looked when brightly painted. When finishedturn the drawing round so the gargoyle can see – it makes them happy to think back towhen they were young (although they may even shed a tear or two if their youth seems avery long time ago).
5 What would happen if one of the gargoyles escaped and wandered off to the nearest shopfor a paper and a packet of crisps? Write down what you think people might say to it.
6 What sort of songs do gargoyles sing when they think no one is around to listen? Writedown a gargoyle song or two.
If you have a local history group or similar then Bob Trubshaw will be willing to talk about medievalcarvings and put local examples into a wider context. For details of fees for talks to adults and ‘gargoyleworkshops’ for accompanied children then contact Bob (details on page 16).
17