project 2003 basic manual
TRANSCRIPT

8/3/2019 Project 2003 Basic Manual
http://slidepdf.com/reader/full/project-2003-basic-manual 1/90
Microsof tPro jec t 2003
MANUA L - FOUNDATION LEVEL
North American Edition

8/3/2019 Project 2003 Basic Manual
http://slidepdf.com/reader/full/project-2003-basic-manual 2/90
PAGE 2 - PROJECT 2003 - FOUNDATION LEVEL MANUAL
FOR USE AT THE LICENSED SITE(S) ONLY
© Cheltenham Courseware Ltd. 1995-2006 www.cheltenhamcourseware.com
© 1995-2006 Cheltenham Courseware Ltd.Email: [email protected]: http://www.cheltenhamcourseware.com
All trademarks acknowledged. E&OE.
© Cheltenham Courseware Ltd. 1995-2006 No part of this document may be copied without written permission from CheltenhamCourseware unless produced under the terms of a courseware site license agreement with Cheltenham Courseware.
All reasonable precautions have been taken in the preparation of this document, including both technical and non-technical proofing.Cheltenham Courseware and all staff assume no responsibility for any errors or omissions. No warranties are made, expressed orimplied with regard to these notes. Cheltenham Courseware shall not be responsible for any direct, incidental or consequentialdamages arising from the use of any material contained in this document. If you find any errors in these training modules, pleaseinform Cheltenham Courseware. Whilst every effort is made to eradicate typing or technical mistakes, we apologize for any errorsyou may detect. All courses are updated on a regular basis, so your feedback is both valued by us and will help us to maintain thehighest possible standards.
Sample versions of courseware from Cheltenham Courseware(Normally supplied in Adobe Acrobat format): If the version of courseware that you are viewing is marked as NOT FOR TRAINING,SAMPLE, or similar, then it cannot be used as part of a training course, and is made available purely for content and style review.This is to give you the opportunity to preview our courseware, prior to making a purchasing decision. Sample versions may not bere-sold to a third party.
For current license information
This document may only be used under the terms of the license agreement from Cheltenham Courseware.Cheltenham Courseware reserves the right to alter the licensing conditions at any time, without prior notice.Please see the site license agreement available at:www.cheltenhamcourseware.com/agreement
Look for this icon for the New features of this software version.
Look for this icon for the Enhanced features of this software version.

8/3/2019 Project 2003 Basic Manual
http://slidepdf.com/reader/full/project-2003-basic-manual 3/90
PAGE 3 - PROJECT 2003 - FOUNDATION LEVEL MANUAL
FOR USE AT THE LICENSED SITE(S) ONLY
© Cheltenham Courseware Ltd. 1995-2006 www.cheltenhamcourseware.com
COURSE BASICS ...................................................................................................................................................... 6
TOOLBARS................................................................................................................................................................. 6
The Title Bar ....................................................................................................................................................... 6
The Menu Bar ..................................................................................................................................................... 6
The Tool Bar ....................................................................................................................................................... 7
The Status Bar .................................................................................................................................................... 7
The Scroll Bar ..................................................................................................................................................... 7
FILE MANAGEMENT ................................................................................................................................................... 8
Opening Files ...................................................................................................................................................... 8
Saving Files ......................................................................................................................................................... 8
Closing Files ..................................................................................................................................................... 10
INSTALLING THE SAMPLE FILES .............................................................................................................................. 10
INTRODUCTION TO MICROSOFT PROJECT 2003 ......................................................................................... 11
WHAT IS PROJECT 2003? ...................................................................................................................................... 11
Project 2003 ...................................................................................................................................................... 11
THE PROJECT 2003 ENVIRONMENT....................................................................................................................... 12
Using the Main Menu ....................................................................................................................................... 12
Using the Ask a Question Box ....................................................................................................................... 12
Using Task Panes ...................................................................................................................................... 13
Using the Getting Started Pane ............................................................................................................... 14
Using the New Project Pane ..................................................................................................................... 15
Using the Search Results Pane ............................................................................................................... 16
Using the Project Help Pane ..................................................................................................................... 17
Using Microsoft Project Help .......................................................................................................................... 18
Accessing the Office Assistant ....................................................................................................................... 19
TOOLBARS............................................................................................................................................................... 20
Showing a Toolbar ........................................................................................................................................... 20
Hiding a Toolbar ............................................................................................................................................... 20
Moving a Toolbar .............................................................................................................................................. 20
Using the Standard Toolbar ............................................................................................................................ 20
Using the Formatting Toolbar ......................................................................................................................... 22
Using the Project Guide .................................................................................................................................. 23
REVIEW QUESTIONS ............................................................................................................................................... 25
DEFINING THE PROJECT ..................................................................................................................................... 26
CREATING A NEW PROJECT .................................................................................................................................... 26
Starting a New Project ..................................................................................................................................... 26
OPENING A PROJECT .............................................................................................................................................. 26
Opening a Project ............................................................................................................................................ 27
USING FILE PROPERTIES ........................................................................................................................................ 27
Utilizing File Properties .................................................................................................................................... 27
ENTERING START AND FINISH DATES .................................................................................................................... 28
Inputting Start and Finish Dates ..................................................................................................................... 28 ESTABLISHING A PROJECT CALENDAR ................................................................................................................... 30
Setting up a Project Calendar ........................................................................................................................ 30
Making a New Calendar .................................................................................................................................. 30
Changing Calendar Options ........................................................................................................................... 31
SAVING .................................................................................................................................................................... 31
Saving Your Project ......................................................................................................................................... 31
QUITTING AND CLOSING ......................................................................................................................................... 32
Closing a Project .............................................................................................................................................. 32

8/3/2019 Project 2003 Basic Manual
http://slidepdf.com/reader/full/project-2003-basic-manual 4/90
PAGE 4 - PROJECT 2003 - FOUNDATION LEVEL MANUAL
FOR USE AT THE LICENSED SITE(S) ONLY
© Cheltenham Courseware Ltd. 1995-2006 www.cheltenhamcourseware.com
Quitting Project 2003 ....................................................................................................................................... 33
REVIEW QUESTIONS ............................................................................................................................................... 33
TASKS ....................................................................................................................................................................... 34
ENTERING TASKS.................................................................................................................................................... 34
Entering Tasks .................................................................................................................................................. 34
ENTERING
TASK
DURATIONS.................................................................................................................................. 35
Entering Task Durations .................................................................................................................................. 35
ENTERING SUBTASKS ............................................................................................................................................. 36
Entering Subtasks ............................................................................................................................................ 37
Creating a Summary Task .............................................................................................................................. 38
USING RECURRING TASKS ..................................................................................................................................... 39
Entering Recurring Tasks ............................................................................................................................... 39
USING TASK NOTES ................................................................................................................................................ 40
Entering Task Notes ........................................................................................................................................ 40
ASSIGNING MILESTONES ........................................................................................................................................ 42
Assigning Milestones ....................................................................................................................................... 42
ENTERING CONSTRAINTS ....................................................................................................................................... 43
Adding Constraints ........................................................................................................................................... 43
Using Deadlines ............................................................................................................................................... 44
EDITING TASKS ....................................................................................................................................................... 44 Editing Tasks .................................................................................................................................................... 44
DELETING TASKS .................................................................................................................................................... 45
Deleting Tasks .................................................................................................................................................. 45
MOVING TASKS ....................................................................................................................................................... 46
Moving Tasks .................................................................................................................................................... 46
CREATING DEPENDENCIES..................................................................................................................................... 46
Establishing Dependencies ............................................................................................................................ 46
Using Finish-to-Start (FS) Dependencies ..................................................................................................... 47
Using Start-to-Finish (SF) Dependencies ..................................................................................................... 48
Using Start-to-Start (SS) Dependencies ....................................................................................................... 49
Using Finish-to-Finish (FF) Dependencies ................................................................................................... 51
REVIEW QUESTIONS ............................................................................................................................................... 53
RESOURCES ............................................................................................................................................................ 55
CREATING A RESOURCE LIST ................................................................................................................................. 55
Creating Resources ......................................................................................................................................... 55
ENTERING WORKING TIME...................................................................................................................................... 57
Entering Working Time .................................................................................................................................... 57
ENTERING COSTS ................................................................................................................................................... 58
Entering Rates .................................................................................................................................................. 58
Editing Resource Costs ................................................................................................................................... 58
ENTERING NOTES ................................................................................................................................................... 59
Entering Notes .................................................................................................................................................. 59
ASSIGNING RESOURCES TO A TASK....................................................................................................................... 60
Assigning with the Assign Resources Dialog Box ....................................................................................... 60
Using the Resource List Options ................................................................................................................... 61 Assigning in the Gantt Table View ................................................................................................................. 63
REVIEW QUESTIONS ............................................................................................................................................... 63
VIEWS ........................................................................................................................................................................ 65
INTRODUCTION TO VIEWS ....................................................................................................................................... 65
USING THE CALENDAR VIEW .................................................................................................................................. 67
Applying the Calendar View ........................................................................................................................... 67
USING THE GANTT CHART VIEW ............................................................................................................................. 68
Applying the Gantt Chart View ....................................................................................................................... 68
8/3/2019 Project 2003 Basic Manual
http://slidepdf.com/reader/full/project-2003-basic-manual 5/90
PAGE 5 - PROJECT 2003 - FOUNDATION LEVEL MANUAL
FOR USE AT THE LICENSED SITE(S) ONLY
© Cheltenham Courseware Ltd. 1995-2006 www.cheltenhamcourseware.com
USING THE NETWORK DIAGRAM VIEW ................................................................................................................... 70
Applying the Network Diagram View ............................................................................................................. 70
USING THE TASK USAGE VIEW ............................................................................................................................... 72
Applying the Task Usage View ...................................................................................................................... 72
USING THE TRACKING GANTT VIEW ....................................................................................................................... 73
Applying the Tracking Gantt View .................................................................................................................. 73
USING THE RESOURCE GRAPH VIEW ..................................................................................................................... 74
Applying the Resource Graph View .............................................................................................................. 74
USING THE RESOURCE SHEET VIEW...................................................................................................................... 75
Applying the Resource Sheet View ............................................................................................................... 75
USING THE RESOURCE USAGE VIEW ..................................................................................................................... 76
Applying the Resource Usage View .............................................................................................................. 76
REVIEW QUESTIONS ............................................................................................................................................... 77
PRINTING REPORTS.............................................................................................................................................. 78
VIEWING AND PRINTING REPORTS ......................................................................................................................... 78
USING PRINT PREVIEW ........................................................................................................................................... 78
Understanding Print Preview .......................................................................................................................... 78
UNDERSTANDING PAGE SETUP .............................................................................................................................. 79
Using Page Setup ............................................................................................................................................ 80
UNDERSTANDING THE PRINT DIALOG BOX............................................................................................................. 80 Using the Print Dialog Box .............................................................................................................................. 80
STARTING THE REPORTS DIALOG BOX .................................................................................................................. 81
Understanding the Reports Dialog Box ........................................................................................................ 81
UNDERSTANDING THE DIFFERENT TYPES OF REPORTS ........................................................................................ 82
Using Overview Reports ................................................................................................................................. 82
Using Current Activity Reports ....................................................................................................................... 83
Using Cost Reports .......................................................................................................................................... 84
Using Assignments Reports ........................................................................................................................... 85
Using Workload Reports ................................................................................................................................. 85
Using Custom Reports .................................................................................................................................... 86
THE PROJECT GUIDE FOR PRINTING WIZARD........................................................................................................ 86
Using the Project Guide for Printing Wizard ........................................................................................... 87
CUSTOMIZING REPORTS ......................................................................................................................................... 88 Using Customized Reports ............................................................................................................................. 88
Creating a New Report .................................................................................................................................... 89
Editing Existing Reports .................................................................................................................................. 89
REVIEW QUESTIONS ............................................................................................................................................... 90

8/3/2019 Project 2003 Basic Manual
http://slidepdf.com/reader/full/project-2003-basic-manual 6/90
PAGE 6 - PROJECT 2003 - FOUNDATION LEVEL MANUAL
FOR USE AT THE LICENSED SITE(S) ONLY
© Cheltenham Courseware Ltd. 1995-2006 www.cheltenhamcourseware.com
Course Basics
Toolbars
The Title Bar
• The title bar is displayed along the top of almost all program, folder and dialogbox windows. It is used to display information such as the name of the
application (or folder) and the document you are working on. Information whichis displayed here may vary. The example shown illustrates the title bar for a
program called Microsoft Word, in which a document called Document1 hasbeen opened or saved:
The Menu Bar
• The menu bar is located under the title bar, and contains a series of drop-downmenus. The example shown illustrates the Microsoft Word Menu Bar:
To execute Menu commands
• In most cases, you are asked to use the mouse to execute a series of menucommands (e.g., File > Save As). What this means is that you select File from
the main menu, followed by Save As:

8/3/2019 Project 2003 Basic Manual
http://slidepdf.com/reader/full/project-2003-basic-manual 7/90
PAGE 7 - PROJECT 2003 - FOUNDATION LEVEL MANUAL
FOR USE AT THE LICENSED SITE(S) ONLY
© Cheltenham Courseware Ltd. 1995-2006 www.cheltenhamcourseware.com
The Tool Bar
• The tool bar contains a series of icons, which allow you to achieve a desiredeffect as quickly as possible. In the example shown, taken from the Microsoft
Word Formatting toolbar, to make the selected text bold, you would click on the
Bold icon:
The Status Bar
• Most application windows have a status bar displayed along the bottom of thewindow. In the example illustrated, taken from Microsoft Word, the status bar
conveys information about the page within the document which you are workingon, along with other relevant information:
The Scroll Bar
• When a program or folder needs to display information within a window, twosets of scroll bars may be displayed along the bottom and right side of thewindow. By using the scroll bars it is possible to move to any position within a
document and also work on a document many times bigger than your physicalscreen size.
To move up and down within a window (using the scroll bar)
• To scroll upwards in a window, click on the upwards-pointing arrow at the top of
the vertical scroll bar:
• To move downwards in a window, click on the downwards-pointing arrow at the
bottom of the vertical scroll bar:
To move right to left within a window
• To move to the right-hand side of a window, click on the right-hand arrow on
the horizontal scroll bar:
• To move to the left-hand side of a window, click on the left-hand arrow on the
horizontal scroll bar:

8/3/2019 Project 2003 Basic Manual
http://slidepdf.com/reader/full/project-2003-basic-manual 8/90
PAGE 8 - PROJECT 2003 - FOUNDATION LEVEL MANUAL
FOR USE AT THE LICENSED SITE(S) ONLY
© Cheltenham Courseware Ltd. 1995-2006 www.cheltenhamcourseware.com
File Management
Opening Files
• From the main menu, select File > Open command or click on the Open iconand select the required file from the dialog box displayed:
• Use the Look in drop-down menu to select the drive or folder which contains
the file you want.
• To open the file you require either double-click on the file name
or select the file name by clicking on it, and then click on the Open button.
Saving Files
To save a new document
• From the main menu, select File > Save command or click on the Save iconand from the dialog box displayed select the required folder. Enter a file nameand then click on the Save button:

8/3/2019 Project 2003 Basic Manual
http://slidepdf.com/reader/full/project-2003-basic-manual 9/90
PAGE 9 - PROJECT 2003 - FOUNDATION LEVEL MANUAL
FOR USE AT THE LICENSED SITE(S) ONLY
© Cheltenham Courseware Ltd. 1995-2006 www.cheltenhamcourseware.com
• After you have saved the file for the first time, clicking on the Save icon will
automatically save your document with the filename you gave it. It does not
give you the option to rename.
To save a document under another name and/or location
• The Save As command can be used to save a file under a different name, tosave a file in a different word processor format, or to save a file to a differentdrive and/or folder. From the main menu, choose File > Save As command.
Note: The File > Save As command will rename the document on the screen
so that you can keep the earlier version, as well as saving any changes you have
made.
To create a new folder in which to save your document
• Click on the Create New Folder icon, displayed within the Save As dialog box.• This will display the New Folder dialog box. Enter the name of the new folder,
and then click on the OK button:
Note: The folder will be created under the current folder.

8/3/2019 Project 2003 Basic Manual
http://slidepdf.com/reader/full/project-2003-basic-manual 10/90
PAGE 10 - PROJECT 2003 - FOUNDATION LEVEL MANUAL
FOR USE AT THE LICENSED SITE(S) ONLY
© Cheltenham Courseware Ltd. 1995-2006 www.cheltenhamcourseware.com
Closing Files
• Click on the Close Window icon displayed at the top-right of the documentwindow. Be sure to click on the Close Window icon, (as opposed to the Close
icon):
Installing the Sample Files
• Use Windows Explorer to create a folder called Project 2003 FoundationSamples, in the My Documents folder.
• If you are installing the sample files from the CD-ROM, place the CD-ROM in the
CD drive and copy the files from theproject_2003_foundation_usa\ exercise_files to the My
Documents\ Project 2003 Foundation Samples folder.
• If these files have been copied to your network server, then ask your
trainer/supervisor for more information about how to copy these files to your
PC’s hard disk.
• Notes for tutors:
The above instructions are for Windows that has not been set-up for a multi-user environment (with individual profiles). The instructions above may require
modification within a Windows mutliuser environment. Where possible pre-
install the relevant work files prior to use by students/delegates.

8/3/2019 Project 2003 Basic Manual
http://slidepdf.com/reader/full/project-2003-basic-manual 11/90
PAGE 11 - PROJECT 2003 - FOUNDATION LEVEL MANUAL
FOR USE AT THE LICENSED SITE(S) ONLY
© Cheltenham Courseware Ltd. 1995-2006 www.cheltenhamcourseware.com
Introduction to Microsoft Project 2003
When you have completed this learning module you will have seen how to:
• Use the main menu
• Use the Ask a Question box
• Use task panes
• Use the Getting Started pane
• Use the New Project pane
• Use the Search Results pane
• Use the Help pane
• Use the Office Assistant
• Show a toolbar
• Hide a toolbar
• Move a toolbar
• Use the Standard toolbar
• Use the Formatting toolbar
• Use the Project Guide
What is Project 2003?
Project 2003
• Microsoft Project 2003 is Microsoft's answer to project management. Itprovides all the tools you need for effective planning, tracking, problem solving,sharing, and completing a project in keeping with conventional management
principles and practices.
• It can be used for a project of any size. It simply provides a framework to start
with, as well as the means to organize and manage effectively. It is like havinga project management assistant:

8/3/2019 Project 2003 Basic Manual
http://slidepdf.com/reader/full/project-2003-basic-manual 12/90
PAGE 12 - PROJECT 2003 - FOUNDATION LEVEL MANUAL
FOR USE AT THE LICENSED SITE(S) ONLY
© Cheltenham Courseware Ltd. 1995-2006 www.cheltenhamcourseware.com
The Project 2003 Environment
Using the Main Menu
• The Main Menu (or Menu Bar) contains all of the Project 2003 menu options.From these menu options, you can access most of Project 2003's features. Itconsists of drop-down menus and submenus that allow you to select the
command you want to execute:
Using the Ask a Question Box
• As well as the menus and submenus, the Main Menu also contains the Ask a
Question box at the far right. This feature allows you to type a question or keywords for a subject with which you need help:
• Project displays any related topics in the Search Results task pane:

8/3/2019 Project 2003 Basic Manual
http://slidepdf.com/reader/full/project-2003-basic-manual 13/90
PAGE 13 - PROJECT 2003 - FOUNDATION LEVEL MANUAL
FOR USE AT THE LICENSED SITE(S) ONLY
© Cheltenham Courseware Ltd. 1995-2006 www.cheltenhamcourseware.com
• You can click on the links to read about the topic.
• If you have internet access, Project will also search on Microsoft Office Online for
related help topics.
Using Task Panes• The Task Pane is a like a dialog box that lists some of the most common tasks
that you might want to accomplish with Project. The Task Pane automaticallyopens when Project is started for the first time. If the pane does not open, open
it by selecting View > Toolbars > Task Pane from the main menu.
• This area of Project has been much improved over previous versions. Earlier
versions only contained the New Project and Search task panes
• Project 2003 provides four task panes: Getting Started, Search Results, Help
and New P roject.
Note: The Shared Workspace task pane is not available for use in Project
2003 Standard:

8/3/2019 Project 2003 Basic Manual
http://slidepdf.com/reader/full/project-2003-basic-manual 14/90
PAGE 14 - PROJECT 2003 - FOUNDATION LEVEL MANUAL
FOR USE AT THE LICENSED SITE(S) ONLY
© Cheltenham Courseware Ltd. 1995-2006 www.cheltenhamcourseware.com
• You can navigate between the task panes by clicking the Other Task Panes
down arrow on the upper right hand corner of the task pane and selecting thepane you would like to use, or by using the Forward and Back arrows at the
top left corner to move between panes:
To show or hide the Task Pane
• To show the task pane, right-click on any toolbar and select Task Pane. Acheck mark will appear beside the toolbar if it is selected
OR from the main menu, choose View > Toolbars and select Task Pane from
the drop-down menu.
• To hide the task pane, right-click on any toolbar and deselect Task Pane
OR from the main menu, choose View > Toolbars and deselect Task Pane
from the drop-down menu.
Using the Getting Started Pane
• The Getting Started pane is a new feature in Project 2003. It is similar to taskpanes found in other Microsoft Office programs and contains links to Microsoft
Office Online, a link to open recently used projects, and a link to create a new
project:
8/3/2019 Project 2003 Basic Manual
http://slidepdf.com/reader/full/project-2003-basic-manual 15/90
PAGE 15 - PROJECT 2003 - FOUNDATION LEVEL MANUAL
FOR USE AT THE LICENSED SITE(S) ONLY
© Cheltenham Courseware Ltd. 1995-2006 www.cheltenhamcourseware.com
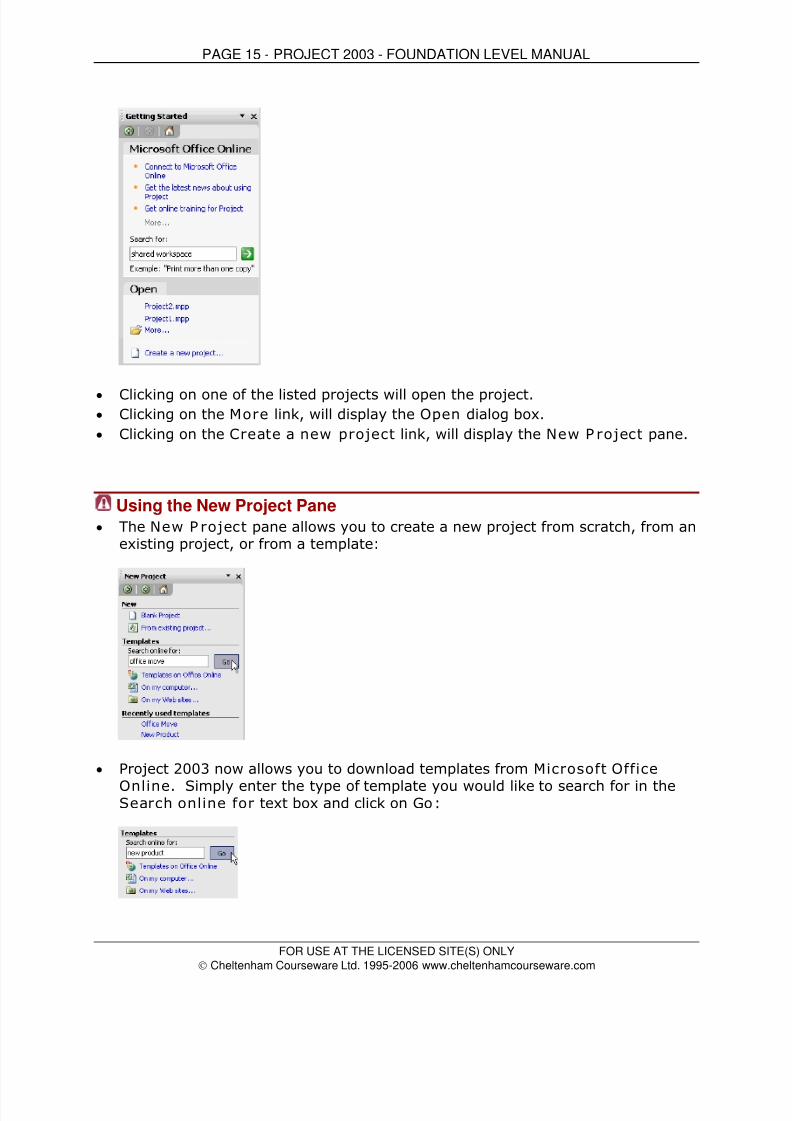
• Clicking on one of the listed projects will open the project. • Clicking on the More link, will display the Open dialog box.
• Clicking on the Create a new project link, will display the New P roject pane.
Using the New Project Pane
• The New P roject pane allows you to create a new project from scratch, from anexisting project, or from a template:
• Project 2003 now allows you to download templates from Microsoft Office
Online. Simply enter the type of template you would like to search for in theSearch online for text box and click on Go:

8/3/2019 Project 2003 Basic Manual
http://slidepdf.com/reader/full/project-2003-basic-manual 16/90
PAGE 16 - PROJECT 2003 - FOUNDATION LEVEL MANUAL
FOR USE AT THE LICENSED SITE(S) ONLY
© Cheltenham Courseware Ltd. 1995-2006 www.cheltenhamcourseware.com
• Click On my computer to open the Templates dialog box, which lists alltemplates that come with Project:
8
• Click On my Web sites to open the New from Templates on my Web Sites
dialog box and browse to find the desired template:
• The New Project pane also lists Recently used templates for you to select
from.
Using the Search Results Pane
• The Search Results pane has two areas. The upper portion is for displaying
the results of a search, and the lower portion is for entering search criteria.• In the Search area, you can use the drop-down menu to choose where you
would like Project to look for the information:

8/3/2019 Project 2003 Basic Manual
http://slidepdf.com/reader/full/project-2003-basic-manual 17/90
PAGE 17 - PROJECT 2003 - FOUNDATION LEVEL MANUAL
FOR USE AT THE LICENSED SITE(S) ONLY
© Cheltenham Courseware Ltd. 1995-2006 www.cheltenhamcourseware.com
• After selecting where you would like Project to search for the information, enter
one or more keywords into the text box, then click on the green arrow:
• Project displays the search results in the upper portion of the task pane:
• Simply click on the link to display the Microsoft Office Help window.
Using the Project Help Pane
• The Project Help pane allows you to enter topics you would like assistance with
in the Assistance area.
• Type one or more keywords in the Search for text box and click on the greenarrow:

8/3/2019 Project 2003 Basic Manual
http://slidepdf.com/reader/full/project-2003-basic-manual 18/90

8/3/2019 Project 2003 Basic Manual
http://slidepdf.com/reader/full/project-2003-basic-manual 19/90
PAGE 19 - PROJECT 2003 - FOUNDATION LEVEL MANUAL
FOR USE AT THE LICENSED SITE(S) ONLY
© Cheltenham Courseware Ltd. 1995-2006 www.cheltenhamcourseware.com
Accessing the Office Assistant
• The Office Assistant can also assist you in finding help on any questions youmay have. Simply click on the Office Assistant, type your question into the
text box and click Search. The assistant will show you a list of possible help
topics on which you can click to open the Microsoft Project Help window and
access the necessary information.
To show the Office Assistant
• From the main menu, choose Help > Show the Office Assistant.
To hide the Office Assistant
• From the main menu, choose Help > Hide the Office Assistant
OR right-click on the Office Assistant and select Hide.
To turn the Office Assistant off
• Click on the Office Assistant, choose Options, and deselect the Use theOffice Assistant check box in the Office Assistant dialog box:

8/3/2019 Project 2003 Basic Manual
http://slidepdf.com/reader/full/project-2003-basic-manual 20/90
PAGE 20 - PROJECT 2003 - FOUNDATION LEVEL MANUAL
FOR USE AT THE LICENSED SITE(S) ONLY
© Cheltenham Courseware Ltd. 1995-2006 www.cheltenhamcourseware.com
Toolbars
Showing a Toolbar
• The Standard and Formatting toolbars are shown by default. The othertoolbars are used only for specific functions in Project. From the main menu,choose View > Toolbars and select the toolbar you would like to show
OR right-click on any toolbar and select the toolbar you would like to show.
Note: A check mark will appear beside the name of a toolbar if it is selected.
Hiding a Toolbar
• From the main menu, choose View > Toolbars and deselect the toolbar youwould like to hide
OR right-click on any toolbar and deselect the toolbar you would like to hide.
Moving a Toolbar
• Toolbars can be anchored to any edge of the Project 2003 window, or theycan float independently. To move a toolbar, hover your mouse over the left
edge of the toolbar you want to move. Your cursor will change to the move
cursor. Click your mouse and drag it to the location you want to move it to:
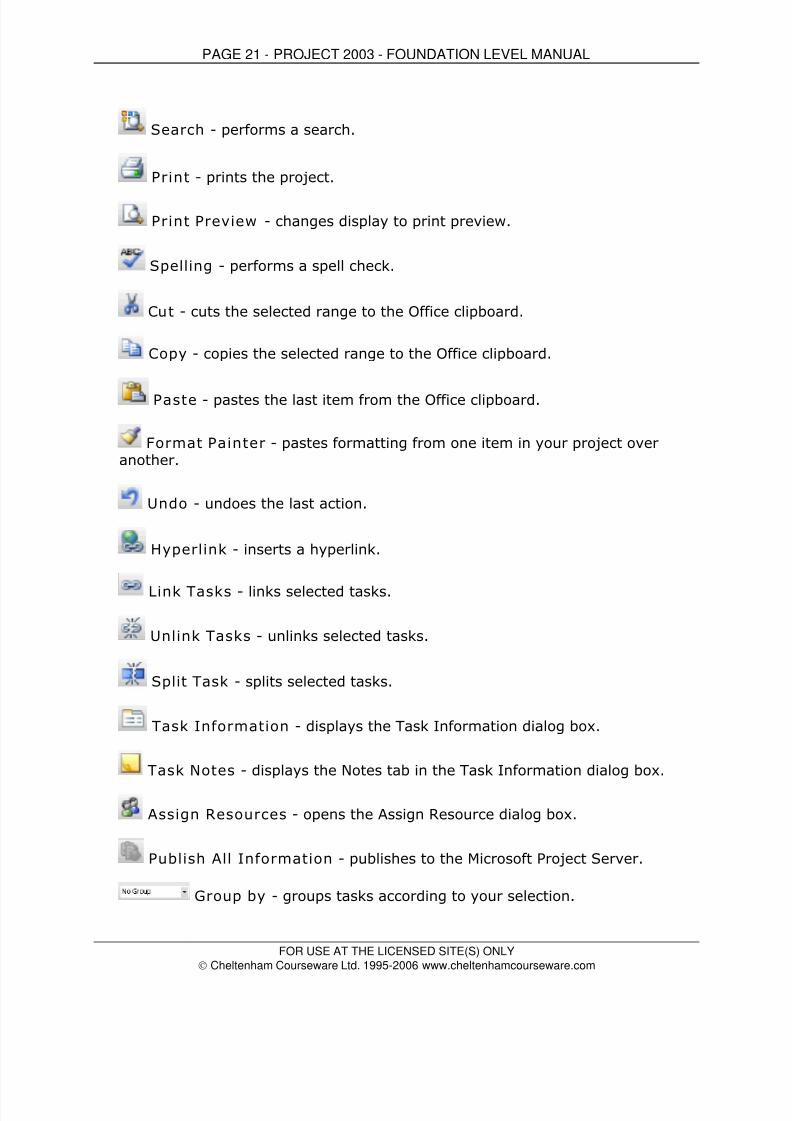
Using the Standard Toolbar
• The Standard toolbar provides quick access to commonly used actions. Eachicon represents a particular action. When you point to an icon (without
clicking), a descriptive tool tip appears to help you identify it. The following is a
list and brief description of the icons on the Standard toolbar:
New - creates new project.
Open - opens an existing project.
Save - saves the current project.
8/3/2019 Project 2003 Basic Manual
http://slidepdf.com/reader/full/project-2003-basic-manual 21/90
PAGE 21 - PROJECT 2003 - FOUNDATION LEVEL MANUAL
FOR USE AT THE LICENSED SITE(S) ONLY
© Cheltenham Courseware Ltd. 1995-2006 www.cheltenhamcourseware.com
Search - performs a search.
Print - prints the project.
Print Preview - changes display to print preview.
Spelling - performs a spell check.
Cut - cuts the selected range to the Office clipboard.
Copy - copies the selected range to the Office clipboard.
Paste - pastes the last item from the Office clipboard.
Format Painter - pastes formatting from one item in your project overanother.
Undo - undoes the last action.
Hyperlink - inserts a hyperlink.
Link Tasks - links selected tasks.
Unlink Tasks - unlinks selected tasks.
Split Task - splits selected tasks.
Task Information - displays the Task Information dialog box.
Task Notes - displays the Notes tab in the Task Information dialog box.
Assign Resources - opens the Assign Resource dialog box.
Publish All Information - publishes to the Microsoft Project Server.
Group by - groups tasks according to your selection.

8/3/2019 Project 2003 Basic Manual
http://slidepdf.com/reader/full/project-2003-basic-manual 22/90
PAGE 22 - PROJECT 2003 - FOUNDATION LEVEL MANUAL
FOR USE AT THE LICENSED SITE(S) ONLY
© Cheltenham Courseware Ltd. 1995-2006 www.cheltenhamcourseware.com
Zoom In - increases the zoom.
Zoom Out - decreases the zoom.
Go to Selected Task - view details of the selected task.
Copy Picture - opens the Copy Picture dialog box.
Microsoft Project Help - opens the Project Help Pane.
Using the Formatting Toolbar
• The Formatting toolbar provides quick access to commonly used formatting
actions. Each icon represents a particular action. When you point to an iconwith your cursor (without clicking), a descriptive tool tip appears to help youidentify it.
Outdent - makes the selected task a summary task.
Indent - makes the selected task a subtask.
Show Subtasks - shows subtasks.
Hide Subtasks - hides subtasks.
Hide Assignments - hides assignments.
Show - allows you to select the level of detail you want to see in your
project from a drop-down menu.
Font - selects fonts from a drop-down menu.
Font Size - selects font size from a drop-down menu.
Bold - changes the selected text to bold.
Italic - changes the selected text to italic.
Underline - underlines the selected text.

8/3/2019 Project 2003 Basic Manual
http://slidepdf.com/reader/full/project-2003-basic-manual 23/90
PAGE 23 - PROJECT 2003 - FOUNDATION LEVEL MANUAL
FOR USE AT THE LICENSED SITE(S) ONLY
© Cheltenham Courseware Ltd. 1995-2006 www.cheltenhamcourseware.com
Align Left - aligns the selected text to the left.
Center - aligns the selected text to center.
Align Right - aligns the selected text to the right.
Filter - allows you to filter tasks.
AutoFilter - allows you to filter information easily.
Gantt Chart Wizard - starts the Gantt Chart Wizard.
Using the Project Guide
• The Project Guide is a new "goal-based user interface" that can help you start
your project. It is similar to the task pane and provides guides and wizards in
four main categories: Tasks, Resources, Track and Report.
To Show the Project Guide:
• To view the Project Guide, from the main menu, select Tools > Options. Clickon the Interface tab and check off Display Project Guide.
• Then from the main menu, select View > Toolbars > Project Guide. TheProject Guide toolbar will be displayed.
• Click on the Show/ Hide Project Guide button on the Project Guide toolbar
to display the Project Guide Pane:
• When you click on a topic on the Project Guide toolbar, the corresponding
Project Guide Pane will be displayed:

8/3/2019 Project 2003 Basic Manual
http://slidepdf.com/reader/full/project-2003-basic-manual 24/90
PAGE 24 - PROJECT 2003 - FOUNDATION LEVEL MANUAL
FOR USE AT THE LICENSED SITE(S) ONLY
© Cheltenham Courseware Ltd. 1995-2006 www.cheltenhamcourseware.com
• Click on the blue links to go to a particular subject where Project will guide youthrough each step:
• You can easily navigate from one topic to the next using the Project Guidetoolbar:
• Each topic has its own drop-down menu that you can use to navigate throughthe steps:

8/3/2019 Project 2003 Basic Manual
http://slidepdf.com/reader/full/project-2003-basic-manual 25/90
PAGE 25 - PROJECT 2003 - FOUNDATION LEVEL MANUAL
FOR USE AT THE LICENSED SITE(S) ONLY
© Cheltenham Courseware Ltd. 1995-2006 www.cheltenhamcourseware.com
• You can quit the Project Guide at any time by clicking on the red “X” at the topright corner of the Project Guide:
OR by deselecting the Show/ Hide Project Guide button on the Project
Guide toolbar.
Review Questions
How would you:
• Use the main menu?
• Use the Ask a Question box?• Use task panes?
• Use the Getting Started pane?
• Use the New Project pane?
• Use the Search Results pane?
• Use the Help pane?
• Use the Office Assistant?
• Show a toolbar?
• Hide a toolbar?
• Move a toolbar?
• Use the Standard toolbar?• Use the Formatting toolbar?
• Use the Project Guide?
8/3/2019 Project 2003 Basic Manual
http://slidepdf.com/reader/full/project-2003-basic-manual 26/90
PAGE 26 - PROJECT 2003 - FOUNDATION LEVEL MANUAL
FOR USE AT THE LICENSED SITE(S) ONLY
© Cheltenham Courseware Ltd. 1995-2006 www.cheltenhamcourseware.com
Defining the Project
When you have completed this learning module you will have seen how to:
• Create a New Project
• Open a Project
• Use File Properties
• Enter Start and Finish Dates
• Establish a Project Calendar
• Save a Project
• Close a Project
• Quit Project
Creating a New Project
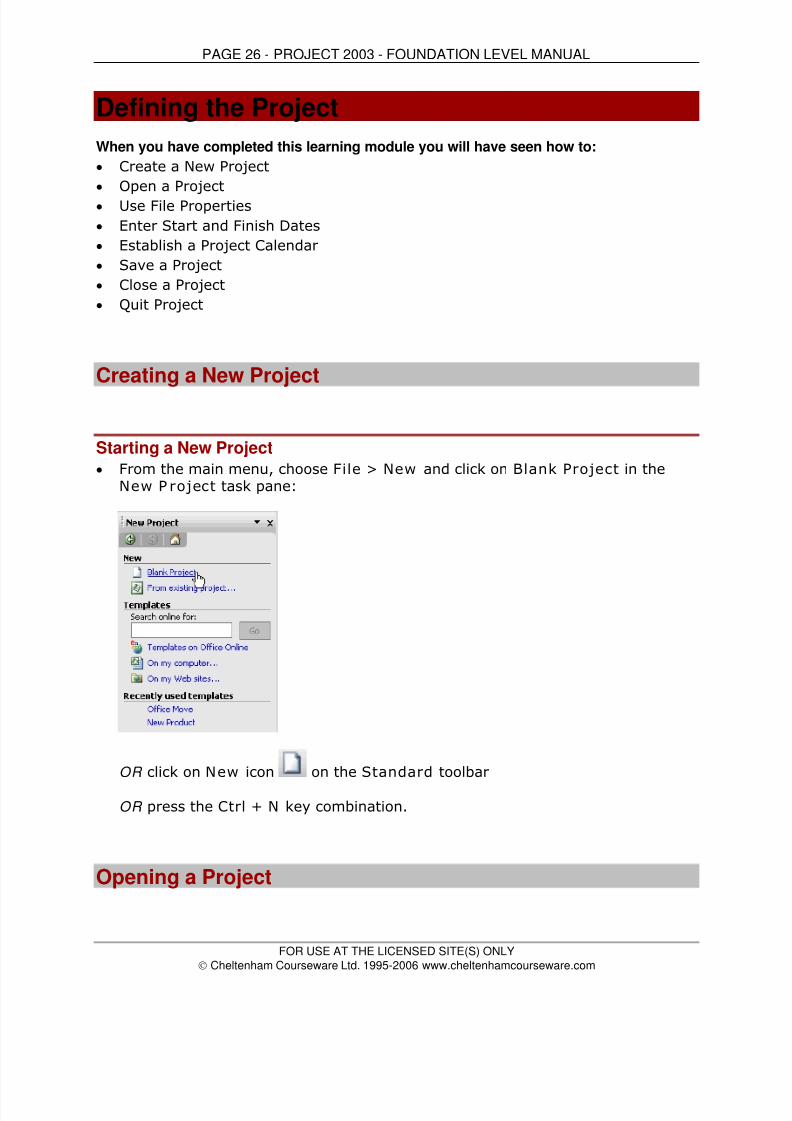
Starting a New Project
• From the main menu, choose File > New and click on Blank Project in theNew P roject task pane:
OR click on New icon on the Standard toolbar
OR press the Ctrl + N key combination.
Opening a Project

8/3/2019 Project 2003 Basic Manual
http://slidepdf.com/reader/full/project-2003-basic-manual 27/90
PAGE 27 - PROJECT 2003 - FOUNDATION LEVEL MANUAL
FOR USE AT THE LICENSED SITE(S) ONLY
© Cheltenham Courseware Ltd. 1995-2006 www.cheltenhamcourseware.com
Opening a Project
• From the main menu, choose File > Open
OR click on Open icon on the Standard toolbar
OR press the Ctrl + O key combination.
• This will display the Open dialog box. Browse to find the project you wish toopen. Open either by clicking on the file and then clicking Open, or bydouble-clicking it:
Using File Properties
Utilizing File Properties
• File properties automatically gathers and stores miscellaneous informationabout a file. To access file properties, from the main menu, choose File >
Properties.
• The File Properties dialog box is displayed.
• The General tab provides a quick summary of the name, type, location, size,
creation date, modified date, accessed date and attributes of the project.
• In the Summary tab, you can enter any additional information you may want to
record regarding your project:

8/3/2019 Project 2003 Basic Manual
http://slidepdf.com/reader/full/project-2003-basic-manual 28/90
PAGE 28 - PROJECT 2003 - FOUNDATION LEVEL MANUAL
FOR USE AT THE LICENSED SITE(S) ONLY
© Cheltenham Courseware Ltd. 1995-2006 www.cheltenhamcourseware.com
• The Statistics tab lists the dates the project was last created, modified,
accessed and printed, as well as who saved it last, the revision number and the
total editing time.
• The Contents tab shows a project summary. It tells the start date, finish date,
duration, work hours, cost, % complete, and % work complete.
• The Custom tab allows you to add custom file properties to the project.
Entering Start and Finish Dates
Inputting Start and Finish Dates
• The first step in starting a new project is establishing basic project information.The start o r finish date is what you will use to anchor your project. Yourschedule will be built around either the start date or the finish date that you
choose.
• The start and finish date information is entered in the Project Information
dialog box.
To Enter Project Information
• To enter project information, from the main menu, choose Project > ProjectInformation . The Project Information dialog box will be displayed:

8/3/2019 Project 2003 Basic Manual
http://slidepdf.com/reader/full/project-2003-basic-manual 29/90
PAGE 29 - PROJECT 2003 - FOUNDATION LEVEL MANUAL
FOR USE AT THE LICENSED SITE(S) ONLY
© Cheltenham Courseware Ltd. 1995-2006 www.cheltenhamcourseware.com
• Depending on what you choose from the Schedule from drop-down menu(Project Start Date is the default), either the start date or finish date will be
available for you to select:
• You can either type in the date, or click the down arrow to display a pop-up
calendar to select a date.
• Typically, the other fields (Current date, Status date, Calendar, and
Priority) can be left as the default values.
• Click OK . Project will close the dialog box and save the information for you.
This information can be changed at any time throughout your project, and can
be useful in trying out "what-if" scenarios in the planning stage.
• You can choose to have the Project Information dialog box open automaticallyevery time you start a new project by choosing Tools > Options to open theOptions dialog box. On the General tab, check off Prompt for project info
for new projects:

8/3/2019 Project 2003 Basic Manual
http://slidepdf.com/reader/full/project-2003-basic-manual 30/90
PAGE 30 - PROJECT 2003 - FOUNDATION LEVEL MANUAL
FOR USE AT THE LICENSED SITE(S) ONLY
© Cheltenham Courseware Ltd. 1995-2006 www.cheltenhamcourseware.com
Establishing a Project Calendar
Setting up a Project Calendar
• Project supplies three basic calendars (Standard, Night Shift and 24 Hours)that you can use as foundations to create your own base calendar. You canmake a calendar that indicates general working times for each resource or group
of resources. Project will use this information for things like scheduling
resources and converting task durations.
Making a New Calendar• To make a new calendar, from the main menu, choose Tools > Change
Working Time. The Change Working Time dialog box will open:
• Click on New . The Create New Base Calendar dialog box will open:
• Enter a descriptive name for the new calendar.
• Use the radio buttons to either create a new base calendar, or make a copy
of the type of calendar you select from the drop-down menu.
• Click OK to go back to the Change Working Time dialog box to customize thenew base calendar.

8/3/2019 Project 2003 Basic Manual
http://slidepdf.com/reader/full/project-2003-basic-manual 31/90
PAGE 31 - PROJECT 2003 - FOUNDATION LEVEL MANUAL
FOR USE AT THE LICENSED SITE(S) ONLY
© Cheltenham Courseware Ltd. 1995-2006 www.cheltenhamcourseware.com
Changing Calendar Options
• Click on Options to open the Calendar tab in the Options dialog box. Enter
the appropriate information to describe a typical workday and workweek.• Click OK to close the Options dialog box:
To change a Calendar
• You can make exceptions to the regular schedule set in the Options dialog box
by altering working times and working days.
• In the Change Working Time dialog box, select the calendar you would like to
make the changes to from the For drop-down menu.
• Use the Select Date(s) portion of the dialog box to select a specific date or
range of dates.
• Use the Set Selected Date(s) to portion of the dialog box to make the
necessary changes.
Saving
Saving Your Project
• From the main menu, choose File > Save

8/3/2019 Project 2003 Basic Manual
http://slidepdf.com/reader/full/project-2003-basic-manual 32/90
PAGE 32 - PROJECT 2003 - FOUNDATION LEVEL MANUAL
FOR USE AT THE LICENSED SITE(S) ONLY
© Cheltenham Courseware Ltd. 1995-2006 www.cheltenhamcourseware.com
OR click on Save icon on the Standard toolbar
OR press the Ctrl + S key combination.
• If you are saving your project for the first time, the Save As dialog box willopen:
• Browse to find the location where you would like to save your project, enter a
name in the File name text box, and click Save.
Quitting and Closing
Closing a Project
• From the main menu, choose File > Close
OR click on Close Window [x] button on upper right hand corner of the
Project window :
• If you have not saved your project yet, you will be prompted to do so:

8/3/2019 Project 2003 Basic Manual
http://slidepdf.com/reader/full/project-2003-basic-manual 33/90
PAGE 33 - PROJECT 2003 - FOUNDATION LEVEL MANUAL
FOR USE AT THE LICENSED SITE(S) ONLY
© Cheltenham Courseware Ltd. 1995-2006 www.cheltenhamcourseware.com
Quitting Project 2003
• From the main menu, choose File > Exit
OR click on Close Window [x] button on the title bar:
Review Questions
How would you:
• Create a New Project?
• Open a Project?
• Use File Properties?
• Enter Start and Finish Dates?
• Establish a Project Calendar?
• Save a Project?
• Close a Project?
• Quit Project?
8/3/2019 Project 2003 Basic Manual
http://slidepdf.com/reader/full/project-2003-basic-manual 34/90
PAGE 34 - PROJECT 2003 - FOUNDATION LEVEL MANUAL
FOR USE AT THE LICENSED SITE(S) ONLY
© Cheltenham Courseware Ltd. 1995-2006 www.cheltenhamcourseware.com
Tasks
When you have completed this learning module you will have seen how to:
• Enter a task
• Enter task durations
• Enter subtasks
• Use recurring tasks
• Use task notes
• Assign milestones
• Enter constraints
• Edit tasks
• Delete tasks
• Move tasks
• Create dependencies
Entering Tasks
• Tasks are the specific activities that must be completed in order to finish yourproject – essentially, a 'to-do' list. Your task list is the backbone of your project
plan. It is essential to create your task list as comprehensively as possiblebecause if a required task is omitted, you may not be able to achieve all of your
goals. It is beneficial to create your task list in approximately the same order asthe tasks will be performed, although it is not necessary to be completely
accurate as there are ways to edit, add, delete, and move tasks.
Entering Tasks
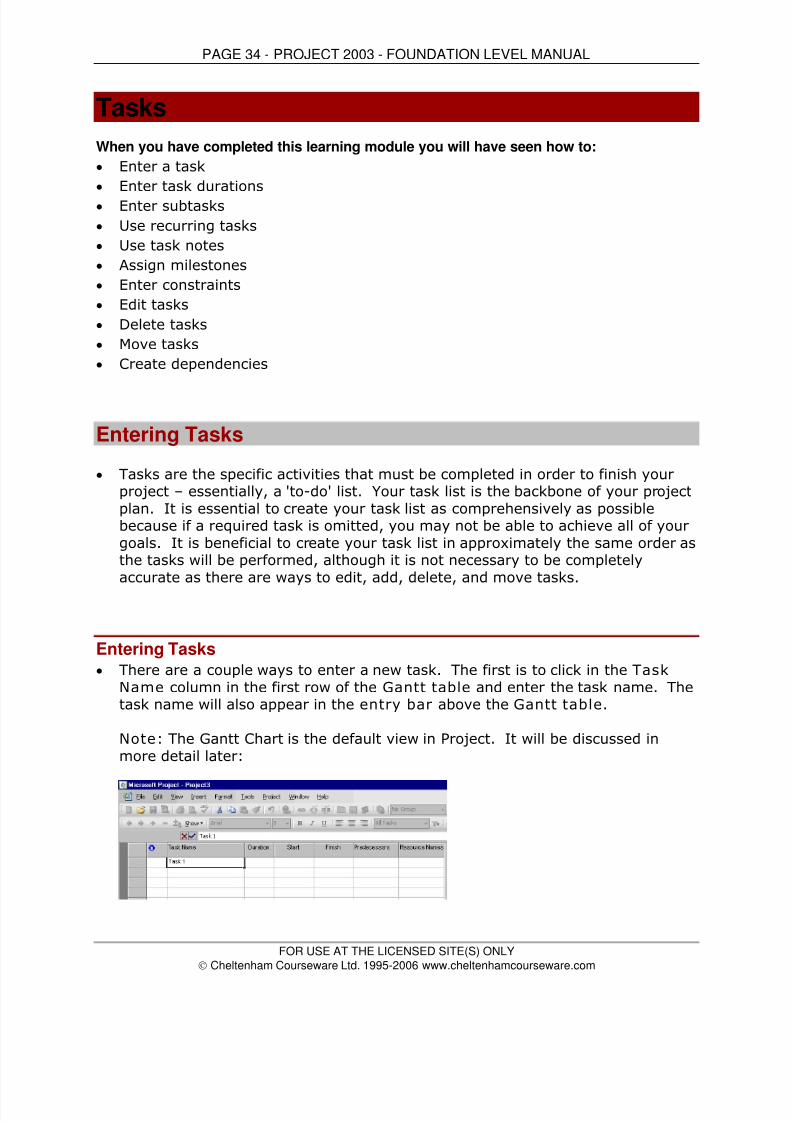
• There are a couple ways to enter a new task. The first is to click in the Task
Name column in the first row of the Gantt table and enter the task name. Thetask name will also appear in the entry bar above the Gantt table.
Note: The Gantt Chart is the default view in Project. It will be discussed in
more detail later:
8/3/2019 Project 2003 Basic Manual
http://slidepdf.com/reader/full/project-2003-basic-manual 35/90
PAGE 35 - PROJECT 2003 - FOUNDATION LEVEL MANUAL
FOR USE AT THE LICENSED SITE(S) ONLY
© Cheltenham Courseware Ltd. 1995-2006 www.cheltenhamcourseware.com
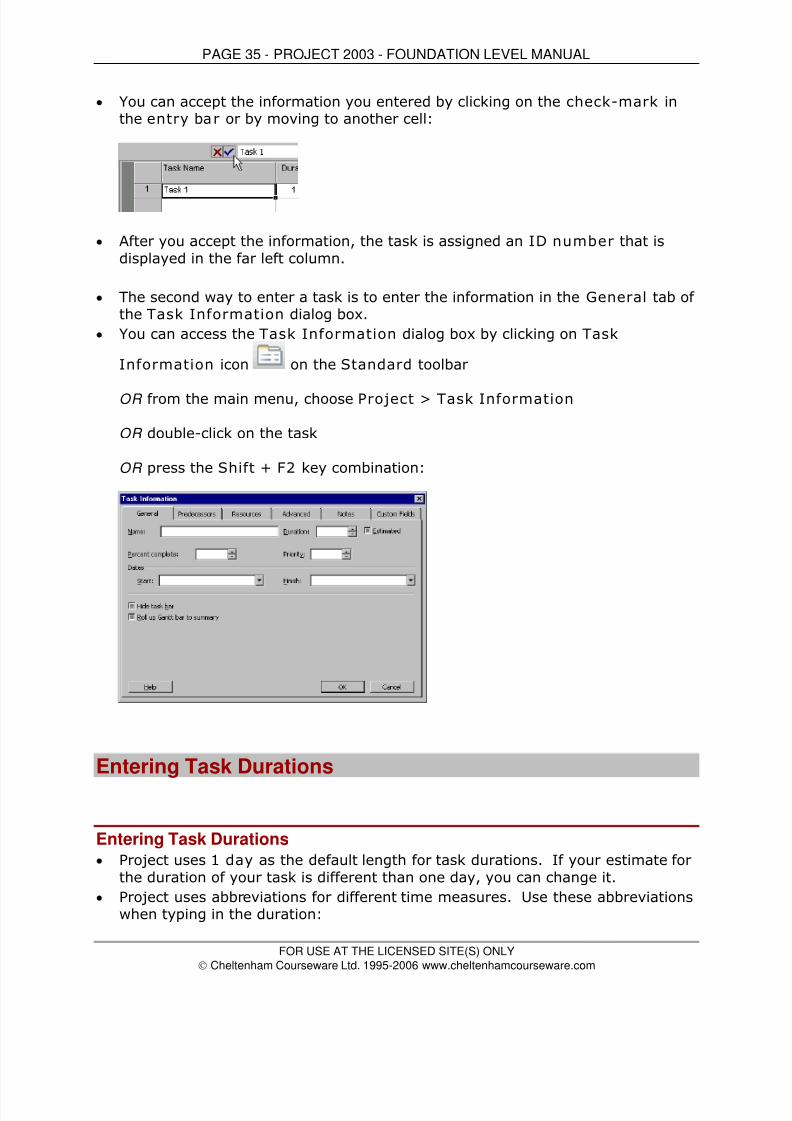
• You can accept the information you entered by clicking on the check-mark inthe entry bar or by moving to another cell:
• After you accept the information, the task is assigned an ID number that is
displayed in the far left column.
• The second way to enter a task is to enter the information in the General tab of the Task Information dialog box.
• You can access the Task Information dialog box by clicking on Task
Information icon on the Standard toolbar
OR from the main menu, choose Project > Task Information
OR double-click on the task
OR press the Shift + F2 key combination:
Entering Task Durations
Entering Task Durations
• Project uses 1 day as the default length for task durations. If your estimate for
the duration of your task is different than one day, you can change it.
• Project uses abbreviations for different time measures. Use these abbreviationswhen typing in the duration:

8/3/2019 Project 2003 Basic Manual
http://slidepdf.com/reader/full/project-2003-basic-manual 36/90
PAGE 36 - PROJECT 2003 - FOUNDATION LEVEL MANUAL
FOR USE AT THE LICENSED SITE(S) ONLY
© Cheltenham Courseware Ltd. 1995-2006 www.cheltenhamcourseware.com
• To change the duration of a task, either type the duration into the Duration column in the Gantt table view
OR use the arrow buttons on the right end of the Duration box to adjust theduration incrementally:
• Note the question mark beside the duration. This indicates that the duration is
an estimate. Unless you know the exact beginning and end times, leave it as anestimate so that Project will have greater flexibility in adjusting the amount of
time needed to complete a task.
• When you manually change the duration of a task, the question mark thatindicates an estimated duration disappears. To specify that the changed
duration is still an estimate, check the Estimated box in the Task Information dialog box:
• Project automatically calculates the Start and Finish dates based upon thebasic project information you provided in the Project Information dialog box
and the task duration you entered. It is best to leave the dates as Project hascalculated them and fine-tune them at a later date.
Entering Subtasks

8/3/2019 Project 2003 Basic Manual
http://slidepdf.com/reader/full/project-2003-basic-manual 37/90
PAGE 37 - PROJECT 2003 - FOUNDATION LEVEL MANUAL
FOR USE AT THE LICENSED SITE(S) ONLY
© Cheltenham Courseware Ltd. 1995-2006 www.cheltenhamcourseware.com
Entering Subtasks
• Subordinate tasks, or subtasks, are used to break large tasks into smallerunits until you reach the level of detail you want. This can be especially useful
in the displaying and printing of your project.
• By breaking large tasks into smaller, more manageable tasks, you may be able
to schedule them to run concurrently, thereby reducing both the duration of thetask and the duration of the project.
To enter a subtask
• Insert a row by highlighting the row directly below where you want to insert asubtask:
• To create a new row, from the main menu, choose Insert > New Task
OR press the Insert key on your keyboard.
• This will create a new task row:
• Enter the name of the subtask. Accept the new task by clicking on the check
mark in the entry bar, or by moving to another cell.
• Click on the Indent icon on the Formatting toolbar to indent the new task tomake it subordinate
OR right-click on the new task’s ID number at the far left and select Indent from the drop-down menu:

8/3/2019 Project 2003 Basic Manual
http://slidepdf.com/reader/full/project-2003-basic-manual 38/90
PAGE 38 - PROJECT 2003 - FOUNDATION LEVEL MANUAL
FOR USE AT THE LICENSED SITE(S) ONLY
© Cheltenham Courseware Ltd. 1995-2006 www.cheltenhamcourseware.com
• Note how the new subtask is indented, and the task above it is now bolded
(indicating that it is a summary task) and has a minus sign beside it that allowsyou to show or hide the subtask:
• It is also possible to break a task down even further and create a subtask for a
subtask:
• This can be especially useful when you are working on a large project that
requires many levels of detail.
Creating a Summary Task
• Alternately, you can choose to group the tasks you have already entered under
a summary task.
• Insert a row by highlighting the row directly below where you want to create a
summary task:

8/3/2019 Project 2003 Basic Manual
http://slidepdf.com/reader/full/project-2003-basic-manual 39/90

8/3/2019 Project 2003 Basic Manual
http://slidepdf.com/reader/full/project-2003-basic-manual 40/90
PAGE 40 - PROJECT 2003 - FOUNDATION LEVEL MANUAL
FOR USE AT THE LICENSED SITE(S) ONLY
© Cheltenham Courseware Ltd. 1995-2006 www.cheltenhamcourseware.com
To create a Recurring Task
• From the main menu, choose Insert > Recurring Task.
• The Recurring Task Information dialog box opens:
• Enter a name in the Task Name box.• Enter the duration in the Duration box.
• Enter the recurrence pattern by using the option buttons, drop-down menus
and check boxes in the Recurrence pattern section.
• Enter the length of time the task recurs by using the options in the Range of
recurrence section.
• Click OK to return to the Gantt Chart view.
• Notice the recurring task symbol in the Indicator column:
Using Task Notes
Entering Task Notes
• Notes can be attached to a task to quickly display information regardinganything related to it. Notes can be displayed onscreen and included in printed
reports.

8/3/2019 Project 2003 Basic Manual
http://slidepdf.com/reader/full/project-2003-basic-manual 41/90
PAGE 41 - PROJECT 2003 - FOUNDATION LEVEL MANUAL
FOR USE AT THE LICENSED SITE(S) ONLY
© Cheltenham Courseware Ltd. 1995-2006 www.cheltenhamcourseware.com
To enter a Task Note
• Select the task to which you would like to add a note and from the main menu,choose Project > Task Notes
OR right-click on the task and select Task Notes from the drop-down menu
OR double-click on the task and select the Notes tab in the Task Information
dialog box:
• Use the area provided to enter your notes. You can use the formatting toolsprovided to format your note.
• Click OK to save and attach the note to your task and return to the Gantt Chart
view.
• Notice the note symbol in the Indicator column:
• Hover your mouse pointer over the note symbol to read the note:

8/3/2019 Project 2003 Basic Manual
http://slidepdf.com/reader/full/project-2003-basic-manual 42/90
8/3/2019 Project 2003 Basic Manual
http://slidepdf.com/reader/full/project-2003-basic-manual 43/90

8/3/2019 Project 2003 Basic Manual
http://slidepdf.com/reader/full/project-2003-basic-manual 44/90
PAGE 44 - PROJECT 2003 - FOUNDATION LEVEL MANUAL
FOR USE AT THE LICENSED SITE(S) ONLY
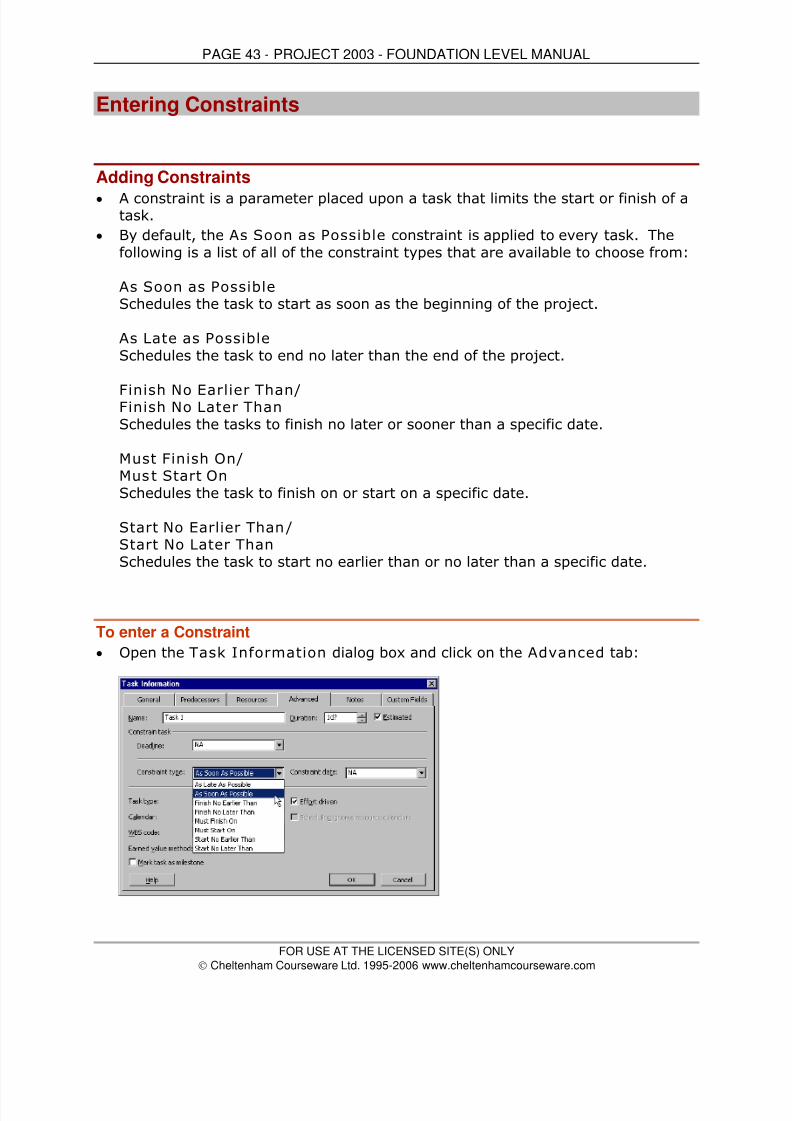
© Cheltenham Courseware Ltd. 1995-2006 www.cheltenhamcourseware.com
• Choose the desired constraint from the Constraint type drop-down menu and
enter a constraint date if applicable.
Using Deadlines• Deadlines differ from constraints in the way that Project doesn't take the
deadline date into consideration when creating a schedule. It will, however,alert you if the estimated finish date for a task is after the deadline date, by
flagging the task in the Gantt view with an exclamation mark.
To Create a Deadline
• To create a deadline, open the Task Information dialog box of the task youwould like to assign a deadline to. Click on the Advanced tab and either type a
date into the Deadline field or use the drop-down calendar to select thedeadline date:
Editing Tasks
Editing Tasks• Tasks can be edited using a number of different methods, although the easiest
and most convenient way is to use the Task Information dialog box because
all of the task information is readily available for you to review and change if
necessary:

8/3/2019 Project 2003 Basic Manual
http://slidepdf.com/reader/full/project-2003-basic-manual 45/90
PAGE 45 - PROJECT 2003 - FOUNDATION LEVEL MANUAL
FOR USE AT THE LICENSED SITE(S) ONLY
© Cheltenham Courseware Ltd. 1995-2006 www.cheltenhamcourseware.com
Deleting Tasks
Deleting Tasks
• Occasionally you will need to delete tasks either because they were entered in
error or they are no longer relevant. There are several ways to do this.
To delete a Task• Highlight the task or range of tasks to be deleted.
• From the main menu, choose Edit > Delete Task
OR press the Delete key on your keyboard
OR right-click on the highlighted task(s) and select Delete Task:

8/3/2019 Project 2003 Basic Manual
http://slidepdf.com/reader/full/project-2003-basic-manual 46/90

8/3/2019 Project 2003 Basic Manual
http://slidepdf.com/reader/full/project-2003-basic-manual 47/90
PAGE 47 - PROJECT 2003 - FOUNDATION LEVEL MANUAL
FOR USE AT THE LICENSED SITE(S) ONLY
© Cheltenham Courseware Ltd. 1995-2006 www.cheltenhamcourseware.com
Using Finish-to-Start (FS) Dependencies
• The finish-to-start dependency is the most common type of relationship. Thestart of one task begins as soon as its predecessor finishes. The successor can't
start until the predecessor finishes.
To create a Finish-to-Start (FS) dependency
• There are a few different ways to establish a finish to start dependency.
• Use the Predecessors tab in the Task Information dialog box.
• Click on the down arrow at the right side of the Task Name column to selectthe name of the task you would like to set as the predecessor:
• Choose the type of dependency from the drop-down menu of the Type column:
• Click OK
OR in the Gantt Chart view, hover your mouse pointer over the task you would
like to make the predecessor until the cursor becomes four arrows pointingoutward:

8/3/2019 Project 2003 Basic Manual
http://slidepdf.com/reader/full/project-2003-basic-manual 48/90
PAGE 48 - PROJECT 2003 - FOUNDATION LEVEL MANUAL
FOR USE AT THE LICENSED SITE(S) ONLY
© Cheltenham Courseware Ltd. 1995-2006 www.cheltenhamcourseware.com
• Click and drag the mouse pointer to the task that you would like to make thesuccessor. The cursor becomes a link symbol and an information box is
displayed describing the link you are creating:
• Release the mouse and the link will be created
OR in the Gantt table view, highlight the tasks you want to link.
• From the main menu, choose Edit > Link Tasks
OR click on Link Tasks icon on the Standard toolbar
OR press the Ctrl + F2 key combination.
Using Start-to-Finish (SF) Dependencies
• In a start-to-finish dependency, the successor task is completed after itspredecessor starts. In other words, the successor task cannot finish until the
predecessor task starts. The start to finish relationship is rarely used, although
it may be necessary in unusual instances.
To create a Start-to-Finish (SF) dependency• Use the Predecessors tab in the Task Information dialog box (as outlined in
the previous section) to set this link
OR create a dependency using any one of the methods used to create a finish to
start dependency (described in the previous section).

8/3/2019 Project 2003 Basic Manual
http://slidepdf.com/reader/full/project-2003-basic-manual 49/90
PAGE 49 - PROJECT 2003 - FOUNDATION LEVEL MANUAL
FOR USE AT THE LICENSED SITE(S) ONLY
© Cheltenham Courseware Ltd. 1995-2006 www.cheltenhamcourseware.com
• Double-click on the arrow joining the tasks in the Gantt Chart view:
• This will open the Task Dependency dialog box:
• Select the Start-to-Finish (SF) dependency type from the Type drop-downmenu.
• Click OK .
Using Start-to-Start (SS) Dependencies
• In a start-to-start relationship, the successor can't start until the predecessorstarts. The tasks can happen simultaneously, but the predecessor needs to
have started in order for the successor to start.
To create a Start-to-Start (SS) dependency
• There are a few different ways to establish a start to start dependency.
• Use the Predecessors tab in the Task Information dialog box.
• Click on the down arrow at the right side of the Task Name column to selectthe name of the task you would like to set as the predecessor:

8/3/2019 Project 2003 Basic Manual
http://slidepdf.com/reader/full/project-2003-basic-manual 50/90
PAGE 50 - PROJECT 2003 - FOUNDATION LEVEL MANUAL
FOR USE AT THE LICENSED SITE(S) ONLY
© Cheltenham Courseware Ltd. 1995-2006 www.cheltenhamcourseware.com
• Choose the Start-to-Start dependency from the drop-down menu of the Type
column:
• Click OK
OR in the Gantt Chart view, hover your mouse pointer over the task you would
like to make the predecessor until the cursor becomes four arrows pointing
outward:
• Click and drag the mouse pointer to the task that you would like to make thesuccessor. The cursor becomes a link symbol and an information box is

8/3/2019 Project 2003 Basic Manual
http://slidepdf.com/reader/full/project-2003-basic-manual 51/90
PAGE 51 - PROJECT 2003 - FOUNDATION LEVEL MANUAL
FOR USE AT THE LICENSED SITE(S) ONLY
© Cheltenham Courseware Ltd. 1995-2006 www.cheltenhamcourseware.com
displayed describing the link you are creating. By default, a Finish-to-Start dependency is created. This can be changed once the link has been made:
• Release the mouse and the link will be created.
• Double-click on the line linking the tasks:
• This will open the Task Dependency dialog box where you can modify thedependency type:
• Click OK .
Using Finish-to-Finish (FF) Dependencies
• In a finish-to-finish relationship, the successor can't finish until the predecessorfinishes. The tasks can happen simultaneously, but the predecessor has to have
finished in order for the successor to finish.
To create a Finish-to-Finish (FF) dependency
• There are a few different ways to establish a finish to finish dependency.
• Use the Predecessors tab in the Task Information dialog box.
• Click on the down arrow at the right side of the Task Name column to selectthe name of the task you would like to set as the predecessor:

8/3/2019 Project 2003 Basic Manual
http://slidepdf.com/reader/full/project-2003-basic-manual 52/90

8/3/2019 Project 2003 Basic Manual
http://slidepdf.com/reader/full/project-2003-basic-manual 53/90
PAGE 53 - PROJECT 2003 - FOUNDATION LEVEL MANUAL
FOR USE AT THE LICENSED SITE(S) ONLY
© Cheltenham Courseware Ltd. 1995-2006 www.cheltenhamcourseware.com
• Click and drag the mouse pointer to the task that you would like to make thesuccessor. The cursor becomes a link symbol and an information box is
displayed describing the link you are creating. By default, a Finish-to-Start dependency is created. This can be changed once the link has been made:
• Release the mouse and the link will be created.
• Double-click on the line linking the tasks:
• This will open the Task Dependency dialog box where you can modify thedependency type:
• Click OK .
Review Questions
How would you:
• Enter a task?
• Enter task durations?
• Enter subtasks?
• Use recurring tasks?
• Use task notes?

8/3/2019 Project 2003 Basic Manual
http://slidepdf.com/reader/full/project-2003-basic-manual 54/90
PAGE 54 - PROJECT 2003 - FOUNDATION LEVEL MANUAL
FOR USE AT THE LICENSED SITE(S) ONLY
© Cheltenham Courseware Ltd. 1995-2006 www.cheltenhamcourseware.com
• Assign milestones?
• Enter constraints?
• Edit tasks?
• Delete tasks?
• Move tasks?
• Create dependencies?

8/3/2019 Project 2003 Basic Manual
http://slidepdf.com/reader/full/project-2003-basic-manual 55/90
PAGE 55 - PROJECT 2003 - FOUNDATION LEVEL MANUAL
FOR USE AT THE LICENSED SITE(S) ONLY
© Cheltenham Courseware Ltd. 1995-2006 www.cheltenhamcourseware.com
Resources
When you have completed this learning module you will have seen how to:
• Create a resource list
• Enter working time
• Enter costs
• Enter notes
• Assign resources to a task
Creating a Resource List
Creating Resources• Resources are people, supplies and equipment that you need to use to
accomplish your tasks and goals.
• Project uses the resource information you provide to make the schedule for your
project. Typically, the more resources you assign, the shorter the duration of the project will be because a task is completed faster when there are more
people or materials assigned to it.
To create a Resource
• One of the best ways to enter resources is by using the Resource Sheet view.• To open the Resource Sheet view, from the main menu, choose View >
Resource Sheet:

8/3/2019 Project 2003 Basic Manual
http://slidepdf.com/reader/full/project-2003-basic-manual 56/90
PAGE 56 - PROJECT 2003 - FOUNDATION LEVEL MANUAL
FOR USE AT THE LICENSED SITE(S) ONLY
© Cheltenham Courseware Ltd. 1995-2006 www.cheltenhamcourseware.com
• Enter a descriptive name for the resource in the Resource Name field. This
can be a worker's name, a job title, or the name of a material.
• Click on the down arrow in the Type field and choose the type of resource.
Project allows you to choose either Work (human resources) or Material:
• If the resource is a material resource, enter a unit of measurement in theMaterial Label field. This could be minutes, gallons, miles etc. depending on
the type of material you are using. If your resource is Work, you can leave this
field empty.
• Enter the initials of the resource in the Initials field. Project enters the first
letter of the resource name as the default, but you can customize it if youprefer.
• Enter the group name in the Group field if you would like the resource to belong
to a group. Remember to spell the group name exactly the same every time
you type it. Groups will be discussed later in this chapter.
• Enter the percentage of working time a resource can contribute to the project inthe Max. Units field. For example, if a resource can work full-time, you wouldenter 100%. If the worker can only work part-time, you would enter 50%, or
whatever percentage is appropriate. Project uses 100% as the default in this
field:
• Enter the rate the resource would normally cost in the Std. Rate field. Although
Project uses hours as the default, you can also enter the rate in minutes, days,weeks, or years. To change the unit, type the amount, followed by a slash,
and the first letter of the unit:
• Enter the rate the resource would cost for overtime work in the Ovt. Rate field.
Once again, Project uses hours as the default, but you may change the unit if
you wish.
• Enter the flat rate a resource would cost in the Cost/ Use field. Use this when a
resource is not charged on a time-related basis (such as a material cost).

8/3/2019 Project 2003 Basic Manual
http://slidepdf.com/reader/full/project-2003-basic-manual 57/90
PAGE 57 - PROJECT 2003 - FOUNDATION LEVEL MANUAL
FOR USE AT THE LICENSED SITE(S) ONLY
© Cheltenham Courseware Ltd. 1995-2006 www.cheltenhamcourseware.com
• Select the way you would like Project to calculate the cost of a resource in theAccrue At field. There are three choices:
Start - Project calculates the entire cost of the resource as soon as the task
begins.Prorated - Project calculates the cost throughout the project.
End - Project calculates the entire cost of the resource when the task iscomplete:
• Select the calendar you would like to base the resource's time on from the drop-down list in the Base Calendar field. Project uses the Standard calendar as
the default:
• Enter a code in the Code field if you wish. Later on, it can help you to organize,
sort or filter your information.
Entering Working Time
Entering Working Time
• The base calendar that you choose for a resource determines its availability.You can customize a resource's calendar if necessary (i.e. Blocking off vacation
time).
To customize Working Time
• In the Resource Sheet view, choose Project > Resource Information to
open the Resource Information dialog box

8/3/2019 Project 2003 Basic Manual
http://slidepdf.com/reader/full/project-2003-basic-manual 58/90
PAGE 58 - PROJECT 2003 - FOUNDATION LEVEL MANUAL
FOR USE AT THE LICENSED SITE(S) ONLY
© Cheltenham Courseware Ltd. 1995-2006 www.cheltenhamcourseware.com
OR double-click on the resource
OR press the Shift + F2 key combination.
• Click on the Working Time tab if it is not already displayed:
• Adjust the calendar to your specifications.
Entering Costs
Entering Rates
• It is important to enter rates for a resource, even if they are estimates, as this
allows Project to calculate the overall cost of a project.
• The cost of a resource may increase or decrease during the life of your project,
and you need to be able to reflect these changes.
• Project allows you to enter up to 125 different cost rates for a resource and
specify the date at which the new rates takes effect.
Editing Resource Costs
• Open the Resource Information dialog box.
• Click on the Costs tab.
• Enter additional information in the Cost rate table section of the Costs tab.
You may enter 25 rates and dates in each of the five tabs in the Cost ratetables section:

8/3/2019 Project 2003 Basic Manual
http://slidepdf.com/reader/full/project-2003-basic-manual 59/90
PAGE 59 - PROJECT 2003 - FOUNDATION LEVEL MANUAL
FOR USE AT THE LICENSED SITE(S) ONLY
© Cheltenham Courseware Ltd. 1995-2006 www.cheltenhamcourseware.com
Entering Notes
Entering Notes
• You use resource notes in much the same way as task notes. They allow you to
attach readily available, additional information to a resource.
To enter a Resource Note:
• In the Resource Sheet view, choose Project > Resource Notes
OR right-click on the resource and select Resource Notes from the drop-down
menu
OR double-click on the resource and click on the Notes tab in the ResourceInformation dialog box:

8/3/2019 Project 2003 Basic Manual
http://slidepdf.com/reader/full/project-2003-basic-manual 60/90
PAGE 60 - PROJECT 2003 - FOUNDATION LEVEL MANUAL
FOR USE AT THE LICENSED SITE(S) ONLY
© Cheltenham Courseware Ltd. 1995-2006 www.cheltenhamcourseware.com
• Use the area provided to enter your notes. You can use the formatting tools
provided to format your note.
• Click OK to save and attach the note to your resource.• Notice the note symbol in the Indicator column of the Resource Sheet view.
Hover your mouse cursor over it to display the note:
Assigning Resources to a Task
Assigning with the Assign Resources Dialog Box
• In the Gantt Chart view, click on the task you would like to assign the resourceto.
• To open the Assign Resources dialog box, from the main menu, choose Tools
> Assign Resources
OR click on Assign Resources icon on the Standard toolbar
OR press the Alt + F10 key combination.
• Highlight the resource you would like to assign and click on Assign:
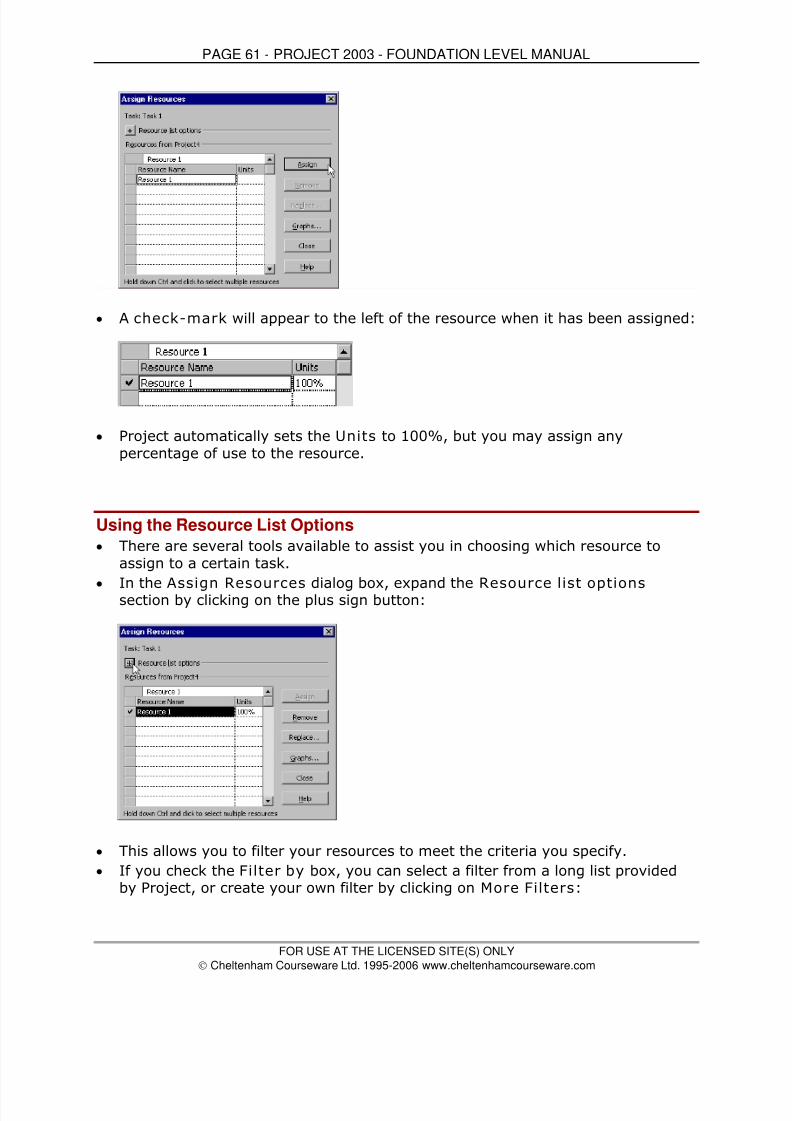
8/3/2019 Project 2003 Basic Manual
http://slidepdf.com/reader/full/project-2003-basic-manual 61/90

8/3/2019 Project 2003 Basic Manual
http://slidepdf.com/reader/full/project-2003-basic-manual 62/90
PAGE 62 - PROJECT 2003 - FOUNDATION LEVEL MANUAL
FOR USE AT THE LICENSED SITE(S) ONLY
© Cheltenham Courseware Ltd. 1995-2006 www.cheltenhamcourseware.com
• If you check the Available to work box, you can enter the number of hoursyou will need a resource. Project then searches and calculates remaining timefor a resource. Resources that are available for the same or greater amount of
hours specified will appear in the list:
• If you click on the Add Resources button, you can select a resource from either
an Active Directory or an Address Book:
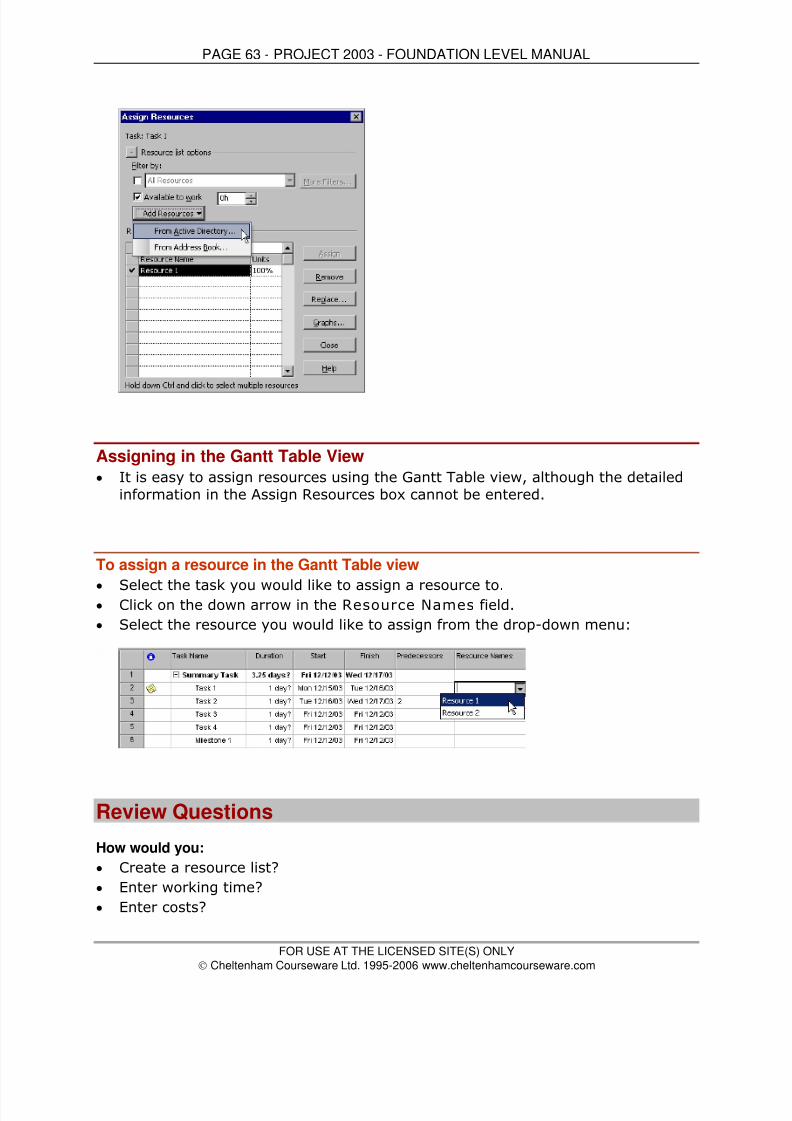
8/3/2019 Project 2003 Basic Manual
http://slidepdf.com/reader/full/project-2003-basic-manual 63/90
PAGE 63 - PROJECT 2003 - FOUNDATION LEVEL MANUAL
FOR USE AT THE LICENSED SITE(S) ONLY
© Cheltenham Courseware Ltd. 1995-2006 www.cheltenhamcourseware.com
Assigning in the Gantt Table View
• It is easy to assign resources using the Gantt Table view, although the detailed
information in the Assign Resources box cannot be entered.
To assign a resource in the Gantt Table view
• Select the task you would like to assign a resource to.• Click on the down arrow in the Resource Names field.
• Select the resource you would like to assign from the drop-down menu:
Review Questions
How would you:
• Create a resource list?
• Enter working time?
• Enter costs?

8/3/2019 Project 2003 Basic Manual
http://slidepdf.com/reader/full/project-2003-basic-manual 64/90
PAGE 64 - PROJECT 2003 - FOUNDATION LEVEL MANUAL
FOR USE AT THE LICENSED SITE(S) ONLY
© Cheltenham Courseware Ltd. 1995-2006 www.cheltenhamcourseware.com
• Enter notes?
• Assign resources to a task?

8/3/2019 Project 2003 Basic Manual
http://slidepdf.com/reader/full/project-2003-basic-manual 65/90
PAGE 65 - PROJECT 2003 - FOUNDATION LEVEL MANUAL
FOR USE AT THE LICENSED SITE(S) ONLY
© Cheltenham Courseware Ltd. 1995-2006 www.cheltenhamcourseware.com
Views
When you have completed this learning module you will have seen how to:
• Use the Calendar view
• Use the Gantt Chart view
• Use the Network Diagram view
• Use the Task Usage view
• Use the Tracking Gantt view
• Use the Resource Graph view
• Use the Resource Sheet view
• Use the Resource Usage view
Introduction to Views
• Now that you are familiar with the basics of Project and know how to enter thecomponents of a project, you must learn how to view the information. Thedifferent views in Project allow you to see the project from a variety of
perspectives and focus on different aspects. This allows you to understand,
visualize, and communicate your project better.
• You can use most views to enter and edit information, although some views can
only display information.
• All views are made up of three basic components:
Chart or graph - information is represented by pictures.
Sheet - information is represented in a table format, similar to a worksheet.Form - information about a single item is represented as it might be on a paperform.
• Views can be accessed by selecting View from the main menu. The most
common views are listed in the drop-down menu. All other views (all 24 of them!) can be accessed by selecting View > More Views from the main menu.
The More Views dialog box opens, which allows you to create, edit, copy,organize and apply any view:

8/3/2019 Project 2003 Basic Manual
http://slidepdf.com/reader/full/project-2003-basic-manual 66/90
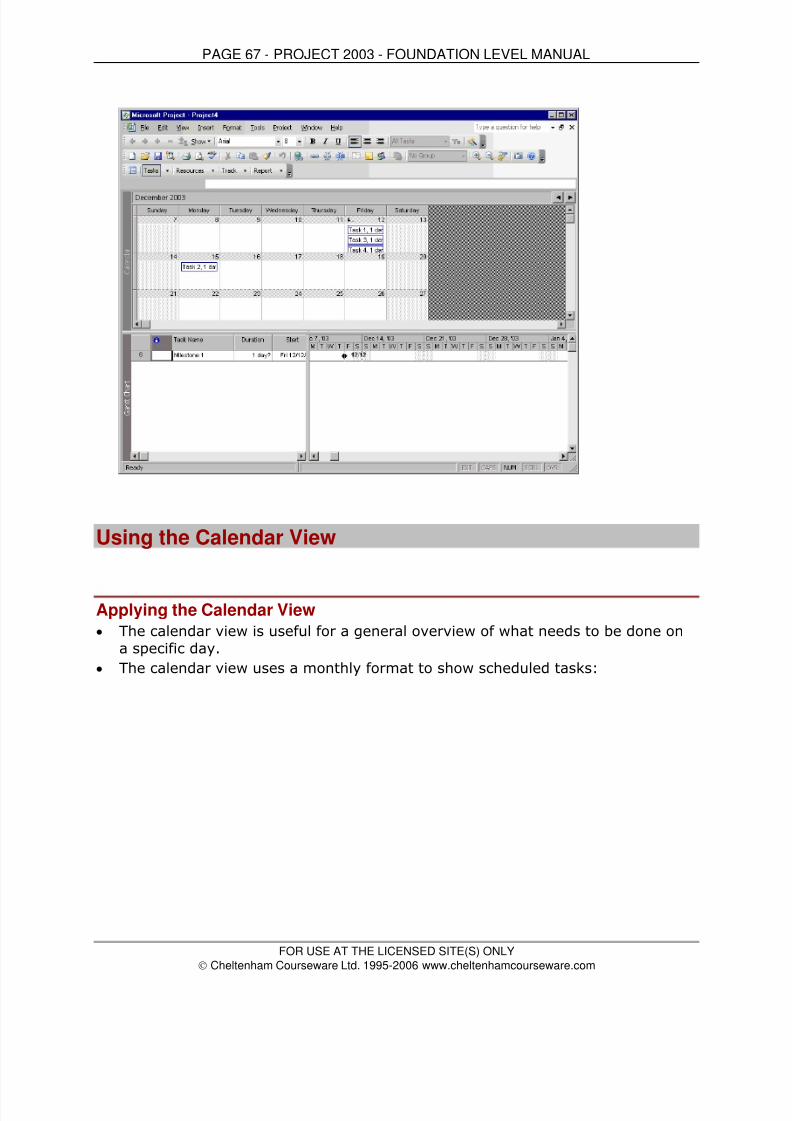
8/3/2019 Project 2003 Basic Manual
http://slidepdf.com/reader/full/project-2003-basic-manual 67/90
PAGE 67 - PROJECT 2003 - FOUNDATION LEVEL MANUAL
FOR USE AT THE LICENSED SITE(S) ONLY
© Cheltenham Courseware Ltd. 1995-2006 www.cheltenhamcourseware.com
Using the Calendar View
Applying the Calendar View
• The calendar view is useful for a general overview of what needs to be done on
a specific day.
• The calendar view uses a monthly format to show scheduled tasks:

8/3/2019 Project 2003 Basic Manual
http://slidepdf.com/reader/full/project-2003-basic-manual 68/90
PAGE 68 - PROJECT 2003 - FOUNDATION LEVEL MANUAL
FOR USE AT THE LICENSED SITE(S) ONLY
© Cheltenham Courseware Ltd. 1995-2006 www.cheltenhamcourseware.com
• Tasks are shown by a bar stretching over the amount of days allocated for the
task.
• A solid black bar shows milestones.
• You can scroll through the months by using the arrow buttons on the top right
corner of the windows:
Using the Gantt Chart View
Applying the Gantt Chart View
• The Gantt Chart view is useful for entering task information and viewing thetiming and relationship between tasks.
• The Gantt Chart View is the default view in Project. It consists of the Gantt
table (on the left) and the Gantt Chart (on the right). The Gantt table is madeup of columns of information, and the Gantt Chart is the graphic representation
of the information entered:

8/3/2019 Project 2003 Basic Manual
http://slidepdf.com/reader/full/project-2003-basic-manual 69/90
PAGE 69 - PROJECT 2003 - FOUNDATION LEVEL MANUAL
FOR USE AT THE LICENSED SITE(S) ONLY
© Cheltenham Courseware Ltd. 1995-2006 www.cheltenhamcourseware.com
• The two windows can be resized so that you can view a larger or smaller portionof the window. To resize, simply hover your mouse cursor over the gray vertical
divider until it becomes two lines with arrows pointing outward. Click and dragthe line until it is in the position you desire:
• The timescale at the top of the Gantt Chart is set to show weeks (in the middletier) and days (in the bottom tier) as the default. However, you can adjust it toshow any timescale you wish. Double-click on the timescale to open the
Timescale dialog box. You can use the Timescale dialog box to format any
tier on the time scale. A preview of your changes is shown in the bottomportion of the dialog box:

8/3/2019 Project 2003 Basic Manual
http://slidepdf.com/reader/full/project-2003-basic-manual 70/90
PAGE 70 - PROJECT 2003 - FOUNDATION LEVEL MANUAL
FOR USE AT THE LICENSED SITE(S) ONLY
© Cheltenham Courseware Ltd. 1995-2006 www.cheltenhamcourseware.com
• You can also zoom in or out to view larger or smaller time increments in theGantt Chart. To zoom in or out, from the main menu, choose View > Zoom.
The Zoom dialog box is displayed:
• Select an option from the list or use the Custom option to create your own.
• Click OK
OR use the Zoom In or Zoom Out icons on the Standard toolbar.
Using the Network Diagram View
Applying the Network Diagram View
• The Network Diagram view is useful for analyzing the general workflow andrelationships between tasks. The Network Diagram view replaced the PERT chart in older versions of Project:

8/3/2019 Project 2003 Basic Manual
http://slidepdf.com/reader/full/project-2003-basic-manual 71/90

8/3/2019 Project 2003 Basic Manual
http://slidepdf.com/reader/full/project-2003-basic-manual 72/90
PAGE 72 - PROJECT 2003 - FOUNDATION LEVEL MANUAL
FOR USE AT THE LICENSED SITE(S) ONLY
© Cheltenham Courseware Ltd. 1995-2006 www.cheltenhamcourseware.com
• You can show or hide details by clicking on the cross that appears on the upper
left corner of a summary node:
Using the Task Usage View
Applying the Task Usage View
• The Task Usage view is useful for showing and organizing assigned resources
under each task. It is also used to set resource work contours (discussedlater):
• By default, the Task Usage table is shown in the left pane. To choose a
different table, click on the select all button at the top left corner of the table:

8/3/2019 Project 2003 Basic Manual
http://slidepdf.com/reader/full/project-2003-basic-manual 73/90
PAGE 73 - PROJECT 2003 - FOUNDATION LEVEL MANUAL
FOR USE AT THE LICENSED SITE(S) ONLY
© Cheltenham Courseware Ltd. 1995-2006 www.cheltenhamcourseware.com
• Right-click and select the view you wish to see:
• Work is shown in the Details section in the right pane. To select differentoptions for the Details section, click on the select all button and right-click .This gives you access to the Timescale, Zoom and Change Working Time
dialog boxes:
Using the Tracking Gantt View
Applying the Tracking Gantt View
• The Tracking Gantt View is useful for comparing the baseline schedule and the
actual schedule (baseline will be discussed in the Project 2003 Intermediate

8/3/2019 Project 2003 Basic Manual
http://slidepdf.com/reader/full/project-2003-basic-manual 74/90
PAGE 74 - PROJECT 2003 - FOUNDATION LEVEL MANUAL
FOR USE AT THE LICENSED SITE(S) ONLY
© Cheltenham Courseware Ltd. 1995-2006 www.cheltenhamcourseware.com
Level Training Manual). It shows a task list in the left pane and the TrackingGantt chart in the right:
• A black bar in the Tracking Gantt view represents summary tasks. When a
task is in progress, a striped bar appears below it, representing work done and
the percentage of work done is displayed to the right of the bar.
Using the Resource Graph View
Applying the Resource Graph View
• The Resource Graph view is useful for supplying a quick visual representation
of resource allocation. It can be used to detect overallocation, percentage of total work time each resource is assigned to, and resource costs:
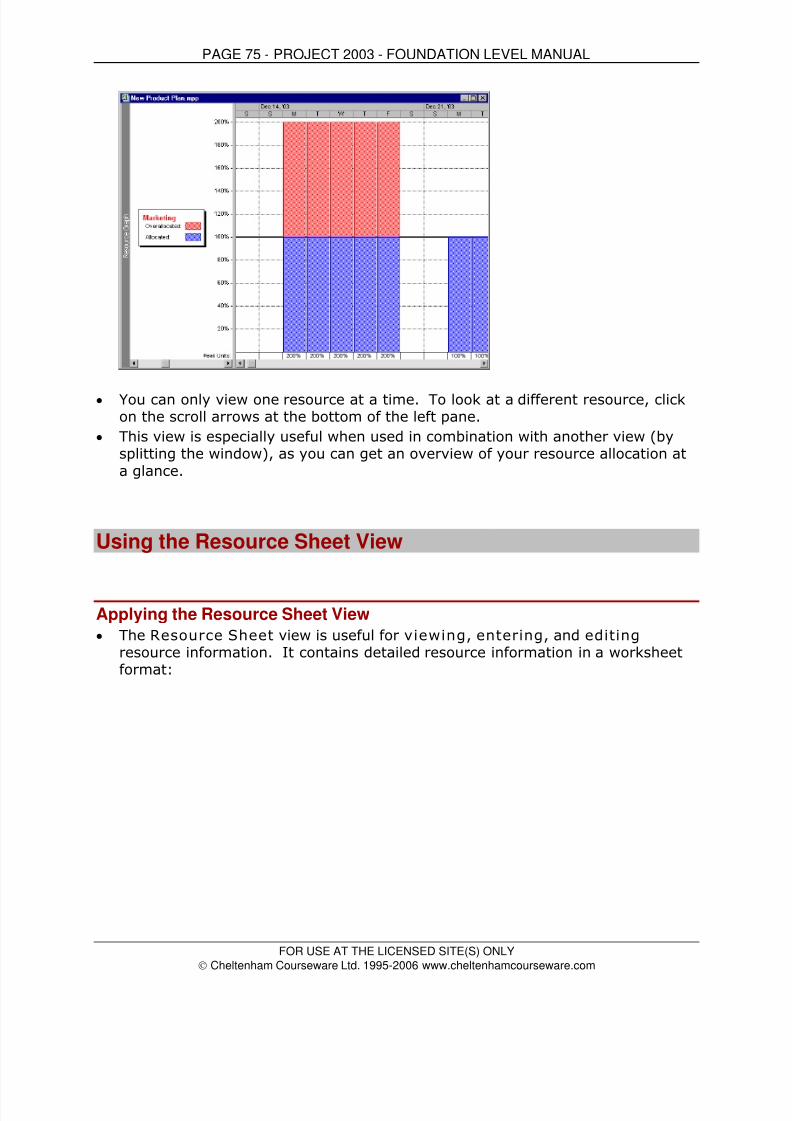
8/3/2019 Project 2003 Basic Manual
http://slidepdf.com/reader/full/project-2003-basic-manual 75/90

8/3/2019 Project 2003 Basic Manual
http://slidepdf.com/reader/full/project-2003-basic-manual 76/90
PAGE 76 - PROJECT 2003 - FOUNDATION LEVEL MANUAL
FOR USE AT THE LICENSED SITE(S) ONLY
© Cheltenham Courseware Ltd. 1995-2006 www.cheltenhamcourseware.com
• This view can be very helpful in determining which group a resource belongs to,
as groups are clearly shown.
• If an overallocation exists, a warning flag is displayed in the Indicator
column. In addition, the resource appears in red.
Using the Resource Usage View
Applying the Resource Usage View
• The Resource Usage view is useful for seeing each resource and the tasksassigned to that resource:

8/3/2019 Project 2003 Basic Manual
http://slidepdf.com/reader/full/project-2003-basic-manual 77/90
PAGE 77 - PROJECT 2003 - FOUNDATION LEVEL MANUAL
FOR USE AT THE LICENSED SITE(S) ONLY
© Cheltenham Courseware Ltd. 1995-2006 www.cheltenhamcourseware.com
• This view can be used for entering and editing resource information, or
assigning tasks.
• To assign or reassign a task, drag and drop between resources.
• A warning flag appears in the Indicator column if an overallocation exists.
Review Questions
How would you:
• Use the Calendar view?
• Use the Gantt Chart view?
• Use the Network Diagram view?
• Use the Task Usage view?
• Use the Tracking Gantt view?
• Use the Resource Graph view?
• Use the Resource Sheet view?
• Use the Resource Usage view?

8/3/2019 Project 2003 Basic Manual
http://slidepdf.com/reader/full/project-2003-basic-manual 78/90
PAGE 78 - PROJECT 2003 - FOUNDATION LEVEL MANUAL
FOR USE AT THE LICENSED SITE(S) ONLY
© Cheltenham Courseware Ltd. 1995-2006 www.cheltenhamcourseware.com
Printing Reports
When you have completed this learning module you will have seen how to:
• Use print preview
• Use page setup
• Use the print dialog box
• Start the report generator
• Use the different types of reports
• Use the Project Guide for Printing wizard
• Customize reports
Viewing and Printing Reports
• To keep others informed of your project, it is sometimes necessary to print views or reports.
• Views and reports are designed to show different information and highlightdifferent aspects of the project. For example, management would require
different information than stakeholders or accountants, etc. Not all information
is relevant to everyone, so it is important to be able to present the appropriate
data to the right people.
• Reports can also display information in a format that is more familiar to the
person who is viewing it.
Using Print Preview
Understanding Print Preview
• Print Preview shows the document exactly as it will appear when printed.
• To display the print preview window, click on Print Preview icon on the
Standard toolbar
OR from the main menu, choose File > Print Preview .
• This is an example of a Gantt Chart in print preview:

8/3/2019 Project 2003 Basic Manual
http://slidepdf.com/reader/full/project-2003-basic-manual 79/90

8/3/2019 Project 2003 Basic Manual
http://slidepdf.com/reader/full/project-2003-basic-manual 80/90

8/3/2019 Project 2003 Basic Manual
http://slidepdf.com/reader/full/project-2003-basic-manual 81/90
PAGE 81 - PROJECT 2003 - FOUNDATION LEVEL MANUAL
FOR USE AT THE LICENSED SITE(S) ONLY
© Cheltenham Courseware Ltd. 1995-2006 www.cheltenhamcourseware.com
OR press the Ctrl + P key combination.
• This opens the Print dialog box:
• The Printer section of the dialog box allows you to choose which printer youwould like to use from a drop-down menu, and displays basic information
regarding the printer you choose.
• The Print range allows you to select which pages you would like to print.
• The Copies section allows you to choose how many copies you would like to
print.
• The Timescale section allows you to select the dates you would like to include
in the report.
• The Print dialog box also gives you quick access to the Print Preview window.
Starting the Reports Dialog Box
Understanding the Reports Dialog Box
• The Reports dialog box is the launching point for all reports. It gives youaccess to the six main categories of reports: Overview, Current Activities,Costs, Assignments, Workload and Custom:

8/3/2019 Project 2003 Basic Manual
http://slidepdf.com/reader/full/project-2003-basic-manual 82/90
PAGE 82 - PROJECT 2003 - FOUNDATION LEVEL MANUAL
FOR USE AT THE LICENSED SITE(S) ONLY
© Cheltenham Courseware Ltd. 1995-2006 www.cheltenhamcourseware.com
• To open the Reports dialog box, from the main menu, choose View > Reports.
• To select one of the different types of reports, click on the name of the reportcategory and then click Select
OR double-click on it.
Understanding the Different Types of Reports
Using Overview Reports
• To display the Overview Reports dialog box, from the main menu, select View
> Reports.
• There are five types of Overview Reports: Project Summary, Top-LevelTasks, Critical Tasks, Milestones and Working Days:
• Project Summary shows top-level information about the entire projectincluding dates, duration, work, costs, task status, and resource status.
• Top-Level Tasks shows the summary tasks at the highest level as of the
current date.
• Critical Tasks shows the status of the tasks on the critical path and the task's
duration, start and finish dates, assigned resources, and predecessors and
successors.
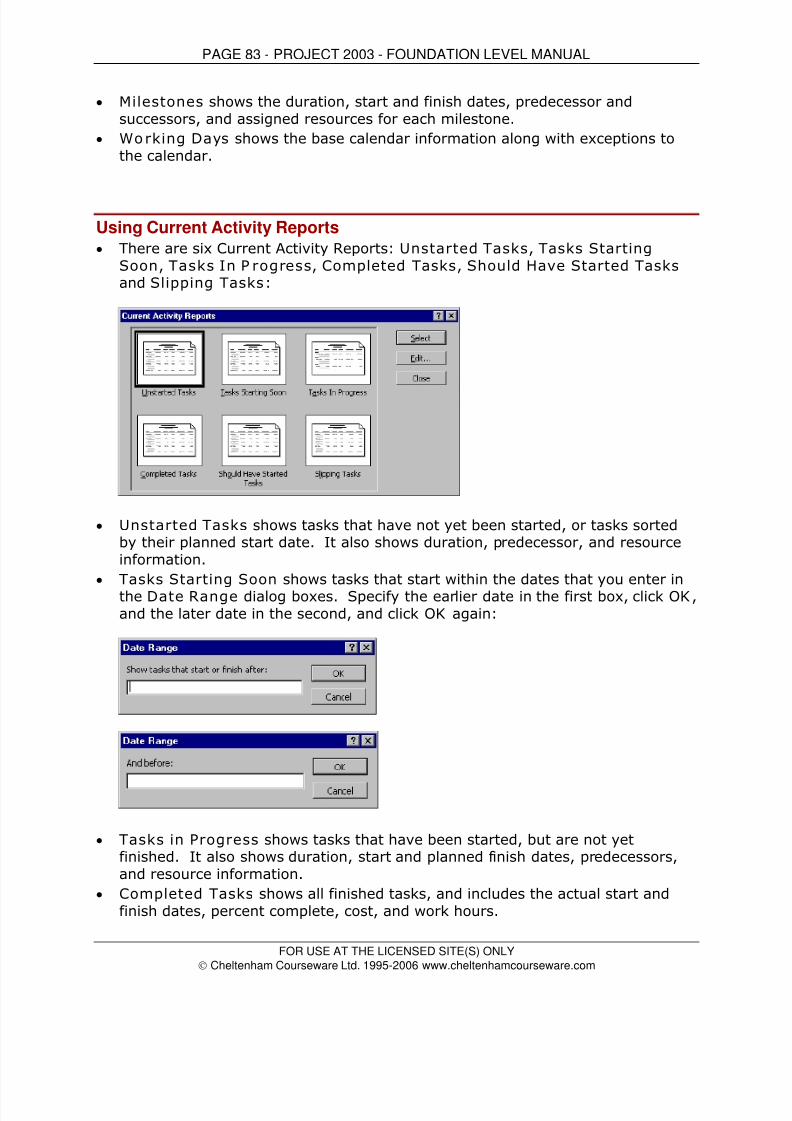
8/3/2019 Project 2003 Basic Manual
http://slidepdf.com/reader/full/project-2003-basic-manual 83/90

8/3/2019 Project 2003 Basic Manual
http://slidepdf.com/reader/full/project-2003-basic-manual 84/90
PAGE 84 - PROJECT 2003 - FOUNDATION LEVEL MANUAL
FOR USE AT THE LICENSED SITE(S) ONLY
© Cheltenham Courseware Ltd. 1995-2006 www.cheltenhamcourseware.com
• Should Have Started Tasks shows all tasks that should have started by thedate you enter in the Should Start By dialog box. The date you enter
determines which tasks are shown in the report. It also includes planned startand finish dates, baseline start and finish dates, and variances for start and
finish dates:
• Slipping Tasks shows tasks that have started behind schedule or have beenrescheduled from the baseline start dates. It also includes planned start and
finish dates, baseline start and finish dates, and variances for start and finish
dates.
Using Cost Reports
• There are five Cost Reports: Cash Flow , Budget, Overbudget Tasks,
Overbudget Resources and Earned Value:
• Cash Flow shows costs, sorted by task, in weekly time increments.
• Budget lists tasks and the budgeted costs. It also includes baseline cost,
variance, and actual costs.
• Overbudget Tasks shows tasks that are overbudget. It also includes cost,baseline, variance, actual cost, and remaining cost.
• Overbudget Resources shows resources that will be overbudget according to
baseline estimates and the current progress of the project.
• Earned Value shows the status of the cost of each task when compared to theactual costs. The following table explains the column headings of this report:
BCWS - Budgeted Cost of Work Scheduled
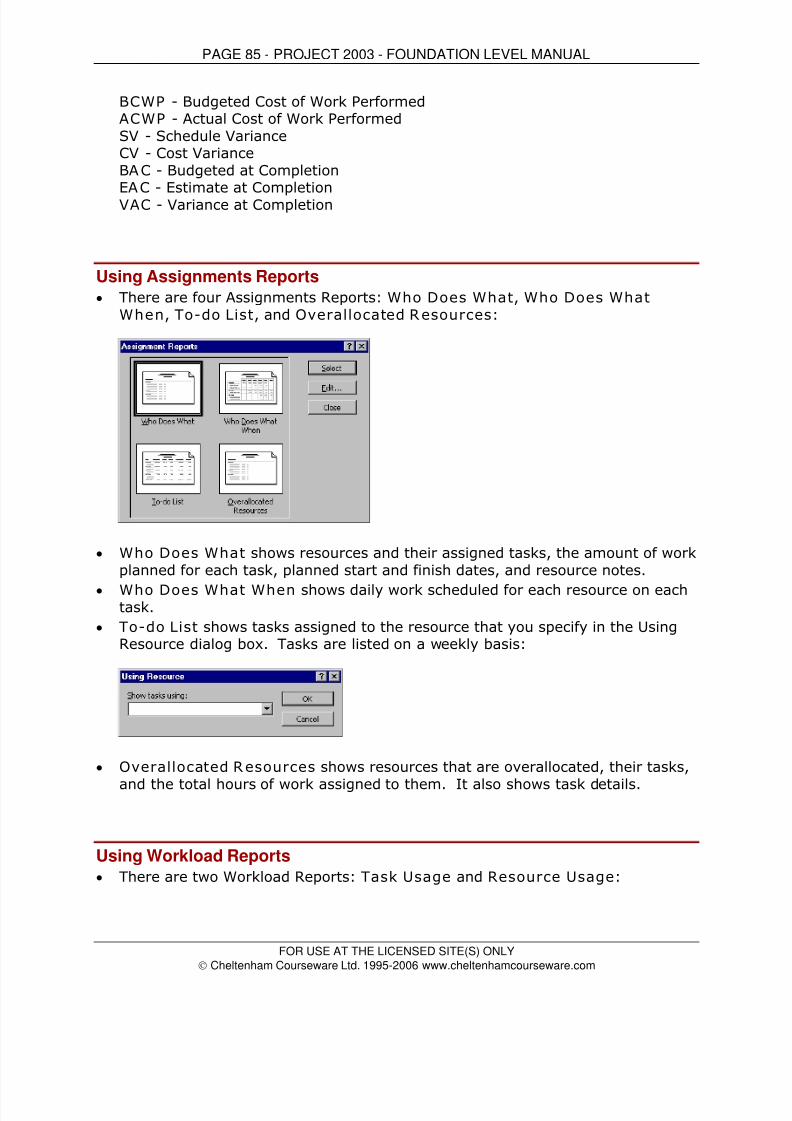
8/3/2019 Project 2003 Basic Manual
http://slidepdf.com/reader/full/project-2003-basic-manual 85/90

8/3/2019 Project 2003 Basic Manual
http://slidepdf.com/reader/full/project-2003-basic-manual 86/90
PAGE 86 - PROJECT 2003 - FOUNDATION LEVEL MANUAL
FOR USE AT THE LICENSED SITE(S) ONLY
© Cheltenham Courseware Ltd. 1995-2006 www.cheltenhamcourseware.com
• Task Usage shows tasks, resources assigned to each task, and the amount of
work assigned to each resource. Information is shown in weekly increments.
• Resource Usage shows resources and tasks assigned to them, as well as the
amount of work assigned to them. Information is shown in weekly increments.
Using Custom Reports
• There are three custom reports listed among the standard reports in the
Custom Reports dialog box: Crosstab, Resource and Task. You can onlyaccess these three reports from the Custom Reports dialog box:
• The Crosstab report shows information about tasks or resources broken down
by time periods.
• The Resource report shows resource information including ID number, name,
initials, groups, maximum units rate, accrual, base calendar, and code
information.
• The Task report shows task information including ID number, name, indicator
icons, duration, planned start and finish dates, predecessors, and assigned
resources.
The Project Guide for Printing Wizard

8/3/2019 Project 2003 Basic Manual
http://slidepdf.com/reader/full/project-2003-basic-manual 87/90
PAGE 87 - PROJECT 2003 - FOUNDATION LEVEL MANUAL
FOR USE AT THE LICENSED SITE(S) ONLY
© Cheltenham Courseware Ltd. 1995-2006 www.cheltenhamcourseware.com
Using the Project Guide for Printing Wizard
• Project 2003 has added a new feature to the Report topic in the Project Guide –
Print current view as a report.
• This allows you to print exactly what you see on the screen as a report which
further customizes printed reports.
• From the Project Guide toolbar, select Report > Print current view as areport:
• This will open the Print Current View pane:
• There are three steps in the process. You can choose to preview or print thereport at any stage during the steps by clicking on the buttons in the lower half
of the pane:

8/3/2019 Project 2003 Basic Manual
http://slidepdf.com/reader/full/project-2003-basic-manual 88/90
PAGE 88 - PROJECT 2003 - FOUNDATION LEVEL MANUAL
FOR USE AT THE LICENSED SITE(S) ONLY
© Cheltenham Courseware Ltd. 1995-2006 www.cheltenhamcourseware.com
• In Step 1, select the number of pages you would like to see in your report.
• Click on Save and go to Step 2 to continue.
• In Step 2, choose the sizing of your report.
• Click on Save and go to Step 3 to continue.
• In Step 3, choose the header, footer, or legend options you desire.
• Click on Save and go to Step 4 to continue.
• In step 4, make any additional modifications you would like to see in yourreport.
• Click Print to print your report.
• This will open the Print dialog box.
• Click OK to print.
Customizing Reports
Using Customized Reports
• You can customize any report that has been covered in this chapter to suit yourparticular needs. You can create a new report or edit an existing report.
• Depending on which report you are customizing, different dialog boxes are
displayed to assist you in changing formatting, field information, etc.

8/3/2019 Project 2003 Basic Manual
http://slidepdf.com/reader/full/project-2003-basic-manual 89/90
PAGE 89 - PROJECT 2003 - FOUNDATION LEVEL MANUAL
FOR USE AT THE LICENSED SITE(S) ONLY
© Cheltenham Courseware Ltd. 1995-2006 www.cheltenhamcourseware.com
Creating a New Report
• To create a new report, click New in the Custom Reports dialog box:
• Project offers four formats to base your new report on: Task, Resource,Monthly Calendar, and Crosstab.
• Select the report type you would like to create from the Define New Report
dialog box and click OK:
• Depending on the type you select, the appropriate dialog box appears to assist
you in building your report.
Editing Existing Reports
• You can edit any report by selecting Edit from any Report dialog box:

8/3/2019 Project 2003 Basic Manual
http://slidepdf.com/reader/full/project-2003-basic-manual 90/90
PAGE 90 - PROJECT 2003 - FOUNDATION LEVEL MANUAL
• Depending on which report you are editing, the appropriate dialog box appears
to assist you.
Review QuestionsHow would you:
• Use print preview?
• Use page setup?
• Use the print dialog box?
• Start the report generator?
• Use the different types of reports?
• Use the Project Guide for Printing wizard?
• Customize reports?