professional climbing instructors association base and top managed ... · professional climbing...
TRANSCRIPT
Professional Climbing Instructors Association Base and Top Managed Climbing Instructor CoursesOutdoor Link, LLC - Todd VogelColorado Mountain Guides - Alan Jolley
copyright 2008 pciA

ContentsCurriculum Outline for BMCI —3Equipment list for outdoor climbing courses —4Institutional Climbing Defined —18Standardization —19Professional Expectations —20Learning and Teaching Styles: the climbing instructor as educator —22Educating for Success - Blume’s Taxonomy —23Approaches to Teaching and Learning —26Use and Abuse of the Clove Hitch —27How to tie the munter hitch —29Overview - Day 2 —36Fear - A Powerful Emotion - Training Workshop —37Full Value Contract —40The Nature of the Adventure Experience —41The Experiential Learning Cycle —42CrEATINg A LESSON PLAN(Adapted from American Canoe Association) —48Equipment: Information on Bolts —51Angles and loads —71Tension releasable rappel —76risk Management —78Jed Williamson’s Accident Matrix —79WHY DO WE HAVE ACCIDENTS - —80Hazardous Attitudes —82 Importance of “What If” Thinking —86Emergency Action Plan - Sample —87Selected Case Study #1 —90Selected Case Study #2 —91Selected Case Study #3 —92Selected Case Study #4 —93Selected Case Study #5 —94Selected Case Study #6 —95Accident report Form Sample —96Hauling Systems for Tr course —98Lowering —100Appendix A - A Short Course in Rope Physics —101Appendix B - A summary of the Conference on Nylon and Ropes —106Appendix C - Safety Loss of Ropes by Lowering Cycles in Toprope Climbing —109Appendix D - Marking of Ropes —114Appendix E - Choosing a Material for Your Cordelette —115Appendix G - Anchors and Directional Forces —125Appendix H - How to tie the Mule Knot on a Munter Hitch —126How Cams Work By WildCountry —127Appendix I - How CAms Work —127Appendix J - a Sample Leave No Trace plan —134Pre Course Written Assessment —138Post Course Written Assessment —141PCIA Base Managed Climbing Instructor Course —142

Curriculum Outline for BMCIorder of topics may be rearranged as needed.Day 1Introduction/Course OverviewProfessional philosophy, expectations and ethicsLearning and Teaching StylesClimbing Equipment: Materials and Knots Harnesses Protection: what to know, teach and practice
Day 2Fear, sequencing, lesson planning, briefing and debriefingProtection continued: BoltsProtection continued: Natural featuresAnchoring: equalizing systems and the myth of redundancyHow strong does an anchor need to be or How do I know when I can stop adding pieces to an anchor?Practice buidling anchorsMunter HitchInstructor rappel safety
Day 32nd - 4th Class Terrain AssessmentBottom Managed top rope climbsPractice - build slingshot top rope anchor & rap over edgeBelay systems for base managed climbingBelay/belayer managementHow to teach ground school - demoRescuing stuck climber - counter balance ascending demoRappelling site management
For 4-day BMCI's: Day 4:Site scenarios and practice
TMCI:Top managed sitesLoweringRaisingPractice
3

Equipment list for outdoor climbing courses
Tent, tarp and car camping equipment if camping•Sleeping bag and pad(s)•Lawn chair•Approach shoes•Climbing shoes (optional, we won't climb much)•1 single dynamic rope•100' of 3/8" or similar static line for anchoring. We can •lend this if neededItemsforropepaddingeg:manufacturedropepads,fire•hose, carpet, etc. Yes, you really will need these and we have some to lend.5 pear shaped locking carabiners•Anchoring materials suitable for crack and boulder/tree •tie-off anchors. Hardware should include a set of Stoppers, SLCDs from .5" to 4", and Tricams. Several long (50’) lengths of static rope or webbing will also be useful. Bring plenty of carabiners (15 or so).Two 30' cordelletes of 7 or 8mm cord. •Twentyfiveto thirtyfeetof1"webbingfor improvised•harnessHarness, belay device, helmet•Don’t run out and buy the local guide book but if you have •one, bring one.Clothing for warm or cold, wet or dry. Bring everything •from shorts to a down jacket and boots.Sunscreen and lip screen. •Day pack•Food and eating gear (cup, bowl, plate, fork, spoon). •Notebook and writing equipment•
Mark Your Gear!!!Mark the middle of your rope with a marker designed for that pur-
pose. Bluewater and PMI distribute these.
Notes for Joshua Tree NP:There is a $10 entrance fee for Joshua Tree National Park. The closest water, phone, grocery, fuel, etc. is a forty minute round trip from camp, 15 minutes in Indian Cove.Having said that it’s often nice to sneak into town for a shower or dinner...
Notes for the Eastern Sierra:Pay showers are a short drive up the road from the camp-ground.The nearest grocery store is a 45 minute round-trip from the campground. The bugs will most likely be bad so bring some bug repellant.
4

Base/Top Single Pitch Climbing Instructor Program Summary
ThePCIAisanon-profitorganizationfocusedonprovidingeducationandcredentialingfornewandexistingclimbinginstructorswhoprimarilyteachbasicskillsand/orfacilitateclimbingexperiences.InadditionthePCIAcertification-basedaccreditation program helps assure land managers, insurance providers and the public that employees of accredited school have been peer reviewed and demonstrated core climbing competencies.
ComprehensiveThe sequentially designed instructional program highlights the subtle yet important differences as well as the similarities thatexistbetweenclimbinginstructionthatoccursonartificialstructures,basemanaged,topmanagedandsinglepitchclimbingsites.Throughamoreconsistent,standardizedapproachtoentrylevelclimbinginstructionthePCIAhopestoimprove the safety of climbing at all levels.
ComplementaryThe PCIA seeks to complement other related professions and to be accessible to anyone interested in climbing instruc-tion.Ourcontinuingeducationrequirementsrecognizethebenefitsofalternativetechnicaltrainingsuchasropescourses,technicalrescue,mountainguiding,canyoneering,andcaving.Wealsorecognizeandvaluetheimportanceofcontinuallyimproving our educational and environmental knowledge. In time, PCIA training and continuing education programs will beavailablethroughmanyorganizationsandatavarietyofnationalandregionalprofessionalconferences. InclusiveThere are many talented climbing educators in America and the PCIA seeks to include the best of the best in its instructor pool. There are many ways for interested people to become involved with the PCIA instructional team ranging from teach-ing a continuing education class to becoming an instructor trainer.
Accomplishment and high standardsIn the modern world of rock climbing instruction professional instructors have received formal training and evaluation. Eachofourcourseshasaformalevaluationcomponentandinordertoachievecertificationanexammustbepassed.Theseexamsarenotaformality–theyrequiresignificantunderstandingofandabilitytoapplykeyskillsinaeffortlessmanner.Thusthestandardsarehighandsuccessfulexamcandidatescanbeconfidentthattheirachievmentisameasureof true professional standards.
Why the PCIA?ThePCIAprogramevolvedfromtheAmericanMountainGuidesAssociationTopRopeSiteManagercertification(nolonger available). The creators of the PCIA program include the founders of the Top Rope Site Manager program along withotheroutdooreducationprofessionalseachwithmanyyearsofexperience.InformingthePCIAourmainpurposewastocontinuethetypeoftrainingofferedbytheformerTopRopeSiteManager’sCourse.Wehavesinceexpandedtheprogram to include trainings for those instructors operating in other settings.
Program OverviewThe PCIA curriculum seeks to serve the climbing public in the best possible manner by providing training and creden-tialing of individuals who provide climbing instruction in climbing gyms, top rope, and single pitch environs. The PCIA believesthatsuchtrainingwillhelpnewclimberstogainaccesstoaccurateandconsistentinformationandtoutilizesafer,moreefficienttechniquesthatareenvironmentallyfriendly.ParticipantsinPCIAinstructortrainingprogramsbenefitfromexposuretocurrentresearch,on-goingprofessionalcritique,andcontinualoversightandqualityassurancereviewsofinstructors. The PCIA program has been designed to provide focused, sequential instruction and credentialing in the art and science of climbing instruction.
PCIAprogramsareintendedforindividualswhoalreadydoordesiretoinstructclimbingskills,facilitateclimbingexperi-ences or monitor climbing activities. Typical participants include climbing school instructors, climbing gym staff, camp staff, leaders of scouting groups, and university and school adventure program leaders. Many recreational climbers take courses simply for the purpose of becoming a better informed and safer climber. For individuals aspiring to be profession-almountainguides,thePCIAcurriculumprovidesaverycomprehensiveexposuretofundamentalclimbingknowledge

and instructional skills that are will prove invaluable for future entry into more advanced guide training programs.
ThePCIAdeliversimportantcoreskillstoclimbinginstructors–someofwhomwillgoontobecomegreatmountainguides as well. In America, the AMGA trains and evaluates mountain guides. However, little to no emphasis is put on the teaching of climbing skills or assessing a guide’s depth of instructional knowledge in AMGA courses. Also, guides gener-allyworkwithsmallgroupsizes,oftenjustoneortwopeople,andareoftenfocusedonaroute-relatedobjectiveratherthan the conveyance of technical skills. Instructors, especially top rope climbing instructors, often work with large group sizesandthegoalsaretypicallyfocusedonskillsacquisitionorhumanobjectivessuchaspersonaldevelopmentorteambuilding.ThePCIAtrainingandevaluationprogramsignificantlybroadenstheknowledgeandskillbaseofbothinstruc-tors and guides. MembershipTheProfessionalClimbingInstructors’Associationisanon-profitorganizationcharteredinColorado.IRS501c3statusispending. Membership includes a quarterly e-newsletter, regional and national opportunities for continuing education credit and training discounts.
PCIA Membership LevelsAsamembership-basedorganizationwerequirethesupportofanactivemembershiptofunction.Yourcontributionsdomake a difference!
General MemberA general membership is open to anyone who has an interest in climbing instruction.
Benefitsinclude:Access to PCIA outdoor climbing instructor coursesSubscriptiontoPCIAe-newsletter–OnBelay.Discount on PCIA continuing education clinicsDiscount at PCIA educational libraryTwice a year 30% discount from AlpenglowGear.com Access to educational resources to prepare for courseSupporting the advancement of climbing education Annual Fee - $50.00
Youth Member The youth membership is for individuals less than 18 years old. It was established to foster professional involvement by young climbers, particularly those who work in climbing centers.
Benefitsinclude:Access to PCIA outdoor climbing instructor courses SubscriptiontoPCIAe-newsletter–OnBelay.Discount on PCIA continuing education programsDiscount at PCIA educational libraryTwice a year access to 30% gear discount from AlpenglowGear.comAccess to educational resources to prepare for courseSupporting the advancement of climbing education Annual Fee - $25.00 PCIA Certified MemberTherearelevelsofcertificationattainablethroughthePCIA.AnycurrentmemberwhopassesacertificationexamisgrantedPCIACertifiedMemberstatusattheappropriatelevel. PCIACertifiedClimbingWallInstructorPCIACertifiedBaseManagedClimbingInstructorPCIACertifiedTopManagedClimbingInstructor

PCIACertifiedSinglePitchInstructor
BenefitsofPCIACertifiedMembershipLevelAllbenefitsofgeneralmembership30% discount at all times through AlpenglowGear.comProfessional purchase discounts from vendor members AccesstoregulatedlandsonparwithcertificationlevelAble to use appropriate PCIA logo for marketing support Marketing support from PCIA Option to create mini-website within PCIA.USPCIA link to member site on PCIA.USAnnual Fee: $0.00. Supporting PartnersSupportingPartnersareindividuals,organizations,orcorporationswhobelieveinthePCIAmissionandwanttocontrib-ute to climbing education.
BronzeandSilverPartnershipsareprimarilyforindividuals,climbingschools,climbinggyms,smallretailers,universi-ties,andnon-profitorganizations.
Gold, Platinum, and Diamond partners are major donors such as manufacturers, large retailers, and interested individuals. BronzePartner $200.00–499.00 Silver Partner $500.00–999.00 GoldPartner $1000.00–4999.00 PlatinumPartner $5000.00–9999.00 Diamond Partner >$10000.00
Eachsupportingpartnerreceivesthefollowingbenefits Access to PCIA outdoor climbing instructor courses (individuals only) SubscriptiontoPCIAe-newsletter–OnBelay.Discount on PCIA continuing education programsDiscount at PCIA educational library30% discount from AlpenglowGear.com (individuals only) Access to educational resources to prepare for courseRecognition with a listing and a link if desired on Pcia.us AccesstoPCIAorganizationalbestpracticesmanual

Able to post job openings on Pcia.us job site A copy of the PCIA membership mailing listSupporting the advancement of climbing education
Inaddition-Gold,PlatinumandDiamondpartnersarerecognizedineacheditionofthee-newsletter(OnBelay)andfeatured on pcia.us.
Accredited Membership Organizationwith1–5instructingstaff(leadersandassistants) $400.00Organizationwith6–10instructingstaff(leadersandassistants)$800.00Organizationwith>10instructingstaff(leadersandassistants) $1200.00
BASE MANAGED CLIMBING INSTRUCTOR COURSE

Themajorityofoutdoortopropeclimbinginstructiontakesplaceatbottommanagedsites.RecognizingthisthePCIAhascreatedafocusedcourseandoptionalcertificationexamthataddressesbasemanagedclimbs.TheBaseManagedClimb-ingInstructor(BMCI)providesinstructorsandpotentialinstructorswithanindepthandstandardizedunderstandingofthe skills essential to teaching climbing in an outdoor setting. Like other PCIA courses, the course reinforces the impor-tance of teaching technically accurate information and debunks many common climbing myths. The emphasis is again on refiningcoreskillsandimprovingeducationaldeliveryofmaterial.
Thethirtyhour(3to4day)coursebuildsupontheexistingskillsofcompetentrecreationalclimberstakinganindepthlook at site selection, equipment, knot selection, anchor construction, rope systems, Leave No Trace practices, rescue and assistance skills as well as key instructional skills. Most importantly the course stresses blending these skills together to formamoreseamlessandefficientclimbingexperienceforparticipants.Uponcompletionofallcoursecomponentspar-ticipants are considered PCIA Assistant Base Managed Climbing Instructors.
AssistantInstructorsmayelecttotakeanoptionalcertificationexamtoachieveBaseManagedClimbingInstructorCerti-fication.Theonedayexaminationstressesefficientsiteandgearutilization,clientandinstructorsafety,sitemanagementandeducationaldelivery.Theexammaybetakenanytimeaftercompletingallcoursecomponents.
This course may be taken as stand alone course or coupled together with the one day Top Managed Climbing Instructor Module and the two day Single Pitch Instructor Module.
Base Managed Climbing Instructor Student Objectives and component skills
Professional SkillsPresents her/himself with a professional demeanor and appropriate attire.•Presents her/himself with essential and well-maintained personal equipment. •Discuss differences between recreational climbing and climbing instruction and supervision.•Continuously practice and illustrate a high level of Leave No Trace understanding. •Understand various legal and administrative aspects related to outdoor climbing.•Design and demonstrate professional client greeting and facility introduction•Discuss options for working with youth populations vs. adult populations.•Beabletodiscussprofessionalism,professionaltrainingprogramsandtheroleoforganizationssuchasthePCIA,CWA,•ACCT and the AMGA.Appropriately choose terrain to meet client needs and match terrain from a guide book or base of cliff with appropriate •anchor site at the top of the cliff.
Climbing AbilityModelatopropeclimbatthe5.6standardillustratingconfident,smooth,andcontrolledmovement.•Demonstrate a variety of basic and intermediate physical climbing movement skills.•
Technical Understanding Demonstrate ability to correctly identify and discuss (in depth) a selection basic climbing gear including various carabiners, •belay tools, webbing and cordage materials and ropes. Possess a working knowledge of and an ability to inspect basic climbing gear such as ropes, anchor cordage and webbing, •harnesses,belaydevices,carabiners,climbingshoes,belaytoolsandartificialformsofprotection.Demonstrate and discuss appropriate use of the following knots: Figure 8 Follow Through, Figure 8 on Bight, Double •Bight Figure 8, Overhand on Bight, Overhand Follow Through, Bowline. Demonstrate and discuss appropriate use of the following hitches: Clove Hitch, Munter Hitch, Blocked Munter, Block •Belay Plate, Prussik Hitch, Klemheist Hitch, Auto Block.Demonstrate construction of a sit harness with webbing or rope. The harness must include leg loops, a swami and be •redundant such that if the closure knot loosens, the harness remains secure.Demonstrate rope coiling into a mountaineer’s coil and a backpack coil. •Demonstrateconfidentandcompetentbelayingusingavarietyofbelaymethodsincludingaperturedevices,assisted•locking devices, and a Munter Hitch with both right and left hand as break hand. Demonstratetheproperplacementofartificialprotectionincludingtapers(Stoppers),Hexentrics,Tri-cams,andSpring•

Loaded Cams. Demonstrate the use of various methods of slinging natural features with rope or webbing and will articulate the pros •and cons of each. Articulate a system for assessing bolts. •Demonstrate understanding of distributive and sequential loading anchor systems and the ability to construct anchor •systemsthatresolveconflictingneedsasmuchaspossible.Construct an effective master point using natural anchor point(s) and the joining materials of their choice. Time Limit: •10 minutes per anchor.Demonstratetheabilitytoefficientlybuildavarietyofdistributedanchorswithartificialgearaswellasamixofnatural•andartificialgear.TimeLimit:10minutesperanchor.Demonstratethesetupanduseofareleasableinstructorbelayedrappelutilizingoneortworopes.•Demonstrate set up of a base managed climb with easier edge access and rappel down the redirected rope demonstrating •protecting themselves adequately both while descending over the edge and while rappelling. Time Limit: 15 minutes.Demonstratesetupofabasemanagedclimbwithdifficultedgeaccessandrappeldowntheredirectedropedemonstrating•protecting themselves adequately both while descending over the edge and while rappelling. Time Limit: 15 minutes.Demonstrateavarietyofbasemanagedstudentbelays–anchored,unanchored,from-anchor,from-harness–andarticulate•appropriate use of each. Demonstrate the ability to supervise a base managed site with at least two climbs operating.•Demonstrate how to take a weighted and un-weighted from-harness belay from a student belayer at the base of a •climb. Demonstrate counter-ascending to assist a client and counter-rappelling to the ground with the client using an assisted •locking device.Demonstrate a variety of belay transitions.•Demonstrate multiple alternatives for protecting a belayer from both an upward pull and falling backward. •
Safety SkillsPresentasamplesitesafetybriefing.•Discuss selection of safe climbing routes for varying abilities and styles of climbing.•Evaluate and problem-solve the need for back-up belays and the use of anchors. •Perform basic assistance and rescue skills such taking over a loaded belay, counter ascending / rappelling, and a climber •pick off. Prepare a risk management and emergency plan for a sample location. •Demonstrate effective supervision of both bouldering and roped climbing areas.•Demonstrate effective spotting techniques. •Demonstrate effective construction of a chest harness with webbing or rope. The harness must attach to the rope in such •a way as to not compress the torso or fully weight the chest harness.Continuously demonstrate adequate personal and student safety.•
Educational AbilityDesign and demonstrate a 45’ lesson on harness application, knot use, belaying and communication.•Design and demonstrate a 45’ lesson showing effective coaching of movement skills through activities, verbal direction •and modeling.Facilitate a 10’-30’ educational presentation on carabiners, belay tools, climbing grades, reading route topos, webbing •and cordage material specs and use, how to select a rope /rope dynamics, Leave No Trace practices, rope coiling.Designademonstratea45’lessononknotandhitchtyingincludingfigure8s.overhands,clovehitch,blockMunter•Hitch and Prussik Hitch.
Base Managed Climbing Instructor Course Pre-Requisites
You are currently at least age 18. Thecandidatemustshowanadequateexperienceleveltothecourseproviderillustratingthathe/sheisreadyforthecourse.Examplesincluderegularclimbingfor2–3years,ahighintensityofclimbinginthepastfewmonths,etc.Leadclimbingexperienceishighlyrecommendedbutnotrequired.You are able to comfortably set-up base managed climbs, to belay, and to rappel without guidance and can demonstrate
detailedfamiliaritywithanchoringprinciples,naturalanchorsandartificialanchors(wedges,hexes,passiveandactivecams). These skills may be assessed at the start of the course.You possess the personal equipment necessary for the course.You are capable of comfortably climbing 5.8 terrain while on a top rope.
Base Managed Climbing Instructor Course LengthThe course is 30 hours (3 days) with pre-course study and lesson preparation required. Some providers offer it as a four day course, or with an optional fourth day of practice.
Base Managed Climbing Instructor Course RatioTherecommendedstudenttoinstructorratiois6:1. BaseManagedClimbingInstructorCertificationUpon completing the Base Managed Climbing Instructor course components (Assistant BMCI) an individual may elect to takeaonedaycertificationexam.Askillconsolidationperiodafterthecourseisrecommendbutnotrequired.Theexami-nationisaonedayfieldexamthatevaluatesbothcoretechnicalskillsandeducationaldelivery.Thetargetgoalforthecertificationstandardisforcandidatestobeabletogeneralizelearnedinformation-inotherwordstobeabletoutilizevariousprinciplestocreatesolutionsforproblemsathand.Generalizationisconsideredthefourthlearningstagefollow-ingmemorization,comprehension,andapplication.
Exampre-requisites:
Candidate must have completed the PCIA Base Managed Climbing Instructor course and be considered a PCIA Assistant Instructor or,Candidate must have completed the AMGA Top Rope Site Manager Course or Single Pitch Instructor Course.
Examcandidateswillbeaskedto:
1. Completeawrittenexamwithascoregreaterthan75%2. Presentaminimumofoneprofessionallyorganizedlessonschosenbytheexaminerfromapublishedlistoftop-ics. 3. Complete two technical scenarios illustrating full comprehension and application of all technical skills taught in the course.
Onlyonemarginalscoreisallowedwithinthefourexamactivities. Acandidatewhofailstheexammayretaketheexamatafuturedate.
CertificationMaintenanceBMCI,TMCI,andSPIcertificationsareonlyvalidwhenPCIAmembershipiscurrent.PCIABaseManagedClimbingInstructorCertificationcertificationscanbemaintainedinmultipleways:
1. A12hour(1.5day)recertificationcoursemaybetakenanytimewithinthreeyearsofthelastdateofcertifica-tion.Therecertificationmustbetakenpriortotheexpirationofyourcurrentcertificate.Ifacourseisnotavailablepriortoexpiration,awrittenextensionmaybeapprovedbythePCIAeducationalcommitteeextendingacertificationuptotwelvemonths. 2. Certifiedindividualsalsohavetheoptionofparticipatinginapprovedcontinuingeducationcoursesaswell.Re-certificationbycontinuingeducationrequiresaminimumof10hoursfocusedontechnicalskillsand6hoursfocusedoneducation skills. 3. CompletionofanAMGAcoursealsomeetsrecertificationrequirements.4. AnupperlevelPCIAcertification(ie.SinglePitchInstructor)supercedestheBaseManagedClimbingInstructorCertificationandbothwillremainvalidaslongastherecertificationrequirementsofthehigherlevelcertificationaremet.5. CertifiedindividualsmaypetitionthePCIAforcreditforactivitiesthatarenotpre-approved.
RecognitionofOtherCertifications

ThePCIArecognizesthattherearemanysourcesofinformationavailabletotheclimbingpublic.AnypersonpossessingacurrentAMGATopRopeSiteManagerCertificationmayjointhePCIAasacertifiedmemberandreceiveaPCIATopManagedClimbingInstructorcertification.Anypersonholdingothercertificationswillbereviewedonacasebycasebasis. BaseManagedClimbingInstructorExamChallengesTheBaseManagedClimbingInstructorExammaybechallenged.Experiencedproviderswhocanprovideevidenceofformalizedinstructioninclimbingmanagementandsignificantfieldexperienceareallowedoneattempttochallengetheexam.Therequirementsforexamchallengesare:
PreviouscompletionoftheAMGATopRopeSiteManagerCoursebutcertificationhaslapsedorexamwasnottaken,or
Greaterthan3yearsexperienceofworkingatleast40daysperyearofmanagingrockoriceclimbingsites.Thesesitesshouldincludeadiversityofareasthatincludebothnaturalandartificialanchors,or
AnindividualmaypetitionthePCIAtobeallowedtochallengetheexambasedonaresumeshowingsignificantexperi-enceandevidenceofformalizedinstruction.(ie.Anindividualwithseveralyearsofpersonalclimbingbackgroundwhoinstructsrockclimbing10–20daysperyearandhastakenatleastsevendaysofformalizedtechnicalcoursesthroughhighlyrecognizedproviders).
PCIA Base Managed Climbing Instructor CourseSample Student Syllabus
Day 1
Introduction and Course Overview 1.0 hr SampleSiteBriefing/LeaveNoTrace 0.5hrKnot and Hitch Overview 1.5 hrs
Participants should be prepared to teach a mini-lesson on any of the following knots or hitches: Figure 8 Family, Over-hand Family, Double Overhand (Grapevine), Water Knot (Tape), Clove Hitch, Bowlines, Munter Hitch, Blocked Munter (Munter Mule), Friction Hitches (Prussik, Klemheist, Autoblock)
Anchoring Principals and Methods 3.0 hrsBase Managed Climb Set Up (Re-directed, slingshots) 3.0 hrs Learning and Teaching Styles, Lesson Planning 1.0 hr
Evening Assignment: Prepare skill and discussion topic lesson plans, practice unfamiliar knots and hitches, set-ups. 10 hrs
Day Two
BelayingSkillsforTopRopeClimbing–generalconcepts,groundschool 2.0hrsBase Managed Belaying 1.5 hrsBase Managed Interventions and Transitions (Re-directed, slingshots) 2.0 hrsSingle Pitch Rappelling System w/ Instructor Belay 2.0 hrs RoleandexpectationsofaClimbingInstructor 0.5hrDemonstration of Lesson and Site Management 1.5 hrsRisk Management 0.5 hr
Evening Assignments: Practice all set-ups. Work on written lesson plans. 10 hrs

Day Three
Equipment Overview and Teaching Topics 2.0 hrs
Detailed presentations on various short topics by students:Belay Device Comparisons; Carabiners Comparisons; Rope, Cordage and Webbing Materials Rope Dynamics; Rope Coiling: Mountaineer coil and backpack coil; Climbing Grades; Reading Route Topos; Instructor Preparation / Pack / Client Pack
Bottom Managed Sites Practice Session 2.0 hrs Professionalism in Instructing 1.0 hr
ImpromptuSiteManagementExercises&TeachingPresentations 4.0hrs45–60minuteseach.Eachpresentationshouldincludeatleast15minutesofteachingand30minutesofsupervisedclimbingonasmallcrag.PossibleTopics:BelayReview,ClimbingMovement,Rappelling,NaturalAnchors,ArtificialAnchors (lottery draw)
Final Debriefs 1.0hrs 10 hrs
Total Course 30 hrs

3
Wall Climbing Instructor Course - 2 days
PCIA Certified Climbing Gym Instructor
Certification does not expire as long as
continuing education is maintained as
below.
CWCI CE Requirements
Every 3 years: 6 hours technical 4 hours educational or 1 day Recert course
Continuing Education
Successfully completes all course components
Pre-requisite required.
Optional Join PCIA as Supporting
Member
PCIA PROGRAMS
CLIMBING WALL INSTRUCTOR CERTIFICATION FLOWCHART
14

4
Certified Base Managed Climbing Instructor
Certification 1 day Evaluation
Base Managed Climbing Instructor Course
3 day course
complete course components to be
Assistant Base Managed Climbing Instructor
Top Managed Climbing Instructor Endorsement
1 day Module Pre-requisites required
Pre-requisite required.
Recertification Requirements
BMCI 1. CEU Option. Within 3 years complete: 8 hrs technical 4 hrs educational or 2. Complete 1 day Update course or 3. Take an upper level AMGA course TMCI and SPCI 1. CEU Option. Within 3 years complete: 10 hrs technical 6 hrs educational or 2. Complete 2 day Update course or 3. Take an upper level AMGA course 8 hrs technical 4 hrs educational or 2. Complete 1 day Update course or
AMGA TRSM Reciprocity Any person certified by the AMGA within the past 3 years will be granted PCIA BMCI certification and a TMCE upon joining the PCIA. Continuing education requirements will take effect 3 years from the date of last AMGA exam. Equivalency option expires 12/31/08.
No Pass. Continued study retake exam
Join PCIA as Supporting Member or greater
Certification Challenges
A one time opportunity is available for
experienced provider to challenge either the BMCI, TMCI, or SPCI
level.
Single Pitch Climbing Instructor Endorsement
2 day Module Pre-requisites required
PCIA PROGRAMS
OUTDOOR CLIMBING INSTRUCTOR FLOW CHART
15

Selected BibliographyThe following texts are excellent resources
Climbing1. Lewis, S. Peter and Dan Cauthorn, 2000. Climbing: From Gym to Crag, The Mountaineers Books, Seattle, WA.2. Cinnamon, Jerry, 2000. The Complete Climber’s Handbook, Ragged Mountain Press, Camden, ME.3.TheMountaineers,1997,FreedomoftheHills,sixthed,TheMountaineersBooks,Seattle,WA.4. AMGA Guide’s Manual: Technical Handbook for Professional Mountain Guides ($25 for members through the AMGA.)5. Bruce Smith, Allen Padgett, National Speleological Society On Rope: North American Vertical Rope Techniques for CavingandRappellers,2ndedition(January1997),NationalSpeleologicalSociety.6.Fasulo,Dave.SelfRescue,FalconPressPublishing,Helena,MT.7.Luebben,Craig,1998,KnotsforClimbers,FalconPressPublishing,Helena,MT.8.Long,John,1998ClimbingAnchors,FalconPressPublishing,Helena,MT.AlsoseeMoreClimbingAnchorsbyLong.9.Shepherd,Nigel,CompleteGuidetoRopeTechniques.10. Hurni, Coaching Climbing, Falcon Press Publishing, Helena, MT.
Adventure Activities / Outdoor Leadership / Education1.Fluegelman,Andrew,1976,TheNewGamesBook,TheHeadlandsPress,DolphinBooks/Doubleday,GardenCity,NewYork.(AlsoseeMoreNewGames,1981)2.Rohnke,Karl,1988,CowstailsandCobrasII,ProjectAdventure,IncHamilton,MA.3.Rohnke,Karl,1984,SilverBullets,ProjectAdventure,Inc.,Hamilton,MA.4.Rohnke,KarlandButler,1995,Quicksilver,ProjectAdventure,Inc.,Hamilton,MA.5.Schoel,Prouty,andRadcliffe,1988,IslandsofHealing,ProjectAdventure,Inc.,Hamilton,MA.6.Armstrong,Thomas,1993,SevenKindsofSmart,Plume/Penguin.7.Graham,John,1997,OutdoorLeadership–Techniques,CommonSense,andSelfConfidence,TheMountaineers,Seattle, WA.8.Drury,JackandBonney,1992,TheBackcountryClassroom–LessonPlansforTeachingintheWilderness,ICSBooks,Merrillville, IN.9.Hampton,BruceandCole,1988,SoftPaths,StackpoleBooks,Harrisburg,PA.
Organizations:
16

Overview - Day 1
Equipment List for TodayHarness, Belay Device, 2 Locking CarabinersShortpieceofrope,pieceofcord6mm>,pieceof1inchwebbing25ftlongFood&waterfortheday
Introduction/Course OverviewProfessionalPhilosophy,professionalexpectationsandethicsWhat does it mean to have a profession?Professionalexpectations Creatingastandardofcare:ExpectationsGuiding, recreational climbing, and instructing distinction; terrain limitationsClient / instructor relationship
Climbing EquipmentKnotswhich knots to teachexamplesofhowtoteachknotsbackup knots
Harnessesconstructing harnessesmanufactured harnesses
Protectionremovableartificialprotection-placement&practice
HomeworkThe Nuts of BoltsSkills for the Educator sectionLesson PlanningEqualizationDiagramsAdministration of Top Rope Programs
Institutional Climbing Defined
Thenumberoforganizedgroupsusingclimbingasaregularactivityhasgrownenormouslyinthepasttenyears.Climb-ingisofferedbyorganizationsasdiverseashighschooloutingclubs,guideservices,summercamps,hugeadventureorganizationsservingthousandsofparticipantsayear,therapeuticrehabilitationprogramsandadjudicatedyouthpro-grams. This “institutional” use of climbing has proliferated because climbing can be a powerful tool. Climbing can help participants to overcome fears, build self esteem, develop a sense of responsibility for self and others, learn to take risks, etc. Climbing is also an enjoyable way to spend some time in a beautiful place and make the most of a day.Institutional climbing is different than its recreational counterpart in terms of structure and safety. Group outings are very structured in all phases of the program. Safety is built into the plan from the time participants are met until the leave. This increase in structure and safety is necessary because the participants are usually novice to the sport, they are in a larger group, and there is a legal and ethical responsibility toward the welfare of the participant. In essence, the casual nature oftenfoundinrecreationalclimbingisremovedintheinstitutionalcontext.Thegrowthofinstitutionalclimbinghasbeenmatchedbyanelevationinparticipantexpectationsandprofessionalstan-dards. Long gone are the days when anyone with a rope and a little climbing know how could simply head out into the woods and run an acceptable program. Although climbing is not a regulated activity, every institutional climbing program is obligated to meet current industry standards of safety and quality. The use of appropriate techniques and technology is agoodfirststepinqualityprogramdelivery,butitmustbesupportedbygoodteachingskills,excellentmanagementandconsistent programming. An institution is operating in a substandard manner if it fails to maintain an atmosphere that is both emotionally safe and personally productive for all of its participants. Climbing has become commonplace in the media and among certain populations. However, our basic resource, climbable and institutionally accessible rock, is limited. Access in many locations is endangered and must be carefully protected. Artificialwallsareausefultrainingtool,butaninadequatesubstitutefortheeducationaladvantagesofthe“outthere”feelof real rock. Institutional climbing programs must adhere to minimum impact ethics and land use regulations. Moreover, ifinstitutionalclimbingprogramsaretocontinueexploitingourlimitedrockresources,theyhaveanobligationtoactivelycontribute to the preservation of those resources. Role modeling and teaching conscientious minimum impact use must be apartofeveryinstitutionalclimbingexperience.The purpose of the PCIA Base and Top Managed Climbing Instructor Courses is to help individuals use the tool of climb-ing effectively in a professional manner.
This course is: A) A source of information for those involved in the creation and management of new climbing programs.B) Aspurtowardsagreaterlevelofstandardizationwithininstitutionalclimbingprograms.Unnecessarily,individu-alizedtechniquesresultinconfusionamongstaffwhoworkformultipleorganizations.Inexperiencedstaffsometimeslose track of the important basic principles amid petty debates over particular knot or belaying preferences. Time saved by reducingstaffretrainingcanbespentgainingessentialclimbingandrescueexperienceorpreparingstafffortheparticularneeds of different participant populations.C. An attempt to debunk some of the myths surrounding techniques. Much of what has worked its way into climbing programs has been drawn from personal or military climbing and is institutionally inadequate, cumbersome, inconsistent or simply dangerous. There are also myths about the liability concerns of climbing programs. Many programs operate in theshadowofunfoundedfears,yetgiveinsufficientconcerntothoseareaswheretheyareactuallyvulnerable.
D) A call to raise the standards within the industry. The basic standards outlined in this course should be achieved andmaintainedbyallinstitutionalclimbingprograms.Climbingprogramscannotbemanagedhaphazardly.Climbinginstructors should be competent with all of the techniques described in this manual. Climbing instruction is a skill which must be practiced, studied and developed over time. If these standards are unattainable, an institution would be advised to contractoutthedeliveryofclimbingexperiencestootherreputable,professionalclimbingorganizations.
This course is not:A) Areplacementforexperienceandmaturityofjudgment.Asafeprogramrequirestheleadershipofpeoplewhohaveadepthofpersonalclimbing,rescue,andinstitutionalexperience.Theattentiontodetailandalertnessthatcomesfrompersonalclimbingcannotbelearnedfromamanual.Experienceinculcatesanabilitytorecognizeanddefusepoten-tially dangerous situations as can arise during a day of climbing or as trends over months of program activity.B) A complete accounting of every detail of effective climbing program delivery. Climbing programs can help ado-

lescentswiththeirselfesteem,executiveswiththeircommunicationskillsorterminalpatientswiththeirgrieving.Successin such particular endeavors requires an integrated methodology of education, teaching and presentation skills. Climbing, if used without deliberate educational intent, devolves into just one more diversion and another lost opportunity. Without thebenefitofacarefullyshapedandarticulatedprogramthatengagestheparticipantonalllevels,climbingholdsthepar-ticipant’sattentiononlyonthestrengthofitsnovelty,ortothedegreethattheexperienceiscovetedasastatussymbol.C) A substitute for professional legal and land use advice. D) The last word on any technical matters. In most situations, the techniques offered will be satisfactory, but the saf-est technique for any given situation must be determined on a case by case basis. Additionally, those who manage or work within a climbing program must keep up with ongoing advances in technology and associated advances in technique and standardization. For any given technique there are alternate, equally useful methods. For the sake of simplicity, this course offers a minimal of alternatives where alternatives are not required. This is intended to promote consistency and ease of learning withinanorganization.
StandardizationDespiteobviousbenefits,standardizationisoftenrejectedonthegroundsthatitsuppressesthecreativityamonginstruc-tors needed for good teaching and the innovative resolution of problematic situations. The fallacy of this objection lies in its failure to distinguish between the proscription of non-prescribed action and the prescription of principles that can be easilymet,butwhichdonotlimitindependentaction.Ifanemployeeistoldthatallanchorsmustfulfilltheprincipleofredundancy, that employee is not restricted in their freedom to coordinate and frame the day’s activities. Neither is the in-structor prohibited from improvising any assist or rescue that might be called for. Any instructor who insists that they must beallowedtotieonetypeofknotratherthananother,whenthechoiceofknotshasnobearingontheparticipantexperi-ence,failstograsptherealchallengesoftheirinstructionaltask.Creativitycanbeprofitablyexercisedintheinstructor’seffortstoorchestrateagoodexperience,nottotryoutanovelanchororanunusualactivity. Standardizationhelpstoensurethatallstaffknowatleastonecorrectmethodforaccomplishingagiventask.Ihaveworkedwithseveralinstructors,forexample,whohadavagueknowledgeofseveralbelayescapes,butwhocouldper-formnoneofthemwiththeconfidenceandfullworkingknowledgerequiredfortheiruseinunusualorstressfulsitua-tions.Athoroughknowledgeofasinglemethodismoreusefulthanasuperficialknowledgeofmany. Theareasoffreedomandlimitationthatinstructorsworkwithinmustbeclearlydefined.Asmallcompetentstaffcanbepermittedtochooseclimbingsitesanchorarrangementsattheirowndiscretion.Withalarge,mixedstaff,itisnecessarytoclearlyidentifyaspecificnumberofappropriateclimbs,rappelsitesandthesetupanduseofthosesites.Instructorsemploytechniquesthatareunfamiliartootherstaff.Thedangerinthisisthatlessexperiencedstaffmayas-sumethatthosetechniquesarepreferableorexpectedandattempttoimitatethemwithoutfullcomprehension.Ionceobserved an instructor “belaying” a climber with a rope simply passed through a carabiner on their harness. When I asked himwhathewasdoing,heexplainedthathehadseenotherinstructorsbelayingthatway.Whathehadobservedwasotherinstructorsbelayingwithamunterhitchonaparabiner.Beingyoung,inexperiencedandunable(orreluctant)toadequately identify his own weaknesses, he had attempted to imitate the technique without having any idea of what he wasdoingoraskingsomeonetoshowhim.Whenindividualsarehiredforworkthattheyarenotparticularlyexperiencedwith,asfrequentlyhappensinthisfield,theymayhavedoubtsabouttheirowncompetency.Thesedoubtscaninterferewith judgment and the honest reporting of incidents and near misses. Its essential that a program manager knows what is really going on in the climbing program. Employees must trust that their employers are on their side and eager to help them learn. It must be clear that you are not out to feed your own ego by catching other’s mistakes. Intelligent, reasonable instructors make ludicrous mistakes. Mistakes of the same type are madeinanyoffice:mis-transferingcallsorbreakingthecopyingmachine.Yourtrainingsmustacknowledgetheinevita-bilityofmistakes,whileemphasizingtheneedforthemeticulousandconservativeattitudenecessarytocatchandcorrectmistakes before they lead to serious injury. TierneyandApirion,1998.

Professional Expectations Philosophy, Ethics and Program Administration:
What does it mean to have a “profession”? (From Michael Swiderski): 1.2. 3. 4. 5. 6.Othercharacteristics,etcofaprofession?
Professional expectations•Teachinguptodateandaccurateinformation•Maximizingclient/instructorsafety,minimizeimpactontheenvironment,othervisitors,localplantandanimallife.•Practicewhatyoupreach/rolemodeling:conditionofpersonalgear…technicalskills,movement,attitude,safety,enviro.We’reheldtohigherstandardsasprofessionalsanditisexpectedthatwereflectthesestandardsevenwhenwe’re not working.•Anabilitytoapplyconceptstodifferentareas,tosystematizeandgeneralizetopicsrelatedtotheTRfield.•Assessmentofterrain–isitappropriateandadequate?TRinstructorsneedtobeabletorecognizeterrainthatisandis not appropriate for a given client group, including approaches and descents.•Personalskillandclientskills.Aretheyinsync.witheachother?•Developingaprofessionalcareer:Itispossibletomakeoutdoorinstructionacareer.•On-goingeducation•Additionalguidetraining,conferenceworkshops:AMGA,AEE,ICORE,RiskManager’s,others•Otherskills:people,medical,outdoor,environmental
Creating a standard of care
•Safety-bothphysicalandemotional,atalltimeswhileunderyourcare.•Transferablelife-longskills•Positiveexperience•Goalsofcourse:areyouawareofwhattheyareandaretheybeingfulfilled?•Areyouprovidingwhatyourclientdeserveandexpect?•Comfort:acomfortableclientismorecapableoflearningandhavingapositiveexperience,peoplerememberdis-comfort!•Time:allowtimeforsiteprep/takedown,organizeclimbing/rappellingsequences,thinkthroughclimbingorder.End with them wanting more.•Planning:“tonothaveaplan,istoplantofail.sitevisit,approach,skillinstruction,set-up,climbs/rappels,takedown,debriefing,eating/personaltime,otherusers.•Easiertoaddaclimborskillratherthantakeawayonethatwasexpected.Considerlimitingtimeofeachperson’sattempt Make a written plan
Guiding, recreational climbing, and instructing distinction; terrain limitations•Youaretherefortheclientsandforthegroup.•Thiscertificationassumesnoleadingrequiredtoset-up,singlewhereaccesstothetopisnon-technical•3rdclassterrainisfixedratherthanshort-roped,fixedareusedon3rdclassterrainwhereasguidesmayelecttoshortrope
Client / instructor relationship•Establishparameters(roles,peers,male/female)•Whatistheclientexpectation?•Oncliff/offcliffbehaviors•Avoiding“pet”students,involvingeveryone•Rolemodeling:technicalskills,movement,attitude,safety
Administrative issues: (also see administrative practices handout in the back)
20

•Legal:Liabilities, informed risk, do everything you can to get participants and guardians to understand risk (video, photos, ver-bal, etc.)...
•Client Orientation:Occurs everywhere from initial marketing to after the activity - in marketing and registration, initial contacts, meeting in-structor, site orientation. Materials, program statements, and curriculum must by in synch with each other and with client objectives.
•Equipment record-keepingThisisdonemanydifferentwaysdependingontheorganizationanditsneeds.Ropelogsareusedbysomebutarenotrequired–allorganizationsneedawrittenpolicydescribingtheirprocedureforinspecting,maintainingandprocuringequipment.Useofpersonalgear–allowedornotallowed?
•Medical trainingWFR,CPR,familiarwithgenericproblems.WFRisrequiredforTRSMsifoperatinginthewildernesscontext(2ormorehoursfromdefinitivecare).First aid kit - be familiar with contentsMost important piece of gear is the brainMedicalScreeningProcess–allprogramsneedone.Whatisyours?Guide’sroleinscreeningprocess:youarethelastsafety valve for the program is something has been missed. Know and understand your programs screening system. Carry participant’s medical information (if your program solicits it), and all pertinent emergency contact information.
•Program goals and boundariesAreyouactingintheclientinterest?,yeartoyearconsistency-whatwillnextyear’sstaffbecapableof?
•LNT (LeaveNoTrace)practices,SiteSelection&newsitesuitabilityImpact potential / access: environmental, people, site hardness, trees, birds, etc; teach skills at different location away fromclimbingsite,limitinggroupsize,numberofropes/anchorsinuse.Terrainclassification,typeoftopropesite–baseortopmanaged?Legal access, insurance, reservationsCliff cleaning: initial and seasonal: How much is too much?local issues: Clean up days, sharing sitesSharingropes:oktoshareroutesbutdonotshareanchors(unlesssharingafixedpiecesuchasabolt)orropes.
•LNT environmental briefing: walk on hard surface, avoid feeding critters, food scraps, digging in dirt, dogs, avoid nestingareas,pee/poop,minimizegroupgearatcliff/keepitinonelocation
•Courtesy Issues: share climbs but not ropes, be capable of moving quickly onto and off routes, set limits, teach quite communication and use names. Some groups shouldn’t be brought to certain sites. LNT trainer or master training for certain staff.
21

Learning and Teaching Styles: the climbing instructor as educator
“Understanding one’s own magical mystery is one of the teacher’s most important assets if he is to understand that every-one is thus differently equipped.”—Buckminster Fuller
One Model:Concrete Experience (“The Doer”)These people tend to be pragmatic, practical and functional; they are searchers who see a purpose in learning; they are good problem solvers and work well with others. The Doer is constantly on the move. Standing and waiting are not pro-ductive.Heorshewillbeseenanxiouslyplayingwithgear,clickingcarabiners,andpullingonholdsuntiltheycanclimb.Nothing other than doing is worth attention.How might you best teach this person climbing related skills?
Active Experimentation (“The Feeler”)Peopleofthisnaturearereceptivelearners;theylearnpredominantlythroughgutintuition.Theytrymanythingstofinda way. They tend to be emotional. They learn by doing and evaluating on the way. The Feeler is doing-oriented though they will be far more sensitive to the connection between what is done and sequences. This learner is aware of similari-tiesanddifferencesofexperiences.Theyareparticularlykinestheticandwilllearnsportseasilybecauseofastrongbodyawareness. The student loses interest in talking and analytical instruction and will be easily lost. They need to be engaged, feeling and sensory have great value. How might you best teach this person climbing related skills?
Reflective Observation (“The Watcher”)People in this category like to get the picture, like to know the purpose of practice. They need to watch others, are good listeners, introspective and contemplative. The Watcher tends to hang back in the climbing class studying everyone’s per-formance. This provides the essential guidance necessary; they emulate what is seen. Role modelling is very important. Talk is largely useless unless verbal directives create images of a valuable nature. This type of person may wish to climb last.How might you best teach this person climbing related skills?
Abstract Conceptualization (“The Thinker”)Such people are analytical, logical, thorough and theoretical. They would rather listen to lectures, are often loners or dreamers. At times they are meticulous to a level of obsession. The Thinker is the type of climber who has read ev-ery book about climbing long before the class. He may be full of “shoulds” and “should nots.” They will need detailed information from the instructor for understanding. Breaks in instruction are welcome forums for this person to press the instructor for more information.How might you best teach this person climbing related skills?
Another Model: Three learning types: visual, verbal/auditory, kinestheticAnother Model: Thomas Armstrong’s Seven Kinds of Smart
Summary:Thoughweareallmixturesofeachlearningstyle,mostofushaveadominanttechnique.Sincewetendtoteachbesttothewaywelearn,itiseasytoseewhyinstructor/studentincompatibilitysometimesexists.Forateachertobemosteffec-tive, they need to be aware of styles and practice instructional methods appropriate to each. Careful observation will soon allow the instructor to pinpoint how a student best responds.
Athleticcoachingtranscendsadominatingpreoccupationwithmechanicalanalysis.Theharmoniousmixtureofmotorcontrol, awareness, self-perception, imagination and spirit is the secret of top performance. Knowing about these elements
22

SyStemizAtion
generAlizAtion
ApplicAtion
memorizAtion
comprehenSion
Educating for Success - Blume’s TaxonomyLearning / Teaching Hierarchy Memorization when new to subject matter sequences rules of the game
Comprehension canexplaintheactionorsequence(youcancheckthisthroughquestioning) Application usesinspecificsituations able to transpose to different setting encourage people to think of common applications anapprenticeinstructorlikelyfitshere
Is this where the difference between learning / teaching begins?Generalization adapts to new environments / situations. This instructor really needs a lesson plan to focus
Systemization improves and integrates methods, as a teacher, each lesson is different This is lead instructorA client can only go as far as they want to and as far as you can take them Your teaching ability is limited by your ability.Question: At what level of understanding should an outdoor instructor be at?
23
First the ClientByDougRobinson–UsedwithpermissionGuiding begins long before you meet the client. There’s a letter, a voice on the phone. Listen. Listen and feel. Who is this person? What does he or she want? And why? Why are they climbing? Why with you? Without asking any more than “So, tellmeaboutyourexperience,”youwilllearnmanyusefulthings.Istherefearmixedwiththedesire?Good!Itwillbeuseful to you. You can harness that fear to help power your safety program. Client assessment has already begun. From this, and further half-blind sessions before you know the face, you will set the tone, energy level and goal of this new client’s trip. Pick a project, set the pace toward it. And be ready for a discreet downshift to less ambition since a lot of people appear hotter on paper than they turn out to be. The sort of professionals weoftenattractareexperiencedatsmoothlysellingthemselves,whichincludestoyou.Ontheotherhand,somehavebeen too modest, even to themselves. You will need to push them, pump them up, sometimes even sandbag them into real-izingtheirpotential.Butambitionisonlyoneofthedimensionsyouwillmeetinclients.Oneofmany,andyouwilllearntorecognize,navi-gate,eveninfluencemoresidesofapersonalitythanyoucannowname.Welcometothehumansideofguiding.Here,you’rethepsychologist.Thisismoresubtleanddifficultthanfootworkandropecraft. But it’s so important that your personal assessment of the client will determine how and when those traditional skills are presented. If you do your assessment carefully and tune your response to the client based on what you learn, then anhourafteryou’vefinallymet,thatclientwillbefollowingbehindyoumarvelingathisgoodfortunetofindaguidewhoissodowntoearth,easytogetalongwithandsensible–inshort,somuchlikehimself/herself.Hello?Hello?A38–year-oldlawyerisontheline.Family,Midwest,marathons,skydiving.Deceptivelycasualvoice.Give me adventure, brand-name summits. Push me ‘till I drop, then listen to me muse about whether I should have gone your direction after college instead of to law school. It’s a good question. Administer double dose of Camp 4 stories; he is devouring your lifestyle with a midlife appetite. It is soon apparent that he wants to have climbed something famous more than he likes to actually climb. He hugs the rock, but will jump at a week in Wyoming if you’ll just promise him two of the Fifty Classics. Hello? A mining engineer and closet environmentalist. At 74 he can still lead 5.7 and climb 5,000 feet in a day. I know this is true because we have been climbing together nearly 20 years and are good friends. I choose a route for him here or pack my ski bag to go to France. There are still some challenges: I haven’t found a strategy that will get him to drink during the dayoreatafteralightlunch.Sobewarethefivepmhypoglycemicrage.Also,wedon’ttalkmuchpolitics.Hello? Here is a teenager, eager but shy. He doesn’t quite know what to ask, how to be cool. Soon you will also talk to momordad.Sonwantstohearadventure,parentsaretunedtoresponsibility.Hewantstodofirstascentsbeforehecandrive. That can be arranged, but I’m more concerned that he learn to build a belay anchor, start training now to avoid tendonitislater,figureoutthatclimbscomeattachedtomountainsaswellastogymwalls,andunderstandthatclimbingsafely is the coolest of all. Hello? Another teenager, autistic, whose parents called in desperation because the only chink in his armor of passivity is climbing.Elegantdinnerwiththefolks;anafternoonwithhisshrink.ThefirstreactionIgotoutofhimwasfromrear-ending another car with his father’s new pickup. Not ideal but it did jump=start communication. I had a lot of one-sided conversations on our climbing trip, and took him home dejected at lack of progress. But no! “he’s so much better, will you take him for the whole winter?” I learned that my standards for a client’s progress are not the ones that count.Hello? 30-year-old sport climber. Leads half a grade harder (5.12) than I’ve cared to try. Wants big walls and swinging leads. We go up on Sentinel, the Steck-Salthe for a day. Water bottles taped to our racks and no day packs, in deference tothosetightchimneys.Buteven5.9withallthatexposureprovestobeawholedifferentstory.Afterthreepitchesit’sallmylead.Eighteenpitchesofenduranceisevidentlyanewidea,too.Webivyaroundafireonthesummit,waitingformoonlight to illuminate the tricky, brushy descent gully. Hello?PleaseholdfortheDoctor…Asurgeon:arrogant,authoritative,adrinker,55yearsold,oncewasaclimber.Maybe you’d be arrogant too if you saved lives every day before breakfast and if you had a small army of technicians who jumped at your every command. Here the dream of ascent is alive, but so is the spare tire. I’ve seen this one gulping amphetamines on top of a 12,000 pass, the spit frothing blood. Three hard days from anywhere makes a tough spot to be in. Fortunately, lower altitude arrived before too much physical damage. But there’s emotional damage here, too. He’s groping for some key understandings lost along with is carefree youth in the mountains. The right peaks and quality belay anchors are not going to satisfy this man. Who’s the Doctor?Walk into a mountain shop in Kansas and here’s a beginning class. Twenty of them, middle aged and casual; a third wom-en,afewkids.LookingoverthegroupIjusthavetoadmirethesepeople.Thishalf-crazydesiretoclimbhasbrokenintotheir ordered and settled lives and brought them in here tonight. They too crave a measure of adventure. And they have
24

fear. The Drop, the Void, are never far from their minds. What can I say to them? Honestly, I too get afraid. And I respect that fear. It’s healthy, it’s there to keep me alive. Here, let me show you slides of kids climbing. Remember? We all used to dothisinstinctively.Nowlet’stalkabouthowstrongclimbingropesare…These clients are all very real. I have guided each on them, some repeatedly. Why make up hypothetical client person-alities when such vivid ones come tumbling out of memory? There have been hundreds more, each a bit different. All unique, all yearning and dreaming. You are hired to facilitate the dream to carve it onto stone. The part about bringing bothofyoubacksafelyisprettysubliminalhere.Justdoit–unobtrusively–allthewhiletellingastoryaboutthetimewhen…Isitobviousbynowthatassessingclientsisyourfirstorderofbusiness?Andatallorderatthat.Adaptingwhatyoudo–and,almost,whoyouare–towhattheyneedandwhattheywant,beginslongbeforeyoustepforwardandtieontoaropewith them. The fortune of your guiding business, not to mention your health and safety, will depend largely on how well you come to understand these people, your clients, and your agility in helping them to live their dreams.
25

Approaches to Teaching and Learning
Inquiry / DiscoveryInquiry: Questioning: Whydobelaysfail?Isthereabetterwaytobelay? Investigating: Do belays fail? Is there evidence Analyzing: Whatsimilaritiesexistbetweenfailures?
Discovery Interpreting: What does this mean? Is there a better way to belay? Understanding: ExplainConnections Answering: Here is a better way.
andthecyclecontinues....continuingquestioning,relationships,etc.unlikescientificmodelwhichsticktoonequestion.
best for concepts
Learning Gradient: Must go beyond telling...“I hear and I forget, I see and I remember, I do and I understand, you ask me and I know!” Telling Showing Doing: participant practices and is evaluated Questioning answersquestions
Socratic- involves questioningRecall: basics such as identifying, naming, selectingProcess: reason for the answer analyzing,comparing,contrasting,inferring,orderingApplication: producesexamplesshowingunderstanding judge,speculate,predict,experimenting eg: What’s wrong with this picture?
26

Use and Abuse of the Clove Hitch
Over the last few years at courses and exams there has been considerable discussion over the use of the clove hitch in guiding situations. Reported, but unconfirmed, testing by the Department of Defense indicated that it was possible for the knot to slip at 700 to 1200 pounds of load and for sheath destruction and core damage to occur at 1200 to 1400 pounds. Consequently some guides felt that there was little point in having a secure, bombproof anchor if the attachment to it was the weakest point of the system—it was better to use an alternative knot in all circumstances.
To get more information the AMGA contacted Bluewater, who agreed to test the clove hitch. The tests were performed under the following conditions:
• A HMS-style carabiner was used
• Test method Mil.Spec. l91A was followed
• All rope was new and of Bluewater manufacture
• All hitches were tied so that the load was applied next to the spine of the carabiner
• A slow static pull was used rather than a dynamic load
When the knot was tied incorrectly, with the load strand farthest away from the spine of the carabiner, it was found that the knot tried to align itself with the spine at 250 Ibs., and carabiner failure occurred—before rope breakage—at approximately 38% below the carabiner's rated strength.
Several factors influence the specific application of these results; namely, the limited number of tests performed, the use of new, rather than used rope, and the use of a static instead of a dynamic load. But some generalizations may be made.
Correctorientation
Load
Incorrectorientation
Load
121
Use and Abuse of the Clove Hitch
27
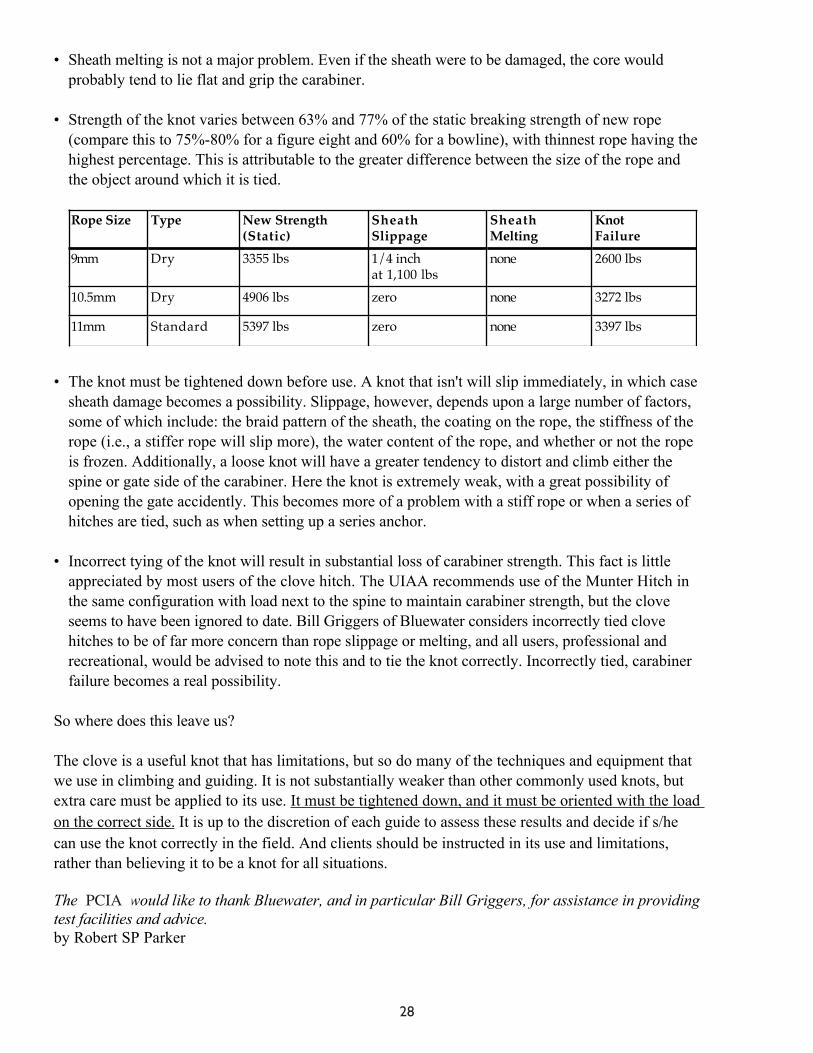
• Sheath melting is not a major problem. Even if the sheath were to be damaged, the core would probably tend to lie flat and grip the carabiner.
• Strength of the knot varies between 63% and 77% of the static breaking strength of new rope (compare this to 75%-80% for a figure eight and 60% for a bowline), with thinnest rope having the highest percentage. This is attributable to the greater difference between the size of the rope and the object around which it is tied.
3397 lbsnonezero5397 lbsStandard11mm
3272 lbsnonezero4906 lbsDry10.5mm
2600 lbsnone1/4 inchat 1,100 lbs
3355 lbsDry9mm
KnotFailure
SheathMelting
SheathSlippage
New Strength(Static)
TypeRope Size
• The knot must be tightened down before use. A knot that isn't will slip immediately, in which case sheath damage becomes a possibility. Slippage, however, depends upon a large number of factors, some of which include: the braid pattern of the sheath, the coating on the rope, the stiffness of the rope (i.e., a stiffer rope will slip more), the water content of the rope, and whether or not the rope is frozen. Additionally, a loose knot will have a greater tendency to distort and climb either the spine or gate side of the carabiner. Here the knot is extremely weak, with a great possibility of opening the gate accidently. This becomes more of a problem with a stiff rope or when a series of hitches are tied, such as when setting up a series anchor.
• Incorrect tying of the knot will result in substantial loss of carabiner strength. This fact is little appreciated by most users of the clove hitch. The UIAA recommends use of the Munter Hitch in the same configuration with load next to the spine to maintain carabiner strength, but the clove seems to have been ignored to date. Bill Griggers of Bluewater considers incorrectly tied clove hitches to be of far more concern than rope slippage or melting, and all users, professional and recreational, would be advised to note this and to tie the knot correctly. Incorrectly tied, carabiner failure becomes a real possibility.
So where does this leave us?
The clove is a useful knot that has limitations, but so do many of the techniques and equipment that we use in climbing and guiding. It is not substantially weaker than other commonly used knots, but extra care must be applied to its use. It must be tightened down, and it must be oriented with the load on the correct side. It is up to the discretion of each guide to assess these results and decide if s/he can use the knot correctly in the field. And clients should be instructed in its use and limitations, rather than believing it to be a knot for all situations.
The AMGA would like to thank Bluewater, and in particular Bill Griggers, for assistance in providing test facilities and advice.by Robert SP Parker
122
pciA
28

How to Tie the Munter Hitch
124
How to tie the munter hitch
29

Prusik hitch Klemheist hitch Autoblock
Bachman hitch Penberthy knot
Friction Hitches
30

31

32

33

34

35


Overview - Day 2
Equipment List for TodayMorning - coursebook, chairAfternoon - helmet, harness, belay device, all the gear you’d need to set up a top rope
Participant FearsSequencing,LessonPlanning,Briefinganddebriefing
Climbing Equipment (cont from Day 1)Permanentartificialprotection-boltingquizNaturalanchors-BFT(BigFriendlyTree)&BFR(BigFriendlyRock)SlingsCarabinersPadding and sheaths
AnchorsSelfEqualizingAnchor(SEQ)Pre-EqualizedAnchor(PEQ)The redundancy Myth
Practice of Anchor Sytem Construction for Bottom Managed Top Ropesextendingoveredge-abrasion,cleanrunningclimbingrope,#ofcarabinersatmasterpoint
Instructor Rappel Over the Edge
Homework:Releaseable Rappel diagrams
37

FEAr - A POwErFUL EMOTIOn - TrAInIng wOrkSHOP
Fear is present in many instances in rock climbing. Some of the common fears related to top roping include fear of falling, a fear of not knowing where to go, or a fear of the material or belayer failing. Although fear is related to risks, instruc-tors must be sensitive to a participant’s feelings of fear. By assisting a participant to understand imagined vs. real risk, the instructor will be better able to aid a person in overcoming a given fear.
Definitions:
Stress-arousesanxietyandfear
Anxiety -unknown&vague,unfocused,distant&lesscontrollable,apprehensionwithoutspecificstimulation(nuclearwar, going broke)inabilitytoforesee—>anxiety(“mostpervasivepsychologicalphenomenaofourtime-Levitt,1980)
Fear -morespecific,immediatelyresolvable Instinctual: ie. encountering a snake Learned:ie.socialfearofnotfittingin.
—>Fear can be a catalyst for change
In adventure education, participants are often placed in an activity that has a high degree of either real or perceived risk. Bylearningtounderstandandcopewithfear,apersonmayattaingreaterconfidence,disciplineanddecision-makingabil-ity. These skills are then transferable to better handling of life situations.
Efects of Fear:Subjective: Cognitive items and feelings Outwardexpressions: -negativeexpectations -decreaseinconfidence -decreased concentration -disrupted attention -talkative, irritable, forgetful introvert -tend to say they are more fearful than actually are
Physiologic Changes: (Adrenalin release —> muscle use —> sugar use —> FATIGUE) OutwardExpressions: -Increased pulse, respirations, etc. -tend to appear less afraid than they actually are
Responses to Eliminate Source: -Freeze -Fight -Flee -Feign Death (false belief in equipment failure)
What are Participant Fears?
BrainstormingActivity(10minutes)–insmallgroups,spend10minutesbrainstormingabroadspectrumofspecificfears/anxietiesthatyouwouldexpectaparticipantwhoisintendingtogoononeofthefollowingtripstohave.
Interesting Points from Research38

Fear Reduction / Coping Durability: In almost all cases post course fears were less than baseline fears. —> Adventure education does help people approach fear in a more healthy manner and improve coping mechanisms. Areas of concern centeraroundperpetuationofselfconfidence:Letting self down Not having enough personal abilityMaking wrong decisions Money’s worth (fear increased but could not interpret meaning)
Gender:Withoutexception,femalesreportedhigherlevelsoffearfulness.Thismaybeduetosexrolestereotyping(Leary,1983)withmalesbeinglesspronetoadmittingfear.Noworksuggeststhatfemalesaremorepronetofearthanmales.** NOTE: Females of a group may more accurately portray the true feelings of the group relative to fears.
Age: Higher levels of fear in younger ( <21 y.o.) students, particularly in social based fears (agrees with other research on age variables). However, older people also tend to take shorter courses which may account for reduced levels of fear sincetimeexposedtoitisless.
Dealing with Student FearsBrainstormingActivity(10minutes)–Insmallgroups,identifyspecificfears(problems)andspecificactivitiesthatcanbeused to reduce/address the fear.
Group A: Time Period Prior to actual initial instructor contact.GroupB:Initialcontactthroughstartofcourse(firstmeeting)-typicalofcollegeoutingGroup C: While on course
Clinical Methods for Reducing Fear:SystematicDesensitization:gradualexposure,(technicalsystems,rockslabs,verticalterrain)Flooding: as in disaster (need to provide coping mech)Modelling: observation of effective fear coping in others (ie. watching you climb)Rehearsing: requires pre planning, (ie. Fear in a Hat, simulation)
**Combinationofdesensitization,modelling,rehearsingtoworkbestinoutdooradventure
Suggestions for Fear Reduction•Goalistohave“HealthyFear”,nottoeliminate-understandsrisk,hascontrol(here&now)•Mostdramaticchangesoccurwithin48hoursofcourse.•Whenfearlevelbecomestoohigh,relevantcuesaremissed•BECONSCIOUSOFABUSE:Considerallofthefearsinone’smindduringanactivity.•Verbalpersuasionisleasteffectivepathwayforpeopletogaininfo.abouttheirabilities. Ie. “it’s okay”, “some of you will, some won’t”•Relyonactualperformancetoinhibitfear&failure
Fear Formula: Fear = Perceived Risk (Information Requested less Information Supplied) The LESSON: provide information!
PriortoContact: Emphasizepeoplenotactivities,itinerary,menusamplesFirstActivities: SlideShoworvideo...Expectedfears...lettersofsupport...acuratelyportrayactivies
Oncourse: StayinthePresent...Discussfearsinlowkeymanner...Recognizeandconfrontexpected fears...Use a Fear Scale before, during and after a climb...Play Fear in A Hat (concerns)... When I get there I will think back...Focus breathing (somatic)...insure success and failure findthepositiveandbuildonit...avoidfearofgroupfrompersonalfailure... don’t allow a failure to lead to fear Progressive/successexperiences-propersequencing!
39

Sources:Bunyan,Pandothers(1990).ChangesinAnxietyPriortoFirstExperienceWhiteWaterCanoeing.Adventure Education and Outdoor Leadership,Vol7(3):29-30.Ewert,Alan(1989).Outdoor Adventure Pursuits: Foundations, Models, and Theories.PublishingHorizons,Inc.Ewert,Alan(1988).TheIdentification&ModificationofSituationalFearsAssociatedwithOutdoorRecreation.Journal of Leisure Research, Vol 20 (2): 106-117.
40

Full Value ContractBreaking up the words FVC into two separate parts; full value representing a person’s total worth or “total value” and the way the group can maintain each other’s full value without lessening it or damaging it. The word Contract representing the verbal promise made within the group and incorporated by the group throughout the remainder of the week. Thus, you havetheFullValueContract.TheFVChasfiveparts:
Challenge by choiceIn any group there is often the predicament of a camper (or staff) forcing or “egging on” another camper into doing some-thing the other camper does not want to do. Challenge by Choice is the idea that “it’s your choice to participate, but we challenge you to make the right choice”. This concept works best if a range of ways to participate are offered.
100%Representing the highest amount of effort any individual can give, 100% is the individual’s full potential. If the participant commitstogiving100%,thenthatpersonhaspromisedtogivetheirbest.Thegroupshouldrealizethateveryone’s100%is different and can change throughout the day.
No DiscountingWhile on the program participants are encouraged to refrain from any form of discounting or “putting down” of others.
Stop Rule“Stop” empowers the participant control over the situation. The participant uses it if he’s feeling that something is wrong emotionally or physically with themselves, the group, or the situation. The group then turns their attention to that person and addresses what is wrong.
Caring RestraintAn important rule, and often the hardest. Caring Restraint applies to the participant who is willing to take a step backward in order for someone else in the group to take a step forward. If someone in the group is really good at doing something, if someone in the group is used to the spotlight most of the time, then that person’s biggest challenge for the day might be to passthetorchontosomeoneelsewhoisn’tasnoticed.Foryoungadultsthisisanexperiencethatifexercised,canblos-som many individuals
41

The nature of the Adventure Experiencea model commonly used in adventure education
LEARNERdeliberate undertaking - motivated - committed pastexperiences-personalability-Needsanddesires
is placed into
UNIQUE ENVIRONMENTNew physical environment, new people
is givenINCREMENTAL CHALLENGESconcrete, manageable - problem solving - draw on mental - physical - emotionalresponsibility - require decisions, actions, results
mixinsomestress/anxietycoping - succumbing - thriving
solved withNEW SKILLS
IE: belaying, rappelling, techniquewhich leads to
MASTERY / COMPETENCYbecause of the above
coupled with opportunity for
REFLECTION / CRITICAL ANALYSISretelling - creation of personal theory / philosophy - leads by analogy to other applications
leading toGROWTHself-awareness - self-esteem - social - acceptance of others - approach to life
42

The Experiential Learning Cycle


The Comfort Zone
Steppingoutofthe“comfortzone”isoneofthecornerstonesofadventureprogramming,becauseoutsideofthecomfortzoneiswherepeoplegrowandlearn.Outsideofthezoneiswhereuniqueoutcomesandcreativeanswersappear.Asafacilitatoronemustbeawareofwhatisinthecomfortzone.andtheprocessofencouragingaparticipanttostepoutsideofit.Insideonescomfortzoneeverythingissafe,known,familiar,secure, comfortable, competent predictable, while on the outside is the complete opposite and everything is unknown,unfamiliar,uncomfortable,risky,unexplored,andunpredictable.Theparticipanthasachoicetoeitherstepoutsidethecomfortzone,ortheyretreatbackinside.Thischoiceoccursatthe“edge”ofthecomfortzone.Howtheyhandletheedgeduringanadventureexperienceoftendetermineshowtheywillhandletheedgeofthecomfortzonebackhome.
Breaking Through the EdgeThe edge is an area of much confusion. There are a number of things that are involved in assisting a participant inbreakingthroughtheedgeoftheircomfortzonebothduringtheadventureexperienceandinotherareasoftheirlives.Theseitemsarehope,constructiveanxiety,asenseofunknown,perceptionofrisk,effort,andtrust.
Hopeexistswhenanindividualviewssomethingasawaytoeliminateaproblem,healawound,orfulfillaneed.Participantsexpectapositiveoutcomeorgoalattainment.
Effortenablestheparticipanttofocusonphysical,emotional,andmentalabilitiesintheexperiencetoprovidemotivation for change to occur. This can take the form of encouraging effort/risk taking.
Trustresultsfromanappropriaterelianceandconfidentdependenceonothers,one’sself,theleader,andtheexperience.Ahigherleveloftrustresultsinmorefocusedeffortduringtasks.
Constructive Level of AnxietyAnxietycausesanindividualtoexperienceanumberofemotionssuchasambivalence,confusion,dissonance,discomfort,frustration,andstress.Whenanxietyisusedwithintherealm
45

of a safe and constructive environment it can assist clients in breaking down old behaviors and developing new morefunctionalchange.Anexampleofthisisablindfoldorotherformsofhandicapping.
A Sense of the Unknown or Unpredictable Challenge is often increased when the experience is unfamiliar, unknown, or unpredictable. A participant should be encouraged to accept their feelings of uncertainty. An example is an “I don’t know” response to participant’s questions.
PERCEPTION OF RISK ExISTS WHEN PARTICIPANTS PERCEIVE THE ExPERIENCE AS SOME FORM OF RISK. DURING PROCESSING INCLUDE DISCUSSION OF PERCEIVED RISK VERSUS ACTUAL RISK AND HAVE THEM COMPARE THE TWO.
46

Sequencing, Briefing and Debriefing Activities
SequencingThesequencingofactivitiesisoftenacriticalfactorinaninstitutionaladventureexperiencewhenpersonalandsocialoutcomesaredesiredinadditiontoarecreationalexperience.Sequencingprovidesanorderofactivitiesappropriatetothegroupsneedsandgoals.Activitiesshouldbuildandflowsmoothlyuponprioractivitiesandshouldbetailoredtotheindividuality of each group. Planning Considerations for activities: Groupsize GroupsMakeup-age,physicalcondition,ect..Group Goals Type of Group ( Do they know each other, total strangers?)Time frame WeatherYour comfort level with the activities Available elements and props
Allofthesefactorswillplayintotheagendayoudesign.Alargepartoftheexperienceisdeterminedbyyourmood,com-fortlevelandpersonality.Maketheagendas,fitnotonlythegroup,butyourneedsaswell.
General Planning Guidelines-Plan more activities than you think you will need.-Planatleast1houroffieldactivitiespriortogoingouttotheclimbingsite.-Plan on processing time.-Be ready to adjust your plan to the needs of the group.
Abitofforethoughtintoactivitysequencinggreatlyimprovestheflow,productivityandoutcomeofaneventorcourse.The following sequence is often succesfully used in adventure programming. As a climbing instructor, you should be aware that these sequences may be in use by leaders bringing groups to you and able to provide appropriately sequenced activities if needed. In some cases, the whole sequence may be offered over a period of a few hours or it may be spread over days and weeks.
ExcellentresourcesmaybeobtainedthroughProjectAdventureortheAssociationofExperientialEducation.
Acquaintance / Ice Breakers - Begin feeling comfortable, minimal problem solving and verbal interaction, encourage interaction and promise of new learning&unknowns,FUNN–functionalunderstandingnotnecessary,facilitatormanagedforsuccess.
Objective: Activities that allow the group members to get to know each other and to become more comfortable with each otherandtheexperience.Sampleactivitiesthatcanbemodifiedforclimbingactivities.Dyads/Mirroring,GearTosstoWarpSpeed,InfiniteCircle,BelayElbowTag
De-Inhibitizers-reintroduce“play,”relaxandloosenup,initiaterisktaking,smallamountsofrisk(physicaloremotional),funactivitiesthat help the group see themselves as capable, success and failure are not as important as effort, cooperative and support-ive in nature.
Objective: Activities that provide participants the opportunity to take a risk, to encourage an atmosphere in which it is ok, evensupported,toappearineptor“sillyinfrontofothers.Sampleactivitiesthatcanbemodifiedforclimbingactivities.2 person mirrors, Human knot.
Trust Activities -physical&emotional,groupinteraction:physicalandverbal,involvesupportandcaringforgroupmembers,involvefun, risk, and fear, activities are sequenced deliberately to slowly build trust with in group. Trust will evolve differently for each individual within a group. It is not always a universal feeling within a group. Trust will often cross into someone personal boundaries and the Challenge by Choice idea must be stressed in these activities.
Objective: To provide group members the opportunity to trust their emotional and physical safety to other group members.
47

SampleActivitiesthatcanbemodifiedforclimbingactivities:Belaying,WillowinWind,LadderWalk.
Problem Solving Activities - patience, trial and error applications, physical and verbal communication are involved to solve a stated problem or goal, arouses a level of frustration, activities demand that the group demonstrates an ability to work together, individual roles in the group evolve to solve the problem.
Objective: An opportunity for the group members to communicate, cooperate, compromise and succeed together in solv-ingaphysicalproblem.SampleActivitiesthatcanbemodifiedforclimbingactivities:BlindPolygon,Climbing,ObjectRetrieval.
Communication Activities - should be physical, involve listening and talking as well as nonverbal, the solving of a problem is an established goal, group Oriented, leadership roles and skills come out.
Objective:Activitiesthatprovidethegroupopportunitiestoenhanceandexploretheirinteractions,communicationskillsand roles in the group. Emphasis is on decision making skills as a group and communication between group members. SampleActivitiesthatcanbemodifiedforclimbingactivities:Minefield,belaying.
Personal and Social Responsible Activities - are dependent on the ability of individuals to support and encourage each other. Help group members acknowledge indi-vidualandcommonreactionstostress,fear,andrisktaking.Activitiesthathelpexpandperceivedlimitsofselfandoth-ersandindoingsoextendselfconfidenceandvalue.Activitiesthatallowthegrouptousealltheskillstheyhavelearnedas a group through out the day.
Objective: To provide the group opportunities to challenge the group to make a difference in a encouraging and supportive environment.SampleActivitiesthatcanbemodifiedforclimbingactivities:serviceproject,rescuepractice.
Personal - individualistic —> persistence/solving frustrations, making a difference
Objective: To provide the group opportunities to challenge the individual to accept feedback and to make a difference inanencouragingandsupportiveenvironment.SampleActivitiesthatcanbemodifiedforclimbingactivities:feedbackactivities, letters to self.
BriefingIngeneral,activitiesshouldbeginwithaninformativebriefingdirectlytowhatisrequiredofthegroupinthefollowingactivity. This is an opportunity to present: •Non-negotiablesafetyinformationandsitemanagementconcerns•Sharedinformationwherethereisgiveandtakeandchoices
BriefingPointers•Presentthesafetyinformationclearly•Statetheparametersclearly(rules,goals,objectives)•Frametheactivityintermsofcompletion.•Allowthegrouptimeforclarification(questions) •Briefthegroupspecificallytothem.Eachgroupwillneeddifferentparameters•Frametheactivityintermsofcompletion•Usemetaphorsthathavemeaningtothegroup
DebriefingDebriefingtheactivityisanimportanttimeoflearningforthegroup.Thedebriefingallowsthegroupto:figureoutwhathappened,reflectonwhathappened,establishwhatwasvaluable,andfigureoutwhattodowiththeinformation.
48

What?SoWhat?NowWhat?APracticalMethodofdebriefingadoptedfromProjectAdventure.
The what? - Event recall only. - what did we do (concrete things) what did you do, see, feel? - mental video or slide show of moments in time The So What? - What does all this mean? -Generalizingandabstractingthecriticalinformationandconceptsfromthewhat stage. - Relating facts to feelings. The Now What? - How are we going to use what we learned? -Transferringwhathasbeenlearnedtothenextgroupchallenge. - Transferring learning to life outside the group.
General PointersThink of a debrief as a time of questions.Allow enough time for the intended objectives. May vary from a few minutes to hours. Is your timing appropriate?Involve everyone - sit in circle, join hands use open lines of communication.Ask open ended questions and give time for answers.Own your statements. Make I statementsFeedbackcanbeeffectiveindebriefing.Redirect questions but avoid answering or implying correctness.Observegroupandsummarizeoften.To encourage listening: Have people only speak when they have the object, have person repeat what last person said.Consider use of journals, group writing, solo, etc. for processingUsefrontloadinginthebriefingformoredirecteddebriefing.Endadebriefingsessiononapositivenote,especiallyanendofcoursedebrief.Metaphors can be a good way to wrap up a course, to help students transfer their learning.
PossibleQuestionstoUseWhat was done? was it worth it?Experiencesversusexpectations?Fears?Overcome?Justified?Highs/lows, easy challenging/Would you do it again? Recommend it to a friend?How did this group work together? Who were the leaders?Who was hard or easy to work with?What did you contribute? Receive?Towhatextentwereyoucommittedtothedecisionandresponsiblefortheoutcome?Howmuchinfluencedidyouhave?Howsatisfiedwithyourperformanceareyou?Learn any thing about yourself?What can be done to improve instruction?What would you like to say to the group? If you could change one thing...Describe with two adjectives...What have you learned to take into daily life?
Adopted from Maine Bound Staff Manual.
49

CrEATIng A LESSOn PLAn (Adapted from American Canoe Association)
A. Goals: the purpose of what you want to teach. ie: The lesson will present information on belaying.B. Objectives: measurable / observable lesson outcomes that can be used to attain goal. ie: The student will be able to demonstrate proper hand position when using a belay plate.
C. Lesson Length: How long should the lesson take? How much time do you have? Include presentation and prac-tice time. How long will it take to prepare?
D. Lesson Location: Where is the most appropriate place to teach the skill? Consider other users, client safety, environmental impacts, etc.
E. Educational Methods: How will you address each learning style and how will you incorporate various ap-proaches to learning? Have an introduction, a body and a conclusion.
F. Lesson Content: What is the actual content? Separate background, supporting information from the baseline that you want to get across. Avoid teaching too much.
G. Equipment Needed
H. Contingency:Whatwillyoudoifthesiteisoccupied?Thegroupislargerthanexpected?Itrains?
I. Evaluation: How will you know that your lesson was successful? Were your objectives met? Feedback?
Tips for a successful lesson plan:• Plan• Relax/Beenthusiastic• Practice• Arriveearly/setup• EnvironmentalIssues• Knowtheaudience,involvethem• MoveAround• SpeakwithAuthoritySupportwithexamplesandanalogies
48

Anchor Component Evaluation Tools
Tree Evaluation Plus Neutral Minus Deal breakerAlive?Species?ground/root interfaceSize
Boulders and Macro Rock Qual-ity Evaluation
Plus Neutral Minus Deal breaker
Size - how heavy is it?Shape - can some-thing be made to stick to itOrientation - relative to expected force, or to the edgeStability - is it stable, balanced, or unstable?ground/Boulder inter-face - ball bearings?Edges?
Bolt Evaluation Plus Neutral Minus Deal breakerrock QualityAppropriate typeDiameter and length appropriate?Other hints? Enviro, appearance, history, etc
Artificial Place-ment Evaluation
Plus Neutral Minus Deal breaker
rock Quality - macro and micro structure Type of crack/type of placement - are they made for each other?Oriented properly?StabilityStrength

Assessed Strength of placed gear In Hard rock In Soft rockThumbs up! Full Strength 1/2 Strength
Thumb sideways 1/2 strength Hmmm.
Thumbs down! Shouldn’t be in your anchor Hmmm.
Real world holding power of well placed artificial protectionType Strength
Small Tapers (≤ 1”) Strength printed on unit
Large Tapers (≥ 1”) 10KN
SLCD ≤ 1” 5KN
SLCD ≥ 1” 10KN
Tri Cams 10KN
Material Loop Strength (avg.) Tensile Strength Appropriate Loop Knot
4 mm cord 6 KN / 1325 lbs Dbl. Fisherman(grapevine)
6mm cord 16.5 KN / 3700 lbs Dbl. Fisherman(grapevine)
7mm cord 20 KN/4400 Lbs 10 KN/ 2200 lbs Dbl. Fisherman(grapevine)
8mm cord 23.5 KN/5280 Lbs 14.7 KN/3300 Lbs Dbl. Fisherman(grapevine)
5.5 Spectra 20 KN/4,000 Lbs 12 KN/ 2800 Lbs Triple Fisherman1” Mil-Spec 23 KN/5000 Lbs 17 KN / 4,000 Lbs Water Knot1” Climb-Spec 27 KN/6,000 Lbs 19 KN / 4,200 Lbs Water Knot11mm/ 7/16” static 6,000 Lbs
50

Anchors Away - The Nuts of Bolts, Part Oneby Duane Raleigh, Climbing Magazine Oct 1992
You're thrutching through the bad moves, vein worms pulsing in your forearms. You swat and shake, then calm yourself by checking the last bolt which is down by your feet. Calling to your belayer for slack, you launch for the exit bucket. And miss.
Falling, you wait for your ratty rope to come taut as it has hundreds of times before. But it never does—the bolt pulls. As you hit the ledge it dawns on you that maybe those bolts you snagged at the Army Surplus weren't such a bargain after all.
There’s a litany of bolts for fastening in concrete and stone, and climbers use them all. Most climbers assume all bolts are bomber, too. Yet when you clip a bolt you don't really know what you're getting. Making matters worse, the person who drilled the anchor probably didn't know what they were getting either. Fact is, most bolts are better at anchoring Pizzeria sign posts like they are designed to do rather than catching leader falls.
To sort the good bolts from the bad, we tested every type and brand we could find. We pulled them in concrete blocks custom made to simulate soft and medium rock, and then checked those results by testing again in sandstone, marble, and granite. When our hydraulic puller finally creaked to a halt we had broken 325 bolts.
You can't just look at the charts, though, and start drilling away. To select and set a solid bolt you have to know what hardness of rock you're dealing with, and understand how bolts work.
Even then, bolting may not be for you. When you drill you assume responsibility for everyone who climbs the route after you. Good bolts and hangers are expensive, and bolting is hard work. If you aren't up to the task and if slapping up a new route means more to you than doing good work, then leave the job to someone else.
A rock and a hard placeA bolt is only as solid as the rock you put it in. And rock can be iron hard, or so soft you can carve it with a stick. You'll know when rock is hard—your dulled bits and quickly drained Hilti battery will tip you off. Soft rock is easy to define, too: even with a hand drill you can punch a big hole with little effort. It's the rock consistencies in between that raise questions.
You can get an idea of how well a bolt should hold in different hardnesses of rock by checking its strengths as supplied by the manufacturer for tensile (pull-out) and shear (straight down load, as a bolt on a vertical wall) in 2000-psi (medium) and 4000-psi (hard) concrete. (2000 psi means that it takes 2000 pounds to crush a one-inch cube of that rock or concrete.) The best bolts for climbing are usually the ones with the highest strength in the lowest psi concrete. Our chart lists manufacturer’s strengths (for simplicity we bumped some concrete strengths to the nearest 500 psi), and based on our own tests, notes whether bolts are suited for use in soft, medium, or hard rock.
For construction purposes 1000-psi concrete is too soft, so bolt companies don't bother testing their anchors in this material. Still, this concrete is about as hard as the soft rock at many climbing areas, so we tested in 1000-psi concrete that we had specially made. These blocks could be scratched with a fingernail, and were about as hard as the limestone swells around Dallas and Austin, Texas and the volcanic rock at Cochiti Mesa and the Enchanted Tower in New Mexico (The rock in these areas seems harder, though, because a tough outer crust belies the soft substrate underneath).
89
Equipment: Information on Bolts
51

52
pictureS w/ Strength And how they work would be good here

Our ''medium'' blocks consisted of 2000-psi concrete. We couldn’t scratch these blocks with our nails, but the “rock” still drilled easily by hand and had a consistency similar to the rock in Penitente Canyon, Colorado, and Smith Rock, Oregon. For “hard” rock, we tested bolts in solid, tombstone-—grade marble and granite blocks and a conglomerate boulder.
You have to be careful when correlating concrete to rock. Concrete is the same consistency throughout, so bolts set in it yield uniform test results. Conversely, rock usually varies in hardness and quality from one bolt hole to the next, making it impossible to predict exactly how strong each placement is. Use our test data and the manufacturer's list strengths as rough comparative guidelines only. Every time you drill a hole re-evaluate whether the rock is sound enough for your bolt. If you can't decide what hardness of rock you're bolting into, err on the safe side and assume it's softer.
The worksMechanical bolts, those that work by either expanding or compressing, grip the rock by pressing
against the wall of the bolt hole (Figure 1). The pressing action creates friction between the anchor and the rock; for the bolt to pull out, the applied load has to overpower this coefficient of friction. But more important than understanding how bolts work is knowing how they don't work.
A bolt will fail by either breaking, pulling out, or destroying the rock around it. A bolt will break if its holding power is greater than its shear strength. You can virtually eliminate bolt breakage by using a bolt with a shear strength of at least 5000 pounds. The hardest you'll likely ever load a bolt is around 26OO pounds, so a 5000 pound shear-strength anchor gives you about a two-to-one safety margin.
(For details on fall forces see "The harder you fall".) Over two tons of breaking strength may seem like overkill, but it isn't. This safety factor is in fact only half what the bolting industry recommends for bolts used to safeguard life.
If a bolt's holding power is less than its shear strength it will pull out before breaking. The typical bolt pull-out follows this scenario: the bolt flexes, crushing the rock beneath it. Without the support of the rock the bolt continues to bend until the developing prying action pulls the bolt out. You can increase a bolt's holding power by using a larger-diameter bolt that won't bend as readily as a smaller one and has a greater rock-to-metal contact (friction) area. In the case of soft rock or rock that has a flaky or crumbling surface, lengthening the anchor may also improve its holding power by letting the bolt grip into the more solid underlying rock, if there is any.
In hard rock, the bolt or the hanger will usually break before the rock crumbles, but the failure of the rock itself is a concern with any anchor in soft and medium rock. To help keep the rock intact, don't place bolts too close to one another at belay/rappel stations. Keep bolts at least one foot apart, and place them equally far from corners, cracks, pockets, and other rock flaws. Before drilling, tap the rock with your hammer. If you hear a hollow sound, place the bolt elsewhere. Watch out, too, not to set a bolt in a block, which may sound solid but could tear loose.
91
53

Finally, don't be fooled by rock with a hard outer crust. Varnished sandstone, limestone, and some volcanic rocks are frequently hard on the outside but soft on the inside. In these cases be sure you use a bolt suitable for soft rock.
Never trust your life to a single bolt.Always double up at belay, rappel, and lowering stations. Bolt companies make millions of
bolts a year, and there's no way they can check each bolt for flaws. And sure enough, defective bolts slip through their safety net—in our tests we found bolts that broke at well below their list strengths in nearly every brand we tested.
Length and girthYou should always place the fattest and longest bolt that's practical. When you're using a power
drill or bolting by hand on rappel there's no excuse for placing a flimsy bolt, and at a minimum you should use a 3/8-inch by 2 1/2-inch bolt in hard rock, 3/8-inch by 3 1/2-inches in medium rock, and a l/2-inch by 4 1/2-inch glue-in bolt in soft rock. (Glue-ins will be covered in Part II of this article.)
Bolting by hand on lead is another story. Here, the game is to get a good bolt in before your calves and forearms cramp and you crash into the talus. The traditional on-lead bolts are the 1/4 and 5/16-inch Rawl Drives. The 1/4-inch bolt, however, is too weak to trust—in our tests these bolts failed at around 1000 pounds, a force attainable in a modest drop. The 5/16-inch Rawl Drives are stronger and more lasting, but Rawl has discontinued these.
This doesn't leave you with much, as all other 5/16-inch bolts are far too weak, and most 3/8-inch and larger bolts take too long to drill. Compounding the problem, hand-drill manufacturing stalwarts, like Rawl, have quit making their hand-held holders and percussion bits. At present, if you want to place a bolt by hand and don't have a hand-drill kit yet, then you are reduced to scrounging used gear, using an inefficient self-drilling system like the Rawl Saber Tooth, or suffering with the primitive Star Four Point drills, which serve as both drill and holder in one, but are poor examples of each. If you have a Rawl holder, 5.10 still has bits for them, although they are costly ($16.95 for a 3/8-inch bit) and break easily. To save money you can make your own bits to fit a Rawl holder by grinding down high-speed cobalt bits (see Quick Clips, Climbing No. 132 for details).
The fastest solid bolt you could ever hand drill in hard rock is the 3/8-inch by 2-inch Rawl Drive. A slightly more time-consuming to drill and more difficult to place bolt is the stronger 3/8- by 2 1/4-inch Rawl Bolt. You can also use 3/8- by 2 1 /4-inch wedge bolts, but these are weaker than the Rawl Bolt. All three bolts are reviewed in detail later.
Big-wall climbers take note: 5/16-inch Grade Five machine bolts pounded into a .275-inch diameter by 1/2-inch deep hole in hard granite will hold around 1000 pounds shear, making them adequate rivets. Deepen the hole to one inch and the rivet becomes stronger than the 1/4 inch Rawl Drive. When you are using machine bolts make sure your drill bit cuts a hole exactly .275-inches in diameter. These bolts rely on a tight force fit with the hole; a hole too large weakens the placement; too small a hole will cause the bolt to bend when you drive it.
92
54

When a bolt holds a fall most climbers think the bolt is good. But the opposite can be true as bolts weaken under the stress fatigue caused by falls. Temperarure swings that swell and shrink the metal are also a source of stress fatigue, and corrosion from weather and galvanic reactions cause bolts to degrade even more.
Most bolts used for rock climbing are made for indoor application in concrete. These bolts are typically carbon steel that is either zinc-plated or galvanized, which is the more durable of the two coatings. When used outdoors, bolts with either coating suffer from more severe environmental impacts than intended. As you can guess, moisture is the big factor in corrosion, and the wetter the climate, the more corrosion is a problem. Salty ocean and road spray, and acid rain accelerate corrosion, causing zinc-plated and galvanized bolts, which can last in drier climates from 14 to 200 years, to corrode and fail in as little as one year. In damp or polluted areas, stainless steel bolts are the only way to go, and can usually withstand these harsh environments for about 40 years.
Besides environmental corrosion, bolts can also detoriare under galvanic corrosion, which occurs when two dissimilar metals, such as a carbon-steel bolt and a stainless-steel hanger, contact one another in the presence of moisture. In climbing areas that see high amounts of precipitation, galvanic corrosion can be a real problem. You can minimize this situation by using stainless-steel hangers with stainless-steel bolts, or carbon-steel bolts with carbon-steel hangers. (If you use stainless-steel bolts be sure you check their list strengths—stainless steel is typically weaker than carbon steel, so you may need to use a larger stainless-steel bolt to equal the strength of a smaller carbon-steel one.) Another alternative is to paint the bolt hanger so it can't directly contact the bolt. (This method will fail if you don't get the paint thick enough.) In the end the only total solution to galvanic corrosion is to use one-piece adhesive eye bolts.
—Marc Jensen
Corrosion
93
55

Externally threaded sleeve anchors. You can find externally threaded sleeve anchors in almost any hardware store. These take the same effort to place and cost about as much as the Hilti HSL and Rawl Bolt, but are only about half as strong because their external threads reduce the effective diameter of the bolt where it contacts the hanger, giving it a low bending strength and making it prone to shearing off.
Externally ThreadedSleeve bolt
Torque bolts. We didn't find any dependable torque bolts, although some climbers use and swear by the USE Diamond Taper Bolt, which can be strong but usually isn't.
To place a torque bolt you tap the bolt into the hole and then torque it down, spreading an expansion cap at the back of the hole to create a friction hold.
USE DiamondTaper bolt
Sounds good enough, and USE Diamond touts this anchor as the strongest expansion bolt made, but the problem is these bolts don't have any leeway for user error. Torque the bolt too tight and you strip the expansion cap, ruining the placement. Get the bolt too loose and the cap will hold a pull-out load about as well as bubble gum on the end of a nail.
We really gave Taper Bolts a chance, setting dozens of them in their optimum substrate, hard rock. We tried to set the bolts by "feel", just as you would when climbing. Half the time we got it right and the 3/8-inch Taper Bolts held up to 3000 pounds in a straight pull out. But we blew it with the other half and the bolts slid out of the hole at only 700 pounds. Worse yet, we couldn't tell the good placements from the bad until we ripped them all out.
The Wej-it Anchor Bolt is another variety of torque bolt, but fortunately most climbers have more sense than to use it. This anchor has two push-wires running down the shaft that culminate in a pair of tangs that splay out when you crank the bolt down. Tested in shear, the 3/8-inch Wej-it Anchor Bolt held around 2600 pounds in hard rock, but broke or pulled out at an average of 1300 pounds in tensile.
Sleeve-and-nail bolts. The Star Dryvin is the only sleeve-and-nail bolt we found. This anchor, once commonly used in sandstone, utilizes a lead sleeve and a steel nail. You tap the sleeve in the hole, and then hammer the nail in, spreading the sleeve. In the best rock the 3/8-inch Dryvin only holds 1400 pounds in shear and less than that in pull-out. In sandstone, where Dryvins were thought to be a good alternative to drilled angles, these bolts are unbelievably weak—we pulled one out with our fingers.
Star Dryvin bolt
Rickety and somewhat expensive at $2 each, there's no excuse for ever using a Dryvin. If you see a star icon on a nail head that's embedded in a sleeve, yank the sucker out and put in a real bolt.
Drop-in bolts. These are the soft lead "shells" you see in the anchor department at the hardware. To use these bolts you drill a hole, hammer the shell in, and then screw a machine bolt into the sleeve to expand it. Drop-ins in the 3/8-inch and I /2-inch sizes can be strong, but for the size holes they require
Drop-in bolt
(a 3/8-inch bolt takes a l/2-inch hole) these anchors are inefficient. Also, drop-in sleeves can crack or strip out when you insert the machine bolt. Save your money for better bolts.
Studs. Stud bolts expand, creating a friction grip, when you hammer them onto an expansion pin set in the back of the hole. We tested Rawl, Star, and Ramset/Red Head stud bolts, although you can find similar bolts from almost any bolt manufacturer.
Stud bolt
Stud bolts can be strong in hard rock, but suffer from several maladies that make them unsuited to rock climbing. First, you have to drill the hole to an exact depth to make sure the expansion pin engages the stud. Second, the exposed threads on these bolts makes them subject to work fatigue. Third, you can't remove or countersink these anchors without destroying the rock around them. And last, you can't buy studs in stainless steel.
NOT!
94
56

Bolt designWhat makes a good bolt? Climbing bolts should be strong, durable, easy to place, corrosion
resistant, have some leeway for user error, and be removable so you can replace them. No bolt fits the entire bill, but various models of sleeve, wedge, compression, self-drill, nail-drive, and adhesive bolts are as good as you can get for now.
Sleeve bolts. These are tapped into a hole and then tightened down with a wrench, drawing a tapered cone into the sleeve, causing the bolt to expand. Sleeve bolts are among the most dependable mechanical anchors in hard and medium rock. Yet you have to be careful as there are two types of sleeve anchors: strong and durable bolts with solid hex-heads and internal threads (Figure 2); and weaker sleeve bolts with external threads and an end nut (See "Not!".) that can break under the strain of repeated loadings.
Figure 2. There aretwo types ofsleeve anchors:shown here arethe strong and durable solidhex-head withinternal threadsRawl bolt (above)and Hilti HSL.
There are two types of sleeve anchors: shown here are the strong and durable solid hex-heads with internal threads. Rawl bolt (above) and Hilti HSL.There are three solid-lead sleeve bolts that are applicable to rock climbing: the 3/8 and 1/2-inch Rawl Bolt, and the 12-millimeter Hilti HSL (model number MS/20). These anchors are easy to place (you tap them in and wrench them down), removable (the expansion cone stays in the back of the hole, however, so you can't reuse the hole), strong in tension and shear, and fit through standard 3/8-inch (10-millimeter) bolt hanger holes.
The Hilti HSL, proving stronger in our tests, is the better of the two bolts, but costs twice as much as the Rawl Bolt. Additionally, the HSL is metric, requiring an expensive metric drill bit. We called every drill supplier in the phone book, but the only 12-millimeter hammer-drill bit we found was from Hilti and cost $57. In comparison, a 1/2-inch bit costs around $20.
In our tests the 12-millimeter HSL and 3/8 and I /2-inch Rawl Bolts were stronger in hard rock than stainless-steel bolt hangers, which usually broke at around 6OOO pounds. In medium rock all three anchors pulled out (rather than breaking) at an average of 4100 pounds (HSL.), 3700 pounds (1/2" Rawl), and 3400 pounds (3/8-inch Rawl), making them the strongest mechanical bolts in this type rock.
We also tested these bolts in soft rock, but their expansion cones, being slightly larger than the drilled hole, sheared away the inside of the hole as the bolt was tapped in, causing the bolt to spin when we attempted to tighten it down. In solid desert sandstone where you can drill a dimensionally correct hole and the bolt tightens down, the l/2-inch Rawl Bolt and Hilti HSL are about twice as strong in shear and pull out as drilled angles.
The HSL and the Rawl Bolt are solid anchors in hard and medium rock, but they have some quirks. The biggest problem is that they require an immaculately clean hole—dust in the hole prevents the expansion cone from setting, preventing you from tightening the bolt down. When you set these bolts be sure you use a blow tube (a piece of aquarium tubing works fine) to clean the hole,
95
57

and use a fairly new drill bit—worn-out bits will undersize the hole and make tightening the bolt difficult. If you get a spinner, clip a quickdraw to the hanger and pull out on it while you turn the bolt. If this doesn't work you'll have to remove the bolt, and since the spinning bolt won't unscrew you'll have to drill it out. Patch any bolt scar with a mix of polyester resin, like Bondo, and crushed rock.
Hilti, Rawl, and all other bolt manufacturers recommend torquing their bolts to a specific number of foot pounds. You aren't likely to take a torque wrench to the cliff, so prepare in advance by placing some bolts in a block of rock, and use a torque wrench to get a feel for the correct tension. On the cliff the bolt should draw up snug, but not too tight. If you over-torque the bolt you might shear the head off, or worse, get it to the verge of shearing. The Hilti HSL and the Rawl Bolt may loosen slightly over time. When this happens, simply retighten them.
Wedge bolts. Wedge bolts have a tapered end with an expansion clip (Figure 3). Other than the Rawl Bolts discussed above, 3/8-inch wedge bolts (1/4-inch ones are far too weak) are the most commonly used climbing anchors. Their simplicity makes them easy to place and inexpensive (typically 40 to 75 cents apiece). And as an added bonus you can set these bolts with one hand—an advantage over the Hilti HSL and Rawl Bolt, which take two hands to start them in the hole, a sometimes difficult procedure.
Figure 3. Wedgebolts have atapered end withan expansion clip.
It's hard to botch a wedge-bolt placement in hard rock, as placing one is as simple as drilling a hole deeper than the bolt is long (you can't drill the hole too deep), blowing the hole out, tapping the bolt in, and tightening it down. Tightening the bolt pulls it slightly out of the hole and draws the expansion clip over a cone, creating a friction hold at the back of the hole. If you don't get the bolt quite tight enough, no problem: this self-energizing' bolt will tighten itself when its loaded.
It is easy to botch a wedge-bolt purchase, however. We tested seven different brands and found that while some can hold up to 4000 pounds in hard granite, others are pitifully weak or are of erratic quality, and can break at as little as 1500 pounds. Compounding the problem, one wedge bolt looks like the next. If you use wedge bolts, the only way to make sure you know what you're getting is to insist on a sealed box or package. Avoid getting wedge bolts out of a bin where they can be mislabeled, or not labeled at all.
The strongest and most dependable wedge bolts are, in decscending order of reliability, the Petzl, Hilti, Ranmset/Red Head (also known as Phillips), Rawl, and Wedge II.
In hard rock the Petzl outdid all other wedge anchors by a long shot, proving stronger than the Petzl Coeur bolt hangcr. At $8 a pop (hanger included) and then anothcr $55 for the neccessary Hilti 10-millimeter bit, though, you have to have plenty of moolah to use thc Petzl wedge bolt. The worst wedge bolts, the ones that can break at only 1500 pounds, are the USE, Star, and "generic" ones.
Because their exterior threads make them prone to work fatigue, wedge bolts aren't nearly as dependable as solid-head sleeve bolts. For that reason if you must use wedge bolts consider 1/2-inch diameter ones, which still fit through a l/2-inch Petzl Cocur bolt hanger, and are far more resilient than the 3/8-inch size.
96
58

Some climbers use wedge bolts in medium rock, like the sandstone of the Southeast. We recommend they quit, especially in overhanging rock. Wedge bolts in this rock may seem solid at first, but after repeated loadings the rock inside the hole around the expansion clip will crush, letting the self-tightening action of the bolt continue. (You'll know when this happens as you'll have to retighten the end nut.) After several tightenings the expansion clip extrudes over the end of the bolt, or can be on the brink of extruding—and then the bolt pulls out without warning. Beware of any wedge bolt that draws out of the hole more than l/2-inch when you tighten it (a common occurrence in soft rock); again the expansion clip may be perilously close to slipping off the end of the bolt.
You can't remove a wedge bolt, but you can counter-sink it and patch the hole if it was drilled slightly deeper than the bolt's length.
Compression bolts. Also confusingly called expansion bolts, these anchors are larger than the drilled hole and are forcibly hammered in, compressing as they go. These bolts try to "spring" back to their original size, creating a frictional force that gives the anchors high pull-out strengths in hard rock. But the expansion effort can also cause the rock to crack or dinner-plate, and over time the bolt itself may crack from stress fatigue.
Figure 4. Compressionbolts like the RawlDrive are larger thanthe drilled hole and areforcibly hammered in,compressing as they go.
The Rawl Drive (Figure 4) is the only compression bolt we found, although Rawl makes a similar, and weaker, anchor called the Spike. Prior to the use of cordless power drills, the Rawl Drive, being fast to place and relatively strong, was the bolt of choice for drilling on lead and on big walls.
Rawl discontinued the 5/l6 inch Rawl Drive, the best bolt for on-lead hand drilling in hard rock, but continues to produce this bolt in the 1/4- and 3/8-inch sizes. The 1/4-inch Rawl Drive is too weak to trust even when brand new and set in hard rock. In softer rock or after a couple of years of weathering, the strength of these anchors is reduced to about body weight. If you place a 1/4-inch Rawl Drive, plan on coming back and replacing that anchor before anyone has time to get on your dangerous route.
The 3/8- by 2-inch Rawl Drive is an acceptable anchor for hand drilling in hard rock as it can hold over 5000 pounds in any direction, doesn't require a wrench, and takes a shorter hole, hence less drilling time, than the longer sleeve bolts. Nevertheless, if you have a power drill you've no reason to use the Rawl Drive, and plenty not to: the bolt tends to dinner-plate the rock, can stress fracture over time, rusts badly, and is less reliable than solid-head sleeve bolts. And, forget about this bolt in medium or soft rock—in our tests the 3/8-inch Rawl Drives pulled out at berween 500 and 1000 pounds.
The 3/8-inch Rawl Drive comes in two styles: round head and hex head. The round-head version is more reliable than the externally threaded hex-head, which can crack across the threads. Disadvantages to the round-head are that it only works with the 1/2-inch Petzl hanger, and it isn't removable. (You can't remove the hex-head Rawl Drive either, but if you drill the hole deep enough you can take the nut and hanger offand counter-sink the bolt.)
97
59
59

Nail-drives. Nail-drives, such as the Petzl Long Life (Figure 5), expand when you drive a nail through the center of the bolt, expanding the anchor at the back of the hole.
If we had our druthers we'd make everyone use the Petzl Long Life for hard rock. Available in l/2-inch and 12-millimeter sizes the Long Life is stronger than the Petzl Coeur hanger, which breaks at around 6000 pounds shear and 4000 pounds tensile. Besides having Herculean strength, the Long Life is easy to place, tamper proof so you don't have to worry about some low-rent swiping the hanger, and because both bolt and hanger are stainless steel, is virtually corrosion free. Unfortunately, even with the Long Life's advantages you aren't likely to ever clip many— they cost $9 each, hanger included.
Figure 5. If we hadour druthers weʼdmake everyone usethe Petzl Long Lifein hard rock, shownhere without itsincluded hanger.
The Long Life is fine in hard rock, but don't count on one in medium rock, where it can fail at under 2000 pounds. Also, don't confuse the Long Life with the fragile All-American, which looks similar and is temptingly available in many hardware stores at about a fourth the cost. You can tell a Long Life from the All American by color: the Petzl bolt is silver; the other is gold.
On our hydraulic puller the 3/8-inch All-American sheared off at a paltry 1000 pounds. Even the meaty looking 1/2-inch one, rated to 3620 pounds tensile, broke at 2200 pounds—a pathetic performance for a bolt this large. And don't even think about using the l/4-inch jobs: the ones we tested snapped off under a 400 pound load.
Self-drills. This anchor serves as borh drill and bolt (Figure 6). We only mention these relatively weak bolts as viable climbing anchors because you can place them by hand—a task you may be forced into as power drills are banned in many parks and bolt manufacturers cease production of the tools you need to hand drill other type anchors.
To set a self-drill you screw the "bit" onto a special holder ($20 to $30) and pound away. Pointed teeth on the end of the bolt cut into the rock. You have to take care to drill the hole to the manufacturer's recommended depth—over or under drilling the hole seriously weakens the bolt. You drill the hole, then clean out both it and the bit. Next you slip a small wedge into the hole and hammer the bolt onto it, flaring the base of the bolt. Last, you mount the hanger by screwing a machine bolt into the center of the self-drill.
Figure 6. A self-drillserves as both drill andbolt. We mention theserelatively weak boltsbecause you can placethem by hand.
Placing a self-drill in hard rock is tough: the "bits," which are dull to begin with, get even duller and can break when you drill with them. Because of this, plan on using two or three bits (about $2 each) per bolt if you want to finish the hole the same day you started it. Even when you get a self-
98
60

drill placed it isn't nearly as strong as a good solid-head sleeve, wedge, or nail-drive bolt—the three brands of self-drills we tested sheared off at around 3000 pounds in hard rock and pulled out at only 750 pounds in medium rock.
Rawl, Ramsct/Red Head, and Petzl all make self-drilling bolts. (Cassin does as well, but theirs weren't available for testing.) If you buy a special adaptor ($30) you can get the Rawl or Ramset/Red Head "snap off" self-drills instead of the "hand flush" type, and let a power drill do the hammering for you, although if you're using a power tool you don't have any business setting these weak anchors.
The Rawl and Ramset/Red Head hand-set tools are heavy, clunky, and are harder on your hands than the streamlined Petzl and Cassin holders, which we found much easier to use. The Rawl Saber Tooth is the least expensive self-drill, but isn't compatible with the metric Petzl and Cassin holders. You can remove the machine bolt and haliger but not the drill portion of self-drills.
Drilled angles. Soft desert sandstone is the trickiest rock to bolt as it can vary in composition from sugary sand to solid varnish. Ideally, you should use glue-in -bolts, which have high pull-out strength in most any type rock. Yet glue-ins need to cure overnight, a luxury you don't have on towers, aid climbs, or even at the top of one-pitch free climbs. In this case a 1/2-inch angle piton ($5.55) hammered into a 3/8-inch hole is the most common solution (Figure 7), although 1/2-inch Rawl Bolts are usually stronger.
To set a drilled angle, drill a 3/8-inch hole as deep as the the pin is long and pound the pin in. In hard sandstone like that at Indian Creek, Utah, you may have to "sculpt" the hole so it's wider at the opening in order to get the pin to hammer fully in.
Figure 7. In lieu ofglue-ins, a 1/2 inch anglepiton hammered into a3/8 inch hole is the mostcommon soft-rock anchor.
We were surprised at the high shear strength of drilled angles in hard desert sandstone. Placed with eye pointed down and drilled at a slight downward angle, these anchors held an average of 3500 pounds in rock that was solid to where the pin was difficult to pound into the hole. (Set with the eye facing up, they held about 1000 pounds less.)
Drilled angles aren't a panacea, though, as they are dangerously weak in straight-out pulls. In the same rock we used to check shear strength, the 10 drilled angles we tested pulled out at an average of only 1100 pounds, so don't pull out on these anchors at belays or when beginning a rappel. Additionally, drilled angles loosen with age as most anyone who has ever repeated a desert "classic" can attest. Test a drilled angle before weighting it, and even if it seems solid don't bet your life that it is.
In the end there really isn't a safe anchor that you can place on lead in soft sandstone. The best you can do is to use large sleeve anchors when they will tighten up, and go with a drilled angle when they won't. When the rock is really bad, hammer a 5/8- or 3/8 inch angle into a 3/8 inch hole, and climb very carefully.
99
61

For anchor longevity and to increase a drilled angle's tensile strength, fill the hole half full of Hilti C-lOO or Ramset/Red Head Ceramic 6 glue. Alternately you can use the more convenient Hilti or Rawl 3/8-inch glue capsules. These won't be as strong, though, because simply crushing the capsuIe (instead of mixing It with a power drill as you’re supposed to) won't mix the glue to full strength. (Don't waste your time with silicone or other caulkings. These won't increase the anchor's strength and will crack to let water in after only a year or two's weathering.)
And last, think of drilled angles as bolts, not pitons. Leave them in place. Removing these anchors leaves an unsightly and unusable square hole.
Adhesive bolts. Glue-in bolts bond molecularly with the rock, giving them the highest pull-out strength of any anchor. These bolts are superior to mechanical anchors in many ways. Foremost, they are reliable in soft and medium rock. To see how adhesive bolts perform in these mediums see part two of this article in the December issue of Climbing.
Sources. For details on where you can buy hangers contact: Blue Water, (800) 533-7673; Cassin and Kong, (800) 3G6-2666; Gold Shuts, (303) 426-0031; Metolius, (503) 382-7585; Petzl (bolts and hangers), (706) 764-1437; SMC, (206) 883-0334; and Trango USA, (303) 443-8438. Consult your local Yellow Pages under "Fasteners" for sources of bolts.
100
62

When you place a bolt you need to make sure it will hold the hardest fall, and will continue to hold falls for years to come. Because of the many variables associated with falls you cannot accurately predict their forces. But based on extensive calculations by Daniel Taupin and Jean-Pierre Verdier in the French treatise Amenagement et Equipment d’un Site Naturel d'Escalade, the loads in average "soft" to "hard' falls range from 1300 to 2600 pounds of force. Toprope falls develop lower impact forces, but can still load the anchors as much as mild leader falls. In live drop tests using a dynamometer to measure peak loads, we generated over 1000 pounds in toprope falls when there was slack in the system or the wall was so steep the climber swung out when he fell. Because the failure of a toprope anchor would likely lead to a serious or fatal accident, make sure toprope anchors are as strong as those you would set for a belay. Using their calculations and figuring in a safety factor, Taupin and Verdier recommend that belays consist of two bolts, each holding a minimum of 5280 pounds in all directions. They further conclude that first bolts directly above belays or ledges should also hold 5280 pounds, and all other protection bolts must withstand at least 4840 pounds. The force you put on a bolt depends on many factors including how static or dynamic a belay you have and the distance you fall. But it isn't so much how far you fall, it's how much rope you have out that determines how hard you load an anchor. A short fall on a short length of rope can produce a higher load than a longer fall on a greater length of rope. That is bccause climbing ropes absorb energy, so thc more rope you have out, the more rope you hav to cushion thc impact. The relationship of fall distance to rope out is the Fall Factor, which you determine by dividing the length of the fall by the amount of rope between you and your belayer. High Fall Factors equal high impact loads; low Fall Factors equal low impact loads. For example, you haven't been training but go climbing anyway. As anyone who saw you chowing at McDonalds could have predicted, you flame out immediately and fall short of the first bolt only 8.25 feet up the climb, which starts off a small ledge about 30 feet up. Your 176-pound carcass drops 16.5 feet and jolts directly onto the belay anchor, producing a Fall Factor of two (neglecting rope stretch, 16.5 feet of air divided by 8.25 feet of rope equals two), the highest possible and the one the UIAA uses to break ropes. Disgusted with your meager performance and grateful to be alive after nearly wrenching the belay bolts out of the wall, you abuse yourself on a fingerboard all winter and return to the climb in the spring. This time you make it 20 feet past a bolt that is 85 feet up before your home resoles delaminate, sending you screamilig 40 feet onto a bolt. You take a good whipper, but your Fall Factor is only .38, and you generate a lower force than the one in your shorter fall. Short falls close to the belay are the harshest because you never have a lot of rope out. Because of this it's vital that the first two or three bolts above the ground or a belay stance are absolutely bomber and spaced relatively closely compared to the anchors on the rest of the route. You can minimize impact forces by choosing your rope carefully. Climbing ropes absorb energy, but their capacity for assimilation isn't infinite. Every time you fall you destroy part of your rope's ability to dissipate energy, so every fall (assuming all other factors remain equal) yieids higher and higher impact loads. Consequently, old ropes give harder catches than new ones. Similarly, "fat" (10.5- to I l-millimeter) ropes, because they have more material for energy absorption, usually give lower impact forces than "skinny" (9.8- to 10-millimeter) ropes.
Your belayer can increase or decrease the impact force, too. If you whip and your belayer reels in slack to keep you from hitting the deck, he then increases the impact force. Conversely, if your belayer waits until he feels your weight coming on the rope and then jumps up, the impact force decreases (use this technique only when the leader isn't in any danger of smacking the ground or a ledge). The way you load a bolt affects its strength. If you pull on a bolt straight down, as you would with one placed on a vertical wall, you load it in shear, which is typically its strongest position. In a horizontal ceiling you pull out on the bolt, loading it in its weaker tensile mode. When you fall or hang you often pull out and then down on a bolt, or may even load it in both directions simultaneously, which is similar to pulling straight out. Since you never know how you are going to load a bolt, you need to cover all bases by using a bolt that even at its weakest can hold the hardest falls.
The harder you fall
101
63

A bolt anchor is only as strong as the weakest link in the hanger-to-bolt-to-rock chain. With bolt hangers, there's no excuse for failure as it's easy to make one that will never break. And rest easy: every one in this review held in excess of 5000 pounds in our tests, a strength greater than most carabiners. (Our chart lists strengths provided by the manufacturer, which are usually conservative.) A bolt hanger should lever on the bolt as little as possible. On vertical walls leverage isn't a problem and virtually any hanger will do. But on overhanging routes or ceilings you need a hanger, like the Petzl Coeur, Metolius S.S., or Cassin Roof Hanger, that lets the carabiner orient close to the bolt to minimize leverage. (See chart to find whether a hanger is suited to overhanging, vertical, or both types of placements.) A bolt hanger needs to protect your carabiners, too. Thin and sharp-edged bolt hangers cut and gouge aluminum carabiners. You can minimize carabiner wear by using bolt hangers made from thick or rounded stock. The best of these are the Petzl Coeur, Metolius S.S., and the Gold Shut. All of the hangers we found will likely outweather the bolt they are hooked to. Nevertheless, it doesn't hurt to go with a stainless steel or titanium hanger, which won't corrode as fast as a plated or coated steel one. In this decade, low visual impact is one of the keys to climbing's survival, so the preferred hangers are the ones land managers and tourists can't see. Metolius knows this and makes their hangers with an optional camouflage coating. As an alternative to factory-colored hangers you can camouflage any hanger by painting it with a color that matches the rock. (You can paint hangers already on the rock by masking around them with duct tape.) If you're at the end of a pitch or fail to make it to the anchors and have to retreat off a bolt, hangers that let you thread the rope directly ehrough them save 'biners and eliminate unsightly slings and chains. At present, only the Gold Shut and Metolius Rap Hanger have this feature. Your chances of breaking a bolt hanger are slim to none, but you can come unclipped from them. When we tried, we could get any bolt hanger to accidentally unclip the carabiner attached to it if the carabiner inverted so its gate pressed against the hanger's upper arm. This isn't likely to happen in normal climbing, but just in case, when you are bolting sections where an accidental unclipping would be disastrous, avoid ring-style hangers like the Gold Shut and eye bolts—these hangers and bolts are the easiest to come unclipped from. (As a precautionary measure you can, of course, use a locking carabiner on any bolt.) Before you buy hangers make sure your bolts fit through them. If you are using 1/2-inch bolts the only commercial hanger that will work is the 12-millimeter Petzl Coeur (model #P38150). (In lieu of this hanger you can drill out a Metolius or 10-millimeter Petzl Coeur to fit 1/2-inch bolts, although modifying hangers is difficult and can overheat and weaken the metal.) Half-inch and 12-millimeter sleeve anchors use 3/8-inch and 10-millimeter bolts, so they fit through regular hangers with a 3/8-inch or 10-millimeter hole.
Chain and homemade hangers No sane climber buys a rope at a hardware store, but plenty get the material for their bolt hangers there. Three-eighths inch chain holds over 8000 pounds, so its plenty strong and lets you thread the rope through the links at belay/rappel stations, eliminating the need to leave carabiners or webbing behind. But don't use chain links on regular protection bolts; this set-up has a high visual impact, and because the crosslink lengthens the portion of the bolt protruding from the hole, reduce the bolt's shear strength.
Homemade angle iron and aluminum hangers are anathema also. We've never seen a homemade hanger that was as good as even the worst commercially made one. Homemade hangers are ugly, lever on the bolts, only hold one carabiner (most commercial hangers accept two carabiners), are hard to clip, aren't tested so you don't know how strong they are, and have sharp edges that gouge carabiners and fillet you if you fall against one.
Far and away the worst homemade hangers are unwelded cold shuts (see "A safe letdown?,"in Climbing No. 130). Unbelievably, we've had several phone calls from climbers defending cold shuts. These 3/8-inch unwelded hangers, they say, have never failed on them.
To those persons: your hangers haven't opened yet, but someday they will. We hammered closed a half-dozen 3/8-inch cold shuts and then pulled them. Every one straightened out at only 1000 pounds, a force easily attainable in a toprope fall.
Hanging tough
102
64

Anchor Equalization
A sketch comparing self and pre equalizing would be helpful
Alan has good graphics illustrating all of these topics
One Piece Anchor Construction
Samples of tying off trees
Two Piece Anchor Construction
example graphics
Three Piece Anchor Construction
example graphics
Hybrid Anchor Systems
example graphics
Loads on Individual Pieces Connected at Varying Angles


Angles and loads
71

Evaluating anchor systems from placements to belayers
There are many systems out there to help us remember everything we need to consider when evaluating an-chors. Choose your system - all are just meant to be tools, none are the “answer”. My favorite is PESSBEE, spelled out below, because it follows the entire system from metaphorical top to bottom.
Protection - the goal is perfect pieces
Equalization - are forces well distributed between all the pieces
Stability - is the master point stable
Strength - Is the anchor strong enough
Belay/belayer effectiveness - can the belayer do a good job of managing the slack and providing a brake
Edges - padded
Efficiency - resources used efficiently?
72

Overview - Day 3Equipment List for TodayHelmet, harness, belay device, all the gear you’d need to set up a top ropeFood&waterfortheday
2nd - 4th Class TerrainTerrain AssessmentPeople AssessmentMovementThrutheTerrain-pass,modeling,routefinding,communication
Bottom Managed top rope climbs
Practice-buildslingshottopropeanchor&rapoveredge
Belayingtypes of belaysexamplesofhowtoteachbelayingbacking up belaysbelayer position
rescuing stuck climber - counter balance ascending demoPractice of counterbalance rescueweightedunweighted
Rappelling
RappellingRappel DevicesLarge group rappel set up (from the top of the cliff)Teaching Rappellingsuitable terrainprogressionproblem preventionbelaying
BlockingKnots - mule move to cliffTension Releaseable Rappel Anchor
Homework:Lowering diagramsRaising diagrams
73

On Belaying
Activity: in pairs or triples, one “teacher”, others are “students”. “Teacher” gets “student” ready to belay. Just focus on the aspects necessary for the student to move the rope. How do you want them to stand? Where is the friction device? If there isasecond“student”findaroleforthem.Notes on what was observed: what methods were used:
Debrief: Look around: what type of belay set up did people use?
Activity: in same teams, new “teacher/student” role. Now teach the “student” how to move the rope. We are just con-cerned with the act of moving rope through the system and resetting hands.
Debrief: here’s what I saw. What additional information would of made it easier for you to teach this? What additional tools or set-up would of made it easier/better for the student? Are there any options in hand reset? (belaying). Why?/why not?
Settingupabelaysystemisacomplexinstructorskillset,there’smoretoitthanmeetstheeye.
Question:Whatarethetwoorthreeorfourmostimportantaspectsofbelaying?(dryeraseboard) 1. 2. 3.
Belay set up variables
Uncontrollable variablesHuman factors: groupprofile–(more? Brainstorm to add to this list)
Terrain factors:
Controllable variables (instructor’s decisions) (+/- each)Terrain: Top or Bottom managed? + -
Stage near cliff or away from cliff? + - Anchored or not anchored? + -
Belay: type of belay: body belay +/-plate (low to high friction) +/-mechanical +/-Munter hitch +/-

Belay: where to place device: on an anchor, on a harness, hybrid systems
Belay: back ups needed? Options: Instructor provided b/u +/-student provided +/-Catastrophe knots? +/-
Belay: how to reset hands? PPS +/-Five step +/-
Belay Decision summary:-What type of device to use? -Where to put device?-Where to put belay team?-How to reset hands? -Backups?

Tension releasable rappel
76

77

risk Management - an insurance company’s perspective:
Risk Management is the process of doing everything you can to protect people, property, and assets from losses. There is a lot more to Risk Management than simply buying insurance. When you purchase insurance you really have entered into a partnership with your insurance program. It is your combined assets that are at stake. If you approach this matter casually your insurance program will be looking for a new partner; as well, the future of recreation will be compromised.
TofurtherunderstandtheimportanceofRiskManagement,itisusefultolookatthefivemostcommonallegationsofalawsuit against Recreation Service Providers:
A. The injured was not adequately warned and informed of the inherent dangers.B. The injured did not receive proper instruction on skills and the use of equipment.C. The trip was in the wrong place at the wrong time (high water, lightening, etc.).D. The guide used bad judgment.E. The rescue was overly lengthy and complicated and subjected the injured to undo pain and suffering.
These are the problems. We have provided you with the solutions. For yourself, for other members of the Association and forthefutureofRecreation-GetOrganized
-WorldWideOutfitterandGuidesAsociation-
78

Jed williamson’s Accident Matrix
79

wHY DO wE HAVE ACCIDEnTS - CUMULATIVE EFFECTS: accidents develop step by step!
“There is no such thing as an accident. What we call by that name is the effect of some cause which we do not see.” -Voltaire Direct Causes: 1. Acts of Nature. 2. Technical Incompetence. a. Simply did not know. b. Incorrectly using learned info 3. Judgement Errors. a. Physical and mental ability. b. Environmental conditions. Contributing_Causes: 1. Sociological a. Heritage and environment. b. Present group: the group decision tends to be riskier than individual’s would have recommended. 2. Physical: a. Prior physical condition. b. Fatigue, illness. 3. Environmental: Severe conditions increase accident likelihood.
4. Psychological - SixHazardousAttitudes: Resistance to Authority “We never tie-in to the rope end when belaying” Follow standard methods, they’re usually right Impulsivity “Ijustfinisheda3daycourse.” Not so fast, think then act
Invulnerability/Overconfidence “Itdoesn’tlooktoofarortoosteep.” “It can’t happen to me.” It could Machismo “The route’s only 5.7, I climb 5.10 at my local area.” Taking Chances is foolish
Resignation “It’s supposed to be dangerous.” “Someone will come and get me.” I can make a difference Get There-itis “That was our plan” Use good judgement *** The highest risk occurs early as an individual is learning the sport.
..hadloggedjustenoughexperiencetofosteradangerouslevelofconfidenceyetnotenoughexperienceorinstructiontorecognizethehazardsandpossibleconsequencesofanunprotectedmistake.”-CharlieLoganRMNP
Do Your Prevention Homework
1. Knowledge and skills: most folks address these issues. a. Technical abilities appropriate to terrain / metaskills b. Search and rescue techniques
c. First aid training d. Judgement and decision-making
2. Route. - Location and terrain80

- Accessandexitpoints - Communication points.
3. Group. - Minimum/maximumsizeforsafety. - Minimum skill level required. - Type of people. - Basic physical condition of participants. - Strengths and weaknesses of individuals and the group. - Are they aware of the inherent risks? - Look for medical, dietary and psychological idiosyncracies.
4. Equipment. - What type best suits both the route and the group? - Isthereextra?Isitadequate?
5. Environmentalextremesexpected.
6. Emergencyevacuationinformationandrouteoptions.
ACCIDENT PROBABILITY ASSESSMENT – ASK, WHAT IF? Objectives: A. Maintain an acceptable margin of safety. B. Increase reaction time and early recogniton.
A. Reduce trial and error solutions.
1. Admit that it can happen to you! 2. Anon-goingassessmentprocessinthefield. a. Review pre-trip consideration and make adjustments. b. Look at participant’s overall health: stamina, agility, grace, coordination, endurance.c. Reflectonparticipantsmentalapproaches:alertness,awareness,attentionlevel. d. Where are people emotionally: response to fear and stress, maturity, persistance. e. How do they funcion in a group: leadership, cooperation, communication patterns, supportiveness. f. Negative/Positive attitudes and behaviors: common sense, judgement, concern for others, individual and group responsibilities. Be aware of the negative behaviors and their potential effect on group safety. g. Examinethespecificenvironmentalfactors:listentoyour“gut” feelings, effect of weather on articipants mentally and physically. Do you know the area? How well? h. Anticipate and ask “what if?” for every situation. Borrow trouble. i. Recognizeeachtrivialfactorasapartofthepotential. j. What is Your own AURA OF SAFETY!
You should create an atmosphere of safety mid- way on the continuum. Adjust the ‘margin of risk’. Use your energy to pump up students in high risk situations. Keep students you are concerned about near you. Share your judgement and decision making.Watch Out! When your energy is down, cues are easily missed.PREVENTIVE AWARENESS means re-evaluating decisions on a continuing basis - a constant hunt for lemons.
3. Accident Case Analysis - hindsight. Best to pick a real accident that you were involved in; otherwise use a case study.
a. Recall the location and time: month, day, hour.b. Think about the other people involved.c.Whatwasthespecificenvironmentandweather?d.Whatwasthequest?Wasthegoalspecific?e. What was the key judgement call involved? Who made it? What were the results?f. What lessons do you carry with you today from that accident? Does it have a presence?
81

g. Would you make a different call if placed in the situation today?
References
Piecesofthisworkshophavebeemexcerptedfromthefollowingsources:Mobley, Michael, “Anatomy of An Accident,” The Journal of Experiential Education.Vol.7,No.3,Fall1984.Williamson, Jed. Ed. Accidents in North American Mountaineering.NewYork;TheAmericanAlpineClub,variousissues(1988–1999).Colorado Outward Bound Instructor Manual.Keystone Helicopter Risk Management Seminar for Flight Paramedics.
“Good judgement is the result of experience and experience is often the result of poor judgement.”
or should we say??“Good judgement is the result of experience built upon knowledge of principles
or the result of poor judgement experiences.”
Hazardous Attitudes
Problem AntidoteResistance to Authority Follow the rules, they are usually rightImpulsivity - “Do something quick!” Not so fast, think then actInvulnerability - “It can’t happen to me” “It could”Machismo Taking chances is foolishResignation I can make a differenceGet there-itis- It’s our job to go Use of good judgement
The Conservative Response
1. Learntorecognizeourowntendenciestoemployhazardousattitudesandtrainourselvestousetheantidotes.
2. Learntorecognizethesetendenciesinothers.3. Use multi-way communication and assertiveness to prevent the accident chain.
82

RISK MANAGEMENT
WHO IS RESPONSIBLE? WHEN DOES IT BEGIN?
AdministrativeMarketingInitial ContactsWritten InformationFollow up ContactsEquipmentEnvironmentExternal InfluencesInstructional StaffInstructional PedagogyParticipantsStaffAdministration
RISK MANAGEMENT - THE ACCIDENT CHAINAn accident is more than just one factor.
Learn to recognize our own tendencies to employ hazardous attitudes and train ourselves to use the antidotes.
Learn to recognize these tendencies in others.
Use multi-way communication and assertiveness to prevent the accident chain.
83

Student Handout: Human FactorsThis is from the American Institute for Avalanche Research and Education. (AIARE) I think Karl Klassen came up with it but others probably were involved too.
Thereareanumberofhumanfactorswhichinfluencedecisionmaking.Thefollowinglistcontainssomeofthem.Itisworth noting that these factors, while less technical and generally of less interest to most decision makers, probably ac-count for more accidents and incidents than avalanche danger factors alone. They warrant serious consideration in and throughout any decision making process.
Age and Gender:Ingeneral,youngermales(typicallymalesaged17–27)aremorewillingtoacceptriskthanolderpeople and females.
Dependents: In general, people who have dependents (especially young children) tend to be less willing to accept risk than those with no dependents.
Technical Proficiency/Physical Condition: Thosewhohaveahighleveloftechnicalproficiencyandareinexcellentphysical condition are often more willing to accept risk than novices.
Blue Sky Syndrome: Conditions never seem as bad when the sun is shining and the skies are blue and people tend to be more aggressive in good weather than in bad.
Fun Factor: The enjoyment derived from skiing, boarding, or sledding provides a powerful urge to have fun in spite of suspecting or knowing conditions may less than ideal. People are less apt to turn back when they are having or anticipat-ing fun.
Goal Seeking: The more important the objective, the more people are willing to ignore risks to achieve it. Logic vs. Emotion: It is common for people to make emotional decisions when anticipating a good time, near a goal, or in a group from which they are seeking validation. In such cases, emotion can overpower the logic that indicates conditions are marginal.
“Real” Risk:Attimes,perceivedriskscanobscurerealrisks.Forexample,someonewhoisafraidoffallingmayperceivethattobethemainhazardwhileonanunstableslope,wheninactualfacttherealriskisanavalanche.Someonemayper-ceive the risk of avalanches is low because they are on a small feature while the real risk is a terrain trap into which they will be carried should an avalanche occur.
Back to the Barn Syndrome: The urge to simply “get it over with” and return to safety, food, and shelter is powerful. Late in the day when people are tired and nearly home is a time when poor decisions are often made.
Negative Event Feedback Loop: Ifpeopleareunawareofexposuretoriskoriftheydeliberatelyexposethemselvesandnothinghappenstheyeventuallybecomehardenedtothatriskandmay,intime,exposethemselveswithoutundertakinga proper decision making process. At that point they are simply taking chances instead of making a calculated, conscious decision to accept risk. “I’ve been here a hundred times before and nothing ever happened to me”.
The “Risky-Shift” Effect:Groupsfindsecurityinnumbersandtendtoacceptrisksthatnoindividualinthatgroupwouldbe willing to accept if they were alone. Shifting your own feelings to match that of the group even though your gut feeling is not to agree.
Communications and Empathy: People who do not communicate well and/or have little empathy for others may “bully” a friend or acquaintance into accepting and playing along with a poor decision.
Stress and Pressure: Decision-making is compromised when under stress or when there is pressure to perform. Stress and pressureareoftenperceivedtobecomingfromexternalsources(employer,client,peergroup,etc.)wheninrealitytheyoftenarearesultofinternalfactors(desiretomeetexpectations,fearoffailure,inexperienceoruncertainty,etc.).Low Self-confidence: Lackofself-confidencecanleadpeopletodistrusttheirinstinctandallowthemtoagreewithadecision that they intuitively feel is wrong. In some cases, people with little formal training or group members with less
84
experiencethantheleader,mayobserveorbecomeawareofsignificantdatathatarecrucialtothedecisionbeingmade.Thesepeopleareoftenunwillingtochallengeorquestionthe“experienced”leaderorstatusquointhegroupevenwhenthey have information or knowledge that others do not.
Unwillingness Listen to Others:Inmanycases,more“experienced”leadersareunwillingtolistentotheconcernsorfeel-ingsof“lessexperienced”groupmemberswhomayhaveinformationorknowledgethatispertinent.
Overconfidence:Often,“experienced”and“knowledgeable”peoplemisinterpretthedatatheythemselveshaveobservedandrecorded.Inmanycases,thisisduetooverconfidenceinone’straining,personalknowledge,and/orexperience.
Limited Observations: Lookingatoneorevenseveralvariablesinisolationdoesnotaccountfortheinfinitepotentialcombinations and permutations. In many cases accidents result not from a single variable but from a combination; the cumulative effect of one variable acting in combination with others greatly compounds the problem and increases the complexityofassessingconditions.
Lack Of Experience: Effectivedecisionmakinginthecomplexgameofavalanchesreliesprimarilyabroadanddeepexperiencebaseaccumulatedovertimeinavarietyofsituations.Ifsomeonelacksexperienceinagivensituation,their“intuition”canleteventhe“experts”down.
Lack of Leadership: When there is a lack of clear leadership or command, the decision making process often stalls. This is especially true in peer groups where there is no formal command structure to facilitate the process of taking in informa-tion,analyzingit,andacting.Insomecases,inactionisasdangerousasmakingthe“wrong”decision.
The Big Picture:Itiseasytonarrowone’sfocusandconcentratecloselyononeortwofactors,especiallyinadifficultsituation,ifanerrorismade,orwhenexperiencingproblems.Thismayleadtomissingsignificant,criticalfactorsinotherareas of concern or missing the cumulative effect of several, apparently minor factors, working in concert. It is essential that decision-makers maintain a clear view of the overall situation and maintain their awareness of all pertinent factors.
85

Importance of “what If” Thinking“What If?” thinking is the ability of a leader to quickly create and implement a plan based on mental and physical con-tingencies available as a result of his ongoing assessment of the probability of events occurring and the consequences of these events. It’s more than an instructor’s backup plan, it’s an attitude that is a part of a good outdoor leader’s entire mode of operating.
There shouldn’t be much mystery in the concept of being well prepared, in engaging in “what if” thinking. Good instruc-tors engage in this kind of thinking at all phases of a course. Our program has systems in place that question our decision makingprocessesbeforeandafterthefact.Weanalyzeincidentsandconstantlyreviewtheoperationsofoursystems.“Whatif”thinkingisaboutquestioningourdecisionsbeforeandwhileweareexperiencingtheirconsequences.Theideabehind this mode of thinking is that despite our best efforts to control the world many things are in fact out of our hands. Systemsfailandtheunexpectedhappens.Beingpreparedmeansbeingreadybothphysically,withthenecessarycontin-gency supplies, and mentally, with the training to use the supplies and improvise when necessary, and having the judgment to “wing it”, if needed. It means understanding that there’s at least a chance that the unlikely will happen.
Probability and consequence are two important factors that must be considered when evaluating decisions. There is a spectrum of possibility associated with events ranging from the very probable to the very improbable. We can plan on it raining in March, and it’s usually not much of a surprise when it does. A July snowstorm in Los Angeles is unlikely enough that one probably can forget about the possibility. Change the venue to the High Sierra, though, and if snow is out of your mind you may be in for an unpleasant time. There is a spectrum of consequence too. Are you risking just your own minor discomfort or the end of the free world as we know it? An outdoor leader must apply the spectrum of possibil-ityandconsequencetosuccessfullyanalyzehisdecisions.Theleadermustalsobepreparedtochangehismindasnewdata becomes available.
The physical preparations, the logistics, of a trip can appear to be the most obvious part of planning for a trip. The equip-ment and food lists, the emergency plans, the contingency equipment; these are all actually second order items inspired by thefirstordereventof“whatif?”thinking.Wecarrytoolsandsparepartsfortheweakmechanicallinksofoursystems.Sparetiresandjacks.Stoveparts.Repairandfirstaidkits.Webackupcriticalsystemswithredundancieswhereneces-sary.Climbinganchorsareanexampleofredundantsystems.Soareanauto’sbrakes.Thesearephysicalmanifestationsofpreparedness.Wewouldn’thavethisstuffifwedidn’tfirstthink“hey,whatif...wegetaflattire/brokencampstove/tent/etc”.Butnoteverysystemcanhavearedundantbackup.It’sjustnotpractical.Wedon’ttowanextravehicleeverywherewedrive.Herethepreparednessisreflectedinamentalstateandtheabilitytoimprovise,or,torewindtothedefinitionofjudgment, to correctly substitute for missing or incomplete information.
“What if?” thinking is then, at another level, the knowledge that since we can’t predict the future, we will have to use ourjudgmentinordertosuccessfullydealwiththesituationswewillexperienceinthefield.Wedon’twanttomakethissound like it is a black art or primarily an act of intuition, it is not. Good decisions are largely based on good data and past experience.Withtheseasabasisweknowthatwemakethebestpossibledecisions.
86

Emergency Action Plan - Sample
Purpose: to provide an outline of action in the event of an emergency or serious incident that involves students or staff. This includes injury, health, missing person, death, motor vehicle accident, criminal event or property damage.
Your responsibilities as an instructor are:
- provide for immediate needs of the injured, secure scene as much as possible.- toinitiatetheemergencynotificationprocessassoonaspossible.Avoidfurtherinvolvementinnotificationpro-cess if possible.- Follow the Emergency Procedures Plan.
You should not:- release the names of people, release the nature of the incident, speculate on cause, announce a death, or estimate propertydamageexcepttoauthorizedemergencypersonnel.- talk to the press.
Emergency Procedures PlanI. Overview of Scene -Assume or delegate Leadership. -Keep Calm. -Observeenvironment-victim’sposition,hazards(rockfall,fire,) -Deducewhatmighthaveoccurred&anticipateprobableinjuries. -Approach rapidly but Safely; protect from further injury. An injured rescuer is of no use. -S = Slow Down -T = Think -0 = 0bserve -P = Plan
Leadership is Management - the leader must -Observe and inquire -Delegateresponsibilities&tasks -First aid leader -Equipment inventory -Group maintenance -Plan evacuation -Organizerunners;Sendforhelp
-Avoid becoming focused on a particular problem so that he/she is aware of all aspects of the scene. -Step Back! -Leadership Assignments -First Aid
ConductInitialAssessment—>TreatanyproblemsConductDetailedExam—>Treatanyproblems -Ideally one person should take charge of coordinating the assessment and care of each victim. A sum mary of this information is periodically forwarded to the overall leader using a SOAP note.
Inventory Equipment Utilizeequipmentsothatitbestmeetstheneedsofthesituation. Keepallgearthatisnotbeingusedinacentralizelocation.Preventitfromgettingwetandlost.
Maintain Group Note environmental conditions, location, time of day, nature of injuries, physical and mental condition of group. Keep everyone busy. Set up temporary camp. 87

Prepare food and drinks for everyone.
Plan Evacuation Options -Victim walks out on own assisted by group members. Scouting needed. -Self evacuation by group and any nearby parties. Scouting needed. -Evacuationbyorganizedrescueparty -litter carry - chopper or plane -sled or snowmobile -dog, horsepack -team Any combination of the above possibilities. Determine what type of evacuation is needed based upon: -Triage and status of victim. -Location of victim. -Terrain&Weather. -PeoplePowerandconditionandexperienceofgroup. -Available Equipment and Supplies. -Litter Evacuations -victim’sconditionshouldbestabilizedbeforetransportunlesstimeiscritical-preferablyconscious. -evacuation itself often deteriorates victim’s condition. -difficulttomaintainairwayofunconsciousvictim. -test all improvised litters. Chopper&PlaneEvacuations -Is there an even faster of safer means of handling the evacuation? Nearby roadheads? How much time will be saved? -Isthereanadequateandaccessiblelandingzone? -Is the weather and visibility suitable for operations? -Always have a backup plan. Choppers -give dispatcher information about landing site, nature of injuries and if medic will need to hike to victim. Dis-patchwillwanttoknowlandingzoneconditionsandnearestobstacles. -Landing Zone needs to be 50’ - 75’ diameter with no more than a 12 degree slope, mark perlmeter, anchor objects nearlandingzone. -If landing on snow, be sure to pack it well to prevent blowing snow that will obstruct pilot’s view. -Weather: need 500’ cloud to ground ceiling, 1 1/2 - 2 miles visibility, winds less than 40 mph. -Pilot may want to pick runners up and have them direct him/her to victim. -Need a Wind Direction indicator - smoke, bandana, etc. -Have a Back Up Plan -Planes -give dispatcher information about landing site, nature of injuries and if medic will need to hike to victim. -LandingSite:needapondabout1milelongforfloatplanes.Inwinter,lcemustbesolidlyfrozenandhavesomesnowcover. Weather: need 500ft cloud to ground ceiling, 1 1/2-2 miles visibility, winds less than 40 mph. Pilot may want to pick runners up and have them direct him/her to victim. Need a wind direction indicator - smoke, bandana, etc. Have a Back Up Plan OrganizeRunners&SendforHelp Sendtwoorthreecompetentandresponsiblepeople.Travelswiftlybutsafelyandmemorizeroute. Leave at least one person with the victim. Runners should take
88

marked maps, indicating accident location,evacuation route, runner’s route, return route, landing site. essentialequipment&foodforlengthofroute,terrain,andweather.Prepareforanightoutandgettinglost copy of all paperwork( PatientAssessmentSummary&RescueRequest.( Person or agency to notify and phone numbers.( Specificwritteninstructionsforrunner’srouteout,ETAofevacuationparty,returnprocedures. back up plan Inremoteareas,runnersshouldnotleaveuntilthesecondaryexamhasbeencompletedandthereisnogreaterneed for them at the scene. Do Not Split Up. Conserve enough energy to lead rescuers back if needed.
ConstantlyObserveBehindYou.Wherenecessary,markyourroutewithclothstrips,flagging,blazes,rockpiles,etc. so that rescue party can follow it back.
Phone Call - runners give number they are at and ask to have all information repeated back to them before hang-ing up.
* * * CONSTANTLY EVALUATE HOW PLAN IS WORKING * * *
89

Selected Case Study #1
This accident involves a rappel failure in a beginning rock climbing class from a university’s education department. The class was practicing rappelling. The victim of this accident was making his second descent. Each member of the class had made one descent on the rope which was anchored around a rock. Witnesses described the victim as moving down three meters,then“fidgeting”withtheropeasiftherewasaproblem.Therope”popped”offtheanchorrock.Thevictimfellabout 20 meters and died instantly.
What pieces of information would you like to know that are not stated?
Is there an established method or technique by which this accident could have been prevented?
Can a general statement be made concerning the knowledge level required to lead a group in an activity?
Do leaders of an activity need to have more ability in an activity than the required by the activity?
What could have prevented this accident?
Whathazardousattitudeswereinvolved?
90

Selected Case Study #2
A student injured his left hand when it was caught between his rappel rope and an overhanging rock lip while participating in beginning lesson.
The student was practicing his second rappel of the day, this one being over the lip of an overhang. On belay, he backed over the lip of the overhang using his left hand as his guide hand and his right hand as the brake hand. As he backed over the lip, he became frightened and panicked. He let go with his brake hand, causing his left hand to slide down the rope. In the process, his left hand was pinned against the overhanging lip of the rock by the rope, with his full body weight of about 100 kilograms pulling against the rope.
What pieces of information would you like to know that are not stated?
What could be done by instructors to reduce the likelihood of this happening?
Can you think of areas where this could potentially be a problem?
Whathazardousattitudeswereinvolved?
91

Selected Case Study #3
A twenty nine year old climber and instructor for 15 years, and student were sharing top ropes with two local climbers.
Theinstructortiedintoatopropebelayonafaceleftofthecrack,andafterexchangingsignalswiththebelayerstartedupthe route. He fell almost at the top. His knot failed, where-upon he fell seven or eight meters. His feet struck a protruding boulder, and he pitched foward against the cliff face, striking his arms, legs, and back. He then crawled 75 meters to the car and was driven to the hospital. His injuries consisted of a fractured ankle, bruised right foot, and numerous abrasions and contusions.
What pieces of information would you like to know that are not stated?
How much responsibility for this accident rests with the instructor?
With the client?
How does this relate to the client / instructor relationship?
Was this accident preventable?
Whathazardousattitudeswereinvolved?
92

Selected Case Study #4
A30y.o.personwaswasdemonstratingrappeltechniquesandwasexplainingtheimportanceofmaintainingbelaycontrol at all times. Then, to demonstrate, and without warning, he suddenly let go of his rappel. The belayer lost control andtheclimberfelluncontrolleddowntherappelrope,comingtorestonaledgeandsufferingfromextensivemultipletrauma.
What pieces of information would you like to know that are not stated?
What could have been done to prevent this accident?
Could this person have been a safe intructor?
When someone says “I learned to climb from a friend,” does that scare you?Whathazardousattitudeswereinvolved?
93

Selected Case Study #5
We were bouldering at Horsetooth Reservoir. I was spotting when the climber fell from two to three meters above me. He landed on my head and I crumpled to the ground. My left foot had been on an outwardly sloping rock, which probably is whyIfracturedmyfibula.
Although most climbers gauge their potential for injury while free climbing, soloing and bouldering, this accident proves that you don’t need to leave the ground to get hurt.
What pieces of information would you like to know that are not stated?
What should be considered prior to bouldering at a site?
Is bouldering often considered mild with respect to risk?
What can be learned from this incident with regard to climbing instruction?
How can you increase awareness of spotter safety?
Whathazardousattitudeswereinvolved?
94

Selected Case Study #6
ClientAhadtakenaseriesofclimbingclassestotallingsixdaysthroughauniversityoutdoorprogram.Theclasseswereentitled “An Introduction to Rock Climbing”, “Advanced Beginner”, and “Instructor Training”. In these classes he had top roped, belayed, and set top rope anchors. He was now taking an intermediate climbing class from the university.
Duringthecourse,studentswerelearningabouttopropeanchors.Thepurposeoftheclasswastogiveclimberstheexpe-rienceofplacingpiecesofclimbingprotectionintherock.Tosetupfortheexercise,Instructor1andClientAhadsetupone system while Instructor 2 and Client B set up a separate system. The second system consisted of four anchors placed inonecrack.BothClientAandBwerenowconsideredqualifiedassistantinstructors.
To complete the lesson, Client A tied in order to be lowered to the ground through the anchor by a belayer from below on the ground. While being lowered, the anchor failed causing Client A to fall to his death.
Instructor2andClientBeachhad“significantexperience”settinganchorsandbelievedtheiranchorwas“bombproof”.The same anchor had been used by two other climbers in the same group.
What pieces of information would you like to know that are not stated?
What administrative management concerns do you have?
Whatdefines“experienced”?
Was the program negligent? Should they be held accountable?
What can be learned from this incident with regard to climbing instruction?
Whathazardousattitudeswereinvolved?
95

Accident report Form Sample
96

97

Hauling Systems for Tr course
98

99

Lowering
100

Appendix A - A Short Course in rope Physics ByDennisTurville,ClimbingMagazine,Circa1987
No other piece of the climbing protection system requires as much blind faith as the rope does. While climbers often use a couple of good anchors for a rappel, or a series of nuts strung out on a pitch, there is seldom any backup system for a rope. Ropes are fundamental, but few climbers have a good working knowledge of what happens to the rope during a fall, which falls are the worst ones to take in terms of the forces generated, or which ropes do the best job of stopping falls. Most of us accept what we are told about ropes, and willingly follow the advice of friends, shop personnel, and the claims of manufac-turers without question.
Ropephysicsisfarfromsimpleand,inadesiretooversimplifyacomplexissue,manyclimbersbuyropesforthewrongreasons.Buyingaropeintelligently,basedonavailabledata,isdifficultatbest.Tenyearsofexperienceintheretailclimb-ing industry helps, and so does a physics degree, but if one doesn’t have that information to draw on, hopefully this article willletclimbersknowwhatisreallyhappeningintheropebusiness,clearupsomemyths,andexposeoutrightmarketinghype. This article is based solidly on the physics of the real climbing world. It is not opinion. The writer’s intent is to help climberschoosethebestclimbingropefortheirstyleofclimb!ngandlevelofexpertise.
Before we discuss what a rope should be, let’s think about what ropes have accomplished over the years. One startling fact shouldalteryourthinkingaboutropes,theirlifespan,andtheirplacewithintheclimbingsystem:nokernmantleropeofa9,10 or 11 millimeter diameter has ever broken in climbing use. Period. Many have been cut over sharp edges or damaged by falling rocks, and one was even slashed by the hardware dangling around a falling climber, but no modern climbing rope has everbeenbrokenbyafallingctimber.Thisoneunalterablefacthasgreatsignificanceforallwhouseropesbecausethereisanamazingamountofoverkillbuiltintothesystem.
Overbuildingisfinebyitself,especiallyconsideringtheconsequencesoftheopposite,butitshouldn’tforceclimbersintobuyingropesthatareheavierormoreexpensivethantheyneedbe.ThefirstkernmantleropesbarelyheldtwoUIAAtestfalls, but no climber was ever able to break any of them. This suggests an obvious question: if climbers couldn’t break two-fall ropes, why are people now telling us we need ropes which hold nine or more falls to be safe? If that question intriques you, kindly read on.
The ideal rope would be a masterful blend of steel cable and rubber band: it would stop the falling climber gently, but it would do so with a minimum of stretch to keep the fall distance as short as possible. While we may be able to send men to the moon, we can’t as yet build the perfect climbing rope. Since we can’t integrate the qualities of steel and rubber, all climbing ropes are studies in compromise. If one aspect of rope performance is given design preference, it can only come attheexpenseofotherqualities.Remember:onenevergetssomethingfornothingintheworldofphysics.Ifwesuddenlyhavearopethatholds13testfallsinsteadoffive,wemusthavegivenupsomething.
No amount of advertising to the contrary can change that— as long as we know better. If what you’re about to read sounds different than what you’ve heard before, it is probably because marketing and mathematics are seldom the same. The big-gest misconception about climbing ropes comes from the way they are tested and then marketed to the climbing public. The UIAAistobecommendedbecausetheydoexistwhensimilarorganizationsarepracticallynon-existentinotherfields,butthetestsadvocatedbythemdonotaccuratelyreflectwhathappensintherealclimbingworld,nordotheygivetheconsumermeaningful data to choose a rope by.
AttheheartofthematteristheextremeUIAAtestfall,afallsoseverethatropemanufacturersthemselvesadmititisimpos-sible to take in a real ciimbing situation. If we cannot take a fall as nasty as the UIAA test fall, why do we test ropes with it? If you manufactured ropes the last thing you would want is a lawsuit brought by the estate of some poor climber who managed tobreakone,sonaturallyyouwouldfeelbetterifyourropewastestedwiththemostextremesituationpossible.TheUIAAtestfallisjustthat.Twomanufacturersofrawropefiberhaverefusedtolettheirproductsbeusedintwistedclimbingropesor for other uses with risk, so the question of liability is a very real one.
IntheUIAAtestfall,an80kgironblockisdroppedfivemetersandheldby2.8metersofrope.Thisyieldsafallfactorof1.78. (Fall factor is the distance fallen compared to the rope used to hold the fall. A fall factor of 2 is therefore the worst one possible.)InordertoobtainUIAAsanction,aropemustholdfivesuchfalls,whethertheyareachieveableinactualclimb-
101

ing situations or not.
Testing is done by labs selected by the UIAA committee, not the UIAA itself. Ropes are simply given a pass / fail test for fivefalls,soanyropeshowingahigherfallcapabilityexhibitsthemanufacturer’srating,notthatoftheUIAA.Theratingitselfisanaverageusually,meaningthatagivennine-fallropeholdsanaverageofninefalls,notexactlyninefalls.Somemanufacturers give a range for fall capacity, such as seven to nine falls, and this is closer to the truth than a single number.
There are many reasons why the UIAA test fall cannot happen in the real climbing world:1) The iron weight stops abruptly. something the human body cannot do. This results in a reduction of impact force by a factor of 2.5 or 10 to 15 percent, depending on whether you choose to believe Beal or Edelrid respectively.2)Theblockisstoppedstaticallywiththeropetiedtoafixedpointinthetest.Staticbelaysdon’thappeninthefieldsincebody belays and mechanical belaying devices both allow some slippage of the belay rope.3) To achieve a high fall factor (over 1.1 the climber must fall past the belayer, something which doesn’t happen very often because of nuts and other anchors in the system.4) The fall must occur on vertical rock or near vertical ice or the fall energy will be dissipated by friction.
ThedifferenceintherealclimbingworldfromtheUIAAtestfalllaboratoryexplainswhywehaveneverbrokenamodernclimbingrope.Sinceallropesmustnowholdfivefalls,andtheoldropesheldtwofallsmoreseverethananyonefallwecan ever take on the rock, it’s pretty obvious why ropes never break. If we can’t break a two-fall rope, why do we need a 13 fall rope to be safe, as some like to tell us? Simply put, we don’t. Actually, a 13 fall rope will hold 13 falls on each end so it’sreallya26-fallropeanyway.Twenty-sixfallswhenwecan’ttakeoneintherealworld.
All of this means that buying a rope based on its test fall capacity is basically nonsense. When one manufacturer came out with a rope that would hold more test falls than anyone else’s, they suddenly had a marketing edge; they started telling us their rope was SAFER because it held more falls, and we believed them. Multi-fall ropes are not safer than ropes which hold fewer falls, but no one was around to tell the climbing public in a way which would get them to believe it. Not only are multi-fall ropes not safer than their counterparts, but a strong case can be made suggesting that some multi-fail ropes are actually less safe, for both beginners and hard-core climbers alike.
A falling climber is energy in motion, and a rope must largely absorb that energy. A rope is a shock absorber, one that, breaks when it cannot absorb any more fall energy. The rope stretches during a fall in two basic ways: mechanical elongation which recoversafterthefall,andfiberelongationwhichispermanent.Everytimearopeholdsaseverefall(overafallfactorof1),it loses some of its ability to stretch and hence its ability to absorb fall energy. Stretchy ropes can absorb more energy and so they can hold more falls but a fall which occurs on them is longer and more dangerous to the climber. Stretch should be kept to a minimum in good climbing ropes.
Impact load or impact force is the amount of shock that is transmitted to the climber’s body and the rest of the climbing system during a fall. If the impact force goes up, everything in the system is more likely to fail. Since we know that ropes don’t break, it follows that the belay or the protection placements are more likely to fail if the impact load increases. All rope manufacturersmustshowafigureforimpactforce,buttheyusedifferentunitsofmeasurement,sowhenshoppingmakecertain you are comparing similar units.
Alowimpactforceisobviouslyveryimportant,butitmustbeconsideredinconjunctionwithstretch.Anexcessivelystretchyrope may have a low impact force, but we still don’t want to fall any farther than we have to, thank you. So stretch and impact load must both be kept to a minimum. Stretch is measured in many ways: working elongation with an 80 kg load, impact force elongation and elongation at failure. Of these, impact elongation is the most useful for choosing a rope, but unfortunately it is seldom listed in rope data. Or it is estimated. It requires sophisticated machinery to measure impact elongation, and many manufacturersdon’tlistthisfigure,particularlysincetheyarenotrequiredtodosobytheUIAA. Impact force elongation measures how much the rope stretches when you fall on it, a very important feature to leave out of rope statistics, but if climbers only bought ropes with published data about impact elongation, perhaps the manufacturers would wake up. The UIAA should address this important point, but curiously they have chosen not to.
The UIAA is suggesting that manufacturers all use kilograms as their impact force unit, which is a mass unit and techni-102

cally incorrect to use as a force measurement, but for layman climbers not concerned about the differences, it represents a welcome step toward consistency.
Impact load, impact stretch, and fall capacity: this is where safety and value come in. In order to facilitate multi-fall rope the UIAA raised its limit on working elongation. At this point manufacturers had three major ways of increasing a rope’s fall capacity:1)Onecanmakeatighterwrapoffibersinthecoreorincreasethediameterofthecorewhichwillgivemoretestfalls,butonlyattheexpenseofincreasedworkingloadstretch,impactload,andweight.2) The mechanical stretch could be increased.3)Themanufacturercouldtreatthebasicnylonwithsomeexpensivechemicalprocessingthatcreatesanylonwithahigherelongation at rupture, but which doesn’t appreciably change impact load or working elongation while giving more test falls. Thisoptionisthemostexpensiveone,however.
So, in order to get a multi-fall rope, it must be heavier, have more stretch, have a higher impact force, cost more, or have somecombinationoftheabove.Multi-fallropeswhichachievehighfallcapacityattheexpenseofimpactloadingarelesssafe than ropes which simply hold fewer talls, particularly for beginners. But beginners are usually who the cheapest ropes are aimed at. You get what you pay for in climbing ropes; a rope with a small price tag might not be the bargain you want, so buyer beware.
Nowwhenwelookatthetableofropestatistics,thingsstartmakingsense.Ifweseeafive-fallropewitharelativelyhighimpactforceandlowpricetagnexttoonewhichisanine-fallropewithalowerimpactforceandaheftypricetag,weknowwhy.Thefirstropeisapricepointrope,onesoldascheaplyaspossible,whiletheotherone,solongasitsimpactforceislow,isamoreexpensivelymaderopeofprocessednylonfibers.Butrememberthatropedatadoesn’ttellthewholestory.Impactforceelongationisstillamurkyitemandbeforeyousaythatincreasingyourfallby,say,sixinchesisunimportant,keepinmindthatafailsixincheslongercanmeanthedifferencebetweenagoodbarstoryandacompoundfracture.
Whetherropedataislackingthroughmanufacturingsecrecy,testinginadequacy,orbyproductanxietyisunimportanttous.The important thing is for climbers to know as much about ropes as possible so they can make good, sound choices. So, a prudent climber will buy a rope with a minimum static stretch and a low impact force. A wise one will select a rope which is light and has good handling characteristics as well, perhaps paying forthat lightness, but passing on the multi-fall monsters, knowing full well a rope won’t break.
Whatever rope is chosen won’t break, but how long will it last? The useful lifespan of ropes is a very controversial issue, with estimates ranging from several years to a couple hundred hours; but whatever the objective life of the rope is, it is obvious thatnoclimbershavemanagedtoexceedit.Consideringthemanytypesofpeoplewhoareclimbers,everythingfromthegarbagescroungersoflowerYosemitetoplasticsurgeonswhopaytheirwayontoexpeditions,itseemsveryunlikelythatclimbers are magically all retiring their ropes at just the same time. We must be putting our ropes out to pasture long before we need to.
Since it is impossibie to wear out a rope by falling on it, and since reliable test data on the aging properties of ropes are not available, a rope’s objective life is open to conjecture. Most climbers retire a rope when it looks hammered, when the sheath is badly worn, perhaps cut in spots, and when they no longer trust it—not when it has held bad falls. Many climbers do not realizethatitisthefallfactorthatdeterminesimpactforce,notthedistancefallen,sotheydontactuallyknowwhatabadfall is in terms of rope dynamics.
UIAA test fail capability doesn’t determine how long a rope will last, the sheath does. The sheath is actually more important than most climbers think. Not only does it dictate when we will ultimately retire a rope; it has much to do with handling characteristics as well. A poorly-woven sheath will cut easier against rock crystals and will wear sooner. A magnifying glass will show interesting differences in sheath weaving for anyone willing to look. A sheath that slips against the core signals a poorlymaderope.Thesheathshouldbefirmlywoventothecoresothereislittleornoslippage,otherwisetheropewillnottake as much abrasion nor will it handle very well.
Once again, not all manufacturers list mantle slip data and those who do use different terms. The mantle slip test uses a two-meterropewhichispulledthroughadisplacementapparatusseveraltimes.Theslippageshouldnotexceed30millimeters
103

maximumafterfivetries,butlessslippageisstillbetter.Somedatashowonlyanumberexpressedinmillimetersandothershowamaximumfigureinmillimeters.Eitherway,thelowerthenumberthebetter.
Other important aspects of abrasion resistance are waterproof and other rope coatings. It has been shown that a rope will withstand 33 percent more abrasion cycles with a waterproof coating than one without. Other coatings limit the absorption of damaging ultraviolet rays by the rope. Coatings do more for a rope’s longevity than the number of test falls it allegedly holds.Notallcoatingsareequal,asyoumightexpect.SomeEuropeanmanufacturersuseaparaffincompoundwhichcomesofftheropequickly.Thetwoothercoatingswhicharemostoftenusedaresiliconeandfluorochemicals,thelatterbeingmoredurable generally. Other than rockfall, which is theleading cause of death among climbing ropes, UV and industrial pollution are a rope’s main enemies. Alcohol, gasoline and other hydrocarbon solvents do not affect nylon chemically, so do not worry if you spill some on your rope. It is certainly not a reason to discard it. Battery acid is another matter; even the fumes are harmful to ropes. A rope may receive more damaging UV while riding on the back of your pack than while actually climbing, so keeping a rope in a rope bag makes good sense.
The amount of abrasion resistance a rope will take is really what ultimately determines when its life is over. The life of the sheath is this subjective life of the rope, and the subjective life is what we all gauge our ropes by. So how can a 13 fall rope last longer than a 5 fall one? The concept is silly because they both have the same subjective lifespan if their sheaths are the same. Now it starts getting sticky again. Some manufacturers have gone to thinner sheaths so they can put more core material into the rope and still stay at a given diameter. This chicanery gives a higher number of test falls, but you can guess what it does to the life of the sheath. So it may well be that those who advertise longer lasting ropes because of their increased test fall capacity are actually less abrasion-resistant because of their thinner sheaths. We replace a rope when we no longer trust it, or we use it on less serious routes, but the life of the rope in terms of the way we use it has nothing to do with the number ofartificialtestfallsitholdsonaverage.
A couple of things should be clear. One is that the number of test falls a rope holds doesn’t have much to do with a rope’s safetyoritsdurability.Anotheristhattheropeindustryshouldstandardizeitstermsandstophidingbehindinconclusivedata.Mostclimbersbuyropesbasedonfallcapacityalone,andthatmeanstheyhaulheavyorexpensiveropesaroundwhenalighter,cheaperonemightfithisorherneedsexactly.Ona20milehikeintoaroute,aropethatisapoundandahalflighteris an obvious joy, and it’s a delight to have it trailing behind you on a pitch instead of some 11.5mm monster. On big walls an 11mm rope is a good investment because of the abuse it must take there due to jumaring.
A thin superstatic line could be used for big wall hauling to save weight and bulk, but static lines (ropes that stretch very little under body weight) should not be used where falls are possible because of their high impact loads. Normal crag climb-ingcaneasilybedoneusing10.5andeven1Ommropeswithoutworry.Forglacierworkandalpineice,use8mmand9mmrespectively. Why lug around more rope than you need to? Double ropes make a great deal of sense, particularly in the area ofropecutting,butAmericansdon’tseemtousethemmuch.Doublelineshavemuchlowerimpactfigures,buttheyalsostretch more. In an area of sharp rock they are the safest choice.
UnlikethefirstascentpartyontheMatterhorn,today’sclimbersdonothavetoworryabouttheirropesbreaking.Theyaredependable and strong. If climbers voice their collective opinion through the ropes they buy, manufacturers will be forced to create the best ropes for climbers, instead of confusing the issue with meaningless and/or incomplete data and misleading advertising. The ideal rope may be a while off yet, but thoughtful climbers can sort through the claims and counterclaims to findjusttherightropetofollowthemintotheclouds.
DennisTurville,ClimbingMagazine(1987?)
The author would like to thank the following for their help in preparing this article: Dick Newell ofBluewater, Helmut Lenes of Climb High, John Cooley and Steve Olson of Robbins, Mike Reeves ofSMC, Frank Petran of Liberty, and Gary Tauber of Chouinard Equipment.
104

105

Appendix B - A summary of the Conference on nylon and ropesTURIN, MARCH 8/9, 2002
Severalscientificpaperswerepresented,includingmathematicalmodelingofbelaytechniquesandanalyticalmodelsfortheanalysisoftextileropes.Waterabsorptioninpolymersismuchbetterunderstoodnowthanover30 years ago, when tests established that a wet rope loses much of its dynamic performance. Today it is known thatwatercausesthenylontoplasticize,drasticallychangingitsmechanicalandphysicalproperties.Workonthis subject, while presented at the conference, can be found elsewhere on this site.
1. Material facts about polymers (nylon) of interest to rope users:- polymers consist of macromolecules, where crystal parts, perfectly ordered chain structures, alternate with amorphous parts, disorderly structures with tangled chains, -thetemperatureatwhichtheamorphouspartsaremodifiediscalledtheglasstransitiontemperature(Tg), because the material behaves similar to glass.- the addition of water lowers the Tg of the material and has the same effect as heating the material,- thus the mechanical and physical properties of nylon change with, among others, temperature and moisture,-withincreasingtemperaturethematerialgoesfromveryhard(glassy)toflowing(rubbery),thematerialissimilarlyplasticizedwhenitiswetted,- testing a wet rope is similar to testing a dry rope at a temperature of 70 - 80 ° C.
2. Rope making facts: - energy capacity is principally given by the core (multiple twisted strands),- to improve dynamic performance increase core and reduce sheath-sheathsareconstructedwith32,36,40,48bobbins(spindles)and,generally,two-on-twoconstruction,- abrasion resistance is more or less proportional to the amount of sheath,- a thicker sheath resists abrasion better than a thin one, all things being equal,- increase bobbins, diminish thickness of yarn (twine) and get a thinner sheath,- for a 10.5 mm rope 48 bobbins are used for a sport rope and 32 for a gym rope,- tight sheath vs. loose sheath. A tight sheath produces a rope, which is more rigid, has more resistance to abrasion and cutting, kinks more, has a higher elongation, is less supple and has less resistance in the knot than one with a loose sheath.
106

3. Why ropes have gone thinner and hold more falls. -fiftyyearsagoan11mmdiameterropebarelyheldtwofalls.Nowwegetaropewith9.5mmdiameterholding eight falls,- yarns: improved raw materials, production methods and quality control,- twine: better methods of twisting of yarn and of shrinkage and dying process,- proper selection (and setting up) of braiding machines and yarn-count,- better knowledge of balancing core and sheath construction,-yearsofexperimentation,researchandexperience.
4.Influenceofsunlightonthedynamicperformanceofmulti-fallmountaineeringropes:- some colours in the sheath fade, while others do not,-thereisacorrelationbetweendecolourisationofthefilamentsandthemechanicalproperties:thehigherthe loss of colour, the higher the degradation of the mechanical properties. It seems to affect more the brilliant and “stylish” colours,- the mechanical properties of the core degrade in a markedly more uniform way and much less than the sheath,-arelativelylowdegradationofthemechanicalpropertiesofthefilaments(approx.10%reductioninbreaking strength and elongation) corresponds to a notable reduction in the number of falls held (up to 50%).Theropeswereexposedforthreemonthsatanelevationof2550mintheDolomites,-asexpected,degradationatalowerelevation(1834m)wasconsiderablyless(upto25%reductioninthe number of falls held),- the value of the impact force is not affected.
5. When to retire a rope; a study of rope wear:- it is hardly any news that the principal factors of rope wear are the combined effects of rubbing against rock, mechanical reduction (rappelling and belaying devices), dust and microcrystals that penetrate the sheath and the number of meters climbed (not the time used),- the enemy of rope wear is friction - most intense in abseiling and top roping, made worse by dirt, and the inevitable rubbing against rock,- to weaken the sheath means to seriously compromise the dynamic performance of the rope,-thesheathofasportropeisabout30%oftheweightoftherope.Thecorealone,ofsuchan8-9fallrope, holds only one fall,- some abseiling devices produce much more wear damage than others,-afteronly50descentswithafigure-eight,thedynamicresistanceofaropeisreducedbyonethird(numberofdrops).Thedescentswereundertakenwithextremecare-slowlyandwithoutimpact,- rappelling with a Robot (a multi-use device manufactured by Kong) does not appear to compromise the dynamic resistance of the rope. The device functions like a carabiner brake,- not surprisingly rope wear is much more severe on granite than on limestone,-ropedegradationisapproximatelyproportionaltothenumberofbrokentextileyarnsofthesheath,-currentworkconfirmspreviouslypublishedinformation.Afterclimbingapproximately5000meters,thedynamicresistanceoftheropeisreducedtohalfandafteranadditional6000metersitisdownto30%(UIAABulletin#146,June1994,inGerman),-seealsoTheJournaloftheUIAA#3,2000,pp.12-13,availableontheInternetunderwww.uiaa.ch.
6.SafetyLossofMountaineeringRopesbyLoweringCyclesinTopropeClimbing.Thispaperisofsufficientimportancethatitcanbefoundinitsentiretyelsewhereonthissite.Thelogical conclusion to this presentation is the use of a heavy sheath (top) rope for toproping. If the pitch has to be led to the toprope anchor, then a sport rope should be used for the lead and a different (top) rope for the lowering and subsequent toproping.A note of caution regarding the use of the Grigri in this study: the device acts statically and should not
107

be used to belay a lead climber. It was developed for toproping and should only be used for this purpose.
7.Claimsaboundaboutthebenefitsofdrycoatingofropes(durablywaterproof,improved handling, abrasion resistance and durability, etc.). First of all, there are no standard procedures. Manufacturers can do as much or as little as they feel like. Furthermore, there are no tests specificallyforclimbingropes,whichmeasuredurability,abrasionresistanceorwaterproofing.Novalidcomparisons can, therefore, be made.
However,thereisnodoubtthattreatmentsandfinishingprocessesareknown,whichreducewaterabsorption. The aging behaviour of this treatment is supposedly good over the rope’s lifetime, but it is alsoacceptedthatthedryproofingdeteriorateswithropeuse.
A study of dry proofed ropes from thirteen different manufacturers, using a variety of test methods, shows that only a very few ropes do indeed repel water well. The rest are bunched together with much higher absorption rates. One may say that many of the claims hold no water, but the ropes do.
One of the presenters felt that climbers do not want ropes with water resistance treatment, because they only climb when it is sunny and are unwilling to pay for the added cost. Until there is an accepted standard, it may indeed not be worth the money to buy a dry treated rope.
8.Sharpedgetesting:theaimistofindasuitabletestmethod.Anattempttodifferentiatebetween edge-proof ropes (based on a sharp-edge test in the UIAA drop test) and others, which make no such claims, by measuring the energy absorption of the rope, failed. The results were nearly the same for all ropes. The suggestion was made to go away from the drop test and approach the problem from cuttingtheropeundertension(sidewayaction),whichalsoreflectrealitymoreclosely.
9.Newdirections:
-findwaystomaintainstrengthinahighhumidityorwetenvironment,- better resistance to sharp edges (a modern rope can only fail by being cut on a sharp edge),-developnew(polyamide)fibers.Thiswillonlyhappen,ifthereareotherneeds.Ropemanufacturersuse only a miniscule amount of the total nylon production in the world.
108

Appendix C - Safety Loss of ropes by Lowering Cycles in Toprope Climbing
Wolfram Vogel and Folker Bocksch, Institute of Mechanical Handling University of Stuttgart. Presented at the conference on Nylon and Ropes, Turin, March 8 - 9, 2002. The complete version of this paper was first published in EUROSEIL, Deutsche Seilerzeitung, 1996, #2.
1. Introduction
On short sport climbing routes, artificial climbing structures and so on, a climber can find short routes of all degrees of difficulty. Toprope climbing is then used frequently by belaying from the ground. In Fig. 1 the rope arrangement in toprope climbing, by belaying from the ground, is shown. The climber is connected with the rope to his harness. The rope leads from the climber to the upper end of the route, where the direction is changed at the carabiner and is led back to the belay device. Because of this arrangement, the fall factor, which describes the relationship of fall height to the paid out rope length and, therefore, the force on the climber in the case of a fall, is small. When the climber reaches the end of the route, the belayer will lower the climber. During lowering the rope is bent over the upper carabiner as well as in the belay device. Dynamic mountaineering ropes are commonly used in toprope climbing. Such ropes are stressed dynamically by leader falls. The measurement of the safety of a rope is the number of break-free norm drops, which is determined in a drop test by using an unused rope and testing it in accordance with DIN EN 892 (UIAA Standard 101). A rope is also exposed to mechanical, thermal and chemical demands while in use. These individual stresses act together on the rope and reduce its original capacity. The reduction of this capacity results in a loss of safety of a used rope, which is expressed by the reduction of the number of break-free drops held. Considerably mechanical stress in toprope climbing results from the bending around the upper carabiner during lowering as well as in the belay device under the rope force. In this investigation ropes are exposed exclusively to the bending during lowering cycles and their safety loss (number of falls) is examined. Three different belay devices are employed.
2. Bending during the lowering cycles
In toprope climbing the direction of the rope changes during the lowering cycle around the upper carabiner as well as in the belay device. The Munter hitch, figure eight descender and Grigri, used in toprope climbing, are shown in Fig. 1. The Munter hitch and the figure eight descender are designated as dynamic belay devices. In these belay devices, the hand power of the belayer is needed to brake the fall. The term dynamic belay device is derived from the braking effect, since during a fall, the impact force can be reduced by rope-slip through the device. In the Munter hitch, the direction of the rope is changed twice with rope-carabiner-contact and twice with rope-rope-contact. In the figure eight descender the rope experiences three bends with rope-metal-contact. The grigri is a representative of a static belay device. The rope is placed around an eccentric with a groove. Using a lever, the eccentric can be positioned in such a way that during climbing, rope can be paid out. During lowering, the position of the eccentric and, therefore, the braking force can be varied, although not as smoothly as with the other devices. The brake functions automatically, i.e. no hand power is needed. A dynamic brake effect arises with the grigri only with a movement of the belayer, who may be lifted up. The bending around the upper carabiner with a radius of 5 mm takes place with an angle α, between 160° and 180°, depending on the horizontal distance the belayer is from a vertical line passing through the upper carabiner.
3. Rope forces during lowering
The rope force during the lowering cycle is dependent on the mass of the climber and the posi≠tion of the rope in the safety chain. The rope force F2 between the upper carabiner and the belay device and the force of the braking hand FH has been measured for the dynamic belay devices, the Munter hitch and figure eight descender, during
109

the lowering with a solid mass of 80 kg. The ex≠perimental arrangement is shown in Fig. 2. The wrapping angle in the upper carabiner is about 170° in these measurements. The measure≠ments have been carried out with an unused mountaineering rope and a used mountaineering rope with a furry rope sheath. The measured rope forces are shown in Table 1. The rope force F1 between the climber and the upper carabiner is equivalent to the mass of the climber. The rope force F2, between the upper carabiner and the belay device, is 56% of the lowered mass, m for a new rope. For the used mountaineering rope the force F2 is, as expected, smaller and amounts to only about 46% of the mass, m. The force of the braking hand FH depends on the choice of the dynamic belay device. In the figure eight descender, about 11% and in the Munter hitch 4% of the mass, m has to be held with a new rope. For the used rope, the hand force goes back to 7.6% and 2.5%, respectively, of the force produced by the mass, m.
4. Ropes
Altogether, eight different single ropes were tested. Most of the tests were carried out on three single ropes, which were made available by European mountaineering rope producers (ArOVA-MAMMUT Ag, CH; EDELMANN + rIDDEr gMBH + CO., D-Isny i.A.; MArLOW rOPES LTD., gB-Hailsham). All of the ropes were examined and tested when new in accordance with DIN EN 892 at the Institute of Mechanical Han≠dling, University of Stuttgart.
5. Test procedure
The testing is performed in two steps. First, the ropes are aged by N lowering cycles using the different belay devices and then they are tested in the drop test ac≠cording to DIN EN 892.
5.1 Aging test of ropes by lowering
The lowering procedure in toprope climbing with belaying from the ground is simulated in the laboratory. Thus, a test stand (Fig. 2) was erected, in which the relationships in toprope climbing are simulated. Additional degradations such as rubbing at edges or environmental in≠fluences are excluded. The belay devices are fixed on the hall floor with a short sling. A lowering cycle is designed as follows: the mass, m is hoisted up with a crane to the height of the upper carabiner using another rope. The test rope is pulled behind, force free and the mass, m is transferred to the test rope. The mass, m is then lowered to the hall floor. The speed of lowering is about 1 m/s. The lowering procedure is repeated N = 20, N = 40, N = 60 and N= 80 times. After each aging test, two samples with a length of 3.8 m are removed for the drop test. One part of the rope is bent only over the upper carabiner and the other part of the rope is only bent in the belay device N-times. After the aging tests, no damage to the sheaths of the ropes could be determined. When belaying with the Munter hitch and figure eight descender, the mass, m can be deposited nearly shock free on the hall floor as the rope is completely unloaded. This is possible, because the force of the braking hand and, therefore, the lowering speed can be finely adjusted. In belaying with the Grigri, the lowering procedure can only be roughly influenced. Before reaching the hall floor, the mass, m has to be sharply slowed down. In doing this, the rope receives an additional dynamic load. In Fig. 3 the measured rope force in a typical lowering cycle with the grigri is shown. After the rope is stopped in the grigri, the maximum rope force is approximately 2.8 times of the force produced by the lowered mass, m.
5.2 Drop tests
The drop tests with the aged ropes are carried out in accordance with DIN EN 892 on the drop test stand at the Institute of Mechanical Handling, University of Stuttgart. The drop test stand is provided with a guided falling mass. The mass used to test a single rope is 80 kg. A 3.8 m long rope is required for each test. The sections of ropes tested were taken from the portions, which passed over the upper carabiner as well as through the belay device. The test sample is connected to falling mass. The rope is passed through the orifice (the test edge with a ra≠dius of 5 mm, equivalent to the radius of the upper carabiner) and then tied, three times, around an anchor pin and
110

finally fixed between a clamp plate. The test sample is then loaded statically with the mass and after one minute the free length of (2500±20) mm is adjusted. During the drop test the mass falls freely for approximately 5000 mm before the rope stretches and absorbs the energy produced by the falling mass. The impact force is measured and recorded during the first fall. After the drop, the rope has to be unloaded within one minute. Be≠tween two consecutive falls the time span has to be (5±0.5) minutes. The drop test is repeated until the rope breaks.
6. Number of drops without breakage
All the ropes were tested when new in accordance with DIN EN 892. The tests were carried out on three test samples. The minimum requirement of the standard requires each sample to hold at least five falls without breaking. The mean value of the num≠ber of drops without breaking of these test samples is designated as nu (on the graphs nu with a mean value bar over the n). The mean value of the number of drops without breaking of the aged test sample is referred to as ng. The relative number of drops without breaking ng/nu is plotted against the number of lowering cycles N. Figs. 4, 5 and 6 show the ropes bent only in the belay devices. For the Munter hitch (Fig. 4) and the figure eight descender (Fig. 5) the relationship between the relative number of drops without breaking and the number of lowering cycles is nearly linear. The rope degradation is more severe for the Munter hitch than for the figure eight descender because of the higher number of bends, the more severe radii and, moreover, the rope-to-rope contact. rope sections, which were exposed to 80 lowering cycles in the Munter hitch, have already lost more than 50% of their original capacity. For rope sections, which were bent in the grigri (Fig. 6), the relative number of drops without breaking decreases steeply after some lowering cycles and is then reduced only slightly. The reduction, with increasing number of lowering cycles, is smaller than with the Munter hitch or the figure eight descender. This behaviour is a consequence of the additional dynamic demand to which the rope is ex≠posed at the end of the lowering procedure. The plot of the relative number of drops without breaking against the number of lowering cycles for rope sections, which are only bent in the upper carabiner, is shown in Fig. 7 for the dynamic belay devices, the Munter hitch and the figure eight descender, and in Fig. 8 for the grigri. For both belay methods the quotient ng/nu decreases with the increas≠ing number of lowering cycles. For the dynamic belays, the relative number of drops without break≠age decreases linearly with increasing number of lowering cycles. The reduction of ng/nu is, despite the high rope forces at the upper carabiner, regularly smaller than for rope sections, which were bent in the dynamic belay devices. For the static belay with the Gri≠gri, the already known behaviour of ng/nu against N, as a consequence of the additional dynamic demand, is shown. The relative number of break-free falls determined in the tests, as a result of rope bending during the lowering cycles in toprope climbing, is evaluated in a regression analysis. A linear starting equation is chosen for the dynamic belay with the Munter hitch and the figure eight descender
(ng/nu) = a0 + a1 N (1)
For the static belay with the grigri an exponential equation is chosen.
(ng/nu) = b0Nb1 (2)
For the regression calculation, equation (2) is changed into the logarithmic form
lg(ng/nu) = c0 +c1lgN (3)
The regression calculation yields the constants a0, a1 and c0, c1. In Table 2 the con≠stants ao and a1, the standard deviation (derivation), s and the coefficient of determination (determination measure), B = r² are listed for the dy≠namic belay devices. Table 3 includes the constants found for the static belay device. The re≠sults of the calculation are plotted in Fig.4 to Fig. 8 as solid lines. Additionally the 95 % confidence interval is shown as a dashed line. The test results are above this calculated statistical limit.
7. Summary 111

The drop tests carried out on mountaineering ropes, which were aged in lowering procedures (to≠prope climbing), have shown that with an increasing number of lowering cycles the number of drops without breaking strongly decreases. Rope sections, which were bent in the figure eight descender or in the Munter hitch, for only 80 low≠ering cycles have only about half, or less than half, of the capacity of a new rope left. This safety loss occurs customarily after few days of top rope climbing. By superimposing other factors of rope degradation upon those caused by the bending in the belay devices and the top carabiner, one can expect a further decrease in the number of drops held without breaking. The safety loss is of no consequence for a rope used solely as a toprope because fall factors are small but is critical for lead climbing, when larger fall heights are possible.
112

113

Appendix D - Marking of ropesThatmarkingaclimbingropewithafeltpencandamageitwasfirstreportedin1998.TheGermanAlpineCub tested a Sharpie felt pen (made in USA and sold in Germany), which apparently was advertised for use on climbing ropes (to mark the middle of the rope, for instance). In the tests the ropes were marked and the marked areawasplacedattheorificeplateinthestandardUIAAdroptest.Fiveunmarkedsamplesheld10-12falls,whilethreemarkedsamplesheld6-8falls.ThisinformationwaspublishedatthattimeintheGazetteofTheAlpine Club of Canada as well as in The American Alpine News.
Last year this topic re-appeared on the Internet as well as in Climbing and Rock & Ice.Inbothmagazinesthe use of felt pens was recommended for the (middle) marking of ropes, while the Internet correspondence centered on the damage. The press, despite being told about the possible damage, did nothing about it. Among the users there was doubt about the sources of the information.
Lastyeartworopemanufacturers(LanexandMammut)andtheGermanAlpineClubvisitedthisproblemagain. Various samples of non-dry and superdry rope were tested using a variety of felt pens (Sharpie was not amongthem).Testingwasdonesevento30daysafterapplication.Reductionvariedfromzeroto50%inthenumber of drops held. Superdry ropes generally had less capacity reduction than non-dry, possibly because the saturationwasless.However,oneparticularropesamplehadaninsignificantincreaseincapacityforthenon-dry rope, but a 35 % reduction for the superdry. This rope, by the way, was the only one, which did not have a reduction in capacity for both the non-dry and superdry sample.
Middle markings, which come with a new rope and were applied by the manufacturer, are safe. Do rope manufacturers sell trustworthy markers? Mammut tested the “Rope Marker”, a pen sold by Beal. The reduction was50%forthenon-dryand17%forthesuperdryrope.Mammuttestedfivedaysandfourweeksafterapplication. The capacity reduction was more for tests done four weeks after application.
Sanford, the manufacturer of the Sharpie pens, will apparently not guarantee a consistent product. The ingredients of the pen may vary. There is no “standard” formula for the chemicals that are contained in the markers. The company has also stated that “Sanford will not endorse or in any way recommend use of these markers for rope climbing (sic), and will not accept liabilities, which may arise from its use.”
The recommendation: do not mark your rope with any kind of felt pen. Water-soluble acrylic paints are apparently safe. No information is available how long they stay on.
The bottom line: (for a rope, which would be safe under normal circumstances) there is a risk when the marked area is loaded by a fall over an edge. Who buys lottery tickets?
114

Appendix E - Choosing a Material for Your Cordelette
Prepared by the Seattle Mountaineers Climbing Committee© Copyright 2001 The Mountaineers
Thecordeletteisausefulpieceofclimbinggearforequalizinganchorsorforapplicationswhereatriplerunner would be used. A variety of cords are available for making cordelettes, each with advantages and disadvantages. For the Intermediate Climbing Course, rather than specifying a material for your cordelette, the decision is left to you. Thinking through this decision will introduce you to the on-going process of evaluating climbing equipment and techniques, then making decisions based on facts and what makes sense to you. In this case, as in many of the choices you will make, there is no “right” answer.
Hereissomebackgroundontheforceexertedinafallandhowthatimpactsthedesignandchoiceofclimbingequipment.Forcesareusuallyexpressedinthemetricunitofkilo-Newtons(kN).Forreference,ifyouandyourpackweigh220pounds,youareexertingaforceof1kNontheground.Impactforcesarealothigher,and 12 kN is about the most your body can take without serious injury. For that reason we climb with dynamic ropesthatlimitthemaximumforcetoabout10kN.Alsoconsiderthatduringaleaderfalltheforceontheanchorisnearlydouble(actually1.66timeswhenyouconsiderfrictionlossacrossthecarabiner).Withthedynamicrope,themaximumforceontheanchormaybe(10)(1.66)=17kN.UIAAminimumsforslingsandcarabiners are higher than that, at 22 kN and 20 kN respectively.
FourcordsthatareavailableinPugetSoundareaclimbingshopsarebrieflydescribedbelow.Youmayfindothers. A summary table is presented after the descriptions.
7 mm Perlon (nylon core, nylon sheath)
YouarealreadyfamiliarwithPerloncord–youused6mmPerlonforyourPrussikslings.Itisthecommonmountaineering accessory cord, and has been available for many years. For a cordelette, 7 mm is the standard size,thoughsomeclimbershaveused6mm.Perlonloseslittlestrengthwhenknottedandwithstandsrepeatedflexingwithnolossinstrength.Itsdisadvantagecomparedtohigh-strengthcordsisgreaterweightandbulk.However, at 40¢ per foot, this is your cheapest option ($8 for 20 feet).
5.5 mm Spectra (Blue Water Titan; Spectra/nylon core, nylon sheath)
Spectra is a form of polyethylene that is stronger per unit area than steel, with only one-tenth the density. It is a popular material for sewn runners. A 5.5 mm strand of Blue Water Titan Spectra is stronger than 7 mm Perlon, making it a promising cordelette alternative. However, Spectra loses almost half its strength when knotted with a Figure Eight knot. So in use, Spectra’s advantage in tensile strength is lost once it is knotted. Howeverthecordelettewillbelighterandlessbulky,thoughmoreexpensiveat$1.05perfoot($21for20feet).A consideration with Spectra is that it has a low melting point, and therefore is not recommended for use with frictionknots.Spectracordmustbetiedwithatriplefisherman’sknotbecausethecoreissoslipperythatitcanpullthroughadoublefisherman’sknotunderload.
115

5.5 mm Spectra-A (Maxim; Spectra/Kevlar core, polyester sheath)
Spectra-AusesKevlararamidfibertomakeareallystrongcordforslingingchocks.Someclimbershaveuseditforcordelettes,howevertherewasalwaysaconcernaboutlossofstrengthafterrepeatedflexing.TheKevlarfibersaresostrongthattheycancutthrougheachotherandweakenthecord.ThistendencywasdemonstratedinasevereflexingandbendingtestwhereSpectra-Alost40%ofitsstrengthafter200flexes.SowhiletheSpectra-AstartsstrongerthanPerlon,itloses39%ofitsstrengthwhenknottedandanother40%uponrepeatedflexing.ThesestrengthlosseswilldiscouragemostclimbersfromusingSpectra-A,eventhoughwhennewitmakes a stronger cordelette than Blue Water Titan Spectra. It is the same price per foot as regular Spectra, so 20 feet will cost you $21.
5 mm Gemini or Tech Cord (Black Diamond and Maxim; “Technora” aramid core, polyester sheath)
“Technora” is the newest material of the four and is an aramid like Kevlar. Its main application is for slinging chocks, however its 5 mm diameter has made it attractive to some climbers as a cordelette. While starting with the highest tensile strength, it loses the most strength of the four upon knotting with a Figure Eight, a startling 60%reduction.Italsolosesstrengthuponrepeatedflexing.At$1.65perfoot,thisisthemostexpensivecordof the four ($33 for 20 feet).
Strength Comparison of Prospective Cordelette Materials*
MaterialTensile
Strength (Single Strand)
Loss in Strength When Knotted with a Figure Eight
Cordelette Strength
(One Anchor)
Loss in Strength After 200
Flexing/Bending Cycles
Cordelette Strength after 200 Flexing/Bending
Cycles†7 mm Perlon(Sterling)
12 kN 8% 22 kN 0% 22 kN
5.5 mm Spectra(Blue Water Titan)
17 kN 47% 17 kN 6% 16kN
5.5 mm Spectra A(Maxim)
18 kN 39% 23 kN 40% 14 kN
5 mm Gemini(Black Diamond)aka: Tech Cord(Maxim)
22 kN 60% 18 kN 45% 10 kN
* These data are taken from “Comparative Testing of High Strength Cord,” presented by Tom Moyer and Chris Harmston at the International Technical Rescue Symposium in October 2000. Cordelette strength was evaluated by slow pull tests of a single arm of the cordelette, which was tied with an overhand knot. Drop tests were also conducted, and the strengths were nearly identical.
† These values are calculated and not test results. It is interesting that once you consider the loss in strength duetoflexing,thematerialswiththehighesttensilestrengthmaketheweakestcordelettes.Yourfinalchoice becomes a trade-off between strength and weight/bulk, with 7 mm Perlon and 5.5 mm Blue Water Titan Spectra being the two most popular choices.
116

1
2000 International Technical Rescue Symposium
Comparative Testing of High Strength Cord
Tom MoyerPaul Tusting, Chris Harmston,
( Tom Moyer)Complete test data for the results presented in this paper can be found at
http://www.xmission.com/~tmoyer/testing
Chris Harmston and Paul Tusting are employees of Black Diamond Equipment, the manufacturer of a product evaluated in this paper. All effort has been made to present the information here impartially. This paper presents the results of testing of many products. It does not represent the official position of Black Diamond Equipment.
AbstractMany climbers carry an 18-foot length of accessory cord called a cordelette for rigging anchors and as a tool forself-rescue situations. In the past, this cord was usually 7mm Nylon. In recent years, many climbers have changed to using one of a number of high-strength materials in smaller diameters. Vectran, Technora, Spectra, Kevlar, Kevlar/Spectra blends and Spectra/Nylon webbing are all used for these purposes along with Nylon cord and Nylon webbing. These materials all have different properties, and in some applications, dramatically different performance. This study tests and compares the strength of different knots in these materials, in both static and dynamic loading, along with their resistance to cyclic flexing, in order to judge their suitability as tools for climbers and rescuers.
BackgroundThe use of Kevlar, Spectra and Vectran fibers to make high-strength rope was pioneered by the sailing industry, to take advantage of their high tensile strength, low elongation, and low moisture absorption. These materials gradually moved into climbing applications, first as chock cord and more recently as cordelette material, prusik cord, and emergency rappel line. In the climbing world they have been surrounded by a lot of mythology and little hard data. It has been said that tying and untying chock cord weakens it severely, that double fisherman's knots are not secure, triple fisherman's are needed, that Kevlar-based cords will self-abrade and eventually weaken, and that knots will not hold in Spectra/Nylon webbing. In recent years, manufacturers have been combining and improving materials, and climbers have been expanding their applications. Have the materials improved? Are the myths true? And most importantly, are these materials strong enough to use in these applications? This testing will provide some answers to these questions.
MaterialsKevlarKevlar was one of the first high-strength fibers to be used in rope. It still offers high tensile strength and very low elongation, but has poor fatigue properties. The fibers inside the rope abrade each other, offering little indication of the reduced strength until the rope breaks. Kevlar has a very high melting point, 500 C or 932 °F. Kevlar-coreropes are sold as escape lines for firefighters - to be used once and discarded. Manufacturers have had some success at solving the self-abrasion problem by combining Kevlar with Spectra.TechnoraTechnora, like Kevlar, is an aramid, but with vastly improved fatigue properties. It shares Kevlar's high tensile strength and high melting point.SpectraSpectra is a very high molecular density form of polyethylene - the same thing used to make grocery bags, six-packcarriers and milk jugs. The manufacturing process aligns the molecules, which vastly increases the strength of the material. It is twice as strong as hardened steel (per unit area) and one-tenth the density. Spectra has several difficult issues. The melting point is very low, 147 C or 297 °F, not much warmer than boiling water. The material is unbelievably slippery, which makes it difficult for manufacturers to form into a workable rope. And, while the modulus of the fibers is comparable to steel, they slowly elongate under a continuous load. This process is called "creep." It is mostly irrelevant to climbers, but annoying to sailors. Spectra/Nylon is also known as Dyneema (a trade name of Beal Ropes) in Europe.
Appendix F - Comparative Testing of High Strength Cord

2
VectranVectran is a liquid crystal polymer - its properties are between those of crystalline solids and liquids. It has similar strength to Spectra, but without the creep problems. It has poor UV resistance, which is not a problem when used as the core in kernmantel rope construction.
Seven products were tested for this project. Sterling Vectran, Blue Water Titan, Black Diamond Gemini2, Maxim Spectra A, Mountain Tools Ultratape, Sterling 7mm Nylon accessory cord, and Liberty Mountain 1 inch Nylon Tubular Webbing.
Sterling Vectran has a Vectran core and a Nylon sheath - it is sold in precut lengths labeled "cordelette" in addition to spools. Blue Water Titan has a braided Spectra/Nylon core and a Nylon sheath. Black Diamond Gemini2 has a Technora core and a polyester sheath. It is identical to the product sold as "Tech Cord" by Maxim (New England Rope). The original Black Diamond Gemini was a different product, similar to Maxim's Spectra-A, and has not been sold in several years. Spectra-A has a braided Spectra/Kevlar core and a polyester sheath. It has largely been replaced by Tech Cord, but is still sold, usually at cheaper prices. Ultratape is a Spectra/Nylon webbing, constructed to minimize the amount of Spectra on the outside surface. This helps protect the Spectra from UV damage, and lets knots hold better, since more Nylon is in contact.
ApplicationsThe cordelette has become the favored tool of climbers for a quick, convenient and redundant anchor, using a minimum of gear. It also doubles as an extremely useful self-rescue tool, or can be cut up and left as rappel anchors when retreating off a climb. Mountain Tools has introduced the concept of the Web-o-lette, a long runner, with sewn eyes in each end. This makes the same 3 point tied-off anchor, but two of the pieces are clipped with only a single strand of webbing. This means the whole length of material can be reduced, which makes it lighter and less bulky on the harness.
Cordelette Anchor Webolette Anchor(Karl Lew photo)
Test MethodsSlow Pull TestsSlow pull tests were done on the 11,000-lb SATEC Apex 11 EMF universal test machine at Black Diamond. These were done on unknotted material over 4" diameter drums, on figure-eight knots, on loops tied with double fisherman's, triple fisherman's and water knots, and on a cordelette loaded on a single arm. Pull rates and fixtures were consistent with CEN standards. The material was not temperature and humidity conditioned, but all tests were done at 29% humidity ±4% and at 71ºF ±6º. Five samples were tested in each material for each configuration and the results were averaged. One sample of various friction knots was also tested in each material on Black Diamond 10.5mm Cirrus dry-coated rope.

3
Keep in mind that an average breaking strength (the arithmetic mean) is not a good quantity to use to determine whether a component is strong enough. A minimum breaking strength - three standard deviations below the mean - is much more appropriate. However, five samples are not sufficient to determine a meaningful statistical minimum, so average strength is presented here.
Drop TestsDrop Tests were conducted at the Rocky Mountain Rescue Group drop tower in Boulder Colorado. The configuration modeled the UIAA and CEN drop test - a fall factor 1.71 fall on 2.8 meters of rope. A new section of 10.5mm Black Diamond Cirrus (nondry) rope was used for each test. This rope carries a UIAA rated impact force of8.4 kN (1888 lb). The cordelette to be tested was placed at the location of the "pivot edge", or the direction change anchor. The force at this point should theoretically be twice the rope tension because of the direction change. In reality, carabiner friction reduces this to around 170%. The load was applied to the cordelette with carabiners, as it would be in a climbing fall. As in the slow pull tests, only one arm of the cordelette was clipped. In accordance with the CEN specifications, the weight was dropped once every five minutes until the cordelette had broken or sustained five falls without breaking.
Flex Cycle TestA cyclic flex test was run to check the fatigue performance of the different materials. A sample of cord passed through a horizontal hole in the fixture, flexed 90 degrees over a steel edge, and was loaded with a 40 lb weight.The fixture was rotated back and forth 180 degrees by a pneumatic actuator for a specified number of cycles, with all the flexing happening at the same point on the sample. The sample was then pull-tested over drums with the fatigued point in the free section to measure any reduction in tensile strength at that point.
ResultsSlow Pull Tests The Technora and Kevlar/Spectra cords live up to their billing as having extraordinary tensile strength, but the story changes immediately when the cord is knotted. Knot efficiencies for a figure-eight knot ranged from 40% on the Gemini to 92% on the Nylon. For a double fisherman's knot, Gemini and Titan share an interesting failure mode. The sheath breaks at the knot and the slippery core unties, pulling through the sheath. When a triple fisherman's knot is tied, this does not happen. The strength gain for the triple fisherman's is not large, but it is enough to change the mechanism. The Ultratape - a Spectra/Nylon webbing - shows excellent strength in all of the knots, contradicting the popular belief that knots will not hold in this type of material. Testing is needed on webbing with a more conventional Spectra/Nylon weave to see if that conclusion can be extended to other products.

4
Tensile Strength
0
1000
2000
3000
4000
5000
6000
Sterling
7mm Nylo
n
Sterling
Vectra
n
Blue W
ater T
itan (
Spectr
a)
BD Gem
ini (Te
chnora
)
Maxim
Spectr
a A (S
pectr
a/Kev
lar)
Mtn To
ols Ultra
tape
1" Tu
bular
Web
bing
Sing
le S
tran
d St
reng
th (l
bs)
0
5
10
15
20
25kNAverage Tensile Strength
Manufacturer's Rated StrengthCEN Minimum for 7mm cord
Figure Eight Knot Comparison
70%86%64%
61%
40%
53%
48%92%
0
1000
2000
3000
4000
5000
6000
Sterling
7mm Nylo
n
Sterling
Vectra
n
Blue W
ater T
itan (
Spectr
a)
BD Gem
ini (Te
chnora
)
Maxim
Spectr
a A (S
pectr
a/Kev
lar)
Mtn Too
ls Ultra
tape (
fig-8)
Mtn Too
ls Ultra
tape (
sewn e
ye)
1" Tu
bular
Web
bing
Sing
le S
tran
d St
reng
th (l
bs)
0
5
10
15
20
25 kNAverage Tensile StrengthFigure-Eight Knot(Knot Efficiency)

5
Loop Knots (Bends) Comparison
0
1000
2000
3000
4000
5000
6000
7000
Sterling
7mm Nylo
n
Sterling
Vectra
n
Blue W
ater T
itan (
Spectr
a)
BD Gem
ini (Te
chnora
)
Maxim
Spectr
a A (S
pectr
a/Kev
lar)
Mtn To
ols Ultra
tape
1" Tu
bular
Web
bing
Loop
Str
engt
h (lb
s)
0
5
10
15
20
25
30 kNDouble Fisherman'sTriple Fisherman'sWater Knot (Ring Bend)Sterling Spec for Vectran
Friction Knots
0
1000
2000
3000
Sterling
7mm Nylo
n
Blue W
ater T
itan (
Spectr
a)
BD Gem
ini (Te
chnora
)
Maxim
Spectr
a A (S
pectr
a/Kev
lar)
Mtn To
ols Ultra
tape
1" Tu
bular
Web
bing
Forc
e (lb
s)
0
5
10
kN
Prusik 3-wrapBachman 4-wrapAutoblock 4-wrapKleimheist 3-wrapKleimheist 4-wrapKleimheist 5-wrap

6
Cordelette Strength
0
1000
2000
3000
4000
5000
6000
7000
Sterling
7mm N
ylon
Sterling
Vectra
n
Blue W
ater T
itan (
Spectr
a)
BD Gem
ini (Tec
hnora
)
Maxim
Spectr
a A (S
pectr
a/Kev
lar)
Mtn Too
ls Web
olette
*
1" Tub
ular W
ebbin
g
Stre
ngth
(lbs
)
0
5
10
15
20
25
30 kNCordelette - Weak ArmCordelette - Strong ArmUIAA max impact forceMax force on direction change
Friction knots were tested to determine whether there were any obvious reasons why any of these materials could not be used for ascending or as a self-rescue rope-grab. For all the cord materials, any of several friction knots work fine and the choice would be based simply on ease of tying and loosening in use. For the two webbing materials, it is tougher to get sufficient holding power. A climber can easily generate forces of 500 lb whenascending. If a hitch will not reliably hold that load, slipping will happen. For the webbing, adding wraps is the only way to get the holding power. The most convenient hitch to do this with is the Kleimheist. The fact that the Spectra/Nylon Ultratape can be used at all for friction knots also contradicts the conventional wisdom.
For the cordelette strength, both the strength of the weak arm (knotted or single-strand sewn) and the strength of the stronger arms are plotted. For most of the materials there is no difference. The material breaks at the pin or in the overhand cordelette knot. For the webolette, the weak arm is a single strand, so the double-strand leg is considerably stronger. Since these are used as anchors, the UIAA spec for maximum dynamic-rope impact force is shown for comparison. This represents a typical worst-case force on the rope. However, if the belay is run through the anchor, force on the anchor is multiplied. A level 170% of the UIAA spec - an assumed maximum - is also shown for comparison. It is apparent from this chart that at least some of these cordelettes would be expected to fail a UIAA drop test.
* For the webolette, the weak arm is a single strand with a sewn eye. The strong arm is a double strand.
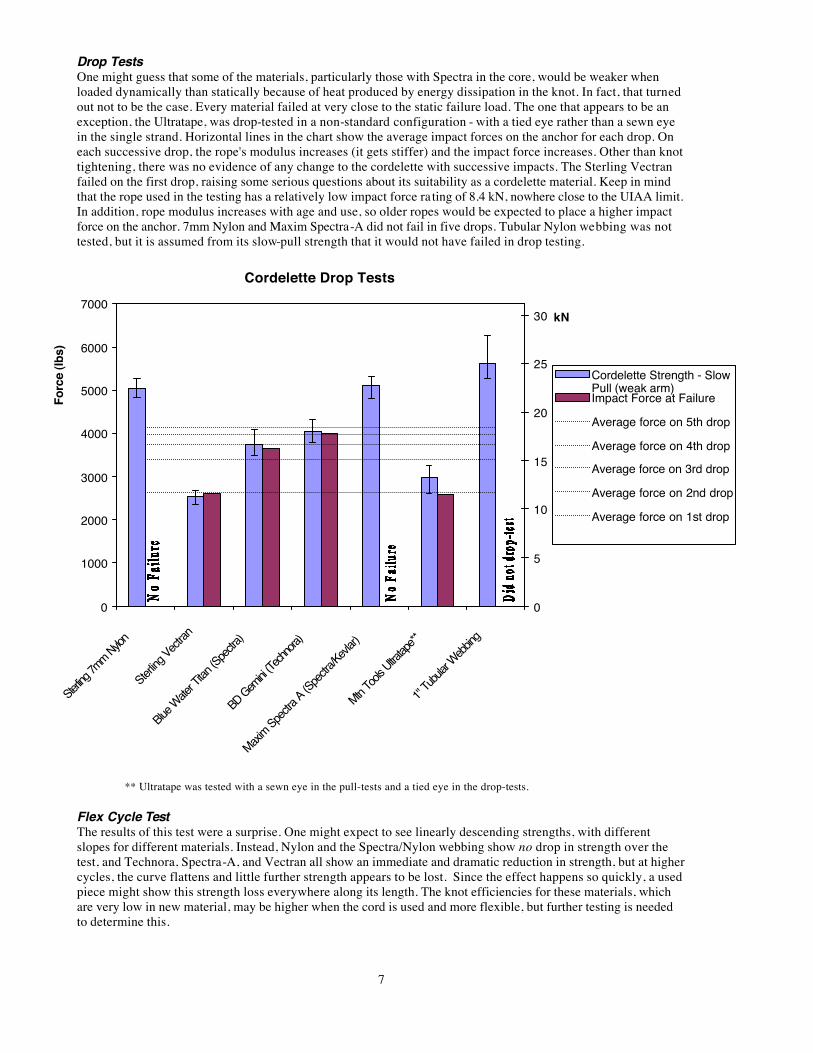
7
Cordelette Drop Tests
0
1000
2000
3000
4000
5000
6000
7000
Sterling
7mm Nylon
Sterling
Vectran
Blue W
ater T
itan (S
pectra)
BD Gem
ini (Tec
hnora)
Maxim Spec
tra A (S
pectra/
Kevlar)
Mtn Tool
s Ultra
tape**
1" Tub
ular W
ebbing
Forc
e (lb
s)
0
5
10
15
20
25
30 kN
Cordelette Strength - SlowPull (weak arm)Impact Force at Failure
Average force on 5th drop
Average force on 4th drop
Average force on 3rd drop
Average force on 2nd drop
Average force on 1st drop
Drop TestsOne might guess that some of the materials, particularly those with Spectra in the core, would be weaker when loaded dynamically than statically because of heat produced by energy dissipation in the knot. In fact, that turnedout not to be the case. Every material failed at very close to the static failure load. The one that appears to be an exception, the Ultratape, was drop-tested in a non-standard configuration - with a tied eye rather than a sewn eye in the single strand. Horizontal lines in the chart show the average impact forces on the anchor for each drop. On each successive drop, the rope's modulus increases (it gets stiffer) and the impact force increases. Other than knot tightening, there was no evidence of any change to the cordelette with successive impacts. The Sterling Vectran failed on the first drop, raising some serious questions about its suitability as a cordelette material. Keep in mind that the rope used in the testing has a relatively low impact force ra ting of 8.4 kN, nowhere close to the UIAA limit. In addition, rope modulus increases with age and use, so older ropes would be expected to place a higher impact force on the anchor. 7mm Nylon and Maxim Spectra-A did not fail in five drops. Tubular Nylon webbing was not tested, but it is assumed from its slow-pull strength that it would not have failed in drop testing.
** Ultratape was tested with a sewn eye in the pull-tests and a tied eye in the drop-tests.
Flex Cycle TestThe results of this test were a surprise. One might expect to see linearly descending strengths, with different slopes for different materials. Instead, Nylon and the Spectra/Nylon webbing show no drop in strength over the test, and Technora, Spectra-A, and Vectran all show an immediate and dramatic reduction in strength, but at higher cycles, the curve flattens and little further strength appears to be lost. Since the effect happens so quickly, a used piece might show this strength loss everywhere along its length. The knot efficiencies for these materials, which are very low in new material, may be higher when the cord is used and more flexible, but further testing is needed to determine this.

8
Bending Flex Cycle Test
0
1000
2000
3000
4000
5000
0 200 400 600 800 1000Bending Cycles
Sing
le S
tran
d St
reng
th (l
bs)
0
5
10
15
20
kN
Sterling 7mm Nylon
Sterling 7mm Nylon AverageTensile StrengthSterling Vectran
Blue Water Titan (Spectra)
BD Gemini (Technora)
Maxim Spectra A (Spectra/Kevlar)
Mtn Tools Ultratape
Mtn Tools Ultratape AverageTensile Strength1" Tubular Webbing
1" Tubular Webbing AverageTensile Strength
ConclusionsHow strong should your anchor be? One arm of a Vectran cordelette, for example, fails at only 2600 lb (11.5 kN). This is little stronger than a good carabiner in the open-gate mode - and the material gets weaker with use. Is this strong enough? One can easily argue that the drop test we performed is unduly harsh. First, it uses a completely static belay. A sticht-plate or tube belay-device can reduce the peak impact forces significantly. Second, the lead rope is run through the central anchor point. This practice increases the load at the anchor. Third, the test loaded only one arm of a cordelette. While the cordelette anchor does not equalize when the belayer shifts position, there is typically enough stretch in each arm that all three will be loaded to varying degrees in a major impact. Fourth, Chris Harmston, Black Diamond's Quality Assurance Manager, has reviewed field failures of climbing gear for eight years. He has never seen a stopper rated at over 10 kN fail, and has seen only a few carabiners fail in closed-gate mode. He believes that forces exceeding 10kN rarely happen in climbing falls.
All that said, we do not think it is unreasonable to expect one arm of the anchor to hold at least one UIAA fall on a soft rope when both the rope and the cordelette material are new! The decrease in strength with use is a worry for any of the Technora, Kevlar or Vectran materials. The Gemini and the Spectra-A are also extremely stiff and difficult to tie and untie. An 18 -foot piece makes a bulky object hanging from the harness. They make excellentchock cord (where a stiff cord is desirable), but would make a poor cordelette. Among the high-strength cords, Titan seems to be the most suitable material for cordelettes. The Ultratape is even better, and the webolette is an elegant solution to multi-point anchors, although we'd prefer to see slightly higher strength on the single-strandarms. Last, Nylon cord and webbing may be the best of all. Although heavier, they are cheap, strong, universally available, and seem to have a virtually unlimited flex life.
AcknowledgementsBlack Diamond provided test material and made their test lab available for this project. Sterling Rope, Blue Water Rope, New England Rope, and Mountain Tools all provided material for testing. Karl Lew asked these same questions a year ago and provided samples for earlier testing in the BD test lab on this subject. Bill May, Lewis Dahm, John Snyder, Jim Gallo, Scott Whitehead, Dave Hibl and others from the Rocky Mountain Rescue Group in Boulder worked hard to get their new drop tower up and running in time for it to be used for this project. Sensotec provided the load cell used to measure forces at the drop-tower. Without all of these contributions, this testing would not have occurred. Thanks everyone.

Anchors and Directional Forces
119
Appendix g - Anchors and Directional Forces
125

How to Tie the Mule Knot on a Munter Hitch
125
Appendix H - How to tie the Mule knot on a Munter Hitch
126

‘Cams can’t work, put a nut in, it’s stronger’, ‘they won’t grip inLimestone’, ‘you can’tuse rigid ones inhorizontal cracks’,‘these are lighter butthose have morerange’, ‘just how dothey work anyway?’There has always been a special buzzabout Friends.* More than any otherpiece of climbing gear Friends havealways created and polarised opinion.Every climber has a question and apoint of view and over the years their counter–intuitive nature andcomplicated physics has perplexedand excited climbers in equalmeasure.
Guide books describe cracks by Friendsize and climbers’ stories of life savingFriend placements are legendary. They are quite simply the mostimportant, the most expensive andthe most desired piece of gear on any climber’s rack.
Yet paradoxically, when polled,climbers still don’t seem to trustthem absolutely. Most would preferto set off on a lonely run-out pitchabove a ‘bomber nut’ than trust to itscomplicated mechanical equivalent.
So why should this beautifully
engineered machine, thatrevolutionised climbing world-wideover two decades ago be viewed withsuch ambivalence? The simple answeris that many climbers just don’t getthem. Why do these 21 componentsmade from exotic aluminium alloyand carbon steel, grip tenaciously inthe crack as we fall past, protectingus from certain disaster? Where didthey come from, who invented them,how do they work?
The Wild Country Cam Book will notonly explain why Friends work buthow they work, where they workbest, as well as the circumstanceswhere they may not work. Based onover two decades of experience inFriend manufacture, Wild Countryknows more about cams than anyother company and is best placed togive you the answers to thequestions you most wanted to ask.
Learn about the design of Friendsfrom prototype to production, thematerials and manufacturingtechniques, the quality control, thestandards and the testing involved.
Learn how a cam works, what is camangle, cam range, predictability andstability, friction and flares.
Learn about using Friends safely inparallel, flared and horizontal cracksand how to select the best Friend forthe job, Forged, Technical or the newZero Cams.
The Wild Country Cam Book has beenwritten to answer all your questionsabout cams, but one question youmay quite rightly ask is why now?The answer is quite simply ZeroCams. This project more than anyother focussed us on explaining moreabout what we do, as we struggledwith the complexities of moving thegame on in cam design. We had tore-evaluate our ideas and techniques
and most importantly, we had toreinvent how we tested and usethese radical miniature cams outthere on the crag.
The Zero cam was the catalyst butThe Cam Book became much morefor us. The desire to write down thedistillation of 25 years of knowledgefor climbers to learn and understandabout cams became compelling. So whether you are an experiencedbig wall climber or fresh apprenticestraight from the gym, we trust you will enjoy the Wild Country Cam Book, brought to you by TheCam Company.
Martin Atkinson, Managing Director Wild Country
(*Friends is the name given to the original
Wild Country cams).
THE CAM COMPANY 3
introduction> the wild country cam book
Above: Andy Cave testing Zeros on Cerro Mascara,Bader Valley, Paine, Patagonia. Photo: Simon Nadin
How Cams work By wildCountrySee http://wildcountry.com.uk for the full Article
127
Appendix I - How CAms work

4 THE CAM COMPANY
Above: Scott Burke on 33rd pitch of Freerider, (left of the Salathé Headwall a 5.10 offwidth) Freerider is 37 pitches of 12d/13a. Photo: Eric Perlman
genesis> a chance meeting
The beginning of the Wild Country story
was a chance meeting between two
climbers from entirely different
backgrounds, Ray Jardine and Mark
Vallance. Had that meeting not taken
place, who is to say if camming devices
would have ever graced our hardware
racks. Of course most people would say
that someone else would have invented
them, but these things are always easy
with hindsight. I would prefer to believe
that if these two climbers, one a
scientist and the other an entrepreneur,
had not teamed up to climb together in
the summer of 1972, ‘Friends’ might
never have been.
Ray grew up in Colorado Springs, a
normal upbringing which included many
outdoor activities but remarkably no
climbing. In 1962 he decided that
aerospace engineering was the career
for him and set about his studies with a
will. It was while on a summer vacation
job in Yellowstone Park that Ray took
climbing lessons with instructor Barry
Corbet of Everest fame. The die was cast
and Ray threw himself into his new
passion, climbing many routes in the
Tetons that year.
By 1964 he had moved on to Northrop
University, Los Angeles, to study
Aeronautical and Astronautical
Engineering, qualifying in 1967 with a
degree in his chosen speciality. Moving
to Denver he began work as a systems
analyst, specialising in computer
simulated space flight, shaping
trajectories for earth satellite and
interplanetary missions.
Through the late 60’s climbing took
on more urgency for Ray. By 1970 he
decided to give up the space race and
began climbing full time, with Yosemite
occupying his ambitions. It was
undoubtedly during this frenzy of
climbing activity that culminated with
his first ascent of the Nose on El
Capitan, that his need to protect those
soaring crack lines developed. The next
two years saw the grades escalate and
by the end of 1972 he had climbed his
first 5.11 New Dimensions, which was
the first all nut ascent. Clean ‘pin free’
climbing was introduced to America by
Yvon Chouinard in the 60’s, and as Ray
pushed the grades ever higher, the need
for a new fast method to protect his
ambitious projects became obvious. The
Friend was born.
Ray had begun to work on his first
prototype Friend in 1971 and during the
following five years both his climbing
career and Friend development
accelerated at an extraordinary pace.
During 1976 and 1977 Ray’s investment
in climbing was paying off, even though
his other passion, Friends, had yet to
become a commercial reality. His
success on Routes like Crimson Cringe
5.12, Hangdog Flyer 5.12c, Separate
Reality 5.12, Owl Roof 5.12c, Rostrum
5.12c and the first 5.13 in the valley,
Phoenix, were not only due to his
outstanding climbing ability but
undoubtedly the success of his early
prototype Friends.
During the summer of 1972 Ray had
met and climbed with fellow instructor
and future business partner Mark
Vallance at the Colorado Outward
Bound School, although at this time
Ray’s early prototypes were still top
secret. It was much later, in 1975, that
Ray introduced his prototype cams to
Mark, a story told later in The Cam Book,
securing a future for what was to
become the first commercial camming
device, the Friend.
In 1977, after many frustrating attempts
to get his Friends made in the USA, Ray
teamed up with Mark Vallance to develop
and produce Friends in Derbyshire,
England. The story of that beginning, the
risks, the commitment, the facts, the
myths and the characters that made it all
possible is now told by these two
remarkable men.

Some day we climbers may wear special
gloves and shoes enabling us to scale
blank walls like spiders. Should we fall
off, like spiders our body harnesses may
instantly attach safety lines to the rock.
If and when inventors develop this
technology, we will no doubt consider it
clever… but obvious – thanks to our
20-20 hindsight. But for now, none
of us can envision the details.
And so it was with the Friends 25
years ago when I was inventing
them. The need was apparent, at
least to me, but the actual
configuration was elusive to me
and everyone else.
Seeking a device that would anchor
itself in a crack, and hold with
greater power the harder the pull, I
began the inventive process in
1971 with a dual sliding wedge
design. Taking advantage of my
aerospace engineering background
I analyzed this configuration and
found it mathematically unsound.
The internal friction between any
kind of wedge reduces their
holding power and in many
situations such a device could pull
out. I was inventing for my own
use and was not about to
compromise safety.
The constant angle spiral is ubiquitous
in nature, from seashells and pinecones
to swirling barometric pressure gradients
and the great spiral nebulas. Really it is
just an expression of uniform growth.
Descartes described the principle
mathematically in 1638, calling it the
equiangular spiral. Since then constant
angle cams have been used in
uncountable mechanical devices.
Configuring a workable device, however,
proved to be an enormous task. In
retrospect it took someone with
aerospace engineering skills, a questing
mind coupled with extreme motivation
and a passion for climbing – something
of a rare combination in those days
perhaps. For months I worked, building
camming prototypes, testing them at
the local crags and innovating design
improvements in the evenings at home.
In the end I filled a couple of sizable
boxes with discarded prototypes.
Then one day after
trying absolutely
everything I could
think of, and
continually
straining my mind
for ever more ideas,
the concept came to me of
a double set of opposing and
independently spring loaded cams. Like
wheels of a car having independent
suspension, each of these cams would
be able to adjust to widely varying
surface irregularities, within its limit, of
course. I put one of these ‘quads’
together and took it to the crags for
testing. The cams were spring-loaded
against each other, and they were held
together with a high-tensile steel bolt.
But the bolt was wrapped with a piece
of ordinary strap iron as a stem, and of
course the device lacked any kind of
trigger.
On a 5.8 route which I called Fantasia
located at Split Rocks, I climbed to a
stance where I could almost let go
with both hands, I managed to
squiggle the quad into a handsized
crack. By the way it behaved I knew
instantly that it was the answer.
The following spring, 1974, I took
my first set of working prototype
Friends to Yosemite and climbed
dozens of difficult routes with
them. These units were rough hewn
and extremely limited by today’s
standards, and I had only a limited
number of them: four size 21/2s
and three 31/2s. But they certainly
proved their worth, and at season’s
end three of us used them in an
attempt to climb the Nose in a day.
Three hours of late afternoon
downpour immobilised us beneath
the Great Roof and forced a bivy
at Camp V. But we did finish
in 20 hours total climbing
time, and managed to cut
the previous three-day
record in half.
In 1977 Mark Vallance
invited me to the UK
to help him start
manufacturing Friends.
Mark is a highly
dedicated and gifted individual, and
was the first person to see the
widespread appeal of Friends. Friend
marketability is obvious now, but it
certainly was not then, and Mark was
the visionary who made it happen.
The next year, Mark founded Wild
Country and started selling Friends.
Ray Jardine – 19 April, 1998.
THE CAM COMPANY 5
history> a brief history of friends
Above: Ray Jardine nesting on Eagle Ledge, the Nose El Capitan circa 1980 Photo: Daniel BolsterInset: First working prototype Friend with strap iron stem Photo: Ray Jardine

THE CAM COMPANY 7
development> with a little help from my friends
Starting a new business is like havingone hundred feet of rope out, norunners and a 5.10 move in front of you, and it can feel like that forweeks on end.
I prepared to jump, the weather wasperfect, clear sky, hard frost and ascattering of snow. The camera teamwas in position and waiting, the‘radio mike’ was turned on andrecording.
I climbed past the top Friend, got myfeet above it, climbed a little higher – ‘Hell I’ll give them a real show’ – andclimbed a little higher still. Then Ijumped.
As the rope tightened, my belayerwas jerked upwards and I felt mybreath being knocked out of me. Iwas lowered to the ground – noneed for a ‘retake’. The five minuteepisode on the BBC’s Tomorrow’sWorld programme was aired at theend of January 1978 and a six yearsecret was out of the bag.
It was 1972 when I first met RayJardine in Colorado, I was on my wayback from Antarctica. We were bothworking for Outward Bound andbetween courses climbed together.Though I did not know it then, hewas carrying the first prototypeFriend around with him – four camson a shaft with no stem or trigger. It required four hands to get it outof a crack.
My first experience of Friends wasmuch later, in 1975. Ray was verysecretive. He was carrying a blue nylonbag around which clinked and rattled.It was another hot October day. Wewere below Washington Column,about to make the first ascent ofPower Failure. I was sworn to secrecybefore the blue bag was opened andI was allowed to see its contents.
Ray’s prototypes were an oddselection. Some of them were
beautifully made with polishedaluminium, carefully filed edges,sophisticated trigger assembly andeven ‘J slots’ for holding the triggerin the closed position for neatnessand fast action. Others were gnarledand bent from use and testing, orjust slung together to try out somenew idea, but retained in thearmoury because they worked.
The name ‘friends’ was coined byChris Walker when he and Ray wereabout to go climbing with severalclimbers who were not in on thesecret. Chris wanted to know if Rayhad the bag of goodies, but didn’tknow how to ask without giving thegame away. Finally he said, “haveyou got the bag of Friends, Ray?”.The name stuck.
After several disappointments in theUSA, Ray asked me to make Friendsin England. Much of the work we didtogether over the summer of 1977came to nothing. We could not findanyone to extrude the 7075 stemalloy. Everything was too expensive.A simple nut with one blob ofaluminium, two drilled holes, a singlepiece of wire and a swage cost twopounds (1977). How could I make apiece of kit with twenty seven hightolerance parts and a whole stack ofholes and operations, and get it intothe shops at a half way realisticprice?
When Ray left for California inSeptember he must have thoughtthat yet another attempt to getFriends off the ground had failed,but a few weeks later everythingstarted to fall into place. Now I hadto go for it, the long unprotectedlead. I borrowed all the money Icould and got the bank to give me a second mortgage on my house. I had some stationery printed andstarted to place orders for tools andcomponents. Finally, in November, I took a deep breath and gave up my job – no runners on this climb –either success, or a big, big fall.
Mark Vallance
Extract from an article published in
the 1978 Climbers Club Journal.
I prepared to jump, the
weather was perfect,
clear sky, hard frost and
a scattering of snow.
Left: Ray Jardine making the first ascent in 1977 of Phoenix 5.13a, Yosemite USA Photo: George MeyersRight: Mark Vallance on Left Unconquerable, E1 5b, Stanage, Peak District, England 1979 Photo: Pete Freeman

8 THE CAM COMPANY
how cams work> designing the perfect cam
Right: Keith Pike on El Matador 5.11a on Devils Tower, Wyoming, USA. Photo: Brian Bailey
Friction and Angles
If you place a ladder against a wallyou don’t need to be a rocketscientist to know that if the angle atwhich the ladder makes contact withthe ground is too big, the foot of theladder will skid away and you will fall.Friction is what keeps the ladder inplace. You can verify this by taking aplastic ruler and leaning it against awall. The angle between the ruler andthe surface you place it on can varybut there is a point beyond which theruler will always slip.
The material that the ladder - or ruler- is made from, and the surface it isplaced on are important. A woodenladder on a concrete path should notbe much of a problem but if a metalladder was used on a polished flooryou would need to be much morecareful. There is less friction betweenaluminium and a polished floor thanbetween wood and concrete: a rubbertipped aluminium ladder would besafer.
To measure the degree of frictionbetween two materials - take forinstance an aluminium ladder and agranite floor, a block of aluminium isplaced on a slab of granite. Thegranite slab is then tilted until thealuminium starts to slide. The angle oftilt is measured and found to be 18°.
Using this information, a device canbe made that will illustrate how theangle of contact is critical to staywithin the friction limit and hold in aparallel crack. Two rectangular alloyrods are bolted together so that theypivot. For convenience a handle isadded to pull on. Aluminium alloy isused because it is strong, lightweightand has better frictional propertiesthan other strong materials. Thisdevice will hold in a perfectly smooth,parallel sided crack, but only if the
rods are placed within the 18° anglewe have measured. For the sake ofsimplicity this is shown in twodimensions. (fig. 1) Just as the ladderwill slip if the angle is too great, so alsowill the aluminium rod slip against theside of the crack if the angle of contactis more than 18°. (fig. 2)
(We use this principle when stemminga very wide chimney. Climbers canpress at a steeper angle because theyhave rubber soled shoes. See pictureof Matador opposite).
This device would have limited use asclimbing protection as it would onlyfit one size of crack - but the conceptcan be developed to fit a variety ofcrack widths by using several pairs ofrods of different lengths (see fig.3). If these rods are fanned out, afamiliar shape emerges - that of acam (fig.4 page 11).
Designing the Perfect Cam
A cam, as used in engineering, is any
roller with an asymmetrical shape.
What the climber needs is a shape
that will transmit the load to the side
of the crack at a consistent angle
within the friction limit of the rock -
what we call a constant angle cam.
So what is the perfect camming
angle? To answer this question one
needs to go back to the friction test.
Aluminium slips on granite at 18°,
but if this angle were used the device
would be at its absolute limit of
friction in a parallel granite crack and
would not work in a flared placement
or in say, a limestone crack. The angle
needs to be reduced a little. Ray
Jardine originally used 15° on his
prototype Friends, which was good
on granite, the rock he was familiar
with, but didn’t work as well in some
rock types he climbed on in Britain in
1977.
Fig 1.
Fig 2.
Fig 3.

THE CAM COMPANY 11
After much testing, Ray and WildCountry decided on 13.75° (see fig.5),an angle that worked well on mostrock types and allowed for use inquite flared cracks, in such rock asgranite and gritstone. Wild Countryhas never needed to change thisangle, which has becomeinternationally acknowledged as thedefinitive camming angle.
Stability
Having designed the perfect cam weneed to make a workable piece ofprotection. A device using twoconstant angle cams rather than thetwo rods as used in the first prototypewould still be very unstable. Friendshave four cams, which offer muchgreater stability in the same way asfour wheels is more stable than threewheels on a car. The width betweenthe cams also plays a key role in thisstability - compare a wide sports carwith a narrow van, which is morelikely to topple over. Therefore as partof the design of Friends the camspacing increases proportionatelywith the cam size, ensuring maximumstability throughout the range ofsizes.
Plane of rotation
As the cams rotate about the axle(known as the plane of rotation) theforce that they transmit to the sidesof the crack is directional. Friendsshould be placed - whenever possible- so that the stem is aligned in thedirection of the anticipated load fromthe falling climber, and directing thestem downwards generally worksbest. This is not always possible, andsometimes the fall may not load thecams in a downwards direction, butthe single stem is designed to allowthe unit to swivel and align itselfcorrectly in most circumstances (seefig.6). If the load is not applied in the
plane of rotation - the cams can slipsideways. Remember the ladder. Ifyou present the ladder other thansquare on to the house it will beunstable and can slip sideways asyou climb up it.
Walking
If you place a Friend in a smoothsided crack and move the stem, onepair of cams will grab the sides ofthe crack whilst the second pair willslide deeper into the crack. If thestem is moved in the oppositedirection the second pair of cams willgrab, and the first pair slide in deeper(fig. 7). This is called walking and cancause a Friend to move into aplacement that is less safe - possiblymaking it move to a wider part of thecrack where the cams no longerwork. Because rope movement andrope drag can cause the Friend tomove, we use strong springs to helpto keep the unit in the position theleader intended. Sometimes the tiringleader may curse the designspecification but the springs havebeen carefully developed to providethe maximum placement stability.
Flared cracks
To go back to the friction test again,the same result would be obtained ifa block of alloy the size of a sugarcube or a block weighing two tonswere used. The angle at which theblock will start to slip is independentof the load applied. What this meansin practice is that if you place aFriend in a flare and pull on it, and itdoes not come out, (and so long asyou do not disturb the placement),the Friend will hold up to the limit ofthe unit or the rock. To fullyappreciate this, think back to theladder. If the ground where theladder was placed sloped down hillthere would still be a spot where the
Above: Mark Vallance on Antenna E4 6a, Cornwall, England. Photo: Steve Foxley. Left: Stefan Glowacz high on the first ascent of Odyssee 2000, (9-), Polar Bear Spire, Baffin Island, Canada. Access to the route was by kayaking through arctic waters. Photo: Gerhard Heidorn
Fig 4.
Fig 5.
how cams work> designing the perfect cam

133
Left: Mike Weeks, Man From Uncle (E6 6b), Pembroke,Wales, UK. Photo: Simon Carter, Onsight Photography. Right: Airlie Anderson on a one day ascent of Zodiac
5.10 A3, El Capitan, Yosemite. Photo: Ian Parnell
ladder would hold and beyond whichthe foot of the ladder would slip. Asthe angle at which the ground slopesincreases, there will come a point atwhich the ladder will never hold. Thesame is true of flared cracks.Depending on the type of rock therewill be an angle of flare in which theFriend will never hold.
Getting them out
We’ve all done it; crammed in aFriend in desperation knowing it willbe a real nightmare for the second.When leading, try not to place themin cracks that are too tight. Whenseconding, assess the placementbefore doing anything - you mightsave yourself a lot of trouble. If itlooks or feels as though it’s stuck,squeeze the trigger as hard as youcan before trying to remove theFriend. If this does not work and theFriend seems well and truly stuck, askfor a tight rope and/or clip intoanother piece so that you can useboth hands, or if on a shorter climb,
how cams work> designing the perfect cam
rappel down later. Concentrate onone pair of cams at a time and try tofeel or see if there is any movement.The floating trigger design of Friendswill enable you to do this as it allowsthe manipulation of individual pairsof cams on either side of the axle. Tryusing a nut key to free the cams. Usea pair of wires looped round thetrigger to pull on the trigger barwhilst pressing or tapping the end ofthe stem to release the cams. Trymoving or tapping the cams sideways- in the direction the axle is pointing.Don’t get angry and don’t give up,most cams can be removed withpatience.
Conclusion
Climbers develop skills in seeingopportunities for placing nuts andthe same is true of camming units.Whilst these skills overlap, they aredistinct. Some climbers can makegreat nut placements but, usuallybecause they don’t fully understandthem, are less successful at placing
Fig 6.
Fig 7.
1
2
3
camming units. Selecting the rightsize of unit first time requiresexperience and using them is a skilland as such needs to be learnt andpractised. Your safety is enhanced bythis skill.
Understanding how Friends work, thedesign parameters and the limitationof friction, cam angle and rock typewill help to increase your safetyfurther. As with all climbing gear,when the chips are down, a marginalplacement made with a completeunderstanding of the dynamics ofcam design is better than noplacement and informed andintelligent misuse of your equipmentis better than having no gear at all.

Appendix J - a Sample Leave no Trace plan
Objective:It is Sierra Mountain Center’s objective to represent the state of the art in teaching and demonstrating mountain and wil-derness skills and leadership. It is our hope that through learning and using current best practices for wilderness living our participants will continue to develop personal values that will transfer to other aspects of their lives to help make the world a better place. For instance, if it makes sense to pack your trash in the wilderness, it makes sense in the city, too. If you can get by using only a couple of gallons of water a day in the wilderness, perhaps you can use less at home. The Leave No Trace (LNT) concept is an important aspect of this objective and is a part of the Sierra Mountain Center ethic as well as a core component of all our trips.
Means:First,staffmustembodythisphilosophyandbewillingtoteachandmodelLNTprinciples.AllSMCfieldlead-staffarecertifiedasLNTtrainers.Ongoingtrainings,courseaudits,andfieldcheckswillhelpSMCdirectorsensurethatthisphi-losophy is adequately addressed on SMC trips. As with any of our high standards, we are willing to dismiss guides who do not meet our ideals for the LNT philosophy.Second, starting with all our 2002 course information, participants will receive a list of the LNT principles with their course informationandacoursespecificpagegeneratedbySMConspecificconcernsandpracticesfortheareatheirtripisoccur-ring.
ThePrinciplesinthefieldonSMCtrips:Allourtripsstartwithapackcheckandtripbriefing.ThisiswherethefieldaspectsofourLNTprogrambegin.Werecognizethat guides will have and use different teaching styles and the fact that participants will also have differing learning styles. So ourtrailheadpresentationwillbetailoredwiththesedifferencesinmindbutwillalwayscontaininformationonarea-specificconcerns and needs. We require a minimum level LNT presentation be provided at the start of each SMC trip, usually at the trailhead. Beyond this we leave the presentation content up to the trip leaders. We believe that a minimum of lecture and a maximumofmodelingandutilizing“teachablemoments”arethebesttechniquestogettheLNTprinciplestaught.
Trailhead “minimum” presentation for LNT:2-10 minutes:1. Review the LNT principles (Plan ahead and prepare, travel (and camp) on durable surfaces, dispose of waste properly, leavewhatyoufind,minimizecampfireimpacts,respectwildlife,respectotherusers).Omitthosethatdon’tapply(usuallywon’tmentionfire,maybenot“leavewhatyoufind”).2.Addressspecificprinciplesassuitedtothetrip.Forexample:Planaheadandprepare:“wealreadydidthisforyouandto make sure we’re doing a good job with it we’ll do a quick pack check in a moment to make sure we all have necessary equipmentfortheday.”Travelandcampondurablesurfaces:pointoutanexampleof“durable”andanexampleof“fragile”anddescribehowwe’llusethisprinciple,specificareasofconcern,howwe’llbetakingbreaks/stagingondurablesurfaces;dispose of waste: reminder about garbage, whys and wherefores of garbage “biodegradables” and human waste issues ap-propriatetothearea;leavewhatyoufind:asappropriatetoarea;respectwildlife:asappropriatetoarea;respectotherusers:objectiveistominimizeourpresenceandfootprint:keepvoicesdown,handsignalswherepossibleatclimbs,breaksoutofsite from the trail, etc.
The principles and the SMC LNT Plan:Plan ahead and prepare*Our priorities are: safety of the individual, safety of our equipment (because it directly affects the safety of the individual), andsafetyoftheenvironment.Byavoidingproblemsinthefirstplacemanyunnecessaryimpactscanbeavoided.Through-out our sign-up process we take care to ensure that participants are adequately prepared. We screen to make sure the trip theyaresigningupforisappropriatetotheirexperienceandskills.Weprovidethoroughpretripinformationthatdescribesthe activities that will be taking place on the trip. Our medical screening process is described elsewhere in our operating manual. A complete packing list is provided to every participant. Before departing on the trip the guide(s) conduct a pack checkduringwhichparticipantgeariscomparedtotheequipmentlist.Omissionsarecorrectedandextraneousequipmentis removed from participant packs. Every effort is made to bring only what is necessary, to teach the reasons for this, and to use modern equipment, suitable for the environments in which we operate.*We carry emergency and contingency equipment that is designed, in part, to more easily allow us to deal with emergencies
134

and problems within our group, avoiding the need for outside assistance. (Of course, if necessary, outside assistance will be sought.) This equipment includes medical kits, communication equipment (radios, cell phones, or satellite phones, depending on the area), emergency sled rigs on winter trips, and other winter safety gear as appropriate.*Ourtripsusetime-testeditinerariesanditisextremelyrarethatwe’llallowaroutetobetraveled“siteunseen”byanyguidewith a SMC group other than SMC owners Todd Vogel and SP Parker as a reconnaissance trip. Generally, we require our guidestopreviewaroutebeforeguidingit,withinformationonrouteandcamplocationsfromourfilesandfromaguideexperiencedwiththeroute.Tobetterprepareandlearnfromourexperiencesontripswekeepdetailedrecordsofproblemsencountered on trips and annotated maps of all pertinent details. We’re in the process of consolidating our annotations to the Inyo National Forest map booklet that became available this summer (2001). This book will have all our itineraries and camps available for review in one convenient place.*Ourgroupsizesaregenerallywellbelowmaximumallowed,generallytwoparticipantsandoneguide(abouthalfourtrips).Ourmaximumgroupsizeisten,eightskitourparticipantsandtwoguides(lessthanfivepercentofourtripshavethis many people).*We do not believe it is practical for us to avoid high use times altogether but we try to avoid high use trailheads during the highest use times, instead diverting use to less popular routes and areas. *SMC guides are required to know SMC policies and abide by them. This includes knowing agency rules and regulations.*Weworkwithagencypersonneltobecomeawareofanyspecialissuesandconcernsspecifictoourareas.Thisinformationis then transmitted to guides operating in these areas, and in turn, the participants.
Travel and camp on durable surfaces*We make sure guides and participants know which surfaces are durable and which are fragile.*We avoid travel and camping on or near riparian and other fragile areas. Our itineraries are designed with this in mind.*We never “create” a campsite. We camp only on hardened spots or where it is possible to completely remove evidence of ourcamp(exceptionbeingsnowcamps).*At snow camps, walls and other structures made from snow are collapsed. *Generally our trips occur in more “pristine” areas where it is important to disperse use to prevent new trails from forming. Ourobjectiveatthesespotsistoleavenoevidenceofourpassing,notevenfootprints(althoughwecantolerateafew…).Werecommendparticipantsbringcampfootwearthatiseasierontheterrain,suchasflip-flops,orlightcampshoes,tohelpachieve this goal. Travel in pristine areas is an art and not all our participants are up to the task. We have carefully developed a progression that helps bring new comers up to speed on trips that occur in less sensitive areas, allowing their skills to de-velopbeforearrivingatpristinespots.Onpristineareas,theartofleavingnotevenfootprintsisemphasized.*Whereourtripsoccurinpopularareasweconcentrateuse,usingestablishedhardenedcampsandstickingtoexistingtrails.Care is taken to take breaks away from the trail, on durable surfaces. *We take care to ensure our clients know and practice other tenants of this principle, such as traveling in the center of the trail, even when it’s wet or muddy, taking breaks off the trail on durable spots, and, when necessary to pull over to let other parties pass, doing so on durable locations.
Dispose of waste properly*We follow the “pack it in, pack it out” principle. Nothing we carry in is allowed to remain including organic wastes and the like (fruit peels, etc). Rest stops and camps are swept for dropped or forgotten items prior to departure to ensure nothing isleftbehind.Wealsotakemeasuresto“naturalize”restandcampspots,removingevenfootprints,ifpossible.Wepackoutotherpeople’strashencounteredenroute.Exceptiontothisistheoccasionaltrashdumpsthatwecomeacross.Intheseinstances,landmanagementagencyisnotified(twiceinthelastfiveyearswehaveencounteredtrashdumpsonInyoNF).*Kitchenandcooking:Weteachandemphasizeproperfoodhandlingtominimizedroppedfoodandwaste.*Human waste:-Urine should be deposited on rocks or gravel, away from camp areas, and avoiding vegetated areas. On snow camps a loca-tion away from camp is designated.-Solidwaste:Participantsareinstructedtodisposeofhumanwastemorethan200feet(weusuallysay“fiveminutesormore”) from water.-Inareaswith“active”soil(generallywellbelowtreeline),weusethe“cathole”method,disposingwasteinholesdug6-8inches deep. -In areas lacking “active” soil (judgment call on the part of the pooper) waste is either deposited in shallow cat holesorinatalusfieldinsuchamannerthatsocialimpactswillbeavoided.-In areas where social impacts could not be avoided or suitable distance from water cannot be achieved waste is packed out using the bag system. Our guides carry this on all long climbs, the Whitney trail, and other routes, for this purpose. If the
135

bagisutilizedthepoopercarrieshisown...-We pack our solid waste out from trips up the North Fork of Lone Pine Creek and from the ice climbing areas June Lake and Lee Vining, and any area where suitable disposal sites are not available (on route on popular climbs, etc). We use either theForestServiceprovidedbagsystemforthis,ortheziplock/kittylitter/papersacksystem.Wastebagsarethendisposedof in either the FS receptical provided at the trailhead at Whitney Portal or in vault toilets (only the paper bag and waste, not the plastic bag, which is thrown in with regular garbage.-Ontheraretripwhenweutilizepackstationsupportbothinandoutwepackouthumanwasteusingtheriverrafting“groover” system.-Snowbasedtrips:takeextraefforttofindacampwithsuitablewastedisposaloptions.Asitecanoftenbefoundthatisawayfromwaterandhaseitherexposedtalusorsandonasunnyaspect(tospeeddecomposition)ortreewellsinwhichwastecanbedeposited.Participantsaremadeawareofthedifficultyofassessingwhetherornotawatercourseisnearby.Withcare suitable spots can be found. Certain trips waste is packed out (base camp spring tours during heavy snow years when suitable disposal spots are not available).-To further control the disposal issue we supply participants with toilet paper, pack-out kits (where appropriate), garbage bags, and have a presentation on proper methods at the pack check.-Used toilet paper and other hygiene products are packed out (alternatives to tp are discussed). We discourage burning tp duetoriskoffireandthefactthattherealwaysseemstobearemainderthatwon’tburn.-Weprovideparticipantswithsmallbottlesofhandsanitizertohelpdealwithsanitaryissues.-We rarely bring soap on our trips but sometimes participants sneak some along. Participants are instructed to use soap more than 200’ from water, and then use it sparingly. Disperse soapy water on rocky or sandy areas. Dishwater is strained and discardedonrockyorsandyareas.Betteryetitmakesafineweaktea...
Leavewhatyoufind *All natural objects should be left as they are found.*Archeological objects are to be observed but left in place.*Campfireringscanandshouldbenaturalizedinareaswherefiresareprohibitedyearround.
Minimizecampfireimpacts*Useofcampfireisrare(ourpolicyisthattheuseofcampfireisrestrictedtoemergenciesonly.WehavenoteverhadacampfireonanSMCtrip.)onSMCtripsaswecookoncampstovesandavoidtheuseofopenfiresasamatterofconvenienceandimpact.Butit’simportantforparticipantstolearnthewhysandwhereforesofcampfireuse.Guidesshouldhelpclientsunderstandwhyfiresareforbiddenincertainareas.*Ifacampfireisused(hardtoimagine)itshouldbealeavenotracemoundorpanfire,ortakeplaceinanexistingfirering.
Respect wildlife*We have adopted a policy of working with agency staff to learn more about species of concern so we may better educate ourselves and our clientele.*Food is stored so as to be critter-proof on all SMC trips. Bear cans are used on all trips into bear habitat where required by law and on all non-ski based trips into Sequoia/Kings NP, Yosemite NP, and the Minarets area. *Wildlife should be observed from a distance and not approached. Don’t harass the wildlife (if food is stored properly you won’t have to throw rocks at the critters).*Pets are not allowed on SMC trips.
Respect other users*Protectthequalityofotheruser’sexperience.Takebreaksandcampoutofsiteofthetrailandotherpartiesmaynotevenknow you are there, thus reducing the number of encounters with other parties.*Yield to stock by anticipating their presence, stepping the entire party off the trail on the downhill side at a durable spot.*Avoidconflictsontheroutes:talktootherpartiesandlearntheirplans,getupearlytoavoidcompetitionfortheclimb.Have an alternate in mind and be willing to use it.
136

137

PCIA Base Managed Climbing Instructor Course Pre Course Written Assessment Please answer the following questions and return the completed material to your instructor in advance of the course or bring it to the first day of the course as requested by your instructor. The test is open book.
This questionnaire is used in part to help determine your strengths and identify gaps in your knowledge base. It also serves to help define the scope of knowledge that is expected of certified top rope site managers in areas that may be difficult to assess in field observations. You will also be given a post course evaluation that must be completed and returned to your instructor before the end of the course.
Name: ____________________________ Course Provider: ___________________________________ Date: _________
Please attach extra sheets if necessary
1. How would you find out about the access situation of a rock-climbing venue?
2. What is meant by the term “American Triangle”? Is this set up desirable or not? Explain why or why not and include other options if appropriate.
3. To whom would you recommend wearing a full body harness rather than just a sit harness?
4. When teaching novices to belay with a Grigri, identify at least four important points to address?
5. Describe how fall factors are calculated? Are high fall factors common in top rope climbing?
6. How would you assess the condition of a climbing rope? What would you be looking for? What information would you like to know about its past use?
7. What is the difference between a knot and a hitch?
8. What American organization works to keep climbing areas open and to conserve the climbing environment?
9. What are the three levels of AMGA Certification in the “Rock” discipline?
10. Which organizational body is currently responsible for setting international minimum safety standards for climbing equipment?
11. When a climber refers to the “Nose”, what is she likely talking about?
12. Identify seven principles of Leave No Trace (LNT) and give a concrete example of how each can be related to minimizing impact by climbers.
138

13. Identify five important concepts that should be evaluated in every anchor system? Please explain each - including the commonly accepted norms / criteria for each.
14. You have arrived at a cliff with two clients to climb and discover that both have left their helmets back at the shop. Describe how you might handle this situation.
15. Who was Fritz Wiessner and how is he related to climbing sports?
16. Outline a standard method of verbal exchange between a belayer and climber when top roping.Belayer Climber
17. What is meant by exfoliation with respect to cliff environments?
18. Across America, many crags are closed to climbers from May to August to help protect what nesting bird?
19. In the Climber’s Guide to Red Rock you find a climb with the following grade - II, 5.7. What does each component of this grade mean?
20. The most appropriate method to stop severe bleeding is:a. Tourniquet b. Pressure points, elevationc. Expose area, direct pressure, elevation d. Direct pressure, add dressings if bleeding continues.

22. Number the following steps of assessment and treatment of a medical problem in the appropriate order:_____ Splint lower leg fracture and dislocated shoulder_____ Check airway, breathing, circulation, stabilize spine_____ Size-up the scene_____ Examine patient, take vital signs and history_____ Develop a problem list
23. A student of yours slipped on the rocks and hit the back of her head. She was knocked out for about 30 seconds. She regained consciousness and is now oriented, calm, and has a normal mental status. She has no spine pain/tenderness, and normal motor/sensory function. The exam is normal except for a small bump on the back of her head. Vital signs are normal.
a. She has had a concussion and should be evacuated b. She has a head injury with increase ICP c. She is okay and does not need to be evacuated d. Her spine will not be able to be cleared
24. How are each of the following rock types formed? Give an example of each. Igneous
Metamorphic
Sedimentary
25. Who was Conrad Kain and how is he related to climbing sports?

PCIA Base Managed Climbing Instructor Course Post Course written Assessment
1. Givethreeexamplesofhowyoumighthelpagroupof10tenyearoldsgettoknoweachotheratthestartofaclimbing day.
2. What is meant by tri-directional loading of a carabiner? Is a carabiner intended to be tri-directionally loaded?
3. Whatstepscouldyoutaketoreduceoreliminatethehazardofpendulumsontopropeclimbswithdiagonalortra-versing sections?
4. Listfivethingsyoucoulddotolimittheimpactofyourgroupatapopularcrag.
5. List at least three factors you should consider when choosing a rope for an institutional top rope set up.
6. Whydowestrivetolimitextensioninananchor?
7. A rappeller, who is also being belayed on a separate rope, has entangled his hair in the rope/rappel device and is groaning loudly in pain part way down a cliff. Describe options you could use to resolve this issue. Include any ideas that might have made it easier to resolve as well.
8. Identifyfivereasonswhyyoumightchooseatopmanagedbelay.
9. Identifyfivereasonswhyyoumightchooseabottommanagedbelay.
10. Describe your decision making as to whether a releasable rappel should be used for a given site.
11. Thebottomofyoursiteisexposedandbelayersmaybeatriskoffallingoff.Identifytwomethodsyoucoulduseto mitigate this risk.
12. What can you do to insure that a climber does not take a long fall while a student is belaying?
13. Give 3 reasons why would you suggest that someone attach a belay carabiner to the belay loop rather than connect it to the swami and leg junctures of a harness.
14. Describe 3 ways to protect yourself while doing a demonstration climb.
15. Describe2–3technicalmethodsorinstructionsyoucouldusetoreducerappelleranxiety.
16. Whatismeantbytheterm“clientcare”?Givethreeexamplesofgoodclientcare.
17. Youareintheopenonamountainridgeandalighteningstormisapproachingfast.Thetimefromflashtosoundis 5 seconds. What would you do with your group?
18. Ifyouwantedtobringagrouptoanationalparkareaornationalforestarea,whatwouldyouexpecttohavetodoin advance? Can you bring a group to any national park you want?
19. Discussthepros/consofbelayingwithaGrigrivs.abelayplateinabottom-managedbelay.
20. Give three reasons why it is usually a good idea to have a belayer tie in for a bottom-managed belay.
141

PCIA Base Managed Climbing Instructor Course
TECHNICAL OBJECTIVES & STUDENT PERFORMANCE RECORD The following skills must be observed for successful completion prior to beginning the certification exam. Many of the skills are cumulative such as anchoring where the candidate is first observed building anchors to a master point then later asked to build an anchor and demonstrate a top managed belay from it, thus not every component skill listed will be evaluated. In this manner, the course provider has multiple opportunities to observe both individual skills and transitions.
Each exercise should be demonstrated in a quick, efficient manner that demonstrates thorough understanding of the objective prior to signing off the skill. During all assessments, the candidate will be expected to protect themselves adequately, provide any needed redundancy to student belays and protect any on-looking climbers. Student Name: _________________Course Dates: _______ Instructor(s): _________________
C1. Knots and Hitches. Objective: The candidate will demonstrate the ability to fluently tie the following knots and to demonstrate the appropriate application of each:
C2. Sit harness made from rope or webbing. Objective: The candidate will demonstrate effective construction of a sit harness with webbing or rope. The harness must include leg loops, a swami and be redundant such that if the closure knot loosens, the harness remains secure.
C3. Chest Harness made from rope or webbing. Objective: The candidate will demonstrate effective construction of a chest harness with webbing or rope. The harness must attach to the rope in such a way as to not compress the torso or fully weight the chest harness and must keep the participant upright.
C4. Passive and Active Protection. Objective: The candidate will demonstrate the proper placement of a variety of artificial protection devices. This may be evaluated as part of other anchor evaluations.
C5. Natural Protection. Objective: The candidate will be able to verbalize and demonstrate the assessment and use of natural anchor components.
C6. Bolt Anchors. The candidate will articulate how to assess bolts. C7. Equalizing Systems. Objective: The candidate will be able to verbalize and demonstrate appropriate use of a variety of equalizing systems which includes pre and self equalization with artificial protection. Observations should reflect a diversity of gear and material applications. Time Limit: 5-10 minutes each
Summary comments of anchoring skills:
Top Managed Skills (for TMCI Course)
C8. Lowering skillsObjective: From an appropriate anchor the candidate will demonstrate the set up and use of an effective direct anchor instructor lower using a Munter Hitch or redirected plate. The candidate should be able to articulate the pros and cons of the lowering tools. Appropriate backups should be used on the lower. Students must lower at least 30 ft. Time Limit: quickly and efficiently.
C9. Student belay (top managed). Objective: From an appropriate anchor the candidate will demonstrate the set up of an effective student belay. The candidate will first provide a lower or belayed student rappel. The candidate will then supervise a student belaying another climber. The belay must be at least 30 ft. Time Limit: quickly and efficiently.
C10. Raising Skills. Objective: From an appropriate anchor: Scenario 1. The candidate will establish an instructor belay, with no additional students present – as in a 1:1 situation and will lower a climber 20ft. The candidate will then demonstrate a raise appropriate to the situation of approximately six feet. Scenario 2. The candidate will establish an instructor lower of 20’, transition to a student belay. The candidate will then demonstrate a raise appropriate to the situation of approximately six feet. The raising system must be different than that used in scenario 1. Time Limit: quickly and efficiently. 142

C11. Rappelling site skills. Objective: From an appropriate anchor the candidate will establish a rappel appropriate to the terrain and participants. The student will rappel 20 ft and become stuck. The candidate will solve the “problem” and the student will rappel to the ground.
Bottom Managed Site Skills:C12. Instructor safety rappelling over the edge. Objective: The candidate will establish an appropriate anchor for a bottom managed climb. The candidate will then demonstrate rappelling over the edge safely, transitioning onto the climbing rope, and rappelling to the ground.
C13. Bottom Managed Climbing Management. Objective: The candidate will demonstrate the management of a bottom belayed climb with student belayer(s). The candidate may be asked to demonstrate solutions to any of the following problems: climber grossly outweighs belayer, use of a back-up belay person, absence of back up belay person, difficult or third class staging area, various belay options.
C14. Counter balance Ascending and Rappelling. Objective: The candidate will counter-ascend to assist a stuck client and will then counter-rappel to the ground with the client. During this process the candidate will demonstrate appropriate client care to the belayer and stuck client.
143

COUrSE & PrOVIDEr EVALUATIOn
Instructor: ___________________ Course Location: _________________ Date: _______
Dear participant: Please take the time to complete all applicable topics at the end of each day. This will contribute to program improvement
Comments on Course Providerdelivery, time management, etc.
Comments on Curriculum – leave in, take out, just right, change to, etc.
Professionalism Discussion
Role modeling of professionalismDiscussion on Instructor Roles / Expectations
Instructors role modeling of games and activities
Leave No Trace lesson / Role modelling
Learning and teaching stylespresentation
Course Provider demonstration of lesson and site management
Experiential education overview
Climbing equipment presentations
Anchoring principles
Belay Principles and Methods
Top managed climbs
Bottom Managed climbs
Rappelling
Ascending
Raising Skills
COURSE & PROVIDER EVALUATION p2. Please provide detailed answers.
How did you find out about the course?

Did the course match the course curriculum?
Are the course pre-requisites adequate?
Was the pre-course information useful?
Were assignment provided in advance of the course?
Did the course provide you with new skills or information? Please provide one or two examples.
What suggestions do you have for curriculum enhancement?
What suggestions do you have for course provider improvement?
What percentage of course information was new to you?
Please comment on the evaluation process. How would you evaluate this course?
What was the best part of the course?
What was the worst part of the course?
Should challenges be allowed in the exam?
Would a book, video or CD be most useful in helping you learn this information?
Other Comments:
Thanks!
145