product manual ridder polygearbox · pdf fileproduct manual ridder polygearbox rpg 265701gb -...
TRANSCRIPT

Product Manual
Ridder PolyGearbox RPG265701GB - V01- 2015.06
Ridder Drive SystemsLorentzstraat 36-38 3846 AX HarderwijkP.O. Box 360 3840 AJ Harderwijkthe Netherlands
T +31 (0)341 416 854 F +31 (0)341 416 611I www.ridder.com E [email protected]

Ridder Drive Systems T +31 (0)341 416 854 F +31 (0)341 416 611 I www.ridder.com
2
TABLE OF CONTENTS
1. GUIDELINES, STANDARDS AND CONDITIONS1.1 Applicable guidelines and standards . . . . . . . . . . . . . . . . . . . . . . . . . . . . . . . . . . . . . . . . . . . . . 31.2 Qualifiedpersonnel . . . . . . . . . . . . . . . . . . . . . . . . . . . . . . . . . . . . . . . . . . . . . . . . . . . . . . . . . . . 31.3 Warningregardingdiscourageduse . . . . . . . . . . . . . . . . . . . . . . . . . . . . . . . . . . . . . . . . . . . . . 31.4 Warrantyprovisions . . . . . . . . . . . . . . . . . . . . . . . . . . . . . . . . . . . . . . . . . . . . . . . . . . . . . . . . . . 3
2. MEANING OF WARNINGS IN THIS PRODUCT MANUAL 2.1 Meaningofwarnings(ISO3864-2) . . . . . . . . . . . . . . . . . . . . . . . . . . . . . . . . . . . . . . . . . . . . . . . 3
3. PRODUCT DETAILS3.1 Description . . . . . . . . . . . . . . . . . . . . . . . . . . . . . . . . . . . . . . . . . . . . . . . . . . . . . . . . . . . . . . . . . 43.2 Application . . . . . . . . . . . . . . . . . . . . . . . . . . . . . . . . . . . . . . . . . . . . . . . . . . . . . . . . . . . . . . . . . 43.3 Dimensions. . . . . . . . . . . . . . . . . . . . . . . . . . . . . . . . . . . . . . . . . . . . . . . . . . . . . . . . . . . . . . . . . . 53.4 Technicalspecifications . . . . . . . . . . . . . . . . . . . . . . . . . . . . . . . . . . . . . . . . . . . . . . . . . . . . . . . . 63.5 Itemnumbersandcomponents . . . . . . . . . . . . . . . . . . . . . . . . . . . . . . . . . . . . . . . . . . . . . . . . 6
4. MOUNTING INSTRUCTIONS4.1 Specialtoolsandequipment-Assemblyandmounting . . . . . . . . . . . . . . . . . . . . . . . . . . . . . 64.2 Assemblyofanelectricmotor(EM)toaRPGgearbox. . . . . . . . . . . . . . . . . . . . . . . . . . . . . . . 64.2 Mountingpositions . . . . . . . . . . . . . . . . . . . . . . . . . . . . . . . . . . . . . . . . . . . . . . . . . . . . . . . . . . . 74.3 Mountinginstructions. . . . . . . . . . . . . . . . . . . . . . . . . . . . . . . . . . . . . . . . . . . . . . . . . . . . . . . . . 7
5. CONNECTION INSTRUCTIONS5.1 Connectionandoperation-abbreviations . . . . . . . . . . . . . . . . . . . . . . . . . . . . . . . . . . . . . . . . 85.2 Connectingcomponents,switchingdevicesandcables . . . . . . . . . . . . . . . . . . . . . . . . . . . . . 85.3 Connectiondiagram:RLS-RPGLimitswitchsystem . . . . . . . . . . . . . . . . . . . . . . . . . . . . . . . . . 8
6. USER INSTRUCTIONS6.1 Conditionsandguidelines-Usage . . . . . . . . . . . . . . . . . . . . . . . . . . . . . . . . . . . . . . . . . . . . . . . 96.2 RotationaldirectionofRPGgearbox . . . . . . . . . . . . . . . . . . . . . . . . . . . . . . . . . . . . . . . . . . . . . 96.3 Operatingtheadjustmentknobs . . . . . . . . . . . . . . . . . . . . . . . . . . . . . . . . . . . . . . . . . . . . . . . 106.4 Safetyfunctionsandstopoptions . . . . . . . . . . . . . . . . . . . . . . . . . . . . . . . . . . . . . . . . . . . . . . 10
7. COMMISSIONING7.1 Commissioning . . . . . . . . . . . . . . . . . . . . . . . . . . . . . . . . . . . . . . . . . . . . . . . . . . . . . . . . . . . . . 107.2 RLS-RPGlimitswitchsystem . . . . . . . . . . . . . . . . . . . . . . . . . . . . . . . . . . . . . . . . . . . . . . . . . . . 117.3 Checking:RLS-RPGconnectionandoperation . . . . . . . . . . . . . . . . . . . . . . . . . . . . . . . . . . . . 127.4 Adjusting:RLS-RPGendpositions . . . . . . . . . . . . . . . . . . . . . . . . . . . . . . . . . . . . . . . . . . . . . . 14
8. MAINTENANCE8.1 Maintenance . . . . . . . . . . . . . . . . . . . . . . . . . . . . . . . . . . . . . . . . . . . . . . . . . . . . . . . . . . . . . . . 17
9. SERVICE9.1 Troubleshooting. . . . . . . . . . . . . . . . . . . . . . . . . . . . . . . . . . . . . . . . . . . . . . . . . . . . . . . . . . . . . 189.2 Technicalsupport. . . . . . . . . . . . . . . . . . . . . . . . . . . . . . . . . . . . . . . . . . . . . . . . . . . . . . . . . . . . 18
10. ENVIRONMENT10.1 Disposal . . . . . . . . . . . . . . . . . . . . . . . . . . . . . . . . . . . . . . . . . . . . . . . . . . . . . . . . . . . . . . . . . . . 1810.2 Decommissioningandremoval . . . . . . . . . . . . . . . . . . . . . . . . . . . . . . . . . . . . . . . . . . . . . . . . 19
Ridder Drive Systems T +31 (0)341 416 854 F +31 (0)341 416 611 I www.ridder.com
3
1.1 Applicable guidelines and standards
TheRidderPolyGearbox(RPG)complieswiththeprovisionsofthefollowingEuropeanguidelines:
MachineryDirective2006/42/EC
Thefollowingharmonizedstandards(orpartsofthesestandards)havebeenapplied:NEN-EN-ISO12100:2010|NEN-EN-IEC60204-1|NEN82079-1(62079:2001)|NEN5509|ISO3864-2
Thisproductmayonlybeputintooperationifithasbeendeterminedthatthesysteminwhichtheproductwillbeinstalledcomplieswiththerequirementsoftheapplicablestandardsandguidelines.
1.2 Qualified personnel
ThisproductmanualcontainsimportantinformationforinstallersonhowtoconnectandcommissionaRPG.Beforeproceedingwiththework,pleasereadthisproductguideandinstructionscarefully.Allworkmustbecarriedoutbyqualifiedandskilledmechanicaland/orelectricalinstallersinasafeandresponsiblemanner.
1.3 Warning regarding discouraged use
ThefollowingconditionsapplywhenusingtheRPG:
• DonotmodifyorchangetheconstructionoftheRPG• TheRPGmaynotbeusedtoliftormovepeople• DonotexceedthemaximumdutycycleoftheRPG
See§3.2foradescriptionoftheRPG’sintendeduse.
1.4 Warranty provisions
Forthewarrantyperiodandconditions,pleaseseethe‘Conditions’sectiononourwebsiteatwww.ridder.com,orintheRiddercatalogue.
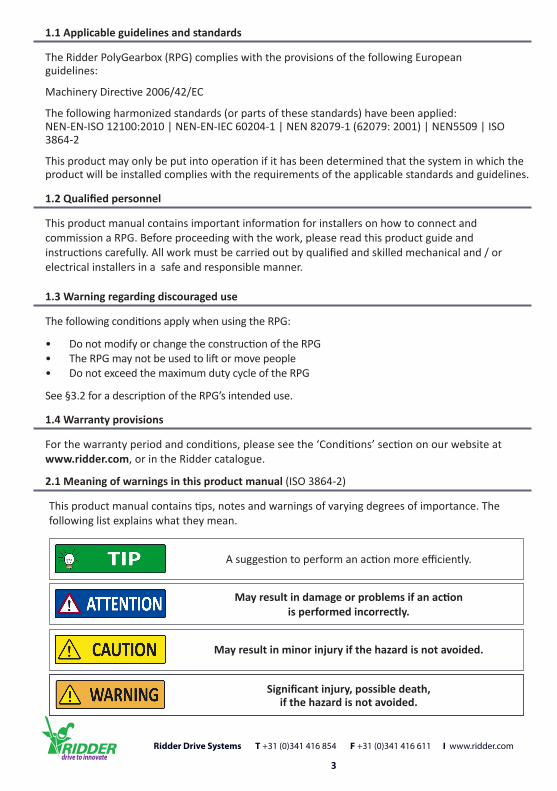
Thisproductmanualcontainstips,notesandwarningsofvaryingdegreesofimportance.Thefollowinglistexplainswhattheymean.
2.1 Meaning of warnings in this product manual (ISO3864-2)
Asuggestiontoperformanactionmoreefficiently.
May result in damage or problems if an actionis performed incorrectly.
May result in minor injury if the hazard is not avoided.
Significant injury, possible death,if the hazard is not avoided.

Ridder Drive Systems T +31 (0)341 416 854 F +31 (0)341 416 611 I www.ridder.com
4
3.1 Description
TheRPGgearboxfeatureaclosedhousing(withoutelectricmotorclosedaswell)andasealedlimitswitchsystem.Thegearboxcanbeappliedatatemperaturerangeof0-60°C.Anexpansionchamberwithmembranekeepstheoilpressurelow,alsoathightemperatures.Aventingplugisnotnecessary.Thereforetheoilinsideiskeptinoptimumcondition.Thegearboxisbothrainandwindresistant,andcanbemountedinanyposition.
AllRPGgearboxesareequippedwithadouble-sidedoutputshaftandaself-brakingwormgeartransmission.Thistwo-stagetransmissionensuresthatthedriveshaftisbrakedwhenthedriveunitstopsmoving.TheRPGisavailableinmodelsthataresuitableforatorqueof150,300or450Nm(see§3.5).TheRPGgearboxesareequippedwitharotatingRLS-RPGlimitswitchsystemwithdutyandsafetyswitches(breakercontacts).Themaximumswitchingrangeofthelimitswitchsystemis43revolutionsofthedriveshaftat3rpm(revolutionsperminute)or65revolutionsat5rpm.
RPGGearboxesareenclosedinalightweightaluminiumhousingandaresuppliedwiththenecessarykeysandfasteners.
RIDDER POLYGEARBOX (RPG): DRIVE UNIT WITHOUT ELECTRIC MOTORAsuitableelectricmotorcanbefittedafterwards.Flangesize:FT85Shaft:Ø14mm.Seeconditionsin§4.2.NOTE:AnRPGfittedwithamotorafterwardsisnotconsideredanRPD!ThenameRidderPolyDrive(RPD)isonlyreservedforanRPGfittedwithanelectricmotorwhichhasbeensuppliedbyRidder.
3.2 Application
TheRPGgearboxesareusedinpolygreenhousesfordrivingventilationandrollerscreensystems.Ventilation and screen purposes:1. -Continuousventilation
-Push-pullscreening2. Sidewallventilationwithcarriage3. Sidewallventilationwithslidingcardanshaft
OtherapplicationsrequirepermissionbyRidderDriveSystems.
3.
1.
2.

Ridder Drive Systems T +31 (0)341 416 854 F +31 (0)341 416 611 I www.ridder.com
5
3.3 Dimensions
3.4 Technical specifications
Mechanical Torque 150,300or450NmSpeed 3or5rpm(revolutionsperminute)Transmissionratio i=1:443(3rpm),i=1:286(5rpm)Rotationrangebetw.endpositions 1-43rev(3rpm),3-65rev(5rpm)RLSadjustment(knobA-B) 44teethSettingaccuracy 13.5° (3rpm),22.5°(5rpm) (°outputshaft/toothadjustmentknob)Driveunit Self-brakingDimensions(WxHxD) 260mmx238mmx219mmFlange-Shaft FT85-Ø14mmWeight 9.9kg(5rpm)-10.3kg(3rpm)Dutycycle Suitableforintermittentduty,dutyclasss3-30%, upto25minutes
ElectricalCablegland(RLS-RPG) M16x1.5mm,Ø5.0to10.0mm,tighteningtorque2.5Nm (IP68)
EnvironmentProtectionrating IP65Ambienttemperature 0-60°C(32-140°F)

Ridder Drive Systems T +31 (0)341 416 854 F +31 (0)341 416 611 I www.ridder.com
6
3.5 Item numbers and components
ThefollowingtableliststheavailablemodelsoftheRPGgearbox.
Item no. Definition Torque* rpm Flange* Shaft* Range Power* Weight Class
506100 RPG150-3-FT85\D14\40 150 Nm 3 FT85 Ø14 40omw. 0,18 kW 9,9kg IP65506130 RPG150-5-FT85\D14\64 150 Nm 5 FT85 Ø14 64omw. 0,25 kW 10,3kg IP65506210 RPG300-5-FT85\D14\64 300 Nm 5 FT85 Ø14 64omw. 0,37 kW 10,3kg IP65506120 RPG450-3-FT85\D14\40 450 Nm 3 FT85 Ø14 40omw. 0,37 kW 9,9kg IP65
*See§3.5and§4.2toinstallasuitableelectricmotorontotheRPGgearbox.
4.1 Special tools and equipment - Installation and mounting
ToinstallandmountanRPG,nospecialtoolsorequipmentareneeded.
4.2 Installing electric motor (EM) onto RPG gearbox
AnRPGgearboxstillneedstobefittedwithasuitableelectricmotor(EM).Theelectricmotor(EM)mustmeetthe3requirementslistedintheillustrationbelow.WestronglyrecommendhavingthegearboxandelectricmotormountedbyaRidder-certifieddealer.
Mounting guidelines:• Lubricatetheshaftandthekeyoftheelectricmotorwithsuitablegrease(EM)• MounttheelectricmotorwithshaftandkeyinlinewiththeinputshaftandkeywayoftheRPG.• InserttheM6bolts(4x)andtightencrosswise,graduallyandevenly..Always follow the instructions of the electric motor (EM) used it these deviate from the guidelines above!!
Installing an electric motor onto the RPG falls under the responsibility of the installer and must be carried out according to the instructions
accompanying the electric motor.

Ridder Drive Systems T +31 (0)341 416 854 F +31 (0)341 416 611 I www.ridder.com
7
4.3 Mounting instructions
4.2 Mounting positions
RPGgearboxescanbemountedinanydesiredposition.
UseboltsM10x25(3x)withaccompanyingwasherstosecureanRPGtoamountingplateorcarriage.Useatighteningtorqueof45Nm.DependingontheRPG’sapplication,mountingplatesareavailableinvarioussizes.SeetheRiddercatalogueorwebsitewww.ridder.comformoreinformation.Ifusingamountingplate,makesuretomounttheRPGsecurelytothebuildingstructureinanaccessiblelocation.
1
MakesuretomounttheRPGsecurely,sothebuildingstructure,mountingplateorcarriagesystemcansufficientlyabsorbtheexertedforcesanddrivetorque.
2WhenmountingtheRPG,ensurethattheRLScoverandthemotorconnectionsremaineasilyaccessible,soyouwillhavenotroubleconnectingandadjustingtheRLS.

Ridder Drive Systems T +31 (0)341 416 854 F +31 (0)341 416 611 I www.ridder.com
8
5.2 Connecting components, switching devices and cables
Only use suitable control components and switching devices. Make sure you are using the correct equipment by consulting the
information of the components and switching devices.
Always ensure that the required protection devices comply with the local or national laws and regulations of the country concerned.
5.3 Wiring diagram: RLS-RPG limit switch system
TheinstallermustincludethefollowingwiringdiagramfortheRLS-RPGlimitswitchsysteminthecompletewiringprocedure.
The RLS limit switch unit of the RPG isnot suitable for switching motor currents.
Aconductordiameterof1.5 mm²appliestothecablesinthegeneralwiringdiagramin§5.3.Connectingthemotor currentviatheRLSisnotallowed!The limit switch system is suitable for switching the following currents:
< 1 A at 24 V AC or < 100 mA at 230 V.Theconductordiameterforthecomponents,switchingdevicesandcablelengthsusedmayvary.Alwaysconsulttheaccompanyinginformationandmanuals.TheRPGisfittedwithaM16x1.5mmcableglandforfeedingthroughtheRLScabling.InordertocomplywithIPclassification(s),seethespecifications(Ø/Nm)insection3.4!TheRLSisequippedwithaterminalstrip(0.8-1.5mm²).
5.1 Connection and operation - abbreviations
Symbol Description A,B Limitswitch/AdjustmentknobA,BACS AutomaticcontrolsystemC Commonterminal(RLS)DirA,B RotationaldirectionA,BEM Electricmotor
Symbol Description RLS RidderLimitSwitchRPD RidderPolyDrive(motorgearbox)RPG RidderPolyGearbox(gearbox)A1,B1 DutyswitchRLSA2,B2 SafetyswitchRLS
Ridder Drive Systems T +31 (0)341 416 854 F +31 (0)341 416 611 I www.ridder.com
9
Thecompletewiringprocedurewilldependon:
• theelectricmotorused• thecomponentsandswitchingdevicesused• applicableguidelinesandstatutoryrequirements
Wiringdiagramsthatmaybeofusecanbefoundonourwebsiteatwww.ridder.comorintheRPDproductguide.Youcanusethesediagramsasabasisandtailorthemtoyourspecificsituation.
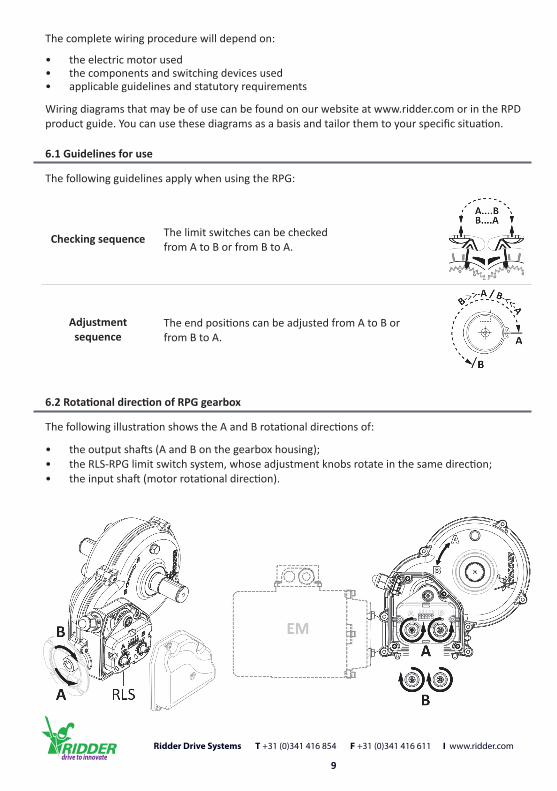
6.1 Guidelines for use
ThefollowingguidelinesapplywhenusingtheRPG:
Checking sequence ThelimitswitchescanbecheckedfromAtoBorfromBtoA.
Adjustment sequence
TheendpositionscanbeadjustedfromAtoBorfromBtoA.
6.2 Rotational direction of RPG gearbox
ThefollowingillustrationshowstheAandBrotationaldirectionsof:
• theoutputshafts(AandBonthegearboxhousing);• theRLS-RPGlimitswitchsystem,whoseadjustmentknobsrotateinthesamedirection;• theinputshaft(motorrotationaldirection).

Ridder Drive Systems T +31 (0)341 416 854 F +31 (0)341 416 611 I www.ridder.com
10
7.1 Commissioning
TocommissionanRPG,itisimportanttohaveanunderstandingoftheoperationandfeaturesoftheRLS-RPGlimitswitchsystemdescribedinsection7.2.AftertheRPGhasbeenmountedandconnected,youwillneedtochecktheconnectionandoperationoftheRLSneeds.ThenextandfinalstepistoadjusttheendpositionsoftheRLSlimitswitchsystem.
§7.2RLS-RPGlimitswitchsystem.§7.3Checking:RLS-RPGconnectionandoperation.§7.4AdjustingRLS-RPGendpositions.
Before the drive system may be put into operation, the installer must always ensure that
the limit switch has been adjusted correctly.
When the RPG is operated automatically or manually (hexagon bolt in the electric motor output shaft), ensure that the position limits of the driven system are not exceeded to avoid damage or injury!
A motor can start or stop automatically without warning!While the drive unit is in operation, the supply voltage will always be present! To prevent injury switch off the supply voltage before performing any maintenance or other work on the drive unit, or take the necessary protective measures while the unit is still in operation!
6.3 Operating the adjustment knobs
6.4 Safety functions and stop options
TheRLS-RPGlimitswitchsystemoftheRPGisequippedwith2adjustmentknobs,AandB.WhencommissioningtheRPG,operatetheseknobsasfollowstochangetheswitchposition:
①Pressandholddowntheadjustmentknobwhilesimultaneouslyturningtheswitchcam(7)inthedesireddirection.②Releasetheadjustmentknobatthedesiredpositionoftheswitchcam(7).
AnRPGwithassembledelecticmotorcanbecontrolledeithermanuallyorautomatically.TheRidderMotorControlRMC400,incombinationwithamanualcontrol(MC)and/orautomaticcontrolsystem(ACS),isasuitablesolution.Alwaysconsultthemanual(s)oftheoperatingorcontroldeviceused.
TheRPGincludesthefollowingsafetyfunctionsandstopoptions:
1. Stoppingatapre-setendpositionwhenthedutyswitchisoperated.2. Stoppingbyasafetyswitchifthedutyswitchisnotoperational.3. Aninhibitedpositionoftheoutputshaftifthedriveunitcomestoastandstillbyaself-braking
wormgeartransmission.

Ridder Drive Systems T +31 (0)341 416 854 F +31 (0)341 416 611 I www.ridder.com
11
A drive unit can reach high temperatures.Take the necessary protective measures to prevent injury!
7.2 RLS-RPG limit switch system
TheRLSusessymbolstoindicatetherotationaldirectionsandswitchpositions.
RLS-RPG limit switch unitTheRPGisequippedwitharotatingRLSlimitswitchunitwithdutyandsafetyswitches.Theendpositionscanbesetusingtwoadjustmentknobs.
Current and voltage rangeThecontactsoftheswitchesintheRLSlimitswitchsystemaresuitableforswitchingthefollowingcurrents:•24VACto1A•230Vto100mA

Ridder Drive Systems T +31 (0)341 416 854 F +31 (0)341 416 611 I www.ridder.com
12
End positions may only be adjusted by means of an electrical control system.
Adjusting the end positions manually (using the hexagon bolt in the electric motor) could result in the position limits of the driven system
being exceeded and cause damage or injury!
ConnectionInorderfortheRLSlimitswitchsystemtooperatecorrectly,thesystemmustbeconnectedaccordingtothediagramin§5.3.Alldutyandsafetyswitchesmustbeconnected.
OperationIftheRPGisrunindirectionA,bothswitchcams(7)willturnanticlockwise.Switchcam7-Acanbeadjusted.IftheRPGisrunindirectionB,bothswitchcams(7)willturnclockwise.Switchcam7-Bcanbeadjusted.Therotationaldirectionoftheswitchcamyouwishtoadjust(7)isindicatedwithanarrow(1)belowtheadjustmentknob(A-B).Theendpositionsareindicatedbyindicator2a(long)abovetheadjustmentknob.Thecurrentpositionoftheswitchcam(7)isindicatedbyindicator3.Iftheswitchcam(7)reachestheendposition,thedutyswitchwillbeoperated,causingtheRPGtostop.ShouldtheRPGexceedtheendposition,theswitchcam(7)willoperatethesafetyswitchatindicator2b(short).Thiswillpreventconsequentialdamagetothesystem.Thesafetyswitchatindicator2cwillbeoperatediftheswitchcam(7)approachesthesafetyswitchfromtheoppositedirection(7).ThismeanstheRPG’smaximumnumberofrevolutionshas been reached.
7.3 Checking: RLS-RPG connection and operation
Place the system in such a position so the motor can be operated without causing damage to the system.
FollowtheseguidelinesandinstructionstocheckwhethertheRLS-RPGisconnectedandoperatingcorrectly:• Checking sequence: YoucancheckthelimitswitchesfromAtoBorfromBtoA.ThisguidefirstdescribeshowtochecklimitswitchAandthenlimitswitchB.
• Itisrecommendtocompletethecheckingandadjustmentprocedures(describedin§7.3and§7.4respectively)immediatelyaftereachother.
u Description
1 Turnbothswitchcams(7)toapositionjustbeforethedutyswitchesusingadjustmentknobsAandB.

Ridder Drive Systems T +31 (0)341 416 854 F +31 (0)341 416 611 I www.ridder.com
13
2
RunthemotorindirectionA.
• MOTORSTOPS-Gotostep3.• MOTORDOES NOT STOP-goto§5.3,§5.4or§5.5. Checkwhetherallwiringhasbeenconnectedcorrectly.
• PayspecialattentiontoA1,B1,A2andB2.• CORRECT-Contactyoursupplier.• NOT CORRECT-Connectwiringcorrectlyandcompletely Gotostep1.
3RunthemotorintheoppositedirectionB.
• MOTORIS RUNNING-Gotostep3-A.• MOTORIS NOT RUNNING-Gotostep3-B.
3-A
IfthemotorisrunningindirectionB,thendutyswitchA1hasbeenoperated.DirectionAisconnectedandoperatingcorrectly.Gotostep8
3-BIfthemotorfailstorun,thendutyswitchA2hasbeenoperated(dutyswitchA1isnotactive).• Gotostep4
4 Switchconnections1and2oftheterminals(6)ontheRLS.
5 Turntheswitchcam(7)toapositionjustbefore the duty switchusingadjustmentknobA.

Ridder Drive Systems T +31 (0)341 416 854 F +31 (0)341 416 611 I www.ridder.com
14
6 RunthemotorindirectionAandcheckwhetherthedriveunitstopsatdutyswitchA1(see3-A).
7
RunthemotorintheoppositedirectionB.
• MOTORMOTOR IS RUNNING - DirectionAisconnectedandoperatingcorrectly.Gotostep8.
• MOTORIS NOT RUNNING - Checktheconditionofthewiring.
• CORRECT - Contactyoursupplier. • NOT CORRECT - Replace/repairthewiring.Repeatstep7
8 Turntheswitchcam(7)toapositionjustbeforethedutyswitchusingadjustmentknobB.
9 Turntheswitchcam(7)toapositionjustbeforethedutyswitchusingadjustmentknobB.
10
RunthemotorintheoppositedirectionA.
• MOTORIS RUNNING - DirectionBisconnectedandoperatingcorrectly.Gotostep11.
• MOTORIS NOT RUNNING - Checktheconditionofthewiring.
• CORRECT - Contactyoursupplier. • NOT CORRECT - Replace/repairthewiring.Repeatstep10.
11 YouhavecompletedcheckingtheconnectionandoperationoftheRLS.

Ridder Drive Systems T +31 (0)341 416 854 F +31 (0)341 416 611 I www.ridder.com
15
7.4 Adjusting: RLS-RPG end positions
Place the system in such a position so the motor can be operated without causing damage to the system.
Followtheseguidelinesandinstructionstoadjusttheendpositions:
• Adjustment sequence: YoucanadjusttheendpositionsfromAtoBorfromBtoA.ThisguidefirstdescribeshowtoadjustendpositionAandthenendpositionB.
• Theoperationandswitch directionoftheRLShavealreadybeencheckedin§7.3.• Itisrecommendedtocompletetheadjustmentprocedure(in§7.4)immediately after the checkingprocedure(in§7.3).
u Description
1
GLOBAL ADJUSTMENT ARunthemotorindirectionAtojustbeforetheendposition(openorclosed)ofthedrivensystem.
• AUTOMATICSTOPbytheRLS. Gotostep 1-A. Note: Motor control must remain active in step 1-A!
• MANUALSTOPbyuserjustbeforetheendpositionofthedrivensystem. Gotostep1-B.
When operating the motor, do not exceed the position limits of the driven system to avoid damage or injury!
1-A
GLOBAL ADJUSTMENT AExtendtheswitchpositionoftheRLS.
① TurnadjustmentknobAintheoppositedirectionofsymbol(4).②AUTOMATICSTOPbytheRLS.
Repeatsteps①and②untiltheRLSswitchesoffjustbeforetheendpositionofthedrivensystem.
• Gotostep2.
1-B
GLOBAL ADJUSTMENT AManuallyadvancethepositionoftheRLSasfollows:
TurnadjustmentknobAinthedirectionofthesymbol(4)untilduty switch A1isfullyoperated(youshouldhearanaudibleclick).Note: Motor control must remain inactive in step 1-B!Gotostep2.

Ridder Drive Systems T +31 (0)341 416 854 F +31 (0)341 416 611 I www.ridder.com
16
2
FINE ADJUSTMENT AChecktheadjustmentasfollows:
①Runmotoratleast½rotationindirectionB.②RunmotorbackwardsindirectionAuntilthedutyswitchisoperatedagain.
• End position system is CORRECT - Gotostep 4.• End position system is NOT CORRECT - Gotostep 3.
3
FINE ADJUSTMENT A
Ifthesystemhasnotreachedthedesiredendposition,it can be fine-tunedbyadjustingknobAbyonetooth.• Gotostep2.
4
GLOBAL ADJUSTMENT BRunthemotorindirectionBtojustbeforetheendposition(openorclosed)ofthedrivensystem.
• AUTOMATICSTOPbytheRLS.Gotostep5-A. Note: Motor control must remain active in step 5-A!
• MANUALSTOPbyuserjustbeforetheendpositionofthedrivensystem.–Gotostep5-B.
When operating the motor, do not exceed the position limits of the driven system to avoid damage or injury!
5-A
GLOBAL ADJUSTMENT BExtendtheswitchpositionoftheRLS.
① TurnadjustmentknobBintheoppositedirectionofsymbol(4).②AUTOMATICSTOPbytheRLS.
Repeatsteps①and②untiltheRLSswitchesoffjustbeforetheendpositionofthedrivensystem.•Gotostep6.
If the switch cam (7) of a previously adjusted end position operates the duty switch (A2 - B2) via switch position 2c,
then the maximum range of 41 to 64 revolutions will be exceeded.
THE RPG IS NOT SUITABLE FOR THIS APPLICATION

Ridder Drive Systems T +31 (0)341 416 854 F +31 (0)341 416 611 I www.ridder.com
17
8.1 Maintenance
AlthoughtheRPGisessentiallymaintenancefree,itisrecommendedtocheckthefollowingevery6monthswhiletheRPGisinuse:
• Mechanicalconditions(wearandtear,attachments)• Thepre-setendpositions(aretheystillcorrectforthedrivensystem?)
Inspectionandmaintenanceworkmayonlybecarriedoutbyqualifiedpersonnel.
5-B
GLOBAL ADJUSTMENT BManuallyadvancethepositionoftheRLSby:
TurnadjustmentknobBthedirectionofthesymbol(4)untilduty switch B1isfullyoperated(youshouldhearanaudibleclick).Note: Motor control must remain inactive in step 5-B!• Gotostep6.
6
FINE ADJUSTMENT BChecktheadjustmentasfollows:
①Runmotoratleast½rotationindirectionA.②RunmotorbackwardsindirectionBuntilthedutyswitchisoperatedagain.
• End position system is CORRECT - Gotostep 8.• End position system is NOT CORRECT - Gotostep 7.
7
FINE ADJUSTMENT B
Ifthesystemhasnotreachedthedesiredendposition,isitcanbefine-tunedbyadjustingknobBbyonetooth.
• Gotostep6.
8 YouhavecompletedadjustingtheendpositionsoftheRLS.

Ridder Drive Systems T +31 (0)341 416 854 F +31 (0)341 416 611 I www.ridder.com
18
9.1 Troubleshooting
Thissectiondescribespossibleproblemsyoumayencounterandtheirsolutions.Ifyourunintoaproblemnotlistedbelow,pleasecontactyoursupplierorthemanufacturer.
Problem 1 RPG is not responding to control commands.
Observation1 RPGdoesnotrespondtocontrolcommands.
Cause 1 Connectionorcableproblem.
Solution1 Checkconnectionsandcablesandmakesuretheyaresecurelyfastened.
Cause 2 SafetyswitchA2orB2isactive,theswitchdirectionisnotcorrect.
Solution2 Switchconnections1and2oftheterminals(6)ontheRLS.
Cause 3 SafetyswitchA2orB2isactive,themaximumrangeofRLShasbeenexceeded.
Solution3 TheRPDisnotsuitableforthisapplication.
Cause 4 Adutyswitch(A1orB1)isdefective.
Solution4 A1isdefectiveifA2isoperatedbyswitchcam(7).ReplacetheRLS.B1isdefectiveifB2isoperatedbyswitchcam(7).ReplacetheRLS.
Problem 3 Unable to fine-tune RLS
Observation3 Endpositionofdrivensystemkeepsonbeingexceededorcannotbereached.
Cause 1 Motorwasnotrun½revolutionbackwardswhencheckingendposition
Solution1 Turnmotoratleast½rotationbackwardsafterfine-tuningandrechecktheendposition.
Fortechnicalsupport,pleasecontactyourlocalAfterSalescontactperson.YoucanfindyourlocalAfterSalescontactpersononourwebsiteatwww.ridder.com
9.2 Technical support
Problem 2 RPG is not being driven.
Observation2 Electricmotor(EM)isrunning,butRPGoutputshaftisnotrotating
Cause 1 Electricmotorisdefective.
Solution1 Checkelectricmotor(EM)andreplaceitifdefective.
Cause 2 Mechanicaldefect.
Solution2 Removeelectricmotor(EM).Checkthekeyandreplaceitifdefective.Ifthekeyisintact,replacetheRPG.

Ridder Drive Systems T +31 (0)341 416 854 F +31 (0)341 416 611 I www.ridder.com
19
10.1 Disposal
ProductsofRidderDriveSystemsshouldbedisposedofaftertheirlifespaninaccordancewiththeapplicablenationaland/orlocalregulations.
Decommissioningandremovalmayonlybecarriedoutbyqualifiedpersonnel.
10.2 Decommissioning and removal

www.ridder.com