product evaluation guide evaluation guide 3 getting connected product evaluation guide | cloud web...
TRANSCRIPT
Product Evaluation Guide
Forcepoint Web Security Cloud

©2017, ForcepointAll rights reserved.10900-A Stonelake Blvd, Quarry Oaks 1, Suite 350, Austin TX 78759Published 2017This document may not, in whole or in part, be copied, photocopied, reproduced, translated, or reduced to any electronic medium or machine-readable form without prior consent in writing from Forcepoint LLC.Every effort has been made to ensure the accuracy of this manual. However, Forcepoint LLC makes no warranties with respect to this documentation and disclaims any implied warranties of merchantability and fitness for a particular purpose. Forcepoint LLC shall not be liable for any error or for incidental or consequential damages in connection with the furnishing, performance, or use of this manual or the examples herein. The information in this documentation is subject to change without notice.
TrademarksForcepoint and the FORCEPOINT logo are trademarks of Forcepoint LLC. SureView, TRITON, ThreatSeeker, Sidewinder and Stonesoft are registered trademarks of Forcepoint LLC. Raytheon is a registered trademark of Raytheon Company. All other trademarks are the property of their respective owners
1
Evaluation Guide 1
Starting Your Evaluation
Product Evaluation Guide | Cloud Web Protection Solutions
Thank you for choosing to evaluate Forcepoint Web Security Cloud.
This guide has been created to help you through your evaluation. It demonstrates the ease with which you can manage and analyze inbound and outbound web traffic according to the varying requirements of users and teams within your organization.
Most of today’s popular sites are highly dynamic, meaning that many sites able to bypass legacy security systems. Forcepoint Web Security Cloud understands the dynamic nature of the modern web, using dynamic categorization and real-time threat data to enable businesses to leverage the power of dynamic web technology without sacrificing security, productivity, or control.
Forcepoint Web Security Cloud enables customers to:
● Reduce business costs and complexity with no on-site equipment to install or maintain, low administrative overhead, and built-in scalability for web gateway consolidation.
● Increase protection via Forcepoint Advanced Classification Engine (ACE) technology and ThreatSeeker Intelligence Cloud to safely leverage the power of modern web tools.
ACE offers contextual awareness, composite risk scoring, and multi-layered, real-time analysis of inbound and outbound web content with data-aware defenses for data theft protection.
ThreatSeeker Intelligence Cloud continuously monitors web content for emerging threats, analyzing up to 5 billion requests per day. It feeds this intelligence to our advanced protection systems, allowing Forcepoint solutions to adapt quickly to the rapidly changing Internet.
● Retain control with 24/7 access and flexible customization of policies, configuration settings, and reporting.
If you have not yet requested an evaluation, see Requesting a free trial.
If you have received your evaluation account and are ready to get started:
● Getting Connected has step-by step instructions to help you get up and running quickly with Forcepoint Web Security Cloud.
● Working with Forcepoint Web Security Cloud introduces reporting, analysis, and management tools to help you evaluate the product.

Starting Your Evaluation
2 Forcepoint Web Security Cloud
For detailed information on any aspect of Forcepoint Web Security Cloud, refer to the Forcepoint Web Security Cloud Help, available on the Support site.
Requesting a free trial
Product Evaluation Guide | Cloud Web Protection Solutions
1. Go to www.forcepoint.com and select Products > Forcepoint Web Security Cloud.
2. On the product page, click Sign Up for a Free Trial or Demo.
3. On the Free Trials & Demos page, under Web Security, click Forcepoint Web Security Cloud.
4. If you already have a forcepoint.com account, log in on the page that appears. If you do not have an account, click Register and follow the steps to enter your details, then return to the Free Trials & Demos page and click the link again.
5. On the Registration page, fill out the request form and read the Evaluation Details information, then click Continue.
6. When prompted, read and accept the terms and conditions, then click Confirm to initiate the evaluation process.
Shortly after you click Confirm, you will receive an email message containing links to the following:
● The Forcepoint Security Portal
● The Forcepoint Web Security Cloud Getting Started Guide
● Support options.
If you are new to Forcepoint cloud-based products, the message also includes your portal username and a temporary password. You will be asked to change the password the first time you log on.
If you are already a Forcepoint cloud customer, Forcepoint Web Security Cloud is added to your account. Use your existing credentials to log on to the portal.
If you prefer to talk to a representative immediately, inside the U.S., call 1-800-723-1166. Outside the U.S., please visit http://www.websense.com/content/find-a-partner.aspx to locate a reseller.
Once you have received your evaluation information:
● Getting Connected has step-by step instructions to help you get up and running quickly with Forcepoint Web Security Cloud.
● Working with Forcepoint Web Security Cloud introduces reporting, analysis, and management tools to help you evaluate the product.
For detailed information on any aspect of Forcepoint Web Security Cloud, refer to the Forcepoint Web Security Cloud Help, available on the Support site.
2
Evaluation Guide 3
Getting Connected
Product Evaluation Guide | Cloud Web Protection Solutions
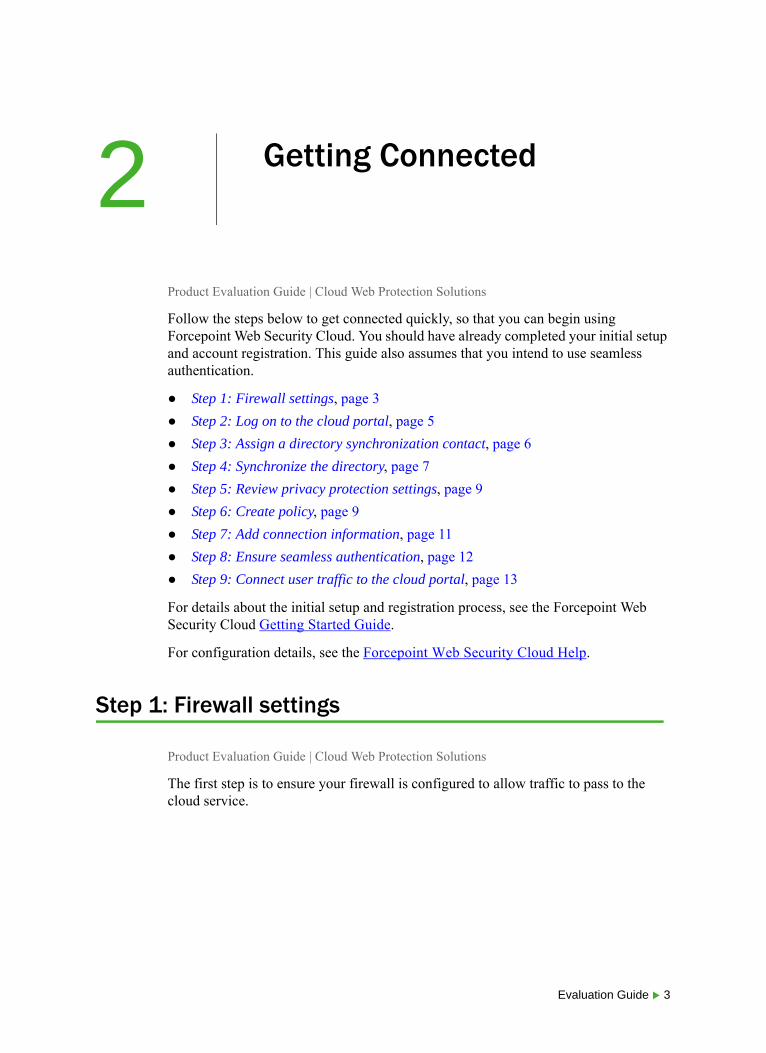
Follow the steps below to get connected quickly, so that you can begin using Forcepoint Web Security Cloud. You should have already completed your initial setup and account registration. This guide also assumes that you intend to use seamless authentication.
● Step 1: Firewall settings, page 3
● Step 2: Log on to the cloud portal, page 5
● Step 3: Assign a directory synchronization contact, page 6
● Step 4: Synchronize the directory, page 7
● Step 5: Review privacy protection settings, page 9
● Step 6: Create policy, page 9
● Step 7: Add connection information, page 11
● Step 8: Ensure seamless authentication, page 12
● Step 9: Connect user traffic to the cloud portal, page 13
For details about the initial setup and registration process, see the Forcepoint Web Security Cloud Getting Started Guide.
For configuration details, see the Forcepoint Web Security Cloud Help.
Step 1: Firewall settings
Product Evaluation Guide | Cloud Web Protection Solutions
The first step is to ensure your firewall is configured to allow traffic to pass to the cloud service.

Getting Connected
4 Forcepoint Web Security Cloud
Ports
Communication with the cloud service uses the following ports:
IP address ranges used by the cloud service
When you have finished configuring your firewall, continue with Step 2: Log on to the cloud portal.
Ports Purpose
80
443
Forcepoint Security Portal communication
8081
8082
Retrieving the PAC file and routing web traffic through the standard cloud web ports
If you are using port 80 for the PAC file, you do not need to open these ports.
8006 Single sign-on
8089 Secure form authentication
CIDR Range Subnet Mask
85.115.32.0/19 85.115.32.0 - 85.115.63.255
85.115.32.0 255.255.224.0
86.111.216.0/23 86.111.216.0 - 86.111.217.255
86.111.216.0 255.255.254.0
116.50.56.0/21 116.50.56.0 - 116.50.63.255
116.50.56.0 255.255.248.0
208.87.232.0/21 208.87.232.0 - 208.87.239.255
208.87.232.0 255.255.248.0
86.111.220.0/22 86.111.220.0 - 86.111.223.255
86.111.220.0 255.255.252.0
103.1.196.0/22 103.1.196.0 - 103.1.199.255
103.1.196.0 255.255.252.0
177.39.96.0/22 177.39.96.0 - 177.39.99.255
177.39.96.0 255.255.252.0
196.216.238.0/23 196.216.238.0 - 196.216.239.255
196.216.238.0 255.255.254.0
192.151.176.0/20 192.151.176.0 - 192.151.191.255
192.151.176.0 255.255.240.0
Evaluation Guide 5
Getting Connected
Step 2: Log on to the cloud portal
Product Evaluation Guide | Cloud Web Protection Solutions
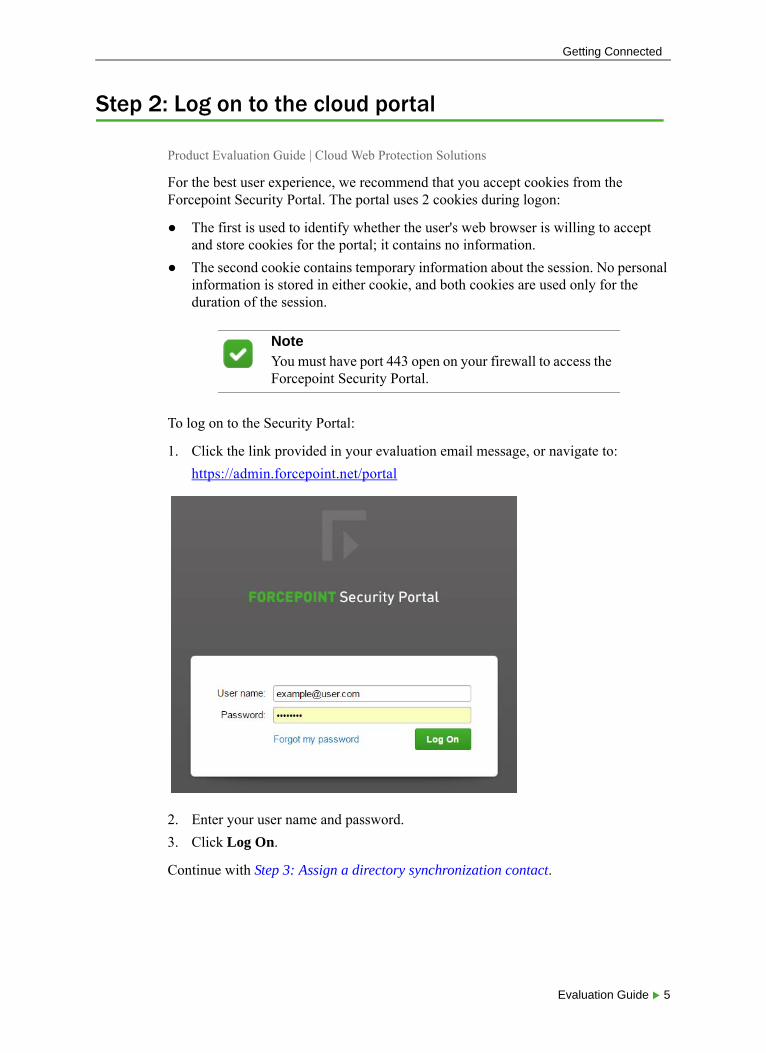
For the best user experience, we recommend that you accept cookies from the Forcepoint Security Portal. The portal uses 2 cookies during logon:
● The first is used to identify whether the user's web browser is willing to accept and store cookies for the portal; it contains no information.
● The second cookie contains temporary information about the session. No personal information is stored in either cookie, and both cookies are used only for the duration of the session.
To log on to the Security Portal:
1. Click the link provided in your evaluation email message, or navigate to:
https://admin.forcepoint.net/portal
2. Enter your user name and password.
3. Click Log On.
Continue with Step 3: Assign a directory synchronization contact.
NoteYou must have port 443 open on your firewall to access the Forcepoint Security Portal.

Getting Connected
6 Forcepoint Web Security Cloud
Step 3: Assign a directory synchronization contact
Product Evaluation Guide | Cloud Web Protection Solutions
To synchronize your directory with Forcepoint Web Security Cloud, you need a contact with permission to run the synchronization. You can either create a new contact specifically for this or add this permission to an existing contact.
To create a new contact and add permissions to the new contact:
1. In the Security Portal, navigate to the Account > Contacts page.
2. Click Add.
3. On the Add Contact page, enter the information needed to create a new contact.
4. Click Submit.
The Contact Details page is displayed.
5. In the User name field, click the hyperlink.
Evaluation Guide 7
Getting Connected
6. On the Login Details page, enter the user name you would like to assign to this contact, along with other login details. (By default, the email address is used as the contact’s login ID.)
7. Under Account Permissions, select Directory Synchronization to enable permission to perform directory synchronization.
8. Click Save.
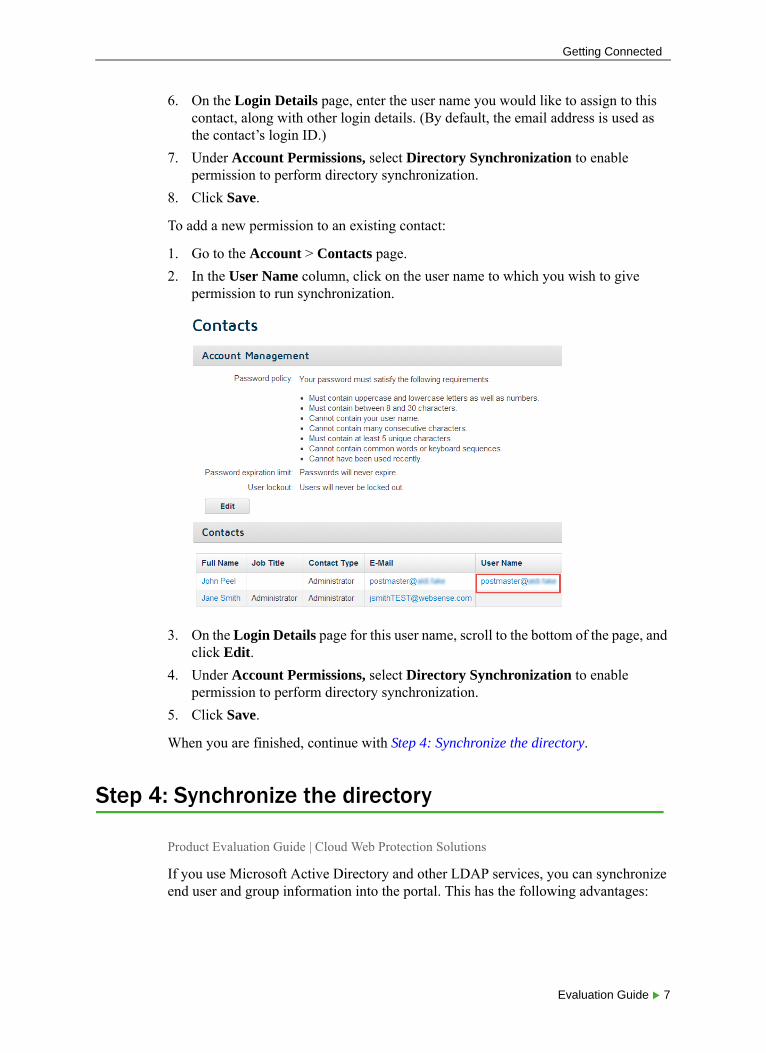
To add a new permission to an existing contact:
1. Go to the Account > Contacts page.
2. In the User Name column, click on the user name to which you wish to give permission to run synchronization.
3. On the Login Details page for this user name, scroll to the bottom of the page, and click Edit.
4. Under Account Permissions, select Directory Synchronization to enable permission to perform directory synchronization.
5. Click Save.
When you are finished, continue with Step 4: Synchronize the directory.
Step 4: Synchronize the directory
Product Evaluation Guide | Cloud Web Protection Solutions
If you use Microsoft Active Directory and other LDAP services, you can synchronize end user and group information into the portal. This has the following advantages:

Getting Connected
8 Forcepoint Web Security Cloud
● Administrators can manage user and group details from the Active Directory instead of from the Security Portal, greatly reducing the time spent maintaining service configuration.
● Scheduled synchronization means new employees in a company can be added to the cloud service automatically; likewise, those leaving can be removed from the service automatically.
● If you have set up the account for NTLM identification and synchronized NTLM IDs, end users do not need to register for the service in the manager.
To synchronize the directory:
1. Go to the Account > Directory Synchronization page in the Security Portal.
2. Click Edit.
3. On the Configure Directory Synchronization page, select Enable directory synchronization to enable synchronization.
You can select other boxes on this page, but they aren’t essential to connecting to Forcepoint Web Security Cloud and may be left as their default settings.
4. Click Save.
5. Scroll down the page.
6. Under Download Directory Sync Client, click one of the links to download the version of the synchronization tool that is right for your system.
Follow the instructions for downloading the client.
Make sure to synchronize the directory for users and to synchronize the directory for groups. After you complete the synchronizations, you can check if the tests have succeeded by going to the Directory Synchronization page and viewing Recent Synchronizations.

Evaluation Guide 9
Getting Connected
Synchronizing all your users does not mean all users start using the service. Synchronizing them allows Forcepoint Web Security Cloud to recognize them when you route them through the cloud solution.
For full instructions on setting up and using directory synchronization, see the Forcepoint Web Security Cloud Help, and the Directory Synchronization Client Administrator's Guide, both available on the Support site.
When you are finished, continue with Step 5: Review privacy protection settings, page 9.
Step 5: Review privacy protection settings
Product Evaluation Guide | Cloud Web Protection Solutions
The cloud portal offers options to prevent end-user identifying information and data security incident trigger values from appearing in logs and reports. If required, you can collect this information for security threats, even when it is not collected for other web traffic.
To review and configure privacy options:
1. Navigate to the Account > Privacy Protection page in the Security Portal.
2. To anonymize report data for web traffic, under Web Privacy Settings, mark Anonymize end user information.
3. Use the options provided to configure what information is anonymized, and under what circumstances.
Note the option to Preserve end user information for security threats.
4. Click Save when you have finished making changes.
When you are finished, continue with Step 6: Create policy.
Step 6: Create policy
Product Evaluation Guide | Cloud Web Protection Solutions
The default policy provided with Forcepoint Web Security Cloud allows most organizations to get up and running quickly and easily with minimal configuration. Your administrators can modify or create new policies as necessary to manage web browsing to comply with the business needs, goals and objectives of your organization.
Policy decisions and levels of control may be different for different user groups, but in all cases should be constructed to allow users to effectively use the Internet as a business tool while protecting the company from security threats such as malware, productivity loss, and objectionable or illegal content. Administrators can also create

Getting Connected
10 Forcepoint Web Security Cloud
custom policies to support domains or users that require differing configurations – for example, remote users.
To create a new policy:
1. Go to the Web > Policy Management > Policies page in the Security Portal.
2. Click Add.
3. Enter the email address of the web administrator that you’d like to assign to this policy.
4. Select a policy template in one of the following ways:
■ Choose from four default templates: Default, Basic, Basic Security, and Monitor Only. Descriptions of each can be found in the cloud portal.
■ Choose an existing policy as a template. All of the current settings in that policy are copied into your new policy, except for proxied connections, end user details, and category exceptions.
5. Decide if you want to associate a specific time zone to the policy. The default time zone is the connection time zone of the browser.
6. Decide if you want to enable search filtering, which blocks displays of explicit thumbnail images and other explicit content in image search results.
7. Click Save.

Evaluation Guide 11
Getting Connected
To edit an existing policy, click on a policy name. Note that each policy has multiple tabs to configure.
When you are finished, continue with Step 7: Add connection information.
Step 7: Add connection information
Product Evaluation Guide | Cloud Web Protection Solutions
In the policy you created, go to the Connections tab.
Under Proxied Connections, enter the details of any external IP addresses for your static sites. This ensures that your onsite users are recognized if you use the PAC file deployment option for them. (PAC file users only have seamless authentication when connecting from recognized sites.)
To create a new proxied connection:
1. Click Add.
2. Enter the connection details.

Getting Connected
12 Forcepoint Web Security Cloud
3. Click Submit when you’re done.
To edit an existing proxied connection:
1. Click on the connection name.
2. Make changes to the details for that connection.
3. Click Submit when you’re done.
Under Non-Proxied Destinations, enter the details of sites that you want to bypass the cloud proxy service. This is commonly used for internal traffic but can be applied to any site. This should not be used as a whitelist for sites, because Forcepoint Web Security Cloud does not process, analyze, or log the traffic of addresses entered here. Go to Custom Categories to create a set of whitelisted sites.
To create a new non-proxied destination:
1. Click Add.
2. Enter the destination details.
3. Click Submit when you’re done.
To edit an existing destination:
1. Click on the destination name.
2. Make changes to the details for that destination.
3. Click Submit when you’re done.
When you’re finished, continue with Step 8: Ensure seamless authentication.
Step 8: Ensure seamless authentication
Product Evaluation Guide | Cloud Web Protection Solutions
The Forcepoint Web Security Cloud service works “out of the box” for many organizations. A single policy applied to an organization’s web traffic provides protection from malware and, depending on your subscription settings, inappropriate content. However, most customers want to tailor the service to align it with their Internet acceptable use policy, which may require granular configuration on a per-user and per-group basis. Also companies usually want to report on the surfing habits of their employees. This requires users to identify themselves to Forcepoint Web Security Cloud.
To configure these options for a policy:
1. In the policy you created, go to the Access Control tab.
On this page, you can define your user access control options, forcing users to enter their Forcepoint Web Security Cloud user name and password to be validated against a policy. If you have deployed Forcepoint Web Security Endpoint, it will always be used for authentication.*
Evaluation Guide 13
Getting Connected
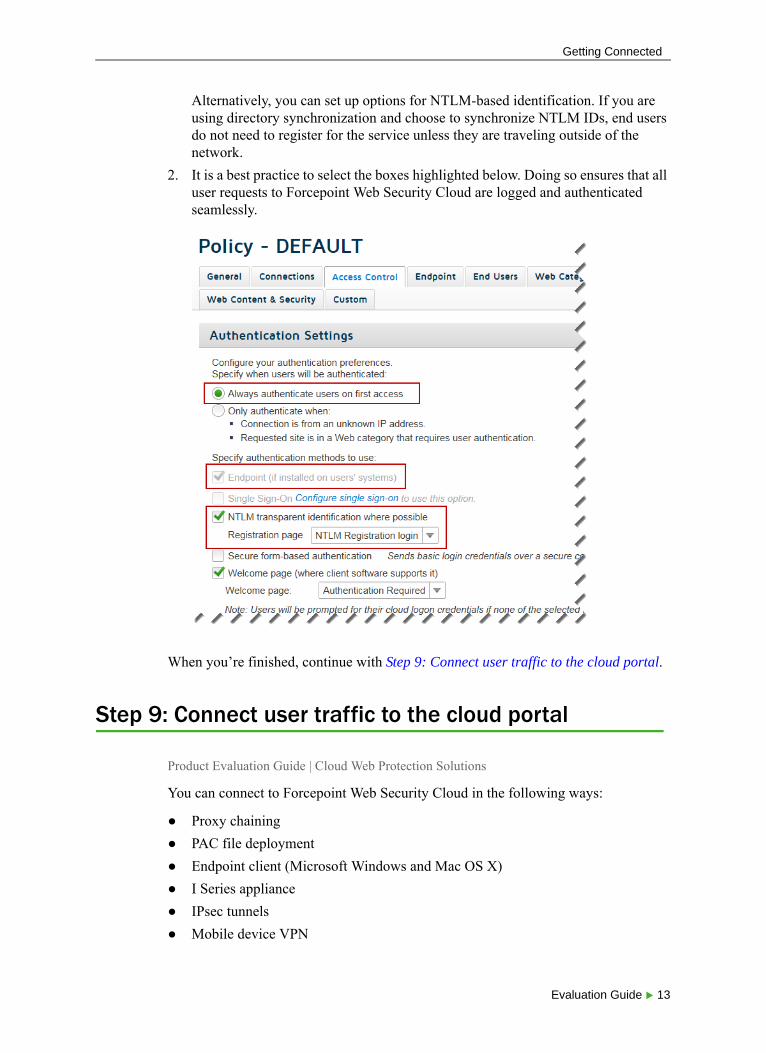
Alternatively, you can set up options for NTLM-based identification. If you are using directory synchronization and choose to synchronize NTLM IDs, end users do not need to register for the service unless they are traveling outside of the network.
2. It is a best practice to select the boxes highlighted below. Doing so ensures that all user requests to Forcepoint Web Security Cloud are logged and authenticated seamlessly.
When you’re finished, continue with Step 9: Connect user traffic to the cloud portal.
Step 9: Connect user traffic to the cloud portal
Product Evaluation Guide | Cloud Web Protection Solutions
You can connect to Forcepoint Web Security Cloud in the following ways:
● Proxy chaining
● PAC file deployment
● Endpoint client (Microsoft Windows and Mac OS X)
● I Series appliance
● IPsec tunnels
● Mobile device VPN
Getting Connected
14 Forcepoint Web Security Cloud
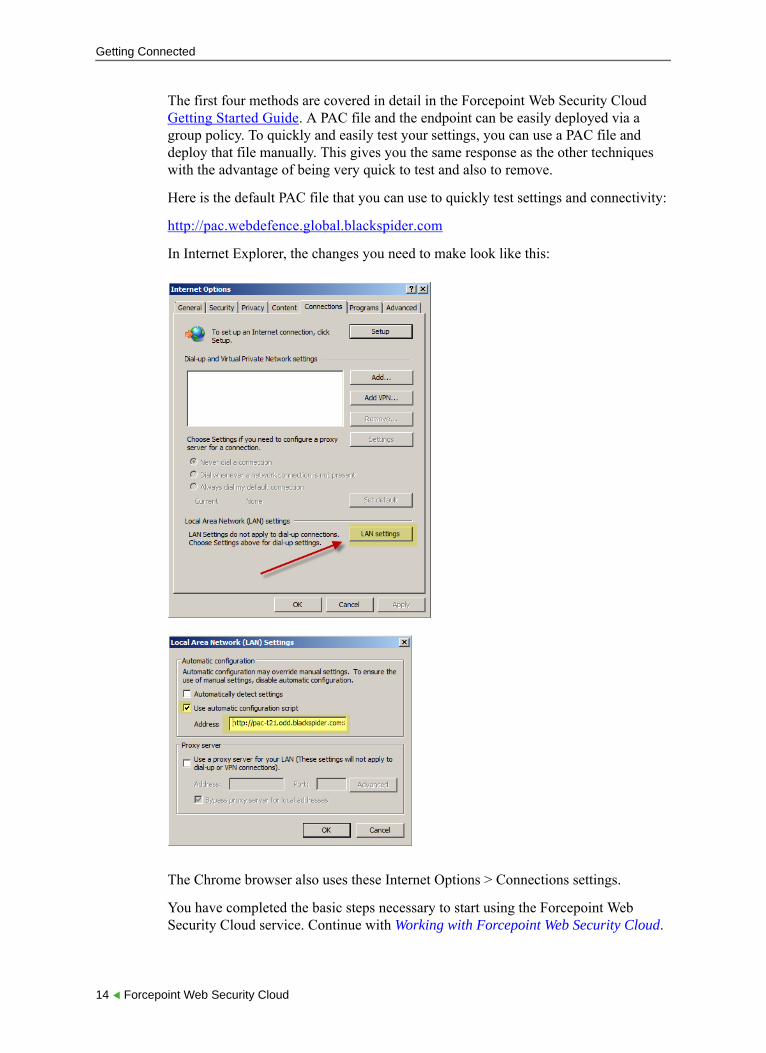
The first four methods are covered in detail in the Forcepoint Web Security Cloud Getting Started Guide. A PAC file and the endpoint can be easily deployed via a group policy. To quickly and easily test your settings, you can use a PAC file and deploy that file manually. This gives you the same response as the other techniques with the advantage of being very quick to test and also to remove.
Here is the default PAC file that you can use to quickly test settings and connectivity:
http://pac.webdefence.global.blackspider.com
In Internet Explorer, the changes you need to make look like this:
The Chrome browser also uses these Internet Options > Connections settings.
You have completed the basic steps necessary to start using the Forcepoint Web Security Cloud service. Continue with Working with Forcepoint Web Security Cloud.

3
Evaluation Guide 15
Working with Forcepoint Web Security Cloud
Product Evaluation Guide | Cloud Web Protection Solutions
To get the most of Forcepoint Web Security Cloud, this guide offers an overview of key product features, with configuration instructions where appropriate. Use the following sections to learn more about what the product offers and try out its features.
● Navigating the cloud portal, page 16
● Using the cloud portal dashboards, page 18
● Configuring real-time malware analysis, page 19
● Assigning actions to web categories, page 20
● Deploying Forcepoint Web Security Endpoint, page 25
● Time periods, page 27
● Managing cloud block and notification pages, page 29
● Using cloud reporting tools, page 29
● Next steps, page 32

Working with Forcepoint Web Security Cloud
16 Forcepoint Web Security Cloud
Navigating the cloud portal
Product Evaluation Guide | Cloud Web Protection Solutions
The cloud portal interface can be divided into the following main areas:
1. Banner
2. Toolbar
3. Content pane
The banner shows:
● Any alerts that are available for your account. You may see the following alert types:
● Your current logon account. When you’re ready to end your administrative session, click the arrow next to the administrator name and select Log Off.
Critical. Your service has been interrupted, and you must act on this alert immediately.
Error. You must act on this alert as soon as possible. If you do not act by the date given in the alert, it will be upgraded to Error and you risk interruption of your service.
Warning. This alerts you to future events that might affect your service – for example upcoming portal outages, or license expiration.
Information. This might be announcing a new release or upcoming maintenance work.

Evaluation Guide 17
Working with Forcepoint Web Security Cloud
● The Help menu, from which you can access assistance for the page you are currently viewing, further product information, and Technical Support resources. The Help menu also includes:
■ A Support PIN, which must be used to authenticate your account when calling Technical Support.
Each PIN is unique per portal user, and is generated when a user logs on. The PIN is valid for 24 hours after logon. After the 24-hour period has expired, a new PIN is generated at the next portal logon.
■ Links to Privacy & Security information, including the Forcepoint, DLP, and security privacy policies and security and privacy-related product certifications.
The toolbar indicates which part of the cloud portal is currently active:
● Dashboard provides access to threat, productivity, bandwidth, and data security dashboards. See Using the cloud portal dashboards, page 18.
● Reporting gives access to all reporting options, including account service reports, your saved reports, and the Report Catalog and Report Builder. See Using cloud reporting tools, page 29.
● Web contains configuration and policy management settings for your web protection product. See:
■ Configuring real-time malware analysis, page 19
■ Assigning actions to web categories, page 20
■ Deploying Forcepoint Web Security Endpoint, page 25
■ Time periods, page 27
■ Managing cloud block and notification pages, page 29
● Account provides access to options that apply to all cloud services, including administrator management, directory synchronization, licenses, and groups.
When you select an item in the toolbar, a navigation pane drops down, containing the available navigation choices for that item. Click the toolbar item again to close the navigation pane.
The content pane varies according to the selection you make in the navigation pane.
ImportantIn order to preserve and maintain the security of your data, Support representatives will not be able to provide customer support without an accurate, up-to-date PIN.

Working with Forcepoint Web Security Cloud
18 Forcepoint Web Security Cloud
Using the cloud portal dashboards
Product Evaluation Guide | Cloud Web Protection Solutions
The dashboard provides a snapshot view of how Forcepoint Web Security Cloud is performing. To view your dashboard, click Dashboard on the Security Portal main menu bar.
● The Threat Dashboard appears when you first access this page. It shows information about suspicious activity that may be related to malware threats in your network.
● The Bandwidth Dashboard shows information about traffic patterns in your network, including the categories, groups, and users consuming the most bandwidth.
● The Productivity Dashboard shows information about blocked requests, and activity in social media categories.
● The Data Security Dashboard shows information about data loss and data threat incidents, including a timeline, incidents by content type, and top sources, destinations, and categories associated with incidents. See Configuring Data Security settings, page 23.

Evaluation Guide 19
Working with Forcepoint Web Security Cloud
In addition to the predefined dashboards, you have the option to add up to 10 custom dashboards. To add a dashboard, click the Settings icon on any dashboard page, then click Add Dashboard.
Provide a name for the new dashboard, then use the Settings menu to populate your custom dashboard with up to 6 charts. You can either define new charts by selecting attributes, or use an existing report as the basis for creating new charts.
Each dashboard includes the following features:
● A number of charts that provide detailed web activity information. Most dashboard charts can be customized to change their display format (for example stacked column, area chart, line chart, bar chart, or pie chart).
● A summary statistic in the top left that covers web activity relevant to the current dashboard over a defined time period (the last day by default). You can select a different time period from the drop-down list: the alternative options are 1 hour, 4 hours, 8 hours, 12 hours, 3 days, 5 days, and 7 days.
● One or more filters that define the range of content shown in the charts.
Configuring real-time malware analysis
Product Evaluation Guide | Cloud Web Protection Solutions
Forcepoint Web Security Cloud analyzes web content and detects threats using the Forcepoint Advanced Classification Engine (ACE). ACE provides inline, real-time composite defense assessments and adjusts your protection dynamically using on-the-fly content classification. You can configure how ACE analysis is performed in your web protection policies.
You can choose to protect your organization from inbound or outbound malware and executables. If you choose to block executables, any file whose contents appear to be executable is blocked. When a file upload or download is blocked, the user is presented with the notification page you select. This gives you peace of mind that the network remains uninfected while enabling employees to harness the business value of the dynamic web.

Working with Forcepoint Web Security Cloud
20 Forcepoint Web Security Cloud
To view and edit the current protection rules for a policy, click the Web Content & Security tab.
Assigning actions to web categories
Product Evaluation Guide | Cloud Web Protection Solutions
Forcepoint Web Security Cloud uses the Forcepoint Master Database to categorize websites. The Master Database is the industry’s most accurate, current, and comprehensive classification of URLs. A combination of proprietary classification software and human inspection is used to categorize and maintain URLs to ensure protection against today’s blended threats. Content is sourced by our ThreatSeeker Intelligence Cloud network, global researchers around the globe, and customer submissions.
Evaluation Guide 21
Working with Forcepoint Web Security Cloud
In web protection policies, each Master Database category is associated with an action. The action tells the policy how to respond to user requests for websites in that category.
The available actions are:
● Allow access: Ensures that websites within the category are always accessible.
● Do not block: The website is not blocked as part of this category, but can be blocked if it exists in another category that has the Block access action assigned.
● Require user authentication: Users must identify and authenticate themselves in order to access the site. This ensures that administrators can monitor who is accessing sites in the category.
● Confirm: Users receive a block page that prompts them to confirm that the site is being accessed for business purposes. Users who click Continue can access the site.
● Use Quota: Users receive a block page that asks them whether to use quota time to view the site. Users who click Use Quota Time can view the site for a predefined period.
● Block access: Users cannot access the site unless it also exists in another category that has been assigned the Allow access action.
In addition to assigning actions to categories, you can define whether or not encrypted websites within a category are decrypted for analysis. Depending on your account, this may allow:
● HTTPS traffic to be inspected to ensure the correct notification or authentication page is delivered to the end user
● HTTPS traffic in categories that you specify to be analyzed for malware and other threats.
To enable SSL decryption, switch the toggle at the top of the Web Categories tab to ON. Next, specify categories to be decrypted for analysis.

Working with Forcepoint Web Security Cloud
22 Forcepoint Web Security Cloud
To view the current categories for a policy, click the Web Categories tab.
You can set up your own custom categories, for example to allow access to specific websites without allowing access to the whole category that they belong to, or to block certain sites without blocking the whole category. To create a custom category:
1. Go to the Web > Policy Management > Custom Categories page
2. Click Add.
3. Enter a name and a description for your new category.
4. Click Submit.
5. In the Specify sites for this category field, type the address of a website (for example, www.google.com).
6. Click Add.

Evaluation Guide 23
Working with Forcepoint Web Security Cloud
7. Repeat steps 5 and 6 for each site that you want to add to the category.
8. Click Submit.
9. Return to the Web Categories tab in your selected policy, and click the custom category you just created. On the page that appears, you can set the disposition for your new category, and add any user or group exceptions.
Configuring Data Security settings
Product Evaluation Guide | Cloud Web Protection Solutions
For each policy that you create, you can enable data security monitoring and configure the types of data loss and data theft activity that you want to detect. You can use data security monitoring to detect:
● Violations of standard regulatory policies
● Data theft involving predefined types of information
● Web communication involving specific, custom phrases or patterns that may indicate transmission of your organization’s sensitive or proprietary data.

Working with Forcepoint Web Security Cloud
24 Forcepoint Web Security Cloud
Open a policy and select the Data Security tab to configure data loss and data theft detection settings.
1. Mark the Enable data security check box to begin.
2. To enable regulation-based data loss detection, click the link next to Select the geographical regions that you want to regulate, then select one or more regions in the pop-up window.
3. Mark the check box next to one or more types of regulation.
Details about each regulation type are available in the Forcepoint Security Portal Help. Click Help > Explain This Page to open the Help system, then select Data Security Content Classifiers in the left navigation pane (near the bottom of the Contents tree).
4. Under Data Theft, mark the check box next to each type of data theft that you want to detect.
5. If you want to define custom classifiers for identifying transmission of your organization’s sensitive or proprietary information:
a. Use the Web > Policy Management > Content Classifiers page to define the phrases or patterns that you want to identify.
b. Return to the Data Security tab in your policy to configure how each classifier is used.
Detailed information about defining classifiers is available in the Forcepoint Security Portal Help; click Help > Explain This Page on the Content Classifiers page.
Evaluation Guide 25
Working with Forcepoint Web Security Cloud
When data loss and data theft incidents are detected, information about them is available in the Data Security Dashboard, as well as the Report Builder and Report Catalog. See Using cloud reporting tools, page 29, for information about using Report Builder and the Report Catalog.
For more information about how data security information is used and stored in the cloud portal, open the Help > Privacy & Security menu and select Data Privacy FAQ.
Deploying Forcepoint Web Security Endpoint
Product Evaluation Guide | Cloud Web Protection Solutions
Forcepoint Web Security Endpoint is designed to provide a seamless experience to end users for authenticating and directing traffic to the Forcepoint Web Security Cloud infrastructure. Administrators can create policies that provide full visibility into inbound and outbound traffic, but that don't restrict use of the device.
The endpoint has been designed to consume minimal CPU, memory, and disk resources. It can be deployed on Windows and Mac operating systems (excludes iOS devices, such as iPhones, iPods, or iPads).
To enable the use of the endpoint for some or all of your end users, you must deploy it to those users. You can deploy the endpoint in the following ways:
Windows operating system users
● Download the endpoint installation file for Windows and push it manually to selected client machines using your preferred distribution method. For example, you might deploy it using Microsoft Group Policy Object (GPO). Alternatively you can send users a URL from which they can download and install the endpoint themselves.
● Deploy the endpoint to the end users in a web policy directly from the cloud. Each user will be asked to install the endpoint software on their machine when they start a browsing session.
Mac operating system users
● Download the endpoint installation package for Mac on individual client machines and launch the installer by double-clicking the package.
● Remotely install the endpoint using Apple Remote Desktop software, which distributes the installation package to a group of machines and performs the installation on that group.

Working with Forcepoint Web Security Cloud
26 Forcepoint Web Security Cloud
All users
If a user does not install the endpoint, he or she is authenticated according to the options you have selected on the Access Control tab for their policy. Single sign-on is used if configured; otherwise the cloud service falls back the next available authentication mechanism: NTLM identification, or basic authentication, in that order. The user is again asked to install the endpoint next time they start a browsing session.
You can download the endpoint installation from the Web > Settings > Endpoint page in the Security Portal.
On this page, you must set an anti-tampering password. This password is used to stop the endpoint service or uninstall the endpoint, and is automatically linked to any deployments of the endpoint, including web deployments.

Evaluation Guide 27
Working with Forcepoint Web Security Cloud
You can deploy the endpoint directly from the cloud by going to the Endpoint tab in a policy:
On this page, you can deploy the endpoint to either the roaming users or all users in the policy. Users in your network will be asked to install the endpoint software on their machine when they start a browsing session. Roaming users must first authenticate themselves via the roaming home page before being asked to install the endpoint software.
Endpoint deployment directly from the cloud is supported on Windows machines for Internet Explorer versions 7 or higher and Firefox version 3.x or higher. The endpoint for the Mac is available for Safari 5.1 or higher, Firefox 8.0 or higher, and Google Chrome 15 or higher.
Time periods
Product Evaluation Guide | Cloud Web Protection Solutions
Forcepoint Web Security Cloud allows you to restrict web surfing by time of day for either a whole policy or for defined website categories, users, and groups. This gives administrators the greatest possible flexibility to enable a customized acceptable use policy.

Working with Forcepoint Web Security Cloud
28 Forcepoint Web Security Cloud
To access the current policies in your account and to create new policies, click Web in the portal’s main menu bar, then click Time periods.
Each account has 4 default time periods: Afternoon, Lunch, Morning, and Working hours. You can view or edit existing time periods, and also create new ones to suit your company’s requirements. For example, click the Working hours period.
The dark area defines the actual time period. Each division is a 15 minute period; notice that when you roll your mouse over the area, the actual time is displayed below the time chart. If the time period has been allocated to one or more policies, the policy names are listed in the Used in field.
You can click Edit to set a different time period, with either a single click or by clicking and dragging to cover a wider area on the time chart. You can also tie the time period to a specific time zone.
Once you have set up your time periods, you can apply them to policies. To do this, navigate to the relevant policy and on the General tab, select options and configure exceptions with the Internet Availability controls. Here you can define granular access rules for groups and individual users.
Evaluation Guide 29
Working with Forcepoint Web Security Cloud
Managing cloud block and notification pages
Product Evaluation Guide | Cloud Web Protection Solutions
When a policy denies access to a resource or needs to inform the user of an event, Forcepoint Web Security Cloud can display an appropriate notification page. There is a standard set of notification pages included with Forcepoint Web Security Cloud, and you can either modify these to suit your needs, or add your own pages. You can then refer to the notification pages from any of your policies.
To view the list of notification pages, click Web in the portal’s main menu bar, then under Policy Management, click Block & Notification Pages.
Each notification is a complete HTML page, and you can use any valid HTML within the pages. Some markup strings and tags are available – for example, an “access denied” image and a placeholder to contain the reason that a page was blocked. These tags are listed and described in the Forcepoint Web Security Cloud Help.
You can create multiple language versions of block and notification pages to display to end users, allowing a single corporate policy to be applied to a multi-national user base. If you create multiple language versions of standard or custom pages, the most appropriate version of the page is served to end users based on their browser settings. The language version displayed to end users will be the version that matches the primary language set in the user’s browser, if a version exists for that language. If a version does not exist, the default language version will be used.
Using cloud reporting tools
Product Evaluation Guide | Cloud Web Protection Solutions
Forcepoint Web Security Cloud provides exceptional reporting functionality with a 360-degree view of web traffic and usage. Administrators can view summary reports and drill down for detailed forensics.

Working with Forcepoint Web Security Cloud
30 Forcepoint Web Security Cloud
To define your own reports, navigate to the Reporting > Report Builder page, then select Web Security (for all web activity) or Data Security (for web activity associated with data loss or data theft incidents).
In the Report Builder, use the attributes provided to generate multi-level, flexible reports that allow you to analyze information from different perspectives and gain insight into your organization’s Internet usage.
Once you have selected your attributes, you can select further filters for the report such as policies and domains, and also a date range.
By drilling down into the report data, you can enter the Transaction Viewer (for general web activity) or the Incident Manager (for data security incidents). Here, you can access all available details about individual transactions or incidents that warrant further investigation.

Evaluation Guide 31
Working with Forcepoint Web Security Cloud
To select from a list of predefined reports, navigate to the Reporting > Report Catalog page.
Below is an example of a volumes report showing the requests for the most frequently visited categories over a 7-day period.
You can click on a bar in the chart to drill down further and see the number of requests in a category by user, site, policy, disposition, or exceptions. The example below shows the Information Technology category requests broken down by user, with the option to drill down even further.

Working with Forcepoint Web Security Cloud
32 Forcepoint Web Security Cloud
You can also view the report results as a table, and download the statistics as a CSV or PDF file.
Next steps
Product Evaluation Guide | Cloud Web Protection Solutions
Once your administrator has set up users and customized policies to meet the needs of your organization, there is little ongoing maintenance or configuration required with Forcepoint Web Security Cloud. However, it is a good practice to periodically use the dashboard and run reports to review and report on the ongoing web security protection provided by the service.
Administrators can schedule non-graphical versions of account summary reports to be sent to an email address on a daily, weekly, bi-weekly, or monthly basis.
Integration with Forcepoint Email Security Cloud
The close integration of Forcepoint Web Security Cloud and Forcepoint Email Security Cloud enables organizations to optimize their email use and to safely leverage the power of dynamic web technology. Customers gain complete web and email security with the benefits of integrated management, reporting, and the value of a consolidated security strategy with the following benefits:
● Blocks web and email threats at their source, improving network efficiency and saving business costs.
● Approximately 85% of email contains a link to a website. The real-time ThreatSeeker Intelligence Cloud network protects end users from the risks of accessing inappropriate and malicious content, including spyware, phishing, botnets, and other threats, via both Internet browsing and email.
● Email and web protection can be configured through a single management interface, requiring the administrator to manage only one set of users and groups and monitor usage through a single dashboard.
Optional add-on modules
Additional Forcepoint Web Security Cloud modules are available to enhance and extend your web protection solution.
● Forcepoint Mobile Security offers the capability to security mobile device use for end users in your organization. Its data-aware defenses protect against malware, phishing, malicious links and the theft of intellectual property.
● With the Forcepoint Advanced Malware Detection for Web module, suspicious files can be forwarded to a cloud-hosted sandbox for analysis. The sandbox activates the file, observes its behavior, and compiles a report. If the file is malicious, an alert is sent to specified administrators.

Evaluation Guide 33
Working with Forcepoint Web Security Cloud
Thank you!
This guide has highlighted the most important aspects of administering Forcepoint Web Security Cloud, and demonstrated the following benefits:
● Threats are blocked before they reach your network, as shown by the statistics on the dashboard. This means reduced bandwidth and maintenance costs for your organization, while still allowing your users to safely leverage the power of dynamic web technology.
● Default policies enable immediate and effective web security with little administrative time required. Policies can be customized to meet the precise needs of your organization and your users while ensuring complete and effective web security.
● The dashboard and reporting functions enable you to track every aspect of web usage and security.
● Integration with Forcepoint Email Security Cloud provides a complete security solution with centralized policies and reporting.
Thank you for evaluating Forcepoint Web Security Cloud.

Working with Forcepoint Web Security Cloud
34 Forcepoint Web Security Cloud